

Page 1
Overview
###????
®
The Multi-Unit Gate Access Panel (MUGAPLM) uses
a digitally secure intercom link that allows it to control
up to four gate operators and other accessories. It
can be used with up to 63 homes and program up to
120 remote control transmitters.
The MUGAPLM is compatible with various LiftMaster
Wireless Products.
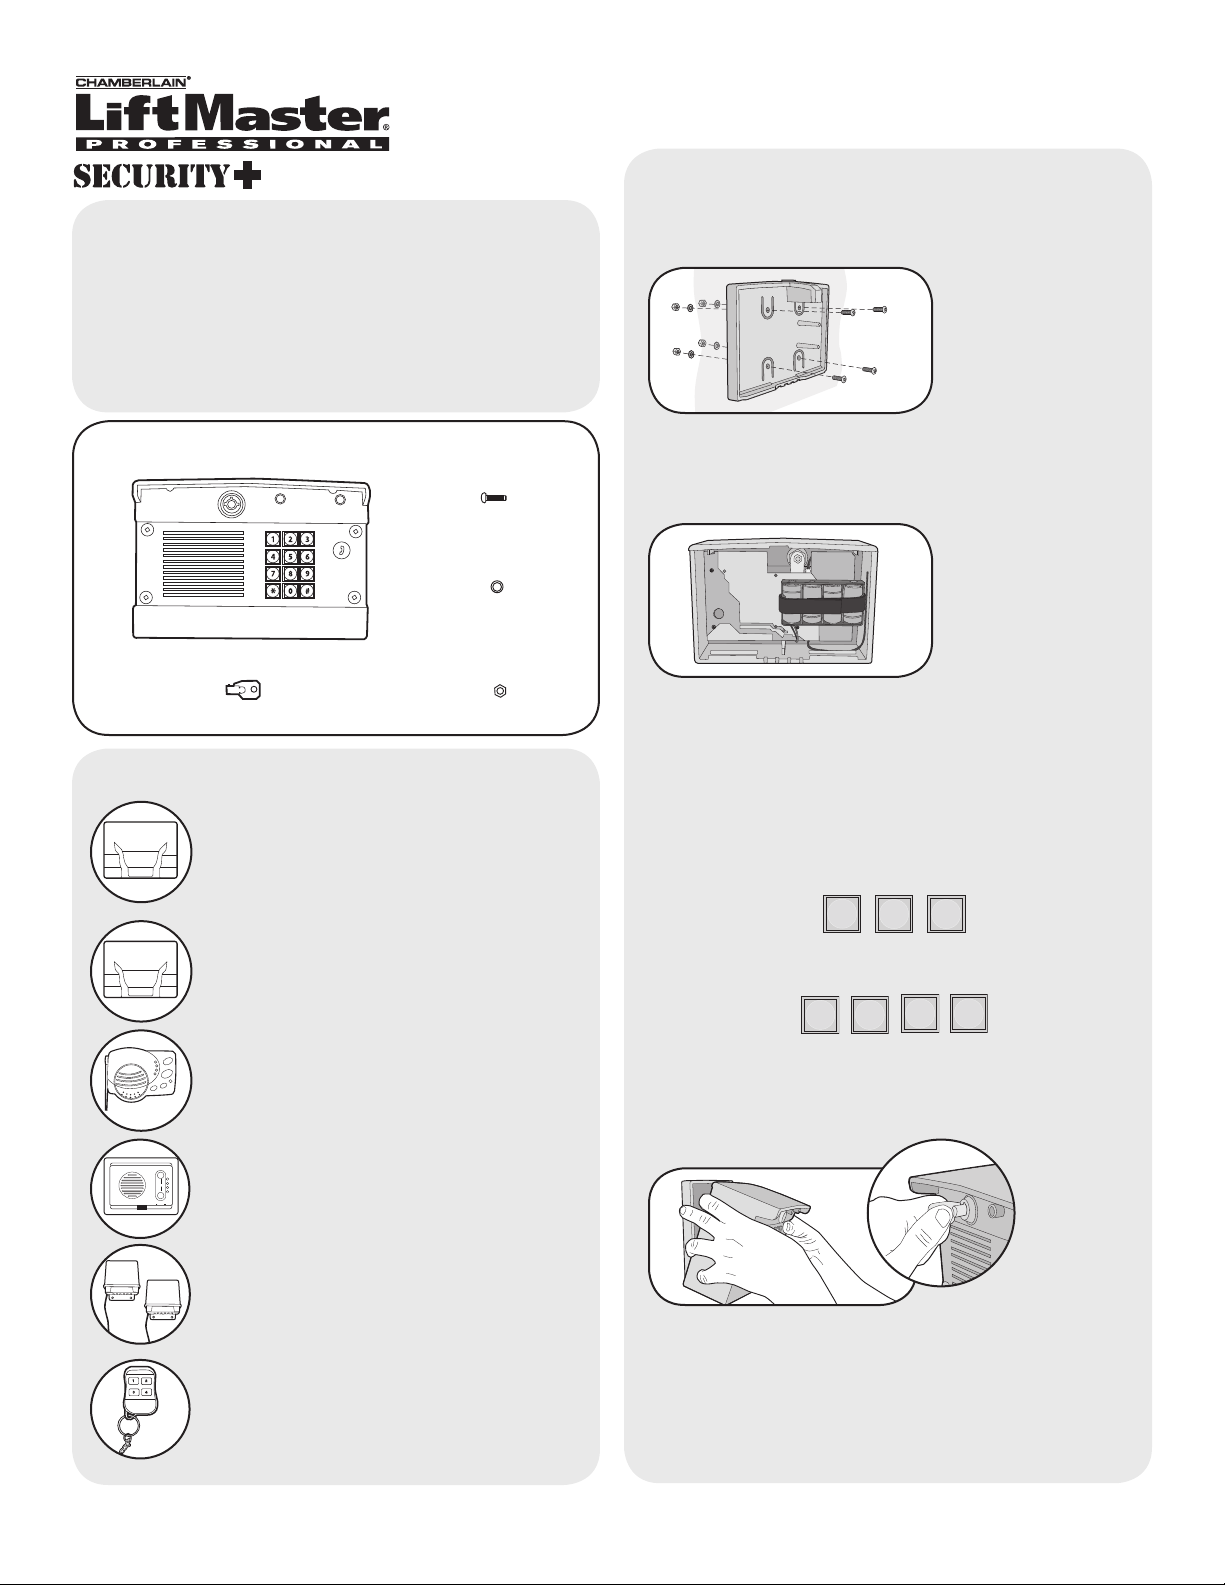
Model MUGAPLM
Multi-Unit Gate Access Panel
MUGAPLM Installation &
Assembly
Step 1
Carton Inventory
Multi-Unit Gate Access Panel (MUGAPLM)
Key (2)
Accessory Overview
Telephone Interface Unit (OTIU): The
OTIU allows the user to identify which
gate or door a visitor is at with Caller ID
and a distinctive ring tone. To answer a
call press “0”. A gate can be opened by
dialing “*9” on the telephone keypad.
Multi-Unit Telephone Interface
(MUOTIU): The MUOTIU acts as a
wireless remote autodialer in a dedicated
line system.
Portable Intercom: The intercom allows
the user to speak with visitors at the
MUGAPLM and open the gate by holding
the Remote button for 10 seconds.
Flush Mount Intercom: The intercom
allows the user to speak with visitors at
the MUGAPLM.
Bolt (4)
Washer (4)
Nut (4)
Choose mounting location for MUGAPLM. Remove
the back panel and attach it to a solid surface or post.
Step 2
Install 4 C batteries (not provided) in the MUGAPLM
and it will beep until the Master PIN Number is
entered.
NOTE: To prevent damage to the circuit DO NOT use
C size Lithium batteries or rechargeable batteries. If
Lithium batteries are needed, switch the C battery
pack with the provided AA battery pack.
Step 3
On keypad press:
Step 4
Enter 4 digit Master PIN Number. Example: 1234.
“BEEP” “BEEP”
NOTE: “ * “ is a cancel button that will cancel any call
or key sequence.
Step 5
Repeater Set: Repeaters are used to
extend the range between the
MUGAPLM and other devices. They are
recommended for use with buildings with
stucco or cement walls.
Remote Control Transmitter: The
remote control transmitter will open the
gate when the numbered button is held
down for 5 seconds within 75' of the
MUGAPLM.
Mount the MUGAPLM onto the back panel. Lock
MUGAPLM with key.
NOTE: Do not slam the MUGAPLM against the wall
or the temper sensor will activate.
If additional MUGAPLM is being used see Operation
& Features: Multi-GAP Mode.
1
Page 2

???
?
123
4
NOTE: If there is already an existing receiver proceed
132 4567891011
DC
AC
+
-
COM
N/C
EXIT
SAFETY
EDGE
COMMON
OPEN
N/O
to Pre-Installed LiftMaster Receiver
(315Mhz Only) section.
Gate Control Unit (GCU)
(not provided)
Assemble
Step 1: Remove GCU cover.
Step 2: Install 4 AA Alkaline
batteries (not provided).
(Lithium batteries
recommended for colder
environments.)
Within 20 seconds enter Master PIN Number on
MUGAPLM:
Followed by GCU Identity as determined in Step 3:
OR
OR
OR
“BEEP” “BEEP”
The GCU LED will blink 3 times indicating
programming is successful. NOTE: The relay will
engage. If error tone is heard or GCU LED emits 3
double blinks, then programming has failed.
Repeat for additional GCUs.
Installation
NOTE: This step applies only if more than one GCU
is being used.
Step 3: Up to four GCUs can be used. Each GCU will
need a different Identity. Set the Identity of the GCU
by changing the Dipswitches as shown in the chart
below.
GCU ID Switch #1 Switch #2
1 OFF OFF
2 ON OFF
3 OFF ON
4 ON ON
Dipswitches
LED
Learn
Button
Program
Press the Learn button on the
GCU for one second. The LED
will light for 20 seconds.
Step 1: Replace GCU cover
and mount near gate operator
control box.
Step 2: Remove bottom panel
of GCU. Connect Terminal 10
on GCU to Common on gate
operator (shown below).
Connect Terminal 9 to Cycle on
gate operator (shown below).
GCU
GATE OPERATOR
2
Page 3
Pre-Installed LiftMaster Receiver (315Mhz Only)
Program
Step 1: Pry open the front
panel of the receiver case
with a coin or a screwdriver.
Step 2: Press and release
the Learn button on the
receiver. The Indicator Light
will light for 30 seconds
indicating that receiver is in Learn
Mode.
Step 3: Within 30 seconds enter Master PIN Number
on GAPLM.
Step 4: Press “1”. The Indicator Light on the receiver
will blink 3 times indicating programming is
successful.
NOTE: An error tone will be heard for 3 consecutive
activations only. After the third activation the
MUGAPLM assumes that the GCU has been
replaced with the receiver.
Repeat Steps 2-4 for each remote, or control device
that will be used to access the LiftMaster door or gate
operator.
Erase All Control Codes
Press and hold the Learn button on the receiver until
the Indicator Light turns off indicating that the receiver
memory is clear (about 6 seconds).
Indicator Light
Learn Button
Programming Accessories
Indoor Multi-Unit Telephone Interface
(MUOTIU)
NOTE: The MUOTIU acts as a wireless remote
autodialer in a dedicated line system.
Step 1: On the phone connected to the MUOTIU,
press “**07” after hearing the dial tone. Hang up and
Learn LED will flash for 15 seconds. If an error tone is
heard it means that memory will have to be cleared
(Refer to MUOTIU manual).
Step 2: Within 15 seconds enter Master PIN Number
on MUGAPLM.
Step 3: Press “05” and MUGAPLM will beep.
Step 4: Followed by (00-63)
Step 5: Then press the Call Button. The MUOTIU will
ring the telephone and Caller ID will display “Unit
Learned”.
For complete installation and operating instructions
refer to MUOTIU manual.
Portable Intercom
Programming Accessories
Indoor Telephone Interface Unit (OTIU)
NOTE: If using the OTIU, each residence that wants
to use this feature must each have a OTIU.
Step 1: On the phone connected to the OTIU, press
“**07” after hearing the dial tone. Hang up and Learn
LED will flash for 15 seconds. If an error tone is heard
it means that memory will have to be cleared (Refer
to OTIU manual).
Step 2: Within 15 seconds enter Master PIN Number
on MUGAPLM.
Step 3: Press “05” and MUGAPLM will beep.
Step 4: Followed by (00-63)
Step 5: Then press the Call Button. The OTIU will
ring the telephone and Caller ID will display “Unit
Learned”.
For complete installation and operating instructions
refer to OTIU manual.
Step 1: Press and release the Learn button on the
intercom.
Step 2: Within 20 seconds enter Master PIN Number
on MUGAPLM.
Step 3: Press “05”.
Step 4: Followed by (00-63)
Step 5: Then press the Call Button. Intercom will
beep indicating programming is successful.
When the Call button is pressed on the MUGAPLM,
the intercom will beep for 40 seconds. During this
time, the intercom will ONLY connect to the
MUGAPLM. Hold down the Talk button on the
intercom to speak to the visitor. Release the Talk
button to hear the response. This will be a secure
conversation and other intercoms will be locked out.
The intercom can also display Gate Status and be put
into Conference Mode by changing the Switch
Settings.
For complete installation and operating instructions
refer to Portable Intercom manual.
3
Page 4
Repeater Set
Remote Control Transmitter
Step 1: On ONE repeater, set Dipswitch #1 to ON. All
other Dipswitches should remain OFF.
Step 2: Press Learn button on both Repeaters (within
5 seconds of each other). LED will light.
Step 3: Within 20 seconds, enter Master PIN Number
on MUGAPLM.
Step 4: Press “05”.
Step 5: Followed by (00-63)
Step 6: Then press the Call button. The LEDs on the
Repeaters will flash 3 times indicating programming is
successful. Allow MUGAPLM 30 seconds to time-out
of Learn Mode, or press the “ * ” to end Learn Mode
before proceeding.
Second Repeater Set
Step 1: On ONE repeater, set Dipswitch #1 to ON. All
other Dipswitches should remain OFF.
Step 2: Press Learn button on both Repeaters (within
5 seconds of each other). LED will light.
Step 3: Press Learn button on ONE of the first set of
Repeaters. LED will light.
Step 4: The LED’s on the second set of Repeaters
will flash three times indicating programming is
successful.
NOTE: If adding Repeaters to existing network, all
accessories that have been programmed to the
MUGAPLM will have to be cleared and
reprogrammed.
When using the OTIU, OTIU-EX, MUOTIU and
MUOTIU-EX only one set of Repeaters may be used.
When using an Intercom two sets of Repeaters may
be used.
Each numbered button on a remote control
transmitter must be programmed separately as each
button controls one of four GCU’s.
Step 1: Enter Master PIN Number on MUGAPLM.
Step 2: Press “8”.
Step 3: Then enter the Gate Control Unit (GCU)
Identity (1-4). If there is only one GCU, enter “1”.
MUGAPLM will beep.
Step 4: Press and hold the remote control transmitter
button that is to be used for that GCU. MUGAPLM will
beep twice indicating programming is successful.
For complete installation and operating instructions
refer to Repeater manual.
4
Page 5
????0
6
123
????0
7
123
????08123
????09###
????7##
#
????5
1
Operation & Features
????9
Adding PIN Numbers
The MUGAPLM can support up to 99 PIN Numbers.
Enter Master PIN Number on MUGAPLM:
“BEEP”
Enter new PIN Number:
Change Master PIN Number
Enter Master PIN Number on MUGAPLM:
“BEEP”
Enter new Master PIN Number:
“BEEP”
If the new PIN Number applies only to a certain GCU,
enter the PIN Number followed by the GCU Identity
(1-4). The result will be a five digit PIN Number
(example: 12341).
Temporary PIN Numbers
A temporary PIN Number can be used only once within
a 24 hour period.
Enter Master PIN Number on MUGAPLM:
“BEEP”
Enter temporary PIN Number:
“BEEP”
If the temporary PIN Number applies only to a certain
GCU, enter the PIN Number followed by the GCU
Identity (1-4). The result will be a five digit PIN number
(example: 12341).
Erasing PIN Numbers
Enter Master PIN Number on MUGAPLM:
“BEEP”
“BEEP”
Speaker Volume
Enter Master PIN Number on MUGAPLM:
Enter one of the following volume levels:
OR
“BEEP”
Default setting is 2.
OR
Microphone Sensitivity
Enter Master PIN Number on MUGAPLM:
Enter one of the following sensitivity levels:
OR
“BEEP”
Default setting is 2.
OR
Keypad Brightness
When it is dark, the panel will light when it detects
movement (up to 5') or when a button is pressed (This
feature is disabled in Power-save Mode).
Enter Master PIN Number on MUGAPLM:
Enter PIN number you want to remove:
Enter one of the following brightness levels:
“BEEP” “BEEP”
A triple beep indicates a PIN Number has been entered
that does not exist. The Master PIN Number cannot be
deleted.
Default setting is 2.
5
OR
“BEEP”
OR
Page 6

????0
5
???56
?
0
1
????5
5
123
????5
2
????5
3
????5
4
Alternate Channel Selections
The MUGAPLM can be set to one of three channels to
prevent range-reducing interference from conflicting
radio transmitters. Any accessories programmed to the
MUGAPLM will have to have memory cleared and be
reprogrammed.
Enter Master PIN Number on MUGAPLM:
Enter one of the following channels:
Multi-GAP Mode
The MUGAPLM can be set to Passive Mode to work
with multiple MUGAPLM’s. The Passive MUGAPLM will
become an accessory to the Active MUGAPLM. Any
accessories that have been taught to the Passive
MUGAPLM will have to have memories cleared and be
reprogrammed to the Active MUGAPLM.
OR
“BEEP”
Default setting is Channel 1.
OR
Vacation Mode
The MUGAPLM can be put into a Sleep Mode to
conserve power and will only respond when the Master
PIN Number is entered into MUGAPLM.
Enter Master PIN Number on MUGAPLM:
To exit Vacation Mode:
Enter Master PIN Number on MUGAPLM:
Party Mode
To keep gate open during a party or activity so the gate
will not have to open with each guest, the MUGAPLM
can be programmed to remain open until it is cycled
close. When the MUGAPLM is in Party Mode it MUST
be connected to an external +12 Volt power supply.
Enter Master PIN Number on MUGAPLM:
Active MUGAPLM
Passive MUGAPLM
On the MUGAPLM that is to be Active, enter the Master
PIN Number:
“BEEP”
“BEEP”
Press:
Within 2 minutes, on the MUGAPLM that is to be
Passive, enter the Master PIN Number:
“BEEP”
To close gate and exit Party Mode, cycle the gate by
entering a PIN Number or by pressing the button on a
remote or intercom.
An error code can be heard if programming is
unsuccessful and MUGAPLM will return to Active Mode.
To exit Passive Mode and return to Active Mode, enter
PIN Number, followed by “57”.
6
Page 7

????5
8
????5
9
Multi-GAP Default GCU Setting
The Passive MUGAPLM defaults to activating GCU #2
when it is activated by a PIN Number entered on that
keypad, a near-by Remote Control Transmitter, or if the
Call button is pressed.
To have the Passive MUGAPLM activate GCU #3:
Enter Master PIN Number on Passive MUGAPLM:
“BEEP”
To have the Passive MUGAPLM activate GCU #4:
Enter Master PIN Number on Passive MUGAPLM:
“BEEP”
To Answer or Make Call
To make a call dial the directory code then press the
Call button.
To answer a call press “0” on the phone connected to
the OTIU or MUOTIU.
Open Gate
To open a gate enter any valid PIN Number on
MUGAPLM.
For multiple GCU’s, enter the PIN Number followed
by the GCU Identity (1-4).
For a Remote Control Transmitter, hold down the
corresponding numbered button for 5 seconds (within
75' of MUGAPLM).
On intercom, press the Remote button while talking to
a visitor. At other times, hold the intercom’s Remote
button for 10 seconds, to activate the Primary GCU.
NOTE: When using a MUOTIU or MUOTIU-EX press
“0” to answer a call.
On a OTIU or MUOTIU, dial “*9” on on the telephone,
while talking to a visitor.
Battery
The AA batteries (not provided) in the GCU will last
up to a year and a half depending on use (Lithium
batteries recommended for colder environments.) If
batteries are low, the intercom will beep three times
after it is activated.
The C batteries (not provided) in the MUGAPLM will
last up to a year and a half with all functions enabled.
Not activating remote control transmitters and
enabling the Power-save Mode can extend battery life
up to five years.
NOTE: To prevent damage to the circuit DO NOT use
C size Lithium batteries. If Lithium batteries are
needed, switch the C battery pack with the provided
AA battery pack.
PIN Number Functions
PIN number Function
01 Self Test Mode
03 Power-save Mode
04 Exit Power-save Mode
05 01 Call Enable MUGAPLM Learn Mode
06 (1-3) MUGAPLM Volume Control
07 (1-3) MUGAPLM Microphone Sensitivity
7 ### PIN Removing PIN Numbers
08 (1-3) MUGAPLM Brightness Control
8 (1-4) Activating a Remote Control
Remote (1-4) Transmitter
09 ### PIN Change the Master PIN Number
9 PIN Add PIN Numbers
9 PIN (1-4) Add PIN Numbers with GCU
restrict
51 PIN Add Temporary PIN Number
51 PIN (1-4) Add Temporary PIN Number with
GCU restrict
52 Vacation Mode
53 Exit Vacation Mode
54 Party Mode
55 (1-3) Alternate Channel Set
56 Place MUGAPLM in Multi-GAP
Passive Mode
57 Place MUGAPLM back to Active
Mode
58 Default GCU #3 to the Passive
MUGAPLM
59 Default GCU #4 to the Passive
MUGAPLM
7
Page 8

Troubleshooting
The MUGAPLM will not program a PIN Number.
The PIN Number is the same number as the factory’s
reset code. Choose another number.
Intercom cannot be programmed.
The MUGAPLM has an automatic “Lock-Out” feature.
Enter the Master PIN Number followed by “05” then
the residence number (00-63) to enter Learn Mode
for one minute. Within 20 seconds, hold down both
buttons on a Flush Mount Intercom or the Learn
Button on an Access Portable Intercom for 1 second.
You should hear a beep within 10 seconds as
Intercom learns network code. After hearing double
beep, press the Call Button on MUGAPLM to ensure
intercoms have been programmed.
GCU does not function.
Ensure GCU has been programmed to the
MUGAPLM (see GCU: Program). If MUGAPLM
beeps 4 times it means the GCU was not
programmed to the MUGAPLM. If GCU has Identity
of 2, 3, or 4 make sure the corresponding Identity is
set with Dipswitches 1 and 2 in GCU (see GCU
Installation).
Manufacturer’s Reset Code is needed to reset
MUGAPLM.
The MUGAPLM’s serial number is printed on the
inside of the MUGAPLM’s back panel.
Call Technical Support at 1-800-528-2806 for Reset
Code. You MUST have MUGAPLM’s serial number to
receive the Reset Code. The MUGAPLM will clear its
memory and can be reprogrammed.
An error tone is heard when GCU is activated.
The MUGAPLM is not communicating with GCU. The
GCU may be out of range or not programmed
correctly. If GCU and MUGAPLM function when close
together, the GCU may need to be mounted higher
off the ground or on a different surface. Metal, trees,
or masonry cause interference.
If MUGAPLM and GCU do not function when close
together, the GCU has not been programmed to the
MUGAPLM. Check the GCU’s Identity and reprogram
it (see GCU Assemble and Program).
There is a buzzing noise or failed connection
when used with the OTIU or MUOTIU.
Move the OTIU/MUOTIU away from computer or
phone. Changing the channel of OTIU/MUOTIU and
MUGAPLM can also solve problem (see Operation &
Features: Alternate Channel Selections).
When used with OTIU or MUOTIU only first couple
of words from caller is heard.
Lower MUGAPLM microphone sensitivity (see
Operation & Features: Microphone Sensitivity).
System has a very short range.
Interference from a conflicting 900Mhz radio
transmitter can affect range. Change the channel of
MUGAPLM (see Operation & Features: Alternate
Channel Selections).
When used in buildings with stucco or cement walls,
the range is greatly reduced. Repeaters can be used
close to the building to solve this problem.
When a call is made, two devices respond.
The two devices were programmed with the same ID
number. Both devices will ring until the call is
answered by one of the devices and a connection is
made.
FOR TECHNICAL SUPPORT DIAL OUR TOLL FREE NUMBER WITHIN USA:
1-800-528-2806
www.liftmaster.com
NOTICE: To comply with FCC and or Industry Canada rules (IC), adjustment or modifications of this receiver and/or transmitter are prohibited,
except for changing the code setting or replacing the battery. THERE ARE NO OTHER USER SERVICEABLE PARTS.
Tested to Comply with FCC Standards FOR HOME OR OFFICE USE. Operation is subject to the following two conditions: (1) this device may not
cause harmful interference, and (2) this device must accept any interference received, including interference that may cause undesired operation.
© 2009, The Chamberlain Group Inc.
114A3890 All Rights Reserved
Page 9

###????
®
Modelo MUGAPLM
Panel de acceso a la puerta
de unidades múltiples
Descripción general
El Panel de acceso a la puerta de unidades múltiples
(MUGAPLM) usa un enlace de intercomunicador que
permite controlar hasta cuatro operadores de puerta y otros
accesorios. Se puede usar con hasta 63 casas y
programarse con hasta 120 transmisores de control remoto.
El MUGAPLM es compatible con diversos productos
inalámbricos de LiftMaster.
Inventario de las cajas
Perno (4)
Arandela (4)
Panel de acceso a la puerta de unidades
múltiples (MUGAPLM)
Llave (2)
Tuerca (4)
Descripción general de accesorios
Unidad de interfaz del teléfono (OTIU): La
OTIU permite al usuario identificar en qué
puerta o entrada está el visitante con el
identificador de llamada y un tono de llamado
distintivo. Para responder una llamada,
presione “0”. Se puede abrir una puerta
marcando “*9” en el teclado del teléfono.
Interfaz de teléfono de unidades múltiples
(MUOTIU): La MUOTIU funciona como un
marcador automático remoto inalámbrico en
un sistema de línea dedicado.
Instalación y montaje del
MUGAPLM
Paso 1
Elija la ubicación de montaje del MUGAPLM. Retire el panel
trasero y sujételo a una superficie o poste sólido.
Paso 2
Instale 4 baterías (no provistas) en el MUGAPLM que
sonará hasta que se ingrese el número de PIN principal.
NOTA: Para evitar daños al circuito, NO use baterías de
litio tamaño C ni baterías recargables. Si se precisan
baterías de litio, cambie el paquete de baterías C por el
paquete de baterías AA provisto.
Paso 3
En el teclado presione:
Paso 4
Ingrese el número de PIN principal de 4 dígitos.
Ejemplo: 1234.
Intercomunicador portátil: El
intercomunicador permite al usuario hablar con
los visitantes en el MUGAPLM y abrir la puerta
manteniendo el botón Remoto presionado
durante 10 segundos.
Intercomunicador de montaje empotrado:
El intercomunicador permite al usuario hablar
con los visitantes en el MUGAPLM.
Juego de repetidores: Los repetidores se
usan para extender el alcance entre el
MUGAPLM y los demás dispositivos. Son
recomendables para usar con edificios que
tienen paredes de estuco o cemento.
Transmisor de control remoto: El transmisor
de control remoto abrirá la puerta cuando el
botón numerado esté presionado durante 5
segundos dentro de 75 pies del MUGAPLM.
NOTA: “ * “ es un botón para cancelar que cancelará
cualquier llamada o secuencia de teclas.
Paso 5
Monte el MUGAPLM en el panel trasero. Cierre el
MUGAPLM con llave.
NOTA: No golpee el MUGAPLM contra la pared o se
activará el sensor de forzamiento.
Si se usa un MUGAPLM adicional, consulte Operación
y características: Modo de GAP múltiple.
“BEEP” “BEEP”
1
Page 10

????123
4
132 4567891011
DC
AC
+
-
COM
N/C
EXIT
SAFETY
EDGE
COMMON
OPEN
N/O
NOTA: Si ya hay un receptor existente, pase a la sección
Receptor LiftMaster preinstalado (sólo 315 Mhz).
Unidad de control de puerta (GCU)
(no incluidas).
Montaje
En menos de 20 segundos, ingrese el número de PIN
principal en el MUGAPLM:
Luego ingrese la identificación de la GCU, como se
determina en el Paso 3:
Paso 1: Retire la cubierta de
la GCU.
Paso 2: Instale 4 baterías alcalinas
AA (no incluidas). (Las baterías de
litio se recomiendan para
ambientes más fríos.)
NOTA: Este paso se aplica sólo si se usa más de una GCU.
Paso 3: Se pueden usar hasta cuatro GCU. Cada GCU
necesitará una identificación diferente. Configure la
identificación de la CGU cambiando los interruptores DIP
como se muestra en la siguiente tabla.
Identificación Interruptor Interruptor
de la GCU
N.º 1 N.º 2
1 APAGADO APAGADO
2 ENCENDIDO APAGADO
3 APAGADO ENCENDIDO
4 ENCENDIDO ENCENDIDO
O
O
O
“BEEP” “BEEP”
El LED de la GCU parpadeará 3 veces, lo que indica que la
programación ha sido exitosa. NOTA: El relé comenzará a
funcionar. Si se escucha el tono de error o si el LED de la
GCU emite 3 parpadeos dobles, la programación ha fallado.
Repita el paso para GCU adicionales.
Instalación
Paso 1: Reemplace la cubierta de
la GCU y móntela cerca de la caja
de control del operador de puerta.
Paso 2: Retire el panel inferior de
la GCU. Conecte la Terminal 10 de
la GCU en Común en el operador
de puerta (como se muestra abajo).
Conecte la Terminal 9 en Ciclo en
el operador de puerta (como se
muestra abajo).
Interruptores DIP
LED
Botón
“Aprendizaje”
OPERADOR
DE PUERTA
GCU
Programación
Presione el botón Aprendizaje
en la GCU por un segundo.
El LED se encenderá durante
20 segundos.
2
Page 11

Receptor LiftMaster preinstalado
(sólo 315 Mhz)
Programación
Paso 1: Abra el panel delantero
de la caja del receptor con una
moneda o un destornillador.
Paso 2: Presione y suelte el
botón Aprendizaje del receptor.
La luz indicadora se encenderá
durante 30 segundos para indicar
que el receptor está en el modo
Aprendizaje.
Paso 3: En menos de 30 segundos, ingrese el número de
PIN principal en el GAPLM.
Paso 4: Presione “1”. La luz del indicador en el receptor
parpadeará 3 veces, lo que indica que la programación ha
sido exitosa.
NOTA: Se escuchará un tono de error durante 3
activaciones consecutivas solamente. Después de la
tercera activación, el MUGAPLM supone que la GCU fue
reemplazada por el receptor.
Repita los Pasos 2 a 4 para cada control remoto o
dispositivo de control que se usará para acceder al
operador de puerta o acceso LiftMaster.
Borrar todos los códigos de control
Presione el botón Aprendizaje en el receptor y no lo suelte
hasta que la luz indicadora se apague, lo que indica que
la memoria del receptor está limpia (aproximadamente
6 segundos).
Luz indicadora
Botón
“Aprendizaje”
Programación de accesorios
Interfaz de teléfono interior con unidades
múltiples (MUOTIU)
NOTA: La MUOTIU actúa como un marcador automático
remoto inalámbrico en un sistema de línea dedicada.
Paso 1: En el teléfono conectado a la MUOTIU, presione
“**07” después de oír el tono de marcado. Cuelgue y verá
que el LED de Aprendizaje parpadeará 15 segundos. Si se
escucha un tono de error, significa que se deberá limpiar la
memoria (ver manual de la MUOTIU).
Paso 2: En menos de 15 segundos, ingrese el número de
PIN principal en el MUGAPLM.
Paso 3: Presione “05” y el MUGAPLM sonará.
Paso 4: Seguido por (00-63)
Paso 5: Luego presione el botón Llamada. La MUOTIU
llamará al teléfono y en el identificador de llamadas
aparecerá “Unidad aprendida”.
Para conocer las instrucciones completas de instalación y
operación, consulte el manual de la MUOTIU.
Intercomunicador portátil
Programación de accesorios
Unidad de interfaz telefónica (OTIU)
NOTA: Si utiliza la OTIU, cada residencia que desee usar
esta característica debe tener una OTIU.
Paso 1: En el teléfono conectado a la OTIU, presione “**07”
después de oír el tono de marcado. Cuelgue y verá que el
LED de Aprendizaje parpadeará 15 segundos. Si se
escucha un tono de error, significa que se deberá limpiar
la memoria (ver manual de la OTIU).
Paso 2: En menos de 15 segundos, ingrese el número de
PIN principal en el MUGAPLM.
Paso 3: Presione “05” y el MUGAPLM sonará.
Paso 4: Seguido por (00-63)
Paso 5: Luego presione el botón Llamada. La OTIU llamará
al teléfono y en el identificador de llamadas aparecerá
“Unidad aprendida”.
Para conocer las instrucciones completas de instalación
y operación, consulte el manual de la OTIU.
Paso 1: Presione y suelte el botón Aprendizaje del receptor.
Paso 2: En menos de 20 segundos, ingrese el número de
PIN principal en el MUGAPLM.
Paso 3: Presione “05”.
Paso 4: Seguido por (00-63)
Paso 5: Luego presione el botón Llamada. El
intercomunicador emitirá una señal sonora para indicar que
la programación ha sido exitosa.
Cuando presione el botón Llamada en el MUGAPLM, el
intercomunicador sonará durante 40 segundos. Durante
este tiempo, el intercomunicador SÓLO se conectará al
MUGAPLM. Mantenga presionado el botón Hablar en el
intercomunicador para hablar con el visitante. Suelte el
botón Hablar para escuchar la respuesta. Esta será una
conversación segura y los demás intercomunicadores
estarán bloqueados.
El intercomunicador también mostrará el Estado de la
puerta y pasará al modo Conferencia cambiando las
Configuraciones del conmutador.
Para conocer las instrucciones completas de instalación y
operación, consulte el manual del intercomunicador portátil.
3
Page 12

Juego de repetidores
Transmisor de control remoto
Paso 1: En UN repetidor, configure el conmutador DIP N.º 1
en ENCENDIDO. Todos los demás interruptores DIP deben
permanecer APAGADOS.
Paso 2: Presione el botón Aprendizaje en ambos
repetidores (con máximo 5 segundos de diferencia entre sí).
El LED se encenderá.
Paso 3: En menos de 20 segundos, ingrese el número de
PIN principal en el MUGAPLM.
Paso 4: Presione “05”.
Paso 5: Seguido por (00-63)
Paso 6: Luego presione el botón Llamada. Los LED de los
repetidores titilarán 3 veces, lo que indica que la
programación fue exitosa. Espere 30 segundos para que el
MUGAPLM sobrepase el tiempo de espera del modo
Aprendizaje o bien presione “ * ” para finalizar el modo
Aprendizaje antes de continuar.
Segundo juego de repetidores
Paso 1: En UN repetidor, configure el interruptor DIP N.º 1
a ENCENDIDO. Todos los demás interruptores DIP deben
permanecer APAGADOS.
Paso 2: Presione el botón Aprendizaje en ambos
repetidores (con máximo 5 segundos de diferencia entre sí).
El LED se encenderá.
Paso 3: Presione el botón Aprendizaje en UNO de los
repetidores delprimer juego de repetidores. El LED se
encenderá.
Paso 4: Los LED del segundo juego de repetidores
parpadearán tres veces, lo que indica que la programación
ha sido exitosa.
NOTA: Si agrega repetidores a una red existente, todos los
accesorios programados en el MUGALPM deberán
limpiarse y reprogramarse.
Cuando use la OTIU, OTIU-EX, MUOTIU y MUOTIU-EX
sólo se puede usar un juego de repetidores. Cuando use un
intercomunicador, se podrán usar dos juegos de
repetidores.
Cada botón numerado en un transmisor de control remoto
se debe programar en forma separada, ya que cada botón
controla una de las GCU.
Paso 1: Ingrese el número de PIN principal en el
MUGAPLM.
Paso 2: Presione “8”.
Paso 3: Luego ingrese la identidad de la Unidad de control
de la puerta (GCU) (1-4). Si hay sólo una GCU, ingrese “1”.
El MUGAPLM emitirá una señal sonora.
Paso 4: Presione y mantenga presionado el botón del
transmisor del control remoto que se usará para esa GCU.
El MUGAPLM emitirá una señal sonora dos veces para
indicar que la programación ha sido exitosa.
Para conocer las instrucciones completas de instalación y
operación, consulte el manual del repetidor.
4
Page 13

????06123????0712
35????08123????09###????7###????51????9
Características y operación
Agregar números de PIN
El MUGAPLM puede tener hasta 99 números de PIN.
Ingrese el número de PIN Principal en el MUGAPLM:
“BEEP”
Ingrese el número de PIN nuevo:
Cambie el número de PIN principal
Ingrese el número de PIN principal en el MUGAPLM:
“BEEP”
Ingrese el número de PIN principal:
“BEEP”
Si el número de PIN nuevo se aplica sólo a una GCU
determinada, ingrese el número de PIN seguido de la identidad
de la GCU (1-4). El resultado será un número de PIN de cinco
dígitos (ejemplo: 12341).
Números de PIN provisionales
Se puede usar un número de PIN temporal sólo una vez
dentro de un período de 24 horas.
Ingrese el número de PIN principal en el MUGAPLM:
“BEEP”
Ingrese el número de PIN
“BEEP”
Si el número de PIN provisional se aplica sólo a una GCU
determinada, ingrese el número de PIN seguido de la identidad
de la GCU (1-4). El resultado será un número de PIN de cinco
dígitos (ejemplo: 12341).
provisional:
“BEEP”
Volumen del altavoz
Ingrese el número de PIN principal en el MUGAPLM:
Ingrese uno de los siguientes niveles de volumen:
O
O
“BEEP”
La configuración predeterminada es 2.
Sensibilidad del micrófono
Ingrese el número de PIN principal en el MUGAPLM:
Ingrese uno de los siguientes niveles de sensibilidad:
OO
Borrar números de PIN
Ingrese el número de PIN principal en el MUGAPLM:
La configuración predeterminada es 2.
“BEEP”
Brillo del teclado
Cuando esté oscuro, el panel se iluminará al detectar
movimiento (hasta 5 pies) o cuando se presione un botón (esta
característica está deshabilitada en el modo ahorro de
energía).
“BEEP”
Ingrese el número de PIN que desea eliminar:
“BEEP” “BEEP”
Una señal sonora triple indica que se ha ingresado un número
de PIN que no existe. El número de PIN principal no se puede
eliminar.
Ingrese el número de PIN principal en el MUGAPLM:
Ingrese uno de los siguientes niveles de brillo:
OO
“BEEP”
La configuración predeterminada es 2.
Page 14

????05???56?01????55123????52????53????54
Alternar selecciones de canales
El MUGAPLM se puede configurar en uno de tres canales para
evitar que la interferencia que reduce el alcance entre en
conflicto con los transmisores de radio. Todo accesorio
programado en el MUGAPLM deberá tener la memoria limpia
y reprogramada.
Ingrese el número de PIN principal en el MUGAPLM:
Ingrese uno de los siguientes canales:
Modo GAP múltiple
El MUGAPLM se puede configurar en el modo Pasivo para
trabajar con múltiples MUGAPLM. El MUGAPLM pasivo se
convertirá en un accesorio para el MUGAPLM activo. Cualquier
accesorio que se programó en el MUGAPLM pasivo deberá
limpiar la memoria y reprogramarse en el MUGAPLM activo.
O
O
“BEEP”
La configuración predeterminada es el canal 1.
Modo Vacaciones
El MUGAPLM se puede poner en el modo Suspensión para
conservar la energía y sólo responderá cuando se ingrese el
número de PIN principal en el MUGAPLM.
Ingrese el número de PIN principal en el MUGAPLM:
Para salir del modo Vacaciones:
Ingrese el número de PIN principal en el MUGAPLM:
Modo Fiesta
Para mantener la puerta abierta durante una fiesta o una
actividad de modo que no se abra con cada invitado, el
MUGAPLM se puede programar para que quede abierto hasta
que se cierre el ciclo. Cuando el MUGAPLM está en modo
Fiesta DEBE estar conectado a un suministro de energía
externo de +12 voltios.
Ingrese el número de PIN principal en el MUGAPLM:
MUGAPLM activo
MUGAPLM pasivo
En el MUGAPLM que será activo, ingrese el número de PIN
principal:
“BEEP”
“BEEP”
Presione:
Espere 2 minutos y en el MUGAPLM que será pasivo, ingrese
el número de PIN principal:
“BEEP”
Se escuchará un código de error si la programación no ha sido
Para cerrar la puerta y salir del modo Fiesta, cierre el ciclo de
la puerta ingresando el número de PIN o presionando el botón
en un intercomunicador remoto.
exitosa y el MUGAPLM volverá al modo activo. Para salir del
modo pasivo y volver al activo, ingrese el número de PIN,
seguido de “57”.
6
Page 15

????58????5
9
Configuración de GCU predeterminada de
GAP múltiple
El MUGAPLM pasivo está predeterminado para activar la GCU
N.º 2 cuando sea activado por un número de PIN ingresado en
ese teclado, un transmisor de control remoto cercano o si se
presiona el botón Llamada.
Para activar el MUGAPLM pasivo, active la GCU N.º 3:
Ingrese el número de PIN principal en el MUGAPLM
pasivo:
“BEEP”
Para activar el MUGAPLM pasivo, active la GCU N.º 4:
Ingrese el número de PIN principal en el MUGAPLM
pasivo:
“BEEP”
Para responder o hacer una llamada
Para hacer una llamada, marque el código del directorio y
luego presione el botón Llamada.
Para responder una llamada presione “0” en el teléfono
conectado a la OTIU o a la MUOTIU.
Abrir puerta
Para abrir una puerta, ingrese cualquier número válido de
PIN en el MUGAPLM.
Para varias GCU, ingrese el número de PIN seguido de la
identificación de la GCU (1-4).
Para un transmisor de control remoto, presione el botón
correspondiente durante 5 segundos (en el radio de 75 pies
del MUGAPLM).
En el intercomunicador, presione el botón remoto mientras
habla con un visitante. En otras ocasiones, mantenga el
botón Remoto del intercomunicador presionado durante 10
segundos para activar la GCU primaria.
NOTA: Cuando use la MUOTIU o la MUOTIU-EX presione
“0” para responder una llamada.
En la OTIU o la MUOTIU, marque “*9” en el teléfono
mientras habla con un visitante.
Batería
Las baterías AA (no incluidas) en la GCU durarán hasta
un año y medio dependiendo del uso (se recomiendan las
baterías de litio para ambientes más fríos). Si las baterías
se están agotando, el intercomunicador emitirá una señal
sonora tres veces después de activarse.
Las baterías C (no incluidas) en el MUGAPLM durarán
hasta un año y medio con todas las funciones habilitadas.
Si no activa los transmisores de control remoto y habilita el
modo Ahorro de energía puede extender la vida útil de la
batería hasta cinco años.
NOTA: Para evitar daños al circuito, NO use baterías de
litio tamaño C. Si se precisan baterías de litio, cambie el
paquete de baterías C por el paquete de baterías AA
provisto.
Funciones de los números de PIN
Número de PIN Función
01 Modo de prueba automática
03 Modo de ahorro de energía
04 Salir del modo Ahorro de energía
05 01 Llamada Habilitar el modo Aprendizaje del
MUGAPLM
06 (1-3) Control de volumen del MUGAPLM
07 (1-3) Sensibilidad del micrófono del
MUGAPLM
7 ### PIN Eliminar números de PIN
08 (1-3) Control de brillo del MUGAPLM
8 (1-4) Activar un control remoto
Remoto (1-4) Transmisor
09 ### PIN Cambiar el número de PIN principal
9 PIN Agregar números de PIN
9 PIN (1-4) Agregar números de PIN con
restricción de GCU
51 PIN Agregar número de PIN provisional
51 PIN (1-4) Agregar número de PIN provisional
con restricción de GCU
52 Modo Vacaciones
53 Salir del modo Vacaciones
54 Modo Fiesta
55 (1-3) Alternar configuración de canales
56 Colocar el MUGAPLM en el modo
Pasivo de GAP múltiple
57 Colocar el MUGAPLM nuevamente
en el modo Activo
58 GCU predeterminado N.º 3 en el
MUGAPLM pasivo
59 GCU predeterminado N.º 4 en el
MUGAPLM pasivo
7
Page 16

Resolución de problemas
El MUGAPLM no programará un número de PIN.
El número de PIN es el mismo número que el código de
reinicio de fábrica. Elija otro número.
El intercomunicador no se puede programar.
El MUGAPLM tiene una característica automática “Cerrar”.
Ingrese el número de PIN principal seguido de “05”, luego
el número de la residencia (00-63) para ingresar el modo
Aprendizaje durante un minuto. Dentro de los 20 segundos,
mantenga presionados ambos botones en el intercomunicador de montaje empotrado o el botón Aprendizaje en el
intercomunicador portátil de acceso durante 1 segundo.
Deberá escuchar una señal sonora dentro de los 10
segundos a medida que el intercomunicador aprende el
código de la red. Después de escuchar la señal sonora,
presione el botón Llamada en el MUGAPLM para
asegurarse de que se hayan programado los
intercomunicadores.
La GCU no funciona.
Asegúrese de que la GCU se haya programado en el
MUGAPLM (ver GCU: Programación). Si el MUGAPLM
emite 4 señales sonoras, significa que la GCU no fue
programada en el MUGAPLM. Si la GCU tiene la identidad
de 2, 3 ó 4, asegúrese de que la identidad correspondiente
esté configurada en los interruptores DIP 1 y 2 en la GCU
(ver Instalación de la GCU).
Es necesario el código de reinicio del fabricante para
reiniciar el MUGAPLM.
El número de serie del MUGAPLM está impreso en el
interior del panel trasero del MUGAPLM. Llame a Soporte
técnico al 1-800-528-2806 para obtener el código de
reinicio. DEBE tener el número de serie del MUGAPLM
para recibir el código de reinicio. El MUGAPLM limpiará
la memoria y se podrá reprogramar.
Se escucha un tono de error cuando se activa la GCU.
El MUGAPLM no se comunica con la GCU. La GCU podrá
estar fuera de alcance o no estar programada
correctamente. Si la función GCU y MUGAPLM estuviesen
cerca, la GCU deberá montarse a mayor altura del suelo
o en una superficie diferente. El metal, los árboles o la
mampostería producen interferencia.
Si el MUGAPLM y la GCU no funcionan cuando están
cerca, la GCU no se ha programado para el MUGAPLM.
Verifique la identidad de la GCU y reprográmela (ver
Montaje y programación de la GCU).
Se escucha un zumbido o una falla en la conexión
cuando se usa con la OTIU o la MUOTIU.
Mueva la OTIU/MUOTIU lejos de la computadora o del
teléfono. Cambiar el canal de la OTIU/MUOTIU y el
MUGAPLM también puede resolver el problema (ver
Operación y características: Alternar selecciones de
canales).
Cuando se usa con la OTIU o la MUOTIU, sólo se
escuchan las primeras palabras de la persona que
llama.
Reduzca la sensibilidad del micrófono del MUGAPLM (ver
Operación y características: sensibilidad del micrófono).
El sistema tiene un alcance muy corto.
La interferencia desde un transmisor de radio de 900 Mhz
en conflicto puede afectar el alcance. Cambiar el canal de
la MUGAPLM (ver Operación y características: Alternar
selecciones de canales).
Cuando se usa en edificios con paredes de estucado o
cemento, el alcance se reduce considerablemente. Los
repetidores se pueden usar cerca del edificio para resolver
este problema.
Cuando se realiza una llamada, responden dos
dispositivos.
Los dos dispositivos se programaron con el mismo número
de identificación. Ambos dispositivos sonarán hasta que
uno de los dispositivos responda la llamada y se realice
una conexión.
PARA OBTENER ASISTENCIA TÉCNICA, LLAME A NUESTRO NÚMERO GRATUITO E.E.U.U:
1-800-528-2806
www.liftmaster.com
AVISO: Para cumplir con las reglas de la FCC y/o de Canadá (IC) ajustes o modificaciones de este receptor y/o transmisor están prohibidos, excepto
por el cambio de la configuración del código o el reemplazo de la batería. NO HAY OTRAS PIEZAS REPARABLES DEL USUARIO.
Se ha probado para cumplir con las NORMAS DE LA FCC PARA USO EN EL HOGAR O LA OFICINA. La operación está sujeta a las dos condiciones
siguientes:(1) este dispositivo no puede causar interferencia perjudicial, y (2) este dispositivo debe aceptar cualquier interferencia recibida,
incluyendo la interferencia que puede causar una operación no deseable.
© 2009, The Chamberlain Group Inc.
114A3890 Todos los derechos reservados
 Loading...