

Page 1
1
Model 940D-01 Security✚
®
Wireless Keyless Entry
™
/
To prevent possible SERIOUS INJURY or DEATH from a moving
gate or garage door:
• Install Keyless Entry Control within sight of the garage door, out of
reach of children at a minimum height of 5 feet (1.5 m), and away
from all moving parts of door.
• ALWAYS keep remote controls out of reach of children. NEVER
permit children to operate, or play with remote control
transmitters.
• Activate gate or door ONLY when it can be seen clearly, is properly
adjusted, and there are no obstructions to door travel.
• ALWAYS keep gate or garage door in sight until completely closed.
NEVER permit anyone to cross path of moving gate or door.
WARNING
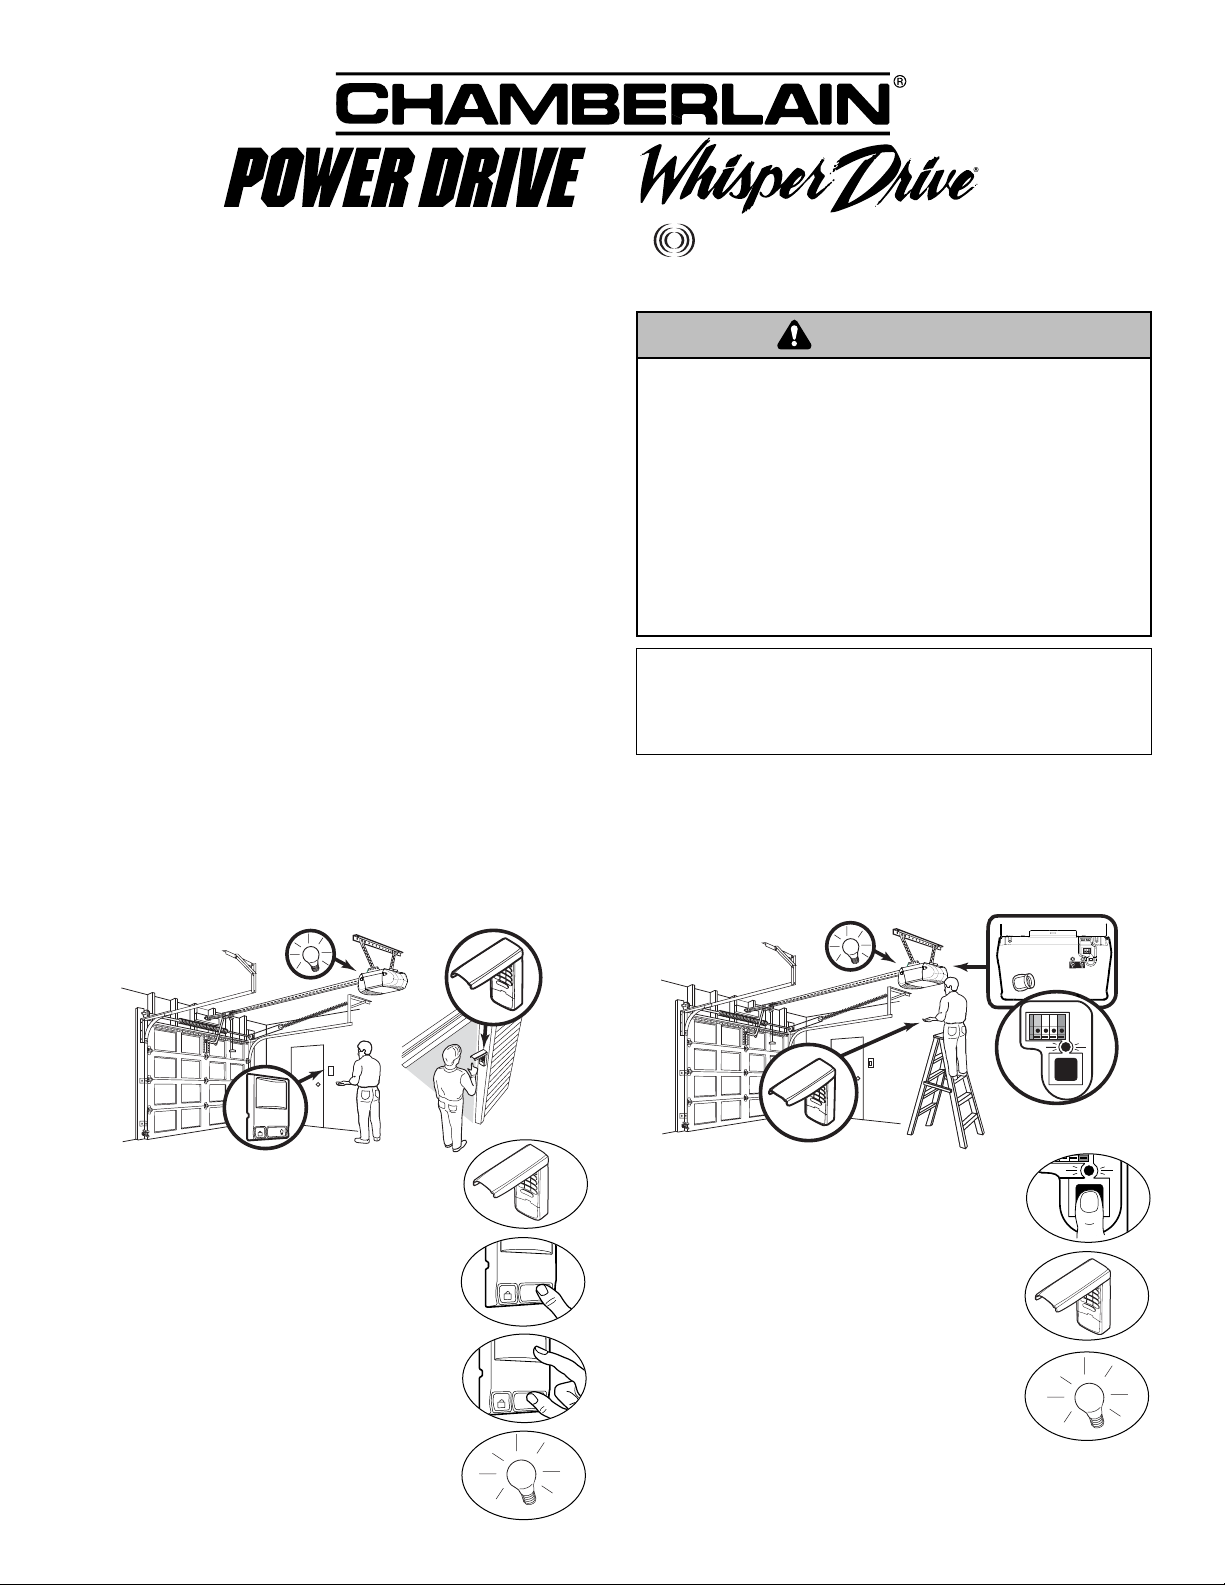
1. Press and release the “learn” button on motor
unit. The learn indicator light will glow
steadily for 30 seconds.
2. Within 30 seconds, enter a four digit personal
identification number (PIN) of your choice on
the keypad. Then press and hold the ENTER
button.
3. Release the button when the motor unit lights
blink. It has learned the code. If light bulbs
are not installed, two clicks will be heard.
SETTING THE PERSONAL ENTRY PASSWORD
We recommend that you install the battery and program
the Keyless Entry now, prior to installation. Then you can
test the reception at the mounting location before you
proceed further.
USING THE “LEARN” BUTTON
Side two contains instructions for installing the Keyless
Entry, changing the personal entry password and setting a
temporary password.
NOTICE: To comply with FCC and or Industry Canada rules (IC), adjustment or modifications of
this receiver and/or transmitter are prohibited, except for changing the code setting or replacing
the battery. THERE ARE NO OTHER USER SERVICEABLE PARTS.
Tested to Comply with FCC Standards FOR HOME OR OFFICE USE. Operation is subject to the
following two conditions: (1) this device may not cause harmful interference, and (2) this device
must accept any interference received, including interference that may cause undesired operation.
FEATURES
For use with any 315 MHz SECURITY✚®garage door openers
having a purple “learn” button.
Personalized Password: Up to 10,000 possible combinations.
Password can be easily changed if desired.
Temporary Password: Can be added for visitors or service
persons. This temporary password can be limited to a
programmable number of hours or a programmable number of
entries.
Rolling Code: While your password remains constant until you
change it, the code between the Keyless Entry and the receiver
changes with each use, randomly accessing over 100 billion
new codes.
Operation: Opener activates when 4-digit password and
ENTER button is pressed.
If wrong numbers are accidentally pressed, correction can be
made immediately. The ENTER button will transmit only the last
four digits.
The keypad will blink for 15 seconds after the password is
transmitted. During that time the ENTER button can be used to
stop or reverse the door travel.
The Lock feature on openers with Multi-Function Door Controls
is designed to prevent operation of the door from portable
transmitters. However, the door will open and close from the
door control push button and the Keyless Entry.
One Button Close: Opener can be closed by pressing only the
ENTER button if the one button close feature has been
activated. This feature has been activated at the factory. To
activate or deactivate this feature press and hold buttons 1 and
9 for 10 seconds. The keypad will blink twice when the one
button close is active. The keypad will blink four times when one
button close is deactivated.
1. Enter a four digit personal identification
number (PIN) of your choice on the keypad.
Then press and hold ENTER.
2. While holding the ENTER button, press and
hold the LIGHT button on the Multi-Function
Door Control.
3. Continue holding the ENTER and LIGHT
buttons while you press the push bar on the
Multi-Function Door Control (all three buttons
are held).
4. Release buttons when the motor unit lights
blink. It has learned the code. If light bulbs
are not installed, two clicks will be heard.
L
O
C
K
L
I
G
H
T
USING THE MULTI-FUNCTION DOOR CONTROL
L
O
C
K
L
I
G
H
T
L
O
C
K
L
I
G
H
T
WARNING
Page 2

© 2006, The Chamberlain Group, Inc.
114A3026C All Rights Reserved
Craftsman
®
is a Registered Trademark of Sears, Roebuck and Co.
FOR SERVICE DIAL OUR
TOLL FREE NUMBER: 1-800-528-9131
INSTALLATION
1. Choose a convenient
location for installation.
Install out of the reach
of children at a
minimum height of 5
feet (1.5 m), away from
all moving parts of door.
For a one-piece door,
choose the optional
location shown in the
illustration to avoid
injury as the door swings up and out.
Test the reception of the Keyless Entry by operating your
opener from the selected location. Change the location if
necessary.
2. Remove the battery cover to access the bottom mounting
hole. Slide the cover down to remove. Remove battery.
3. Center the keypad at eye level against the selected location.
Mark 4-1/4" (10.8 cm) up the centerline from the bottom and
drill a 1/8" (3.2 mm) pilot hole. Install top mounting screw,
allowing 1/8" (3.2 mm) to protrude above surface. Position
keypad on screw head and adjust for snug fit.
With cover open so bottom mounting hole is visible, Mark the
position of the hole. Remove keypad and drill 1/8" (3.2 mm)
pilot hole. Replace keypad and complete installation with
bottom screw, using care to avoid cracking plastic housing.
Do not over tighten.
Reinstall battery and replace the battery cover. To replace
battery cover slide up and snap it into place.
Door Jamb Edge
(Optional)
Keyless
Entry
Door Jamb Face
(SECTIONAL DOOR ONLY)
KEYLESS ENTRY MUST BE
INSTALLED WITHIN
SIGHT OF THE DOOR
Exterior Front Wall
1-Piece or
Sectional Door
Typical
Installation
TO CHANGE AN EXISTING, KNOWN PIN
If the existing PIN is known, it may be changed by one person
without using a ladder.
1. Press the four buttons for the present PIN, then press and
hold the # button.
The opener light will blink twice. Release the # button.
2. Press the new 4-digit PIN you have chosen, then
press ENTER.
The motor unit lights will blink once when the PIN has been
learned.
Test by pressing the new PIN, then press ENTER. The door
should move.
TO SET A TEMPORARY PIN
You may authorize access by visitors or service people with a
temporary 4-digit PIN. After a programmed number of hours or
number of openings, this temporary PIN expires and will no
longer open the door. It can be used to close the door even
after it has expired. To set a temporary PIN:
1. Press the four buttons for your personal entry PIN (not the
last temporary PIN), then press and hold the ✽ button.
The opener light will blink three times. Release the button.
2. Press the temporary 4-digit PIN you have chosen, then press
ENTER.
The opener light will blink four times.
3. To set the number of hours this temporary PIN will work,
press the number of hours (up to 255), then press ✽.
OR
3. To set the number of openings this temporary PIN will work,
press the number of times to open (up to 255), then press #.
The opener light will blink once when the temporary PIN has
been learned.
Test by pressing the four buttons for the temporary PIN, then
press ENTER. The door should move. If the temporary PIN was
set to a certain number of openings, remember that the test has
used up one opening. To clear the temporary password, repeat
steps 1-3, setting the number of hours or times to 0 in step 3.
SPECIAL NOTE: The temporary password can ONLY be
programmed to Keyless Entries working on a 315 MHz
Chamberlain, Craftman
®
or LiftMaster Garage Door Opener. It
WILL NOT work on Keyless Entries programmed to an external
receiver.
The temporary password will continue to CLOSE the door even
after the time has expired. To eliminate this, program a new
temporary password into the Keyless Entry.
THE KEYLESS ENTRY BATTERY
The battery should produce power
for at least one year. Replace when
the Keyless Entry illumination
becomes dim or it doesn’t stay on
after a keystroke.
Dispose of old battery properly.
To prevent possible SERIOUS INJURY or DEATH:
• NEVER allow small children near batteries.
• If battery is swallowed, immediately notify doctor.
WARNING
KEYLESS ENTRY MOUNTING
(For reference only.)
Replacement parts:
Keypad cover . . . . . . . . . . . . . . . . . . . . . . . . . . . . . . . . . . .41D542-1
Battery . . . . . . . . . . . . . . . . . . . . . . . . . . . . . . . . . . . . . . . . . . .10A25
Battery cover . . . . . . . . . . . . . . . . . . . . . . . . . . . . . . . . . . . . .41D541
4 1/4"
WARNING
Top Cover
Bottom
Mounting Hole
9V Battery
Battery Cover
Page 3

CÓMO ESTABLECER LA CONTRASEÑA PERSONAL DE
ENTRADA
Recomendamos programar la contraseña ahora, antes de instalar
el sistema de entrada sin llave. Entonces se podrá probar la
recepción en el lugar de montaje antes de proceder.
AVISO: Para cumplir con las reglas de la FCC y/o de Canadá (IC), las reglas, ajustes o modificaciones de
este receptor y/o transmisor están prohibidos, excepto por el cambio de la graduación del código o el
reemplazo de la pila. NO HAY OTRAS PIEZAS REPARABLES DEL USUARIO.
Se ha probado para cumplir con las normas de la FCC para USO DEL HOGAR O DE LA OFICINA. La
operación está sujeta a las dos condiciones siguientes:(1) este dispositivo no puede causar interferencia
perjudicial, y (2) este dispositivo debe aceptar cualquier interferencia recibida, incluyendo la interferencia
que puede causar una operación no deseable.
1
1. Oprima y suelte el botón "Apredizaje" de la unidad
del motor. La luz indicadora de este botón estará
encendida por 30 segundos.
2. En 30 segundos, ingrese un número de
identificación personal (PIN) que haya elegido,
usando el teclado. Luego oprima y mantenga
oprimido el botón ENTER.
3. Suelte el botón cuando las luces de la unidad del
motor empiecen a parpadear. Ya aprendió el
código. Si no se han puesto focos, se escucharán
dos chasquidos.
CÓMO USAR EL BOTÓN “APREDIZAJE” (LEARN)
El lado dos contiene las instrucciones para instalación de su
Entrada sin llave, cambiar la contraseña de entrada personalizada
y para programar una contraseña provisoria.
Modelo 940D-01
Entrada sin llave con
Security✚
®
™
/
Para evitar la posibilidad de una LESIÓN GRAVE o INCLUSO LA MUERTE de
una puerta cuando está en moviemento:
• Instale la entrada sin llave que quede a la vista desde la puerta de la
cochera, fuera del alcance de los niños a una altura mínima de 1.52 m
(5 pies), y alejado de las partes móviles de la puerta.
• SIEMPRE conserve los controles remotos lejos del alcance de los niños.
NUNCA permita que los niños operen o jueguen con los botones del
control de la puerta de la cochera ni con los controles remotos.
• SÓLO active la puerta de la cochera siempre y cuando la puedan ver con
claridad, esté debidamente ajustada y no haya ninguna obstrucción en el
recorrido de la puerta al cerrarse
• SIEMPRE tenga la puerta de la cochera a la vista hasta que esté
completamente cerrada. Si el nudo de la cuerda se suelta, usted podría
caerse. NUNCA permita ninguna persona atravesar el recorrido de una
puerta cuando está en moviemento.
ADVERTENCIA
ADVERTENCIA
CARACTERÍSTICAS
Para usarase con abridor de puertas de cochera Security✚®de 315
MHz y receptores universal que tengan un botón “Aprender” (Learn)
morado.
Contraseña Personalizada: Hasta 10,000 combinaciones posibles. La
contraseña puede cambiarse fácilmente si así se desea.
Contraseña Provisoria (característica no es disponible con
receptor universal): Puede agregarse para visitantes o personas de
servicio. Esta contraseña provisoria puede limitarse a un número
programable de horas o un número programable de entradas.
Código Cambiante: Mientras que la contraseña se mantiene
constante hasta que la cambie el usuario, el código entre el sistema de
entrada sin llave y el receptor cambia con cada uso, accesando en
forma aleatoria más de 100,000 millones de nuevos códigos.
Operación: El abridor se activa cuando se usa la contraseña de 4
dígitos y se oprime el botón ENTER.
Si se presionan accidentalmente números equivocados, la corrección
puede hacerse inmediatamente. El botón ENTER transmitirá sólo los
cuatro últimos dígitos.
El teclado parpadea durante 15 segundos después de que se transmita
la contraseña. Durante ese tiempo el botón ENTER puede usarse para
detener o retroceder el recorrido de la puerta.
El función de seguro en operdores con controles de la puerta de
funciónes multiples son diseñada para evitar la operación de la puerta
con los controles remotos manuales. No obstante, la puerta se puede
abrir y cerrar con los siguientes accesorios: El control de la puerta, el
interruptor de llave externo, y la entrada sin llave.
Cierre con un botón: El abridor se puede cerrar presionando sólo el
botón ENTER si está activada la función de cierre con un botón. Esta
función viene activada de fábrica. Para activarla o desactivarla,
presione y mantenga presionados los botones 1 y 9 durante 10
segundos. El teclado parpadeará dos veces cuando se active la
función de cierre con un botón. y parpadeará cuatro veces cuando se
la desactive.
1. Ingrese un número de identificación personal
(PIN) que haya elegido, usando el teclado. Luego
oprima y mantenga oprimido el botón ENTER.
2. Mientras mantiene oprimido el botón ENTER,
oprima y mantenga oprimido el botón de la luz
(LIGHT) de la Control de Funciones Multiples.
3. Continúe oprimiendo los dos botones, ENTER y
LIGHT, mientras oprime también la barra de la
Control de Funciones Multiples (con los tres
botones oprimidos).
4. Suelte los botones cuando las luces. El codigo a
sido aprendido. Si no tiene focos instalados,
escuchara dos chasquidos indicando que el
codigo esta prodramado.
CÓMO USAR LA CONTROL DE FUNCIONES MULTIPLES
L
O
C
K
L
I
G
H
T
L
O
C
K
L
I
G
H
T
ADVERTENCIA
K
C
O
L
T
H
G
I
L
Page 4

PARA SERVICIO, MARCAR NUESTRO NÚMERO
TELEFÓNICO GRATUITO: 1-800-528-9131
© 2006, The Chamberlain Group, Inc.
114A3026C Todos los Derechos Reservados
Craftsman®est une marque de commerce de Sears, Roebuck & Co.
INSTALACIÓN
1. Escoger una ubicación
conveniente para la
instalación. Debe
instalarseno menos de 5
pies (1.5 m) de el piso.
Debe quedar fuera del
alcanze de los niños y de
las partes mobiles de la
puerta.
Para una puerta de una
pieza, elegir la ubicación
opcional mostrada en la
ilustración para evitar
lesiones al oscilar la
puerta hacia arriba y hacia afuera.
Pruebe la recepción de la Entrada sin llave, operando su abridor
desde el punto que haya elegido. Cambie la ubicación si es
necesario.
2. Quite la tapa de las baterías para tener acceso al orificio de montaje
que se encuentra en la parte inferior. Quite la bateria.
3. Centre el teclado a nivel de los ojos sobre la ubicación seleccionada.
Marque 10.8 cm (4-1/4 de pulg.) por encima de la línea central desde
la parte inferior y perfore un orificio piloto de 3.2 mm (1/8 de pulg.).
Inserte un tornillo de montaje superior, dejando que sobresalga
3.2 mm (1/8 de pulg.) de la superficie. Ubique el teclado sobre la
cabeza del tornillo y apriete el tornillo.
Teniendo la cubierta abierta para que pueda verse el orificio de
montaje inferior, marque la posición del orificio. Extraiga el teclado y
perfore un orificio piloto de 3.2 mm (1/8 de pulg.). Vuelva a colocar el
teclado y termine la instalación con el tornillo inferior, teniendo
cuidado de no agrietar la caja plástica. No apriete demasiado.
Vuelva a instalar la batería y coloque la cubierta. Para colocar la
cubierta de la batería, deslícela hacia arriba y fíjela en su posición
ejerciendo presión.
Borde del quicial
de la puerta
(Ubicación opcional para
la puerta de 1 pieza)
Entrada
sin llave
Cara del quicial de la puerta
(UBICACIÓN OPCIONAL PARA
LA PUERTA DE SECCIONAL)
ENTRADA SIN LLAVE DIGITAL DEBE
INSTALARSE DENTRO DEL
ALCANCE DE VISION DE LA PUERTA
Pared delantera exterior
Puerta de 1 pieza
o seccional
Instalación
típica
PARA CAMBIAR UN PIN EXISTENTE
Si el PIN existente ya es conocido, una persona lo puede cambiar sin
usar una escalera.
1. Oprima los cuatro botones que correspondan al PIN actual, luego
oprima y mantenga oprimido el botón #.
La luz del abridor parpadeará dos veces. Suelte el botón #.
2. Oprima el nuevo PIN de cuatro dígitos y luego oprima ENTER.
Las luces de la unidad del motor parpadearán una vez cuando el PIN
se haya aprendido.
Pruebe oprimiendo el nuevo PIN, luego oprima ENTER. La puerta
debe moverse.
PARA PONER UN PIN TEMPORAL
Usted puede autorizar el acceso a sus visitas o a personal de servicio
con un PIN temporal de cuatro dígitos. Después de un determinado
número de horas programadas, o número de aberturas, este PIN
temporal expira y no vuelve a abrir la puerta. Se puede usar para
cerrar la puerta aún después de que haya expirado. Haga lo siguiente
para poner un PIN temporal:
1. Oprima los cuatro botones correspondientes a su PIN de entrada
personal (no el último PIN temporal); luego oprima y mantenga
oprimido el botón ✽.
La luz del abridor va a parpadear tres veces. Suelte el botón.
2. Oprima los cuatro dígitos del PIN temporal que haya elegido, luego
oprima ENTER.
La luz del abridor va a parpadeará cuatro veces.
3. Para fijar el número de horas que el PIN temporal debe funcionar,
oprima el número de horas (hasta 255), luego oprima ✽.
O
3. Para fijar el número de aberturas que el PIN temporal debe
funcionar, oprima el número de veces para abrir (hasta 255), luego
oprima #.
La luz del abridor parpadeará una vez cuando el PIN temporal haya
sido aprendido.
Pruebe oprimiendo los cuatro botones correspondientes al PIN
temporal, luego oprima ENTER. La puerta debe moverse. Si el PIN
temporal se ha fijado para abrir la puerta un determinado número de
veces, recuerde que la prueba constituye una vez. Para borrar la
contraseña temporal, repita los pasos 1 al 3; fijando el número de
horas o de veces en 0, en el paso 3.
NOTA ESPECIAL: La contraseña provisoria se puede programar
SÓLO en los entrada sans clés que controlan un abridor de puerta de
cochera Chamberlain, Craftsman®o LiftMaster de 315 MHz. NO
FUNCIONA en los entrada sans clés programados para un receptor
externo.
La contraseña provisoria seguirá CERRANDO la puerta incluso
después de haberse vencido el plazo. Para eliminar este problema,
programe otra contraseña provisoria en el entrada sans clé.
LA BATERÍA DEL ENTRADA SIN LLAVE
La batería debe producir energía
suficiente para un año por lo menos.
Cambie la batería cuando baje la
intensidad la iluminación del teclado.
Deshacerse de su batería usada de la
manera adecuada.
Para evitar la posibilidad de LESIONES GRAVES o INCLUSO
LA MUERTE:
• NUNCA permita que los niños pequeños estén cerca de las baterías.
• Si alguien se traga una batería, llame al médico de inmediato.
ADVERTENCIA
ADVERTENCIA
MONTAJE DE LLAVE DIGITAL
(Para referencia solamente.)
Partes de repuesto:
Tapa el teclado . . . . . . . . . . . . . . . . . . . . . . . . . . . . . . . . . . . . . .
41D542-1
La batería . . . . . . . . . . . . . . . . . . . . . . . . . . . . . . . . . . . . . . . . . . . . .10A25
Tapa de la batería . . . . . . . . . . . . . . . . . . . . . . . . . . . . . . . . . . . . .
41D541
4 1/4
de pulg.
ADVERTENCIA
Orificio de montaje
del fondo
Batería 9V
Tapa de la batería
Ta p a
 Loading...