

TM
en
FEATURES
For use with ML500, ML700, ML750, ML850, GPD60, GPD65 and
GPD80 garage door openers.
Personalized Password: Up to 10,000 possible combinations.
Password can be easily changed if desired.
Rolling Code: While your password remains constant until you change
it, the code between the Keyless Entry and the receiver changes with
each use, randomly accessing over 100 billion new codes.
Operation: Opener activates when 4-digit password and
ENTER button is pressed. If wrong numbers are accidentally pressed,
correction can be made immediately. The ENTER button will transmit
only the lastfour digits. The keypad will blink for 15 seconds after the
password is transmitted. During that time the ENTER button can be
used to stop or reverse the door travel. The Lock feature on openers
with Multi-Function Door Controls is designed to prevent operation of
the door from portable transmitters. However, the door will open and
close from the door control push button and the Keyless Entry.
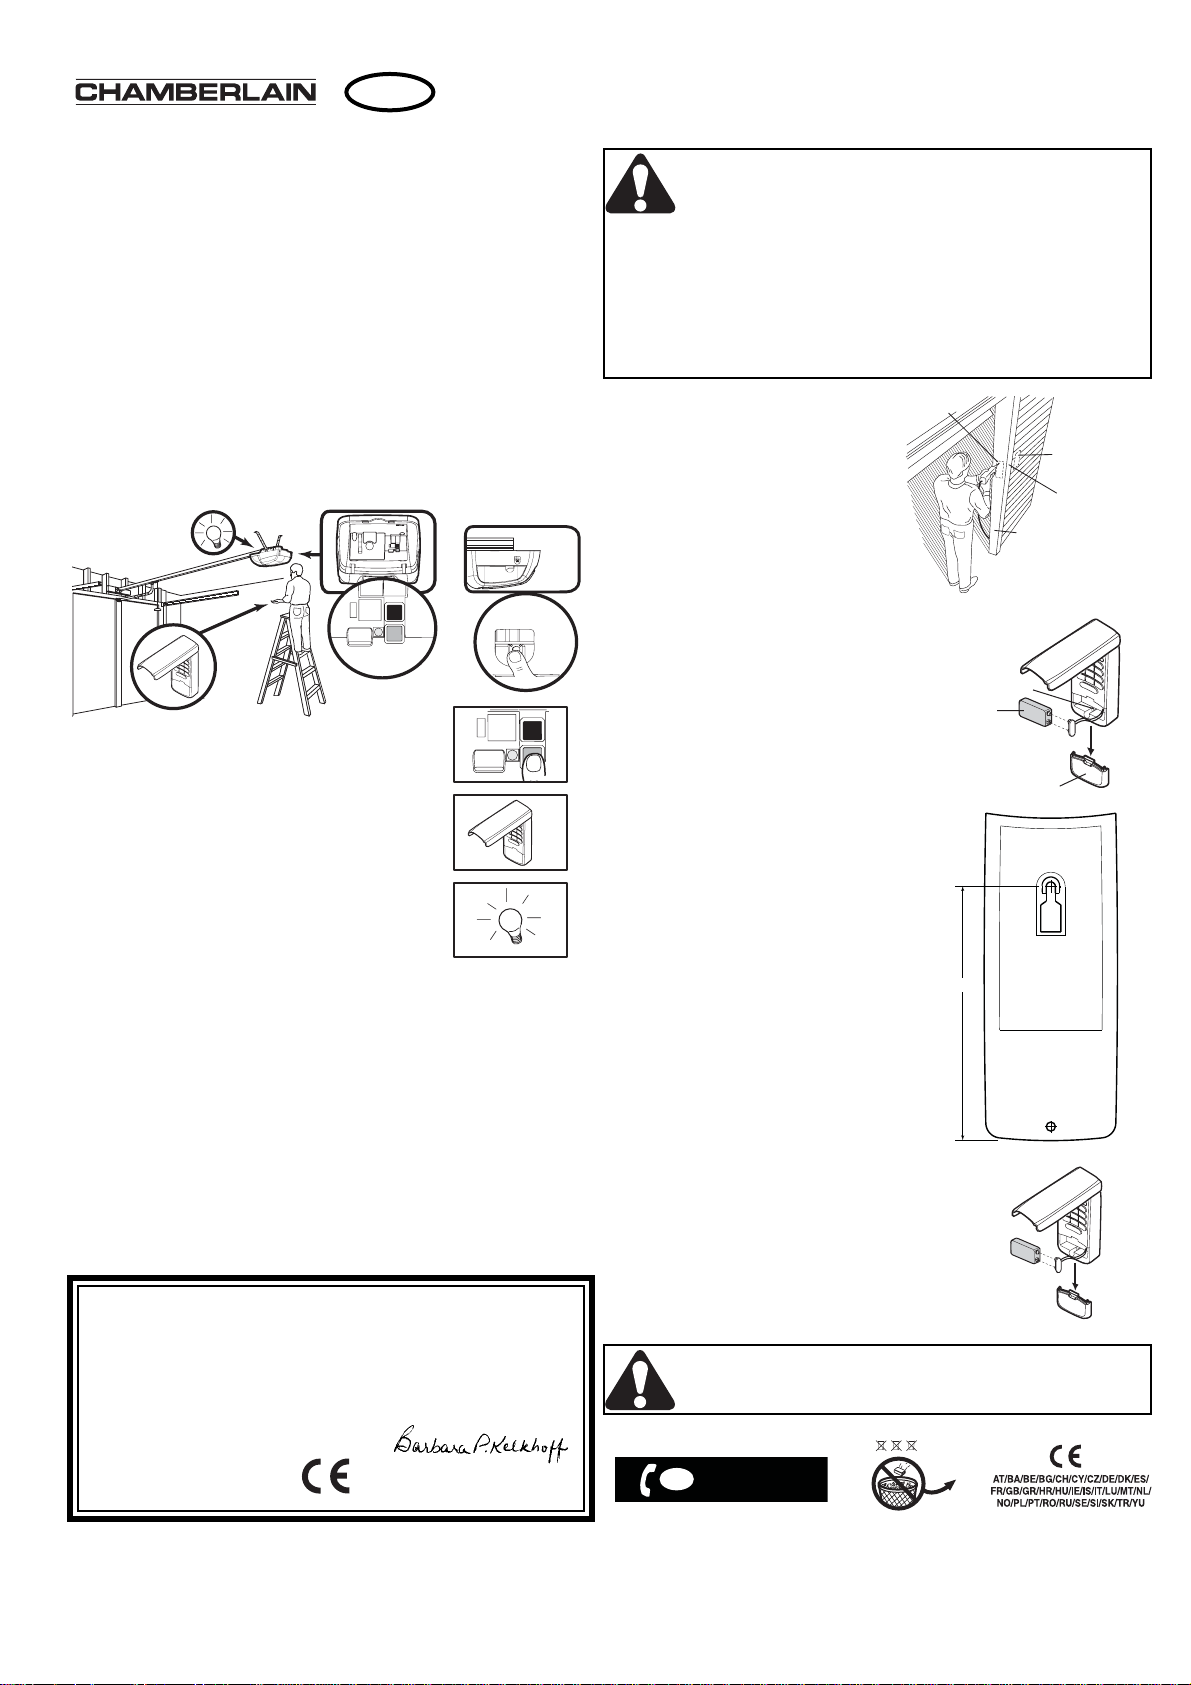
SETTING THE PERSONAL ENTRY PASSWORD
We recommend that you program your password now, before you
install the Keyless Entry. Then you can test the reception at the mounting location before you proceed further.
Wireless Keyless Entry with rolling code Model 8747EML
1. Press and release the learn button on
motor unit. The learn indicator light
will glow steadily for 30 seconds.
2. Within 30 seconds, enter a four digit
personal identification number (PIN)
of your choice on the keypad. Then
press and hold the ENTER button.
3. Release the button when the motor
unit lights blink. It has learned the
code. If light bulbs are not installed,
two clicks will be heard.
USING THE “LEARN” BUTTON
To prevent possible SERIOUS INJURY or DEATH from a moving gate or garage door:
• Install Keyless Entry Control within sight of the garage door,
out of reach of children at a minimum height of 1.5 m, and away
from all moving parts of door.
• ALWAYS keep remote controls out of reach of children.
NEVER permit children to operate, or play with remote control
transmitters.
• Activate gate or door ONLY when it can be seen clearly, is
properly adjusted, and there are no obstructions to door travel.
• ALWAYS keep gate or garage door in sight until completely
closed. NEVER permit anyone to cross path of moving gate or
door.
INSTALLATION
1. Choose a convenient location for
installation. Install out of the reach of
children at a minimum height of 1.5 m,
away from all moving parts of door. For
a one-piece door, choose the optional
location shown in the illustration to avoid
injury as the door swings up and out.
Test the reception of the Keyless Entry
by operating your opener from the
selected location. Change the location if
necessary.
2. Remove the battery cover to
access the bottom mounting hole. Slide the
cover down to remove. Remove battery.
3. Center the keypad at eye level against the
selected location. Mark 4-1/4" (10.8 cm) up
the centerline from the bottom and drill a 1/8"
(3.2 mm) pilot hole. Install top mounting
screw, allowing 1/8" (3.2 mm) to protrude above surface. Position keypad on
screw head and adjust for snug fit. With
cover open so bottom mounting hole is
visible, Mark the position of the hole.
Remove keypad and drill 1/8" (3.2 mm)
pilot hole. Replace keypad and complete
installation with bottom screw, using
care to avoid cracking plastic housing.
Do not over tighten. Reinstall battery
and replace the battery cover. To
replace battery cover slide up and snap
it into place.
TO CHANGE AN EXISTING, KNOWN PIN
If the existing PIN is known, it may be changed by one person
without using a ladder.
1. Press the four buttons for the present PIN, then press and hold the #
button. The opener light will blink twice. Release the # button.
2. Press the new 4-digit PIN you have chosen, then press ENTER.
The motor unit lights will blink once when the PIN has been learned.
Test by pressing the new PIN, then press ENTER.The door should
move.
The Keyless Entry Battery
The battery should produce power for at least one
year. Replace when the Keyless Entry illumination
becomes dim or it doesn’t stay on after a keystroke.
Dispose of old battery properly.
To prevent possible SERIOUS INJURY or DEATH:
• NEVER allow small children near batteries.
• If battery is swallowed, immediately notify doctor.
SKU:8747EML-03
Declaration of Conformity
The undersigned, hereby declare that the equipment specified
conforms to the Directives and Standards stated.
Model:...................................................................................................................8747EML
ETS 300 683, EN 300 220-3
- 2004/108/EC
- 1999/5/EC
Chamberlain GmbH
Alfred-Nobel-Str. 4
D-66793 Saarwellingen
May, 2008
Barbara P. Kelkhoff
Manager, Reg. Affairs
ML700, ML750, ML850
ML500 > 06.2006
2002 - 05.2005 = 747EML
1
2
3
Keyless
Entry
108mm,
Bottom
mounting hole
Battery
4 1/4"
Typical
Installation
Exterior Front Wall
1-Piece or
Sectional Door
Door Jamb Edge
(Optional)
Door Jamb Face
(SECTIONAL DOOR ONLY)
KEYLESS ENTRY MUST BE
INSTALLED WITHIN
SIGHT OF THE DOOR
Battery Cover
Cd Hg
GB
i
0800 317847
Pb
de
Merkmale
Kann mit ML500, ML700, ML750, ML850, GPD60, GPD65 und GPD80
Garagentorantrieben verwendet werden.
Persönliches Passwort: Bis zu 10.000 Kombinationen möglich.
Passwort kann auf Wunsch einfach verändert werden.
Rolling Code:Während das eigene Passwort bis zur Veränderung
durch den Benutzer gleich bleibt, ändert sich der Code des FunkcodeSchlosses und des Empfängers mit jeder Betätigung und greift dabei
wahllos auf einen Pool von 100 Milliarden neuer Codes zu.
Funktionsweise:Öffner wird aktiviert, sobald das 4-stellige Passwort
eingegeben und die ENTER-Taste (ENTER) gedrückt wird.Sollten
versehentlich falsche Zahlen eingegeben werden, kann eine sofortige
Korrektur vorgenommen werden. Die ENTER-Taste übermittelt nur die
vier zuletzt eingegebenen Ziffern.Die Tastatur blinkt etwa 15 Sekunden
lang nachdem das Passwort übertragen wurde. Während dieser Zeit
kann die ENTER-Taste benutzt werden, um die Torbewegung anzuhalten oder umzukehren.Die Funksperre bei Öffnern mit
Multifunktionswandkonsole ist dafür vorgesehen die Bedienung der Tür
mit tragbaren Sendern zu verhindern. Das Tor lässt sich jedoch öffnen
und schließen mit dem Wandschalter und dem Codeschloss.
Einrichten des persönlichen Zugangspasswortes
Wir empfehlen das Passwort jetzt zu programmieren, noch bevor Sie
das Funkcode-Schloss installieren. Sie können dann den Empfang
am vorgesehenen Halterungsplatz testen bevor Sie weiter vorgehen.
Schlüsselloses Zugangssystem Rolling Code Modell 8747EML
1. Drücken Sie einmal kurz den Lern-Knopf am
Motorkopf. Die LED wird 30 Sekunden lang
anhaltend leuchten.
2. Innerhalb dieser 30 Sekunden geben Sie
bitte eine 4-stellige persönliche PINNummer ihrer Wahl ein. Dann halten Sie die
ENTER-Taste gedrückt.
3. Sobald die Antriebsbeleuchtung zu blinken
beginnt, können Sie die ENTER-Taste
loslassen. Der Code ist eingelernt. Sollten
keine Glühbirnen eingebaut sein, wird Sie
ein zweimaliges Klicken auf das erfolgre
iche Einlernen aufmerksam machen.
Benutzung des LERN-Knopfes
Um mögliche schwerwiegende Verletzungen oder Tod durch ein
sich bewegendes Tor zu vermeiden:
• Installieren Sie Funkcode-Schloss in Sichtweite des
Garagentores, außer Reichweite von Kindern, in einer Höhe
von mindestens 1,50 Metern und in sicherer Entfernung zu
allen beweglichen Teilen des Tores.
• Bewahren Sie Fernbedienungen IMMER außerhalb der
Reichweite von Kindern auf. Erlauben Sie niemals Kindern
das Bedienen oder Spielen mit Fernbedienungen.
• Aktivieren Sie das Tore NUR, wenn Sie sie sehen können, es
korrekt eingestellt ist und sich keine Hindernisse im
Schwenkbereich des Tores befinden.
• Beobachten Sie Tore IMMER solange, bis sie komplett
geschlossen sind und erlauben Sie niemandem sich im
Schwenkbereich des Tores aufzuhalten.
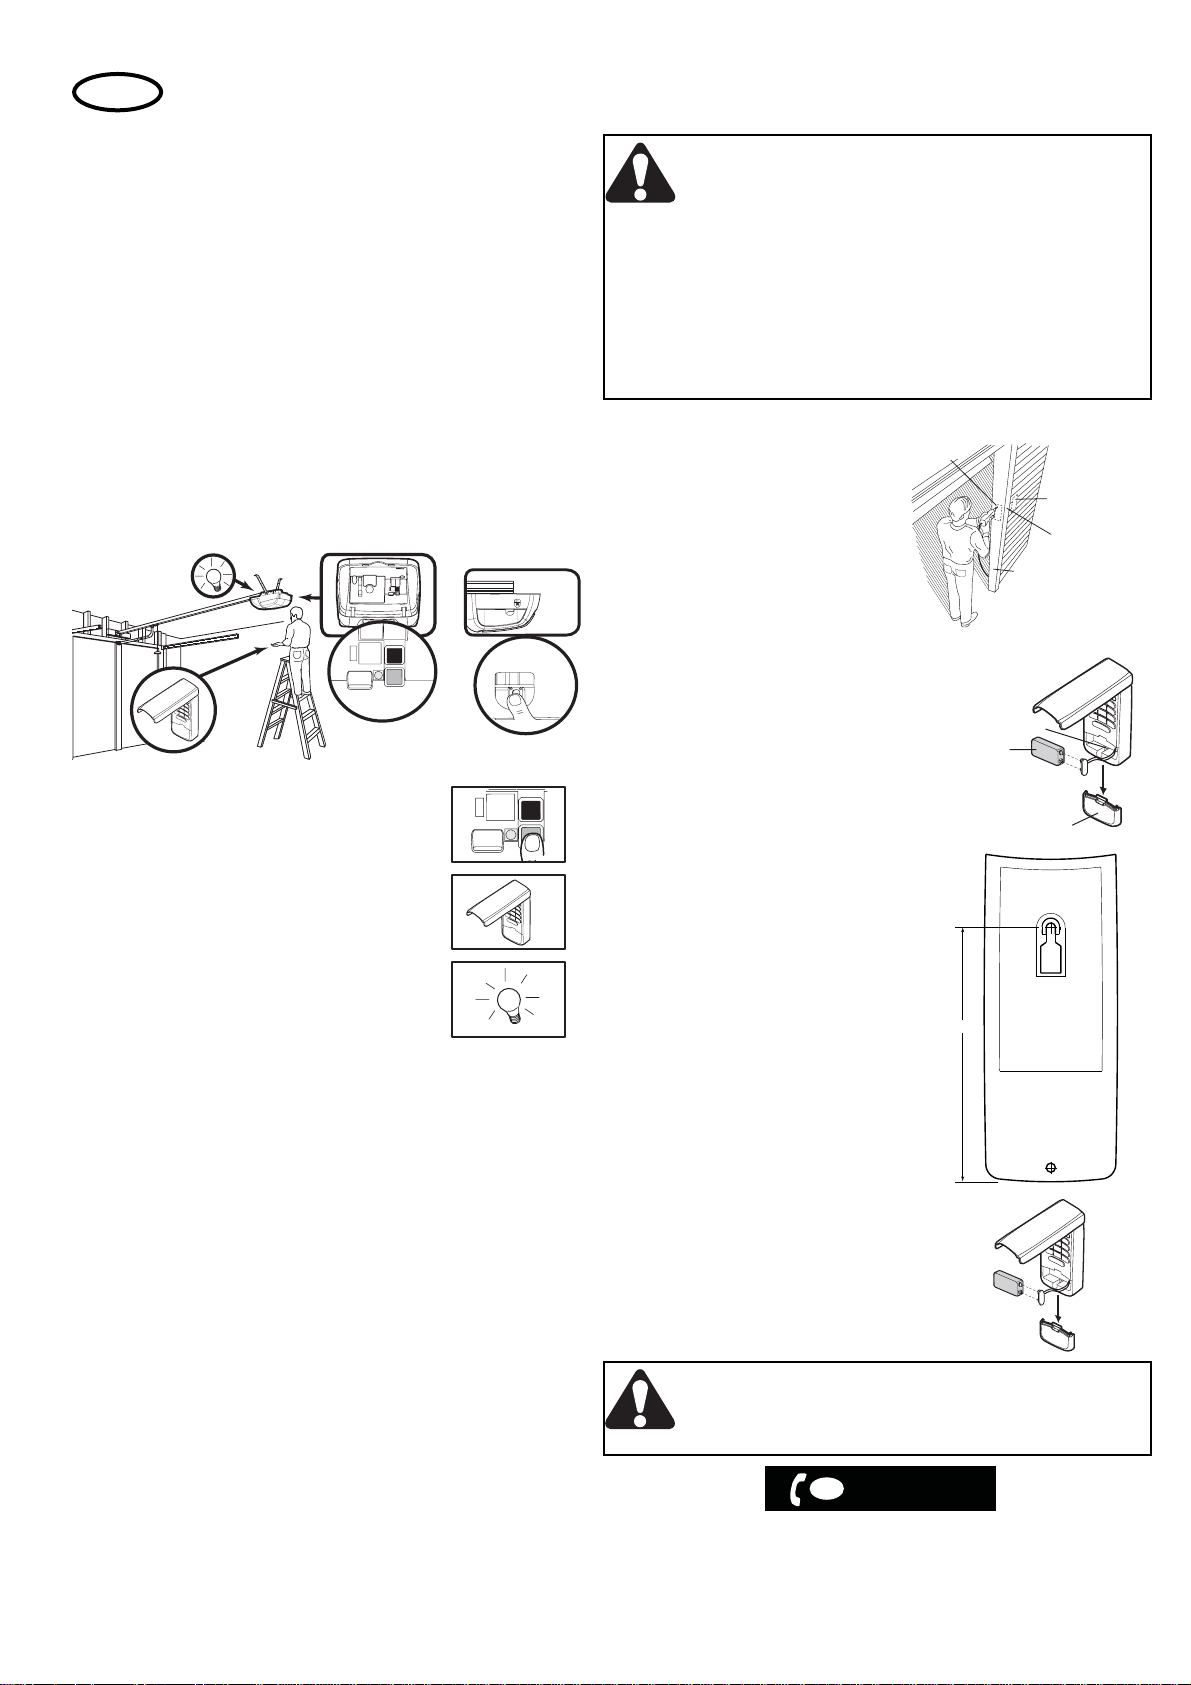
INSTALLATION
1. Wählen Sie einen geeigneten Platz
für die Installation. Nehmen Sie den
Einbau an einer Stelle vor, außerhalb
der Reichweite von Kindern mit einer
Mindesthöhe von 1,50 Meter und sicherer Entfernung zu allen beweglichen
Teilen des Garagentors. Bei einem einteiligen Tor wählen Sie einen geeigneten
Montageplatz (siehe Abbildung) um
Beschädigungen zu vermeiden, wenn
das Tor nach oben und nach außen
schwingt. Testen Sie vom gewählten
Platz aus, ob der Öffner das Signal des
Funkcode-Schlosses empfängt. Wenn nötig
verändern Sie die Position.
2. Entfernen Sie die Batterieabdeckung, um
an die untere Montagevorrichtung zu gelangen. Schieben Sie die Abdeckung nach unten,
um sie zu entfernen. Entnehmen Sie die
Batterie.
3. Zentrieren Sie die Tastatur auf Augenhöhe
am ausgewählten Platz. Bringen Sie mittig
und 10,80 cm oberhalb der Unterkante eine
Markierung an und bohren Sie ein 3,2
mm großes Loch. Drehen Sie die obere
Montageschraube ein, so dass diese 3,2
mm aus der Wand herausragt.
Positionieren Sie die Tastatur auf dem
Schraubenkopf und sorgen Sie für
Passgenauigkeit. Markieren Sie nun das
untere Bohrloch bei geöffneter
Abdeckung. Entfernen Sie die Tastatur
und bohren Sie das untere Loch (3,2
mm). Stecken Sie nun die Tastatur
erneut auf und vervollständigen Sie die
Montage durch Anziehen der unteren
Schraube. Achten Sie beim Anziehen
darauf, dass das Plastikgehäuse nicht
beschädigt wird. Schraube nicht zu fest
anziehen. Setzen Sie die Batterie wieder
ein und schließen Sie das Batteriefach.
Um das Batteriefach zu schließen,
schieben Sie die Abdeckung hoch bis
zum Einrasten.
Ändern einer bekannten PIN-Nummer
Ist die existierende PIN-Nummer bekannt, kann sie durch eine Person
verändert werden, ohne dass eine Leiter benötigt wird.
1. Drücken Sie die vier Tasten der aktuellen PIN, dann halten Sie die #
Taste gedrückt. Der Öffner wird zweimal blinken. Lassen Sie die #
Taste wieder los.
2. Geben Sie die neue 4-stellige Pin ein und drücken Sie anschließend
ENTER.
Die Antriebsbeleuchtung wird ein Mal blinken, wenn der Code
eingestellt ist. Testen Sie die korrekte Funktion durch das Eingeben der
neuen PIN und drücken Sie dann ENTER. Das Garagentor sollte sich
bewegen.
Die Batterie des Funkcode-Schlosses
Die Batterie sollte eine Mindestlebensdauer von
einem Jahr haben. Ersetzen Sie die Batterie,
sobald die Beleuchtung schwächer wird oder nach
einer Eingabe nicht mehr leuchtet. Entsorgen Sie
die Batterie ordnungsgemäß.
Um mögliche schwerwiegende Verletzungen oder Tod zu vermeiden:
• Halten Sie kleine Kinder von Batterien fern.
• Sollten Batterien verschluckt werden, konsultieren Sie
sofort einen Arzt.
SKU:8747EML-03
ML700, ML750, ML850
ML500 > 06.2006
2002 - 05.2005 = 747EML
1
2
3
Schlüsselloses
Zugangssystem
DE
i
06838/907 100
Unteres
Befestigungsloch
108mm,
4 1/4"
Typische
Installation
Garagenvorderseite
bei einteiligem Tor
oder Sektionaltor
Torpfostenkante
(optional)
Torpfostenfront
(nur bei Sektionaltor)
Das schlüssellose
Zugangssystem muß
in Sichtweite des Tores
installiert werden
Batterie
Batterieabdeckung

fr
Caractéristiques
Utilisable avec les ouvre-portes ML500, ML700, ML750, ML850,
GPD60, GPD65 et GPD80.
Code d’accès personnel : jusqu'à 10.000 combinaisons. Le code
d’accès peut être aisément modifié.
Code tournant : Alors que le code d’accès personnalisé reste identique tant que l'utilisateur ne le modifie pas, le code radio transmis
entre le système d’accès radio et le récepteur change à chaque utilisation et puise dans un répertoire de 100 milliards de codes aléatoires.
Mode de fonctionnement : Le système d'ouverture est activé dès que
le code d’accès à 4 chiffres est saisi sur le clavier et validé par la
touche ENTER (ENTREE). En cas de saisie de chiffres erronés, il est
possible de procéder à une correction immédiate. La touche ENTER
ne transmet alors que les derniers chiffres saisis. Le clavier clignote
pendant env. 15 secondes après la transmission du code d’accès.
Pendant ce temps, il est possible d'utiliser la touche ENTER pour
arrêter ou inverser le mouvement de la porte. Le verrouillage radio de
la console murale multifonctions est prévu pour inhiber la commande
de la porte avec des télécommandes. La porte peut toutefois être
ouverte et fermée à l'aide de l'interrupteur mural et du système d’accès
à code.
Création du code d’accès personnel
Nous recommandons de programmer votre code d’accès, avant de
fixer le système d’accès à code radio au mur. Vous pouvez ensuite
tester la réception à l'endroit de fixation prévu avant de continuer.
Système d'accès sans clé à code tournant modèle 8747EML
1. Presser une fois brièvement le bouton d'apprentissage sur la tête du moteur. La diode
s'allume en continu pendant 30 secondes.
2. Au cours de ces 30 secondes, taper le code
d’accès personnel à 4 chiffres de votre choix.
Maintenir ensuite la touche ENTRER enfoncée.
3. Dès que l'éclairage de l'entraînement commence à clignoter, vous pouvez relâcher la
touche ENTER. Le code est programmé. En
l'absence d'ampoule, un double clic signale
que l'apprentissage a été réalisé avec succès.
Utilisation du bouton APPRENTISSAGE
INSTALLATION
1. Sélectionner un endroit approprié
pour l'installation. Procéder au montage à un endroit hors de portée des
enfants, à une hauteur minimale de 1,5
mètres et à bonne distance de toutes
les pièces mobiles de la porte de
garage. S’il s’agit d’une porte de
garage basculante, sélectionner un
emplacement de montage (voir ill.) permettant d'éviter tous dommages
lorsque la porte oscille vers le haut ou
vers le bas. Depuis l'emplacement
sélectionné, tester si la motorisation reçoit
bien le signal radio du système d’accès à
code radio. Modifier la position si nécessaire.
2. Retirer le couvercle du logement de la pile
pour atteindre le dispositif de montage
inférieur. Repousser le couvercle vers le bas
pour le retirer. Sortir la pile.
3. Centrer le clavier à hauteur des yeux à
l'endroit voulu. Tracer un repère au milieu et à
10,8 cm au-dessus du rebord inférieur et
percer un trou de 3,2 mm. Visser la vis
de montage de sorte à ce qu'elle
dépasse de 3,2 mm du mur. Positionner
le clavier sur la tête de la vis et contrôler
l'ajustage. Tracer maintenant le trou
inférieur avec le cache en position
ouverte. Déposer le clavier et percer le
trou du bas (diamètre 3,2 mm).
Remettre en place le clavier et compléter le montage en serrant la vis du
bas. Lors du serrage, veiller à ne pas
endommager le boîtier en plastique. Ne
pas serrer trop fortement la vis du bas.
Remettre en place la pile et refermer le
couvercle du logement correspondant.
Pour ce faire, repousser le couvercle
vers le haut jusqu'à ce qu'il s'enclenche.
Modification du code d’accès personnel connu
Si le code d’accès personnel est connu, il peut être modifié par une
personne sans avoir recours à une échelle pour accéder à la motorisation.
1.Taper les quatre chiffres du code d’accès actuel et maintenir enfoncée la touche #. L’éclairage de l’automatisme clignote deux fois.
Relâcher la touche #.
2. Saisir le nouveau code d'accès à 4 chiffres et appuyer ensuite sur la
touche ENTER.
L'éclairage de l'entraînement clignote une fois lorsque le code est
enregistré. Tester le bon fonctionnement en tapant le nouveau code
d'accès et valider avec la touche ENTER. La porte du garage doit se
mettre en mouvement
Pile du système d’accès à code radio
La pile présente une autonomie d'au moins un
an. Remplacer la pile dès que l'éclairage commence à faiblir ou ne s'allume plus après la
saisie du code. Veiller à respecter les dispositions en vigueur pour la mise au rebut de la pile.
Afin d'éviter de possibles blessures graves ou même un danger de mort :
• Ne pas laisser les piles à portée de main des enfants.
• En cas d'ingestion, consulter immédiatement un médecin.
Afin d'éviter de possibles blessures graves ou même un
danger de mort dû à une porte en mouvement :
• Installer le système d’accès à code radio à portée de vue
de la porte du garage, hors de portée des enfants, à une
hauteur minimale de 1,50 m, et à bonne distance de toutes
les pièces mobiles de la porte.
• Conserver SYSTEMATIQUEMENT les télécommandes
hors de portée des enfants. Ne jamais autoriser les enfants
à manipuler les télécommandes ou à jouer avec.
• N'activer la porte QUE lorsque vous la voyez, lorsqu'elle
est correctement réglée et qu'il n'y a pas d'obstacles dans
la zone de basculement de la porte.
• NE PAS quitter la porte des yeux tant qu'elle n'est pas fermée, et n'autoriser personne à stationner dans la zone de
basculement de la porte.
SKU:8747EML-03
ML700, ML750, ML850
ML500 > 06.2006
2002 - 05.2005 = 747EML
1
2
3
Système d'accès
sans clé
FR
i
03 87 95 39 28
108mm,
Installation
typique
Face avant de la porte
de garage dans le cas
d’une porte d’un seul
tenant ou sectionnelle
Chant du montant
de porte (option)
Face avant du montant
de porte(uniquement pour
porte sectionnelle)
Le système d'accès sans clé
doit être installé à portée
de vue de la porte.
Trou de
fixation au bas
Pile
Couvercle du
compartiment
de la pile
4 1/4"

nl
Kenmerken
Kan worden gebruikt in combinatie met garagedeuraandrijvingen
ML500, ML700, ML750, ML850, GPD60,GPD65 en GPD80.
Persoonlijk wachtwoord: tot wel 10.000 combinaties mogelijk.
Wachtwoord kan naar wens eenvoudig worden gewijzigd.
Rolling code: terwijl het eigen wachtwoord tot de wijziging door de
gebruiker gelijk blijft, verandert de code van het zendcodeslot en de
ontvanger tijdens elk gebruik en maakt daarbij geheel willekeurig
gebruik van een pool van 100 miljarden nieuwe codes.
Functiewijze:Opener wordt geactiveerd, zodra het 4-cijferige wachtwoord worden ingevoerd en de ENTER-toets (ENTER) wordt ingedrukt.
Wanneer per ongeluk verkeerde cijfers worden ingevoerd, kan een correctie meteen worden uitgevoerd. De ENTER-toets verzendt alleen de
vier laatste, ingevoerde cijfers. Het toetsenbord knippert ca. 15 seconden lang nadat het wachtwoord is verzonden. Gedurende deze tijd kan
de ENTER-toets worden gebruikt om de deurbeweging te stoppen of
om te keren. De radiografische blokkering bij openers met een multifunctionele wandconsole is bedoeld om de bediening van de deur met
draagbare zenders te verhinderen. De deur kan echter worden
geopend en gesloten met de wandschakelaar en het codeslot.
Instellen van het persoonlijke toegangswachtwoord
Wij adviseren het wachtwoord nu te programmeren, nog voordat u
het zendcodeslot installeert. U kunt dan de ontvangst op de gewenste
bevestigingsplaats testen voordat u verder gaat.
Sleutelloos toegangssysteem rolling code-model 8747EML
1. Druk eenmaal kort op de leerknop bij de
motorkop. De LED zal gedurende 30 seconden continu branden.
2. Binnen deze 30 seconden voert u een 4cijferig persoonlijk PIN-nummer naar keuze in.
Houd vervolgens de ENTER-toets ingedrukt.
3. Zodra de openerverlichting begint te knipperen, kunt u de ENTER-toets loslaten. De
code is opgeslagen. Wanneer er geen gloeilampen ingebouwd zijn, wordt u geattendeerd
op het succesvol opslaan door een tweevoudig
klikgeluid.
Gebruik van de LEER-knop
Om mogelijk zwaar of fataal letsel door een bewegende deur te
vermijden:
• Installeer het zendcodeslot in het zichtveld van de garagedeur,
buiten bereik van kinderen, op een hoogte van minimaal 1,50
meter en op veilige afstand van alle bewegende delen van de
deur.
• Berg de afstandsbedieningen ALTIJD buiten bereik van
kinderen op. Laat kinderen nooit de deur bedienen of met de
afstandsbedieningen spelen.
• Activeer de deur ALLEEN wanneer u de deur kunt zien, deze
correct ingesteld is en er zich geen hindernissen in het
draaibereik van de deur bevinden.
• Observeer deuren ALTIJD zolang tot deze compleet gesloten
zijn en laat niemand toe tot het draaibereik van de deur.
INSTALLATIE
1. Kies een geschikte plaats voor de
installatie. Voer de inbouw uit op een
plek buiten bereik van kinderen op een
hoogte van minimaal 1,50 meter en op
veilige afstand van alle bewegende
delen van de garagedeur. Bij een eendelige deur kiest u een geschikte montageplek (zie afbeelding) om
beschadigingen te vermijden, wanneer
de deur naar boven en naar buiten kantelt. Test vanaf de gekozen plaats of de
opener het signaal van het zendcodeslot
ontvangt. Indien noodzakelijk wijzigt u de
positie.
2. Verwijder de batterijdeksel, zodat de onderste montagevoorziening bereikbaar is. Schuif
de deksel omlaag om deze te verwijderen.
Verwijder de batterij.
3. Centreer het toetsenbord op ooghoogte op
de gekozen plaats. Breng in het midden en
10,80 cm boven de onderzijde een merkteken
aan en boor een gat met een diameter
van 3,2 mm. Draai de bovenste montageschroef er dusdanig in dat deze 3,2
mm uit de wand steekt. Plaats het toetsenbord op de schroefkop en zorg voor
pasnauwkeurigheid. Teken nu het onderste boorgat af bij een geopende deksel.
Verwijder het toetsenbord en boor het
onderste gat (3,2 mm). Breng het toetsenbord opnieuw aan en voltooi de
montage door het vastdraaien van de
onderste schroef. Let er tijdens het vastdraaien op dat de kunststof behuizing
niet beschadigd wordt. Schroef niet te
vast aandraaien. Plaats de batterij weer
terug en sluit het batterijvak. Om het
batterijvak te sluiten, schuift u de deksel
omhoog tot deze vergrendelt.
Wijzigen van een bekend PIN-nummer
Is het bestaande PIN-nummer bekend, kan deze door iemand worden
gewijzigd zonder gebruik te maken van een ladder.
1. Druk de vier toetsen van de huidige PIN in en houd vervolgens de #toets ingedrukt. De opener zal tweemaal knipperen. Laat de #-toets
weer los.
2. Voer de nieuwe 4-cijferige PIN in en druk vervolgens op ENTER.
De aandrijvingsverlichting knippert eenmaal, wanneer de code
ingesteld is. Test de correcte werking door het invoeren van de nieuwe
PIN en vervolgens op ENTER te drukken. De garagedeur moet gaan
bewegen.
De batterij van het zendcodeslot
De batterij moet een minimumlevensduur van een
jaar hebben. Vervang de batterij zodra de verlichting zwakker wordt of na een invoer niet meer
brandt. Voer de batterij af op correcte wijze.
Om mogelijk zwaar of fataal letsel te vermijden:
• Houd kleine kinderen uit de buurt van batterijen.
• Wanneer batterijen worden ingeslikt, meteen een arts
raadplegen.
SKU:8747EML-03
114A3687
ML700, ML750, ML850
ML500 > 06.2006
2002 - 05.2005 = 747EML
1
2
3
Sleutelloos
toegangssysteem
108mm,
4 1/4"
Typische
installatie
Voorzijde deurkozijn
(alleen bij sectionaaldeur)
Het sleutelloze toegangssysteem moet in
het zichtveld van de deur
worden geinstalleerd
Onderste
bevestigingsgat
Batterij
Batterij deksel
Voorzijde garage
bij eendelige deur
of sectionaaldeur
Rand deurkozijn
(optioneel)
NL
i
020 684 7978

it
Caratteristiche
Può essere utilizzato con i sistemi di automazione per porta garage
(apriporta) ML500, ML700, ML750, ML850, GPD60, GPD65 et GPD80.
Password personale: fino a 10.000 combinazioni possibili. La password può essere modificata a piacere e con facilità.
Rolling Code: mentre la propria password rimane sempre la stessa
fino alla sua modifica da parte dell’utilizzatore, il codice della tastiera a
codice radio e dell’apparecchio ricevente cambia ogni volta che si
aziona l’apriporta. I nuovi codici illimitatamente disponibili a tale scopo,
sono 100 miliardi.
Modalità di funzionamento: l’apriporta si attiva non appena si
inserisce la password a 4 cifre e si preme il tasto ENTER (ENTER).
Nel caso in cui si inseriscano per sbaglio numeri non corretti, è possibile effettuare subito una correzione. Il tasto ENTER trasmette soltanto
i quattro numeri inseriti per ultimi. La tastiera lampeggia per 15 secondi
circa dopo che la password è stata trasmessa. In questo lasso di
tempo è possibile utilizzare il tasto ENTER per arrestare la porta
garage o per invertirne il movimento. La funzione di blocco negli apriporta con pannello di comando multifunzione è stata predisposta per
impedire il comando della porta garage con telecomandi portatili. Si
può tuttavia aprire e chiudere la porta con il pulsante di comando a
parete e con la tastiera a codice radio.
Impostazione della password personale di accesso
Si raccomanda di programmare la password a questo punto, ovvero
prima di installare la tastiera a codice radio. Si può fare una prova di
ricezione sul punto di fissaggio stabilito prima di procedere oltre.
Sistema di accesso senza chiavi Rolling Code modello 8747EML
1. Premere una volta brevemente il pulsante di
programmazione sulla testa del motore. Il LED
resterà acceso per 30 secondi senza interruzione.
2. Entro questi 30 secondi inserire un codice
PIN personale di 4 cifre a piacere. Quindi
tenere premuto il tasto ENTER.
3. Non appena la luce dell’apriporta inizia a
lampeggiare, si può rilasciare il tasto ENTER.
Il codice è stato memorizzato. Se la lampadina
non è installata, l’avvenuta programmazione è
segnalata da un doppio scatto.
Utilizzo del pulsante di programmazione
Per escludere la possibilità di lesioni gravi o mortali provocate
dalla porta garage in movimento
• Installare la tastiera a codice radio in un punto con visuale
sulla porta garage, fuori dalla portata dei bambini, ad un’altezza
di almeno 1,50 metri e ad una distanza di sicurezza da tutte le
parti in movimento della porta.
• Tenere SEMPRE i telecomandi fuori dalla portata dei bambini.
Non consentire mai ai bambini di azionare o giocare con i telecomandi.
• Azionare l’apriporta SOLTANTO quando la porta garage è visibile, correttamente regolata e quando non si trovano ostacoli
nell’area di movimento della porta.
• Tenere SEMPRE la porta garage sotto osservazione fino a
che è completamente chiusa e non consentire a nessuno di
sostare nell’area di movimento della porta.
INSTALLAZIONE
1. Scegliere un posto adatto per l’installazione. Effettuare l’installazione in un
punto fuori dalla portata dei bambini, ad
un’altezza minima di 1,50 metri e ad
una distanza di sicurezza da tutte le
parti in movimento della porta garage.
In caso di porta monoblocco scegliere
un posto adatto per il montaggio (v.
figura) tale da escludere ogni possibilità
di danni quando la porta si muove
verso l’alto e verso l’esterno. Dal posto
scelto verificare se l’apriporta riceve il
segnale della tastiera a codice radio. Se necessario, cambiare la posizione.
2. Togliere il coperchio della batteria per
accedere al dispositivo di montaggio inferiore.
Spingere il coperchio verso il basso per
toglierlo. Estrarre la batteria.
3. Centrare la tastiera all’altezza degli occhi
sul posto scelto. Apporre un segno al
centro e 10,80 cm sopra il bordo inferiore, quindi praticare un foro di 3,2 mm.
Avvitare la vite di montaggio superiore in
modo che sporga 3,2 mm dalla parete.
Infilare la tastiera sulla testa della vite e
posizionarla con precisione. Apporre ora
un segno per il foro inferiore con il coperchio aperto. Togliere la tastiera e praticare il foro inferiore (3,2 mm). Infilare di
nuovo la tastiera e completare il montaggio stringendo la vite inferiore e
facendo attenzione a non danneggiare
la scatola di plastica. Non stringere
eccessivamente la vite. Inserire di nuovo
la batteria e chiudere il vano della batteria spingendo il coperchio verso l’alto
fino al blocco in posizione.
Modifica di un codice PIN noto
Se si conosce il codice PIN esistente, questo può essere modificato da
una persona senza necessità di usare una scala.
1. Premere i quattro tasti del codice PIN attuale, quindi tenere premuto il
tasto #. La luce dell’apriporta lampeggia due volte. Rilasciare il tasto #.
2. Inserire il nuovo codice PIN a 4 cifre e quindi premere il tasto
ENTER.
Se il codice è stato impostato, la luce dell’apriporta lampeggia una volta.
Verificare il corretto funzionamento inserendo il nuovo codice PIN e premendo poi il tasto ENTER. La porta garage si deve mettere in movimento.
Batteria della tastiera a codice radio
La batteria deve avere una durata minima di un
anno. La batteria va sostituita non appena la luce
diventa più debole o se non si accende più dopo
un inserimento. Smaltire la batteria come previsto
dalle norme.
Per escludere la possibilità di lesioni gravi o mortali
• Tenere le batterie fuori dalla portata dei bambini.
• In caso di ingestione delle batterie, consultare immediata
mente un medico.
SKU:8747EML-03
ML700, ML750, ML850
ML500 > 06.2006
2002 - 05.2005 = 747EML
1
2
3
Sistema di accesso
senza chiavi
IT
i
02 303 52 006
108mm,
Installazione
tipica
Lato anteriore
garage con porta
monoblocco o
sezionale
Bordo montante
porta (opzionale)
Fronte montante porta
(solo porta sezionale)
Il sistema di accesso senza chiavi
deve essere installato in un punto
con visuale sulla porta
Foro fissaggio inferiore
Batteria
Coperchio
vano batteria
4 1/4"

es
Características
Se puede utilizar con los automatismos para puertas de garaje ML500,
ML700, ML750, ML850, GPD60, GPD65 et GPD80.
Contraseña personalizada: existen hasta 10.000 combinaciones posibles. La contraseña se puede modificar sencillamente cuando se
desee.
Código dinámico: mientras que la propia contraseña no varia hasta
que el usuario la modifique, el código de la cerradura por radio y del
receptor se cambia cada vez que se accione y al hacerlo, accede
aleatoriamente a un registro de 100 mil de millones de códigos
nuevos.
Funcionamiento: el abridor se activa en cuanto se introduzca una
contraseña de 4 cifras y se pulse la tecla INTRO (ENTER). Si por
equivocación, se introdujeran números erróneos, se puede llevar a
cabo una corrección inmediata. La tecla INTRO transmite sólo las últimas cuatro cifras introducidas. El teclado parpadea durante unos 15
segundos después de haber transmitido la contraseña. Durante este
espacio de tiempo, se puede utilizar la tecla INTRO para detener o
invertir el desplazamiento de la puerta. El bloqueo de la radiofrecuencia en abridores con control para pared multifuncional se ha previsto
para impedir el manejo de la puerta con emisores portátiles. No
obstante, la puerta se puede abrir y cerrar con el interruptor mural y la
llave digital.
Crear una contraseña personal de acceso
Le recomendamos programar en este momento la contraseña, incluso
antes de instalar la cerradura por código de radio. Entonces, puede
comprobar la recepción en el puesto de soporte previsto antes de proseguir.
Sistema de acceso sin llave código dinámico modelo 8747EML
1. Pulse una vez brevemente el botón de registro en culata de motor. El LED se iluminará
permanentemente durante 30 segundos.
2. En el transcurso de dichos 30 segundos, se
deberá introducir un número PIN personal de
cuatro dígitos a su elección. A continuación
mantenga la tecla INTRO pulsada.
3. En cuanto empiece a parpadear la iluminación del automatismo, puede soltar la tecla
INTRO. El código queda entonces registrado. Si
no se ha instalado ninguna bombilla, se apreciará un clic doble que le indica que el registro ha
sido correcto.
Utilización del botón de REGISTRO
Para evitar posibles lesiones graves o incluso la muerte debido
a una puerta en movimiento:
• Instale la cerradura por código de radio a la vista de la puerta
de garaje, fuera del alcance de niños, a una altura de 1,50 metros como mínimo y a una distancia segura con todas las piezas
móviles de la puerta.
• Conserve los mandos a distancia SIEMPRE fuera del alcance
de los niños. No permita en ningún caso que los niños manejen
o jueguen con los mandos a distancia.
• Active la puerta SÓLO si puede apreciar que está correctamente ajustada y no existe ningún obstáculo en el alcance de
giro de la puerta.
• Observe la puerta SIEMPRE lo necesario hasta que quede
completamente cerrada y no permita que nadie se halle en el
alcance de giro de la puerta.
INSTALACIÓN
1. Elija un lugar adecuado para la
instalación. Efectúe el montaje en un
lugar que se halle fuera del alcance
de los niños con una altura mínima de
1,50 metros y a una distancia segura
con todas las piezas móviles de la
puerta de garaje. Con una puerta de
una sola pieza, elija un espacio de
montaje adecuado (véase figura) para
evitar deterioros si la puerta oscila
hacia arriba o hacia el exterior.
Compruebe en el lugar elegido si el
abridor recibe la señal de la cerradura
por código de radio. En caso necesario, modifique la posición.
2. Retire la tapa de la batería para acceder al
dispositivo inferior de montaje. Deslice la
cubierta hacia abajo para retirarla. Retire la
batería.
3. Coloque el teclado centrado a la altura de
los ojos en el lugar elegido. Señale una
marca en el centro y a 10,80 cm por
encima del borde inferior y taladre un
agujero de 3,2 mm. Gire el tornillo superior de montaje, de tal forma que sobresalga 3,2 mm de la pared. Posicione el
teclado en la cabeza del tornillo y
asegúrese que el ajuste sea preciso.
Señale entonces el agujero inferior en la
cubierta abierta. Retire el teclado y taladre el agujero inferior (3,2 mm). Vuelva
a insertar el teclado y complete el montaje apretando el tornillo inferior. Al apretar, compruebe que no se dañe la carcasa de plástico. No apriete el tornillo
demasiado fuerte. Vuelva a colocar la
batería y cierre el compartimento para
baterías. Para cerrar el compartimento
para baterías, deslice la cubierta hacia
arriba hasta que encaje.
Modificar un número PIN conocido
Si se sabe el número PIN existente, se puede modificar por una persona sin que se requiera escalera.
1. Pulse las cuatro teclas del PIN actual, mantenga entonces la tecla #
pulsada. El abridor parpadea dos veces. Suelte la tecla # de nuevo.
2. Introduzca el PIN de cuatro cifras y pulse a continuación INTRO.
La iluminación del automatismo parpadea una vez si el código está
ajustado. Compruebe el correcto funcionamiento introduciendo el
nuevo PIN y pulse entonces INTRO. La puerta de garaje se debería
desplazar.
La batería de la cerradura por código de radio
La batería debería tener una vida útil de un año
como mínimo. Sustituya la batería en cuanto la iluminación sea más tenue y no se ilumine después
de pulsar una vez. Deseche la batería usada
debidamente.
Para evitar posibles lesiones graves e incluso la muerte:
• Mantenga a las baterías fuera del alcance de los niños.
• En caso de ingerir una batería, consulte a su médico de
inmediato.
SKU:8747EML-03
ML700, ML750, ML850
ML500 > 06.2006
2002 - 05.2005 = 747EML
1
2
3
Sistema de accesso
sin llave
ES
i
900 34 66 35
108mm,
Orificio de
montaje de
la parte inferior
4 1/4"
Instalación
típica
Parte delantera del
garaje con puerta de
una sola pieza o
puerta seccional
Borde de batiente
de puerta (opcional)
Frente de batiente de puerta
(sólo en puerta seccional)
El sistema de accesso sin llave se
deberá instalar al alance de la
vista de la puerta
Bateria
Tapa para
bateria

pt
Características
Pode ser usado com os automatismos de portões de garagem ML500,
ML700, ML750, ML850, GPDD60, GPD65, GPD80.
Palavra-passe pessoal: Até 10 000 combinações possíveis. A
palavra-passe pode ser facilmente alterada sempre que se quiser.
Código aleatório: Enquanto que a palavra-passe se mantém inalterada, até o utilizador a modificar, os códigos da fechadura com código
rádio e do receptor alteram-se a cada activação, seleccionando um
código novo de entre um universo de 100 mil milhões possíveis.
Modo de funcionamento: O contacto NF é activado, assim que a
palavra-passe de 4 dígitos é introduzida e a tecla ENTER premida. Se
os algarismos introduzidos estiverem errados, pode ser imediatamente
efectuada uma correcção. A tecla ENTER apenas transmite os quatro
últimos algarismos introduzidos. O teclado pisca durante aprox. 15
segundos depois de a palavra-passe ter sido transmitida. Durante este
tempo, a tecla ENTER pode ser utilizada para parar ou inverter o movimento do portão. O bloqueio por radiofrequência em contactos NF com
botoneira multifunções tem como função evitar o controlo do portão
através de emissores portáteis. No entanto, é possível abrir e fechar o
portão com o interruptor de parede e com a fechadura com código.
Definição de uma palavra-passe pessoal de acesso
Aconselhamos que programe agora a palavra-passe, ainda antes de
instalar a fechadura com código rádio. De seguida, pode testar a
recepção do sinal a partir do local de suporte previsto antes de
prosseguir com a instalação.
Sistema de acesso sem chave com código aleatório modelo 8747EML
1. Prima uma vez o botão Programar localizado na cabeça do motor. O LED fica aceso
durante 30 segundos.
2. No período desses 30 segundos, introduza
um número PIN pessoal de 4 dígitos à sua
escolha. Depois mantenha a tecla ENTER premida.
3. Assim que a luz do automatismo começar a
piscar, pode soltar a tecla ENTER. O código já
está programado. Se não estiverem instaladas
quaisquer lâmpadas incandescentes, um
duplo clique avisa-o sobre uma programação
bem sucedida.
Utilização do botão PROGRAMAR
Para evitar possíveis lesões graves ou fatais resultantes do
movimento do portão:
• Instale a fechadura com código rádio de forma a ser visível a
partir do portão da garagem, a estar fora alcance das crianças,
a uma altura mínima de 1,50 m e a uma distância segura de
todas as partes móveis do portão.
• Guarde SEMPRE os controlos remotos fora do alcance das
crianças. Nunca permita que crianças utilizem ou brinquem
com os controlos remotos.
• Active os portões APENAS quando tiver a certeza de que
estes se encontram correctamente ajustados e de que não
existem quaisquer obstáculos na área de movimentação do
portão.
• Controle SEMPRE os portões até eles se fecharem completamente, não permitindo que ninguém se mantenha na área de
movimentação do portão.
INSTALAÇÃO
1. Seleccione um local adequado para
a instalação. Monte o sistema num
local fora do alcance das crianças, a
uma altura mínima de 1,50 m, e a
uma distância segura de todas as
peças móveis do portão da garagem.
No caso de um portão de uma folha,
seleccione um local de montagem
apropriado (ver figura), de forma a
evitar danos quando o portão se
deslocar para cima e para fora. Teste,
a partir do local pretendido, se o contacto NF recebe o sinal da fechadura com
código rádio. Se necessário, altere a posição.
2. Retire a tampa do compartimento da pilha
de forma a aceder ao dispositivo de montagem inferior. Pressione a cobertura para
baixo, a fim de a desmontar. Retire a pilha.
3. Centre o teclado à altura dos olhos no local
pretendido. Faça uma marca a meio, a 10,80
cm acima da aresta inferior, e faça um furo
com 3,2 mm de diâmetro. Aperte o parafuso de montagem superior até ele
sobressair 3, 2 mm da parede.
Posicione o teclado na cabeça do parafuso, tendo cuidado de verificar se fica
bem ajustado. Com a cobertura aberta,
marque o furo inferior. Retire o teclado e
faça o furo inferior (3,2 mm). Encaixe
novamente o teclado e complete a montagem apertando o parafuso inferior. Ao
apertar, tenha cuidado para não partir a
caixa de plástico. Não aperte demasiado o parafuso. Volte a colocar a pilha, e
feche o respectivo compartimento. Para
fechar o compartimento da pilha, faça
deslizar a cobertura até engatar.
Alteração de um número PIN conhecido
O número PIN, caso seja conhecido, pode ser alterado por uma pessoa, sem ser necessária a intervenção do administrador.
1. Marque o PIN actual e mantenha a tecla # premida. O contacto NF
pisca duas vezes. Solte novamente a tecla #.
2. Introduza o novo PIN de 4 dígitos e, de seguida, prima ENTER.
A luz do automatismo pisca uma vez assim que o código for definido.
Verifique se funciona correctamente, introduzindo o novo PIN e premindo a tecla ENTER. O portão de garagem tem de se mover.
Pilha da fechadura com código rádio
A pilha deve ter uma vida útil mínima de um ano.
Substitua a pilha assim que a luz começar a ficar
mais fraca ou não se acender ao carregar numa
tecla. As pilhas usadas devem ser colocadas no pilhão.
Para evitar possíveis lesões graves ou fatais:
• Mantenha as pilhas fora do alcance das crianças.
• Se engolir uma pilha, consulte imediatamente um médico.
SKU:8747EML-03
ML700, ML750, ML850
ML500 > 06.2006
2002 - 05.2005 = 747EML
1
2
3
Sistema de acesso
sem chave
108mm,
Instalação
típica
Frente da garagem
no caso de um portão
de uma folha ou de
um portão seccional
Rebordo do pilar
do portão (opcional)
Face frontal do pilar do portão
(apenas em portões seccionais)
O sistema de acesso sem chave
tem de ser instalado dentro do
campo de visão do portão
Orificio de
fixação inferior
Pilha
Tampa do
compartimento da pilha
4 1/4"
PT
i
(+49) 6838/907 100

sv
Särskilda kännetecken
Kan användas i kombination med garageportöppnare av typ ML500,
ML700, ML750 ML850, GPD60, GPD65 och GPD80.
Personligt lösenord: Upp till 10 000 kombinationer är möjliga. Vid
behov kan lösenordet snabbt ändras.
Rullande kod: Medan det egna lösenordet förblir detsamma tills det
ändras av användaren, ändras koden till det trådlösa kodlåset och mottagaren vid varje användning. Systemet väljer ut en valfri kod ur en
samling på 100 miljarder nya koder.
Funktionssätt: Öppnaren aktiveras efter att det fyrsiffriga lösenordet
har angetts och ENTER-knappen (ENTER) har tryckts in. Om felaktiga
siffror har angetts av misstag kan dessa genast korrigeras. Efter att
ENTER-knappen har tryckts in överförs endast de fyra senaste siffrorna. Knappsatsen blinkar i ungefär 15 sekunder efter att lösenordet har
överförts. Under denna tid kan ENTER-knappen användas för att stoppa eller reversera portens rörelse. Radiospärren som aktiveras när multifunktions-väggpanelen öppnas ska förhindra att porten manövreras
med bärbara sändare. Porten kan dock öppnas och stängas med
brytaren på väggen och kodlåset.
Ställa in personligt lösenord
Vi rekommenderar att du nu programmerar in
ett nytt lösenord innan du installerar det trådlösa kodlåset. Därefter
kan du testa mottagningen vid den avsedda monteringsplatsen för
hållaren innan du fortsätter med installationen.
Inträde utan nyckel, modell 8747EML med rullande kod
1. Tryck in inlärningsknappen kort på motorns
kåpa. Lysdioden lyser kontinuerligt under 30
sekunders tid.
2. Ange ett valfritt fyrsiffrigt personligt identifieringsnummer (PIN) inom dessa 30 sekunder.
Håll därefter ENTER-knappen intryckt.
3. Släpp ENTER-knappen så snart öppnarens
belysning börjar blinka. Öppnaren har nu lärt
sig koden. Om inga glödlampor har satts in
kommer ett dubbelt klickljud att indikera att
inlärningen var framgångsrik.
Använda inlärningsknappen
• Förvara ALLTID fjärrkontrollen utom räckhåll för barn. Låt
aldrig barn använda eller leka med fjärrkontroller.
• Aktivera porten ENDAST om du kan se att den har ställts in
rätt och inga hinder finns inom portens rörelseområde.
• Håll ALLTID porten under uppsikt tills den har stängts komplett
och se till att inga personer vistas inom portens rörelseområde.
INSTALLATION
1. Välj en lämplig plats för installationen.
Installera utrustningen på en plats utom
räckhåll för barn på minst 1,50 m höjd
och med tillräckligt avstånd till garageportens alla rörliga delar. Vid en vipport
måste du välja en lämplig monteringsplats (se bild) för att undvika skador
när porten svängs uppåt och utåt. Testa
från den utvalda platsen att öppnaren
kan ta emot signalen från det trådlösa
kodlåset. Ändra på positionen vid behov.
2. Ta av batterilocket för att komma åt den
undre monteringsanordningen. Skjut locket
nedåt för att ta av det. Ta ut batteriet.
3. Centrera knappsatsen på ögonhöjd på den
utvalda platsen. Gör en markering i mitten
och 10,80 cm ovanför underkanten och borra
därefter ett 3,2 mm stort hål. Skruva in den
övre monteringsskruven så att dessa 3,2
mm skjuter ut ur väggen. Positionera
knappsatsen på skruvens skalle och se
till att den sitter rätt. Markera det undre
borrhålet medan locket är öppet. Ta av
knappsatsen och borra det undre hålet
(3,2 mm). Sätt på knappsatsen igen och
avsluta monteringen genom att dra åt
den undre skruven. Var försiktig så att
plastkåpan inte skadas när du drar åt
skruven. Dra inte åt skruven för hårt.
Lägg in batteriet igen och sätt på batterilocket. Stäng batterifacket genom att
skjuta locket uppåt tills det snäpper in.
Ändra ett känt PIN-nummer
Om ett befintligt PIN-nummer redan är känt, kan det ändras utan att en
stege behövs.
1. Tryck in de fyra knapparna för det aktuella PIN-numret och håll
sedan knappen # intryckt. Öppnaren blinkar två gånger. Släpp knappen
# igen.
2. Ange ett nytt fyrsiffrigt PIN-nummer och tryck sedan på ENTER.
Öppnarens belysning blinkar en gång när koden har ställts in.
Kontrollera att funktionen stämmer genom att ange det nya PIN-numret
och tryck sedan på ENTER. Garageporten måste nu köra.
Batteri till trådlöst kodlås
Batteriet ska hålla i minst ett år. Byt ut batteriet om belysningen börjar
försvagas eller om den inte längre lyser efter att du angett koden. Lämna
in batteriet till ett godkänt insamlingssystem.
Tänk på följande för att undvika allvarliga personskador eller dödsolyckor:
• Förvara batterier utom räckhåll för
småbarn.
• Uppsök genast läkare om någon har
svalt ett batteri.
Tänk på följande för att undvika allvarliga personskador
eller dödsolyckor medan en port stängs eller öppnas:
• Installera det trådlösa kodlåset inom synhåll för garageporten, utom räckhåll för barn, på minst 1,50 m höjd och på
säkert avstånd från portens alla rörliga delar.
Declaration of Conformity
The undersigned, hereby declare that the equipment specified
conforms to the Directives and Standards stated.
Model:...................................................................................................................8747EML
ETS 300 683, EN 300 220-3
- 2004/108/EC
- 1999/5/EC
Chamberlain GmbH
Alfred-Nobel-Str. 4
D-66793 Saarwellingen
May, 2008
Barbara P. Kelkhoff
Manager, Reg. Affairs
SKU:8747EML-03
114A3687B
ML700, ML750, ML850
ML500 > 06.2006
2002 - 05.2005 = 747EML
1
2
3
Inträde utan
nyckel
SV
(+49) 6838/907 100
i
108mm,
Undre
monteringshål
Batteri
4 1/4"
Typisk
installation
Garagets framsida
vid vipport eller
sektionsport
Kant til portstolpe (option)
Framsida till portstolpe
(endast vid sektionsport)
Inträde utan nyckel
måste installeras
inom synhåll för porten
Batterilock
 Loading...