

Page 1
Universal Radio Control Kit
Model 855CB
WARNING
Children operating or playing with a garage door
opener can injure themselves or others.
door could close and cause serious injury or death.
Install the receiver (or any additional push buttons)
out of the reach of children and away from all
moving parts of the door and door hardware,
where the garage door is visible.
children to operate the push button(s) or the remote
control transmitter(s).
A moving garage door could injure someone under
it.
Activate the opener only when the door is
properly adjusted, you can see it clearly, and there
are no obstructions to door travel.
Disconnect power to the garage door opener before
proceeding.
To comply with FCC and DOC rules, adjustment or modification of receiver
and/or transmitter is prohibited except for changing the code setting or
replacing the battery. THERE ARE NO OTHER USER SERVICEABLE
PARTS.
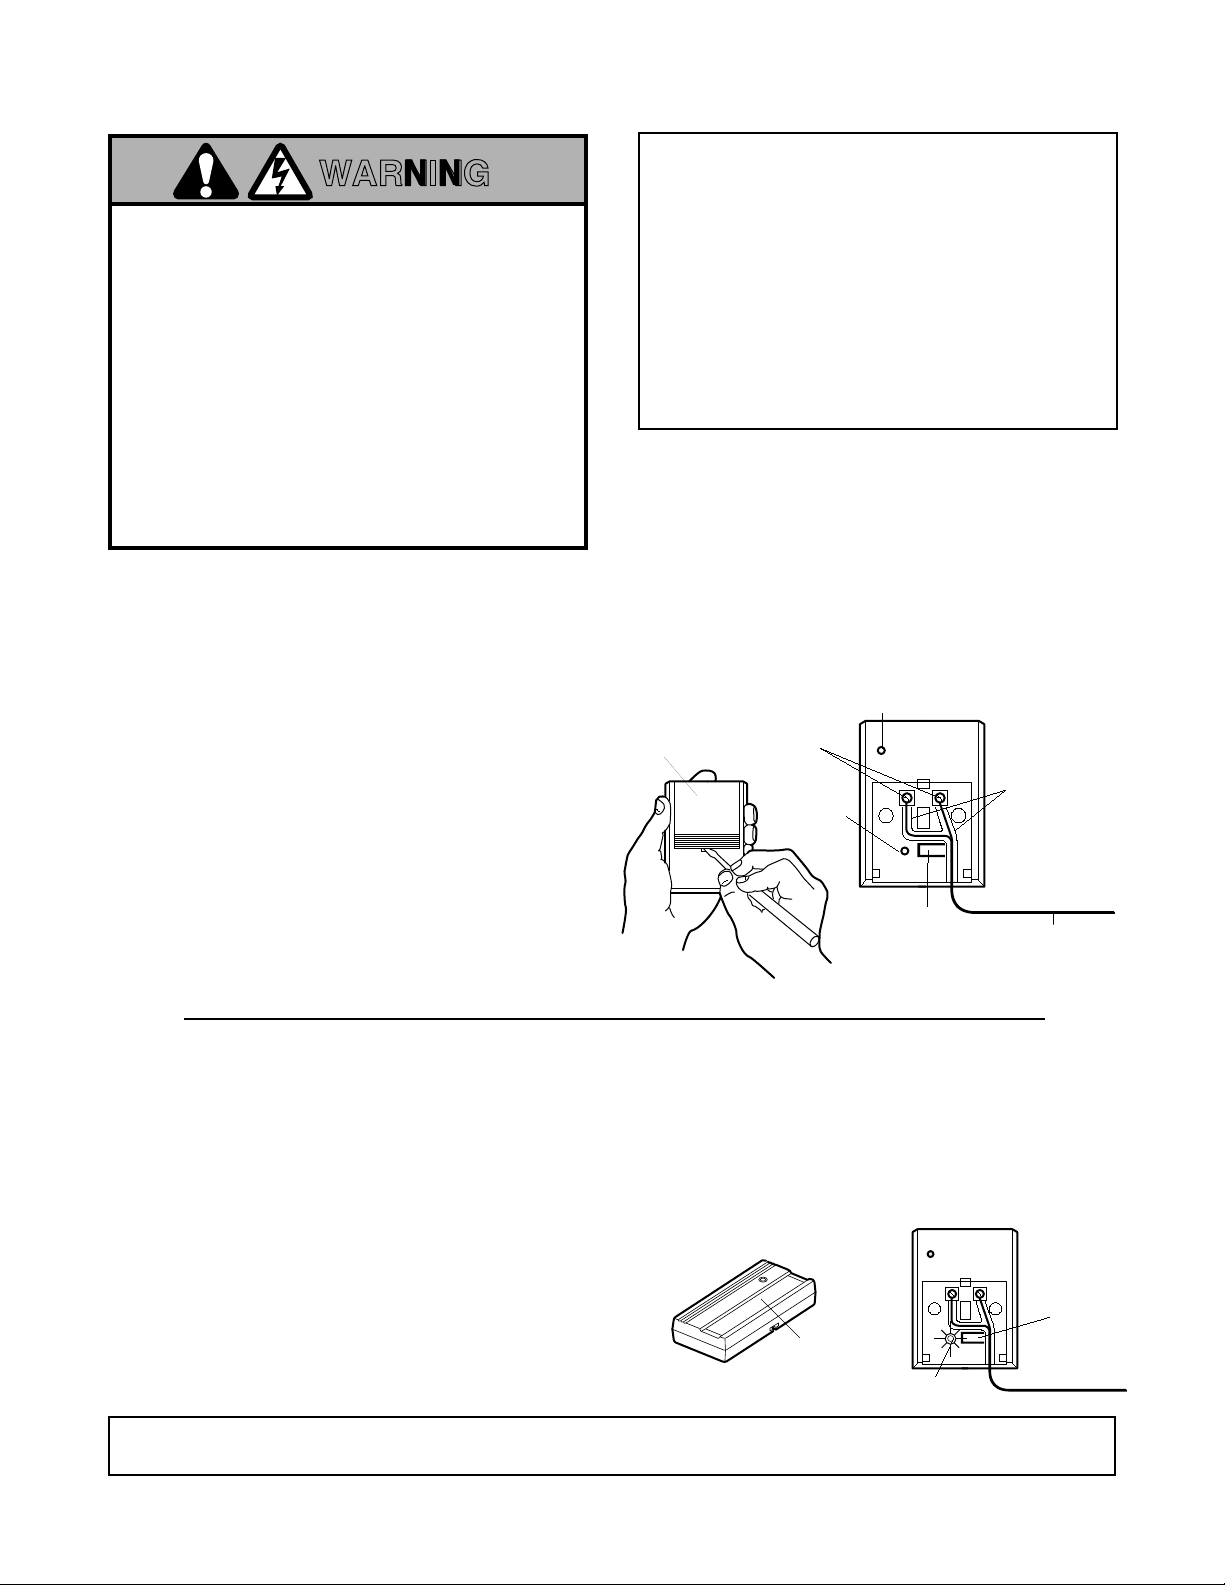
OPENER RECEIVER: Insert a small screwdriver in slot on
receiver front panel as shown. Twist up actuator cover.
CONNECT RECEIVER AND OPENER: Remove about 1/4"
of insulation from each end of the 2-strand bell wire.
Connect one end to the receiver screw terminals (polarity is
NOT required). Route wire along the channels and out the
bottom as shown.
Connect the other end of the bell wire to the two opener
terminal screws labeled “2” (white) and “1”(red), “common” and
“command” or the terminals used for the push button control.
Use insulated staples (not supplied) to secure bell wire
between receiver and opener. Length of bell wire depends on
where the receiver will be installed. Replace actuator cover.
Choose a 120Vac polarized outlet for the receiver which is
OUT OF THE REACH OF CHILDREN. Plug receiver into
selected outlet. Return power to the opener.
The garage
but
Do not allow
OWNER’S MANUAL
Some states prohibit the service or repair of garage door
openers whch cannot be made to comply with the safety
standards contained in UL 325 (either the1988 or 1992
revision). In order to comply with both the letter and the
spirit of these laws, Chamberlain
that this universal remote control not be used with any
Chamberlain
door opener manufactured prior to April 1, 1982, and that
it not be used with
state of New York. To find out if your Chamberlain-made
garage door opener was manufactured prior to or after
April 1, 1982, please call 1-800-528-9131 before
installing this universal remote control.
RADIO CONTROLS consist of a receiver and remote control
transmitter(s). The remote control sends a coded signal from
outside the garage. Inside the garage, the plug-in receiver
accepts the transmitted signal and starts the door opener.
IMPORTANT: Disable your existing receiver before
installing this replacement unit. If this is not possible,
locate receiver as far from original receiver as possible.
When installing two or more receivers in a garage,
position them at least 10 feet apart to prevent electronic
interference.
Actuator Cover
NOTICE TO U. S. CONSUMERS:
strongly recommends
®
, Lift-Master®, or Sears Craftsman®garage
any
garage door opener within the
Power Indicator Light
Terminals
"SMART"
Indicator
Light
"SMART"
Actuator
Bell Wire
Channels
Connect Bell Wire
To Garage Door
Opener Terminals
Bell Wire
The receiver and remote control(s) have been factory
preset with a matching code. THE REMOTE(S)
OPERATES FROM THE LARGE PUSH BUTTON. You
can activate your opener with as many as four
“SMART” remotes and one Touch Code remote.
If you purchase additional remote control transmitters to
operate this receiver:
1) Remove the receiver actuator cover.
2) Press and HOLD the selected remote push button
NOTE: If the remote control push button is not held
down until the receiver indicator light flashes, the
receiver will not learn the code.
To erase ALL remote codes from memory: Press and
HOLD receiver “SMART” actuator. Indicator light
alongside will glow. When the indicator light turns OFF
(in about 6 seconds) ALL codes will be erased.
Single Function
A
Remote Control
Universal Receiver
B
(Illustration A).
3) Then press the “SMART” actuator on the receiver
(Illustration B). The adjacent indicator light will FLASH.
Release the remote control push button.
The opener will now operate when either the receiver
actuator or the remote control push button is pressed.
Push button
Indicator Light
"SMART"
Actuator
REPLACEMENT PARTS: Remote Control housing only (no circuit board) - 41A3984-5; Visor clip - 29C128; Battery - 10A14;
Universal Receiver (complete) - 41A4161-3; Receiver Actuator Cover - 41A3591
114A1811B All Rights Reserved Printed in Mexico
©1994, The ChamberlainGroup, Inc.
 Loading...