

Page 1
SECURITY+® REMOTE CONTROLS
MODELS 371LM AND 373LM
Single Button Remote Control
Model 371LM
For use with garage door openers, gate operators or other products that are 315 MHz Security+®.
Compatible with garage door openers that have a purple learn button. The code between the remote
control and the receiver changes with each use, randomly accessing over a billion new codes. Refer
to your product manual for the location of the learn button.
NOTE: Your product may look different than the products illustrated in this manual.
3-Button Remote Control
Model 373LM
To prevent possible SERIOUS INJURY or DEATH from a moving gate or garage door:
• ALWAYS keep remote controls out of reach of children. NEVER permit children to operate,
or play with remote controls.
• Activate gate or door ONLY when it can be seen clearly, is properly adjusted, and there are
no obstructions to door travel.
• ALWAYS keep gate or garage door in sight until completely closed. NEVER permit anyone to
cross path of moving gate or door.
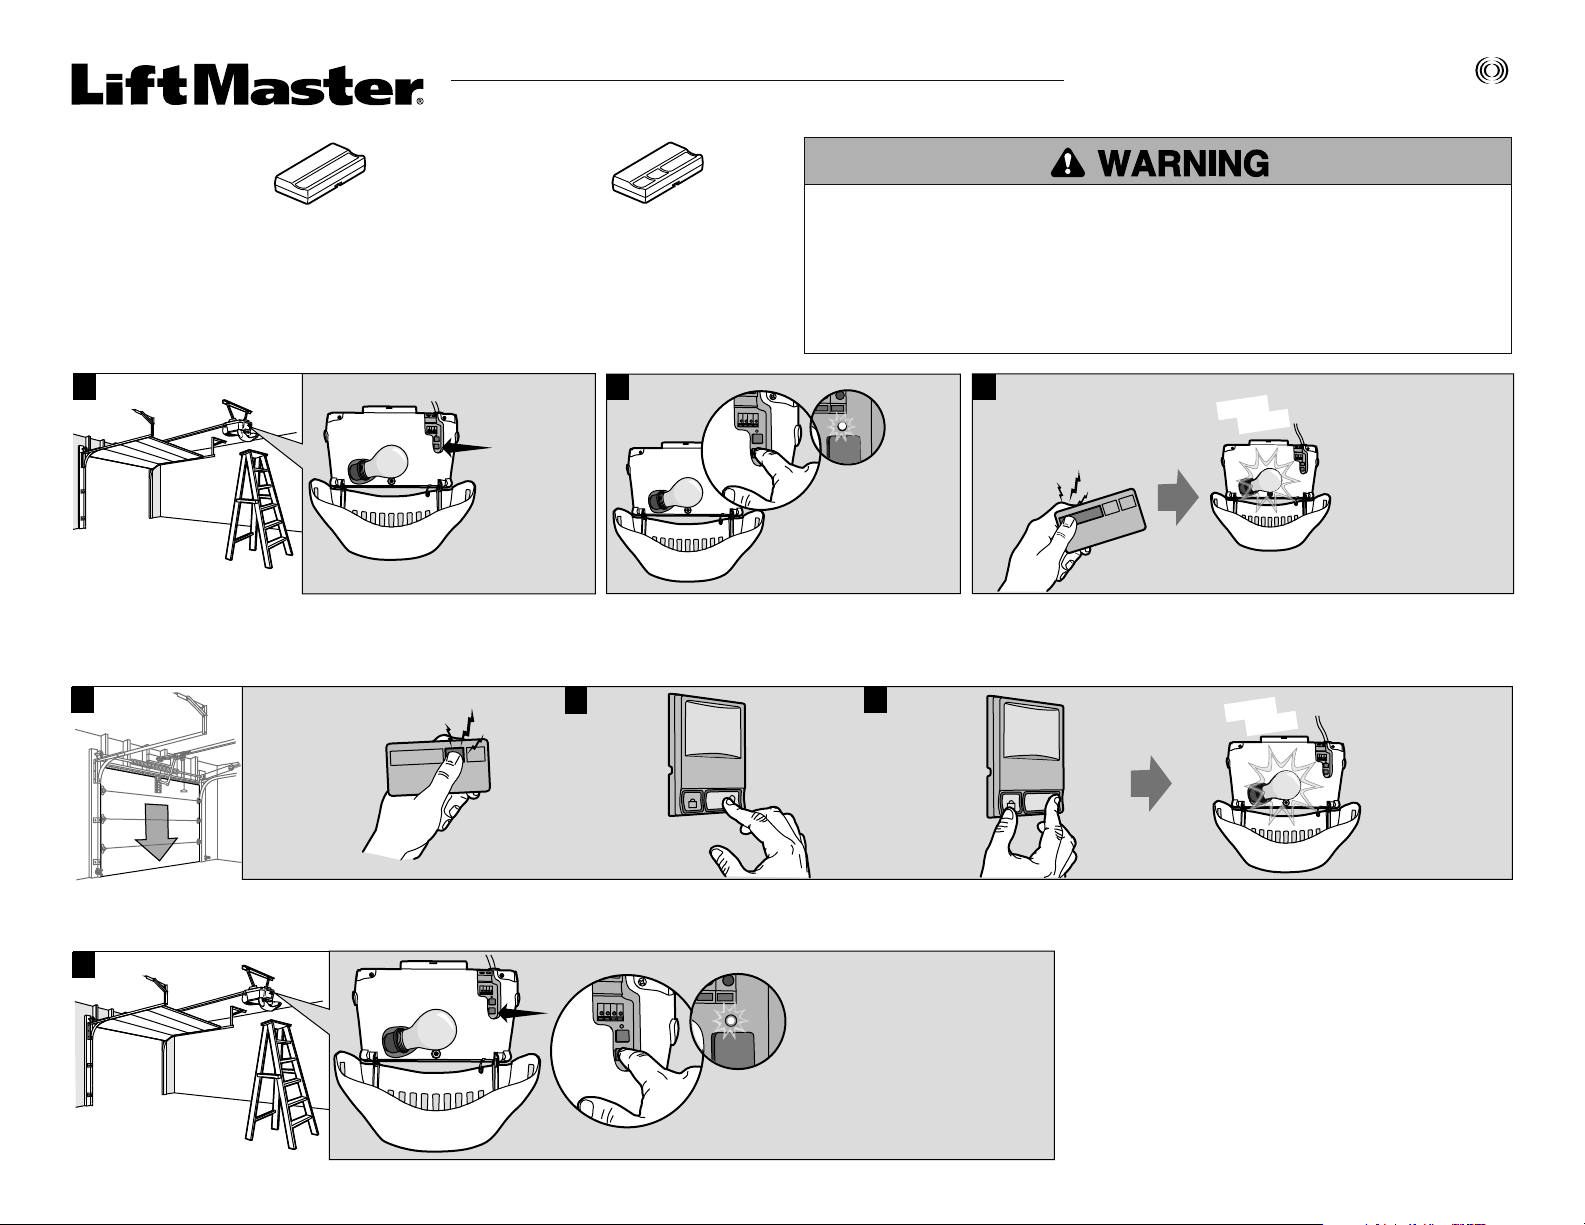
PROGRAMMING THE REMOTE CONTROL
1
Locate the
Smart/Learn
button.
2
Press and
immediately release
the learn button.
The learn LED will glow
steadily for 30 seconds.
Within 30 seconds...
3
Press and hold the button
on the remote control
that you wish to use.
“click”
“click”
Release the button
when the garage
door opener lights
blink or two clicks
are heard.
If programming to
other products,
press the button a
second time to
activate the product.
TO CONTROL THE GARAGE DOOR OPENER LIGHTS
This feature is only available on garage door openers equipped with a multi-function door control and a remote control with more than one button. Not available with universal receiver.
With Security+
1
®
remote controls, a remote control button can be programmed to operate the garage door opener lights without opening the door.
+
3
Press and
hold the
lock button
on the
door control.
LOCK
LIGHT
With the door closed,
press and hold
the remote
control button
that you want to
control the light.
+
2
Press and
hold the
light button
on the
door control.
LOCK
LIGHT
“click”
“click”
After the garage
door opener
lights flash,
release all
buttons.
TO ERASE ALL CODES FROM MEMORY
Test by pressing the remote control button. The garage door opener lights should turn on or off but the door should not move.
When deactivating any unwanted remote control code, all previous codes will be erased.
1
Press and hold the learn button
on garage door opener or other
product until the learn LED goes
out (approximately 6 seconds).
All previous codes are now erased.
Reprogram each remote control
you wish to use.
Page 2
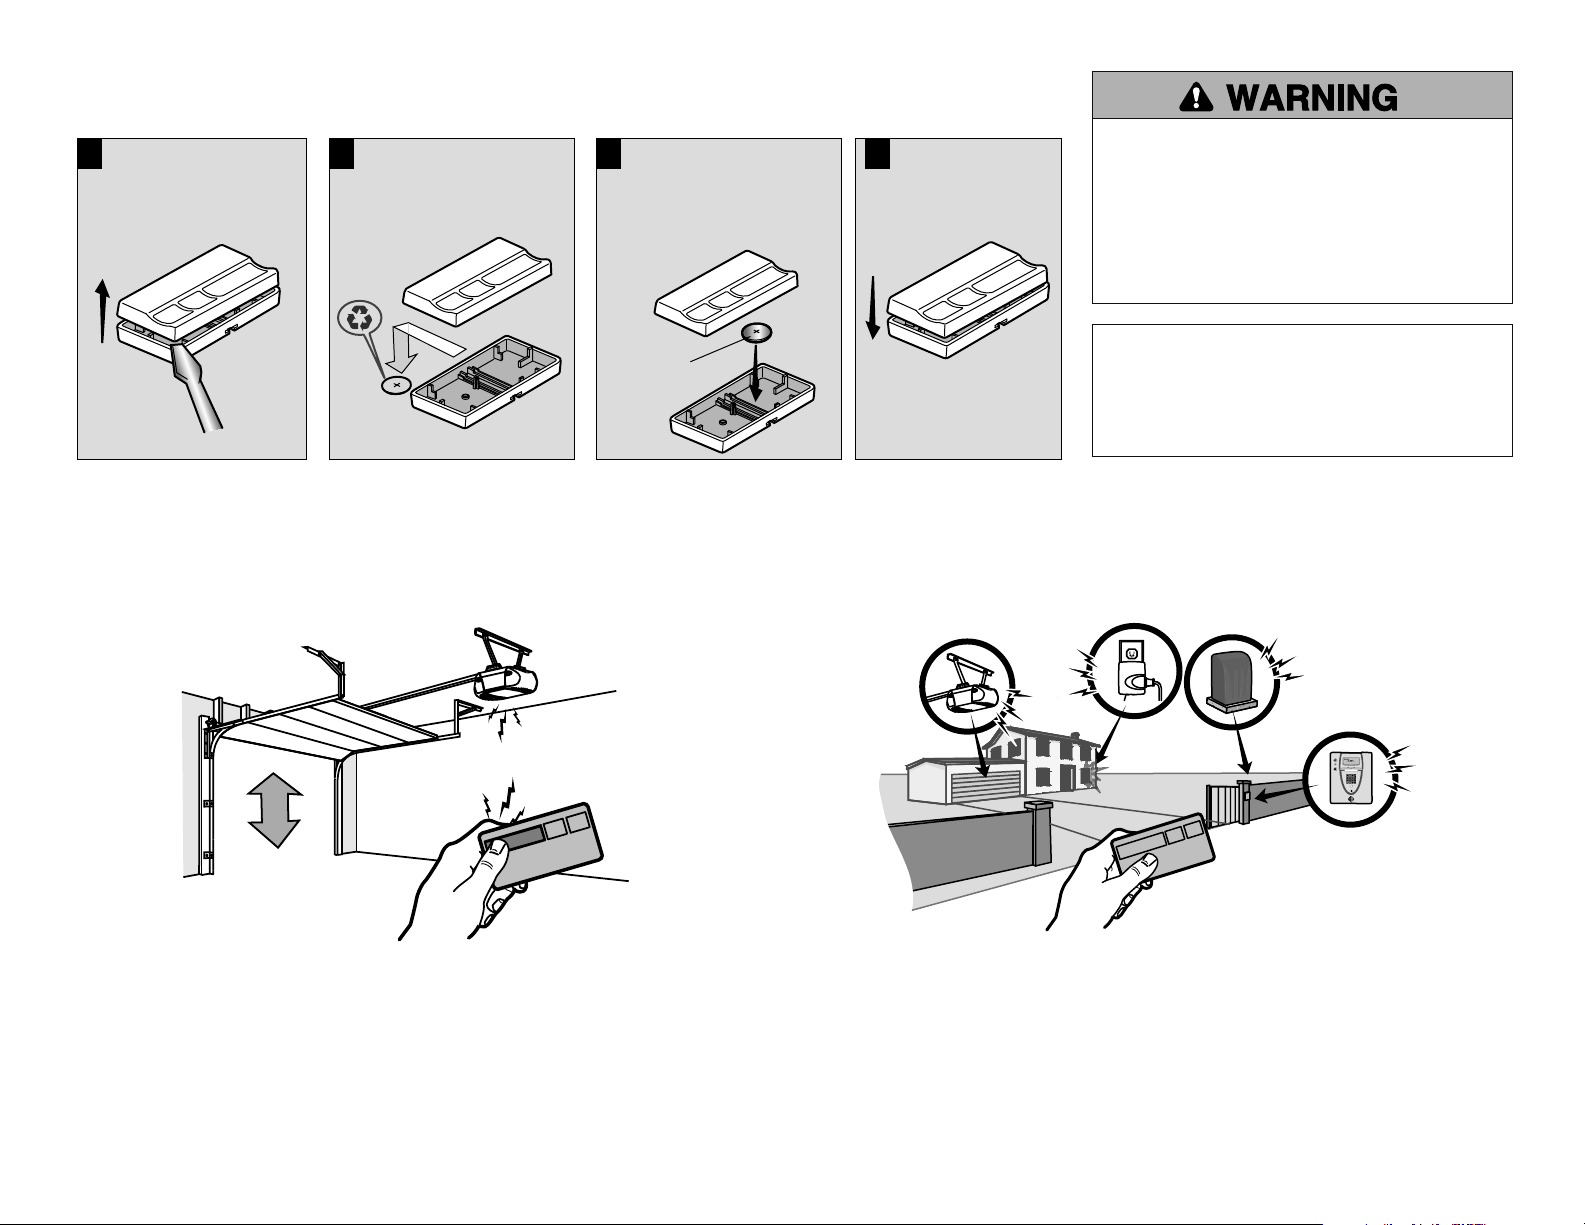
THE REMOTE CONTROL BATTERY
The lithium battery should produce power for up to 3 years. To replace battery:
1
Use the visor clip or
screwdriver to pry open
the cover.
2
Remove the old battery.
Dispose of old batteries
properly
.
3
Insert replacement batteries
positive side up. Replace
the batteries with only
3V CR2032 coin cell
batteries.
3V CR2032
4
Replace cover.
To prevent possible SERIOUS INJURY or DEATH:
• NEVER allow small children near batteries.
• If battery is swallowed, immediately notify doctor.
To reduce risk of fire, explosion or chemical burn:
• Replace ONLY with 3V CR2032 coin batteries.
• DO NOT recharge, disassemble, heat above 212°F
(100°C) or incinerate.
NOTICE: To comply with FCC and or Industry Canada rules (IC), adjustment
or modifications of this receiver and/or transmitter are prohibited, except for
changing the code setting or replacing the battery. THERE ARE
NO OTHER USER SERVICEABLE PARTS.
Tested to Comply with FCC Standards FOR HOME OR OFFICE USE. Operation
is subject to the following two conditions: (1) this device may not cause
harmful interference, and (2) this device must accept any interference
received, including interference that may cause undesired operation.
HOW TO USE THE REMOTE CONTROL
Press and hold the button down until the door or gate starts to move. The remote control will
operate from up to 3 car lengths away on typical installations.
Installations and conditions vary, contact an installing dealer for more information.
REPLACEMENT PARTS
3V CR2032 Lithium battery . . . . . . . . . . . . . . . . . . . . . . . . . . . . . . . . . . . . . . . . . . . . . . . . . . .10A20
Visor Clip (not available for mini-remote controls). . . . . . . . . . . . . . . . . . . . . . . . . . . . . . . . .29B137
3-BUTTON REMOTE CONTROLS
Additional buttons on any Security+® remote control or mini-remote control can be programmed
to operate other Security+
systems.
®
garage door openers, light controls, gate operators or access control
ONE YEAR LIMITED WARRANTY
LiftMaster warrants to the first retail purchaser of this product that is free from defect in materials
and/or workmanship for a period of 1 year from the date of purchase.
Page 3
SECURITY+® TÉLÉCOMMANDE
MODÈLES 371LM ET 373LM
Télécommande à un bouton
Modèle 371LM
Utilisation avec les ouvre-portes de garage, les dispositifs de fermeture de porte ou d'autres produits de la
gamme 315 MHz Security+
de couleur violette. Le code roulant entre ces bouton-poussoir et le récepteur change avec chaque usage,
accédant au hasard plus de 100 milliards de nouveaux codes. Reportez-vous au manuel de votre produit quant à
l'emplacement du bouton d'apprentissage.
REMARQUE : Vos produits peuvent sembler différents que les produits illustrés en ce manuel.
®
. Compatible avec les ouvre-portes de garage équipés d'un bouton d'apprentissage
Télécommande à 3 boutons
Modèle 373LM
Afin d’éliminer les risques de BLESSURES GRAVES ou DE MORT découlant de l’actionnement d’une clôture
ou d’une porte de garage :
• TOUJOURS garder les télécommandes hors de la portée des enfants. Ne JAMAIS laisser un enfant
manipuler une télécommande ni jouer avec elle.
• Actionner la clôture ou la porte UNIQUEMENT lorsqu’elle est clairement visible, correctement ajustée et
que le mécanisme est libre de toute entrave.
• TOUJOURS garder la clôture ou la porte de garage en vue jusqu’à sa fermeture complète. Ne permettez à
quiconque de passer lorsqu’une clôture ou une porte est en mouvement.
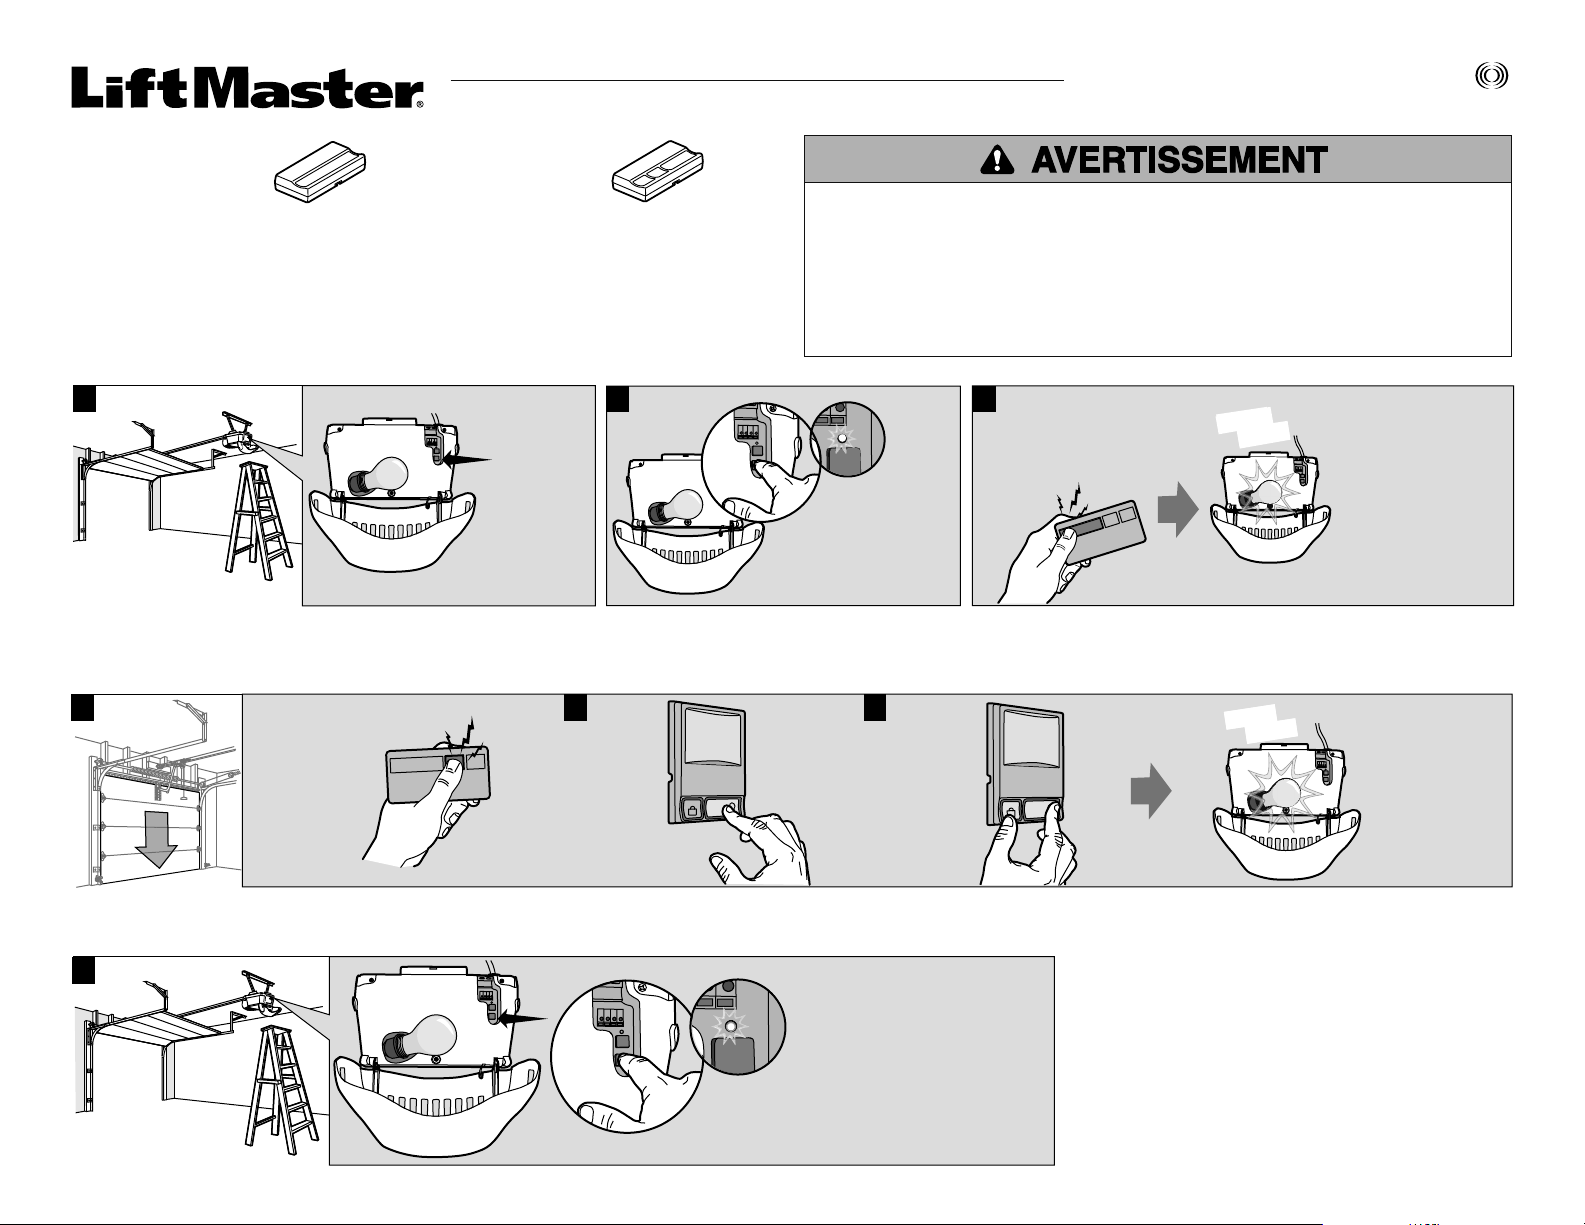
PROGRAMMATION DE LA TÉLÉCOMMANDE
1
Localiser la
Locate the
bouton
Smart/Learn
Smart/Learn.
button.
2
Press and
immediately release
the learn button.
The learn LED will glow
steadily for 30 seconds.
alors. Dans un délai de 30
Within 30 seconds...
secondes...
Appuyer et relâchez
immédiatement sur
la bouton Smart/Learn.
La DEL rouge s’allume
3
Press and hold the button
Appuyez sur le bouton de la
on the remote control
télécommande qu’on désire
that you wish to use.
utiliser.
“click”
"clic"
“click”
"clic"
Lorsque les éclairages de
Release the button
l’ouvre-porte de garage
when the garage
clignotent ou que deux
door opener lights
clics se font entendre,
blink or two clicks
la télécommande a été
are heard.
programmée.
If programming to
En cas de programmation
other products,
vers d'autres produits,
press the button a
appuyez sur le bouton une
second time to
deuxième fois pour activer
activate the product.
le produit.
COMMANDE DE L’ÉCLAIRAGE DE L’OUVRE-PORTE
Cette fonctionnalité n'est disponible que sur les ouvre-portes équipés d'un contrôle multi-fonctionnel et d'une télécommande à plusieurs boutons. N'est pas disponible avec un récepteur universel. Avec les télécommandes
Security+
®
, un bouton de télécommande peut être programmé pour faire fonctionner l'éclairage de l'ouvre-porte de garage sans en ouvrir la porte.
1
With the door closed,
La porte étant fermée,
press and hold
enfoncer et tenir
the remote
un bouton de la
télécommande
control button
auquel on
that you want to
attribuera le
control the light.
contrôle de
l’éclairage.
+
2
Press and
Appuyer sans
hold the
relâcher sur le
light button
bouton Light
on the
(Éclairage) du
door control.
commande de
porte.
LOCK
LIGHT
Press and
Appuyer sans
hold the
relâcher sur le
lock button
bouton Lock
+
on the
(Verrouillage)
door control.
du commande
de porte.
3
LOCK
LIGHT
"clic"
“click”
"clic"
“click”
After the garage
Lorsque les
door opener
lumières de
lights flash,
l’ouvre-porte
release all
clignotent, relâcher
buttons.
tous les boutons.
POUR EFFACER TOUS LES CODES DE LA MÉMOIRE
Pour inactiver toute télécommande non désirée, effacer d’abord tous les codes.
1
Faire un essai en appuyant sur le bouton-poussoir de la télécommande. L’éclairage de
Press and hold the learn button
Enfoncer et tenir le bouton «learn»
on garage door opener or other
du ouvre-portes jusqu’à ce que le
product until the learn LED goes
témoin lumineux learn s’éteigne
out (approximately 6 seconds).
(environ 6 secondes). Tous les codes
All previous codes are now erased.
précédents sont maintenant effacés.
Reprogram each remote control
Reprogrammer chaque télécommande
ou entrée sans clé qu’on désire utiliser.
you wish to use.
l’ouvre-porte doit s’allumer ou s’éteindre sans que la porte ne bouge.
Page 4
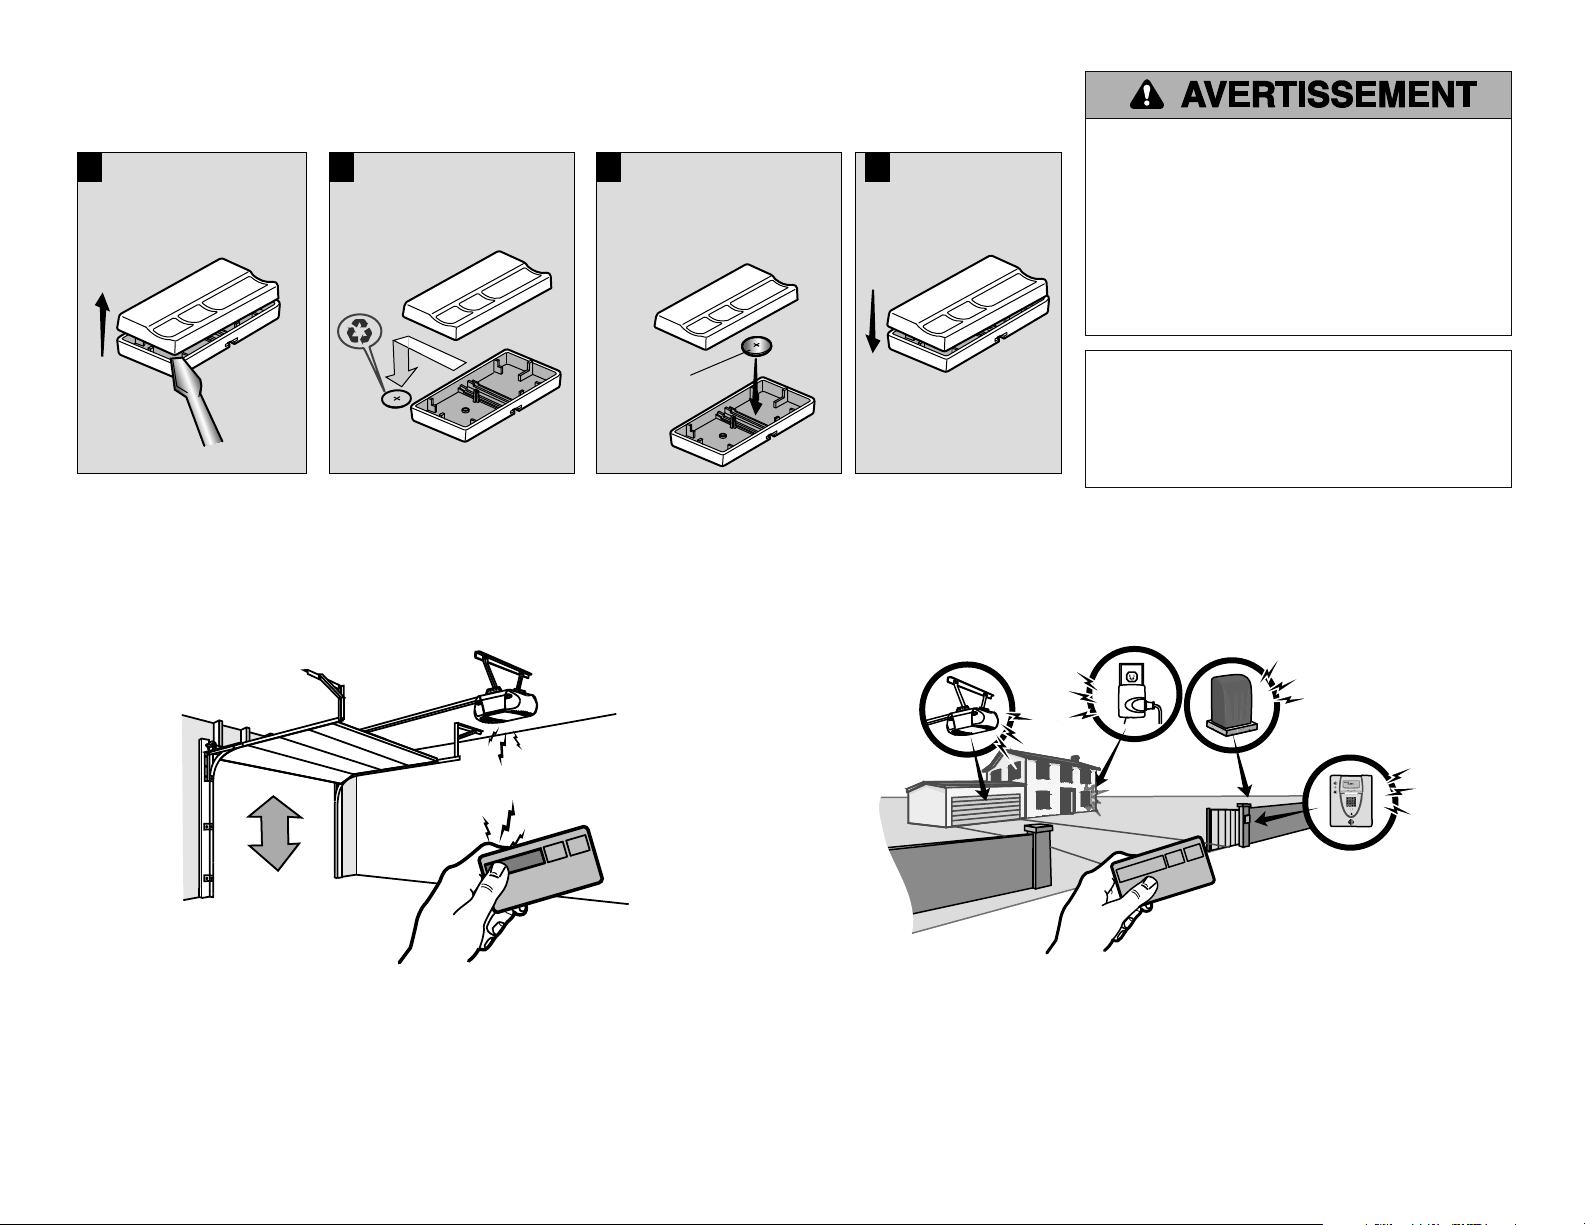
LES PILE DE TÉLÉCOMMANDE
La pile au lithium devrait durer pendant une période allant jusqu’à 3 ans. Pour changer la pile :
1
Ouvrir le couvercle à
l’aide de la pince du
pare-soleil ou de la lame
d’un tournevis.
2
Retirez l'ancienne pile. Se
débarrasser des vieilles
piles convenablement.
3
Insérer la pile de
remplacement avec le positif
(+) vers le haut. Remplacer
les piles uniquement par des
piles capsules 3V CR2032.
4
Replacer le couvercle.
Pour prévenir d’’eventuelles BLESSURES GRAVES ou
LA MORT :
• Ne JAMAIS laisser de petits enfants à proximité des piles.
• Aviser immédiatement un médecin en cas d’ingestion de la pile.
Pour réduire le risque d'incendie, d'explosion ou de brûlure
chimique :
• Remplacer les piles UNIQUEMENT par des piles capsules
3V CR2032.
• NE PAS recharger, ni démonter, ni chauffer à une température
supérieure à 100°C (212°F), ni incinérer.
3V CR2032
COMMENT UTILISER LA TÉLÉCOMMANDE
Maintenez le bouton enfoncé jusqu’à ce que la porte ou la barrière commence à se déplacer. La télécommande
fonctionne habituellement jusqu’à une distance maximum de trois véhicules. Les installations et les conditions
diffèrent, veuillez contacter un représentant installateur pour de plus amples informations.
AVIS : Les règles de la FCC ou d’Industrie Canada (IC), ou les deux, interdisent tout
ajustement ou toute modification de ce récepteur et/ou de cet émetteur, sauf pour
modifier le code ou pour remplacer la pile. IL N’EXISTE AUCUNE AUTRE PIÈCE
SUSCEPTIBLE D’ÊTRE ENTRETENUE PAR L’UTILISATEUR.
Vérifié pour conformité avec les normes de la FCC POUR UTILISATION À LA MAISON
OU AU BUREAU. L’utilisation est sujette aux deux conditions ci-après : (1) ce
dispositif ne peut causer des interférences nuisibles, et (2) ce dispositif doit accepter
toute interférence reçue, y compris une interférence pouvant causer un
fonctionnement non désiré.
TÉLÉCOMMANDES À 3 BOUTONS
Les boutons supplémentaires sur n’importe quelle télécommande ou télécommande miniature trois boutons
Security+® peuvent être programmés pour faire fonctionner d’autres ouvre-portes de garage ou systéme
d'accés Security+®.
PIÈCES DE RECHANGE
Pile au lithium 3V CR2032 . . . . . . . . . . . . . . . . . . . . . . . . . . . . . . . . . . . . . . . . . . . . . . . . . . . . . . . . . . . . . 10A20
Pince de pare-soleil (non disponible avec les mini-télécommandes) . . . . . . . . . . . . . . . . . . . . . . . . . . . . 29B137
GARANTIE LIMITÉE DE UN AN
LiftMaster garantit à l’acheteur au détail initial de ce produit que le produit est exempt de tout défaut de matière
ou vice de fabrication pour une an.
Page 5
CONTROLES REMOTO DE SECURITY+®
MODELOS 371LM Y 373LM
Control remoto con un botón
Modelo 371LM
Para uso con abre-puertas de garajes, portones y otros productos Security+® de 315 MHz. Compatible con
abre-puertas de garaje que tienen un botón púrpura de aprendizaje. El código del control remoto y el receptor
cambia aleatoriamenta cada vez que se usa, y se pueden cambinar had 100 mil millones de códigos. Consultar
el manual del producto sobre la ubicación del botón de aprendizaje.
NOTA: Sus productos pueden parecer diferentes que los productos ilustrados en este manual.
Control remoto con 3 botones
Modelo 373LM
Para evitar posibles LESIONES GRAVES o INCLUSO LA MUERTE con el movimiento del portón o la puerta
de cochera:
• SIEMPRE conserve los controles remotos donde los niños no los alcancen. NUNCA deje que los niños
usen ni jueguen con los transmisores de control remoto.
• Active el portón o la puerta SÓLO si puede verlos claramente, si están bien ajustados, y si no hay ninguna
obstrucción en su trayectoria.
• SIEMPRE conserve el portón o la puerta de cochera a la vista hasta que esté completamente cerrada.
NUNCA permita que nadie cruce la trayectoria de una puerta o portón en movimiento.
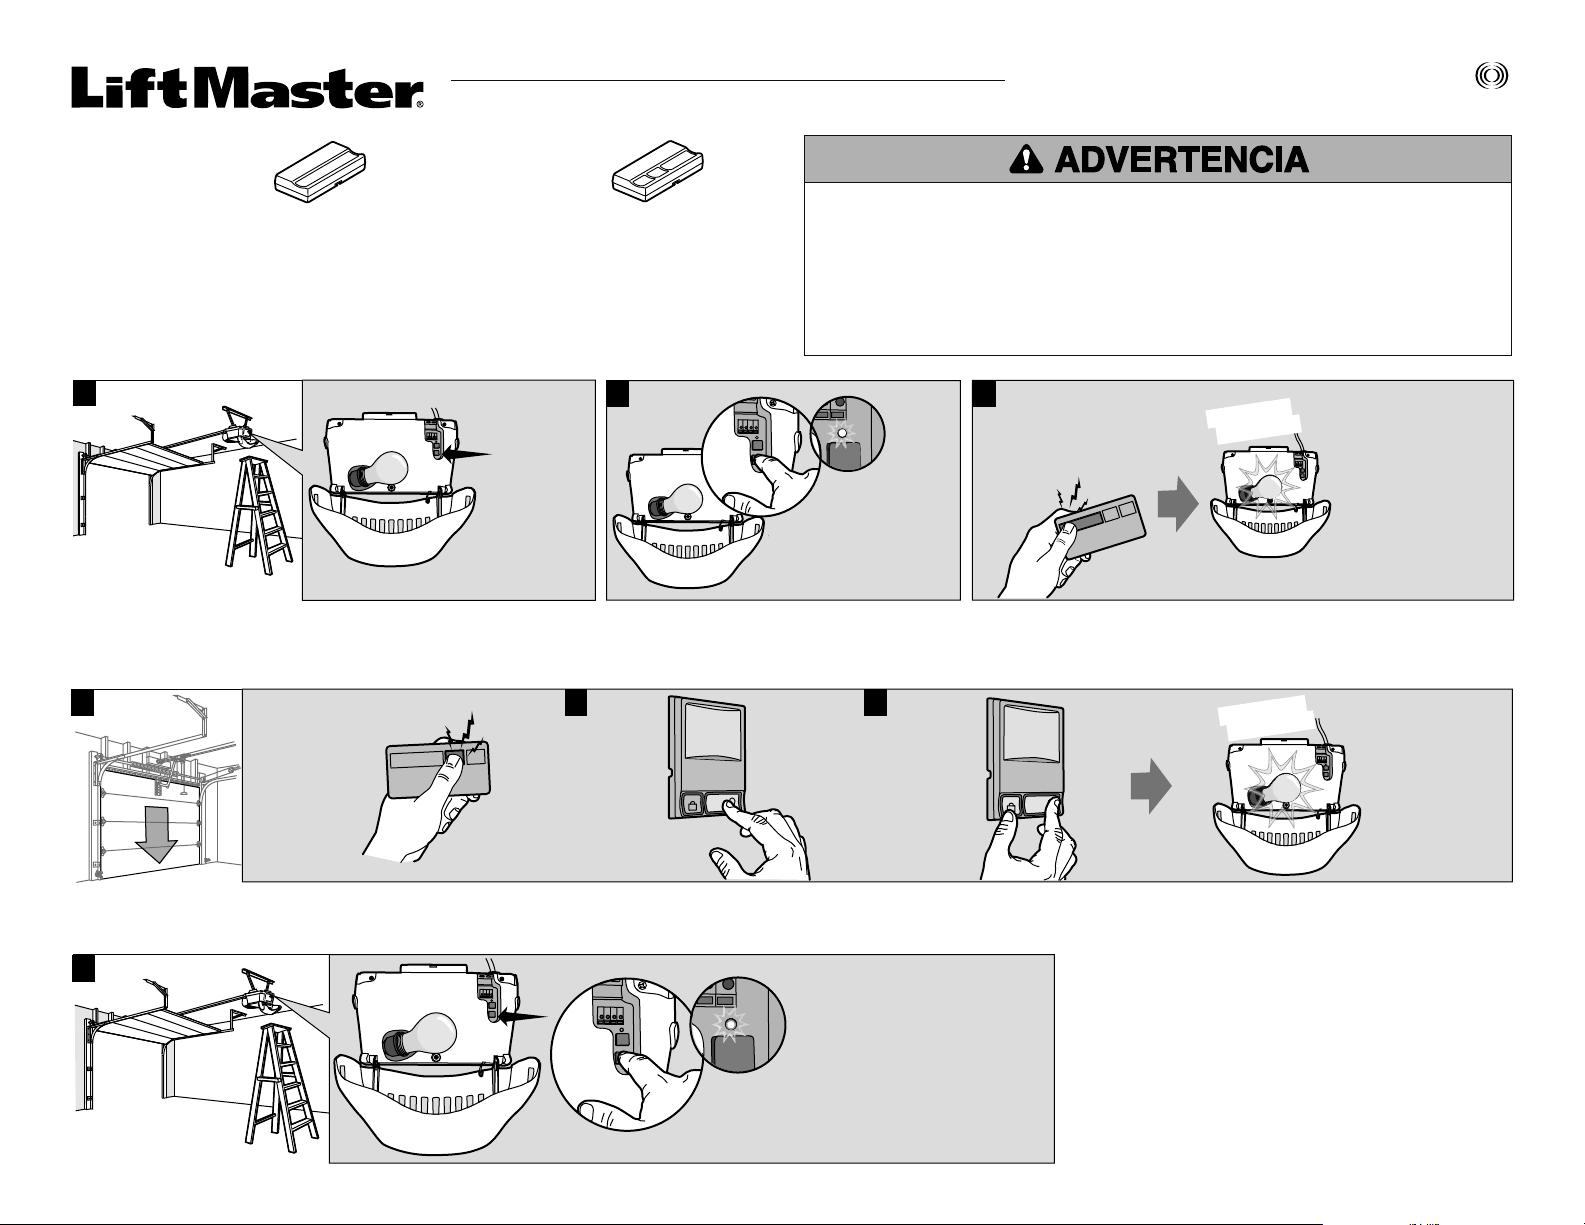
PROGRAMAR EL CONTROL REMOTO
1
2
Locate the
Ubique el botón
Smart/Learn
Smart/Learn
button.
(Aprendizaje).
Press and
immediately release
the learn button.
The learn LED will glow
steadily for 30 seconds.
Within 30 seconds...
los 30 segundos...
Oprima y suelte
immediatamente
el botón Smart/Learn
(Aprendizaje). El indicador
DEL se encenderá. Dentro de
3
Press and hold the button
Oprimir el botón del control
on the remote control
remoto con el cual desea
that you wish to use.
comandar la puerta.
"chasquido"
“click”
“click”
"chasquido"
Release the button
Si las luces de la
when the garage
unidad se encienden
door opener lights
intermitentemente o
blink or two clicks
escucha dos clics, signifi ca
are heard.
que el control remoto está
If programming to
programado.
other products,
Al programarlo para otros
productos, oprima el botón
press the button a
por segunda vez para
second time to
activar el producto.
activate the product.
PARA CONTROLAR LAS LUCES DEL ABRE-PUERTAS
Esta función se encontrará solamente en abre-puertas de garaje equipadas con control de varias funciones y control remoto con más de un botón. Función no disponible en receptores electrónicos universales. En el control
remoto Security+
1
®
es posible programar un botón para encender las luces sin abrir la puerta del garaje.
+
2
Oprima y
Press and
mantenga
hold the
oprimido el
light button
botón de light
on the
(luz) de la
door control.
control de
la puerta.
LOCK
With the door closed,
Con la puerta cerrada,
press and hold
oprima y mantenga
the remote
oprimido el botón
control button
del control remoto
that you want to
que desee usar
control the light.
para el control de
la luz.
3
Press and
Oprima y
hold the
mantenga
oprimido el
lock button
botón lock
+
LIGHT
on the
(bloqueo) de
door control.
la control de la
puerta.
LOCK
LIGHT
"chasquido"
“click”
"chasquido"
“click”
After the garage
Cuando las luces
door opener
de la unidad
se enciendan
lights flash,
intermitentemente,
release all
suelte todos los
buttons.
botones.
PARA BORRAR TODOS LOC CÓDIGOS DE LA MEMORIA
Para desactivar cualquier control remoto que no desee usar, antes que nada borre todos los códigos.
1
Probar oprimiendo el botón remoto. Deben encenderse y apagarse las luces del abridor pero la puerta debe permanecer inmóvil.
Oprima y mantenga oprimido el
botón Smart/Learn "Aprendizaje" de
Press and hold the learn button
la abre-puertas, hasta que la luz del
on garage door opener or other
indicador de Smart/Learn "Aprendizaje"
product until the learn LED goes
se apague (aproximadamente 6
out (approximately 6 seconds).
segundos). Ya estarán borrados todos
All previous codes are now erased.
los códigos anteriores.
Reprogram each remote control
Vuelva a programar cada uno de los
you wish to use.
controles remotos o la entrada sin
llave que desee usar.
Page 6
LA BATERÍA DEL CONTROL REMOTO
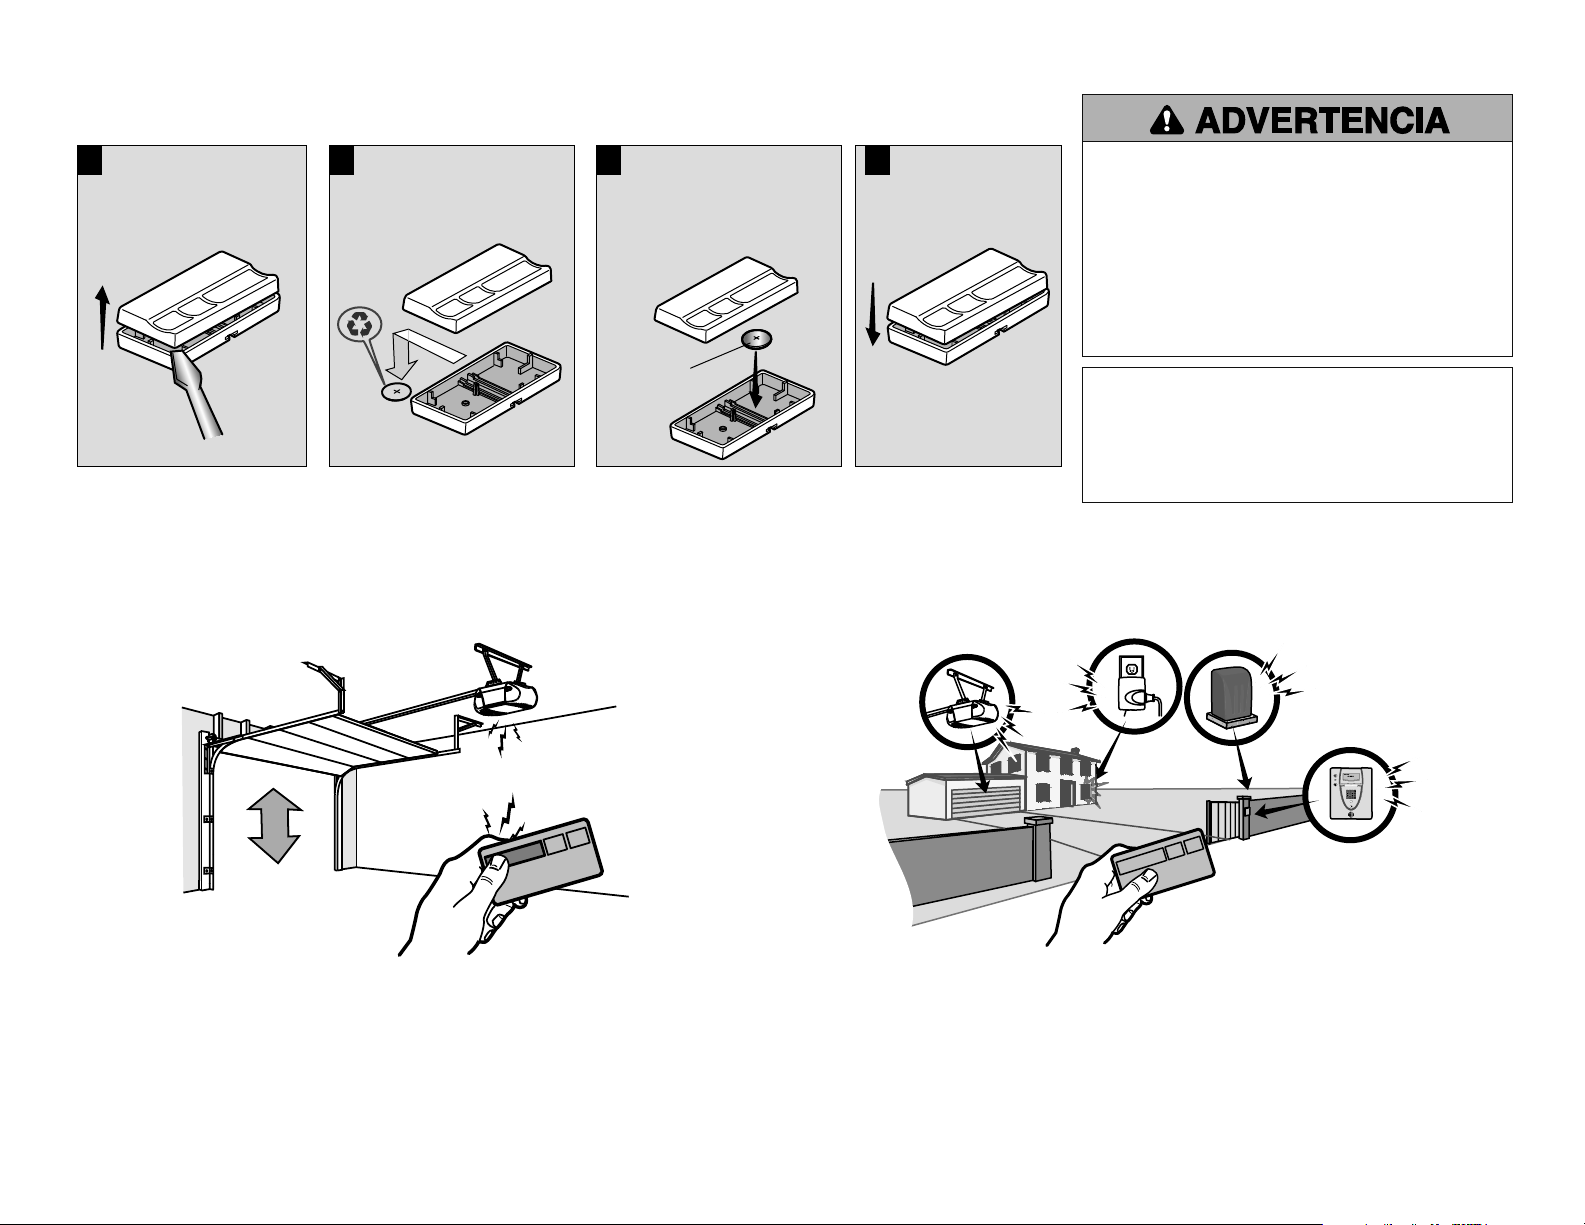
La batería de litio puede durar hasta 3 años. Para cambiar la batería:
1
Use el broche del visera
o un destornillador para
abrir la tapa.
2
Quite la batería vieja. Elimine
las baterías usadas en forma
adecuada.
3
Coloque la nueva batería con
el lado positivo hacia arriba.
Remplace las pilas solamente
por pilasde botón 3V CR2032.
3V CR2032
CÓMO USAR EL CONTROL REMOTO
Mantenga oprimido el botón hasta que la puerta comience a moverse. El control remoto operará desde una
distancia de hasta 3 autos en las instalaciones típicas. Los tipos y las condiciones de instalación pueden variar.
Comuníquese con un distribuidor con servicio técnico para obtener más información.
4
Remplazar la cubireta.
Para evitar la posibilidad de LESIONES GRAVES o INCLUSO LA
MUERTE:
• NUNCA permita que los niños pequeños estén cerca de las
baterías.
• Si alguien se traga una batería, llame al médico de inmediato.
Para reducir el riesgo de incendio, explosión o combustión
química:
• Remplace ÚNICAMENTE con baterías planas 3V CR2032.
• NO recargue, desarme, caliente por encima de
100°C (212°F) o incinere.
AVISO: Para cumplir con las reglas de la FCC y/o de Canadá (IC), ajustes o
modificaciones de este receptor y/o transmisor están prohibidos, excepto por el
cambio de la graduación del código o el remplazo de la pila. NO HAY OTRAS PIEZAS
REPARABLES DEL USUARIO.
Se ha probado para cumplir con las normas de la FCC para USO DEL HOGAR O DE LA
OFICINA. La operación está sujeta a las dos condiciones siguientes: (1) este
dispositivo no puede causar interferencia perjudicial, y (2) este dispositivo debe
aceptar cualquier interferencia recibida, incluyendo la interferencia que puede causar
una operación no deseable.
CONTROLES REMOTOS DE 3 BOTONES
Los canales adicionales de cualquier control remoto o minicontrol remoto Security+® se pueden programar
para funcionar con otros abre-puertas de garaje, controles de luz, operadores de portón o sistemas de control
de accesso de Security+®.
PARTES DE REPUESTO
Batería de litio de 3V CR2032 . . . . . . . . . . . . . . . . . . . . . . . . . . . . . . . . . . . . . . . . . . . . . . . . . . . . . . . . . . 10A20
Broche de la visera (no es disponible con minicontrol remotos) . . . . . . . . . . . . . . . . . . . . . . . . . . . . . . . 29B137
GARANTÍA LIMITADA DE UN AÑO
LiftMaster garantiza al primer comprador de este producto que está libre de defectos de materiales y/o mano
de obra, y dicha garantía se extiende por un año a partir de fecha de compra.
Page 7

Page 8

© 2015, LiftMaster
All Rights Reserved
Tous Droits Réservés
114A4109B Todos los Derechos Reservados
 Loading...