

Cetacea Sound ASTRO-CLD001 User manual

Astronaut CL
Owner's Manual
Technical Audio for the 21st Century Classroom
OWNER'S MANUAL
For use with the following Astronaut CL systems.
System No.: ASTRO-CLW001 | ASTRO-CLD001 | ASTRO-CLR001
Online ResourcesContact Info
CETACEA SOUND CORP
2003 East Center Circle
Plymouth, Minnesota 55441
SALES
sales@cetaceasound.com
CUSTOMER SERVICE
customerservice@cetaceasound.com
PHONE
(763) 559-1019
U.S.A., Canada, and Caribbean
(800) 556-1922
FAX
(763) 559-1585
ONLINE
www.cetaceasound.com
@
NEWS CENTER
Announcements
& Events
EMAIL / RSS
News Delivered
Your Way
SUPPORT
Documentation
& Resources
Index
GETTING STARTED 2–5
A
Important—Read First 2
Shipping Kit Contents 3
Astronaut Up Close 4
Safety Precautions 5
INSTALLATION 6–17
B
Installer Notes 6
Cabling Options 7
Ceiling Mount Instructions 8–13
Source Connections 14–15
Power Connection 16–17
TECHNICAL SUPPORT 18–20
C
Troubleshooting Guide 18–19
Contact Info 20
LIMITED WARRANTY 21
D
1

Getting Started
The Astronaut is an amplifi ed speaker
Astronaut branded speaker systems are amplifi ed and designed
to plug into either mono or stereo sources of sound. Please check
the model number of your speaker for input specifi cations.
Common Sources
Computer
Projector
Microphone
DVD / VHS
Interactive Whiteboard
CD / iPod® / iPad
The Astronaut has a built-in amplifi er. Connect to fi xed or
variable line level sources only.
iPod® and iPad® are registered trademarks of Apple Inc.
®
IMPORTANT—READ FIRST
Turn OFF special effects
When using an electronic source, turn off all equalizer or
compression algorithm effects, commonly called “bass boost”,
“surround sound”, “jazz”, etc. If connecting to a computer,
make sure that the sound card software is properly set up
for uncompressed and un-boosted stereo output. Use only
the stereo output from DVD’s and personal computers. The
Astronaut is not designed to plug into third party amplifi ers,
pre-amps, or subwoofer output jacks. Most line and variable
headphone jacks are suitable sources.
A
PLEASE READ ALL INSTRUCTIONS CAREFULLY AND KEEP A COPY OF THIS GUIDE IN A SAFE PLACE
2
Getting Started
A
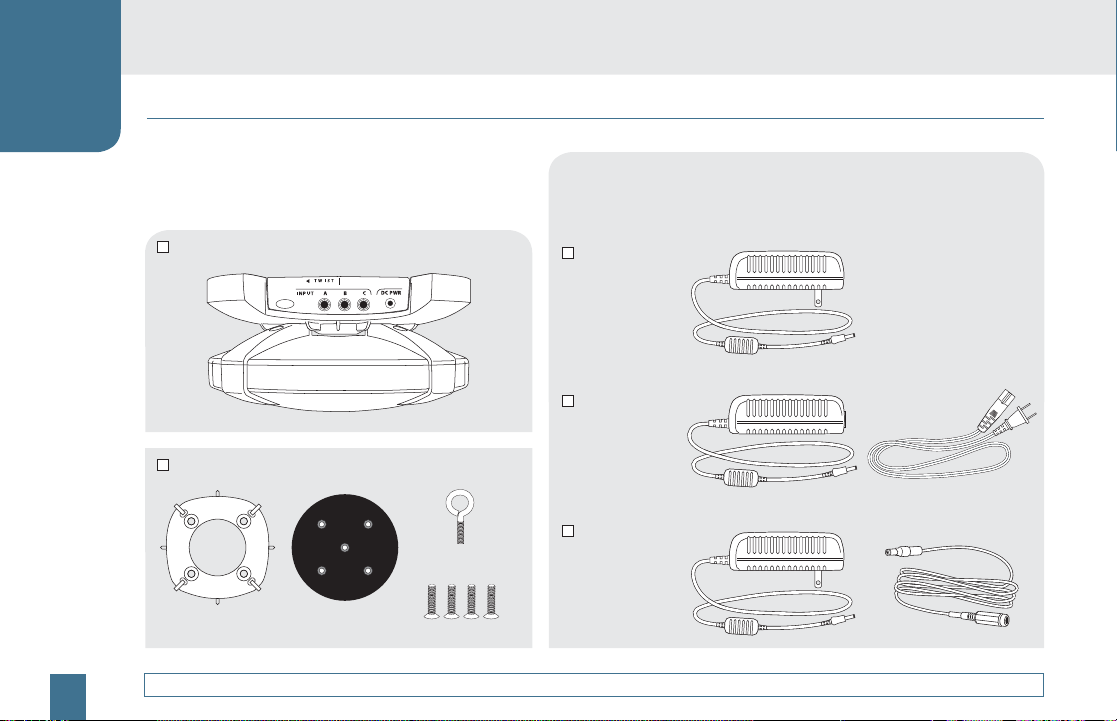
SHIPPING KIT CONTENTS
Please check that you have all of the following
items. If any items are missing, please contact
Cetacea Sound directly at (800) 556-1922.
Astronaut CL Speaker
Ceiling Mount Kit
Eye Bolt
Mounting Bracket
Aluminum Bolts (4)Ceiling Plate
Power Supply
1 of the following 3 power supply (PS) packages is included with your
system. Refer to the original order documentation for system number (S/N).
S/N: ASTRO-CLW001
Wall Mount PS
S/N: ASTRO-CLD001
Desktop PS
S/N: ASTRO-CLR001
Wall Mount PS
w/ 30' Ext. Cable
3
PLEASE SAVE THE BOXES IN CASE YOU NEED TO RETURN YOUR PRODUCT FOR ANY REASON

Getting Started
Twist right to install /
TWIST
left to uninstall
ON / OFF LED
Green when on
A – LINE INPUT
Stereo/mono, 3.5 mm mini-jack
B – LINE INPUT
Stereo/mono, 3.5 mm mini-jack
C – LINE INPUT
Stereo/mono, 3.5 mm mini-jack
DC POWER
External power supply connector
ASTRONAUT UP CLOSE
A
PLEASE READ ALL INSTRUCTIONS CAREFULLY AND KEEP A COPY OF THIS GUIDE IN A SAFE PLACE
4

Getting Started
A
SAFETY PRECAUTIONS
Follow these instructions & use precautions
Safeguard this equipment from high humidity conditions.
Read the instructions completely prior to attaching the
speaker overhead.
Take special care to not drop the equipment while
mounting to the ceiling.
Heed to all cautions and warnings posted within this guide
and on the speaker equipment.
When not using the equipment for long periods of time,
e.g. one month or longer, disconnect the power supply. The
Astronaut has over-voltage and diode protection built in;
however, it is best to err on the side of caution.
NOTE
All literature can be found on our website. Please download
an electronic copy of this guide for your records.
Never force anything into the openings or source inputs of
the speaker equipment.
Do not use this equipment if it shows obvious signs of
damage from shipping or dropping.
Do not use this equipment if ambient temperatures exceed
120 °F (48 °C).
Make sure equipment is properly mounted according to the
Ceiling Mount Instructions found in this guide. This is the
only approved method of installation; any other may cause
a loss in warranty.
5

Installation
Input source specifi cations
Stereo Sources
Maximum input voltage should not exceed 300 mV per input
channel (A, B, or C). Do not use any multi-channel sources like
3-channel, Dolby Digital 5-channel, THX, or Q-Sound.
Mono Sources
Maximum input voltage should not exceed 150 mV per input
channel (A, B, or C). Use microphones that offer a mono or stereo
line output instead of microphone level output. Cetacea Sound
microphones are compatible with the Astronaut. Use of other
brands may result in unpredictable results and is not advised.
Line Level Sources
Although preamps, projector outputs, and music mixers are
popular, it is possible to “overdrive” the Astronaut with these
devices, leading to premature failure and a loss of warranty
coverage.
INSTALLER NOTES
Additionally, equalizers, bass boost, surround sound, QSound,
spatializer, and other compression techniques are not necessary
and will add nothing to the sound quality. This can also
“overdrive” the Astronaut, leading to failure and a loss of
warranty coverage.
Recommended assembly tools
The following tools are recommended to mount the Astronaut
to a suspended ceiling tile.
Phillips head screwdriver
Hand drill with ¼" and ½" bits
Measuring tape
B
PLEASE READ ALL INSTRUCTIONS CAREFULLY AND KEEP A COPY OF THIS GUIDE IN A SAFE PLACE
6
Installation
B
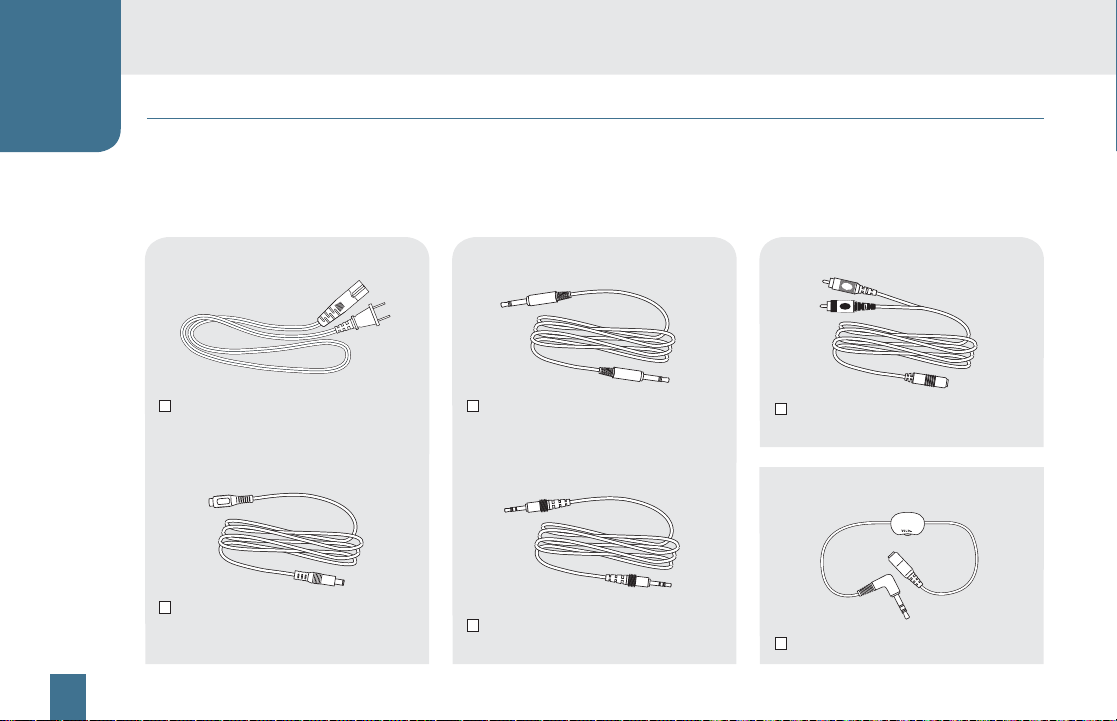
CABLING OPTIONS
Cetacea Sound offers a variety of source and power cabling options to best support
your specifi c installation project. Please ensure that all source and power cables are
procured prior to installation. Please visit our website for ordering information.
Power Extension Cables
AC Extension Cables
Lengths: 6' | 10' | 20' | 30'
DC Extension Cables
Lengths (non-plenum): 6' | 10' | 20' | 40'
Lengths (plenum): 20' | 40'
Source Cables
Mono Cables, M-M
Length: 6'
Stereo Cables, M-M
Lengths: 3' | 20'
RCA Adapter
RCA to 3.5 mm, M-F
Length: 6'
Volume Control
In-line Volume Control, M-F
7
 Loading...