

Cessna 150G Owner's Manual

MORE PEOPLE BUY AND
PL V CESSNA AIRPLANES
THAN ANY OTHER MAKE
19 67
N3177J
RE-PRINT
WORLD S LARGEST PRO-
DUCER
OF
GENERA'
AVIATION AIRCRAFT
SINCE 1956
OWNER'S
MANUAL
CESSNA

CESSNA
PO: 267896 LOT: 10-1584S
P/N: 14-00541
LOC: 00CE
8900009
SNP 150C 1967 OWNERS MANUAL

PERFORMANCE - SPECIFICATIONS
STANDARD
AND TRAINER COMMUTER
GROSS WEIGHT 1600 lbs 1600 lbs
SPEED:
Top Speed At Sea Level 123
mph 125
^h
Cruise, 75% Power at 7500 ft 120 mph 122 mph
RANGE:
Cruise, 75% Power at 7500 ft 480 mi 490 mi
22.5 Gallons, No Reserve 4.0 hrs 4.0 hrs
120 mph 122 mph
Cruise, 75% Power at 7500 ft 745 mi 760 mi
Long Range Version, 35.0 Gallons 6. 2 hrs 6. 2 hrs
120 mph 122 mph
Optimum Range at 10,000 ft 560 mi 565 mi
22.5 Gallons, No Reserve 5.7 hrs 5.7 hrs
98 mph 99 mph
Optimum Range at 10,000 ft 870 mi 885 mi
Long Range Version, 35. 0 Gallons 8.9 hrs 8.9 hrs
98 mph 99 mph
RATE OF CLIMB AT SEA LEVEL 670 fpm 670 fpm
SERVICE CEILING 12, 650 ft 12, 650 ft
TAKE-OFF:
Ground Run 735 ft 735 ft
Total Distance Over 50-ft Obstacle 1385 ft 1385 ft
LANDING:
Landing Roll 445 ft 445 ft
Total Distance Over 50-ft Obstacle 1075 ft 1075 ft
EMPTY WEIGHT: (Approximate) Standard Trainer
With Standard Fuel Tanks 975 lbs 1005 lbs 1060 lbs
With Long Range Fuel Tanks 980 lbs 1010 lbs 1065 lbs
BAGGAGE 120 lbs 120 lbs
WING LOADING: Pounds/Sq Foot 10,2 10.2
POWER LOADING: Pounds/HP 16.0 16.0
FUEL CAPACITY:
Total (Standard Tanks) 26 gal. 26 gal.
Total (Long Range Tanks) 38 gal. 38 gal.
OIL CAPACITY: Total 6 qts 6 qts
PROPELLER: Fixed Pitch (Diameter) 69 inches 69 inches
ENGINE. Continental Engine 0-200-A* 0-200-A*
100 rated HP at 2750 RPM
•The Model F150, which is manufactured by Reims Aviation S.A., Reims (Marne) France, is
identical to the 150 except that it is powered by an 0-200-A engine manufactured under license
by Rolls Royce, Crewe, England. All 150 information in this manual pertains to the F150 as well.
D397-13—RAND—1000-9/77
1 1

CONGRATULATIONS
Welcome
to
the ranks
of
Cessna owners! Your Cessna has been designed
and constructed
to
give you the most
in
performance, economy, and com-
fort.
It is
our desire that you will find flying
it,
either
for
business
or
pleasure, a pleasant and profitable experience.
This Owner's Manual has been prepared
as a
guide
to
help you
get
the
most pleasure and utility from your Model 150.
It
contains information
about your Cessna's equipment, operating procedures, and performance;
and suggestions
for its
servicing and care.
We
urge you
to
read
it
from
cover
to
cover, and
to
refer
to it
frequently.
Our interest
in
your flying pleasure has not ceased with your purchase
of
a Cessna. World-wide, the Cessna Dealer Organization backed
by the
Cessna Service Department stands ready
to
serve you. The following
services
are
offered
by
most Cessna Dealers:
FACTORY TRAINED PERSONNEL
to
provide you with courteous
expert service.
FACTORY APPROVED SERVICE EQUIPMENT
to
provide you
with the most efficient and accurate workmanship possible.
A STOCK
OF
GENUINE CESSNA SERVICE PARTS
on
hand
when you need them.
THE LATEST AUTHORITATIVE INFORMATION FOR SERV-
ICING CESSNA AIRPLANES, since Cessna Dealers have
all
of the Service Manuals and Parts Catalogs, kept current
by
Service Letters and Service News Letters, published
by
Cessna
Aircraft Company.
We urge
all
Cessna owners
to
use the Cessna Dealer Organization
to the
fullest.
A current Cessna Dealer Directory accompanies your new airplane.
The
Directory
is
revised frequently, and a current copy can
be
obtained from
your Cessna Dealer. Make your Directory one
of
your cross-country
flight planning aids; a warm welcome awaits you
at
every Cessna Dealer.

* Maximum height of airplane wth nose gear depressed and
an optional flashing beacon installed.
** Overall length of airplane with optional bullet - shaped
propeller spinner. When standard propeller spinner
is Installed, length is 23'.
*8'-7Vi" MAX.
33/4°
.••23-9"
-10-0"
7'-0"
32'-8J6"
5'-9" MAX.
PRINCIPAL
DIMENSIONS
ii

TABLE OF CONTENTS
SECTION I - OPERATING CHECK LIST 1-1
SECTION II - DESCRIPTION AND
OPERATING DETAILS 2-1
SECTION ill - OPERATING LIMITATIONS 3-1
SECTION IV- CARE OF THE AIRPLANE 4-1
OWNER FOLLOW-UP SYSTEM 4-8
SECTION V - OPERATIONAL DATA 5-1
SECTION VI- OPTIONAL SYSTEMS 6-1
ALPHABETICAL INDEX Index-l
This manual describes the operation and performance
of
the Standard Model 150, the Trainer and the Commuter. Equip-
ment described as "Optional" denotes that the subject equipment
is optional on the Standard airplane. Much
of
this equipment
is
standard on the Trainer and Commuter.
•
» •
111

Visually check fuel filler caps,
inspection plates , and general
aircraft condition during walk-
around inspection. If night
flight is planned, check operation
of all lights , and make sure a
flashlight is available.
(a)
(t»
(c)
(d)
Turn on master switch and check fuel quantity
indicators, then turn master switch off.
Check ignition switch "OFF. "
Check fuel valve handle "ON."
Remove control wheel lock.
(a) Remove rudder gust lock, tf installed.
(b) Disconnect tail tie-down.
(c) Check carburetor air filter for restrictions by
dust or other foreign matter.
(d) On first flight of day and after each refueling,
pull strainer drain knob and drain a two-
ounce quantity of fuel from the fuel strainer
to check for presence of water and sediment.
(e) Check nosewheel strut and tire for proper
inflation.
(f ) Disconnect nose tie-down.
(a) Remove gust lock, if installed.
(b)
(c)
(a)
(b)
Check main wheel tire for proper inflation.
Inspect airspeed static source hole on side of
fuselage for stoppage (left side only).
Disconnect wing tic-down.
(a)
(b)
(c)
Check ail level. Do not operate with less than
4 quarts. Fill for extended flights.
Check propeller and spinner for nicks and
security.
Same as
Remove pi tot tube cover, if installed, and
check pi tot tube opening for stoppage.
Check fuel tank vent opening for stoppage.
Check stall warning vent opening for stoppage
Same as
Figure 1-1.
iv
s
6 4
1
3
NOTE
2
INSPECTION
EXTERIOR
3
4
6
4
7
5
8
3
2
1
8

Section
/
OPERATING CHECK LIST
One
of
the first steps
in
obtaining the utmost performance, service,
and flying enjoyment from your Cessna
is to
familiarize yourself with your
airplane's equipment, systems, and controls. This can best
be
done
by
reviewing this equipment while sitting
in
the airplane. Those items whose
function and operation are not obvious are covered
in
Section EL
Section I lists,
in
Pilot's Check List form, the steps necessary
to
operate your airplane efficiently and safely.
It is
not a check list
in its
true form
as it is
considerably longer, but
it
does cover briefly
all of
the
points that you should know for„a typical flight.
The flight and operational characteristics
of
your airplane are normal
in
all
respects. There are no unconventional characteristics
or
operations
that need
to be
mastered.
All
controls respond
in
the normal way within
the entire range
of
operation.
All
airspeeds mentioned
in
Sections I and
II are indicated airspeeds. Corresponding calibrated airspeeds may
be obtained from the Airspeed Correction Table
in
Section
V.
BEFORE ENTERING
THE
AIRPLANE.
(1) Make an exterior inspection
in
accordance with figure 1-1.
BEFORE STARTING
THE
ENGINE.
(1) Seats and Seat Belts — Adjust and lock.
(2) Brakes — Test and
set.
(3) Master Switch — "ON.
"
(4) Fuel Valve Handle
--
"ON."
STARTING
THE
ENGINE.
(1) Carburetor Heat
--
Cold.
1-1

(2) Mixture -- Rich.
(3) Primer — As required.
(4) Ignition Switch -- "BOTH. "
(5) Throttle — Open 1/4".
(6) Propeller Area — Clear.
(7) Starter Handle -- Pull.
BEFORE TAKE-OFF
Throttle Setting -- 1700 RPM.
Engine Instruments -- Within green arc.
Magnetos -- Check (75 RPM maximum differential between magnetos
Carburetor Heat -- Check operation.
Suction Gage -- Check (4. 6 to 5. 4 inches of mercury).
Flight Controls -- Check.
Trim Tab -- "TAKE-OFF" setting.
Cabin Doors -- Latched.
Flight Instruments and Radios — Set.
TAKE-OFF.
NORMAL TAKE-OFF.
(1) Wing Flaps -- Up.
(2) Carburetor Heat -- Cold.
(3) Throttle -- Full "OPEN."
(4) Elevator Control -- Lift nose wheel at 50 MPH.
(5) Climb Speed --72 MPH until all obstacles are cleared, then set
up climb speed as shown in "NORMAL CLIMB" paragraph.
MAXIMUM PERFORMANCE TAKE-OFF.
(1) Wing Flaps --Up.
(2) Carburetor Heat — Cold.
(3) Brakes — Hold.
(4) Throttle — Full "OPEN. "
(5) Brakes — Release.
(6) Elevator Control -- Slightly tail low.
(7) Climb Speed --52 MPH (with obstacles ahead).
CLIMB.
NORMAL CLIMB.
(1) Air Speed -- 75 to 80 MPH.
2-2

(2) Power — Full throttle.
(3) Mixture — Rich (unless engine is rough).
MAXIMUM PERFORMANCE CLIMB.
(1) Air Speed — 72 MPH.
(2) Power -- Full throttle.
(3) Mixture -- Rich (unless engine is rough).
CRUISING.
(1) Power -- 2000 to 2750 RPM.
(2) Elevator Trim -- Adjust.
(3) Mixture -- Lean to maximum RPM.
BEFORE LANDING.
(1) Mixture — Rich.
(2) Carburetor Heat — Apply full heat before closing throttle.
(3) Airspeed -- 65 to 75 MPH.
(4) Wing Flaps --As desired below 100 MPH.
(5) Airspeed -- 60 to 70 MPH (flaps extended).
NORMAL LANDING.
(1) Touch Down -- Main wheels first.
(2) Landing Roll -- Lower nose wheel gently.
(3) Braking -- Minimum required.
AFTER LANDING.
(1) Wing Flaps --Up.
(2) Carburetor Heat -- Cold.
SECURE AIRCRAFT.
(1) Mixture — Idle cut-off.
(2) All Switches -- Off.
(3) Parking Brake -- Set.
(4) Control Lock -- Installed.

1
2 3 4 5 6 7 8 9 10 11 12 13 14 15 16 17 18
19
36
35 34 33 32 31 30 29 28 27 26 25 24 23 22 21 20
1.
Altimeter
13.
Oil Pressure Gage
25.
Mixture Control Knob
2.
Airspeed Indicator
14. Oil Temperature Gage
26.
Throttle
3.
Turn-and-Dank Indicator (Opt.)
15.
Ammeter
27.
Elevator Trim Control Whee
4.
Directional Gyro (Opt.)
16.
Fuel Quantity Indicator (Right)
28.
Electrical Switches
5. Vertical Speed Indicator (Opt.)
17.
Optional Instrument Space
29.
Carburetor
Air
Heat Control
6.
Gyro Horizon (Opt.)
18. Suction Gage (Opt.)
30.
Omni Course Indicator (Opt.
7.
Compass Correction Card
19.
Optional Instrument Space
31.
Parking Brake Control
8.
Optional Radio
20.
Map Compartment
32.
Clock
9.
Magnetic Compass
21.
Fuse/Circuit Breaker Panel
33.
Ignition Switch
0. Fuel Quantity Indicator (Left)
22.
Cigar Lighter
34.
Starter Handle
1.
Aircraft Registration Number 23.
Cabin
Air and
Heat Controls
35.
Primer
2.
Tachometer
24. Wing Flap Switch
36.
Master Switch
Figure
2-1.
1-4
INSTRUMENT PANEL

Section II
DESCRIPTION AND OPERATING DETAILS
The following paragraphs describe the systems and equipment whose
function and operation is not obvious when sitting in the airplane. This
section also covers in somewhat greater detail some of the items listed
in Check List form in Section I that require further explanation.
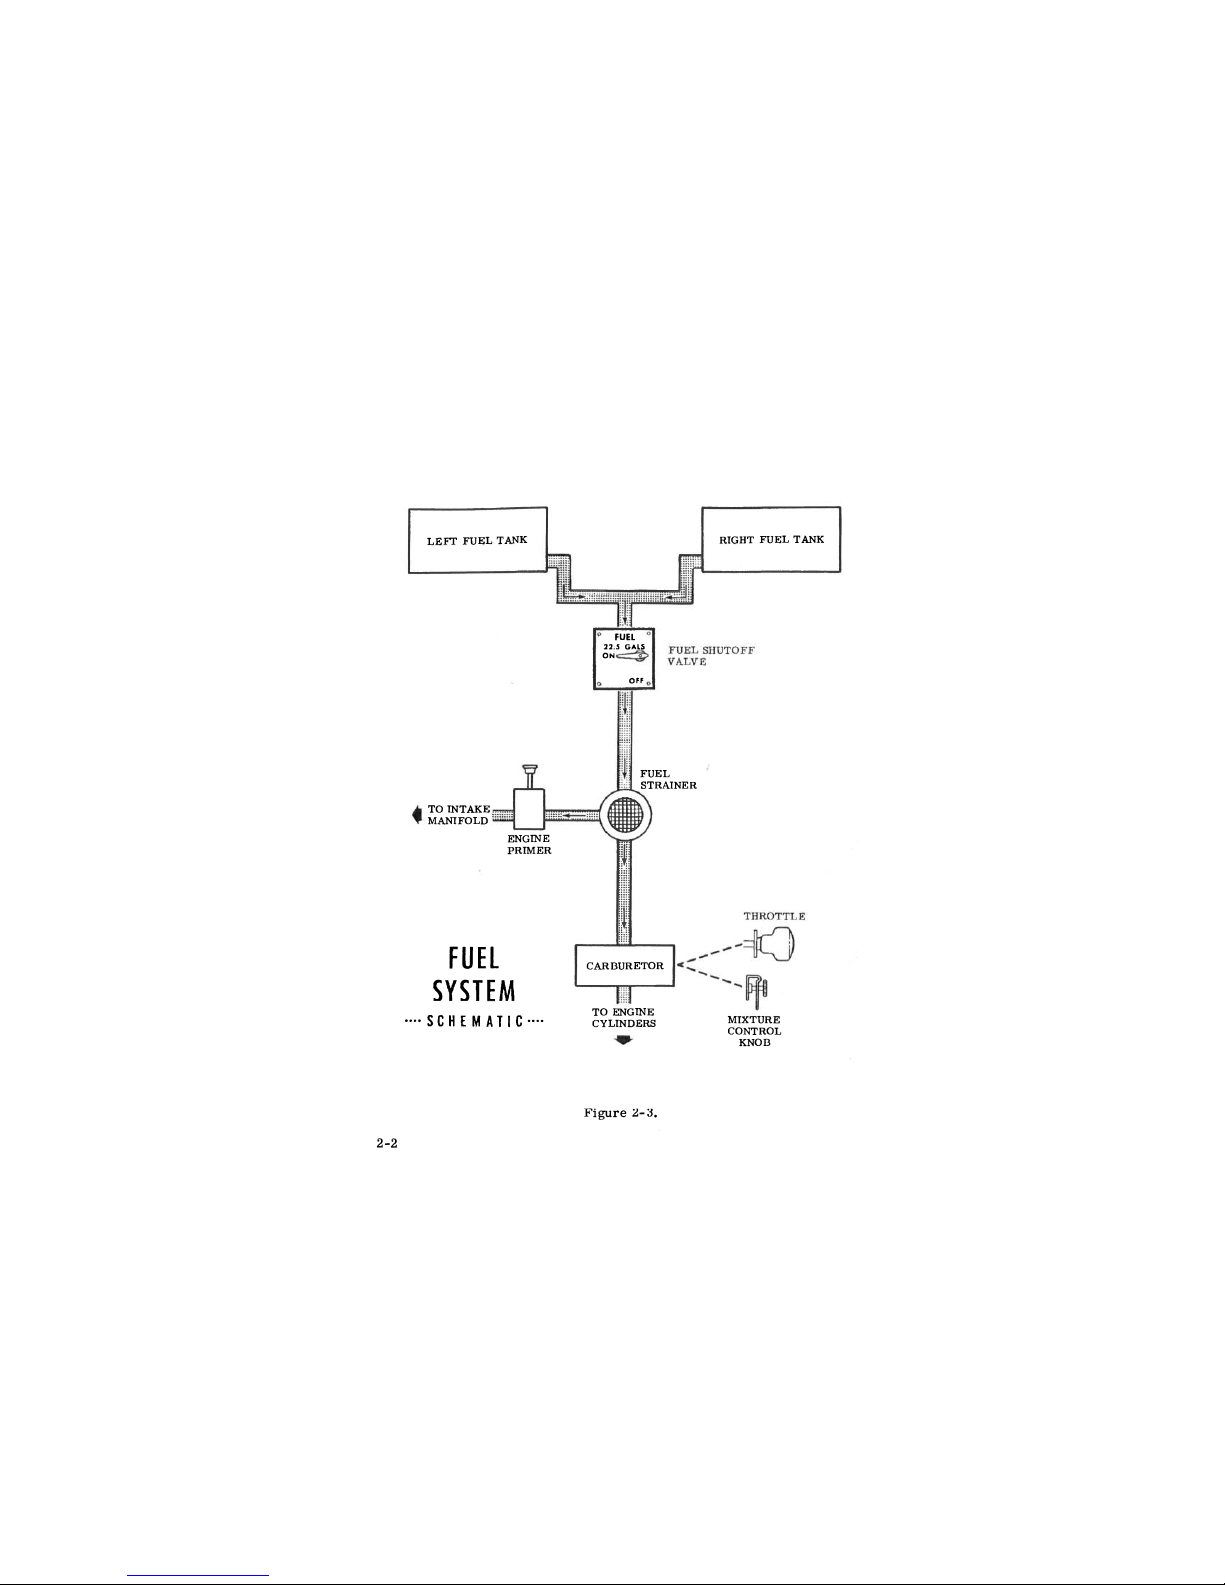
FUEL SYSTEM.
Fuel is supplied to the engine from two tanks, one in each wing.
From these tanks, fuel flows by gravity through a fuel shutoff valve and
fuel strainer to the carburetor.
Refer to figure 2-2 for fuel quantity data. For fuel system service
information, refer to Lubrication and Servicing Procedures in Section IV.
FUEL STRAINER DRAIN KNOB.
Refer to fuel strainer servicing procedure, Section IV.
FUEL QUANTITY DATA (U.S. GALLONS)
TANKS
USABLE FUEL
ALL FLIGHT
CONDITIONS
UNUSABLE
FUEL
TOTAL
FUEL
VOLUME
TWO, STANDARD WING
(13 GAL. EACH)
22.5
3. 5
26. 0
TWO, LONG RANGE WING
(19 GAL. EACH)
35. 0
3. 0
38. 0
Figure 5-4.
5-1
2-2
Figure 2-3.
-•SCHEMATIC
—
FUEL
SYSTEM
CARBURETOR
TO ENGINE
CYLINDERS
MIXTURE
CONTROL
KNOB
ENGINE
PRIMER
TO INTAKE
MANIFOLD
FUEL
STRAINER
ON
OFF
22.5 GALS
FUEL
RIGHT FUEL TANK
LEFT FUEL TANK

ELECTRICAL SYSTEM.
Electrical energy is supplied by a 14-volt, direct-current system
powered by an engine-driven alternator (see figure 2-4). A 12-volt
storage battery is located on the right, forward side of the firewall just
inside the cowl access door. The master switch controls all electrical
circuits except the clock and the ignition system.
AMMETER.
The ammeter indicates the flow of current, in amperes, from the
alternator to the battery or from the battery to the aircraft electrical
system. When the engine is operating and the master switch is
TT
ON,
TT
the ammeter indicates the charging rate applied to the battery. In the
event the alternator is not functioning or the electrical load exceeds the
output of the alternator, the ammeter indicates the discharge rate of the
battery.
FUSES AND CIRCUIT BREAKERS.
Fuses on the instrument panel protect most of the electrical circuits
in your airplane. (The clock fuse is located adjacent to the battery.) The
circuits controlled by each fuse are indicated above each fuse retainer.
Fuse capacity is indicated on each fuse retainer cap. Fuses are removed
by pressing the fuse retainers inward and rotating them counterclockwise
until they disengage. The faulty fuse may then be lifted out and replaced.
Spare fuses are held in a clip on the inside of the map compartment door.
A
TT
push-to-resetM circuit breaker on the instrument panel protects
the alternator circuit. The cigar lighter is protected by a manually re-
set type circuit breaker mounted directly on the back of the lighter behind
the instrument panel.
LANDING LIGHTS (OPT).
A three-position, push-pull type switch controls the optional landing
lights mounted in the leading edge of the left wing. To turn one lamp on
for taxiing, pull the switch out to the first stop. To turn both lamps on
for landing, pull the switch out to the second stop.
FLASHING BEACON (OPT).
The flashing beacon should not be used when flying through clouds or
overcast; the flashing light reflected from water droplets or particles in
2-3

ELECTRICAL SYSTEM SCHEMATIC
CIGAR LIGHTER
(WITH CIRCUIT BREAKER)
TO WING FLAP SYSTEA
TO LANDING &
TAXI LIGHTS (OPT)
TO FLASHING
BEACON (OPT)
BCN LT _
PITOT HT TO P'TOT H^AT
SYSTEM (OPT)
TO RADIO (OPT)
TO RADIO (OPT)
TO RADIO (OPT)
TO
NAVIGATION
LIGHT FUSE
CODE
® CIRCUIT BREAKER
FUSE
-H" DIODE
f- CAPACITOR
MECHANICAL CONNECTION
TO DOME LIGHT &
OPT COURTESY LIGHTS
TO NAVIGATION LIGHTS
TO TURN & BANK
INDICATOR (OPT)
TO INSTRUMENT LIGH
TO FUEL QUANTITY
INDICATORS
MAGNET^
Figure 5-4.
5-4
FLAPS
REGULATOR
GEN
60
LAND
LTS
ALTERNATOR
A +
A +
G
s
F
AMMETER
CLOCK
F
BATTERY
+
BATTERY
CONTACTOR
STARTER
HANDLE
MASTER
SWITCH
STARTER
NAV
LTS
IGNITION
SWITCH
INT
LTS
INST
L-
R
RADIO
RADIO
RADIO

the atmosphere, particularly at night, can produce vertigo and loss of
orientation.
CABIN HEATING AND VENTILATING SYSTEM.
The temperature and volume of airflow into the cabin can be regulated
to any degree desired by manipulation of the push-pull "CABIN HEAT" and
"CABIN AIR" knobs.
Heated fresh air and outside air are blended in a cabin manifold just
aft of the firewall by adjustment of the heat and air controls; this air is
then vented into the cabin from an outlet on the left side of the manifold.
Windshield defrost air is also supplied by a duct leading from the manifold.
A separate adjustable ventilator near each upper corner of the wind-
shield supplies additional outside air to the pilot and passenger.
PARKING BRAKE SYSTEM.
To set parking brake, pull out on the parking brake knob, apply and
release toe pressure to the pedals, and then release the parking brake
knob. To release the parking brake, apply and release toe pressure on
the pedals while checking to see that the parking brake knob is full in.
STARTING ENGINE.
Ordinarily the engine starts easily with one or two strokes of primer
in warm temperatures to six strokes in cold weather, with the throttle
open approximately 1/4 inch. In extremely cold temperatures, it may
be necessary to continue priming while cranking.
Weak intermittent explosions followed by puffs of black smoke from
the exhaust stack indicate overpriming or flooding. Excess fuel can be
cleared from the combustion chambers by the following procedure: Set
the mixture control in full lean position, throttle full open, and crank
the engine through several revolutions with the starter. Repeat the
starting procedure without any additional priming.
2-5
 Loading...