

Page 1

Page 2

Table of Contents
Guide to using this manual................................................................................................................. 2
Graphic illustrations.......................................................................................................................... 2
Symbols and notations in text..................................................................................................... 2
Equipment and features................................................................................................................. 2
Technology improvements............................................................................................................ 2
Safety Precautions.................................................................................................................................. 2
Fitness..................................................................................................................................................... 2
Safety clothing and equipment................................................................................................... 3
Refuelling............................................................................................................................................... 3
Transporting unit................................................................................................................................ 3
Pre-use checklist................................................................................................................................ 3
Starting................................................................................................................................................... 4
During operation................................................................................................................................ 4
Vibrations.............................................................................................................................................. 4
Maintenance and repairs................................................................................................................ 4
Technical Specifications....................................................................................................................... 5
Parts List..................................................................................................................................................... 5
Assembling the Unit.............................................................................................................................. 6
Adjusting the control handle........................................................................................................ 6
Tightening the harness straps...................................................................................................... 6
Loosening the harness straps...................................................................................................... 6
Fuelling........................................................................................................................................................ 6
Mixing the fuel..................................................................................................................................... 6
Storing fuel............................................................................................................................................ 7
Change the fuel filter once a year.............................................................................................. 7
Starting/stopping the engine ...................................................................................................... 7
Before starting..................................................................................................................................... 7
When the engine begins to fire................................................................................................... 8
When engine is running.................................................................................................................. 8
Stopping the engine......................................................................................................................... 8
If the engine does not start........................................................................................................... 8
Fuel tank has run dry and has then been refuelled...........................................................8
Operation instructions.......................................................................................................................... 9
First time use (breaking-in).......................................................................................................... 9
During operation ............................................................................................................................... 9
After use................................................................................................................................................. 9
Cleaning the air filter........................................................................................................................ 9
Carburettor........................................................................................................................................... 9
The Spark Plug.................................................................................................................................... 9
Engine behaviour............................................................................................................................. 10
Storing the machine............................................................................................................................. 10
Minimising wear and avoiding damage................................................................................. 10
Maintenance and repair.................................................................................................................. 11
Disposal.................................................................................................................................................. 11
1
Page 3

Guide to using this manual
Graphic illustrations
All important components are shown in this manual. The operational and
handling instructions will be explained via illustrations.
Symbols and notations in text
The individual steps and procedures described in the manual may be marked in
different ways.
WARNING: There is risk of accident, personal injury, damage to property or
individual components.
NOTE or HINT: It is not essential for use of the machinery, however may help
improve the user's understanding of the situation and result in better use.
Equipment and features
This manual may refer to several models with different features. Components that
are not installed in all models and related products are marked as such. These
components should be available as third-party products from specialised stores.
Technology improvements
Kogan.com's management principle is to continually improve quality. As a result,
our technology is improving all the time. If the operating characteristics or
appearance of the unit differs from that shown in this manual, then please
contact the Kogan support team for assistance.
Safety Precautions
Special safety precautions must be observed when working with this tool.
It is important that you read and fully understand, then observe all of the
following safety precautions and warnings.
• Careless of improper use of the blower may case serious or fatal injuries.
• Observe all applicable local safety regulations, standards and ordinances.
• Minors should never be allowed to use the blower.
• Bystanders, especially children and animals, should not be allowed in the
area where a blower is being used.
• The operator of the blower has the responsibility to avoid injury to third
parties and to avoid damage to all property.
• Don't lend or rent the blower to someone else without supplying them with
a copy of this manual for their reference. Ensure that anyone using the
blower is aware of the instructions in this manual and understand them.
Fitness
• To use the blower, you must be fit to use it, such as:
• Be rested, with good health and good mental conditions.
• If you get tired, take a break.
2
Page 4

• Do not operate the blower if you are under the influence of any drugs or
alcohol that may impair your vision, dexterity or judgement.
Safety clothing and equipment
• Clothing must be sturdy and snug-fitting, but allowing for complete
freedom of movement – industrial safety clothing is recommended.
• Avoid loose-fitting jackets, scarves, neck-ties, jewellery, flared trousers,
cuffed trousers, unconfined long hair or anything else that could get
caught in the air intake.
• Wear sturdy boots with non-slip soles. Steel-toed safety boots are
recommended.
• Wear safety googles, glasses or a face shield.
• Wear sound barriers (ear plugs or mufflers) to protect your hearing.
• Wear heavy-duty, non-slip gloves, preferably made of chrome leather.
• Never touch a hot cylinder or muffler, as burns may result.
Refuelling
• Always stop the engine before refuelling.
• Petrol is an extremely flammable fuel. Do not smoke or have any other
flames near petrol. Do not put fuel into a hot engine – fuel may spill and
cause a fire.
• Remove the fuel filler cap on the unit carefully to ensure that any pressure
build-up inside the tank may release slowly.
• Add petrol to the blower in a well-ventilated location outdoors. Wipe up
any spilled fuel before starting the blower.
• Take care not to get petrol on your clothing. If you get petrol on your
clothes, change them immediately.
• Unit vibrations can cause an improperly tightened fuel cap to loosen, or
even come off completely, spilling quantities of fuel. To avoid this hazard,
check the fuel cap occasionally to ensure that it is still tightly sealed.
• On units with a screw cap, tighten the cap by hand with as much force as
comfortably possible. On units with a hinged handle on the fuel cap,
tighten as described in the chapter 'Fuelling'.
• Check for fuel leakage while refuelling and during operation. If a fuel leak is
found, do not start or run the engine until the leak is fixed.
• Store petrol and oil in properly labelled, approved safety cans or tanks.
Transporting unit
• Always stop the engine before transporting.
• Protect the unit in a vehicle to prevent it tipping over, spilling fuel or being
damaged.
Pre-use checklist
• Throttle trigger must move freely and spring back to the idle position when
released.
• The stop switch must move easily to 'Off'.
• Tightness of the spark plug cap – if the cap is loose, sparks may occur and
ignite escaping fuel vapour.
3
Page 5

Starting
• Start the engine at least 3 metres away from the location where you
refuelled the blower, outdoors only.
• To reduce the risk or breathing toxic fumes, never start or run the unit in a
confined location.
• Place the unit on the ground in an open area.
• Make sure you have good balance and secure footing.
• Hold the unit securely.
The unit is a one-person unit. Do not allow other persons to be near while
running the unit – even when starting.
During operation
WARNING: your blower produces toxic exhaust fumes when the engine is
running. These gases (such as carbon monoxide) may be colourless and
odourless. To reduce the risk of serious or fatal injury from breathing toxic fumes,
never run the blower indoors or in poorly ventilated locations.
Ensure proper ventilation when working in trenches, hollows or other confined
areas.
To reduce the risk of igniting the combustible fuel vapours and causing a fire,
never smoke while working with, or standing next to the blower.
Always hold the unit firmly – always make sure you have firm and sturdy footing.
Examine the working area – do not direct air blasts towards bystanders or
animals, as the air flow can blow small objects at great speed.
Take care in slippery conditions, such as on ice, in the wet or snow, or while on
slopes or uneven ground.
Watch out for obstacles, such as roots, ditches, holes or rubbish that could cause
you to trip or stumble.
Vibrations
Prolonged use of the unit may result in vibration-induced circulation problems in
the hands. No general recommendation can be given for the length of usage as
it depends on several factors.
The recommended period of usage can be prolonged by:
• Hand protection (wearing warm gloves.)
• Taking breaks.
The recommended period of usage is shortened by:
• Any personal tendency to suffer from poor circulation (with symptoms
such as frequently cold fingers, itching etc..)
• Low ambient temperatures.
• Gripping force (A tight grip hinders circulation.)
Continual and regular users should monitor the conditions of their hands and
fingers closely.
Maintenance and repairs
Do not attempt any maintenance work not described in this owners manual.
For repairs/maintenance not covered in this manual, contact the Kogan customer
support team for advice.
• Never modify the blower in any way, as this may result in serious injury.
• Always stop the engine and disconnect the spark plug before doing and
4
Page 6
maintenance or repair work, or cleaning of the unit.
• Always clean dust and dirt off the machine after finishing your task.
• Do not store or service the unit near any fire or flame.
• Check the fuel cap regularly for leakages.
• Only use the approved spark plug as specified and make sure it is in good
condition.
• Inspect the ignition wires (insulation in good condition, secure connections
etc..)
• To reduce the risk of fire due to ignition outside the cylinder, move the stop
switch to OFF before turning the engine over on the starter with the spark
plug cap removed or the spark plug unscrewed.
• Check the condition of the muffler periodically.
• To avoid the risk of fire or hearing loss, do not operate the unit with the
muffler damaged or missing.
• Never touch a hot muffler, as burns may result.
Technical Specifications
Model CT33CLFBLWA
Displacement (cc) 32.6
Rated Power (KW/r/min) 0.9/8000
Idle Speed
2500 ± 150
Carburettor Style Diaphragm
Fuel Ratio 40 : 1
Fuel Tank Capacity (L) 0.65
Air Volume (m3/s) 0.2
Overall Weight 8kg
Packing Dimension 420 x 350 x 420mm
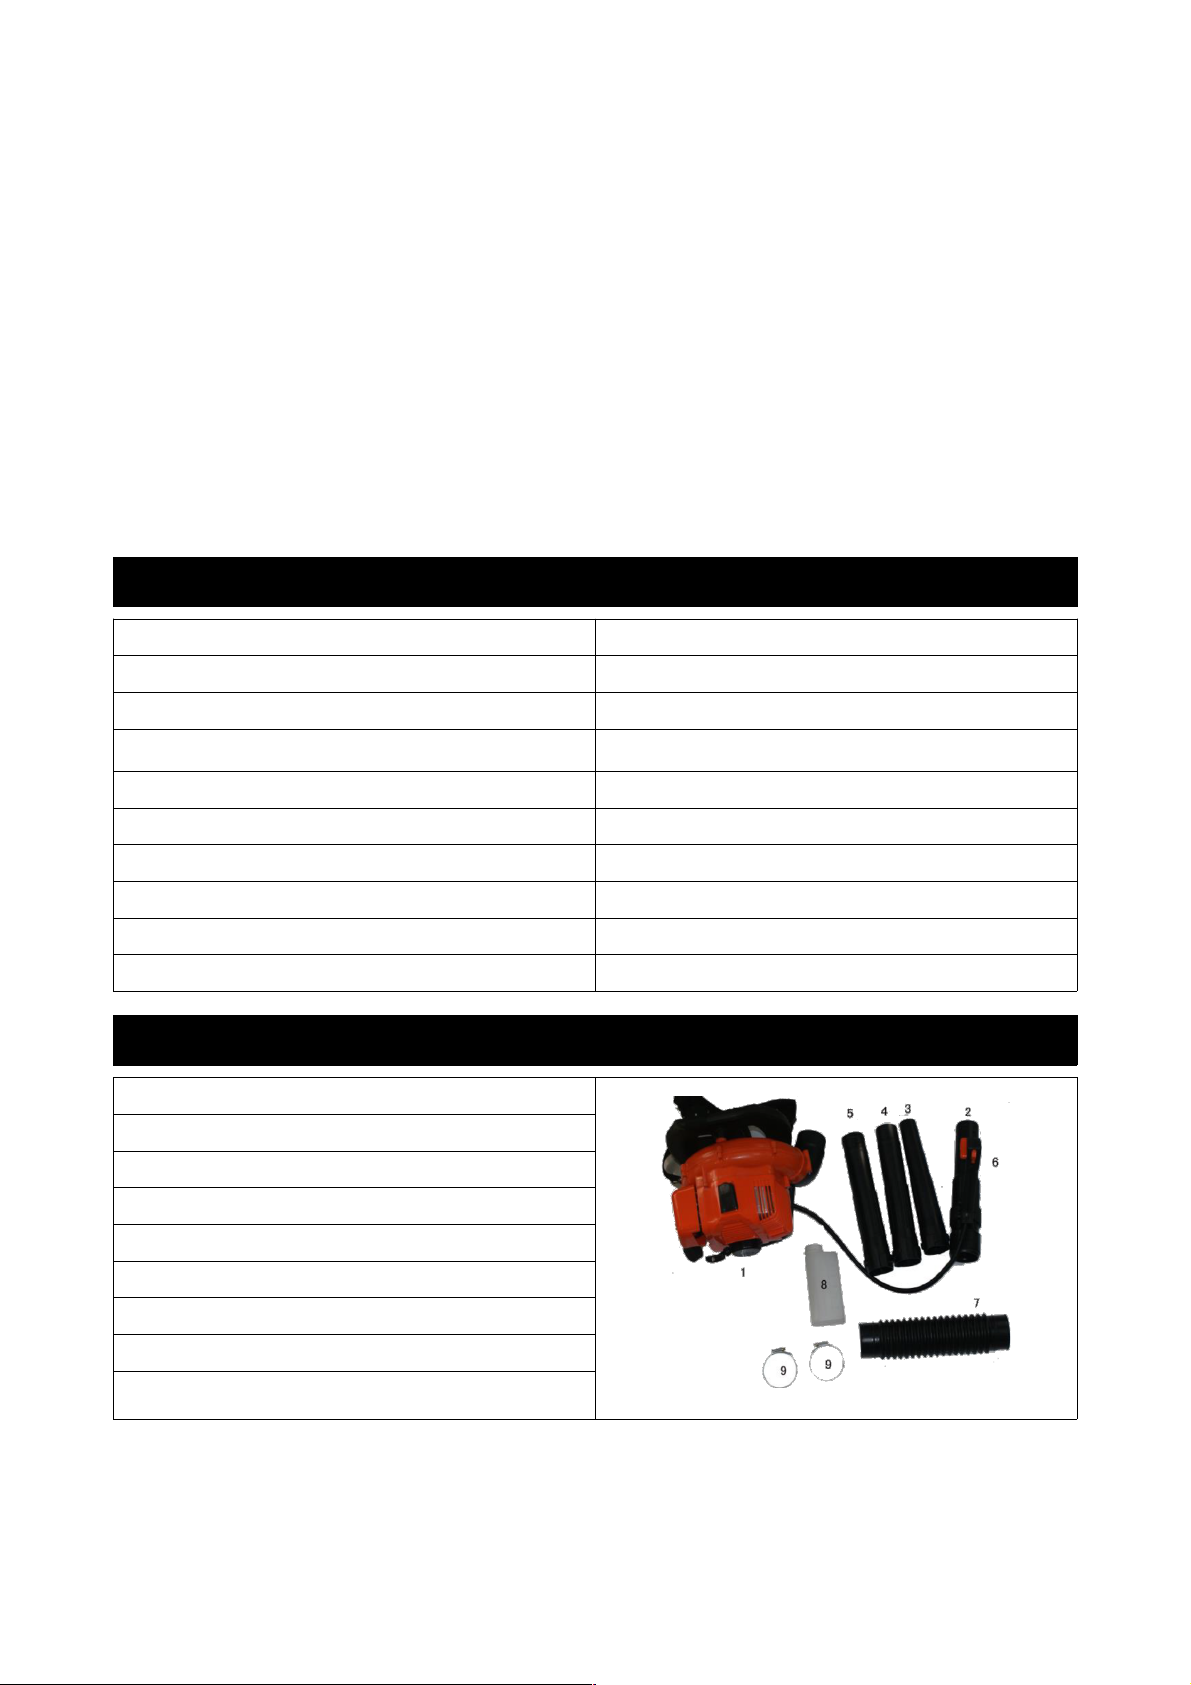
Parts List
1 – Main unit
2 – Blower pipe A
3 – Blower pipe B
4 – Blower pipe C
5 – Blower pipe D
6 – Control Box
7 – Hose
8 – 40 : 1 Oil Can
9 - Clips
5
Page 7
Assembling the Unit
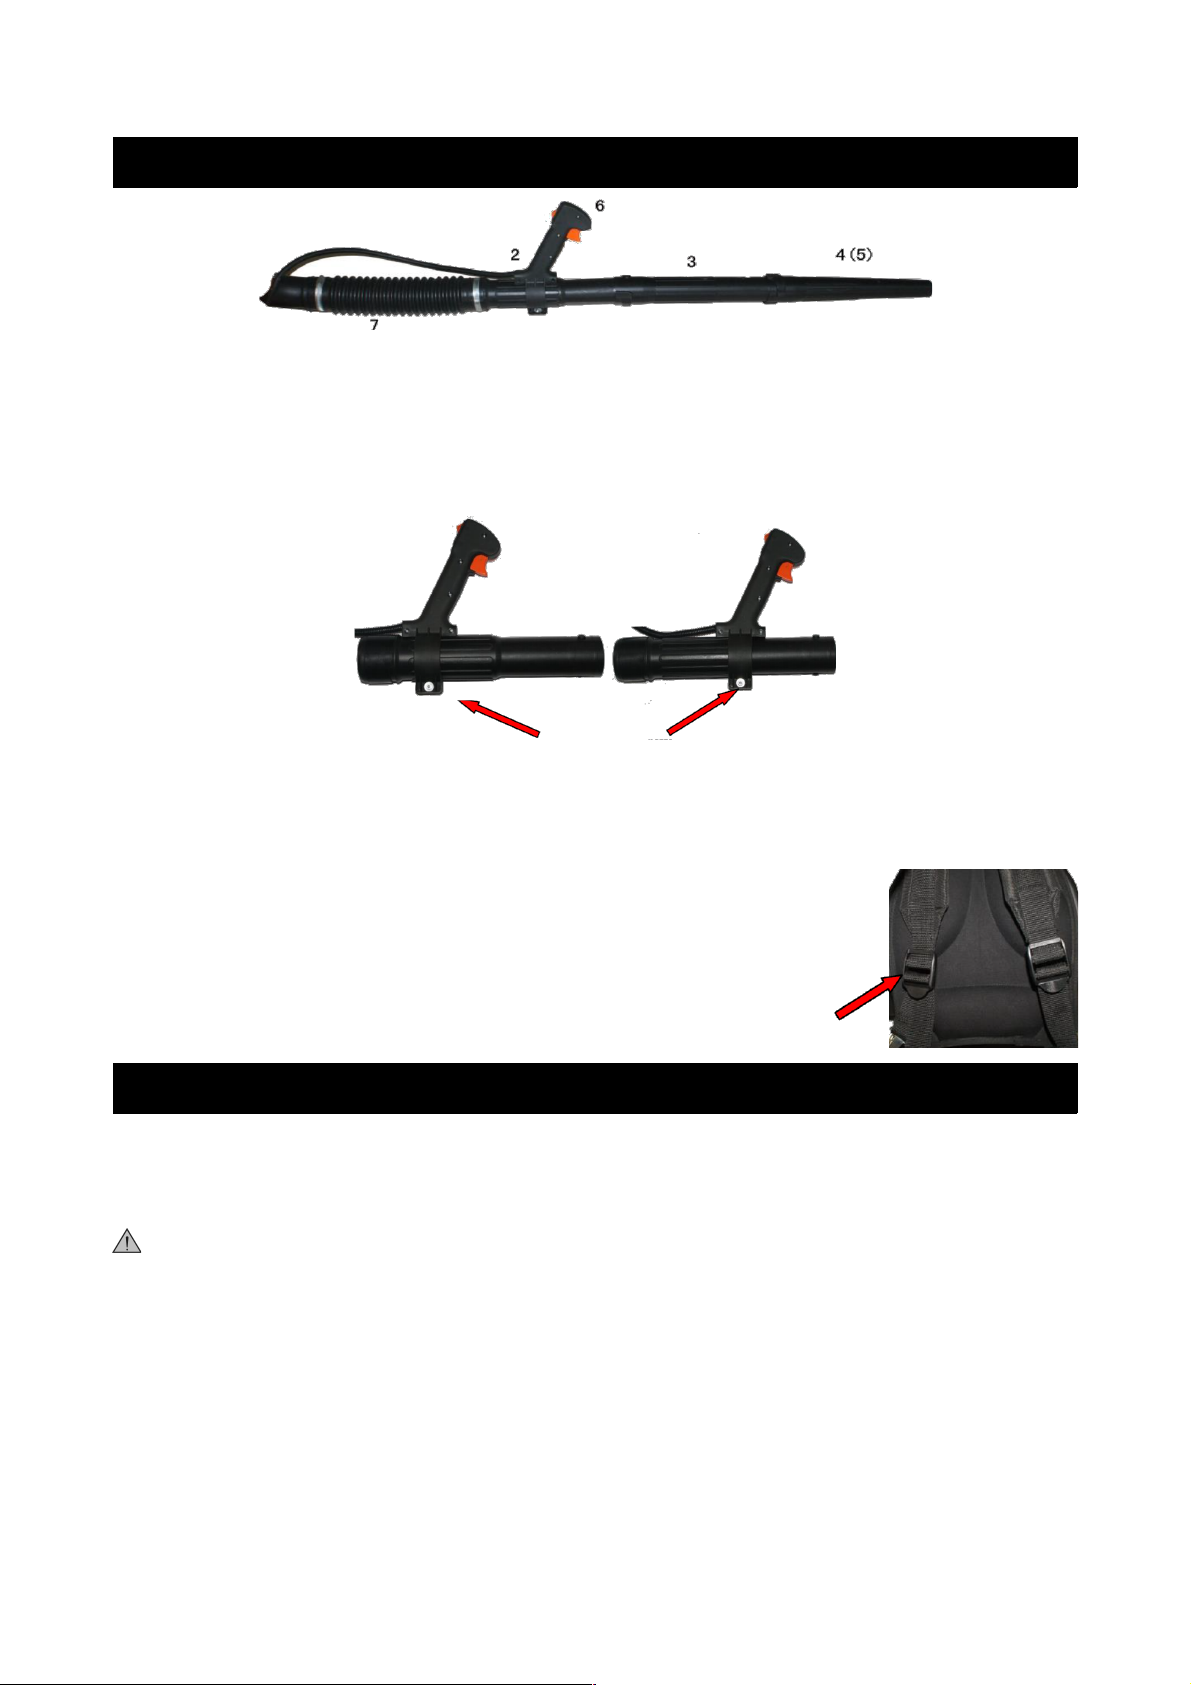
Adjusting the control handle
• Place the unit on its back
• Release the clamp screw
• Slide the control handle along the pleated hose to the most comfortable
position
• Retighten the clamp screw
Tightening the harness straps
• Pull the ends of the straps downwards to tighten the harness.
Loosening the harness straps
• Lift the tabs of the two sliding adjusters.
• Adjust the straps so that the back plate is held firmly
and comfortably against your back.
Fuelling
Your engine requires a mixture of petrol and engine oil. The quality of these
products and the mixed ratio has a decisive influence on the function and service
life of the engine.
WARNING: Unsuitable fuel, lubricants or mixed ratios other than those
specified may result in serious damage to the engine, sealing rings, hoses or fuel
tank.
Mixing the fuel
Avoid direct skin contact with the petrol or inhaling the vapours Use a container
approved for storing fuel. Pour the oil into the container first, then add the petrol
and mix thoroughly.
Mix to a ratio of 40 (unleaded petrol) to 1 (engine oil).
6
Adjustment Screw
Adjuster
Page 8
Storing fuel
Only mix sufficient fuel for a few months work. Store mixed fuel in an approved
safety-type fuel container, in a dry and safe location.
• Thoroughly shake the mixture in the container before fuelling the blower.
Beware that pressure may build up in the container, so open it slowly and
carefully.
• Clean the fuel tank and fuel container from time to time. Dispose of the
cleaning fluid at a properly authorized disposal station.
• Before refuelling, clean the filler cap and the area around it to ensure that
no dirt or other waste falls into the tank.
• Position the unit so that the filler cap is facing upwards. Take care not to
spill the fuel when refuelling, and do not overfill the tank.
• After refuelling, tighten the filler cap by hand as securely as possible.
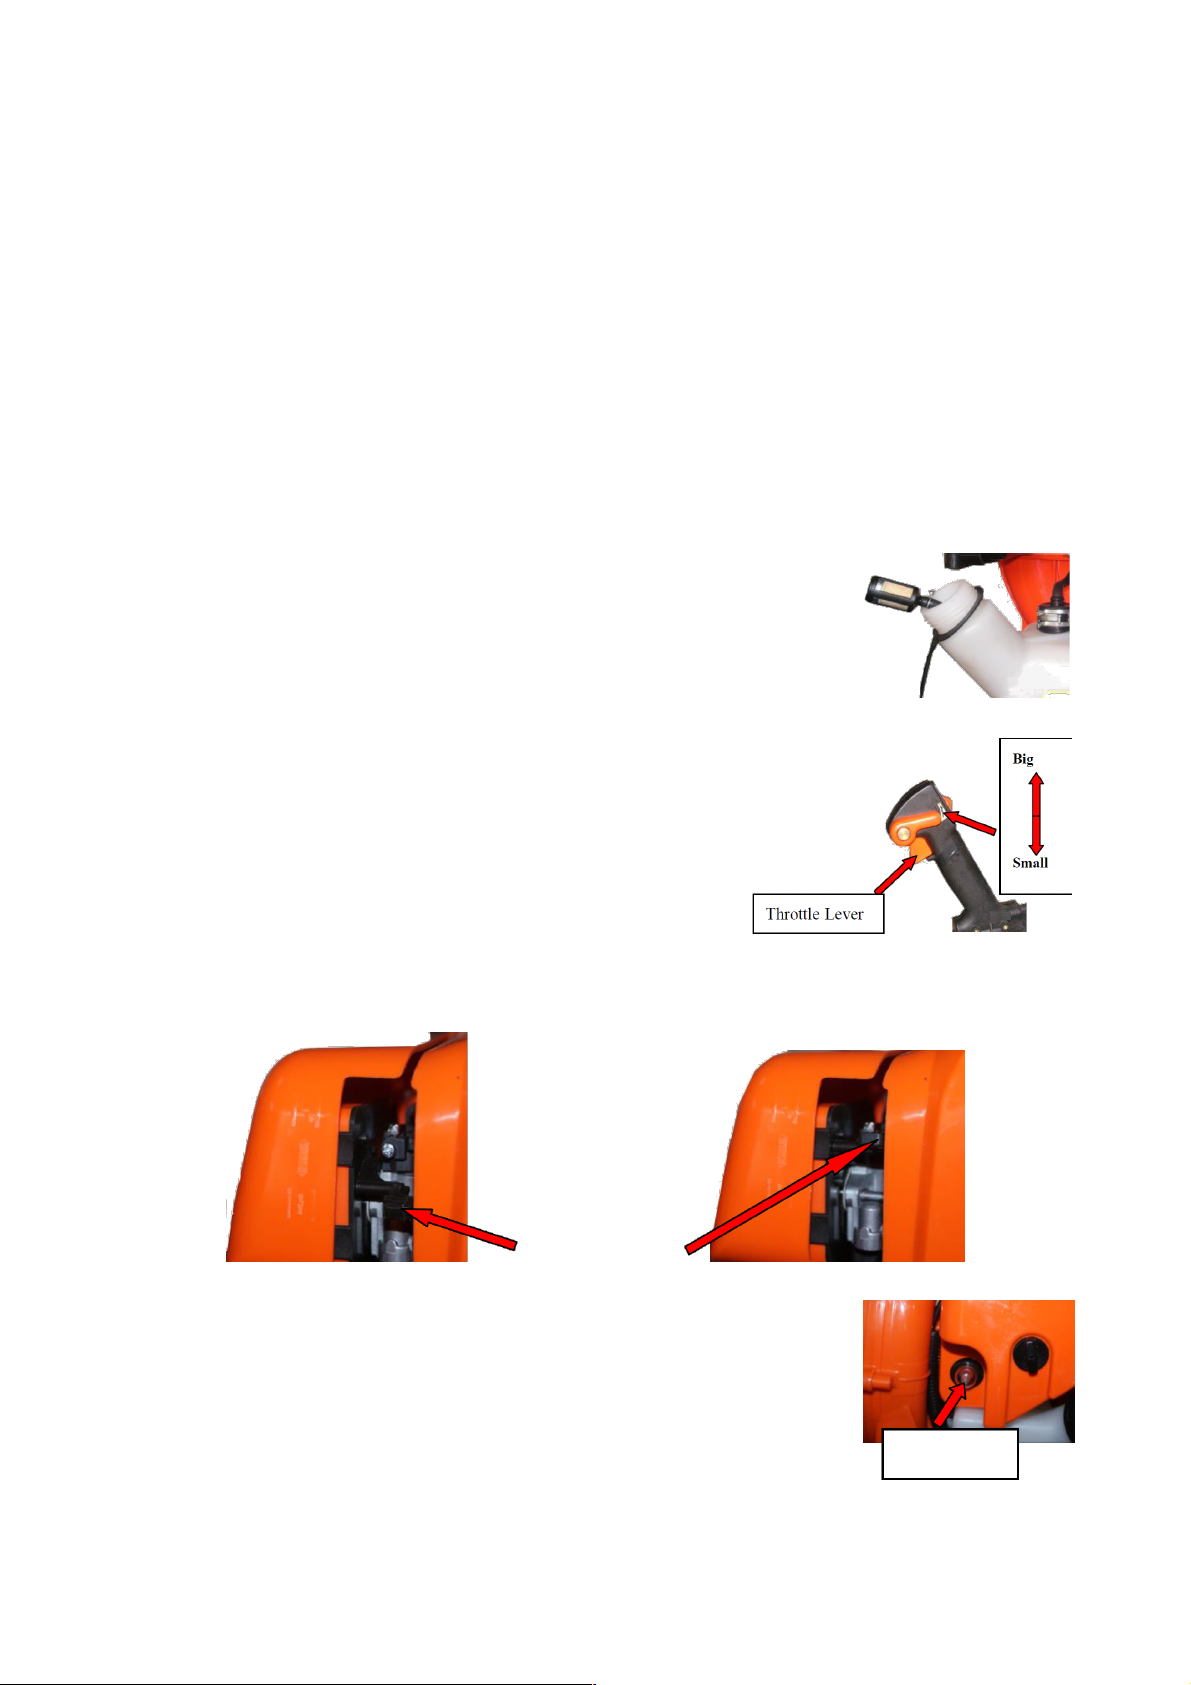
Change the fuel filter once a year
• Drain the fuel tank.
• Use a hook to pull the fuel filter out of the tank and take
it off the hose.
• Push a new filter into the hose.
• Place the filter bank into the tank.
Starting/stopping the engine
• Observe all safety precautions.
• Move the lever to the center position – this is the
oil-controlling setting.
• The lever can adjust the airflow volume.
• Put the lever on “0” before switching off the
engine, and the engine will stop automatically.
Before starting
If the engine is cold, close the choke.
• If the engine is hot, open the choke fully. Also use this
position when the engine has been running but is still
cold.
• Press the oil pump at least 10 times (See picture at right).
• Put the unit on the ground. Check that bystanders are
well clear of the general work area and the nozzle.
• Make sure you have a firm footing. Hold the unit with
7
Open the choke
Close the choke
Choke lever
Oil Pump
Page 9
your left hand on the housing and put one foot against the base plate to
prevent it slipping.
• Pull the starter grip slowly with your right hand to 20cm and give it a brisk
strong pull.
• Do not pull the starter rope all the way out, as it may break.
• Do not let the starter grip snap back.
• Guide it slowly back into the housing so that the starter rope can rewind
properly.
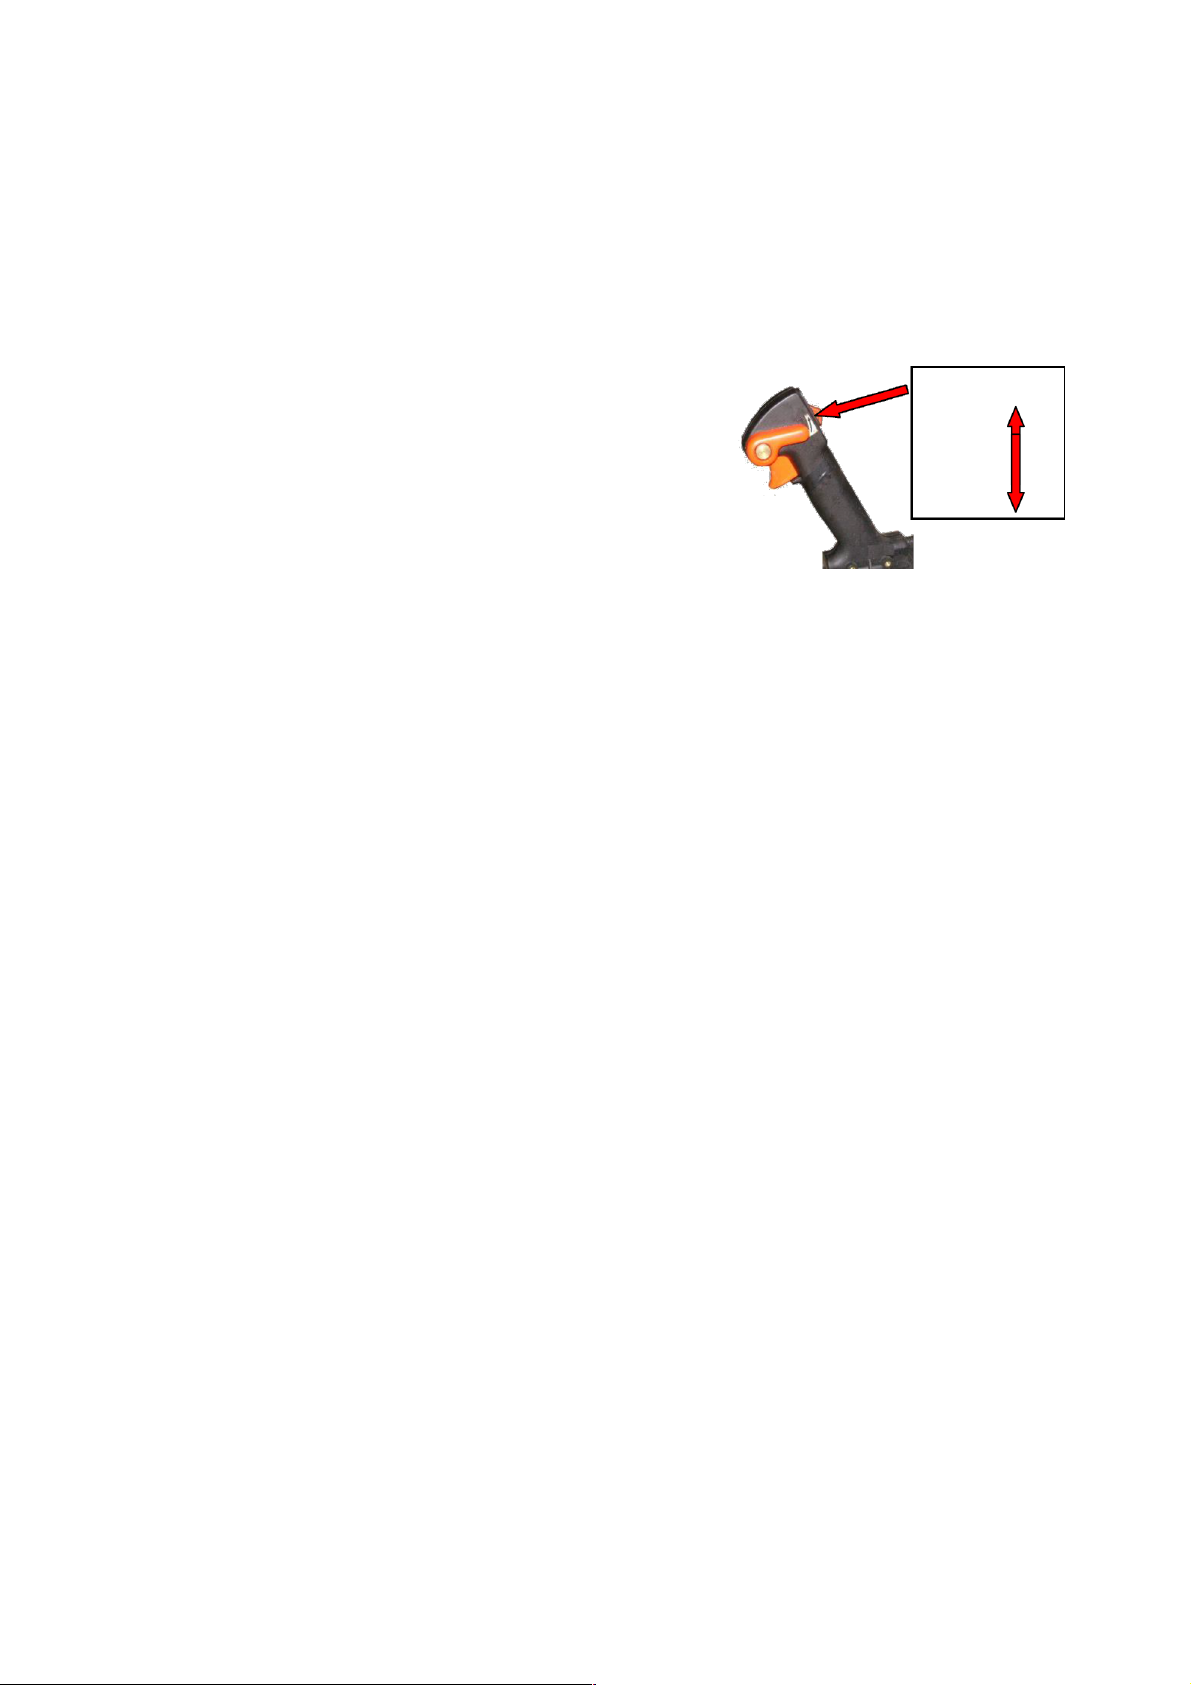
When the engine begins to fire
• If the engine is cold, open the choke and
continue cranking until engine runs.
• If the engine is warm, continue cranking until
engine runs.
When engine is running
• Move the lever to the center position so that the engine settles down to
idle speed.
Stopping the engine
• Move the lever to “0” and the engine will shut down.
If the engine does not start
• If you do not open the choke, quickly enough after the engine begins to
fire, the engine will stop.
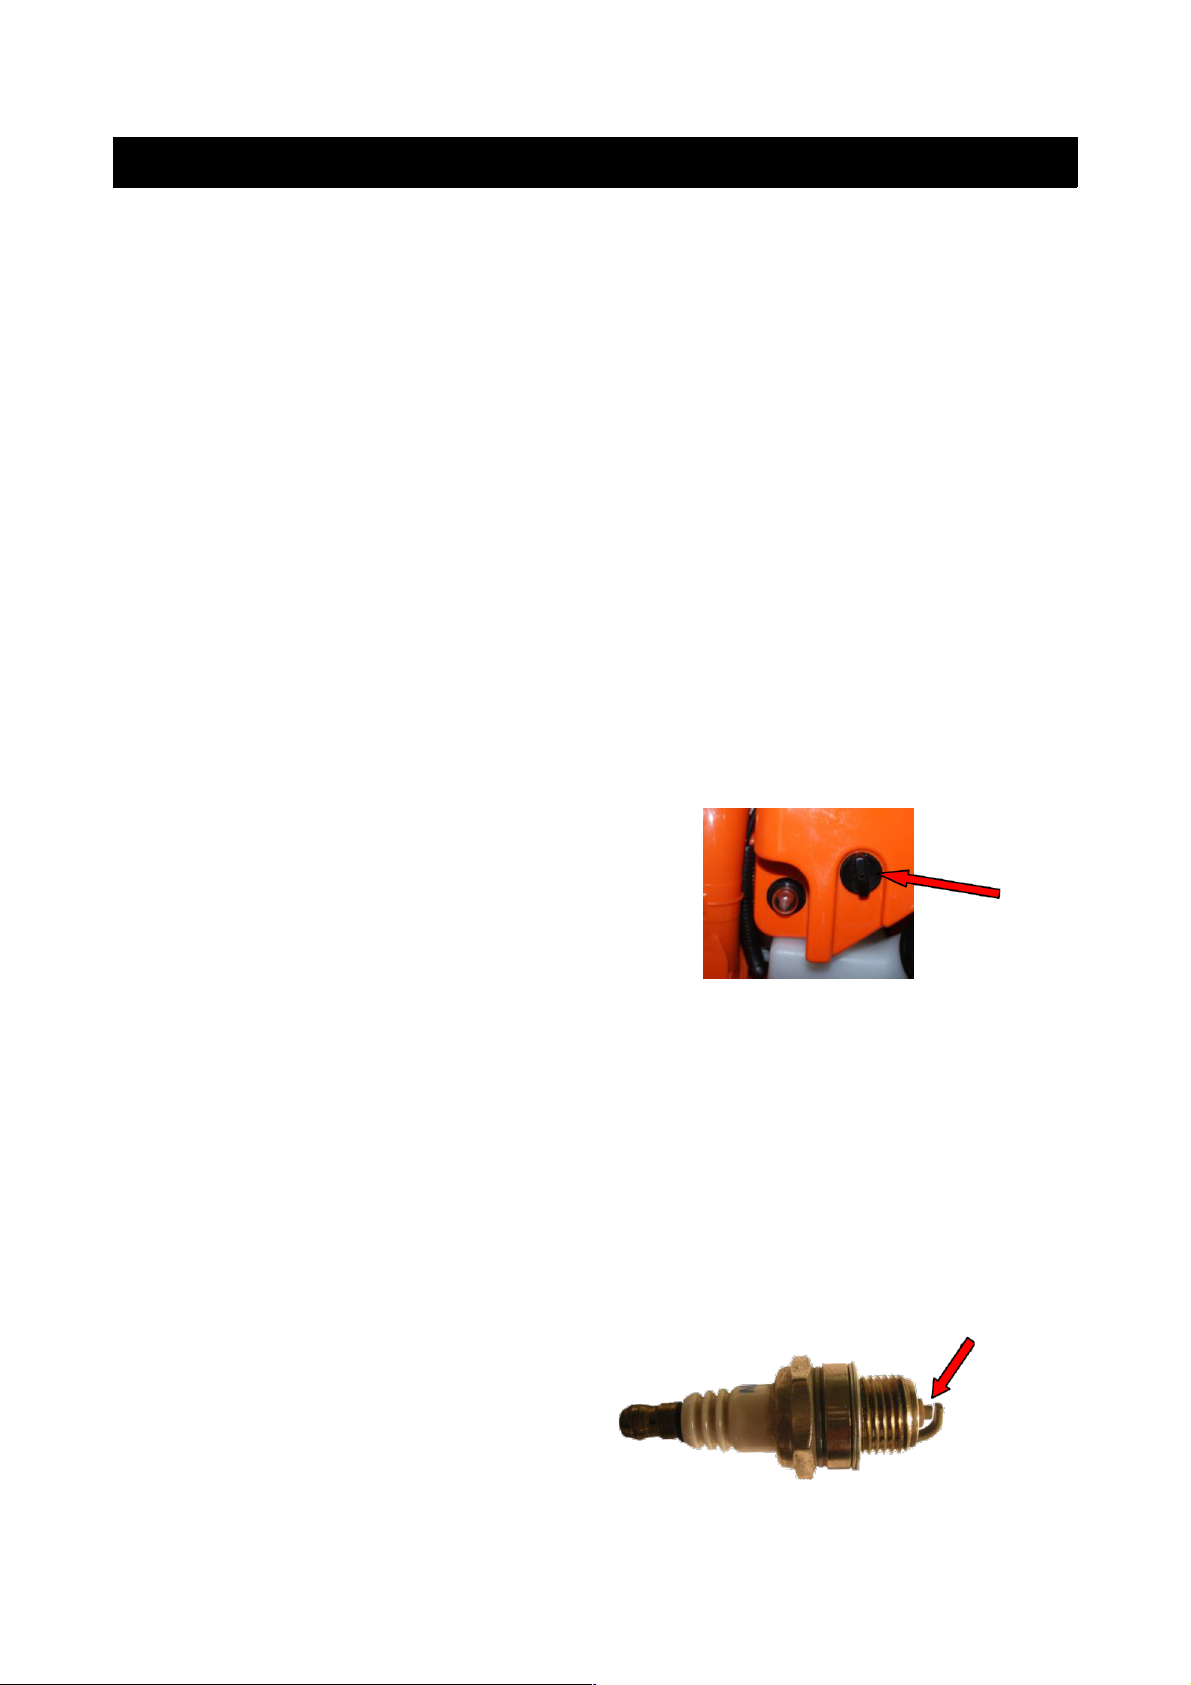
• Remove the spark plug.
• Unscrew and dry the spark plug.
• Set the stop switch to OFF.
• Pull the starter rope several times to clear the combustion chamber.
• Fit the spark plug and reconnect the spark plug cap.
• Move the stop switch to ON.
• Open the choke, even if the engine is cold.
• Now try again to restart the engine.
Fuel tank has run dry and has then been refuelled
• Pull the starter rope at least 10 times.
8
Stop Switch
Stop
Start
Page 10
Operation instructions
First time use (breaking-in)
A new machine should not be run at high speed. This avoids unnecessarily high
loads during the break-in period. The frictional resistances in the engine are
greater during this period. The engine develops it's maximum power after about
5 to 15 tank fillings.
During operation
After a long period of full-throttle operation, allow the engine to run for a short
time at idle speed so that the heat of the engine can be dissipated by the flow of
cooling air. The protects the engine-mounted components (ignition, carburettor
etc...) from thermal overload.
After use
Wait for the engine to cool down. To avoid condensation, fill the fuel tank and
keep the unit in a dry place until you need it again. If you will be storing the unit
unused for a long period of time, see the chapter “storing the machine”.
Cleaning the air filter
Dirty air filters reduce engine power, increase fuel consumption and make starting
more difficult.
• Close the choke.
• Pull A and remove the air filter cover.
• Remove the filter from the cover and
inspect it. If it is dirty or damaged, either
clean the filter or fit a new one.
• Install the filter.
• Fit the cover and tighten the screws.
Carburettor
Your carburettor comes from the factory with a standard setting. This setting will
provide the optimum fuel-air mixture under most operating conditions.
The high speed screw alters the engine power output and the maximum engine
speed. If the setting is too lean, there is risk of engine damage due to
insufficient lubrication and overheating.
The Spark Plug
If the engine is down on power, difficult to start or is running poorly and idle
speed, check the spark plug.
• Remove the spark plug. (See
“starting/stopping the engine”)
• Check the electrode gap A
(0.6~0.7mm) and adjust as
necessary.
9
A
A
Page 11
Rectify any problems that may have caused fouling of the spark plug:
• Too much oil in the fuel mixture
• Dirty air filter
• Unfavourable running conditions
Fit a new spark plug after every 100 operating hours or so, or sooner if the
electrodes are badly eroded.
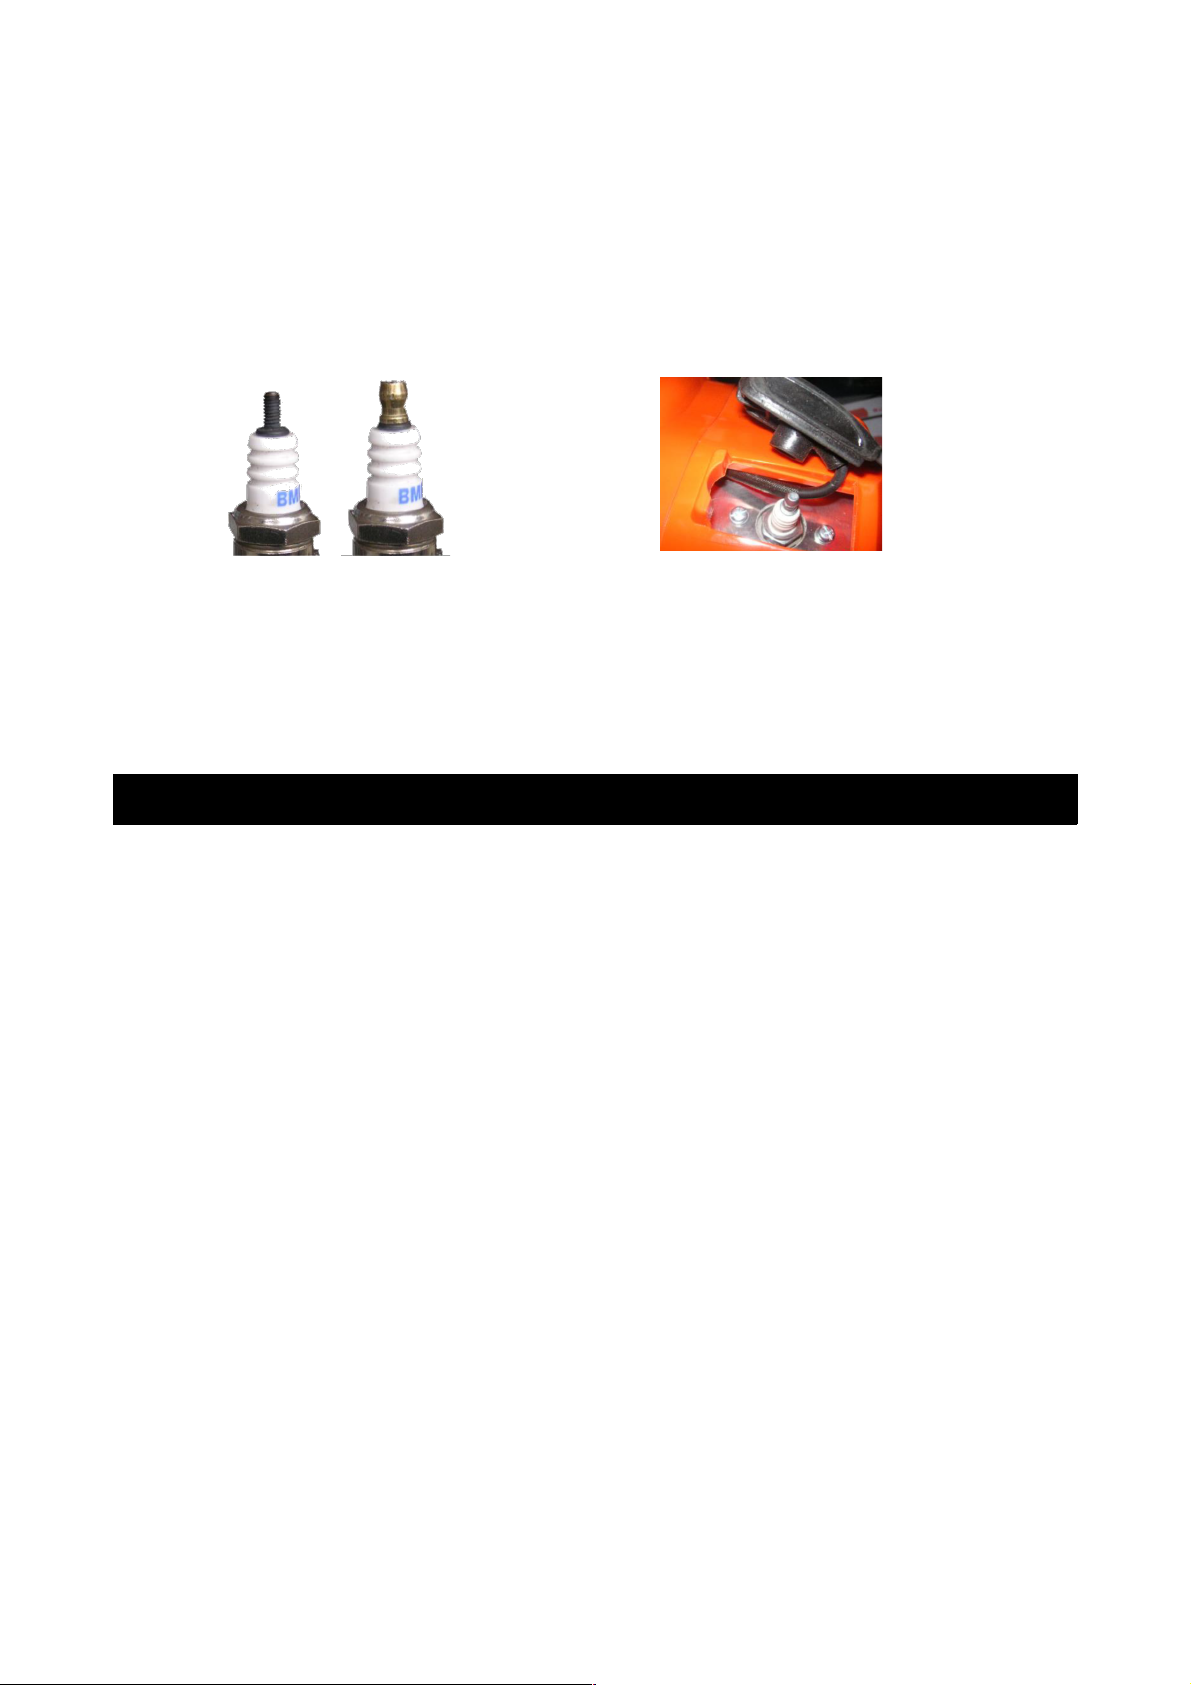
• If the spark plug comes with a detachable adapter nut, screw it firmly.
• Press the cap firmly onto the spark plug.
Engine behaviour
If the engine behaviour and performance is unsatisfactory, even though the air
filter is clean and the carburettor is properly adjusted, they cause may be in the
muffler.
Have your muffler checked for contamination by a service center.
Storing the machine
If storing the unit for periods of 3 months or longer:
• Clean the fuel tank.
• Run the engine until the carburettor is dry – this helps to prevent the
carburettor diaphragms from sticking together.
• Thoroughly clean the machine – pay special attention to the cylinder and
air filter.
• Store the machine in a dry, locked location out of reach of children or other
unauthorised persons.
• Do not expose the container to direct sunlight for unnecessarily long
periods. UV rays can make the container material brittle, which could result
in leakage or breakage.
Minimising wear and avoiding damage
Observing the instructions in this manual will reduce the risk of wear or damage
to the blower.
The blower must be operated, maintained and stored with the due care and
attention described in this manual.
The user is responsible for all damage caused by non-observance of the safety
precautions, operating and maintenance instructions in this manual. This includes,
in particular:
• Alterations or modifications to the product not approved by Kogan.com
• Using non-approved accessories, power tools or cutting tools
• Using the blower for purposes for which it was not designed
• Continuing to use the blower with defective components
10
Page 12

Maintenance and repair
All maintenance work should be performed by the owner, or if not, they should
be performed by a commercial hardware workshop.
If these operations are not carried out as specified, the user assumes
responsibility for any damage that may occur. Among other things, this includes:
• Damage to the engine due to neglect or deficient maintenance, incorrect
carburettor adjustment or inadequate cleaning of the cooling air inlets.
• Corrosion and other consequential damage resulting from improper
storage.
Disposal
Do not dispose of the blower with your household waste. Contact your local
council to find out the correct method to dispose of electrical and mechanical
waste so that you may minimise the impact on the local environment.
11
 Loading...