

Page 1

POWERPLUS 2 X 20V BRUSHLESS
CHAINSAW (SKIN ONLY)
CT20V2BCHSA
Page 2

Page 3

SAFETY & WARNINGS
General power tool safety warnings
1. Work area safety
a) Keep work area clean and well lit. Cluttered and dark areas invite accidents.
b) Do not operate power tools in explosive atmospheres, such as in the presence of
flammable liquids, gases, or dust. Power tools create sparks which may ignite the
dust or fumes.
c) Keep children and bystanders away while operating a power tool. Distractions can
cause you to lose control.
2. Electrical safety
Do not expose power tools to rain or wet conditions. Water entering a power tool will
increase the risk of electric shock.
3. Personal safety
a) Stay alert. Watch what you are doing and use common sense when operating a
power tool. Do not use a power tool while you are tired or under the influence of
drugs, alcohol, or medication. A moment of inattention while operating power tools
may result in serious personal injury.
b) Use personal protective equipment. Always wear eye protection. Protective
equipment such as dust mask, non-skid safety shoes, hard hat or hearing
protection used for appropriate conditions will reduce personal injuries.
c) Prevent unintentional starting; ensure the switch is in the off-position before
connecting to the battery pack, picking up or carrying the tool.
d) Do not overreach. Keep proper footing and balance at all times. This enables
better control of the power tool in unexpected situations.
Page 4

4. Power tool use and care
a) Do not force the power tool. Use the correct power tool for your application. The
correct power tool will do the job better and safer at the rate for which it was
designed.
b) Do not use the power tool if the switch does not turn it on and off. Any power tool
that cannot be controlled with the switch is dangerous and must be repaired.
c) Store idle power tools out of the reach of children and do not allow persons
unfamiliar with the power tool or these instructions to operate the power tool.
Power tools are dangerous in the hands of untrained users.
d) Maintain power tools. Check for misalignment or binding of moving parts,
breakage of parts and any other condition that may affect the power tool's
operation. If damaged, have the power tool repaired before use. Many accidents
are caused by poorly maintained power tools.
e) Use the power tool and accessories by these instructions, taking into account the
working conditions and the work to be performed. Use of the power tool for
operations different from those intended could result in a hazardous situation.
5. Service
Have your power tool serviced by a qualified repair person using only identical replacement
parts. This will ensure that the safety of the power tool is maintained.
Important safety precautions
1. For battery pack:
a) Before using the battery pack, read all instructions and cautionary markings on the
battery pack, charger and product using battery pack.
b) If the operating time has become excessively shorter, stop operating immediately.
It may result in a risk of overheating and possible burns.
c) Do not short the battery pack.
d) Do not touch the terminals with any conductive material.
e) Do not expose the battery pack to water or rain. A short circuit of the battery can
cause a large current flow, overheating, possible burns and even a breakdown.
f) Do not store the tool and battery pack in locations where the temperature may
exceed 140'F (60'C).
g) Do not incinerate the battery pack even if it is severely damaged or is completely
worn out. The battery pack can explode in a fire.
h) Be careful not to drop or strike the battery.
i) Do not use a damaged battery.
Page 5

2. For charger:
CAUTION: Danger of explosion if the battery is incorrectly replaced. Replace
a) Before charging, study the instruction manual carefully.
b) Before charging the battery, connect the power cord into the power supply first
and then connect the battery pack with the charger. Once the battery is fully
charged, disconnect the power supply after removing the battery pack from the
charger.
c) This device is for indoor use only. Water, rain, or moisture should be avoided. Do
not use power tools in damp or wet locations.
d) Correct use: chargers are to be used exclusively for charging 20V Certa
rechargeable battery packs. Any other application may result in a risk of fire,
electric shock or electrocution. The user bears sole responsibility for any damage
caused by inappropriate use. The generally recognised accident prevention
regulations and the safety instructions which accompany them must be adhered
to.
e) The charger is specifically designed to charge Certa battery packs. Do not attempt
to charge any other battery with this charger.
the battery only with an identical replacement model.
f) The use of any attachment not recommended or supplied by Kogan.com may
result in a risk of fire, electric shock, or injury to persons.
g) To reduce risk of damage to electric plug and cord, pull by the plug rather than the
cord when disconnecting charger.
h) Make sure cord is appropriately located so that it will not be stepped on, tripped
over or otherwise subject to damage or stress.
i) Do not operate charger with damaged cord or plug. Replace them immediately
should any damage found.
j) Do not operate charger if it has received a sharp blow, been dropped or otherwise
damaged in any way; contact Kogan.com.
k) Do not disassemble the charger; contact Kogan.com when service or repair is
required. Incorrect reassembly may result in a risk of electric shock or fire.
l) To reduce the risk of electric shock, unplug the charger from outlet before
attempting any maintenance or cleaning.
m) Charging must only be performed when the battery pack temperature is between
50'F (10'C) and 113'F (45'C).
n) The charger vents should never be covered or clogged by any foreign object.
o) The charger is designed to operate on standard household electrical power. Do not
attempt to use it on any other voltage.
p) Unplug the charger immediately if there is any sign of smoke or flame.
q) Do not drill into the housing of the charger or battery pack.
r) Keep the charger away from children.
Page 6

WARNING: The parts inside the charger are live and can create a shock
hazard. Do not stick anything in the battery charger terminal slots.
3. Safety precautions for charger and battery
a) Do not charge the battery when the temperature is below 32"F (O'C) or above 113'F
(45'C). The most suitable temperature for charging is 68-78"F (20~25'C).
b) Do not insert objects into the hole reserved for the battery in the charger.
c) Never short-circuit the battery. Short-circuiting the battery will severely damage
the battery and cause dangers of fire and explosion.
d) This appliance is not intended for use by persons, including children, with reduced
physical, sensory or mental capabilities or lack of experience and knowledge,
unless they have been given supervision or instruction concerning use of the
appliance by a person responsible of their safety.
e) Children should be supervised to ensure that they do not play with the appliance.
f) Do not dispose of electrical appliances as unsorted municipal waste; use separate
collection facilities.
g) If electrical appliances are disposed of in landfills or dumps, hazardous substances
can leak into the environment, damaging health, and well-being.
h) If the supply cord is damaged, it must be replaced by Kogan.com or its service
agent to avoid a hazard.
WARNING: If any parts are missing, do not operate tool until the missing
parts are replaced. Failure to do so could result in possible serious personal
injury.
4. Disposal of exhausted batteries
For safety and to preserve natural resources, recycle or dispose of properly. This product
contains a lithium-ion battery and must be disposed of properly. Local, state or federal laws
may prohibit disposal of lithium-ion batteries in ordinary trash. Consult your local waste
authority for information regarding available recycling and disposal options.
WARNING: Do not attempt to destroy or disassemble the battery pack or
remove any of its components. Do not touch terminals with metal objects
as short-circuit may result? Keep away from children. Failure to comply with
these warnings could result in fire and serious injury.
Page 7

5. Tips for maintaining battery life
a) Charge the battery pack before completely discharged. Always stop tool operation
and charge the battery pack when you notice a decrease in tool power.
b) Never over-discharge a fully charged battery pack. Over discharging shortens the
battery service life.
c) Charge the battery pack under room temperature between 50~113'F (10~45'C). Let
a hot battery pack cool down before charging it.
d) Charge the battery pack once every 3 months if you do not use it for a long period.
Li-ion battery is known to sell discharge over time. The battery may be damaged if
it is over-discharged.
6. Installing or removing battery pack
a) Hold the tool and the battery pack firmly when installing or removing the battery
pack. Failure to hold the tool and the battery pack firmly may cause them to slip
from your hands and result in damage to the tools and battery pack and a
personal injury.
b) Always switch off the tool before installing or removing the battery pack.
c) To remove the battery pack, press the release button and pull it out.
d) To install the battery pack with the charger, align the terminal pin on the charger
and slide the battery into the charger.
Note:
Do not use force when installing the battery pack. If the battery pack does not slide in
easily, it is not being inserted correctly.
Page 8
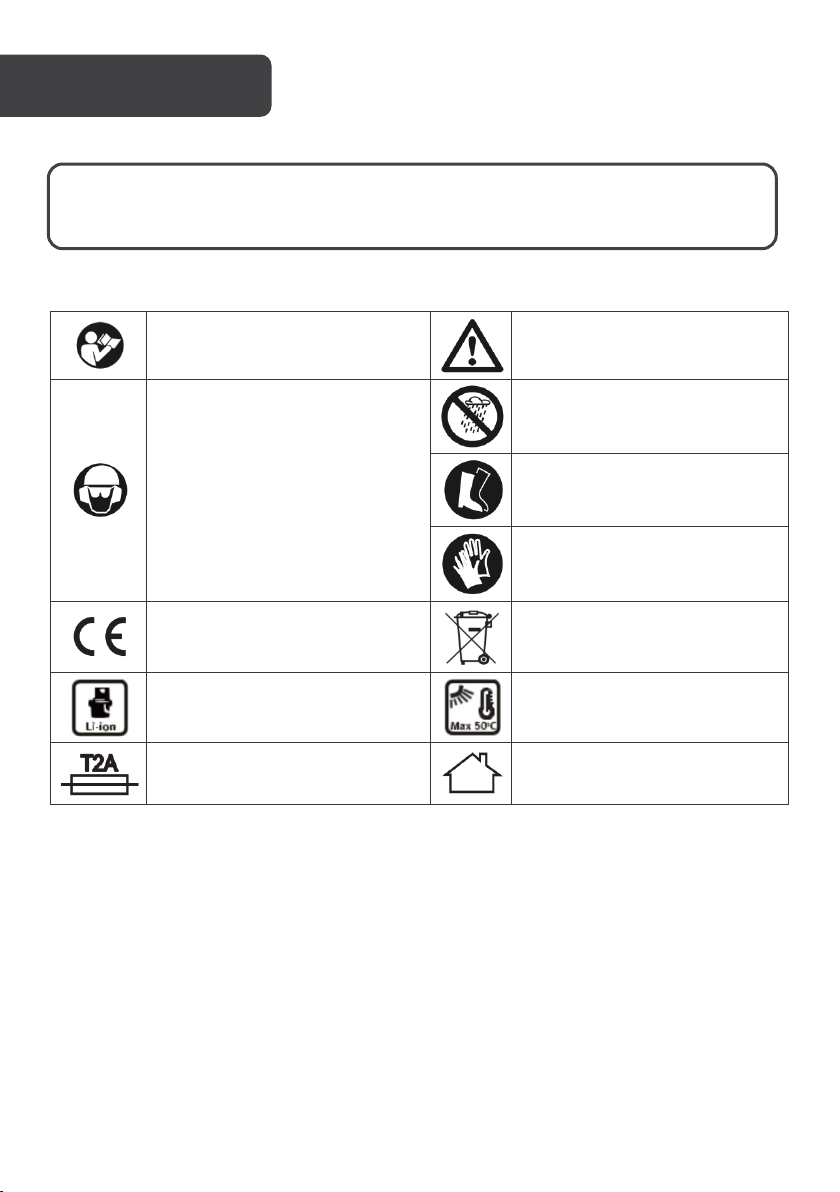
ATTENTION:
Do not expose the battery to
OVERVIEW
WARNING: Verify that the switch is in the OFF position before inserting or
removing the battery pack.
Read the user manual before
using this tool.
Whenever the tool is in use, safety
goggles must be worn to
safeguard against flying objects.
Ear protection, such as a
soundproof helmet, must be worn
to protect the operators hearing. If
the operator is working in an area
where there is a risk of falling
objects, a safety helmet must also
be worn.
CE certification marking
Li-ion battery
Temperature protection limitation
Warning! Danger! Note!
Do not expose to rain or moisture
Wear safety boots to protect
against electric shock
Wear gloves to protect your
hands
Do dispose of the battery with
household waste.
strong sunlight or heat sources
for long periods (max. 50°C)
The charger is only suitable for
use indoors
Page 9
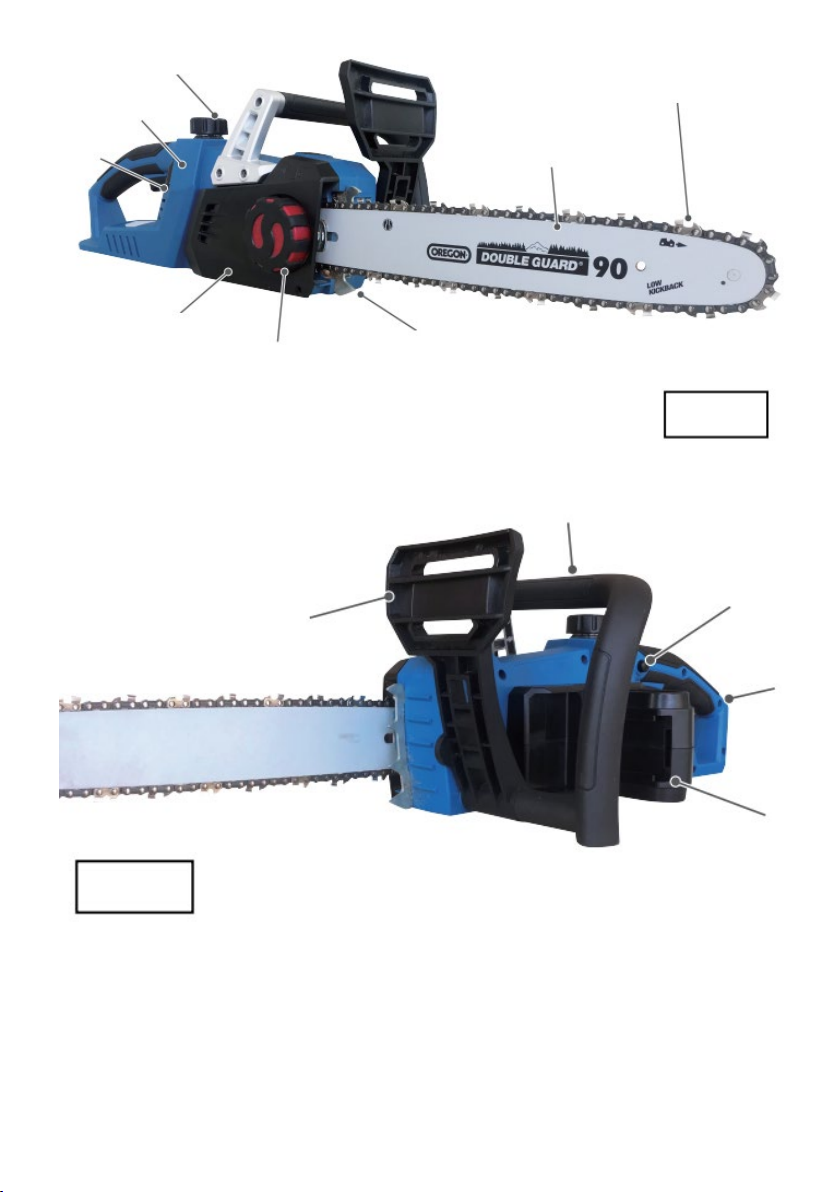
Protection handle
Lock-off button
Front handle
Rear handle
Fig. 2
Saw chain
Fig. 1
Sprocket cover
On/Off switch
Chain oil indicator
Oil tank cap
Spike bumper
Release knob for
chain wheel cover
Guide bar
Battery socket
Page 10

INSTRUCTION
Note:
• Read all safety warnings, instructions and specifications provided with this
tool.
• Failure to follow all instructions listed below may result in injury.
a) With the saw running, keep all parts of the body away from the saw chain. Before
starting the saw, make sure that the saw chain does not touch anything. When
working with a chainsaw, a moment of carelessness may cause clothing or body
parts to be caught by the saw chain.
b) Always hold the chainsaw with your right hand on the rear handle and your left
hand on the front handle. Holding the chainsaw in the reverse working position
increases the risk of injury and must not be done.
c) The power tool may only be held on the insulated grip surfaces in case the saw
chain touches covered cables. Saw chains touching a live wire will energise metal
parts of the power tool and could cause an electric shock to the operator.
d) Wear eye and ear protection. Additional protective equipment for head, hands,
legs and feet is recommended. Suitable protective clothing reduces the risk of
injury from flying debris and accidental contact with the saw chain.
e) Do not work on a tree with the chainsaw. Operation on a tree may result in injury.
f) Always make sure you stand firmly and use the chainsaw only if you stand on firm,
safe and level ground. Slippery ground or unstable surfaces such as a ladder can
lead to loss of balance or control over the chainsaw.
g) When cutting a live branch, expect it to spring back. If the tension in the wood
fibres is released, the tensioned branch may hit the operator and/or rip the
chainsaw out of control.
h) Be particularly careful when cutting undergrowth and young trees. The thin
material may get caught in the saw chain and hit you or upset your balance.
i) Carry the chainsaw by the front handle when switched off, with the chain facing
away from your body. Always remove the protective cover when transporting or
storing the chainsaw. Careful handling of the chainsaw reduces the likelihood of
accidental contact with the running chain.
j) Follow instructions for lubrication, chain tension and changing accessories. An
improperly tensioned or lubricated chain can either break or increase the risk of
recoil.
k) Keep handles dry, clean and free of oil and grease. Greasy, oily handles are slippery
and cause loss of control.
l) Only saw wood. Do not use the chainsaw for work for which it is not intended. Do
not use the chainsaw to saw plastic, masonry or construction materials that are
not made of wood. Using the chainsaw for work other than that for which it was
intended can lead to dangerous situations.
Page 11

1. Avoiding kickback
Kickback may occur if the tip of the guide bar touches an object or if the wood bends and
the saw chain become stuck in the cut. In some cases, contact with the tip of the bar may
result in an unexpected rearward reaction by hitting the guide bar upwards and in the
direction of the operator.
Jamming the saw chain at the top of the guide bar can quickly push the bar back in the
operator's direction.
Any of these reactions can cause you to lose control of the saw and potentially seriously
injure yourself.
Do not rely solely on the safety devices built into the chainsaw. As a chainsaw user, you
should take various measures to avoid accidents and injuries.
A kickback is the result of incorrect or faulty use of the power tool. It can be prevented by
taking appropriate precautions as described below:
a) Hold the saw firmly with hands, thumb and finger enclosing the handles of the
chainsaw. Bring your body and arms into a position where you can withstand the
recoil forces. If appropriate measures are taken, the operator can control the recoil
forces. Never release the chainsaw.
b) Avoid abnormal posture and do not saw above shoulder height. This will prevent
accidental contact with the bar tip and allow better control of the chainsaw in
unexpected situations.
c) Always use replacement bars and saw chains specified by Kogan.com. Incorrect
replacement bars and saw chains can cause the chain to tear and/or kickback.
d) Follow the instructions for sharpening and maintaining the saw chain. Depth
limiters that are too low increase the tendency to kickback.
Note:
Observe the safety and operating instructions in the separate operating instructions for
the battery and charger.
WARNING: This power tool generates an electromagnetic field during
operation. This field may affect active or passive medical implants under
certain circumstances.
To reduce the risk of serious or fatal injury, it is recommended that persons
with medical implants consult their physician and the manufacturer of the
medical implant before operating the machine.
Page 12

2. Vibration and noise reduction
ATTENTION: It is recommended that a first-time user should at least
practice cutting logs on a sawhorse or frame.
To reduce the influence of vibration and noise: limit working hours, use settings for lower
vibration and noise emissions and wear personal protective equipment. Observe the
following points to minimise vibration and noise exposure:
1. Use the product only in accordance with its design and instructions.
2. Ensure that the product is in good condition and well maintained.
3. Use the correct accessories and ensure that they are in good condition.
4. Hold the product firmly but not tightly by the handles provided.
5. Maintain the product according to these instructions and keep it well lubricated.
6. Plan your working hours according to these instructions to spread a higher load
over a longer period.
3. Emergency
Familiarise yourself with the use of the product by reading this manual completely. Make a
note of the safety instructions and follow them carefully.
This will help you prevent risks and hazards.
a) Always be careful when using the product so that you can identify and react to
hazards early. Quick intervention can prevent serious injury and property damage.
b) Switch off the product and disconnect it from the power supply if problems occur.
Have the product repaired by Kogan.com, if necessary, before reusing the product.
4. Residual risks
Even if you operate this power tool correctly, there are always residual risks. The following
hazards may occur in connection with the construction and design of this power tool:
a) Injuries and material damage caused by flying parts.
b) Hearing damage if you do not wear suitable hearing protection or use the power
tool for a long period.
c) Damage to health resulting from hand/arm vibrations if the power tool is used for
an extended period or is not properly operated and maintained.
Page 13
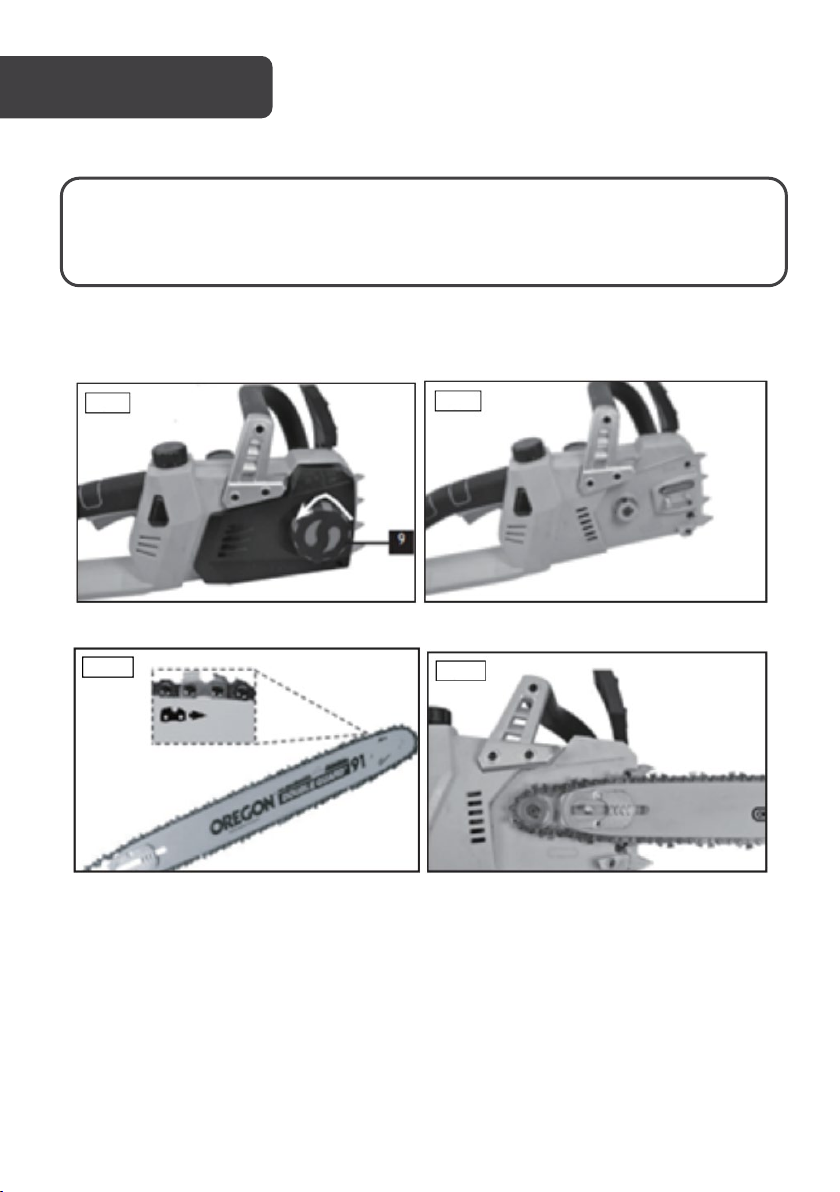
Fig 3
Fig 4
Fig 5b
Fig 5a
WARNING: Watch your step. Switch off the device and pull out the battery
when it is fully assembled, and the chain tension has been adjusted. Always
wear protective gloves when working on the chainsaw to avoid injury.
Page 14
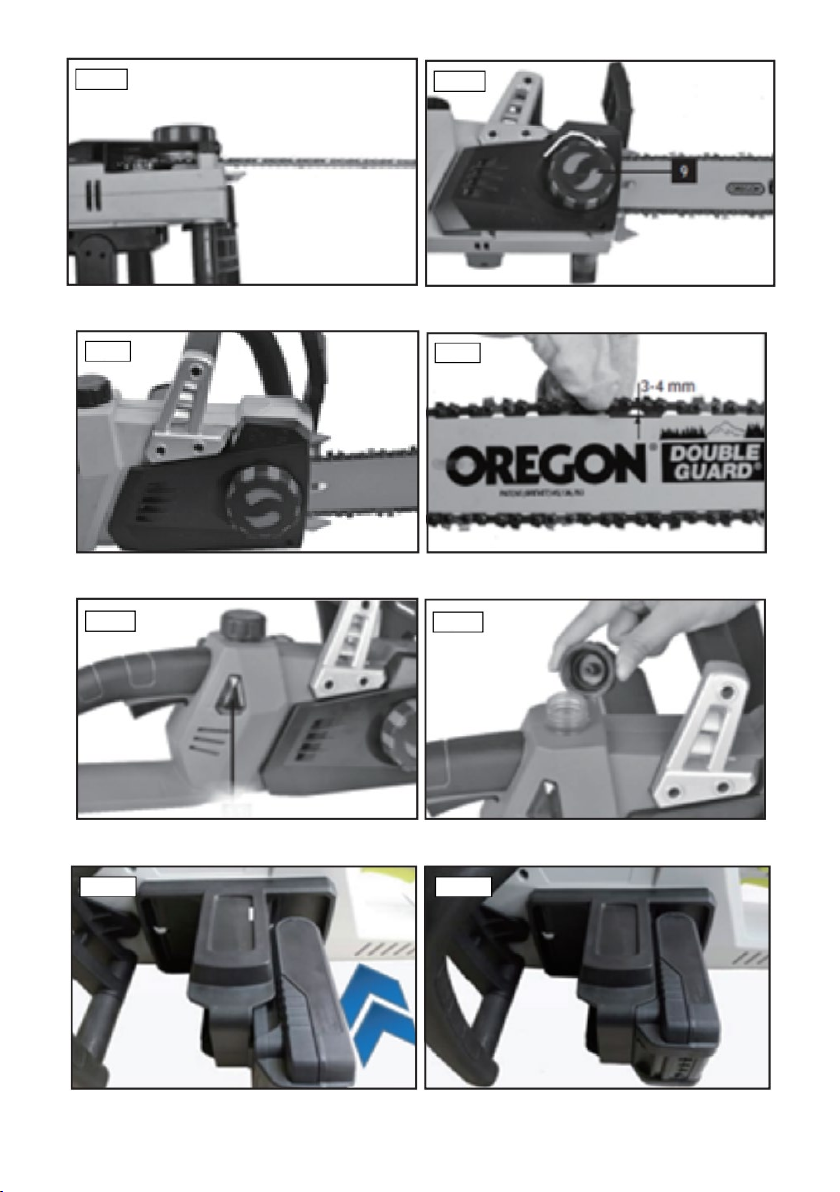
Fig 10b
Fig 9a
Fig 6a
Fig 6b
Fig 10a
Fig 9b
Fig 8
Fig 7
Page 15
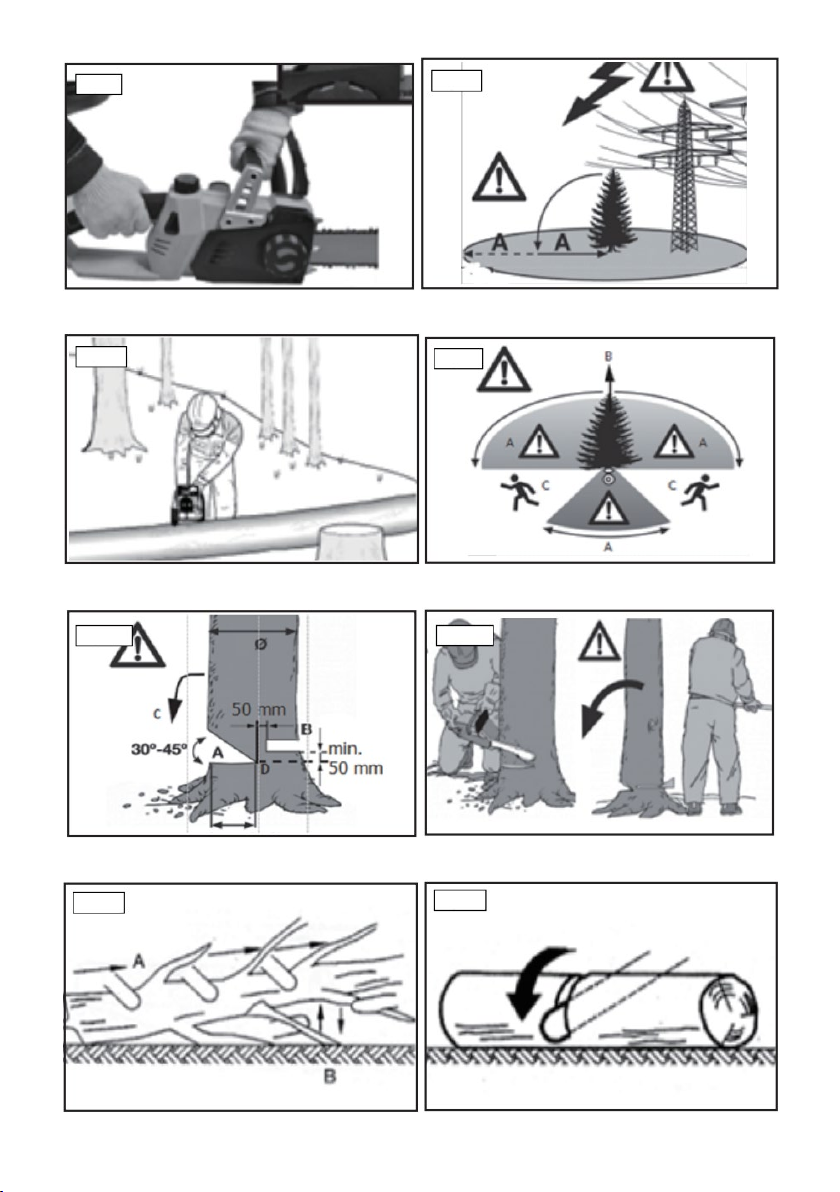
Fig 12
Fig 11
Fig 13
Fig 17
Fig 16
Fig 15b
Fig 15a
Fig 14
Page 16
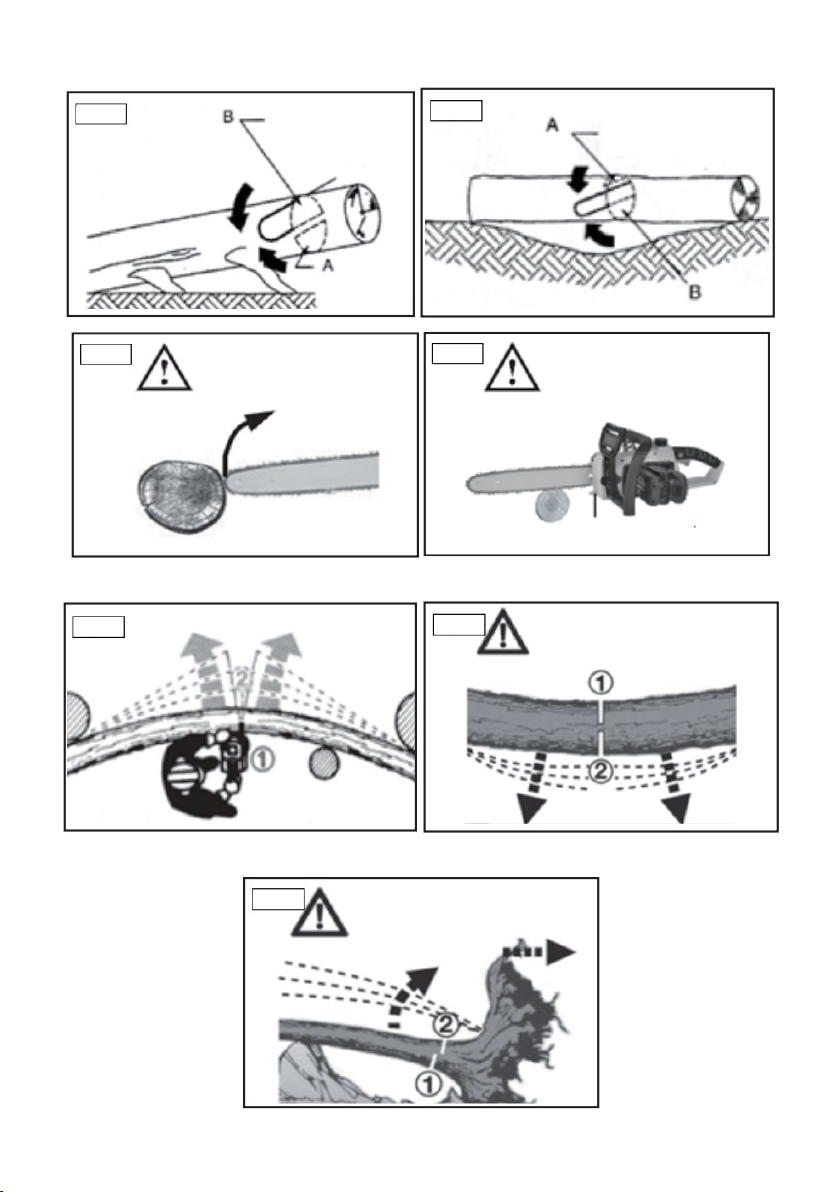
Fig 18
Fig 24
Fig 19
Fig 23
Fig 22
Fig 21
Fig 20
Page 17

Some safety precautions must be observed when using equipment to prevent injury and
damage:
• Read the operating instructions carefully and follow their instructions.
Use these instructions to familiarise yourself with the device, its correct use and
safety regulations.
• Keep these in a safe place so that the information is available to you at all times
• If you should hand over the device to another person, hand over these operating
instructions.
1. Mounting the guide bar and saw chain
a) Unpack all parts carefully and check for completeness.
b) Loosen the fixing screw for the chain wheel cover (Fig. 3).
c) Remove the chain wheel cover (Fig. 4).
d) Place the chain in the circumferential groove of the saw chain as shown (Fig. 5a).
e) Insert the saw chain and guide bar into the chainsaw holder as shown. Guide the
chain around the sprocket (Fig. 5b).
f) Fit the chain wheel cover (Fig. 6a) and secure with the fixing knob (Fig. 6b).
Do not tighten the fixing screw until the chain tension has been adjusted.
2. Tensioning the saw chain
Watch your step.
Always switch off the device and remove the battery from the device before checking and
adjusting.
Always wear protective gloves when working on the chain saw to avoid injury.
a) Loosen the fixing knob for the chain wheel cover a few turns (Fig. 3).
b) Turning to the right increases the chain tension, turning to the left reduces the
chain tension. The saw chain is correctly tensioned when it can be lifted by approx.
3-4mm in the middle of the sword (Fig.8).
c) Turn the knob clockwise to guide the saw chain (Fig. 6b).
All chain links must lie properly in the guide groove of the guide bar.
Page 18

Tips for tensioning the chain:
• The saw chain must be correctly tensioned to ensure safe operation. You will see
the optimum tension when the saw chain can be lifted by 3-4mm in the middle of
the sword.
• Since the saw chain heats up as a result of sawing and changes its length as a
result, check the chain tension every 10 minutes and adjust it if necessary. This is
especially true for new saw chains.
• After finishing work, relax the saw chain as it shortens when it cools down. This will
prevent the chain from being damaged.
3. Saw-chain lubrication
Always switch off the device and remove the battery from the device before checking and
adjusting the chain. Always wear protective gloves when working on the chain saw to avoid
injury.
ATTENTION: Never operate the chain without saw chain oil. Using the
chainsaw without saw chain oil or with an oil level below the minimum mark
(Fig. 9) will damage the chainsaw.
Observe temperature conditions.: Different ambient temperatures require lubricants with
very different viscosity. At low temperatures, you need thin oils (low viscosity) to produce a
sufficient lubricating film. If you use the same oil in summer, it would be liquefied further by
the higher temperatures alone. This can cause the lubricating film to break off, overheating
the chain and damaging it. Lubricating oil also burns and leads to unnecessary pollution.
4. Filling the oil tank
a) Place the saw chain on a level surface.
b) Clean the area around the oil tank cover and then open it. (Fig. 9b)
c) Fill the tank with saw chain oil. Ensure that no dirt gets into the tank so that the oil
nozzle is not blocked.
d) Close the oil tank cap.
Page 19

OPERATION
1. Removing and Inserting the battery
• Batteries must be used to operate the saw. (Fig. 10a)
• To remove the battery from the device, press the unlock button on the battery and
remove the battery.
• To insert the battery, slide the battery into the device along the guide rail. You will
hear it click into place.
• Do not insert the battery until the device has been fully assembled.
• There is a risk of injury!
2. Charging
• Do not expose the battery to extreme conditions such as heat and shock. There is
a risk of injury from leaking battery fluid! In case of eye or skin contact, rinse the
affected areas with water or neutraliser and seek medical advice.
• Charge the battery only in dry rooms, the outer surface of the battery must be
clean and dry before connecting the charger.
• There is a risk of injury from electric shock.
• Only charge the battery with the included charger.
• Charge the battery before first use. Do not charge the battery several times in a
row.
• A significantly shortened operating time despite charging indicates that the
battery is exhausted and must be replaced. Only use an original battery, which you
can obtain from the customer service.
• Always observe the applicable safety instructions as well as regulations and
information on environmental protection. Defects resulting from improper handling
are not covered by the warranty.
3. Charging the battery
Allow a freshly discharged battery to cool for about 15 minutes before inserting it into the
charger.
Page 20
4. Checking the state of charge of the battery
Press the button on the battery, the number of lit LEDs indicates the charge status of the
battery:
a) All LEDs light up: The battery is fully charged.
b) 1 LED lights up: Battery is empty, please charge.
c) Used batteries: A significantly shortened operating time despite charging indicates
that the battery is exhausted and must be replaced. Only use a replacement
battery, which can be obtained from the customer service.
Always observe the applicable safety instructions as well as regulations and information on
environmental protection.
5. Switching on/off
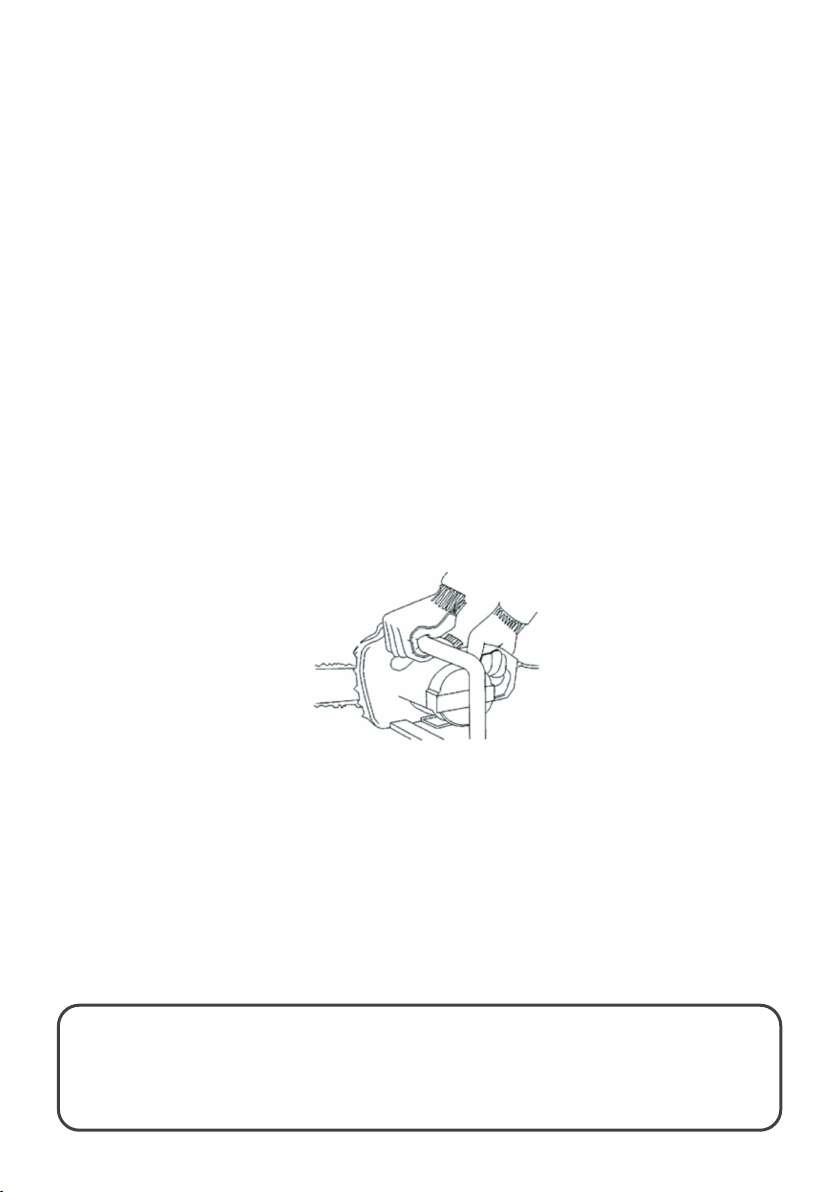
1. Hold the chain saw with both hands on the handles as shown below and in Fig.11
(thumb under the handle).
2. Press and hold the lock-off button, and switch on the chain saw with on/off switch.
The lock-off button can then be released.
3. Switching off:
a) Release the on/off switch.
b) The built-in brake quickly brings the rotating saw chain to a standstill.
CAUTION: Only carry the saw by the front handle. If you carry the saw only
on the rear handle with the switching elements, you could accidentally
activate the lock-off switch and the on/off switch at the same time and start
the chainsaw.
Page 21

6. Charging
1. Chain brake:
The chain brake is a protective mechanism triggered by the front handguard. If the
chainsaw is thrown back by a kickback, the chain brake is released and stops the saw chain
in less than 0.12 seconds.
Check the chain brake function regularly. To do this, fold the handguard forward and
switch on the chainsaw briefly. The saw chain must not start.
Pull the front handguard back until it engages to release the chain brake.
WARNING: Do not use the saw if the guards do not function properly.
Do not attempt to repair safety guards yourself; contact Kogan.com.
2. Hand protection:
The front handguard (activating the chain brake) and the rear handguard protect the
fingers against injuries caused by contact with the saw chain if it breaks due to overloading.
7. Working with the chainsaw
Before each use, check the following points to ensure that you can work safely:
1. Condition of the chainsaw
Before starting work, inspect the chainsaw for damage to the housing, battery, saw chain
and guide bar. Never operate a damaged device.
2. Oil container
Check the level of the oil tank before and during work to ensure sufficient oil is available.
Never operate the saw if there is no oil or the oil level has dropped below the min mark (Fig.
9) to avoid damaging the chainsaw. On average, one filling will last for 15 minutes,
depending on the pauses and load.
3. Saw chain
Check the tension of the saw chain and the condition of the cutting edges. The sharper the
saw chain, the easier and more controllably the chain saw can be operated.
The same applies to the chain tension. Also, check the chain tension every 10 minutes
during work to increase your safety! Especially new saw chains tend to expand.
4. Chain brake
Check the function of the chain brake as described in the chapter "Safety devices" and
release it.
Page 22

5. Protective clothing
You must wear the appropriate, tight-fitting protective clothing such as cut-resistant
trousers.
6. Hearing protection and safety glasses
Wear a protective helmet with integrated hearing and face protection during felling and
forest work.
This protects from falling branches and branches.
8. Correct basic work procedures
1. Cutting down a tree (Fig. 12-15)
If two or more persons cut and fell at the same time, the distance between the cutting and
cutting persons should be at least twice the height of the tree to be cut (Fig.12). When
felling trees, care must be taken that other persons are not exposed to danger, that no
supply lines are hit and that no material damage is caused. If a tree comes into contact
with a power line, the power company must be informed immediately.
When sawing on slopes, the chainsaw operator should be on the ground above the tree to
be cut, as the tree is likely to roll or slide downhill after cutting (Fig.13). Before felling, an
escape route must be planned and, if necessary, cleared. The escape route must lead
diagonally from the expected fall line to the rear, as shown in Figure 14 (A = danger zone, B
= fall direction, C = escape area).
Before felling, the natural inclination of the tree, the position of larger branches and the
wind direction must be taken into account to assess the fall direction of the tree.
Remove dirt, stones, loose bark, nails, staples, and wire from the tree.
2. Set notch cut (Fig. 15a)
Saw a notch (A) at right angles to the direction of fall with a depth of 1/3 of the tree
diameter, as shown in Figure 15a.
First, make the bottom horizontal notch (A). This will avoid jamming the saw chain or guide
bar when setting the second notch.
3. Setting the felling cut (Fig. 15a/15b)
Place the felling cut at least 50 mm above the horizontal notch cut. Make the felling cut
(B) parallel to the horizontal notch cut. Saw the felling cut only deep enough to leave a
web (felling bar) (D) which can act as a hinge. The bridge prevents the tree from turning
and falling in the wrong direction. Do not saw through the bridge. When the felling cut
approaches the bridge, the tree should begin to fall. If it appears that the tree may not fall
in the desired fall direction (C) or may tilt back and clamp the saw chain, interrupt the
felling cut and use wood, plastic or aluminium wedges to open the cut and turn the tree to
the desired fall line.
When the tree begins to fall, remove the chainsaw from the cut, turn it off, lay it down and
leave the danger area via the planned escape route. Watch out for falling branches and do
not trip.
Page 23

4. Delimbing
This is the separation of the branches from the felled tree. When pruning, leave larger
branches pointing downwards to support the tree for the time being. Keep smaller
branches away from the ground as shown in Figure 16 (A = Direction of cut when pruning, B
= Distance from the ground). Leave supporting branches standing until the trunk is sawn
with a cut. Branches that are under tension should be sawn from bottom to top to avoid
jamming the saw.
5. Cut tree trunk to length
This means dividing the felled tree into sections. Make sure that you stand securely and
that your body weight is evenly distributed on both feet. If possible, the trunk should be
supported by branches, beams or wedges. Follow the simple instructions for light sawing.
When the entire length of the log is evenly supported, as shown in Figure 17, saw from
above. Be careful not to cut into the ground.
If the log is resting on one end, as shown in Figure 18, first saw 1/3 of the log diameter from
the bottom (A) to avoid splintering. Make the second cut from above (2/3 diameter) at the
level of the first cut (B) (to avoid jamming).
When the log rests on both ends, as shown in Figure 19, first saw 1/3 of the log diameter
from the top to avoid splintering (A). Make the second cut from below (2/3 diameter) at the
level of the first cut (B) (to avoid jamming).
When sawing on slopes, always stand above the tree trunk, as shown in Figure 13. To
maintain full control at the moment of sawing, reduce the contact pressure towards the
end of the cut without loosening the firm grip on the handles of the chainsaw. Make sure
that the saw chain does not touch the ground. When the cut is complete, please wait for
the saw chain to stop before removing the chainsaw. Always switch off the chainsaw motor
before changing from tree to tree.
6. Kickback
Kickback is the sudden up and backstroke of the running chainsaw. The causes are usually
touching the workpiece with the tip of the sword or jamming the saw chain.
In the event of recoil, significant forces may suddenly occur, and the chainsaw will usually
react uncontrolled. The result is often serious injury to workers or people in the vicinity.
Particularly with lateral cuts, inclined cuts and longitudinal cuts, the danger of kickback is
particularly great because the claw stop cannot be used. Avoid such cuts as far as possible
and work particularly carefully if they cannot be avoided.
The danger of kickback is greatest if you place the saw in the area of the tip of the sword as
this is where the leverage is strongest (Fig. 20). Always place the saw flat and close to the
claw (Fig. 21).
7. Sawing of wood under tension
Sawing wood that is under tension requires special care. Wood under tension, which is
released from tension by sawing, sometimes reacts completely uncontrolled.
This can lead to serious or even fatal injuries (Fig. 22-24).
Such work may only be carried out by trained specialists.
Page 24
(approx. 20 cm).
CLEANING & CARE
1. Replace saw chain and guide bar:
The guide bar must be replaced when the guide groove of the guide bar is worn out, or the
spur gear in the sword is damaged or worn.
Proceed as described in chapter “Mounting the guide bar and saw chain”.
a) Check the automatic chain lubrication.
b) Regularly check the function of the automatic chain lubrication to prevent
overheating and associated damage to the sword and saw chain. To do this, point
the tip of the sword against a smooth surface (board, pruning a tree) and let the
chain saw run.
If there is an increasing trace of oil during this process, the automatic chain
lubrication works correctly.
CAUTION: Do not touch the surface. Maintain a sufficient safety distance
2. Sharpening the saw chain:
a) Effective work with the chainsaw is only possible if the saw chain is in good
condition and sharp. This also reduces the risk of kickback.
b) The saw chain can be sharpened by any specialist dealer. Do not try to sharpen
the saw chain yourself if you do not have a suitable tool and the necessary
experience.
3. Cleaning and storage:
a) Clean the clamping mechanism regularly by blowing it out with compressed air or
cleaning it with a brush.
b) Do not use tools for cleaning.
c) Keep the handles oil-free to ensure a secure grip.
d) Clean the appliance with a damp cloth and, if necessary, with a mild detergent.
e) If the chain saw will not be used for a long period, remove the chain oil from the
tank. Place the saw chain and the sword briefly in an oil bath and then wrap them
in oiled paper.
CAUTION: Before each cleaning, switch off the device and remove the
battery. Never immerse the device in water or other liquids for cleaning.
Keep the chainsaw in a safe and dry place and out of the reach of children.
Page 25
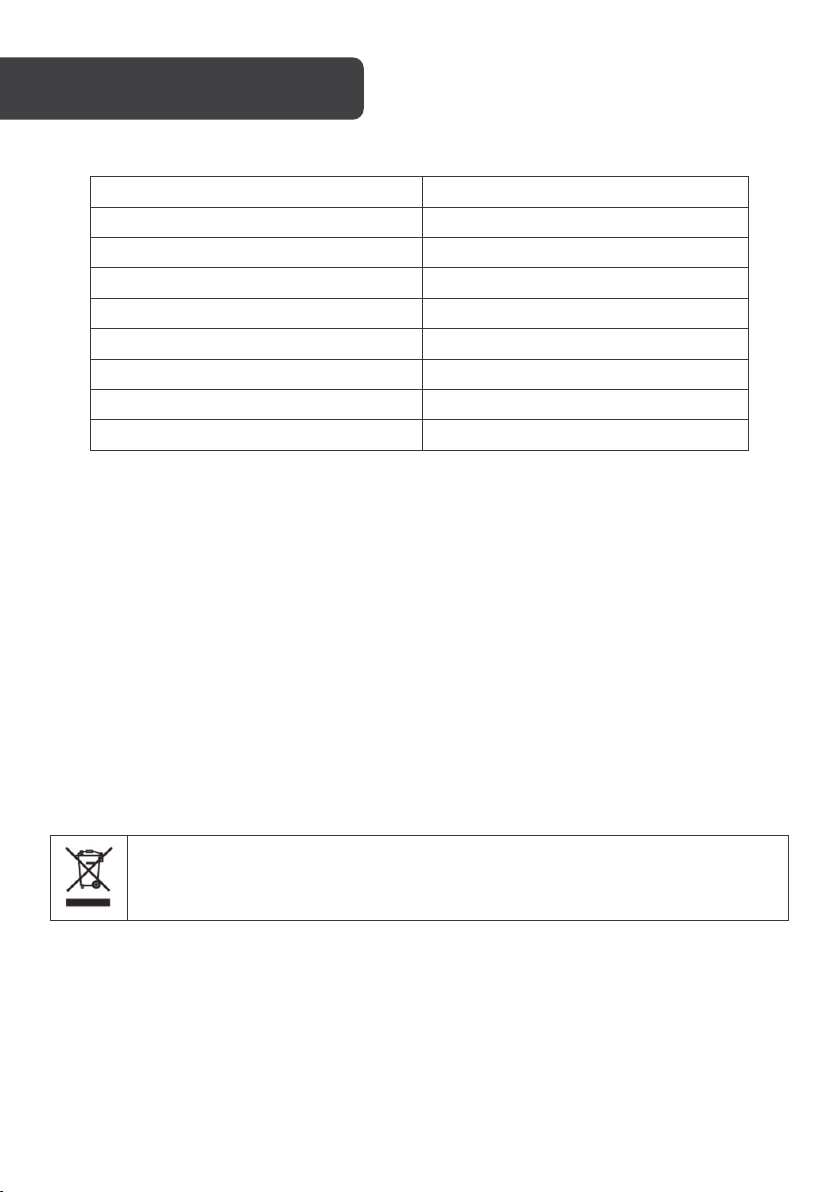
Rated voltage
40V DC
No load speed
14.5m/s
Sound pressure level (LpA)
90.17dB (A), k= 3dB (A)
Sound power level (LwA)
101.17dB (A), k= 3dB (A)
Vibration level (main handle)
3.02m/s2, K=1.5m/s2
Vibration level (auxiliary handle)
4.02m/s2, K=1.5m/s2
Oil tank capacity
150ml
Guide bar length
14” (355mm)
Battery
2 x 4.0Ah (not included)
This marking indicates that this appliance should not be disposed with other
sustainable reuse of material resources.
SPECIFICATIONS
• The specified vibration emission value has been measured according to a
standardised test procedure and can be used to compare one power tool with
another.
• The specified vibration emission value may also be used for an initial suspension
assessment.
• The vibration emission value during actual use of the power tool may differ from
the declared value depending on how the power tool is used.
• Try to keep the vibration load as low as possible. Examples of measures to reduce
vibration are wearing gloves when using the tool and limiting working time. All
parts of the operating cycle must be taken into account (e.g. times when the
power tool is switched off and times when it is switched on but running without
load).
Disposal
house-hold wastes. To prevent possible harm to the environment or human health
from uncontrolled waste disposal, recycle it responsibly to promote the
Page 26

Page 27

Page 28

Need more information?
We hope that this user guide has given you
the assistance needed for a simple set-up.
For the most up-to-date guide for your product,
as well as any additional assistance you may require,
head online to help.kogan.com
 Loading...