

Cronotermostato 5300
Crono-termostato 5300
Chronothermostat 5300
Chronothermostat 5300
Cepra 5300
Manual de instrucciones
Manual de instrucções
Manuel d'instructions
Instructions manual
3
12
21
30
Manual 5300.qxd 18/06/04 11:28 Página 1

Manual 5300.qxd 18/06/04 11:28 Página 2
33
MANUAL DE INSTRUCCIONES
IMPORTANTE
Enhorabuena. Ha elegido un cronotermostato que debi-
do a su sencillez le permitirá, con un ajuste adecuado de
sus funciones, aprovechar al máximo las posibilidades
de su instalación.
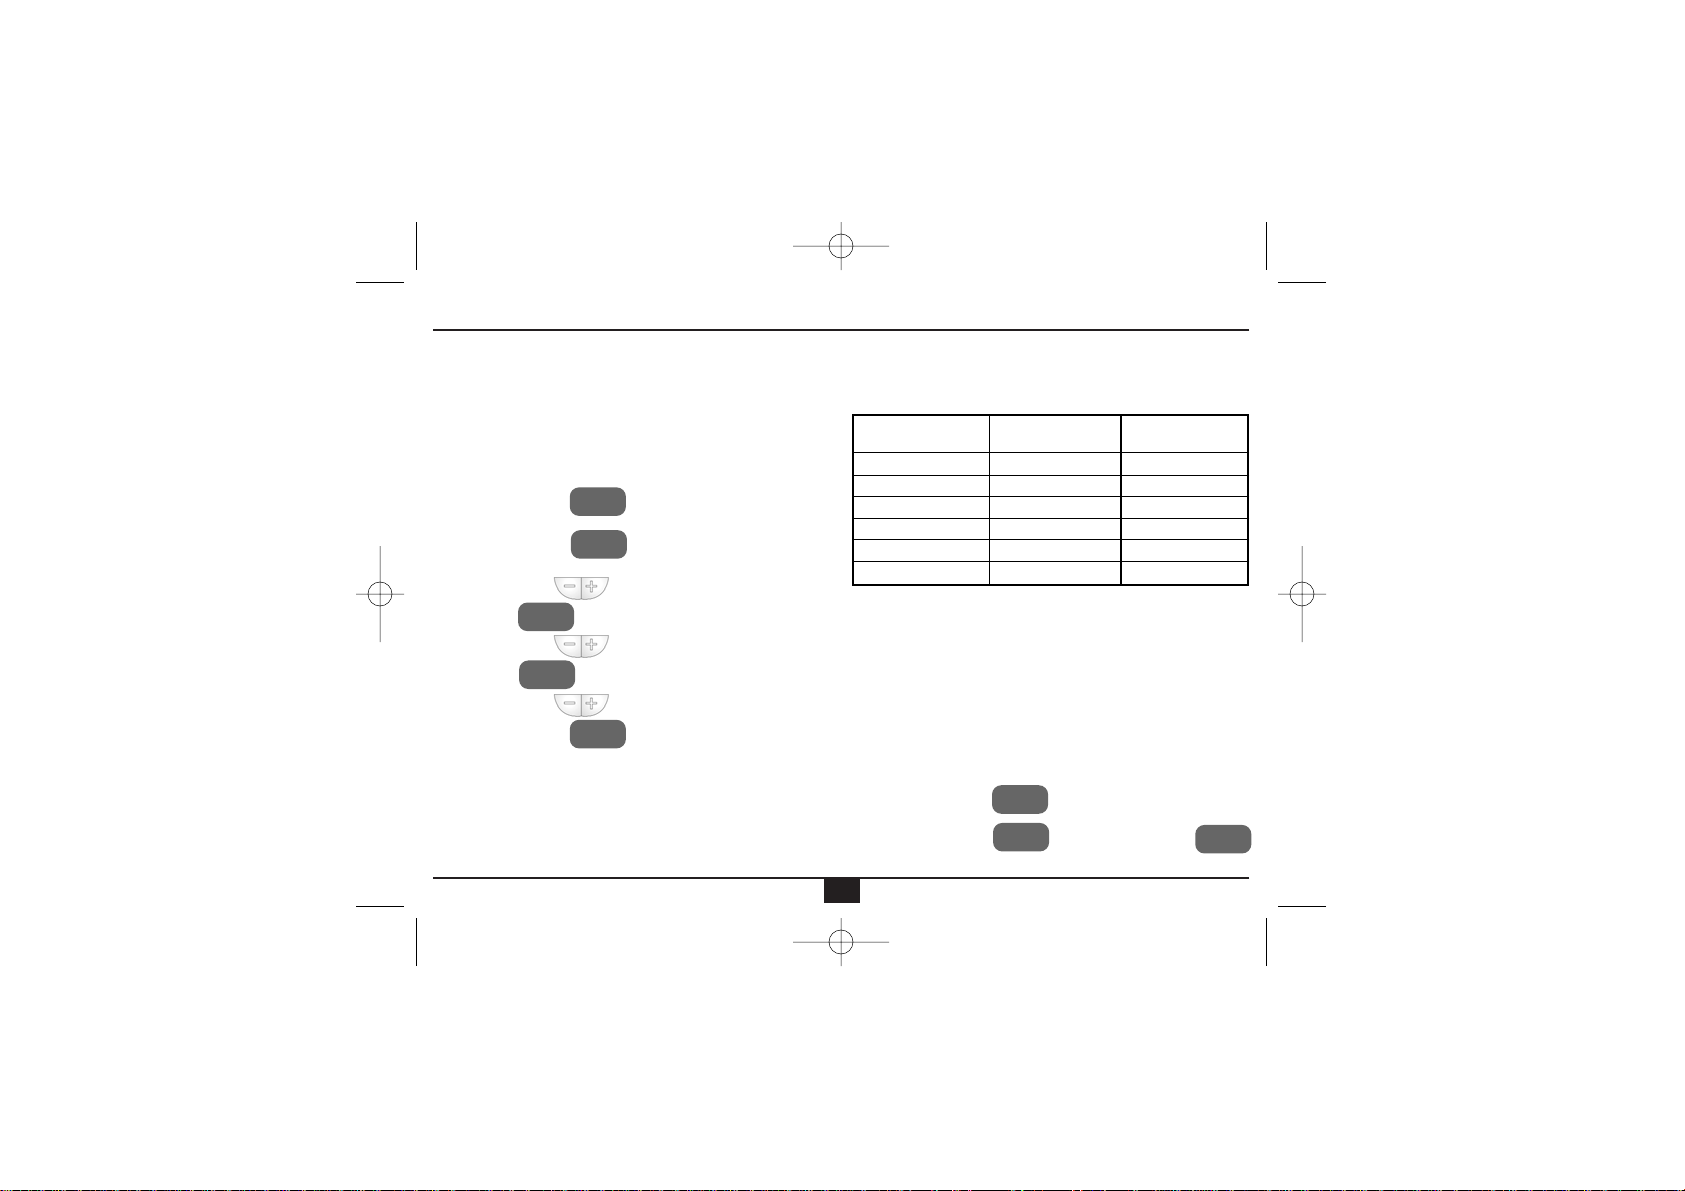
AJUSTE DEL DÍA Y LA HORA ACTUAL
• Presione la tecla para situarnos en la pantalla principal.
• Presione la tecla . El día de la semana
comienza a parpadear.
• Con las teclas ajuste el día.
• Presione . La hora comienza a parpadear.
• Con las teclas ajuste la hora.
• Presione .Los minutos comienzan a parpadear.
• Con las teclas ajuste los minutos.
• Presione la tecla para finalizar la programación y regresara la pantalla principal.
PROGRAMACIÓN
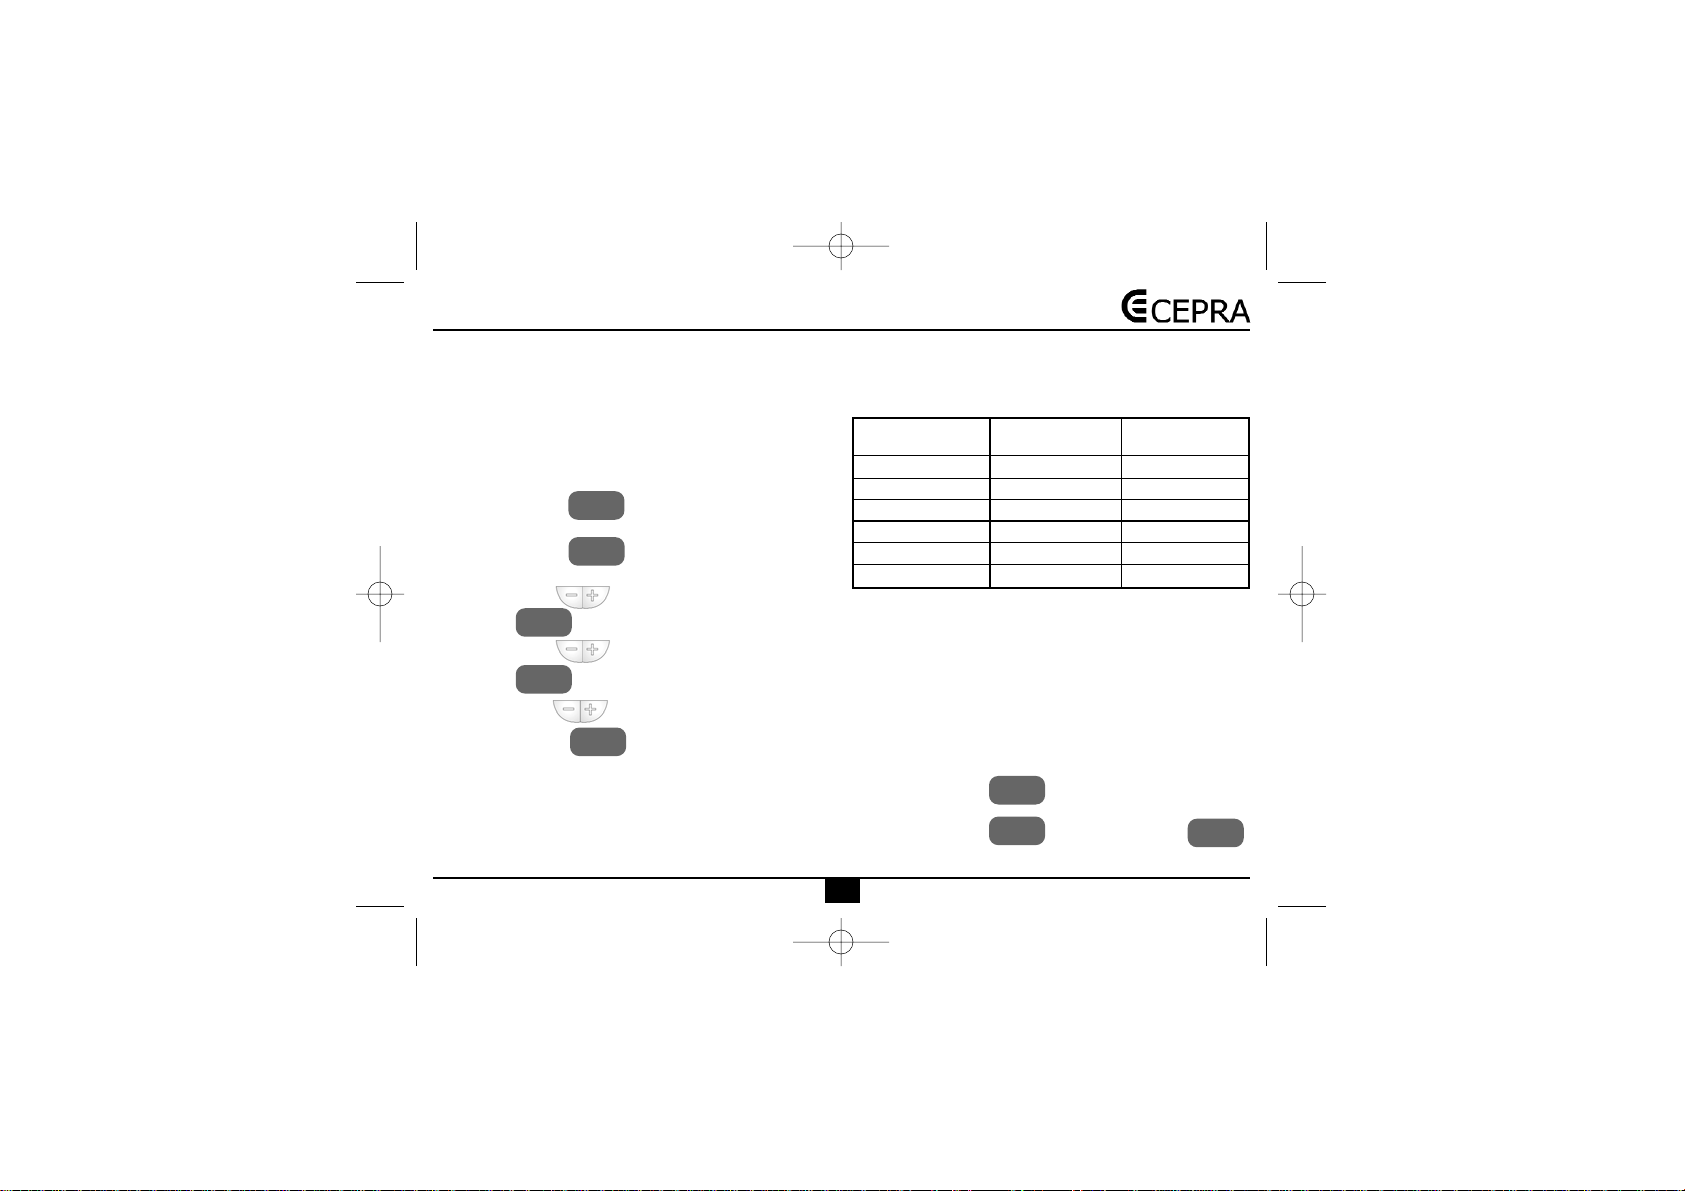
En el cronotermostato CEPRA 5300 se puede establecer
una programación diaria (todos los días de la semana
tienen el mismo programa horario) o una programación
semanal (programas distintos para cada día de la semana).
De fábrica, el cronotermostato trae la siguiente programación diaria:
Para que la programación establecida para el CEPRA
5300 sea la adecuada, es necesario que el tiempo de
programación se ordene de manera creciente, siendo el
tiempo mínimo 00:00 para el primer periodo P1 y el
máximo 23:50 para el último periodo P6.
La hora de comienzo de cada periodo y la temperatura
de consigna, pueden ser modificadas según se indican
a continuación.
Programación diaria
(De Lunes a Domingo la programación es igual)
• Presione la tecla para situarnos en la pantalla principal.
• Presione la tecla y sin soltarla pulse
para acceder a la programación.
DIA Y
HORA
DIA Y
HORA
DIA Y
HORA
SET
SET
SET
SET
20ºC
17ºC
20ºC
19ºC
22ºC
17ºC
7:00
9:00
12:30
15:00
17:30
23:00
P1
P2
P3
P4
P5
P6
Periodos
horarios
Hora
inicio
Temperatura
consigna
PROG
LU-DOM
Manual 5300.qxd 18/06/04 11:28 Página 3
Cronotermostato 5300
44
En la parte superior de la pantalla, parpadean los días
de la semana.
• Con ayuda de las teclas seleccionar el bloque de días:
LUN MAR MIE JUE VIE SAB
DOM
.
• Presione la tecla para confirmar el bloque de
programación.
1)
A continuación comienza a parpadear la hora del
primer periodo de programación P1.
• Con ayuda de las teclas ajuste la hora de
inicio del primer periodo. El ajuste se realiza
en intervalos de 10 minutos.
• Presione la tecla
2)
La temperatura de consigna del primer periodo
comienza a parpadear
• Con ayuda de las teclas ajuste la temperatura deseada. El ajuste se realiza de grado en
grado.
• Presione la tecla para confirmar y pasar al
siguiente periodo horario. Repetir los pasos
1 y 2 hasta programar los 6 periodos horarios.
Finalizar la programación pulsando la tecla .
Si se desea modificar la programación de cualquier día,
proceder de la siguiente manera:
Programación Semanal
• Presione la tecla para situarnos en la pantalla principal.
• Presione la tecla y sin soltarla pulse
para acceder a la programación.
En la parte superior de la pantalla, parpadean los días
de la semana.
• Con ayuda de las teclas seleccionar el día
que quiere modificar:
LUN … DOM
.
Automáticamente la programación se convierte en
semanal, adoptándose el día modificado dentro de
la programación
• Presione la tecla para confirmar el día.
1)
A continuación comienza a parpadear la hora del
primer periodo de programación P1.
• Con ayuda de las teclas ajuste la hora de
inicio del primer periodo. El ajuste se realiza
en intervalos de 10 minutos.
• Presione la tecla .
2)
La temperatura de consigna del primer periodo
comienza a parpadear
• Con ayuda de las teclas ajuste la temperatura deseada. El ajuste se realiza de grado en
grado.
SET
SET
SET
PROG
LU-DOM
PROG
LU-DOM
PROG
LU-DOM
PROG
LU-DOM
PROG
LU-DOM
PROG
LU-DOM
Manual 5300.qxd 18/06/04 11:28 Página 4
55
• Presione la tecla para confirmar y pasar al
siguiente periodo horario. Repetir los pasos
1 y 2 hasta programar los 6 periodos horarios.
Finalizar la programación pulsando la tecla .
Para modificar la programación de cualquier otro día,
repetir el mismo proceso.
VISUALIZACION DE LA PROGRAMACIÓN AJUSTADA
• Presione la tecla para situarnos en la pantalla principal.
• Presione la tecla .
— Si la programación es diaria:
• En la parte superior de la pantalla aparecen los días
LUN MAR MIE JUE VIE SAB DOM
y en la parte inferior la hora de inicio y la temperatura de consigna
del primer periodo horario P1.
• Pulsando la tecla sucesivas veces, visualizará
la hora de inicio y la temperatura de consigna de cada uno de los periodos horarios siguientes: P2, P3, P4, P5 y P6.
— Si la programación es semanal:
Programación del día actual:
• En la parte superior de la pantalla aparece la indicación del día actual y en la parte inferior la hora de
inicio y la temperatura de consigna del primer periodo horario P1de ese día.
• Pulsando la tecla sucesivas veces, visualizará
la hora de inicio y la temperatura de consigna de cada uno de los periodos horarios siguientes: P2, P3, P4, P5 y P6.
Programación de cualquier otro día de la semana dis-
tinto al actual:
• Con ayuda de las teclas seleccione el día de
la semana que quiere consultar
LUN … DOM
. En la
parte inferior de la pantalla se visualiza la hora de
inicio y la temperatura de consigna del primer periodo horario P1.
• Pulsando la tecla sucesivas veces, visualizará
la hora de inicio y la temperatura de consigna de cada uno de los periodos horarios siguientes: P2, P3, P4, P5 y P6.
• Si desea consultar la programación de otro día,
repetir el proceso anterior.
• Para volver a la pantalla principal, presione la tecla
SET
SET
SET
PROG
LU-DOM
PROG
LU-DOM
PROG
LU-DOM
PROG
LU-DOM
PROG
LU-DOM
Manual 5300.qxd 18/06/04 11:28 Página 5
Cronotermostato 5300
66
CCAAMMBBIIOO MMAANNUUAALL DDEE LLAA TTEEMMPPEERRAATTUURRAA DDEE CCOONNSSIIGGNNAA
La variación manual de la temperatura de consigna se
puede realizar de cuatro formas distintas:
• Hasta el siguiente periodo horario.
• Durante un número de horas definidas ( seleccionables entre 1 a 9 horas).
• Durante un número de días definidos ( seleccionables de 1 a 99 días).
• De modo permanente.
CAMBIO DE LA TEMPERATURA DE CONSIGNA HASTA
EL SIGUIENTE PERIODO HORARIO
• Presione la tecla para situarnos en la pantalla principal.
• Presione la tecla para aumentar el valor de consigna
• Presione la tecla para disminuir el valor de consigna.
NOTA: Para cancelar la variación manual de la temperatura y regresar a la temperatura ajustada en el programa horario, presionar la tecla .
Cuando se realiza una variación manual de la temperatura de consigna hasta el siguiente periodo horario, en
la pantalla, aparece de forma alterna, el tiempo que
resta hasta el siguiente periodo horario y junto a la indicación de la temperatura de consigna, aparece la palabra MANUAL.
CAMBIO DE LA TEMPERATURA DE CONSIGNA DURANTE UN NÚMERO DE HORAS DEFINIDAS
• Presione la tecla para situarnos en la pantalla principal.
• Presione la tecla para aumentar el valor de consigna
• Presione la tecla para disminuir el valor de consigna.
• Presione la tecla para entrar en la programación del número de horas.
• Con las teclas seleccione el número de horas
(de 1 a 9 horas) durante las cuales quiere modificar
el programa horario.
NOTA: Para cancelar la variación manual de la temperatura y regresar a la temperatura ajustada en el programa horario, presionar la tecla .
Cuando se realiza una variación manual de la temperatura de consigna durante un número de horas, en la
pantalla, aparece de forma alterna, el tiempo que resta
hasta el siguiente periodo horario y junto a la indicación
de la temperatura de consigna, aparece la palabra
CONFORT.
Una vez dentro del periodo de cambio, pulsando las
teclas puede volver a modificar la temperatura
como desee.
SET
SET
DIA Y
HORA
SET
SET
Manual 5300.qxd 18/06/04 11:28 Página 6
77
CAMBIO DE LA TEMPERATURA DE CONSIGNA DURANTE UN NÚMERO DE DÍAS DEFINIDOS
• Presione la tecla para situarnos en la pantalla principal.
• Presione la tecla .
• Con las teclas ajustar la temperatura deseada.
• Presione la tecla durante 3 segundos para
entrar en la programación del número
de días. En la pantalla aparece la letra "d" y el
número de días parpadeando.
• Con las teclas seleccione el número de días
(de 1 a 99 días) durante los cuales quiere modificar el programa horario.
NOTA: Para cancelar la variación manual de la temperatura y regresar a la temperatura ajustada en el programa horario, presionar la tecla .
Cuando se realiza una variación manual de la temperatura de consigna durante un número de días, en la pantalla, aparece de forma alterna, el número de días que
restan hasta el siguiente periodo horario y junto a la
indicación de la temperatura de consigna, aparece la
palabra FIJAR.
CAMBIO DE LA TEMPERATURA DE CONSIGNA DE
MODO PERMANENTE
• Presione la tecla para situarnos en la pantalla principal.
• Presione la tecla para aumentar el valor de consigna
• Presione la tecla para disminuir el valor de consigna.
• Presione la tecla para mantener la temperatura de forma permanente.
NOTA: Para cancelar la variación manual de la temperatura y regresar a la temperatura ajustada en el programa horario, presionar la tecla .
Cuando se realiza una variación manual de la temperatura de consigna de modo permanente, en la pantalla,
junto a la indicación de la temperatura de consigna,
aparece la palabra FIJAR.
SET
SET
SETSET
FIJAR
FIJAR
FIJAR
Manual 5300.qxd 18/06/04 11:28 Página 7
Cronotermostato 5300
88
TIEMPO
FUNC.
TIEMPO DE FUNCIONAMIENTO
El cronotermostato ofrece diferentes históricos de horas
de funcionamiento:
• Tiempo de funcionamiento durante el día actual.
• Tiempo de funcionamiento durante el día anterior.
• Tiempo de funcionamiento durante la semana
actual.
• Tiempo de funcionamiento durante la semana anterior.
• Tiempo total de funcionamiento.
Para visualizar los tiempos de funcionamiento:
• Presione la tecla para situarnos en la pantalla principal.
• Al pulsar por primera vez la tecla , en la
pantalla se visualizan las horas de funcionamiento del día actual.
• Al pulsar por segunda vez la tecla , en la
pantalla se visualizan las horas de funcionamiento del día anterior.
• Al pulsar por tercera vez la tecla , en la pantalla se visualizan las horas de funcionamiento de la semana en la que se hace la consulta.
Parpadea la indicación DOM.
• Al pulsar por cuarta vez la tecla , en la pantalla se visualizan las horas de funciona-
miento de la semana anterior a la que se hace la
consulta. Se mantiene fija la indicación de todos los
días de la semana.
• Al pulsar la quinta vez la tecla , en la pantalla
se visualizan las horas de funcionamiento de la semana anterior más la actual. Parpadean todos los días
de la semana.
IMPORTANTE
Si se mantiene pulsada la tecla durante más de
tres segundos se produce la puesta a cero de los contadores.
BORRAR LA PROGRAMACIÓN
Presionando el botón de se borran todos los
ajustes introducidos en el cronotermostato.
Cuando esto ocurre, el cronotermostato realiza un chequeo de todos los segmentos de la pantalla, recupera
el programa estándar de fábrica y el reloj se ajusta a las
00:00 horas del Domingo. La pantalla permanece parpadeando hasta que se pulsa alguna tecla.
AJUSTE DEL DIFERENCIAL DE CONMUTACIÓN
• Presione la tecla para situarnos en la pantalla principal.
• Presione la tecla para visualizar el límite
superior de conmutación HI.
• Presione de nuevo la tecla para visualizar
el límite inferior de conmutación LO.
SET
SET
TIEMPO
FUNC.
TIEMPO
FUNC.
TIEMPO
FUNC.
TIEMPO
FUNC.
TIEMPO
FUNC.
TEMP
INTERV
TEMP
INTERV
BORRAR
Manual 5300.qxd 18/06/04 11:28 Página 8
99
Para modificar el valor ajustado:
• Presione la tecla y sin soltarla presione
En la pantalla aparece HI y su valor actual parpade-
ando.
• Utilizando las teclas seleccione el nuevo
valor del límite superior HI. (Ver tabla de equivalencia).
• Presione de nuevo la tecla . En la pantalla
aparece LO y su valor actual parpadeando.
• Utilizando las teclas seleccione el nuevo
valor del límite inferior LO. (Ver tabla de equivalencia).
• Para finalizar el ajuste, pulse la tecla .
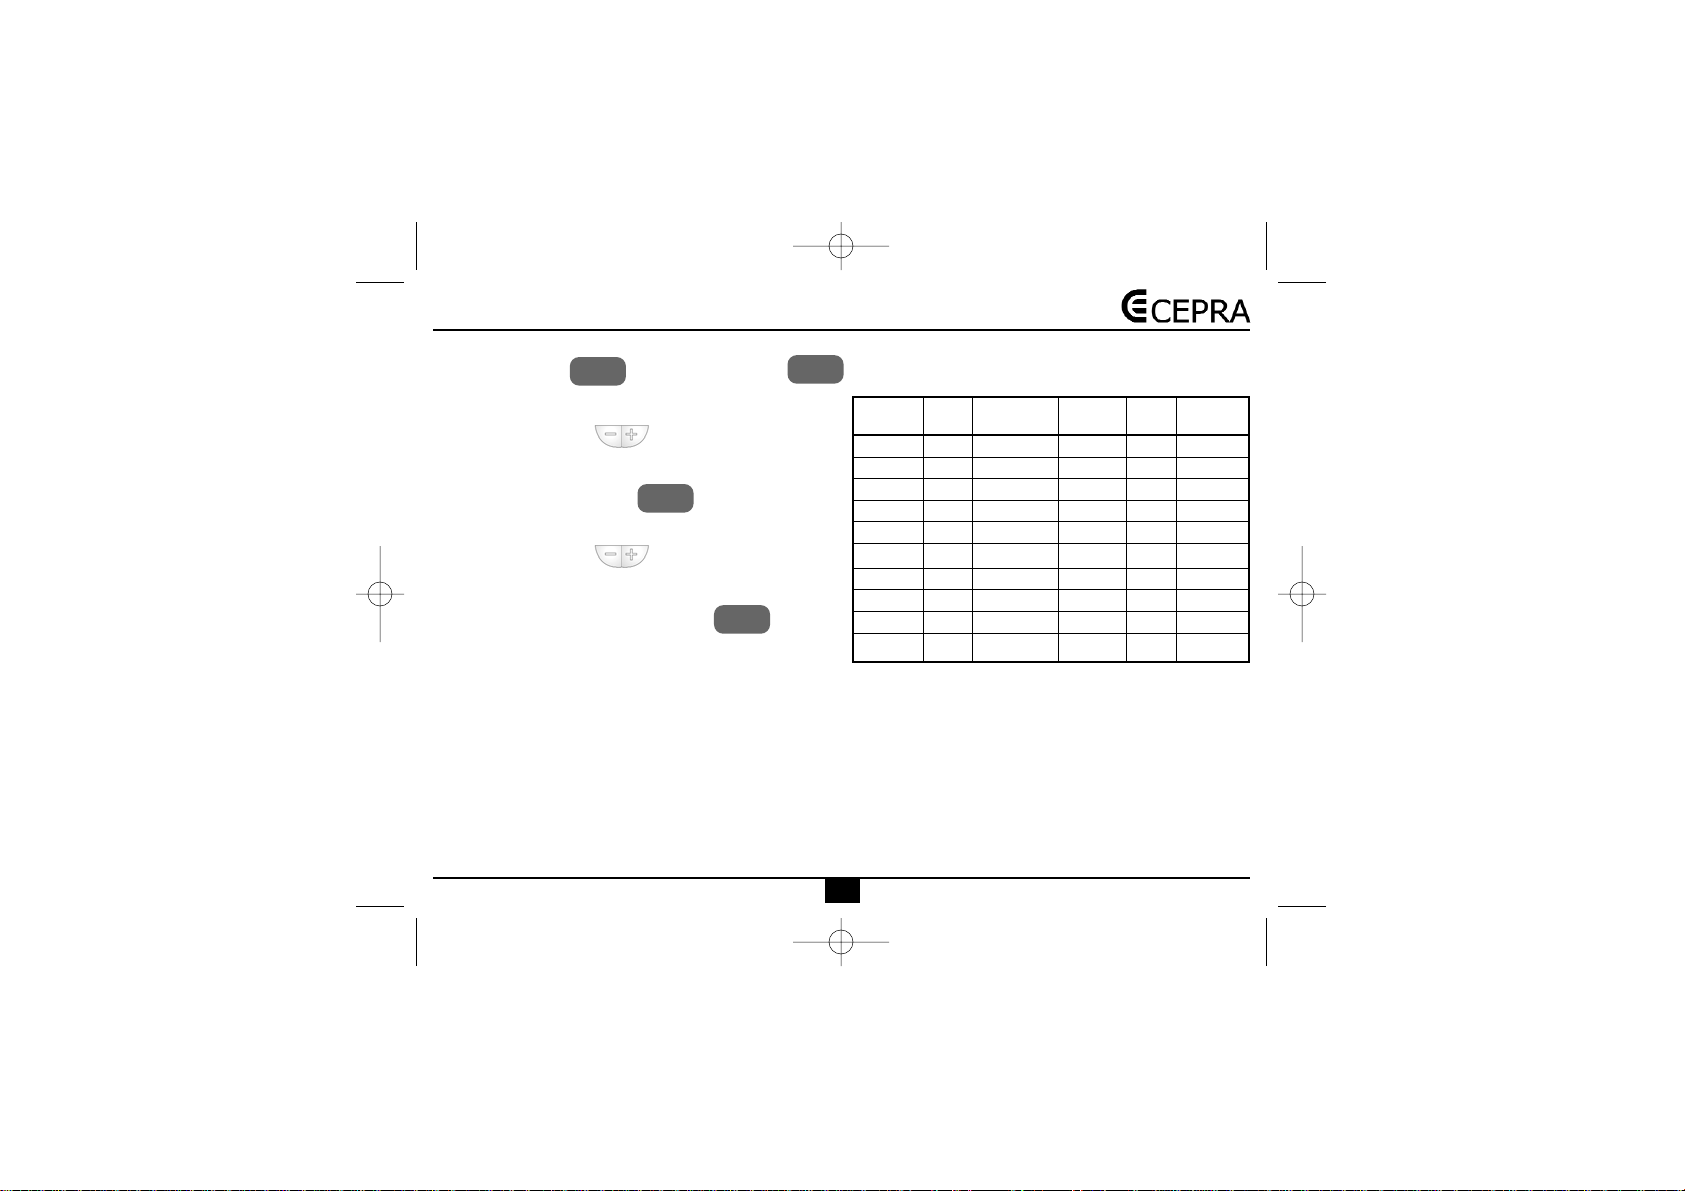
En la tabla siguiente se muestra la equivalencia entre los
valores ajustados HI y LO y las temperaturas correspondientes.
NOTA: El diferencial mínimo de conmutación es 0,5K.
SET
SET
TEMP
INTERV
TEMP
INTERV
0
-0,5
-1,0
-1,5
-2,0
-2,5
-3,0
-3,5
-4,0
-4,5
0
+0,5
+1,0
+1,5
+2,0
+2,5
+3,0
+3,5
+4,0
+4,5
0
-1
-2
-3
-4
-5
-6
-7
-8
-9
Lo 0
Lo 1
Lo 2
Lo 3
Lo 4
Lo 5
Lo 6
Lo 7
Lo 8
Lo 9
Hi 0
Hi 1
Hi 2
Hi 3
Hi 4
Hi 5
Hi 6
Hi 7
Hi 8
Hi 9
Equiva-
lencia
Límite
inferior
Límite
superior
Valor
0
+1
+2
+3
+4
+5
+6
+7
+8
+9
Valor
Equiva-
lencia
Manual 5300.qxd 18/06/04 11:28 Página 9

Cronotermostato 5300
1100
INSTALACIÓN
Advertencias:
El cronotermostato debe ser instalado por personal cua-
lificado siguiendo la normativa vigente.
Debe buscar una ubicación que tenga una temperatura
representativa del local que va a controlar, lejos de focos
de calor, corrientes de aire o influencia directa de la
radiación solar o del sistema de calefacción.
Antes de realizar cualquier conexión, asegúrese que ha
desconectado el suministro eléctrico.
Montaje:
• Levante la tapa frontal para acceder a la parte interior del cronotermostato.
• En la parte inferior, hay una tapa que cubre el
emplazamiento de las baterías.
• Quite esa tapa, para lo cual es necesario presionar
sobre el símbolo y desplazarla hacia la derecha.
• Quite las baterías en el caso que las hubiese puesto.
• Quite el tornillo.
• Tire de la carcasa, levemente hacia delante. De esta
manera se accede a los bornes de conexión y a los
orificios de montaje.
• Fije el marco embellecedor a la pared o a la caja de
mecanismos utilizando los tacos y los tornillos que
se dan en el suministro.
• Fijar la base del cronotermostato al marco embellecedor utilizando dos tornillos.
• Realizar la conexión eléctrica según la aplicación.
Asegúrese de que el cableado es correcto.
• Coloque la carcasa frontal del cronotermostato.
Vuelva a colocar el tornillo y ponga las baterías en
su correcta posición.
• Coloque la tapa que cubre las baterías y restablezca
el suministro eléctrico.
Cuando alimenta el cronotermostato, se realiza un autochequeo de los segmentos de la pantalla y a continuación la pantalla se queda parpadeando. Pulsando cualquier tecla la pantalla se estabiliza y puede proceder a
la programación según las indicaciones anteriormente
descritas.
APLICACIONES PRINCIPALES
Manual 5300.qxd 18/06/04 11:28 Página 10
1111
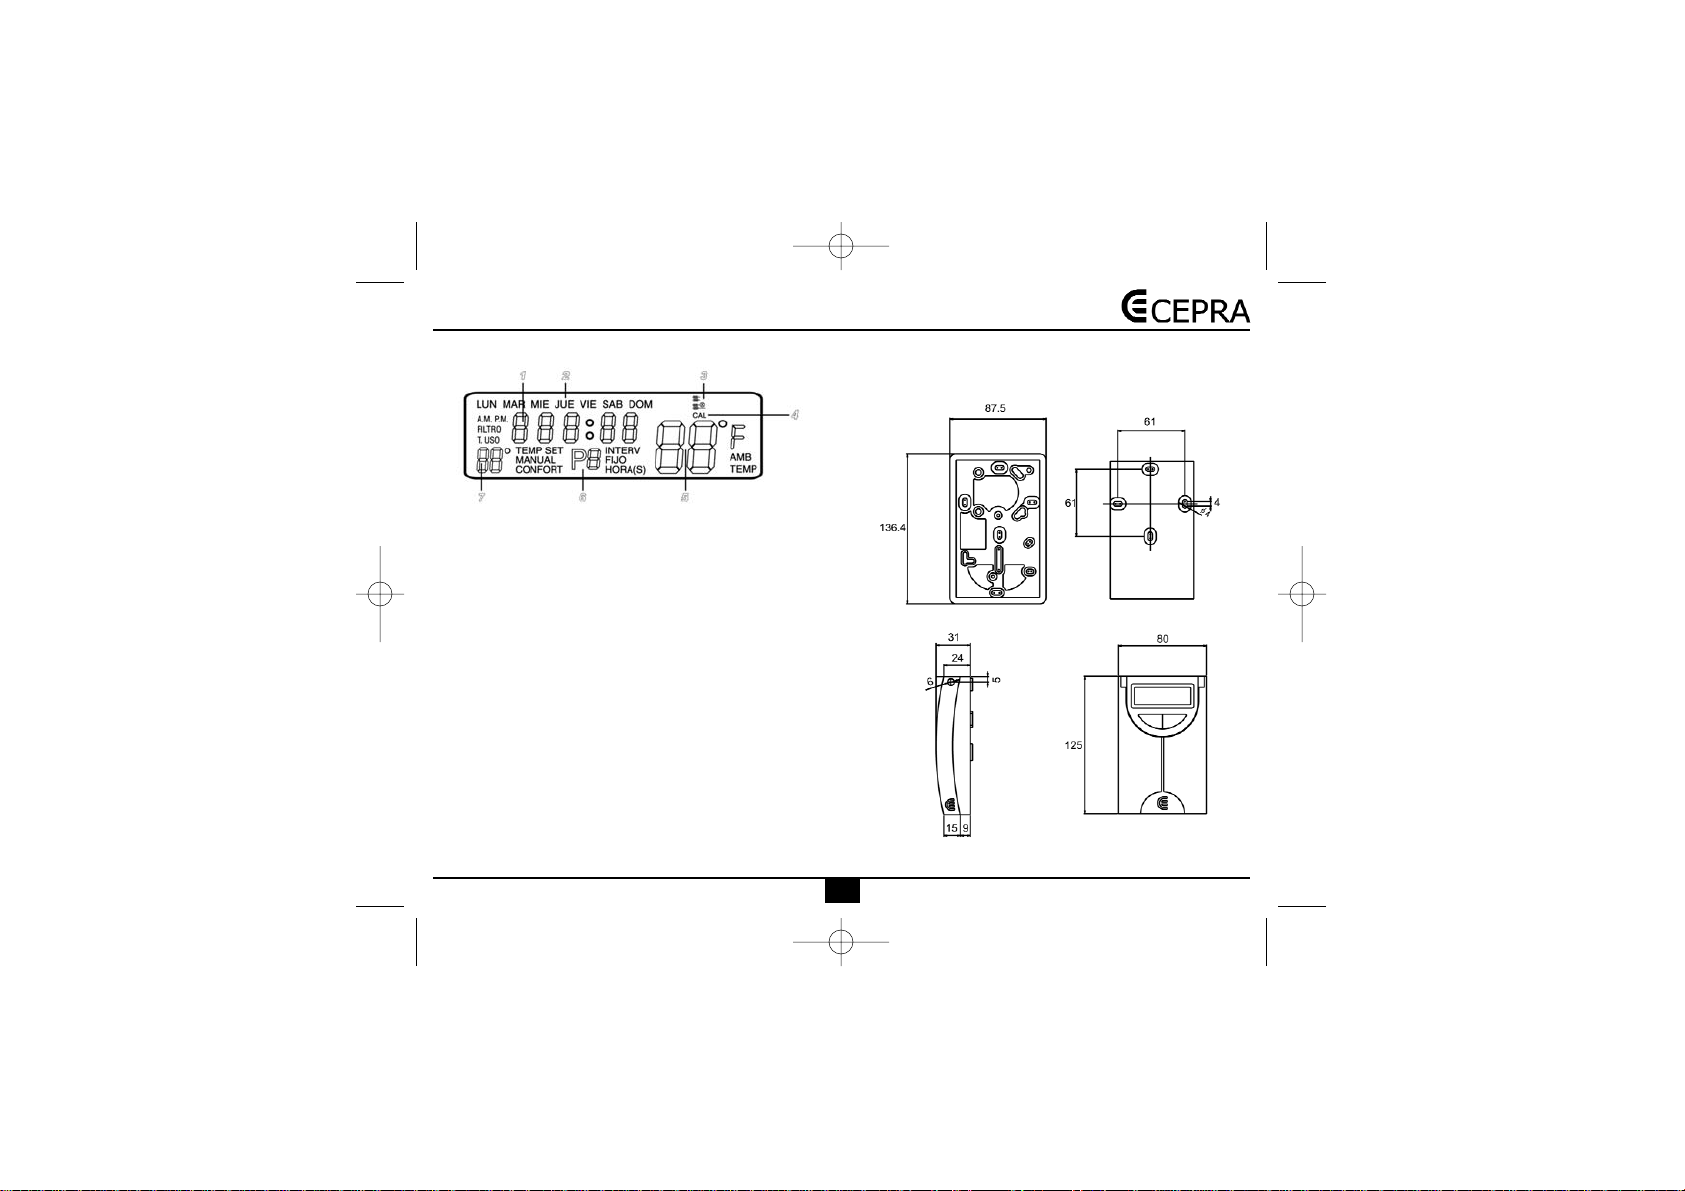
DATOS VISUALIZADOS EN LA PANTALLA
DATOS TÉCNICOS
Ajuste de la temperatura de consigna: 7 a 35 ºC, en
intervalos de 1K.
Temperatura de funcionamiento: 0 a 45ºC.
Temperatura de almacenaje: -10 a 50ºC.
Sonda de temperatura: NTC interna.
Alimentación: 2 baterías alcalinas LR6, "AA", 1,5 V.
Diferencial: Ajustable, mínimo 0,5 K.
Contacto: Conmutado, libre de potencial.
Capacidad de corte: 8 ( 3,5) A a 250 V CA.
1. Indicación hora actual (tiempo de funcionamiento).
2. Indicación día de la semana.
3. Símbolo de indicación calefacción conectada.
4. Indicación de modo de funcionamiento.
5. Indicación temperatura ambiente. (Indica la necesidad del cambio de batería con el símbolo “Lo” parpadeante).
6. Indicación de programa activo. (Esta lectura se alterna con la de horario de confort cada 30 segundos).
7. Indicación de temperatura de consigna.
DIMENSIONES
Manual 5300.qxd 18/06/04 11:28 Página 11
Cronotermostato 5300
1122
INSTRUÇÕES
IMPORTANTE
Parabens. Você escolheu um cronotermostato que, devi-
do à simplicidade do mesmo, e através do ajuste adequado das funções, permite aproveitar o máximo das
possibilidades da sua instalação.
AJUSTE DO DIA E A HORA ACTUAL
• Pressione a tecla para se situar no ecrã principal.
• Pressione a tecla . O dia da semana começa
a piscar.
• Com as teclas ajuste o dia.
• Pressione . A hora começa a piscar.
• Com as teclas ajuste a hora.
• Pressione . Os minutos começam a piscar.
• Com as teclas ajuste os minutos.
• Pressione a tecla para finalizar a programação e voltar ao ecrã principal.
PROGRAMAÇÃO
No cronotermostato CEPRA 5300 pode ser establecida
uma programação diária (todos os dias da semana têm
o mesmo programa horário) ou uma programação
semanal ( programas diferentes para cada dia da semana).
De fábrica, o cronotermostato traz a seguinte programação diária:
Para o CEPRA 5300 adoptar a programação estabelecida é preciso que o programa horário esteja ordenado
de forma ascendente, sendo a hora mínima que se pode
programar no primeiro período P1, as 00:00 e a hora
máxima que se pode programar no último período P6,
as 23:50.
A hora de início de cada período e a temperatura de
referência, podem ser modificadas como indicado a
seguir:
Programação diária
(De Segunda-feira a Domingo a programação é igual).
• Pressione a tecla para se situar no ecrã
principal.
• Pressione a tecla e sem soltar, aperte
para aceder à programação.
DIA Y
HORA
DIA Y
HORA
DIA Y
HORA
SET
SET
SET
SET
PROG
LU-DOM
20ºC
17ºC
20ºC
19ºC
22ºC
17ºC
7:00
9:00
12:30
15:00
17:30
23:00
P1
P2
P3
P4
P5
P6
Períodos
horários
Hora de
início
Temperatura
de referência
Manual 5300.qxd 18/06/04 11:28 Página 12

1133
Na parte superior do ecrã, piscarão os dias da semana.
• Através das teclas seleccionar o bloco de
dias:
LUN MAR MIE JUE VIE SAB DOM
.
• Pressione a tecla para confirmar o bloco de
programação.
1)
Seguidamente, a hora do primeiro período de pro-
gramação P1 começa a piscar.
• Através das teclas ajuste a hora de início do
primeiro período. O ajuste é realizado em
intervalos de 10 minutos.
• Pressione a tecla
2) A temperatura de referência do primeiro período
começa a piscar
• Através das teclas ajuste a temperatura desejada. O ajuste é realizado de grau em
grau.
• Pressione a tecla para confirmar e passar
ao seguinte período horário. Repetir os
passos 1 e 2 até programar os 6 períodos horários.
Finalizar a programação pressionando a tecla
Caso Você deseje modificar a programação de qualquer
dia, siga estes passos:
Programação Semanal
• Pressione a tecla para se situar no ecrã
principal.
• Pressione a tecla e sem soltar, aperte
para aceder à programação.
Na parte superior do ecrã, piscarão os dias da semana.
• Através das teclas seleccionar o dia que Você
quiser modificar:
LUN … DOM
.
Automáticamente a programação torna-se semanal,
adoptando o dia modificado dentro da programação
• Pressione a tecla para confirmar o dia.
1)
Seguidamente, a hora do primeiro período de pro-
gramação P1 começa a piscar.
• Através das teclas ajuste a hora de início do
primeiro período. O ajuste é realizado em
intervalos de 10 minutos.
• Pressione a tecla
2)
A temperatura de referência do primeiro período
começa a piscar.
• Através das teclas ajuste a temperatura desejada. O ajuste é realizado de grau em
grau.
SET
SET
SET
PROG
LU-DOM
PROG
LU-DOM
PROG
LU-DOM
PROG
LU-DOM
PROG
LU-DOM
PROG
LU-DOM
Manual 5300.qxd 18/06/04 11:28 Página 13

Cronotermostato 5300
1144
• Pressione a tecla para confirmar e passar
ao seguinte período horário. Repetir os
passos 1 e 2 até programar os 6 períodos horários.
Finalizar a programação pressionando a tecla .
Para modificar a programação de qualquer outro dia,
repetir o mesmo processo.
VISUALIZAÇÃO DA PROGRAMAÇÃO AJUSTADA
• Pressione a tecla para se situar no ecrã principal.
• Pressione a tecla
— Se a programação for diária:
• Na parte superior do ecrã aparecem os dias
LUN
MAR MIE JUE VIE SAB DOM
e na parte inferior a
hora de início e a temperatura de referência do primeiro período horário P1.
• Pressionando a tecla sucessivas vezes, Você
visualizará a hora de início e a temperatura
de referência de cada um dos períodos horários
seguintes: P2, P3, P4, P5 e P6.
— Se a programação for semanal:
Programação do dia actual:
• Na parte superior do ecrã aparece a indicação do
dia actual e na parte inferior a hora de início e a
temperatura de referência do primeiro período horário P1 desse dia.
• Pressionando a tecla sucessivas vezes, Você
visualizará a hora de início e a temperatura
de referência de cada um dos períodos horários
seguintes: P2, P3, P4, P5 e P6.
Programação de qualquer outro dia da semana que não
seja o actual:
• Através das teclas seleccione o dia da semana que Você quiser consultar
LUN… DOM
. Na parte
inferior do ecrã aparece a hora de início e a temperatura de referência do primeiro período horário P1.
• Pressionando a tecla sucessivas vezes, Você
visualizará a hora de início e a temperatura
de referência de cada um dos períodos horários
seguintes: P2, P3, P4, P5 e P6.
• Se Você quiser consultar a programação de outro
dia, repita o processo anterior.
• Para voltar ao ecrã principal, pressione a tecla
SET
SET
SET
PROG
LU-DOM
PROG
LU-DOM
PROG
LU-DOM
PROG
LU-DOM
PROG
LU-DOM
Manual 5300.qxd 18/06/04 11:28 Página 14

1155
MUDANÇA MANUAL DA TEMPERATURA DE REFERÊNCIA
A mudança manual da temperatura de referência pode
ser realizada de quatro maneiras diferentes:
• Até o seguinte período horário.
• Durante um número de horas definidas (seleccionáveis entre 1 a 9 horas).
• Durante um número de dias definidos (seleccionáveis
de 1 a 99 dias).
• De modo permanente.
MUDANÇA DA TEMPERATURA DE REFERÊNCIA ATÉ O
SEGUINTE PERÍODO HORÁRIO
• Pressione a tecla para se situar no ecrã
principal.
• Pressione a tecla para aumentar o valor de
referência
• Pressione a tecla para diminuir o valor de referência.
NOTA: Para cancelar a mudança manual da temperatura e voltar para a temperatura ajustada no programa
horário, pressionar a tecla
Quando for realizada uma variação manual da tempe-
ratura de referência até o seguinte período horário, no
ecrã aparecerá, de forma alternada, o tempo que resta
até o seguinte período horário e junto da indicação da
temperatura de referência, aparecerá a palavra
MANUAL.
MUDANÇA DA TEMPERATURA DE REFERÊNCIA
DURANTE UM NÚMERO DE HORAS DEFINIDAS
• Pressione a tecla para se situar no ecrã
principal.
• Pressione a tecla para aumentar o valor de
referência.
• Pressione a tecla para diminuir o valor de referência.
• Pressione a tecla para entrar na programação do número de horas.
• Através das teclas seleccione o número de
horas (de 1 a 9 horas) durante as quais Você deseja
modificar o programa horário.
NOTA: Para cancelar a variação manual da temperatura e voltar para a temperatura ajustada no programa
horário, pressionar a tecla .
Quando for realizada uma variação manual da temperatura de referência durante um número de horas, no
ecrã aparecerá, de forma alternada, o tempo que resta
até o seguinte período horário e junto da indicação da
temperatura de referência, aparecerá a palavra CONFORT.
Estando dentro do período de mudança, pressionando
as teclas . Você poderá voltar a modificar a temperatura como desejar.
DIA Y
HORA
SET
SET
SET
SET
Manual 5300.qxd 18/06/04 11:29 Página 15

Cronotermostato 5300
1166
MUDANÇA DA TEMPERATURA DE REFERÊNCIA
DURANTE UM NÚMERO DE DIAS DEFINIDOS
• Pressione a tecla para se situar no ecrã
principal.
• Pressione a tecla .
• Através das teclas ajustar a temperatura
desejada.
• Pressione a tecla durante 3 segundos para
entrar na programação do número
de dias. No ecrã aparecerá a letra "d" e o número
de dias a piscar.
• Através das teclas seleccione o número de
dias ( de 1 a 99 dias) durante os quais
Você deseja modificar o programa horário.
NOTA: Para cancelar a variação manual da temperatura e voltar para a temperatura ajustada no programa
horário, pressionar a tecla .
Quando for realizada uma variação manual da temperatura de referência durante um número de dias, no
ecrã aparecerá, de forma alternada, o número de dias
que restam até o seguinte período horário e junto da
indicação da temperatura de referência, aparecerá a
palavra FIJAR.
MUDANÇA DA TEMPERATURA DE REFERÊNCIA DE
MODO PERMANENTE
• Pressione a tecla para se situar no ecrã
principal.
• Pressione a tecla para aumentar o valor de
referência
• Pressione a tecla para diminuir o valor de referência.
• Pressione a tecla para manter a temperatura
de forma permanente.
NOTA: Para cancelar a variação manual da temperatura e voltar para a temperatura ajustada no programa
horário, pressionar a tecla .
Quando for realizada uma variação manual da temperatura de referência de modo permanente, no ecrã,
junto da indicação da temperatura de referência, aparecerá a palavra FIJAR.
SET SET
SET
SET
FIJAR
FIJAR
FIJAR
Manual 5300.qxd 18/06/04 11:29 Página 16
1177
TIEMPO
FUNC.
TEMPO DE FUNCIONAMENTO
O cronotermostato oferece diferentes históricos de horas
de funcionamento:
• Tempo de funcionamento durante o dia actual.
• Tempo de funcionamento durante o dia anterior.
• Tempo de funcionamento durante a semana actual.
• Tempo de funcionamento durante a semana anterior.
• Tempo total de funcionamento.
Para visualizar os tempos de funcionamento:
• Pressione a tecla para se situar no ecrã
principal.
• Pressionando uma vez a tecla no ecrã visualizam-se as horas de funcionamento do dia actual.
• Pressionando duas vezes a tecla , no ecrã
visualizam-se as horas de funcionamento do dia anterior.
• Pressionando três vezes a tecla , no ecrã
visualizam-se as horas de funcionamento da semana
em que a consulta está sendo feita. Piscará a indicação DOM.
• Pressionando quatro vezes a tecla , no ecrã
visualizam-se as horas de funcionamento da semana
anterior à da consulta. A indicação de todos os dias
da semana aparece fixa.
• Pressionandoa tecla cinco vezes, noecrãaparecem indicadas as horas de funcionamento
da semana anterior mais a actual. Piscam todos os
dias da semana.
IMPORTANTE
Se se mantém pressionada a tecla durante mais
de três segundos, os contadores põem-se a
zero.
APAGAR A PROGRAMAÇÃO
Pressionando o botão de , são apagados todos
os ajustes introduzidos no cronotermostato. Quando isto
ocorre, o cronotermostato realiza uma checagem de
todos os segmentos do ecrã, recupera o programa standard de fábrica e o relógio fica ajustado às 00:00 horas
do Domingo. O ecrã permanece piscando até alguma
tecla ser pressionada.
AJUSTE DO DIFERENCIAL DE COMUTAÇÃO
• Pressione a tecla para se situar no ecrã
principal.
• Pressione a tecla para visualizar o limite
superior de comutação HI.
• Pressione de novo a tecla para visualizar o
limite inferior de comutação LO.
SET
SET
TIEMPO
FUNC.
TIEMPO
FUNC.
TIEMPO
FUNC.
TIEMPO
FUNC.
TIEMPO
FUNC.
TEMP
INTERV
TEMP
INTERV
BORRAR
Manual 5300.qxd 18/06/04 11:29 Página 17

Cronotermostato 5300
1188
TEMP
INTERV
Para modificar o valor ajustado:
• Pressione a tecla e, sem soltar, pressione
. No ecrã aparece HI e o seu valor actual a
piscar.
• Utilizando as teclas seleccione o novo valor
do limite superior HI. (Ver tabela de equivalência).
• Pressione de novo a tecla . No ecrã aparece
LO e o seu valor actual a piscar.
• Utilizando as teclas seleccione o novo valor
do limite inferior LO. (Ver tabela de equivalência).
• Para finalizar o ajuste, pressione a tecla .
Na tabela seguinte é indicada a equivalência entre os
valores ajustados HI e LO e as temperaturas correspondentes.
SET
TEMP
INTERV
SET
NOTA: O diferencial mínimo de comutação é 0,5K.
0
-0,5
-1,0
-1,5
-2,0
-2,5
-3,0
-3,5
-4,0
-4,5
0
+0,5
+1,0
+1,5
+2,0
+2,5
+3,0
+3,5
+4,0
+4,5
0
-1
-2
-3
-4
-5
-6
-7
-8
-9
Lo 0
Lo 1
Lo 2
Lo 3
Lo 4
Lo 5
Lo 6
Lo 7
Lo 8
Lo 9
Hi 0
Hi 1
Hi 2
Hi 3
Hi 4
Hi 5
Hi 6
Hi 7
Hi 8
Hi 9
Equiva-
lência
Límite
inferior
Límite
superior
Valor
0
+1
+2
+3
+4
+5
+6
+7
+8
+9
Valor
Equiva-
lência
Manual 5300.qxd 18/06/04 11:29 Página 18

1199
INSTALAÇÃO
Advertências:
O cronotermostato deve ser instalado por pessoal qua-
lificado seguindo a normativa em vigor.
Deverá procurar uma localização que tenha uma tem-
peratura representativa do local a ser controlado, longe
de fontes de calor, correntes de ar ou influência directa
da radiação solar ou do sistema de aquecimento.
Antes de realizar qualquer ligação, certifique-se de que
o fornecimento eléctrico esteja cortado.
Montagem:
• Levante a tampa frontal para aceder à parte interior
do cronotermostato.
• Na parte inferior, há uma tampa que cobre o compartimento das baterias.
• Tire essa tampa. Para isso, é preciso pressionar
sobre o símbolo e empurrar para a direita.
• Tire as baterias, caso já estejam dentro.
• Tire o parafuso
• Tire da carcaça, levemente para frente. Deste modo,
se acede aos terminais de ligação e aos orifícios de
montagem.
• Fixe a moldura na parede ou na caixa de mecanismos utilizando as buchas e os parafusos incluídos
no fornecimento.
• Fixar a base do cronotermostato na moldura utilizando dois parafusos.
• Realizar a ligação eléctrica conforme a aplicação.
Certifique-se de que a cablagem seja correcta.
• Coloque a carcaça frontal do cronotermostato. Volte
a colocar o parafuso e coloque as baterias na posição correcta.
• Coloque a tampa que cobre as baterias e ligue de
novo o fornecimento eléctrico.
Quando o cronotermostato recebe alimentação, é realizada uma auto-checagem dos segmentos do ecrã e
seguidamente o ecrã fica a piscar. Pressionando qualquer tecla, o ecrã estabiliza-se e Você poderá proceder
à programação seguindo as indicações anteriormente
descritas.
APLICAÇÕES PRINCIPAIS
Manual 5300.qxd 18/06/04 11:29 Página 19

Cronotermostato 5300
2200
DADOS VISUALIZADOS NO ECRÃ
1. Fudicação hora atual (tempo de funcionamento).
2. Fudicação día da semana.
3. Fudicação de aquecimento em funcionamento.
4. Fudicação de modo de funcionamento.
5. Fudicação da temperatura (ambiente). (1)
6. Fudicação de programa ativo. (2)
7. Fudição de temperatura de ordem.
(1): Fudicação da necessidade do troco de batería com
o símbolo "Lo" o modo de pestanejar.
(2): A presente leitura combina-se com horario de con-
fort cada 30 segundos.
DADOS TÉCNICOS
Ajuste da temperatura de referência: 7 a 35 ºC, em
intervalos de 1K
Temperatura de funcionamento: 0 a 45ºC
Temperatura de armazenagem: -10 a 50ºC
Sonda de temperatura: NTC interna
Alimentação: 2 baterias alcalinas LR6, "AA", 1,5 V
Diferencial: Ajustável, mínimo 0,5 K
Contacto: Comutado, livre de potencial
Capacidade de corte: 8 ( 3,5) A a 250 V CA
DIMENSÕES
Manual 5300.qxd 18/06/04 11:29 Página 20

2211
MANUEL D’INSTRUCTIONS
IMPORTANT
Félicitations. Vous avez choisi un chronothermostat qui,
grâce à sa simplicité, vous permettra, après un ajustage
adéquat de ses fonctions, profiter au maximum des possibilités de son installation.
AJUSTAGE DU JOUR ET DE L'HEURE ACTUELLE
• Appuyez sur la touche pour vous situer sur
l'écran principal.
• Appuyez sur la touche . Le jour de la semaine commencera à trembloter.
• Avec les touches ajustez le jour.
• Appuyez sur . L'heure commencera à trembloter.
• Avec les touches ajustez l'heure.
• Appuyez sur . Les minutes commenceront à
trembloter.
• Avec les touches ajustez les minutes.
• Appuyez sur la touche pour terminer la programmation et retourner à l'écran principal.
PROGRAMMATION
Avec le chronothermostat CEPRA 5300 vous pouvez éta-
blir une programmation journalière (tous les jours de la
semaine ont le même programme horaire) ou une pro_
grammation hebdomadaire (des programmes différents
pour chaque jour de la semaine).
Le chronothermostat est programmé en usine avec la
programmation journalière ci-dessous:
Pour que le CEPRA 5300 adopte la programmation établie il faut que le programme horaire soit ordonné de
façon ascendante l'heure minimale qu'on peut programmer pour la premier période P1 étant 00:00 et
l'heure maximale qu'on peut programmer pour la dernière période P6 étant 23:50.
L'heure de commencement de chaque période et la température de consigne, peuvent être modifiés selon les
indications ci-dessous :
Programmation journalière
(De Lundi jusqu'a Dimanche
la programmation est égale)
• Appuyez sur la touche pour vous situer sur
l'écran principal.
• Appuyez sur la touche et sans cesser de
faire pression appuyez sur pour accéder à la
programmation.
DIA Y
HORA
DIA Y
HORA
DIA Y
HORA
SET
SET
SET
SET
PROG
LU-DOM
20ºC
17ºC
20ºC
19ºC
22ºC
17ºC
7:00
9:00
12:30
15:00
17:30
23:00
P1
P2
P3
P4
P5
P6
Périodes
horaires
Heure
commencement
Température
consigne
Manual 5300.qxd 18/06/04 11:29 Página 21

Chronothermostat 5300
2222
En la partie supérieure de l'écran, les jours de la semaine trembloteront.
• En vous servant des touches sélectionnez le
bloc de jours:
LUN MAR MIE JUE VIE SAB
DOM
.
• Appuyez sur la touche pour confirmer le bloc
de programmation.
1)
A continuation l'heure de la première période de
programmation P1 commencera à trembloter.
• En vous servant des touches ajustez l'heure
de commencement de la première période.
L'ajustage se réalise selon des intervalles de 10
minutes.
• Appuyez sur la touche
2)
La température de consigne de la première période
commencera à trembloter.
• En vous servant des touches ajustez la température désirée. L'ajustage se réalise degré à degré.
• Appuyez sur la touche pour confirmer et
passer à la période horaire suivante.
Répétez les démarches 1 et 2 jusqu'à ce que vous
ayez programmé les 6 périodes horaires.
Terminez la programmation en appuyant sur la touche
Si vous désirez modifier la programmation d'un jour
quelconque, vous devrez agir de la façon suivante:
Programmation Hebdomadaire
• Appuyez sur la touche pour vous situer sur
l'écran principal.
• Appuyez sur la touche et sans cesser de
faire pression appuyez sur pour accéder à la
programmation.
En la partie supérieure de l'écran, les jours de la semaine trembloteront.
• En vous servant des touches sélectionnez le
jour que vous voulez modifier:
LUN … DOM
.
Automatiquement la programmation deviendra hebdomadaire, et le jour modifié dans la programmation reste sélectionné.
• Appuyez sur la touche pour confirmer le jour.
1)
Ensuite l'heure de la première période de program-
mation P1 commencera à trembloter.
• En vous servant des touches ajustez l'heure
de commencement de la première période.
L'ajustage se réalise selon des intervalles de 10
minutes.
• Appuyez sur la touche .
SET
SET
SET
PROG
LU-DOM
PROG
LU-DOM
PROG
LU-DOM
PROG
LU-DOM
PROG
LU-DOM
PROG
LU-DOM
Manual 5300.qxd 18/06/04 11:29 Página 22

2233
2)
La température de consigne de la première période
commencera à trembloter.
• En vous servant des touches ajustez la température désirée. L'ajustage se réalise degré à degré.
• Appuyez sur la touche pour confirmer et
passer à la période horaire suivante. Répétez les
démarches 1 et 2 jusqu'à ce que vous ayez programmé les 6 périodes horaires.
Terminez la programmation en appuyant sur la touche
Pour modifier la programmation d'un autre jour quel-
conque, répétez le même procès.
VISUALISATION DE LA PROGRAMMATION AJUSTÉE
• Appuyez sur la touche pour vous situer sur
l'écran principal.
• Appuyez sur la touche .
— Si la programmation est journalière:
• En la partie supérieure de l'écran apparaîtront les
jours
LUN MAR MIE JUE VIE SAB DOM
et en la partie
inférieure l'heure de commencement et la température de consigne de la première période horaire P1.
• En appuyant sur la touche plusieurs fois,
vous visualiserez l'heure de commencement
et la température de consigne de chacune des périodes horaires suivantes: P2, P3, P4, P5 et P6.
— Si la programmation est hebdomadaire:
Programmation du jour actuel:
• En la partie supérieure de l'écran il apparaîtra l'indication du jour actuel et en la partie inférieure l'heure
de commencement et la température de consigne de
la première période horaire P1 de ce jour.
• En appuyant sur la touche plusieurs fois,
vous visualiserez l'heure de commencement
et la température de consigne de chacune des périodes horaires suivantes: P2, P3, P4, P5 et P6.
Programmation d'un jour quelconque de la semaine dif-
férent du jour actuel:
• En vous servant des touches sélectionnez le
jour de la semaine que vous désirez consulter
LUN
… DOM
. En la partie inférieure de l'écran vous
verrez l'heure de commencement et la température
de consigne de la première période horaire P1.
• En appuyant sur la touche plusieurs fois,
vous verrez l'heure de commencement
et la température de consigne de chacune des périodes horaires suivantes: P2, P3, P4, P5 et P6.
• Si vous désirez consulter la programmation d'un
autre jour, répétez le procès ci-dessus.
• Pour retourner à l'écran principal, appuyez sur la touche .
SET
SET
SET
PROG
LU-DOM
PROG
LU-DOM
PROG
LU-DOM
PROG
LU-DOM
PROG
LU-DOM
Manual 5300.qxd 18/06/04 11:29 Página 23

Chronothermostat 5300
2244
CHANGEMENT MANUEL DE LA TEMPÉRATURE DE
CONSIGNE
La variation manuelle de la température de consigne
peut être faite de quatre façons différentes:
• Jusqu'à la période horaire suivante.
• Pendant un nombre d'heures définies (sélectionnables
entre 1 à 9 heures).
• Pendant un nombre de jours définis (sélectionnables
de 1 à 99 jours).
• De façon permanente.
CHANGEMENT DE LA TEMPÉRATURE DE CONSIGNE
JUSQU'À LA PÉRIODE HORAIRE SUIVANTE
• Appuyez sur la touche pour vous placer sur
l'écran principal.
• Appuyez sur la touche pour augmenter la
valeur de consigne
• Appuyez sur la touche pour diminuer la valeur
de consigne.
NOTE: Pour annuler la variation manuelle de la température et retourner à la température ajustée en le programme horaire, appuyez sur la touche .
Lorsqu'on réalise une variation manuelle de la température de consigne jusqu'à la période horaire suivante, il
apparaîtra sur l'écran, de façon alterne, le temps qui
reste jusqu'à la période horaire suivante et à côté de l'indication de la température de consigne il apparaîtra le
mot MANUEL.
CHANGEMENT DE LA TEMPÉRATURE DE CONSIGNE
PENDANT UN NOMBRE D'HEURES DÉFINIES
• Appuyez sur la touche pour vous situer sur
l'écran principal.
• Appuyez sur la touche pour augmenter la valeur
de consigne.
• Appuyez sur la touche pour diminuer la valeur
de consigne.
• Appuyez sur la touche pour entrer en la programmation du nombre d'heures.
• Avec les touches sélectionnez le nombre
d'heures (de 1 à 9 heures) pendant lesquelles vous
voulez modifier le programme horaire.
NOTE: Pour annuler la variation manuelle de la température et retourner à la température ajustée en le programme horaire, appuyez sur la touche .
Lorsqu'on réalise une variation manuelle de la température de consigne pendant un nombre d'heures, il apparaîtra sur l'écran de façon alterne le temps qui reste jusqu'à la période horaire suivante et à côté de l'indication
de la température de consigne il apparaîtra le mot
CONFORT.
Une fois dans la période de change, en appuyant sur les
touches vous pourrez modifier à nouveau la
température selon vos préférences.
DIA Y
HORA
SET
SET
SET
SET
Manual 5300.qxd 18/06/04 11:29 Página 24

2255
CHANGEMENT DE LA TEMPÉRATURE DE CONSIGNE
PENDANT UN NOMBRE DE JOURS DÉFINIS
• Appuyez sur la touche pour vous situer sur
l'écran principal.
• Appuyez sur la touche .
• Avec les touches ajustez la température désirée.
• Appuyez sur la touche pendant 3 secondes
pour entrer en la programmation du nombre de
jours. Sur l'écran il apparaîtra la lettre "d" et le nombre de jours en tremblotant.
• Avec les touches sélectionnez le nombre de
jours ( de 1 à 99 jours) pendant lesquels vous désirez
modifier le programme horaire.
NOTE: Pour annuler la variation manuelle de la température et retourner à la température ajustée en le programme horaire, appuyez sur la touche .
Lorsqu'on réalise une variation manuelle de la température de consigne pendant un nombre de jours, il apparaîtra sur l'écran, de façon alterne, le nombre de jours
qui restent jusqu'à la période horaire suivante et à côté
de l'indication de la température de consigne il apparaîtra le mot FIJAR.
CHANGEMENT DE LA TEMPÉRATURE DE CONSIGNE
DE FAÇON PERMANENTE
• Appuyez sur la touche pour vous situer sur
l'écran principal.
• Appuyez sur la touche pour augmenter la valeur
de consigne.
• Appuyez sur la touche pour diminuer la valeur
de consigne.
• Appuyez sur la touche pour maintenir la
température de façon permanente.
NOTE: Pour annuler la variation manuelle de la température et retourner á la température ajustée en le programme horaire, appuyez sur la touche .
Lorsqu'on réalise une variation manuelle de la température de consigne de façon permanente, il apparaît sur
l'écran, à côté de l'indication de la température de consigne, le mot FIJAR.
SET
SET
SET
SET
FIJAR
FIJAR
FIJAR
Manual 5300.qxd 18/06/04 11:29 Página 25

Chronothermostat 5300
2266
TEMPS DE FONCTIONNEMENT
Le chronothermostat offre des différents historiques
d'heures de fonctionnement:
• Temps de fonctionnement pendant le jour actuel.
• Temps de fonctionnement pendant le jour antérieur.
• Temps de fonctionnement pendant la semaine actuelle.
• Temps de fonctionnement pendant la semaine antérieure.
• Temps total de fonctionnement.
Pour visualiser les temps de fonctionnement:
• Appuyez sur la touche pour vous situer sur
l'écran principal.
• Lorsque vous appuyez une première fois sur la touche , sur l'écran sont visualisées les heure de
fonctionnement du jour actuel.
• Lorsque vous appuyez une deuxième fois sur la touche , sur l'écran sont visualisées les heures
de fonctionnement du jour antérieur.
• Lorsque vous appuyez une troisième fois sur la touche , sur l'écran sont visualisées les heures
de fonctionnement de la semaine lors de
laquelle vous faites la consultation. L'indication DOM
tremblote.
• Lorsque vous appuyez une quatrième fois sur la touche , sur l'écran se visualisent les heures de
fonctionnement de la semaine antérieur
à celle lors de laquelle vous faites la consultation.
L'indication de tous les jours de la semaine reste fixe.
• Lorsque vous appuyez pour la cinquième fois sur la
touche , on visualise sur l’écran le temps de
fonctionnement de la semaine précédente, ainsi que
la semaine en cours. Tous les jours de la semaine
commencent à clignoter.
IMPORTANTE:
Si vous faites pression sur la touche pendant
plus de trois secondes les compteurs se mettent à zéro.
EFFACER LA PROGRAMMATION
En appuyant sur le bouton tous les ajustements
introduits en le chronothermostat sont effacés. Lorsque
cela se passe, le chronothermostat réalise une vérification de tous les segments de l'écran, récupère le programme standard d'usine et l'horloge s'ajuste à 00:00
heures du Dimanche. L'écran tremblote jusqu'à ce qu'on
appuie sur une touche quelconque.
AJUSTEMENT DU DIFFÉRENTIEL DE COMMUTATION
• Appuyez sur la touche pour vous placer sur
l'écran principal.
SET
SET
TIEMPO
FUNC.
TIEMPO
FUNC.
TIEMPO
FUNC.
TIEMPO
FUNC.
TIEMPO
FUNC.
TIEMPO
FUNC.
BORRAR
Manual 5300.qxd 18/06/04 11:29 Página 26

2277
• Appuyez sur la touche pour visualiser la
limite supérieure de commutation HI.
• Appuyez à nouveau sur la touche pour
visualiser la limite inférieure de commutation LO.
Pour modifier la valeur ajustée:
• Appuyez sur la touche et sans cesser de
faire pression appuyez sur Sur l'écran apparaît HI et sa valeur actuelle en tremblotant.
• En utilisant les touche s sélectionnez la nouvelle valeur de la limite supérieure HI. (Voir table d'équivalence).
• Appuyez à nouveau sur la touche Sur l'écran
il apparaîtra LO et sa valeur actuelle en tremblotant.
• En utilisant les touches sélectionnez la nouvelle valeur de la limite inférieure LO. (Voir table d'équivalence).
• Pour terminer l'ajustage, appuyez sur la touche
En la table ci-dessous l'équivalence entre les valeurs
ajustée HI et LO et les températures correspondantes est
montrée.
NOTE: Le différentiel minimum de commutation est
0,5K.
SET
SET
TEMP
INTERV
TEMP
INTERV
0
-0,5
-1,0
-1,5
-2,0
-2,5
-3,0
-3,5
-4,0
-4,5
0
+0,5
+1,0
+1,5
+2,0
+2,5
+3,0
+3,5
+4,0
+4,5
0
-1
-2
-3
-4
-5
-6
-7
-8
-9
Lo 0
Lo 1
Lo 2
Lo 3
Lo 4
Lo 5
Lo 6
Lo 7
Lo 8
Lo 9
Hi 0
Hi 1
Hi 2
Hi 3
Hi 4
Hi 5
Hi 6
Hi 7
Hi 8
Hi 9
Equiva-
lence
Limite
inférie.
Limite
supérie.
Vale
ur
0
+1
+2
+3
+4
+5
+6
+7
+8
+9
Vale
ur
Equiva-
lence
TEMP
INTERV
TEMP
INTERV
Manual 5300.qxd 18/06/04 11:29 Página 27

Chronothermostat 5300
2288
INSTALLATION
Avertissements:
Le chronothermostat doit être installé par des travailleurs
qualifiés selon les normes en vigueur.
Vous devez chercher un endroit ayant une température
représentative du local que vous allez contrôler, loin des
sources de chaleur, des courants d'air ou de l'influence
directe de la radiation solaire ou du système de chauffage.
Avant de réaliser toute connexion, vérifiez que vous avez
déconnecté l'approvisionnement électrique.
Montage:
• Levez le couvercle frontal pour accéder à la partie
intérieure du chronothermostat.
• En la partie inférieure, il y a un couvercle qui couvre
l'emplacement des batteries.
• Enlevez ce couvercle. Pour ce faire, il faut faire pression sur le symbole et la déplacer ver la droite.
• Enlevez les batteries si vous les avez mises.
• Enlevez le vis
• Tirez de la carcasse, légèrement en avant. De cette
façon vous aurez accès aux bornes de connexion et
aux trous de montage.
• Fixez le cadre d'embellissement sur le mur ou sur la
boîte des mécanismes en utilisant les chevilles et les
vis fournis.
• Fixez la base du chronothermostat au cadre d'embe-
llissement en utilisant deux vis.
• Réalisez la connexion électrique selon l'application.
Vérifiez que le câblage est correct.
• Placez la carcasse frontale du chronothermostat.
Placez le vis à nouveau et mettez les batteries en leur
position correcte.
• Placez le couvercle qui couvre les batteries et rétablissez l'approvisionnement électrique.
Lorsque vous alimentez le chronothermostat, une autovérification des segments de l'écran se réalise et ensuite
l'écran reste tremblotant. En appuyant sur une touche
quelconque l'écran se 'stabilise et peut procéder à la programmation selon les indications décrites au préalable.
APPLICATIONS PRINCIPALES
Manual 5300.qxd 18/06/04 11:29 Página 28

2299
DONNÉS VISUALISÉS SUR L'ÉCRAN
1. Indication de l'heure actuelle (temps de fonctionnement).
2. Indication du jour de la semaine.
3. Symbole d'indication de chauffage connecté.
4. Indication de mode de fonctionnement.
5. Indication de température d'ambiance. (indique le
besoin de changer de batterie avec le symbole "Lo"
clignotant).
6. Indication de programme actif. (Cette lecture s'affiche en alternance avec celle d'horaire de confort toutes les 30 secondes).
7. Indication de température de consigne.
DONNÉS TECHNIQUES
Ajustage de la température de consigne: 7 à 35 ºC, en
des intervalles de 1K.
Température de fonctionnement: 0 à 45ºC.
Température de stockage: -10 à 50ºC.
Sonde de température: NTC interne.
Alimentation: 2 batteries alcalines LR6, "AA", 1,5 V.
Différentiel: Ajustable, minimum 0,5 K.
Contact: Commuté, libre de potentiel.
Capacité de coupe: 8 ( 3,5) A à 250 V CA.
DIMENSIONS
Manual 5300.qxd 18/06/04 11:29 Página 29

Chronothermostat 5300
3300
INSTRUCTIONS
IMPORTANT
Congratulations. You have chosen a crono-thermostat
that thanks to its simplicity, will allow you, by properly
adjusting its functions, to make the most of its installation
possibilities.
ADJUSTING THE CURRENT DAY AND HOUR
• Press the key to go to the main screen.
• Press the key. The day of the week starts
flashing.
• With the keys adjust the day.
• Press . The hour starts flashing.
• With the keys adjust the hour.
• Press . The minutes start flashing.
• With the keys adjust the minutes.
• Press the key to finish the programming and
go back to the main screen.
PROGRAMMING
In the crono-thermostat CEPRA 5300 you can establish a
daily programming (every day of the week have the
same daily program) or a weekly program (different programs for each day of the week).
By default, the crono-thermostat has the following daily
programming:
For the CEPRA 5300 to adopt the established program,
it is necessary that the time program is increasingly ordered, being the minimum time for the first period P1,
00:00 and the maximum time for the last period P6,
23:50.
The start time of each slot and the consignment temperature can be modified in the following way.
Daily programming
(The same programming from Monday to Sunday)
• Press the key to go to the main screen.
• Press the key and keep pressing it, then
press to go to the programming.
DIA Y
HORA
DIA Y
HORA
DIA Y
HORA
SET
SET
SET
SET
PROG
LU-DOM
20ºC
17ºC
20ºC
19ºC
22ºC
17ºC
7:00
9:00
12:30
15:00
17:30
23:00
P1
P2
P3
P4
P5
P6
Slot
Start
time
Consignment
temperature
Manual 5300.qxd 18/06/04 11:29 Página 30

3311
PROG
LU-DOM
In the upper part of the screen, the days of the week start
flashing.
• With the keys, select the group of days :
LUN
MAR MIE JUE VIE SAB DOM
.
• Press the key to confirm the programming
block.
1)
Then the hour of the first slot P1 starts flashing.
• With the help of the keys set the start hour
of the first slot. The time can be set in steps of 10
minutes.
• Press the key.
2)
The consignment temperature of the first slot starts
flashing.
• With the help of the keys set the desired
temperature. The temperature can be set in steps of
1 degree.
• Press the key to confirm the programming
and going to the next slot. Repeat the steps 1 and 2
until you have programmed the 6 slots.
Finish the programming by pressing the key.
If you want to modify the programming for any day, do
the following:
Weekly Programming
• Press the key to go to the main screen.
• Press the key and keep pressing it, then
press the to go to the programming.
In the upper part of the screen, the days of the week start
flashing.
• With the keys, select the day you want to
modify:
LUN … DOM
. The programming will automatically become weekly, and the modified day is
adopted within the programming.
• Press the to confirm the day.
1)
Then the hour of the first slot P1 starts flashing.
• With the help of the keys set the start hour
of the first slot. The time can be set in steps of 10
minutes.
• Press the key.
2)
The consignment temperature of the first slot starts
flashing.
• With the help of the keys set the desired
temperature. The temperature can be set in steps of
1 degree.
• Press the key to confirm the programming
SET
SET
SET
PROG
LU-DOM
PROG
LU-DOM
PROG
LU-DOM
PROG
LU-DOM
PROG
LU-DOM
PROG
LU-DOM
Manual 5300.qxd 18/06/04 11:29 Página 31

Chronothermostat 5300
3322
and going to the next slot. Repeat the steps 1 and 2
until you have programmed the 6 slots.
Finish the programming by pressing the key.
Repeat this process if you want to modify the program-
ming of any other day.
DISPLAYING THE SET PROGRAMMING
• Press the key to go to the main screen.
• Press the key.
— If you use a daily programming:
• In the upper part of the screen, the seven days of the
week
LUN MAR MIE JUE VIE SAB DOM
are displayed, and in the lower part the screen displays the
start time and temperature of the first slot P1.
• By pressing the key several times, the screen
will display the start time and consignment
temperature of every one of the following slots: P2,
P3, P4, P5 and P6.
— If you use a weekly programming:
Programming the current day:
• In the upper part of the screen it displays the current
day indicator and in the lower part it displays the
start time and the temperature of the first slot P1 of
that day.
• By pressing the several times, the screen will
display the start time and consignment temperature
of every one of the following slots: P2, P3, P4, P5
and P6.
Programming any other day of the week different from
the current day:
• With the help of the keys select the day of the
week you want to check
LUN … DOM
. In the lower
part of the screen the start time and consignment
temperature for the first slot P1 are displayed.
• By pressing the key several times, the screen
will display the start time and consignment
temperature of every one of the following slots: P2,
P3, P4, P5 and P6.
• If you want to check the programming for any other
day, repeat the steps above.
• To go back to the main screen, press the key.
HOW TO MANUALLY CHANGE THE CONSIGNMENT
TEMPERATURE
The manual variation of the consignment temperature
may be done in four different ways:
• Until the next slot.
• During a certain number of hours ( selectable from 1
to 9 hours).
• During a certain number of days ( selectable from 1
to 99 days).
• Permanently.
SET
SET
SET
PROG
LU-DOM
PROG
LU-DOM
PROG
LU-DOM
PROG
LU-DOM
Manual 5300.qxd 18/06/04 11:29 Página 32
3333
HOW TO CHANGE THE CONSIGNMENT TEMPERATURE UNTIL THE NEXT SLOT
• Press the key to go to the main screen.
• Press the key to increase the consignment value.
• Press the key to decrease the consignment
value.
NOTE: To cancel the temperature manual variation and
then go back to the temperature adjusted by the program, press the key.
When a manual variation is done in the consignment
temperature until the next slot, in the screen, alternatively, the time remaining until the next slot is displayed,
and together with the consignment temperature indication, it displays the word MANUAL.
HOW TO CHANGE THE CONSIGNMENT TEMPERATURE DURING A CERTAIN NUMBER OF HOURS
• Press the key to go to the main screen.
• Press the key to increase the consignment value.
• Press the key to decrease the consignment
value.
• Press the key to enter the number of hours.
• With the keys select the number of hours
(from 1 to 9 hours) during which you want
to modify the programming.
NOTE: To cancel the temperature manual variation and
then go back to the temperature adjusted by the program, press the key.
When you make a manual variation of the consignment
temperature during a certain number of hours, the screen alternatively displays the time remaining until the next
slot together with a consignment temperature indicator,
and the word COMFORT.
Once in the slot you want to modify, by pressing the
keys you can modify the temperature again as
you want.
HOW TO CHANGE THE CONSIGNMENT TEMPERATURE DURING A CERTAIN NUMBER OF DAYS.
• Press the key to go to the main screen.
• Press the key.
• With the keys adjust the desired temperature.
• Press the key during and keep pressing it
during 3 seconds to enter the number of
days in the programming.. The screen displays the
letter "d" and the number of days is flashing.
• With the keys select the number of days
(from 1 to 99 days) during which you want
to modify the programming.
NOTE: To cancel the temperature manual variation and
then go back to the temperature adjusted by the program, press the key.
DIA Y
HORA
SET
SET
SET
SET
SET
SET
FIJAR
FIJAR
Manual 5300.qxd 18/06/04 11:29 Página 33

Chronothermostat 5300
3344
When you make a manual variation of the consignment
temperature during a certain number of days, the screen
alternatively displays the time remaining until the next
slot together with a consignment temperature indicator,
and the word FIJAR.
HOW TO CHANGE THE CONSIGNMENT TEMPERATU-
RE PERMANENTLY
• Press the key to go to the main screen.
• Press the key to increase the consignment value.
• Press the key to decrease the consignment
value.
• Pres the key to keep the temperature permanently.
NOTE: If you want to cancel the temperature manual
variation and go back to the temperature adjusted in the
program, press the key.
When you make a manual permanent variation of the
consignment temperature , the screen displays the word
FIJAR besides the consignment temperature indicator.
OPERATING TIME
The crono-thermostat includes different historical reports
with the operating times:
• Operating time during the current day.
• Operating time during the day before.
• Operating time during the current week.
• Operating time during the week before.
• Total operating time.
To display the operating times:
• Press the key to go to the main screen.
• When you press for the first time the key, the
screen displays the operating time during
the current day.
• When you press for the second time the key,
the screen displays the operating time
during the day before.
• When you press for the third time the key,
the screen displays the operating time during
the week in which you make the query. The indicator
SUN starts flashing.
• When you press for the fourth time the key,
the screen displays the operating time during
the week before you make the query. The indicator
with the days of the week stays fixed.
SET
SET
SET
TIEMPO
FUNC.
TIEMPO
FUNC.
TIEMPO
FUNC.
TIEMPO
FUNC.
FIJAR
Manual 5300.qxd 18/06/04 11:29 Página 34

3355
• When the key is pressed for the fifth time, the
operating hours of the previous week plus the current
week are displayed on the screen. All of the days of
week will be blinking.
IMPORTANT:
If you keep pressing the key during more than
three seconds, the counters reset to zero.
HOW TO DELETE THE PROGRAMMING
By pressing the key you will delete all the adjus-
tments entered in the crono-thermostat. When
this happens, the crono-thermostat makes a check-up of
all the segments of the screen, it recovers the default
standard program and the clock displays the 00:00
hours of the Sunday. The screen remains flashing until
you press any key.
HOW TO ADJUST THE COMMUTATION DIFFERENTIAL
• Press the key to go to the main screen.
• Pres the key to display the upper limit of the
commutation HI.
• Press the key again to display the lower limit
of the commutation LO.
To modify the adjusted value:
• Press the key. Keep pressing it and press the
key. The screen displays HI and its current
value is flashing.
• With the keys select the new value for the
upper limit HI. (See the equivalency table).
• Press the key again. En la pantalla aparece
LO y su valor actual parpadeando.
• By using the keys select the new value for the
lower limit LO. (See the equivalency table).
• To finish with the adjustment, press the key.
In the following table you will find the equivalency between the adjusted values HI and LO and the corresponding temperatures.
SET
SET
SET
TIEMPO
FUNC.
TIEMPO
FUNC.
TEMP
INTERV
TEMP
INTERV
TEMP
INTERV
TEMP
INTERV
BORRAR
NOTE: The minimum commutation differential is 0,5K.
0
-0,5
-1,0
-1,5
-2,0
-2,5
-3,0
-3,5
-4,0
-4,5
0
+0,5
+1,0
+1,5
+2,0
+2,5
+3,0
+3,5
+4,0
+4,5
0
-1
-2
-3
-4
-5
-6
-7
-8
-9
Lo 0
Lo 1
Lo 2
Lo 3
Lo 4
Lo 5
Lo 6
Lo 7
Lo 8
Lo 9
Hi 0
Hi 1
Hi 2
Hi 3
Hi 4
Hi 5
Hi 6
Hi 7
Hi 8
Hi 9
Equiva-
lence
Lower
limit
Upper
limit
Value
0
+1
+2
+3
+4
+5
+6
+7
+8
+9
Value
Equiva-
lence
Manual 5300.qxd 18/06/04 11:29 Página 35

Chronothermostat 5300
3366
INSTALLATION
Warnings:
The crono-thermostat must be installed by skilled per-
sonnel according to the valid law. You must look for a
place with a representative temperature in the room you
want to control, far from heat sources, air flows or the
direct influence of the solar radiation or heating systems.
Before making any connection, make sure that you have
switched the central power supply off.
Assembly:
• Open the front cover to get to the inside part of the
crono-thermostat.
• In the lower part, there is another cover for the battery holder.
• Open that cover, pressing on the symbol and sliding it to the right.
• Remove the batteries if you have already installed
them.
• Unscrew the screw
• Remove the cover by pulling outwards. This way you
will get to the connection terminals and to the holes
for the assembly.
• Fix the frame to the wall or to the machinery case
with the screws and slabs supplied.
• Fix the base of the crono-thermostat to the frame
with the screw.
• Make the electrical connection depending on the
appliance. Make sure that the cables are the proper
ones.
• Put the front cover of the crono-thermostat. Put the
screws again and place the batteries in their correct
position.
• Put the cover for the battery holder and switch the
central power supply on.
When you connect the crono-thermostat it makes an
auto-check-up of the segments of the screen and then
the screen starts flashing. by pressing any key the screen
will be stabilized and you can proceed programming
according to the instructions given below.
MAIN APPLICATIONS
Manual 5300.qxd 18/06/04 11:29 Página 36

3377
DATA DISPLAYED IN THE SCREEN
1. Current time indication (operating time).
2. Day of the week indication.
3. Heating connected indication symbol.
4. Operating mode indication.
5. Room temperature indication (indicating the need to
change the battery when the "Lo" symbol is flashing).
6. Active programme indication (this reading alternates
with that of the confort schedule every 30 seconds).
7. Assigned temperature indication.
TECHNICAL DATA
Adjustment of Set temperature: 7 to 35 ºC, with intervals
of 1K.
Operating temperature: 0 to 45ºC.
Storing temperature: -10 to 50ºC.
Temperature sensor: internal NTC .
Supply: 2 alkaline batteries LR6, "AA", 1,5 V.
Differential: Adjustable, minimum 0,5 K.
Contact: change-over.
Switching current: 8 ( 3,5) A to 250 V AC.
DIMENSIONS
Manual 5300.qxd 18/06/04 11:29 Página 37

Manual 5300.qxd 18/06/04 11:29 Página 38

GARANTÍA/GUARANTEE/GARANTIE
2 años/anos/years/années
Grupo de Empresas Temper S.L. garantiza este aparato por 2 años ante todo defecto de fabricación. Para hacer
válida esta garantía, es imprescindible presentar con este resguardo el ticket o factura de compra.
Grupo de Empresas Temper S.L. garantía este aparelho contra defeitos de fábrica ate 2 anos.
Grupo de Empresas Temper S.L. garantit cet apareil pour le durée de 2 annèes contre tout défault de fabrication.
Grupo de Empresas Temper S.L. guarantees this device during 2 years against any manufacturing defect.
Ref. Art.
Nº Serie/Serial number
Nombre/Name/Nom
Fecha de venta/Data de venda/
Date of purchase/Date de vente
ESPAÑA
Temper Clima, S.A.
San Sotero, 11
28037 MADRID
ESPAÑA
Tel.: +34-913044440
Fax: +34-913272755
e-mail:info@temperclima.es
www.temperclima.es
PORTUGAL
SFT Equipamiento eléctrico, S.A.
Proceta Cesário Verde, 10, S/cv
Massamá 2745-740 (QUELUZ)
PORTUGAL
Tel.: +351-214389314
Fax: +351-214300804
e-mail:info@sft.pt
TUNEZ
TUNILIGHT SARL
Berges du Lac
Zone Nord 2045
TUNISIA
Tel.: +216-1781904
Fax: +216-1781820
(E)
(P)
(F)
(GB)
Sello del establecimiento vendedor:
Canmbo da firma vendedora:
Dealer stamp:
Cachet du commercant:
Manual 5300.qxd 18/06/04 11:29 Página 39

Manual 5300.qxd 18/06/04 11:29 Página 40
 Loading...