

Page 1
Air Cooler
Instruction Manual
Model AL-100
PLEASE READ THE INSTRUCTION MANUAL CAREFULLY BEFORE USING THIS UNIT.
Page 2

Table of Contents
WARNINGS AND PRE-CAUTIONS ………………………...1
FEATURES…………………………………………………….1
STRUCTURE…………………………………………………. 2
CONTROL PANEL FUNCTION………………………………3
OPERATING INSTRUCTIONS……………………………….5
IMPORTANT NOTES………………………………………….8
TECHNICAL REFERENCE DATA…………………………...8
WARNINGSANDPRECAUTIONS
1. Warnings.
o Use the specified power supply.
o Do not operate the unit with wet hands.
o Do not unplug the power supply while machine is running.
o Extension power cord is not recommended.
o Do not insert fingers, sticks or other objects into the unit.
o In case of bad smell, turn off the unit and then switch off power supply.
o If the supply cord is damaged, it must be replaced by the manufacturer or its service
agent or a similarly qualified person in order to avoid a hazard.
o Do not cover the air outlet and air inlet.
o The appliance must not be located immediately below a socket outlet.
o Do not use this appliance in the immediate surroundings of a bath, a shower or
swimming pool.
o This appliance is not intended for use by persons (including children) with reduced
physical, sensory or mental capabilities, or lack of experience and knowledge.
o Children should be supervised to ensure that they do not play with the appliance.
2. Notice.
o Do not operate the unit near flammable or explosive gas.
o Keep unit at least 1 meter away from TV or Radio for interference.
o Do not unplug power by pulling the power cord.
o Empty water tank and unplug the power before putting unit in storage.
o Do not wash the unit using water or chemical solvent.
o Turn off machine, unplug the power, and then use damp cloth for cleaning.
o Do not shake or beat the unit.
o Do not block wind inlet and outlet of the unit.
o Do not mix old and new batteries in the remote controller.
o Disconnect power supply if the unit will not be sued for a long time.
Page 3

IMPORTANTNO TES
1. The range of the remote control is five meters.
2. Batteries must be inserted into the remote control which must be pointed direct at the
unit, using the front portion to activate.
3. Use indoor only.
4. Should it be necessary to move the unit after the water has been added, roll gently to
the required position and activate the bracket the castors.
5. The unit is safe and reliable if the power socket is earthed.
6. Clean the filter every 20-30 days of operation for optimum performance by removing
screw at back of the unit and gently rinsing filter in clean water.
7. Always ensure that there is water in the unit when in use for cooling.
FEATURES
o 3-in-1 functions: cooler, air purifier and humidifier.
o Purify air by removing dusts and unpleasant odors.
o Purify and sterilize air by generating negative ion.
o Environment-friendly, large cooling capacity, and high performance rating.
o Add ice to ice tank to achieve additional cooling, down to 3-5℃.
o Enery efficiency and low power consumption.
o Water curtain provides moisture to protect skin from dryness.
o Activated carbon filter any nylon filters can be alternative at will.
Page 4

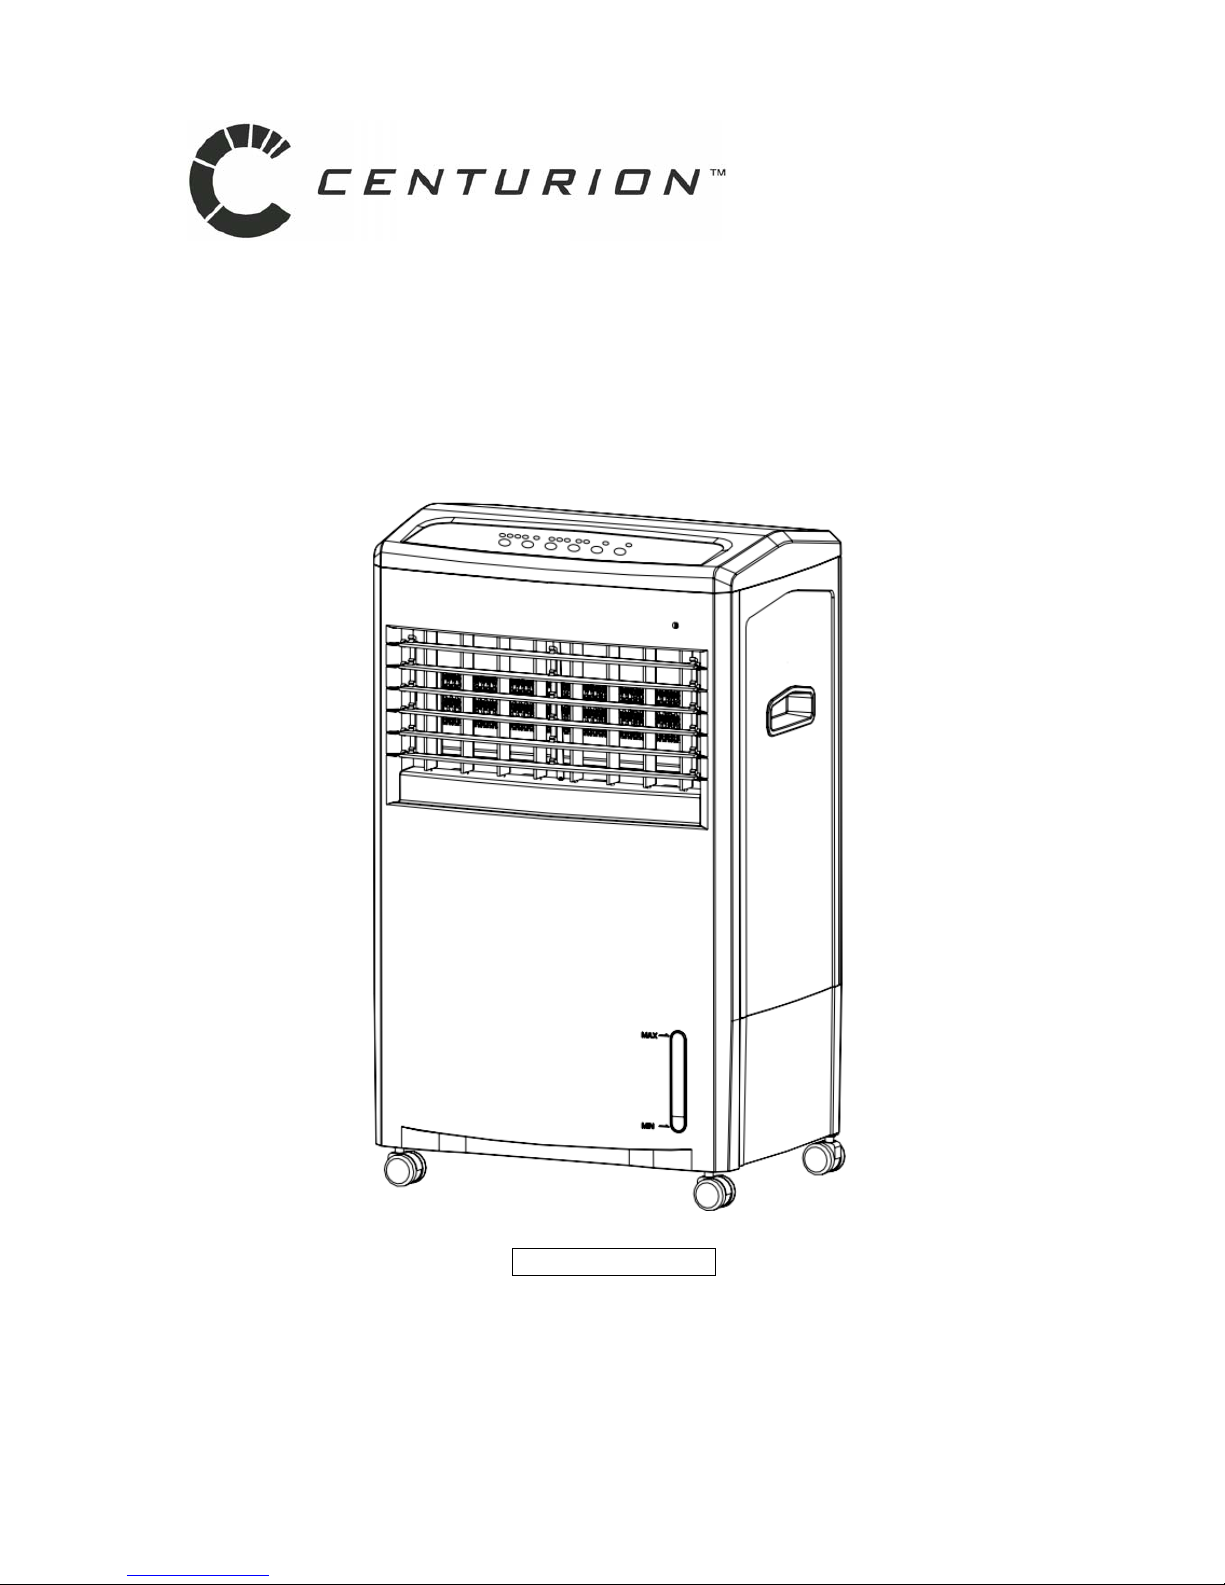
STRUCTURE
1. Control Panel
2. Horizontal V ane
3. Vertical Vane
4. Caster
5. Handle
6. Water Level Indicator
7. Wire Hook
8. Power Cord
9. Filter Frame
10. Water Panel
11. Bottom Water Tank
12. Drain Stopple
Page 5

CONTROLPA N E L FUNCTION
1. TIMER button for timer
2. MODE button
3. SPEED button
4. WIND/COOL button for air flow or cooling
5. button for run or stand-by, turn on or off anion generator
COOLING
o Open or take down the detachable water panel on left side of the board.
o Add clean water into the water tank, and observe water level through the transparent
window to control water volumn, total water should ben between “Min” and “Max”.
o For extra cooling operation, place ice into the large compartment and close the water
panel.
o Press button
o Press “COOL” button for cold breeze.
Page 6

AIR FLOW
o Press “SPEED” button on control panel to select fan speed as below.
o HI: STRONG
o MI: MEDIUM
o LO: SLOW
o Press “WIND” button on control panel, air flow will automatically oscillate from left to
right.
o To regulate air flow up or down, adjust front louvres manually.
CONTROLPA N E L FUNCTION
TIMER
o There are four positions with indicator lights
0.5H: HALF AN HOUR
1H: ONE HOUR
2H: TWO HOURS
4H: FOUR HOURS
o Press “TIMER” button to select any of the above settings.
o Your unit will automatically switch off when selected.
o If the timer button is not used, your unit will continue operating until switched off.
OPERATINGINSTRUCTIONS
REMOTE CONTROL
The use of the remote control is the same as the control panel, the method is as follows.
o Installation of batteries. Open the battery board of the remote control panel, install 2pcs
of AAA battery into the slot, then cover the board.
Note: The polarity of batteries must be accordance with that indicated in the remote control
panel. Please don’t mix batteries with new from old when use.
Note: In order to save the environment pollution, please deal with the exhausted batteries
properly. Do not discard it freely.
Page 7

OPERATING INSTRUCTIONS – remote control
o How to use the remote control panel:
1. SPEED button: three wind flow level: “HIGH”,
“MIDDLE”, & “LOW” with three LED
indicator.
2. TIMER button: one press increase 0.5 hour,
total 7.5 hours, the four LED indicators
always indicate the time remained. If the set
timer is reached, the machine automatically
switch off.
3. MODE button: press the mode button can
work normal breeze, natural breeze & sleepy
breeze.
4. COOL button: press the “COOL” button to
cool.
WIND button: press the “WIND” button can
change wind bearing 120°.
5. button: can run and stand-by the unit,
turn on or off anion generator.
Note: If the remote control is not going to be used for a long time, please take out
the batteries to avoid any corrosion of parts from the leakage of electrolyte from
batteries.
Page 8

SETUPINSTRUCTION
CLEAN & REPLACE THE FILTER
The filter is already assembled before delivery from factory. But the filter should be
cleaned or replaced after a certain time use, it should be operated by technical people or
ask for advice by local distributor. The method is mentioned below.
1. Hold the filter down to the board position with force to back side can remove filters.
2. Take the filter out of the filter frame, tap the filter with certain object for cleaning. If the
filter is really dirty, dip it into natural detergent solution to wash and flush with water.
3. Put the cleaned or newly replaced filter slightly into its proper position into filter frame,
then cover the filter frame gently.
Note: 1. Filter can be used for one year normally, if damage occurs, the filter should be
changed immediately.
2. The filter unit from factory is nylon mesh, customers are free to choose nylon filter
or activated carbon filter.
How to clean filter:
Remove the filter frame from the unit, take out the dirty filter and clean it (it can be cleaned
with water). When it is dry, please install it as per directive.
Page 9

TECHNICALREFERENCEDA TA
Model AL-100
Rated Voltage AC220-240V / 50HZ
Rated Power (cooling) 70W
Electrical Protection Class II
Airflow Volume 350M3/h
Net Weight 5.5kgs
Water Tank 8L
Meas.of unit (L x W x H) 380 x 265 x 630mm
Page 10

Luftkylare
AL-100
Bruksanvisning
LÄS BRUKSANVISNINGEN NOGA INNAN DU ANVÄNDER APP ARA TEN.
Page 11

Innehåll
VARNING - FÖRSIKTIG ......................................................................................................................... 2
VIKTIGT ................................................................................................................................................. 3
FUNKTIONER ........................................................................................................................................ 3
UPPBYGGNAD ...................................................................................................................................... 4
REGLAGEPANEL - FUNKTION ............................................................................................................. 5
REGLAGEPANEL - FUNKTION ............................................................................................................. 6
ANVISNING ........................................................................................................................................... 6
UNDERHÅLL.......................................................................................................................................... 8
TEKNISKA SPECIFIKATIONER ............................................................................................................. 9
VARNING - FÖRSIKTIG
1. Varning
o Använd angiven spänningsmatning.
o Använd inte luftkylaren om du är blöt om händerna.
o Dra inte ut kontakten när luftkylaren är igång.
o Använd helst inte förlängningssladd.
o Stick inte in fingrarna, pinnar eller andra föremål i apparaten.
o Stäng enheten och dra ut kontakten om det luktar illa.
o Om sladden skadas, måste den bytas av tillverkaren eller behörig servicetekniker.
o Täck inte luftutsläppet eller luftintaget.
o Luftkylaren får inte ställas precis under ett vägguttag.
o Använd inte apparaten i närheten av ett badkar, en dusch eller en simbassäng.
o Luftkylaren får inte användas av barn eller personer som saknar kunskap om och
erfarenhet av hur den används.
o Håll barn under uppsikt så att de inte leker med apparaten.
2. Obs!
o Använd inte luftkylaren nära lättantändlig eller explosiv gas.
o Ställ den minst 1 meter från TV och radio för att inte riskera störningar.
o Dra aldrig ut kontakten genom att dra i sladden.
o Töm vattenbehållaren och dra ut kontakten innan luftkylaren ställs undan en längre tid.
o Tvätta inte enheten med vatten eller lösningsmedel.
o Stäng av den, dra ut stickkontakten och använd en fuktig trasa vid rengöring.
o Skaka eller slå inte på apparaten.
o Blockera inte luftintaget eller luftutsläppet.
o Blanda inte gamla och nya batterier i fjärrkontrollen.
o Dra ut stickkontakten om apparaten inte ska användas på länge.
Page 12

VIKTIGT
1. Avståndet mellan luftkylaren och fjärrkontrollen bör vara högst fem meter.
2. Lägg i batterier i fjärrkontrollen. Rikta fjärrkontrollen direkt mot apparaten.
3. Får endast användas inomhus.
4. Om du måste flytta enheten när det är vatten i den ska den rullas försiktigt till rätt plats.
Lås hjulen när den står på önskad plats.
5. Luftkylaren är säker att använda med ett jordat vägguttag.
6. Rengör filtret efter 20-30 dagars användning för bästa möjliga effekt: Lossa skruven på
enhetens baksida och skölj försiktigt filtret i rent vatten.
7. Se alltid till att det finns vatten i apparaten när den används för kylning.
FUNKTIONER
o 3-i-1-funktion: Apparaten både kyler, renar luften och höjer fukthalten i rummet.
o Rengör luften genom att fånga upp damm och luft.
o Rengör och steriliserar luften genom att generera negativa joner.
o Miljövänlig, god kylkapacitet och hög effekt.
o Fyll på is i isbehållaren för att få extra kyleffekt, ned till 3-5ºC.
o Energieffektiv med låg energiförbrukning.
o Vattenridå ger fukt som skyddar huden från att torka ut.
o Använd aktivt kolfilter eller nylonfilter efter önskemål.
Page 13

UPPBYGGNAD
1. Reglagepanel
2. Vågräta blad
3. Lodräta blad
4. Hjul
5. Handtag
6. Vattennivåindikator
7. Sladdhållare
8. Sladd
9. Filterhållare
10. V attenp anel
11. Nedre vattenbehållare
12. Tömningsplugg
Page 14

REGLAGEPANEL - FUNKTION
1. TIMER - Timerknapp
2. MODE - Lägesknapp
3. SPEED - hastighetsreglage
4. WIND/COOL – knapp för val av luftflöde eller kylning
5.
Strömbrytare: Sätt på, stäng av till standbyläge, sätt på eller stäng av
produktionen av negativa joner
KYLNING
o Öppna och ta ned den avtagbara vattenpanelen på vänster sida.
o Fyll på rent vatten i vattenbehållaren och kontrollera samtidigt vattennivån genom det
genomskinliga fönstret. Vattennivån ska ligga mellan ”Min” och ”Max”.
o Lägg i is i det stora facket för extra kyleffekt. Stäng vattenpanelen.
o Tryck på
o Tryck på “COOL” för att starta kylningen.
Page 15

LUFTFLÖDE
o Tryck på “SPEED” på kontrollpanelen för att välja fläkthastighet.
o HI: SNABB
o
MI: MELLAN
o
LO: SAKTA
o Tryck på ”WIND” på kontrollpanelen och luftflödet börjar automatiskt att oscillera
(svänga) från vänster till höger.
o Ställ in det främre ventilationsgallret manuellt om du vill rikta luftflödet uppåt eller
nedåt.
REGLAGEPANEL - FUNKTION
TIMER
o Det finns fyra lägen med kontrollampor
0.5H: EN HALVTIMME
1H: EN TIMME
2H: TVÅ TIMMAR
4H: FYRA TIMMAR
o Tryck på ”TIMER” för att välja någon av ovannämnda inställningar.
o Luftkylaren stängs av automatiskt efter den valda tiden.
o Om du inte använder timer fortsätter den att gå tills någon stänger av den.
ANVISNING
FJÄRRKONTROLL
Du använder fjärrkontrollen på samma sätt som reglagepanelen.
o Installera batterier: Öppna fjärrkontrollens batterifack och lägg i 2 stycken batterier i stl
LR03. Sätt tillbaka luckan.
Obs! Se till att batterierna är rättvända enligt polaritetsmärkningen på fjärrkontrollen.
Blanda aldrig nya och gamla batterier.
Obs! Se till att lämna urladdade batterier till avfallshantering för att inte bidra till
miljöförstöring. Kasta dem inte i soporna.
Page 16

ANVISNINGAR – Fjärrkontroll
o Använda fjärrkontrollen:
1. SPEED: Tre lägen för luftflöde: ”HIGH”,
”MIDDLE” och ”LOW” med tre LED-lampor.
2.
TIMER: Tryck en gång för att öka med en
halvtimme. Högsta möjliga inställning är 7,5
timmar. De fyra LED-lamporna visar alltid
återstående tid. När den inställda tiden nås,
stängs luftkylaren automatiskt av.
3.
MODE: Tryck på knappen för att välja läge:
normal fläkt, naturlig fläkt och långsam fläkt.
4.
COOL: Tryck på knappen för att få kyla.
WIND: Tryck på ”WIND” för att ändra
vindriktningen 120°.
5. : Sätt på luftkylaren eller stäng av till
standbyläge, sätt på eller stäng av
jongeneratorn.
Obs! Ta ut batterierna ur fjärrkontrollen om den inte ska användas på länge, för att
förhindra korrosion på grund av elektrolytläckage från batterierna.
Batterilucka
Batteri
Fjärrkontroll
Page 17

UNDERHÅLL
RENGÖRA OCH BYTA FILTER
Filtret är redan monterat vid leverans från fabriken. Det måste dock rengöras eller bytas
efter viss tids användning, vilket ska ske av tekniskt kunnig person. Be gärna din leverantör
om hjälp. Här följer den metod som ska användas.
1. Tryck ned filtret så att det kan tas ut bakifrån.
2. Ta ur filtret från hållaren och gör rent det genom att knacka lätt på det. Om filtret är
mycket smutsigt kan du doppa det i ett rengöringsmedel med lågt ph-värde och spola
med vatten.
3. Sätt tillbaka det rena eller nya filtret i rätt läge och lägg försiktigt på filterhållaren.
Obs! 1. Filtret kan i normala fall användas i ett år. Om det skadas måste det bytas
omgående.
2. Filterenheten från fabriken är tillverkat av nylonnät, men det går också bra att
använda ett aktivt kolfilter.
Så här rengör du filtret:
Ta ut filterhållaren från luftkylaren, ta ut det smutsiga filtret och rengör det (det kan rengöras
med vatten). Sätt tillbaka det enligt anvisningarna när det har torkat.
Öppna eller fäll ner vattenpanelen. Lägg isboxen i
vattentanken eller häll vatten på isen.
Filter Filterram
Page 18

TEKNISKA SPECIFIKATIONER
Modell
AL-100
Märkspänning AC 220-240 V, 50 Hz
Märkeffekt (kylning) 70 W
Skyddsklass II
Luftflöde 350 m3/h
Nettovikt 5,5 kg
Vattenbehållare 8 l
Mått (l x b x h) 380 x 265 x 630 mm
Direktiv 2002/96/CE för Waste of Electrical and Electronic Equipment (WEEE).
Den här symbolen på produkten eller i instruktionerna betyder att den elektriska och elektroniska
utrustningen ska slängas separat från annat hushållsavfall när den inte fungerar längre. Inom EU
finns separata återvinningssystem för avfall.
Kontakta lokala myndigheter eller din återförsäljare för mer information.
Elektronikprodukter kan vara skadliga för miljön och ska därför tas om hand separat för att minska
åverkan på miljön.
• Batterier måste kastas i särskilda behållare för batteriåtervinning. De får ej kastas i
hushållsavfallet.
• Elektronikprodukter skall lämnas in på närmaste återvinningsstation och får inte kastas i
hushållsavfallet.
 Loading...