


drs

CenterVue
DRS Operating Manual
Pg. 1 of 57
Operating Manual

CenterVue
DRS Operating Manual
Pg. 2 of 57
CenterVue SpA
Via San Marco 9h, 35129 Padova – ITALY
Tel. +39 049 739 6147
Fax +39 049 739 6148
MANUAL INFORMATION
Date of release: November 6th, 2015
Revision number: 21
Reference software version: v2.4
Manufacturer:
SUMMARY
1. INTRODUCTION ....................................................................................................................................... 4
2. SYSTEM .................................................................................................................................................... 5
3. LABELING ................................................................................................................................................. 6
4. SYMBOLS.................................................................................................................................................. 7
4.1 Symbols adopted on the device ............................................................................................................ 7
4.2 Symbols adopted in this manual ............................................................................................................ 7
5. PREPARING THE DRS ............................................................................................................................. 8
6. PREPARING THE PATIENT ..................................................................................................................... 9
7. WARNINGS AND PRECAUTIONS ......................................................................................................... 10
8. NOTES TO OPERATOR ......................................................................................................................... 11
9. PERFORMING THE TEST ...................................................................................................................... 12
9.1 Adding a new patient ........................................................................................................................... 12
9.2 Selecting an existing patient ................................................................................................................ 12
9.3 Starting the image acquisition process ................................................................................................ 13
9.4 Automated acquisition ......................................................................................................................... 14
9.5 Manual alignment ................................................................................................................................ 15
9.6 Anterior Eye ......................................................................................................................................... 16
9.7 Stereo exams ....................................................................................................................................... 17
9.8 Warning messages .............................................................................................................................. 17
10. REVIEWING THE IMAGES ..................................................................................................................... 19
10.1 Patient record screen ........................................................................................................................... 19
10.2 Full image screen ................................................................................................................................ 20
11. REMOTE VIEWER .................................................................................................................................. 23
12. PRINTOUT............................................................................................................................................... 25
12.1 Single image printout ........................................................................................................................... 25
12.2 Dual image printout .............................................................................................................................. 25
13. RETINAL FIELDS .................................................................................................................................... 27
14. SETTINGS ............................................................................................................................................... 28
14.1 Fields ................................................................................................................................................... 28
14.2 Exam .................................................................................................................................................... 28
14.3 Network ................................................................................................................................................ 30
14.4 System ................................................................................................................................................. 34
14.5 EKN ...................................................................................................................................................... 41
14.6 About .................................................................................................................................................... 42
15. AUTOMATIC SOFTWARE UPDATE ...................................................................................................... 43
16. SYSTEM SHUTDOWN ............................................................................................................................ 44
17. CLEANING............................................................................................................................................... 45
17.1 Front lens ............................................................................................................................................. 45
17.2 Patient cushions .................................................................................................................................. 46
17.3 Touch screen panel ............................................................................................................................. 47
17.4 Plastic shells ........................................................................................................................................ 47

CenterVue
DRS Operating Manual
Pg. 3 of 57
18. MAINTENANCE ....................................................................................................................................... 48
19. ELECTROMAGNETIC COMPATIBILITY ................................................................................................ 49
20. FCC (USA) and IC (Canada) radio certification ....................................................................................... 49
21. TECHNICAL SPECIFICATIONS ............................................................................................................. 50
22. DISPOSAL ............................................................................................................................................... 51
23. TROUBLESHOOTING ............................................................................................................................. 52
APPENDIX A - DICOM Statement .................................................................................................................. 53
APPENDIX B – AUTOMATED MOSAIC FUNCTION ..................................................................................... 55
APPENDIX C – EYE KNOWLEDGE NETWORK (EKN) ................................................................................. 57

CenterVue
DRS Operating Manual
Pg. 4 of 57
The clinical interpretation of the images acquired by the DRS is restricted to
licensed eye care practitioners. The process of making a diagnosis using DRS
results is the responsibility of the eye care practitioner.
A device specific training is required for any operator to become able to use the
system.
Federal laws (US) restrict this device to sale by or on the order of a physician or a
properly licensed practitioner.
1. INTRODUCTION
The Digital Retinography System (DRS) is a fundus camera for the acquisition of digital images of
the retina without the use of a mydriatic agent.
In particular, the DRS allows to acquire color images of the retina over a field of view of 45° x 40°,
in a fully automatic mode. Seven different retinal fields can be framed using multiple internal
fixation targets.
CenterVue
DRS Operating Manual
Pg. 5 of 57
The DRS system is supplied with:
Power cord;
Spare fuses;
This Operating Manual;
Dust cover;
Microfiber cleaning tissue for touch screen;
Front lens photographic cleaning paper, pack of single-use sheets
Silicone forehead rest;
Hand blower;
Glasses with adjustable prisms;
USB 2.0 extension cord.
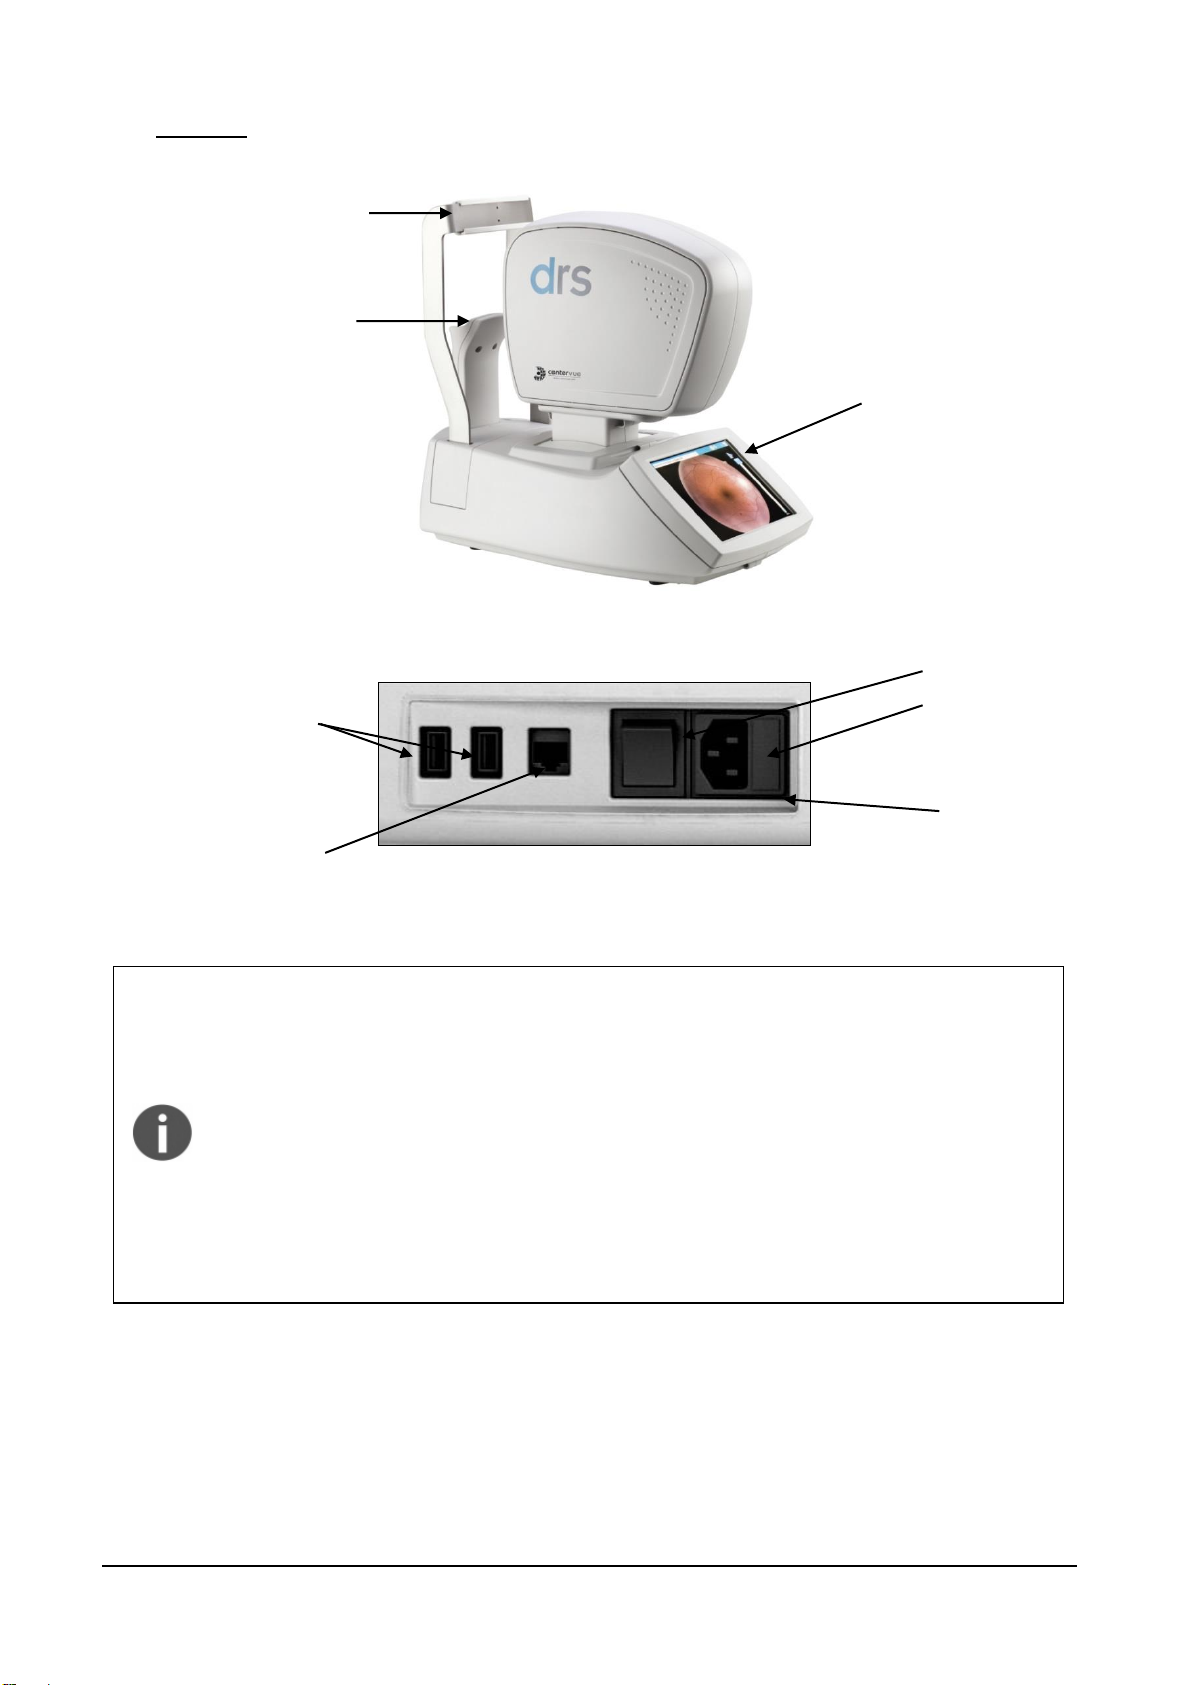
Chin rest =
applied part
Forehead rest =
applied part
Patient side
Operator side
Touch screen
USB ports
Ethernet port
Power switch
Power inlet
Fuses
2. SYSTEM
Figure 1 - DRS left side view
Figure 2 - Detail of the device right side

CenterVue
DRS Operating Manual
Pg. 6 of 57
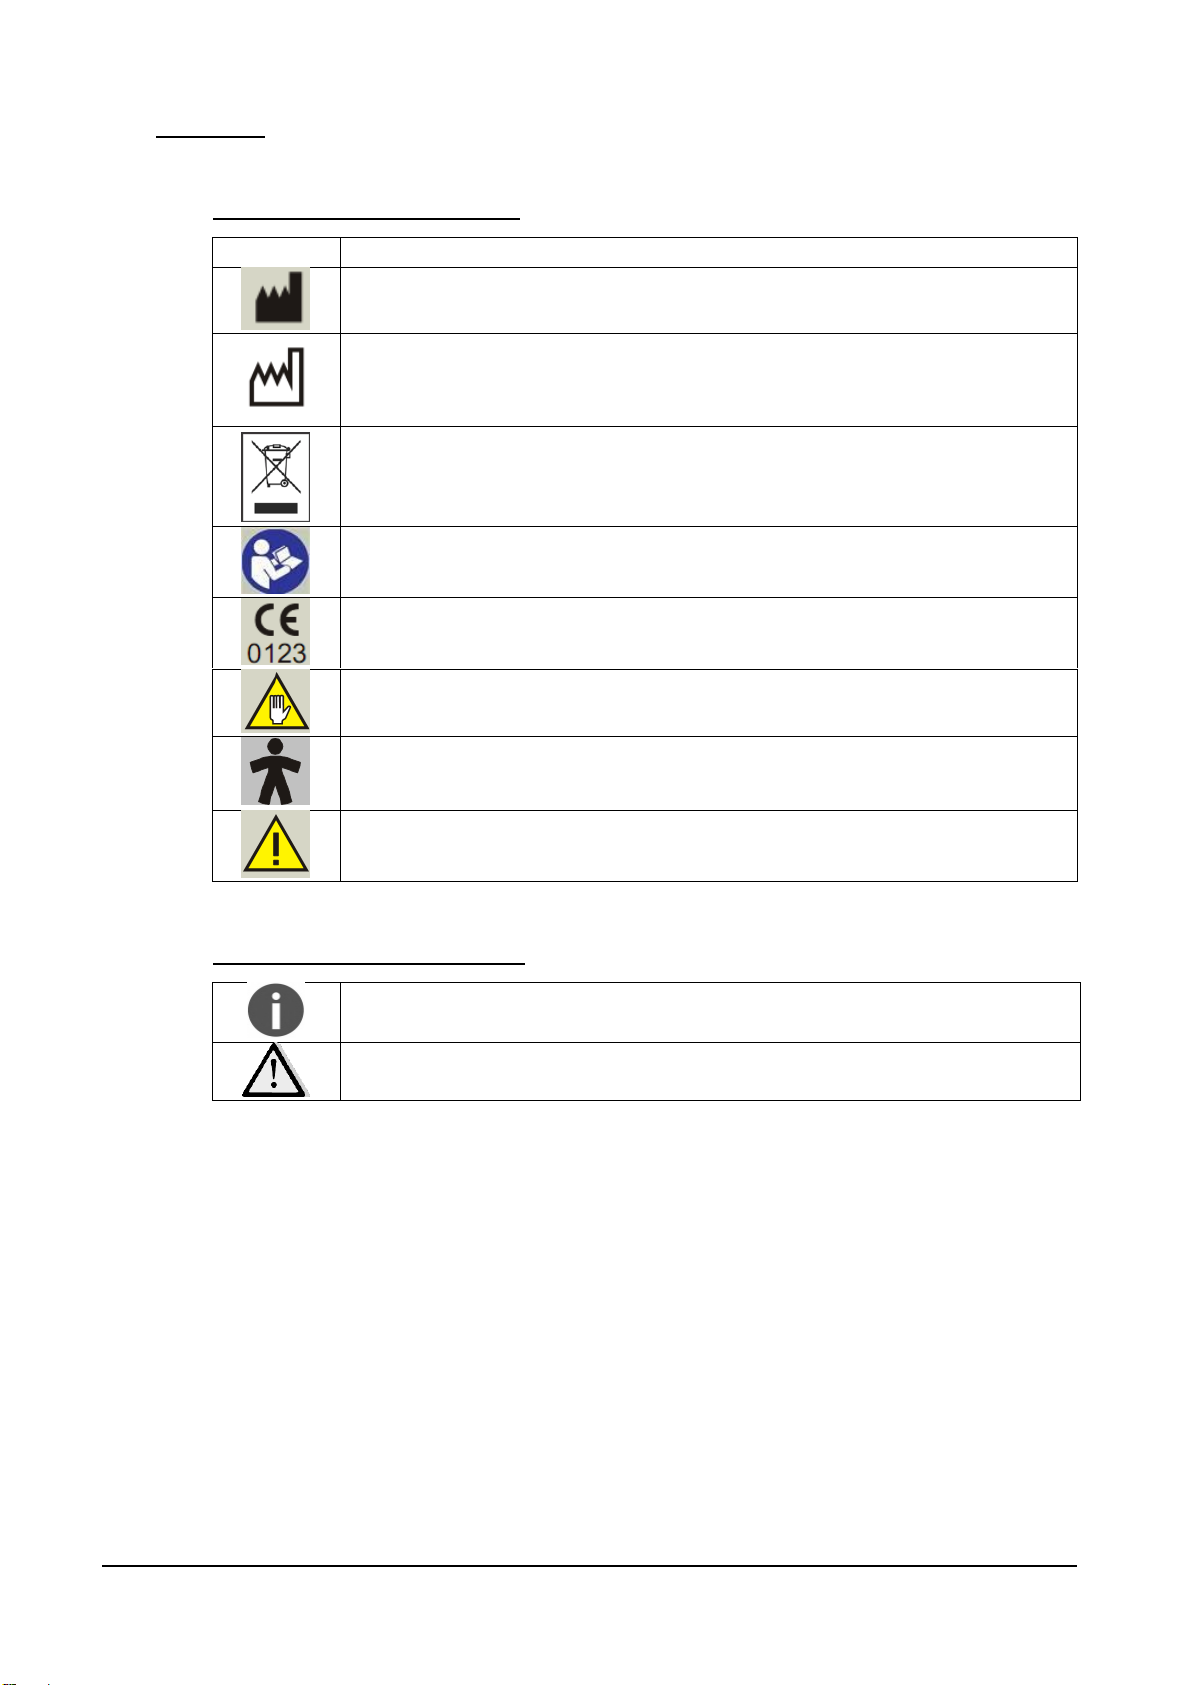
3. LABELING
CenterVue
DRS Operating Manual
Pg. 7 of 57
Symbol
Explanation
Manufacturer Data
Manufacturing Date (year/week of production)
Electronic and electric devices must be recycled.
Refer to Instruction Manual
CE mark: the device complies with the essential requirements of the
European Medical Devices Directive 93/42/EC
Warning: Do Not Touch
Type B Applied Part
Generic Warning
Note
Warning
4. SYMBOLS
4.1 Symbols adopted on the device
4.2 Symbols adopted in this manual

CenterVue
DRS Operating Manual
Pg. 8 of 57
The test should be performed in conditions of semi-obscurity to facilitate natural
dilation of the pupil.
Figure 3 - Forehead rest patient side
Figure 4 - Forehead rest rear side
1
5. PREPARING THE DRS
Read carefully and thoroughly paragraph 7 WARNINGS AND PRECAUTIONS before
proceeding with first use.
To set up your DRS follow these steps:
extract the system from its box;
place the DRS on a suitable electrical table1;
connect the power cord provided with the unit to the power inlet (see Figure 2);
optionally connect a compatible printer1 to any of the USB ports (see Figure 2);
attach the silicon forehead rest (included in the tool box) on the forehead rest frame as
shown in the pictures below (Figure 3 and Figure 4);
Time zone configuration
The first time the DRS is powered on, the operator is requested to set the time zone. The
configuration request (Figure 5) will appear every time the DRS is started, until the time zone is set
(see §14.4).
Figure 5 – Request to configure time zone
Request for camera auto-tuning
After a software upgrade to the latest version a message as in Figure 6 may appear. Such
message appears only once when a new software is started for the first time: please apply the lens
cap and press ok, then wait until the completion message (Figure 7) appears.
Not provided with the DRS

CenterVue
DRS Operating Manual
Pg. 9 of 57
Patients wearing Contact Lenses: image quality may be affected by contact lenses. It is
recommended to have contact lenses removed before imaging the patient.
Figure 6 – Request to perform camera auto-tuning
Figure 7 – Camera auto-tuning completion message
6. PREPARING THE PATIENT
This paragraph explains how to prepare a patient for the DRS test. There are no restrictions as to
the selection of the patients undergoing DRS testing. The DRS is a non-mydriatic device (minimum
pupil diameter 3.8 mm), so there is no need to dilate the subject’s pupil. Patient contacting parts
are indicated in Figure 1.
Before the test inform the patient about the following:
1) the test is non-invasive, in particular the system will never touch your eye and you will only
see a flash of light when a photograph is taken;
2) find a comfortable position, keeping the chin and forehead firmly pressed against the rests;
3) at the beginning of each test, the unit will move around to find your pupil: this is absolutely
normal;
4) when the test starts look straight in front of you and when a small green circle becomes
visible anywhere within the field look steady at it;
5) open your eyes wide so that eyelids do not interfere and try to not blink during the test;
6) do not move during the test;
7) if you follow these instructions the acquisition of a single photo will take less than 30
seconds.

CenterVue
DRS Operating Manual
Pg. 10 of 57
Federal laws (US) restrict this device to sale by or on the order of a physician or a
properly licensed practitioner.
The clinical interpretation of DRS images is restricted to licensed eye care
practitioners.
A device specific training is required for any operator to become able to use the
system.
Do not open the device: this could lead to electric shocks or damage to the system.
Do not use the instrument in the event that the cover or other parts of the device
have been removed.
Only technicians authorized by CenterVue may service the DRS. CenterVue
cannot be held responsible for system safety should the DRS be opened, repairs
carried out, third parties software be installed, or parts be replaced by unauthorized
persons.
Do not expose the device to water: this could lead to fire or electric shock.
Stand clear from moving parts during operation.
The instrument is supplied with an earth ground by means of a protection
conductor contained inside the power supply cable. Before turning on the system,
make sure the power supply socket is correctly grounded to avoid the risk of
electric shock.
The room where the DRS is operated must respect IEC or ISO safety standards
relative to medical use of a room or area.
The DRS must NOT be used in an oxygen rich environment or in presence of
flammable anesthetics.
External equipment connected to the DRS within the patient environment must be
compliant with IEC 60601. Equipment not complying with IEC 60601-1 shall be
kept outside the patient environment and complying with IEC 60950. Any person
who connects external equipment to signal input, signal output or other connectors
of the DRS has formed a Medical Electrical System according the definition of
IEC 60601-1 and is therefore responsible for the system to comply with the
requirements of IEC 60601-1, § 16. If in doubt, contact the local representative.
Data Backup: the DRS contains Patient Health Information. It is strongly
recommended the use of the “backup” utility. See par. Settings >> System.
The device must be placed in a room which is not exposed to adverse chemical-
physical conditions, such as the presence of sulfur, salt, dust, direct sunlight, lack
of ventilation, high humidity, sudden temperature drops or peaks. The safety and/or
effectiveness of the instrument cannot be guaranteed if these conditions are not
fulfilled.
The DRS needs to be operated in a semi dark room (except when taking Anterior
Eye photos).
The DRS needs to be operated under the following environmental conditions:
Temperature: 10 - 40 C° (50 - 104 F°) / Humidity (max): 90% not condensing
The DRS needs to be stored under the following environmental conditions:
Temperature: -10 - 60 C° (14 - 140 F°) / Humidity (max): 90% not condensing
A not optimal pupil alignment may cause the acquisition of an image of the retina
7. WARNINGS AND PRECAUTIONS
The following precautions are particularly relevant to the device safety:
The following precautions are particularly relevant to prevent use errors:

CenterVue
DRS Operating Manual
Pg. 11 of 57
that has a growing light crescent on a board. Such growing light should be
considered an artifact and not a feature of the retina under examination.
Do not leave the front lens uncovered while the system is not in use.
The auto-alignment process may fail in some circumstances such as:
long eye-lashes;
presence of make-up;
room too bright;
direct light on a patient’s face;
very big pupil.
Under such circumstances the exam should be repeated after removing the cause of
the failure.
Note on auto-alignment:
8. NOTES TO OPERATOR
No specific skills are required to operate the DRS.
A minimal, device specific, training is required to become able to use the system.
The operator needs to be acquainted with the following concepts:
pupil: the central part of the external surface of the eye, through which light goes in;
retina: the internal surface of the eye ball;
fixation / fixating: the ability of a subject to stare at a specific point in space and specifically
the DRS internal fixation targets.
CenterVue
DRS Operating Manual
Pg. 12 of 57
When the DRS is enabled for data transmission to EKN a new icon appears in the
home screen top bar, providing data upload status information. See also par. Settings
>> EKN and Appendix C for additional information regarding the EKN.
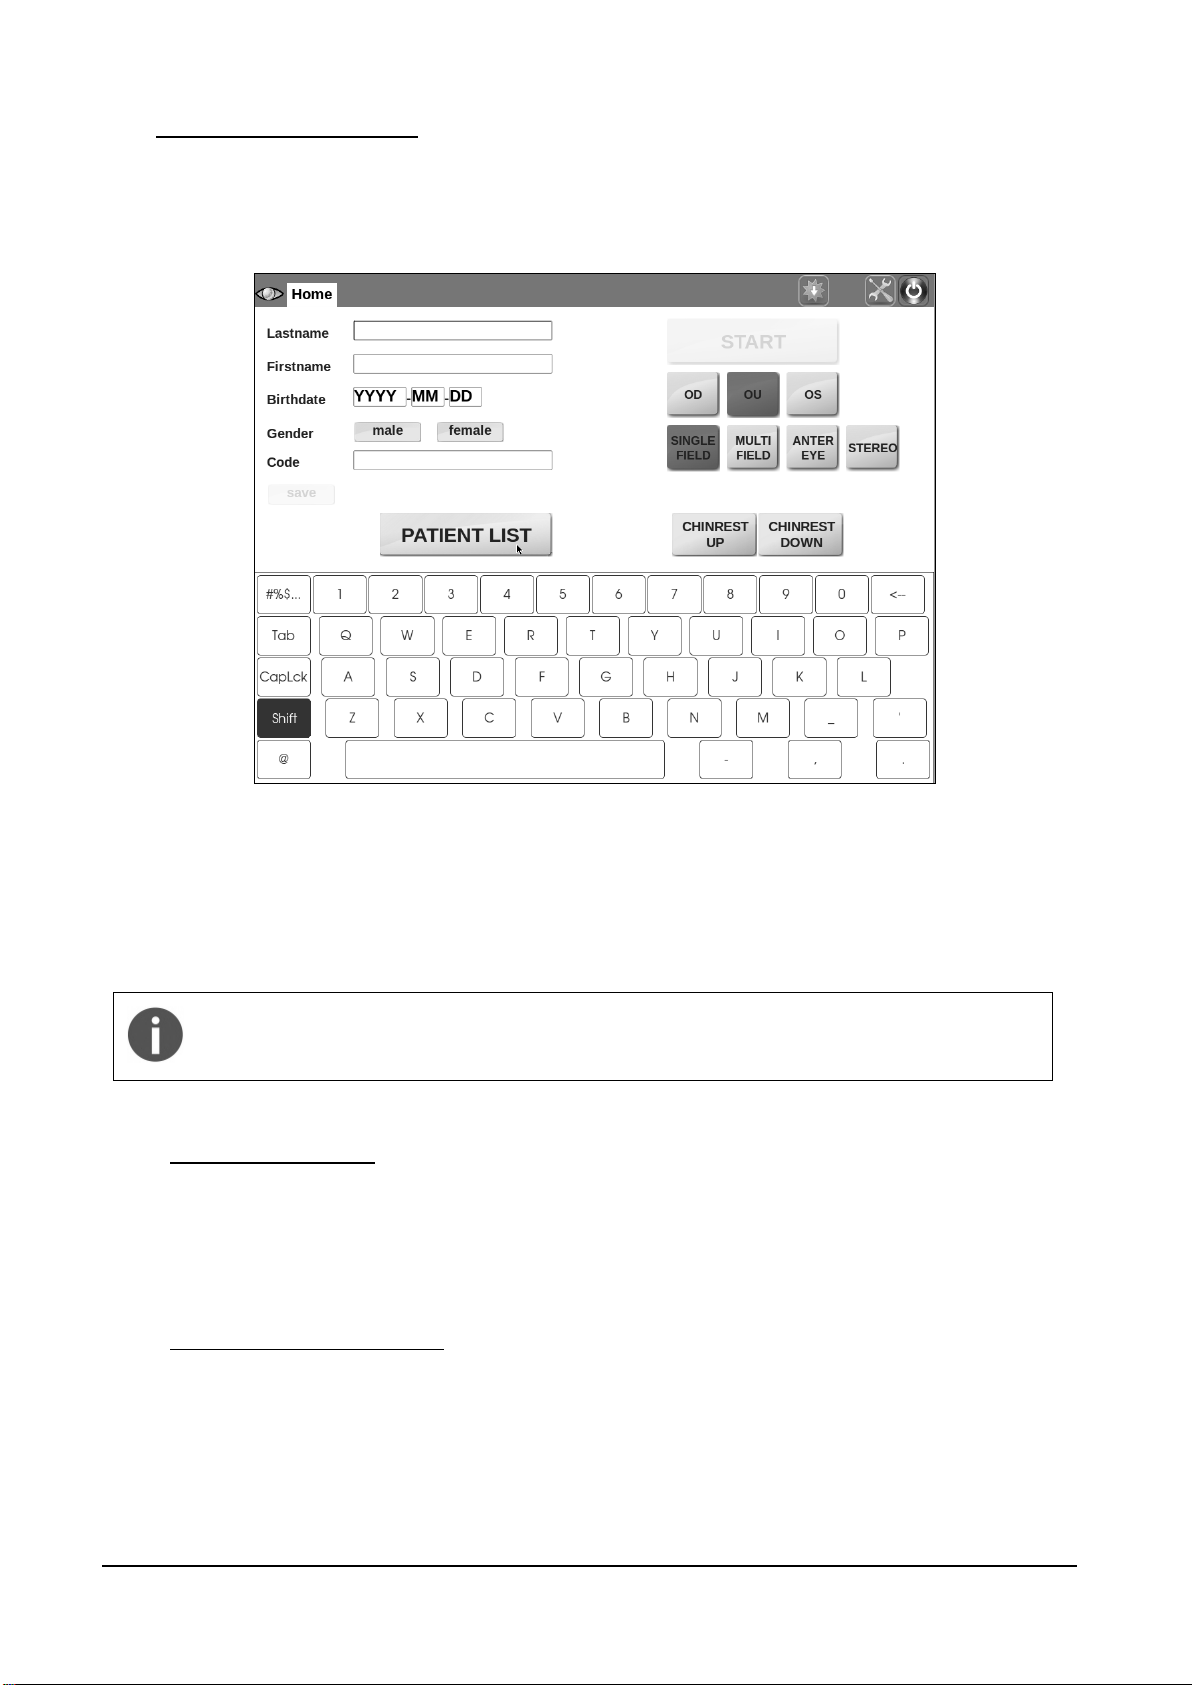
9. PERFORMING THE TEST
This paragraph explains how to operate the DRS to perform a complete test.
When the unit is turned on and the boot process is over, the Home screen shows up (see Figure
8).
Figure 8 - Home screen
Several options are available at this point, such as:
- adding a new patient (see 9.1 below);
- selecting an existing patient from the list (see 9.2 below);
- starting the image acquisition process without identifying the patient (see 9.3 below).
9.1 Adding a new patient
To add a new patient to the list, type the last name (mandatory), first name and date of birth in the
corresponding boxes. Optionally select the gender and type a Code of your choice and any patient
related notes. Then click on save.
9.2 Selecting an existing patient
To select an existing patient from the list, click on the PATIENT LIST button: the complete list of
stored patients will show up (see Figure 9).
The following mechanisms are available to find a specific patient:
scroll the list by dragging the screen up or down;

CenterVue
DRS Operating Manual
Pg. 13 of 57
The START button is only enabled if the chin rest is engaged. If the patient is
not properly positioned on the chin rest, the START button will not be enabled
and it will not be possible to start the acquisition process.
sort the list by one of the available field (the list can be sorted by last name, date of birth or
date of last visit) by clicking on the corresponding arrows ( for descending, for
ascending) located at the header of the list (by default patients are sorted by their numeric
ID, in ascending order);
search for a specific patient by typing the initials of the last name or first name or code in
the search box.
Once the desired patient has been identified in the list, click on the corresponding line to select and
open the Patient Record screen (see Figure 23).
Figure 9 - Patient list screen
9.3 Starting the image acquisition process
When a new patient has been created or an existing one selected or none of the above
(anonymous), it is possible to start the image acquisition process. Before proceeding, be sure that
the patient received complete explanations concerning the test and what she/he is required to do,
as explained at par. 6 above.
Then choose among the different options / parameters:
a. Click OU to acquire images from both eyes (default), OD for the right eye and OS for the
left eye;
b. Select SINGLE FIELD to acquire one 45° image of the retina (default);
c. Select MULTI FIELD to acquire multiple 45° fields. See par. 14.1 for details on how to
configure the fields acquired in each of the above two options;
d. Select ANTERIOR EYE to acquire the external part of the eye;
e. Select STEREO to acquire a stereo pair of the nasal field and produce a stereoscopic view
of the optic disc (see details below);
f. Position the patient on the chin rest and head rest and use the CHINREST UP and
CHINREST DOWN buttons to adjust the chin rest position, if needed. When the
AUTOMATIC CHIN REST flag is selected from the settings menu (see par. 14), the chin
rest is automatically adapted to the patient head characteristics.
Press the START button to start the acquisition procedure.
CenterVue
DRS Operating Manual
Pg. 14 of 57
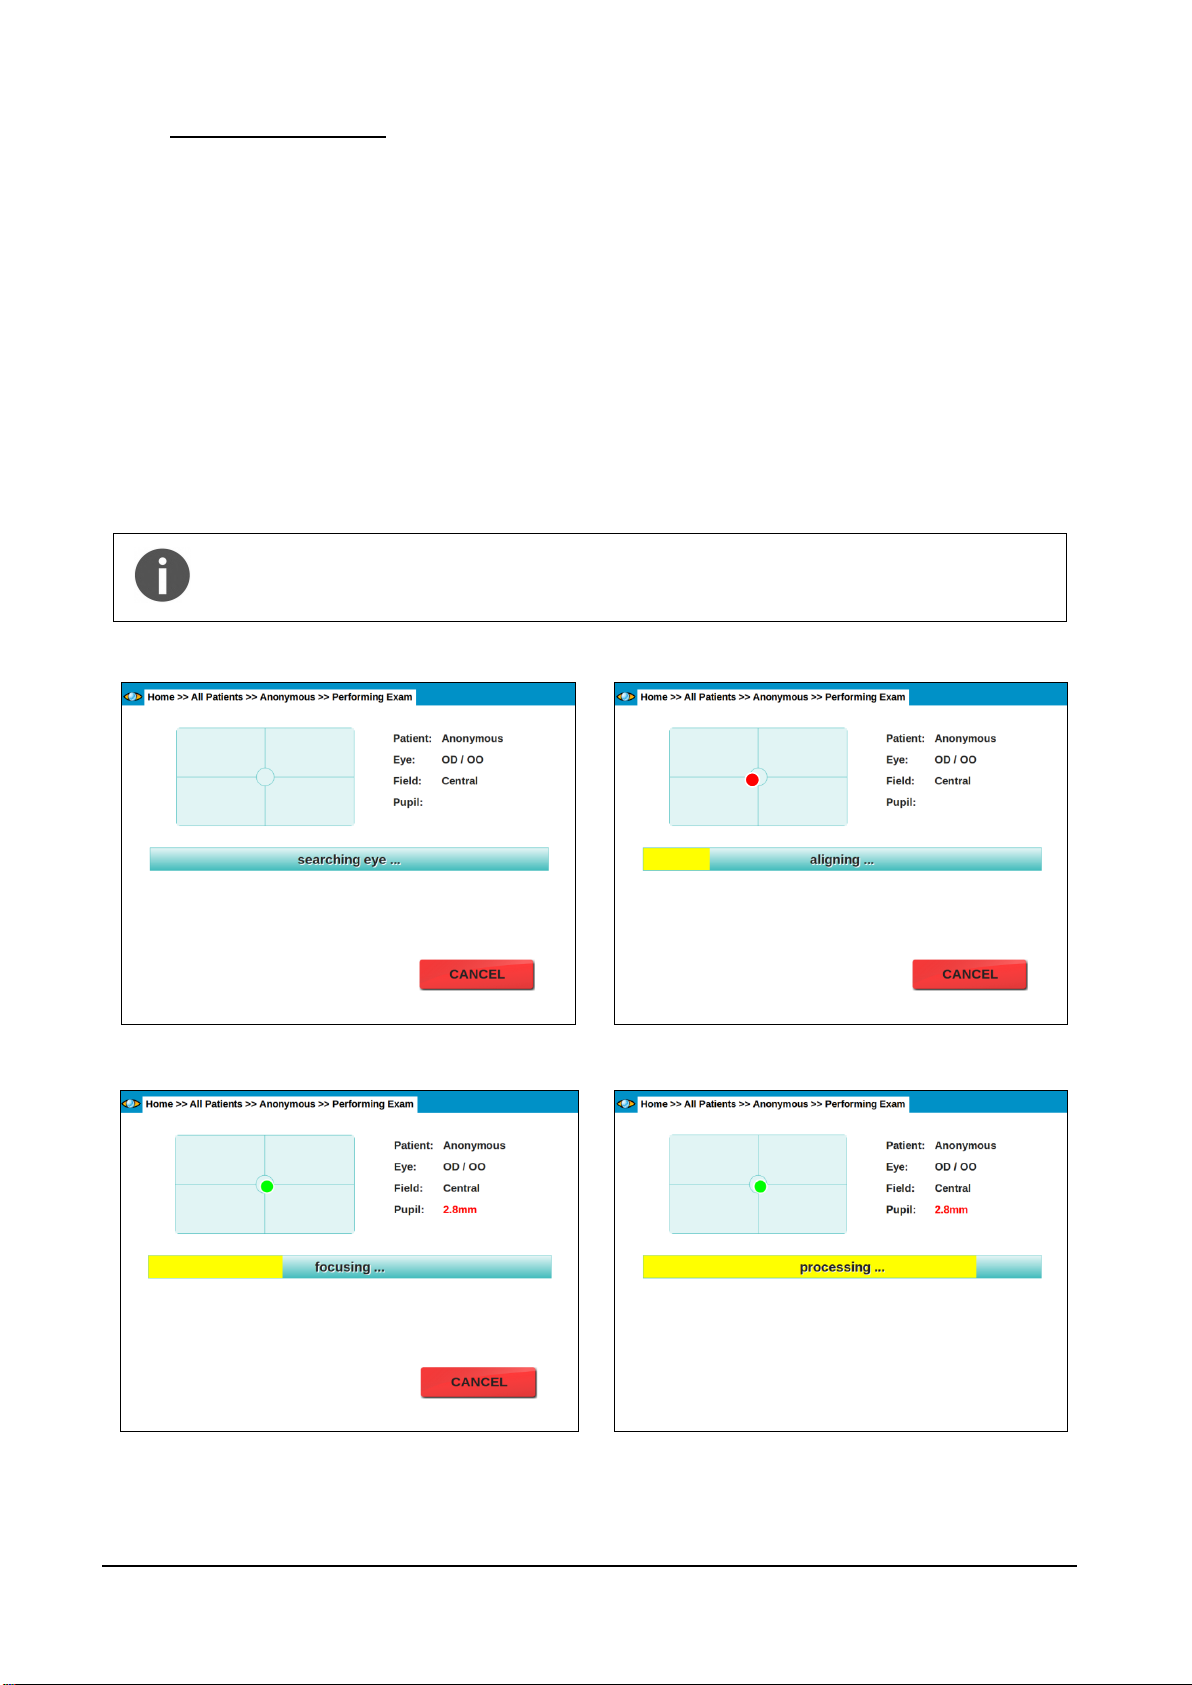
At any time during the above sequence it is possible to stop the acquisition process
by pressing the CANCEL button. In case the auto-alignment process fails, manual
alignment is possible: see par. 9.5 below for details.
Figure 10 - Eye search in progress
Figure 11 – Auto-alignment in progress
Figure 12 - Auto-focus in progress
Figure 13 - Image processing and saving in progress
9.4 Automated acquisition
Once the START button is pressed, the DRS will automatically perform the following steps:
a. Move the optical head to locate the patient’s pupil (see Figure 10);
b. Move the optical head to center the patient’s pupil to the front lens (see Figure 11); the
system will also display the pupil current diameter and which eye is being acquired; the red
circle in Figure 11 represents the pupil and becomes green when proper centering is
achieved.
c. Perform auto-focus (see Figure 12);
d. Capture an image, by flashing the retina. This step involves also automatic tuning of the
flash level;
e. Store the image in the local hard drive (see Figure 13);
f. In case of acquisition of both eyes and/or multiple fields, the acquired images can be
displayed before proceeding to the next one, depending on the settings (see par. 14.2).

CenterVue
DRS Operating Manual
Pg. 15 of 57
9.5 Manual alignment
If, for some reasons, the automated eye search fails, a message as in Figure 14 shows up.
Reasons for failure include: improper patient positioning, patient not fixating steadily, patient
moving the head and / or the gaze during eye search.
If any of the above situations applies, try to fix the cause (re-position the patient, instruct her/him to
steadily fixate at the target and/or to not move) before proceeding with manual alignment.
Use the UP / DOWN / LEFT / RIGHT buttons to adjust the optical head position and align the
patient’s eye to the instrument front lens. As soon as the eye is detected the automated procedure
will resume.
Figure 14 – Message indicating failure of automatic eye search
The result of the acquisition process is one or more retinal images as the one shown in Figure 15.
Figure 15 – Example of retinal image captured by the DRS
CenterVue
DRS Operating Manual
Pg. 16 of 57
In order to capture a focused image of the anterior part of the eye, the patient’s
forehead must be placed on the chinrest at a distance of 3-5 cm (1-2 inches)
from the instrument forehead rest. The patient’s chin should be placed near the
edge of the chin rest (see Figure 16).
The room must be sufficiently lit in order to take an anterior eye image.
Figure 16 - Anterior eye: correct patient position
Figure 17 - Anterior eye acquisition
Figure 18 - Full screen view of the anterior eye
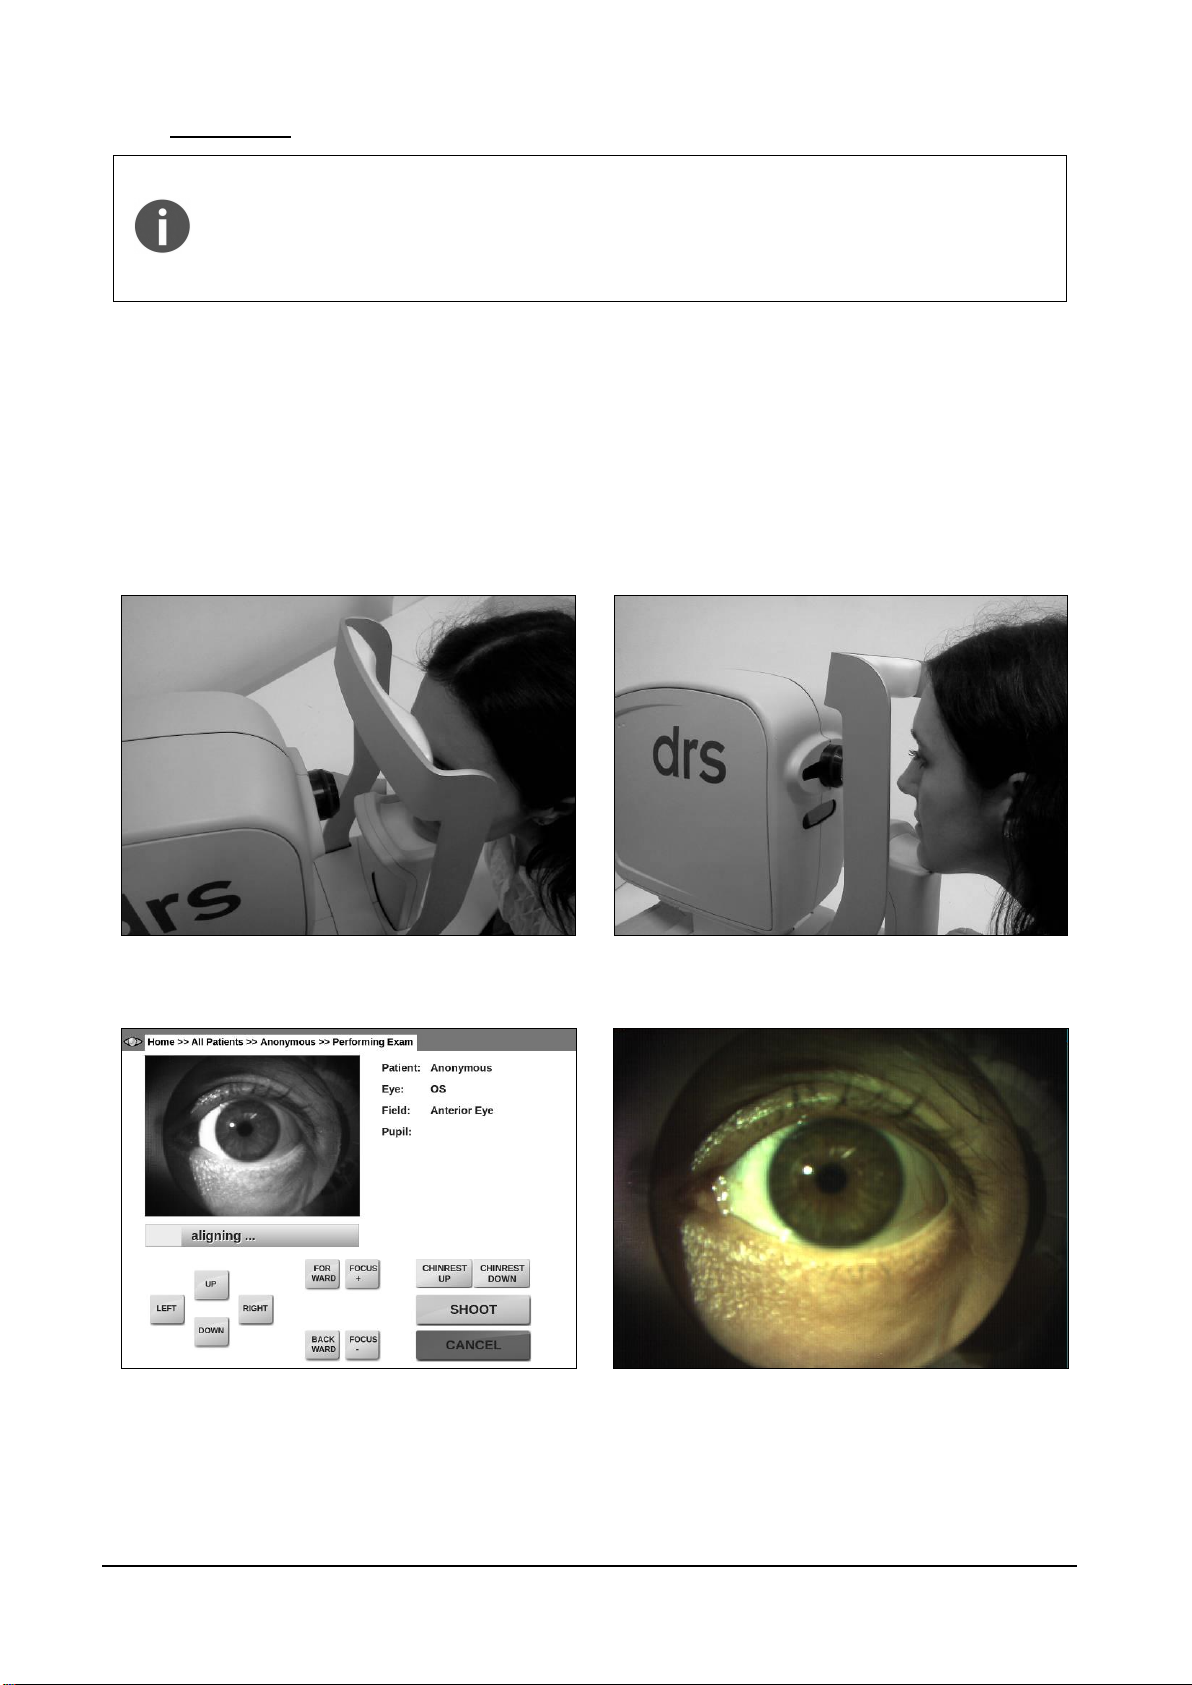
9.6 Anterior Eye
Once the process is started, the optical head moves in front of the selected eye and performs a
rough alignment. When it reaches the optimal position, a live color view of the eye is displayed
(Figure 17) so that manual alignment and focus can be performed using the on-screen buttons.
Manual adjustment of alignment and focus may be necessary to capture a good quality picture.
Click on the live image to toggle a full-screen view (Figure 18). Once satisfied with alignment and
focus, press SHOOT to acquire the image.
CenterVue
DRS Operating Manual
Pg. 17 of 57
9.7 Stereo exams
If Stereo is selected before starting the exam, two slightly offset images of the central-nasal field
will be captured with automatic alignment and focus. A delay between the shots is applied in order
to let the pupil recover. The delay amount can be set in the Settings page (see par. 14). At the end
of the acquisition process the resulting two images will appear in the Patient Record screen
(Figure 19). See par. 10 for details on how to review stereo pairs.
Figure 19 - Patient record with stereo pair
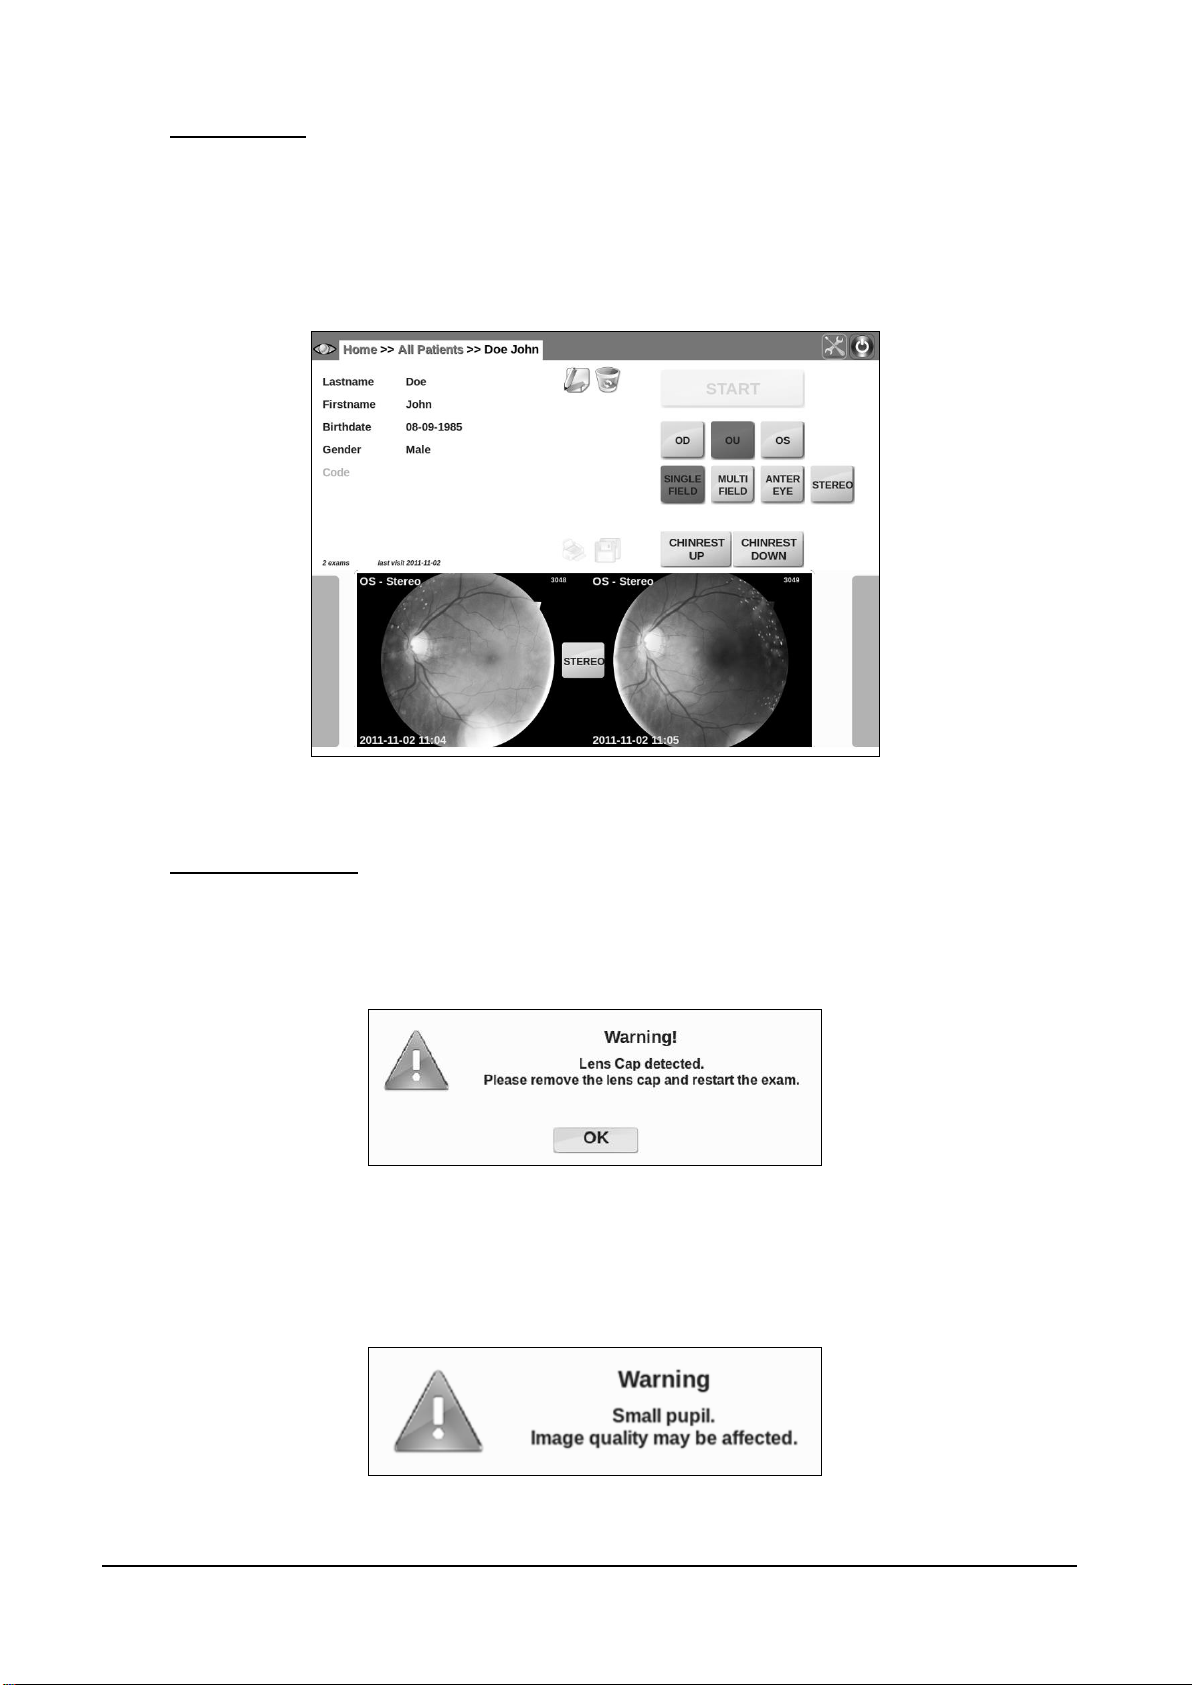
9.8 Warning messages
If the lens cap is placed on the front lens when an exam is started, the message shown in Figure
20 will appear (unless “check lens cap presence” is off, see 14.2). Press OK to exit and restart the
exam after having removed the lens cap.
Figure 20 - Message when lens cap is detected
If the pupil – measured immediately before the snapshot - is smaller than 3.8 mm, a warning
message is shown to inform the operator about the possible degradation of image quality (see
Figure 21).
Figure 21 - Warning due to small pupil

CenterVue
DRS Operating Manual
Pg. 18 of 57
When the auto-focus process is not able to find an optimal focus, a warning message is shown to
inform the operator about the possible occurrence of poor focusing conditions (see Figure 22).
Figure 22 - Warning due to incorrect focusing
 Loading...