

Page 1

User Manual
Thank you very much for your choice of this product designed by our company!
Contents
For your safety................................................................................................................................. 1
About Your Phone ........................................................................................................................... 2
Preparing Your Phone..................................................................................................................... 4
Call functions ................................................................................................................................... 6
Text entry ......................................................................................................................................... 7
Menu operation ............................................................................................................................... 7
Menu functi ons ................................................................................................................................ 8
1.Phonebook ............................................................................................................................ 8
2.Call center ............................................................................................................................. 8
3. Messaging ............................................................................................................................ 9
4.Multimedia .......................................................................................................................... 11
5. Extras .................................................................................................................................. 12
6. Profiles ................................................................................................................................ 13
7. Ca m e r a ............................................................................................................................... 13
8. Settings .............................................................................................................................. 13
9. FM radio ............................................................................................................................. 15
10 File manager ..................................................................................................................... 15
11. Services ............................................................................................................................ 15
12. Fun .................................................................................................................................... 15
Accessories ..................................................................................................................................... 15
Maintain and Care ........................................................................................................................ 16
Safety .............................................................................................................................................. 16
Technical Specifications ................................................................................................................ 17
For your safety
Read these simple guidelines. Breaking the rules may be dangerous or illegal. Further
detailed information is given in this manual.
ROAD SAFETY
Always keep your hands free to operate the vehicle while driving. Park the vehicle before using
your phone.
SWITCH OFF IN AIRCRAFT
Using of wireless telephones in aircraft may disrupt the operation of the aircraft. It is
dangerous and illegal. Insure switching off the phone before going aboard.
SWITCH OFF IN HOSPITALS
Page 2
Follow any restrictions or rules. Switch off the phone near medical equipment.
SWITCH OFF WHEN REFUELING
Switch off the phone at a refueling point or any fuel or chemicals places.
SWITCH OFF NEAR BLASTING POINT
Don’t use the phone where blasting is in progress. Observe restrictions, and follow any
regulations or rules.
INTERFERENCE
All wireless phones may be susceptible to interference, which could affect the performance.
USE NORMALLY
Use in the normal position explained in the product documentation. Don't touch the antenna
unnecessarily.
ENHANCEMENTS AND BATTERIES
Use only the approved enhancements and batteries. Do not connect incompatible products.
EMERGENCY CALLS
Ensure the phone is switched on and in service. Enter the emergency number, and then press
the talk key. It will give your location. Do not end the call until the permission.
About Your Phone
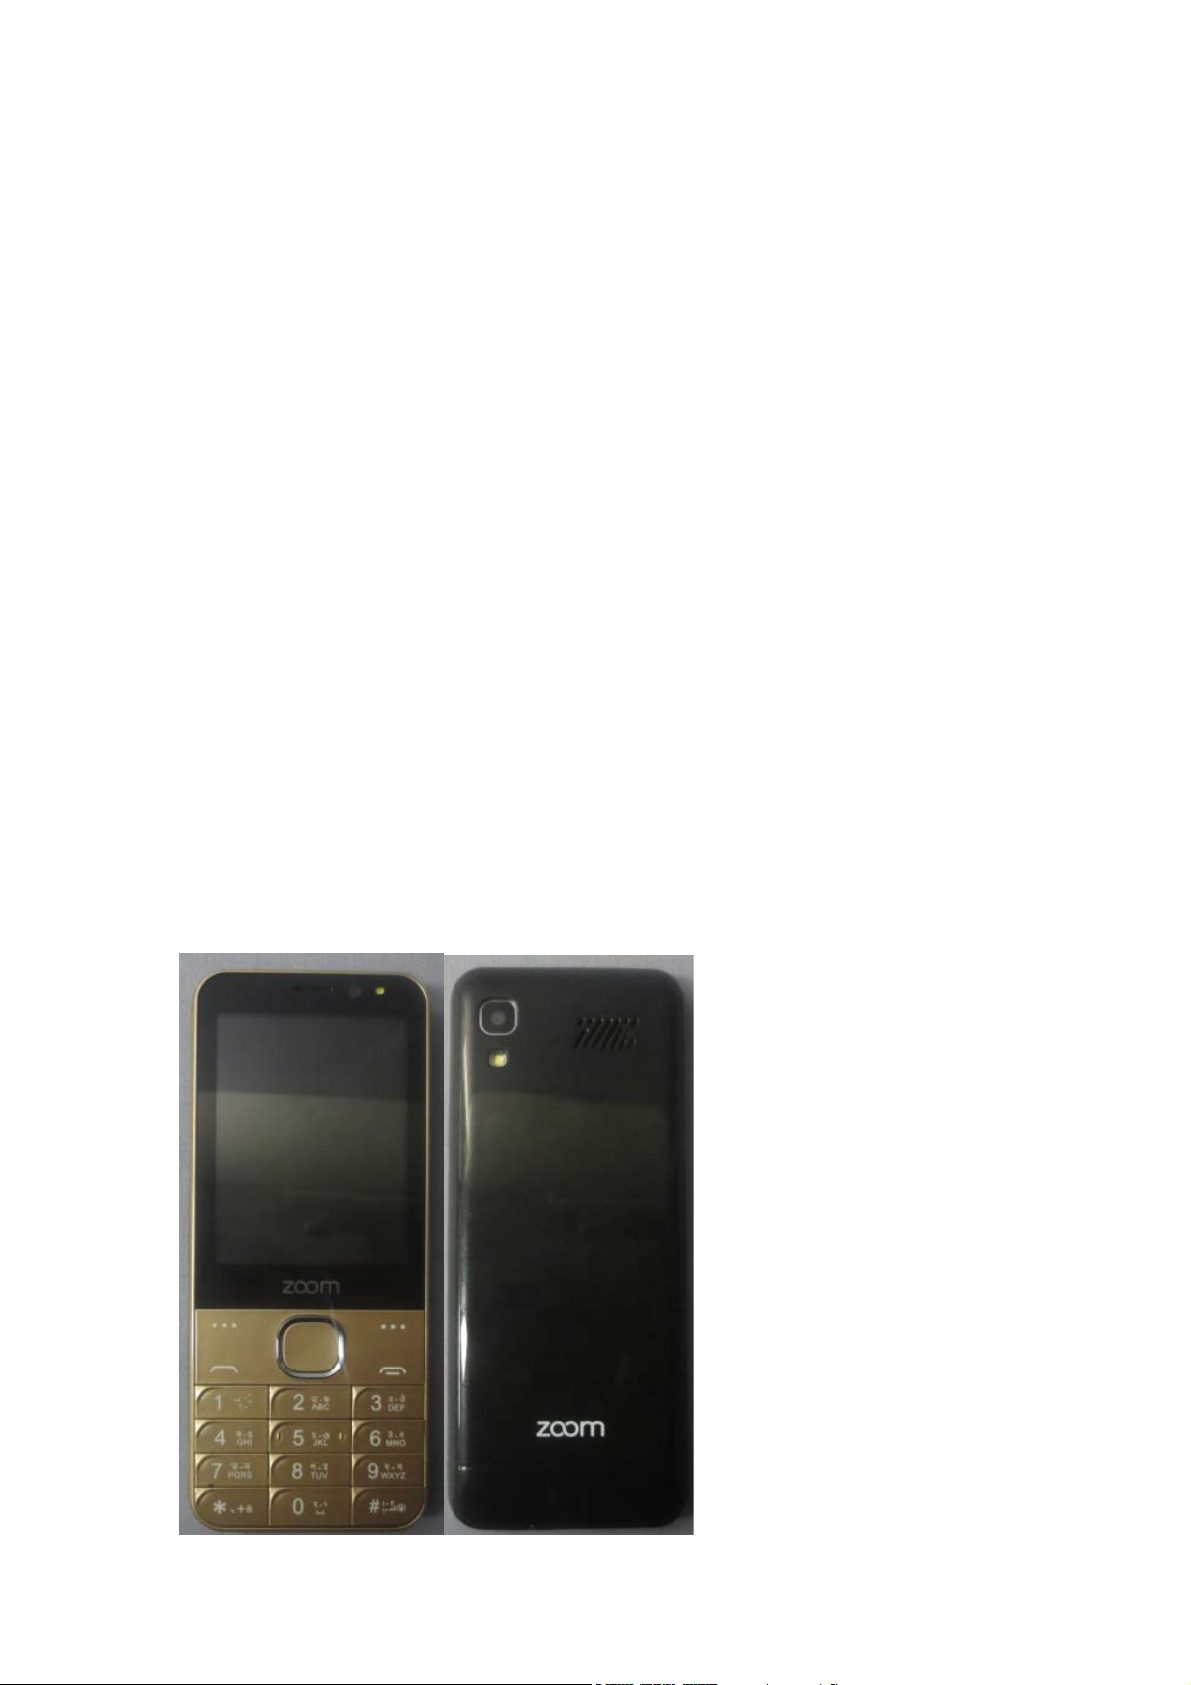
1. Glimpse of Your Phone
Page 3
2. Knowing the Keys
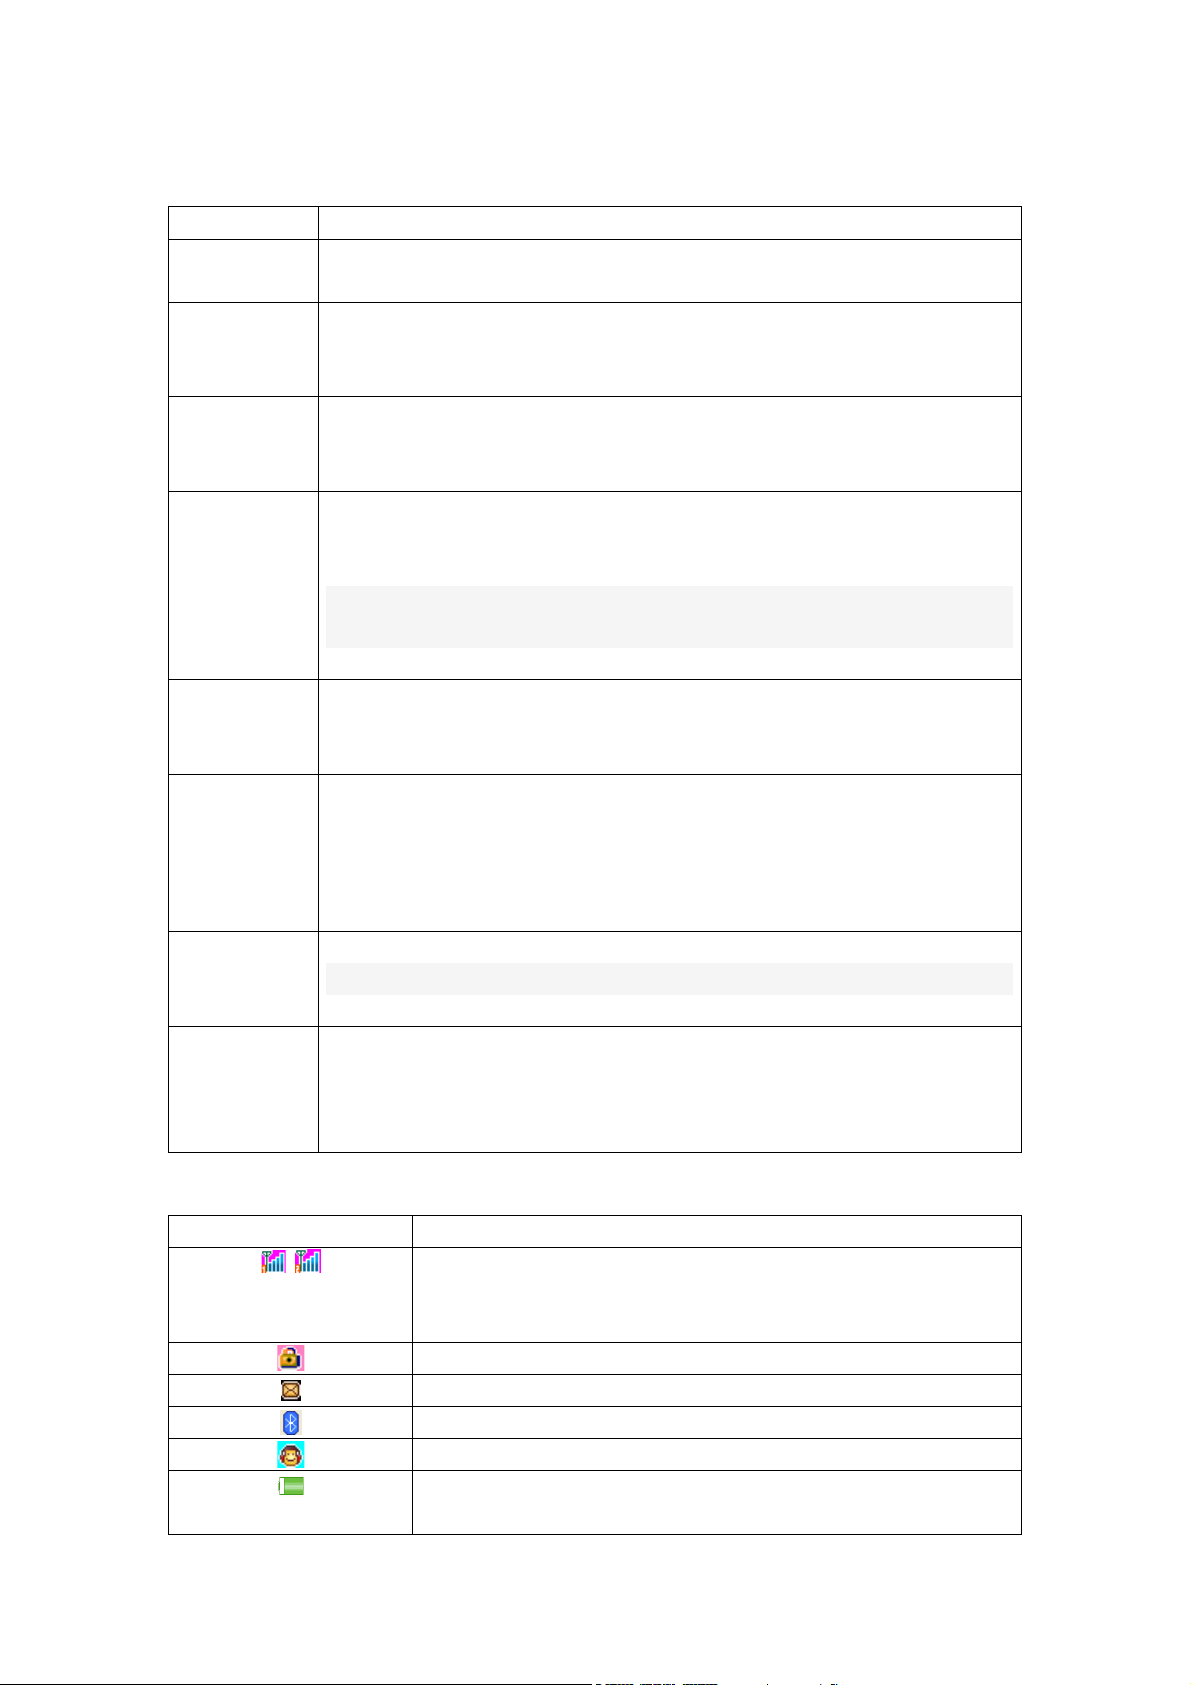
Key
Key Description
Left Soft Key, Right Soft Key
Call / Answer Key
End / Power Key
menu.
Navigator Keys
OK Key
Press from standby mode to start the main menu.
*(Star) Key
Press after hitting the Left Soft Key to unlock keypad (when locked).
#(Pound) Key
Short press or long press when editing to change input method.
Numeric Keys
Press corresponding keys to input number when dialing or numbers and
In standby mode, long press “0” to open or close Torch.
Icon
Explanation
Signal Strength of SIM1/SIM2
Fuller bar means stronger signal.
Lock the keypad
Battery Status
Shows the charge level of phone battery. Fuller bar indicate more
On the button above the screen shows the description text.
Press After dialing to connect, press if there is an incoming call to answer,
press from standby to go to call records list.
Long press to power phone ON/OFF; press to end; reject call; or to exit a
Press up/down/left/right direction in menu to scroll, browse or in edit page
to move cursor.
In standby mode, Up key to alarm, calendar down keys, left the message, to
the right of the profile.
Press this key to select an item in menu or list.
It has different functions for different uses:
Short press from standby changes between * /+/P/W.
Short press or long press when editing go to symbol list screen.
Press between ring and silent mode standby changes
characters when editing; press “0” key when editing to enter a space.
3. Understanding Display Icons
/
Shows the received signal strength.
New SMS
Bluetooth is open
Headset is on
Page 4

fully charged.
Alarm
Appears when an alarm is set and activated.
Incoming Call Alert Mode
power left. When charging, the bar will scroll until the battery is
Ring
Preparing Your Phone
1. Installing SIM Card
Please keep your SIM card away from reach of children.
Scratches and bends can easily damage the SIM card. Please be extra careful when
installing, removing, handling or storing your SIM card.
Before installing or removing the SIM card, make sure the phone is switched OFF,
and then remove the back cover and battery.
1. Use the back lower left corner of the gap, remove the battery cover.
2. Remove the battery (see Removing Battery).
3. Place SIM card into the SIM holder
4. Fit the battery with the metallic contacts at the bottom right corner comer.
5. Replace the back cover by fitting it to the back of the phone.
2. Installing Memory Card
Turn off the phone, and take out the battery.
Keep the golden color side of the Memory card downward, and push it gently to the right
place.
Before take out off the memory card, be sure to Power off the phone and remove the battery
first.
3. Install Battery
(1)Connect the battery’s metal touch points separately with the battery compartment metal
touch points, and enter the battery base to the slot.
(2) Slide the back cover toward the top of the phone to lock the cover into its place.
4. Remove Battery
Remove the back cover then push toward the bottom of the phone and lift the battery at the
at the top side center to remove.
Page 5

Settings and data stored in the phone or SIM card may be lost after the battery is
removed.
5. Charge Battery
Connect the charger to power supply, and then insert the charger pin into the I/O jack.
Note:
1. When charging, DO NOT removes or takes out the battery to avoid the battery circuit to
burn out.
2. While charging, it is normal that the phone and charger will become hot.
3. If the battery is completely empty, it may take a period of time before the charging icon
appears on the display.
6. USB Management
When USB cable plugged in, phone will have the following options:
Mass storage: the phone can be connected to the PC and used as a USB Flash Disk.
COM port: the phone can be connected to the PC and used as Dial-Up Network.
7. Power on and off
Press and hold end key to turn on/off the phone.
And if you have set PIN or phone code, input it correctly.
8. Security Cods
PIN Code
The PIN (Personal Identification Number) code protects your SIM card against
unauthorized use. It is normally supplied with the SIM card package. Be careful while entering
PIN code,
3 wrong tries in entering PIN code will block the SIM from use, requiring input of PUK
code to unblock. Please contact your operator for further details.
PIN2 Code
The PIN2 code is required when activating certain special features (such as call costs and
fixed dialing). It is normally supplied with the SIM card package. Be careful while entering
PIN2 code, 3 wrong tries in entering PIN2 code will block the SIM from use, requiring input of
PUK2 code to unblock. Please contact your operator for further details.
PUK Code
The PUK (Personal Unblocking Key) code is required to unblock a blocked PIN code. It is
normally supplied with the SIM package; otherwise contact your service provider for the code.
Keep your PUK code in a safe place, do not throw it away. Contact your service provider if it is
lost.
If your SIM is blocked,your phone will ask you to enter PUK code to unblock. You have 10
tries to enter the right PUK code, after which your SIM might be permanently blocked.
Page 6

Phone Password
The Phone Code is a 4 to 8 digit security code that protects unauthorized use of your
phone.
The factory default code is “1122”. Once activated, the phone will ask you to enter Phone
code every time it is turned on. For your protection, change the default phone code as soon as
possible.
Do not forget your phone password.
Call functions
1. Making a Call
Make a domestic call
Enter the phone number including the area code. Press the talk key to make a call.
Make an extension call
When making an extension call, press * key three times to get “P” that is a prefix of extension
numbers. It will dial automatically in several seconds since you dialed the telephone
exchange.
viz.: area code—telephone exchange numbers—P—extension numbers, then press talk key.
Make an international call
Enter the country code, the area code and the phone number, press talk key to dial. ”+” is
needed when input country code, and it can be got by pressing * key twice. Dial to Hong kong,
Macao and Taiwan phone ibid.
Make a call from Phone book
Enter Phone book, select the phone number, and then press talk key to make a call.
Redial a call by recent call lists
In standby mode, press the send key to find the recent call lists, scroll to the number or name,
then press talk key to dial.
2. Answer a call
An incoming call window will be displayed as the phone receives a call. The number will
appear on the window if you have opened this function. If this number is not saved in the
phone book, the call’s district number will show it on the window.
Press left soft key or talk key to answer it. Press right soft key can set to silence.
If an incoming call arrived during your operation in sub window, a new window will be popped
to inform you and your any operation will be broken. If you missed a call, a missed call log will
appear after you return to the start screen.
3. Call options
During a call, press Left soft key to enter call options or press right soft key to open or close
Page 7

hand free function. And the options content is changeable according to your call status. The
functions of Call Waiting, Call Hold need the support of net work.
Here are some parts of the options, such as "hold", "End single call", "new call" "phone book",
"message", "call record", "information", "recorder", "Silent", "DTMF "and" Volume. ""Hold" and
"new call" should be supported by the current network.
Text entry
You may be requested to input text message many times when you using this phone. For
example, when you write a message or add a new phone book record, you can select different
input methods, such as ABC, abc……
You can input characters, letters, digitals or special characters including punctuations.
Switch input methods
In a text entry state, you can short press or long press the # key to switch from one method to
another method.
Input method
Switch to uppercase or lowercase mode.
Press a key once to insert the first letter on the key, twice for the second letter, etc.
If you pause briefly, the last letter in the display is accepted and your phone awaits the next
entry.
Input special character
When use any kind of method, short press or long press * key to display the character list,
and then press the direction key to select the item. You can also press “1” key to get the
character.
Input blank
When use any kind of method except numeric method, press “0” key to input blank.
Menu operation
The phone provides a serious of menu. And you can select it according to your need. The
functions exist in these menus and submenus. Access the menus by pressing the shortcut
key or scrolling.
Access menus by scrolling
Press the left selection key to enter the main menu in standby mode. Press the direction key
scrolling to access the menu and select Left soft key. If the menu have some submenu, Press
the direction key scrolling to access the submenu and select Left soft key. Press “BACK” to
back.
Access menus by using a shortcut
Some items like menu, its submenus and options can be accessed by clicking the shortcut
Page 8

icon in stand by mode.
Menu functions
1.Phonebook
When you enter phonebook press up/down key to select quick search, Search Contact, Add
New Contact, Delete, Extra Number, phonebook Settings etc.
Press the right soft key to enter the phone book in the standby mode. Select a number, then
you can view, send text messages, send multimedia messages, phone calls, IP dialing, edit,
delete, copy, and mark all the settings and the phone book.
2.Call center
2.1 Call history
Select call center from main menu, you can view the information about call history, including
missed calls, dialed calls, received calls, all calls and delete call logs.
2.2 Call settings
2.2..1 SIM1 (SIM2) calls settings:
Call waiting
If it is supported by your service provider, call waiting will notifies you of an incoming call
even if you are in a call. You can then accept, reject, or ignore the incoming call.
To make this function available, please contact local network provider.
Call divert
Call diverting is a network services, it tells your network to divert incoming calls to
another number to avoid missing a call.
The following is available: divert all voice calls, divert if unreachable, divert if no answer, divert
if busy and cancel all divert.
Call barring
This function uses call barring network service feature that allows you to restrict your SIM
card calls. When you set this function, the network requires network operators to provide
barring password. If the password is incorrect, an error message will be prompted. After
selecting the desired option, continue to choose to enable or disable the phone will be
asked to enter prohibited password and phone contact with the network, after a pause,
the network will respond and inform result of the operation.
Line switching
Switch to Line 1 or Line 2, Line 1 is the default state.
Note: If you choose Line 2, whether outgoing calls and network operators have a relationship.
Page 9

Note: The above four settings only can open this business phone card, detailed consultation
carriers
2.2.2 Advance settings
Auto redial:
dialing process, if the other party does not answer, then over time the phone will automatically
re-dial. Automatic redial the number up to 10 times during this period, the user can not dial
any other phone, to end automatic redial, just press the Cancel button.
IP dial:
network according to the inserted SIM card, which starts a set of IP numbers.
Plus domestic area code Function: Allows you to set the domestic area code, such as 0755,
when the telephone roaming activate this IP number, call a general call can be directly added
to code.
Plus international code Function: Allows you to set into an international code, for example +86,
when the phone is roaming, activate the IP number, you can directly call a general call to join
the international code.
Call time reminder: set the sound or a periodic tone during a call, so that you keep abreast of
the call duration.
Connect notice
Answer mode: call answer settings
▲ any key: select this feature click any key to answer the call when a call.
▲ Headset Auto Answer: Select this function to call when you plug in your headphones, the
system automatically answer.
Automatic redial: turn on or off automatically re-dial. When you select Open, the
General IP dialing: You can set up to four IP numbers, the case where the carrier
:
:
After opening this function, there will be vibration after the call is connected
3. Messaging
1.1 Write message
Text message:
Step one: First, enter the text message content to be sent.
Press the "Options" softkey, you can select the following options:
Send to: complete the short message editor, select Enter the number or add from the phone
book.
Punctuation: * key to select the symbol you want to insert.
Input Method: # key to switch input method.
Advanced Options: Select Insert number or Insert contact
Save: save the selected information card 1 or card 2
Multimedia message:
Step one: First enter the MMS to be sent.
Select "new information", press the "OK" soft key, you can do the following: Send to:
complete the short message editor, select the input number or add from the phone book.
Add a picture: You can add a picture phone or memory card.
Add ringtones: Ringtones can be added or memory card.
Add Video: You can add a video phone or memory card.
Page 10

Add subject: You can add multimedia theme.
Preview MMS: You can preview the edited MMS.
Page Options: Add a new page: You can add a page in the current page.
Delete this page: You can delete this page. Previous / Next: When multiple pages can be up /
down page switching.Page time: MMS page displays the time set.
Advanced Settings: Insert attachments: You can add attachments or the memory card of a
mobile phone.
Save: Save the article MMS, which is stored in the MMS Drafts.
1.2 In box
Access this menu to view the received messages.
When has the new SMS, the phone will ring, the unread message icon also to be able to
appear on top of the screen. Press left soft key in view text message screen to do the
following functions:
1.3 Drafts
Store the SMS without sending for reediting and sending later.
Access this menu, select one SMS from list,user can send, edit, delete and advanced.
1.4 Outbox
Access this menu to view the send failed SMS.
Press left soft key in viewing text message screen to resend, edit, delete and advanced.
1.5 Sent messages
Access this menu to view the sent messages.
Press left soft key in viewing SMS screen to forward, delete and advanced.
1.6 Message settings
Text message
SIM card 1/2 information setting: With this feature, you can set the default information
about SMS features.
Memory status: view the short message stored in the SIM card and phone number of the total
capacity, depending on the circumstances specific capacity is short message content with the
phone and SIM card itself may be.
SMS blacklist: blacklist function after opening, blacklist numbers sent information will be
blocked.
Save sent message: Select save close or open the message.
Preferred storage position: Set the default storage location of short messages, select the SIM
card or phone.
SIM card SMS settings with SIM card 2 1
Multimedia message
Data Account: Set the access point to receive multimedia messages when SIM card used.
General Settings:
Edit Settings: Some parameter settings MMS, such as page time, edit mode, auto signature.
reply ,call sender, forward, delete, advanced and save to phonebook.
Page 11

Send Settings: Some relevant parameter settings for MMS sent. The transmission report, read
report, priority, transmission time, send and save the switch.
Receive settings: MMS received during some of the relevant parameters. Such as network
settings, filters, read the reports, send reports.
Preferred Storage: You can set the preferred storage location for the phone or memory card.
Memory status: Displays the phone and memory card memory usage.
Service message: receive and load switch settings service information.
4.Multimedia
4.1 Image viewer
Access this menu; you can view the pictures in the list. If you select one picture, there are
several operations including “view”,”Browse style”, “send”, “Use as”, “rename”, “delete”,”Sort
by”,”Delete all files”,”Storage”and “Image information”.
4.2 Video recorder
You can use this function after recording, adjust the camera direction on a good scene or
character, press the OK button to start or pause recording, video recording, press the up or
down navigation keys to adjust the zoom, press the left and right navigation adjust the
exposure compensation parameters. To end the recording Press Stop soft key, the system
prompts whether to store the video. "Option" key provides the following functions:
Video settings: Set video recorder exposure compensation, night shoot mode, to avoid flicker,
so the recorded image to achieve the best condition;
Video settings: Set the video quality of the video.
WB: can be set to automatic, sunlight, tungsten, fluorescent, cloudy, incandescent light;
Effects settings: Set video effects, can be set to normal, gray, retro, retro green, retro blue,
negative;
Storage Location: choose phone or memory card to store location;
When you restore the factory settings VCR: to restore the default values.
4.3 Video player
Access the menu, you can enter film list and press “option” to choose a movie clip to play,
send, rename, delete.delete all files,sort by,storage.
While playing, press right or left key to adjust the rate of progress, Press the OK key to
pause playing , press up key to switch to full screen, press down key to stop playing and press
* key and # key to adjust volume.
4.4 Audio player
Select audio player item in main menu to enter audio player interface. Press up/down key to
replace the play mode .Press the OK key to play or pause Mp3, Press the scroll left/right key
to switch to the previous/next song, Press * key and # key to adjust volume. In playing
interface, press “List” to enter the list of song, then press “”option” to do the work such as
Play, Refresh List and Settings.
Page 12

The concrete operations in Settings are “List auto gen.”, “Repeat”, “Shuffle”, “Background
play”,”Lyrics display”.
Note: If “List auto gen.” is opened, the play list will be created automatically form memory
card according to the storage. If closed, the user should create or delete the file in play list
manually.
4.5 Sound recorder
The sound recorder supports two formats: WAV and AMR.
When there’s no recording file in the current Storage Device, you can press left soft key
to entry the options as following:
New Record: Start the recorder.
List: View a list of audio files.
Settings:Set up the audio quality of the storing of the sound-recording.
When recording files exist in the current Storage Device, you can press left soft key or OK key
to enter the following options:
New record:Start the recorder.
Play: Play the selected recording file.
List: View a list of audio files.
Settings:Set up the audio quality of the storing of the sound-recording.
5. Extras
Calculator
The phone can be used as a calculator to finish some simple arithmetic work.
Press number key to enter the number. Press # key to enter radix point. Press the scroll up,
down, left or right key to enter plus, minus, multiplication or division. Press the right soft key
can delete a number; Press center key to get the result.
Ebook reader
Insert the SIM card and T card download e-books tool, available online or download books
view, the specific operation can be viewed to help explain.
Flash Light
Turn on/off the flash light(you also can hold press “0” key in standby mode to turn on/off the
light.
Calendar
Access this menu, the calendar will be shown on the screen. Press the direction key to change
the date and the calendar shown on the screen will be changed accordingly.
Alarm
Set the alarm time and it will remind you by alert tone or vibration when the alarm time
expires.
Page 13

You can set 5 alarms in the phone at most.
6. Profiles
User profiles define how your phone reacts when you receive a call or a message, how your
keypad sounds when you press a key, and more. Each of the available profiles can be left at
their default setting or customized to suit your needs. Select and customize the most suitable
profile for your situation. The available modes are General, silent, Meeting and Outdoor.
7. Camera
Select camera item in main menu to enter preview screen. Then press scroll up or down key to
adjust lens. Press soft left key to do the work: Photos, Camera settings and image
settings.Effect settings, Camera switch,storage,And press center key to take photo.
8. Settings
8.1 Phone settings
- Time and Date
Set the home city, time and date, date’s format and update with time zone.
- Schedule power on/off
Phone settings specified switch time.
- Language
Select the operating language.
- Pref, input methods
You can set the default input methods in text editor.
- Display
Set Wallpaper, screen auto lock, Power On/Off Display , show date and time.
- Flight mode
Use this function user can switch between dual SIM open flight mode.
-
UART settings
Dial SIM card settings.
- Misc. settings
LCD backlight: You can set the backlight duration and brightness.
8.2 Security settings
You can set the security settings to protect the phone or SIM card from unauthorized use. The
default security code is 1122.
8.2.1 SIM1/SIM2 Security
Page 14

SIM Lock
Set the phone to ask for your PIN code each time you start your phone (if this function is
supported by your SIM card).
Note: After three consecutive incorrect PIN code entries, the code will be blocked, and you
need the PUK code to unblock it.
The PIN code and PUK code are usually supplied by the SIM card. If you don’t get them,
please contact with the supplier. The default PIN code is 1234 usually.
Change password
You can change PIN code, PIN2 code here.
8.2.2 Phone security
Phone lock can be used to lock the device to avoiding unauthorized use.
Set the phone to ask for your security code each time you start your phone.
Change Password:You can change phone lock password here.
8.2.3 Secret protection
Privacy can be set on or off, turn on privacy protection, you can enter settings in the check you
want to protect the
Menu item, after setup is complete, go to the menu where you set a password is required to
enter the post-entered correctly.
8.3 Network settings
This feature is available to operate network settings when you are roaming or travel outside.
Access the menu; you can select the network manually or automatically.
8.4 Dual SIM settings
Use this function user can switch between dual SIM open, only SIM1 open, only SIM2 open,
flight mode.
8.5 Connectivity
8.5.1 Bluetooth: The phone supports Bluetooth. It can realize the functions such as phone
call and data exchange etc while wirelessly connected with headphones, computer or any
other handheld devices.
- Power: Open or close this function.
- Visibility: Active the Bluetooth been searched or not.
- My Device
Display the current or once connected device, and inquiry the new one.
- My name: display the Bluetooth name.
8.6 Restore factory settings
You can reset some of the Phone settings to their original values by input phone lock
password. The default phone lock password is 1122.
Page 15

9. FM radio
This cellular phone provides the function of the radio. In the interface of the radio, press the
Left/right key can carry on the forward searching or the backward searching automatically,
until search a channel. Press the Up/Down key will increase/reduce 0.1 HZ.
Press the OK key can start/close the broadcasting of the broadcast. Get into the interface of
the radio; press “options” can carry on the operations:Channels list, Manual input and Auto
search.
- Channel list
At most 30 channels could be saved in the list.
- Manual Input
Directly input the FM frequency of the channel.
- Auto search
To search all channels and save them in the channel list automatically.
10 File manager
It provides you the functions such as browsing media files, checking storage space and
formatting function.
When browsing the media files, you can operate the selected files such as view, rename
coping, deleting etc.
11. Services
After inserting the SIM, SIM card services will be displayed.
12. Fun
This machine is designed for users to use the game of leisure. Specifically described with
reference to your phone instructions.
Accessories
Battery
Extra batteries of various capacities are available from our company or through your dealer.
Charger
Light weight, practical quick chargers used for charging on wall outlets. Charging time is about
1.5 to 4 hours. The charging condition is being displayed on screen. You may use your phone
while charging.
Headset
You can accept or reject the coming call by hook key in headset.
Page 16

NOTE: Don’t plug out headset when call in or call out process.
Maintain and Care
Caring for Battery
This phone uses a rechargeable battery as power source, when the charge is weak,
recharge immediately to protect the batter life. It is best to drain the battery charge first.
When not using the charger, unplug it from the power source and the phone. Over
charging will shorten the battery life. Not leave the charger connected to the unit or battery for
more than a week.
Temperature affects battery charge capacity. Your battery may need to be warm up or
cool down before charging. If the battery temperature is lower than 0°C and higher than +
45°C., it will not recharge.
Use the battery as it is originally intended. Do not short circuit the battery by connecting
the positive and negative terminals with a conductor.
Do not use a damaged battery
The battery will not perform properly and its life will be shortened if exposed to extreme
temperatures.
Do not place the battery in fire; follow local awls and ordinances in disposing used
battery.
Maintenance
Do not leave your phone within the reach of small children (certain removable parts may
be accidentally ingested).
Do not use your phone in damp areas (bathroom, swimming pool…). Protect it from
liquids and other moisture.
Do not expose your phone to extreme temperatures lower than - 10°C and higher than +
55°C.
Safety
Use of your phone is subject to safety measures designed to protect users and their
environment.
Road safety
Do not use your phone when driving. In order to give your full attention to driving, stop
and park safely before making a call. You must comply with any current legislation
Aircraft safety
When travelling by plane, you will need to switch your phone off when so instructed by
the cabin crew or the warning signs. Using a mobile phone may be dangerous to the operation
of the aircraft and may disrupt the phone network. Its use is illegal and you could be
prosecuted or banned from using cellular networks in the future if you do not abide by these
regulations.
Page 17

Environment safety
Your phone is a radio transmitter which may interfere with electronic medical equipment or
implants, such as hearing aids, pacemakers, insulin pumps, etc. It is recommended that
a minimum separation of 15 cm be maintained between the phone and an implant. Your
doctor or the manufacturers of such equipment will be able to give you any advice you
may need in this area
Do not use your phone in damp areas.
Technical Specifications
Handset Weight: About 82g
Dimensions: 100.8*44.1*12.3mm
Battery: 3.7V 1700mAh
Band: GSM850/900 DCS1800/PCS1900MHZ
Battery Info:
Battery Capability Call Duration Duration
Li-ion 1700mAh 2 hours 6 days
NOTE: Actual operating conditions depend on the local network environment, SIM, and user
behavior.
Warning: Any consequence caused by misuse, abuse, or not following any and all of the
above-written suggestions and instructions shall not hold the producer in any way responsible
to any degree.
Announcement: The manufacturer reserves the right to change or upgrade specifications or
software versions without prior or separate notice. Trade marks mentioned or used in this
material belong to their respective owners.
FCC Statement
1. This device complies with Part 15 of the FCC Rules. Operation is subject t o the following two
conditions:
(1) This device may not cause ha r mful i nterf er en ce.
(2) This device must accept any interference received, including interference that may cause
undes i r ed operation.
2. Changes or modifications not expressly approved by the party responsible for compliance could
void the user's authority to operate the equipment.
NOTE:
This equi pme nt ha s be en tes te d and f oun d to c ompl y wit h t he li mits for a Cla ss B digita l de vic e,
purs uant to Pa rt 1 5 of the FCC Rule s. T hese limi ts a re des ign ed to pro vide r eas ona ble pr ote cti on
against harmful interference in a residential installation.
This equipment genera tes uses and ca n radiat e radio fr equenc y energy a nd, if not installed an d
used in ac c ordance wi th the instr u ct ions, may cause ha rmful i nterfe r e n c e to ra di o c o m mu n i c a t i o ns .
Page 18

Howe ver, t here is no g uar ante e t hat i nter fe re nce will not occ ur i n a pa rt icul ar insta lla ti on. If t his
equipment does cause harmful interference to radio or television reception, which can be
determined by turning the equipment off and on, the user is encouraged to try to correct the
interference by one or more of the following measures:
Reorient or relocate the receiving antenna.
Increase the separation between the equipment and receiver.
Connect the equipment into an outlet on a circuit different from that to which the receiver is
connected.
Consult the dealer or an experienced radio/TV technician for help.
SAR Information Statement
Your wireless phone is a radio transmitter and receiver. It is designed and manufactured not to
exceed the emission limits for exposure to radiofrequency (RF) energy set by the Federal
Communications Commission of the U.S. Government. These limits are part of comprehensive
guidelines and e s tablish per mi tted le vel s o f RF e n ergy for the g e ne r a l po p ul a t i o n. The g ui de lines
are based on standards that were developed by independent scientific organizations through
periodic and thorough evaluation of scientific studies. The standards include a substantial safety
margin designed to assure the safety of all persons, regardless of age and health. The exposure
standard for wireless mobile phones employs a unit of measurement known as the Specific
Absorption Rate, or SAR. The SAR limit set by the FCC is 1.6 W/kg. * Tests for SAR are
conducted with the phone transmitting at its highest certified power level in all tested frequency
bands. Although the SAR is determined at the highest certified power level, the actual SAR level
of the phone while operating can be well below the maximum value. This is because the phone is
designed to operate at multiple power levels so as to use only the power required to reach the
network. In general, the closer you are to a wireless base station antenna, the lower the power
output. Before a phone model is available for sale to the public, it must be tested and certified to
the FCC that it does not exceed the limit established by the government adopted requirement for
safe exposure. The tests are performed in positions and locations (e.g., at the ear and worn on the
body) as required by the FCC for each model. The highest SAR value for this model phone when
tested for use at the ear is 0.621W/Kg and when worn on the body, as described in this user guide,
is 1.187W/Kg(Body-worn measurements differ among phone models, depending upon available
accessories and FCC requirements). TWhile there may be differences between the SAR levels of
various phones and at various positions, they all meet the government requirement for safe
exposure. The FCC has granted an Equipment Authorization for this model phone with all
reported SAR levels evaluated as in compliance with the FCC RFexposure guidelines. SAR
information on this model phone is on file with the FCC and can be found under the Display Grant
section of http://www.fcc.gov/ oet/fccid after searching on
FCC ID: 2AEXB-PIXEL Additional information on Specific Absorption Rates (SAR) can be
found on the Cellular Telecommunications Industry Asso-ciation (CTIA) web-site at
http://www.wow-com.com. * In the United States and Canada, the SAR limit for mobile phones
used by the public is 1.6 watts/kg (W/kg) averaged over one gram of tissue. The standard
incorporates a sub-stantial margin of safety to give additional protection for the public and to
acco u nt for any variat i ons i n measur ements .
Body-worn Operation
This device was tested for typical body-worn operations. To comply with RF exposure
requireme nts, a minimu m separ ation dis tance of 15mm must be mai ntaine d betwee n the us er’s
body and the handset, including the antenna. Third-party belt-clips, holsters, and similar
accessories used by this device should not contain any metallic components. Body-worn
acce ssor ies tha t d o not mee t th ese r eq uire men ts ma y n ot c ompl y wi th RF ex posur e r equir eme nts
and should be avoided. Use only the supplied or an approved antenna.
 Loading...