

Page 1
User Manual
Page 2

Table of Contents
Product Features .............................................................. 3
Using Touchpad
Product Mode
Charging the Device
PicoBit Main Menu
Connection Methods
Screen Mirroring ...................................................................................... 6
Air Pico
HDMI
DLNA
Micro SD Card
Internet..................................................................................................10
Bluetooth
..................................................................................................... 7
........................................................................................................ 8
....................................................................................................... 8
............................................................................................... 10
................................................................ 3
................................................................... 4
......................................................... 5
............................................................ 6
......................................................... 6
.......................................................................................... 9
Specifications ................................................................. 14
Safety Precautions
Product Certifications
FCC Compliance Information ................................................................. 15
FCC Class Notice
FCC Caution............................................................................................ 15
FCC RF Radiation Exposure Statement:
Industry Canada Statement
CE Class Notice
CE Caution
IEC-60825-1 Caution
The MIT License (MIT)
...................................................................................... 16
.............................................................................................. 16
......................................................... 14
..................................................... 15
.................................................................................... 15
................................................. 15
.................................................................. 15
............................................................................. 16
........................................................................... 16
Warranty ........................................................................ 16
Android Settings ............................................................. 11
Projector Settings
Keystone Adjustment ............................................................................ 11
Screen Rotation
Screen Setting
Laser Alignment
Bi-Phase Adjustment
Pico Reset
....................................................................................... 12
.............................................................................................. 13
.......................................................... 11
..................................................................................... 12
..................................................................................... 13
............................................................................. 13
2
Page 3
Product Features Using Touchpad
For your safety, do not point the laser light directly into eyes or people. Doing so may
cause serious injuries.
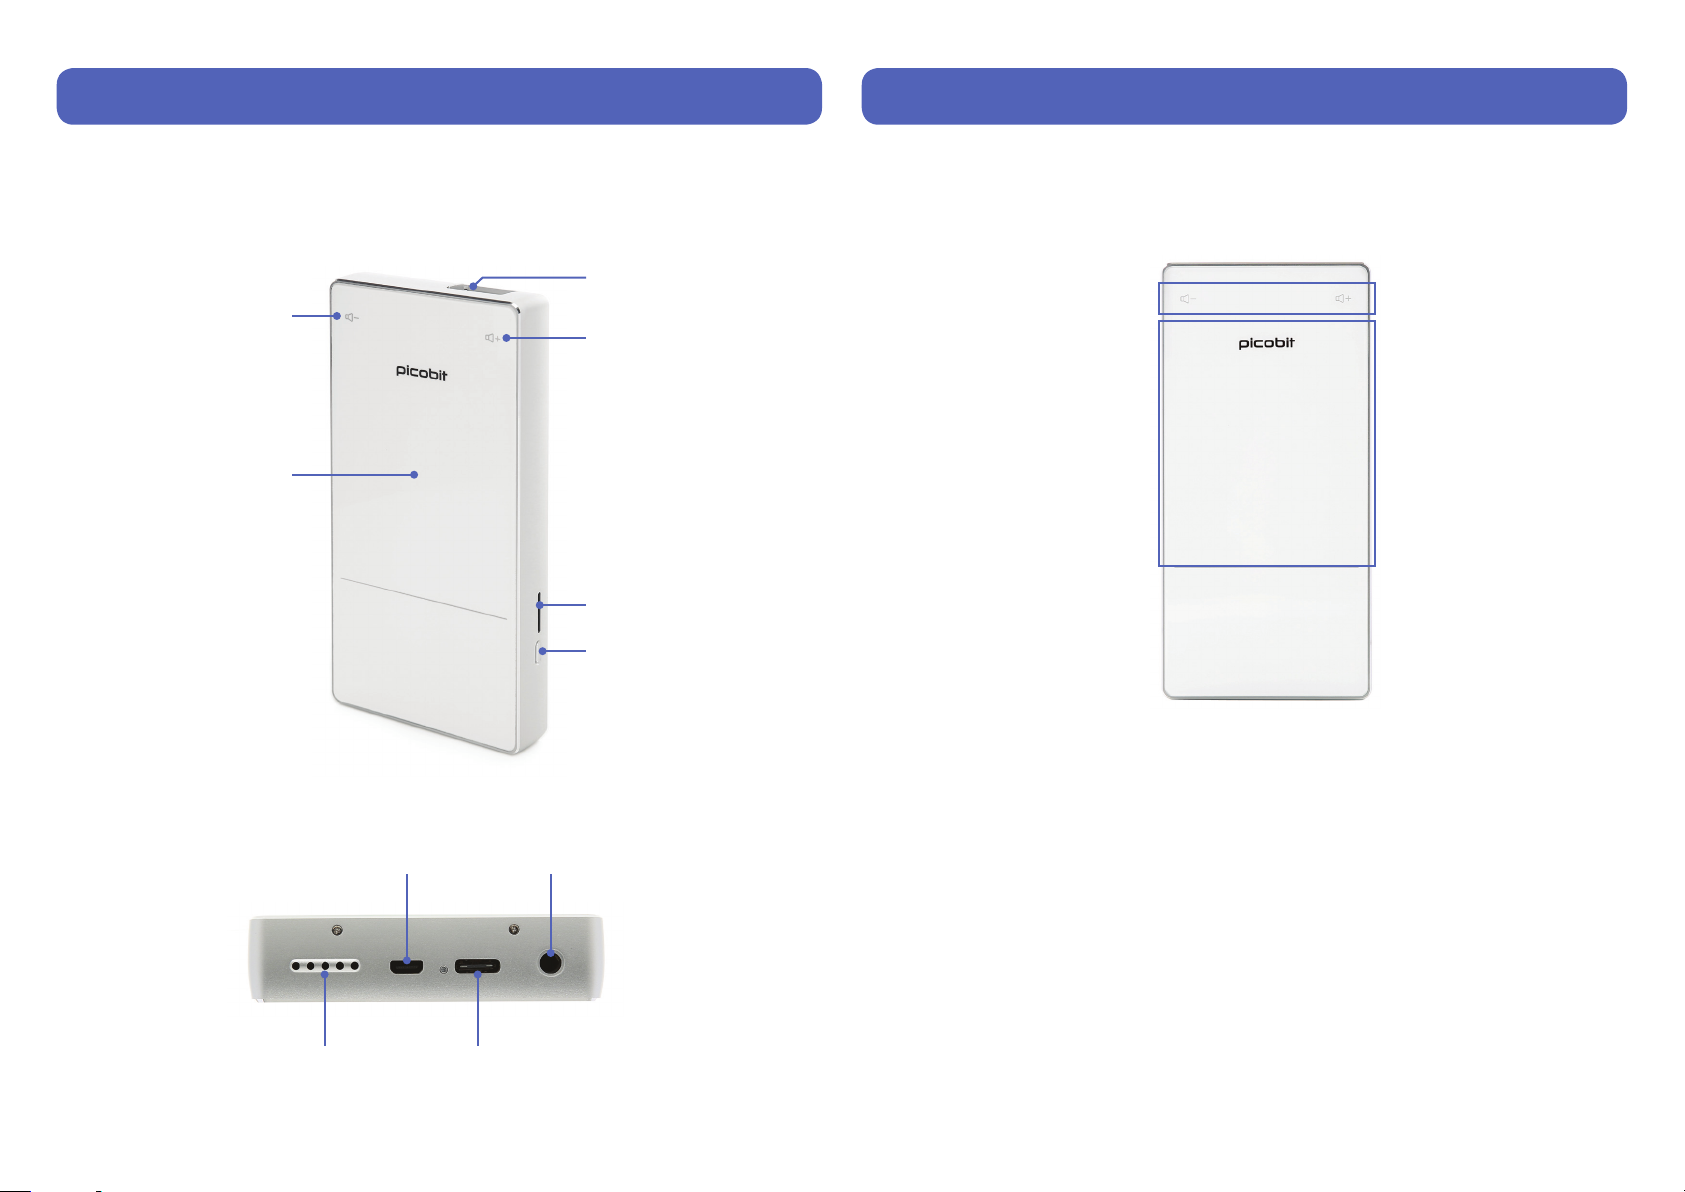
Projection Aperture
Volume Down
Volume Up
Touchpad
Micro SD Card
Power
The top surface of PicoBit is touchpad. When PicoBit is fully loaded, cursor will appear
on the screen for users to control using this touchpad.
1
2
Micro HDMI
Speaker USB Type-C Charging Port
3.5 mm Audio Jack
3
Tap these icons to increase and decrease volume.
1
Freely navigate the screen using a finger - this area recognizes your finger
2
movement as cursor movement on the screen.
Page 4
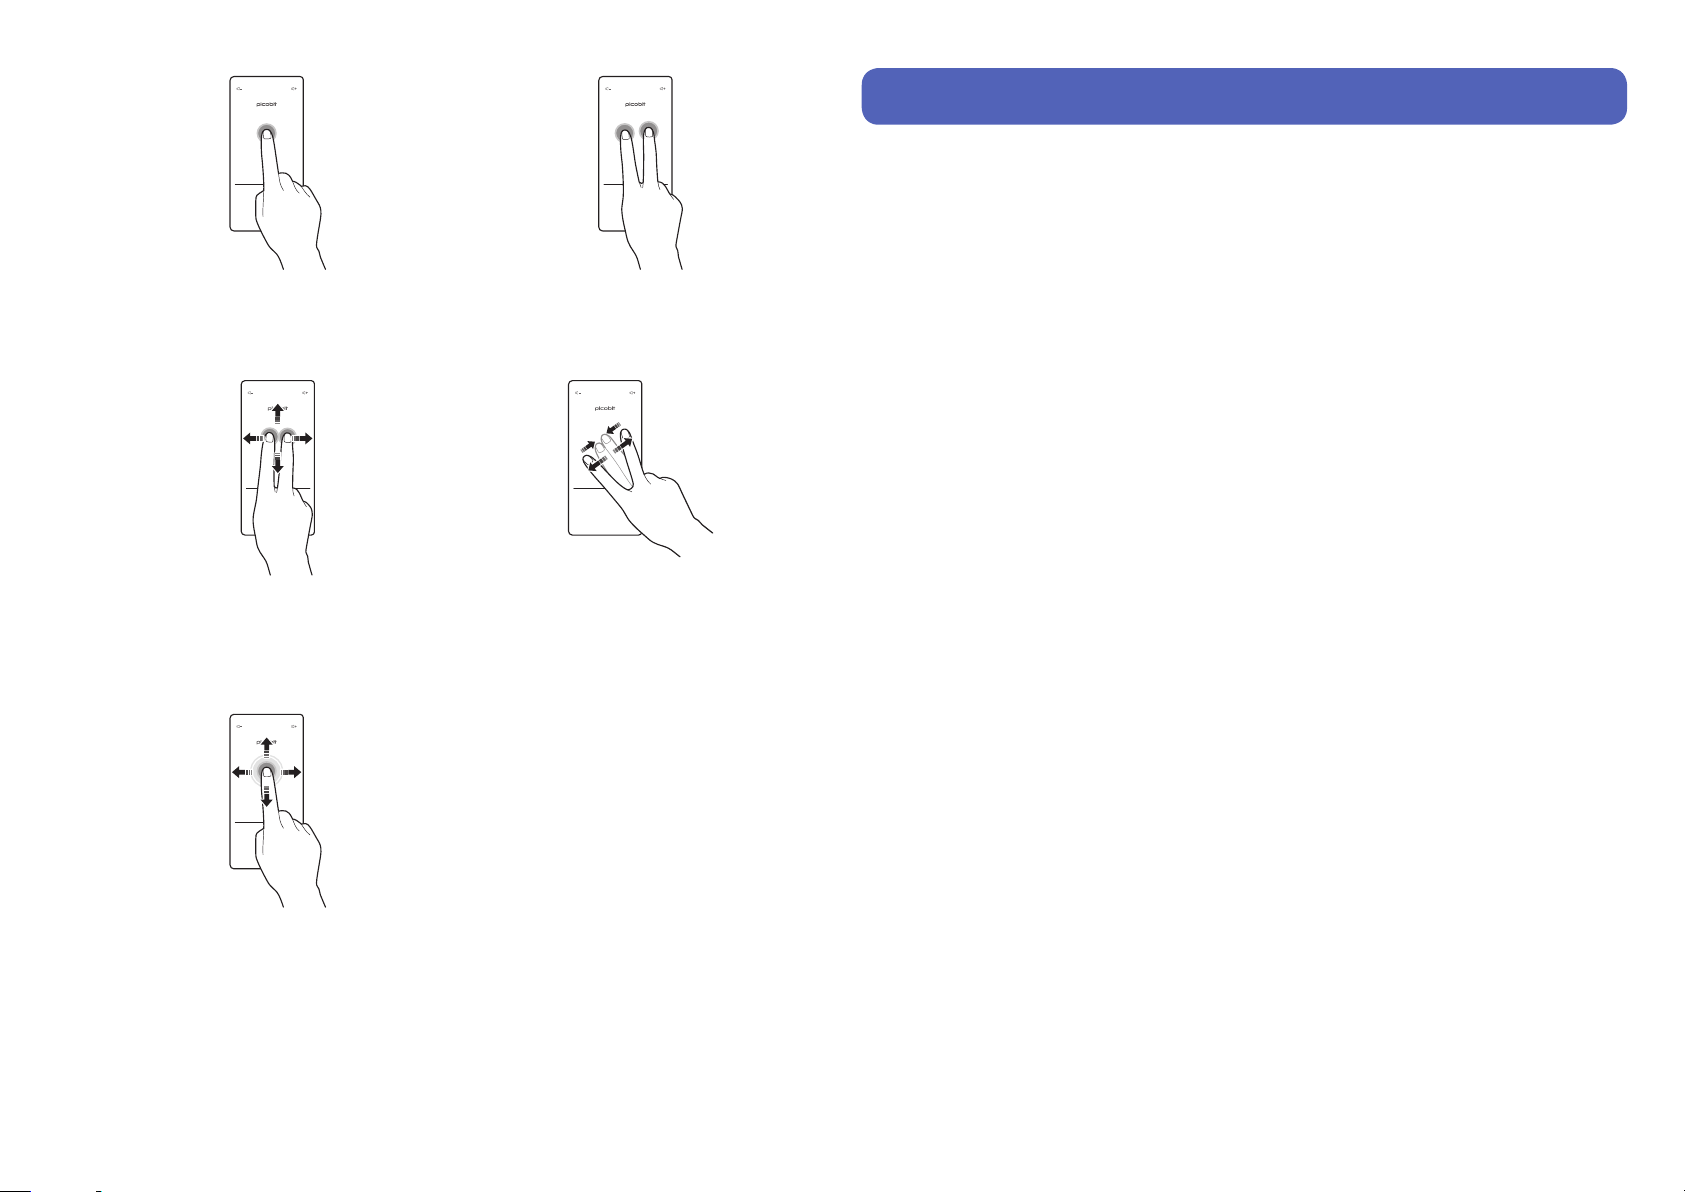
• Left click – Tap once • To go back or cancel – Tap once
with two fingers
• Scroll – Tap once and hold down
with two fingers. Without releasing
the fingers, scroll up and down.
• Zoom in & out – Using two
fingers, pinch in to zoom out and
pinch out to zoom in.
Product Mode
LED Indicator - Different colors of LED indicators located below touchpad
1
represent status of the PicoBit.
• Solid Blue – PicoBit is powered on
• Green – Fully charged
• Red – Charging
Power On – Press power switch for 3 seconds.
2
Power Off – Press power switch for 6 seconds. After 3 seconds, power menu
3
will be displayed. Continue to press it for another 3 seconds, and the product will
power off.
Power Menu – While product is turned on, press power switch for 3 seconds
4
to see the Power menu (Power off or Restart option). This menu does not show
during HDMI or WiFi Display mode.
APC (Auto Power Control) Setting – This setting is to efficiently control the
5
amount of light emitting from PicoBit’s laser diodes. Due to this setting, a thin
white line on the top of the screen will always be present when PicoBit is turned
on.
• Drag – Tap once and hold down.
Without releasing the finger, slide
finger in any direction to drag.
Release finger on desired area.
4
Page 5
Charging the Device
Battery Operating Time: Approx. 2.5 hours
Battery Charging Time: 4-5 hours
To charge PicoBit : Use the supplied USB Type-C cable and power adapter to charge
the device.
Please note that using other adapters than the one provided may result in longer
charging times or damage to the internal battery.
It is not recommended to use PicoBit continuously for more than 4-5
IMPORTANT!
hours or continuously charge for a long period of time. Due to the
structure of the projection module, heat problem with module may occur
if PicoBit is continuously played or charged for a long period of time.
Please cool off the device by turning it off after playing it for 4-5 hours.
Environmentally Friendly Disposal and Recycling
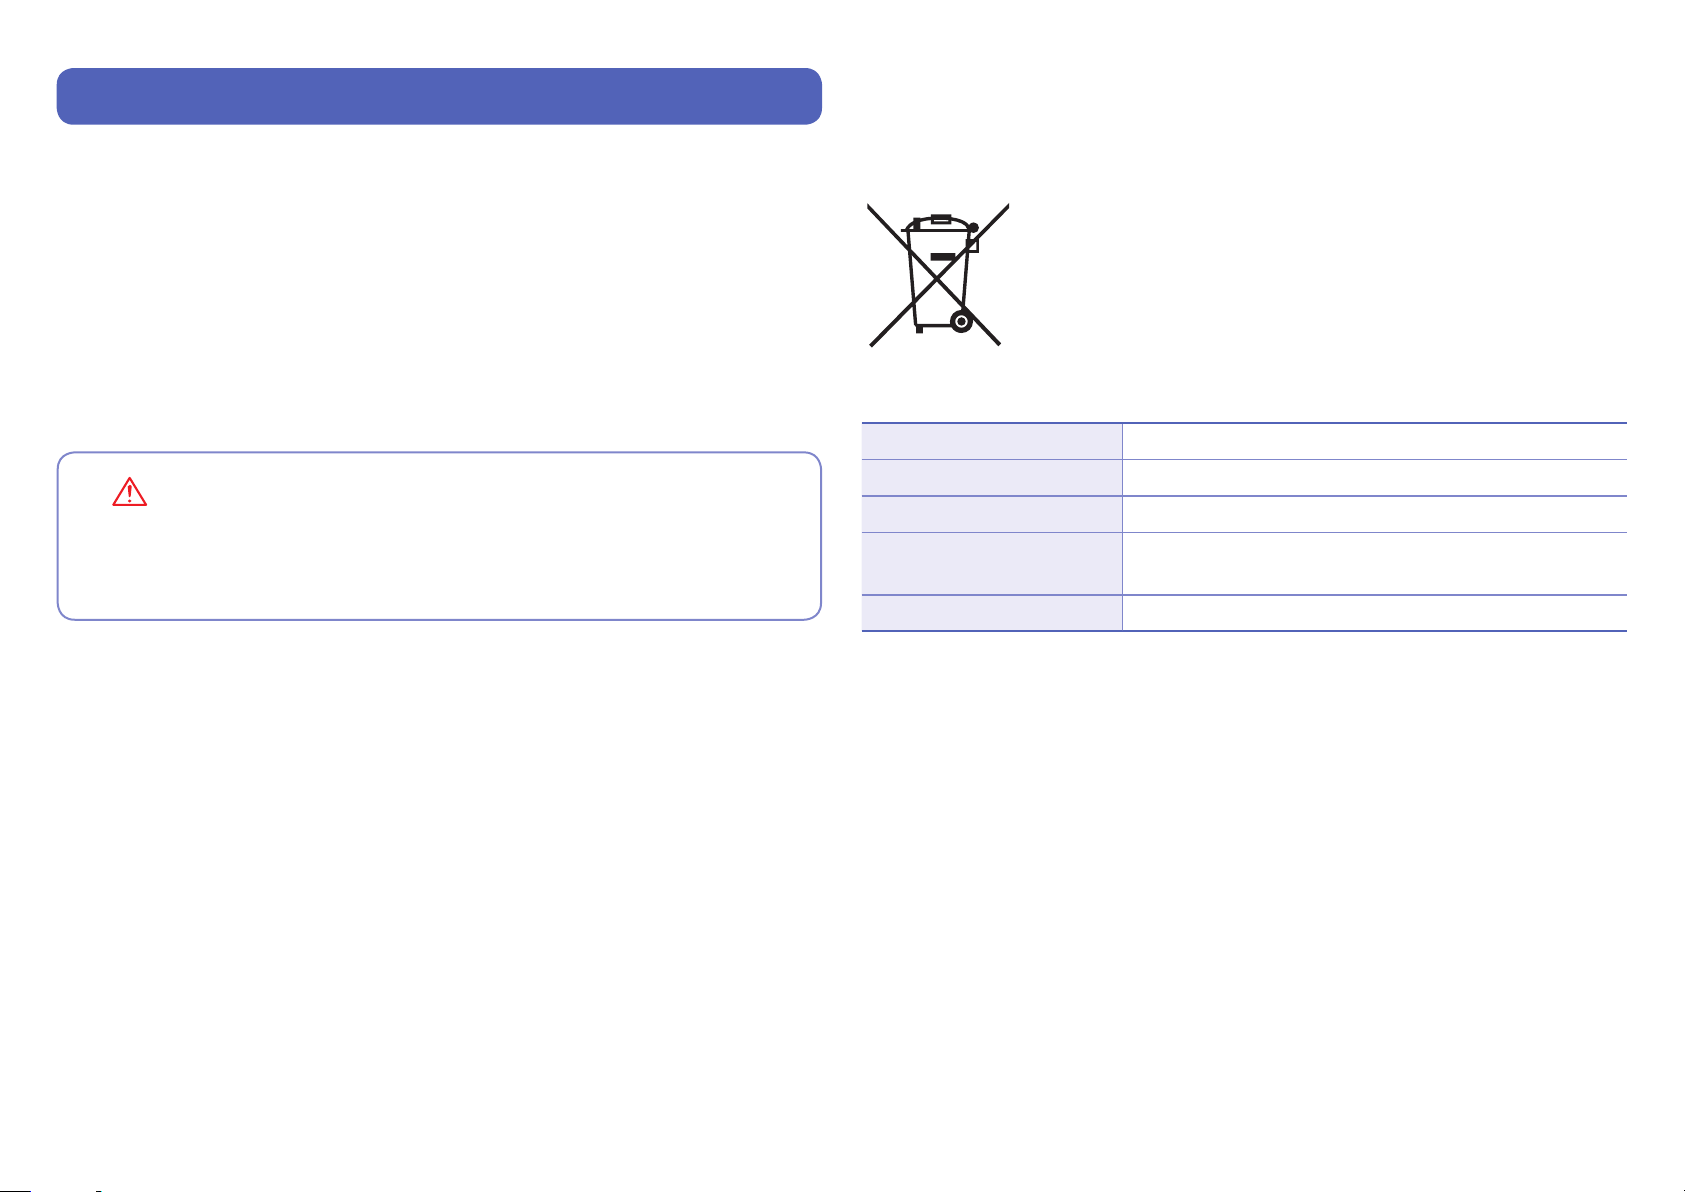
To protect the environment, dispose this product separately
from household waste once it has reached its end of life, or
take it to your local electronic waste disposal center.
Built-in Battery Specification
Battery Type Rechargeable Lithium-ion Polymer Battery
Battery Operating Time Approx. 2.5 hours (with continuous use)
Battery Capacity 3,500 mAh @ 5 V 2 A
Charging the Battery
Battery Charging Time Approx. 4 – 5 hours
Use supplied cable and power adapter to charge the battery.
(Green LED – Fully Charged / Red LED – Charging)
5
Page 6
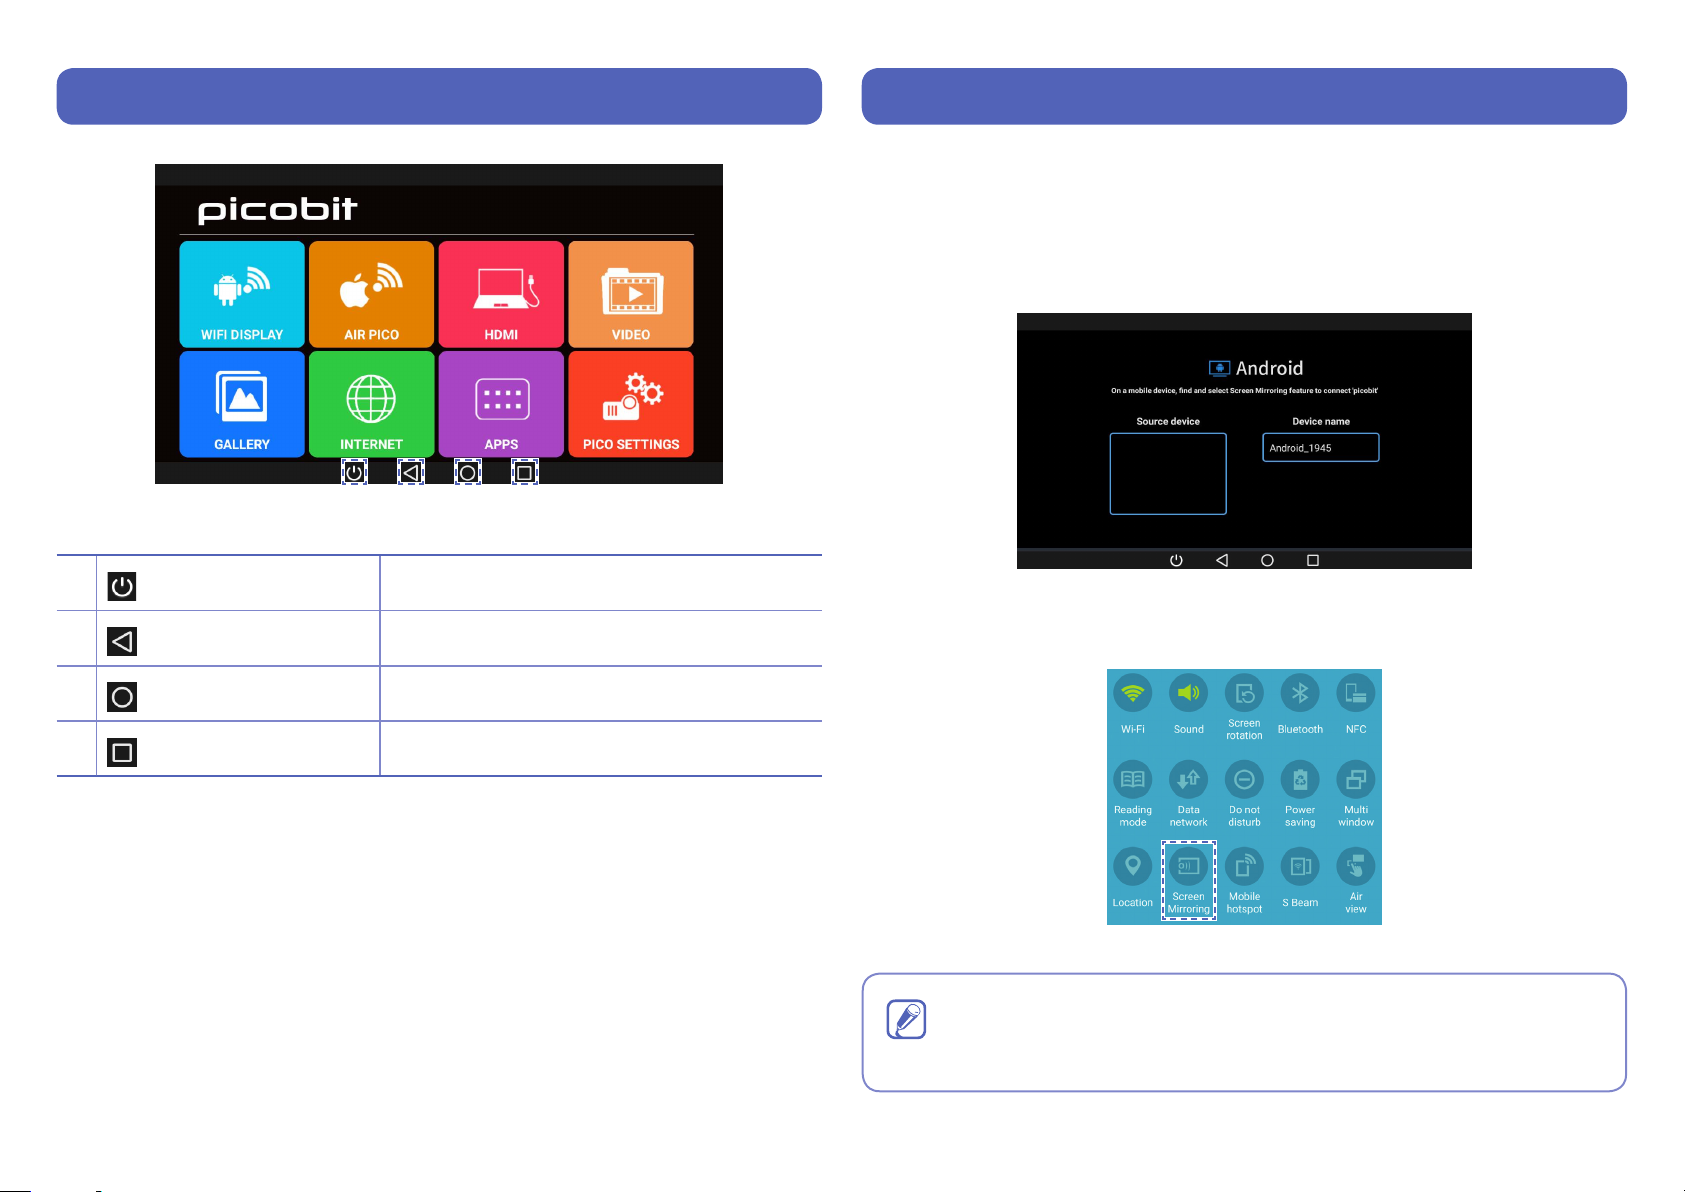
PicoBit Main Menu
1 2 3 4
Connection Methods
Screen Mirroring
(WiFi Display / Smart View / Screen Sharing / Media Output)
• On the default menu screen, select “WiFi Display” icon to enter WiFi Display mode.
1
2
3
4
Power Menu
Back
Home
Task Manager
To power off or restart the device
To go back to the previous page
To go back to the main menu
To manage applications running on PicoBit
• On a mobile device, find and select Screen Mirroring feature (WiFi Display / Smart
View / Screen Sharing / Media Output).
Wireless display feature is called different names on different devices.
( i.e. Samsung device = Smart View / Screen Mirroring, LG device = Screen
Note
Sharing, etc.)
6
Page 7
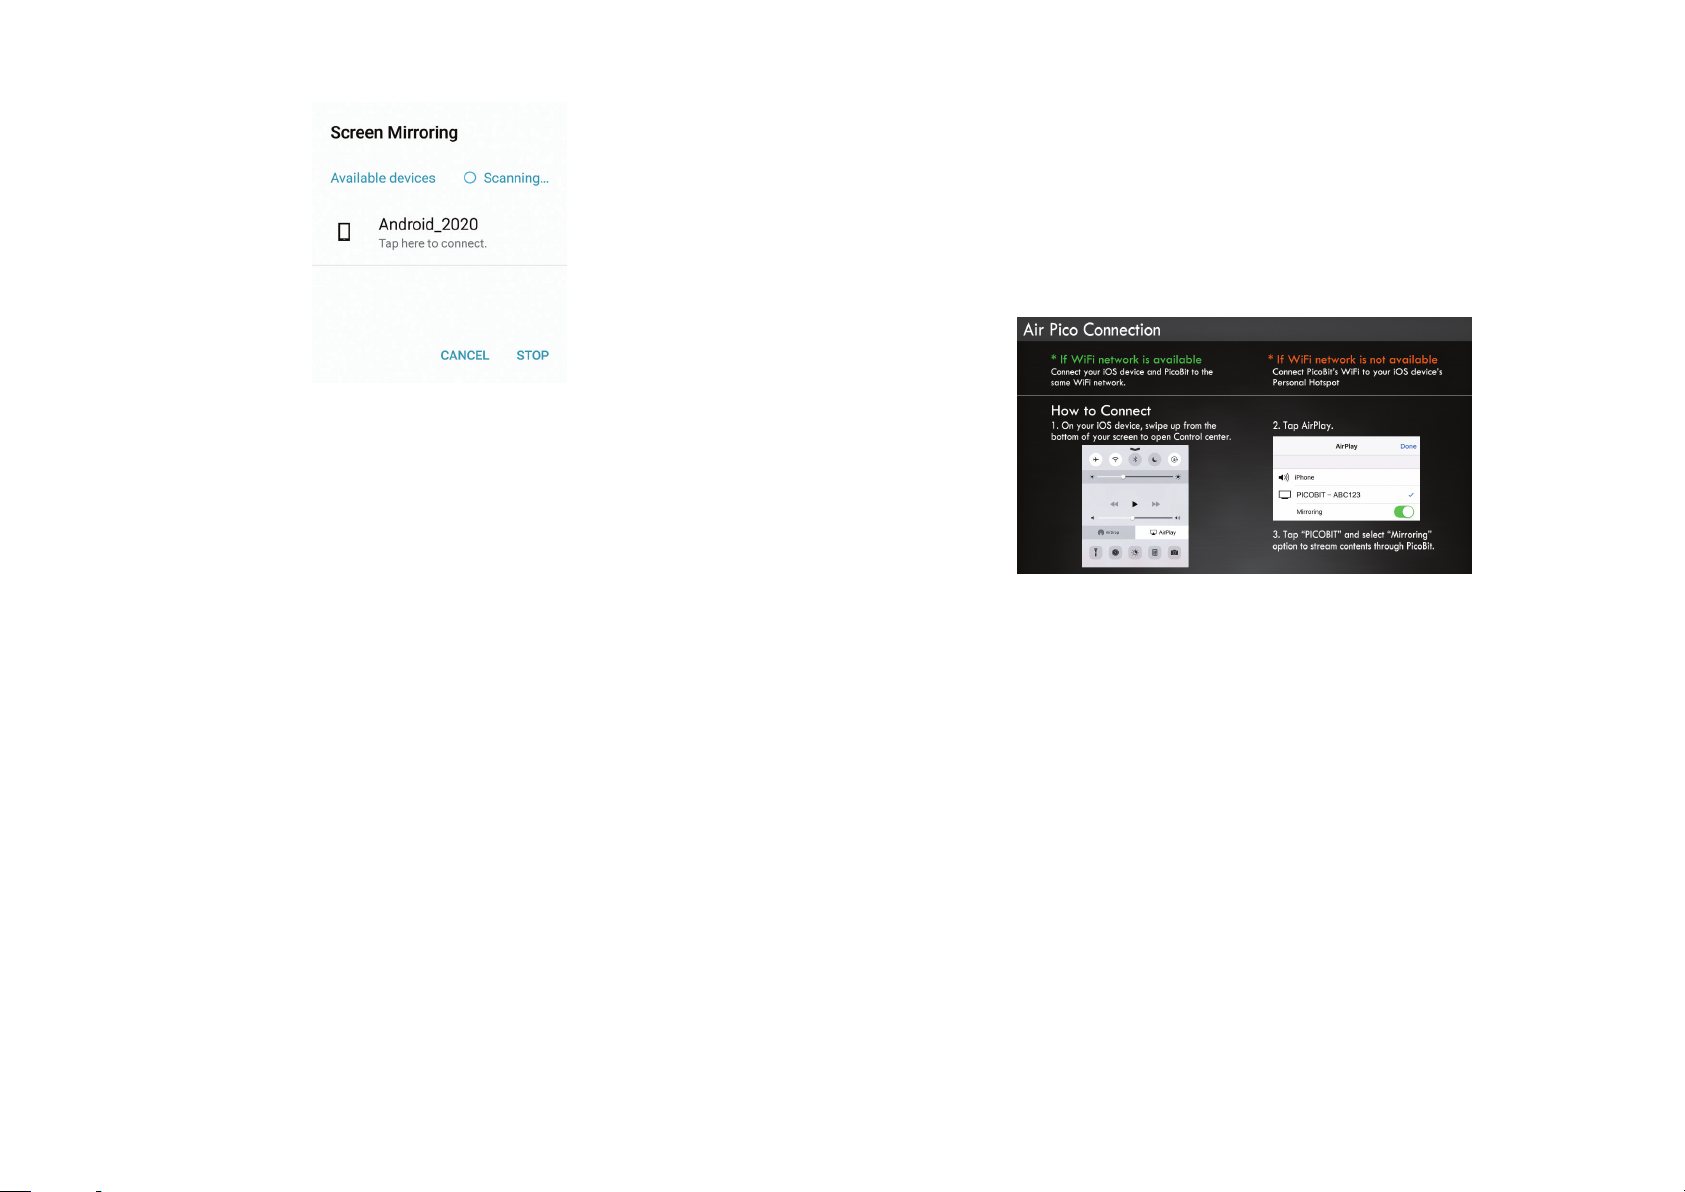
• When device discovers “Android_XXXX”, tap to connect.
• PicoBit will start mirroring display upon successful connection.
Air Pico
• PicoBit and the desired iOS device must be connected to the same WiFi network
for this feature (If there is no WiFi network available, use iOS device’s hotspot to
connect PicoBit’s WiFi to the device).
• After checking both devices are connected to the same WiFi network, select “Air
Pico” icon on the default menu screen to enter the Air Pico mode.
• Below image will be displayed upon entering Air Pico mode.
• Follow instructions on screen: On your iOS device, pull up the task bar from the
bottom of screen and select AirPlay.
• Select “PICOBIT-XXXXX” and turn on “Mirroring” option.
• PicoBit will start mirroring display upon successful connection.
7
Page 8
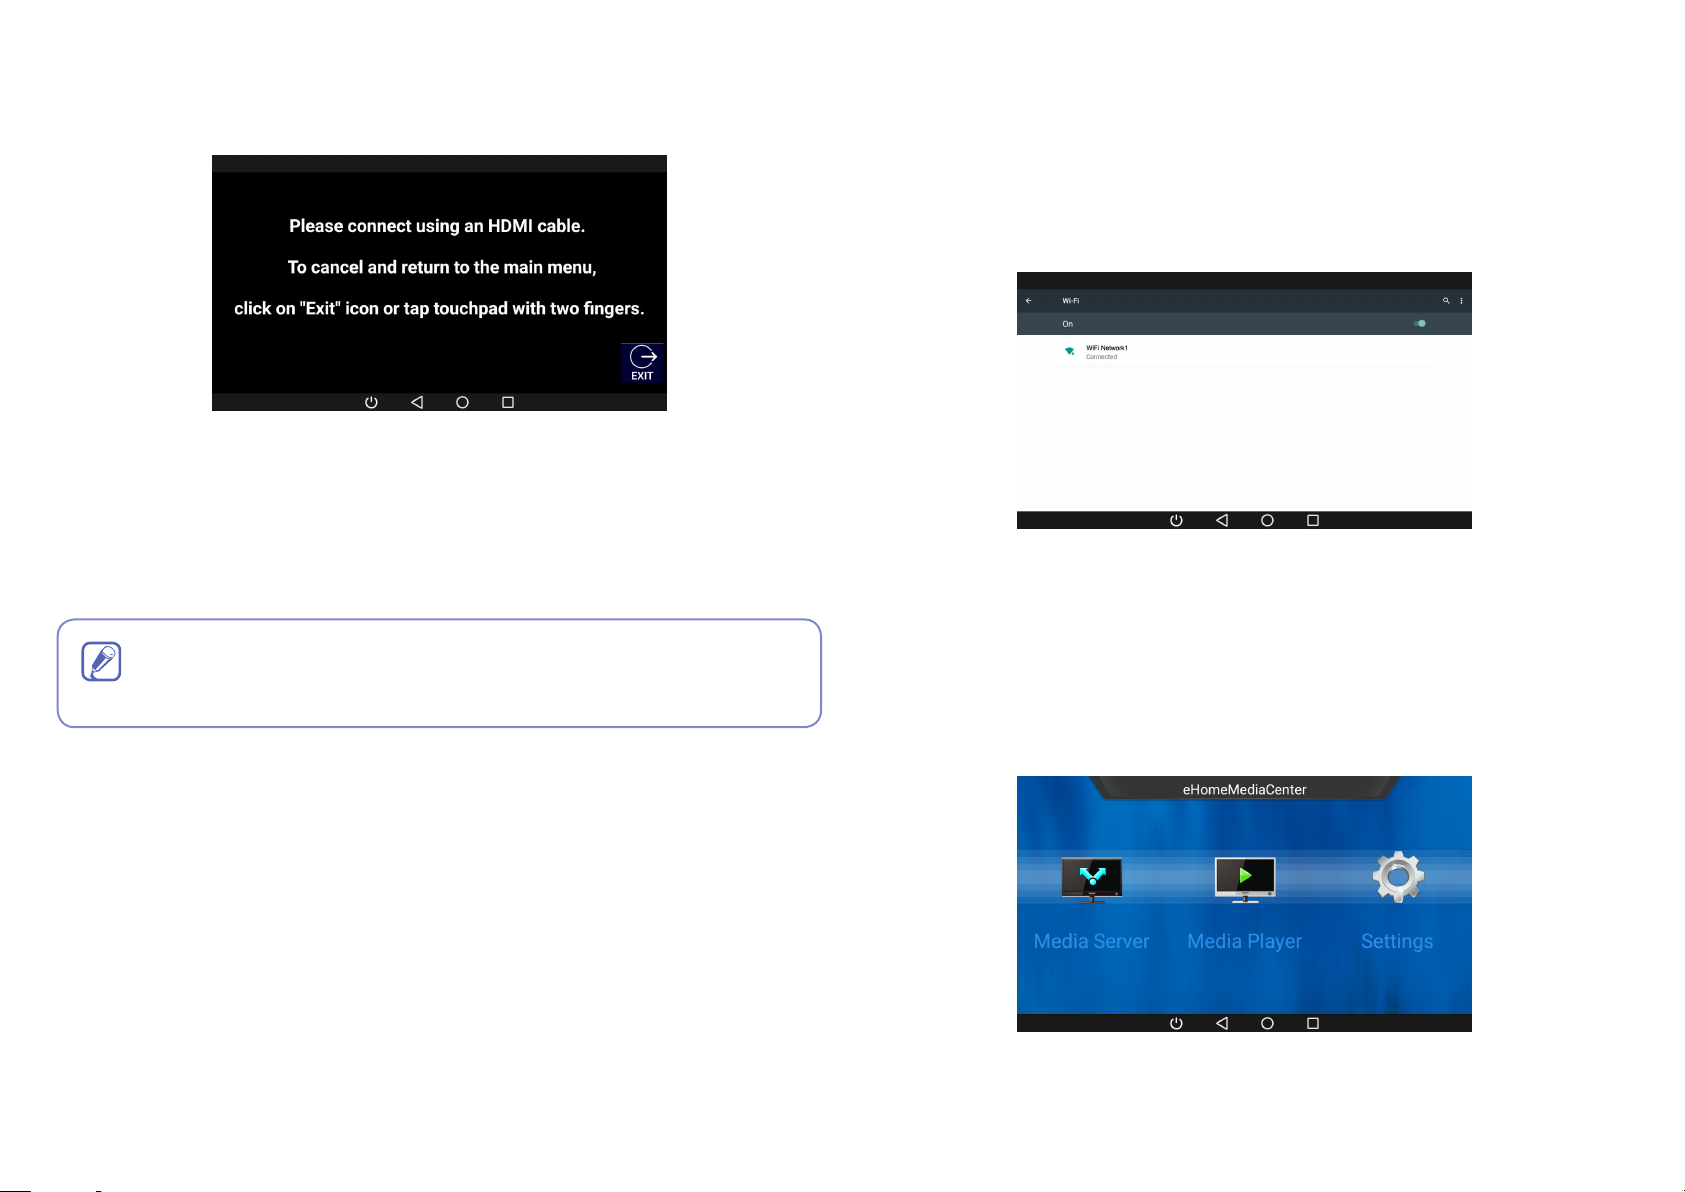
HDMI
DLNA
• On the default menu screen, select “HDMI” icon to enter wired connection mode.
• For HDMI connection, use Micro HDMI to HDMI cable (sold separately) to connect
PicoBit with the device.
• You may tap touchpad with two fingers or disconnect cable connection to exit HDMI
mode during usage.
During HDMI connection, it is recommended to use 3.5mm audio jack to
Note
connect to an external speaker (Bluetooth speaker is not recommended).
Desired mobile device must have applicable DLNA app installed and running.
(Ex. ArkMC, BubblePnP, etc.)
Go to “Apps” icon on the default menu screen, then find “Settings” icon to
1
check connected WiFi on PicoBit.
Connect to that same WiFi network on a mobile device.
2
After verifying that PicoBit and the mobile device are connected to the same
3
network, select “Apps” icon on the main menu.
8
Find and select “eHomeMediaCenter” app to enter DLNA mode.
4
Page 9
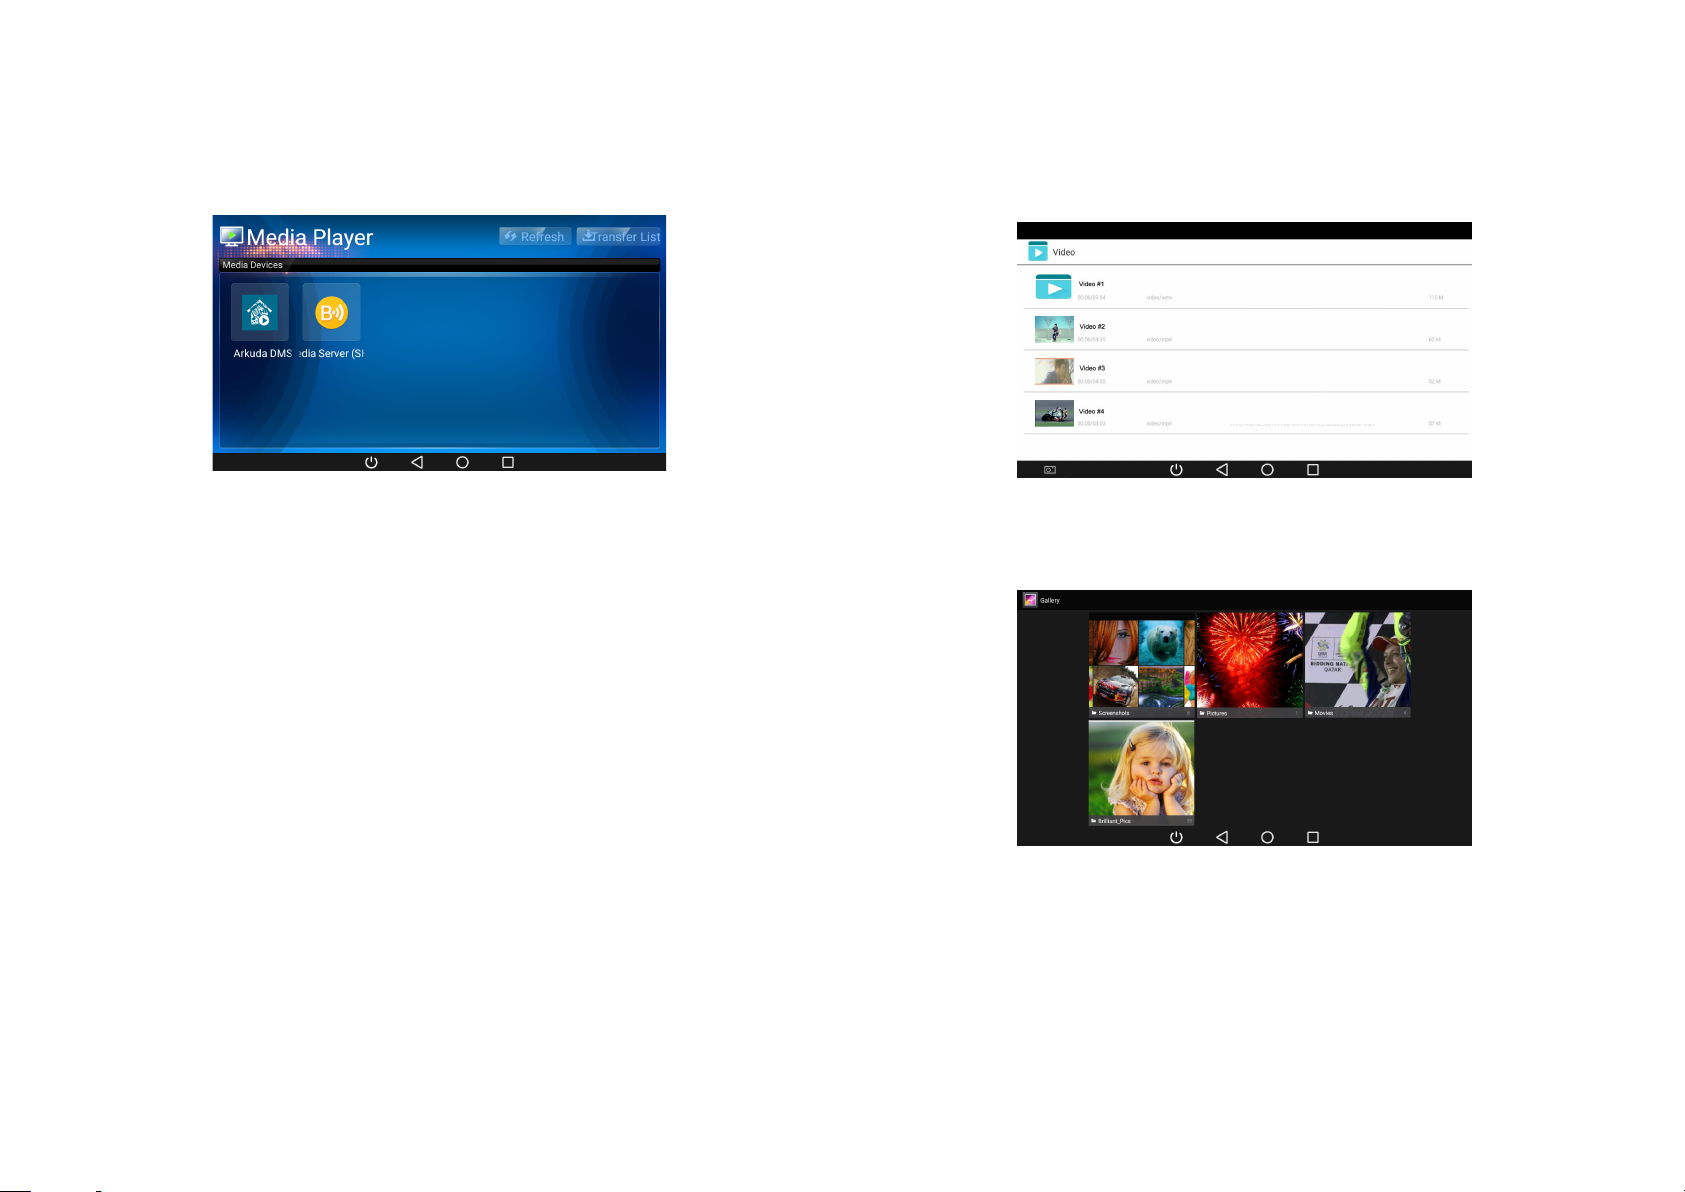
Go to the mobile device you wish to connect, and open up DLNA app
5
(ex. ArkMc DLNA).
Micro SD Card
• Insert Micro SD card.
On PicoBit, select the “Media Player” option to see the list of saved media
6
contents in connected mobile device.
Select your device.
7
Find an image or a video to play through PicoBit (Files saved on Micro SD card
8
will be not discovered).
• To enjoy videos or movies stored on Micro SD card, select “Video” icon on the
default menu.
• Browse through and select a video to play through PicoBit.
• To share images stored in the SD card, select “Gallery” icon on the default menu.
• Browse through and select an image to display through PicoBit.
9
Page 10
Internet
Bluetooth
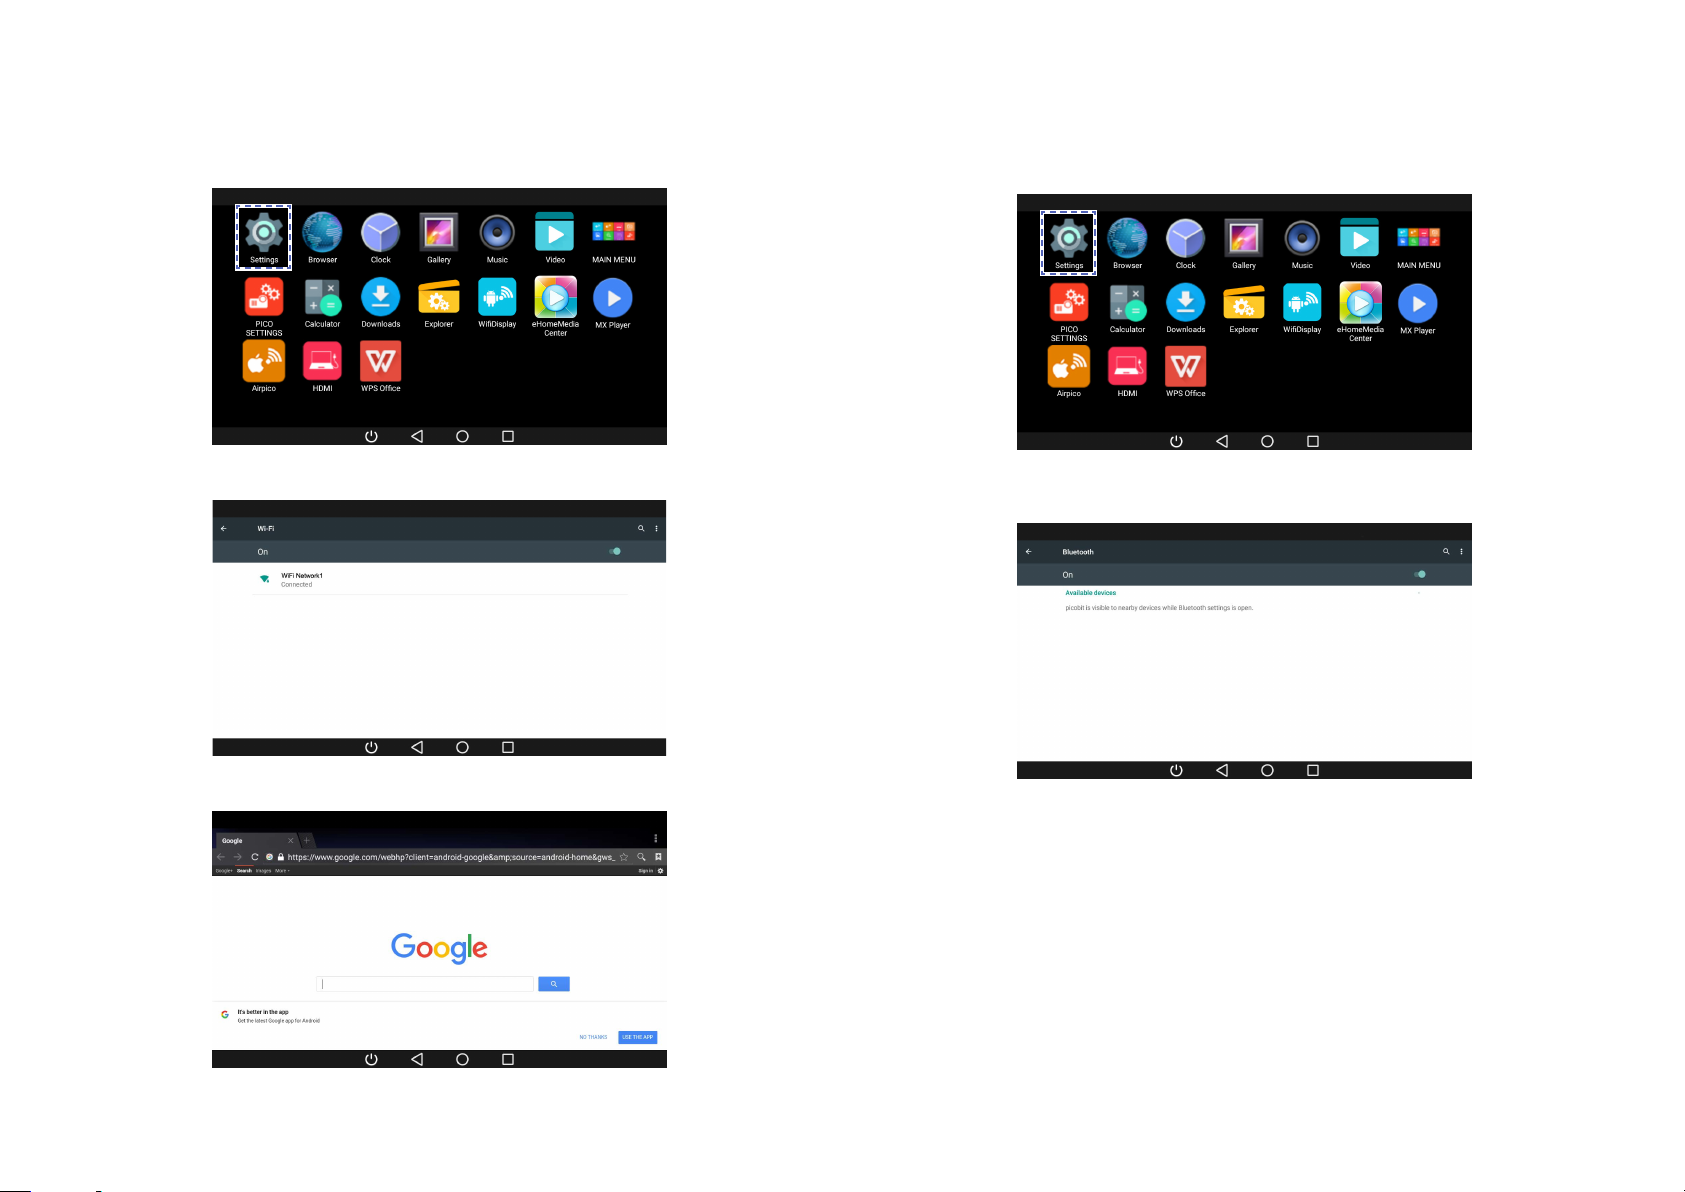
To connect to WiFi network, select “Apps” icon on the default menu.
1
Find and select “Settings” app.
2
Go to WiFi option and connect to available WiFi network.
3
• To connect a Bluetooth device to PicoBit, select “Apps” icon on the default menu.
• Find and select “Settings” app.
• Go to Bluetooth option and turn on Bluetooth.
On the default menu screen, select “Internet” icon to use internet browser.
4
Freely use the web to do web surfing, streaming, etc.
5
• Find and connect desired Bluetooth device (Bluetooth mouse, speaker, headset, etc)
to PicoBit.
10
Page 11
Android Settings Projector Settings
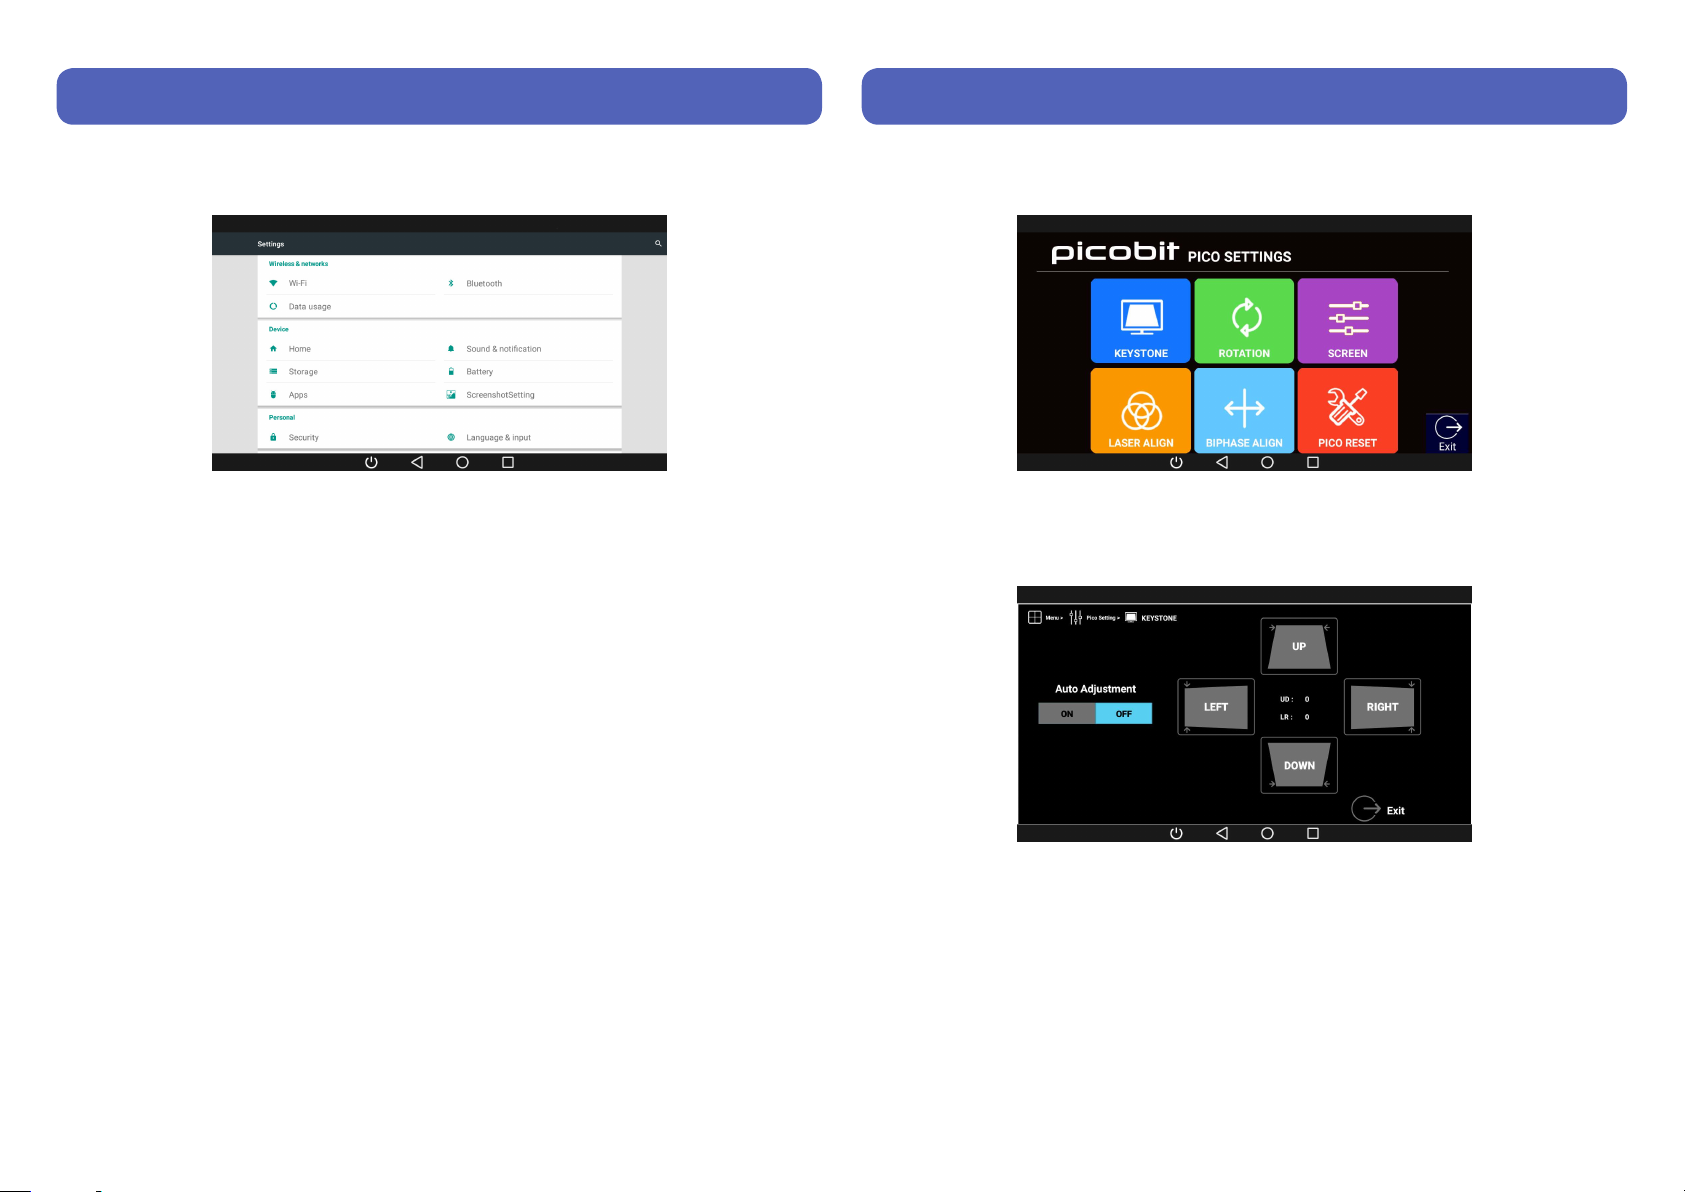
Android Settings – Make changes to basic device settings. Make changes to basic
device settings (WiFi, Bluetooth, Date & Time, Language, etc.).
• From the main menu, select “Apps” icon.
• Find and select “Settings” app.
• Make changes to various settings as needed.
Pico Settings – Make changes to projector settings. All adjustments are saved as it is
made.
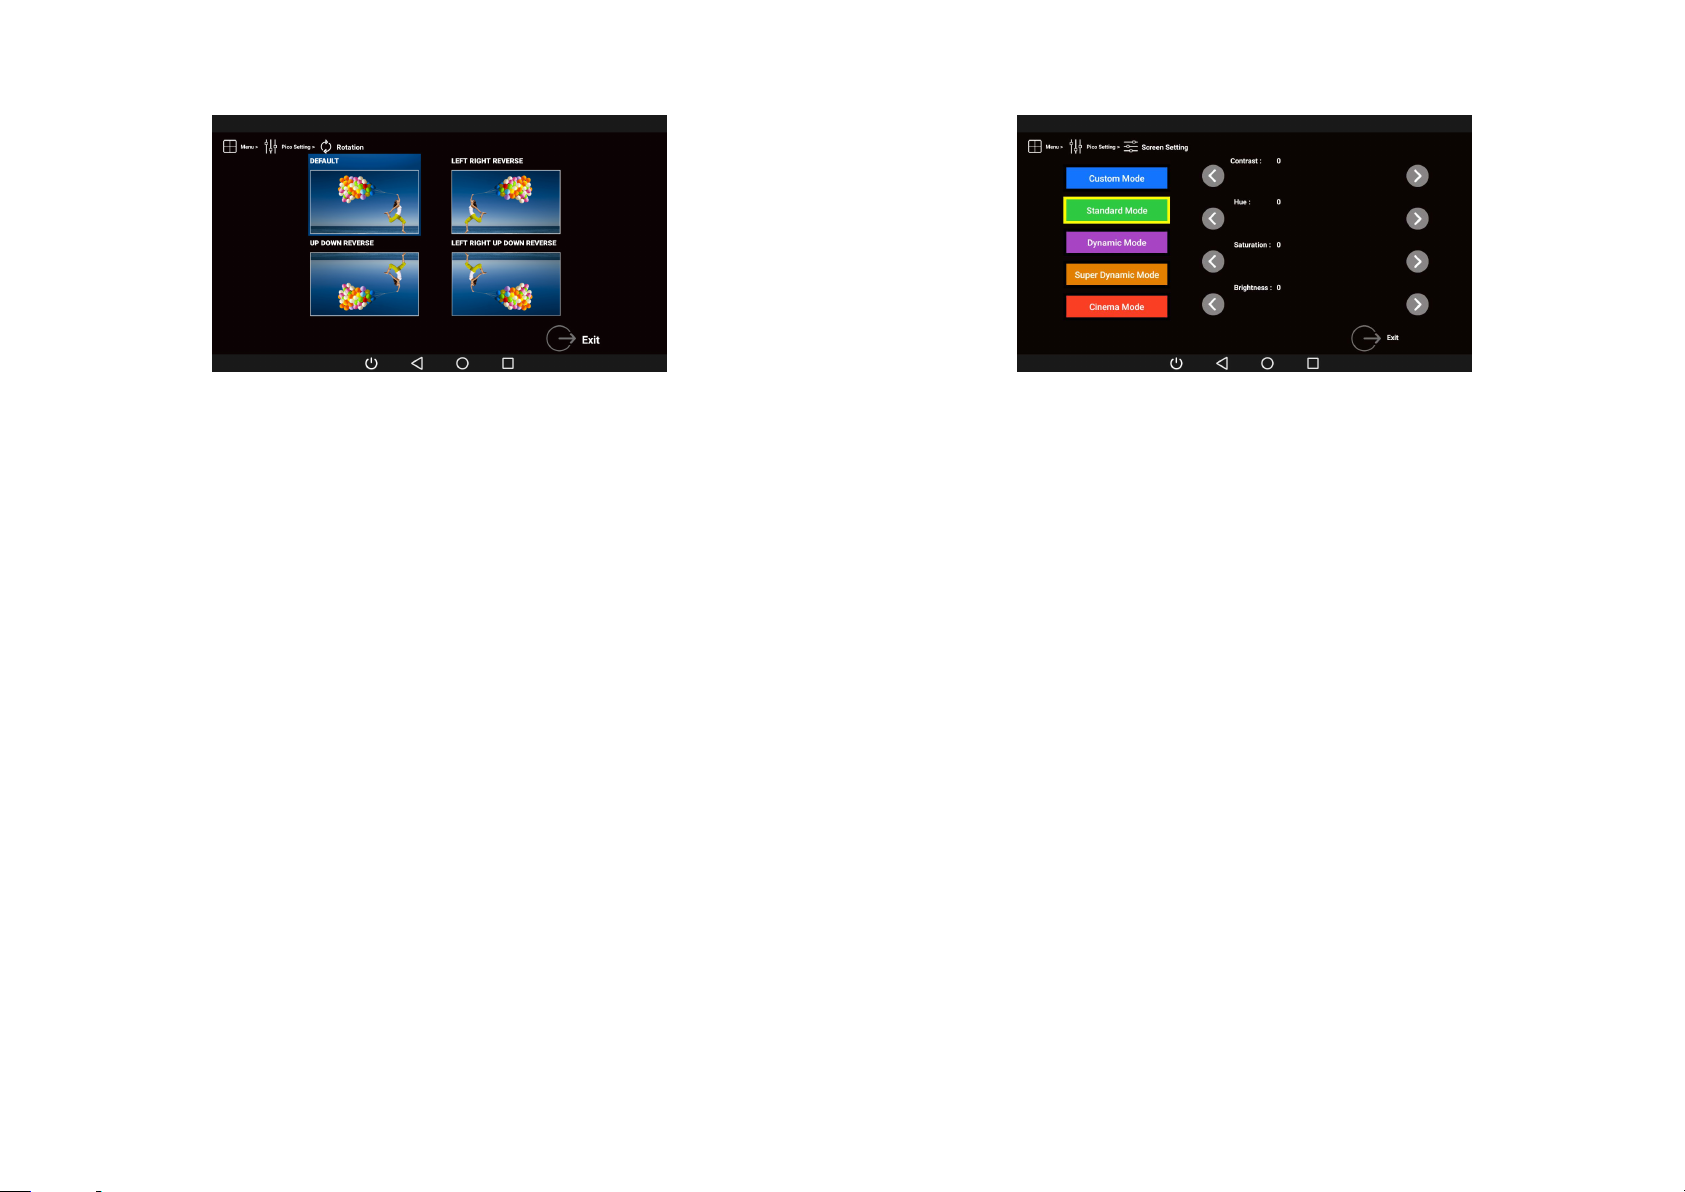
Keystone Adjustment
• Auto adjustment enables automatic keystone feature (only up and down angles).
• For manual adjustment, select UP, DOWN, LEFT, and RIGHT icons to adjust screen
shape as needed.
- Adjustment Range: Up - 0° ~ 20° Down - 0° ~ 30°
Left - 0° ~ 30° Right - 0° ~ 30°
• All adjustments made will be erased and reset to the default setting when the device
powers off.
11
Page 12
Screen Rotation
Screen Setting
• Select icons to change screen orientation as desired.
• All adjustments made will be erased and reset to the default setting when the device
powers off.
• Custom Mode – Users can modify various screen settings as desired.
- Move the pink dot controller to adjust contrast, hue, saturation, brightness of the
screen as desired.
- Adjustment range: Contrast: -10 ~ 10 Hue: -15 ~ 15
Saturation: -15 ~ 15 Brightness: -30 ~ 30
• Standard Mode (DEFAULT setting) – For a generic environment
• Dynamic Mode – For a relative bright environment
• Super Dynamic Mode – For more brighter environment
• Cinema Mode – For a dark environment
• All the adjustments made will be erased and reset to the default Standard mode
when the device powers off.
12
Page 13
Laser Alignment
Bi-Phase Adjustment
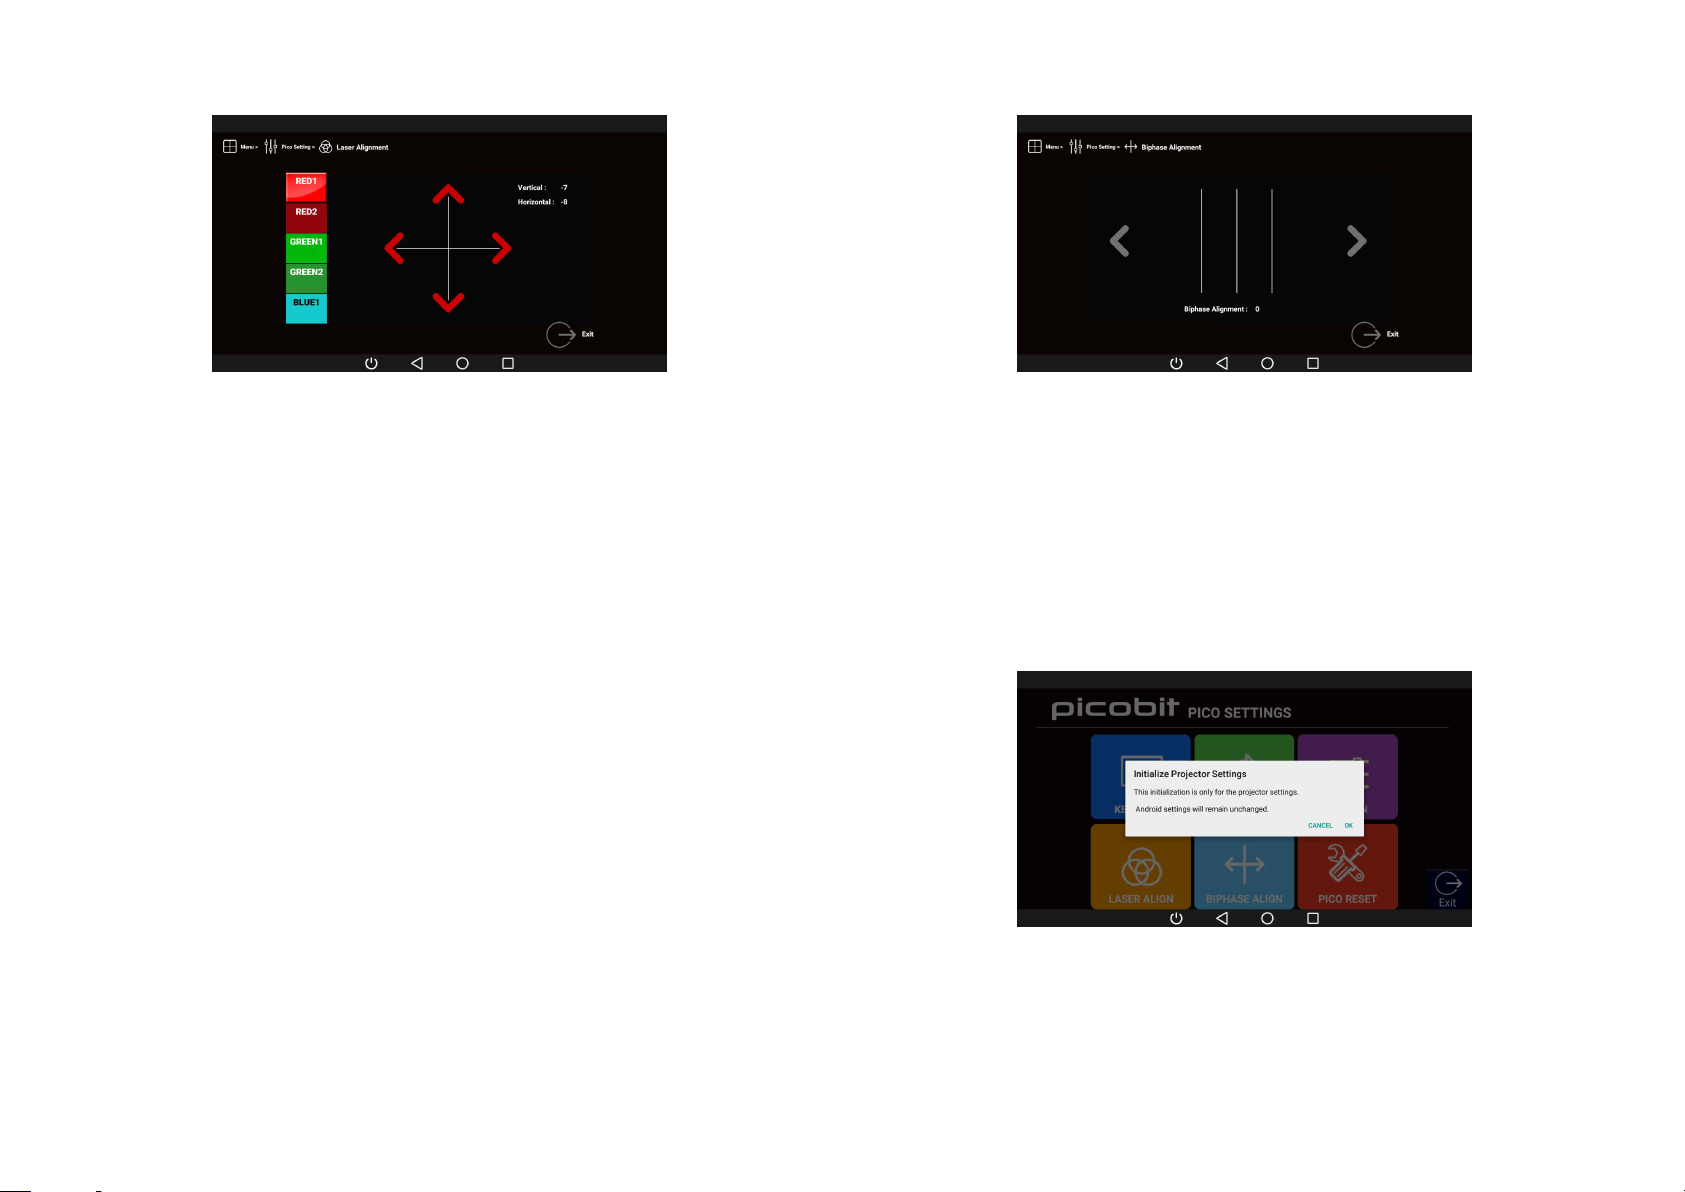
• Select up, down, left, and right arrows to adjust Red1, Red2, Green1, Green2, and
Blue lasers to align the lasers.
• Align the lasers until the white cross lines are as thin as it can be.
• Adjustment range: Up & Down: -20 ~ 20
Left & Right: -120 ~ 120
• Once saved, all adjustments made will remain through power cycles.
• Use left and right arrows to align the lines.
• Adjust the lines until the white lines are aligned together.
• Once saved, all adjustments made will remain through power cycles.
Pico Reset
• All changes made in Pico Settings will be erased.
• Android settings will remain unchanged. To reset Android settings, go to Android
settings menu and select Factory Reset.
13
Page 14

Specifications Safety Precautions
Item Specification
Display Method Laser Beam Scanning
Product Lifetime 14,000 hours
63 ANSI lumen*
Brightness
Aspect Ratio 16:9
Throw Ratio 1.3 : 1
Sequential Contrast Ratio 80,000 : 1
Resolution 1920 X 720p (Upscaled HD)
Color Depth 16.7 M colors (R/G/B 24bit)
Focus Infinite Focus (Always-in-focus)
Maximum Image (Screen) Size 250 inches (Depending on ambient light)
Embedded OS Android 5.1.1 (Lollipop)
CPU Quadcore 1.3 GHz
Internal Memory 4 GB
WiFi Dual (2.4 Ghz & 5 Ghz)
(The perceived brightness is about 100 lamp-based
projector (DLP) lumen)
• This product is not waterproof – avoid using it near water or wet places.
• There is a risk of malfunction if product is used in places where sudden or extreme
temperature changes occur.
• Applying excessive force or impact to this product may result in product damage,
and will void warranty.
• Never attempt to disassemble or service this product yourself. Doing so can result in
electrical shock and void warranty.
• This is a Class 3R Laser product. For your safety, please do not look directly into the
laser source. Doing so may damage your eyes.
• It is not recommended to use PicoBit continuously for more than 4-5 hours or
continuously charge for a long period of time. Due to the structure of the projection
module, heat problem with module may occur if PicoBit is continuously played or
charged for a long period of time. Please cool off the device by turning it off after
playing it for 4 – 5 hours.
Bluetooth 4.0
Battery Capacity Approx. 3,500 mAh
Operating Time
Audio Interface Internal speaker, 3.5mm ear phone jack, or Bluetooth
Operating Temperature 32 °F – 104 °F (0 °C – 40 °C)
Size
*The perceived brightness of laser projectors with a given ANSI brightness measure is about
1.7 times higher to human eye.
Approx. 2.5 hours
(Average movie playing time on SD card)
138 x 66.5 x 15 mm
(5.4 x 2.6 x 0.6 inches)
14
Page 15
Product Certifications
If this equipment does cause interference to radio or television reception, which can
be determined by turning the equipment off and on, the user is encouraged to correct
the interference by one of the following measures:
• Reorient or relocate the receiving antenna.
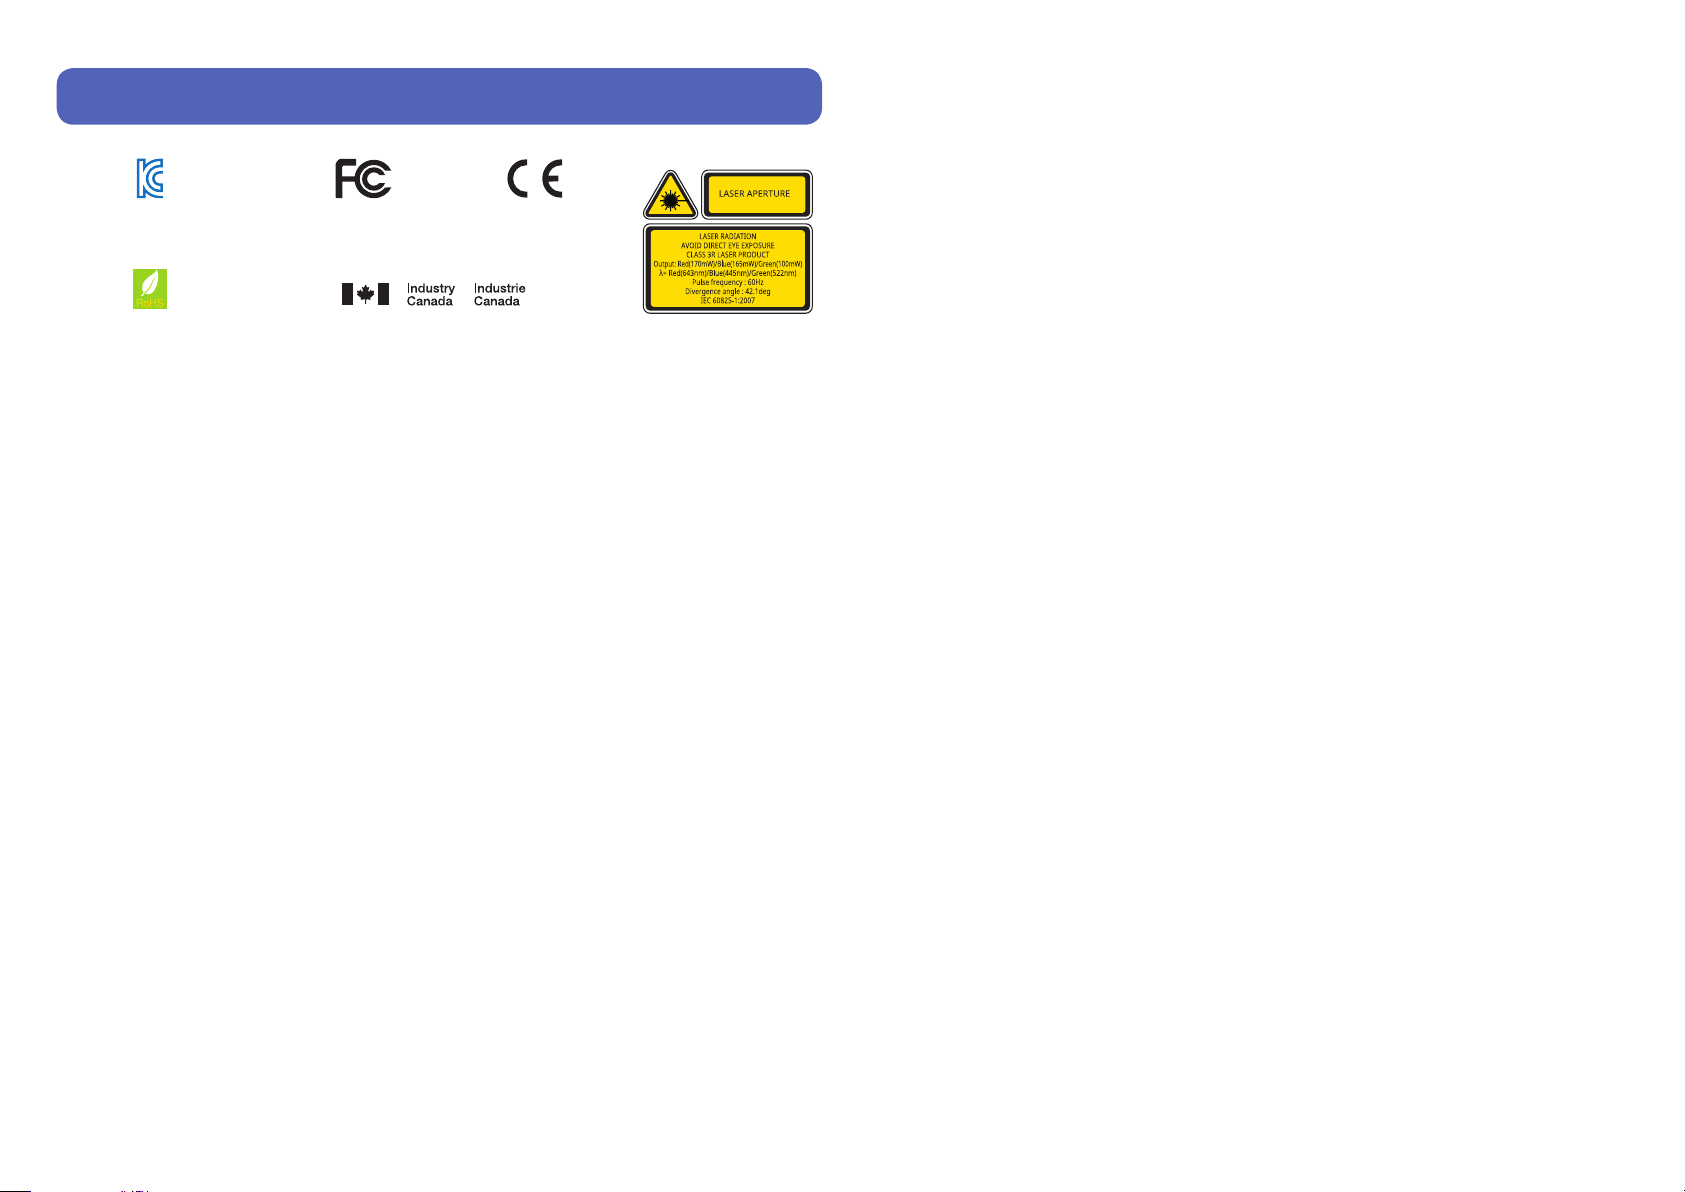
KC : MSIP-CMM-CLK-PICOBIT FCC ID : TCLPICOBIT CE1177
compliant
RoHS IC No : 10211A-PICOBIT IEC-60825-1 : Class 3R LaserIEC-60825-1 : Class 3R Laser
FCC Compliance Information
This device complies with Part 15 of the FCC Rules. Operation is subject to the
following two conditions:
1. This device may not cause harmful interference to another device.
2. This device must accept any interference received, including interference that may
cause undesired operation.
FCC Class Notice
This equipment has been tested and found to comply within the limits for a Class B
digital device, pursuant to Part15 of the FCC Rules.
These limits are designed to provide reasonable protection against harmful
interference when the equipment is operated in a residential environment.
This equipment generates, uses, and radiates radio frequency energy, and if not
installed and used in accordance with the instructions, may cause harmful interference
to radio communications.
However, there is no guarantee that interference will not occur with special
installation.
• Increase separation between the equipment and receiver.
• Connect the equipment to an outlet on a circuit different from which the receiver is
connected.
• Consult the dealer or an experienced radio/TV technician.
FCC Caution
Any changes or modifications in construction of this device which are not expressly
approved by the party responsible for compliance could void the user’s authority to
operate the equipment.
FCC RF Radiation Exposure Statement:
This equipment complies with FCC RF radiation exposure limits set forth for an
uncontrolled environment. This equipment should be installed and operated with
a minimum distance of 20 centimeters between the radiator and your body. This
transmitter must not be co-located or operating in conjunction with any other antenna
or transmitter.
Industry Canada Statement
This device complies with Industry Canada license- exempt RSS standard(s).
Operation is subject to the following two conditions:
1. This device may not cause interference.
2. This device must accept any interference, including interference that may cause
undesired operation of the device.
15
Page 16

CE Class Notice
This product is in compliance with the essential requirements and other relevant
provisions of Directive 1999/5/EC. The declaration of conformity may be consulted at:
http://celluon.com/docs/picobit_doc_ce.pdf
CE Caution
Risk of explosion if battery is replaced by an incorrect type. Dispose of used batteries
according to the instructions.
Warranty
Celluon warrants this product to be free from defects in materials and workmanship
under normal use for a period of one (1) year from the date of purchase, as evidenced
by the receipt of purchase.
During the warranty period, Celluon shall repair or replace the product if defective. If
replaced, the replacement shall be with a product of equal or greater value.
IEC-60825-1 Caution
Use of control or adjustments or performances of procedures other than those
specified here in may result in hazardous radiation exposure.
The MIT License (MIT)
Copyright (c) Sergey Ryazanov (http://home.onego.ru/~ryazanov)
Permission is hereby granted, free of charge, to any person obtaining a copy of this
software and associated documentation files (the “Software”), to deal in the Software
without restriction, including without limitation the rights to use, copy, modify,
merge, publish, distribute, sublicense, and/or sell copies of the Software, and to
permit persons to whom the Software is furnished to do so, subject to the following
conditions:
The above copyright notice and this permission notice shall be included in all copies or
substantial portions of the Software.
THE SOFTWARE IS PROVIDED “AS IS”, WITHOUT WARRANTY OF ANY KIND,
EXPRESS OR IMPLIED, INCLUDING BUT NOT LIMITED TO THE WARRANTIES OF
MERCHANTABILITY, FITNESS FOR A PARTICULAR PURPOSE AND NONINFRINGEMENT.
IN NO EVENT SHALL THE AUTHORS OR COPYRIGHT HOLDERS BE LIABLE FOR ANY
CLAIM, DAMAGES OR OTHER LIABILITY, WHETHER IN AN ACTION OF CONTRACT,
TORT OR OTHERWISE, ARISING FROM, OUT OF OR IN CONNECTION WITH THE
SOFTWARE OR THE USE OR OTHER DEALINGS IN THE SOFTWARE.
Celluon does not warrant against normal wear and tear, nor damage caused by
accident or abuse.
This warranty is limited to the purchaser and is not transferable.
Please contact [email protected] for warranty supports.
16
Page 17
Celluon, Inc.
Gwanggyo Business Center #1010, 156 Gwanggyo-ro, Yeongtong-gu, Suwon-si, Gyeonggi-do, Republic of Korea (16056)
www.celluon.com
All rights are reserved by Celluon. All contents are properties of Celluon.
All products and trademarks are registered trademarks of their respective companies. Version 1.2
 Loading...