

Page 1

Binocular & Digital Camera
Model #72204 /72205/72217
Page 2

Cautions
Introduction
VistaPix i s a bin ocu lar integ rat ed with a d igital ca mer a that is great f or
sportin g ev ents, con cer ts and wil dlife act ivi tie s such as hun tin g or
bird-wa tch ing . Vista Pix lets y ou r ecord mem ori es and sights at the
touch of a b utt on. Use th e full-featu red binocula r fo r clos er v iews a nd
cap ture i mag es to t ake home w ith you at the sa me t ime. Vi sta Pix ma kes
it po ssi ble to sha re you r fu n with oth ers by dow nloading ima ges fr om t he
camera r igh t to yo ur comput er t o e-ma il t o your fri ends a nd f amily.
˙ Avoid dropping VistaPi x.Do not disassemble VistaPi x.
Usage of the battery
˙ Please always use Alkaline Battery(AAA Alkaline Battery).
˙ Please remove batteries when not using your VistaPix for long periods
of time.
Cautions
˙Never immerse VistaPix into any fluid or liquid.Remove dust or stains
with a soft cloth dampened with water or neutral detergent.
Keep in a dry and cool dust-free environment or a container when it is
not used.
About usage
˙ To avoid damage do not use VistaPix under the following conditions.
1.Places in temperature higher that 100 F.(35 C)
2.Damp or dust places.
3.Places with strong electromagnetic field.
˙ Please do not disassemble or repair the product to avoid malfunction.
˙ Please do not drop the product on the ground to avoid malfunction.
o
o
Page 3
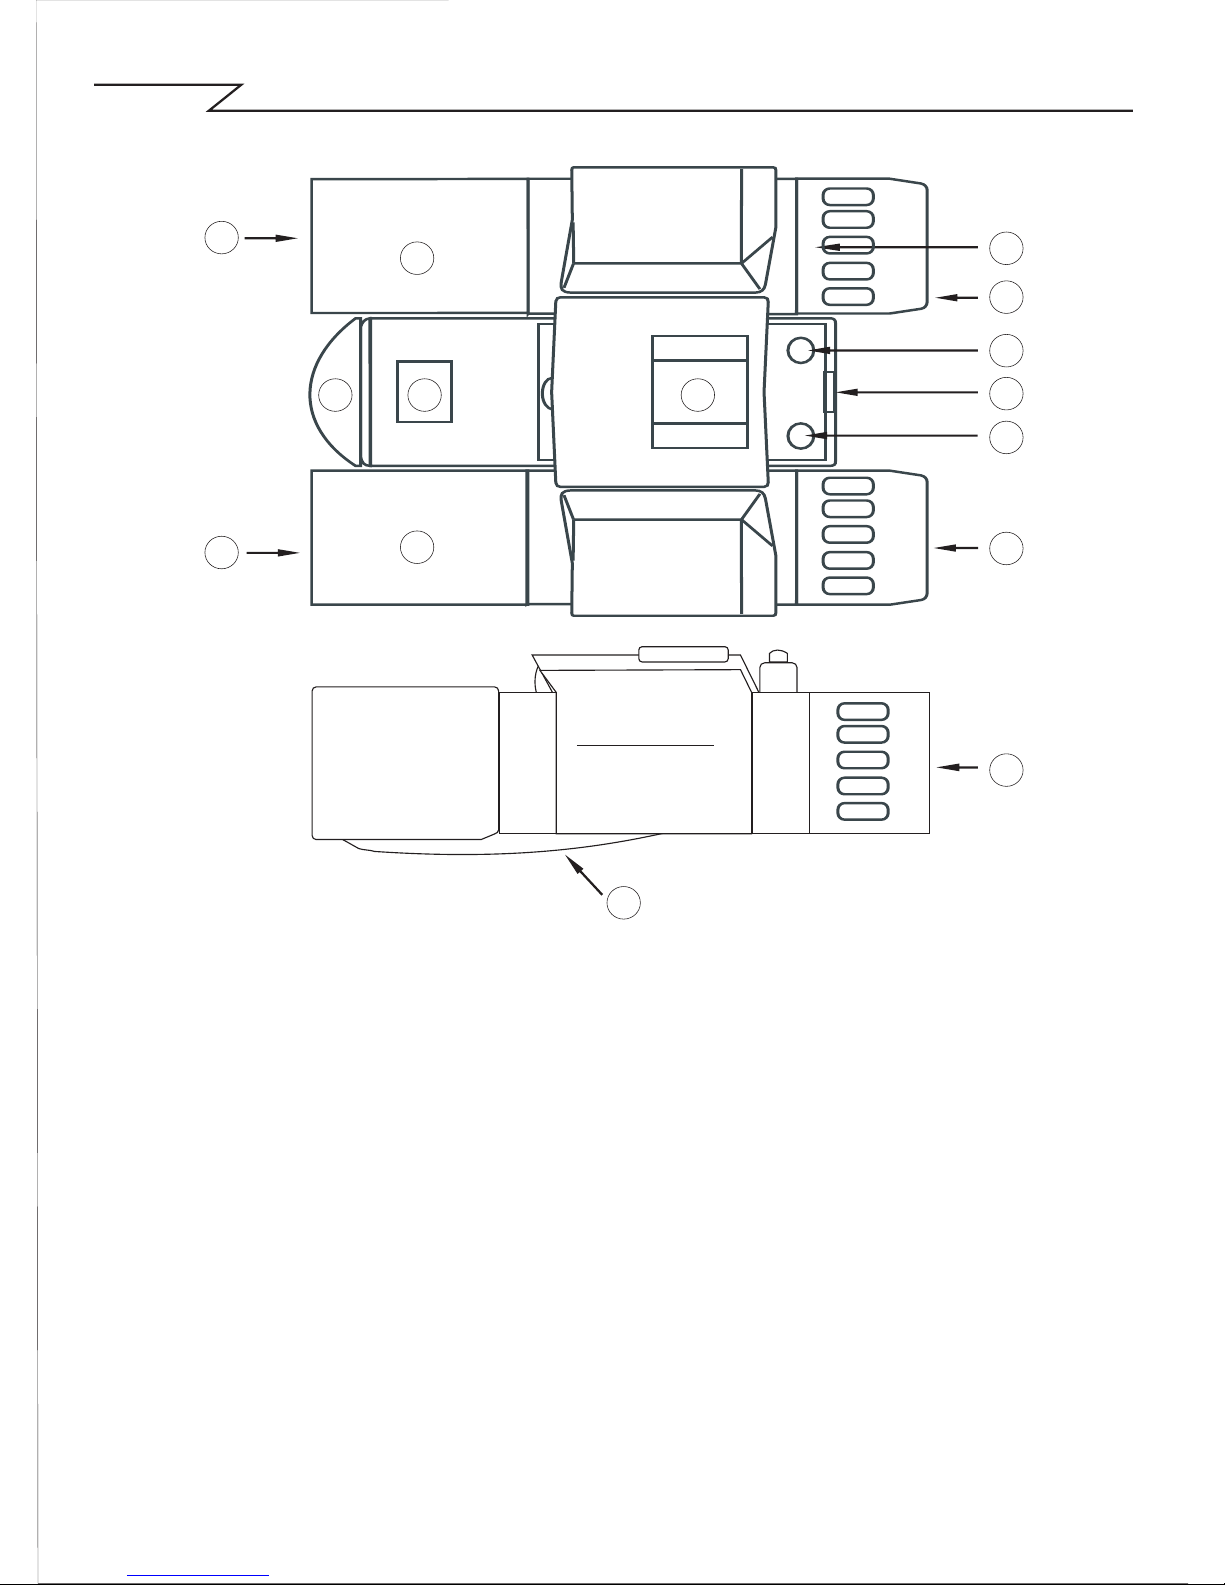
Product part identification
1. Diopter Knob(on underside)
2. Center Focus Knob
3. Objective Lens
4. Power/Mode Button
5. Shutter/Set Button
6. USB Port
7. Eyepiece
8. Camera Lens
9. LCD Screen
10. Battery Compartment Lid
11. Objective Barrel
-
11
3
8 9
3
11
2
1
7
5
6
4
7
7
10
Page 4

Looking at or near the sun will cause instant and irreversible damage
to your eye. Eye damage is often painless, so there is no warning to
the observer that damage has occurred until it is too late. Do not point
the binocular at or near the sun.Children should always have adult
supervision while observing...............................................................
WARNING !
Never use a VistaPix to look at the sun !
Howtouseyourbinocular
Adjustment of eye-relief for eyeglass wearers
Fold down the ru bbe r eyecups and pla ce them ag ain st y our gla sse s t o
get the be st vie win g re sult .
How To Use Your Binocular
Adjusting the eyepieces
The dis tan ce bet wee n your eye s is ca lle d in t er pup illa ry dis tanc e.
The in ter pup illa ry dis tanc e is dif fer ent from o ne p erson to a nother.
It is im p ortant to adju st to your in ter pu pilla ry dis tance bef ore usin g
your Vis t aPix :
- Hold Vis t aPix f ir m ly in t he n orm al vie win g posit io n.
- Adju st t he b arrels by pushin g togethe r or pullin g apart un til you se e a
sin gle c ir c le fie ld wit h bot h of yo ur eyes.
Focusing the Binocular
1. Set the Dio pte r Knob on und ers id e of Vis t aPix at it scente r
Poin t between + and - .
2. Choose an obje ct tha t is 10 met ers (30 ft) aw ay.
3. Lookin g wit h ju st your le ft e ye, rotate th e Center F ocu s Knob unt il
the o bje ct y ou a re vie win g is in b est fo cus .
4. Lookin g wit h ju st your rig ht eye , rotate t he Dio pter Kn ob u ntil t he
obje ct you a re v ie win g is in b est fo cus .
5. Vie w in g your o bje ct w it h both e yes , turn the Center Fo cus Kn ob t o
brin g it in b est fo cus .
Page 5
How To Use Your Camera
Attention!!:
* To extend battery life remove the batteries when not using the camera..
Failure to do so will result in losing pictures and dead battery after
several days.
* When batteries are removed, memory of pictures can maintain for 30
seconds. Batteries must be replaced within 30 seconds to avoid losing
pictures. Be sure VistaPix is OFF before replacing the batteries.
Inserting Batteries
Lift the battery compartment lid and insert two AAA size alkaline batteries.
Operation Instruction
Camera Functions Control
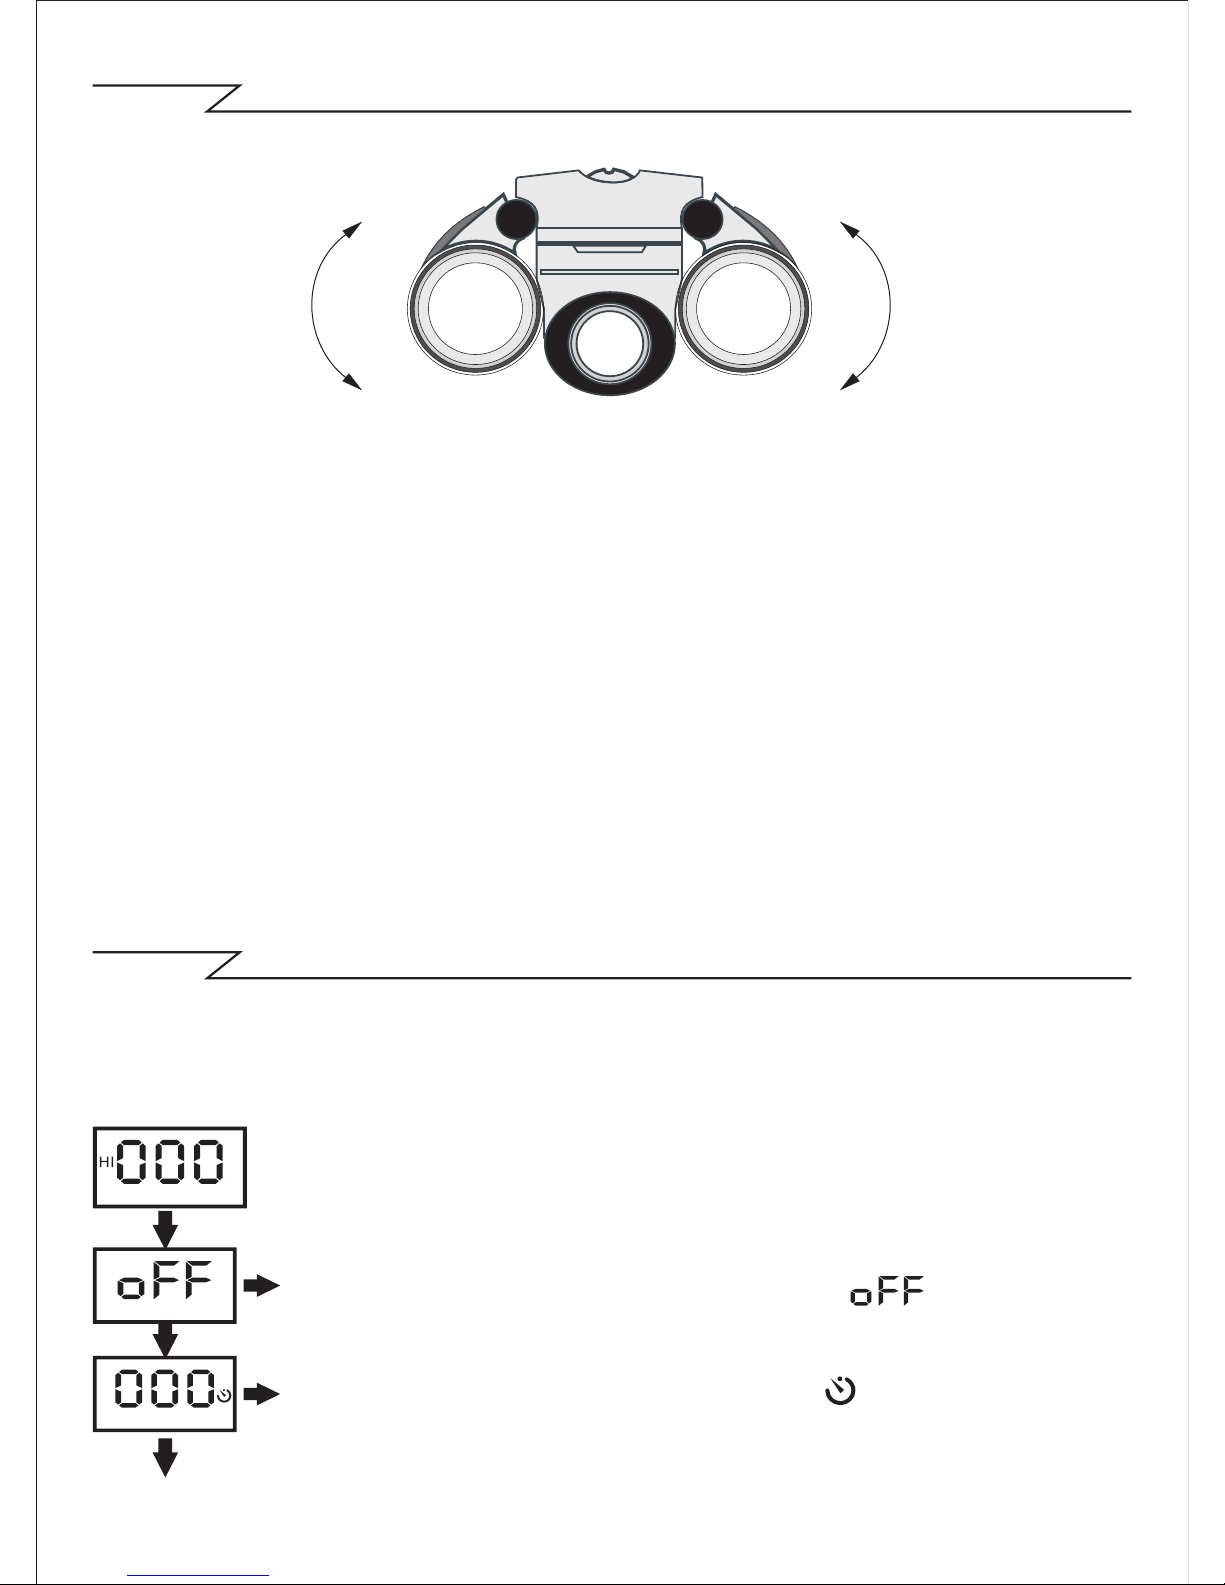
Pow er of f th e ca mera
Pre ss th e Fu ncti on b utto n to sel ect the“ ”shown on t he
LCD , the n pr ess the Shut ter butt on t o po wer o ff th e ca mera .
Aut o - S hoot Mod e
1.P ress the Func tio n but ton to s elec t“ ”sho wn o n th e LCD .
2.P ress the Shut ter butt on w ithi n 5 seco nds. The time r ru ns
fo r ab out 10 s econ ds b efor e the pho to i s ta ken.
Page 6

Operation Instruction
Taki ng 3 Pho tos C ont inuo usly
1.P ress the Func tio n but ton to s elec t“ ”sho wn o n th e LCD .
2.H old d own Shut ter butt on w ithi n 5 seco nds and it will t ake 3
pho tos c ont inuo usly. An d sa ved as jp g fo rmat .
Pho to R eso luti on S ele ctio n
The res olu tion status will a lway s s how on the LC D d ispl ay in
sma ll c har acte r.
1.P ress Fu ncti on butt on to s ele ct“ M ode” chara cte r sh own on
LCD ;
2.“ Hi” me ans VGA mode 640 *480 pi xels ,“ Lo ” mea ns QVGA
mod e 32 0*2 40 p ixe ls;
3.W hen you sel ect Mod e f unct ion, pr ess the sh utte r b utto n
onc e to sw itch be twee n t he Hi mode an d the L o m ode.
Ima ge Co mpr essi on / Proc essing M ode Shif t:
1.P ress Fun ctio n bu tton to s elec t th e ic on s hown on L CD.
2.P ress the shut ter butt on w ithi n 5 seco nds to s hift bet ween
Com pres sion (Hd) and ord inar y mo de(L d).
Flu ores cent La mp F req uenc y S elec tion
1.P ress th e Fu ncti on butt on to sele ct the“ 60” i con sho wn on
the LCD .
2.P ress th e Sh utte r b utto n w ithi n 5 se cond s t o s witc h t he i con
“60 ” to“ 50” .
Tips :“ 60 ” mea ns you are in 60H Z; If you pre ss shut ter but ton,
you wil l s witc h t o 5 0HZ. Ge nera lly spe akin g, ther e i s 6 0Hz
flu ores cent la mp freq uenc y u sed in Uni ted Sta tes, As ia. An d
50H z us ed in Japa n a nd Euro pe.
Del ete All Pho tos
1.P ress the Func tio n but ton to s elec t th e“ ”ico n sh own o n
the LCD.
2.P ress the Shut ter butt on t he L CD w ill flas h. P ress the
Shu tter But ton a gai n wit hin 5 se cond s to del ete all t he
pho tos s tor ed in the mem ory.
Del ete S ing le Ph otos
1.P ress the Func tio n but ton to s elec t th e“ ”ico n sh own o n
the LCD.
2.P ress the Shut ter butt on o nce with in 5 sec onds to dele te
the last pho to.
Con tinu ous Shoo t Mod e
1.P ress the Func tio n but ton to s elec t“ ”sho wn o n th e LCD .
2.P ress and hold the Shu tter but ton with in 5 sec onds .
Not es: U nde r the con tinu ous shoo tin g mod e, t he p hoto s ar e
all take n in QVG A mode and can be down load ed i ndiv idua lly.
Page 7

SOFTWARE INSTALLATION
You mu st in sta ll th e P ho to Imp re ss ion a n d dri ve r b ef or e d own lo ad ing
t he p h o t o s .
1. Please put the software CD int o yo ur c omp uter an d th e in sta ll m enu
will be displa yed automatical ly a s show n be low:
. .... . . . . . . . . . .... . . . . . . . . . .... . . . . . . . . . .... . . . . . . . . . .... . . . . . . . . . .... . . . . . . . . . ....
... ... ........... ... ... ... ... .........
2. Click t he ico n In sta ll Pho toI mpr ession, t hen follo w th e belo w st eps to
install it.
Page 8

SOFTWARE INSTALLATION
3. Click t he ico n In sta ll Dri ver, t hen follow th e install ati on direct ion s to
install it.
Tips
Do not connect the camera to your computer during installing software.
If the install menu does not appear on your screen automatically ,
follow the steps below.
1. Place the CD into your CD-ROM drive.
2. Press the "Start" button on your computer and select’’Run’’.
3.Enter E:\autorun.exe (If E is your CD-ROM drive letter).
4. Follow the directions of the installation.
You can use the Funhouse software to edit or print the photos.
Click Install Funhouse to install it per your request.
Page 9

DOWNLOAD PHOTOS
Please follow the steps below to download the photos.
1. Connect your camera to computer with USB cable .
2. Double-click the PhotoImpression icon on your desktop.
3. Click the Camer a / Scanner button.
4. Click the icon.
5. Select the photo you want to view and click OK.
6. Click Save.
7. Click Save As.
8. Input the file name and select the file type.
Click Save to save your photo.
Step 3
Step 5
Step 4
Step 6
Page 10

Tip:
‧Your photos downloaded will be automatically saved at the folder
\\My Documents\MyPictures\ .
DOWNLOAD PHOTOS
Step 7 Step 8
Page 11

PC CAM FUNCTION
Functions Introduction
Sources :You can set the Brightness,Cotrast and the other camera controls
Select “Default” and press “OK”.
Format : You can adjust the resolution and the color mode of images;
the color mode is suggested to select [RGB-24].
Live : You can browse real-time videos or images.
Capture: When you play live videos,click and select this function to
acquire the single picture and store it in the album.
Done : Finish the PC Camera Functions.
5. Click Live to start browsing.
6. Click Done to finish browsing.
■
Browse Live
1.Connect your camera to the computer with the USB cable correctly.
2.Double-click the PhotoImpression icon on your desktop.
3.Click the icon Camera/Scanner.
4.Click the Video Camera symbol . You will see the dialog box
displayed as below.
■
Page 12

If your operation system is Windows XP, you may need to
take the following steps.
1. Connect your camera to the computer with the USB cable.
2. Double-click My Computer icon on the desktop.
3. Double-click DaulCamera icon .
You can browse live via your camera now.
4. Click Take a New Picture button. The picture you are browsing will
be captured.
5. Select the picture you captured, click Copy this file to save your
picture.
6. Select the place you want to copy this photo, then click Copy.
PC CAM FUNCTION
Page 13

Troubleshooting
For Taking Photos
Q:There are color spots or stripes layers and segments on my photos.
A: This is caused by camera`s internal program loop, the factors might be
caused from using the non-alkaline or low batteries. Please turn off
all the power. (including USB cable and batteries), then turn on after
10 seconds.
Q: Why my photo was blurred?
A: The camera was shaking during shooting. Please hold the camera
steadily.
Q: There is shadow on my photo, what`s the reason?
A: Maybe the lens of camera was obscured by your hand or strap during
shooting. Please make sure the lens was not obscured while shooting.
■
Page 14

Troubleshooting
For Downloading Photos
Q: Can I connect the camera to the computer when I install the driver?
A: No, the camera should not be connected when installing the driver.
Q: After I finished installing the software, when I download the photos from
my camera, there is an icon showing no photos in camera ? .
A: First make sure that you have taken photos already, then check the total
number of the photos showing on the camera`s LCD.
Please also check if the USB cable is connected to your computer and
camera correctly. If it still does not work, please do the following steps:
If your O/S (oper ating system) is Win XP or Win 2000
(1) Open [Device Manager] (Select [My computer] on the Desktop,
Press right key/Properties/Hardware/Device Manager?)
(2) Select [Action] [Scan for hardware changes]
If your O/S is W in 98SE or W in ME
(1) Open [Device Manager] (Select [My computer] on the Desktop,
Press right key/Properties/Device Manager)
(2) Press right key/[Refresh]
Q: The camera can`t work after connection, there`s a yellow mark !
showing at Device Manager/Imaging devices/ DaulCamera
A: Due to a conflict of the computer`s peripheral, please follow below
steps:
(1)Select DaulCamera in [Device Manager]
(2)Press right key/[Uninstall] (If OS is WIN98SE or WIN ME, Press right
key/[Remove])
(3)Remove USB cable
(4)Restart Computer
(5)Re-plug USB cable
Q: After finished installing software and connect the camera to the
computer, in device manager there`s unknown USB device .
A: Please check if your camera was connected to your computer correctly,
if it was, please do the following steps:
(1)Unload driver
(2)Re-install driver.
■
“ ”
“ ”
“ ”
 Loading...