

Page 1
®
VistaPix™
8x32
Binocular
&
igital
Model
#72216
User Guide
Camera
Page 2

&
autions
utions
·
Never
Remove
detergent.
when
•
Takethe
•
Avoid
immerse
it is
dropping
Warning:
•
Avoid
• Do
lead to
•
Please
it
· Keep
using
not
look
blindness.
take
around
the
batteries
VistaPixinto
dust
orstains
Keep in a
not
used.
batteries
undercombustibility
at
the sun with the Binocular,
carewhen
theirnecks
product
or
silica
dry
outwhen
theVistaPix.
and
away
gels into
with a
and
VistaPix
using
bodiesto
from
small
theirmouth.
any
cool
Do
fluidor
soft
cloth
dampened
dust-free
isnot
not
disassemble
gas
environment.
thecarrying
avoid
children
liquid.
environment
to
beused
which
strap,
danger
will
anddo
to
preventthem
with
water
over
VistaPix.
damage
not
due
to
improperoperation.
orneutral
or a container
along
letchildren
from
the
period.
eyes
even
putting
twist
the
Usage
•
Please
•
Please
time.
About
· Do
not
damage.
i.Places
2.0amp
3.Places
•
Please
•
Please
of
the
battery
always
remove
useAlkaline
usage
placethe
in
temperature
or
dusty
with
strong
do
notdisassemble
do
notdrop
batteries
product
places
electromagnetic
the
producton
Battery
when
underthe
higher
or
repairthe
not
than
(AAA
using
your
following
o
100C
field.
product
the
groundto
Alkaline
Battery)
VistaPix
environmentsto
toavoid
avoid
foriong
malfunction.
periods
avoid
malfunction.
of
any
Page 3
ontents
1.lntroduction......................................... ................. 1
2.Notice to user......... ... ......
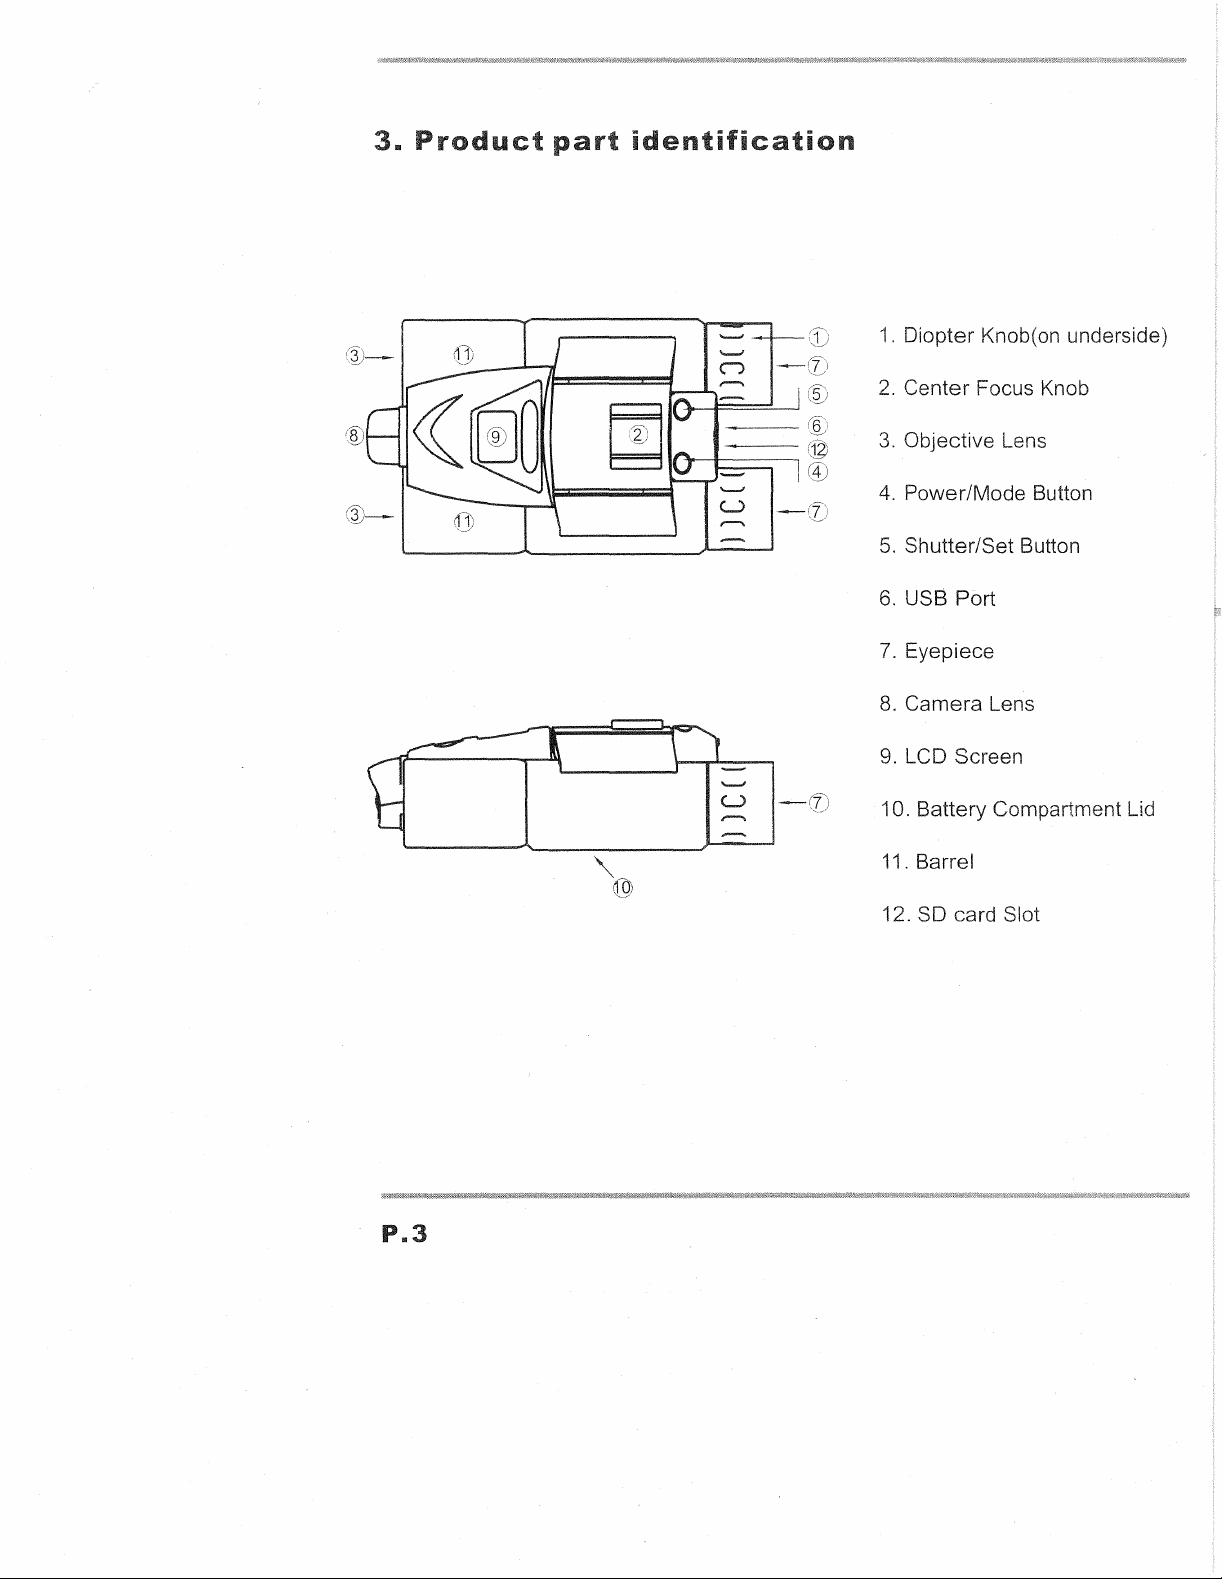
3.Product part identification.................................... 3
4.Memory
5.Digital camera modes.......... ..... ... ....... .... ............. 5
6.How to use the binocular..................................... 7
7.Using the camera.............................. .................. 8
8.System requirements.......................................... 9
9.Basic maintenance............................ ................
1 O.Driver software and image
downloading procedure........................... 11-- 14
11.Viewing (Movie) recorded imag
& Image Download............... .................. 4
...
......... ......... ............... 2
on
.......... 15
10
Page 4
u
VistaPix
sporting
bird-watching.
of a button.
images
VistaPix
images
family.
Battery
1.
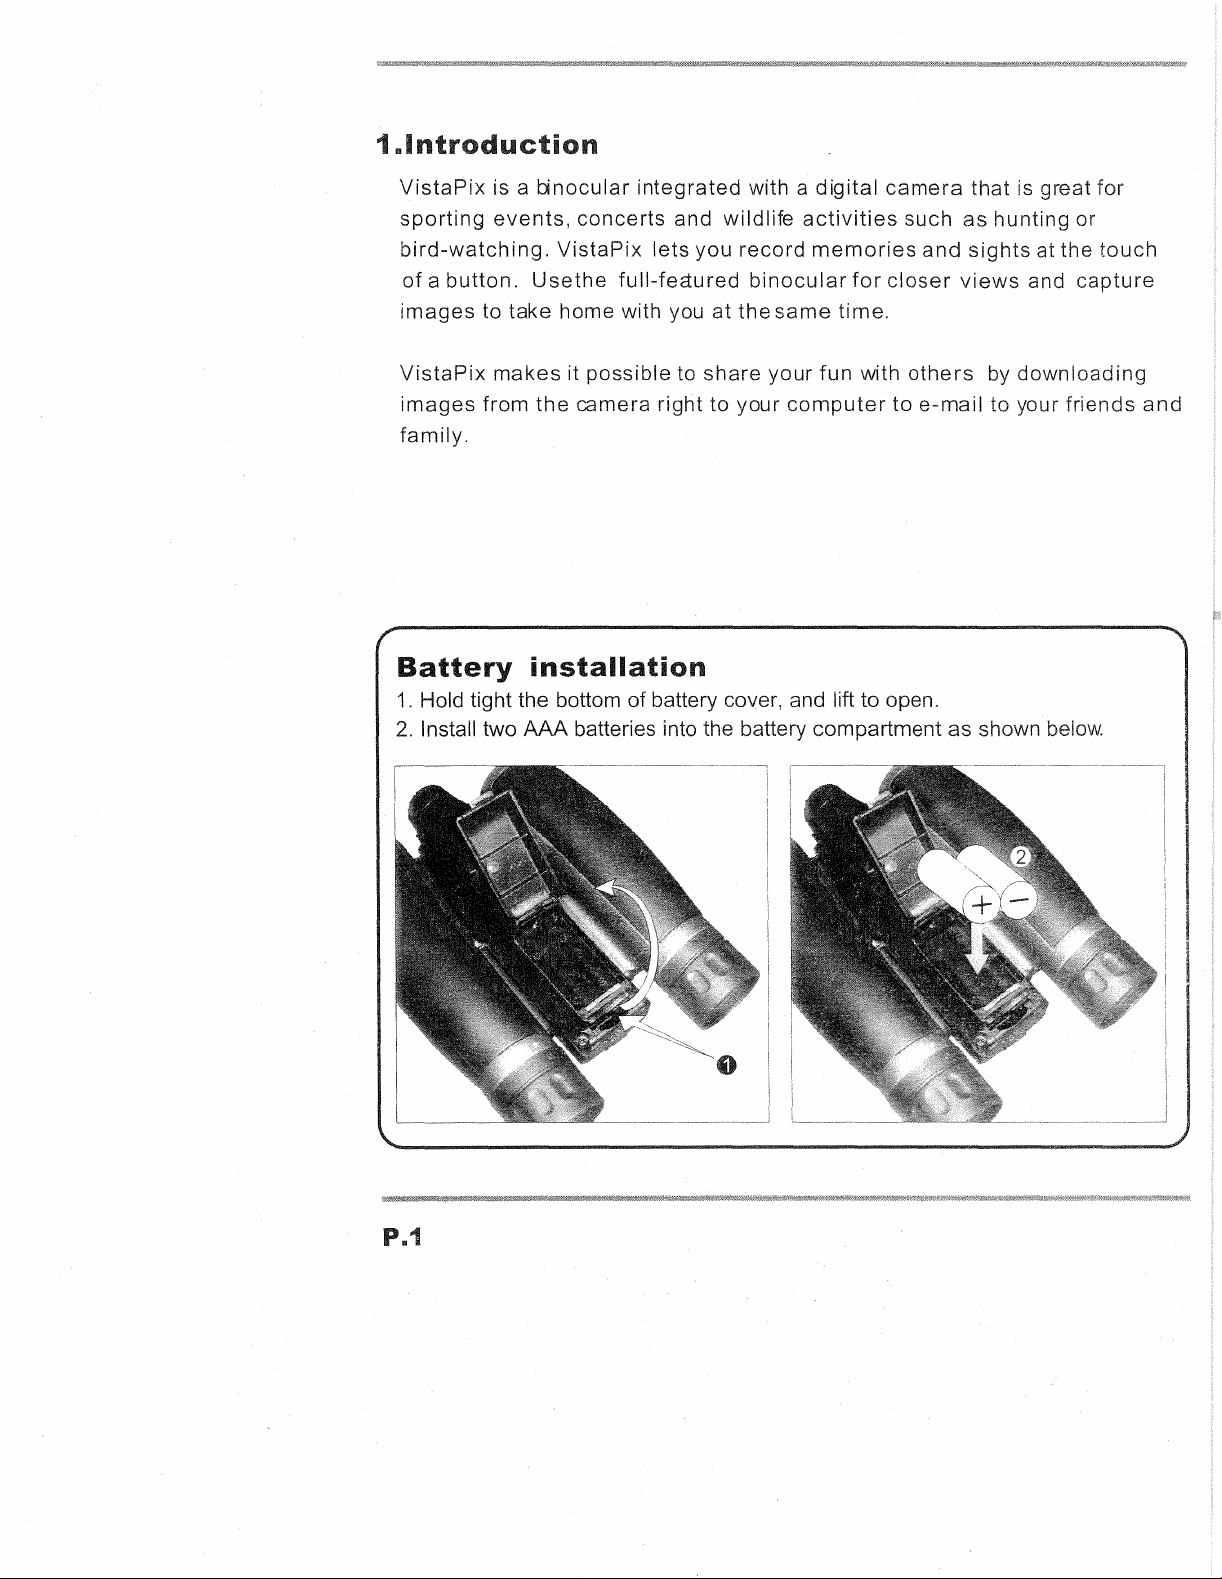
Hold tight the bottom of battery cover, and lift to open.
2.
Install two
is a
binocular
events,
to take home with you at
makes
from
concerts
VistaPix
Usethe
it
the
camera right to your
integrated
lets
full-fea:ured
possible
and
you
to
share
installation
AAA
batteries into the battery compartment as shown
with a
wildlife
record
binocular
the
same
your
digital
activities
memo
for
time.
fun
with
computer
camera
such
and
closer
others
to
e-mail
that
is great
as
hunting
sights
views
by
downloading
to your
at
and
below.
or
the
touch
capture
friends
and
Page 5
ce
2-1.
When
automatically
2-2.
The
the
Looking at or near the sun will cause instant and irreversible
to
the damage has occurred until it is too late. Do not
the binocular at or near the sun.
Children should always have
noaction
\/istaPix
LCD.
When
ser
Never
use a VistaPix
your
eye. damage is often painless, so there is no warning
is
performedwith
turn
offafter
has a
battery
the
battery
to
look
at
adult
supervision while Observing.
your
90
seconds.
level
display
is
low
you
will
the
sun!
binocular,
in
hear a long
the
damage
point
the
right
to
VistaPixwili
lower
"beep" . If
corner
of
no
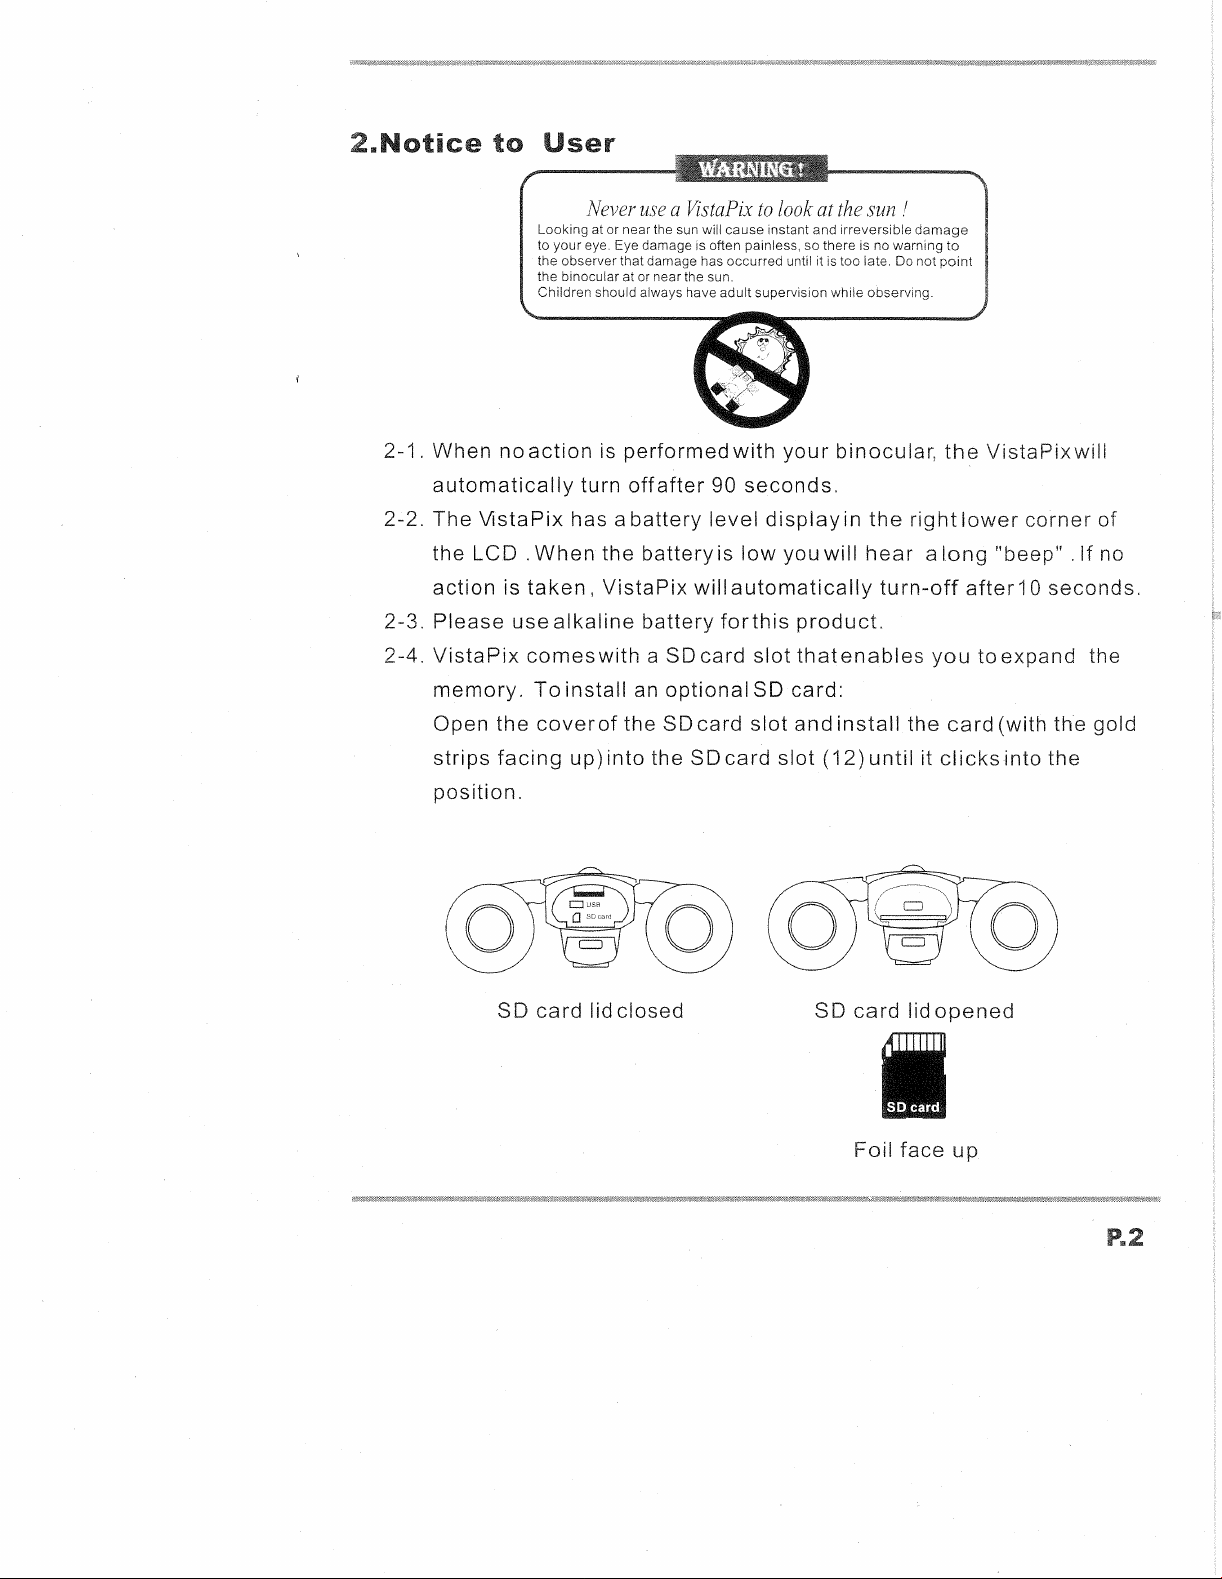
2-3.
2-4.
action
is
Please
VistaPix
memory.
Open
strips
the
facing
position.
SO
taken,
usealkaline
VistaPix
battery
will
comeswith a SOcard
To
install
coverof
up) i n t 0 the
card
lid
closed
an
optional
the SO
card
SOc
automatically
forthis
a r d
product.
slot
thatenables
SO
card:
slot
and
slot
(1
SO
turn-off
install
2 )
until
card
Foil
after1 0 seconds.
you
toexpand
the
card
it c I i c k
lidopened
face
up
the
(with gold
si
n t 0
the
Page 6
III
roduct
pa
ident
cation
1.
Diopter
Knob(on underside)
Center
2.
3. Objective Lens
4. Power/Mode Button
5.
Shutter/Set Button
6.
USB
7.
Eyepiece
8.
Camera
9.
Battery
10.
11. Barrel
12. SO card Slot
Focus Knob
Port
Lens
Screen
Compartment Lid
P
..
3
Page 7

sl
SD
The
ViewCatcherhas
images
the
will
memory
memo
be
saved
is full.
card
built
into
inflash
theflash
memory,so
memory
inside
when
your
youtake
ViewCatcher
im
,the
untii
Whenever
images
when
So
card
memory
Download
When
must
be
Download
Take
out
then
follow
can be
Download
Insert
downloading
downloaded.
(Once
to
use
you
taken
downloading
downloading
downloaded
the
downloaded.
the
SOcard
the
SO card
the
ViewCatcher
insertan
with
the
must
be
images
the
m
Internal
SO
card
the
downloading
Optional
and
steps
memory
optional
SO card and
the
images,
downloaded
photos,
separately.
(if
necessary)and
steps
connectthe
and
all
the
is full, you
until
SOmemory
flash
the
separately.
the
internal
and all the
card
to
photos
the
internal
card
memoryare
internalflash
memory
connect
photos
the
computer,
in
the
SO
can
remove
memory
totake
the
card
the
is
images,
stored
memo
and
the
VistaPix
in
the
then
memory
card
II
as
5e
andthe
card
to
the
internal
Ilow
the
can,be
and
continue
well).
the
memory
computer,
memory
Page 8

mera
4-1. Press the left button (Mode/Power Button) to scroll
Press right button(Shutter/Set Button)to select a
HI
n n n n
LO
C.f
0
00
FMT
Will
(I
0
Full display of mode icon.
0
~
of
[ High Resolution
mode
mode]
icons.
mode
(1600x1200)
[
Low
Resolution
mode]
(640x480)
[Optional
[ High Resolution
SO
Card
mode]
inserted]
(With card inserted)
through
or
to take images.
the Modes.
5
Low
[
Resolution
mode]
(With card inserted)
[
Self
timer
mode]
VistaPix will take an Image
[ Erase Last
[
Erase
Image
All Images
mode]
10
seconds.
Page 9

[ card
Format
mode ]
VistaPix will format card Images will
[ Continuous picture taking
(Video capture mode). Saves
[
>------<
,-
HI
,-
UI
Power
[ Mass Storage
When
I I
I
[SO card full mode]
0
When
off
mode]
mode]
connected to computer using
the
memory
-
[ SO card
)-----<
'------"
"FMT"
may
When no action
taking mode automatically after
warning]
will flash
if
VistaPix is unable to
need to be re-formatted.
is
performed
on
mode]
images
as an
cabie
wili display.
is full, the displays "Full"
access
the
card. SO card
each chosen mode, it will return to photograph
10
seconds.
Page 10

To
and
adjust
place
use
the
eye-relieffor
them
against
eyeglass
your
nocu
glasses
wearers:
to
get
the
Fold
best
down
viewing
the
rubber
result.
eyecups
Adjusting
The distance between
The interpupillary distance
It
is
important to adjust to your interpupillary distance before usingyour
VistaPix:
-
Hold the VistaPix firmly in the normal viewing position.
- Adjust the barrels by pushing together or pulling apart
circle field with both
A.
Set the Diopter Knob on underside
+ and - .
B.
Choose an object that is at least 15 meters (49.21 ft)
C.
Looking with
you are viewing is
D.
Looking with just your right eye, rotate the Knob until the object you are
viewing
E.
Viewing
best focus.
eyepieces
your
eyes
is
called interpupillary
is
different from one person to another.
of
your eyes.
of
Vista Pix at its
just
your left eye, rotate the Center Focus
in
best focus.
is
in
best focus.
your
object with both eyes, turn the Center Knob
center
distance.
until you
point between
away.
Knob
see
a single
until the object
to
bring it
in
Page 11

Use this product under good lighting conditions, avoid facing light source
directly. Remember to keep a distance of at least 49 feet (15 meters)
from the target when taking a photo. As you press the
hold the binocular very steady until you hear a
is
unsteady, the camera will not focus well and blurred
Photographic
6-1-1. Turn
6-1-2.
6-1-3. Select a target to view with the binocular, and aim at
6-1-4.
6-1-5. The digital counter
6-1-6.
6-1-7. The self timer function can be selected from the
Press the Mode/
Press the Shutter/Set Button (5) to take
sound indicating the picture has been taken.
When the camera's
To
erase the last image taken, use the Mode/Power Button
the
Button for 3 seconds.
Mode/Power Button (4). Press the Shutter/Set Button (5) to take
image after 10 seconds.
functions
on
Power by pressing the Mode/ Power Button (4)
Power
"erase last image" mode (trash can icon), and press theShutter/Set
Button (4)
on
the
memory
toselect
lCDwill
advance each time an image
is
full, the screen will
"Beep" sound. If the binocular
an
image.
"Shutter/Set" button,
images
the resolution mode CHi" orilla").
Ashort
display
LCD
the
will result.
3seconds.
target.
beep will
Full.
(4
)to select
by
using the
is
taken.
an
6-1-8.
6-1-9.
VistaPix
connected to a
hard drive" under the
disk to toretrieve, view and save images
When connected to a PC, the screen will display
If
at
"FMT" icon will flash. correct this the card
Formatted.
Press the Shutter/Set Button for 3 Seconds NOTE:This will erase
all images stored on the memory card.
is
a Mass Storage Device. This means that
PC
through the USB
"My
Computer" icon. Simply
any time VistaPix can not access the optional
To
format the
SO
card, select "SO card
port
Windows will
to
a permanent location.
while
access
SO
may
format
add
a "Removable
the removable
the
[PC] screen.
memory
need
to be
mode" and
card, the
Page 12

6-1-10.
VistaPix
record a video
mode:
-Use
-Press
-Press
has a
the
Mode/Power
the
Shutter/Set
the
Shutter/Set
continuous
stream
as an AVI file.
Button (4) to
Button (5) to
button again
picture
taking
select
begin
to
finish the
the
taking
video.
System
7-1.
Windows
7-2.
Pentium
7-3.
128MB
7-4.
Video(VGA)
7-5.
CD-ROM
7-6. USB
7-7.
600MB
Installation
Since VistaPix is a Mass
just
as if it were a hard drive, therefore no software driver is
Storage Mode
If using VistaPix with an
necessary to install the software Driver.
requirements
98SE
233MHzor
SDRAM
port
offreehard
/2000
card
of
).
/ ME
higher
with2MB
disk
driver
Storage
older
/XP
of
RAM
forminimum
space.
Device you can access
version of
Windows
16-bit(High
captured
98SE it
needed
may
be
Color)
images
display.
Mass
9
VistaPix
B
'---4DtJ
PC
with
USB
port
Page 13

C
Operating
non-condensing.
8
-1.Never
with a soft
and
8
-2.Take
period.
8 -3.
Avoid
Environment:
immerseVistaPix
cool
dust-free
the
batteries
dropping
r
cloth
41°t0104
into
dampened
environment
out
when
the
VistaPix.
°F(5°
anyfluid
with
VistaPixis
Do
to
water
when
notdisassemble
40°C).
or
liquid.
or
neutral
notin
not
20%-85%
use.
tobe
relatlvehum
movedust
detergent.
used
overa
VistaPix.
or
stains
Keep
long
in a
dry
o
Page 14

install
di
i
camera
binocula
1.Before
product
2.lf
you
computer,
Simply
1.
Insert
camera
2.
Click
the
begin
4.
Follow
guide
you
Click
on
you
install
to the
the
computer.
havewindows
youshould
view
andsave
the CD
installation.
included
binocular.
mouseon
the
"lnstaIlShieldWizard"
throughthe
"Next"when
"Installation
driver,
MEl
20001
not
needto
images
with
your
driver
complete.
installation.
please
do
XP
operation
install
throughyour
Digital
Driver"
steps
to
to
notuse
system
thedigital
My
3.
Begin
computer
the
5.
Computer
the
the
U
cable
installed
camera
binocular
Computericon.
"Install
installation
driver.
Shield
will
automatically
of
will
automatically
to
connectthe
in
your
driver.
Wizard
driverprogram.
ll
and your
execute
install
6.
If
the
appear
installing
"Yes"
11
"Microsoft
on the
the
button
driver,
to
digital
screen
please
continue
sign"
as you
installing.
request
are
press
7. I nstallation
"Finish"
*
After
installing
driver.
button
Please
complete.
digital
restart
Please
camera
your
computer.
press
binocular
Page 15

1. I
2.
Select
nsert
the
CD ROM.
"Install
Photo
Express".
3.
Choose
"Confirm"
the
language
button.
and
press
4.
Enter
6.
Press
installing
"Next"button
window.
to
confirm.
5.After
button.
7.
The
on
the
I
nsert
"Next"
confirming,
serialnumber
frontof
the n umber
button.
the
press
is
indicated
CD
a nd
IiNext"
cover.
press
12
Page 16

8.
Please
10.
Afterconfirming,
button
confirmthe
file
press
location.
"Next"
9.Press
11.
Begin
"Next"
installing
buttonto
software.
confirm.
12.
Afterconfirming,
button.
13
press
"Next"
13.
Press
Software
completed.
"Finish"
installation
button
when
Page 17

1.
Click Ulead Photo Express 5
'Choose the folder where you want
to save the images.
and select "Digital Camera".
3.
Double click the photo
Click "Get Photo"
to
start editing.
2.
Select "digital" to download the
images from the
Or select "Binocular" click "Get
Photo"
to
Press "Start"
4.
Click "Edit" bar and select the
editing feature.
and select "digital Camera".
download images from
built-in memory.
to
download images.
SO
card.
If
you
have
further
question,
http://www.ulead.com/
please
visit
Ulead
websi
di y
14
Page 18

ewing
1.
Use the USB cable to
After
(Movie)
connection
"PC"
record
connect
displays
the
USB port
on LCD.
images
from
on
to
VistaPix.
Double
2.
4.
Open
click"MY
\DCIM\1 OOscope\
COMPUTER"
3.
Double
5.
Select
double
through
software
click"Removable
thevideo
click
"Windows
or
file
(*.AVI) and
it, the
othersoftware.
video
Media
Device".
will
play
Player"
In
order
your
DirectX
from
going
www.microsoft.com/windows/directx/default.aspx
Follow
to use
VistaPix,
version
Media
to the
the
download
Playeryou
Microsoft
Windows
thecomputer
8.0a
Media
or
later.
can
DirectX
instructions
Player
viewing
If
you
upgrade
Web
given
to
viewthe
theAVlfile
experience
DirectX
Page at:
to
on the
the
web
P..15
videoAVI
needs
problems
tobe
most
site.
filetaken
running
viewing
current
The
download
with
Microsoft
AVI
files
version
by
isfree.
Page 19

Digital
Gamera
SRecifications
Resolution HI-1600x1200 / LO-640x480
Photograph
Image
Focus
Exposure
sensor
range
measure
HI-8 P / LO-20
CMOS sensor
1Sm(
49.21ft )-infinity
Auto
P(Built-in
8MB
White balance Auto
Memory
Memory slot
Battery
inside
8MB
Flash
internal memory
card
slot for expandability
alkaline battery x 2
AAA
Binocular sgecifications
Specifications
8
x32
mm
SD
RAM
memory)
Angular
Eye
field
Relief
of
viw
Coatings
Close
focusing
distance
Package Contents
USB
Cable
Software
Guide
Binocular
n;
System
1.
2.
3.
4.
minimum
Dimensions
.IWeig
Requirements:
Window
The
128MB
981
processor
SDRAM
Video(VGA)
16-bit
98SEI
above
card
(High
MEl
with
5.60 Field
92.7m(304
4.0
12.5
3.5
x1
xi
xi
156mm
2000/
Pentium
2MB
of
Color)
display.
of
mm
mm
m
x 1
02mm x 56mm
g
XP
233MHz
RAM
for
view:
ft)
at
914m(1000
YDS)
5.
CD-ROM
6.
USB
7.
600MB
disk
port
of
space.
free
hard
 Loading...