

Page 1
ENGLISH
INSTRUCTION MANUAL
MODEL 44856 / 44857
Page 2
reTrace™ Deluxe Interface
6
Turn the unit on by pressing and holding the POWER key for
3 seconds. Powering outdoors with a clear view of the sky will
ensure good quality GPS reception. If this is the first time you are
7
8
turning on your reTrace
™
Deluxe, the Compass window will appear.
1
2
5
9
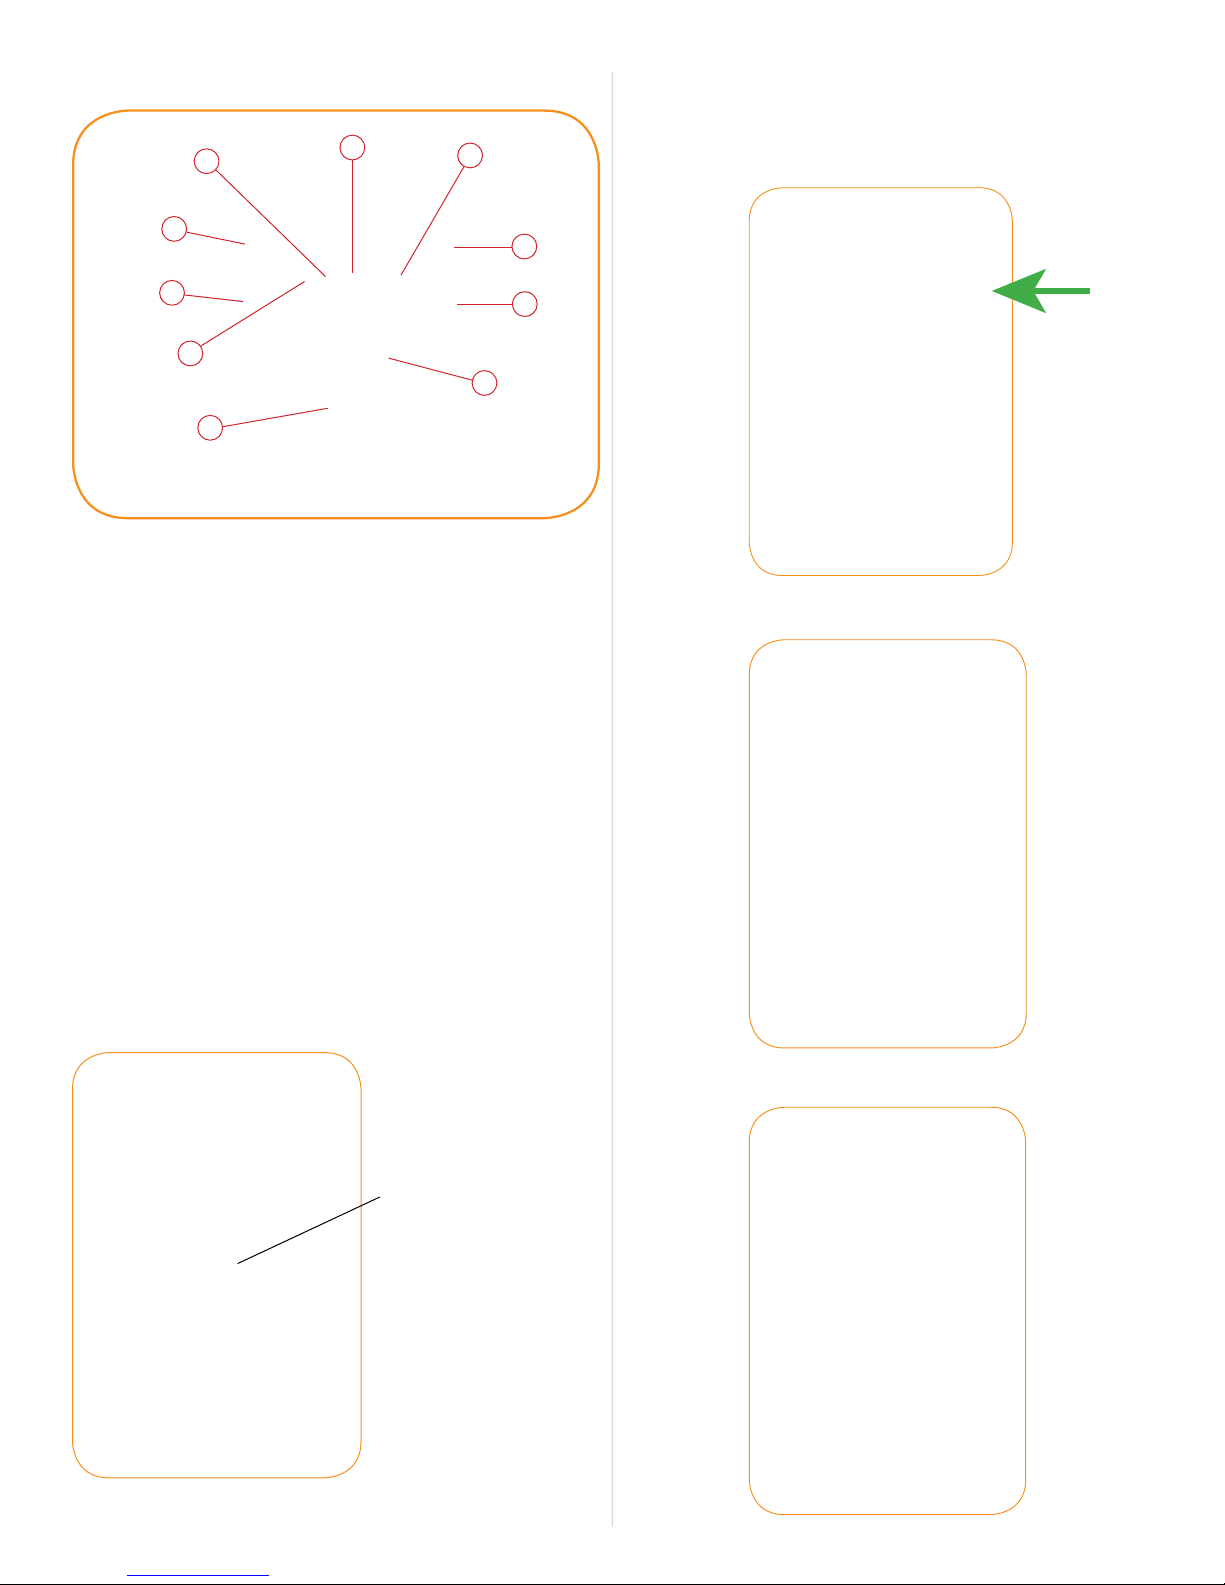
1. Scroll Key
2. Change Settings Key
3. Power Key
4. Set Key
5. Satellite Signal Strength Icon
6. Data Log Icon
7. Clock/Time of Day
8. Battery Status Icon
9. Latitude and Longitude Reading
10. Main Screen (Compass Mode Shown)
10
3
4
Start Up Page
INSTALL BATTERIES
Unscrew the latch on the back of your reTrace™ Deluxe to access
the battery compartment. Insert two “AAA” alkaline or lithium
batteries in the direction marked inside the battery compartment.
Replace cover and screw down securely. Replace the batteries
when the display’s “Battery” icon indicates low power.
2 AAA batteries
(not uncluded)
Compass Window
2
Page 3
I. COMPASS
II. WAYPOINTS/POINTS OF INTEREST (POIs)
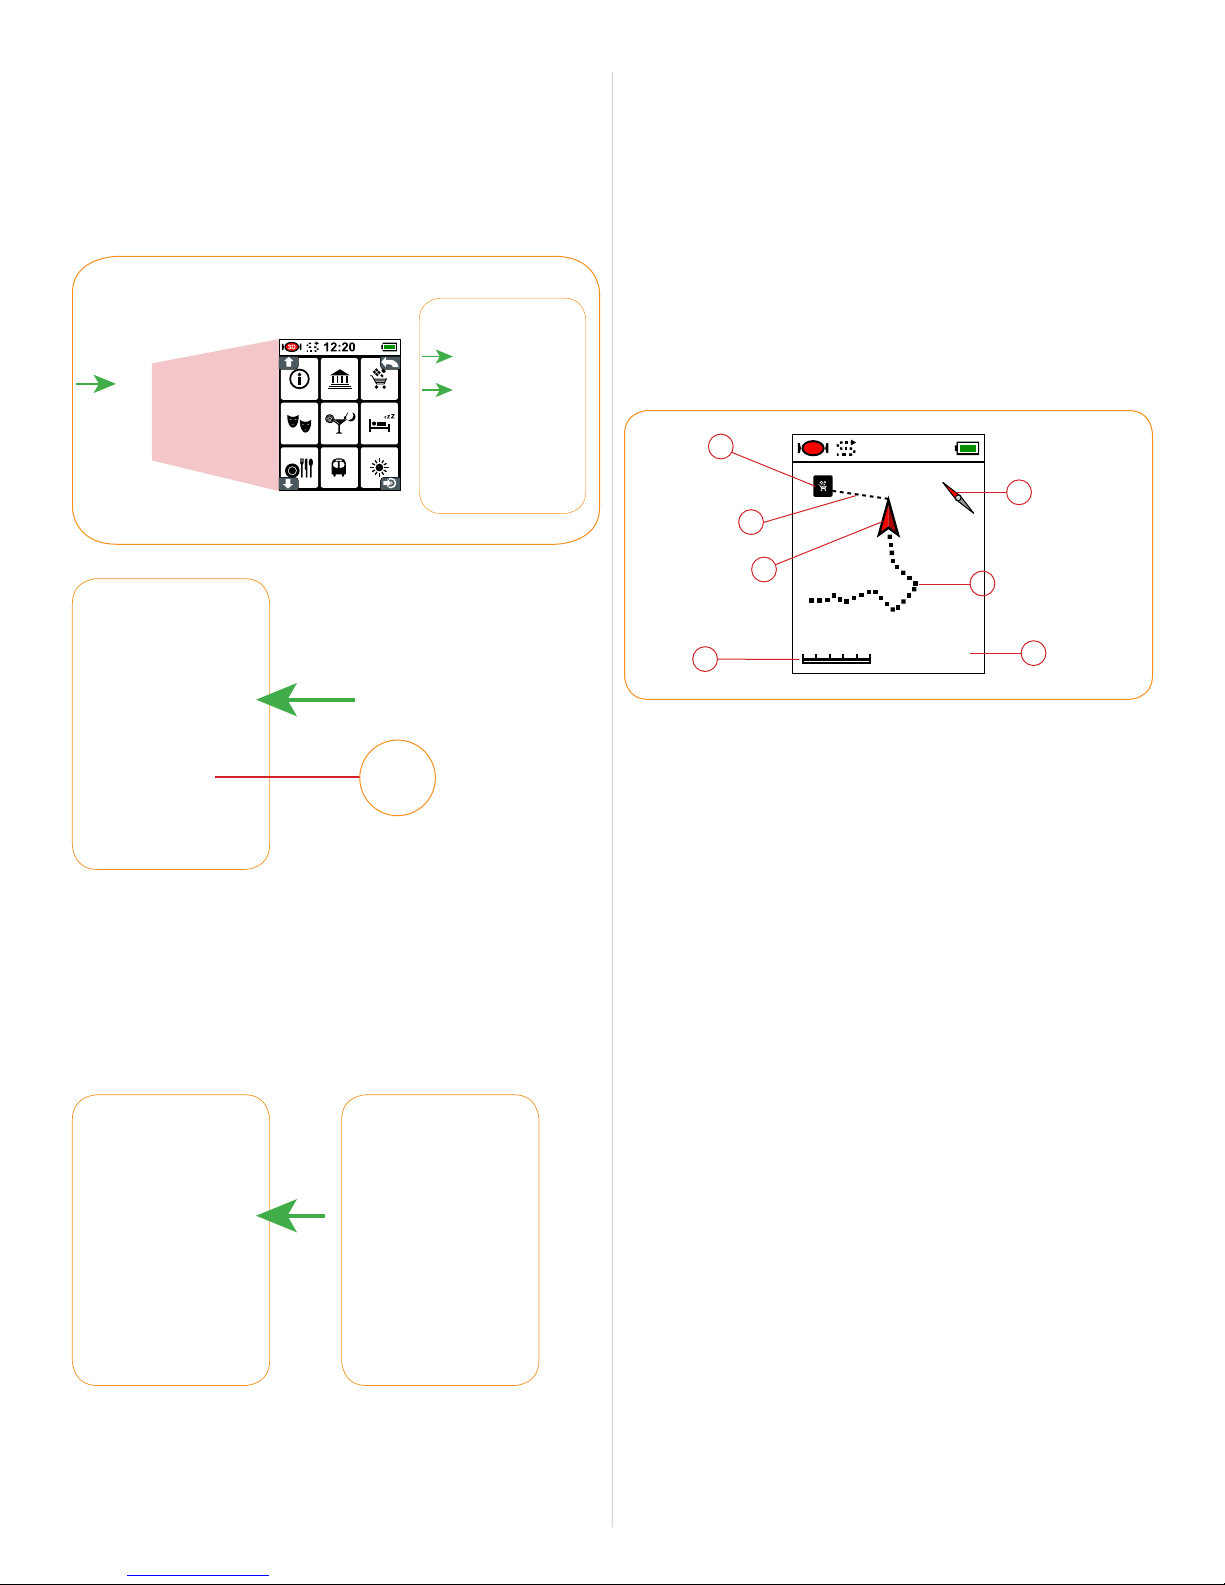
WAYPOINT PAGE ICONS
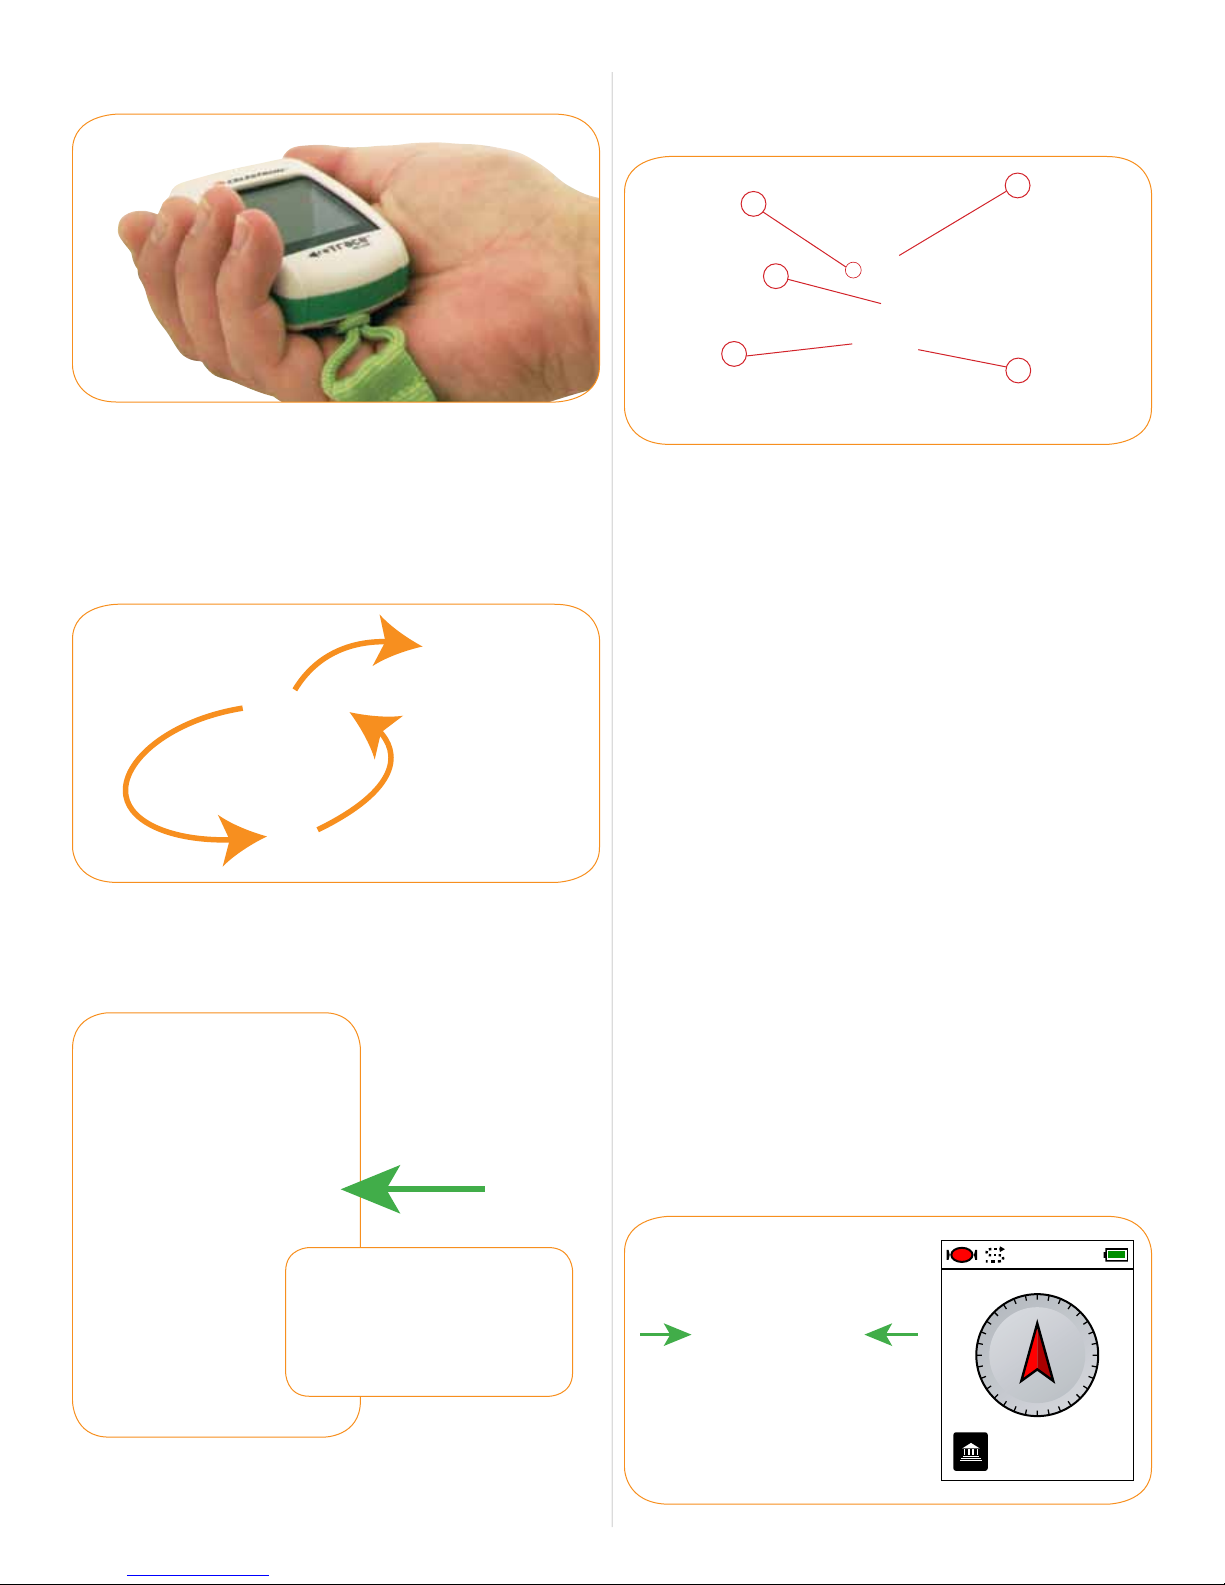
The Compass window is the default window when reTrace is
activated for the first time. Use it like a normal compass by holding
in the palm of your hand as level (parallel) with the ground as
possible. (This will ensure the most accurate reading.) The arrow
will always point to true North giving you your relative direction.
*NOTE: You may need to calibrate the compass. To do this, move
the compass in a “Figure 8” pattern a few times as shown below.
To see your current Latitude and Longitude reading, press and
hold the SET key. The reading will automatically go away 3
seconds after you release the SET key.
5
4
1
2
3
1. 32 Way Arrow – The 32 Way Arrow points in the direction of
your saved Waypoint or POI. If the GPS signal is not fixed, the
display will be empty. If the current window has no POI
assigned, the arrow with be gray.
2. Waypoint Icon- You can choose and store 20 unique Waypoint
Icons to help you keep track of your marked places. NOTE:
Waypoints are also referred to as POIs or Points of Interest.
3. Distance to Waypoint Display – This readout will display the
distance to your selected Waypoint. NOTE: This is the straight
line distance and does not reflect the actual distance you
have traveled. If the GPS signal is not fixed, the display will
look as follows: _ _ _._. The maximum distances are 0 to 1760
yards, 1-9999 miles, 0 to 1000m and 1 to 9999km.
4. Time – The time of day is displayed here.
5. Waypoint Number – The number you assign to your Waypoint
or POI.
The reTrace
of Interest (POIs) or Waypoints. In other words, by using your
reTrace
to your favorite locations – anywhere in the world. These could
be camping spots, fishing spots, a secret location, your favorite
restaurant or where you parked your car.
™
Deluxe allows you to save 20 unique Points
™
Deluxe, you will be able to retrace your steps back
SETTING YOUR WAYPOINTS/POIs
STEP 1. Assign A Number
When you are standing at your POI, the first thing you will do is
assign a number to this POI. Press the CHANGE SETTING key
and/or SET key to toggle through the numbers 1-20 in the upper
left of screen as described above.
Latitude and
Longitude Reading
3D
12:20
01
_ _._
3
yd
Page 4
STEP 2. Choose a Waypoint Icon
Once you are satisfied with the number, press and hold your
CHANGE SETTING key for 3 seconds to pull up your Select Icon
screen (A). Using your SCROLL and your CHANGE SETTINGS
keys, toggle through the different icons until you find the one you
like (B). Press the SET key once to record the change then press
again to return to the main screen
(C).
Page, toggle through and select the saved waypoint number, then
look at the direction of the arrow and the displayed distance.
From the Waypoint screen, press the SCROLL key to get to the
next screen. If you have a POI open, the next page will be the
Trail Monitor page. If you don’t have a POI selected, the next
page with be the Temperature and Altitude screen.
III. NAVIGATING
TRAIL MONITOR PAGE
This powerful extra layer of detailed positional information is
displayed in a simple, easy to read format and gives the user
a host of visual tools to help in pinpointing their position
and orientation.
(A) (B)
(C)
STEP 3. Mark the Spot
You are now ready to set your POI or “mark” the spot, saving the
coordinates in the device’s memory. Press and hold the SET key
until the display reads 0.0
It’s that simple. The coordinates are now saved. As you move away
from the marked spot, you will notice the distance on the screen
increase, and the arrow will point back in the direction of the
freshly marked POI. When you want to retrace your steps and find
your way back to any POI you have saved, just go to the Waypoint
A
3D
12:20
E
B
C
D
12m
A. Waypoint / POI or Trail Head Icon
B. Distance Line:
Shows direct distance from your position
12.8yd
F
G
to the marked POI or trailhead
C. Position Arrow: Shows your position relative to trailhead,
your orientation, and direction you are traveling
D. Scale Setting: Scale setting auto adjusts depending on
your distance
E. Compass Needle: Points North, helping to determine your
direction and position relative to the POI
F. Data Log Trail: Dotted line showing the path taken
relative to the POI. This is based on recorded GPS
data points
G. Distance to POI: Numeric display gives straight line
distance to the POI
There are 2 modes that the Trail Monitor Page is used for.
1. POI or Waypoint Mode: The Trail Monitor page automatically
tracks your ‘trail” when a POI or waypoint is selected. In this
mode it is not recording the trail, but giving extra information to
the user by displaying the trail you have taken with all the
curves and bends. It also displays the mini compass arrow, the
straight line trail to the POI, the distance from the POI and a
scale reading.
2. Trail Data Recording: This is the hidden power of the reTrace
Deluxe. Depending on the time interval settings (see Data
Log Period setting – in Settings section) the reTrace
can save from 14 hours to 50,000 hours of data! That’s not
a misprint. The design of the reTrace
user to choose the recording interval, which is from 1 second
to 3600 seconds (or 1 hour), making this possible. What
is a data point, you ask? A data point is a snapshot of your
™
Deluxe allows the
™
Deluxe
™
4
Page 5

geographical position and the conditions around you at
10688
ft
70.81
F
12:20
3D
E
D
A
C
B
mb
3688
3D
12:20
3D
A
B
C
a specific instant in time. This snapshot includes your
GPS coordinates, the time, the temperature, your altitude and
barometric pressure. This data is recorded and saved to
memory. Once uploaded to the computer through the reTrace
Deluxe software, the data points are strung together and this
makes up your data log. The information is displayed in graphs
and charts. The trail is overlaid on a Google
To set the reTrace
screen, press and hold the SCROLL key until the Data Log
icon is displayed on the top of the screen next to the clock.
Data
Log
Icon
Your trail data is now being recorded. To turn off the trail data
recording function, press and hold the SCROLL key until the
Data Log icon goes away.
From the Trail Monitor screen, press the SCROLL key to get to the
next screen – the Altitude and Temperature screen.
™
Deluxe to record trail data, while in any
®
map.
™
IV. ALTITUDE AND TEMPERATURE
THE ALTITUDE/TEMPERATURE PAGE
In this screen, the temperature and altitude are displayed
in easy to read large numbers. To change the units, go to the
Settings section.
From the Altitude and Temperature screen, press the SCROLL key
to get to the next screen – the Barometer.
V. BAROMETER
THE BAROMETER PAGE
A simple and clearly displayed chart showing both the change
in barometer pressure and the current barometer reading. The
chart is created by the pressure being recorded at specific time
intervals. The default time interval is 5 minutes. You can change
the recording time intervals through your settings. The units of
measure can also be chosen in your settings.
A. Barometer Data Chart: A graphical representation of the
barometric pressure. Maximum number of recorded points
is 120. Time between points is determined in Settings.
B. Barometer 4 Digit Value
C. Barometer Units of Measure: Mb=millibars, Hg=millimeters
of mercury
VI. SETTINGS
From the Compass page, hold the CHANGE SETTINGS key for
3 seconds. This will open up your Settings mode. Five windows
are accessible in the Settings mode. Each window is split
between two “set-able” functions. Using the SCROLL and
the CHANGE SETTINGS keys, toggle through the settings
windows. The windows will appear in the following order. (A red
background means that function is highlighted.)
A. Temperature Reading
B. Altitude Reading
C. Temperature Degree Icon
D. Temperature Unit (°F or °C)
E. Altitude Unit ( Ft-feet or M-meters)
TIME and
TEMPERATURE
5
HOURS and UNITS
OF MEASURE
Map data ©2011 Google
Page 6

4. Press SCROLL or CHANGE SETTINGS to toggle through
-12 -11 -10 -9 -8 -7 -6 -5 -4 -3 -2 -1 +1 +2
GMT
+3 +4 +5 +6 +7 +8 +9 +10 +11+12
the GMT settings until you find your setting number.
5. Press the SET key to make your selection. This will return you
to the setting window.
NOTE: GMT does not account for Daylight Savings. If you
are in the US and it is summer, add 1 hour to your setting.
For example, if you are located on the west coast, your GMT
setting would be -8:00. To account for daylight savings, add
1:00 to show the correct setting of -7:00.
ALTITUDE UNITS and
AUTO POWER OFF
BACKLIGHT AUTO
OFF and ALTITUDE
BENCH-POINT
DATA LOG PERIOD
and BAROMETER
RECORD TIME
*To return to the Compass page, press the POWER key
quickly once.
a. Time Zone Setting
In order to guarantee an accurate clock reading for your reTrace™
Deluxe, the clock is based on GMT (Greenwich Mean Time). The
default setting is +8:00, which means most users will need to
adjust the time. This is a very simple undertaking. Follow these
steps:
1. Refer to the GMT Zone map below, find your zone and
its + or – setting.
2. Make sure time is highlighted red in the settings window.
3. Press your SET key. This will bring up a full window with the
clock setting of +8:00.
GMT Zones Map
b. Temperature Unit Setting
You can choose the temperature unit of measure here. The default
setting for the temperature unit is °F. Changing Unit Setting is
easy. With the Temperature Unit Setting window highlighted,
press your SET key once. °C should now be displayed. To go
back to °F, press your SET key again.
c. Time Format Setting
The default time format of the device is set to 12H. To change to
24H, press your SET key once. To go back to 12H, press your
SET key again.
d. Distance Unit Setting
You can set your distance unit settings between Metric and
Imperial Standards. The default Distance Unit is set to Yd (Yards).
To Change to M (Meters), press your SET key once. To go back
to Yd, press your SET key again. *Note: Your choices are Yd or M
only, but the reTrace
™
Deluxe will adjust the units based on your
distance from the POI and display them accordingly. For instance,
6
Page 7

if the unit of measure is set to M and you travel past 1000 meters,
the unit will automatically switch to Km (Kilometers). It will do the
same with feet and miles.
e. Altitude Unit Setting
The default Altitude Unit is set to Ft (Feet). To Change to M
(Meters), press your SET key once. To go back to Ft, press your
SET key again.
f. Auto Off
The default Auto Off time is set for 5 Minutes. You can set your
™
reTrace
Deluxe to turn off at 5, 10, 30 or 60 minutes as well
as stay always “on”. Press your SET key to toggle through the
choices.
g. Backlight On Setting
2. Manually set altitude: To manually set the altitude benchmark,
press the CHANGE SETTING key once to highlight the
Manual setting (finger) icon. Press the POWER key to open
the manual setting window. Using your SCROLL key or the
CHANGE SETTINGS keys, enter the height you would like for
your benchmark.
The most accurate way to set the benchmark is to be at sea
level and enter 0000 for the height. If this is not possible, there
are many online sources for acquiring your altitude benchmark.
Once you acquire your local benchmark, you need to go to that
spot and enter the altitude into your reTrace
i. Data Log Period Setting
™
Deluxe.
The default value for Backlight is “on”. You can adjust the timer to
5, 10, 15 and 30 minutes. Press your SET key to toggle through
the choices.
h. Altitude Benchmark Setting
In order for your altitude reading to be accurate, you need to set
the benchmark height. reTrace
™
Deluxe offers two ways to do this.
To pull up the choice window, press the SET key.
1. Set altitude using GPS: On the top of the screen is a satellite
icon with a number. This is the GPS altitude. This is a fairly
accurate reading of your height based on the GPS coordinates
and the air pressure reading from the unit. To select this
benchmark setting method, press the SET key.
The Data Log setting tells the reTrace™ Deluxe how often to
record data. This is a powerful tool that collects info about your
travels that can be saved and uploaded to the reTrace
™
Deluxe
software for analyzing. The default time for the Data Log Period is
5 seconds. Press your SET key to select and make changes. This
window appears:
Press your SCROLL and CHANGE SETTINGS keys to change
the digits to your desired number as described in previous
instructions. When finished, press the POWER key once to return
to the main screen.
j. Barometer Curve Record setting
To change the interval of barometric recording points, press your
SET key and choose 5, 10, 30 or 60 minutes. The default setting
for recording the barometer curve is 5 minutes.
7
Page 8

VII. DATA MAPPING SOFTWARE
Your reTrace™ Deluxe works with special software to give you a
robust online experience. Using the software, you can upload
all of your POIs and data of all your recorded trails which are
displayed on up-to-date Google
STEP 1. To download the software. Go to www.celestron.com
and navigate to your product. Follow this path: New Products>
reTraceDeluxe. This will take you to this screen:
®
maps.
This prompt will appear. Select “yes”.
Now all your information has been uploaded to the reTrace™
Deluxe software. Let’s go through the 3 different features and
tools the software offers.
1. WAYPOINTS AND POIs SCREEN
Your POIs will now show up on the map. You may have to zoom
in to see them.
STEP 2. Once the software is downloaded, open the software
on your PC. Next, using the included USB cord, connect your
™
reTrace
Deluxe to your PC. Make sure your device is turned on
and click the “Connect” button.
STEP 3. To load data from your reTrace™ Deluxe, click the “Load
from device” button.
You can now see your saved POIs displayed over a Google® map.
There are 3 map choices.
1 Map: A basic roadmap (shown above)
2. Satellite: An up-to-date satellite photo
3. Terrain: A geographical map with shading showing
topographical details
You can also add Waypoints and save them to your device using
the reTrace
™
Deluxe software.
Here are two ways to do this:
1. Using the cursor:
– Right click any location on the map with your cursor.
This window will appear
Map data ©2011 Google
8
Page 9

– Select a Waypoint number for this location
– An icon will appear at this spot. To change the icon, right
click on it and a window with all 27 icons will appear.
Choose your new icon
– To save changes to your device, select “Send to device”
2. Using the search feature:
– At the bottom of the software window is a search box
– Type in a city, zip code, a complete address, a landmark
or latitude and longitude coordinates and press “search”.
That location will appear with a POI icon associated with
it. The more detail you provide, the more accurate the
location will be. You can change the POI icon by right
clicking and selecting a new one
In the calendar, any data logs you have recorded will be
highlighted in orange. To see the data, double click on the
highlighted day and each log will appear under the calendar. If you
double click one of the logs that appear, the information for that
log will be displayed on the map and in the chart area.
On the map are two new icons, the green box is the start of your
trail and the checkered box is the end. You will see your trail is
shown in a dark blue line that connects the two icons. By clicking
anywhere on the line the nearest data point will be displayed,
showing index number, the date and time, and the latitude and
longitude. There is also an option for adding a photo. To add a
photo, click the “add photo” link. Browse your computer and
select a photo. It will appear at that selected data point.
2. TRACK LOGS
Clicking on the Track Logs tab will open a new window in the
™
reTrace
Deluxe software. This window displays a calendar (A),
a small map (B), a window chart showing the altitude, temperature
and air pressure (C), and animation controls for animating your
track (D).
The reTrace™ Deluxe software comes with a “Play Back Your
Track” feature. Select the play button and watch as a Celestron
icon is animated, following your track. The controls allow you to
fast forward, rewind, pause and stop as well.
If you select the “Details” tab, the map screen will now change
to a very detailed breakdown showing the date and time, latitude
and longitude, altitude, air pressure and temperature for every
data point recorded in this trail.
Map data ©2011 Google
9
Page 10

Below the map and detail area is the chart area. Select a tab
to choose your temperature, altitude and barometric pressure
readings for the recorded trail.
To save your Track Logs to your computer, click the button
“Save to PC”.
Here you will see that you can:
A. Change the device settings
B. Backup the Track Log
C. Update your firmware
A. Changing the device settings: It’s as easy as selecting
each of the choices available. They are:
– Distance Units
– Temperature Format
– Time Format
– Data Logging interval
– Set your GMT time zone
– Set your Power Off time
– Set The Backlight Off time
– Set the Altitude benchmark or Offset
– Set the time interval for the Barometric pressure reading
When you are satisfied with your changes, click the save button.
The change takes place immediately.
B. Backup your Track logs:
– Click the backup button and browse to a folder to back up
C. Update your firmware:
– Occasionally new firmware will be released and available
on our website
– Download the new firmware from the website and save it
to a file on your computer
– Use this feature to browse to the folder and select
the update
3. DEVICE SETTINGS
The reTrace™ Deluxe software allows you to change the settings
for your device. First Click the Device Settings tab. This window
will appear.
Please read the Google™ Maps Terms of Service at:
http://maps.google.com/intl/en/help/terms maps.html
WARNINGS AND NOTICES
GPS SYSTEMS AND LOCATION ACCURACY NOTICE
The Global Positioning System (GPS) is operated by the
government of the United States of America, which is solely
responsible for its accuracy and maintenance. The system
is subject to changes which could affect the accuracy and
performance of all GPS equipment. The inherent nature of the
GPS system itself limits the accuracy of the distance indicated on
the reTrace Deluxe display to within roughly +/- 3 to 5 meters (or
yards) of the actual marked location.
WARNING
This device is intended as a supplemental handheld navigation
aide only. The user assumes all responsibility associated with the
use of this product. It must not be used for any purpose requiring
precise measurement of location, direction, distance, velocity,
or typography. This device should not be used for any aircraft
navigation applications.
VEHICULAR USE NOTICE
Celestron is committed to the safe and responsible enjoyment of
the outdoors. Do not use this product while driving. An accident
can result in property damage, injury, or death if the operator fails
to practice prudent driving practices. It is the sole responsibility
of the driver of any vehicle to operate the motor vehicle in a safe
manner. Information from the GPS unit can distract the operator
of a motor vehicle. It is unsafe to operate the controls of the GPS
Map data ©2011 Google
10
Page 11

unit while operating a motor vehicle. If used in a motor vehicle,
it must not be used by the operator of the motor vehicle. If it is
used in a motor vehicle, it must be mounted in a manner such
that it does not distract the operator, does not interfere with
the operator’s field of view, and does not block or interfere with
the air bags or other safety mechanisms of the motor vehicle.
Windshields and car windows with integrated metallic materials,
such as defrosters, or car window tinting films, can degrade the
GPS reception inside a car.
LIABILITY NOTICE
In no event shall Celestron be liable for any incidental, special,
indirect or consequential damages, whether resulting from the
use, misuse, or inability to use this product or from the defects in
the product. Some states do not allow the exclusion of incidental
or consequential damages, so the above limitations may not apply
to you.
Your Celestron reTrace has a Two Year Limited Warranty.
For detailed warranty information and to register your new product,
please visit our website: www.celestron.com
Designed and intended for those 13 years of age and older.
www.celestron.com
©2011 Celestron
2835 Columbia Street
Torrance, CA 90503 U.S.A.
Telephone: 310.328.9560 / Fax: 310.212.5835
 Loading...