

Celestron Regal F-ED 52301, Regal F-ED 52303, Regal F-ED 52302, Regal F-ED Instruction Manual
Page 1

Regal F-ED Spotting Scope Instruction Manual
ENGLISH
Congratulations on your purchase of a Celestron Regal F-ED spotting scope! Whether your interest is in sports, bird watching,
nature or wildlife, hunting, casual astronomy, or other activities these spotting scopes offer the finest optical quality to allow you
years of viewing and/or imaging pleasure.
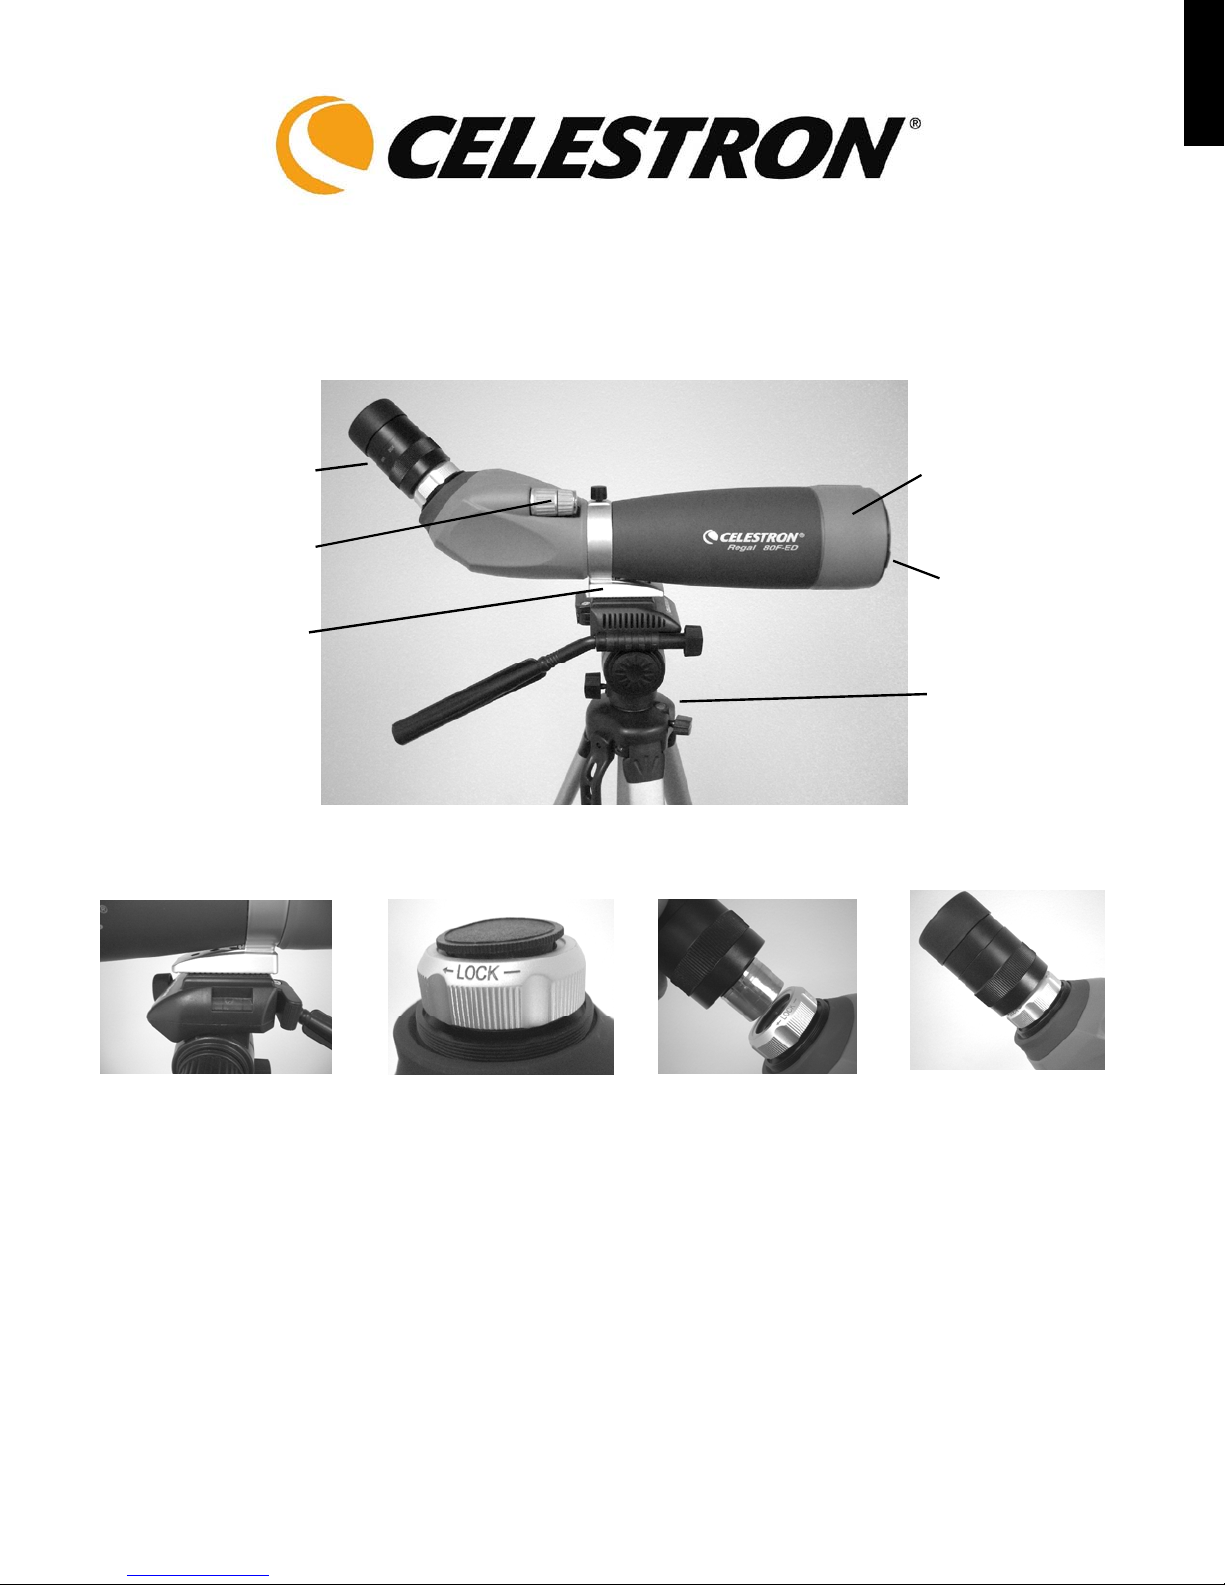
SCOPE
Zoom Eyepiece
Focus Knobs
Tripod
Adapter
Lens Shade
Lens Cap of
Objective Lens
Optional Photo
Tripod
Figure 1
Assembly of the Spotting Scope
Figure 2a Figure 2b Figure 2c Figure 2d
Attach your spotting scope to a photo/video tripod before trying to observe as the size and power of the spotting scope requires a
solid platform to be able to see sharp and steady views. For the Regal 100F-ED model a Tripod Balancing Platform should be
installed for optimum balancing on a tripod (see information later).
1. Remove all items from the carton.
2. Remove the spotting scope from its carrying case.
3. Remove the plastic bag from the spotting scope.
4. Remove the zoom eyepiece from its protective case and remove the cap from the chrome barrel end.
5. Attach the spotting scope to a photo/video tripod. – shown in Figure 2a. The tripod adapter (silver part) of the spotting
scope is attached to the tripod with the 1/4x 20 threads in the tripod head. Tighten securely.
6. Attach the zoom eyepiece to the spotting scope.
A. Remove the plug up cap from the Eyepiece Locking Collar -- silver part in Figure 2b.
B. Rotate the eyepiece locking collar counterclockwise.
C. Insert the chrome barrel end of the eyepiece all the way in to the eyepiece locking collar – Figure 2c.
D. Tighten securely the eyepiece locking collar by rotating it clockwise.
Page 2

Operating your Spotting Scope
Observing (Visual) Use
Warning Note: Never look directly at the Sun with the naked eye or with your spotting scope. Permanent eye damage
may result.
Remove the lens cap protecting the front objective lens of the spotting scope – see Figure 1.
Eyecup Setting
The zoom eyepiece has a twist-up type Eyecup. If you wear
eyeglasses,
the eyecup should be all the way down (turn
Eyecup
counterclockwise) as this will allow you to see the full field of
view. If you do not wear eyeglasses, normally the eyecup
Power Indicator
should be all the way up (turn clockwise). You can also use the
eyecup at any position between the full up or down position if
it is more comfortable for you.
Changing the Magnification (Power)
Figure 3
Knurled Ring
You can change the power by turning the Knurled Ring in either direction. The power will be shown on the indicator where it
up with the white line. You will have to refocus after changing the power. Remember that the brightest views with the
is lined
widest field of view will always be at the lowest power.
Focusing
Position Lock Knob
Your spotting scope has a dual focus knob system. Once you reach
with the large (coarse) focus knob, then you can use the fine
focus
focus knob (small one) to achieve a very sharp image. Rotate the
Dual Focus Knobs
coarse focus knob until the image in the eyepiece is clear and sharp.
You will have to refocus when changing power. Once you are
focused clearly on an object, turn the focus knob clockwise to focus
on a closer object and counterclockwise for a more distant object.
Figure 4
Viewing Position
The normal position for the spotting scope is shown in Figure 1. You may rotate the spotting scope to any position in a range
out 180° if it is more convenient for you. You rotate the spotting scope by unlocking the Position Lock Knob and turning
of ab
it clockwise. Then, rotate the spotting scope to the position you desire and then lock the position lock knob.
Sight Guide Line and the Lens Shade
You can use the Sight Guide Line (located on the Lens Shade) to aid you in locating your object. It may
difficult to use in the normal position of the spotting scope. It may be easier to use if you rotate the
be
viewing position slightly to enable better viewing with the sight line guide.
The Lens Shade pulls out and is useful to block unwanted glare and other reflections that can spoil your
view and/or image.
Figure 5
Optional Eyepieces
Your spotting scope was designed so that you could use optional 1.25” eyepieces. These type eyepieces are available from
Celestron
as well as from several other manufacturers. Extra eyepieces will allow usage of higher powers, wider fields of
view, and other factors. These type eyepieces will attach similar to how the zoom eyepiece is attached.
Page 3

Tripod Balancing Platform (for the 100mm model)
20 Threaded Hole
(not shown)
Locking Ring
This is used on the Regal 100 F-ED model to properly balance your spotting scope on top of a photo/video tripod.
¼"-20 Mounting Screw
¼"-
Mounting Screw
To use the tripod
balancing platform:
Mount the platform to the top of your photo tripod using the ¼"-20 threaded hole on the bottom side of the platform.
Attach your spotting scope to the platform using the ¼"-20 mounting screw located on the top side of the platform. Thread the
mounting screw in as far as it will go. Slide the attached spotting scope along the slotted cutout until your spotting scope is
balanced on the tripod. Tighten the locking ring to hold the spotting scope in place.
Photographic Use
SLR Cameras
To use your spotting scope for photography, you will shoot through the spotting scope with the zoom eyepiece attached. Make
sure the e
yepiece locking collar is secure during each stage of the setup.
Remove the eyecup from the top of the zoom eyepiece. With the eyecup down, rotate it counterclockwise to remove
it and the eyepiec
e will appear as in Figure 6a with exposed threads at the top.
Attach the T-Adapter (this is packed with the zoom eyepiece in its protective case) to the threads at the top of the
zoom eyepiece –
Figure 6b. Make sure the threads are positioned as shown.
Thread an optional T-Ring for your make and model of SLR camera onto the T-threads of the T-Adapter – Figure 6c.
Attach your SLR camera body to the T-Ring. – Figure 6d shows setup complete awaiting your SLR camera.
F-ED spotting scopes have fixed apertures and, as a result, fixed f/ratios. To properly expose your subjects
Regal
photographically, you need to set your shutter speed accordingly. Most SLR cameras offer through-the-lens metering which
lets you know if your picture is under or overexposed. Adjustments for proper exposures are made by changing the shutter
speed. Consult your camera manual for specific information on metering, changing shutter speeds, and other settings.
Hint: Most photos will be the sharpest and brightest when using the lowest power on the zoom eyepiece.
Figure 6a Figure 6b Figure 6c Figure 6d
Digital Cameras
Since digital cameras (not digital SLR cameras) do not use the T-system to mount cameras to lenses, spotting scopes,
telescopes,
etc. you need a different way to be able to use them to take photos. Celestron (and many other companies) offer
Universal Digital Camera Adapters which makes it easy to attach a digital camera to your Regal F-ED spotting scope.
However, many brands of digital cameras cannot obtain a centered image due to their lenses not being able to reach up to the
center of the eyepiece. In this case, you cannot use the Universal Camera Adapter but can only use your camera by holding it
behind the eyepiece for taking images.
Note: With many digital cameras, your image will be vignetted (gives you a circular image surrounded by black
background) w
hich is normal.
You will shoot through the spotting scope with the zoom eyepiece (or any optional 1.25” eyepiece) attached.
Page 4
Maintenance
To protect your spotting scope when not being used, put on all lens covers and the lens cap to keep the optics clean and then
put the scope in the soft carrying case. If your optics could use cleaning, use an optics cleaning kit and follow the instructions.
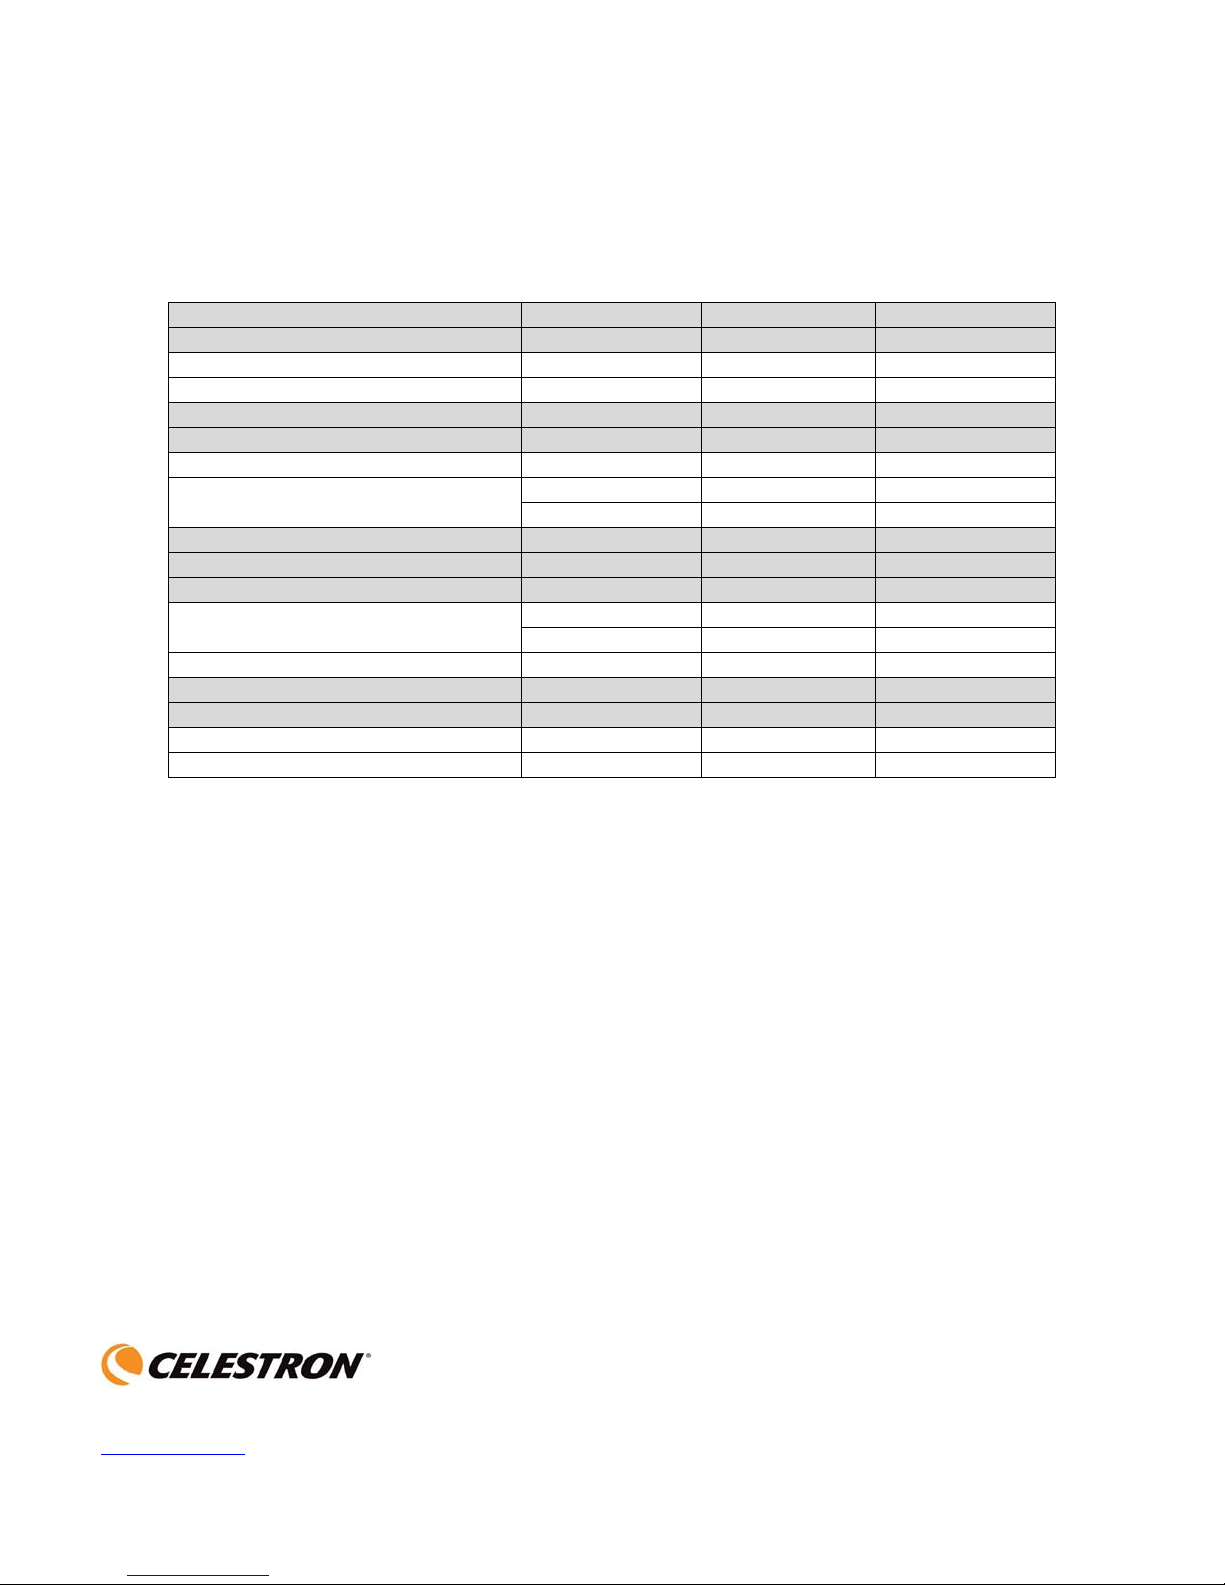
Specifications
Model 52301 52302 52303
Description
Viewing Position
Aperture - mm
Focal Length – mm / Focal Ratio
Magnification
Eyepiece - Zoom
Angular Field of View
Linear Field of View
- Feet @ 1000 yds. / meters @ 1000 m
Eye Relief
Near Focus
Prisms - BaK - 4
Optical Coatings
Waterproof
Length without eyepiece
Weight
Note: All Specifications are subject to change without notice.
Regal 65 F-ED Regal 80 F-ED Regal 100-F-ED
45° Angled 45° Angled 45° Angled
65 80 100
386 / f/6 480 / f/6 540 / f/5.4
16x-48x 20x-60x 22x-67x
8-24mm 8-24mm 8-24mm
2.6° @ 16x 2.1° @ 20x 1.9° @ 22x
1.3° @ 48x 1.0° @ 60x 0.9° @ 67x
136/45 @ 16x 112/37 @ 20x 100/33 @ 22x
68/23 @ 48x 56/19 @ 60x 50/17 @ 67x
20mm @ 16x 20mm @ 20x 20mm @ 22x
15ft @ 16x 20ft @ 20x 26ft @ 22x
4.6m @ 16x 6.1m @ 20x 7.9m @ 22x
Yes Yes Yes
Fully Multi-Coated Fully Multi-Coated Fully Multi-Coated
Yes Yes Yes
13" - 330mm 17" 61oz. – 1.7kg 72oz. –
432mm 20" -508mm
2.0kg 89oz. – 2.5kg
Warranty
Regal F-ED Spotting Scopes have the Celestron No Fault Limited Lifetime Warranty for the U.S.A. and Canadian customers.
For complete details of eligibility and for warranty information on customers in other countries visit the Celestron website.
2835 Columbia St.
Torrance, California 90503 U.S.A.
www.celestron.com
REV. 2 111808 ©2009 All Rights Reserved Printed in China 01-09
Page 5
Bedienungsanleitung für Regal F-ED Spotting-Scope
DEUTSCH
Herzlichen Glückwunsch zum Kauf eines Regal F-ED Spotting-Scopes von Celestron! Gleichgültig, ob Sie sich für Sport,
Vogelbeobachtung, die Natur, wild lebende Tiere, die Jagd, gelegentliche Astronomie oder andere Aktivitäten interessieren, diese
Spotting-Scopes bieten Ihnen die feinste optische Qualität, die Ihnen beeindruckende Beobachtungs- und/oder Bildgebungserlebnisse
über viele Jahre garantieren wird.
Zoom-Okular
Fokussierknöpfe
Stativ- Adapter
Gegenlichtblende
Kappe der
Objektivlinse
Optionales
Fotostativ
SCAbb. 1
Aufbau des Spotting-Scopes
Abb. 2a Abb. 2b Abb. 2c Abb. 2d
Setzen Sie das Spotting-Scope vor dem Einsatz für Beobachtungen auf ein Foto-/Videostativ; die physische Größe und Vergrößerung
des Spotting-Scopes erfordern eine robuste Plattform für scharfe und verwacklungsfreie Bilder. Für die Regal 100F-ED-Modelle
sollte eine Stativ-Nivellierplattform zur optimalen Ausrichtung auf dem Stativ installiert werden (siehe nachstehende Informationen).
1. Nehmen Sie alle Komponenten aus dem Karton.
2. Nehmen Sie das Spotting-Scope aus der Tragetasche.
3. Nehmen Sie das Spotting-Scope aus der Plastiktüte.
4. Entfernen Sie das Zoom-Okular aus dem Schutzbehälter und nehmen Sie den Deckel vom verchromten Ende der Steckhülse ab.
5. Setzen Sie das Spotting-Scope auf ein Foto-/Videostativ (siehe Abb. 2a). Der Stativadapter (silbernes Teil) des Spotting-
Scopes wird auf dem Stativkopf mit ¼ x 20 Gewinde installiert. Drehen Sie ihn fest auf.
6. Setzen Sie das Zoom-Okular auf dem Spotting-Scope auf.
A. Nehmen Sie den Verschlussdeckel vom Schließring des Okulars ab (silbernes Teil in Abb. 2b).
B. Drehen Sie den Schließring des Okulars gegen den Uhrzeigersinn.
C. Stecken Sie das verchromte Ende der Steckhülse des Okulars ganz in den Schließring des Okulars (Abb. 2c).
D. Drehen Sie den Schließring des Okulars fest, indem Sie ihn im Uhrzeigersinn drehen.
Page 6

Betrieb des Spotting-Scopes
Okular verfügt über eine herausdrehbare Augenmuschel.
Beobachtungen
Warnhinweis: Niemals mit bloßem Auge direkt oder durch das Spotting-Scope in die Sonne schauen. Sie könnten
permanenten Augenschaden davontragen.
Entfernen Sie die Schutzkappe vor der vorderen Objektivlinse des Spotting-Scopes (Abb. 1).
Okular-Einstellung
Das ZoomWenn Sie eine Brille tragen, sollte die Augenmuschel ganz eingezogen
Augenmusche
werden (gegen den Uhrzeigersinn drehen), da dies ein volles Gesichtsfeld
ermöglicht. Wenn Sie keine Brille tragen, sollte die Augenmuschel ganz
Vergrößerungsanzeige
herausgedreht werden (im Uhrzeigersinn drehen). Sie können die
Augenmuschel auch in jeder anderen Position zwischen der ganz
eingezogenen und ganz herausgedrehten Position verwenden, wenn das
Rändelring
eine bequemere Betrachtung ermöglicht.
Abb. 3
Ändern der Vergrößerung
Die Vergrößerung kann durch Drehen des Rändelrings in eine beliebige Richtung geändert werden. Die Vergrößerungskraft wird auf
der Anzeige durch Ausrichtung mit der weißen Linie angezeigt. Nach Veränderung der Vergrößerungsleistung müssen Sie die
Bildschärfe erneut einstellen. Das hellste und breiteste Sichtfeld erhalten Sie immer mit der geringsten Vergrößerung.
Fokussierung
Ihr Spotting-Scope weist ein doppeltes Fokussierknopfsystem auf.
Wenn Sie mit dem (großen) Grobtriebknopf eine Scharfstellung
Positionsfeststellknopf
erzielt haben, können Sie die Schärfe mit dem (kleinen)
Feintriebknopf noch verbessern. Zur Scharfstellung drehen Sie den
Grobtriebknopf, bis das Bild im Okular klar und scharf ist. Nach
Veränderung der Vergrößerungsleistung müssen Sie die Bildschärfe
erneut einstellen. Wenn Sie ein Objekt scharf eingestellt haben,
Doppelte
Fokussierknöpfe
drehen Sie den Fokussierknopf im Uhrzeigersinn, um ein näher
gelegenes Objekt anzuvisieren, und gegen den Uhrzeigersinn, um ein
weiter entferntes Objekt anzuvisieren.
Abb. 4
Betrachtungsposition
Die normale Position für das Spotting-Scope ist in Abb. 1 gezeigt. Sie können das Spotting-Scope auf jede Position in einem Bereich
von ca. 180° drehen, wenn das nützlich ist. Das Spotting-Scope wird gedreht, indem der Positionsfeststellknopf entriegelt und im
Uhrzeigersinn gedreht wird. Dann drehen Sie das Spotting-Scope in die gewünschte Position und verriegeln den
Positionsfeststellknopf.
Sichtführungslinie und Gegenlichtblende
Sie können die Sichtführungslinie (auf der Gegenlichtblende) verwenden, um die Lokalisierung eines Objekts
zu erleichtern. Ihre Verwendung in der Normalposition des Spotting-Scopes ist u.U. schwierig. Es ist
möglicherweise einfacher, die Betrachtungsposition leicht zu drehen, um eine bessere Betrachtung mit der
Sichtführungslinie zu ermöglichen.
Die Gegenlichtblende lässt sich herausziehen und ist nützlich, um eine unerwünschte Blendung und andere
Reflexionen zu blockieren, die die Ansicht und/oder das Bild beeinträchtigen können.
Abb. 5
Optionale Okulare
Ihr Spotting-Scope ist zur Verwendung optionaler 1,25 Zoll Okulare ausgelegt. Die Okulare sind bei Celestron und verschiedenen
anderen
Herstellern erhältlich. Zusätzliche Okulare ermöglichen die Verwendung von höheren Vergrößerungsleistungen, breiteren
Gesichtsfeldern und anderen Faktoren. Diese Okulare werden ähnlich wie das Zoom-Okular aufgesetzt.
Page 7

Stativ-Nivellierplattform (für das 100 mm Modell)
Befestigungsschraube
Diese wird mit dem Regal 100 F-ED-Modell verwendet, um das Spotting-Scope richtig oben auf einem Foto-/Videostativ auszurichten.
¼ Zoll -20
¼ Zoll -20
Gewindeöffnung
(nicht gezeigt)
Verwendung d
er Stativ-Nivellierplattform:
Installieren Sie die Plattform oben auf dem Fotostativ. Hierzu dient die ¼
Installieren Sie das Spotting-Scope auf der Plattform mit der ¼
Zoll-20 Befestigungsschraube, die sich an der Oberseite der Plattform
Zoll-20-Gewindeöffnung an der Unterseite der Plattform.
Feststellring
Befestigungsschraube
befindet. Schrauben Sie die Befestigungsschraube so weit wie möglich ein. Schieben Sie das installierte Spotting-Scope am
geschlitzten Ausschnitt entlang, bis das Spotting-Scope auf dem Stativ ausgewuchtet ist. Ziehen Sie den Feststellring fest, um das
Spotting-Scope festzustellen.
Fotografie
SLR-Kameras
Das Spotting-Scope kann für Fotos verwendet werden, indem Sie Fotoaufnahmen durch das Spotting-Scope mit aufgesetztem ZoomOkular machen. Stellen Sie sicher, dass der Schließring des Okulars in jeder Phase der Einrichtung festgestellt ist.
Entfernen Sie die Augenmuschel vom Zoom-Okular. Ziehen Sie die Augenmuschel ein und drehen Sie sie gegen den
Uhrzeigersinn. Das Okular sieht dann wie in Abb. 6a abgebildet aus, d.h. das freiliegende Gewinde ist oben.
Setzen Sie den T-Adapter (mit dem Zoom-Okular im Schutzbehälter verpackt) auf das Gewinde oben am Zoom-Okular auf
(Abb. 6b). Achten Sie darauf, dass das Gewinde wie gezeigt positioniert ist.
Schrauben Sie einen optionalen T-Ring für den Typ und das Modell Ihrer SLR-Kamera auf das T-Gewinde des T-Adapters
(Abb. 6c).
Setzen Sie dann Ihre SLR-Kamera auf den T-Ring. Abb. 6d zeigt die für die SLR-Kamera bereite Anordnung.
Regal F-ED Spotting-Scopes haben feste Blendenöffnungen und demzufolge feste f-Ratios. Um Ihre Objekte fotografisch richtig zu
belichten, müssen Sie Ihre Belichtungszeit entsprechend einstellen. Die meisten SLR-Kameras bieten „Through-the-lens Metering“,
so dass Sie wissen, wenn Ihr Bild unter- oder überbelichtet ist. Die Einstellungen für korrekte Belichtungen erfolgen durch die
Änderung der Belichtungszeit. Die spezifischen Informationen zur Lichtmessung, Änderung der Belichtungszeit und andere
Einstellungen können Sie in der Bedienungsanleitung Ihrer Kamera nachlesen.
Tipp: Die meisten Fotos sind am schärfsten und hellsten, wenn die niedrigste Vergrößerung am Zoom-Okular verwendet wird.
Abb. 6a Abb. 6b Abb. 6c Abb. 6d
Digitalkameras
Da Digitalkameras (nicht jedoch SLR-Digitalkameras) nicht das T-System zum Aufsatz von Kameras auf Objektive, Spotting-Scopes,
Teleskope etc. verwenden, brauchen Sie eine andere Option zu ihrer Verwendung zur Aufnahme von Fotos. Celestron (und viele
andere Hersteller) bieten Universaladapter für Digitalkameras an, die den Aufsatz einer Digitalkamera auf dem Regal F-ED SpottingScope erleichtern. Viele Digitalkameras verschiedener Hersteller können jedoch kein zentriertes Bild produzieren, weil ihre
Objektive nicht bis ins Zentrum des Okulars reichen. In diesem Fall können Sie keinen Universalkameraadapter verwenden, sondern
müssen Ihre Kamera hinter dem Okular halten, um Bilder aufzunehmen.
Hinweis: Bei vielen Digitalkameras ist das Bild vignettiert (rundes Bild, das von einem schwarzen Hintergrund umgeben ist).
Das ist no
rmal.
Sie nehmen die Fotoaufnahmen durch das Spotting-Scope mit aufgesetztem Zoom-Okular (oder einem optionalen 1,25 Zoll Okular) vor.
Page 8

Pflege
09
Um Ihr Spotting-Scope bei Nichtgebrauch zu schützen, setzen Sie alle Objektivabdeckungen und -deckel auf, um die Optik sauber zu
halten, und legen Sie dann das Spotting-Scope in die weiche Tragetasche. Wenn Ihre Optik gereinigt werden muss, verwenden Sie
ein Optik-Reinigungskit und befolgen Sie die Anleitung.
Technische Daten
Modell 52301 52302 52303
Beschreibung
Betrachtungsposition
Blendenöffnung - mm
Brennweite – mm / Öffnungsverhältnis
Vergrößerung
Okular - Zoom
Winkelsichtfeld
Linearsichtfeld
- Fuß bei 1000 Yards /m bei 1000 m
Augenabstand
Naheinstellung
Prismen - BaK - 4
Optische Vergütung
Wasserdicht
Länge ohne Okular
Gewicht
Hinweis: Alle Spezifikationen können ohne Mitteilung geändert werden.
Regal 65 F-ED Regal 80 F-ED Regal 100 F-ED
45° angewinkelt 45° angewinkelt 45° angewinkelt
65 80 100
386 / f/6 480 / f/6 540 / f/5,4
16x-48x 20x-60x 22x-67x
8-24 mm 8-24 mm 8-24 mm
2,6° bei 16x 2,1° bei 20x 1,9° bei 22x
1,3° bei 48x 1,0° bei 60x 0,9° bei 67x
136/45 bei 16x 112/37 bei 20x 100/33 bei 22x
68/23 bei 48x 56/19 bei 60x 50/17 bei 67x
20 mm bei 16x 20 mm bei 20x 20 mm bei 22x
15 Fuß bei 16x 20 Fuß bei 20x 26 Fuß bei 22x
4,6 m bei 16x 6,1 m bei 20x 7,9 m bei 22x
Ja Ja Ja
Mehrfach-Vergütung Mehrfach-Vergütung Mehrfach-Vergütung
Ja Ja Ja
330 mm (13 Zoll) 432 mm (17 Zoll) 508 mm (20 Zoll)
61 oz. – 1,7 kg 72 oz. - 2,0 kg 89 oz. – 2,5 kg
Garantie
US- und kanadischen Kunden wird für das Regal F-ED Spotting-Scope die Celestron eingeschränkte „No Fault“-Garantie auf
Lebenszeit gewährt. Umfassende Einzelheiten zur Qualifikation und Garantieinformationen für Kunden in anderen Ländern finden
Sie auf der Celestron-Website.
2835 Columbia St.
Torrrance, California 90503 USA
www.celestron.com
REV2 111808 ©2009 Alle Rechte vorbehalten Gedruckt in China 01-
Page 9

Manuale di istruzioni per lo spotting scope Regal F-ED
ITALIANO
Congratulazioni per il vostro acquisto di uno spotting scope Celestron Regal F-ED! Che siate interessati a sport, osservazione di
uccelli, natura, animali selvatici, caccia, astronomia dilettantistica o altre attività, questi spotting scope vi offrono l’ottica della
migliore qualità, per garantirvi anni di osservazioni e/o creazioni di immagini impagabili.
SCOPE
Oculare zoom
Manopole di
messa a fuoco
Adattatore per
treppiedi
Copri-obiettivo
Cappuccio
della lente
dell’obiettivo
Treppiedi fotografico
opzionale
Figura 1
Assemblaggio dello spotting scope
Figura 2a Figura 2b Figura 2c Figura 2d
Fissate lo spotting scope ad un treppiede per fotografia/video prima di cercare di eseguire le osservazioni, in quanto le dimensioni e la
potenza dello spotting scope richiedono una piattaforma sicura per permettervi di vedere in modo nitido e stabile. Per il modello
Regal 100F-ED, una piattaforma di equilibratura per treppiede va installata per equilibrare lo strumento su un treppiede in modo
ottimale (vedere le informazioni che seguono).
1. Togliete tutti gli articoli dalla confezione.
2. Togliete lo spotting scope dalla sua custodia di trasporto.
3. Togliete la borsa di plastica dallo spotting scope.
4. Togliete l’oculare zoom dalla sua custodia protettiva e il cappuccio dall’estremità del barilotto cromato.
5. Collegate lo spotting scope al treppiedi per fotografia/video. – mostrato nella Figura 2a. L’adattatore per treppiedi (la parte
color argento) dello spotting scope viene fissato al treppiedi con la filettatura ¼ x 20 nella testa del treppiedi. Fissatelo bene.
6. Collegate l’oculare zoom allo spotting scope.
A. Rimuovete il coperchio a tappo dal collare di bloccaggio dell’oculare – la parte color argento nella Figura 2b.
B. Ruotate il collare di bloccaggio dell’oculare in senso antiorario.
C. Inserite completamente l’estremità a barilotto cromato dell’oculare nel collare di bloccaggio dell’oculare – Figura 2c.
D. Fissate bene il collare di bloccaggio dell’oculare girandolo in senso orario.
Page 10

Funzionamento dello spotting scope
Anello zigrinato
Uso per l’osservazione (visiva)
Avvertenza: non guardate mai direttamente il sole ad occhi nudi o attraverso lo spotting scope, onde evitare danni permanenti
agli occhi.
Togliete il cappuccio della lente che protegge la lente dell’obiettivo anteriore dello spotting scope – vedere la Figura 1.
Approntamento del paraocchi
L’oculare zoom dispone di un paraocchi a torsione. Se indossate
occhiali
da vista, il paraocchi deve essere completamente abbassato
Paraocchi
(giratelo in senso antiorario), in quanto questo vi permette di
visualizzare l’intero campo visivo. Se non usate occhiali da vista, di
solito il paraocchi dovrà essere completamente alzato (giratelo in senso
Indicatore di
alimentazione
orario). Potete anche disporre il paraocchi in qualsiasi posizione fra
quella completamente alzata e quella completamente abbassata, se vi
risulta più a gevole.
Figura 3
Cambiamento del livello di ingrandimento (potenza)
Potete cambiare la potenza girando l’anello zigrinato in una direzione o nell’altra. La potenza verrà mostrata sull’indicatore dove è
allineato con la riga bianca. Dopo aver cambiato la potenza, dovrete rimettere a fuoco. Ricordate che le visualizzazioni più luminose
con il campo visivo più ampio saranno sempre alla potenza più bassa.
Messa a fuoco
Lo spotting scope dispone di un sistema a doppia manopola di
messa a fuoco. Una volta ottenuta la messa a fuoco con la
manopola di messa a fuoco grande (macrometrica), potete usare la
Manopola di bloccaggio
della posizione
manopola di messa a fuoco micrometrica (quella piccola) per
ottenere un’immagine molto nitida. Girate lentamente la manopola
di messa a fuoco macrometrica fino a quando l’immagine
nell’oculare non risulta chiara e nitida. Quando cambiate la
Manopola doppia di
messa a fuoco
potenza dovrete rimettere a fuoco. Una volta che abbiate messo a
fuoco chiaramente un oggetto, girate la manopola di messa a fuoco
in senso orario per mettere a fuoco su un oggetto più vicino, o in
senso antiorario per mettere a fuoco un oggetto più distante.
Figura 4
Posizione di visualizzazione
La posizione normale per lo spotting scope è illustrata nella Figura 1. Potete ruotare lo spotting scope su qualsiasi posizione in un raggio di
irca 180° se vi risulta più comodo. Ruotate lo spotting scope sbloccando la manopola di bloccaggio della posizione e girandola in senso
c
orario. Poi ruotate lo spotting scope sulla posizione desiderata e bloccate di nuovo la manopola di bloccaggio della posizione.
Riga di guida della visuale e copri-obiettivo
La riga di guida della visuale (situata sul copri-obiettivo) vi aiuta a individuare l’oggetto da visualizzare.
Potrebbe
essere difficile usarla nella normale posizione dello spotting scope. Potrebbe risultarvi più facile
usarla se ruotate leggermente la posizione di visualizzazione per poter eseguire le osservazioni usando la riga di
guida della visuale.
Il copri-obiettivo si tira in fuori ed è utile per bloccare la luce indesiderata e altri riflessi che possono disturbare
la vostra osservazione e/o l’immagine.
Figura 5
Oculari opzionali
Lo spotting scope è stato concepito per permettervi di usare oculari opzionali da 1,25 pollici. Oculari di questo tipo sono disponibili
presso C
elestron e svariati altri fabbricanti. Gli oculari extra vi permettono di usare potenze superiori, campi visivi più ampi e altro.
Gli oculari di questo tipo si collegano in modo simile all’oculare zoom.
Page 11

Piattaforma di equilibratura per treppiedi (per il modello da 100 mm)
Viene usata con il modello Regal 100 F-ED per equilibrare in modo adeguato lo spotting sui treppiedi da fotografia/video.
Vite di montaggio da ¼ poll.20
Vite di montaggio
Foro filettato da ¼ poll.-20
(non mostrato)
Anello di serraggio
Come usare la p
iattaforma di equilibratura per treppiedi
Montate la piattaforma incima al treppiedi da fotografia usando il foro filettato da ¼ di pollice -20 sulla parte inferiore della piattaforma.
Collegate lo spotting scope alla piattaforma usando la vite di montaggio da ¼ di pollice - 20 situata sulla parte superiore della
piattaforma. Avvitate la vite di montaggio fino a fine corsa. Fate scivolare lo spotting scope collegato lungo la fessura fino a quando
non risulta equilibrato sul treppiedi. Serrate l’anello di serraggio per tenere lo spotting scope in posizione.
Uso fotografico
Fotocamere SLR
Per usare lo spotting scope a fini fotografici, scatterete le foto attraverso lo spotting scope con l’oculare zoom collegato. Assicuratevi
che il collare d
Togliete il paraocchi dalla sommità dell’oculare zoom. Per farlo, abbassatelo e ruotatelo in senso antiorario; l’oculare apparirà
come nella
Collegate l’adattatore a T (nella confezione si trova con l’oculare zoom nella sua custodia protettiva) alle filettature sulla
sommità dell’o
Avvitate un anello a T opzionale per il modello e la marca della vostra fotocamera SLR sulle filettature a T dell’adattatore a T –
Figura 6c.
Collegate il corpo della fotocamera SLR all’anello a T. La Figura 6d mostra l’approntamento completo in attesa della fotocamera
SLR.
spotting scope Regal F-ED hanno aperture fisse e, di conseguenza, rapporti f/ fissi. Per esporre correttamente i soggetti dal punto
Gli
di vista fotografico, dovrete impostare di conseguenza la velocità dell’otturatore. La maggior parte delle fotocamere SLR offre una
gradazione visibile attraverso l’obiettivo che permette all’utente di sapere se l’immagine è sottoesposta o sovraesposta. Le regolazioni
per ottenere le esposizioni corrette vengono apportate cambiando la velocità dell’otturatore. Consultate il manuale della vostra
fotocamera per informazioni specifiche sulla gradazione, sul cambiamento delle velocità di otturazione e su altre impostazioni.
Suggerimento: in linea di massima, le fotografie risulteranno più nitide e luminose usando la potenza più bassa dell’oculare
dello zoo
i bloccaggio dell’oculare sia ben fissato ad ogni fase dell’approntamento.
Figura 6a con le filettature esposte alla sommità.
culare zoom – Figura 6b. Assicuratevi che le filettature siano posizionate come illustrato.
m.
Figura 6a Figura 6b Figura 6c Figura 6d
Macchine fotografiche digitali
Poiché le fotocamere digitali (non quelle SLR) non usano il sistema a T per il montaggio su obiettivi, spotting scope, telescopi e così via,
vrete bisogno di un metodo diverso per poterle usare per scattare fotografie. Celestron (e molte altre aziende) offre adattatori universali per
a
macchine fotografiche digitali, che facilitano il collegamento di una fotocamera digitale allo spotting scope Regal F-ED. Tuttavia, molti
marchi di fotocamere digitali non riescono ad ottenere un’immagine centrata perché i loro obiettivi non sono in grado di raggiungere il centro
dell’oculare. In questo caso, non si può usare l’adattatore universale per fotocamera, ma si può usare solo la fotocamera, tenendola dietro
l’oculare per acquisire immagini.
Nota: con molte fotocamere digitali, l’immagine risulterà vignettata (sarà un’immagine circolare circondata da uno sfondo
nero), e questo è
normale.
Scatterete attraverso lo spotting scope con l’oculare zoom (o qualsiasi oculare opzionale da 1,25 pollici) collegato.
Page 12

Manutenzione
09
Lunghezza focale
–
mm / Rapporto
Per proteggere lo spotting scope quando non viene usato, inserite tutti i coperchi ed i cappucci delle lenti per mantenere puliti i
componenti ottici, e mettete quindi il dispositivo nella sua custodia da trasporto morbida. Se i componenti ottici richiedessero la
pulizia, usate un kit apposito e seguite le istruzioni relative.
Dati tecnici
Modello 52301 52302 52303
Descrizione
Posizione di visualizzazione
Apertura - mm
Regal 65 F-ED Regal 80 F-ED Regal 100 F-ED
Angolata a 45° Angolata a 45° Angolata a 45°
65 80 100
focale
Ingrandimento
Oculare - Zoom
Campo visivo angolare
Campo visivo lineare
- Piedi/metri a 1000 iarde / 914 metri
Sollievo oculare
Messa a fuoco minima
Prismi - BaK - 4
Rivestimenti ottici
Impermeabile
Lunghezza senza oculare
Peso
386 / f/6 480 / f/6 540 / f/5,4
16x-48x 20x-60x 22x-67x
8-24 mm 8-24 mm 8-24 mm
2,6° a 16x 2,1° a 20x 1,9° a 22x
1,3° a 48x 1,0° a 60x 0,9° a 67x
136/45 a 16x 112/37 a 20x 100/33 a 22x
68/23 a 48x 56/19 a 60x 50/17 a 67x
20 mm a 16x 20 mm a 20x 20 mm a 22x
15 piedi a 16x 20 piedi a 20x 26 piedi a 22x
4,6 m a 16x 6,1 m a 20x 7,9 m a 22x
Sì Sì Sì
Multistrato
completo
Sì Sì Sì
330 mm (13 pollici) 432 mm (17 pollici) 508 mm (20 pollici)
61 once – 1,7 kg 72 once –
Multistrato
completo
Multistrato
completo
2,0 kg 89 once – 2,5 kg
Nota: tutti i dati tecnici sono soggetti a cambiamento senza preavviso.
Garanzia
Gli spotting scope Regal F-Ed sono coperti dalla garanzia limitata a vita Celestron di nessuna responsabilità da parte del cliente, per i
clienti statunitensi e canadesi. Per dettagli completi relativi all'idoneità e per informazioni sulla garanzia negli altri Paesi, visitate il
sito Web Celestron.
2835 Columbia St.
Torrance, California 90503 U.S.A.
www.celestron.com
REV 2 111808 ©2009 Tutti i diritti sono riservati Stampato in Cina 01-
Page 13

Manual de instrucciones del telescopio terrestre Regal F-ED
ESPAÑOL
enfoque
Le felicitamos por su compra del telescopio terrestre Regal F-ED de Celestron. Bien esté interesado en deportes, en observar aves o la
naturaleza, la fauna, la caza, e incluso en observaciones de astronomía ocasionalmente u otras actividades, estos telescopios le ofrecen
la mejor calidad óptica, garantizándole años de satisfacción en visualización y en obtención de imágenes.
Pieza ocular del
zoom
Botón de
Adaptador
del trípode
Visera del objetivo
Tapa del objetivo
Trípode para
fotos opcional
Figura 1
Ensamblaje del telescopio terrestre
Figure 2a Figura 2b Figura 2c Figura 2d
Coloque su telescopio en el trípode para cámaras de fotos o vídeo antes de observar, ya que el tamaño y la potencia del mismo requieren
una plataforma estable para poder disfrutar de una visualización clara y fija. Para el modelo Regal 100F-ED, se deberá instalar una
plataforma compensadora de trípode para obtener un equilibrio óptimo sobre el mismo (vea la información más adelante).
1. Extraiga todas las piezas de la caja.
2. Extraiga el telescopio del estuche.
3. Quite la bolsa de plástico al telescopio.
4. Retire la caja protectora del ocular de zoom y quite la tapa del extremo del tambor cromado.
5. Coloque el telescopio en un trípode para fotos o vídeo, como se muestra en la Figura 2a. El adaptador del trípode (pieza
plateada) del telescopio está conectado al trípode con roscas de 1/4x 20 en el cabezal del trípode. Apriételo bien.
6. Conecte el ocular del zoom al telescopio.
A. Retire la tapa del cuello de bloqueo del ocular (pieza plateada en la Figura 2b).
B. Gire el cuello de bloqueo del ocular hacia la izquierda.
C. Introduzca el extremo del tambor cromado del ocular hasta el final del cuello de bloqueo del ocular (Figura 2c).
D. Apriete bien el cuello de bloqueo del ocular girándolo hacia la derecha.
Page 14

Funcionamiento de su telescopio terrestre
Uso de observación (visual)
Nota de precaución: Nunca mire directamente al sol sin proteger adecuadamente sus ojos o con un telescopio terrestre. Los
ojos pueden sufrir daños permanentes e irreversibles.
Quite la tapa de la lente que protege la parte delantera del objetivo del telescopio (vea la Figura 1).
Posicionamiento del cilindro protector
El ocular de zoom tiene un cilindro protector de rosca. Si utiliza
el cilindro protector deberá estar completamente hacia
gafas,
abajo (gírelo hacia la izquierda), ya que esto le permitirá ver
todo el campo visual. Si no tiene gafas, el cilindro protector
debería estar completamente hacia arriba (gírelo hacia la
derecha). También puede utilizar el cilindro protector en
cualquier posición entremedia si es más cómodo para usted.
Cambio del aumento (potencia)
Puede cambiar la potencia girando el aro estriado en cualquier dirección. La potencia se mostrará en el indicador alineado con la
blanca. Tendrá que volver a enfocar después de cambiar de potencia. Recuerde que la visualización más nítida con el campo
línea
visual más amplio siempre será en la menor potencia.
Enfoque
Su telescopio terrestre tiene un sistema doble de botones de enfoque.
vez que enfoque con el botón grande podrá entonces usar el
Una
botón más pequeño para conseguir una imagen más nítida. Gire el
botón grande de enfoque hasta que la imagen en la pieza ocular se
vea con claridad y nitidez. Tendrá que volver a enfocar al cambiar
de potencia. Una vez enfocada claramente la imagen, gire el botón de
enfoque hacia la derecha para enfocar un objeto más cercano y hacia
la izquierda para enfocar uno más lejano.
Figura 3
Cilindro protector
Indicador de potencia
Aro estriado
Botón de bloqueo de
la posición
Doble botón de
enfoque
Figura 4
Posición de visualización
La posición normal del telescopio se muestra en la Figura 1. Puede girar el telescopio a cualquier posición hasta los 180º
aproximadamente
si es más conveniente para usted. Puede girar el telescopio desbloqueando el botón de bloqueo de la posición y
girándolo hacia la derecha. A continuación, gire el telescopio a la posición que desee y después fije el botón de bloqueo de la
posición.
Línea de guía visual y la visera del objetivo
Para ayudarle a localizar su objeto puede utilizar la línea de guía visual (ubicada en la visera del objetivo).
ser difícil utilizarla en la posición normal del telescopio. Puede ser más fácil si gira ligeramente la
Puede
posición de visualización para conseguir ver mejor con la línea de guía visual.
La visera del objetivo se expande y es útil para bloquear el resplandor que se quiere evitar y otros reflejos que
pueden entorpecer su visión o ver la imagen.
Figura 5
Oculares opcionales
Su telescopio terrestre ha sido diseñado para que pueda utilizar oculares opcionales de 1,25 pulgadas (31,8 mm). Estos tipos de
oculares
se encuentran disponibles a través de Celestron y otros fabricantes. Los oculares extra permiten el uso de mayores potencias,
campos visuales más amplios y otros factores. Estos tipos de oculares se incorporan de forma similar a los de zoom.
Page 15

Plataforma compensadora para trípodes (para los modelos de 100 mm)
Ésta se utiliza en el modelo Regal 100 F-ED para equilibrar correctamente su telescopio encima de un trípode para cámaras
fotográficas o de vídeo.
Tornillo de montaje de 6,35 mm
(¼ pulg.) -20
Orificio roscado de 6,35 mm
(¼ pulg.) -20 (no se muestra)
Rueda de bloqueo
Tornillo de montaje
Para utilizar la plataforma compensadora de trípode:
Acople la plataforma en la parte superior del trípode utilizando el orificio roscado de 6,35 mm (¼ pulgada)-20 en la parte inferior de
la plataforma.
Ajuste su telescopio a la plataforma utilizando el tornillo de montaje de 6,35 mm (¼ pulgada)-20 que se encuentra en la parte superior
lateral de la plataforma. Enrosque el tornillo de montaje hasta el final. Deslice el telescopio ya colocado a lo largo de la ranura hasta
que éste esté equilibrado en el trípode. Apriete la rueda de bloqueo para sujetar en su lugar el telescopio.
Uso fotográfico
Cámaras SLR
Si desea utilizar su telescopio para la fotografía, tendrá que tomar fotos a través del telescopio con el ocular de zoom conectado.
Asegúrese de que el cuello de bloqueo del ocular está asegurado durante cada fase de la preparación.
Quite el cilindro protector de la parte superior del ocular de zoom. Con el cilindro protector hacia abajo, gírelo hacia la
izquierda p
Conecte el adaptador en forma de T (éste está empaquetado con el ocular de zoom en su estuche protector) a las roscas de la
parte superio
Enrosque el aro opcional en forma de T (en el modelo de cámara SLR) en las roscas en T del adaptador en forma de T (vea la
Figura 6c).
Conecte su cámara SLR al aro en forma de T. La Figura 6d muestra la configuración completa para colocar su cámara SLR.
telescopios Regal F-ED tienen aberturas fijas y, como resultado de ello, las f/escalas también son fijas. Para exponer
Los
correctamente sus objetos fotográficamente, necesita establecer el tiempo de exposición de acuerdo a ellos. La mayoría de las cámaras
SLR ofrecen regulación por medio de la lente, lo cual le deja saber si la foto tiene exceso o insuficiencia de exposición. Los ajustes
para obtener una exposición apropiada se realizan al cambiar el tiempo de la exposición. Consulte el manual de su cámara para
obtener información específica sobre la regulación, el cambio del tiempo de exposición y otras configuraciones.
ara quitarlo y el ocular aparecerá como en la Figura 6a con las roscas expuestas en la parte superior.
r del ocular de zoom (vea la Figura 6b). Asegúrese de que las roscas estén puestas como se muestran.
Consejo: La mayoría de las fotografías tendrán la máxima calidad cuando se utilice la potencia menor en la pieza ocular de
zoom.
Figura 6a Figura 6b Figura 6c Figura 6d
Cámaras digitales
Como las cámaras digitales (excluyendo las de SLR) no utilizan el sistema en T en el montaje de las cámaras a las lentes, telescopios terrestres,
elescopios, etc., se necesita una forma diferente para poder tomar fotografías. Celestron (y muchas otras compañías) ofrecen adaptadores
t
universales para cámaras digitales, lo que facilita conectar una cámara digital a su telescopio Regal F-ED. No obstante, muchas marcas de
cámaras digitales no pueden obtener una imagen centrada debido a que sus lentes no pueden llegar al centro del ocular. En este caso, no puede
usar el adaptador universal para cámaras sino que sólo puede usar su cámara sujetándola por detrás del ocularpara tomar imágenes.
Nota: Con muchas cámaras digitales, su imagen aparecerá de forma circular rodeada de un fondo negro, lo cual es normal.
Tomará la imagen a través del telescopio con el ocular de zoom conectado (o cualquier ocular opcional de 1,25 pulg. [31,8 mm]).
Page 16

Mantenimiento
Para proteger su telescopio cuando no lo esté utilizando, colóquele todas las tapas y cubiertas de las lentes para mantener limpias las
piezas ópticas y ponga el telescopio en su estuche. Si sus piezas ópticas deben limpiarse, utilice un limpiador especial para dichas
piezas y siga las instrucciones de limpieza.
Especificaciones
Modelo 52301 52302 52303
Descripción
Posición de visualización
Apertura (mm)
Distancia focal – mm / Radio focal
Aumento
Pieza ocular - zoom
Campo visual angular
Campo visual lineal
Pies a 1000 yardas / metros a 1000 m
Distancia entre la pupila y el ocular
Enfoque a corta distancia
Prismas - BaK - 4
Recubrimiento óptico
A prueba de agua
Longitud sin ocular
Peso
Nota: Todas las especificaciones están sujetas a cambios sin notificación.
Regal 65 F-ED Regal 80 F-ED Regal 100-F-ED
En ángulo de 45° En ángulo de 45° En ángulo de 45°
65 80 100
386 / f/6 480 / f/6 540 / f/5,4
16x-48x 20x-60x 22x-67x
8-24 mm 8-24 mm 8-24 mm
2,6° a 16x 2,1° a 20x 1,9° a 22x
1,3° a 48x 1° a 60x 0,9° @ 67x
136/45 a 16x 112/37 a 20x 100/33 a 22x
68/23 a 48x 56/19 a 60x 50/17 a 67x
20 mm a 16x 20 mm a 20x 20 mm a 22x
15 ft a 16x 20 ft a 20x 26 ft a 22x
4,6 m a 16x 6,1 m a 20x 7,9 m a 22x
Sí Sí Sí
Total multi
recubrimiento
Sí Sí Sí
13 pulg. – 330 mm 17 pulg.
61 oz. – 1,7 kg 72 oz. –
Total multi
recubrimiento
– 432 mm 20 pulg. -508 mm
2 kg 89 oz. – 2,5 kg
Total multi
recubrimiento
Garantía
Los telescopios terrestres Regal F-ED tienen la garantía limitada de responsabilidad objetiva durante la vida útil del producto de
Celestron para los clientes de EE.UU. y Canadá. Para obtener todos los detalles sobre el derecho de los clientes y la información
sobre la garantía en otros países, visite el Sitio Web de Celestron.
2835 Columbia St.
Torrance, California 90503 EE.UU.
www.celestron.com
REV 2 111808 ©2009 Todos los derechos reservados Impreso en China 01-09
Page 17

Manuel de l’utilisateur de la longue-vue Regal F-ED
FRANÇAIS
Nous vous félicitons d'avoir fait l’acquisition d’une longue-vue Regal F-ED Celestron ! Que vous vous intéressiez aux sports ou à
l'observation des oiseaux, de la faune et de la flore, à la chasse, à l’astronomie ou à d’autres occupations, ces longues-vues offrent la
meilleure qualité optique garantie pour en profiter des années lors de vos séances d’observation ou d’imagerie.
Oculaire zoom
Boutons de mise
au point
Adaptateur
de trépied
Figure 1
Assemblage de la longue-vue
Paresoleil pour
objectif
Cache de la lentille
de l’objectif
Trépied photo
(en option)
Figure 2a Figure 2b Figure 2c Figure 2d
Fixez votre longue-vue sur un trépied pour photo/vidéo avant de vous en servir pour toute forme d’observation étant donné que la taille
et la puissance de grossissement de la longue-vue nécessite un trépied solide pour obtenir des images nettes et fixes. Pour les modèles
Regal 100F-ED, il convient d’installer une plate-forme de stabilité pour trépied afin d’obtenir un équilibre optimal du trépied (voir
informations ci-dessous).
1. Retirez tous les éléments du carton.
2. Sortez la longue-vue de son étui de transport.
3. Retirez le sac en plastique de la longue-vue.
4. Retirez l’oculaire zoom de son étui protecteur, ainsi que le cache situé sur l’extrémité du barillet chromé.
5. Fixez la longue-vue sur un trépied photo/vidéo. – voir Figure 2a. L’adaptateur de trépied (pièce argentée) de la longue-vue se
fixe au trépied au moyen d’un filetage ¼ x20 dans la tête du trépied. Serrez fermement.
6. Fixez l’oculaire zoom sur la longue-vue.
A. Retirez le cache de la bague de blocage de l’oculaire -- pièce argentée illustrée en Figure 2b.
B. Tournez la bague de blocage de l’oculaire dans le sens inverse des aiguilles d’une montre.
C. Insérez complètement l’extrémité du barillet chromé de l’oculaire dans la bague de blocage de l’oculaire – Figure 2c.
D. Serrez fermement la bague de blocage de l’oculaire en la tournant dans le sens des aiguilles d’une montre.
Page 18

Fonctionnement de votre longue-vue
Pour des observations (utilisation visuelle)
Avertissement : Ne regardez jamais directement le Soleil à l’œil nu ou avec votre longue-vue pour éviter tout risque de lésion
oculaire permanente.
Retirez le cache protecteur de la lentille de l’objectif avant de la longue-vue – voir Figure 1.
Mise en place de l’œilleton
Œilleton
L’oculaire zoom est doté d’un œilleton de type vissable. Si
des lunettes, l’œilleton doit être totalement en bas (en tournant dans le
sens inverse des aiguilles d’une montre) afin de vous permettre
vous portez
Indicateur du
grossissement
d’observer la totalité du champ de vision. Si vous ne portez pas de
lunettes, l’œilleton doit être normalement entièrement relevé (en
tournant dans le sens des aiguilles d’une montre). Vous pouvez
Bague moletée
également utiliser l’œilleton sur toute position intermédiaire entre le
point le plus bas et le point le plus haut si cela vous semble plus
confortable.
Figure 3
Changement du grossissement (Puissance)
Vous pouvez changer le grossissement en tournant la bague moletée dans l’une ou l’autre direction. Le grossissement apparaît sur
l’ind
icateur lorsqu’il est aligné sur la ligne blanche. Il faut refaire une mise au point après avoir changé la puissance. N’oubliez pas que
la puissance de grossissement la plus faible est celle qui permet d’obtenir le champ de vision le plus net et le plus important.
Mise au point
Votre longue-vue est équipée d’un double système de boutons de mise au
int. Une fois que vous parvenez à la mise au point avec le bouton le
po
Bouton de blocage
en position
plus gros (mise au point grossière), utilisez le bouton de mise au point
précise (le plus petit) pour obtenir une image très nette. Tournez le bouton
de mise au point grossière jusqu’à ce que l’image dans l’oculaire soit
claire et nette. Vous devrez refaire une mise au point si vous modifiez la
puissance. Une fois parvenu à une mise au point nette sur un objet,
Double boutons
de mise au point
tournez le bouton de mise au point dans le sens des aiguilles d’une montre
sur un objet rapproché et dans le sens inverse pour un objet plus éloigné.
Figure 4
Position d’observation
La position normale de la longue-vue est illustrée en Figure 1. Vous disposez d’une plage de 180° pour orienter la longue-vue sur
rte quelle position si cela est plus pratique pour vous. Pour tourner la longue-vue, il suffit de débloquer le bouton de blocage de
n’impo
position et de le tourner dans le sens des aiguilles d'une montre. Tournez ensuite la longue-vue sur la position souhaitée, puis
verrouillez le bouton de blocage de position.
Guide de visée et paresoleil pour objectif
Vous pouvez utiliser le guide de visée (situé sur le paresoleil) afin de localiser l’objet recherché. Il peut être
difficile
de s’en servir lorsque la longue-vue est dans sa position normale. Pour plus de facilité, tournez la
position d'observation légèrement de manière à obtenir une meilleure vue avec le guide de visée.
Le paresoleil peut être sorti et il est utile pour bloquer toute lumière éblouissante ou autres reflets indésirables
susceptibles d’interférer avec votre observation et/ou de gâcher l’image.
Figure 5
Oculaires en option
Votre longue-vue a été conçue de manière à vous permettre d’y ajouter des oculaires en option de 1,25 po. Ces types d’oculaires sont
disponib
les chez Celestron ainsi qu’auprès d’autres fabricants. Ces oculaires supplémentaires permettent des grossissements plus
importants, des champs de vision plus larges et autres. Ces types d’oculaires se fixent de manière similaire à l’oculaire zoom.
Page 19

Plate-forme de stabilité du trépied (pour le modèle 100 mm)
20
(non illustré)
Ce dispositif est utilisé sur les modèles Regal 100 F-ED pour équilibrer correctement la longue-vue sur un trépied photo/vidéo.
Vis de montage ¼ po-20
Orifice fileté ¼ po-
Bague de serrage
Vis de montage
Pour utiliser la plate-forme d’équilibrage du trépied :
Installez la plate-forme sur la partie supérieure de votre trépied photo à l’aide du trou fileté ¼ po-20 situé sous cette plate-forme.
Fixez votre longue-vue sur la plate-forme à l’aide de la vis de montage ¼ po-20 située sur la partie supérieure de la plate-forme. Vissez
la vis de montage à fond. Enclenchez la longue-vue ainsi fixée en la faisant coulisser dans la gorge prévue à cet effet jusqu’à ce que la
longue-vue soit équilibrée sur le trépied. Serrez la bague de serrage pour maintenir la longue-vue en position.
Pour des photographies
Appareils photos SLR
Pour utiliser votre longue-vue afin de prendre des photos, vous devrez cadrer à travers la longue-vue sur laquelle vous aurez fixé
l’oculaire zoom. Assurez-vous que la bague de blocage de l’oculaire est fermement serrée à chaque étape de l’installation.
Retirez l’œilleton du dessus de l’oculaire zoom. Tournez-le dans le sens inverse des aiguilles d’une montre pour le retirer.
L’oculaire se présente alors tel qu’en Figure 6a avec le filetage exposé sur le dessus.
Fixez l’adaptateur en T (celui-ci est emballé avec l’oculaire zoom dans son étui protecteur) sur le filetage situé sur le dessus de
l’oculaire zoom – Figure 6b. Assurez-vous que le filetage est positionné comme illustré.
Vissez une bague en T en option afin que de pouvoir introduire votre marque et modèle d’appareil photo SLR dans le filetage
de l’adaptateur en T – Figure 6c.
Installez ensuite votre appareil photo SLR sur la bague en T. La Figure 6d illustre l’installation prête à recevoir l’appareil
photo SLR.
Les longues-vues Regal F-ED ont des ouvertures fixes, et donc des rapports focaux fixes. Pour obtenir une bonne exposition des sujets
photographiés, vous devez régler la vitesse de l'obturateur en conséquence. La plupart des appareils photos SLR disposent d’un témoin
dans le viseur vous permettant de savoir si l'image est sous-exposée ou surexposée. Les réglages de l’exposition s’effectuent en
changeant la vitesse d’obturation. Consultez le manuel d’utilisation de votre appareil photo pour toute information précise sur le réglage
de la focale, la modification des vitesses d’obturation et autres réglages.
Conseil utile : la plupart des photos seront plus nettes et plus contrastées en utilisant la plus petite ouverture de l’oculaire.
Figure 6a Figure 6b Figure 6c Figure 6d
Appareils photos numériques
Étant donné que les appareils photos numériques (et non appareils photos SLR numériques) n’utilisent pas de système en T pour monter
l’appareil sur un objectif, une longue-vue, un télescope ou autre, il vous faudra procéder différemment si vous voulez vous en servir pour
prendre des photos. Celestron (et de nombreuses autres sociétés) propose des adaptateurs universels pour appareils photos numériques qui
permettent d’installer facilement un appareil photo numérique sur votre longue-vue Regal F-ED.
Toutefois, de nombreuses marques d’appareils photo numériques ne permettent pas d'obtenir une image centrée car leur lentille ne renvoie pas
l’image au centre de l’oculaire. Si tel est le cas, vous ne pourrez pas utiliser l'adaptateur universel pour appareil photo, mais uniquement
l'appareil seul en le maintenant derrière l’oculaire pour prendre des photos.
Remarque:sur de nombreux appareils photo numériques, l’image s’affiche dans une vignette (sous forme d’image circulaire sur fond
oir), ce qui est tout à fait normal.
n
Vous prendrez vos photos à travers la longue-vue équipée de l’oculaire zoom (ou tout autre oculaire en option de 1,25 po).
Page 20

Entretien
Distance focale
-
mm
-pieds à 1000 verges.
Pour protéger votre longue-vue lorsqu’elle n’est pas utilisée, remettez en place tous les caches ainsi que celui de la lentille pour
préserver les optiques et rangez la longue-vue dans son étui de transport souple. S'il faut nettoyer les optiques, utilisez un kit de
nettoyage pour optiques en suivant le mode d’emploi.
Spécifications
Modèle 52301 52302 52303
Description
Position d’observation
Ouverture - mm
Rapport focal
Grossissement
Oculaire - Zoom
Champ de vision
angulaire
Champ de vision linéaire
/mètres à 1000 m
Dégagement oculaire
Mise au point rapprochée
Prismes - BaK - 4
Revêtements optiques
Étanche
Longueur sans oculaire
Poids
Regal 65 F-ED Regal 80 F-ED Regal 100-F-ED
Coudée à 45° Coudée à 45° Coudée à 45°
65 80 100
386 / f/6 480 / f/6 540 / f/5,4
16x-48x 20x-60x 22x-67x
8-24 mm 8-24 mm 8-24 mm
2,6° à 16x 2,1° à 20x 1,9° à 22x
1,3° à 48x 1,0° à 60x 0,9° à 67x
136/45 à 16x 112/37 à 20x 100/33 à 22x
68/23 à 48x 56/19 à 60x 50/17 à 67x
20 mm à 16x 20 mm à 20x 20 mm à 22x
15 pi à 16x 20 pi à 20x 26 pi à 22x
4,6 m à 16x 6,1 m à 20x 7,9 m à 22x
Oui Oui Oui
Traitement multicouches
complet
Oui Oui Oui
13 po – 330 mm 17 po –
61 oz – 1,7 kg 72 oz –
Traitement multicouches
complet
432 mm 20 po – 508 mm
2,0 kg 89 oz – 2,5 kg
Traitement multicouches
complet
Remarque : Toutes les spécifications sont sujettes à des changements sans notification préalable.
Garantie
Les longues-vues Regal F-ED bénéficient d’une garantie Celestron à vie limitée sans égard à la responsabilité pour les acheteurs
résidant aux États-Unis et au Canada. Pour tout complément d’information sur l’application de la garantie et autres dispositions
concernant les clients d’autres pays, consultez le site web de Celestron.
2835 Columbia St.
Torrance, Californie 90503 U.S.A.
www.celestron.com
REV 2 111809 ©2009 Tous droits réservés Imprimé en Chine 01-09
 Loading...