

Page 1
ExloraScope User Guide TL**.qxd 4/9/04 10:00 AM Page 1
Page 2
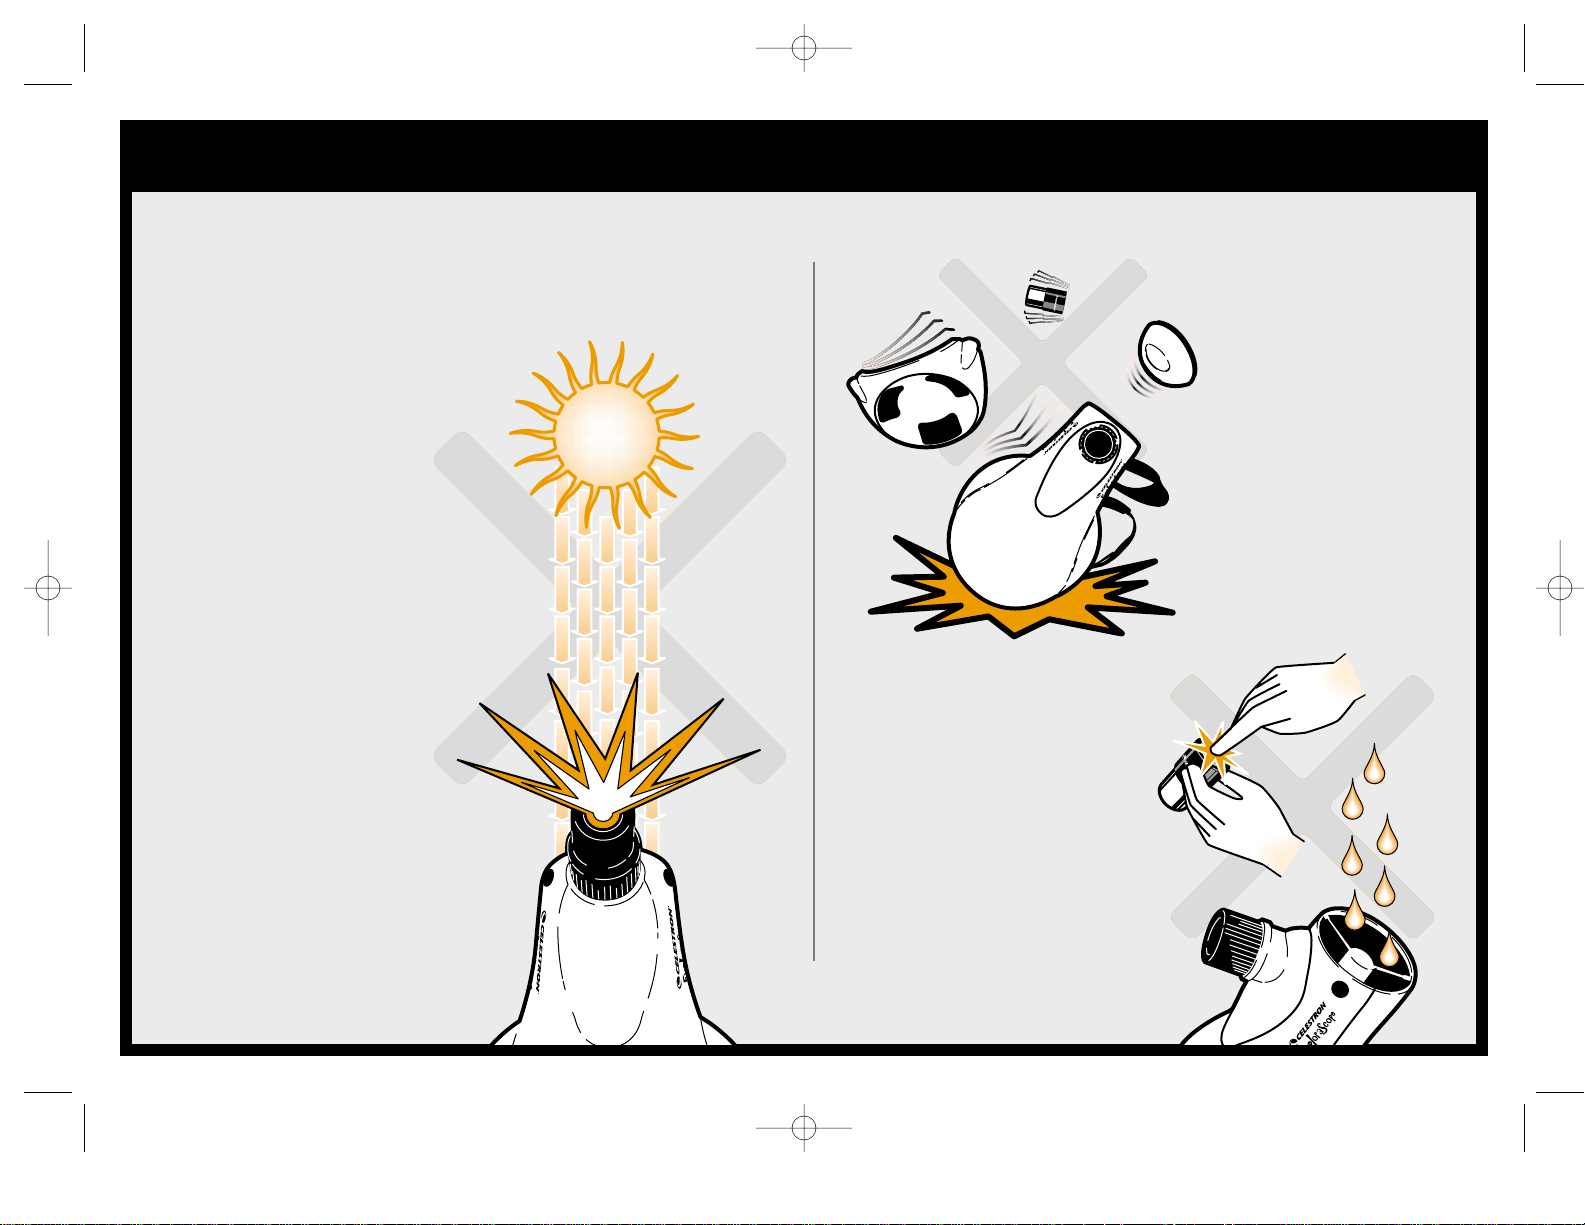
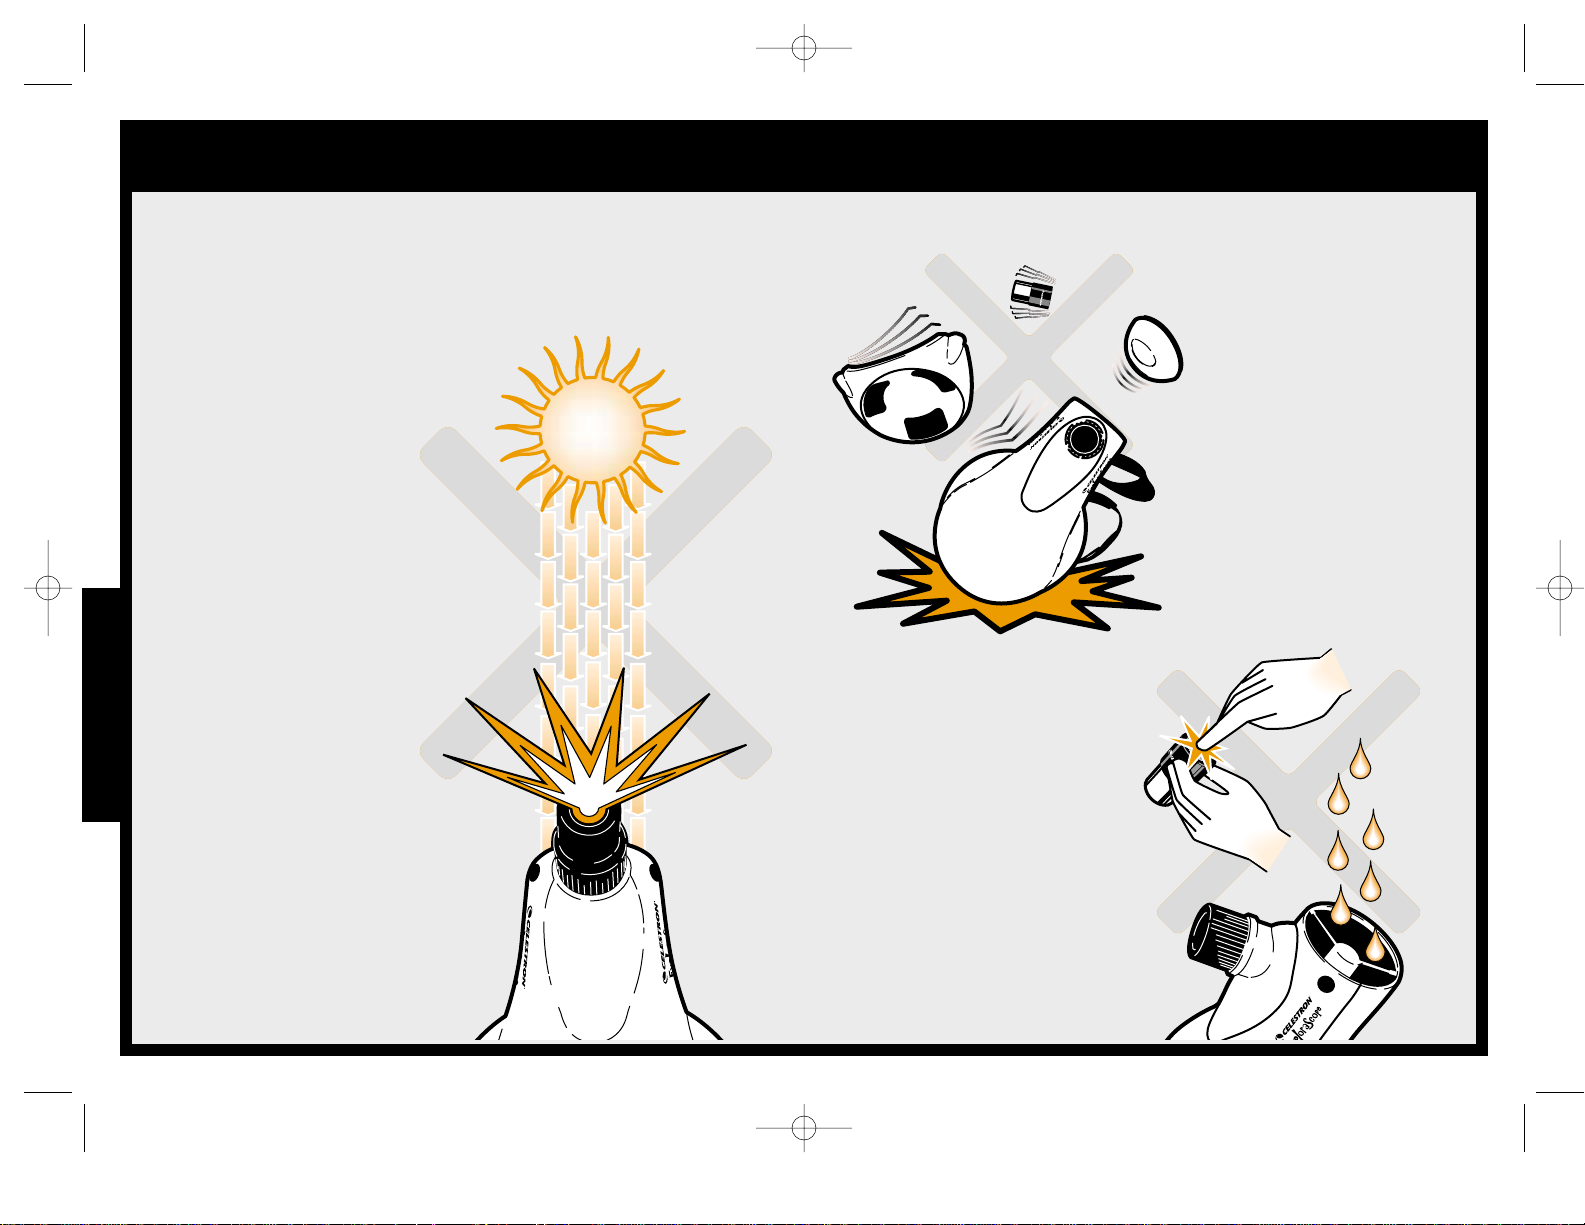
Proper Use & Safety
Never look directly at the
sun with the naked eye or
with a telescope unless you
have the proper solar
filter. Permanent and
irreversible eye damage
may result.
Never use your telescope
to project an image of the
sun onto any surface.
Internal heat build-up can
damage the telescope and
any accessories attached to
it.
Never leave the telescope
unsupervised, either when
children are present or
adults who may not be
familiar with the correct
operating procedures of
your telescope.
Never touch the lens
in the eyepiece or the
mirrors inside the
telescope.
Never allow objects
or excess moisture
inside the telescope.
Always handle the
eyepiece gently by
the sides.
Always treat your
ExploraScope with
care—it can be
broken if handled
roughly.
CAUTION!
ExloraScope User Guide TL**.qxd 4/9/04 10:00 AM Page 2
Page 3
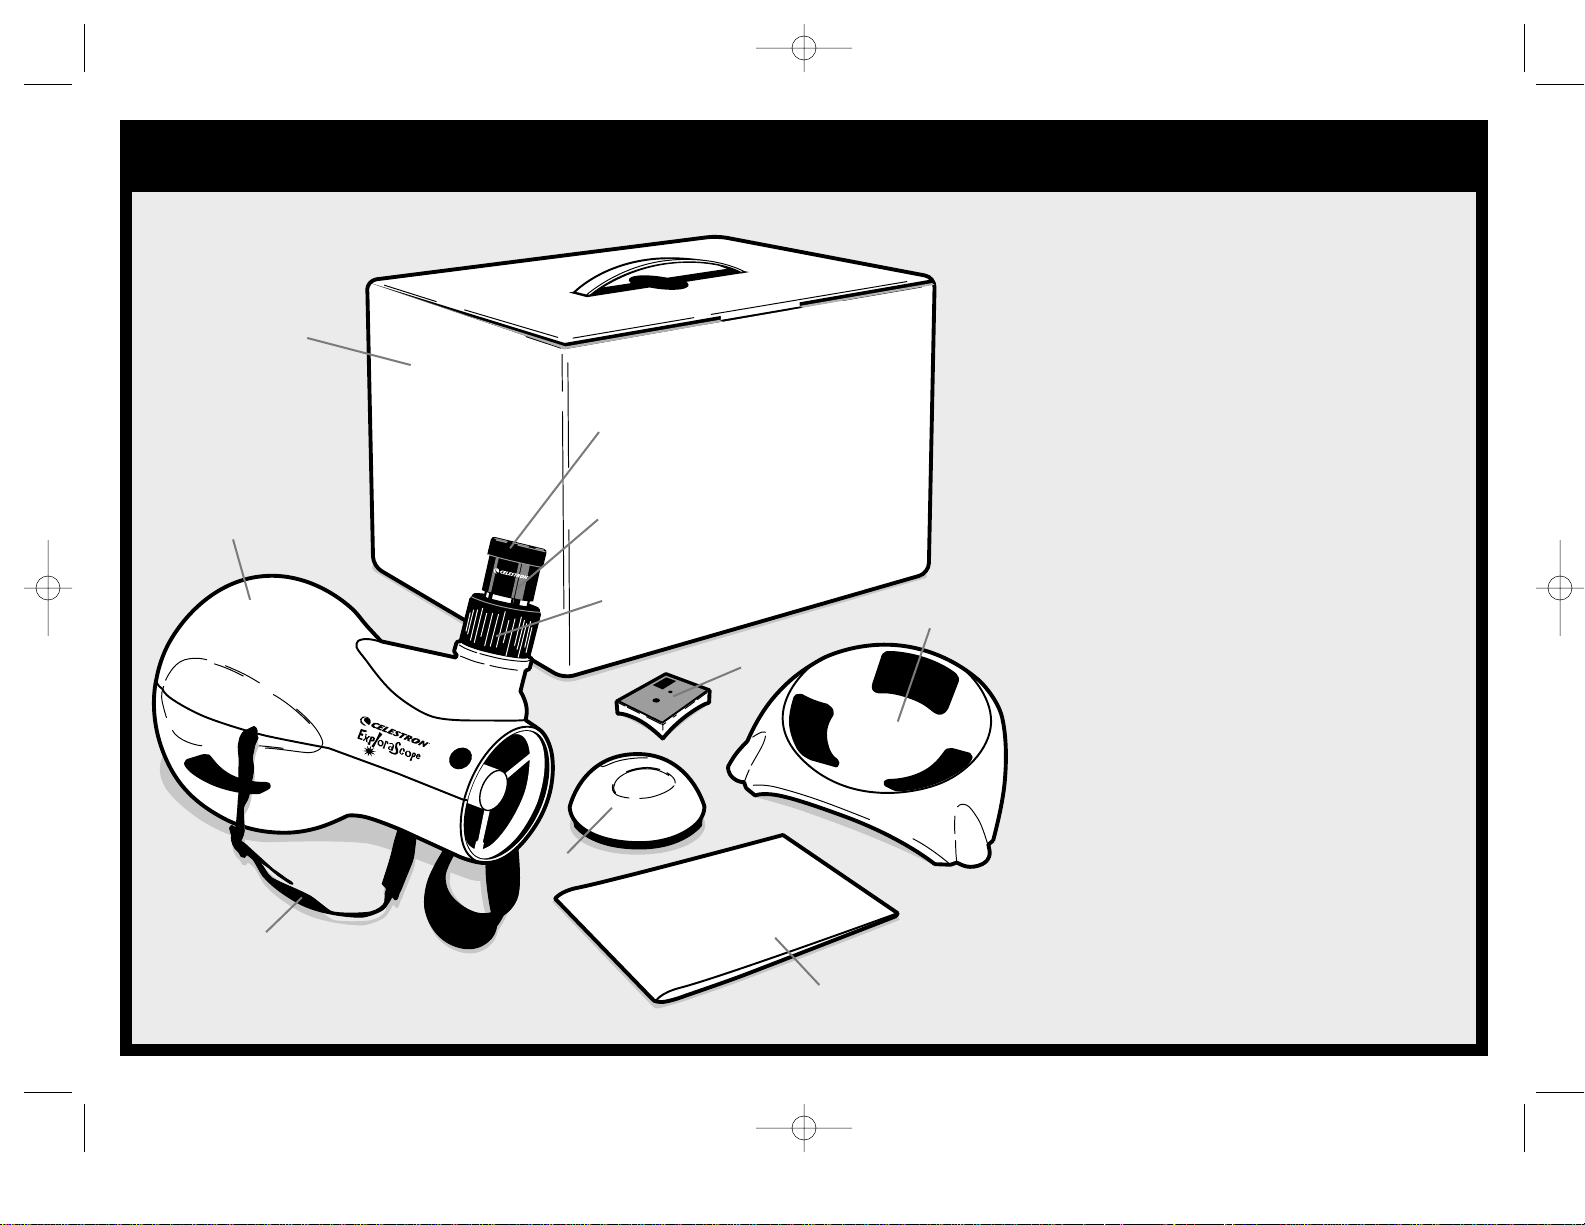
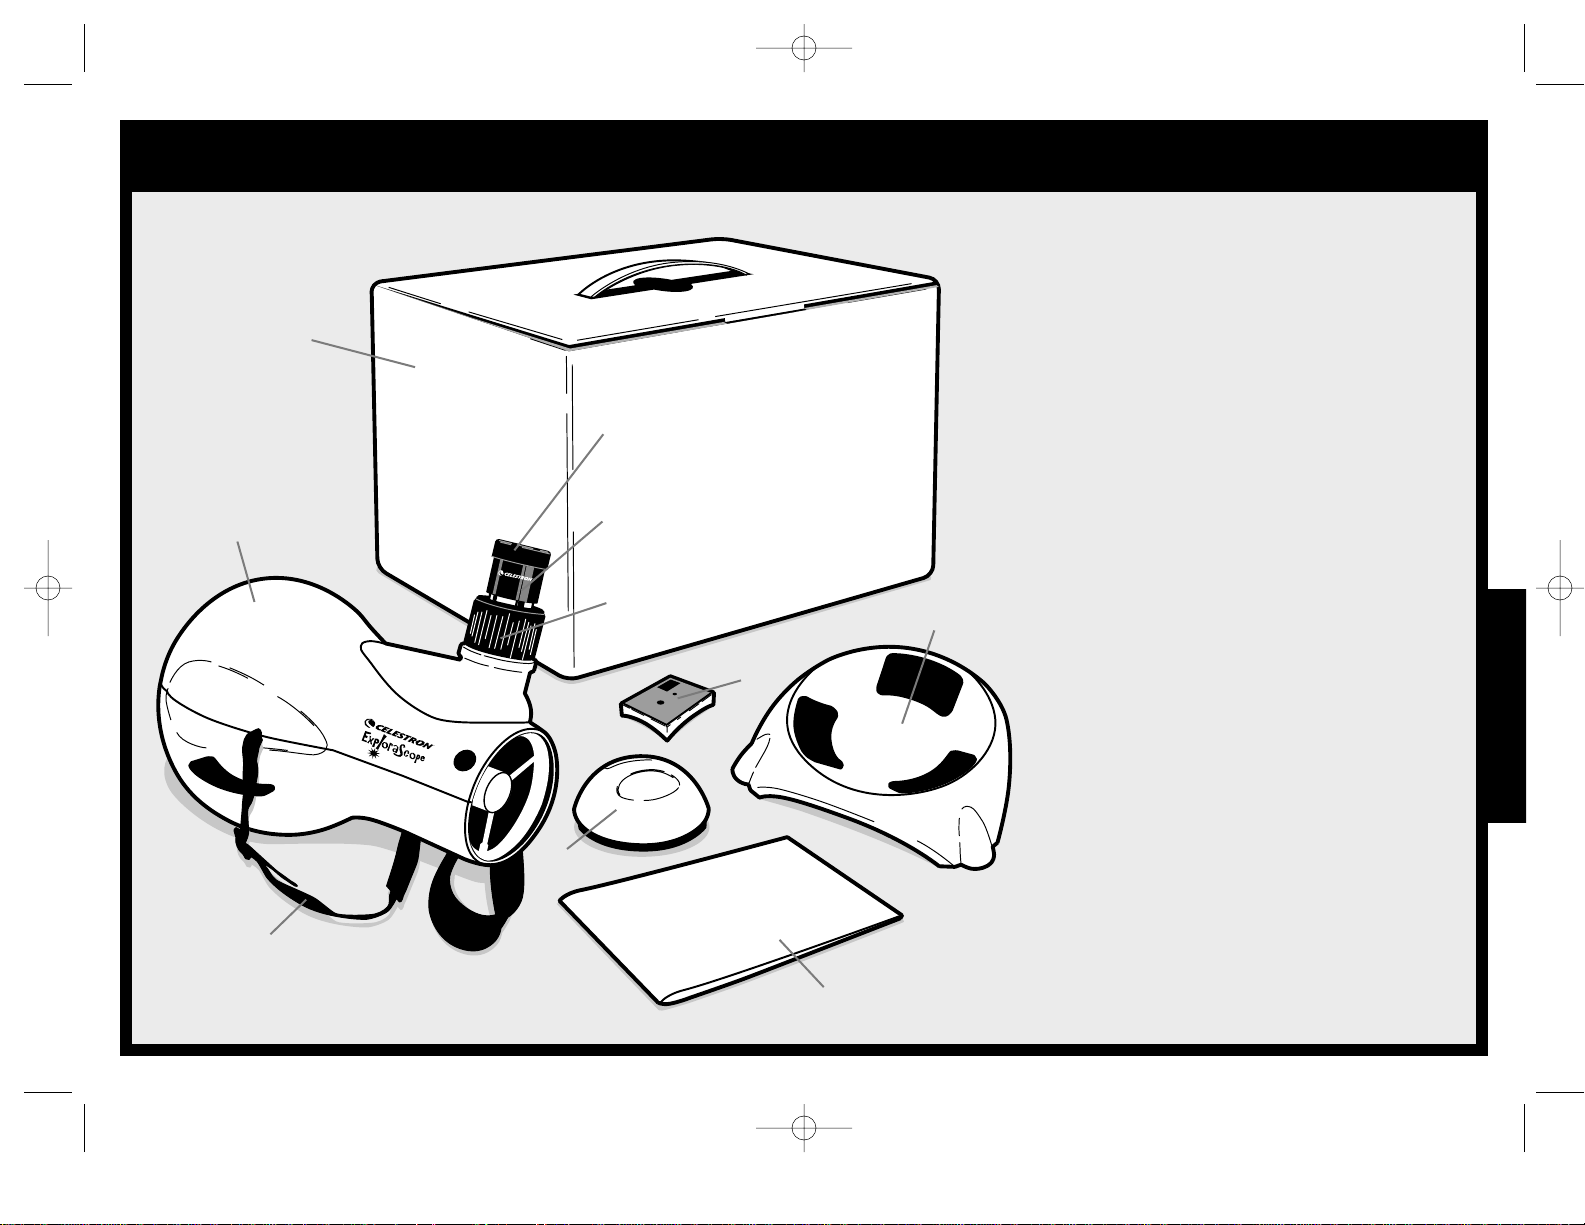
Welcome
1
Eyepiece
Eyepiece
Dust Cap
Focuser
ExploraScope
Front Cover
Setup & User’s Guide
Reusable
Box
Tripod Adapter
Carrying Strap
Swivel Base
Your New Celestron ExploraScope
Your new ExploraScope is designed for use
by the entire family and works equally well
for celestial (night sky) or terrestrial (land)
observing. The possibilities for fun and
learning are limitless!
Be sure to read this entire manual for the
safest and most rewarding use of your
ExploraScope. Pay special attention to
safety warnings and always supervise small
children.
Your ExploraScope includes:
•ExploraScope telescope & strap
•Swivel base
•44x eyepiece with dust cap
•Protective front cover
•Adjustable focuser
•Tripod adapter
•Reusable storage & carrying box
•Setup & User’s Guide
Optional accessories are also available from
your Authorized Celestron Dealer. See the
inside back cover for more information.
ExploraScope Technical Specifications
Diameter . . . . . . . . . . . . . . . . . . . . .80 mm
Focal Length . . . . . . . . . . . . . . . . .550 mm
Eyepiece . . . . . . . . . . . . . . . .12.5 mm (44x)
Field of View . . . . . . . . . . . . . . . . . . . . . .1°
Near Focus . . . . . . . . . . . . . . . . . . . . .50 ft.
ExloraScope User Guide TL**.qxd 4/9/04 10:00 AM Page 1
Page 4
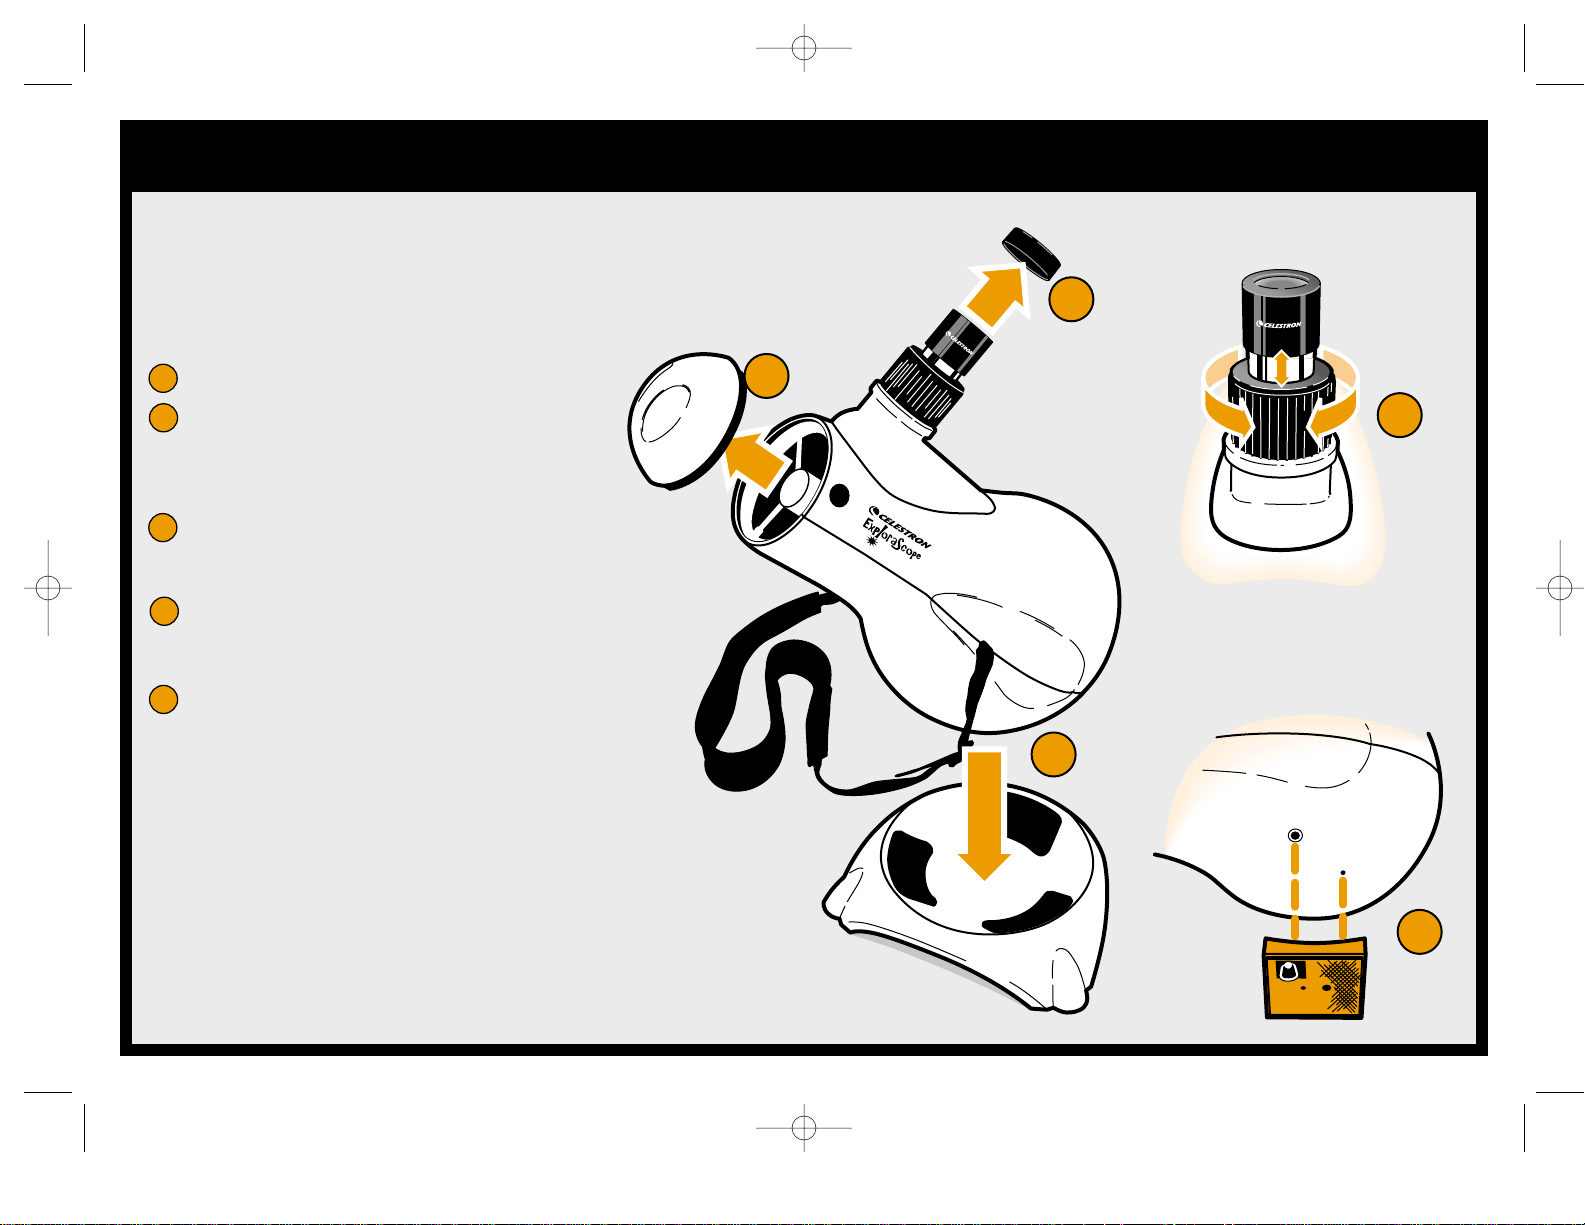
Assembling the ExploraScope
2
Assembly
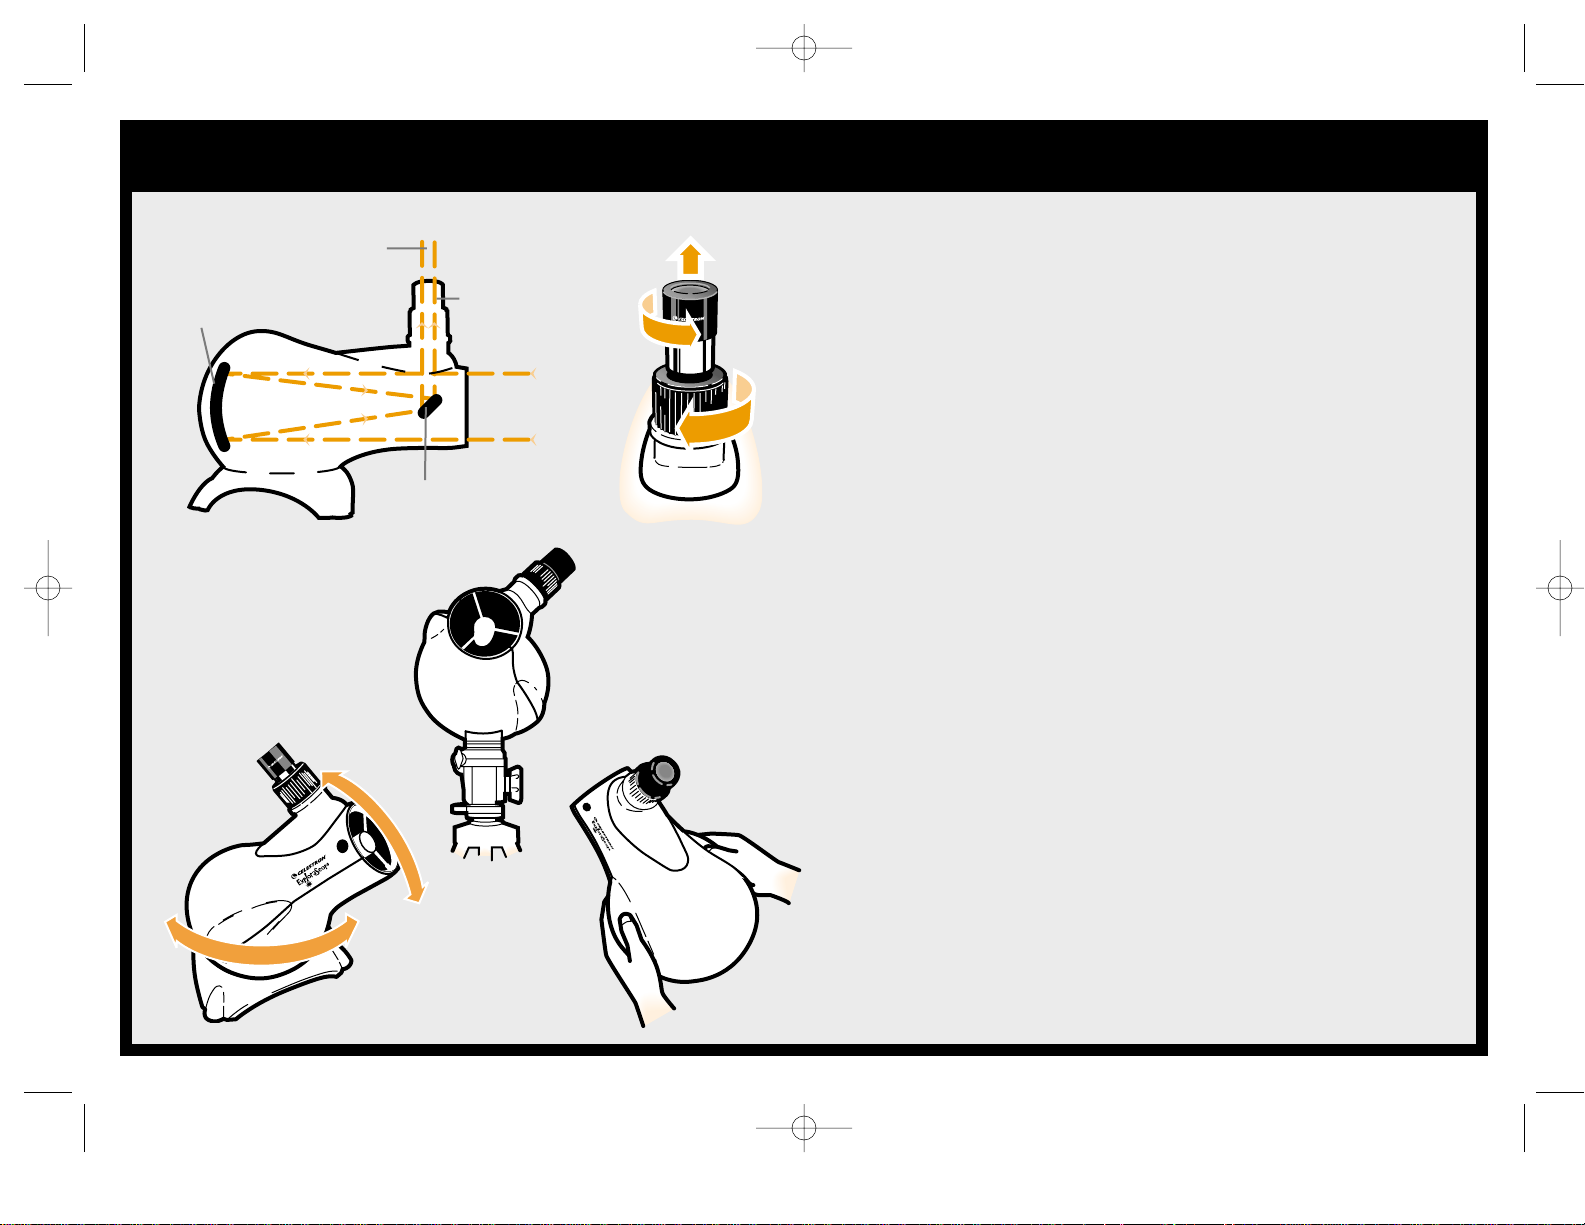
Assembling your ExploraScope is simple and
should only take a few moments. Familiarize
yourself with the parts of your telescope first,
then follow the instructions below.
Remove the eyepiece dust cap.
Remove front cover and set it aside.
Always use the front cover to protect the
ExploraScope’s internal components when
not in use.
Place the ExploraScope on its base. You have
the option of using the scope with or without
the base or with a tripod (see step 5).
Turn the focuser to adjust the focus of
objects being viewed as described in
“Using Your ExploraScope.”
To use a standard camera tripod with your
ExploraScope you must first attach the
tripod adapter. Align the adapter screw
and pin with the holes in the base of the
scope and tighten. The ExploraScope is
ready to be attached to a standard photo
tripod.
That’s all there is to it! If you are using the
base or a tripod you will want to find a steady
surface to set up on before observing. Use the
carrying strap or shipping box to make
transporting your ExploraScope safer and
easier.
321
1
234
5
5
4
ExloraScope User Guide TL**.qxd 4/9/04 10:00 AM Page 2
Page 5
Observing Tips
3
How the ExploraScope Works
The ExploraScope is a reflector type telescope, using two mirrors
to gather and focus light at the eyepiece. This type of telescope
has the advantage of a more compact size for a given aperture.
The diameter of a telescope’s aperture, or opening, is what
determines its ability to see faint objects far away. Magnification
power is determined by the eyepiece. Celestron offers other
eyepieces for your ExploraScope to increase the magnification or
increase the field of view at lower magnifications. Please see the
optional accessories section.
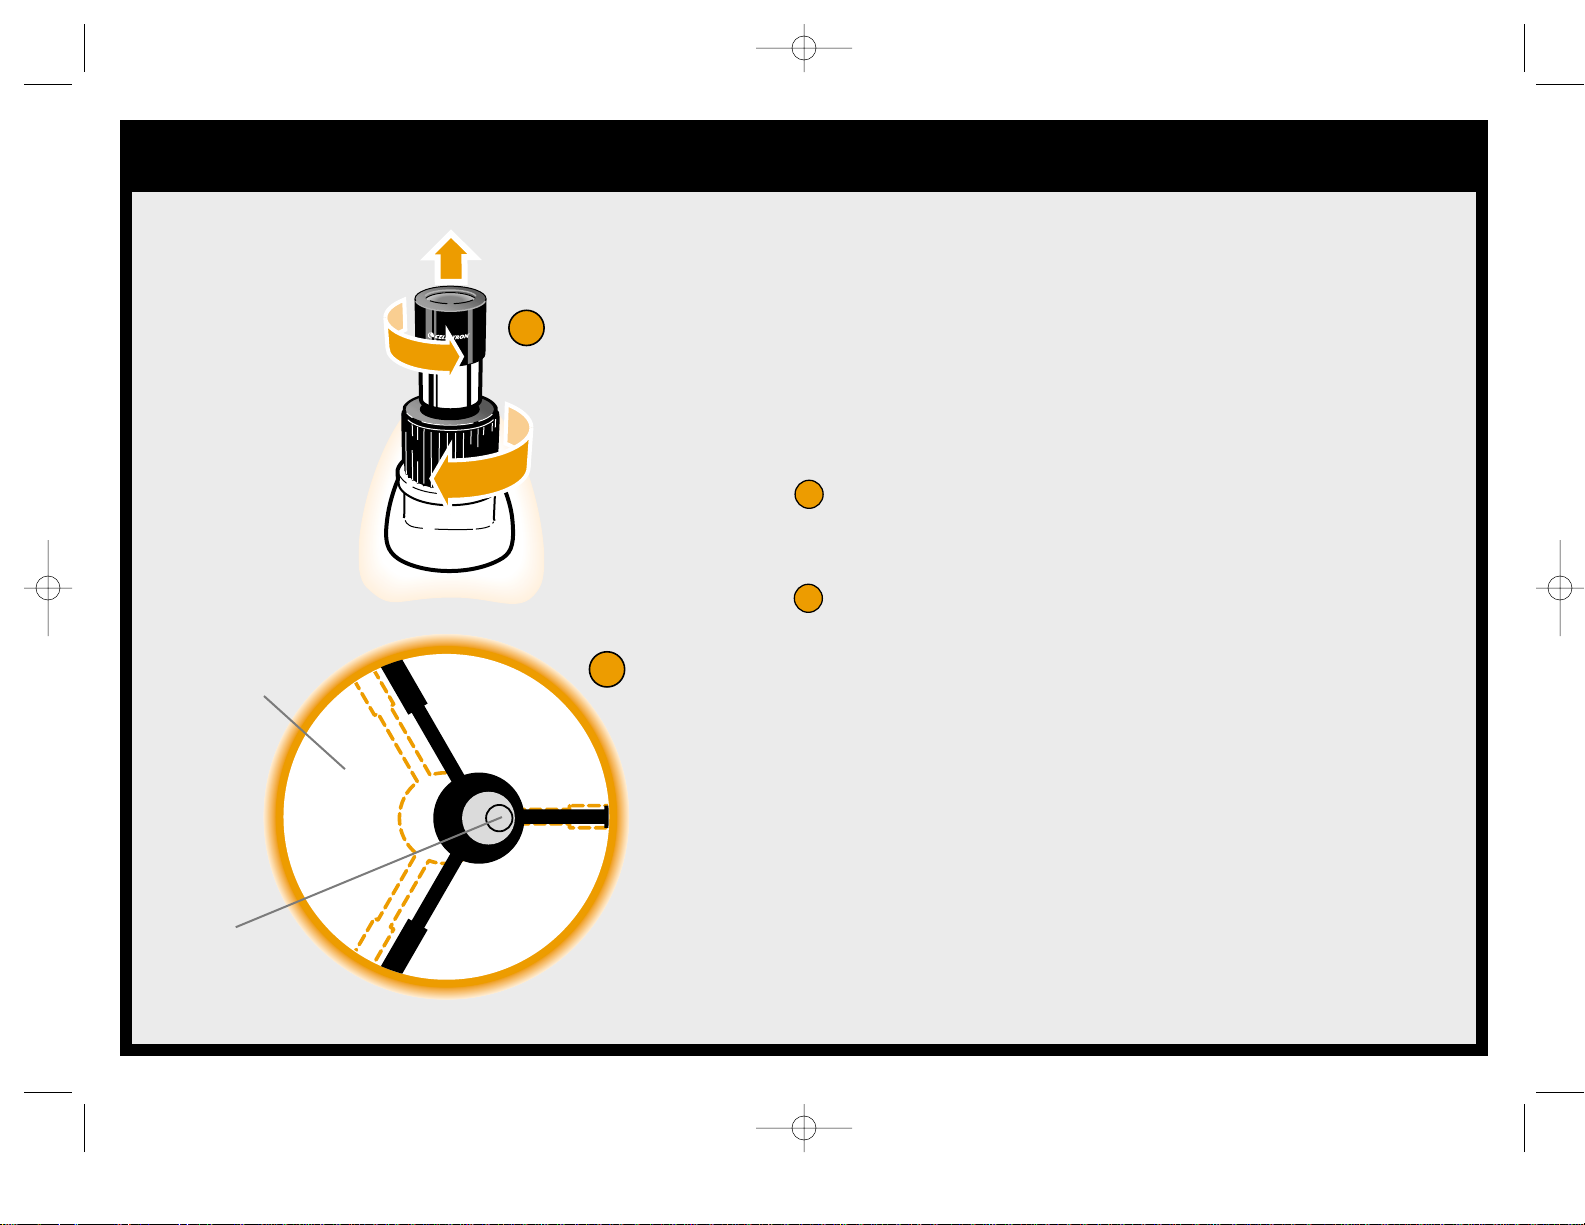
To remove the eyepiece, rotate the focuser clockwise until the
eyepiece is fully extended. Rotate the chrome eyepiece barrel
counterclockwise until the eyepiece is removed.
Using Your ExploraScope
You may set the ExploraScope and observe by swiveling it on its
base, or you can attach it to a tripod using the included tripod
adapter. You may also simply hold the scope by the handles in
your hands or on your lap. For celestial viewing, the stability
provided by the base or a tripod are helpful since distant stars
and planets can take time to locate and can move easily out of
the field of view. For terrestrial observations holding the scope
may work better since you can more easily point to the horizon
and follow moving objects.
To view an object, simply point and look through the eyepiece.
To focus, slowly rotate the focuser until the image in the eyepiece
is clear and sharp. To focus on an object that is closer than your
current target, turn the focusing knob clockwise. For more
distant objects, turn the focusing knob counter clockwise.
Eyepiece
Aperture
Incoming
Light
Magnified Image
Primary
Mirror
Secondary
Mirror
ExloraScope User Guide TL**.qxd 4/9/04 10:00 AM Page 3
Page 6
Observing Tips
4
Terrestrial objects must be at least fifty feet away to be
viewed clearly. You may view objects in the daytime sky such
as aircraft and birds, but be careful never to view the sun
with your ExploraScope or any other telescope without using
the proper filtering equipment.
When working with any optical instrument, there are a few
things to remember to ensure you get the best possible image.
If you wear corrective lenses (specifically glasses), you may
want to remove them when observing with an eyepiece
attached to the telescope. If you have astigmatism, corrective
lenses must be worn at all times.
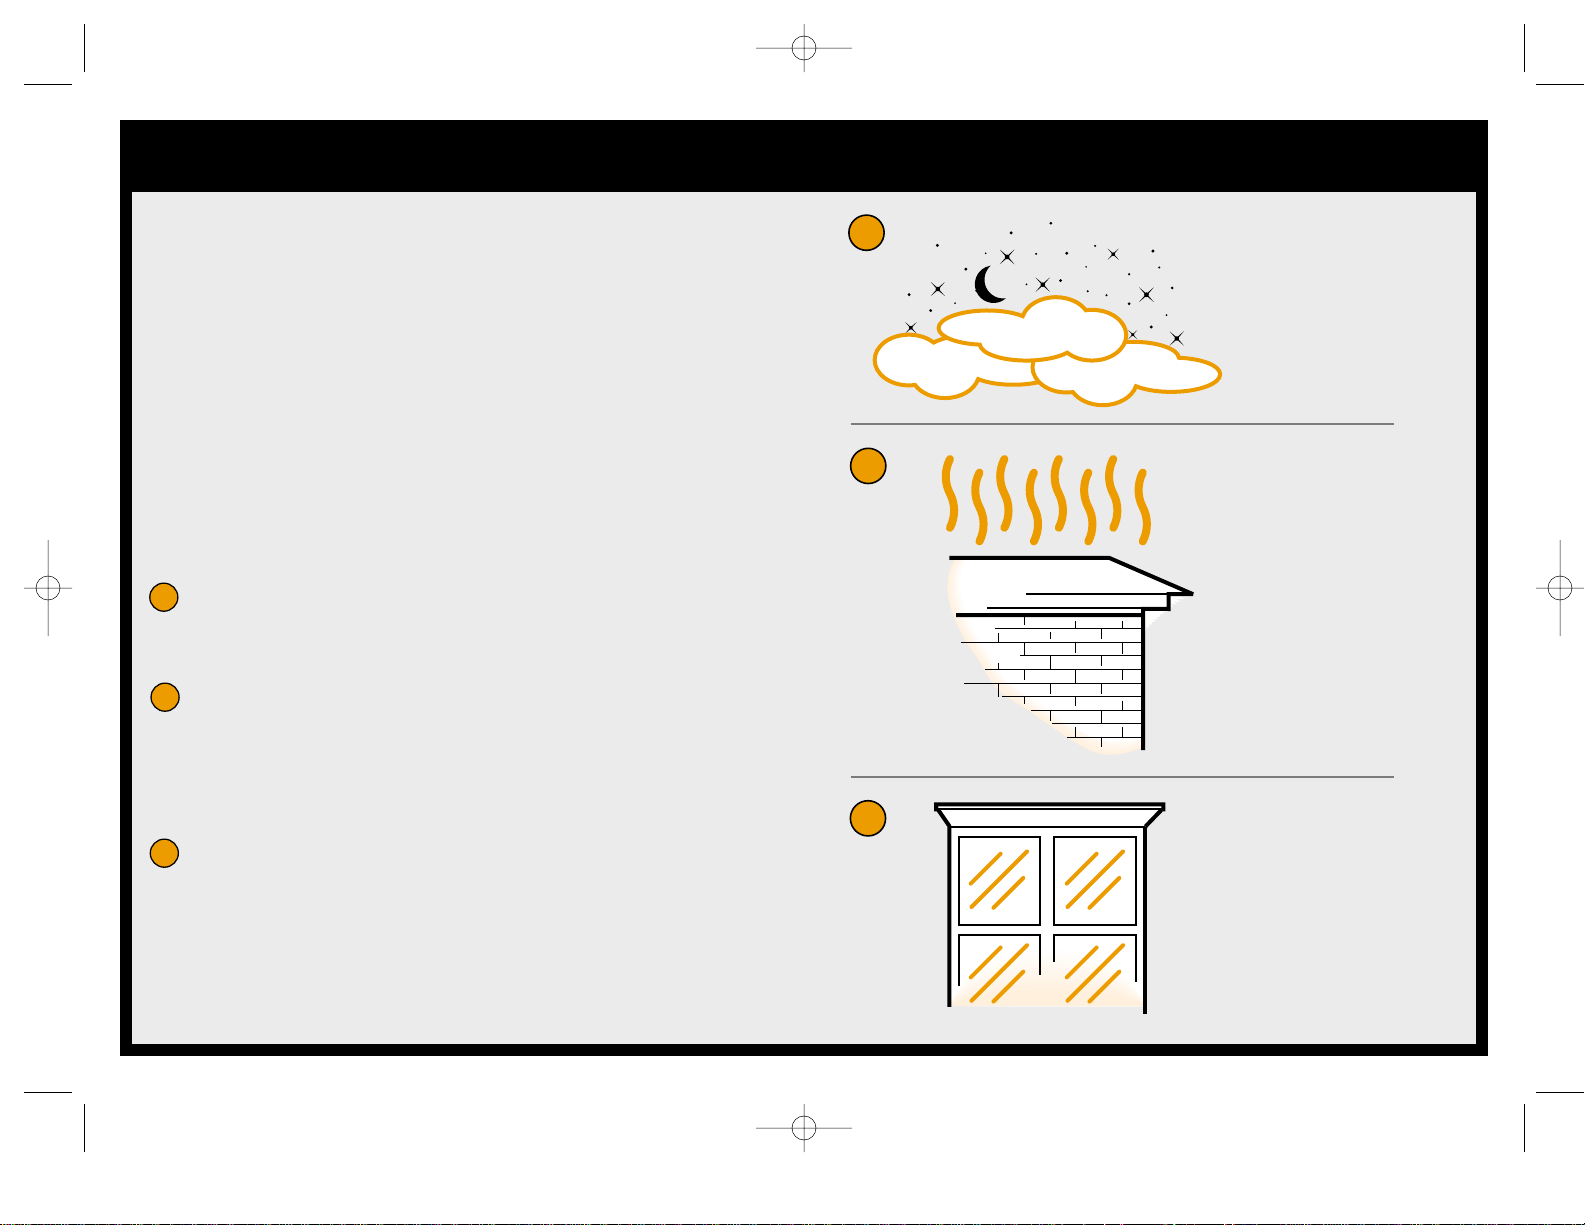
Hazy skies, fog, and mist can make it difficult to focus
when viewing terrestrially. The amount of detail seen
under these conditions is greatly reduced.
Never look across or over objects that are producing heat
waves. This includes cars and asphalt parking lots on hot
summer days or building rooftops. Heat waves will
distort the atmosphere and affect your view in many of
the same ways as uneven window glass.
Never look through window glass. Glass found in
household windows is optically imperfect. This
inconsistency can and will distort images and affect your
ability to focus the telescope. In most cases you will not
be able to achieve a truly sharp image, while in some
cases you may actually see double.
Avoid hazy skies
and fog
Avoid looking
over rooftops
Avoid looking
through window
glass
123
123
ExloraScope User Guide TL**.qxd 4/9/04 10:00 AM Page 4
Page 7
Star Hopping
5
Star Hopping
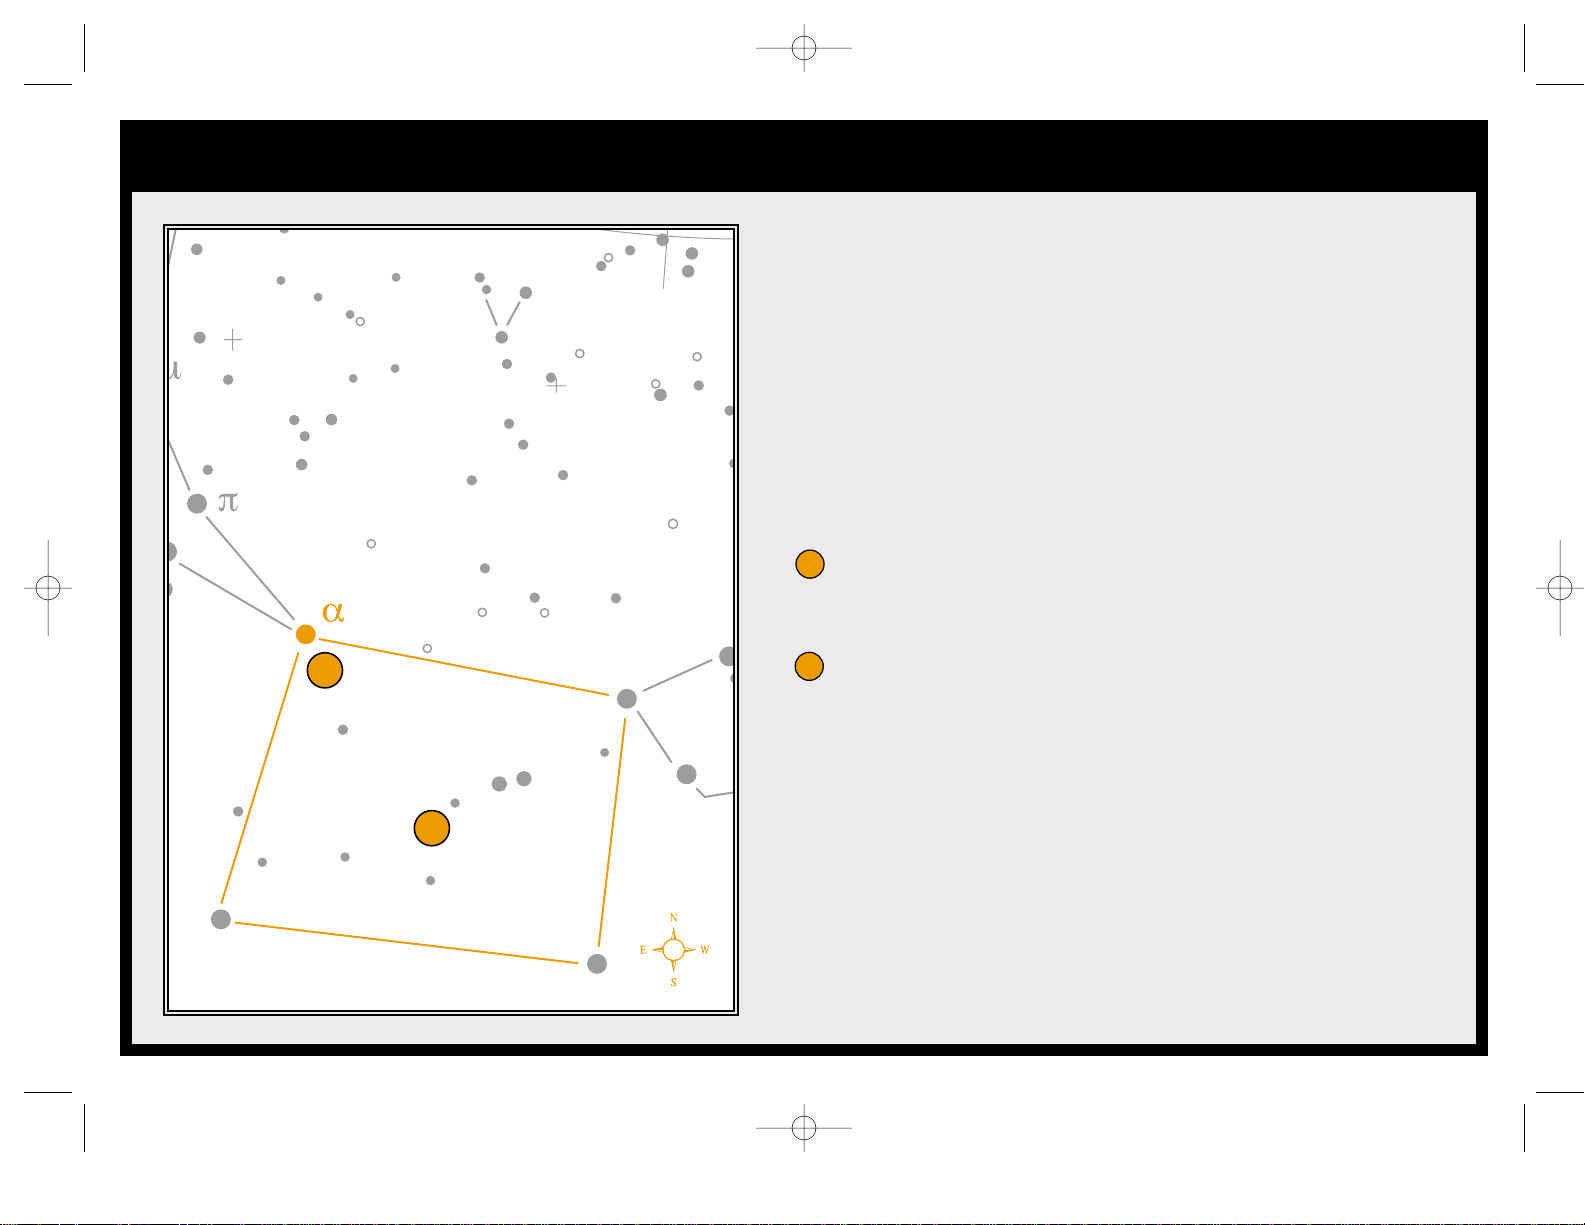
One way to find celestial objects is to use a process called "star
hopping." Star hopping is done by using bright stars to "guide" you to
an object. For successful star hopping it is helpful to know the field
of view of your telescope. Your ExploraScope has a field of view of
approximately 1°. Therefore, if you know an object is 3° away from
your present location, you just need to move 3 fields of view towards
the desired object. Let's try a popular example: The Andromeda
Galaxy, also known as M31.
To find M31:
Locate the constellation of Pegasus, a large square visible in the
fall in the eastern sky, moving toward a point overhead, and in
winter months it's overhead moving toward the west.
Start at the star in the northeast corner—Alpha (α)
Andromedae.
OMEDA
GREAT NEBULA
M31
M32
GLORIA FREDERIKA
NGC7662
NGC7
1
2
1
2
ExloraScope User Guide TL**.qxd 4/9/04 10:00 AM Page 5
Page 8
Star Hopping
6
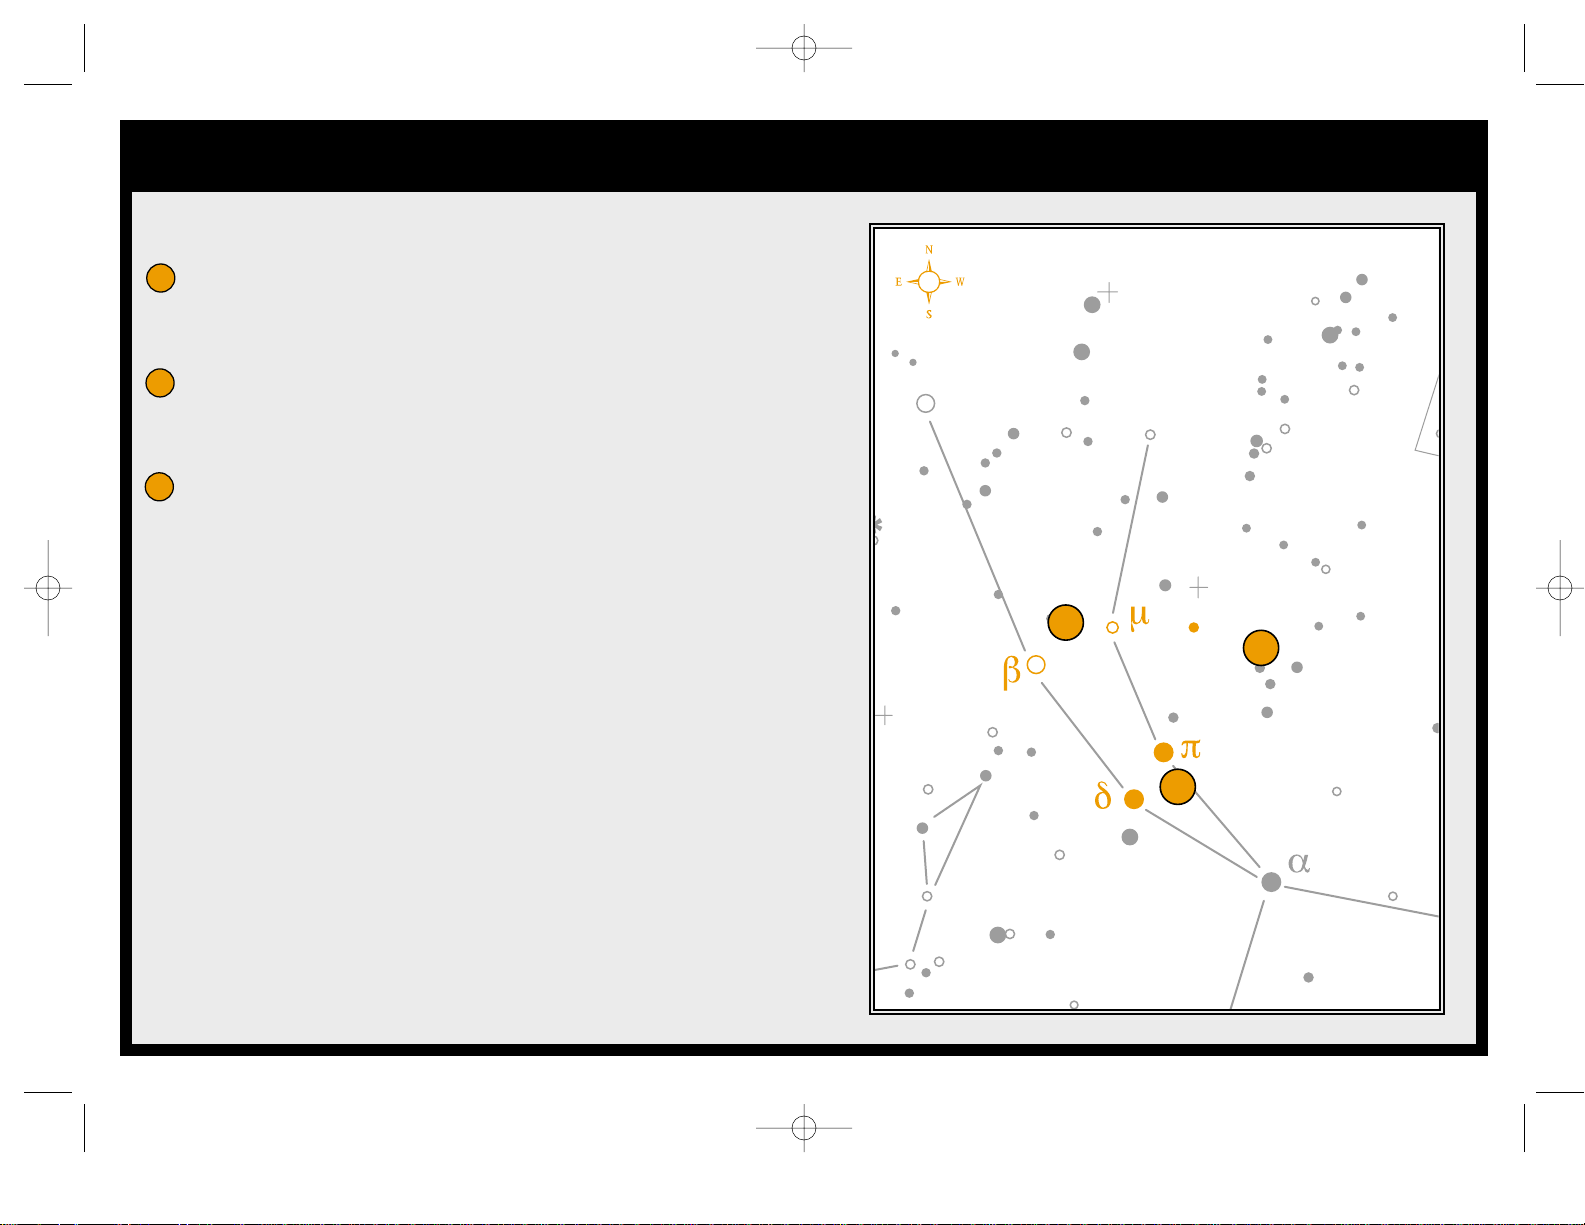
Finding M31 continued...
Move northeast approximately 7° (seven fields of view). There
you will find two stars of equal brightness—Delta (δ) and Pi (π)
Andromeda—about 3° apart.
Continue in the same direction another 8°. There you will find
two stars—Beta (β) and Mu (µ) Andromedae—also about 3°
apart.
Move 3° northwest—the same distance between the two stars—
to the Andromeda galaxy.
Star hopping to the Andromeda Galaxy (M31) is a snap, since all the
stars needed to do so are visible to the naked eye. Using this
technique you can locate many objects in the sky.
NGC752
ANDROMEDA
GREAT NEBULA
M31
M32
CA
N
345
345
ExloraScope User Guide TL**.qxd 4/9/04 10:00 AM Page 6
Page 9
Collimation Adjustment
Collimation is the optical alignment of your telescope’s mirrors.
Your ExploraScope was collimated at the factory and should never
need to be adjusted. If for some reason the telescope is dropped or
damaged it may be necessary to adjust the alignment of the mirrors.
Do not alter the collimation unless it’s necessary.
Checking the Collimation
Remove the eyepiece: rotate the focuser clockwise until the
eyepiece is fully extended. Rotate the chrome eyepiece barrel
counterclockwise until the eyepiece is removed.
With the eyepiece removed, look down the focuser and you will
see an image of the secondary mirror reflected back in the
primary mirror.
If the secondary mirror is not perfectly centered in the primary
mirror then your telescope is out of alignment. To correct this,
you must adjust the primary collimation screws located at the
rear of the tube.
7
1
2
1
2
Primary
Mirror
Secondary
Mirror
ExloraScope User Guide TL**.qxd 4/9/04 10:00 AM Page 7
Page 10
8
Collimation Adjustment
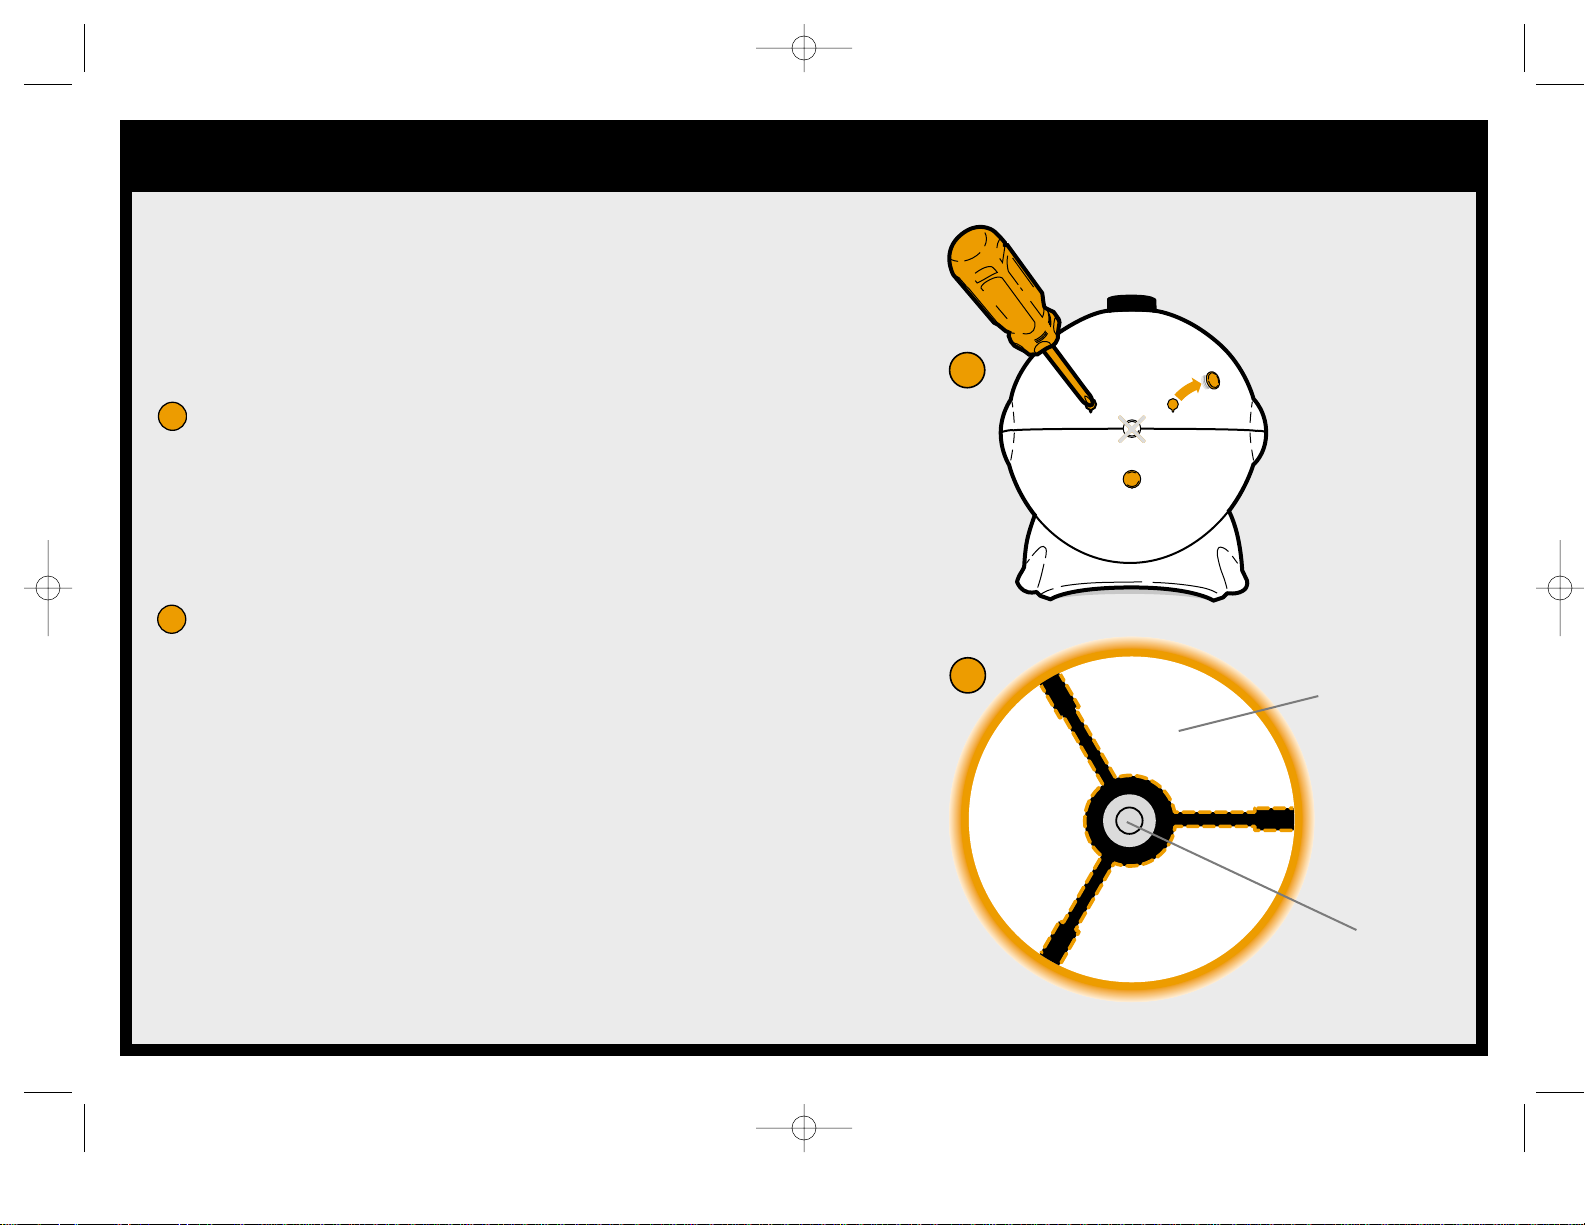
Correcting the Collimation
The ExploraScope has three holes at the rear of the tube for
accessing collimaton adjustments. Each hole has a alignment screw
that will tilt the mirror when tightened or loosened. The center screw
is not related to collimation and should not be adjusted. To align
your ExploraScope:
Remove the caps covering each of the three collimation screws.
Do not remove the cap in the center of the tube.
Using a Phillips screw driver, adjust the collimation screws until
the image of the secondary mirror moves towards the center of
the primary mirror. In order to tighten a screw, it may be
necessary to slightly loosen the remaining screws.
With both mirrors aligned you should see the silhouette of the
secondary mirror positioned in the center of the primary mirror.
Carefully replace the rubber protective covers over the
adjustment holes and replace the eyepiece
To make collimation easier and more precise, Celestron offers an
optional Collimation Tool (#94183) that aides in aligning your eye to
the center of the optical path.
Primary
Mirror
Secondary
Mirror
3
4
4
3
ExloraScope User Guide TL**.qxd 4/9/04 10:00 AM Page 8
Page 11
Optional Accessories
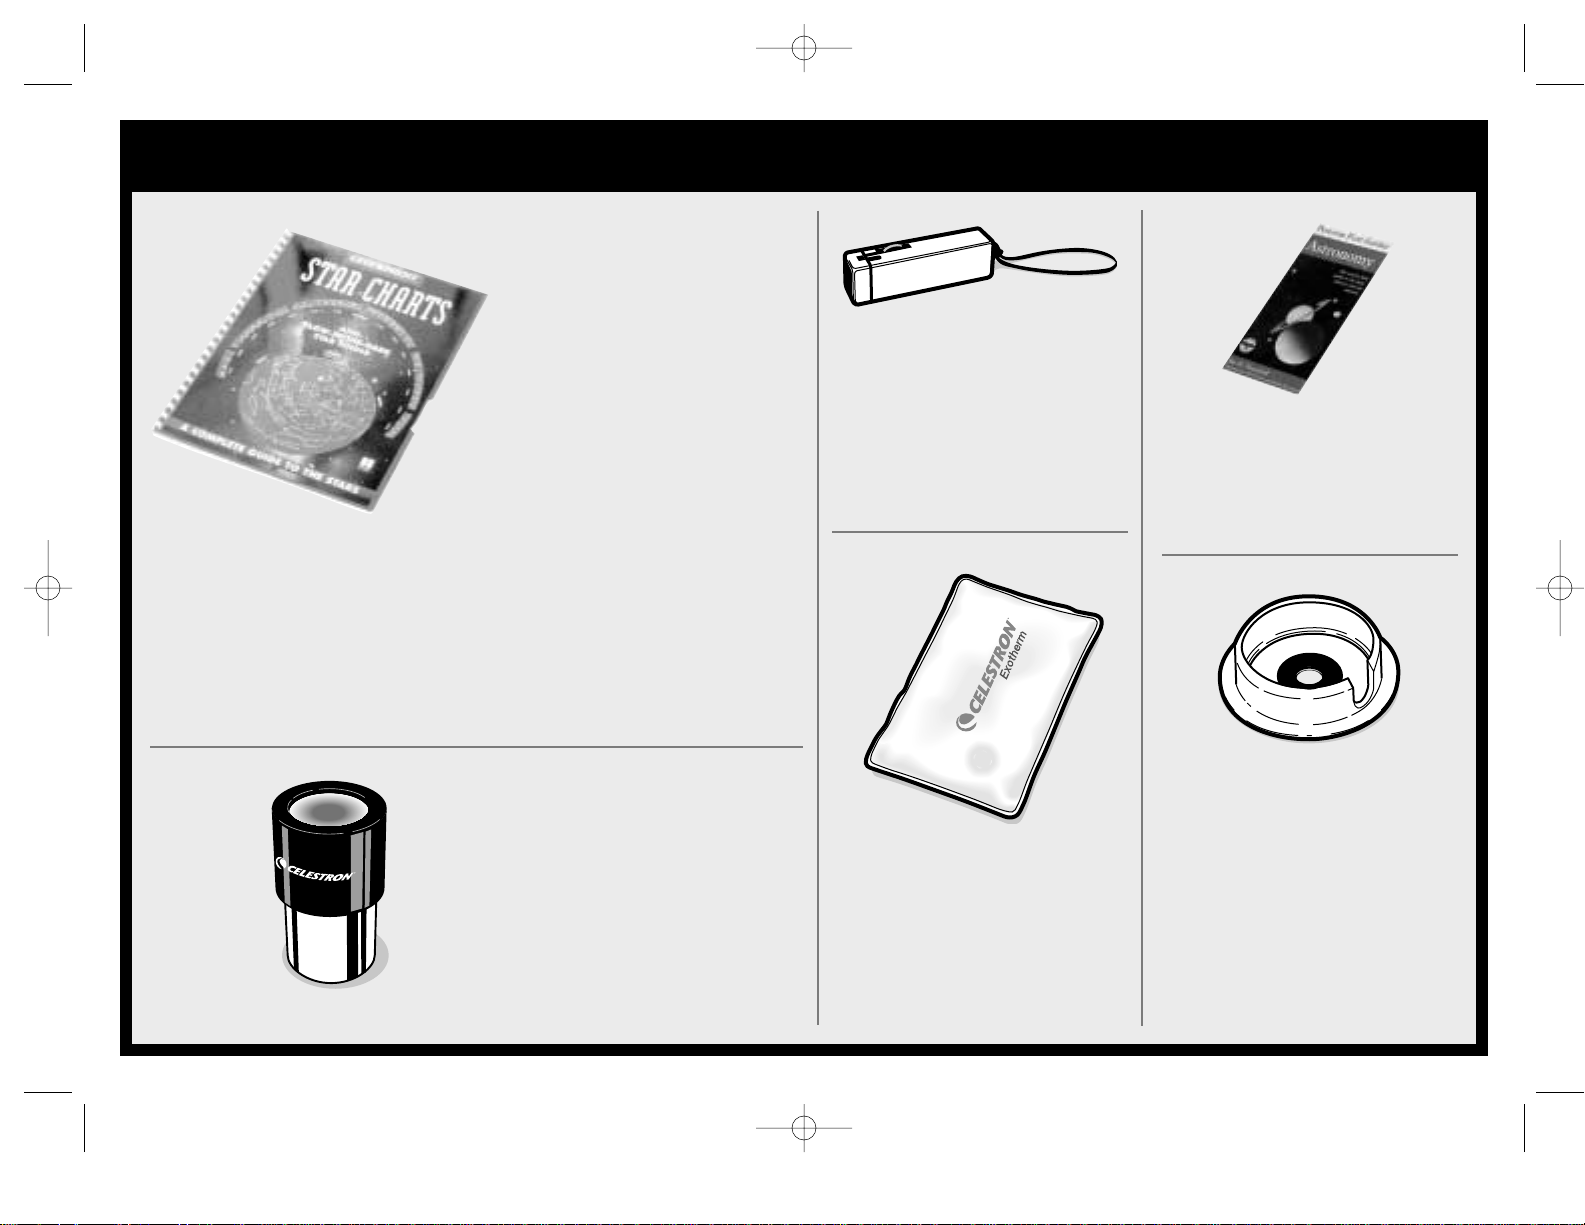
#94183 Collimation Tool
The optical performance of most
Newtonian telescopes can be
optimized by collimating, or
realigning, the telescope’s optics,
as needed. This procedure is
easily accomplished with
Celestron ’s Collimation Tool, a
handy accessory that comes with
detailed instructions.
#93588 Night Vision Flashlight
Celestron ’s premium model for
astronomy, using two red LEDs to
preserve night vision better than red
filters or other devices. Brightness is
adjustable. Operates on a single
9 volt battery (included).
Additional Eyepieces
Celestron offers additional eyepiece
choices for your ExploraScope. The
6mm ExploraScope eyepiece
(#93227) provides 92 times
magnifying power, while the 25mm
ExploraScope Eyepiece (#93226)
provides 22 times magnifying power
and an even wider field of view.
#93722 Sky Map
Celestron Sky Maps are the ideal
teaching guides for learning the
night sky. Even if you already
know your way around the major
constellations, these maps can
help you locate all kinds of
fascinating objects. The front
cover has a specially designed
glow-in-the-dark planisphere that
rotates to simulate the seasonal
progression of celestial objects
through the sky. More than a
thousand stars and deep-sky
objects are listed and charted. The
illustrated reference section
provides basic information and
the visual characteristics of
various types of stars, nebulae and
galaxies.
#93504 Exotherm Hand Warmer
Perfect for chilly evenings outdoors
camping, stargazing, or at sporting
events, the Exotherm Hand Warmer
is convenient, reusable, and made
from non-toxic materials. Heat lasts
up to one hour.
#93728 Peterson First Guide
A simplified field guide to the
stars, planets and the universe. A
great road map for those starting
out in astronomy.
ExloraScope User Guide TL**.qxd 4/9/04 10:00 AM Page 9
Page 12
Celestron Two Year Limited Warranty
A. CELESTRON WARRANTS THIS TELESCOPE TO BE FREE FROM DEFECTS IN MATERIALS AND
WORKMANSHIP FOR TWO YEARS
. CELESTRON WILL REPAIR OR REPLACE SUCH PRODUCT OR PART
THEREOF WHICH
, UPON INSPECTION BY CELESTRON, IS FOUND TO BE DEFECTIVE IN MATERIALS OR
WORKMANSHIP . ASACONDITION TO THE OBLIGA TIONOF
CELESTRON TO REPAIR OR REPLACE SUCH
PRODUCT, THE PRODUCT MUST BE RETURNED TO C
ELESTRON TOGETHER WITH PROOF-OF-
PURCHASE SATISFACTORY TO CELESTRON.
B. THE
PROPER RETURN AUTHORIZATION NUMBER MUST BE OBTAINED FROM CELESTRON IN
ADVANCE OF RETURN
. CALL CELESTRON AT (310) 328-9560 TO RECEIVE THE NUMBER TO BE
DISPLAYED ON THE OUTSIDE OF YOUR SHIPPING CONTAINER
.
A
LL RETURNS MUST BE ACCOMPANIED BY A WRITTEN STATEMENT SETTING FORTH THE NAME,
ADDRESS, AND DAYTIME TELEPHONE NUMBER OF THE OWNER
, TOGETHER WITH A BRIEF DESCRIPTION
OF ANY CLAIMED DEFECTS
. PARTS OR PRODUCT FOR WHICH REPLACEMENT IS MADE SHALL BECOME
THE PROPERTY OF
CELESTRON.
T
HE CUSTOMER SHALL BE RESPONSIBLE FOR ALL COSTS OF TRANSPORTATION AND INSURANCE, BOTH
TO AND FROM THE FACTORY OF CELESTRON, AND SHALL BE REQUIRED TO PREPAY SUCH COSTS.
C
ELESTRON SHALL USE REASONABLE EFFORTS TO REPAIR OR REPLACE ANY TELESCOPE COVERED BY
THIS WARRANTY WITHIN THIR TY DAYS OF RECEIPT. IN THE EVENT REPAIR OR REPLACEMENT SHALL
REQUIRE MORE THAN THIRTY DAYS, CELESTRON SHALL NOTIFY THE CUSTOMER ACCORDINGL Y.
C
ELESTRON RESERVES THE RIGHT TO REPLACE ANY PRODUCT WHICH HAS BEEN DISCONTINUED FROM
ITS PRODUCT LINE WITH A NEW PRODUCT OF COMPARABLE V ALUE AND FUNCTION
.
THIS WARRANTY SHALL BE VOID AND OF NO FORCE OF EFFECT IN THE EVENT A COVERED PRODUCT
HAS BEEN MODIFIED IN DESIGN OR FUNCTION, OR SUBJECTED TO ABUSE, MISUSE, MISHANDLING OR
UNAUTHORIZED REPAIR
. FURTHER, PRODUCT MALFUNCTION OR DETERIORATION DUE TO NORMAL
WEAR IS NOT COVERED BY THIS WARRANTY .
CELESTRON DISCLAIMS ANY WARRANTIES, EXPRESS OR IMPLIED, WHETHER OF
MERCHANTABILITY OF FITNESS FOR A PARTICULAR USE, EXCEPT AS
EXPRESSLY SET FORTH HEREIN.
THE SOLE OBLIGATION OF CELESTRON UNDER THIS LIMITED WARRANTY
SHALL BE TO REPAIR OR REPLACE THE COVERED PRODUCT, IN ACCORDANCE
WITH THE TERMS SET FORTH HEREIN. CELESTRON EXPRESSLY DISCLAIMS ANY
LOST PROFITS, GENERAL, SPECIAL, INDIRECT OR CONSEQUENTIAL DAMAGES
WHICH MAY RESULT FROM BREACH OF ANY WARRANTY, OR ARISING OUT OF
THE USE OR INABILITY TO USE ANY CELESTRON PRODUCT. ANY WARRANTIES
WHICH ARE IMPLIED AND WHICH CANNOT BE DISCLAIMED SHALL BE LIMITED
IN DURATION TO A TERM OF TWO YEARS FROM THE DATE OF ORIGINAL RETAIL
PURCHASE.
S
OME STATES DO NOT ALLOW THE EXCLUSION OR LIMITA TION OF INCIDENTAL OR CONSEQUENTIAL
DAMAGES OR LIMITA TION ON HOW LONG AN IMPLIED WARRANTY LASTS
, SO THE ABOVE LIMIT ATIONS
AND EXCLUSIONS MAY NOT APPLY TO YOU
.
THIS WARRANTY GIVES YOU SPECIFIC LEGALRIGHTS
, AND YOU MAY ALSO HA VE OTHER RIGHTS WHICH
VARY FROM ST ATE TO STATE
.
CELESTRON RESERVES THE RIGHT TO MODIFY OR DISCONTINUE
, WITHOUT PRIOR NOTICE TO YOU, ANY
MODEL OR STYLE TELESCOPE
.
IF WARRANTY PROBLEMS ARISE
, OR IF YOU NEED ASSISTANCE IN USING YOUR TELESCOPE CONTACT:
C
ELESTRON
CUSTOMER SERVICE DEPAR TMENT
2835 COLUMBIA STREET
TORRANCE, CA 90503 USA
T
EL. (310) 328-9560 FAX
. (310) 212-5835
M
ONDAY-FRIDAY 8AM-4PM PST
ALL AUTHORIZED RETURNS SHOULD BE SHIPPED TO:
CELESTRON
1380 C
HARLES WILLARD ST.
CARSON, CA 90747
T
HIS WARRANTY SUPERSEDES ALL OTHER PRODUCT WARRANTIES.
NOTE: THIS WARRANTY IS VALID TO U.S.A. AND CANADIAN CUSTOMERS WHO HAVE PURCHASED
THIS PRODUCT FROM AN AUTHORIZED CELESTRON DEALER IN THE U.S.A. OR CANADA. WARRANTY
OUTSIDE THE U.S.A. AND CANADA IS VALID ONLY TO CUSTOMERS WHO PURCHASED FROM A
CELESTRON DISTRIBUTOR OR AUTHORIZED CELESTRON DEALER IN THE SPECIFIC COUNTRY AND
PLEASE CONTACT THEM FOR ANY W ARRANTY SERVICE
.
Product design and specifications subject to change without prior notice. © 2004 Celestron
ExloraScope User Guide TL**.qxd 4/9/04 10:00 AM Page 10
Page 13
ESPAÑOL
GuGuía del usuario a del usuario
y Operaciy Operación
ExloraScope User Guide TL**.qxd 4/9/04 10:00 AM Page 11
Page 14
ESPAÑOL
Uso Correcto y Medidas de Seguridad
Nunca mire directamente
hacia el sol sin protección
ocular, o con un telescopio
a menos que usted tenga el
filtro solar adecuado. Esto
puede causar un daño
permanente e irreversible
a los ojos.
Nunca use su telescopio
para proyectar una
imagen del sol sobre
cualquier superficie. La
acumulación de calor
interno puede dañar su
telescopio y todo accesorio
ligado a éste.
Nunca deje el telescopio
sin supervisión, tanto
cuando haya niños
presentes como adultos
que puedan no estar
familiarizados con los
procedimientos correctos
para la operación de su
telescopio.
Nunca toque las
lentes del ocular o los
espejos del interior del
telescopio.
Nunca permita que
ingrese algún objeto o
humedad en exceso en
el interior del
telescopio.
Siempre agarre el
ocular cuidadosamente
por los costados.
Siempre trate su
ExploraScope con
cuidado – puede
romperse si es
manejado bruscamente.
¡PRECAUCIÓN!
12
ExloraScope User Guide TL**.qxd 4/9/04 10:00 AM Page 12
Page 15
ESPAÑOL
Bienvenido
Ocular
Cobertor del ocular
Dispositivo de enfoque
Telescopio ExploraScope
Cobertor
Frontal
Guía del usuario y de operación
Caja
Reutilizable
Adaptador
del Trípode
Correa para transporte
Base Giratoria
Su Nuevo Celestron ExploraScope
Su nuevo ExploraScope está diseñado para ser
usado por toda la familia y funciona
igualmente bien para la observación celestial
(cielo nocturno) o terrestre (la tierra). ¡Las
posibilidades de divertirse y aprender son
ilimitadas!
Asegúrese de leer este manual completamente
para un uso más seguro y provechoso de su
ExploraScope. Preste atención especial a las
advertencias de seguridad y siempre supervise a
los niños pequeños.
Su ExploraScope incluye:
•El telescopio ExploraScope y la correa
•Una base giratoria
•Un ocular de 44x con cobertor
•Un cobertor frontal protector
•Un dispositivo de enfoque ajustable
•Un adaptador del trípode
•Una caja reutilizable para almacenamiento
y transporte
•Una guía del usuario y de operación
Puede adquirir los accesorios opcionales en la
tienda de su Vendedor Autorizado Celestron.
Vea en el interior de la cubierta trasera para
más información.
Especificaciones Técnicas del ExploraScope
Diámetro . . . . . . . . . . . . . . . . . . . . . 80 mm
Distancia Focal . . . . . . . . . . . . . . . 550 mm
Ocular . . . . . . . . . . . . . . . . . 12,5 mm (44x)
Campo visual . . . . . . . . . . . . . . . . . . . . . 1°
Foco cercano . . . . . . . . . . . . . . . . . . . 15 m
13
ExloraScope User Guide TL**.qxd 4/9/04 10:00 AM Page 13
Page 16

ESPAÑOL
Ensamblando el ExploraScope
Ensamblaje
Ensamblar su Explorascope es simple y sólo debería
tomarle unos pocos minutos. Primero familiarícese
con las partes de su telescopio, luego siga las
instrucciones que se encuentran debajo.
Remueva el cobertor del ocular
Remueva el cobertor frontal y colóquelo a un
costado. Siempre use el cobertor frontal para
proteger los componentes internos del
ExploraScope cuando no esté en uso.
Coloque el ExploraScope sobre su base. Usted
tiene la opción de usar el telescopio con o sin la
base o con un trípode (vea el paso 5).
Gire el dispositivo de enfoque para ajustar el
foco de los objetos que están siendo
observados como se describe en ¨Usando Su
ExploraScope¨.
Para usar un trípode estándar de cámara con su
ExploraScope, usted primero debe unir el
adaptador del trípode. Alinee el tornillo y la
clavija del adaptador con los orificios de la base
del telescopio y ajústelos. El ExploraScope está
listo para ser unido a un trípode estándar de
fotografía.
¡Esto es todo lo que hay que hacer! Si usted está
usando la base o un trípode, usted deberá hallar una
superficie uniforme sobre la cual ubicarse antes de la
observación. Use la correa para transporte o la caja
de empaque para hacer que el transporte de su
ExploraScope sea más seguro y fácil.
32154
12345
14
ExloraScope User Guide TL**.qxd 4/9/04 10:00 AM Page 14
Page 17

ESPAÑOL
Consejos para la observación
Ocular
Apertura
Luz
Entrante
Imagen Magnificada
Espejo
primario
Espejo
secundario
Cómo funciona el ExploraScope
El ExploraScope es un telescopio de tipo reflector, que usa dos espejos para
reunir y focalizar la luz en el ocular. Este tipo de telescopio tiene la ventaja
de que tiene un tamaño más compacto para una apertura dada.
El diámetro de una apertura de telescopio, o abertura, es lo que determina
su capacidad para ver objetos débiles a lo lejos. La potencia de
magnificación es determinada por el ocular. Celestron ofrece otros oculares
para su Explorascope, para aumentar la magnificación o el campo visual
con magnificaciones menores. Por favor vea la sección de accesorios
opcionales.
Para remover el ocular, rote el dispositivo de enfoque en el sentido de las
agujas del reloj hasta que el ocular esté completamente extendido. Rote el
tubo cromado del ocular en el sentido contrario al de las agujas del reloj
hasta que el ocular sea removido.
Usando Su ExploraScope
Usted puede instalar el ExploraScope y realizar las observaciones
girándolo sobre su base, o bien puede unirlo a un trípode usando el
adaptador para el trípode incluido. Usted también puede simplemente
sostener el telescopio por las manijas con sus manos o apoyarlo sobre su
falda. Para una visión celestial, la estabilidad proporcionada por la base o
por un trípode es de gran ayuda, ya que las estrellas y los planetas
distantes pueden llevar tiempo hasta que logre localizarlos y pueden
moverse fácilmente fuera del campo visual. Para observaciones terrestres,
puede funcionar mejor si usted sostiene el telescopio ya que puede apuntar
con mayor facilidad al horizonte y seguir los objetos en movimiento.
Para visualizar un objeto, simplemente apunte y mire a través del ocular.
Para focalizar, rote lentamente el dispositivo de enfoque hasta que la
imagen en el ocular sea clara y nítida. Para focalizar sobre un objeto que se
encuentre más cerca que su blanco actual, gire la perilla del dispositivo de
enfoque en el sentido de las agujas del reloj. Para objetos más distantes,
gire la perilla del dispositivo de enfoque en el sentido contrario al de las
agujas del reloj.
15
ExloraScope User Guide TL**.qxd 4/9/04 10:00 AM Page 15
Page 18

ESPAÑOL
Consejos para la observación
Evite los cielos
brumosos
y la niebla
Evite realizar
observaciones
sobre techos
Evite realizar
observaciones a
través de los
cristales de las
ventanas
123
123
Los objetos terrestres deben estar por lo menos a 15 m de distancia
para poder ser observados con claridad. Usted puede ver objetos en
el cielo durante el día tales como aviones y pájaros, pero sea
cuidadoso y nunca observe el sol con su ExploraScope o cualquier
otro telescopio sin usar el equipo de filtros adecuado.
Cuando se trabaja con cualquier instrumento óptico, hay algunas
cosas que deberán recordarse para poder estar seguro de que usted
va a obtener la mejor imagen posible.
Si usted usa lentes correctores (específicamente anteojos), usted
debería quitárselos cuando realice una observación a través de un
ocular unido al telescopio. Pero si usted tiene astigmatismo, deberá
usar los lentes correctores en todo momento.
Los cielos brumosos, la niebla y el rocío pueden dificultar la
focalización cuando esté realizando una observación terrestre.
La cantidad de detalles que pueden verse bajo estas condiciones
se encuentra completamente reducida.
Nunca observe a través o por encima de objetos que estén
generando ondas de calor. Esto incluye a los automóviles y a los
lotes de estacionamiento de asfalto en los días calurosos del
verano, o los techos de los edificios. Las ondas calientes
distorsionarán la atmósfera y afectarán su visión en varias
maneras del mismo modo que lo hacen los cristales de las
ventanas cuando no son uniformes.
Nunca mire a través del cristal de una ventana. El cristal que se
encuentra en las ventanas de las casas es imperfecto desde el
punto de vista óptico. Esta inconsistencia puede y distorsionará
las imágenes y afectará su habilidad para enfocar el telescopio.
En la mayoría de los casos usted no será capaz de adquirir una
imagen verdaderamente nítida, mientras que en algunos casos,
usted podrá realmente ver doble.
16
ExloraScope User Guide TL**.qxd 4/9/04 10:00 AM Page 16
Page 19

ESPAÑOL
Triangulación de Estrellas
OMEDA
GREAT NEBULA
M31
M32
GLORIA FREDERIKA
NGC7662
NGC7
1
2
Triangulación de Estrellas
Una manera de encontrar objetos celestiales es a través de un proceso
llamado triangulación de estrellas. La triangulación de estrellas se realiza
utilizando las estrellas brillantes para que estas lo ¨guien¨ hacia un objeto.
Para realizar una triangulación de estrellas exitosa es de gran ayuda
conocer el campo visual de su telescopio. Su ExploraScope tiene un campo
visual de aproximadamente 1°. Por lo tanto, si usted sabe que un objeto
está 3° de distancia de su ubicación actual, usted sólo necesita moverse
3 campos visuales hacia el objeto deseado. Probemos con un ejemplo
popular: La Galaxia de Andrómeda, también conocida como M31.
Para buscar M31:
Localice la constelación de Pegasus, un gran cuadrado visible
durante el otoño en el cielo oriental, que se mueve hacia un
punto superior y en los meses de invierno se mueve hacia un
punto superior y hacia el oeste.
Empiece en la estrella que se encuentra en el ángulo nordesteAlpha (α) Andrómeda.
1
2
17
ExloraScope User Guide TL**.qxd 4/9/04 10:00 AM Page 17
Page 20

ESPAÑOL
Triangulación de Estrellas
NGC752
ANDROMEDA
GREAT NEBULA
M31
M32
CA
N
3
4
5
Buscando M31 continuación…
Muévase hacia el nordeste aproximadamente 7° (siete campos
visuales). Allí usted encontrará dos estrellas con el mismo brillo
- Andrómeda Delta (δ) y Andrómeda Pi (π) - que se encuentran
a 3° de distancia.
Continúe moviéndose en la misma dirección otros 8°. Allí usted
encontrará dos estrellas Andrómeda Beta (β) y Andrómeda
Mu (µ) - las cuales también se encuentran a 3° de distancia.
Muévase 3° hacia el noroeste - la misma distancia entre las dos
estrellas - hacia la galaxia de Andrómeda.
La triangulación de estrellas a la Galaxia de Andrómeda (M31) es
instantánea, ya que todas las estrellas que se necesitan para poder
hacerla son observables a simple vista. Por medio de esta técnica
usted puede localizar muchos objetos en el cielo.
345
18
ExloraScope User Guide TL**.qxd 4/9/04 10:00 AM Page 18
Page 21

ESPAÑOL
Ajuste de la Colimación
1
Espejo
Primario
Espejo
Secundario
2
La colimación es la alineación óptica de los espejos de su telescopio.
Su ExploraScope fue colimado en la fábrica y nunca debería
necesitar un ajuste. Si por alguna razón el telescopio se cayera o
dañara, podría ser necesario ajustar la alineación de los espejos.
No altere la colimación a menos que sea necesario.
Controlando la Colimación
Remueva el ocular: rote el dispositivo de enfoque en el sentido de las
agujas del reloj hasta que el ocular esté completamente extendido.
Rote el tubo cromado del ocular en el sentido contrario al de las
agujas del reloj hasta que el ocular sea removido.
Una vez que el ocular ha sido removido, mire a través del
dispositivo de enfoque y verá una imagen del espejo secundario
reflejada sobre el espejo primario.
Si el espejo secundario no está perfectamente centrado con
respecto al espejo primario, entonces su telescopio está fuera de
alineación. Para corregir esto, usted deberá ajustar los tornillos
de colimación primaria ubicados en la parte posterior del tubo.
1
2
19
ExloraScope User Guide TL**.qxd 4/9/04 10:00 AM Page 19
Page 22

ESPAÑOL
Ajuste de la Colimación
Espejo
Primario
Espejo
Secundario
4
3
Corrigiendo la Colimación
El ExploraScope tiene tres orificios en la parte posterior del tubo
para poder acceder a los comandos de ajuste de la colimación.
Cada orificio tiene un tornillo de alineación que inclinará el espejo
cada vez que este sea ajustado o aflojado. El tornillo central no
está relacionado con la colimación y no deberá ser ajustado.
Para alinear su ExploraScope:
Remueva las tapas que cubren cada uno de los tres tornillos de
colimación. No quite la tapa que se encuentra en el centro del tubo.
Usando un destornillador Phillips, ajuste los tornillos de
colimación hasta que la imagen del espejo secundario se mueva
hacia el centro del espejo primario. Para poder ajustar un tornillo,
puede ser que necesite aflojar un poco los tornillos restantes.
Con ambos espejos alineados usted debería poder ver la silueta del
espejo secundario ubicada en el centro del espejo primario.
Cuidadosamente vuelva a colocar las cubiertas protectoras de
goma sobre los orificios de ajuste y vuelva a colocar el ocular.
Para efectuar la colimación de manera más fácil y precisa,
Celestron le ofrece una Herramienta de Colimación opcional
(# 94183) que le ayuda a alinear su ojo con el centro del paso
óptico.
3
4
20
ExloraScope User Guide TL**.qxd 4/9/04 10:00 AM Page 20
Page 23

ESPAÑOL
Accesorios opcionales
#94183 Herramienta
de Colimación
El rendimiento óptico de la mayoría
de los telescopios Newtonianos puede
ser optimizado realizando la
colimación o la realineación de las
ópticas del telescopio, en caso que sea
necesario. Este procedimiento es
fácilmente realizado con la
Herramienta de colimación de
Celestron, un accesorio manuable que
viene con instrucciones
detalladas.
#93588 Linterna
para Visión Nocturna
Este modelo de calidad superior
de Celestron para la astronomía,
usa dos LEDs rojos para preservar
la visión nocturna mejor que los
filtros rojos u otros dispositivos.
El brillo es ajustable. Opera con
una sola batería de 9 voltios
(incluida).
Oculares Adicionales
Celestron le ofrece opciones de
oculares adicionales para su
ExploraScope. El ocular
ExploraScope de 6 mm (#93227)
proporciona una potencia de
magnificación de 92 veces, mientras
que el ocular ExploraScope de
25 mm (#93226) proporciona una
potencia de magnificación de
22 veces y un campo visual uniforme
más amplio.
#93722 -Mapa del Cielo
Estos mapas son la guía de
instrucción ideal para aprender
acerca del cielo nocturno Aún si
usted ya sabe como ubicar las
constelaciones mayores, estos mapas
pueden ayudarle a localizar todo
tipo de objetos fascinantes. La tapa
frontal contiene un planisferio
especialmente diseñado que brilla en
la oscuridad y que rota para simular
la progresión de los objetos
celestiales por estaciones a través del
cielo. Contiene una lista y tablas con
más de mil estrellas y objetos de las
profundidades del cielo. La sección
de referencia ilustrada le brinda
información básica y las
características visuales de varios
tipos de estrellas, nebulosas y
galaxias.
#93504 - Calentador para las
manos reutilizable Exotherm
Perfecto para usar en los fríos
atardeceres en ambientes exteriores,
durante campamentos, observaciones
de estrellas o en eventos deportivos, el
calentador para manos Exotherm es
conveniente, reutilizable, y hecho con
materiales no tóxicos. El calor dura
hasta 1 hora.
#93728 Guía de Peterson
para Principiantes
Una guía de campo simplificada de
las estrellas, los planetas y el
universo. Un gran mapa del camino
para aquellos que se inician en la
astronomía.
ExloraScope User Guide TL**.qxd 4/9/04 10:00 AM Page 21
Page 24

ESPAÑOL
Garantía de Dos Años Celestron
®
A. CELESTRON GARANTIZA ESTE TELESCOPIO COMO LIBRE DE DEFECTOS EN LOS MATERIALES Y EN LA
FABRICACIÓN POR UN PERÍODO DE DOS AÑOS. CELESTRON REPARARÁ O REEMPLAZARÁ EL
PRODUCTO O LA PARTE CUANDO UNA INSPECCIÓN POR PARTE DE CELESTRON, DETERMINE QUE
EXISTAN DEFECTOS EN LOS MATERIALES O EN LA FABRICACIÓN. EL PRODUCTO DEBE DEVOLVERSE
A CELESTRON JUNTO CON UNA PRUEBA DE COMPRA QUE SEA SATISFACTORIA A CELESTRON, COMO
UNA CONDICIÓN PARA LA OBLIGACIÓN DE CELESTRON DE REPARAR O REEMPLAZAR EL PRODUCTO.
B. DEBE OBTENERSE UN NÚMERO DE AUTORIZACIÓN DE RETORNO APROPIADO POR ADELANTADO DE
CELESTRON. LLAME A CELESTRON AL TELÉFONO (310) 328-9560 (E.U.A.) PARA RECIBIR EL
NÚMERO QUE DEBE SER ESCRITO POR FUERA DEL EMPAQUE DE ENVÍO.
TODAS LAS DEVOLUCIONES DEBEN ACOMPAÑARSE POR UNA DECLARACIÓN ESCRIT AESTABLECIENDO EL
NOMBRE, DIRECCIÓN
, Y NÚMERO DE TELÉFONO DURANTE EL DÍA DEL DUEÑO
, JUNTO CON UNA
DESCRIPCIÓN BREVE DE LOS DEFECTOS OBSERV ADOS
. L
AS PARTES O EL PRODUCTO QUE SE
REEMPLAZARÁN SE CONVERTIRÁN EN PROPIEDAD DE
CELESTRON
.
E
L CLIENTE SERÁ RESPONSABLE DE TODOS LOS COSTOS DE TRANSPORTE Y SEGURO
, AMBOS DESDE Y
HASTA LA FÁBRICA DE
CELESTRON, Y SE LE EXIGIRÁ PAGAR POR ADELANTADO TALES COSTOS.
CELESTRON HARÁ LOS ESFUERZOS RAZONABLES PARA REPARAR O REEMPLAZAR CUALQUIER
TELESCOPIO CUBIERTO POR ESTA GARANTÍA DENTRO DE LOS TREINTA DÍAS DE SU RECEPCIÓN. ENEL
CASO DE REPARACIÓN O EL REEMPLAZO SE REQUERIRÁN MÁS DE TREINTA DÍAS. CELESTRON
NOTIFICARÁ AL CLIENTE AL RESPECTO. CELESTRON SE RESERVA EL DERECHO DE REEMPLAZAR
CUALQUIER PRODUCTO QUE SE HAYA DISCONTINUADO DE SU LÍNEA DE PRODUCTOS CON UN NUEVO
PRODUCTO DE VALOR Y FUNCIONAMIENTO COMP ARABLES.
ESTA GARANTÍA SERÁ NULA Y SIN FUERZA DE EFECTO EN EL CASO DE QUE UN PRODUCTO CUBIERTO
POR LA MISMA HA YA SIDO MODIFICADO EN EL DISEÑO O FUNCIONAMIENTO, O SUJETO A ABUSO, MAL
USO, MALTRATO O UNA REPARACIÓN NO AUTORIZADA. MÁS AÚN, EL FUNCIONAMIENTO DEFECTUOSO
DEL PRODUCTO O EL DETERIORO DEBIDO AL USO NORMAL NO ESTÁN CUBIERTOS POR ESTA GARANTÍA.
CELESTRON DESCONOCE CUALQUIER GARANTÍA, EXPRESA O IMPLÍCITA, O DE
COMERCIABILIDAD O ADAPTACIÓN PARA UN USO PARTICULAR, EXCEPTO QUE
ELLO HAYA SIDO EXPRESAMENTE ESTABLECIDO AQUÍ.
LA SOLA OBLIGACIÓN DE CELESTRON BAJO ESTA GARANTÍA LIMITADA SERÁ LA
DE REPARAR O REEMPLAZAR EL PRODUCTO CUBIERTO, DE ACUERDO CON LAS
CONDICIONES ESTABLECIDAS AQUÍ. CELESTRON EXPRESAMENTE DESCONOCE
CUALQUIER PÉRDIDA DE GANANCIA, DAÑOS CONSECUENCIALES GENERALES,
ESPECIALES, O INDIRECTOS QUE PUEDAN RESULTAR DE LA BRECHA DE
CUALQUIER GARANTÍA, O GENERARSE FUERA DEL USO O POR LA INCAPACIDAD
PARA USAR CUALQUIER PRODUCTO DE CELESTRON. CUALQUIER GARANTÍA
QUE ESTÉ IMPLÍCITA Y QUÉ NO PUEDA SER DESCONOCIDA SE LIMITARÁ EN SU
DURACIÓN A UN TÉRMINO DE DOS AÑOS DE LA FECHA DE COMPRA ORIGINAL
EN LA TIENDA MINORISTA.
ALGUNOS ESTADOS NO PERMITEN LA EXCLUSIÓN O LIMITACIÓN DE DAÑOS CONSECUENCIALES O
INCIDENTALES O LA LIMITACIÓN DE CUÁNTO TIEMPO DURA UNA GARANTÍA IMPLÍCITA
, DE MODO QUE
LAS LIMITACIONESY EXCLUSIONES ANTERIORES PODRÍAN NO SER APLICABLES EN SU CASO PARTICULAR
.
ESTA GARANTÍA LE OTORGA A USTED DERECHOS LEGALES ESPECÍFICOS
, Y USTED TAMBIÉN PODRÍA
TENER OTROS DERECHOS QUE V ARÍAN ENTRE LOS DISTINTOS ESTADOS
.
CELESTRON SE RESERV A EL DERECHO DE MODIFICAR O DISCONTINUAR
, SIN AVISO PREVIO, CUALQUIER
MODELO O ESTILO DE TELESCOPIO
.
SI HUBIERA PROBLEMAS CON LA GARANTÍA, O SI USTED NECESIT ARA A YUDA
PARA EL USO DEL TELESCOPIO CONTACTE A
:
C
ELESTRON
CUSTOMER SERVICE DEPAR TMENT
2835 COLUMBIA STREET
TORRANCE, CA 90503 USA
T
EL. (310) 328-9560 FAX
. (310) 212-5835
D
E LUNES A VIERNES DE 8AM-4PM (HORA DEL PACÍFICO)
TODAS LAS DEVOLUCIONES CON AUTORIZACIÓN DEBERÁN SER ENVIADAS A :
CELESTRON
1380 C
HARLES WILLARD ST.
CARSON, CA 90747
E
STA GARANTÍA REEMPLAZA A TODAS LAS OTRAS GARANTÍAS DEL PRODUCTO.
NOTA: EST A GARANTÍA ES VÁLIDA PARA LOS CLIENTES DE E.U.A. Y CANADIENSES QUE HAYAN
COMPRADO ESTE PRODUCTO A UN VENDEDOR DE CELESTRON AUTORIZADO EN E.U.A. O CANADÁ. LA
GARANTÍA FUERA DE E.U.A. Y CANADÁ SÓLO ES VÁLIDA PARA LOS CLIENTES QUE COMPRARON EL
PRODUCTO A UN DISTRIBUIDOR DE CELESTRON O A UN VENDEDOR DE CELESTRON AUTORIZADO EN
UN PAÍS ESPECÍFICO
; POR FAVOR CONTÁCTELOS A ELLOS P ARACUALQUIER SERVICIO BAJO LA GARANTÍA.
El diseño del producto y las especificaciones del mismo están sujetas a cambios sin previo aviso © 2004 Celestron
ExloraScope User Guide TL**.qxd 4/9/04 10:00 AM Page 22
Page 25

FRANÇAIS
Guide dGuide d’installation installation
et det d’utilisationutilisation
ExloraScope User Guide TL**.qxd 4/9/04 10:00 AM Page 23
Page 26

FRANÇAIS
Consignes de bonne utilisation et de sécurité
Ne jamais regarder
directement le soleil à l’œil
nu avec un télescope sans
filtre solaire adéquat. Ceci
pourrait entraîner des
blessures oculaires
permanentes et
irréversibles.
Ne jamais utiliser le
télescope pour projeter
une image du soleil sur
une quelconque surface.
La chaleur qui s’accumule
à l’intérieur de l’appareil
pourrait endommager le
télescope ou ses
accessoires.
Ne jamais
laisser le
télescope seul en présence
d’enfants ou encore
d’adultes n’en connaissant
pas les procédures de
fonctionnement
habituelles.
Ne jamais entrer en
contact avec la lentille de
l’oculaire ou les miroirs
se trouvant à l’intérieur
du télescope.
Ne jamais introduire
d’objets à l’intérieur du
télescope ni laisser
l’humidité s’y infiltrer.
Toujours manier
l’oculaire de visée
avec précaution en le
tenant par les côtés.
Toujours manier
avec précaution votre
ExploraScope qui
risque de se casser
dans le cas contraire.
ATTENTION !
24
ExloraScope User Guide TL**.qxd 4/9/04 10:00 AM Page 24
Page 27

FRANÇAIS
Bienvenue
Oculaire
Cache anti-poussière
de l’oculaire
Bouton de
mise au point
ExploraScope
Cache frontal
Guide d’installation
et d’utilisation
Boîte
réutilisable
Adaptateur
pour trépied
Sangle de transport
Socle pivotant
Votre nouvel ExploraScope Celestron
Votre nouvel ExploraScope est conçu pour pouvoir
être utilisé par l’ensemble de la famille tout en
produisant de bons résultats pour l’observation
céleste (ciel nocturne) et terrestre (de la terre). Les
possibilités ludiques et éducatives de votre
ExploraScope sont infinies !
Ne pas oublier de lire l’ensemble du présent
guide de manière à pouvoir utiliser votre
ExploraScope en toute sécurité et sans
difficulté. Prendre le temps de lire les
consignes de sécurité et ne jamais laisser
d’enfants utiliser le télescope seuls.
Votre ExploraScope comprend :
•Un télescope ExploraScope et une sangle
•Un socle pivotant
•Un oculaire 44x à cache anti-poussière
•Un cache frontal de protection
•Un bouton de mise au point réglable
•Un adaptateur pour trépied
•Une boîte de rangement/transport réutilisable
•Un guide d’installation et d’utilisation
Des accessoires en option sont également disponibles
par l’intermédiaire de votre concessionnaire agréé
Celestron. Consulter l’intérieur du verso pour tous
renseignements supplémentaires.
Spécifications techniques de l’ExploraScope
Diamètre : . . . . . . . . . . . . . . . . . . . . 80 mm
Longueur de mise au point : . . . . . 550 mm
Oculaire de visée : . . . . . . . . 12,5 mm (44x)
Champ de vision : . . . . . . . . . . . . . . . . . . 1°
Mise au point rapprochée : . . . . . . . 15,2 m
25
ExloraScope User Guide TL**.qxd 4/9/04 10:00 AM Page 25
Page 28

FRANÇAIS
Assemblage de l’ExploraScope
Assemblage
L’assemblage de votre ExploraScope est simple
et ne prend que quelques minutes. Commencez
par vous familiariser avec les pièces de votre
télescope avant de suivre les consignes
indiquées ci-dessous.
Retirer le cache anti-poussière de l’oculaire.
Retirer le cache frontal et le laisser de côté.
Toujours remettre le cache frontal en place de
manière à protéger les composants intérieurs
de l’ExploraScope lorsqu’il ne sert pas.
Placer l’ExploraScope sur son socle. Vous
pouvez utiliser le télescope avec ou sans son
socle ou son trépied (consulter l’étape 5).
Tourner le bouton de mise au point de
manière à régler le télescope sur les objets
visualisés de la manière décrite au chapitre
‘Utilisation de votre ExploraScope’.
Pour utiliser un trépied d’appareil photo
standard, vous devez tout d’abord fixer
l’adaptateur de trépied à votre
ExploraScope. Aligner la vis de
l’adaptateur et la clavette sur les trous
situés sur le socle du télescope, puis visser.
L’ExploraScope est prêt à être fixé à un
trépied pour appareil photo standard.
Votre télescope est prêt ! Si vous utilisez le
socle ou un trépied, vous devez les placer sur
une surface plane avant d’utiliser le télescope.
Utiliser la sangle ou boîte de transport pour
transporter votre ExploraScope en toute
sécurité et sans difficulté.
32154
12345
26
ExloraScope User Guide TL**.qxd 4/9/04 10:00 AM Page 26
Page 29

FRANÇAIS
Astuces d’observation
Oculaire
Ouverture
Lumière
rentrante
Image agrandie
Miroir
primaire
Miroir
secondaire
Fonctionnement de l’ExploraScope
L’ExploraScope est un télescope de type réflecteur qui possède deux
miroirs permettant d’absorber et de diriger la lumière vers l’oculaire.
Ce type de télescope offre l’avantage d’une taille plus compacte pour
une ouverture donnée.
Le diamètre de l’ouverture du télescope détermine sa capacité à visualiser
les astres faibles au loin. La puissance de grossissement dépend de
l’oculaire. Celestron offre d’autres oculaires conçus pour votre
ExploraScope de manière à augmenter le grossissement ou encore le champ
de vision lorsque le grossissement est peu important. Veuillez consulter le
chapitre traitant des accessoires optionnels.
Pour retirer l’oculaire, faire pivoter le bouton de mise au point dans le sens des
aiguilles d’une montre jusqu’à ce que l’oculaire se trouve entièrement déplié.
Faire tourner le canon de l’oculaire en chrome dans le sens inverse des aiguilles
d’une montre, jusqu’à ce que l’oculaire se détache.
Utilisation de votre ExploraScope
Vous pouvez placer l’ExploraScope sur son socle et observer en le faisant
pivoter; vous pouvez également le fixer sur un trépied avec l’adaptateur
pour trépied inclus. Vous pouvez également tout simplement tenir le
télescope par les poignées ou le placer sur vos genoux. Pour une
observation céleste, il est utile d’avoir recours au socle ou au trépied
inclus dans la mesure où les étoiles ou planètes distantes prennent
parfois du temps à être localisées et sortent facilement du champ de
vision. Pour une observation terrestre, il peut s’avérer plus simple de
porter le télescope dans la mesure où cette technique permet de se diriger
plus facilement vers l’horizon et de suivre les objets en mouvement.
Pour visualiser un objet, pointer et regarder par l’oculaire. Pour mettre au
point, faire pivoter le bouton de mise au point jusqu’à ce que l’image
apparaissant dans l’oculaire de visée devienne claire et nette. Pour régler
l’objectif sur un objet se trouvant plus près de vous que le réglage actuel,
tourner le bouton de mise au point dans le sens des aiguilles d’une montre.
Pour les objets plus distants, tourner le bouton de mise au point dans le sens
inverse des aiguilles d’une montre.
27
ExloraScope User Guide TL**.qxd 4/9/04 10:00 AM Page 27
Page 30

FRANÇAIS
Astuces d’observation
Éviter les ciels
brumeux
et le brouillard.
Éviter de
regarder
au-dessus
des toitures.
Ne jamais
regarder à
travers une vitre.
1
2
3
Les objets terrestres doivent se trouver à une distance d’au moins
quinze mètre pour pouvoir être visionnés clairement. Vous pouvez
visionner des objets célestes pendant la journée, tels qu’avions et
oiseaux, mais veillez à ne jamais diriger votre ExploraScope ou tout
autre télescope vers le soleil sans filtre solaire adéquat.
L’utilisation d’un instrument optique nécessite certains éléments
de manière à obtenir la meilleure qualité d’image possible.
Si vous portez des lentilles de contact (et plus particulièrement
des lunettes), il peut s’avérer utilise de les retirer avant
d’observer par l’intermédiaire d’un oculaire fixé à un télescope.
Si vous êtes astigmate, vous devez porter vos lentilles ou verres
correcteurs en permanence.
Les ciels brumeux, le brouillard et la brume risquent
d’engendrer des difficultés de mise au point en observation
terrestre. Les détails sont nettement moins précis dans des
conditions de ce type.
Ne jamais regarder au-delà ou par-dessus des objets
produisant des vagues de chaleur. Ceci inclut les voitures et
parkings d’asphalte pendant les jours d’été particulièrement
chauds, ou encore les toitures des bâtiments. Les vagues de
chaleur dérèglent l’atmosphère et ont une influence sur la
visibilité de la même manière que les panneaux irréguliers
des vitres.
Ne jamais regarder à travers une vitre. Les vitres des fenêtres
ménagères contiennent des défauts optiques. Ces irrégularités
peuvent et risquent de déformer les images et donc
d’influencer de manière négative la mise au point de votre
télescope. Dans la majeure partie des cas, vous ne
parviendrez pas à obtenir une image parfaitement nette
tandis que de temps à autre, vous risquez d’obtenir une
image double.
123
28
ExloraScope User Guide TL**.qxd 4/9/04 10:00 AM Page 28
Page 31

FRANÇAIS
Cheminement visuel
OMEDA
GREAT NEBULA
M31
M32
GLORIA FREDERIKA
NGC7662
NGC7
1
2
Cheminement visuel
L’une des manières utilisées pour visionner les astres célestes
consiste en une procédure appelée le ‘cheminement visuel’. Le
cheminement visuel consiste à utiliser les étoiles les plus brillantes
comme point de repère vers un astre précis. Pour que la méthode
de cheminement visuel porte ses fruits, il est bon de connaître le
champ de vision de votre télescope. Le champ de vision de votre
ExploraScope est d’environ 1°. En conséquence, si vous souhaitez
visualiser un astre se trouvant à 3° de votre emplacement actuel,
vous devez régler le champ de vision de 3 degrés vers l’astre
souhaité. Prenons un exemple célèbre : La Galaxie d’Andromède
également appelée M31.
Recherche de M31 :
Localiser la constellation de Pégase, grand carré visible à
l’automne à l’est en vous déplaçant jusqu’à un point à la
verticale, tandis que pendant les mois d’hiver, ce point à la
verticale se déplace vers l’ouest.
Commencer par l’étoile située dans le coin nord-est – (α) Alpha
d’Andromède.
1
2
29
ExloraScope User Guide TL**.qxd 4/9/04 10:00 AM Page 29
Page 32

FRANÇAIS
Cheminement visuel
NGC752
ANDROMEDA
GREAT NEBULA
M31
M32
CA
N
345
Recherche de M31, suite…
Déplacez-vous vers le nord-est d’environ 7° (7 champs de vision)
Vous trouverez deux étoiles d’une luminosité semblable –
(δ) Delta et (π) Pi d’Andromède - séparées par une distance
d’environ 3°.
Continuer dans la même direction pendant encore 8°. Vous
trouverez deux étoiles – (β) Bêta et (µ) Mu d’Andromède –
également séparées par une distance d’environ 3°.
Déplacez-vous de 3° vers le nord-ouest – distance égale à celle qui
sépare les deux étoiles - jusqu’à la galaxie d’Andromède.
Le cheminement visuel jusqu’à la galaxie d’Andromède (M31) est un
jeu d’enfants dans la mesure où l’ensemble des étoiles requises pour
atteindre cette galaxie est visible à l’œil nu. Cette technique permet de
localiser de nombreux astres.
345
30
ExloraScope User Guide TL**.qxd 4/9/04 10:00 AM Page 30
Page 33

FRANÇAIS
Réglage de la collimation
1
1
2
Miroir
primaire
Miroir
secondaire
2
La collimation se définie comme l’alignement optique des miroirs de
votre télescope.
Votre ExploraScope est collimaté en usine et ne nécessite aucun
réglage. Cependant, si pour une raison quelconque le télescope
tombait ou se retrouvait endommagé, il serait alors nécessaire de
régler l’alignement des miroirs. Régler la collimation uniquement en
cas de besoin.
Vérification de la collimation
Retirer l’oculaire : Faire pivoter le bouton de mise au point dans
le sens des aiguilles d’une montre jusqu’à ce que l’oculaire se
trouve entièrement déplié. Faire tourner le canon de l’oculaire en
chrome dans le sens inverse des aiguilles d’une montre, jusqu’à ce
que l’oculaire se détache.
Lorsque l’oculaire a été retiré, regardez à l’intérieur du bouton de
mise au point. Vous devriez apercevoir une image du miroir
secondaire réfléchie dans le miroir primaire.
Si le miroir secondaire n’est pas parfaitement centré à l’intérieur
du miroir primaire, c’est que l’alignement de votre télescope est
incorrect. Pour rectifier l’alignement, commencer par régler les
vis de collimation primaire situées sur l’arrière du tube.
31
ExloraScope User Guide TL**.qxd 4/9/04 10:00 AM Page 31
Page 34

FRANÇAIS
Réglage de la collimation
Miroir
primaire
Miroir
secondaire
4
3
Rectification de la collimation
L’ExploraScope comporte trois trous situés sur l’arrière du tube qui
permettent d’accéder aux réglages de la collimation. Chaque trou
possède une vis d’alignement qui permet d’incliner le miroir en la
resserrant ou au contraire à la desserrant. La vis centrale ne
correspond pas aux réglages de la collimation et ne doit pas être
réglée. Alignement de votre ExploraScope :
Retirez les caches des trois vis de collimation. Ne pas retirer le
cache central du tube.
Avec un tournevis cruciforme, réglez les vis de collimation
jusqu’à ce que l’image du miroir secondaire se déplace vers le
centre du miroir primaire. Il peut s’avérer nécessaire de
desserrer légèrement les autres vis pour pouvoir resserrer une
vis spécifique.
Lorsque les deux miroirs sont alignés, vous devriez obtenir la
silhouette du miroir secondaire au centre du miroir primaire.
Remettre en place avec précaution les caches de protection en
caoutchouc sur les trous de réglage, puis réintroduire l’oculaire.
Pour faciliter la procédure de collimation et la rendre plus précise,
Celestron propose un Outil de collimation (Réf. 94183) permettant
de faciliter l’alignement de l’œil jusqu’au centre du chemin optique.
3
4
32
ExloraScope User Guide TL**.qxd 4/9/04 10:00 AM Page 32
Page 35

FRANÇAIS
Accessoires optiques
Réf. 94183 Outil de collimation
La performance optique de la
plupart des télescopes newtoniens
peut être optimisée en procédant à
une collimation, c’est-à-dire en
réalignant les éléments optiques du
télescope, au besoin. Cette procédure
est simple à réaliser grâce à l’outil de
collimation Celestron, accessoire
pratique livré avec un mode
d’emploi détaillé.
Réf. 93588 - Lampe torche
de nuit à voyants DEL
Modèle de choix Celestron conçu pour
l’astronomie et comportant deux
voyants DEL rouges permettant une
meilleure préservation de la vision
scotopique que les filtres rouges ou
systèmes autres. Luminosité réglable.
Fonctionne avec une pile unique de
9 volts (comprise).
Oculaires supplémentaires
Celestron propose un choix
d’oculaires supplémentaires pour
votre ExploraScope. L’oculaire
pour ExploraScope 6 mm
(Réf. 93227) offre une puissance
de grossissement de 92x tandis
que l’oculaire pour ExploraScope
de 25 mm (Réf. 93226) permet un
grossissement de 22x et offre un
champ de vision encore plus large.
Réf. 93722 Carte du ciel
Les cartes du ciel constituent le
guide d’apprentissage idéal pour
quiconque souhaite connaître le ciel
de nuit. Même dans le cas où vous
connaîtriez déjà la plupart des
constellations, ces cartes aident à
localiser de nombreux astres
fascinants. La page de couverture
comprend un planisphère
fluorescent spécialement conçu
pour effectuer une rotation qui
simule la progression saisonnière
des astres célestes. Le planisphère
comprend des listes et tableaux qui
répertorient plus de mille étoiles et
astres du ciel profond. Le chapitre
de référence illustré fournit des
renseignements courants ainsi que
les caractéristiques visuelles de
différents types d’étoiles, de
nébuleuses et de galaxies.
Réf. 93504 - Pochette
réchauffe-mains exothermique
Idéale pour les soirées fraîches à l’extérieur,
en camping, pour l’observation des étoiles
ou les événements sportifs. La pochette
réchauffe-mains exothermique est
pratique, réutilisable et conçue à partir de
matériaux non toxiques. Reste chaude
pendant 1 heure.
Réf. 93728 ‘Premier Guide’
de Peterson
Guide de terrain simplifié des
étoiles, des planètes et de l’univers.
Très bonne carte pour astronomes
débutants.
ExloraScope User Guide TL**.qxd 4/9/04 10:00 AM Page 33
Page 36

FRANÇAIS
Garantie Celestron limitée de deux ans
A. CELESTRON GARANTIT CE TÉLESCOPE CONTRE TOUS DÉFAUTS DE MATÉRIAUX OU VICES DE
FABRICATION PENDANT UNE PÉRIODE DE DEUX ANS
. CELESTRON S’ENGAGE À RÉPARER OU À
REMPLACER LE PRODUIT OU UNE PARTIE DUDIT PRODUIT LORSQU
’IL A ÉTÉ ÉTABLI APRÈS INSPECTION
PAR C
ELESTRON, QUE LE-DIT PRODUIT OU LA-DITE PIÈCE COMPORTE DES DÉFAUTS DE MATÉRIAUXOU
VICES DE FABRICATION. LA RESPONSABILITÉ DE
CELESTRON RELATIVE À LA RÉPARA TION OU AU
REMPLACEMENT DU PRODUIT N
’EST APPLICABLE QUE DANS LE CAS OÙ LE PRODUIT EST RENVOYÉ À
CELESTRON ACCOMPAGNÉ D
’UNE PREUVE D’ACHAT JUGÉE SATISFAISANTE PAR CELESTRON.
B. V
OUS DEVEZ OBTENIR LE NUMÉRO D’AUTORISATION DE RENVOI DU PRODUIT AUPRÈS DE CELESTRON
A VANT D’ENVOYER LE PRODUIT. VEUILLEZ CONTACTER CELESTRON AU (310) 328-9560 DE MANIÈRE
À OBTENIR LE NUMÉRO À AFFICHER SUR L
’EXTÉRIEUR DU PAQUET À EXPÉDIER.
T
OUS LES RETOURS DOIVENT ÊTRE ACCOMPAGNÉS D
’UNE NOTICE ÉCRITE INDIQUANT LE NOM, L’ADRESSE
ET LE NUMÉRO DE TÉLÉPHONE DU PROPRIÉTAIRE PENDANT LES HEURES OUVRABLES
, AINSI QU’UNE
DESCRIPTION SUCCINCTE DES DÉFAUTS PRÉSUMÉS. LES PIÈCES OU PRODUITS FAISANT L ’OBJET D’UN
REMPLACEMENT DEVIENNENT LA PROPRIÉTÉ DE
CELESTRON.
L
E CLIENT EST RESPONSABLE DE L ’ENSEMBLE DES FRAIS D’ENVOI ET D’ASSURANCE EN DIRECTION ET EN
PROVENANCE DE L’USINE CELESTRON, ET DOIT S’ACQUITTER DE CES FRAIS AU PRÉALABLE.
C
ELESTRON GARANTIT CE TÉLESCOPE CONTRE TOUS DÉFAUTS DE MATÉRIAUX OU VICES DE FABRICATION
PENDANT UNE PÉRIODE DE DEUX ANS
. DANS LE CAS OÙ LA RÉPARATION OU LE REMPLACEMENT DU
PRODUIT PRENDRAIT PLUS DE TRENTE JOURS
, CELESTRON S’ENGAGE À EN NOTIFIER LE CLIENT.
CELESTRON EST AUTORISÉ À REMPLACER TOUT PRODUIT SANS SUITE DE SA GAMME P AR UN PRODUIT
NOUVEAU D’UNE VALEUR ET D’UNE UTILISATION SEMBLABLES.
L
A PRÉSENTE GARANTIE SERA CONSIDÉRÉE COMME NULLE ET SANS INCIDENCE SI LE PRODUIT A ÉTÉ
MODIFIÉ DANS SA CONCEPTION OU SON UTILISATION
, S’IL A ÉTÉ SUJET À UN USAGE ABUSIF, EXCESSIF,
SUITE À NÉGLIGENCE, OU ENCORE S’IL A F AIT L’OBJET DE RÉP ARATIONS NON AUTORISÉES. DE PLUS, LES
DÉFAILLANCES DU PRODUIT CAUSÉES PAR LA DÉTÉRIORATION ET L’USURE NORMALE NE SONT P AS
COUVERTES PAR LA PRÉSENTE GARANTIE.
CELESTRON RÉFUTE TOUTE GARANTIE EXPRESSE OU IMPLICITE RELATIVE À LA
V ALEUR MARCHANDE OU À LA CONFORMITÉ D’UTILISA TION DU PRODUIT EN VUE
D’UN BUT PRÉCIS, EXCEPTÉ DANS LES CAS DÉCRITS ICI-MÊME.
SELON LES TERMES DE LA PRÉSENTE GARANTIE LIMITÉE, L’UNIQUE OBLIGATION
DE CELESTRON RÉSIDE DANS LA RÉPARATION OU LE REMPLACEMENT DU
PRODUIT SOUS GARANTIE, CONFORMÉMENT AUX TERMES MENTIONNÉS ICIMÊME. CELESTRON RÉFUTE TOUTE PERTE DE BÉNÉFICES OU DOMMAGES
GÉNÉRAUX, SPÉCIFIQUES, INDIRECTS OU CONSÉCUTIFS EN RELATION AVEC UNE
RUPTURE DE LA GARANTIE OU ENCORE ÉMANENT D’UNE INAPTITUDE À
L’UTILISATION DE TOUT PRODUIT CELESTRON. TOUTE GARANTIE IMPLICITE OU
SANS DISSOLUTION POSSIBLE EST LIMITÉE EN DURÉE À DEUX ANS À COMPTER DE
LA DATE D’ACHAT D’ORIGINE.
C
ERTAINS ÉTATS N’AUTORISENT PAS LES EXCLUSIONS OU LIMITATIONS RELATIVES AUX DOMMAGES
ACCIDENTELS OU CONSÉCUTIFS
. EN CONSÉQUENCE, LES LIMIT ATIONS OU EXCLUSIONS MENTIONNÉES CI-
DESSUS NE S’APPLIQUENT PAS À TOUS LES CAS DE FIGURE.
LA PRÉSENTE GARANTIE VOUS CONFÈRE DES DROITS JURIDIQUES SPÉCIFIQUES
. IL EST POSSIBLE QUE VOUS
BÉNÉFICIIEZ D
’AUTRES DROITS EN FONCTION DE VOTRE ÉTAT DE RÉSIDENCE.
CELESTRON EST AUTORISÉ À MODIFIER OU À DÉLAISSER SANS NOTIFICATION PRÉALABLE
, TOUT MODÈLE
OU STYLE DE TÉLESCOPE
.
POUR TOUT PROBLÈME RELATIF À LA GARANTIE OU POUR ASSISTANCE RELATIVE À L’UTILISA TION
DE VOTRE TÉLESCOPE
, VEUILLEZ VOUS ADRESSER À :
C
ELESTRON
CUSTOMER SERVICE DEPAR TMENT
2835 COLUMBIA STREET
TORRANCE, CA 90503 USA
T
ÉL. (310) 328-9560 FAX
. (310) 212-5835
D
U LUNDI AU VENDREDI DE 8H00 À 16H00, HEURE DE LA CÔTE PACIFIQUE.
TOUT RENVOI AUTORISÉ DOIT ÊTRE ADRESSÉ À :
CELESTRON
1380 C
HARLES WILLARD ST.
CARSON, CA 90747
L
A PRÉSENTE GARANTIE ABROGE TOUTE AUTRE GARANTIE PRODUIT.
REMARQUE : LA PRÉSENTE GARANTIE EST VALABLE POUR LA CLIENTÈLE AMÉRICAINE ET
CANADIENNE AY ANT FAIT L’ACHAT DU PRÉSENT PRODUIT PAR L’INTERMÉDIAIRE D’UN CONCESSIONNAIRE
CELESTRON AGRÉÉ AUX ÉTATS-UNIS OU AU CANADA. EN DEHORS DES ÉTATS-UNIS ET DU CANADA, LA
GARANTIE COUVRE UNIQUEMENT LA CLIENTÈLE A YANT FAIT L’ACHAT DU PRODUIT AUPRÈS D’UN
DISTRIBUTEUR CELESTRON OU D’UN CONCESSIONNAIRE CELESTRON AGRÉÉ DANS LE PAYS DONNÉ.
V
EUILLEZ NOUS CONTACTER POUR TOUS RENSEIGNEMENTS RELATIFS À L’ENTRETIEN SOUS GARANTIE.
Conception produit et spécifications non contractuelles. © 2004 Celestron
ExloraScope User Guide TL**.qxd 4/9/04 10:00 AM Page 34
Page 37

DEUTSCH
Einstellungs- und Einstellungs- und
BenutzeranleitungBenutzeranleitung
ExloraScope User Guide TL**.qxd 4/9/04 10:00 AM Page 35
Page 38

DEUTSCH
Richtiger Gebrauch und Sicherheit
Nie mit einem Teleskop
ohne richtigen Sonnenfilter
mit ungeschütztem Auge
direkt in die Sonne blicken.
Ansonsten können
permanente und nicht
rückgängig zu machende
Augenschäden auftreten.
Teleskop nie verwenden,
um ein Bild der Sonne auf
eine andere Oberfläche zu
projizieren. Das Teleskop
und alle damit
verbundenen Zubehörteile
können durch interne
Wärmebildung beschädigt
werden.
Das Teleskop nie
unbeaufsichtigt lassen, wenn
Kinder oder Erwachsene
anwesend sind, die mit der
korrekten Verwendung Ihres
Teleskops nicht vertraut
sind.
Die Linse im Okular
bzw. die Spiegel im
Teleskop nicht
berühren.
Keine Objekte oder
übermäßige
Feuchtigkeit ins
Innere des Teleskops
gelangen lassen.
Das
Okular stets
vorsichtig an den
Seiten anfassen.
Stets vorsichtig mit
dem ExploraScope
umgehen, da es
durch groben
Umgang beschädigt
werden kann.
ACHTUNG!
36
ExloraScope User Guide TL**.qxd 4/9/04 10:00 AM Page 36
Page 39

DEUTSCH
Willkommen!
Okular
Okular-Staubkappe
Fokussierer
ExploraScope
V ordere Abdeckung
Einstellungs- und Benutzeranleitung
Wiederverwendbare Kiste
Stativadapter
Trageriemen
Drehbasis
Ihr neues Celestron ExploraScope
Ihr neues ExploraScope ist für die V erwendung durch
die ganze Familie ausgelegt und ist gleichermaßen für
die Himmelsbeobachtung (Nachthimmel) wie für
terrestrische Beobachtungen (Land) geeignet. Die
Möglichkeiten, mit diesem Teleskop viel Spaß zu haben
und auch viel zu lernen, sind unbegrenzt!
Lesen Sie diese Anleitung sorgfältig ganz durch, um Ihr
ExploraScope sicher zu verwenden und das Meiste aus
Ihrem Gerät heraus zu holen. Achten Sie besonders auf
Sicherheitshinweise und lassen Sie kleine Kinder nie
unbeaufsichtigt.
Im Lieferumfang Ihres ExploraScope sind
enthalten:
•ExploraScope-Teleskop mit Riemen
•Drehbasis
•44x Okular mit Staubkappe
•Vordere Schutzabdeckung
•Einstellbarer Fokussierer
•Stativadapter
•Wiederverwendbare Kiste für Aufbewahrung
und Transport
•Einstellungs- und Benutzeranleitung
Bei Ihrem Celestron-Vertragshändler sind optionale
Zubehörteile erhältlich. Auf der Innenseite des
rückseitigen Deckblatts finden Sie weitere
Informationen.
ExploraScope - Technische Spezifikationen
Durchmesser . . . . . . . . . . . . . . . . . . . . . . . 80 mm
Brennweite . . . . . . . . . . . . . . . . . . . . . . . . 550 mm
Okular . . . . . . . . . . . . . . . . . . . . . . 12,5 mm (44x)
Sichtfeld . . . . . . . . . . . . . . . . . . . . . . . . . . . . . . .1°
Nahfokus . . . . . . . . . . . . . . . . . . . . . . . . . . 50 Fuß
37
ExloraScope User Guide TL**.qxd 4/9/04 10:00 AM Page 37
Page 40

DEUTSCH
Montage des ExploraScope
Montage
Die Montage Ihres ExploraScope ist einfach und
dauert nur wenige Augenblicke. Machen Sie sich
zunächst mit den Teilen Ihres Teleskops vertraut.
Befolgen Sie dann die folgenden Anleitungen.
Nehmen Sie die Okular-Staubkappe ab.
Nehmen Sie die vordere Abdeckung ab und
legen Sie sie beiseite.
Wenn das ExploraScope nicht verwendet
wird, bringen Sie stets die vordere Abdeckung
an, um die internen Gerätekomponenten zu
schützen.
Setzen Sie das ExploraScope auf seine Basis.
Sie können das Teleskop mit oder ohne Basis
oder mit einem Stativ (siehe Schritt 5)
einsetzen.
Drehen Sie am Fokussierer, um den Fokus
der anzuzeigenden Objekte einzustellen. Dies
wird unter „Verwendung Ihres
ExploraScope" beschrieben.
Um ein Standard-Kamerastativ mit Ihrem
ExploraScope zu verwenden, müssen Sie
zunächst den Stativadapter anbringen.
Richten Sie die Adapterschraube und den
Bolzen mit den Öffnungen in der
Teleskopbasis aus und ziehen Sie sie fest. Das
ExploraScope kann nun auf einem StandardFotostativ angebracht werden.
Und das war's auch schon! Wenn Sie die Basis
oder ein Stativ verwenden, wird empfohlen, eine
ebene Fläche zu finden, auf der Sie das Gerät für
die Beobachtung aufstellen. Der Trageriemen
bzw. die Lieferkiste sorgen für einen leichten und
sicheren Transport Ihres ExploraScope.
32154
12345
38
ExloraScope User Guide TL**.qxd 4/9/04 10:00 AM Page 38
Page 41

DEUTSCH
Tipps für die Beobachtung
Okular
Blendenöffnung
Eingehendes
Licht
Vergrößertes Bild
Primärspiegel
Sekundärspiegel
Funktionsweise des ExploraScope
Das ExploraScope ist ein Reflektor-Teleskop, das zwei Spiegel einsetzt, um
Licht am Okular zu sammeln und zu fokussieren. Dieser Teleskoptyp hat
den Vorteil, dass er bei einer bestimmten Blendenöffnung sehr kompakt ist.
Der Durchmesser der Blendenöffnung eines Teleskops bestimmt seine
Fähigkeit, weit entfernte Objekte anzuzeigen. Die Vergrößerungsleistung ist
vom Okular abhängig. Celestron bietet für Ihr ExploraScope drei Okulare an,
um die Vergrößerung bzw. das Sichtfeld bei geringerer Vergrößerung zu
steigern. Angaben hierzu finden Sie im Abschnitt zu optionalen Zubehörteilen.
Um das Okular zu entfernen, drehen Sie den Fokussierer im Uhrzeigersinn,
bis das Okular ganz ausgefahren ist. Drehen Sie den Okularkörper gegen den
Uhrzeigersinn, bis das Okular sich löst.
Verwendung Ihres ExploraScope
Sie können das ExploraScope auf seiner Basis aufstellen und bei der
Beobachtung drehen, oder Sie können es an einem Stativ anbringen, wozu der
im Lieferumfang enthaltene Stativadapter verwendet wird. Sie können das
Teleskop auch einfach mit den Griffen in der Hand oder in Ihrem Schoß
halten. Für die Himmelsbeobachtung ist die durch die Basis bzw. ein Stativ
gebotene Stabilität nützlich, da das Auffinden von weit entfernten Sternen
und Planeten eine Weile dauern kann und diese sich bei Bewegung des
Teleskops schnell aus dem Sichtfeld entfernen können. Für terrestrische
Beobachtungen ist das einfache Festhalten des Teleskops evtl. besser geeignet,
da Sie es leichter auf den Horizont richten und sich bewegende Objekte besser
verfolgen können.
Um ein Objekt zu sehen, richten Sie das Teleskop einfach darauf und blicken
Sie durch das Okular. Um zu fokussieren, drehen Sie den Fokussierer
langsam, bis das Bild im Okular deutlich und scharf ist. Um ein Objekt zu
fokussieren, das näher als Ihr derzeitiges Ziel liegt, drehen Sie den
Fokussierer im Uhrzeigersinn. Um weiter entfernte Objekte zu fokussieren,
drehen Sie gegen den Uhrzeigersinn.
39
ExloraScope User Guide TL**.qxd 4/9/04 10:00 AM Page 39
Page 42

DEUTSCH
Tipps für die Beobachtung
Dunstigen
Himmel und
Nebel vermeiden
Beobachtung
über Hausdächer
vermeiden
Beobachtung
durch
Fensterglas
vermeiden
1
2
3
Terrestrische Objekte müssen sich mindestens 15 m vom Teleskop
entfernt befinden, um scharf angezeigt werden zu können. Sie
können Objekte am Taghimmel beobachten, z. B. Flugzeuge und
Vögel, doch blicken Sie nie mit dem ExploraScope oder einem
anderen Teleskop ohne richtige Filterausrüstung in die Sonne.
Bei der Verwendung jedes optischen Geräts gibt es einige Punkte, die
Sie beachten sollten, um ein optimales Bild zu gewährleisten.
Wenn Sie Kontaktlinsen oder eine Brille tragen, sollten Sie diese evtl.
abnehmen, wenn Sie ein Teleskop mit Okular verwenden. Falls Sie
unter einem Astigmatismus leiden, müssen Sie jederzeit
korrigierende Linsen tragen.
Dunstiger Himmel und Nebel können das Fokussieren bei
terrestrischen Beobachtungen erschweren. Unter diesen
Bedingungen sind viel weniger Details sichtbar.
Blicken Sie nicht auf oder über Objekte, die Hitzewellen
verursachen. Dazu zählen Autos und geteerte Parkplätze an
heißen Sommertagen sowie Hausdächer. Hitzewellen verzerren
die Atmosphäre und wirken sich ähnlich wie Fensterglas
verschiedener Stärke auf Ihre Sicht aus.
Beobachten Sie nicht durch Fensterglas. In Haushaltsfenstern
eingesetztes Glas ist optisch nicht perfekt. Dadurch kann das
Bild verzerrt werden und Sie können das Teleskop nicht richtig
fokussieren. In den meisten Fällen erhalten Sie dann kein
wirklich scharfes Bild, in manchen Fällen sehen Sie sogar
doppelt.
123
40
ExloraScope User Guide TL**.qxd 4/9/04 10:00 AM Page 40
Page 43

DEUTSCH
Star Hopping
OMEDA
GREAT NEBULA
M31
M32
GLORIA FREDERIKA
NGC7662
NGC7
1
2
Star Hopping
Eine Möglichkeit, Himmelsobjekte zu finden, ist das sog. „Star
Hopping". Dazu verwenden Sie helle Sterne, um Sie zu einem Objekt
zu „führen". Für ein erfolgreiches Star Hopping ist es nützlich, das
Sichtfeld Ihres Teleskops zu kennen. Ihr ExploraScope hat ein
Sichtfeld von ca. 1°. Wenn Sie daher wissen, dass ein Objekt 3° von
Ihrem gegenwärtigen Standort entfernt ist, müssen Sie sich nur
3 Sichtfelder zum gewünschten Objekt bewegen. Hier ein beliebtes
Beispiel: Die Andromeda-Galaxie, auch als M31 bekannt.
So suchen Sie M31:
Suchen Sie das Sternbild Pegasus, ein großes Rechteck, das im
Herbst am östlichen Himmel zu sehen ist und sich auf einen
Punkt direkt über Ihnen zu bewegt. In Wintermonaten bewegt
sich das Sternbild vom Punkt über Ihnen nach Westen.
Beginnen Sie mit dem Stern an der nordöstlichen Ecke, Alpha
(α) Andromedae.
1
2
41
ExloraScope User Guide TL**.qxd 4/9/04 10:00 AM Page 41
Page 44

DEUTSCH
Star Hopping
NGC752
ANDROMEDA
GREAT NEBULA
M31
M32
CA
N
345
Fortsetzung Suche von M31...
Bewegen Sie sich um ca. 7° nach Nordosten (sieben Sichtfelder).
Dort finden Sie zwei Sterne, die ungefähr gleich hell sind,
Delta (δ) und Pi (π) Andromedae, ca. 3° voneinander entfernt.
Gehen Sie in der gleichen Richtung um weitere 8° weiter.
Dort finden Sie zwei Sterne, Beta (β) und Mu (µ) Andromedae,
ebenfalls ca. 3° voneinander entfernt.
Gehen Sie um 3° nach Nordwesten, das ist ungefähr der Abstand
zwischen den beiden Sternen.
Dort befindet sich die Andromeda-Galaxie.
Star Hopping zur Andromeda-Galaxie (M31) ist ganz einfach, da alle
dazu benötigten Sterne mit dem bloßen Auge sichtbar sind. Mit dieser
Technik können Sie viele Himmelsobjekte finden.
345
42
ExloraScope User Guide TL**.qxd 4/9/04 10:00 AM Page 42
Page 45

DEUTSCH
Kollimationseinstellung
1
Primärspiegel
Sekundärspiegel
2
Unter Kollimation versteht man die optische Ausrichtung der
Spiegel Ihres Teleskops.
Ihr ExploraScope wurde im Werk kollimiert und sollte keine
weitere Einstellung erfordern. Falls das Teleskop jedoch fallen
gelassen oder anderweitig beschädigt wird, kann es notwendig sein,
die Spiegel auszurichten. Ändern Sie die Kollimation nur, wenn
dies unbedingt notwendig ist.
Überprüfen der Kollimation
Okular entfernen: Drehen Sie den Fokussierer im Uhrzeigersinn,
bis das Okular ganz ausgefahren ist. Drehen Sie den
Okularkörper gegen den Uhrzeigersinn, bis das Okular sich löst.
Bei entferntem Okular sperren Sie den Fokussierer. Sie sehen ein
Bild des Sekundärspiegels, das im Primärspiegel reflektiert wird.
Wenn der Sekundärspiegel nicht genau im Primärspiegel
zentriert ist, ist Ihr Teleskop nicht richtig ausgerichtet. Um dies
zu korrigieren, müssen Sie die Primärkollimationsschrauben
einstellen, die sich an der Hinterseite der Röhre befinden.
1
2
43
ExloraScope User Guide TL**.qxd 4/9/04 10:00 AM Page 43
Page 46

DEUTSCH
Kollimationseinstellung
Primärspiegel
Sekundärspiegel
4
3
Korrigieren der Kollimation
Das ExploraScope verfügt über drei Öffnungen an der Rückseite des
Rohrs, um die Kollimationseinstellung zu ermöglichen. Jede
Öffnung verfügt über eine Stellschraube, mit der der Spiegel beim
Festziehen oder Lösen gekippt wird. Die mittlere Schraube hat
nichts mit der Kollimation zu tun und sollte nicht eingestellt
werden. So richten Sie Ihr ExploraScope aus:
Nehmen Sie die Kappen ab, die jede der drei
Kollimationsschrauben abdecken. Nehmen Sie die Kappe an der
Mitte des Rohrs nicht ab.
Stellen Sie die Kollimations-Stellschrauben mit einem
Kreuzschlitzschraubendreher ein, bis das Bild des
Sekundärspiegels sich zur Mitte des Primärspiegels hin bewegt.
Um eine Schraube festzuziehen, müssen Sie die restlichen
Schrauben evtl. etwas lösen.
Wenn beide Spiegel ausgerichtet sind, sollten Sie die Silhouette
des Sekundärspiegels in der Mitte des Primärspiegels sehen.
Bringen Sie die Gummischutzkappen wieder vorsichtig an den
Einstellöffnungen an und befestigen Sie das Okular wieder.
Um die Kollimation zu vereinfachen und präziser zu machen, bietet
Celestron ein optionales Kollimationswerkzeug (Nr. 94183), das bei der
Ausrichtung Ihres Auges auf die Mitte des optischen Pfades hilft.
3
4
44
ExloraScope User Guide TL**.qxd 4/9/04 10:00 AM Page 44
Page 47

DEUTSCH
Optionales Zubehör
Nr. 94183 Kollimationswerkzeug
Die optische Leistung der meisten
Newton-Teleskope kann mittels
Kollimation oder Ausrichtung der
Teleskopoptik bei Bedarf optimiert
werden. Dieses Verfahren ist mit dem
Kollimationswerkzeug von Celestron,
einem praktischen Zubehörteil, das
mit detaillierten Anleitungen geliefert
wird, ganz einfach.
Nr. 93588
Nachtsicht-Taschenlampe
Celestrons führendes
Astronomiemodell, verwendet zwei
rote Leuchtdioden, um für bessere
Nachtsicht als mit Rotfiltern oder
anderen Geräten zu sorgen.
Helligkeit ist einstellbar. Wird mit
einer 9 Volt-Batterie betrieben (im
Lieferumfang enthalten).
Zusätzliche Okulare
Celestron bietet weitere
Okularoptionen für Ihr ExploraScope.
Das 6 mm ExploraScope-Okular (Nr.
3227) bietet eine 92 Mal stärkere
Vergrößerung, das 25 mm
ExploraScope-Okular
(Nr. 93226) eine 22 Mal stärkere
Vergrößerung und ein noch weiteres
Sichtfeld.
Nr. 93722 Himmelskarte
Celestron-Himmelskarten sind die
idealen Lernhilfen für die
Erkundung des Nachthimmels.
Selbst wenn Sie sich bereits gut mit
den wichtigsten Konstellationen
auskennen, können diese Karten
Ihnen helfen, alle möglichen
faszinierenden Objekte zu finden.
Auf dem Frontdeckblatt ist eine
speziell entworfene, im Dunkeln
leuchtende Planisphäre zu finden, die
sich dreht, um den saisonalen V erlauf
der Himmelsobjekte am Himmel zu
simulieren. Über 1000 Sterne und
Himmelsobjekte sind aufgeführt und
kartografisch erfasst. Der illustrierte
Referenzabschnitt liefert
grundlegende Informationen und die
visuellen Merkmale verschiedener
Typen von Sternen, Nebeln und
Galaxien.
Nr. 93504 Exotherm-
Handwärmer
Perfekt für kalte Abende im Freien, beim
Campen, bei der Himmelsbeobachtung,
bei Sportveranstaltungen und mehr. Der
Exotherm-Handwärmer ist praktisch,
kann wiederverwendet werden und
besteht aus nicht-toxischen Materialien.
Wärme hält bis zu eine Stunde lang an.
Nr. 93728 Peterson First Guide
Ein vereinfachter Feldführer für Sterne,
Planeten und das Universum. Eine toller
Orientierungsplan für alle, die in die
Astronomie einsteigen möchten.
ExloraScope User Guide TL**.qxd 4/9/04 10:00 AM Page 45
Page 48

DEUTSCH
Celestron - Beschränkte Zweijahres-Garantie
A. CELESTRON GARANTIERT
, DASS DIESES TELESKOP ZWEI JAHRE LANG FREI VON MATERIAL- UND
VERARBEITUNGSFEHLERN IST. CELESTRON REPARIERT ODER ERSETZT EIN PRODUKT ODER TEIL EINES
PRODUKTS
, DAS SICH NACH INSPEKTION DURCH
CELESTRON ALS HINSICHTLICH MATERIAL ODER
VERARBEITUNG DEFEKT ERWIESEN HA T. ALS BEDINGUNG ZUR VERPFLICHTUNG CELESTRONS ZUR
REPARATUR BZW
. ZUM ERSETZEN EINES SOLCHEN
PRODUKTS MUSS DAS PRODUKT ZUSAMMEN MIT
EINEM FÜR
CELESTRON AUSREICHENDEN KAUFBELEG AN CELESTRON ZURÜCKGESCHICKT WERDEN.
B. VOR DEM RÜCKSENDEN MUSS VON CELESTRON EINE RÜCKSENDE-GENEHMIGUNGSNUMMER
(RETURN AUTHORIZATION NUMBER) EINGEHOLT WERDEN. UM DIE NUMMER ZU ERHALTEN, RUFEN
SIE
CELESTRON UNTER +(310) 328-9560 AN. BRINGEN SIE DIE NUMMER AUßEN AM
VERSANDBEHÄL TER AN.
ALLEN RÜCKSENDUNGEN MUSS EIN SCHREIBEN BEILIEGEN, DAS NAMEN, ADRESSE UND
TELEFONNUMMER DES
BESITZERS SOWIE EINE KURZE B
ESCHREIBUNG DES DEFEKTS ENTHÄLT. TEILE
ODER P
RODUKTE, DIE ERSETZT WERDEN, WERDEN EIGENTUM VON CELESTRON.
DERKUNDE IST FÜR ALLE TRANSPORT- UND VERSICHERUNGSKOSTEN SOWIE ZU ALS AUCH VOM
C
ELESTRON-WERK VERANTWORTLICH UND MUSS SOLCHE KOSTEN IM VORAUS ENTRICHTEN.
CELESTRON UNTERNIMMT ALLE ANGEMESSENEN BEMÜHUNGEN, EIN VON DIESER GARANTIE
GESCHÜTZTES
TELESKOP INNERHALB VON 30 TAGEN NACH EINTREFFEN ZU REPARIEREN ODER ZU
ERSETZEN
. SOLLTE DIE REPARATUR BZW. DAS ERSETZEN MEHR ALS 30 TAGE BEANSPRUCHEN,
BENACHRICHTIGT
CELESTRON DEN KUNDEN ENTSPRECHEND. CELESTRON BEHÄL T SICH DAS RECHT
VOR
, EIN PRODUKT , DAS NICHT MEHR IN DER PRODUKTREIHE ANGEBOTEN WIRD, MIT EINEM NEUEN
PRODUKT VERGLEICHBAREN WERTS UND VERGLEICHBARER FUNKTION ZU ERSETZEN.
DIESE GARANTIE GILT ALS NICHTIG, WENN EIN DURCH DIE GARANTIE GESCHÜTZTES PRODUKT
HINSICHTLICH
BAUWEISE ODER FUNKTION MODIFIZIERT ODER MISSBRAUCHT, FALSCH GEBRAUCHT UND
UNGENEHMIGT REPARIERT WURDE
. DARÜBER HINAUS SIND DURCH NORMALE VERWENDUNG BEDINGTE
FEHLFUNKTION ODER ABNUTZUNG NICHT IM RAHMEN DIESER GARANTIE EINGESCHLOSSEN.
CELESTRON SCHLIESST SÄMTLICHE GARANTIEN, OB STILLSCHWEIGEND ODER
AUSDRÜCKLICH ERTEILT, OB DIE VERMARKTBARKEIT ODER EIGNUNG FÜR EINEN
BESTIMMTEN ZWECK BETREFFEND, AUSSER WIE HIERIN FESTGELEGT AUS.
CELESTRON VERPFLICHTET SICH IM RAHMEN DIESER BESCHRÄNKTEN
GARANTIE EINZIG UND ALLEIN DAZU, DAS DURCH DIE GARANTIE GESCHÜTZTE
PRODUKT IM RAHMEN DER HIERIN AUFGESTELLTEN BEDINGUNGEN ZU
REPARIEREN ODER ZU ERSETZEN. CELESTRON SCHLIESST AUSDRÜCKLICH
SÄMTLICHE ANSPRÜCHE AUFGRUND VON PROFITAUSFÄLLEN, ALLGEMEINE,
INDIREKTE ODER FOLGESCHÄDEN, DIE AUS EINER VERLETZUNG EINER
GARANTIE ODER DER VERWENDUNG ODER NICHT MÖGLICHEN VERWENDUNG
EINES CELESTRON-PRODUKTS ENTSTEHEN, AUS. JEGLICHE IMPLIZIERTEN
GARANTIEN, DIE NICHT AUSGESCHLOSSEN WERDEN KÖNNEN, SIND AUF ZWEI
JAHRE AB DEM ERSTKAUFDATUM DES PRODUKTS BEIM HÄNDLER BESCHRÄNKT.
IN EINIGEN
LÄNDERN KÖNNEN FOLGESCHÄDEN NICHT AUSGESCHLOSSEN ODER DIE DAUER EINER
IMPLIZIERTENGARANTIE NICHT BESCHRÄNKT WERDEN, DESHALB GELTEN DIE OBEN ANGEGEBENEN
BESCHRÄNKUNGEN UND AUSSCHLÜSSE EVTL. NICHT FÜR SIE.
DIESE G
ARANTIE ERTEILT IHNEN BESTIMMTE
RECHTE. SIE HABEN JE NACH JURISDIKTION EVTL. AUCH
NOCH ANDERE
RECHTE.
CELESTRON BEHÄLT SICH DAS
RECHT VOR
, ALLE TELESKOPMODELLE ODER -
STILE OHNE VORHERIGE
ANKÜNDIGUNG ZU MODIFIZIEREN ODER NICHT MEHR ANZUBIETEN.
BEI GARANTIEPROBLEMEN ODER WENN SIE HILFE BEI DER VERWENDUNG IHRES TELESKOPS
BENÖTIGEN, WENDEN SIE SICH BITTE AN:
C
ELESTRON
C
USTOMER SERVICE
DEPARTMENT
2835 COLUMBIA STREET
TORRANCE, CA 90503 USA
TEL. (310) 328-9560 FAX. (310) 212-5835
MONTAG-FREITAG 8 BIS 16 UHR (US-PAZIFIKZEITZONE)
ALLE GENEHMIGTEN RÜCKSENDUNGEN SIND AN FOLGENDE ANSCHRIFT ZU SENDEN:
CELESTRON
1380 CHARLES WILLARD ST.
CARSON, CA 90747
DIESE GARANTIE HAT VOR ALLEN ANDEREN PRODUKTGARANTIEN VORRANG.
HINWEIS: DIESE GARANTIE GIL T FÜR US- UND KANADISCHE KUNDEN, DIE DIESES PRODUKT BEI
EINEM CELESTRON-VERTRAGSHÄNDLERIN DEN USA ODER IN KANADAERWORBEN HABEN. GARANTIEN
AUßERHALB DER USA UND KANADAS GELTEN NUR FÜR KUNDEN, DIE IHR PRODUKT BEI EINEM
CELESTRON-VERTRIEBSUNTERNEHMEN ODER -VERTRAGSHÄNDLER IM JEWEILIGEN LAND ERWORBEN
HABEN. IM GARANTIEFALL WENDEN SIE SICH AN DEN HÄNDLER.
Produktdesign und Spezifikationen unterliegen Änderungen ohne vorherige Ankündigung. © 2004 Celestron
ExloraScope User Guide TL**.qxd 4/9/04 10:00 AM Page 46
 Loading...