

Page 1

LCD DIGITAL MICROSCOPE
by
INSTRUCTION MANUAL
MODEL #44362
ENGLISH
ENGLISH 1
Page 2
2. INTRODUCTION
Thank you for purchasing the Cosmos LCD Digital Microscope by Celestron with a 5MP sensor and 3.5” color LCD screen.
Your microscope is a precision optical instrument, made of the highest quality materials to ensure durability and long life. It is
designed to give you a lifetime of pleasure with a minimal amount of maintenance.
Before attempting to use your microscope, please read
through the instructions and reference the diagrams
below. Familiarizing yourself with the many features of
the Cosmos microscope will go a long way to making
your experience enjoyable.
The Cosmos microscope provides low power viewing
from 4x to 160x using the built-in software and
LCD screen. For additional magnification up to 800x,
connect the microscope to your PC (Magnification
depends on monitor size.) The Cosmos microcope is
a low magnification power microscope, mainly suited
for examining specimens like coins, stamps, rocks,
electronics, insects, and other 3D objects. Specimens
on slides can be viewed with top illumination, but this
microscope is not ideal for this purpose. See some of our
biological microscopes more suited to this type of viewing
at www.celestron.com.
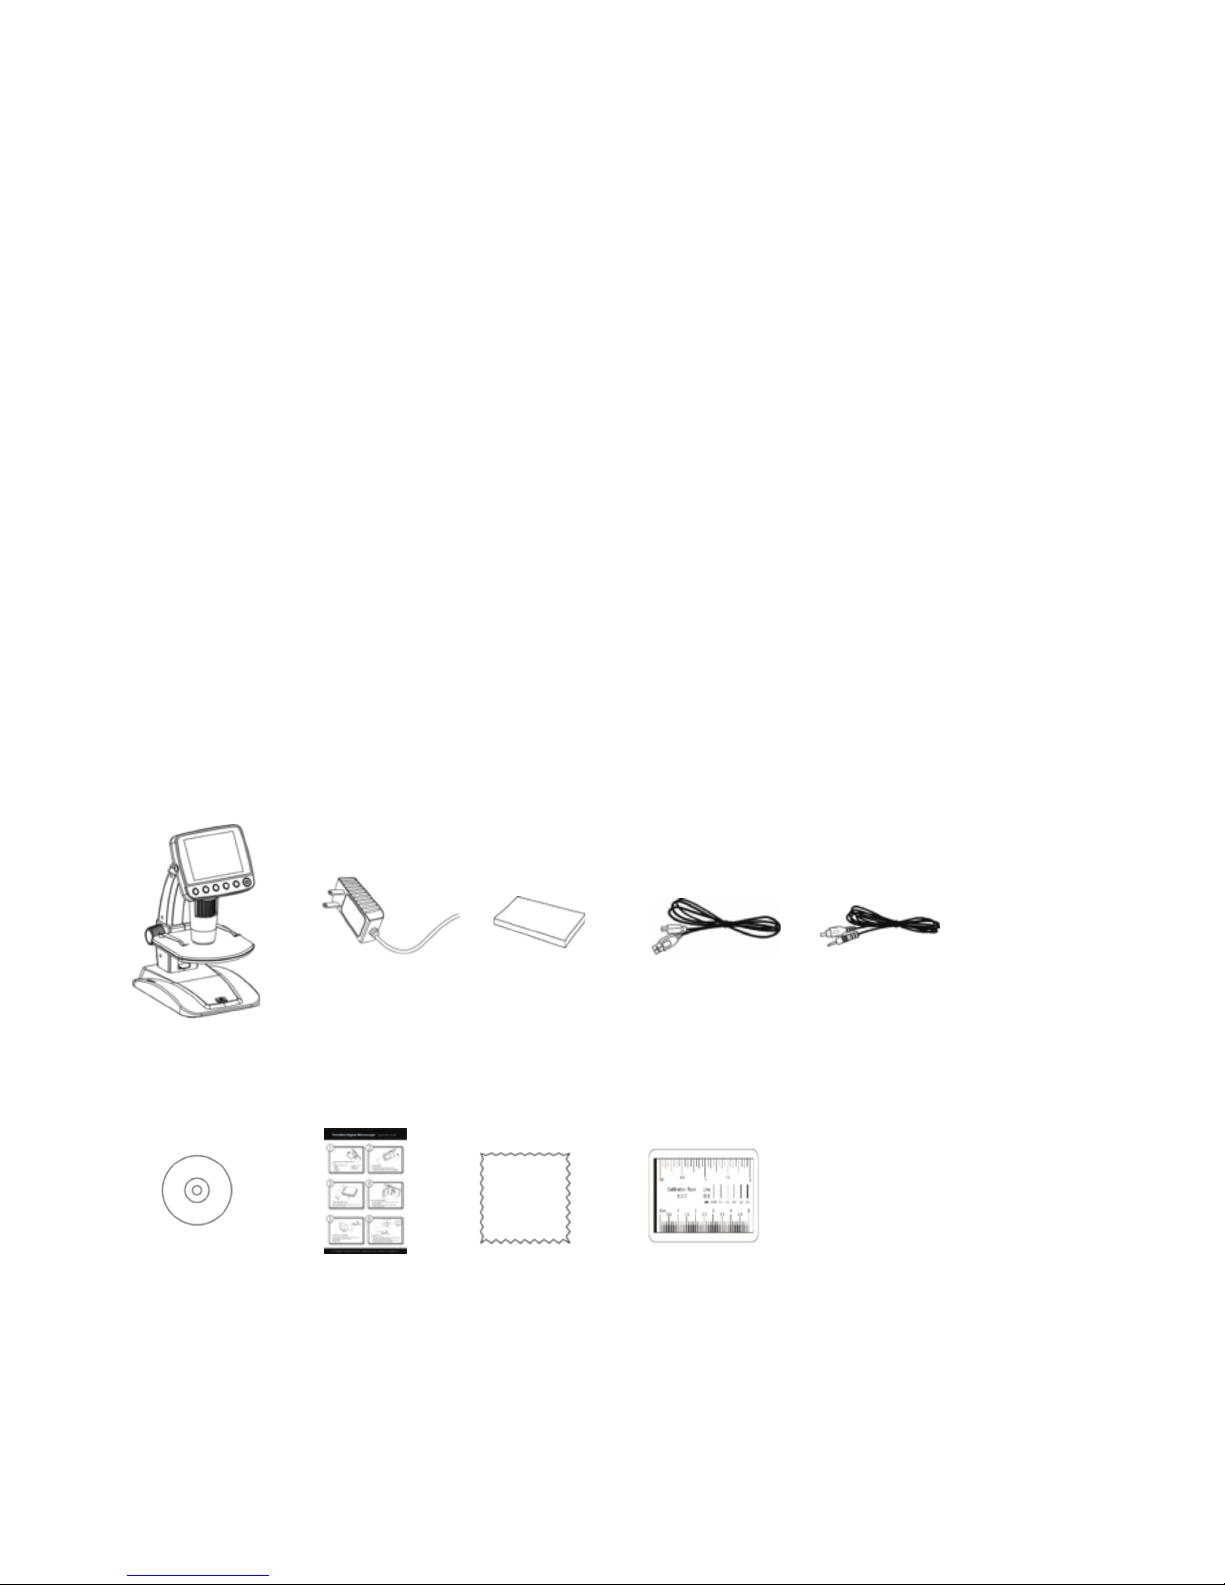
IN THE BOX
The Cosmos LCD Digital Microscope does not use
an eyepiece like a traditional microscope. Instead,
the camera sensor “sees” the specimen with 10x
magnification, and the image is displayed on the high
resolution color LCD screen. This makes viewing fun,
cuts down on neck and eye strain and allows for easy
sharing with others. Recording still images and video is a
snap. Saving, transferring and sharing your image files is
quick and easy with the included 2.0 USB cable and your
home computer. Additionally, you can view on most TV
screens with the AV/TV Cable.
Take some time to read the simple care, maintenance
and troubleshooting tips provided for you in this manual
to ensure that your Cosmos microscope provides you
with years of quality performance, usage, and enjoyment.
Cosmos
LCD Digital
Microscope (1)
CD (1) QSG (1) Cleaning Fabric (1) Calibration Ruler (1)
2 I ENGLISH
AC Adapter (1) Lithium Battery (1) USB cable (1) TV Out cable (1)
Page 3
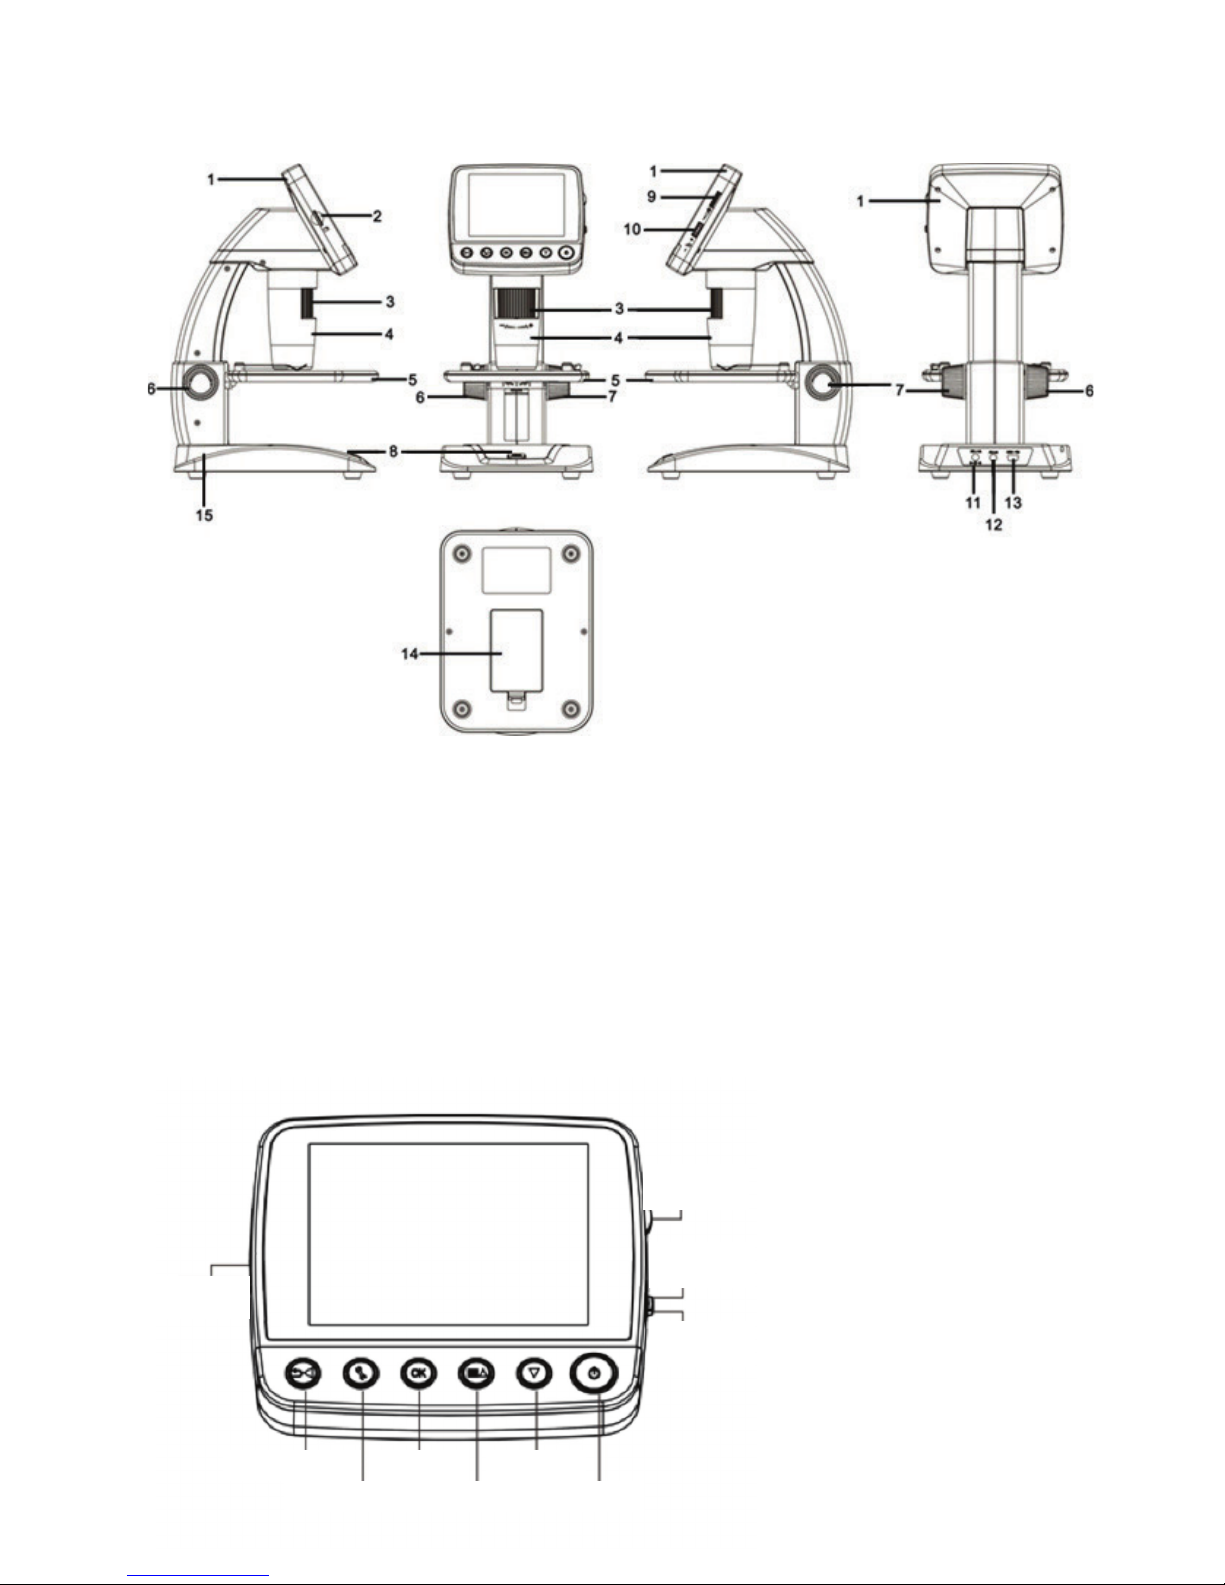
PARTS
FUNCTION
1. 3.5” Full Color LCD display
2.
MicroSD card slot
3. Focus Wheel
4. Microscope Tube
5. Stage
6. Stage Lock Wheel
7. Stage Height Adjustment Wheel
8. Capture Button
9. LED Illuminator Adjustment Wheel
10. $IGITAL:OOM3WITCHs
11. 5v DC In port
12. TV Out port
13. USB port
14. Battery Compartment
15
. Battery Charge Indicator LED
LCD SCREEN DETAIL
Micro SD Card
Slot
Play Back/Left
Settings
Confirm
Mode/Up
LED
Adjustment
Knob
Zoom In
Zoom Out
Down
Power
ENGLISH 3
Page 4

SPECIFICATIONS
SKU 44362
LCD Monitor 3.5” (90 mm) TFT Color LCD /4X digital zoom/320 x 240 pixels, 4:3 ratio
Sensor Size 5 MP (mega pixels)
Stage Adjustable Height 4.38” x 4.38” x .38” (111 x 111 x 9.5 mm)
Lens 5 element IR cut , high quality glass/EFL(Equivalent Focal Length): 15.8mm /FOV: 13.0”
Magnification 4x to 160x using LCD screen (Up to 800x on computer monitor via USB connection)
Focuser Range 10 mm to infinity
Image Distortion .10%
Illuminator Upper ring- 8 bright white adjustable LEDs
Shutter Trigger On base – limits image shake
Still Image Resolution Adjustable: 5MP, 3MP, 1.3MP, VGA (12MP with interpolation*)
Video Resolution VGA, 30fps
Power 1050 mAh rechargeable lithium battery
Memory Micro
Computer Interface 2.0 USB- Battery charging option through USB also
AC Adapter 44362: (multi country plug)- 100 to 240V- 50/60Hz
Software On unit: Imaging software with zoom and timer features
Operating Systems Supported Windows: Windows XP/Vista/7.0/8.0 Mac: OSX 10.6-10.8
Software Languages On unit: (9) English, German, French, Spanish, Italian, Portuguese, Japanese, Chinese
TV Output AV cable (included)
Dimensions 149 x 104 x 227 mm (5.80” x 4.10” x 8.90” )
Weight 1.5 lbs /24 oz. or 680 grams)
SD card slot- Supports up to 32G (card NOT included)
On CD (for computers): Celestron Portable CapturePro (with measuring and note-taking
features)
Simple, Chinese traditional
On Computer: (12) English, German, French, Spanish, Russian, Italian, Portuguese, Dutch,
Polish, Japanese, Korean and
Chinese
*Interpolation refers to software adding pixels to an image to artificially make it larger. This can be beneficial
when printing in larger formats.
4 I ENGLISH
Page 5
3. SETUP
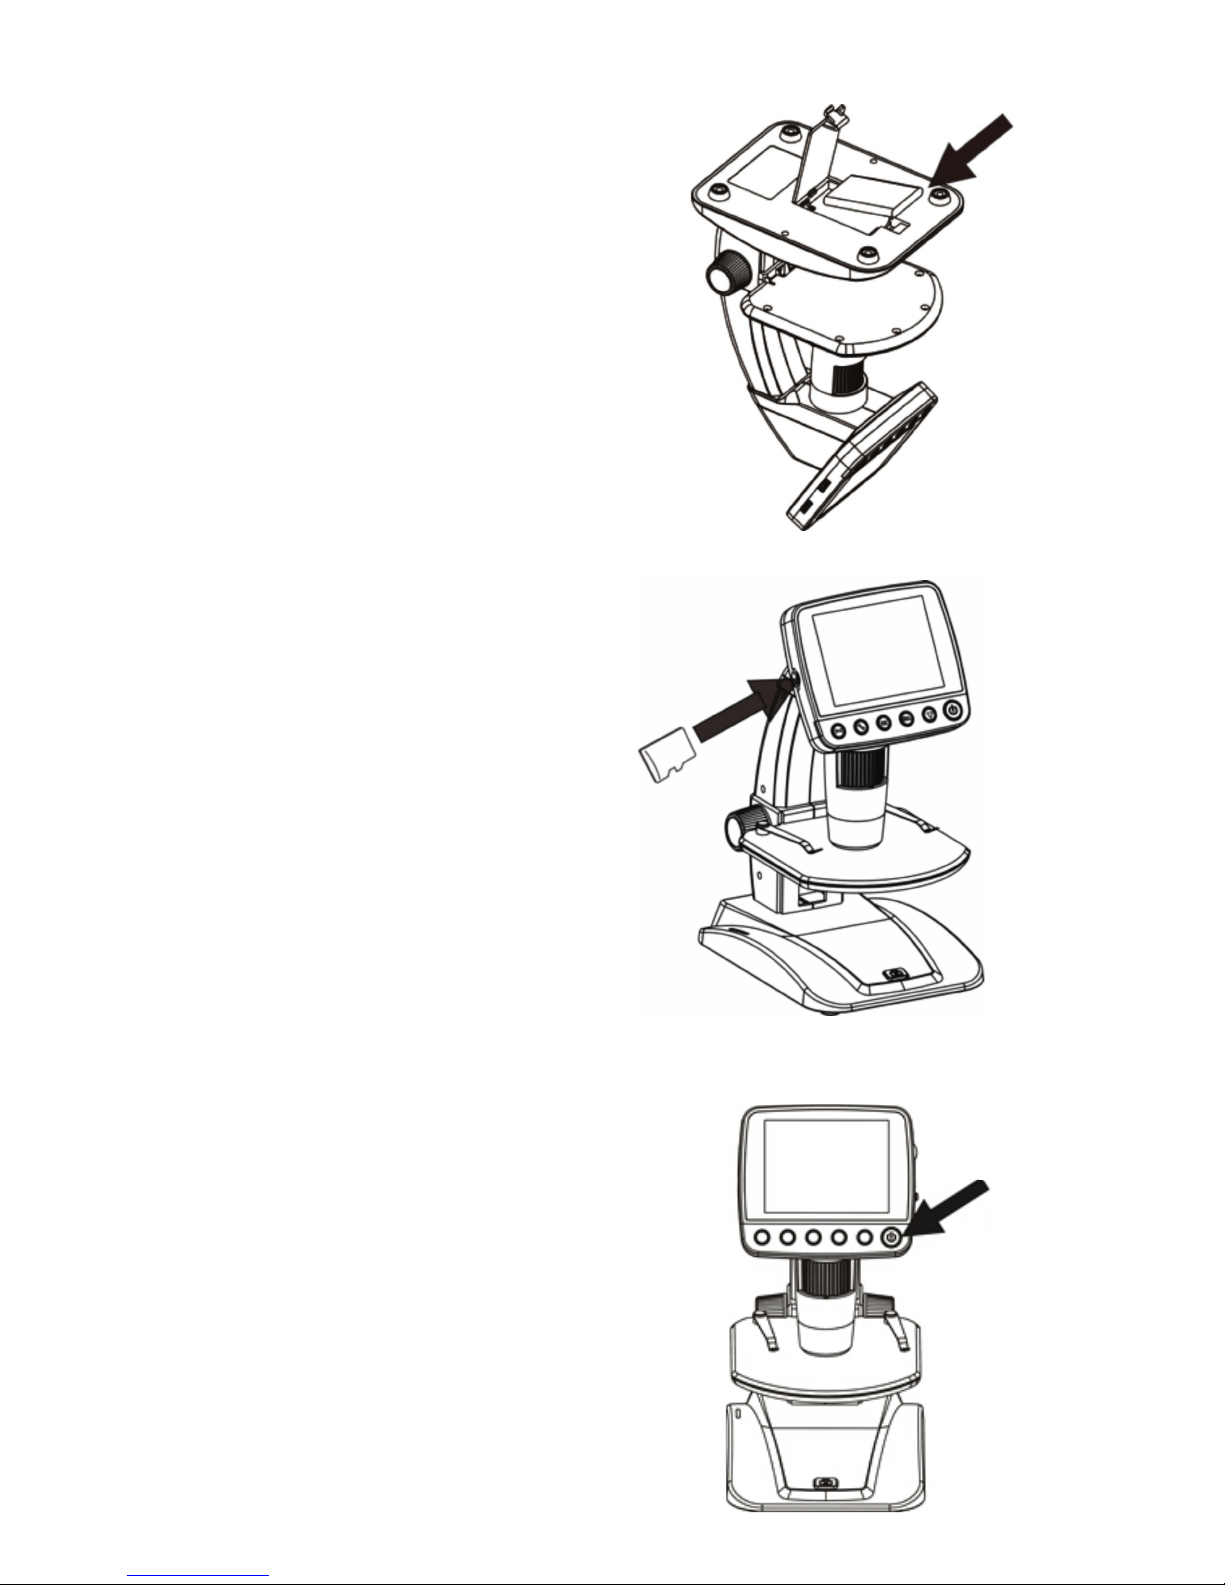
INSTALL BATTERY
Open the Battery Compartment and insert the Lithium battery,
making sure to align the connection points correctly.
NOTE: Although the battery has a partial charge, if you are going to use the microscope
with the battery only, be sure to charge the battery first. Refer to section 3.E
below for more details on charging the battery
INSERT MICRO SD CARD
To capture images with your microscope while NOT connected
to a computer, you need to insert a MicroSD card.
NOTE: The MicroSD card is NOT included. To capture images without a MicroSD card,
see section 5.E in this manual for instructions on installing the computer software
and using it to save images to your computer.
Locate the MicroSD card slot (2) on the side of the LCD
housing.
Slide the card into the slot until it clicks into place and latches.
Be sure not to force the card into the slot, as this may damage
the card or the slot.
NOTE: The MicroSD card should be formatted before use. See section 6.2.G for details
on formatting the card.
POWER ON
Press the POWER button to turn the unit on.
Press POWER button again to turn the unit off.
NOTE: The Microcsope has a Power Save feature. Refer to section 6.2.C for details.
Power button
ENGLISH 5
Page 6

DISPLAY ICONS
Small Image Capture
Video Capture
Time Lapse Capture
Number of Images Taken/Number of
Images Remaining
Video Capture Time Remaining
(Hours:Minutes:Seconds)
CHARGE THE BATTERY
s
Plug the small end of the power adapter into the DC
In port (11) located on the back of the unit.
s
Plug the other end into a standard AC wall outlet.
s
The Battery Charge Indicator LED (15) will light up
red to show the battery is charging.
s
When battery is fully charged, the Battery Charge
Indicator LED will turn off and you can unplug the unit.
s
You can now use the microcope without an external
power source continuously for up to 2 hours.
s
You can monitor the battery power level on the LCD
screen. Look for the Battery Power Indicator Icon
described above.
NOTE: If you purchased your Cosmos Microscope outside of North America (item
44362), you will notice that the AC adapter has 3 interchangeable plug
heads. Refer to section 7 to see how to change the plug heads.
MicroSD Card Recognized
Video Capture Setting
Current Resolution Setting
Battery Power Indicator
NOTE: The Display Icons can be turned off by pressing the Zoom Button (10) inward.
6 I ENGLISH
Page 7
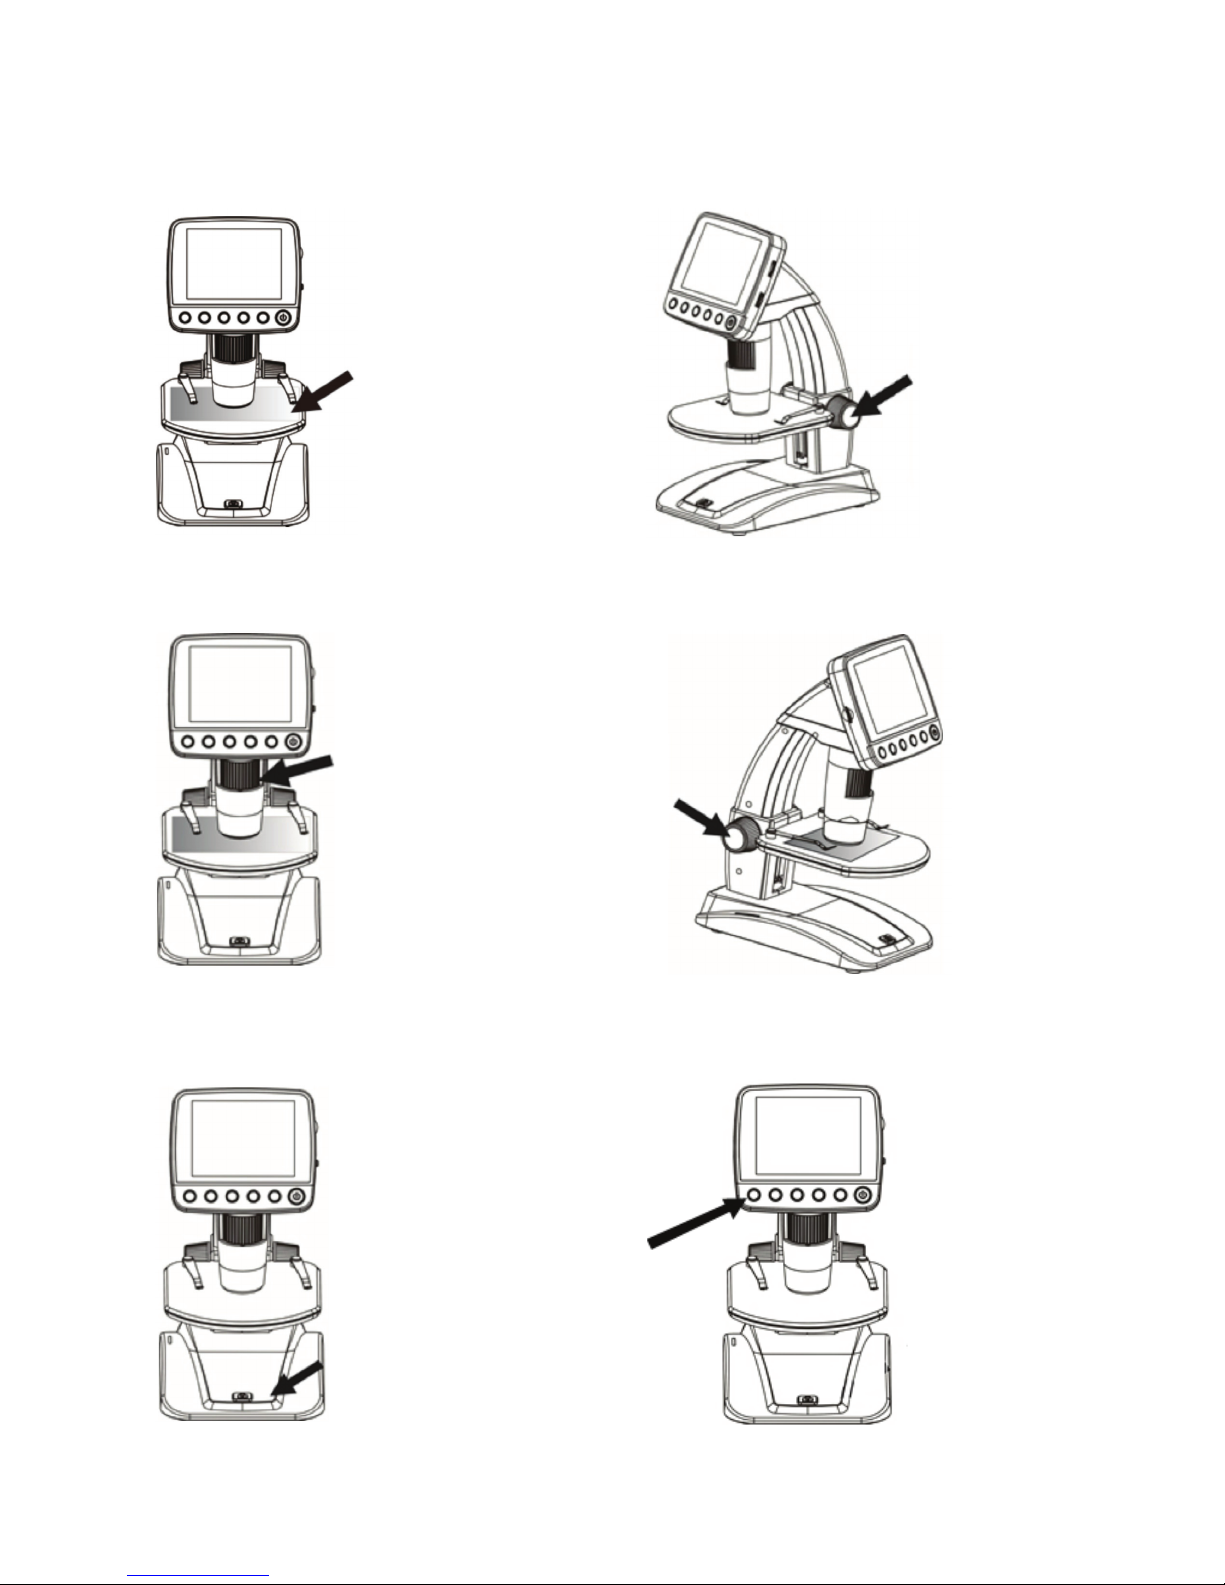
4. OBSERVING AND CAPTURING IMAGES:
DIGITAL IMAGING
A.
Make sure your Cosmos, LCD Digital Microcope is powered ON.
Put object onto the stage
B. Place your specimen on the stage (5). If your object is thin
enough, secure it to the stage using the chrome clips.
D. Rotate the Focus Wheel (3) to get a fine focus on the object.
C. Rotate the Stage Height Adjustment Wheel (7) to bring
your specimen closer to the Microscope Tube (4).
E. When the desired focus is achieved, lock the stage
in position by tightening the Stage Lock Wheel (6)
F. To record an image, press the Capture Button (8).
NOTE: Press the Playback/Left button on the LCD screen housing to scroll between
Still Image Capture mode and Video Capture mode.
G. While in video mode, press the Capture Button to start
recording video. Press the button again to stop.
ENGLISH 7
Page 8
5. SOFTWARE FEATURES
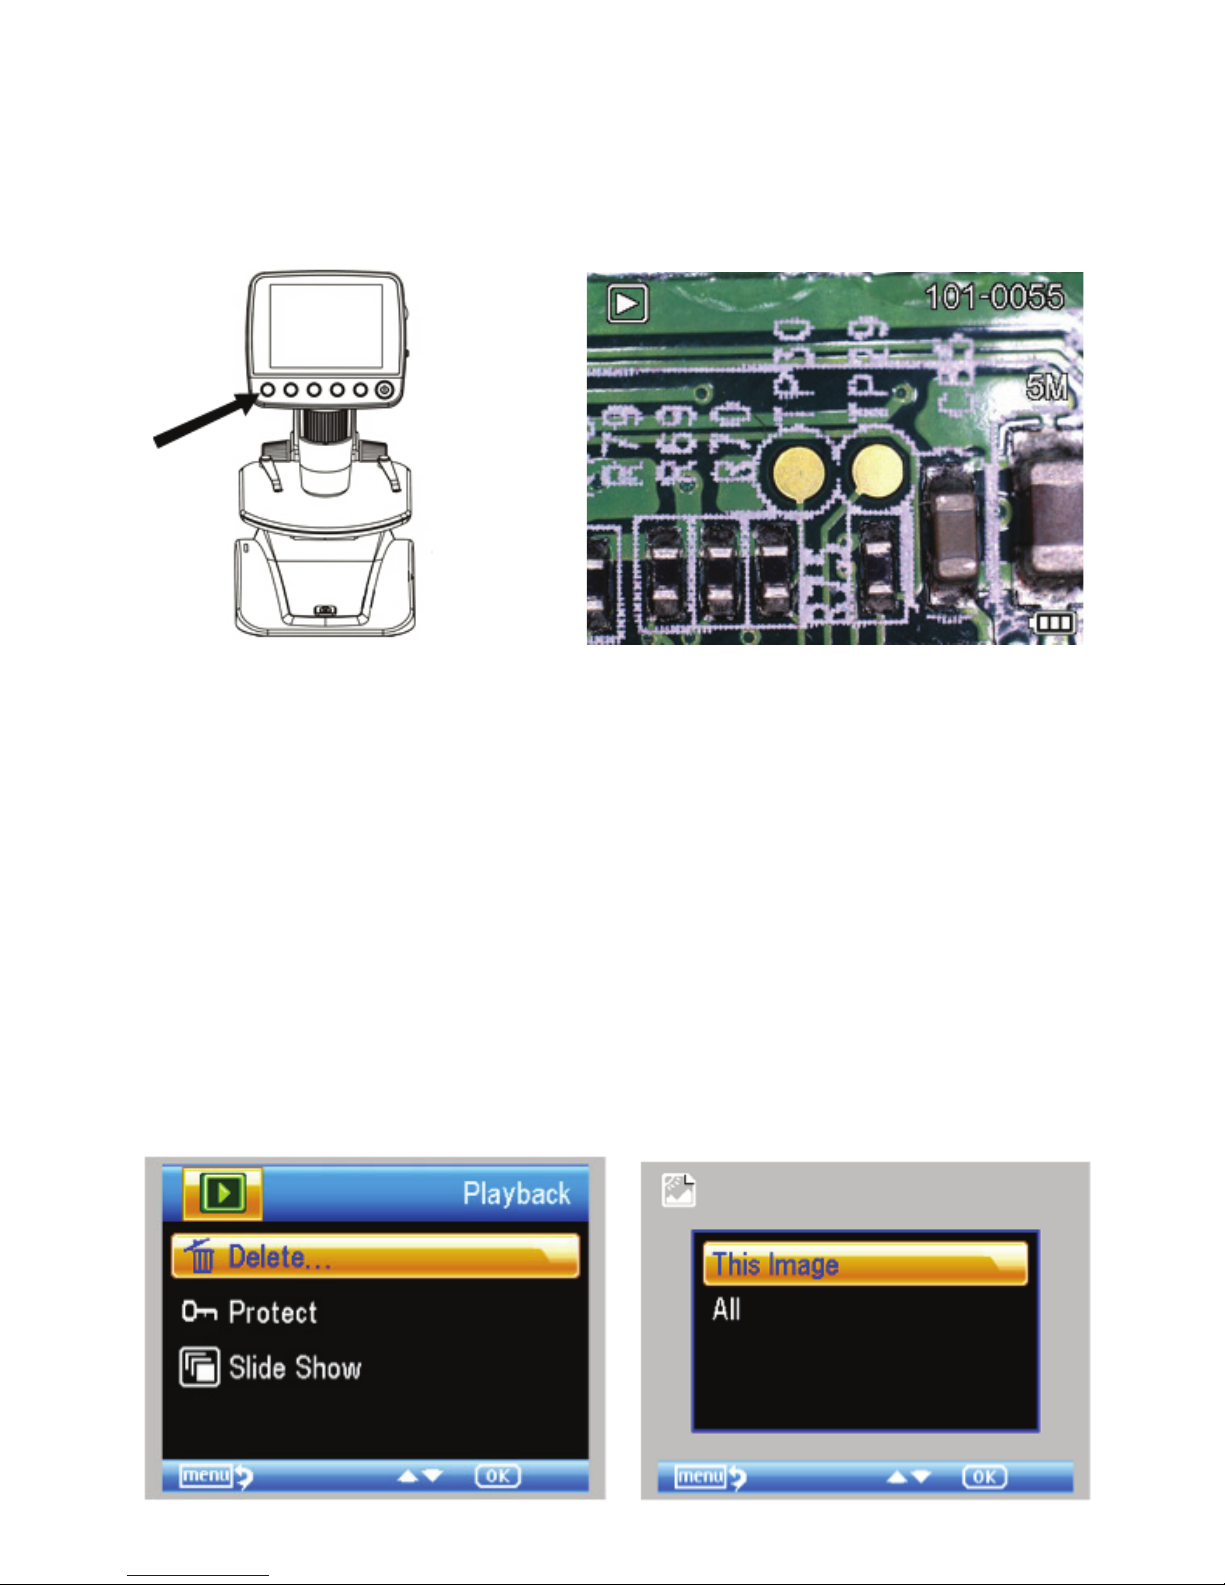
REVIEW SAVED IMAGE FILES
To play back video or review a still image, simply press and hold the Playback/Left
button on the LCD housing.
The following screen will appear with 3 choices:
1. Delete
2. Protect
3. Slide Show
DELETE IMAGE FILES
This choice deletes the selected image/video or
ALL images.
8 I ENGLISH
Page 9

PROTECT IMAGE FILES
This choice allows you to ‘lock’ and ‘unlock’ the selected
image/video file or ALL images/video files on disk for
protection.
SLIDE SHOW
This choice creates a slide show using all the image
files on the MicroSD card. Select Slide Show, and then
choose the interval between each image.
FILTERS
When on the main screen or in viewing mode, press the
MODE/UP button
A. Color Image
B.. Negative Image
C. Black and White Image
A.
to scroll between:
B.
C.
ENGLISH 9
Page 10

DIGITAL ZOOM
s
Press the Zoom Button up to zoom in, and down to
zoom out.
s
The Zoom has a range from 1.0x to 4.0x
TRANSFER FILES TO COMPUTER
s
Connect your micrcscope to your computer via USB 2.0
s
On the LCD screen, choose “Upload Images”, using the
OK button.
s
Your computer will copy the files on your MicroSD card
to your hard drive.
s
When the transfer is complete, you can open the files on
your computer.
Zoom In
Zoom Out
CELESTRON PORTABLE
CAPTUREPRO SOFTWARE
s#ONNECTTHEMICROSCOPETOYOURCOMPUTERASDESCRIBED
above.
s#HOOSEh0REVIEWON#OMPUTERv-ODEFROMTHECHOICES
on the LCD screen.
s/PENTHE#ELESTRON0ORTABLE#APTURE0RO3OFTWAREON
your PC.
NOTE: Refer to section 5.E in this manual for instructions on installing and using
the Celestron Portable CapturePro Software
NOTE: Once the software is launched, the LCD screen will go blank and you will begin controlling
the microscope with the computer. However, you will still use the microscope to control
the following features:
1. Illuminator Brightness
2. Focus Wheel
3. Stage Adjustment Wheel
4. Stage Lock Wheel
5. Power button
NOTE: When you connect to a computer via USB, the lithium battery will charge.
10 I ENGLISH
Page 11

CONNECT TO TV
s)NSERTTHEINCHPLUGONTHEENDOFTHESUPPLIEDVIDEO
cable into the Cosmos Microscope’s AV OUT port located
on the back of the base.
s)NSERTTHEYELLOW2#!PLUGONTHEVIDEOCABLEINTOONE
of your television’s yellow video input connectors.
NOTE: Refer to your television’s manual to locate your TV’s video connector.
s4URNONTHETELEVISION"ESUREYOURTELEVISIONISTUNED
to the appropriate input channel.)
s9OUSHOULDNOWSEEANIMAGEOFTHESPECIMENYOUARE
viewing on your television screen.
Video-in on TV monitor
Video-out
6. SOFTWARE MENU INTRODUCTIONS
MAIN MENU
s
Press SETTINGS button to enter Main Menu 1.
s
The menu choices will vary depending on whether you
are in still image or video mode.
s
When in still image mode, you will see:
1. Resolution
2. Time Lapse
3. Quality
4. Sharpness
s
There is only one setting in video mode:
1. Resolution
RESOLUTION SETTING:
s
In still image mode, choices are:
- 12.0 MP (interpolated*)
- 9.0 MP (interpolated*)
- 5.0 MP
- 3.0 MP
- 1.3 MP
- VGA
ENGLISH 11
Page 12

s
In video mode, choices are:
- VGA
- QVGA
TIME LAPSE SETTING
s
FRAME S: In this window, you will set the number
of frames you want to take.
s
INTERVAL: In this window the interval between
shots is set.
- Once you have made your selections, press OK
to confirm and press the Menu/Setup button to
go back to preview mode.
NOTE: The number above represents 32 frames.
- When you press the Capture Button to begin
your time lapse, you will notice a new icon
is displayed in the upper left corner of the
screen.
- When all the frames are taken, the microscope
will go back to the preview screen.
- To stop the auto capture before it completes,
press the Capture Button once.
-NOTE: The TIME LAPSE setting only works in Still Image mode.
QUALITY
The Quality settings determine the level of compression
for the image you are about to take. The more compression,
the smaller the file size, but the less detail in the image.
There are 3 choices in the Quality setting window:
1. Super Fine (largest files, least compressed)
2. Fine
3. Normal (smallest files, most compressed)
NOTE: The number above represents 15 seconds.
12 I ENGLISH
Page 13

SHARPNESS
Sharpness increases the differences the imaging process
detects between the edges of the pixels. There are no rules
when it comes to the sharpness settings. Experiment to find
out which works best for your specimens.
The Sharpness choices are:
1. Hard
2. Normal
3. Soft
MAIN MENU 2
While in MAIN MENU 1, press the left button to enter MAIN
MENU 2. The choices here are :
1. Language
2. Power Save
3. Frequency
4. Date Stamp
5. TV Out
6. Date/Time
7. Format SD
8. System Reset
9. Version
LANGUAGE
Cosmos Digital LCD Microscope may be used in 9 languages:
1. English
2. German
3. French
4. Spanish
5. Italian
6. Portuguese
7. Japanese
8. Simple Chinese
9. Traditional Chinese
s
Scroll to your preferred language and press OK to select it.
ENGLISH 13
Page 14

POWER SAVE
Power Save allows you to conserve battery power by setting
the unit to turn off automatically. The choices for times are:
1. OFF: Power Save feature is off; unit will not turn off
automatically
2. 5 min.: Unit will turn off after 5 minutes of non-use
3. 10 Min.: Unit will turn off after 10 minutes of non-use
4. 15 Min.: Unit will turn off after 15 minutes of non-use
5. 30 Min.: Unit will turn off after 30 minutes of non-use
FREQU ENCY
This setting has to do with your TV’s refresh rate. For USA
(NTSC), use 60Hz; for others, use 50Hz.
DATE STAMP
If you wish, you can display a date stamp on image files (but
not on video files).
The choices are:
1. DATE/TIME: Displays both DATE and TIME on the saved
image file
2. DATE: Displays only the date on the image file
3. OFF: Will NOT display any DATE/TIME information
TV OUT
Set your TV out setting to either NTSC or PAL, depending on
your location.
1. Choose NTSC for:
- North America
- South America (excluding Brazil, Argentina,
Uruguay and French Guiana)
- Myanmar, South Korea, Taiwan, Japan and
the Philippines
2. Choose PAL for:
- All countries
NOT listed above
NOTE: The DATE and/or TIME will NOT be displayed in the preview mode-
only on the recorded image file.
NOTE: See map on following page.
14 I ENGLISH
Page 15

DATE/TIME
s
Here you can set the correct Date and Time
s
You can also choose from the following date display options:
- YY/MM/DD
- DD/MM/YY
- MM/DD/YY
SD CARD
From this screen, you can format your MicroSD card. You
should format your MicroSD before using it for the first time.
NOTE: During formatting, ALL files will be erased from the card.
SYSTEM RESET
This screen allows you to reset ALL the settings to the factory
default settings.
VERS ION
The Version screen will display information on your firmware
version. You cannot actually change any setting here.
ENGLISH 15
Page 16

7. MULTI-PLUG (OPTIONAL)
There are 3 interchangeable plug heads that will fit outlets in
Europe, the United Kingdom, Hong Kong and China.
To change the plug head:
- Grasp the main plug housing with one hand
and the plug head of choice with the other.
- Press the small button release on the plug
housing (circled in below image).
- Locate and interlock the tabs on the plug head
with the grooves on the plug housing.
- Rotate the plug head clockwise 90° until you
hear a “click” as the plug head locks into place
To remove the plug head, press the small button release and
rotate the plug head counterclockwise until it releases.
8. CARE AND MAINTENANCE
Your microscope with digital camera is a precision optical instrument and should be treated with care at all times. Follow these
care and maintenance suggestions and your microscope will need very little maintenance throughout its lifetime.
t
Store your microscope in a dry, clean place.
t
Never use your microscope where operation of such devices
is restricted. Improper use creates the risk of serious
accident.
t
Do not try to access the internal components of your
microscope or attempt to modify it in any way. Only
authorized technicians should perform m
or repairs.
aintenance
t
Keep your microscope away from water and other liquids.
Never use it in the rain or snow. Moisture creates the danger
of fire and electric shock.
t
To clean dust or smudges from the LCD screen or other
optical component, first blow the dust off with a camel’s hair
brush or air blower. Then use the included dry, microfiber
cloth to wipe the surface.
t
If the exterior surfaces of your microscope need cleaning,
wipe with a moist cloth.
16 I ENGLISH
Page 17

9. TROUBLESHOOTING
PROBLE MS SOLUTION
The unit does not turn on. Check the battery power. If necessary, recharge by plugging into AC power.
s
The screen is blank.
There are smudges or blemishes on the
screen.
Microscope is connected to a television, but
no image appears on the television screen.
The battery indicator LED is not illuminating,
even though the power adapter is connected
and plugged into a wall socket.
-orThe battery is not charging.
10. WARRANTY
Your Cosmos Digital LCD Microscope has a two year limited warranty. Please visit the Celestron website for detailed
information on all Celestron microscopes: www.celestron.com
Ensure that the power is on.
s
Check the battery power and recharge the battery if necessary.
s
Verify that the object you want to magnify is positioned correctly under the lens.
Clean the screen and lens carefully with the included microfiber cloth.
s
Ensure that the television is on.
s
Switch to the appropriate video input channel on your television. (This will vary by
manufacturer.)
s
Ensure that the video cable is securely connected to the microscope’s Video Out port
and plugged into the correct video input on your television
Make sure the cable is plugged into the proper port.
Check that the outlet has power and is not malfunctioning. If the outlet is connected
to a wall switch, make sure that the switch is on.
FCC Statement :This equipment has been tested and found to comply with the limits for a Class B digital device, pursuant to part 15 of the FCC
Rules. These limits are designed to provide reasonable protection against harmful interference in a residential installation. This equipment generates,
uses, and can radiate radio frequency energy and, if not installed and used in accordance with the instructions, may cause harmful interference to
radio communications. However, there is no guarantee that interference will not occur in a particular installation. If this equipment does cause harmful
interference to radio or television reception, which can be determined by turning the equipment off and on, the user is encouraged to try to correct the
interference by one or more of the following measures:
s 2EORIENTORRELOCATETHERECEIVINGANTENNA
s )NCREASETHESEPARATIONBETWEENTHEEQUIPMENTANDRECEIVER
s #ONNECTTHEEQUIPMENTINTOANOUTLETONACIRCUITDIFFERENTFROMTHATTOWHICHTHERECEIVERISCONNECTED
s #ONSULTTHEDEALERORANEXPERIENCEDRADIO46TECHNICIANFORHELP
© 2014 Celestron. Celestron and Symbol are trademarks of Celestron, LLC. All rights reserved.
4ORRANCE#!s4ELEPHONE
TM & © 2014 Cosmos Studios, Inc. All rights reserved.
This product is designed and intended for use by those 14 years of age and older.
Product design and specifications are subject to change without prior notification.
Made in China | Fabriqué en Chine | Hecho en China | Hergestellt in China | Fabbricato in Cina
ENGLISH 17
Page 18

c
0
s
A
SPACETIME ODYSSEY
M
by
~
0
CELESTRON
s
~
'
LCD
DIGITAL
QUICK
Congratulations
WHAT'S
•
LCD
•
USB
Felicitations
CONTENU
•
Microscope
externe
logiciel
Pour
on
purchasing
IN
THE
microscope
cable
•
de
le
for
connecting
pour
votre
DE
a
ecran
CD
du
logiciel
mesure
manuel
•
LA
du
d'instructions
MICROSCOPE
START
the
BOX
2
GB
achat
BOiTE
ACL
•
PC
COSMOSTM
Micro
SO
the
microscope
du
microscope
•
Carte
memo
Cable
USB
5MP
card
•
Rechargeable
to
your
a
ire
flash
pour
connecter
complet,
ecran
(f)
CJ
f~
MODEL#44362
GUIDE
LCD
Microscope.
lithium
ion
battery
•
AV
cable
for
connecting
PC
and
charging
the
battery
•
Calibration
ACL
5
Mpx
COSMOS™.
Micro
de
2
Go
•
Batterie
au
lithium
-
ion
rechargeable
le
microscope
visitez
a
votre
PC
et
recharger
www.celestron.com
ruler
de
Ia
to
an
for
use
with
•
Cable
batterie
•
external
monitor
PC
measuring
AV
pour
Regie
de
@
ll
l
~:~t~
'E::,::r:lll
ENGLISH
•
Software
CD
software
F
RAN
se
connecter
calibrage
a
un
pour
!'utilisation
moniteur
avec
CA
le
IS
Herzlichen
LIEFERUMFANG
•
USB-Kabel,
Die
Felicidades
CONTENIDO
•
USB
Para
Congratulazioni
CONTENUTO
•
•
misurazione
Per
GIUckwunsch
LCD-Mikroskop
vollstandige
Microscopio
para
consultar
Microscopio
Cavo
consultare
urn
das
por
LCD
conectar
LCD
USB
per
per
• 2
GB
Mikroskop
Bedienungsanleitung
adquirir
DE
LA
•
Tarjeta
el
microscopio
el
per
aver
DELLA
•
Scheda
il
collegamento
PC
il
manuale
zum
MicroSD-Karte
el
manual
acquistato
Kauf
des
COSMOS™
•
Wiederaufladbare
zum
Aufladen
an
microscopio
CAJA
micro
CONFEZIONE
microSD
LCD
SO
de
2
al
PC
y
cargar
de
instrucciones
il
microscopio
da
2
GB
del
microscopio
di
istruzioni
de
GB
5MP
LCD-Mikroskops.
Lithium-lonen-Batterie
lhren
PC
anzuschlieDen
erhalten
5MP
COSMOS™.
•
Baterfa
recargable
Ia
baterfa
completo,
LCD
COSMOS™
•
Batteria
agli
a
un
PC
e
per
completo,
For
complete
•
Zusammen
Sie
auf
www.celestron.com
de
litio-ion
•
Regia
de
calibracion
visite
da
5
mega
ioni
di
litio
ricaricabile
il
caricamento
visitare
www.celestron.com.
instruction
•
AV-Kabel
fur
den
Anschluss
mit
der
PC-Messsoftware
•
Cable
AV
para
conectar
para
usar
con
el
software
www.celestron.com
pixel.
•
Cavo
AV
per
il
della
batteria
•
Righello
manual,
visit
an
einen
verwendbares
a
un
monitor
de
medicion
collegamento
di
calibrazione
a
un
per
externen
Bildschirm
Kalibrierungslineal
externo
•
para
PC
monitor
esterno
l'uso
con
CD
de
software
il
software
•
Software-CO
•
CD
DEUTSCH
ESPAN
Ol
•
Cable
ITALIANO
software
di
•
www.CELESTRONcoM
Page 19

c
0
s
M
0
s·
A
S P A
C E
T
I M
E
0 0 Y S S
E
Y
0
1.
GET
TO
KNOW
YOUR
MICROSCOPE
[A]
Power
Button
[B]
LCD
Screen:
Full
color
3.5
inch
TFT
display
ENGLISH
[C]
Adjustable
Stage:
Includes
clips
for
securing
specimens
on
slides
[D]
Coarse
Focus
Wheel:
Adjusts
the
coarse
focus
by
moving
stage
up
and
down
[E]
lock
Wheel:
locks
the
stage
in
desired
position
[F]
Fine
Focus
Wheel:
Focuses
in
clearly
on
your
specimen
[G]
Illuminator
Adjustment:
Increases
or
decreases
the
brightness
of
the
LED
illuminator
[H]loom
Adjuster:
Up
to
4X
zoom
[I]
Base
[J]
Shutter
Trigger:
Push
to
capture
still
images
and
video
[K]
AC
Power
Port
:
5V·1A
input
[l]
AV
Out:
For
use
with
an
external
monitor,
great
for
the
classroom
[M]
USB
Out:
For
transferring
images
to
you
computer
using
the
provided
software
[N]
Battery
Compartment:
1100
mAh
battery
stored
here
[0]
Battery
Indicator:
LED
turns
red
when
battery
is
depleted
2.
MICROSCOPE
SETUP
STEP
1.
Insert
the
battery
into
the
battery
compartment.
STEP
2.
Your
microscope's
battery
ships
with
a
partial
charge,
but
we
recommend
charging
it
tully
before
your
first
use.
To
charge
the
battery,
plug
the
microscope
into
your
computer
or
USB
charger
using
the
provided
USB
cable.
STEP
3.
Once
the
battery
is
charged,
press
the
power
button
to
turn
on
your
microscope.
NOTE:
For
detailed
instructions
on
using
your
microscope,
refer
to
the
full
manual
on
the
included
CD
or
online
at
www.celestron.com
~
Now
that
you
know
the
parts
of
your
COSMOSr"
microscope,
let's
do
some
experiments!
f)
D
K l M
FRANCAIS
1.
FAMILIARISEZ-VOUS
AVEC
VOTRE
MICROSCOPE
[A]
Bouton
d'
alimentation
[B]
Ecran
ACL
:
affichage
TFT
de
3,5
pouces
(87
mm)
[C]
Platine
reglable:
comprend
l
es
clips
pour
fixer
les
ec
hanti
lio
ns
sur
l
es
lames
[D]
Anneau
de
mise
au
point
rapide
:
ajuste
Ia
mise
au
po
i
nt
rapide
en
depla~ant
Ia
plat
i
ne
de
haut
en
bas
[E]
Anneau
de
verrouil
l
age
:
verrouille
Ia
platine
dans
Ia
positio
n
desiree
[F]
Anneau
de
mise
au
point
fi
ne
:
mise
au
point
neue
sur
vot
re
echantillon
[G]
Bouton
de
reglage
de
i'ill
u
minateur:
augmente
ou
dim
i
nue
Ia
luminosite
de
l'illuminateur
DEL
[H]
Reglage
de
zoom:
zoom
jusqu'a
4X
[I]Base
[J]
Declencheur
de
l'obturateur
:
enfoncez
pour
cap
t
urer
des
images
fixes
et
filmer
des
videos
[K]
Port
d'alimentation
en
c
.a.
:
entree
de
5
Va
1A
[l]
Sortie
AV:
pour
une
utilisat
i
on
avec
un
moniteur
externe,
i
deal
pour
Ia
salle
de
classe
[M]
Sortie
USB
:pou
r
transfere
r
des
images
vers
votre
o
rdinateur
gr!ce
au
logiciel
fourni
[N]
Compartiment
a pi
les
:
pile
de
1100
mAh
stockee
ici
[0]
lndicateur
de
piles
:
Ia
DEL
s'
allume
en
rouge
lorsque
Ia
pile
est
dechargee
2.
INSTALLATION
OU
MICROSCOPE
ETAPE
1.1nserezla
pile
dans
le
compartiment
a
piles.
ETAPE
2.
la
pile
de
votre
microscope
est
livre
avec
une
charge
part
i
elie,
mais
il
est
recommande
de
Ia
charger
completement
avant
Ia
premiere
utilisation
.
Pour
cha
r
ge
r
Ia
batterie,
branchezle
micr
os
cope
sur
votre
ordinateur
ou
c
ha
rgeur
USB
a l'
aide
du
c!ble
USB
fourni.
ETAPE
3.
Une
lois
que
Ia
pile
est
chargee,
appuyez
sur
le
bouton
d'
alimentation
pour
allumer
vot
re
microscope.
REMAROUE:
Pour
des
inst
r
uct
i
ons
detaillees
sur
l'
utilisa
t
ion
de
votre
microscope
,
consultezle
manuel
compiet
sur
le
CD
ou
en
ligne
a
www.celestron
.com
LCD
DIGITAl
MICROSCOPE
I
QUICK
START
GU
IDE
~
Maintenant
que
vous
connaissez
les
differentes
parties
de
votre
microscope
COSMosr•,
faisons
quelques
experiences!
[l]
Sa
l
ida
AV
:
Pa
ra
uso
con
un
moni
tor
externo
,
perfec
to para
una
clase
[
M]
Salida
USB:
Para
tr
anslerir
image
nes al
or
dena
dor
con
el
so
ftware
in
c
lu
ido
(N] Co
mpart
i
mi
en
to
de
bat
er
fa
s:
Bate
rfa de
1100
mAh
(O]
In
d
ic
ad
or
de
baterf
a:
E
IL
ED
se
vu
el
ve
ro
jo
cuando
se
ha
gast
ado
Ia
ba
te
rfa
1.
IHR
MIKROSKOP
IM
iiBERBLICK
[A]
Ne
tztas
te
DEUTSCH
2.
INSTALACIIJN
DEL
MICROSCOPIO
[B]
LCD·B
ildsc
hirm:
3,5-loii·TFH
arbb
ild
s
ch
i
rm
[C]
Einste
li
b
are
r
Tisch:
eins
c
hlieD
ii
ch Kl
emmen
zum
Fixieren
von
Prob
en
au
f
Objek
tt
ra
gern
[D]
Grobes
Fokussierrad:
Der
grobe
Fokus
wird
d
urch
Aut·
und
Abbewegen
des
Tisches
a
ngepasst
[E]
Sperrrad
:
Halt
den
Tisch
in
der
gewunscht
en
Position
[F]
Fe
ine
s
Fokussierrad:
urn
lhre
Pr
oben
scharl
einzustellen
[G]
Beleuchtungseinstellung:
Erhoht
o
der
ver
r
ingert
die
Heliigkeit
der
LED·Beleuchtung
[H]
loom·Regler:
bis
zu
4·
1acher
loom
[I]
Fun
(J]
AusiOs
er:
Drucken,
urn
ein
Foto
oder
V
id
eo
aulzunehmen
[K]
Wechselst
r
omanschluss
:
5
V-
1 A Ei
ngangsle
i
stung
[l]
AV·A
us
gang
:
fur
den
Einsatz
eine
s e
xt
er
ne
n
Bildschirms,
ide
al
fur
Kl
assenzimmer
[M]
USB·Ausgang:
zum
Ubertragen
von
Bildern
au
f
lhren
Compu
t
er
unter
Verwendung
der
mitgelielerten
Software
[N]
Batte
ri
elach:
Hier
wird
eine
1100-
mAh
·B
atter
ie
eingelegt
[0
]
Batte
ri
es
ta
nd
·Anzeige
: D
ie
LED
leuch
t
et
bei
n
ied
rige
m
Batterie
stand
rot
2.
AUFBAU
DES
MIKROSKOPS
SCHRITT
1:
legen
Sie
die
Batterie
in
das
Batte
r
iefach
ein.
SCHRITT
2:
lhr
Mi
kroskop
wird
mit
eine
r
teilwei
se
a
ulge
laden
Batterie
geiie
fe
rt
,
doch
emplehien
wir
Ihnen
,
di
ese
vor
der
Erstverwendung
zunachs
t
volistandig
aufzu
i
aden
.
Schl
i
eO
en
Sie
zum
Aufladen
der
Ba
tterie
das
Mikroskop
tibe
r
das
mitg
eli
e
fert
e
USB-Kabe
l
an
lhren
Computer
oder
ein
USB·lad
eg
erat
an.
SCHRITT
3: Nach
dem
Aufladen
der
B
atte
rien
auf
die
Netztaste
dr
uc
ken
,
urn
lhr
Mi
kroskop
einzuschalten.
ANMERKUNG:
De
tai
liierte
lnformationen
ube
r
die
Verwendung
lh
r
es
Mikroskops
erhalten
Sie
in d
er
volistandigen
Be
dienungsanleitung
auf
d
er
entha
l
tenen
CD
oder
on
li
ne
auf
www.celestron.c
om
~
Nachdem
Sie
nun
lhr
COSMOS
r"
-Mikruskup
kennengelernt
haben
,
kiinnen
wir
ein
paar
Experimente
wagen!
1.
CONOZCA
SU
MICROSCOPIO
[A]
B
oton
de
encendido
[B]
Pantalia
LCD:
Pantalia
TFT
de
3,5
pulga
d
as
a
todo
color
ESPANOL
[C]
Sopo
r
te
ajustable:
lnciuye
clips
para
asegurar
los
esp
ecimenes
en
muestras
[D]
Rueda
de
enfoque
aproximado:
Ajusta
el
en
fo
que
aproximado
moviendo
el
sopor
te
arr
i
ba
y
abajo
[E]
Rueda
de
bl
oqu
eo:
Bloquea
el
soporte
en
Ia
po
s
ici
on
de
s
eada
(F]
Rueda
de
entoque
preciso:
Enfoca
con
p
re
c
is
i
on
el
espec
i
me
n
[G
Aju
st
e
de
iium
i
nador:
Aumen
ta o r
educe
el
brillo
del
iluminador
LED
[H]
Aju
s
te
de
zoom:
loom
hasta
4x
[I]
Base
(J]
Act
i
vador
de
obturador:
Pulsar
para
captur
ar i
ma
genes
lijas
y
video
[K]
Puerto
de
a
li
me
ntacion
CA:
entrada
de
5V·1A
PASO
1.
1
ntroduzc
a
Ia
b
aterfa
en
el
co
mpar
ti
miento
.
PASO
2.
La
ba
t
er
fa
de
su
micr
osco
pio
se
en
tr
ega
con
una
carga
par
c
ia
l,
pe
ro
r
ecomendamos
cargarla
por
co
mpl
eto
ant
es
del
primer
uso
.
Pa
ra
c
argar
Ia
bate
r
fa
,
conecte
el
mic
ro
sco
pio
al
ordenad
or
o
carg
ado
r
USB
c
on
el
cable
USB
i
nci
uid
o.
PASO
3.
Cuando
Ia
baterfa
es
te
car
ga
da
,
pu
l
se
el
boton
de
en
cen
di
do
para
encender
el
micro
sc
opio.
NOTA:
P
ara
obtener
i
ns
tru
cc
io
nes
deta
lla
das
sob
re
el
us
o
d
el
mic
r
osc
op
io,
consulte
el
manual
completo
en
el
CD
inclui
do
o en
lf
ne
a
en
111111111
.
c
elestron
.
com
~
Ahura
que
cunuce
las
piezas
de
su
micruscupio
COSMOS
TM,
iexperi
m
en
t
em
u
s!
1.
PANORAMICA
DEL
MICROSCOPIO
[A]
Ta
sto
di
accensione
(B
]
Schermo
LCD:
TFT
a
co
lor
i
da 3,5
po
lli
ci
I
TA
LIANO
(C
] P
ia
no
regolabile
:
include
dei te
rm
agli
per
ass
i
curare
i
camp
ioni
su
i
ve
tri
ni
(0
]
Manopola
di
messa
a
l
uoco
app
r
oss
im
ativa:
cons
en
te di
r
ego
lare Ia
me
ssa
a
luoc
o
appross
i
ma
tiva
muove
ndo
il
pia
no
vers
o
l'a
lt
o
o
verso
il
basso
[E]
Manopola
di
blocco:
c
onsen
te
di
blo
c
care
il
pia
no
nel
la
po
si
zione
de
s
ide
r
ata
[F]
Ma
nopola
di
me
ssa
a f
uoco
:
con
sen
te
di
metter
e a
fuoco
con
ch
iar
ezz
a
il
c
ampione
(G
]
Regolatore
illum
i
nato
re:
consente
di a
umentare
o d
imi
nui
re
Ia
lumin
os
ita
de
ll
'
illumi
nator
e
LED
[H
]
Re
golat
o
re
zo
o
m:
c
apa
ci
ta
di
zoom
fino a 4x
[I]
B
as
e
[J]
T
as
to
di
scatto:
con
sen
te
di
ac
quisire
to
to e
video
[K]
Connettore
di
alimentazio
ne
CA: i
ng
re
sso
5
V·1
A
[l]
Uscita
AV
:
consente
il co
ll
egamen
to
di
un
monito
r
est
er
no
, special
me
nte
ut
il
e
per
le
lezio
ni in
au
la
[M]
U
SB:
consente
il
tr
asle
r
iment
o
de
ll
e
i
mmagin
i
su
un
PC
med
ia
nt
e
il
software
fornito
[N]
Va
no
batter
ia:
per
l'i
ns
erimento
di un
batte
r
ia
da
1100
mAh
[0
] Sp
ia
batter
ia:
Ia
sp
ia
LED
si
i
ll
umina
in
ross
o qua
ndo
Ia
ba
tt
eria
e
sca
ri
ca
2.
CONFIGURAZIONE
OLE
MICROSCOPIO
FASE
1.
lnse
r
ire
Ia
ba
tt
eria
ne
l r
ela
t
ivo
vano.
FASE
2.
AI
momento
dell
'a
cqui
sto
Ia
b
att
eria
e
parzialmente
carica
,
tu
ttav
ia
e
necessario
ca
r
ica
r
la
comp
i
eta
me
nt
e
prima
di
iniziare
a
ut
ilizz
are il
m
icros
co
pio.
Per
car
i
care
Ia
batte
ria,
co
ll
ega
re
il
microscop
io
a un
PC
o
al
car
icature
USB
med
ian
te
il
c
avo
USB
fo
r
nito.
FASE
3.
Una
volta
inserita
Ia
b
atter
ia,
pre
me
re
il
tasto
di
accens
ione
per
a
ccende
re
il
m
icr
oscop
io.
NOTA:
Per
istruz
io
ni
de
tt
agl
iat
e
su
li'
u
so
de
l
microsc
o
pi
o, con
su
ft
are
il
manuale
comp
l
eto
nel
CO
forn
ito
oppure
online
al
s
ito
web
w111w
.
cel
es
t
ron.com
~
E
ora
,
dupu
aver
passatu
in
r
assegna
le
parti
che
custituisconu
il
micruscu
pio
COSMOS
TM,
e
il
momentu
di
iniziare
a
fare
degli
esperimenti.
~
Page 20

c
0
s M
0
s··
A
SPAG
fliM
E G
DYSS
fY
~
.
-
ENGliS
H
EXPERIMENT
1
CATCHING A TARDIGRADE
Tardigrades,
sometimes
called
"water
bears
,"
are
tiny
multicellular
critters
(usually
just
.05-1.5
mm
in
length)
that
live
in
moist
lichen
or
moss. They
are
some
of
the
toughest
animals
on
Earth, considering
they
can
live
in
environments
with
sub-zero
temperatures,
no
oxygen
or
water,
and
x-ray
levels
up
to
1000
times
the
lethal
human
dose.
They
can
even
live
in
boiling
alcohol!
Tardigrades
can
survive
in
environments
with
no
atmospheric
pressure,
like
outer
space,
and
extremely
high
pressure.
up
to 6 times
the
pressure
of
the
deepest
part
of
the
ocean-all
for
up
to
100
years.
Let's
go
catch
one!
STEP
1.
Find a mossy
spot,
like a tree
near a pond.
For
the
best
chances
of
catching a water
bear,
make
sure
the
lichen
or
moss
is
moist.
STEP
2.
Collect a small
sample
of
the
moss
or
lichen
with
tweezers
and
put
it
in a petri
dish,
or
any
small. clear plastic
container.
STEP
3.
Dampen
the
moss
completely
using
distilled
water,
so
there
is
a
centimeter
of
water
in
the
dish.
Let
this
soak
for
24
hours.
STEP
4.
SQueeze
the
matter
from
the
moss into
the
petri
dish.
STEP
5.
Place
the
petri
dish,
with
the
water,
on
the
stage
of
the
COSMOSTM
LCD
Microscope.
Bring
the
contents
of
the
dish
into
focus
by
adjusting
the
coarse
and
fine
focus
knobs.
You
should
see
your
new
pet
tardigrade
.
If
you
don't
see
anything,
try a new
piece
of
moss.
Keep
searching!
It
may
take a few
attempts
before
you
capture a water
bear.
Once
you
find
one,
the
petri
dish
can
be
its
new
home.
STEP
6.
Feeding
your
tardigrades
is
simple. They
love
to
eat
moss!
Just
add
a
pinch
of
moss
once a month.
Tardigrades
also
dine
on
nematodes,
tiny
roundworms
that
live
in
the
moss.
Nice,
wet
moss
is
most
likely
to
contain
nematodes.
FRANfA
IS
EXPERIENCE
1
ATTRAPER
UN
TARDIGRADE
Les
tardigrades.
parfois
appelas • oursons
d'eau,
"sont
de
minuscules
creatures
multicellulaires
(generalement a peine
0,05 a 1,5
mm
de
longueur)
QUi
vivant
dans
le
lichen
humide
ou
Ia
mousse.
lis
font
partie
des
animaux
les
plus
resistants
sur
Ia
terre, etant
donna
QU'ils
peuvent
vivre
dans
des
environnements
avec
des
temperatures
inferieures a zero,
sans
oxygene
ou
eau. et
des
niveaux
de
rayons X jusQu'a
1000
lois
plus
eleves
Que
Ia
dose
martelle
pour
les
humains.
lis
peuvent
meme
vivre
dans
de
l'alcool
en
ebulli-
tion!
Les
tardigrades
peuvent
survivre
dans
des
environnements
sans
pression
atmospheriQue,
tels
Que
l'espace,
et
avec
une
pression
tres
elevee,
jusQu'a
6
lois
Ia
pression
de
Ia
partie
Ia
plus
profonde
de
!'ocean-
et
tout
cela
pour
une
peri
ode
all
ant
jusQu'a
100
ans.
Allons
en
capturer
un!
lCD
MIC
ROS
CO
PE I E
XPERIME
NT
#1
~j;
.
-
~
r
-;;~r~ -~
....
;~~!i:
ETAPE
1.
Trouvez
un
emplacement
moussu,
comme
un
arbre
pres
d'un
etang.
Pour
de
meilleures chances
d'attraper
un
ourson d'eau, assurez-vous
QUe
le
lichen
ou
Ia
mousse
est
humide.
ETAPE
2.
Recueillez
un
petit
echantillon
de
Ia
mousse
ou
du
lichen
avec
des
pincettes
et
mettez-le
dans
une
bol1e
de
Petri,
ou
n'importe
Quel
petit
contenant
en
plastiQue
transparent.
ETAPE
3.
Humidifiezla
mousse
completement
avec
de l'eau distillee,
afin
Qu'il
y
aie
un
centimetre d'eau
dans
Ia
boite.
Laissez-fa
tremper
pendant
24
heures.
ETAPE
4.
Entassezla
matiere
de
Ia
mousse
dans
Ia
boite
de
Petri.
ETAPE
5.
Placezla
boite
de
Pet
ri,
avec
l'eau, sur
Ia
platina
du mic
roscope
a
ecran
ACL
COSMosr•.
Faites
une
mise
au
point
du
contenu
de
Ia
boite
en
ajustant
les
boutons
de
mise
au
point
rapide
et
fine.
Vous
devriez
voir
votre
nouvel
animal
de
compagnie
tardigrade. Si
vous
ne
voyez
rien, essayez
un
autre
morceau
de
mousse. Continuez
a
chercher!
II
se
peut QUe
vous
deviez
taire
QUelQues tentatives
avant
de
pouvoir
capturer
un
ourson
d'eau.
Une
lois
Que
vous
en
trouver un,
Ia
boite
de
Petri
peut
etre
sa
nouvelle
maison.
ETAPE
6.
II
est
facile
de
nourrir
vos
tardigrades.
lis
aiment
manger
de
Ia
mousse!
II
suffi
t d'
ajouter
une
pincee
de
mousse
une
lois
par
mois.
Les
tardigrades
mangent
egalement
des
nematode
s,
de
minuscules
vers
ronds
QUi
vivent
dans
Ia
mousse.
Une
bonne
mousse
humide
est
plus
susceptible
de contenir
des
nematodes.
DEUTSCH
VERSUCH
1
EIN
BARTIERCHEN
EINFANGEN
Bartierchen,
teils
auch
,Wasserbaren"
genannt, sind
winzige
Viel
zeller
(in
der
Regel
nur
0,5
bis
1,5
mm
lang),
die
in
feuchten
Flechten
oder
feuchtem
Moos
Ieben.
Sie
gehiiren
zu
den
widerstandsfahigsten
Tieren
der Erde,
denn
sie
kiinnen
in
Umgebungen mit
Temperaturen
unter
null, ohne
Sauerstofl,
ohne
Wasser
sowie
bei
einer
Riintgenstrahlenkonzentration
tiberleben,
welche
die
tiidliche
Dosis
fur
einen Menschen
um
das
1000-Fache
ubersteigt.
Selbst
in
kochendem
Alkohol
konnen
sie
uberleben!
Bartierchen
(Tardigraden)
konnen
in
Umgebungen
ohne
atmospharischen
Druck, wie
zum
Beispiel
im freien
All,
sowie
unter
extrem
hohen Oruckverhaltnissen,
die
den Druck
am
tief
sten
Punkt
der
Ozeane
um
das
6-Fache
ubersteigen,
Ieben-
und
das
alles
bis
zu
100
Jahre
lang.
Fangen
wir
eins
ein!
SGHRITT
1:
Suchen
Sie
sich
eine
moosige
Stelle,
wie
einen
Baum
in
der
Nahe
eines
Teichs. Einen
Wasserbaren
Iangen
Sie
am
ehesten, wenn
die
Flechte
oder das
Moos
feucht
ist.
SGHRITT
2:
Nehmen
Sie
mit einer
Pinzette
eine
kleine
Moos-
oder
Flechten-
probe
und
legen
Sie
diese
in
eine
Petrischale
oder einen
kleinen,
transparenten
Kunststoffbehalter.
I
I I ' !
,/
I j
~----,
l -
I
{"~
~
t~JL
~"""
yJ
-----~-
_)
LJ
SGHRITT
3:
Feuchten
Sie
das
Moos
voll
sta
ndig
mit
destilliertem
Wasser
an,
bis
im
Schalchen
ein
Zentimeter Was
ser steht.
Weichen
Sie
es
24
Stunden ein.
SCHRITT
4:
Drucken
sie
das
Moos
in
die
Petrischale
aus.
SGHRITT
5:
Stell
en
Sie
die
Petrischale
mit
dem Wass
er
auf
den Tisch
des
COS
-
MOST" LCD-Mikroskops
und
stellen
Sie
den
lnhalt
der
Petrischale
scharf,
indem
Sie
die
Grob-und
Feinfokusknopfe
einstellen. Nun
s
ollten
Sie
lhren
neuen
Teddybar
en
sehen konnen.
Versuchen
Sie
es
mit
einem
neuen
Stuck Moos, falls Sie nichts
erkennen
kiinnen.
Suchen
Sie
immer
weiter!
Spatestens nach
ein
paar
Versuchen
werden
Sie
einen
Wasserbaren
entdecken. Sobald
Sie
einen
gefunden
haben,
ist
die
Petrischale sein
neues
Zuhaus
e.
SCHRITT
6:
lhren
Tardigraden
zu
futtern
ist ganz
einfach. Seine
Liebllng
sspeise
i
st Moos!
Legen
Sie
einf
ach
jeden
Monat ein
klein
wenig
Moos
hi
nein.
Tardigraden
verspeisen
auch Nematoden,
winzige
Faden-
wurmer,
die
im
Moos
Ieben. Praktischerweise
enthalt
feuchte
s
Moos
hochstwahrscheinlich
auch
Nematoden.
ESPANOL
EXPERIMENTO
1
CAPTAR
UN
TARDfGRADO
Los
tardigrados son
animates
multicelulares
diminutos (habitualmente
de
0,05
-1,5
mm
de
longitud)
que
habitan
en
liQuenes o musgo
humedo.
Son uno
s
de
los animat
es
mas
resistentes
del
planeta,
teniendo
en
cuenta
Que
pueden
vivir
en
ent
orn
os
con
temperaturas bajo cer
o,
sin oxi
geno
ni
agua
, y
con
niveles
de rayos X hasta
1000
veces
Ia
dosis fetal para humanos. ilncluso
pueden vivir
en alcohol
hirviendo!
Los
tardigrados
pueden
sobreviv
ir
en
entornos
sin
presion
atmosferica,
como
el
espacio exterior
, y
presione
s ex
tremadamente
elevadas
,
hasta 6 vec
es
Ia
presion
del oce
ano
mas
profundo-durante
hasta
100
anos.
iVamos a capturar uno!
PASO
1.
Encuent
re
un
Iugar
con
musgo,
como
un arb
ol
cerca
de
un estanQue.
Para
tener
Ia
maxima pro
babilidad
de
capturar
un
tardigrado
,
a
se
gurese
de
QUe
los
liQuenes o el
musgo
este
n h
umedos
.
PASO
2.
Recoja
una
peQuena
muest
ra
el
musgo
o l
os
liQuenes
con
pinza
s y
pongala
en
una
placa
de
Petri, o un
recipiente
peQueno
transparente
de plast
ico.
PASO
3.
Humedezca
por
compfeto
el
musgo
usando
agua
destilada, de forma
Que
Quede un
centime
tro
de
agua
en
Ia placa. Dejelo
empapar
durante
24
horas.
PASO
4. Exprima
el material
del
musgo
en
Ia p
laca
de
Petri.
PASO
5. GoloQue
Ia
placa
de
Petri
con
el
agua
sob
re
el
soporte
del microscop
io
LCD
COSMOST".
EnfoQue
el
contenldo
de
Ia
placa
ajustando
los
mandos
de
enfoQue
aproximado y preciso. Deberfa
ver
su
nuevo
tardfgrado. Si
no
ve
nada,
pruebe
con
otro
trozo
de
musgo.
i Si
ga
buscando! Puede
t
ardar
unos
momentos
en
captur
ar un tardigrado. Cuando
encuentre
un
o,
Ia
placa
de
Petri
puede
ser
su nuevo
habitat.
PASO
6.
Alimentar sus
tardfgrados
es sencillo.
iLes
encanta comer
musgo!
Aiiada
una
pizca
de
musgo
una vez al
mes.
Los
tardfgrados
tambien se
afimentan
de
nematodos, peQue
nos g
usanos Que
habitan
en
el musg
o.
El
musgo humedo
es
muy proba
ble Q
ue
contenga
nematodos.
ITAliANO
ESPERIMENTO
1
ACCHIAPPA
UN
TARDIGRADO
I tardigrad
i,
anche
chiamati "or
si d'
acQua", sono minuscule bes
tiol
ine
mu
lticellulari
(normalmente
di
lunghezza
com
presa tra 0,05
e 1,5 mm) che
vi
vono
in
condizioni
di
umidita tra musc
hi e li
cheni.
Sono
tra
gli
esseri piu
resistenti sulla
Terra
, c
onsiderando che posso
no vivere a temperatur
e sotto
lo zero
, in
assenza
di
oss
igeno o acqua
e a liv
elli
di
emissione
di
ragg
i X
mille
volte
superiori
alia
dose letale per gli e
sse
ri
umani.
Poss
ono
addirittura
vi
vere
nell'alcool
in
ebollizione! I tard
igradi p
osso
no
sopravvivere
in ambie
nti
privi
di pressione atmosferi
ca,
come
lo spaz
io, o a
eleva
tissima
pressione,
oltre 6 vo
lte
Ia
pressione
della par
te
piu
profunda
dell'oceano
, e
per
un
tempo
superiore ai
tOO
anni. Andiamo
ad
acciuff
arne
uno
1
FASE
1.
Cercare
un luogo
muschioso, co
me
ad
esemp
io
un albero
vicino
ad
uno
s
ta
gno. Per
aumentare
le possibilita di
acchiappare
un orso d'acQu
a
assicur
arsi
che
illichene
o if
mus
chio si
ano
umidi.
FASE
2.
Raccogliere
un
piccolo campione
di
muschio o
lichene con dell
e
pi
nzette e collocar
lo in
una piast
ra di Petri, o
Qualsiasi
alt
ro
picco
lo
co
ntenitore
di plast
ica pulit
o.
FASE
3.
Bagnare
if
muschio
con
dell'acqua
dis
lillata, in modo da
avere un
centimetro d'acQua
nella pia
str
a. Lasciare
if
musch
io i
mmerso
n
ell'acQua
per
24
ore.
FASE
4.
Strimre
l'es
tratto
dal
muschio sulla piastra
.
FASE
5.
Collocare
Ia
piastra
di
Petri, con l'acQ
ua, sui
piano del
microscop
io LCD
COSMOS"'.
Mettere a fuo
co
if contenuto della piastra regolan
do
le
d
ue
manopole
di mes
sa
a fuoco.
II
pic
colo
tardigrado
dovrebbe
esse
re
vi
sibile.
Se
non
si
osserva nulla
, ripr
ovare
con
un nu
ovo
campio
ne di
musc
hio.
Non
demordere! Potre
bbero
essere necessa
ri piu tentativi
pr
ima
di
poter
osservare
un
ors
o d'
acQua.
Una
volta trovato
, Ia piastra
di
Petri
pun
diventare
Ia
sua nuova casa.
FASE
6. I tardigradi
sono facili
da
alimentare.
Adora
no
if musc
hio! Bast
a
dar
gliene un
pizzico
una
volt
a al mese. I
tardigra
di
si
cib
ano anc
he
di
n
ematodi,
pic
coli vermi cili
ndric
i che
vivono
nel
muschio.
Perfe
tto,
cio
si
gnifica
che
nel
muschio
bagna
to e m
ulto
probabile trovare nematodi.
Page 21

c
0
s M
0
s
··
L
CD
DIGITA
L MICROSCO
PE
EXPERIME
NT #2
SPAI:E
TIMI OIJY
SSI
Y
··
--------
-..
r.•
-
c j
~--
·~
··
1
: , , ,
•,
~
"-·
~
•
, I
~
.
.
OJ,
I O
Jl
jj
/
~
,
,
::
::::
:::
:::
:
:~r
: :::::::::
:::·:::·:···
····
:
i
·
~
~
'llo,
EXPERIMENT
2
EXPLORING
THE
BEAUTIFUL
COMPLEXITY
OF
THE
DANDELION
ENGli
SH
STEP
1:
Pick
some
dandelions
in
your yard
or
at a nearby
park.
Choose
a
lew
examples: a closed
flower
head,
an
open
flower
head,
and
a
seed
head.
STEP
2:
The
dandelion
is
part
of
the
daisy
family.
It's
actually
one
flower
made
up
of
many
smaller
flowers
called
florets.
Because
one
daisy
is a composite
of
many
florets,
the
daisy
family
has
the
scientific
name
'Gompositae."
To
expose
the
florets,
make a vertical
incision
through
the
dandelion
bud.
STEP
3:
Isolate
an individual
floret
by
gently
pulling
it
out
from
the
flower
head.
Place
the
floret
on
the
microscope
stage.
For a better
view,
try
placing a black
piece
of
paper
on
the
stage
before
adding
your
specimen.
Observe
the
floret
under
low
power.
STEP
4:
Next, view
the
seed
at
the
base
of
the
floret
at
higher
magnification
.
You
will
see
some
amazing
features.
STEP
5:
Observe
the
seed
head
under
the microscope
at
low
and
high
powers
STEP
6: Ta
ke images
of all
the parts
of
the
dandelion
at
high and
low
pow
ers
.
The
parts
are:
[A]
The
flower
head
in
bloom
[B]
The
round
flower
head
[G]
The
parachute
and
seed
[D]
The
single
seed
head
[E]
The
floret
[F]
The
jagged
leaf
EXPERIENCE
2
EXPLORER
LA
BELLE
COMPLEXITE
DU
PISSENLIT
FRANC
AIS
ETAPE
1:
Gueillez
quelques
pissenlits
dans votre
cour
ou
dans
un
pare
a prox·
imite.
Ghoisissez·en
quelques·uns : un
avec
Ia
tete
de
!leur
fermee,
un
avec
Ia
IB!e
de
!leur
ouverte
et
une
tete
de semences
.
ETAPE
2 :
le
pissenlit
fait
partie
de
Ia
famille
des
marguerites. G'est
en
fait
une
!leur comp
osee de
nombreuses
!leurs
plus
petites,
appelee
s
lleurons.
Puisqu'une
marguerite
est
un
compose
de
plusieurs
lleurons,
Ia
famille
des
marguerites
porte
le
nom
scientifique
•
Compositae
"·Pour
exposer
les
lleurons,
pratiquez
une
incision
verticale
dans
le
bourgeon
du
pissenlit.
ETAPE
3:
lsolez
un
fleuron
individual
en
le
lirant
doucement
pour le sortir
de
Ia
tete
de
Ia !leur. Placez
le
fleuron
sur
Ia plati
ne
du micr
oscope.
Pour
una
meilleure
vue, essayez
de
placer
un morceau
de papier
noir
sur
Ia
platine
avant
d'y
placer
votre
echantillon. Observez
le
lleuron
a Ia
ibie
puissance
.
ETAPE
4:
Ensuite,
observez
Ia
graine a Ia
base
du neu
ron a fort grossisse·
men!.
Vous
verrez
quelques
caracteristiques etonnantes.
ETAPE
5:
Observer
Ia
tete
de
Ia
semence
au
microscope a faibl
es
et fortes
puissances
ETAPE
6:
Prendre
des
photos de
toutes
les
parties
du pis
senlit
a f
or
tes
eta
faibles
puissance
s.
Les
parties
sont
:
[A)
La
tete
de
!le
ur
en
floraison
[B)
La
tete
de
!leur ronde
VERSUCH
2
[G]
La
!leur
(parachute)
et
Ia
graine
[D]
La
tete
de semence
unique
[E]
Le
neur
on
[F]la feu
ille dentee
DIE
WUNDERSCHONE
KOMPLEXITAT
DES
LOWENZAHNS
ENTDECKEN
DEUTSCH
SGHRITT
1:
Pllucken
Sie
in
fhrem
Hoi
oder
in
einem
Park
ein
paa
r Lowen·
zahnpllanzen.
Wah
len
Sie
verschiedene Exemplare aus: e
ine
geschlossene
BIUte, eine
geoffnete
Btu
te und
einen
Samenkopf
(Pusteblume).
SGHRITT
2:
Der
Lowenzahn gehort
zur
Familia
der
KorbbiUtler.
Er
besteht
eigentli
ch aus
einer
Blume
, die
sich
aus vielen
kle
ine
n Bl
uten
,
Roschen
genannt
, zus
ammensetzt.
Daher werden
sie
auch
unter
dem
wissenschaftlichen
Namen "Gompositae" gefUhrt.
Machen
Sie
zum
Freileg
en der
Roschen
einen
vertikalen Sch
nitt
durch
die
Lowenzahnkno
spe
.
SGHRITT
3:
Nehmen
Sie
ein einzelnes
Roschen
herau
s,
inde
m S
ie
es
vorsichtig
vom
BIUtenkopf z
ieh
en.
Legan
Sie
das Roschen
auf
den Mi
kroskop·
tisch
. Legen S
ie fUr ein
klareres
Bild
zuvo
r ein
StUck schwarzes
Papier
unter die
Probe
auf
dem
Tisch. Betrachten
Sie das
Roschen
unter
einer
geringen VergroHerung.
SGHRITT
4:
Schauen
Sie sich
als
Nachstes
den
Sam
en
unten
am
Roschen
unter
einer
hOhere
n VergroOerung
an.
Sie
werden
ein paar
faszinierende
Details
entdecken.
SGHRITT
5: Unters
uchen
Sie nun
bei
geringen und
hohen
VergroOerungen den
Samenk
opf
unterm
Mikrosko
p.
SGHRITT
6:
Machen
Sie
von
allen
Teilen
des lowenzahns
bei
hoh
en
und
niedr
igen
VergroOerungen
Aufnahmen.
Er
besteht a us:
[
A]
BIUtenkopf
in
voller
Blute
[B] Run
der
BIUtenkopf
[
G]
Fallschirm
und
Samen
[D]
Einzelner
Samenkopf
[E] Roschen
[F]
Gezacktes
Blalt
EXP
ERIMENTO 2
EXPLORAR
LA
MARAVILLOSA
COMPLEJIDAD
DEL
DIENTE
DE
LEON
ES
PAtiOI
PASO
1:
Recoja a
lgunos
dientes
de leon
de
su
jardin o un
parque cer
cano. Elija
divers us
ejemplares: Eliia
div
ers
os
ejemplare
s.
PASO
2:
El
diente
de
leon
forma
parte
de
Ia familia
de las
margaritas.
De
hecho,
es
una
!lor
compuesta
de
muchas flor
es
m~s
pequenas
,
llamadas cogollos.
como
una
margarita es
un compuesto
de
mucho
s
cogollo
s,
Ia
familia de las ma
rgarita
s tiene
el
nombre cientific
o
"
Gompositae
".
Para exponer
los co
gollos, reali
ce
una
incision
vert
ical
en
el capullo
del
diente
de
leon.
PASO
3: Ais
le
un
cogollo
individual tirando
sua
vemente
para
sa
carlo
del
c
apull
o.
Goloque
el
cogollo sobre
el
soporte
del
microscopio
. Para
observarlo mejor, coloq
ue
un
tro
zo
de
papel negro
sobre
el soport
e
antes
de colocar
el
esp!cime
n.
Obser
ve
el cogollo
con una pote
nci
a
ba
ja.
PASO
4: A c
ontinuacion, obser
ve Ia sem
ill
a de Ia b
ase
del
cogollo
con
un
aumento mayor.
Vera
algu
nas
caracteristic
as impresionan
tes.
PASO
5: Obse
rve
Ia
semilla
en
el
microscopi
o con p
otencias
baja
s y
alta
s
PASO
6: Tome
capturas
de
todas
las
secciones del
diente
de
leOn
con poten·
cias
alta
s y
bajas.
las secciones son:
[A]
El
capullo
florecido
[B] El
nucleo
redondo
de
Ia
!lor
[G] La
apertu
ra y
Ia semilla
[D]la
cabeza
de
una sola semill
a
[E]
El cogollo
[F]la hoja
rasgada
ESPERIM
ENTO
2
ESPLORA
LA
COMPLESSA
BELLEZZA
DEL
DENTE
Dl
LEO
NE
ITA
liANO
FASE
1.
Racco
glie
re dei denti
di leo
ne
in giardino
o in un parco. Prender
e
alc
uni campioni: una in
fioresc
enza chius
a, una
infiorescenza
a pe
rt
a e
una infruttescenza.
FASE
2.
II dente di
leone
forma par
te della
famigl
ia
delle margherite
.
Di
fa
tto
e
co
stituit
o da t
anti
piccoli
fio
ri chiama
ti
flosculi.
Poich
e una mar
gherita
si co
mpone
di
multi floscu
li, ali
a famig
lia
delle margherite
e statu
a
sseg
nato if
nome
di
"Gom
pos
ita
e". P
er espor
re i
flo
sculi,
praticare
un
'inc
isione
verticale
sulfa gemma
del d
ent
e di leon
e.
FASE
3.1solar
e un
floscu
lo stac
candol
o da
ll'infiorescenza. Gollo
care if flosculo
su
i p
iano
del micros
copio. Pe
r una mig
liore osse
rva
zione
, collocare
sui p
iano
un pezzo
di
carta
di color ne
ro prima
di appoggi
are
if
ca
mpione
. Osservare
if
floscul
o a b
assa pote
nza.
FASE
4. Quindi, osser
vare
if seme
ali
a base del floscu
lo con
un
maggior
e
in
grandimento.
Si
potran
no
vedere delle forme str
aordinarie
.
FASE
5. Os
servare l'infrut
tes
cenza al microscopio a
bassa
e a
lta pote
nza.
FASE
6. Scattar
e de
lle
toto
di
tulle le parti del dente
di l
eone
a ba
ssa
e alta
po
tenza. le parti sono:
[A
]lnfio
res
cenza
sboc
cia
ta
[B]Infiore
scen
za circ
olar
e
[G] Ombrell
o e seme
[D) Sing
ola
infruttescenza
[
E)
Floscu
lo
[F]
Foglia
seghettata
Page 22

TM
and©
2014
COSMOS"'
©
2014
Celestron.
All
rights
Warranty:
Your
microscope
has
a
detailed
information
FCC
Note:
This
device.
pursuant
tion
against
harmful
radiate
radio
frequency
cause
harmful
will
not
occur
or
television
reception.
encouraged
to
•
•
•
•
This
product
Product
design
FOR
COMPLETE
Celestron,
LLC.
TM
et
©
2014
©
2014
Celestron.
Garantie:
Votre
Celestron
pour
equipment
to
part
interference
in
a
particular
try
to
Reorient
Increase
Connect
receiver
Consult
is
designed
and
SPECIFICATIONS
•
Torrance,
microscope
des
informations
two
on
all
Celestron
has
been
15
of
the
FCC
interference
in
energy
and
to
radio
installation.
which
can
be
correct
the
interference
or
relocate
the
the
separation
the
equipment
is
connected
the
dealer
or
and
intended
specifications
CA
COSMOS"'
Tous
droits
b8n8ficie
detail
www.celestron.com.
Remarque
FCC
:
Cet
Equipement
a
dispositif
numErique
de
classe
B.
Ces
limites
visent
nuisibles
frEquences
manuel.
il
n'existe
installation
radio
remettant
l'une
Ce
produit
La
conception
notification
FOR
WWW.CELESTRON.COM
Celestron,
TM
©
Warranty:
lnformationen
FCC-Hinweis:
Gerate
Grenzwerte
Oieses
kann.
wird
,
werden
dieses
vor,bergehendes
angehalten.
Dieses
+
dans
une
radio
et
peut
causer
aucune
garantie
particuliEre.
ou
tEIEvisuelle
sous
tension).
des
mesures
•
REorienter
•
Augmenter
•
Branchez
le
rEcepteur
•
Demandez
est
conQu
du
prealable.
COMPLETE
LLC.
•
Torrance,
und
©
2014
2014
Celestron.
lhr
Mikroskop
zuallen
Oieses
der
Klasse
B
sollen
einen
Gerat
erzeugt.
wenn
es
nicht
Sfrungen
im
.
dass
in
einer
Gerat
Storungen
Ausschalten
die
S!Orung
•
Die
Empfangsantenne
•
Den
Abstand
•
Das
Gerat
Empfangers
•
Den
Handler
Gerat
wurde
installation
suivantes:
SPECIFICATIONS
Funkverkehr
an
conformEment
protEger
convenablement
rEsidentielle
s'il
n
'est
pas
instaiiE
des
interfErences
contre
des
Si
I'Equipement
(ce
qui
peut
ftre
vous
fte
s
encouragE
ou
dEplacer
Ia
sEpara
tion
l'appareil
+
est
branchE.
!'assistance
et
destine
produit
et
les
CA
90503
COSMOS"'
Aile
Rechte
hat
eine
zweijahrige
Celestron
Mikroskope
Gerat
wurde
getestet
in
,bereinstimmung
angemessenen
verwendet
Hochfrequenzenergie
in
,bereinstrmmung
verursachen.
bestimmten
Installation
beim
Radio
-
des
Gerats
durch
eine
oder
verlegen
zwischen
dem
eine
andere
anschlieflen.
oder
einen
erfahrenen
fUr
den
Gebrauch
Studios,
Inc.
reserved.
year
limited
warranty.
microscopes
at
www.celestron.com.
tested
and
found
These
limits
installation
installed
and
If
this
equipment
by
turning
by
one
or
antenna.
the
equrpment
an
outlet
on
perienced
radio/TV
for
use
subject
to
PRODUCT
INFORMATION,
U.S.A.
Tel:
Inc.
Tous
to
However.
by
Rules.
a
residential
.
if
not
communications.
determined
receiving
between
into
.
an
ex
are
AND
90503
Studios,
reserves.
d'
une
garantie
limit8e
lees
sur
toute
Ia
EtE
testE
et
trouvE
conforme
:j:
Ia
Partie
les
particuliers
.
Cet
Equipement
et
utilisE
conformEment
nuisibles
aux
engendre
des
en
+
tenter
rEceptrice
I'Equ
ipe
secte
ur
votre
revendeur
les
personnes
AND
PRODUCT
Tel:
800.421.9649
Inc.
communications
se
interfErences
le
mettant
d'y
ment
d'
un
sont
interfErences
dEterminE
l'antenne
entre
Ia
prise
de
pour
specifications
U.SA
Studios,
vorbehalten.
Garantie
.
Bille
einer
www.celestron.com.
und
entspricht
mit
Artikel15
Schutz
vor
Srrungen
und
mit
den
Anweisungen
Es
kann
jedoch
keine
oder
Steckdose
Srrungen
Fernsehempfang
festgestellt
der
nachstehenden
oder
neu
ausrichten.
und
dem
auf
einem
Radio-
von
14
werden
Empfanger
und
Jahren
mehrere
Gerat
All
rights
reserved.
Please
see
Celestron's
comply
with
the
are
.
used
does
more
a
circuit
those
change
800.421.9649
de
gam
me
produisant
remEdier
.
et
circuit
ou
celle
de
sujettes
INFORMATION,
Aile
se
den
der
FCC-Bestimmungen
kann
verursacht.
anderen
Fernsehtechniker
limits
designed
to
Thi
the
technician
droits
15
gEnEre
le
Rechte
kann
provide
s
equipment
in
accordance
there
is
no
guarantee
cause
harmful
equipment
of
the
following
and
receiver.
different
from
for
help
14
years
of
without
prior
VISIT:
•
reserves.
deux
ans.
Veuillez
de
microscopes
aux
limites
des
rEglements
contre
les
interfErences
et
peut
aux
instructions
radio
.
dans
le
cadre
nuisant
hors
tension.
en
ayant
rEcepteur.
diffErent
de
d'un
technician
14
ans
et
plus.
a
modification
•lmprime
en
vorbehalten.
hen
Cele
stron-Website
Grenzwerten
f.r
rn
Wohngegenden
diese
ausstrahlen
rnstalliert
und
keine
Garantie
auftreten
k'
nnen
was
durch
,
wird
der
Maflnahmen
vergroflern.
Stromkreis
um
und
Ianger
konzipiert.
with
off
Printed
pour
Emettre
Toutefois
+
puis
celui
gegeben
Benutzer
zu
Design
FOR
BESU
website
for
for
a
Class
B
digital
reasonable
generates
interference
and
measures:
that
.
age
WWW.CELESTRON.COM
Celestron
de
d'une
Ia
rEception
recours
VISIT:
Chine
digitale
Oiese
bieten.
verwendet
.
Falls
beheben:
als
dem
Hille
protec-
.
uses.
and
the
instructions
that
interference
to
radio
on.
the
user
to
which
the
and
older.
notification.
in
China
11/13
consulter
le
site
a
un
Ia
FCC.
des
du
,
en
le
:j:
sur
lequel
radio/TV.
sans
TI/13
fOr
ausfOhrliche
und
ein
dazu
des
bitten
.
is
Celestron,
TI/13
TM
©
can
.
may
Garantia:
de
www.celestron.com.
Notas
de
porcionar
equipo
instrucciones
existen
crea
apagando
una
Este
web
edad.
El
Para
VISITE:
Celestron,
TI/13
TM
©
Garanzia:
Celestron
Nota
dispositivi
stati
installazioni
a
radio
causare
che
attrezzatura
essere
a
tentare
Apple,
negli
App
II
presente
superiore
Progettazione
PER
WWW.CELESTRON.COM
Celestron,
CE:
Model
und
technische
COMPLETE
CHEN:
LLC.
y
©
2014
2014
Celestron.
Su
Celestron
FCC:
Este
Clase
B,
seg·n
una
genera
garantlas
interferencias
y
encendiendo
o
m·s
de
producto
diseiio
y
las
WWW.CELESTRON.COM
LLC.
e ©
2014
2014
Celestron
II
microscopio
per
FCC:
La
digitali
ideate
per
residenziali.
frequenza
interferenze
l'interferenza
causi
determinato
di
correggere
•
•
•
•
illogo
Stati
Uniti
Store
e
ai
LE
SPECIFICHE
LLC.
Daten
SPEZIFIKATIONEN
WWW.CELESTRO
•
Torrance,
CA
COSMOS"'
Todos
microscopio
tiene
para
obtener
informacion
equipo
ha
sido
probado
el
Apartado
protecciOn
,
utiliza
.
puede
las
•
Reoriente
•
Aumente
•
Conecte
conectado
•
Consulte
ayuda
esta
especificaciones
especificaciones
•
informazioni
presente
fornire
Orientare
Aumentare
Collegare
ricevitore.
Consultare
Apple,
un
prodotto
14
anni.
del
•
15
razonable
y
puede
emitir
provocar
interferencias
de
que
no
se
produzcan
perjudiciales
para
el
equipo,
medidas
siguientes:
o
recoloque
Ia
separaciOn
el
equipo
el
receptor
con
el
vendedor
.
disenado
estan
Torrance,
CA
COSMOS~
•
Tutti
i
ha
una
garanzia
dettagliate
attrezzatura
di
Classe
B.
ai
sensi
un
'
adeguata
La
presente
e,
se
non
installata
dannose
aile
non
si
verificher:J:
interferenze
dannose
dall'accensione
l'
interferenza
o
posizionare
Ia
distanza
l'attrezzatura
il
rivenditore
iPhone,
iPod
e
in
altri
Paesi.
marchio
di
servizio
e
progettato
prodotto
e
le
specifiche
COMPLETE
Torrance,
CA
90503
~
#44362
I
©2014
ktinnen
ohne
vorherige
N.CO
90503
Studios,
los
una
de
se
a
y
90503
Studios,
diritti
E
protezione
radiocomunicazioni.
in
e
a
UNO
M
U.SA
Tel:
Inc.
Todos
derechos
garantfa
limitada
detallada
sabre
y
cumple
con
las
normas
FCC.
contra
interferencias
energla
de
radiofrecuencia
daOinas
interferencias
Ia
recepciOn
de
recomienda
al
Ia
antena
receptora.
entre
el
equipo
una
toma
de
corriente
.
o
un
tEcnico
pretendido
para
sujetas
a
cambios
completas
U.S.A.
Inc.
e
Tel:
•
riservati.
limitata
di
due
su
tutti
i
microscopi
stata
testata
ed
delle
parte
15
nei
confronti
attrezzatura
genera,
e
utilizzata
conformemente
una
particolare
alia
ricezione
spegnimento
dell'attrezzatura,
mediante
una
o
nuovamente
!'antenna
tra
l'
attrezzatura
una
presa
su
un
circuito
o
un
tecnico
Touch
radio/TV
e
iPad
sono
di
Apple
Inc.
e
destinato
sono
soggette
E
INFORMAZIONI
U.S.A.
Tel:
800.421.9649
800.421.9649
reservados.
de
las
Estas
daOinas
a
las
en
radio
usuario
y
de
personas
informacion
800.421.9649.
Tutti
anni.
E
risultata
delle
utilizza
Tuttavia,
installazione.
radio
pi
"
delle
e
il
ricevitore
marchi
all'uso
)t
Celestron
AnkUndigung
PRODUCT
dos
todos
limitaciones
comunicaciones
o
el
o
radio/TV
Celestron
Normative
di
o
di
diverso
SUL
INFORMATION,
•
Gedruckt
los
derechos
anos
.
Par
favor
los
microscopios
de
limitaciones
una
receptor.
i
esperto
a
los
se
en
una
instalaciOn
y,
si
no
se
instal
par
instalaciOn
televisiOn.
Ia
que
intentar
corregir
circuito
distinto
experimentado
de
14
o
sin
previo
aviso.
de
•
lmpreso
diritti
riservati.
Si
prega
di
consultare
a
www.celestron.com.
conforme
ai
FCC
.
Tali
interferenze
dannose
e
puO
irrad
aile
istruzioni,
non
vi
E
alcuna
In
caso
televisiva,
Ia
il
che
l'utente
misure
seguenti:
ricezione.
.
da
quello
per
assistenza.
di
Apple
di
persone
modifiche
senza
PRODOTTO,
•
Stampato
E
Inc.,
di
andern.
in
China
reservados.
,
consulte
el
sitio
Celestron
dispositivos
diseOado
para
domEstica.
a y
utiliza
radio
.
Sin
embargo,
Si
este
puede
determinarse
las
interferencias
de
aquEI
al
que
para
obtener
anos
de
productos,
en
China
il
silo
web
limiti
per
i
limini
sono
in
energia
puO
garanzia
presente
potrebbe
incoraggiato
cui
E
collegato
registrati
eta
pari
o
preawiso.
VISITARE:
in
Cina
TI/13
digitales
seg
han
concreta.
mas
iare
a
Web
en
pro-
Este
·
n
equipo
con
estE
di
il
las
no
Page 23

Page 24

Page 25

 Loading...