

Page 1

ENGLISH
IINNSSTTRRUUCCTTIIO
LLCCDDDDiiggiittaallMMiiccrroossccooppee((LLDDMM)
ONN
MMooddeell##444433442
MAANNUUAALL
M
2
)
Page 2
Introduction
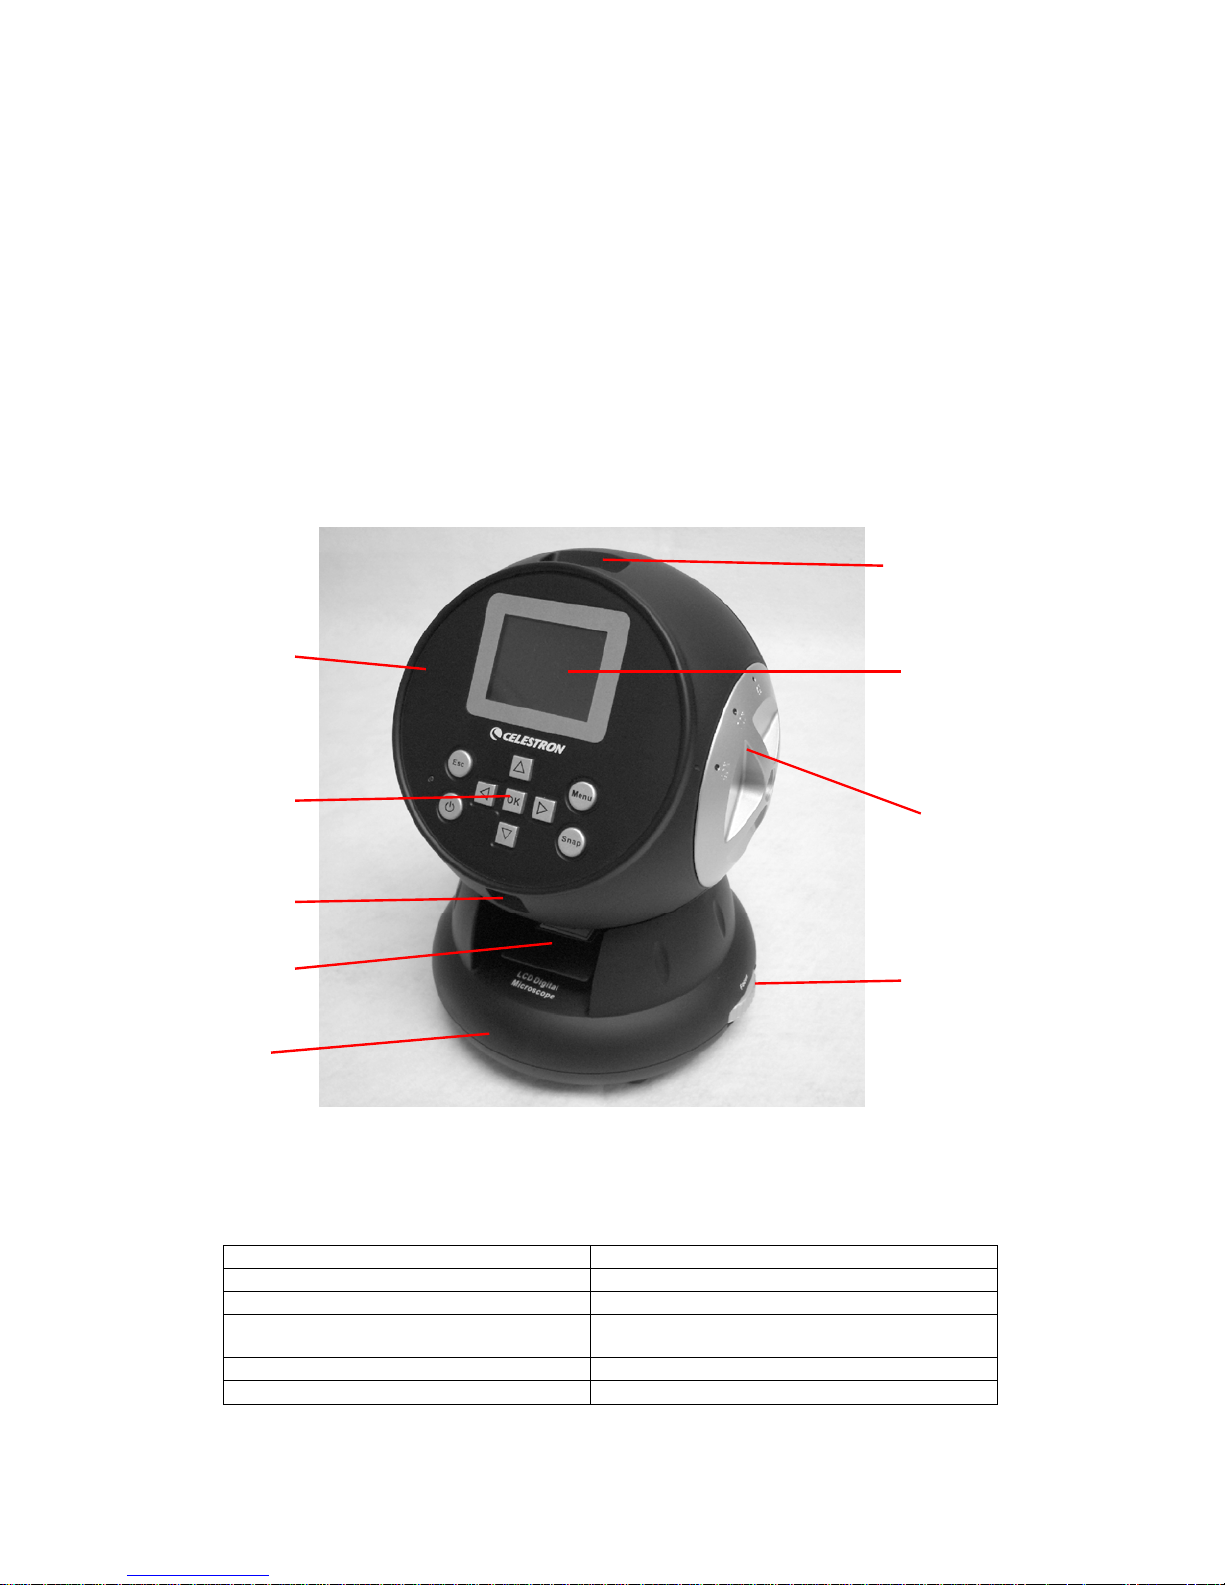
Body
Function Keys
Base
SD Card Receptacle
Focus Control
Thank you for purchasing the Celestron LCD Digital Microscope (LDM) with a 2” monitor. Your microscope is a precision optical
instrument, made of the highest quality materials to ensure durability and long life. It is designed to give you a lifetime of pleasure with a
minimal amount of maintenance.
Before attempting to use your microscope, please read through the instructions to familiarize yourself with the functions and operations
to maximize your enjoyment and usage. See the microscope photos to locate the parts discussed in this manual.
This microscope provides high powers from 24x up to 240x (up to 1920x with digital zoom). This microscope is ideally suited for
examining specimen slides of yeasts and molds, cultures, plant and animal parts, fibers, bacteria, etc.
The LCD Digital Microscope does not use eyepieces that are used in traditional microscopes. You will view specimens on the LCD
screen which are easy to see and you can enjoy them with others also. You can also take snapshots or short videos with the built-in
digital camera.
The final section provides simple care and maintenance tips for you to follow to ensure that your microscope provides you with years of
quality performance, usage, and enjoyment.
LCD Monitor
Mini USB Cable
Receptacle
Slide Specimen
Mechanism
Power Knob
Figure 1
Standard Accessories Included with your Microscope
Digital Camera – built-in Slide Holder
LCD Monitor AC Adapter
4x Objective Lens AC Adapter Plugs – USA/EU/UK
10x Objective Lens 5 Prepared Slides, 10 Blank Slides, and
10 Cover Slips
40x Objective Lens SD Card Slot
Bottom Illuminator USB Mini Cable
2
Page 3
Specifications
Model # 44342 Specifications
Stage Simple with Slide Holder Mechanism - 1.7”x1.7” (44mmx44mm)
Digital Camera
LCD Monitor
Focuser Smooth, single motion
Objectives Achromatic 4x, 10x and 40x – all optical glass
Flash Memory
USB Cable 2.0 Mini – length 6.5’ (2m)
Slide Holder Accepts Standard Glass Slides – 1” x 3” (25mm x 76mm)
Power Knob Triple with click stop
Illuminator Built-in Electric – LED 6Volt and 6Watt
AC Adapter Input – Universal 100 to 240Volt, 50/60HZ
Weight/Dimensions 28oz (794g) / 6.5” (165mm) x 6.5” (165mm) x 8.5” (215mm)
2MP CMOS; 6x magnification in lieu of an eyepiece; 1600x
1200 pixel array
2” with 8x Digital Zoom – High Definition Digital TFT display
640 x 240 pixels
32MB – approximately 65 snapshots (JPEG files) @ 2MP resolution
or a few minutes of VGA video (AVI files)
Magnification (Power) Table
Use the following table to determine the magnification of the different objective lenses in combination with your microscope using the
normal mode of the digital image on the LCD screen and using the digital zoom feature.
Objective Lens
Digital Image – normal
Maximum with 8x digital
zoom feature
4x 10x 40x
24x 60x 240x
192x 480x 1920x
Setting Up Your Microscope
1. Carefully remove the microscope and other parts from the carton and set them on a table, desk, or other flat surface.
2. Remove the plastic cover from the microscope.
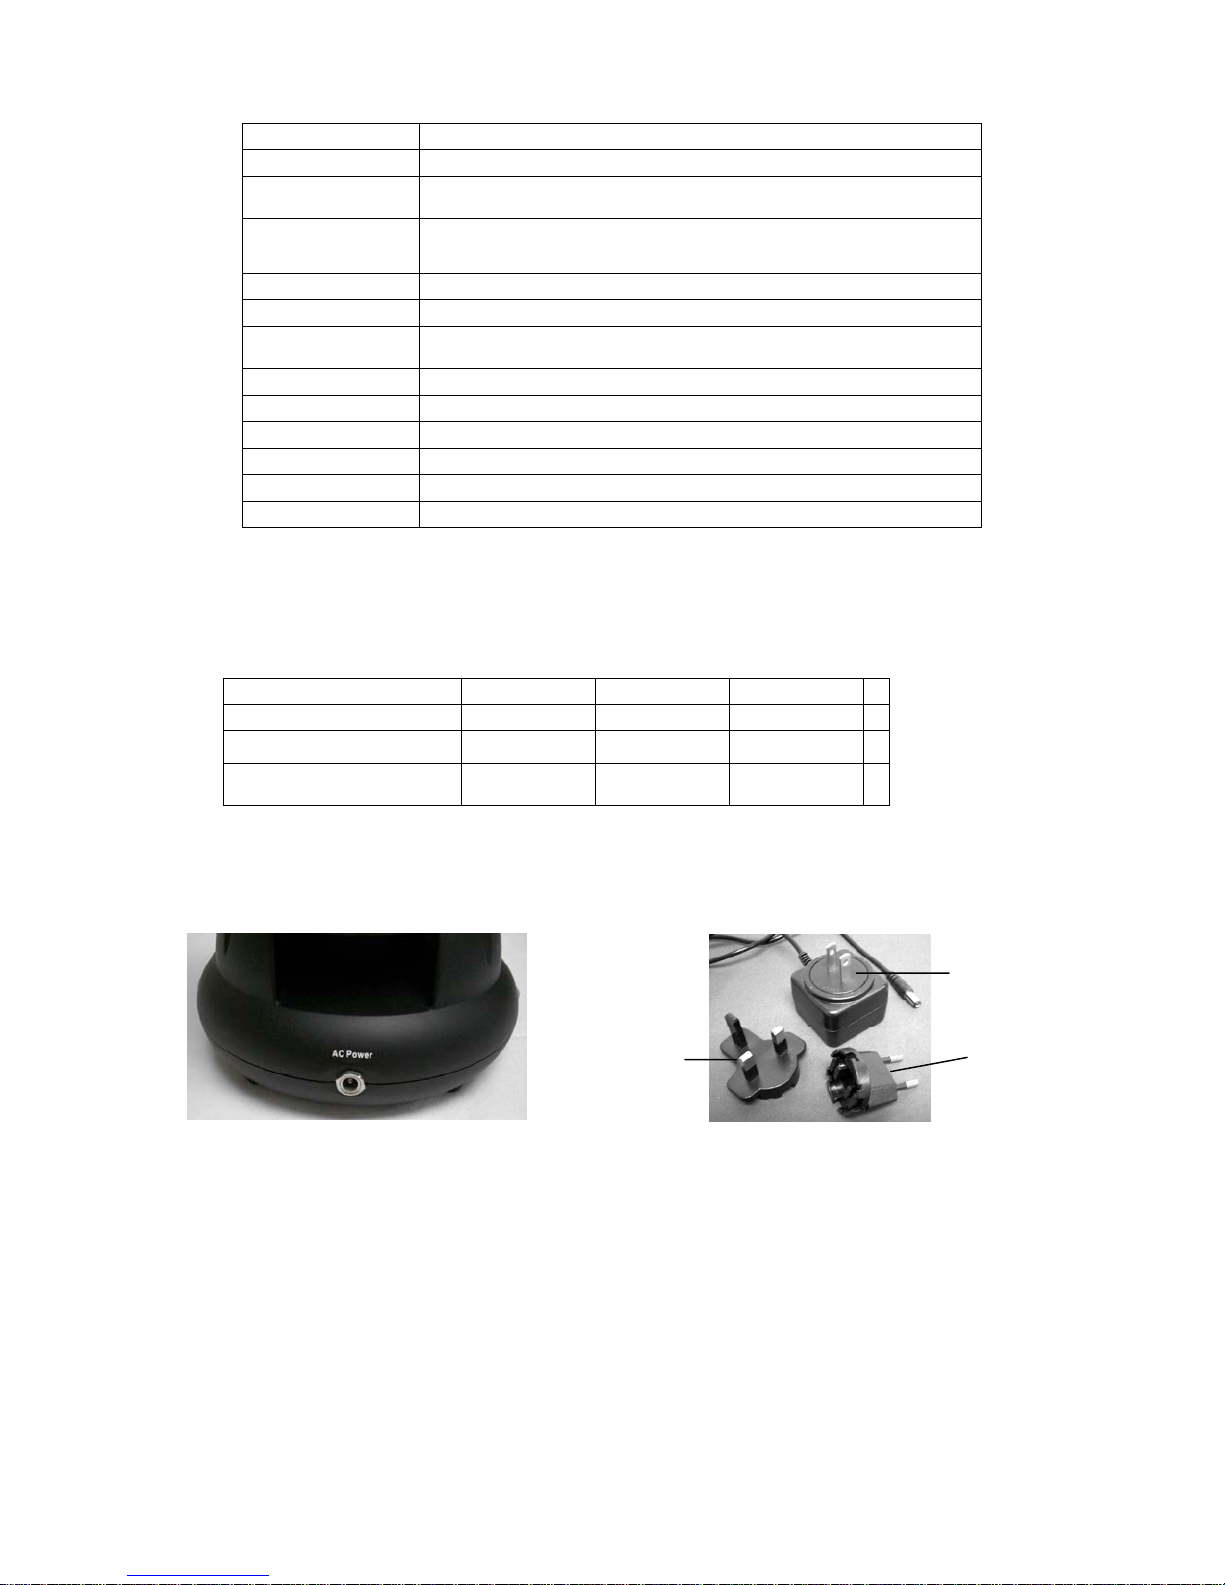
USA Plug
UK Plug
Figure 2 Figure 3
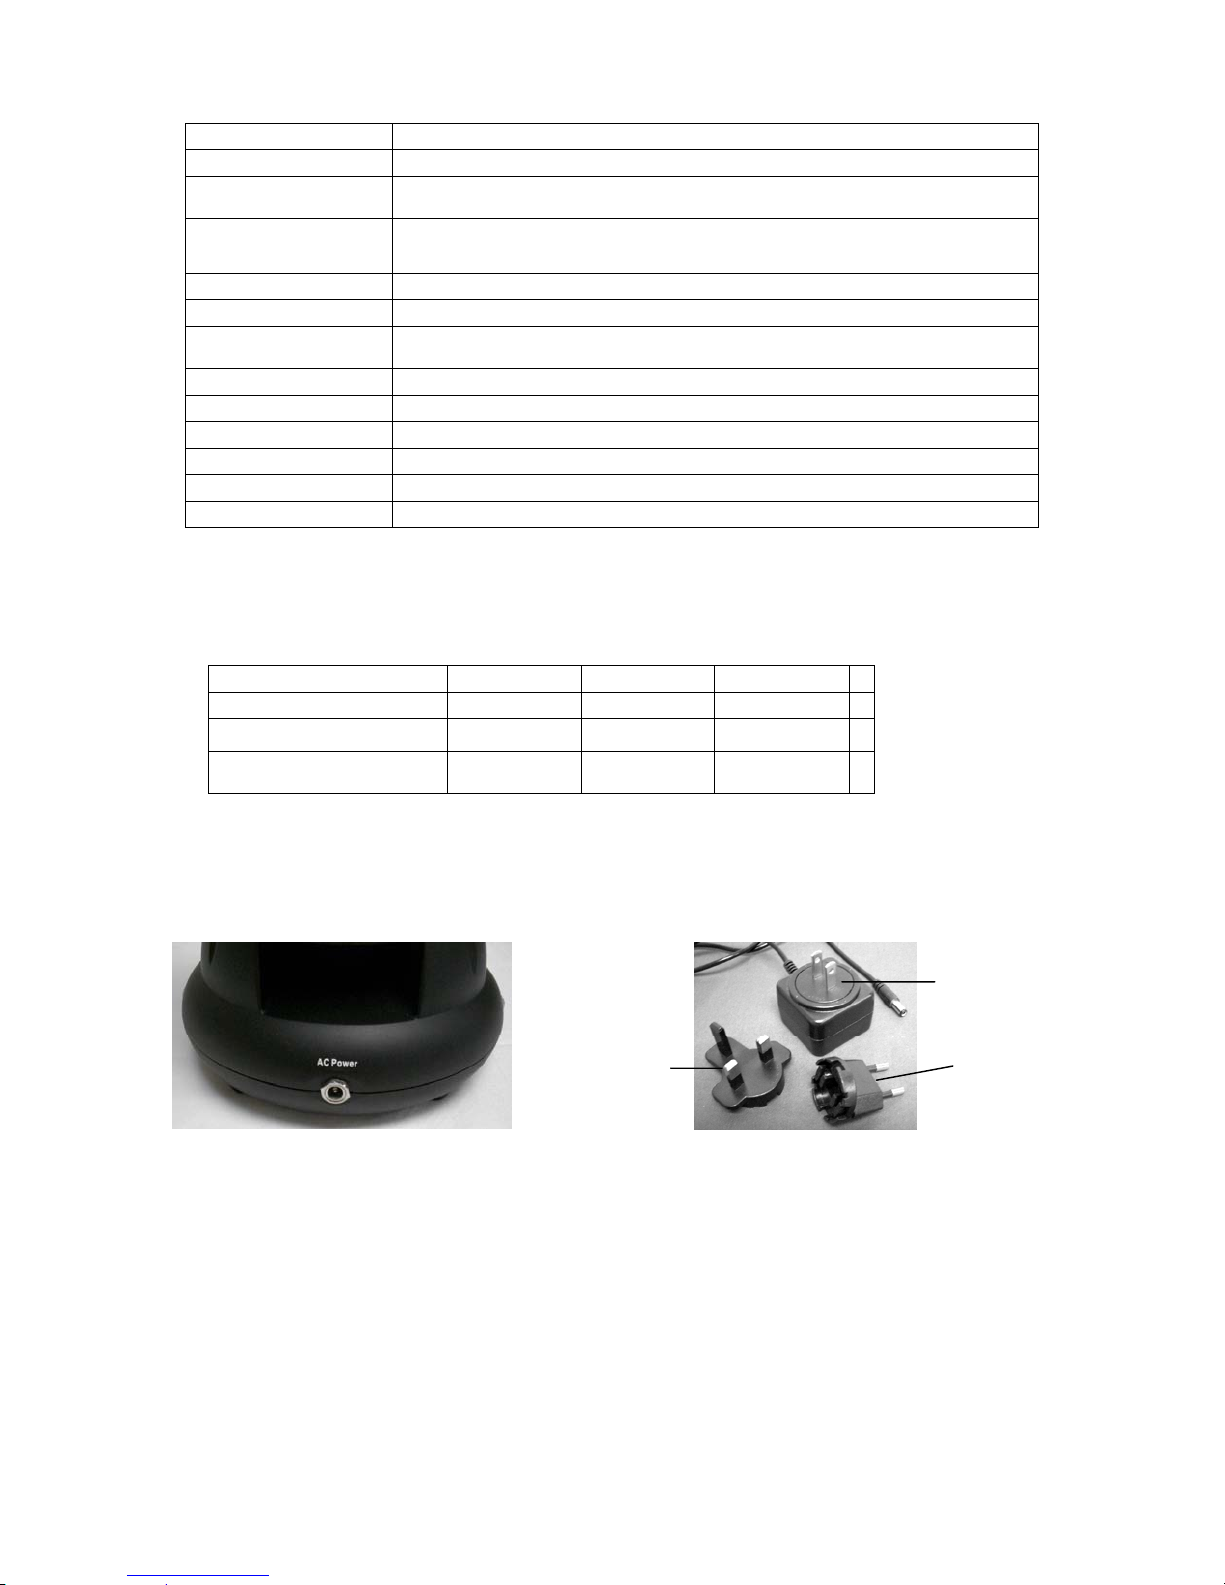
3. Plug the small cable from the AC adapter into the socket on the back of the base (see Figure 2 above).
4. Insert the plug end of the AC adapter into the proper power source.
Note: The AC Adapter supplied with this microscope has an interchangeable plug system that can work in the USA, UK,
Europe,
change plugs for your particular requirement by doing the following:
A. Push down on the small button labeled “PUSH” and hold it down while at the same time hold the prongs of the plug and rotate
it slightly counterclockwise and pull up to remove it. Then remove your finger from holding the “PUSH” button down.
and many other parts of the world. The plug for the USA will be installed in the AC Adapter. You can easily
Europe Plug
B. Take the plug style that you want to use and center it over the AC Adapter and rotate it until it falls down into the opening.
Then rotate it clockwise until you hear a click sound which lets you know the plug is now installed correctly.
3
Page 4

Microscope Operation
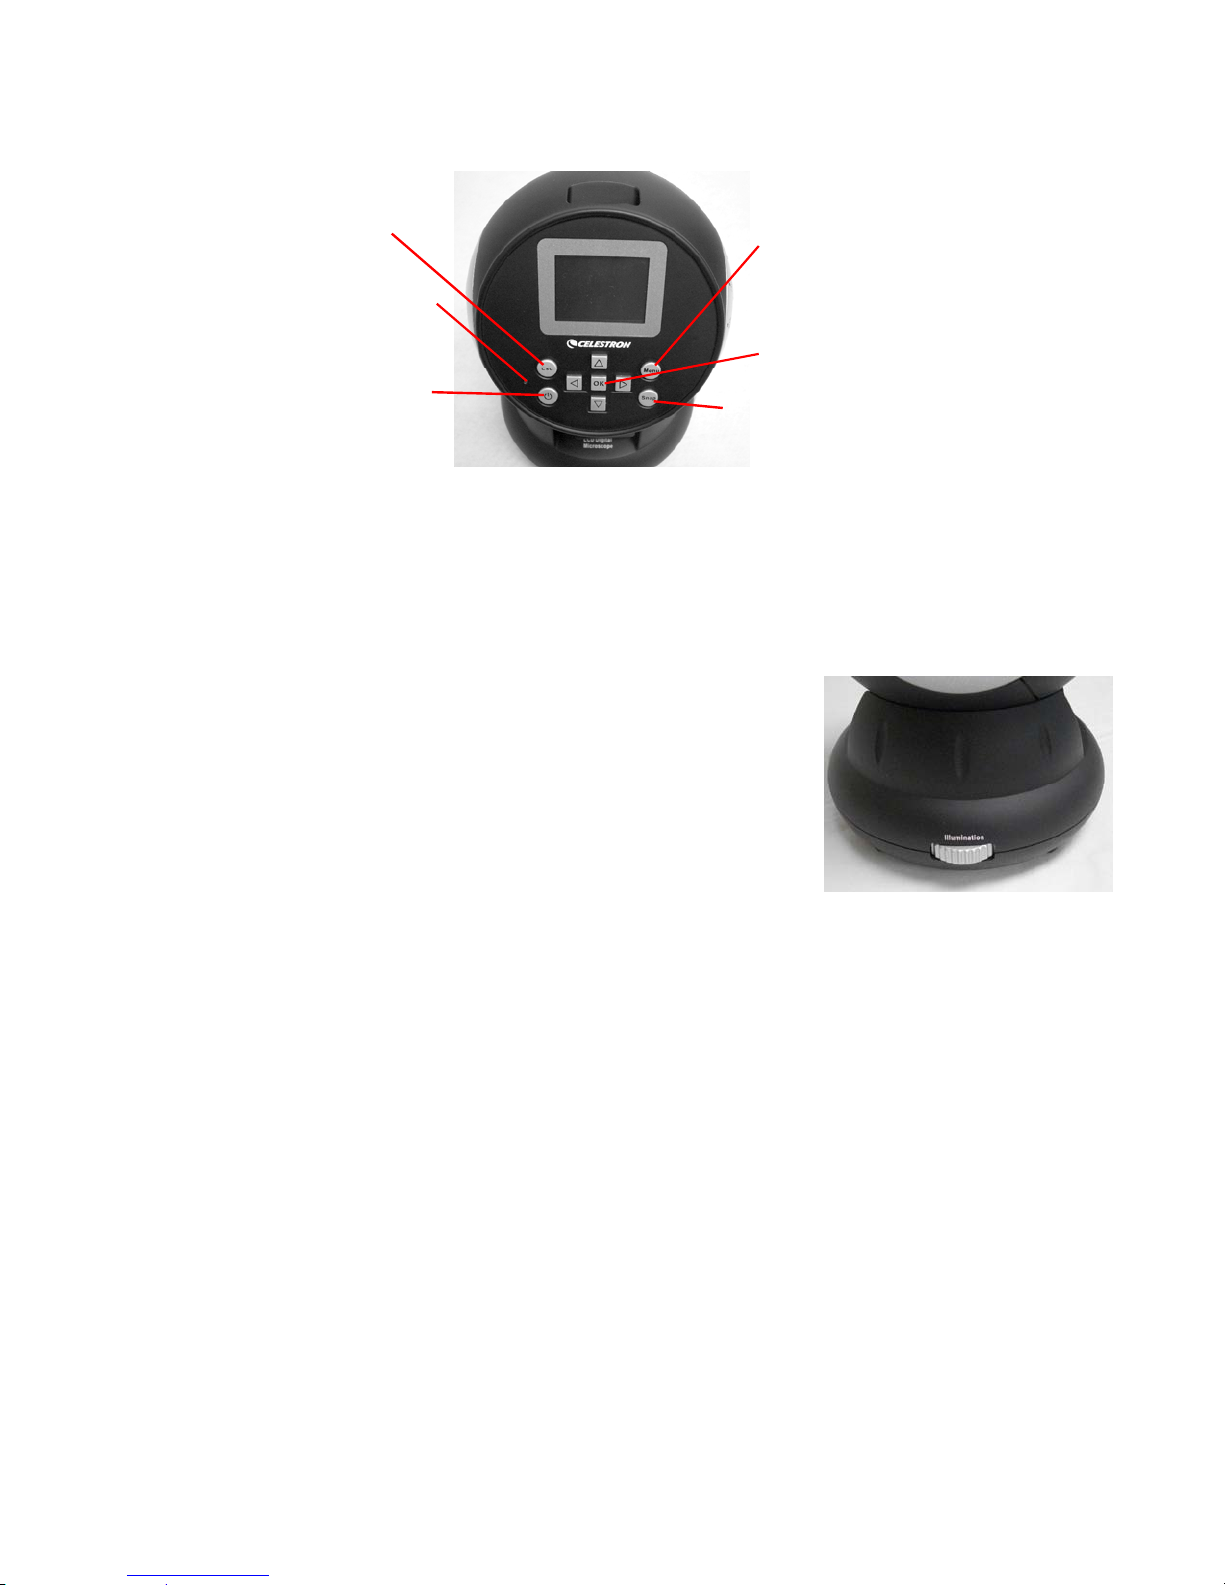
ESC (Change) Key
Monitor On LED
Direction/OK Keys
Before looking at slide specimens you must remove the protective cover over the LCD screen, turn the LCD on, turn on the illuminator,
and understand how to use the slide holder and then you are ready to begin viewing.
Menu Key
Power On/Off
Button
Figure 4
Snap Key
LCD Module
This digital microscope is different than traditional microscopes --- instead of using eyepieces to look at a specimen in a traditional
microscope, the LCD monitor replaces the eyepieces so you can look at the specimen on the screen by yourself or share the views with
others. To begin to view specimens with your microscope, you will have to turn the LCD monitor on by turning the Power Button “On”
(see Figure 4). Push the button once and shortly the Monitor On LED (red color) will come on indicating the LCD monitor is “On”.
That is basically all you need to do to use the LCD screen for viewing specimens. The various keys on the LCD Module are mainly used
for taking images (snapshots and video) and will be discussed later in this manual.
Illumination
1. To turn the illuminator on, see Figure 5 below and turn the control dial to the left.
2. The illuminator is used for specimen slides where the light shines up through the hole
in the stage through the slide.
3. Rotate the illuminator dial to the brightness level desired when viewing specimens.
Figure 5
Adjusting the Lighting
Specimens of different size, thickness, and color variations will require different levels of illumination. There are two ways to change the
amount of illumination when viewing a specimen; adjusting the brightness on the dial shown above in Figure 5 and changing the EV
function on the LCD monitor. The EV (exposure value for brightness) function increases or decreases the brightness level by using the
Left and Right arrow keys on the LCD monitor.
When viewing a specimen that is not transparent or dark in color, you may need to increase the amount of light to resolve certain features
or details. This is best done by simply increasing the brightness of the illuminator by rotating the brightness control dial all the way to its
highest setting.
Optimum lighting will be found by experimenting with adjustments as each specimen may require slightly different illumination as well
as the same specimens viewed under different powers.
4
Page 5
Viewing a Specimen
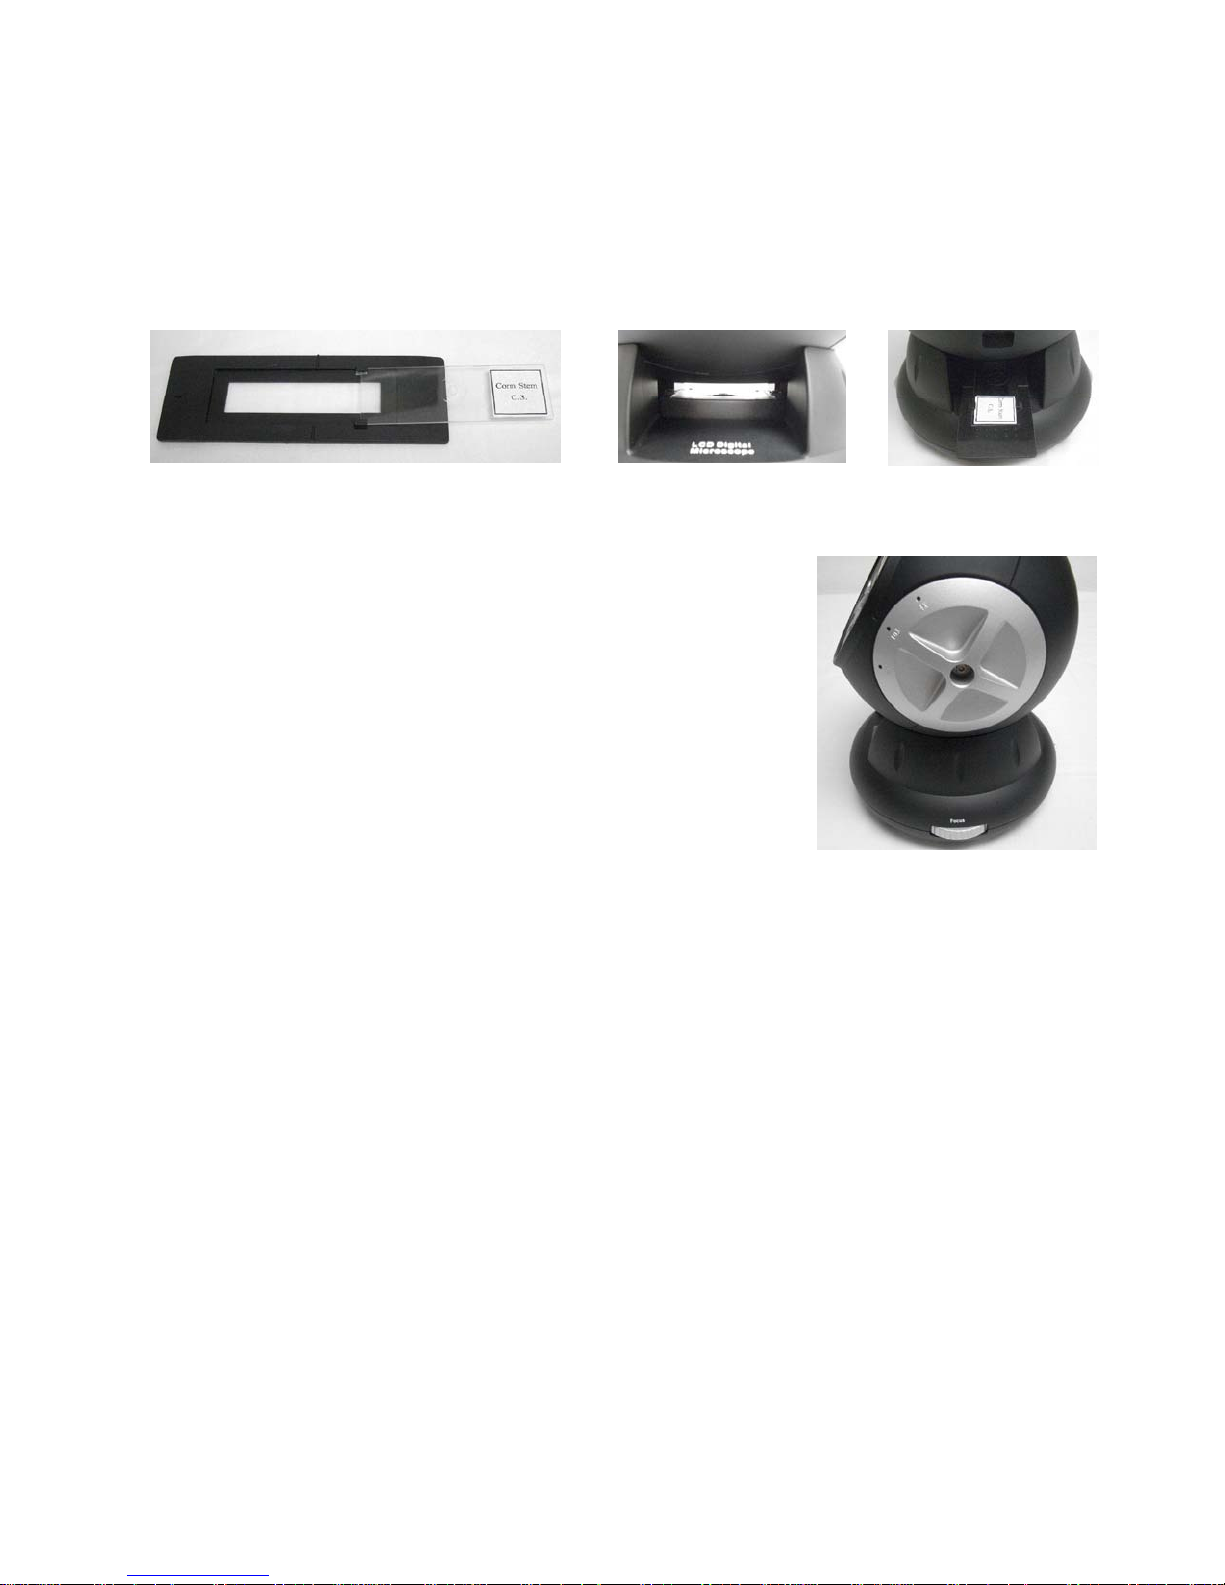
Your instrument is provided with a fixed, simple stage with holding clips to guide the positioning of the slide holder.
1. Place a specimen slide - 1” x 3” size (25mm x 76mm) into the slide holder. Do this by gently placing the specimen slide under the
small guides of the slide holder (Figure 6). Then, push the slide all the way into the cutout in the slide holder.
2. The slide holder with slide inserted will be placed onto the stage with the arrow on the slide holder pointed forward.
Inside the stage (Figures 7 & 8) are two small holding clips under which the slide holder is to be inserted.
3. Push the slide holder in until you begin to see the specimen (remember to start at the lowest power). You can examine the specimen
by moving the slide holder back and forth slowly and moving it slightly to the left or right.
4. For slides that have the specimen off to one side you may not be able to see the entire specimen and in these cases you can then
remove the slide from the slide holder and rotate the slide 180° and try again.
5. Manually moving the slide holder may seem difficult at first but after experimenting it becomes quite easy to use.
Figure 6 Figure 7 Figure 8
Once the slide is in place you will be ready to start viewing by setting the power.
6. Use the power knob (in the center of Figure 9) to rotate the objective lenses until the 4x
dot is lined up near the indicator – it will click when positioned correctly. Always start
with the lowest power objective (4x with this microscope) which gives you 24 power and
work your way up to higher powers. At 24 power you will have the widest field of view
and the brightest image.
7. Look at the LCD screen while turning the focus control (Figure 9) until the specimen
comes into view. You may need to position the slide specimen as discussed above so the
image is in the field of view.
8. With the 4x objective lens, you can also vary the power anywhere from 24x to 192x by
using the digital zoom of the LCD module. Use the direction keys (Up/Down) on the
LCD module to use the digital zoom. On the left of the screen will be an icon indicating
what digital zoom setting you are at. Note: Digital zoom is best up to 4x.
9. For
higher powers, you will need to rotate the power knob to the 10x objective position
for medium power and to the 40x objective for the maximum power. You will have to
refocus when changing the power of the objective lenses. While using either of the 10x
or 40x lenses you also can increase power by using the digital zoom.
Note: At maximum powers the images may not be as sharp and dark. Your best views will be at the lower powers.
Figure 9
Digital Imaging
You can take snapshots or a short video with your microscope using the built-in digital camera. With the internal storage memory, you
do not need to use a PC or any other devices to do imaging. Transferring of images to your PC for saving and or printing them is easy
and will be discussed later in this manual.
Note: If you are going to take images, do not connect the USB cable to your PC or damages could occur to the equipment. The
USB cable is not used at all for taking images!
General Settings
Before setting up the snapshot or video menus you need to make some general setups first. You can enter the general settings from the
Snapshot Mode, Video Mode, or Time Mode (all three with icons showing in the top right of the LCD screen). You navigate the
different modes by pressing the Esc key.
You begin by pressing the Menu key and this will have “Capture” or “Video Output” highlighted at the top left of the screen. Then press
the Right direction key which will then show “Setup” highlighted. Your choices are below and you navigate to each selection by using
the Up/Down keys.
1. Format – press OK to enter, choose to Cancel or Execute, and then press OK to set.
2. Language – press OK to enter, choose English, French, German, Italian, Spanish, Portuguese, simplified Chinese, traditional
Chinese, or Japanese and then press OK to set.
3. Date Input – press OK to enter. Choose Off or Set. If you choose Off, then press OK to set. If choosing “Set” you will set the
Day/Month/Year and time. For making the date/time settings:
5
Page 6

A. Use the Up/Down keys for your choice of what to display first – the day, the month, or year.
B. Then, use the Left/Right keys to highlight the day, month, year, hour (24-hour format), minutes, or seconds. At each
selection, you use the Up/Down keys to make your choices and then press OK to set the choices.
C. Press the Left key twice to Exit the Menu.
D. The date and time will be shown in the top right of the screen if you “Set” it.
Note: Most
To set up for Snapshot or Video Modes, you press the Esc key until the correct icon is in the top right of the LCD screen.
Settings will have to be set each time you turn on the LCD screen. You will see an “M” in the bottom right of the
screen which means you are using the internal memory. If using an optional SD Card, then the SD Card icon will be
shown in the bottom right of the screen.
Set Up for the Snapshot Mode
The icon of a digital camera should be in the top right of the LCD screen to begin. Then press the Menu key.
1. In the top left of the LCD screen is the EV (Exposure Value) which shows the brightness level. The normal (default) position is
0.0 and this can be adjusted in increments up to +2.0 to -2.0 by pushing the Left/Right directional keys. If the default position
is chosen, then the EV will not be shown on the screen.
2. In the lower right of the screen is shown the remaining snapshots available to take from the internal memory.
3. In the top right of the screen is shown an icon of a camera which indicates it is ready for snapshot mode. The resolution being
used is shown in the bottom left of the screen.
4. By pushing the directional keys (Up/Down) you change the digital zoom shown by an icon.
5. Push the Menu Key to make the following choices in the highlighted “Capture” section. Push the Up/Down keys to switch to
the choices and push OK to enter and set the item.
A. Size – this sets the resolution you want to use for the image. The camera itself uses the 1600 x 1200 pixel
arrangement (2MP) sensor but you can use digital interpolation to increase the resolution or you can use lower
resolutions to increase the number of images you can save in your internal storage memory. Use the directional keys
to make changes and then click on “OK” to save your setting.
B. EV – you can change the default setting for the exposure value.
C. Color – you can change from Standard (normal), to Monochrome (black/white), Vivid, or Sepia.
D. Time Stamp – if you desire to have the time alone, date alone, or the time and date together stamped on your images
you can choose which, or you can choose to have no stamp. Press OK to set your choice.
E. Press the Left key twice to Exit the Menu.
Set Up for the Video Mode
The icon of a video camera should be in the top right of the LCD screen to begin.
1. In the lower left of the screen is shown the resolution for taking videos.
2. In the lower right is the available time left in memory for taking videos.
3. By pushing the directional keys (Up/Down) you change the digital zoom as shown by an icon.
4. Push the Menu Key to make the following choices in the highlighted “Video Output” section. Push the Up/Down keys to
switch to the choices and push OK to enter and set the item.
A. Size – this sets the resolution you want for the image. You should choose 800x600 pixels. Lower resolution (640x
480 pixels) will allow for longer videos using the internal memory but may not be compatible with various
computers. Use the Up/Down keys to make your selection and then press OK to set.
B. EV – you can change the default setting for the exposure value you wish to use.
C. Press the Left key twice to Exit the Menu.
Taking Images
1. Snapshots – to take snapshots make sure you are in the camera snapshot mode (camera icon in the top right of the screen) and
you will use the Snap Key to take an image. Adjust to the sharpest focus using the focus dial as this is critical to obtaining the
best images possible. Push the key when ready and the image will be stored in the internal storage memory. Experiment at
best focus position and varying brightness levels and after a while you will be able to take good images.
2. Video – to take a video make sure you are in the video mode (video/movie camera icon in the top right of the screen). Use the
Snap Key to begin the video and also to end it. The elapsed time of the video is shown on the screen in the bottom right.
3. You can also take images (snapshot or video) by using an SD (Secure Digital) Card (up to 1GB). Your SD card is inserted in
the LCD Monitor (Figure 1). When you insert the SD card properly the SD card icon will be visible at the bottom right of the
LCD screen. On the bottom right of the screen will also be shown the memory available on the SD card. When imaging this
way the images are saved on the SD card and not in the internal storage memory.
Note: Inserting or removing an SD card while the LCD is on may cause the LCD to shut down and/or could damage the SD
card. Always turn off the LCD screen to insert or
remove an SD card.
6
Page 7

Reviewing and Managing Your Images
You can review and manage your snapshots and videos on the LCD Monitor that are saved in the internal storage memory.
1. Push the ESC key until you enter the Stored Images Mode.
A. Use the directional keys to select the image you want to view – all images (and videos) will be numbered.
B. The selected image will have a yellow border around it and press the OK key to view this image.
C. When reviewing a snapshot image, you can use the digital zoom for enlargement. But, when done reviewing the
image return the digital zoom to the zero position. Press the OK key to return to the stored images.
D. When reviewing a video image (the video/movie camera icon will be displayed on the image), you can stop and start
the video by pushing the Up key. Push the Down key at any time during the video to return to the start position. For
videos, in the top right of the screen is shown the length of the video and while playing the video the elapsed time is
shown in the bottom center of the screen. Press the OK key to return to the stored images.
E. Push the ESC key to exit the stored images and return to real time.
2. When you have an image with the yellow border around it, you can manage it by pushing the Menu key:
A. By using the Up/Down keys you have a choice of “Delete”, “Copy To Card”, or “Protect”.
B. Delete – press OK to enter this selection. With the Up/Down keys you have a choice of “Single” which allows you to
delete the file selected by pressing OK, “All” which allows you to delete all files in memory by pressing OK – if you
select “All” you will be asked to confirm this by choosing “Execute” or “Cancel”. If you do not want to delete any
files press the Left key to exit back to the Menu items.
C. Copy To Card – this has no function.
D. Protect (lock) – press OK to enter this selection. With the Up/Down keys you have a choice of “Single” which
protects the image selected, “All” which protects all images in memory, or “Select” which takes you back to the
stored images. For any images locked, an icon of a lock will appear at the center bottom of the screen. To “Unlock”
any or all locked images, turn the LCD screen off and none of the images will be protected.
E. From the Menu you may push the Left key to exit the Menu.
Transferring Your Images
To transfer images to a PC, you need to have a free USB port and have an imaging program(s) for snapshots and videos.
Note: Do Not
1. You
2. If you used an SD card to store your images, you can transfer them to your PC using the method in # 1 above or you can take
disconnect the USB cable while transferring images or damage may occur.
can transfer images from the internal storage memory to your PC by using the supplied Mini USB Cable. The small plug
end of the cable plugs into the LCD Monitor (Figure 1) and the large plug end of the cable plugs into your PC. Your PC will
automatically recognize the new hardware. Then, you will be asked to choose which program on your PC you want to transfer
the images to – you may have to choose a different program for snapshot images and another program for video images
depending on what software programs are installed on your computer.
the SD card out and use the SD card slot on your PC to transfer the images. Using either way your PC will ask you to choose
which program you want to transfer the images to.
Care, Maintenance, and Warranty
Your Celestron microscope is a precision optical instrument and should be treated with care at all times. Follow these care and
maintenance suggestions and your microscope will need very little maintenance throughout its lifetime.
When you are done using your microscope, remove any specimens left on the stage.
Turn off the illuminator switch.
Turn off the LCD monitor.
Unplug the power cord.
Always place the plastic bag over the microscope when not in use or when being stored.
Store the microscope in a dry and clean place.
Be very careful if using your microscope in direct sun light to prevent damage to the microscope or your eyes.
When moving your microscope, carry it with both hands (if possible) by the base or the round body.
Clean the outside surfaces with a moist cloth.
Always unplug any cords before cleaning.
Never clean optical surfaces with cloth or paper towels as they can scratch optical surfaces easily.
Blow off dust with a camel’s hair brush or an air blower from optical surfaces.
To clean fingerprints off of optical surfaces, use a lens cleaning agent and lens tissue available at most photo outlets and when
cleaning do not rub in circles as this may cause sleeks or scratches to occur.
Never disassemble or clean internal optical surfaces. This should be done by qualified technicians at the factory or other
authorized repair facilities.
When handling glass specimen slides, use care as the edges can be sharp.
7
Page 8

Sample Images
The following specimen images left to right below were taken at 40x, 100x, 400x of a Corn Stem C.S.
Warranty
Your microscope has a two year limited warranty. Please see the Celestron website for detailed information on all
Celestron microscopes at www.celestron.com
EEC: This product complies with EEC guidelines in EN61558-2-6:1997 and EN61558-1:1997+A1
.
FCC Statement
This device complies with Part 15 of FCC Rules. Operation is subject to the following two conditions:
1. This device
2. This device must accept any interference received, including interference that may cause undesired
operation.
may not cause harmful interference, and
RoHS
2835 Columbia St.
Torrance, California 90503 U.S.A.
www.celestron.com
REV 2 112508 Printed in China 01-09
Page 9
DEUTSCH
BBEEDDIIEENNUUNNG
LLCCDD--DDiiggiittaallmmiikkrroosskkoopp((LLDDMM)
GSSAANNLLEEIITTUUNN
MMooddeellll444433442
2
G
G
)
Page 10

Einführung
Wir danken Ihnen für den Kauf eines Celestron LCD-Digitalmikroskops (LDM) mit einem 2-Zoll-Monitor. Ihr Mikroskop ist ein optisches
Präzisionsinstrument, das aus Materialien von höchster Qualität hergestellt ist, um Haltbarkeit und eine lange Lebensdauer des Produkts zu
gewährleisten. Es wurde entwickelt, um Ihnen mit minimalen Wartungsanforderungen viele Jahre Freude zu bereiten.
Lesen Sie diese Anleitung durch, bevor Sie versuchen, das Mikroskop zu benutzen, um sich mit den Funktionen und Arbeitsabläufen vertraut
zu machen. So werden Sie das Instrument optimal und zielgerichtet nutzen können und viel Freude daran haben. Die in diesem Handbuch
beschriebenen Teile sind in den Fotos veranschaulicht.
Das Mikroskop liefert hohe Vergrößerungsleistungen von 24x bis zu 240x (bis zu 1920x mit Digital-Zoom). Dieses Mikroskop ist ideal für die
Untersuchung von Objektträgern mit Hefe- und Schimmelpilzproben, Kulturen, Pflanzen- und Tierproben, Fasern, Bakterien etc. geeignet.
Das LCD-Digitalmikroskop verwendet nicht die in herkömmlichen Mikroskopen verwendeten Okulare. Die Proben werden auf dem LCDBildschirm betrachtet, wo sie leicht zu sehen sind und auch gemeinsam mit anderen Personen betrachtet werden können. Sie können auch
Schnappschüsse oder kurze Videos mit der integrierten Digitalkamera aufnehmen.
Der abschließende Abschnitt enthält einfache Pflege- und Wartungstipps. Befolgen Sie diese, um eine jahrelange Qualitätsleistung und
Nutzung sicherzustellen, damit Sie lange Freude an Ihrem Mikroskop haben.
SD-Karten-Steckplatz
Hauptteil
Funktionstasten
Mini-USBKabelanschluss
ObjektträgerMechanismus
Fuß
LCD-Monitor
Zoom-Knopf
Fokusregler
Abb. 1
Im Lieferumfang des Mikroskops enthaltenes Standardzubehör
Digitalkamera - integriert
LCD-Monitor
4x-Objektivlinse Wechselstrom-Adapterstecker –
10x-Objektivlinse 5 fertige Objektträger, 10 leere
40x-Objektivlinse
Untere Beleuchtung
Objektträgerhalter
Wechselstromadapter
USA/EU/GB
Objektträger und 10 Deckgläschen
SD-Kartensteckplatz
USB-Mini-Kabel
2
Page 11
Technische Daten
Stecker
Modell 44342 Technische Daten
Objekttisch Einfach mit Objektträgerhalter-Mechanismus – 44 mm x 44 mm (1,7 x 1,7 Zoll)
Digitalkamera
LCD-Monitor
Fokussierer Leichtgängig, eine Bewegung
Objektive Achromatisch 4x, 10x und 40x – alle optisches Glas
Flash-Speicher
USB-Kabel 2,0 Mini – Länge: 2 m (6,5 Fuß)
Objektträgerhalter Zur Aufnahme von Standard-Glasobjektträgern (25 mm x 76 mm) (1 x 3 Zoll)
Zoom-Knopf Dreifach mit Klickstopp
Beleuchtung Integriert, elektrisch – LED 6 Volt und 6 Watt
Wechselstromadapter Eingabe - Universal 100 bis 240 Volt 50/60 Hz
Gewicht/Abmessungen 794 g (28 oz.) / 165 x 165 x 215 mm (6,5 x 6,5 x 8,5 Zoll)
2 MP CMOS; 6x-Vergrößerung anstelle von Okular; 1600x
1200 Pixel-Array
2 Zoll mit 8x Digital-Zoom – Hochdefinitions (HD)-TFT-Digitalanzeige
640 x 240 Pixel
32 MB – ca. 65 Schnappschüsse (JPEG-Dateien) mit 2 MP Auflösung
oder einige Minuten VGA-Video (AVI-Dateien)
Tabelle: Vergrößerungsleistung
Verwenden Sie die folgende Tabelle, um die Vergrößerung der verschiedenen Objektivlinsen in Verbindung mit Ihrem Mikroskop bei
Verwendung des normalen Modus des Digitalbildes auf dem LCD-Monitor und Verwendung der Digital-Zoom-Funktion zu bestimmen.
Objektivlinse
Digitalbild - normal
Max. mit 8x Digital-ZoomFunktion
4x 10x 40x
24x 60x 240x
192x 480x 1920x
Aufbau des Mikroskops
1. Nehmen Sie das Mikroskop und die anderen Teile vorsichtig aus dem Karton und stellen Sie sie auf einen Tisch, Schreibtisch oder
eine andere flache Oberfläche.
2. Entfernen Sie die Plastikabdeckung vom Mikroskop.
US-Stecker
GB-
3. Schließen Sie das kleine Kabel des Wechselstromadapters an der Buchse auf der Rückseite des Fußes an (siehe Abb. 2 oben).
4. Schließen Sie das Steckerende des Wechselstromadapters an einer geeigneten Stromquelle an.
Hinweis: Der mit diesem Mikroskop gelieferte Wechselstromadapter verfügt über ein austauschbares Steckersystem, das in den USA,
Großbritannien,
Wechselstromadapter installiert. Die Stecker können einfach mit dem folgenden Verfahren für Ihre jeweiligen
Anforderungen ausgewechselt werden:
A. Drücken Sie auf den kleinen Knopf mit der Kennzeichnung „PUSH“ (DRÜCKEN). Halten Sie ihn gedrückt und halten Sie gleichzeitig
die Steckerstifte fest und drehen Sie sie etwas gegen den Uhrzeigersinn. Ziehen Sie sie nach oben und entfernen Sie den Stecker.
Lassen Sie dann den Finger los, mit dem Sie den Knopf mit der Bezeichnung „PUSH“ (DRÜCKEN) gedrückt haben.
Abb. 2 Abb. 3
Europa und vielen anderen Teilen der Welt funktioniert. Der Stecker für die USA ist im
EU-Stecker
B. Nehmen Sie jetzt den gewünschten Stecker und zentrieren Sie ihn über dem Wechselstromadapter. Drehen Sie ihn, bis er in die
Öffnung fällt. Drehen Sie ihn dann im Uhrzeigersinn, bis Sie ein Klicken hören. Damit wird signalisiert, dass der Stecker richtig
installiert ist.
3
Page 12
Betrieb des Mikroskops
Strom
-
Ein
/Aus-Taste
Vor der Betrachtung von Proben mit dem Mikroskop müssen Sie die Schutzabdeckung über dem LCD-Bildschirm abnehmen, den LCDBildschirm und die Beleuchtung einschalten. Sie müssen auch wissen, wie der Objektträgerhalter verwendet wird.
ESC (Ändern)-Taste
Monitor-Ein-LED
Abb. 4
Menü-Taste
Richtungs-/OK-Tasten
Schnapp-schusstaste
LCD-Modul
Dieses Digitalmikroskop unterscheidet sich von herkömmlichen Mikroskopen: Anstatt wie in einem herkömmlichen Mikroskop die Proben
durch ein Okular zu betrachten, ersetzt der LCD-Monitor die Okulare und ermöglicht Ihnen die Betrachtung der Proben auf dem Bildschirm
allein oder auch gemeinsam mit anderen Personen. Vor der Betrachtung von Proben müssen Sie Ihren LCD-Monitor einschalten, indem Sie
den Netzschalter einschalten (siehe Abb. 4). Drücken Sie die Taste einmal. Kurz darauf leuchtet die Monitor-LED (rot) auf und zeigt an,
dass der LCD-Monitor eingeschaltet ist. Das ist im Grunde alles, was Sie wissen müssen, um den LCD-Monitor zur Betrachtung von Proben
zu verwenden. Die verschiedenen Tasten auf dem LCD-Modul dienen hauptsächlich zur Aufnahme von Bildern (Schnappschüsse und
Video) und werden weiter unten in dieser Bedienungsanleitung besprochen.
Beleuchtung
1. Abb. 5 unten zeigt, wie die Beleuchtung eingeschaltet wird: Drehen Sie den Drehregler nach
links.
2. Die Beleuchtung wird für Objektträger verwendet. Das Licht leuchtet durch die Öffnung im
Objekttisch durch den Objektträger.
3. Drehen Sie den Beleuchtungsdrehregler, um die gewünschte Helligkeit für die
Probenbetrachtung einzustellen.
Einstellung der Beleuchtung
Abb. 5
Proben von unterschiedlicher Größe, Dicke und Farbvariation erfordern unterschiedliche Beleuchtungsstufen. Es gibt zwei Möglichkeiten,
die Lichtmenge bei der Probenbetrachtung zu ändern: Einstellung der Helligkeit auf der Drehscheibe, die oben in Abb. 5 gezeigt ist, und
Änderung der EV-Funktion auf dem LCD-Monitor. Die EV-Funktion (Exposure Value for Brightness/Belichtungswert für Helligkeit) erhöht
oder reduziert die Helligkeitsstufe. Hierzu werden die Links- und Rechtspfeile auf dem LCD-Monitor verwendet.
Bei der Betrachtung von nicht transparenten oder dunklen Proben empfiehlt es sich u. U., die Lichtmenge zu erhöhen, um bestimmte
Merkmale oder Details aufzulösen. Das erreicht man am besten durch die Erhöhung der Helligkeit der Beleuchtung durch Drehen des
Helligkeitsreglers auf die höchste Einstellung.
Zur Erzielung der optimalen Beleuchtung werden Sie etwas mit den Einstellungen experimentieren müssen, denn jede Probe erfordert u. U. eine
leicht abweichende Beleuchtung. Das gilt auch für die gleichen Proben bei Betrachtung mit verschiedenen Vergrößerungsleistungen.
Betrachtung einer Probe
Das Instrument ist mit einem festen, einfachen Objekttisch mit Halteklemmen zur Führung der Positionierung des Objektträgerhalters
ausgestattet.
1. Setzen Sie einen Probenobjektträger (25 x 76 mm, 1 x 3 Zoll) in den Objektträgerhalter. Dazu setzen Sie den Probenobjektträger
vorsichtig unter die kleinen Führungen des Objektträgerhalters (Abb. 6). Dann schieben Sie den Objektträger ganz in den Ausschnitt
des Objektträgerhalters.
2. Der Objektträgerhalter mit eingesetztem Objektträger wird so auf den Objekttisch gesetzt, dass der Pfeil auf dem Objektträgerhalter
nach vorn zeigt. Im Innern des Objekttisches (Abb. 7 und 8) befinden sich zwei kleine Halteklemmen, unter denen der
Objektträgerhalter eingeschoben wird.
3. Drücken Sie den Objektträgerhalter ein, bis Sie die Probe sehen (immer mit der geringsten Vergrößerungsleistung beginnen). Sie
können die Probe untersuchen, indem Sie den Objektträgerhalter langsam hin und zurück und leicht nach links oder rechts schieben.
4. Bei Objektträgern, auf denen sich die Probe auf einer Seite befindet, ist möglicherweise nicht die ganze Probe zu sehen. In diesen Fällen
können Sie den Objektträger aus dem Objektträgerhalter nehmen, den Objektträger um 180° drehen und es dann noch einmal probieren.
4
Page 13

5. Die manuelle Entfernung des Objektträgerhalters kann am Anfang etwas schwierig sein, aber nach etwas Experimentieren ist die
Verwendung einfach.
Abb. 6 Abb. 7 Abb. 8
Nachdem der Objektträger eingesetzt ist, können Sie ihn betrachten, indem Sie die Vergrößerung einstellen.
6. Verwenden Sie den Zoom-Knopf (in der Mitte von Abb. 9), um die Objektivlinsen zu drehen,
bis sich der 4x-Punkt in der Nähe der Anzeige befindet – er klickt, wenn er korrekt positioniert
ist. Beginnen Sie stets mit dem Objektiv der geringsten Vergrößerung (4x bei diesem
Mikroskop), das Ihnen eine Vergrößerungsleistung von 24x bietet. Arbeiten Sie sich dann zu
höheren Vergrößerungsleistungen hinauf. Eine Vergrößerungsleistung von 24x bietet das
breiteste Sichtfeld und hellste Bild.
7. Schauen Sie auf den LCD-Bildschirm, während Sie den Triebknopf (Abb. 9) drehen, bis die
Probe ins Sichtfeld rückt. Sie müssen u.U. den Objektträger wie oben besprochen
positionieren, so dass das Bild im Sichtfeld ist.
8. Mit der 4x Objektivlinse können Sie auch die Vergrößerungsleistung im Bereich von 24x bis
192x unter Verwendung des Digital-Zooms des LCD-Moduls variieren. Verwenden Sie die
Richtungspfeile (Aufwärts/Abwärts) am LCD-Modul zur Verwendung des Digital-Zooms.
Links auf dem Bildschirm erscheint ein Symbol zur Anzeige der Digital-Zoom-Einstellung.
Hinweis: Digital-Zoom ist optimal bis zu 4x.
9. Für
höhere Vergrößerungsleistungen müssen Sie den Zoom-Knopf für mittlere Vergrößerung
auf die 10x-Position drehen. Für die maximale Vergrößerungsleistung drehen Sie ihn auf das
40x-Objektiv. Sie müssen bei Änderung der Vergrößerungsleistung der Objektivlinsen die Schärfe neu einstellen. Bei Verwendung
einer der 10x oder 40x Linsen haben Sie auch die Möglichkeit, die Vergrößerungsleistung mit dem Digital-Zoom zu erhöhen.
Hinweis: Bei maximalen Vergrößerungsleistungen sind die Bilder u. U. nicht so scharf und dunkel. Eine optimale Betrachtung
wird bei den geringeren Vergrößerungsleistungen
erzielt.
Abb. 9
Digitalbildaufnahmen
Sie können auch Schnappschüsse oder kurze Videos mit der integrierten Digitalkamera Ihres Mikroskops aufnehmen. Da das System über
einen internen Speicher verfügt, braucht kein PC oder anderes Gerät für die Bildaufnahmen verwendet zu werden. Die Übertragung von
Bildern auf Ihren PC zum Speichern und Ausdrucken ist einfach und wird weiter unten in dieser Bedienungsanleitung beschrieben.
Hinweis: Schließen Sie für Bildaufnahmen nicht das USB-Kabel an Ihrem PC an, da das Gerät beschädigt werden könnte. Das USBKabel wird für Bildaufnahmen überhaupt nicht benutzt.
Allgemeine Einstellungen
Vor der Einrichtung der Schnappschuss- oder Videomenüs müssen Sie einige allgemeine Einstellungen vornehmen. Sie können die
allgemeinen Einstellungen aus dem Snapshot Mode (Schnappschussmodus), Video Mode (Videomodus) oder Time Mode (Zeitmodus)
aufrufen (alle drei Modi werden durch Symbole oben rechts am LCD-Bildschirm angezeigt). Durch Drücken der Esc-Taste navigieren Sie
die verschiedenen Modi.
Drücken Sie zu Beginn die Taste „Menu“ (Menü). Damit wird oben links am Bildschirm „Capture“ (Aufnahme) oder „Video Output“
(Videoausgabe) markiert. Drücken Sie dann die Rechts-Taste. Nun wird „Setup“ markiert. Ihre Optionen sind nachstehend aufgeführt.
Navigieren Sie zu den Optionen mit den Aufwärts/Abwärts-Tasten.
1. Format – Drücken Sie auf OK, um die Option aufzurufen. Wählen Sie „Cancel“ (Abbrechen) oder „Execute“ (Ausführen) und
drücken Sie zur Einstellung auf OK.
2. Language (Sprache) – Drücken Sie zum Aufruf der Option auf OK und wählen Sie Englisch, Französisch, Deutsch, Italienisch,
Portugiesisch, vereinfachtes Chinesisch, traditionelles Chinesisch oder Japanisch und drücken Sie auf OK, um die Sprache
einzustellen.
3. Date Input (Datumseingabe) – Drücken Sie auf OK, um die Option aufzurufen. Wählen Sie „Off“ (Aus) oder „Set“ (Einstellen).
Wenn Sie „Off“ (Aus) wählen, drücken Sie auf OK, um es einzustellen. Wenn Sie „Set“ (Einstellen) wählen, stellen Sie den
Tag/Monat/Jahr und die Uhrzeit ein. Einstellung des Datums und der Uhrzeit:
A. Wählen Sie die zuerst anzuzeigende Option mit den Aufwärts/Abwärts-Tasten – Tag, Monat oder Jahr.
B. Markieren Sie dann mit den Links/Rechts-Tasten den Tag, Monat, das Jahr, die Stunde (24-Stunden-Format), Minuten oder
Sekunden. Verwenden Sie bei jeder Option die Aufwärts/Abwärts-Tasten, um Ihre Auswahl vorzunehmen, und drücken
Sie auf OK, um die Optionen einzustellen.
C. Drücken Sie die Links-Taste zweimal, um das Menü zu verlassen.
D. Das Datum und die Uhrzeit werden jetzt oben rechts im Bildschirm angezeigt, wenn Sie es mit „Set“ (Einstellen) einstellen.
5
Page 14

Hinweis: Die meisten Einstellungen müssen jedes Mal neu eingestellt werden, wenn Sie den LCD-Bildschirm einschalten. Unten
rechts am Bildschirm ist ein „M“ zu sehen, d.h. Sie verwenden den internen Speicher. Wenn Sie eine optionale SD-Karte
verwenden, wird das SD-Kartensymbol unten rechts am Bildschirm angezeigt.
Zur Einstellung des Schnappschuss- oder Videomodus drücken Sie die Esc-Taste, bis das richtige Symbol oben rechts am LCD-Bildschirm
erscheint.
Einrichtung für Schnappschussmodus
Das Symbol einer Digitalkamera sollte zu Beginn oben rechts am LCD-Bildschirm erscheinen. Drücken Sie nun die Taste „Menu“ (Menü).
1. Oben links auf dem LCD-Monitor befindet sich die EV-(Exposure Value)-Funktion, die die Helligkeitseinstellung anzeigt. Die
normale (Standard) Position ist 0,0. Sie kann durch Drücken der Links/Rechts-Richtungspfeile in Inkrementen von bis zu +2,0 bis -2,0
eingestellt werden. Wenn die Standardposition gewählt wird, wird EV nicht auf dem Bildschirm angezeigt.
2. Unten rechts im Bildschirm wird die Anzahl der verbleibenden Schnappschüsse im internen Speicher angezeigt.
3. Oben rechts im Bildschirm ist ein Symbol einer Kamera angezeigt, das die Bereitschaft für Schnappschussmodus anzeigt. Die
verwendete Auflösung wird unten links am Bildschirm angezeigt.
4. Durch Drücken der Richtungspfeile (Aufwärts/Abwärts) können Sie den Digital-Zoom ändern, der durch ein Symbol angezeigt
wird, wenn die Tasten gedrückt werden.
5. Drücken Sie die Taste „Menu“ (Menü), um die folgenden Auswahlen im markierten Abschnitt „Capture“ (Aufnahme) zu treffen.
Drücken Sie die Aufwärts/Abwärts-Tasten, um zu den Optionen zu wechseln, und drücken Sie OK, um sie aufzurufen und das
Element einzustellen.
A. Size (Größe) – Damit wird die gewünschte Auflösung für die Aufnahme eingestellt. Die Kamera selbst verwendet den
1600 x 1200 Pixelanordnungs (2 MP)-Sensor, aber Sie können die Auflösung mit Hilfe der digitalen Interpolation erhöhen.
Es ist auch möglich, die Auflösungen zu reduzieren, um mehr Bilder im internen Speicher speichern zu können. Nehmen
Sie mit Hilfe der Richtungstasten Änderungen vor und klicken Sie dann auf OK, um Ihre Einstellung zu speichern,
B. EV – Sie können die Standardeinstellung ändern, um den Expositionswert einzustellen.
C. Color (Farbe) – Mögliche Einstellungen sind Standard (normal), Monochrom (schwarz/weiß), Vivid (lebhaft) oder Sepiaton.
D. Time Stamp (Zeitstempel) – Bietet die Möglichkeit für folgende Einstellungen: nur Uhrzeit, nur Datum, Uhrzeit- und
Datum-Stempel auf den Bildern (gemäß Ihrer Auswahl), kein Stempel. Drücken Sie auf OK, um Ihre Auswahl
einzustellen.
E. Drücken Sie die Links-Taste zweimal, um das Menü zu verlassen.
Einrichtung für Videomodus
Das Symbol einer Videokamera sollte zu Beginn oben rechts am LCD-Bildschirm erscheinen.
1. Unten links am Bildschirm wird die Auflösung für Videoaufnahmen angezeigt.
2. Unten rechts wird die verfügbare, verbleibende Zeit im Speicher für Videoaufnahmen angezeigt.
3. Durch Drücken der Richtungspfeile (Aufwärts/Abwärts) können Sie den Digital-Zoom ändern, der durch ein Symbol angezeigt
wird, wenn die Tasten gedrückt werden.
4. Drücken Sie die Taste „Menu“ (Menü), um die folgenden Auswahlen im markierten Abschnitt „Video Output“ (Videoausgabe) zu
treffen. Drücken Sie die Aufwärts/Abwärts-Tasten, um zu den Optionen zu wechseln, und drücken Sie OK, um sie aufzurufen und das
Element einzustellen.
A. Size (Größe) – Damit wird die gewünschte Auflösung für die Aufnahme eingestellt. Sie sollten 800 x 600 Pixel auswählen.
Eine geringere Auflösung (640 x 480 Pixel) ermöglicht längere Videos mit dem internen Speicher, aber sie ist
möglicherweise nicht kompatibel mit verschienenen Computern. Nehmen Sie Ihre Auswahl mit den Aufwärts/Abwärts-
Tasten vor und drücken Sie auf OK, um sie einzustellen.
B. EV – Sie können die Standardeinstellung ändern, um den gewünschten Expositionswert einzustellen.
C. Drücken Sie die Links-Taste zweimal, um das Menü zu verlassen.
Aufnehmen von Bildern
1. Snapshots (Schnappschüsse) – Zur Aufnahme von Schnappschüssen müssen Sie im Kamera-Schnappschussmodus sein
(Kamerasymbol oben rechts im Bildschirm). Für Schnappschussaufnahmen wird die Snap-Taste verwendet. Stellen Sie mit dem
Fokusdrehregler die optimale Bildschärfe ein. Das ist wichtig, um optimale Bilder zu erhalten. Drücken Sie die Taste, wenn Sie
bereit sind. Daraufhin wird das Bild im internen Speicher gespeichert. Experimentieren Sie mit der optimalen Fokusposition und
variieren Sie die Helligkeitsstufen. Nach einer Weile erzielen Sie gute Aufnahmen.
2. Video – Um Videoaufnahmen machen zu können, müssen Sie im Videomodus sein (Video/Filmkamera-Symbol oben rechts am
Bildschirm). Verwenden Sie die Snap-Taste, um das Video zu beginnen und zu beenden. Die Laufzeit des Videos wird auf dem
Bildschirm unten rechts angezeigt.
3. Sie können auch Aufnahmen (Schnappschuss oder Video) mit einer SD-(Secure Digital)-Karte machen (bis zu 1 GB). Die SDKarte wird in den LCD-Monitor (Abb. 1) gesteckt. Bei richtigem Einsatz der SD-Karte wird unten rechts am LCD-Bildschirm ein
SD-Kartensymbol angezeigt. Unten rechts auf dem Bildschirm wird auch die verfügbare Speicherkapazität der SD-Karte
angezeigt. Bei Aufnahmen in diesem Modus werden die Bilder auf der SD-Karte und nicht im internen Speicher gespeichert.
Hinweis: Der Einsatz oder das Entfernen einer SD-Karte bei eingeschaltetem LCD kann dazu führen, dass der LCD-Monitor
abgeschaltet
Sie eine SD-Karte einstecken oder entfernen.
wird und/oder dass die SD-Karte beschädigt wird. Schalten Sie immer den LCD-Bildschirm aus, wenn
6
Page 15

Anzeige und Verwaltung Ihrer Bilder
Sie können Ihre intern gespeicherten Schnappschüsse und Videos auf dem LCD-Monitor anzeigen und verwalten.
1. Drücken Sie die ESC-Taste, bis Sie den „Stored Images Mode“ (Modus gespeicherte Bilder) aufgerufen haben.
A. Wählen Sie das Bild zur Betrachtung mit den Richtungspfeiltasten – alle Bilder (und Videos) sind nummeriert.
B. Das ausgewählte Bild ist mit einem gelben Rand versehen. Drücken Sie auf OK, um das Bild zu betrachten.
C. Bei der Anzeige eines Schnappschusses können Sie den Digital-Zoom zur Vergrößerung verwenden. Stellen Sie nach
Betrachtung des Bildes den Digital-Zoom wieder auf die Nullposition. Drücken Sie auf die OK-Taste, um zu den
gespeicherten Bildern zurückzukehren.
D. Bei der Betrachtung eines Videobildes (das Video/Filmkamerasymbol wird auf dem Bild angezeigt) können Sie das Video
durch Drücken der Aufwärts-Taste stoppen und starten. Sie können jederzeit während der Videoanzeige durch Drücken der
Abwärts-Taste in die Start-Position zurückkehren. Bei Videos wird oben rechts im Bildschirm die Länge des Videos
angezeigt. Bei der Wiedergabe des Videos wird die Laufzeit unten in der Mitte des Bildschirms angezeigt. Drücken Sie auf
die OK-Taste, um zu den gespeicherten Bildern zurückzukehren.
E. Drücken Sie die ESC-Taste, um die gespeicherten Bilder zu verlassen und in den Echtzeit-Modus zurückzukehren.
2. Wenn Sie ein gelb umrandetes Bild haben, können Sie es verwalten, indem Sie die Taste „Menu“ (Menü) drücken:
A. Wenn Sie die Aufwärts/Abwärts-Tasten verwenden, haben Sie die Wahl zwischen „Delete“ (Löschen), „Copy to Card“
(Auf Karte kopieren) oder „Protect“ (Schützen).
B. Delete (Löschen) – Drücken Sie auf OK, um diese Option aufzurufen. Die Aufwärts/Abwärts-Tasten bieten Ihnen folgende
Optionen: „Single“ (Eine) ermöglicht das Löschen der Datei durch Drücken von OK. „All“ (Alle) ermöglicht das Löschen
aller Dateien im Speicher durch Drücken von OK. Wenn Sie „All“ (Alle) wählen, werden Sie zur Bestätigung aufgefordert,
indem Sie „Execute“ (Ausführen) oder „Cancel“ (Abbrechen) wählen. Wenn Sie keine Dateien löschen wollen, drücken
Sie auf die Links-Taste, um zu den Menüoptionen zurückzukehren.
C. Copy to Card (Auf Karte kopieren) – Diese Option hat keine Funktion.
D. Protect (Schützen) – Drücken Sie auf OK, um diese Option aufzurufen. Die Aufwärts/Abwärts-Tasten bieten Ihnen die
Auswahl zwischen den Optionen „Single“ (Ein), die das ausgewählte Bild schützt; „All“ (Alle), die alle Bilder im Speicher
schützt, oder „Select“ (Auswählen), die Sie zu den gespeicherten Bildern zurückbringt. Für alle gesperrten Bilder erscheint
ein Schlosssymbol unten in der Mitte des Bildschirms. Um ein oder alle gesperrten Bilder zu „entsperren“, schalten Sie den
LCD-Bildschirm aus. Dann werden keine Bilder geschützt.
E. Im Menü können Sie die Links-Taste drücken, um das Menü zu verlassen.
Übertragung von Bildern
Um Bilder auf einen PC zu übertragen, müssen Sie einen freien USB-Port und (ein) Bildprogramm(e) für Schnappschüsse und Video haben.
Hinweis: Das USB-Kabel darf wegen Beschädigungsgefahr während der Bildübertragung nicht
1. Bilder können mit Hilfe des im Lieferumfang enthaltenen Mini-USB-Kabels vom internen Speicher auf einen PC übertragen
werden. Das Kabelende mit kleinem Stecker wird am LCD-Monitor (Abb. 1) eingesteckt und das Kabelende mit großem Stecker
wird am PC angeschlossen. Der PC erkennt die neue Hardware automatisch. Dann wählen Sie, an welches Programm auf Ihrem
PC Sie die Bilder übertragen wollen. Sie müssen u. U. ein anderes Programm für Schnappschüsse und ein anderes Programm für
Videos auswählen, je nachdem welche Software Sie auf Ihrem Computer installiert haben.
2. Wenn Ihre Bilder auf einer SD-Karte gespeichert sind, können Sie diese auf den PC mit dem unter Punkt 1 oben beschriebenen
Verfahren übertragen. Es ist auch möglich, die SD-Karte herauszuziehen und den SD-Kartensteckplatz auf dem PC zur Übertragung
der Bilder zu verwenden. Bei beiden Methoden werden Sie vom PC gefragt, in welches Programm Sie die Bilder übertragenwollen.
abgetrennt werden.
Pflege, Wartung und Garantie
Ihr Celestron-Mikroskop ist ein optisches Präzisionsinstrument, das stets mit der erforderlichen Sorgfalt behandelt werden sollte. Wenn Sie
diese Empfehlungen zur Pflege und Wartung befolgen, erfordert Ihr Mikroskop während seiner Lebensdauer nur sehr wenig Wartung.
Wenn Sie die Arbeit mit dem Mikroskop beendet haben, entfernen Sie alle Probenreste auf dem Objekttisch.
Schalten Sie den Beleuchtungsschalter aus.
Schalten Sie den LCD-Monitor aus.
Ziehen Sie das Netzkabel ab.
Bei Nichtgebrauch oder Lagerung stets die Kunststoffabdeckung des Mikroskops anlegen.
Das Mikroskop an einem trockenen, sauberen Ort aufbewahren.
Bei Gebrauch des Mikroskops in direktem Sonnenlicht sehr vorsichtig vorgehen, um Beschädigung des Mikroskops oder
Augenverletzungen zu verhüten.
Das Mikroskop nur mit beiden Händen (falls möglich) am Fuß oder dem runden Teil transportieren.
Reinigen Sie die Außenflächen mit einem feuchten Lappen.
Vor Reinigungsarbeiten immer erst alle Kabel abziehen.
Niemals optische Oberflächen mit Stoff- oder Papiertüchern reinigen, da sie optische Oberflächen leicht zerkratzen können.
Staub mit einem Kamelhaarpinsel oder einem Luftgebläse von den optischen Oberflächen abpusten.
Zur Entfernung von Fingerabdrücken von optischen Oberflächen verwenden Sie ein Objektivreinigungsmittel und
Linsenreinigungstücher,
das zu Kratzern o.ä. führen kann.
Die internen optischen Oberflächen nicht zerlegen oder reinigen. Solche Arbeiten dürfen nur von qualifizierten Technikern im
Herstellungswerk oder von anderen auto
Beim Umgang mit Objektträgern aus Glas vorsichtig vorgehen. Sie können scharfe Kanten haben.
die in den meisten Fotofachgeschäften erhältlich sind. Beim Reinigen keine Kreisbewegungen machen, da
risierten Reparatureinrichtungen vorgenommen werden.
7
Page 16

Beispielaufnahmen
Die folgenden Probenaufnahmen wurden mit 40x, 100x, 400x (von links nach rechts) von einem Maisstengel (C.S.) aufgenommen.
Garantie
Ihr Mikroskop hat eine eingeschränkte Zwei-Jahres-Garantie. Auf der Celestron-Website www.celestron.com finden Sie detaillierte
Informationen.
EWG: Dieses Produkt entspricht den EWG-Richtlinien in EN61558-2-6:1997 und EN61558-1:1997+A1.
FCC-Erklärung
Dieses Gerät entspricht Teil 15 der FCC-Bestimmungen. Der Betrieb unterliegt den folgenden zwei
Bedingungen:
1. Das Gerät dar
2. Dieses Gerät muss alle empfangenen Störungen annehmen, einschließlich Störungen, die einen
unerwünschten Betrieb verursachen.
f keine schädlichen Störungen verursachen, und
RoHS
2835 Columbia St.
Torrance, California 90503 USA
www.celestron.com
REV 2 112508 Gedruckt in China 01-09
Page 17

ITALIANO
MAANNUUAALLEEDDIIIISSTTRRUUZZII
M
MMiiccrroossccooppiiooddiiggiittaalleeLLCCDD((LLDDMM)
MMooddeelllloonn..444433442
2
ONNII
O
)
Page 18

Introduzione
Slot per cavo Mini USB
Grazie per aver acquistato il Microscopio digitale LCD (LDM) Celestron con monitor da 2 pollici. Il microscopio è uno strumento ottico
di precisione, realizzato con materiali della più alta qualità per assicurarne la lunga durata. È stato progettato perché duri una vita intera,
con una minima manutenzione.
Prima di cercare di utilizzare il microscopio, vi preghiamo di leggere le istruzioni per acquistare familiarità con le sue funzioni e
operazioni, e per ottimizzarne l'uso. Per individuare le varie parti esaminate in questo manuale, consultate le foto del microscopio.
Questo microscopio offre alte potenze di ingrandimento, da 24x fino a 240x (con lo zoom digitale arriva fino a 1920x). Il microscopio è
ideale per esaminare vetrini di preparati di lieviti e muffe, colture, parti di piante e animali, fibre, batteri e così via.
Il Microscopio digitale LCD non utilizza oculari come i microscopi tradizionali. I preparati vengono visualizzati sullo schermo LCD (a
cristalli liquidi) e possono essere facilmente mostrati ad altre persone. Con la fotocamera/telecamera digitale incorporata potete anche
scattare fotografie o riprendere brevi filmati.
La sezione finale di questo manuale fornisce semplici consigli per la cura e la manutenzione dello strumento, che dovrete seguire per
assicurare che possa offrirvi anni di prestazioni ed uso di alta qualità, e tutto il divertimento che desiderate.
Slot per scheda SD
Corpo
Tasti di funzione
Meccanismo per
preparato su vetrino
Base
Monitor LCD
Manopola della
potenza
Controllo di messa
a fuoco
Figura 1
Accessori standard inclusi con il microscopio
Fotocamera/telecamera digitale incorporata Portavetrino
Monitor LCD Adattatore c.a.
Lente dell’obiettivo con ingrandimento 4x Spine adattatore c.a. – USA/EU/Regno Unito
Lente dell’obiettivo con ingrandimento 10x 5 vetrini pronti, 10 vetrini vuoti e 10 coperture
Lente dell’obiettivo con ingrandimento 40x Slot per scheda SD
Illuminatore inferiore Mini cavo USB
per vetrino
2
Page 19

Dati tecnici
Modello n. 44342 Dati tecnici
Portaoggetti Semplice, con meccanismo per portavetrini - 44 mm x 44 mm (1,7 poll. x 1,7 poll.)
Fotocamera/telecamera
digitale
Monitor LCD 2 pollici zoom digitale 8x – Display digitale TFT ad alta definizione 640 x 240 pixel
Focalizzatore Movimento singolo uniforme
Obiettivi Acromatico da 4x, 10x e 40x – tutti gli elementi ottici in vetro
Memoria flash
Cavo USB 2,0 Mini – lunghezza 6,5 piedi (2m)
Portavetrino Accetta vetrini standard - 25 mm x 76 mm (1 poll. x 3 poll.)
Manopola della potenza Triplo con movimento a scatti
Illuminatore Elettrico incorporato – LED da 6 V e 6 W
Adattatore c.a. Ingresso - universale da 100 a 240 V, 50/60 HZ
Peso/dimensioni 794 g (28 once) / 165 mm (6,5 poll.) x 165 mm (6,5 poll.) x 215 mm (8,5 poll.)
CMOS da 2 MP; ingrandimento 6x senza oculare; 1600 x 1200 pixel
32 MB – circa 65 istantanee (file JPEG) con risoluzione di 2 MP
oppure alcuni minuti di filmato VGA (file AVI)
Tabella delle potenze di ingrandimento
Usare la seguente tabella per determinare l’ingrandimento delle diverse lenti dell’obiettivo nella modalità normale dell’immagine digitale
sullo schermo LCD e con la funzione di zoom digitale del microscopio.
Lente dell’obiettivo
Ingrandimento immagine digitale
nella modalità normale
Ingrandimento massimo con
zoom digitale 8x
4x 10x 40x
24x 60x 240x
192x 480x 1920x
Approntamento del microscopio
1. Estrarre con cautela dalla scatola il microscopio e le altre parti e disporli su un tavolo, una scrivania o un’altra superficie piana.
2. Togliere il rivestimento di plastica dal microscopio.
Spina per USA
Spina per
Regno Unito
Figura 2 Figura 3
3. Collegare il piccolo cavo dall’adattatore c.a. alla presa sul retro della base (vedere la Figura 2 sopra).
4. Inserire l’estremità con spina dell’adattatore c.a. nell’appropriata presa di alimentazione.
Nota: l’adattatore c.a. in dotazione a questo microscopio include un sistema di spine intercambiabili per prese di corrente che
possono funzionare negli St
negli Stati Uniti è installata nell’adattatore c.a. Si possono cambiare facilmente le spine per i propri requisiti particolari nel
modo seguente.
A. Premere il piccolo pulsante contrassegnato da “PUSH” e tenerlo premuto mentre nello stesso tempo si afferrano i contatti della
spina e si esegue un lieve movimento in senso antiorario tirando verso l'alto per estrarla. Poi smettere di esercitare pressione
con il dito sul pulsante “PUSH”.
ati Uniti, nel Regno Unito, in Europa e in molte altre parti del mondo. La spina adatta per l’uso
Spina per Europa
B. Prendere il tipo di spina che si desidera usare, centrarla sopra l’adattatore c.a. e ruotarla fino a sistemarla nell’apertura. Quindi
farla ruotare in senso orario fino a sentire un clic che indica la corretta installazione della spina.
3
Page 20

Funzionamento del microscopio
Prima di osservare preparati su vetrino, occorre rimuovere il rivestimento protettivo dallo schermo LCD e accenderlo, accendere
l’illuminatore e capire come usare il portavetrini; a questo punto si è pronti a iniziare le osservazioni.
Tasto ESC (cambia)
Tasto Menu
Spia schermo acceso
Tasti freccia/OK
Pulsante On/Off
Tasto Snap
(Scatta)
Figura 4
Modulo LCD
Questo microscopio digitale è diverso dai microscopi tradizionali: lo schermo LCD sostituisce gli oculari del microscopio tradizionale e
permette all’utente di guardare il preparato sullo schermo, da solo o con altri. Per visualizzare preparati con il microscopio, accendere lo
schermo LCD con il pulsante di accensione (ON) (Figura 4). Premere il pulsante una volta e dopo un momento si accenderà la spia di
monitor acceso (rossa) indicando che il monitor LCD è attivato. Per usare lo schermo LCD e visualizzare i preparati non occorre altro. I
vari tasti del Modulo LCD servono principalmente ad acquisire immagini (istantanee e filmati), e sono descritti dopo in questo manuale.
Illuminazione
1. Per accendere l’illuminatore, vedere la Figura 5 qui sotto e girare verso sinistra la
manopola di controllo della luminosità.
2. L’illuminatore viene usato per i vetrini di preparato e illumina dal basso attraverso
il foro nel portaoggetti e il vetrino.
3. Quando si osservano i preparati, girare la manopola dell’illuminatore sul livello di
luminosità desiderato.
Regolazione dell’illuminazione
Preparati di dimensioni, spessore e variazioni di colore differenti richiedono diversi livelli di illuminazione. Vi sono due modi per
regolare l'illuminazione quando si visualizza un preparato; si può regolare la luminosità mediante la manopola illustrata nella Figura 5
sopra e la funzione EV (valore di esposizione) dello schermo LCD. La funzione EV (valore di esposizione per la luminosità) consente di
aumentare o diminuire la luminosità premendo i tasti freccia a sinistra e a destra dello schermo LCD.
Quando si esamina un preparato di colore scuro o non trasparente, può essere necessario aumentare l'illuminazione per evidenziare
caratteristiche o dettagli particolari. Il modo migliore per farlo è semplicemente aumentare la luminosità dell’illuminatore ruotando la
manopola della luminosità fino al valore massimo.
Per determinare l’illuminazione ottimale eseguire alcune prove di regolazione, in quanto i preparati differenti, o anche lo stesso preparato
a potenze d'ingrandimento diverse, possono richiedere un’illuminazione diversa.
Figura 5
Visualizzazione di un preparato
Lo strumento dispone di un semplice portaoggetti fisso con delle clip di ritegno che guidano il posizionamento del portavetrino.
1. Posizionare nel portavetrini un vetrino di preparato – di dimensioni 25 mm x 76 mm (1 poll. x 3 poll.). Farlo mettendo delicatamente
il vetrino di preparato sotto le piccole guide presenti sul portavetrini (Figura 6). Quindi spingere completamente il vetrino nella
fessura presente nel portavetrini.
2. Il portavetrini con il vetrino inserito viene messo sul portaoggetti con la freccia presente sul portavetrini rivolta in avanti.
All’interno del portaoggetti (Figure 7 e 8) sono presenti due piccole clip di ritegno sotto le quali va inserito il portavetrini.
3. Spingere il portavetrini all’interno finché non si inizia a vedere il preparato (ricordarsi di iniziare con la potenza più bassa). Si può
esaminare il preparato spostando lentamente avanti e indietro il portavetrini e muovendolo leggermente a sinistra o a destra.
4. Per i vetrini che presentano il preparato spostato su un lato, potrebbe essere impossibile visualizzare l’intero preparato; in questi casi
si può rimuovere il vetrino dal portavetrini, ruotarlo di 180° e riprovare.
4
Page 21

5. Spostare manualmente il portavetrini potrebbe sembrare difficile all’inizio, ma dopo aver fatto un po’ di pratica risulta piuttosto facile.
Figura 6 Figura 7 Figura 8
Una volta che il vetrino sia in posizione, si è pronti a iniziare la visualizzazione impostando la potenza.
6. Usare la manopola della potenza (al centro della Figura 9) per ruotare le lenti
dell’obiettivo finché il punto corrispondente a 4x non risulta allineato all’indicatore –
quando la manopola è posizionata correttamente, si sente uno scatto. Iniziare sempre con
l’obiettivo di potenza più bassa (4x con questo microscopio), che consente una potenza
d'ingrandimento di 24x, e passare successivamente a potenze superiori. Alla potenza 24x
si ottengono il campo visivo più ampio e l’immagine più luminosa.
7. Ruotare il controllo della messa a fuoco (Figura 9) mentre si guarda lo schermo LCD fino
a visualizzare il preparato. Potrebbe essere necessario posizionare il preparato nel vetrino
come indicato sopra, in modo che l’immagine rientri nel campo visivo.
8. Con la lente dell’obiettivo 4x, si può anche variare la potenza d'ingrandimento da 24x a
192x (e tutte le potenze intermedie) con lo zoom digitale del modulo LCD. Usare i tasti
direzionali (Su/Giù) sul modulo LCD per usare lo zoom digitale. Sulla sinistra dello
schermo, un’icona indica su quale impostazione dello zoom digitale ci si trova.
Nota: la funzione dello zoom digitale risulta migliore a 4x.
9. Per
le potenze d'ingrandimento superiori occorre ruotare la manopola della potenza sulla
posizione di obiettivo 10x per una potenza media, o sull’obiettivo 40x per ottenere la
massima potenza. Regolare di nuovo la messa a fuoco quando si cambia la potenza
d'ingrandimento dell’obiettivo. Quando si usano lenti da 10x o 40x, si può anche
aumentare la potenza d'ingrandimento con lo zoom digitale.
Nota: alle massime potenze le immagini potrebbero non essere altrettanto nitide e scure. Le visualizzazioni migliori si
ottengono alle potenze inferiori.
Figura 9
Creazione di immagini digitali
Grazie alla fotocamera/telecamera digitale incorporata nel microscopio è possibile scattare istantanee o effettuare brevi filmati. La
memoria interna del microscopio consente di ottenere immagini senza usare un PC o altri dispositivi. Il trasferimento delle immagini al
PC per il salvataggio o la stampa è facile come descritto dopo in questo manuale.
Nota: se si desidera acquisire immagini, non collegare il cavo USB al PC per evitare danni all’apparecchiatura. Il cavo USB non
serve affatto per l'acquisizione delle immagini!
Impostazioni generali
Prima di impostare i menu per istantanee o filmati, occorre effettuare alcune procedure di impostazione generale. Si possono effettuare le
impostazioni generali dalla modalità Snapshot (Istantanea), da quella Video (Filmato) o da quella Time (Ora); tutte e tre le modalità
hanno icone che appaiono nella parte superiore destra dello schermo LCD. Si passa da una modalità all’altra premendo il tasto Esc.
Si inizia premendo il tasto Menu: nella parte superiore sinistra dello schermo appaiono evidenziate le parole “Capture” (Acquisizione) o
“Video Output” (Produzione di filmato). Si preme quindi il tasto direzionale destro, che mostra evidenziata la parola “Setup”
(Impostazione). Le scelte a disposizione dell’utente sono indicate sotto; si può arrivare a ciascuna scelta usando i tasti direzionali Su/Giù.
1. Format (Formato) –premere OK per sceglierlo, scegliere poi Cancel (Annulla) o Execute (Esegui) e poi premere OK per impostare.
2. Language (Lingua) – premere OK per sceglierlo, scegliere English (inglese), French (francese), German (tedesco), Italian
(italiano), Spanish (spagnolo), Portuguese (portoghese), simplified Chinese (cinese semplificato), traditional Chinese (cinese
tradizionale) o Japanese (giapponese) e poi premere OK per impostare.
3. Date Input (Immissione data) – premere OK per sceglierlo. Scegliere Off (disattivato) o Set (imposta). Se si sceglie Off, premere poi
OK per impostare tale scelta. Se si sceglie “Set” occorre impostare giorno/mese/anno e ora. Per effettuare l’impostazione di data/ora,
fare quanto segue.
A. Usare i tasti Su/Giù per scegliere che cosa si desidera visualizzare per primo: il giorno, il mese o l’anno.
B. Usare quindi i tasti Destra/Sinistra per evidenziare il giorno, il mese, l’anno, l’ora (in formato a 24 ore), i minuti o i
secondi. Ad ogni selezione, si possono usare i tasti Su/Giù per effettuare le scelte e poi premere OK per impostarle.
C. Premere due volte il tasto freccia Sinistra per uscire dal Menu.
D. La data e l’ora saranno indicate nella parte in alto a destra dello schermo se vengono impostate.
Nota: la maggior parte delle i
nella parte inferiore destra dello schermo, che significa che si sta usando la memoria interna. Se si usa una scheda SD
opzionale, l’icona della scheda verrà mostrata nella parte inferiore destra dello schermo.
mpostazioni dovrà essere impostata ogni volta che si accende lo schermo LCD. Si vedrà una “M”
5
Page 22

Per impostare le modalità Snapshot (Istantanea) o Video (filmato), si preme il tasto Esc finché non appare l’icona corretta nella parte
superiore destra dello schermo LCD.
Impostazione per la modalità Snapshot (Istantanea)
Per poter iniziare, l’icona di una fotocamera digitale dovrebbe trovarsi nella parte superiore destra dello schermo LCD. Premere quindi il
tasto Menu.
1. La funzione EV in alto a sinistra sullo schermo LCD (valore di esposizione) mostra il livello di luminosità. Il valore normale è 0,0
e può essere aumentato fino a +2,0 o diminuito fino a –2,0 premendo i tasti freccia Sinistra/Destra. Se viene scelta la posizione
predefinita, la funzione EV non viene mostrata sullo schermo.
2. Nella parte inferiore destra dello schermo viene indicato il numero di istantanee ancora disponibili in base alla memoria interna.
3. In alto a destra sullo schermo è presente un’icona a forma di fotocamera per indicare che il dispositivo è pronto per la modalità
Snapshot (istantanea). La risoluzione impiegata è mostrata nella parte inferiore sinistra dello schermo.
4. Premere i tasti freccia (Su/Giù) per cambiare lo zoom digitale mostrato da un’icona quando si premono i tasti.
5. Premere il tasto Menu per effettuare le scelte seguenti nella sezione evidenziata “Capture” (Acquisizione). Premere i tasti a
freccia Su/Giù per passare da una scelta all’altra e OK per selezionare e impostare la voce.
A. Size (Dimensioni) – serve a impostare la risoluzione che si desidera usare per l’immagine. La fotocamera utilizza un
sensore da 1600 x 1200 pixel (2 MP), ma è possibile effettuare l’interpolazione digitale per aumentare la risoluzione,
oppure si possono usare risoluzioni inferiori per aumentare il numero di immagini che si possono salvare nella memoria
interna del dispositivo. Usare le frecce direzionali per apportare cambiamenti e poi fare clic su “OK” per salvare le
impostazioni.
B. EV – si può cambiare l’impostazione predefinita per il valore di esposizione.
C. Color (Colore) – si può passare da Standard (normale) a Monochrome (bianco e nero), Vivid (brillante) o Sepia
(seppia).
D. Stamp Mode (Modalità ora) – serve ad indicare sulle immagini l’ora soltanto, la data soltanto oppure l’ora e la data
insieme, o nessuna indicazione. Premere OK per impostare la propria scelta.
E. Premere due volte il tasto freccia Sinistra per uscire dal Menu.
Impostazione per la modalità Video (filmato)
Per poter iniziare, l’icona di una telecamera dovrebbe trovarsi nella parte superiore destra dello schermo LCD.
1. Nella parte inferiore sinistra dello schermo viene indicata la risoluzione usata per il filmato.
2. In basso a destra viene indicato il tempo restante nella memoria per acquisire filmati.
3. Premere i tasti freccia (Su/Giù) per cambiare lo zoom digitale, come mostrato da un’icona quando si premono i tasti.
4. Premere il tasto Menu per effettuare le scelte seguenti nella sezione evidenziata “Video Output” (Produzione di filmato). Premere
i tasti a freccia Su/Giù per passare da una scelta all’altra, e OK per selezionare e impostare la voce.
A. Size (Dimensioni) – serve a impostare la risoluzione che si desidera per l’immagine. Bisognerebbe scegliere 800 x 600
pixel. Una risoluzione più bassa (640 x 480 pixel) permette di acquisire filmati più lunghi usando la memoria interna,
ma questa scelta potrebbe non essere compatibile con vari computer. Usare i tasti freccia Su/Giù per fare la propria
scelta, e poi premere OK per impostare.
B. EV – si può cambiare l’impostazione predefinita per il valore di esposizione che si desidera usare.
C. Premere due volte il tasto freccia Sinistra per uscire dal Menu.
Acquisizione di immagini
1. Snapshot (Istantanee) – per scattare foto, assicurarsi di essere nella modalità “snapshot” della fotocamera (icona a forma di
fotocamera in alto a destra sullo schermo) e usare il tasto Snap per acquisire un’immagine. Regolare sulla messa a fuoco più
nitida usando l’apposita manopola di regolazione: è essenziale per ottenere le migliori immagini. Premere il tasto per salvare
l’immagine nella memoria interna. Si possono provare diversi livelli di luminosità e focalizzazione, e presto si sarà in grado di
acquisire buone immagini.
2. Video (filmato) – per acquisire un filmato, assicurarsi di trovarsi nella modalità “video” (l’icona di una telecamera appare nella
parte superiore destra dello schermo). Usare il tasto Snap per avviare il video e per terminarlo. Il tempo trascorso del filmato
viene indicato nella parte inferiore destra dello schermo.
3. Si possono anche acquisire immagini (istantanee o filmati) usando una scheda SD (Secure Digital) (fino a 1 GB). La scheda SD
viene inserita nel monitor LCD (Figura 1). Se la scheda SD è inserita correttamente, nella parte inferiore destra dello schermo
LCD viene visualizzata l’icona relativa. In basso a destra sullo schermo è indicata anche la memoria disponibile nella scheda SD.
In questa modalità di acquisizione delle immagini, le immagini vengono salvate sulla scheda SD e non nella memoria interna.
Nota: se si inserisce o si rimuove la scheda SD mentre lo schermo LCD è acceso si può provocare lo spegnimento dello
schermo e/o danni alla scheda SD. Spegnere sempre lo scherm
o LCD per inserire o rimuovere una scheda SD.
6
Page 23

Visualizzazione e gestione delle immagini
Le istantanee e i filmati salvati nella memoria interna possono essere rivisti e gestiti sullo schermo LCD.
1. Premere il tasto ESC finché non si entra nella modalità Stored Images (immagini memorizzate).
A. Usare i tasti a freccia per selezionare l’immagine che si desidera visualizzare – tutte le immagini (ed i filmati) saranno
numerate.
B. L’immagine selezionata avrà attorno ad essa un bordo giallo; premere il tasto OK per visualizzarla.
C. Quando si esamina un’immagine istantanea, si può usare lo zoom digitale per ingrandirla. Dopo averla visualizzata,
tuttavia, riportare lo zoom digitale sulla posizione di zero. Premere il tasto OK per ritornare alle immagini memorizzate.
D. Quando si esamina un filmato (l’icona della telecamera appare sull’immagine), si può interrompere e riavviare il filmato
premendo il tasto freccia Su. Premere il tasto Giù in qualsiasi momento durante il filmato per riportarlo alla posizione
iniziale. Per i filmati, nella parte superiore destra dello schermo viene mostrata la durata del filmato e, mentre lo si
riproduce, viene mostrato il tempo trascorso dal suo inizio nella parte inferiore centrale dello schermo. Premere il tasto
OK per ritornare alle immagini memorizzate.
E. Premere il tasto ESC per uscire dalla immagini memorizzate e ritornare al tempo reale.
2. Premere il tasto Menu per effettuare come segue la gestione di un'immagine con il bordo giallo.
A. Usando i tasti Su/Giù, si può scegliere fra “Delete” (cancella), “Copy To Card” (copia sulla scheda) o “Protect”
(proteggi).
B. Delete (cancella) – premere OK per fare questa scelta. Con i tasti Su/Giù si può scegliere fra “Single” (che permette di
cancellare il file selezionato premendo OK) e “All” (che permette di cancellare tutti i file in memoria premendo OK) –
se si seleziona “All”, viene richiesto di confermare scegliendo “Execute” (Esegui) o “Cancel” (Annulla). Se non si
vuole cancellare nessun file, premere il tasto a freccia Sinistra per uscire e ritornare alle voci del Menu.
C. Copy To Card (copia sulla scheda) – questo tasto non ha alcuna funzione.
D. Protect (blocca) – premere OK per fare questa scelta. Con i tasti freccia Su/Giù si può scegliere “Single” (che protegge
l’immagine selezionata), “All” (che protegge tutte le immagini in memoria) o “Select” (che riporta l’utente alle
immagini memorizzate). Per qualsiasi immagine bloccata per la sua protezione, appare l’icona di un lucchetto nella
parte inferiore centrale dello schermo. Per “sbloccare” qualsiasi immagine bloccata (o tutte), spegnere lo schermo LCD:
questo elimina la protezione delle immagini.
E. Per uscire dal Menu quando ci si trova al suo interno, si può premere il tasto freccia Sinistra.
Trasferimento delle immagini
Per trasferire immagini ad un PC, occorre disporre di una porta USB libera e di un programma per la creazione di immagini (per
istantanee e/o filmati).
Nota: non
1. È possibile trasferire immagini dalla memoria interna al PC con il cavo Mini USB in dotazione. Inserire l'estremità del cavo con
2. Se le immagini sono memorizzate su una scheda SD, è possibile trasferirle al PC usando il metodo n. 1 indicato sopra oppure
scollegare il cavo USB mentre si trasferiscono le immagini per evitare danni.
la spina piccola nello schermo LCD (Figura 1) e l’estremità con la spina grande nel PC. Il PC riconosce automaticamente il nuovo
hardware. Poi viene chiesto a quale programma, sul PC, si desiderano trasferire le immagini – potrebbe essere necessario
scegliere un programma per le istantanee e un programma diverso per i filmati, a seconda di quali programmi software sono a
propria disposizione sul computer.
inserendo la scheda SD nello slot per schede SD del PC. Indipendentemente dal metodo usato, il PC chiede all’utente il
programma al quale si desidera trasferire le immagini.
Cura, manutenzione e garanzia
Il microscopio Celestron è uno strumento ottico di precisione e va trattato sempre con cura. Seguire questi suggerimenti per la cura e la
manutenzione per assicurare che il microscopio richieda pochissima manutenzione nel corso della sua durata utile.
Quando si termina di usare il microscopio, rimuovere qualsiasi preparato rimasto sul portaoggetti.
Spegnere l’interruttore degli illuminatori.
Spegnere il Monitor LCD.
Scollegare il cavo di alimentazione.
Installare sempre sul microscopio il rivestimento di plastica quando non si utilizza il dispositivo.
Conservare il microscopio in un luogo pulito e asciutto.
Fare molta attenzione se si usa il microscopio alla luce diretta del sole, per evitare danni al microscopio o ai propri occhi.
Quando si sposta il microscopio, trasportarlo con entrambe le mani (se possibile) afferrandolo per la base o per il corpo rotondo.
Pulire le superfici esterne con un panno umido.
Scollegare sempre tutti i cavi prima di eseguire la pulizia.
Non pulire mai le superfici ottiche con salviette di tessuto o di carta, in quanto possono graffiarle facilmente.
Rimuovere la polvere dalle superfici ottiche con una spazzolina di setole di cammello o una bomboletta di aria compressa.
Per eliminare dalle superfici ottiche le impronte digitali, usare un detergente per lenti e salviette per lenti disponibili presso la
maggior
la formazione di striature o graffi.
Non smontare mai né pulire le superfici ottiche interne. Questa operazione va eseguita da tecnici qualificati presso la fabbrica o
presso altre strutture di riparazione autorizzate.
Fare attenzione quando si manipolano vetrini di preparati, in quanto i bordi possono essere taglienti.
parte dei negozi di ottica, e durante la pulizia non strofinare con movimento circolare, in quanto ciò potrebbe causare
7
Page 24

Immagini campione
Le seguenti immagini di preparati, qui sotto da sinistra a destra, sono state acquisite a ingrandimenti 40x, 100x, 400x. Il preparato è
costituito da uno stelo di mais.
Garanzia
Il microscopio è coperto da una garanzia limitata di due anni. Per informazioni dettagliate su tutti i microscopi Celestron,
consultare il sito Web di Celestron all’indirizzo www.celestron.com
CEE: questo prodotto risulta conforme alle linee guida CEE riportate in EN61558-2-6:1997 e EN61558-1:1997+A1
.
Dichiarazione FCC
Questo dispositivo risulta conforme alla Parte 15 delle norme FCC. Il funzionamento è soggetto alle seguenti
due condizioni:
1. Questo dispositivo
2. Questo dispositivo deve accettare qualsiasi interferenza ricevuta, comprese le interferenze che
potrebbero causare un funzionamento indesiderato.
non può causare interferenze dannose, e
RoHS
2835 Columbia St.
Torrance, California 90503 U.S.A.
www.celestron.com
REV 2 112508 Stampato in Cina 01-09
Page 25

ESPAÑOL
MAANNUUAALLDDEEIINNSSTTRRUUCCCCII
M
MMiiccrroossccooppiiooddiiggiittaallccoonnppaannttaallllaaLLCCDD((LLDDMM)
MMooddeellooNNºº444433442
2
ONNEESS
O
)
Page 26

Introducción
Le damos las gracias por la compra de su microscopio digital con monitor de 2 pulgadas LCD (LDM) de Celestron. Este microscopio es un
instrumento óptico de precisión, fabricado con materiales de la más alta calidad para garantizar su larga durabilidad. Está diseñado para
ofrecerle una vida llena de entretenimiento con un mantenimiento mínimo.
Antes de intentar usar su microscopio, lea todas las instrucciones para familiarizarse con las funciones y operaciones a fin de maximizar el
disfrute y uso del mismo. Vea las fotos del microscopio para ubicar las piezas detalladas en este manual.
Este microscopio ofrece una gran potencia, desde 24x hasta 240x (hasta 1920x con el zoom digital). Este microscopio es ideal para examinar
muestras de levadura y hongos, cultivos, plantas y partes de animales, fibras, bacterias, etc.
El microscopio digital con pantalla LCD no utiliza los oculares que usan los microscopios tradicionales. Verá las muestras en la pantalla de
cristal líquido (LCD), lo que hará mas fácil la observación, además de poder hacerlo con otras personas. También puede tomar fotos o vídeos
cortos con la cámara digital integrada.
En la sección final de este manual le ofrecemos sencillos consejos para el mantenimiento y cuidado que debe seguir para garantizar que su
accesorio pueda ofrecerle años de rendimiento, uso y deleite de calidad.
Ranura para la tarjeta SD
Estructura
Botones de funciones
Enchufe del
minicable USB
Mecanismo para
los portaobjetos
de muestras
Base
Monitor LCD
Botón de potencia
Control de enfoque
Figura 1
Accesorios estándar que se incluyen con su microscopio
Cámara digital integrada
Monitor LCD
Objetivo de 4x
Objetivo de 10x 5 portaobjetos muestras preparadas, 10 en blanco
Objetivo de 40x
Iluminador inferior
Portaobjetos
Adaptador de CA
Enchufes de adaptadores de CA – USA/UE/RU
y 10 cubiertas
Ranura de tarjeta SD
Minicable USB
2
Page 27

Especificaciones
para RU
Modelo Nº 44342 Especificaciones
Platina Simple con mecanismo para portaobjetos: 44 x 44 mm (1,7 x 1,7 pulgadas)
Cámara digital 2 MP CMOS; aumento de 6x en lugar de un ocular; 1600x matriz de 1200 píxeles
Monitor LCD
Mecanismo de enfoque Movimiento único, suave
Objetivos Acromáticos 4x, 10x y 40x: vidrio todo óptico
Memoria flash
Cable USB 2,0 Mini: 2 metros de largo
Portaobjetos Acepta portaobjetos de vidrio estándar: 25 x 76 mm (1 x 3 pulgadas)
Botón de potencia Triple con sonido al detenerse
Iluminador Eléctricos incluidos: LED de 6 voltios y 6 vatios
Adaptador de CA Entrada universal de 100 a 240 voltios, 50/60 HZ
Peso y dimensiones 794 g (28 onzas) / 165 mm (6,5 pulg.) x 165 mm (6,5 pulg.) x 215 mm (8,5 pulg.)
2 pulgadas con zoom digital de 8x: Pantalla TFT digital de alta definición
Píxeles 640 x 240
32 MB: aproximadamente de 65 fotos (archivos JPEG) @ resolución 2 MP
o unos minutos de vídeo VGA (archivos AVI)
Tabla de aumento (potencia)
Utilice la siguiente tabla para determinar el poder de aumento de los diferentes objetivos en combinación con su microscopio usando el modo
normal de la imagen digital en la pantalla LCD y el zoom digital.
Objetivo
Imagen digital -- normal
Máximo con función zoom
digital de 8x
4x 10x 40x
24x 60x 240x
192x 480x 1920x
Instalación del microscopio
1. Saque con cuidado el microscopio y las otras piezas del cartón y póngalos en una mesa, en un escritorio u en otra superficie plana.
2. Retire del microscopio la cubierta protectora de plástico.
Enchufe para USA
Enchufe
Figura 2 Figura 3
3. Conecte el cable pequeño del adaptador de CA en la conexión situada en la parte posterior de la base (véase la figura 2 más arriba).
4. Introduzca la clavija del adaptador de CA en la fuente de alimentación adecuada.
Enchufe para Europa
Nota: El adaptador de CA suministrado con este microscopio tiene un sistema conector intercambiable que puede funcionar en
EE.UU.,
de CA. Puede cambiar fácilmente los enchufes para adaptarlos a sus requisitos particulares haciendo lo siguiente:
A. Presione hacia abajo en el pequeño botón etiquetado PUSH (empujar) y manténgalo presionado mientras que sujeta las espigas de
contacto, gire ligeramente hacia la izquierda y tire para quitarlo. A continuación, retire el dedo para soltar el botón PUSH.
B. Elija el estilo de enchufe que desee utilizar y céntrelo sobre el adaptador de CA; a continuación, gírelo hasta que caiga en la
abertura. Gírelo hacia la derecha hasta que le oiga encajar. El enchufe está ahora correctamente instalado.
Reino Unido, Europa y en muchas otras partes del mundo. El enchufe para los EE.UU. se instalará con el adaptador
3
Page 28

Funcionamiento del microscopio
y OK (aceptar)
Antes de mirar las muestras debe retirar la cubierta protectora de la pantalla LCD, encenderla, encender el iluminador y entender cómo se
utiliza el portaobjetos, entonces está listo para comenzar la visualización.
Botón ESC (cambio)
Botón del menú
Luz encendido del monitor
Botones direccionales
Botón de apagado
y encendido
Figura 4
Botón de la
instantánea
Módulo LCD
Este microscopio digital es diferente de los microscopios tradicionales --- en vez de usar oculares para ver una muestra en un microscopio
tradicional, el monitor LCD sustituye los oculares de forma que puede ver la muestra en la pantalla y compartirlas con otras personas. Para
empezar a ver las muestras con su microscopio, tendrá que encender el monitor LCD con el botón de encendido y apagado (véase la figura 4).
Pulse el botón una vez y poco después se encenderá la luz roja LED del monitor, lo que indica que el monitor LCD está “encendido”.
Básicamente, esto es todo lo que necesita hacer para usar la pantalla LCD y ver las muestras. Los diversos botones del módulo LCD se
utilizan principalmente para obtener imágenes (fotos y vídeos) y se discutirán posteriormente en este manual.
Iluminación
1. Para encender el iluminador, vea la Figura 5 a continuación y gire el control hacia la
izquierda.
2. El iluminador se utiliza para las muestras donde la luz pasa por el orificio de la platina a
través del portaobjetos.
3. Gire el control del iluminador hacia el nivel de brillo que se desee al visualizar las
muestras.
Ajuste de la iluminación
Figura 5
Las muestras de diferente tamaño, espesor y variaciones de color requerirán diferentes niveles de iluminación. Hay dos formas de cambiar el
nivel de iluminación cuando examina una muestra: ajustando el brillo con el disco como se mostró anteriormente en la figura 5 y cambiando
la función VE en el monitor LCD. La función VE (valor de exposición del brillo) aumenta o disminuye el nivel del brillo usando los botones
indicando hacia la izquierda y derecha en el monitor LCD.
Cuando examine una muestra que no es transparente o tenga un color oscuro, quizás necesite aumentar la cantidad de luz para poder ver
determinadas características o detalles. Esto puede realizarse mejor aumentando simplemente el brillo del iluminador al girar el disco de
control del brillo hasta su ajuste máximo.
La iluminación óptima se obtendrá experimentando con los ajustes ya que cada muestra podría requerir un nivel de iluminación ligeramente
diferente así como las mismas muestras cuando se ven bajo diferentes aumentos.
Visualización de una muestra
Su instrumento viene con una simple platina fija con pinzas de sujeción para guiar el posicionamiento del portaobjetos.
1. Coloque una muestra de 25 x 76 mm en el portaobjetos. Haga esto colocando suavemente la platina portaespecimen debajo de las
pequeñas guías del portaobjetos (Figura 6). A continuación, empuje la platina hasta el final de la ranura en el portaobjetos.
2. El portaobjetos con la muestra insertada se colocará en la platina con la flecha del portaobjetos apuntando hacia adelante.
Dentro de la platina (Figuras 7 y 8) hay dos pequeñas pinzas de sujeción y debajo de las mismas es donde hay que introducir el
portaobjetos.
3. Empuje el portaobjetos hacia adentro hasta que comience a ver la muestra (recuerde comenzar en la potencia más baja). Puede
examinar el especimen moviendo el portaobjetos hacia adelante y hacia atrás, y ligeramente hacia la izquierda o derecha.
4. En las platinas que tienen la muestra hacia un lado, quizás no pueda ver todo el espécimen y en estos casos puede entonces retirar la
platina del portaobjetos, girarla 180º y comenzar de nuevo.
4
Page 29

5. Quizás parezca difícil al principio mover manualmente el portaobjetos, pero después de practicar unas cuantas veces se podrá utilizar
muy fácilmente.
Figura 6 Figura 7 Figura 8
Una vez esté la platina en su lugar ya podrá iniciar su visualización al establecer la potencia.
6. Utilice el botón de potencia (en el centro de la Figura 9) para girar el objetivo hasta que el
punto 4x esté alineado cerca del indicador; hará clic al posicionarlo correctamente. Comience
siempre con el objetivo de menor aumento (4x con este microscopio) lo que le da una
potencia de 24 y vaya avanzando hasta los objetivos de mayor aumento. Con un aumento de
24, tendrá el campo de visión más amplio y la imagen más brillante.
7. Mire la pantalla LCD mientras gira el mando de enfoque (Figura 9) hasta que pueda ver la
muestra. Quizás necesite situar la muestra de la forma indicada anteriormente para que la
imagen esté en el campo visual.
8. Con el objetivo 4x, también puede variar la potencia de 24x a 192x usando el zoom digital
del módulo LCD. Utilice los botones direccionales (arriba/abajo) en el módulo LCD para
utilizar el zoom digital. A la izquierda de la pantalla habrá un icono que indica la
configuración del zoom digital en que se encuentra. Nota: El zoom digital es mejor hasta 4x.
9. Para
un aumento mayor, tendrá que girar el botón de potencia hasta la posición del objetivo
10x para obtener una potencia media y hasta 40x para la máxima. Tendrá que volver a
enfocar cuando cambie de objetivo. Cuando use cualquiera de las lentes 10x o 40x, también
podrá aumentar la potencia con el zoom digital.
Nota: A potencias máximas las imágenes podrían ser menos nítidas y oscuras. La mejor visualización será en las potencias más
bajas.
Figura 9
Imagen digital
Puede tomar fotos o grabar vídeos cortos con su microscopio utilizando la cámara digital integrada en el mismo. Con la memoria interna, no
necesita un PC ni ningún otro dispositivo para obtener la imagen. La transferencia de las imágenes a su PC para guardarlas o imprimirlas es
fácil y se discutirá posteriormente en este manual.
Nota: Si va a obtener imágenes, no conecte el cable USB a su PC o podría dañarse el equipo. El cable USB no se usa nunca para
obtener imágenes.
Configuración general
Antes de establecer los menús de fotos y vídeo tendrá que establecer primero algunas configuraciones generales. Puede entrar en la
configuración general desde el modo Snapshot (Foto), Video o Time (Hora) (los tres con iconos que se muestran en la parte superior derecha
de la pantalla LCD). Puede navegar los diferentes modos pulsando el botón Esc.
Puede comenzar pulsando el botón Menu (Menú) y este tendrá “Capture” (Captura) o “Video Output” (Salida de vídeo) resaltado en la parte
superior
(Configurar). Sus opciones se encuentran a continuación y puede navegar hacia cada una utilizando las teclas indicando hacia arriba o abajo.
Nota: La
izquierda de la pantalla. A continuación, pulse el botón indicando a la derecha y se mostrará entonces resaltada la opción “Setup”
mat (Formato): pulse OK (Aceptar) para entrar, elija Cancel (Cancelar) o Execute (Ejecutar) y a continuación pulse OK para
1. For
establecerlo.
2. Language (Idioma): pulse OK (Aceptar) para entrar, elija English (Inglés), French (Francés), German (Alemán), Italian (Italiano),
Spanish (Español), Portuguese (Portugués), Simplified Chinese (Chino simplificado), Traditional Chinese (Chino tradicional) o
Japanese (Japonés) y después pulse OK para establecerlo.
3. Date Input (Entrada de fecha): pulsar OK para establecerla. Elegir Off (Quitar) o Set (Establecer). Si elige Off (Quitar), pulse OK a
continuación para establecerlo. Si elige “Set” (Establecer) podrá introducir el día/mes/año y la hora. Para establecer la fecha y hora:
A. Utilice los botones indicando hacia arriba y abajo para hacer su elección de lo que mostrar primero: día, mes o año.
B. A continuación, utilice los botones indicando hacia la derecha o izquierda para resaltar el día, mes, año, la hora (en formato
de 24 horas), los minutos o segundos. En cada selección, utilice los botones indicando hacia arriba o abajo para hacer su
elección y pulse OK para establecer sus selecciones.
C. Pulse el botón indicando hacia la izquierda dos veces para salir del menú.
D. La fecha y hora se mostrarán en la parte superior derecha de la pantalla si así lo establece (Set).
mayoría de los valores de configuración deberán establecerse cada vez que enciende la pantalla LCD. Verá una “M” en
la parte inferior derecha de la pantalla, lo cual significa que está utilizando la memoria interna. Si utiliza una tarjeta SD
opcional, entonces el icono de dicha tarjeta aparecerá en la parte inferior derecha de la pantalla.
5
Page 30

Para establecer los modos Snapshot (Foto) o Video, pulse el botón Esc hasta que el icono correcto esté en la parte superior derecha de la
pantalla LCD.
Establecer el modo Snapshot (Foto)
El icono de una cámara digital deberá estar en la parte superior derecha de la pantalla LCD para comenzar. Después, pulse el botón Menu.
1. En la parte superior izquierda de la pantalla LCD está el Valor de exposición (VE) que muestra el nivel de brillo. La posición
normal (predeterminada) es 0.0 y puede ajustarse en incrementos de hasta +2.0 a -2.0 pulsando los botones que indican hacia la
izquierda o la derecha. Si se elige la posición predeterminada, entonces la VE no aparecerá en la pantalla.
2. En la parte inferior derecha de la pantalla se muestran las fotos restantes disponibles para tomar de la memoria interna.
3. En la parte superior izquierda de la pantalla se muestra el icono de una cámara que indica que está lista para el modo de obtención
de fotos. La resolución que se está utilizando se muestra en la parte inferior izquierda de la pantalla.
4. Al pulsar los botones que indican arriba y abajo, puede cambiar el zoom digital mostrado por el icono.
5. Pulse la tecla Menu para realizar las siguientes elecciones en la sección resaltada de “Capture” (Captura). Pulse los botones que
indican arriba y abajo para cambiar de elección y OK (Aceptar) para entrar y establecer el eleme
A. Size (Tamaño): esto ajusta la resolución que desee utilizar para la imagen. La cámara en sí usa un sensor de disposición de
1600 x 1200 píxeles (2 MP) pero puede usar la interpolación digital para aumentar la resolución o puede bajar la resolución
para aumentar el número de imágenes que puede guardar en su memoria interna. Utilice los botones de direcciones para
realizar los cambios y después haga clic en “OK” (Aceptar) para guardar su configuración.
B. EV (Valor de exposición o VE): puede cambiar la configuración predeterminada por el valor de exposición.
C. Color: puede cambiar de Standard (Normal) a Monochrome (Negro y blando), Vivid (Color vivo) o Sepia.
D. Stamp Mode (Modo estampación): si desea tener sólo la hora, sólo la fecha o la hora y la fecha estampados en sus
imágenes, puede seleccionar cualquiera de estas opciones o ninguna estampación. Pulse OK para establecer su elección.
E. Pulse el botón indicando hacia la izquierda dos veces para salir del menú.
nto.
Establecer el modo Video
El icono de una cámara de vídeo deberá estar en la parte superior derecha de la pantalla LCD para comenzar.
1. En la parte inferior izquierda de la pantalla se muestra la resolución para tomar vídeos.
2. En la parte inferior derecha se indica el tiempo que queda en la memoria para tomar vídeos.
3. Al pulsar los botones que indican arriba y abajo, puede cambiar el zoom digital mostrado por el icono.
4. Pulse la tecla Menu para realizar las siguientes elecciones en la sección resaltada de “Video Output” (Salida de vídeo). Pulse los
botones que indican arriba y abajo para cambiar de
A. Size (Tamaño): esto ajusta la resolución que desee utilizar para la imagen. Debe elegir 800 x 600 píxeles. Una resolución
más baja (240 x 480 píxeles) le permite tomar vídeos más largos utilizando la memoria interna pero podría ser incompatible
con algunos ordenadores. Utilice los botones indicando hacia arriba y abajo para seleccionar y después pulse OK (Aceptar)
para establecerlo.
B. EV (Valor de exposición o VE): puede cambiar la configuración predeterminada por el valor de exposición que desee utilizar.
C. Pulse el botón indicando hacia la izquierda dos veces para salir del menú.
elección y OK (Aceptar) para entrar y establecer el elemento.
Obtención de imágenes
1. Fotos: para tomar fotos, asegúrese de que está en el modo de fotos (el icono de la cámara aparece en la parte superior derecha de la
pantalla) y utilice el botón Snap (Instantánea). Ajuste al enfoque más nítido utilizando el control de enfoque, ya que esto es
fundamental para obtener las mejores imágenes posibles. Pulse el botón cuando esté listo y la imagen se guardará en la memoria
interna. Pruebe las diferentes opciones de enfoque y los diferentes niveles de brillo, y en unos minutos podrá tomar buenas
imágenes.
2. Vídeo: para tomar un vídeo asegúrese de que está en el modo vídeo (icono de cámara de vídeo o película en la parte superior
derecha de la pantalla). Use la tecla Snap para comenzar a grabar el vídeo y también para finalizarlo. El tiempo transcurrido del
vídeo se muestra en la parte inferior derecha de la pantalla.
3. También puede obtener imágenes (fotos o vídeo) usando una tarjeta SD (Secure Digital) (hasta de 1 GB). Su tarjeta SD se
introduce en el monitor LCD (Figura 1). Cuando introduce correctamente la tarjeta SD, el icono de la misma aparecerá en la parte
inferior derecha de la pantalla LCD. En la parte inferior derecha de la pantalla se mostrará también la memoria disponible en la
tarjeta SD. Cuando se obtienen de este modo las imágenes, éstas se guardan en la tarjeta SD y no en la memoria interna.
Nota: la inserción o extracción de una tarjeta SD mientras la pantalla LCD está encendida puede causar el apagado de la
pantalla LCD y/o podría dañarse la tarjeta SD. Siempre apague la pantalla LCD para insertar o
extraer una tarjeta SD.
Revisión y gestión de las imágenes
Puede revisar y gestionar sus fotos y vídeos en el monitor LCD que se guardaron en la memoria interna.
1. Pulse el botón ESC hasta que introduzca en el modo Stored Images (Imágenes almacenadas).
A. Utilice los botones direccionales para seleccionar la imagen que desee ver; todas las imágenes (y vídeos) estarán numeradas.
B. La imagen seleccionada tendrá un borde amarillo alrededor; pulse el botón OK (Aceptar) para ver esta imagen.
C. Al visualizar una imagen de foto, puede utilizar el zoom digital para agrandarla. Pero al terminar su visualización de la
imagen, vuelva el zoom digital a la posición cero. Pulse la tecla OK (Aceptar) para volver a las imágenes almacenadas.
6
Page 31

D. Al revisar una imagen de vídeo (el icono de la cámara de vídeo o película aparecerá en la pantalla), puede detener e iniciar
el vídeo pulsando el botón indicando hacia arriba. Pulse el botón indicando hacia abajo en cualquier momento durante el
vídeo para volver a la posición de inicio. Para los vídeos, en la parte superior derecha de la pantalla se muestra en la parte
inferior central de la pantalla el tiempo del vídeo y mientras que se reproduce el mismo se muestra el tiempo transcurrido.
Pulse la tecla OK (Aceptar) para volver a las imágenes almacenadas.
E. Pulse el botón ESC para salir de las imágenes almacenadas y volver a la hora real.
2. Cuando tenga una imagen rodeada por un borde amarillo, puede gestionarla pulsando el botón Menu (Menú):
A. Al utilizar los botones indicando hacia arriba y abajo, tiene la opción de “Delete” (Borrar), “Copy To Card” (Copiar a la
tarjeta) o “Protect” (Proteger).
B. Delete (Borrar): pulse OK (Aceptar) para introducir esta selección. Con los botones indicando arriba y abajo puede elegir
“Single” (Uno) que le permite borrar el archivo seleccionado al pulsar OK (Aceptar) y “All” (Todos) para borrar todos los
archivos en la memoria al pulsar OK (Aceptar); si elige “All”, se le pedirá que confirme su selección eligiendo “Execute”
(Ejecutar) o “Cancel” (Cancelar). Si no desea borrar ningún archivo, pulse el botón indicando a la izquierda para salir de
nuevo a los elementos del menú.
C. Copiar a la tarjeta: esto no tiene función.
D. Protect (Proteger) (Bloquear): pulse OK (Aceptar) para introducir esta selección. Con los botones indicando arriba o abajo
puede seleccionar “Single” (Uno) que protege la imagen seleccionada, “All” (Todos) que protege todas las imágenes de la
memoria o “Select” (Seleccionar) para volver a las imágenes almacenadas. En las imágenes que estén protegidas, aparecerá
un icono de un candado en la parte inferior central de la pantalla. Para “Unlock” (Desbloquear) cualquier imagen o todas,
apague la pantalla LCD y ninguna imagen será protegida.
E. Desde el Menú puede pulsar el botón indicando hacia la izquierda para salir del mismo.
Transferencia de imágenes
Para transferir imágenes a un PC o MAC, necesita tener un puerto USB libre y un programa (o programas) para imágenes de fotos y vídeos.
Nota: No
desconecte el cable USB mientras está transfiriendo las imágenes o se podrían producir daños.
1. Puede
2. Si usó una tarjeta SD para almacenar sus imágenes, puede transferirlas a su PC usando el primer método o puede extraer la tarjeta
transferir imágenes desde la memoria interna a su PC utilizando el mini-cable USB suministrado. La pequeña clavija del
cable se conecta al monitor LCD (Figura 1) y la grande del mismo se conecta a su PC Su PC reconocerá automáticamente el nuevo
Hardware. A continuación, se le pedirá que elija el programa en su PC al que desee transferir las imágenes; quizás tenga que elegir
un programa diferente para fotos y otro para vídeos según los programas de software que tenga instalados en su ordenador.
SD y usar la ranura para la tarjeta SD de su PC para transferir las imágenes. De cualquier forma, su PC le pedirá que seleccione el
programa al que desea transferir las imágenes.
Cuidado, mantenimiento y garantía
Su microscopio Celestron es un instrumento óptico de precisión y debe tratarse siempre con cuidado. Siga estas sugerencias de cuidado y
mantenimiento y su microscopio necesitará muy poco mantenimiento durante toda su vida útil.
Cuando haya terminado de usar el microscopio, retire todas las muestras que hayan quedado en la platina.
Apague el interruptor del iluminador.
Apague el monitor LCD.
Desenchufe el cable de alimentación.
Coloque siempre la bolsa de plástico sobre el microscopio cuando no lo esté usando o cuando vaya a guardarlo.
Guarde el microscopio en un lugar limpio y seco.
Tenga mucho cuidado si usa el microscopio bajo la luz directa del sol para evitar daños en el microscopio o en los ojos.
Al mover su microscopio, sujételo con ambas manos (si es posible) por la base o la estructura redonda.
Limpie las superficies exteriores con un paño húmedo.
Desenchufe siempre todos los cables antes de limpiar el microscopio.
Nunca limpie las superficies ópticas con un paño ni con toallitas de papel ya que pueden rayar fácilmente las superficies ópticas.
Retire el polvo de las superficies ópticas con un cepillo de pelo de camello o un soplador de aire.
Para limpiar las huellas de las superficies ópticas, use un limpiador de lentes y tejido para limpiar las lentes, que podrá encontrar en
la mayoría de las tiendas de fotografía y
Nunca desmonte ni limpie las superficies ópticas internas. Esto debe ser realizado por técnicos calificados en la fábrica u otros
centros de reparación autorizados.
Cuando manipule los portaobjetos de vidrio, tenga cuidado porque los bordes pueden ser afilados.
cuando limpie estas superficies no frote en círculo ya que esto podría causar ralladuras.
7
Page 32

Imágenes de muestras
Las siguientes imágenes de muestras (de izquierda a derecha) se tomaron de un tallo de maíz C.S. con los objetivos de 40x, 100x y 400x
respectivamente.
Garantía
Su microscopio tiene una garantía limitada de dos años. Consulte la información detallada de todos los microscopios
Celestron en el sitio Web de Celestron www.celestron.com
CEE: este producto cumple con la normativa EN61558-2-6:1997 y EN61558-1:1997+A1 de la CEE.
.
Declaración FCC
Este dispositivo cumple con la parte 15 de la normativa FCC. Su funcionamiento está sujeto a las siguientes
dos condicio
1. Este dispositivo no puede causar interferencias perjudiciales, y
2. Este dispositivo debe aceptar todas las interferencias recibidas, incluyendo las interferencias que podrían
causar un funcionamiento no deseado.
nes:
RoHS
2835 Columbia St.
Torrance, California 90503 EE.UU.
www.celestron.com
REV 2 112508 Impreso en China 01-09
Page 33

FRANÇAIS
GUUIIDDEEDDEELL’’UUTTIILLIISSAATTEEUURR
G
MMiiccrroossccooppeennuumméérriiqquueeààmmoonniitteeuurrLLCCDD((LLDDMM)
MMooddèèlleenn°°444433442
2
)
Page 34

Introduction
Nous vous remercions d'avoir fait l'acquisition d'un microscope numérique LCD Celestron (LDM) avec moniteur de 2 po. Votre microscope
est un instrument de précision optique fabriqué à partir de matériaux de la meilleure qualité pour lui assurer une grande durabilité et
longévité. Il est conçu pour vous donner une vie entière de satisfaction avec un entretien minimum.
Avant de tenter d’utiliser votre microscope, veuillez lire attentivement le mode d’emploi afin de vous familiariser avec ses différentes
fonctions et son mode opérationnel et d’en profiter ainsi pleinement. Reportez-vous aux photos du microscope pour repérer les différentes
pièces dont il est question dans ce manuel.
Ce microscope offre des puissances de grossissement allant de 24x à 240x (et jusqu’à 1920x avec le zoom numérique). Ce microscope
convient parfaitement à l’observation d’échantillons de levures et de moisissures, de cultures, d’éléments végétaux et animaux, ainsi que de
fibres, bactéries et autres placés sur des lames porte-objets.
Le microscope numérique à moniteur LCD ne fonctionne avec aucun des oculaires habituellement utilisés sur les microscopes traditionnels.
Vous afficherez des échantillons sur l’écran LCD afin de les observer sans difficulté et tout en en faisant profiter d’autres personnes. Vous
pourrez également prendre des clichés ou réaliser de courtes vidéos grâce à l’appareil photo intégré.
La dernière partie de ce manuel offre des conseils de nettoyage et d'entretien faciles à suivre pour augmenter la qualité de la performance de
votre microscope et l’utiliser avec satisfaction pendant des années.
Prise pour carte SD
Corps
Touches de fonction
Prise pour mini
câble USB
Mécanisme pour
lame porte-objets
Socle
Ėcran LCD
Bouton de mise
en marche
Bouton de mise au
Figure 1
Accessoires standard livrés avec votre microscope
Appareil photo numérique – intégré
Moniteur LCD
Objectif 4x
Objectif 10x
Objectif 40x
Illuminateur inférieur
Pince valet
Adaptateur c.a.
Prises adaptatrices c.a. – USA/U.E./R.U.
5 lames porte-objets préparées, 10 lames
porte-objets vierges, et 10 couvre-objets
Fente de carte SD
Mini câble USB
2
Page 35
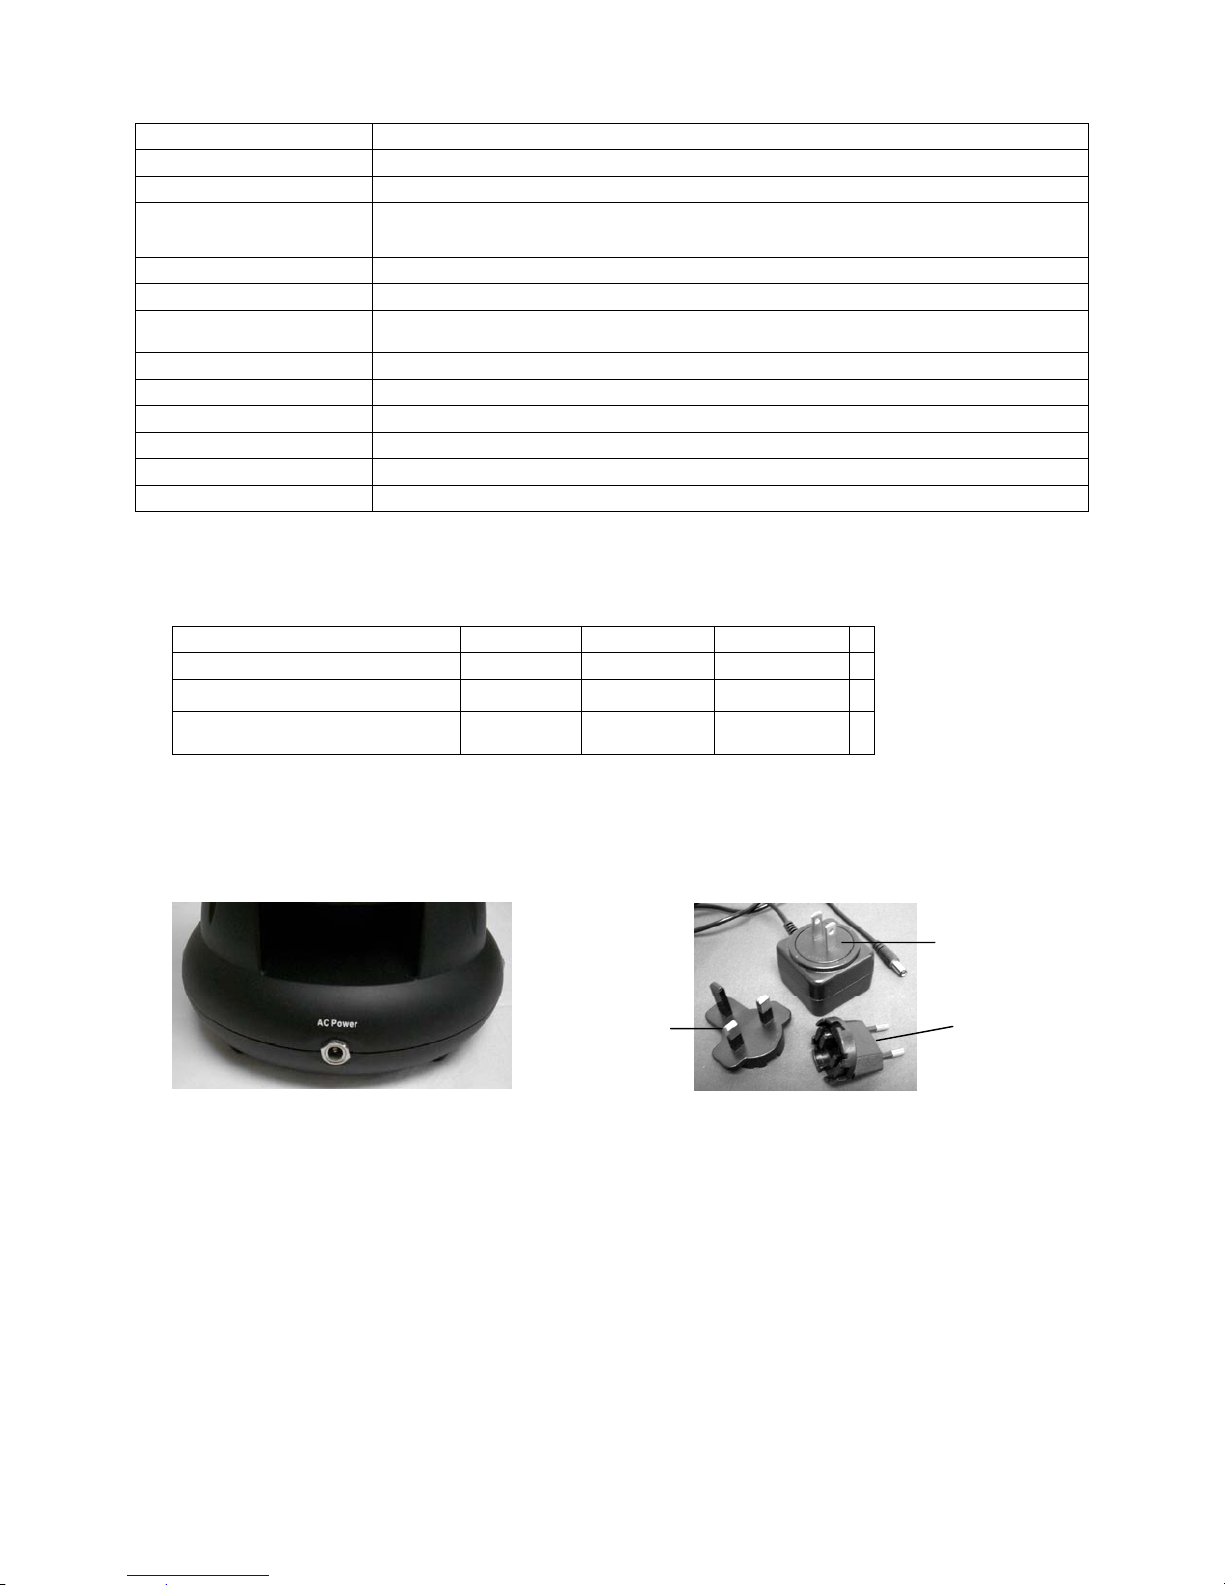
Spécifications
Modèle n° 44342 Spécifications
Platine Simple avec mécanisme de pince valet – 44 mm x 44 mm (1,7 po x 1,7 po)
Appareil photo numérique 2MP CMOS ; grossissement 6x à la place d’un oculaire ; matrice de pixels 1600 x 1200
Moniteur LCD
Dispositif de mise au point Mouvement unique régulier
Objectifs Achromatique 4x, 10x et 40x – tous les éléments optiques sont en verre
Mémoire Flash
Câble USB 2,0 Mini – longueur 2 m (6,5 pi)
Pince valet Pour lamelles en verre 25 mm x 76 mm (1 po x 3 po)
Bouton de mise en marche Triple avec butée à déclic
Illuminateur Électrique intégré – LED 6 volts et 6 watts
Adaptateur c.a. Entrée – Universel 100 à 240 volts 50/60Hz
Poids/dimensions 794 g (28 oz) / 165 mm (6,5 po) x 165 mm (6,5 po) x 215 mm (8,5 po)
50,8 mm (2 po) avec zoom numérique 8x – Affichage numérique TFT haute définition
640 x 240 pixels
32Mo – environ 65 clichés (fichiers JPEG) à une résolution de 2MP
ou quelques minutes de vidéo VGA (fichiers AVI)
Tableau des grossissements (puissance)
Utilisez le tableau ci-dessous pour déterminer le grossissement des différents objectifs en combinaison avec votre microscope en utilisant le
mode normal de l’image numérique sur l’écran LCD et à l'aide de la fonction zoom numérique.
Objectif
Image numérique – normale
Maximum avec fonction zoom
numérique 8x
4x 10x 40x
24x 60x 240x
192x 480x 1920x
Installation de votre microscope
1. Retirez délicatement le microscope et les autres pièces du carton et installez-les sur une table, un bureau ou toute autre surface
plane.
2. Retirez la housse plastique protégeant le microscope.
Prise des États-Unis
Prise du R-U
Figure 2 Figure 3
3. Branchez le petit câble de l'adaptateur c.a. dans la prise située au dos du socle (voir Figure 2 ci-dessus).
4. Insérez la prise de l’adaptateur c.a. dans une source d’alimentation électrique appropriée.
Prise Européenne
Remarque : L’adaptateur c.a. fourni avec ce microscope est doté d’un système de prises interchangeables qui permet de l’utiliser aux
États-Unis, au Ro
adaptée au format américain dans l’adaptateur c.a. Vous pouvez changer facilement de prise selon vos besoins en
procédant comme suit :
A. Appuyez sur le petit bouton accompagné de la mention « PUSH » (APPUYER) et maintenez-le enfoncé tout en maintenant les
broches de la prise. Tournez ensuite légèrement dans le sens inverse des aiguilles d’une montre, puis tirez sur la prise pour la
retirer. Retirez ensuite le doigt qui maintenait le bouton « PUSH » (APPUYER) enfoncé.
B. Prenez alors le format de prise voulu et centrez la prise sur l’adaptateur c.a., puis tournez jusqu’à ce qu’elle s’insère dans
l’ouverture. Tournez-la ensuite dans le sens des aiguilles d’une montre jusqu’au déclic. La prise est alors correctement installée.
yaume-Uni, en Europe, ainsi que dans de nombreux autres pays. Le microscope est livré avec une prise
3
Page 36

Fonctionnement du microscope
Avant d’observer des lames d’échantillons, vous devez retirer le cache protecteur de l’écran LCD, allumer l’écran, allumer l’illuminateur, et
comprendre comment utiliser la pince valet afin de pouvoir commencer.
Touche ESC (échap.)
Touche Menu
LED de mise en
Touches
Bouton marche/arrêt
Touche Snap
(Prise de vue)
Figure 4
Module LCD
Ce microscope numérique est différent des microscopes traditionnels—alors que ces derniers utilisent des oculaires pour l’observation des
échantillons, le moniteur LCD vous permet de les regarder directement à l’écran ou d'en faire profiter d'autres personnes. Pour commencer à
observer des échantillons avec votre microscope, allumez le moniteur LCD en appuyant sur le bouton de mise en marche «ON » (voir Figure 4).
Appuyez une fois sur le bouton. Peu après, le voyant LED de mise en marche du moniteur (de couleur rouge) s'allume pour indiquer que le
moniteur LCD est sous tension. C’est pratiquement tout ce dont vous avez besoin pour utiliser l'écran LCD afin d’examiner des échantillons.
Les différentes touches du module LCD servent essentiellement à prendre des photos (clichés et vidéo) et seront expliquées plus loin dans de
manuel.
Éclairage
1. Pour allumer l'illuminateur, reportez-vous à la Figure 5 ci-dessous et tournez la molette de
commande vers la gauche.
2. L’illuminateur permet d’examiner les lames porte-objets en les éclairant à travers l’orifice
de la platine.
3. Tournez la molette de l’illuminateur sur le niveau de luminosité souhaité pour observer des
échantillons.
Réglage de l’éclairage
L’éclairage des échantillons doit être adapté à leur taille, leur épaisseur, et leurs variations de couleur. Il existe deux façons de changer le
degré d’illumination lorsque l’on observe un échantillon ; en ajustant l'intensité avec la molette illustrée ci-dessus en Figure 5 ou en
modifiant la fonction EV (Valeur d’exposition) sur le moniteur LCD. La fonction EV (Valeur d’exposition pour la luminosité) permet
d’augmenter ou de diminuer le taux d’intensité lumineuse au moyen des touches fléchées Gauche ou Droite du moniteur LCD.
Pour observer un échantillon qui manque de transparence ou qui est sombre, il peut être nécessaire d’augmenter l’intensité lumineuse pour
faire ressortir certaines caractéristiques ou certains détails. Le moyen le plus facile d’y parvenir consiste simplement à augmenter l’intensité
de l’illuminateur en tournant à fond la molette de commande d’intensité lumineuse sur son réglage le plus élevé.
Pour obtenir un éclairage optimum, il est nécessaire d’expérimenter avec les différents réglages étant donné que chaque échantillon peut
nécessiter un éclairage légèrement différent tout comme un même échantillon examiné sous différents grossissements.
Figure 5
Observation d’un échantillon
Votre instrument est équipé d’une simple platine fixe dotée de fixations pour guider le positionnement de la pince valet.
1. Placez une lame porte-objets – 25 mm x 76 mm (1 po x 3 po) dans la pince valet. Pour cela, introduisez délicatement la lame porteobjets dans les petits guides de la pince valet (Figure 6). Ensuite, enfoncez la lame à fond dans la partie découpée de la pince valet.
2. La pince valet ainsi que la lame insérée seront ensuite placées sur la platine, flèche de la pince valet orientée sur l’avant.
À l’intérieur de la platine (Figures 7 et 8), introduire la pince valet dans les deux petites fixations.
3. Enfoncez la pince valet jusqu’à ce que vous puissiez apercevoir l’échantillon (n’oubliez pas de commencer par le grossissement le plus faible).
Vous pouvez examiner l'échantillon en déplaçant la pince valet lentement d’avant en arrière et en la bougeant légèrement à gauche ou à droite.
4
Page 37

4. Pour les lames sur lesquelles l’échantillon est de côté, il se peut que l’échantillon ne soit pas totalement visible, auquel cas il vous faudra
retirer la lame de la pince valet, tourner la lame sur 180° et recommencer.
5. Il peut sembler difficile au début de déplacer manuellement la pince valet, mais avec un peu de pratique, vous y parviendrez sans
difficulté.
Figure 6 Figure 7 Figure 8
Une fois que l’échantillon est en place, vous pourrez commencer à observer en réglant la puissance.
6. Utilisez le bouton de commande (au centre de la Figure 9) pour tourner l’objectif jusqu’à
ce que le point 4x soit aligné près de l’indicateur – vous entendrez un déclic une fois
parfaitement positionné. Commencez toujours avec l’objectif de plus faible puissance (4x
avec ce microscope) qui vous donne un grossissement de 24 et passez progressivement à
des puissances supérieures. Avec un grossissement de 24, vous disposez du champ de
vision le plus important et de l’image la plus lumineuse.
7. Regardez l’écran LCD en tournant le bouton de mise au point (Figure 9) jusqu’à ce que
l’échantillon soit visible. Il peut être nécessaire de positionner la lame porte-objets
comme expliqué ci-dessus afin que l’image apparaisse dans le champ de vision.
8. Avec l’objectif 4x, vous pouvez également varier le grossissement de 24x à 192x en
utilisant le zoom numérique du module LCD. Utilisez les touches directionnelles (Vers
le haut/Vers le bas) du module LCD pour vous servir du zoom numérique. Sur la gauche
de l’écran, une icône indique le réglage actuel du zoom numérique. Remarque : Le zoom
numérique donne un résultat optimal jusqu
’à un grossissement de 4x.
9. Pour des grossissements plus importants, il est nécessaire de tourner le bouton de
commande sur la position d’objectif 10x pour un grossissement moyen et sur l’objectif
Figure 9
40x pour un grossissement maximum. Il faudra refaire une mise au point si vous changez
de puissance d’objectif. Lorsque vous utilisez l’un des objectifs 10x ou 40x, vous pouvez également augmenter le grossissement à
l’aide du zoom numérique.
Remarque : Si l’on utilise des grossissements plus élevés, les images risquent de manquer de netteté et de contraste. Pour de
meilleures observations, préférez des grossissements moins importants.
Imagerie numérique
L’appareil photo numérique intégré vous permet de prendre des clichés ou faire des mini-vidéos. Grâce à sa mémoire de stockage interne,
vous n’avez nul besoin de PC ou d’autres dispositifs pour l’imagerie. Le transfert des images sur votre PC pour les enregistrer ou les
imprimer est une procédure simple et facile qui sera abordée plus loin dans ce manuel.
Remarque : Si vous décidez de prendre des photos, ne branchez pas le câble USB sur votre PC pour ne pas risquer d’endommager
votre matériel. Le câble USB n’est jamais utilisé pour faire des photos !
Réglages généraux
Avant de configurer les menus prise de vue ou vidéo, il est nécessaire de procéder à certains réglages préalables. Vous pouvez accéder à ces
réglages à partir du mode Cliché, Vidéo ou Heure (ces trois icônes s’affichent dans l’angle supérieur droit de l’écran LCD. Vous pouvez
passer d’un mode à l’autre en appuyant sur la touche Esc (échap).
Commencez par appuyer sur la touche Menu afin de mettre « Capture » ou « Video Output » (Sortie vidéo) en surbrillance dans l’angle
supérieur gauche de l’écran. Appuyez ensuite sur la touche directionnelle droite pour mettre « Setup » (Configurer) en surbrillance. Vos
choix sont indiqués ci-dessous et vous pouvez naviguer d’une sélection à l’autre à l’aide des touches Vers le haut/Vers le bas.
1. Format – appuyez sur OK pour accéder à cette fonctionnalité, choisissez Cancel (Annuler) ou Execute (Exécuter), puis validez en
appuyant sur OK.
2. Language (Langue) – appuyez sur OK pour accéder à cette fonctionnalité, choisissez English (Anglais), French (Français), German
(Allemand), Italian (Italien), Spanish (Espagnol), Portuguese (Portugais), simplified Chinese (Chinois simplifié), traditional
Chinese (Chinois traditionnel), ou Japanese (Japonais) puis valider en appuyant sur OK.
3. Date Input (Saisie de la date) – appuyez sur OK pour accéder à cette fonctionnalité. Choisissez Off (Désactiver) ou Set (Régler).
Si vous choisissez « Off » (Désactiver), appuyez ensuite sur OK pour valider votre sélection. Si vous sélectionnez « Set » (Régler),
vous pourrez régler les fonctions Jour/Mois/Année et heure. Pour effectuer les réglages date/heure :
A. Utilisez les touches Vers le haut/Vers le bas pour choisir ce que vous voulez afficher en premier : jour, mois ou année.
B. Utilisez ensuite les touches Gauche/Droite pour mettre en surbrillance le jour, le mois, l’année, l’heure (format 24
heures), les minutes et les secondes. Pour chaque sélection, utilisez les touches Vers le haut/Vers le bas pour effectuer
vos choix, puis appuyez sur OK pour les valider.
C. Appuyez sur la touche Gauche deux fois pour quitter le menu.
D. La date et l’heure apparaîtront dans l’angle supérieur droit de l’écran si vous les réglez.
5
Page 38

Remarque : La plupart des réglages devront être refaits chaque fois que vous allumez l’écran LCD. Lorsque vous voyez un « M »
s’afficher dans l’angle inférieur droit de l’écran, cela signifie que vous utilisez de la mémoire interne. Si vous utilisez
une carte SD optionnelle, l’icône de la carte SD apparaîtra alors dans l’angle inférieur droit de l’écran.
Pour régler les modes Snapshot (Prise de vue) ou Video (Vidéo), appuyez sur Esc (échap) jusqu’à ce que la bonne icône s’affiche dans
l’angle supérieur droit de l’écran LCD.
Réglage du mode Snapshot (Prise de vue)
L’icône d’un appareil photo numérique doit apparaître dans l’angle supérieur droit de l’écran LCD pour commencer. Appuyez ensuite sur la
touche Menu.
1. La mention EV (Valeur d’exposition), qui permet d’ajuster la luminosité, s’affiche dans l’angle supérieur gauche de l’écran LCD.
La position normale (par défaut) est 0,0 et peut être ajustée par incréments jusqu’à +2,0 et -2,0 à l’aide des touches directionnelles
Gauche/Droite. Si l’on choisit la position par défaut, l’EV n’apparaîtra pas sur l’écran.
2. Le nombre de clichés disponibles avec la mémoire interne est affiché dans l’angle inférieur droit de l’écran.
3. L’icône de l’appareil photo affichée dans l’angle supérieur droit de l’écran indique qu’il est prêt pour le mode prise de vue. La
résolution utilisée est indiquée dans l’angle inférieur gauche de l’écran.
4. En appuyant sur les touches directionnelles (Vers le haut/Vers le bas), vous modifiez le zoom numérique indiqué par une icône.
5. Appuyez sur la touche Menu pour effectuer les choix suivants dans la section « Capture » en surbrillance. Appuyez sur les touches
Vers le haut/Vers le bas pour naviguer d’un choix à l’autre et appuyez sur OK pour saisir et valider le choix.
A. Size (Dimensions) – ceci permet de régler la résolution souhaitée pour l’imagerie. L’appareil photo utilise
automatiquement une résolution de 1600 x 1200 pixels (2MP), mais vous pouvez utiliser une interpolation numérique pour
augmenter la résolution, ou des résolutions inférieures pour augmenter le nombre d’images que vous pourrez conserver dans
la mémoire de stockage interne. Utilisez les touches directionnelles pour effectuer des changements puis cliquez sur « OK »
pour enregistrer votre réglage.
B. EV – vous pouvez changer le paramètre par défaut pour la valeur d’exposition.
C. Color (Couleur) – vous pouvez passer de Standard (Normal), à Monochrome (Noir/Blanc), Vivid (Vives), ou Sepia (Sépia).
D. Time Stamp (Horodatage) – si vous souhaitez afficher uniquement la date ou l’heure sur vos photos, ou bien la date et
l’heure, sélectionnez la fonction choisie. Vous pouvez également supprimer tout horodatage. Appuyez sur OK pour valider
votre choix.
E. Appuyez sur la touche Gauche deux fois pour quitter le menu.
Réglage du mode Video (Vidéo)
L’icône d’une caméra vidéo doit apparaître dans l’angle supérieur droit de l’écran LCD pour commencer.
1. La résolution pour prendre des vidéos est affichée dans l’angle inférieur gauche de l’écran.
2. Le temps disponible restant en mémoire pour les vidéos est affiché dans l’angle inférieur droit.
3. En appuyant sur les touches directionnelles (Vers le haut/Vers le bas), vous modifiez le zoom numérique indiqué par une icône.
4. Appuyez sur la touche Menu pour effectuer les choix suivants dans la section « Video Output » (Sortie vidéo) en surbrillance.
Appuyez sur les touches Vers le haut/Vers le bas pour naviguer d’un choix à l’autre et appuyez sur OK pour saisir et valider le
choix.
A. Size (Dimensions) – ceci permet de régler la résolution souhaitée pour l’imagerie. Il est préférable de choisir 800 x 600
pixels. Une résolution plus basse (640 x 480 pixels) permet des vidéos plus longues en utilisant la mémoire interne, mais
risque de ne pas être compatible avec différents ordinateurs. Utilisez les touches Vers le haut/Vers le bas pour effectuer
votre sélection puis appuyez sur OK pour valider.
B. EV – vous pouvez changer le paramètre par défaut selon la valeur d’exposition souhaitée.
C. Appuyez sur la touche Gauche deux fois pour quitter le menu.
Pour prendre des photos
1. Snapshots (Prises de vue) – pour faire des photos, veillez à être sur le mode appareil photo (icône de l’appareil photo affichée dans
l’angle supérieur droit de l’écran) et utilisez la touche Snap (Prise de vue) pour prendre une photo. Faites une mise au point très
nette à l’aide de la bague de mise au point afin d’obtenir les meilleures images possibles. Appuyez sur la touche une fois prêt et
l’image sera enregistrée dans la mémoire de stockage interne. Expérimentez pour trouver la meilleure mise au point en variant
également la luminosité. Après quelque temps, vous serez capable de faire de belles photos.
2. Vidéo – pour faire une vidéo, veillez à être en mode vidéo (icône de caméra vidéo dans l’angle supérieur droit de l’écran). Utilisez
la touche Snap (Prise de vue) pour démarrer et arrêter la vidéo. Le temps de vidéo écoulé est indiqué sur l’écran, dans l’angle
inférieur droit.
3. Vous pouvez également prendre des photos (clichés ou vidéo) en utilisant une carte SD (Numérique sécurisée) (jusqu’à 1 Go). Votre
carte SD est insérée dans le moniteur LCD (Figure 1). Lorsque la carte SD est correctement introduite, l’icône de la carte SD s’affiche
dans l'angle inférieur droit de l’écran LCD. La mémoire disponible sur la carte SD s’affiche dans l’angle inférieur droit de l’écran
également. En procédant de cette façon, les images sont enregistrées sur la carte SD et non dans la mémoire de stockage interne.
Remarque : L’insertion ou le retrait d’une carte SD lorsque l’écran LCD est allumé peut provoquer la fermeture de l’écran LCD
et/ou endommager la carte SD. Éteignez toujours l’écran LCD pour insérer ou retirer une carte SD.
6
Page 39

Pour revoir et gérer vos photos
Vous pouvez revoir et gérer les photos et vidéos qui ont été enregistrées dans la mémoire de stockage interne sur le moniteur LCD.
1. Appuyez sur ESC (échap) jusqu’à ce que vous soyez dans le mode Stored Images (Images enregistrées).
A. Utilisez les touches directionnelles pour sélectionner l’image que vous souhaitez voir – toutes les images (et vidéos) sont
numérotées.
B. L’image sélectionnée apparaît dans un cadre jaune. Appuyez sur OK pour voir cette image.
C. Lorsque vous revoyez un cliché, vous pouvez l’agrandir grâce au zoom numérique. Une fois terminé, remettre le zoom
numérique sur zéro. Appuyez sur OK pour revenir aux images enregistrées.
D. Lorsque vous revoyez une image vidéo (icône de caméra vidéo affichée sur l’image), vous pouvez arrêter et démarrer la
vidéo en appuyant sur la touche Vers le haut. Appuyez sur la touche Vers le bas à tout moment pendant la vidéo pour
revenir à la position de départ. Pour les vidéos, la longueur de la vidéo est affichée dans l’angle supérieur droit de l’écran et
pendant la lecture, le temps écoulé s'affiche en bas au centre de l'écran. Appuyez sur OK pour revenir aux images
enregistrées.
E. Appuyez sur la touche ESC (échap) pour sortir des images enregistrées et retourner au temps réel.
2. Lorsqu’une image est entourée d’un cadre jaune, vous pouvez la traiter en appuyant sur la touche Menu :
A. L’utilisation des touches Vers le haut/Vers le bas vous offre les sélections suivantes : « Delete » (Supprimer), « Copy To
Card » (Copier sur la carte), ou « Protect » (Protéger).
B. Delete (Supprimer) – appuyez sur OK pour valider cette sélection. Avec les touches Vers le haut/Vers le bas, vous avez le
choix entre « Single » (Sélection unique) pour supprimer le fichier sélectionné en appuyant sur OK, et « All » (Tout) pour
supprimer tous les fichiers en mémoire en appuyant sur OK – si vous sélectionnez « All » (Tout), il vous sera demandé de
confirmer ce choix en sélectionnant « Execute » (Exécuter) ou « Cancel » (Annuler). Si vous ne voulez supprimer aucun
fichier, appuyez sur la touche de Gauche pour revenir aux éléments du Menu.
C. Copy To Card (Copier sur la carte) – ceci n’a aucune fonction.
D. Protect (Protéger) (verrouiller) – appuyez sur OK pour valider cette sélection. Avec les touches Vers le haut/Vers le bas,
vous avez le choix entre « Single » (Sélection unique) pour protéger l’image sélectionnée, « All » (Tout) pour protéger
toutes les images en mémoire, ou « Select » (Sélectionner) qui vous ramène aux images enregistrées. Pour toute image
verrouillée, une icône de verrou apparaît en bas au centre de l’écran. Pour utiliser la fonction « Unlock » (Déverrouiller) sur
une image verrouillée ou plusieurs, éteignez l’écran LCD et aucune de ces images ne sera protégée.
E. À partir du Menu, vous pouvez appuyer sur la touche Gauche pour quitter le Menu.
Pour transférer vos images
Pour transférer des images sur un PC, vous devez disposer d’un port USB libre et d’un programme de traitement d’images pour les clichés et vidéos.
Remarque : Ne débranchez pas
1. Vous
2. Si vous utilisez une carte SD pour stocker vos images, vous pouvez les transférer sur votre PC à l’aide de la méthode décrite ci-
pouvez transférer des images entre votre mémoire de stockage interne et votre PC à l’aide du mini câble USB fourni. La
petite extrémité du câble se branche dans le moniteur LCD (Figure 1) et la plus grosse sur votre PC. Votre PC détecte
automatiquement le nouveau matériel. Ensuite, vous devrez choisir le programme de votre PC où vous allez transférer les images –
vous devez choisir un programme pour les photos et un programme différent pour les vidéos selon les logiciels de traitement
d’images installés sur votre ordinateur.
dessus en n° 1 ou sortir la carte SD et utiliser la fente pour carte SD de votre PC afin de transférer ces images. Dans tous les cas,
votre PC vous demandera de choisir le programme avec lequel vous souhaitez effectuer votre transfert d’images.
le câble USB pendant le transfert d’images pour ne pas endommager le matériel.
Entretien, nettoyage et garantie
Votre microscope Celestron est un instrument de précision optique qu’il convient de toujours manipuler avec soin. Si vous respectez ces
conseils de nettoyage et d’entretien, votre microscope ne nécessitera qu'un entretien minimum pendant toute sa durée de vie.
Lorsque vous avez fini de vous servir de votre microscope, retirez tous les échantillons laissés sur la platine.
Éteignez l’interrupteur des illuminateurs.
Éteignez l’écran LCD.
Débranchez le cordon d’alimentation.
Recouvrez toujours le microscope avec la housse de protection lorsqu’il n’est pas utilisé ou pour le ranger.
Rangez le microscope dans un lieu propre et sec.
Si vous utilisez votre microscope sous la lumière directe du Soleil, faites très attention à ne pas endommager l’instrument ni à vous
abîmer les yeux.
Lorsque vous déplacez votre microscope, transportez-le à deux mains (si possible) par le socle ou la partie ronde du corps.
Nettoyez les surfaces externes avec un chiffon humide.
Débranchez toujours les cordons d’alimentation avant le nettoyage.
Ne nettoyez jamais les surfaces optiques avec des chiffons ou serviettes en papier qui pourraient les rayer facilement.
Éliminez la poussière des surfaces optiques avec une brosse en poils de chameau ou une buse de pulvérisation.
Pour éliminer les empreintes des surfaces optiques, utilisez un agent nettoyant pour objectifs et un chiffon spécial disponibles dans
la plupart des magasins de photo, et ne faites pas de cercles pour éviter les filandres ou
Ne jamais démonter ni nettoyer les surfaces optiques internes. Cette procédure devrait être confiée à des techniciens qualifiés en
usine ou à des centres de réparations agréés.
Lors de la manipulation des lames porte-objets en verre, faites attention aux bords coupants.
7
rayures.
Page 40

Images d’échantillons
Les images ci-dessous d’échantillons de tige de maïs en coupe transversale, ont été prises, de gauche à droite, à des grossissements de
40x, 100x, 400x.
Garantie
Votre microscope bénéficie d’une garantie limitée de deux ans. Veuillez consulter le site web Celestron pour des
informations détaillées sur toute la gamme de microscopes Celestron à www.celestron.com
CEE : Ce produit est conforme aux directives EN61558-2-6:1997 et EN61558-1:1997+A1 de la CEE
.
Déclaration FCC
Ce dispositif est conforme à la partie 15 de la réglementation de la Commission Fédérale sur les
Communications. So
1. Ce dispositif ne doit pas provoquer d’interférences dangereuses, et
2. Ce dispositif doit accepter toute interférence reçue, y compris les interférences pouvant provoquer un
fonctionnement indésirable.
n fonctionnement est sujet aux deux conditions suivantes :
RoHS
2835 Columbia St.
Torrance, California 90503 U.S.A.
www.celestron.com
RĖV 2 112508 Imprimé en Chine 01-09
 Loading...