


User Manual
About this manual...........................................................
Thank you for choosing the Celero 5G. In order to maintain your device in optimal condition, please read this manual and keep it for future reference.
Table of content...............................................................
About this manual....................................................... |
2 |
|
4.5 Chrome............................................................ |
13 |
|
1 |
Getting started......................................................... |
3 |
|
4.6 Calendar.......................................................... |
13 |
|
1.1 Overview.............................................................. |
3 |
|
4.7 Camera............................................................. |
15 |
|
1.2 Setup................................................................... |
4 |
|
4.8 Photos.............................................................. |
16 |
|
1.3 Home screen..................................................... |
5 |
|
4.9 Clock................................................................ |
16 |
|
1.4 Status bar........................................................... |
6 |
5 |
Google applications............................................. |
17 |
2 About your phone.................................................. |
6 |
6 More applications................................................. |
19 |
||
|
2.1 Power on/off...................................................... |
6 |
7 |
Security................................................................... |
19 |
|
2.2 Battery............................................................... |
7 |
|
7.1 Screen lock....................................................... |
19 |
3 Personlize your phone.......................................... |
7 |
|
7.2 SIM card lock.................................................. |
19 |
|
|
3.1 Language............................................................ |
7 |
|
7.3 Lock screen preferences............................. |
19 |
|
3.2 Date & time....................................................... |
7 |
|
7.4 Fingerprint sensor......................................... |
19 |
|
3.3 Display............................................................... |
8 |
|
7.5 Smart lock....................................................... |
20 |
|
3.4 Sound................................................................. |
8 |
|
7.6 Encryption & credentials............................. |
20 |
|
3.5 Digital wellbeing & parental controls......... |
9 |
8 |
Account.................................................................. |
20 |
4 |
Applications............................................................. |
9 |
|
8.1 Account information..................................... |
20 |
|
4.1 Call....................................................................... |
9 |
|
8.2 Software update........................................... |
20 |
|
4.2 Contacts.......................................................... |
10 |
9 Safety & regulatory information....................... |
20 |
|
|
4.3 Messages......................................................... |
11 |
10 Troubleshooting.................................................. |
24 |
|
|
4.4 Gmail................................................................ |
12 |
|
|
|
2
1 Getting Started.............................................................
1.1 Overview
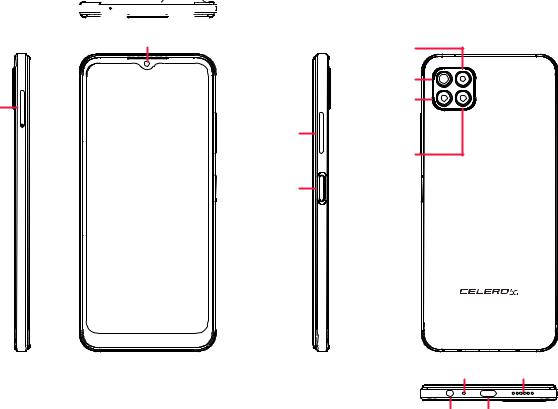
Microphone |
|
|
|
|
Note: The fingerprint sensor is located on the power key. |
||||||
|
|
|
|
|
|||||||
|
|
|
|
|
|
|
|
|
|
|
|
|
|
|
|
|
|
|
|
|
|
|
|
|
|
|
|
|
|
|
|
|
|
|
|
|
|
|
|
|
|
|
|
|
|
|
|
|
|
|
|
|
|
|
|
|
|
|
|
|
|
|
|
|
|
|
|
|
|
|
|
Front Camera |
2 MP Depth |
|
|
|
16 MP Main |
SIM and |
|
5 MP |
|
|
Ultra-Wide |
||
microSD™ |
|
||
|
Angle |
||
tray |
Volume |
||
|
|||
|
key |
Flash |
|
|
|
||
|
Power |
|
|
|
key |
|
Microphone Speaker
Headset USB connector type-C
Recent Apps button
•Touch to view cards of recent applications. Swipe up on the screen to remove a specific thumbnail from the list, or scroll all the way to the left and touch Clear all to remove all thumbnails from the list.
•Pressing the Recent Apps button will also allow access to Screenshot. Touch Screenshot to immediately capture what is on the screen.
Home button
•From any application or screen, touch to return to the Home screen.
•Touch and hold to launch Google Assistant, with which you can search for information online, open apps on your phone, or send messages.
Back button
Touch to go back to the previous screen, or to close a dialog box, options menu, or the Notification panel.
Power key
•Press and release quickly to lock or light up the screen.
•Press and hold to reveal the popup menu to select from Power off, Restart or Emergency.
3
•Press and hold the Power key and Volume down key to take a screenshot and save it.
•Press and hold the Power key for at least 10 seconds to force reboot.
Volume key
•Use the Volume up or down keys to adjust the ringtone volume, the call volume during a phone call, or the media volume while listening to music, watching a video, or streaming content.
•Press the Volume key during an incoming call to mute the ringtone.
•While using the Camera, press the Volume up or down key to take a photo.
1.2 Set up
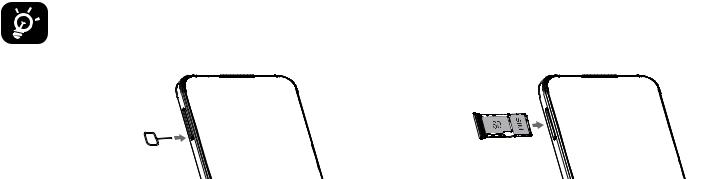
Inserting Nano SIM card
You must insert your Nano SIM card to make phone calls using your network.
Your phone only supports Nano SIM cards. In order to avoid damaging your phone, do not attempt to insert other SIM types, such as Mini or Micro cards.
Insert the SIM pin |
Place or remove |
that’s provided to |
the Nano SIM card |
eject the SIM tray |
and the microSD |
and then slide it |
card in the correct |
out gently |
slot as shown |
Note: Even if no SIM card is installed, your phone will still power on and you will be able to connect to a Wi-Fi network and use some of the phone’s features.
Set up your phone
The first time you power on the phone, you should set the following options:
•Touch  to select the phone’s language, then touch Start.
•Select an available Wi-Fi network or touch Set up offline and Continue.
•If Wi-Fi was set up:
•Copy your apps and data from another device or touch Don’t copy to continue.
•Sign in with your Google Account, otherwise touch Skip to continue.
•Turn on  to select each of the options for Google Services, otherwise toggle off
  and touch Accept to continue.
•Set PIN for a screen lock, otherwise touch Skip to continue.
•Review additional apps. Check the box  for the apps you want, otherwise uncheck
  and touch Ok to continue.
•Turn on  to let Carrier Hub access: LOCATION, otherwise toggle off
  and touch Accept to continue.
•if Set up offline was chosen:
4
• Touch |
to set up Time Zone, Date, and Time, then touch Next to continue. |
•Turn on  to select each of the options for Google Services, otherwise toggle off
  and touch Accept to continue.
•Set PIN for a screen lock, otherwise touch Skip to continue.
•Turn on  to let Carrier Hub access: LOCATION, otherwise toggle off
  and touch Accept to continue.
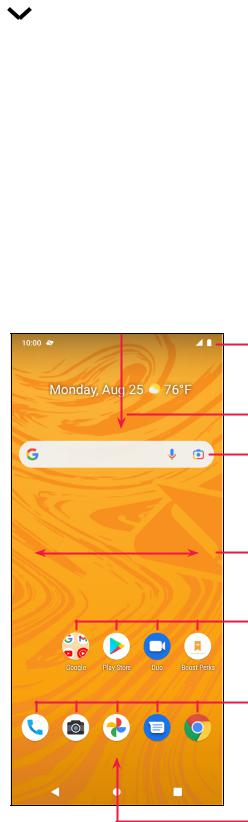
1.3 Home screen
You can bring all of the items that you use most frequently (applications, shortcuts, widgets, folders) to your Home screen for quick access. Touch the Home button to return to the Home screen.
Status bar |
• Status/Notification indicators |
• Touch and hold to view the Notification panel |
Swipe down again to access the control center |
Search bar |
• Enter text in the search bar |
• Click the microphone to initiate a search by speaking |
Swipe left or right to view more screens |
Touch to open an application or folder |
Touch and hold to move or change applications |
Favorite apps tray |
• Touch to open the application |
• Touch and hold to move or change applications |
Swipe up on the bottom of the screen to access apps menu
5
1.4 Status bar
The Status bar appears at the top of your Home screen and includes icons indicating your phone’s status and new notification alerts.
Icon |
Status |
Icon |
Status |
|
|
|
|
|
Bluethooth® active |
|
Battery (fully charged) |
|
|
|
|
|
Wi-Fi® active |
|
New message |
|
|
|
|
|
Network (Full signal) |
|
Vibrate mode |
|
|
|
|
|
5G data service |
|
Screenshot captured |
|
|
|
|
|
Airplane mode |
|
Connected via USB cable |
|
|
|
|
|
Alarm set |
|
New Gmail message |
|
|
|
|
|
Battery (charging) |
|
|
|
|
|
|
2 About your phone........................................................
2.1 Power on/off
To turn the device on, hold down the Power key until the phone powers on. Unlock your phone (using Swipe, Pattern, PIN, Password, Fingerprint or Face key) if necessary. Once unlocked, the Home screen is displayed.
If you don’t know your PIN code or if you have forgotten it, contact Customer Care. For safety, please do not store PIN code in your phone.
To power the device off, press and hold the Power key until options appear, then select Power off.
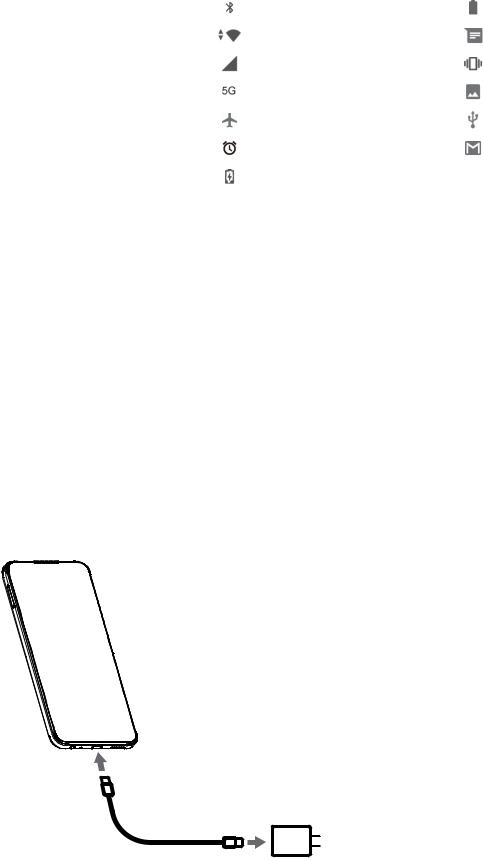
Charging
Insert the small end of the charging cable into the charge port and plug the charger into an electrical outlet.
• Insert the USB type-C cable into the charge port as shown.
• Connect charger to power outlet.
NOTE: Please use the charger and USB type-C cable that came with your device. Using the wrong cable and charger may damage the charging port or reduce battery performance.
6
2.2 Battery
Make these adjustments to optimize your battery life.
Turn on power saving mode
•Go to Settings > Battery > Battery saver
•Touch Turn on now to activate the battery saving mode.
Screen timeout
•Go to Settings > Display > Advanced > Screen timeout
•Select the screen timeout duration.
Lower screen brightness
•Go to Settings > Display > Brightness level
•Lower the brightness by sliding  to the left.
3 Personalize your phone
3.1 Language
Choose from multiple languages supported on your device.
•Go to Settings > System > Languages & input > Languages.
•Touch + Add a language to select a language from the list.
•Touch and hold  next to your desired language and drag it to the top of the list.
3.2 Date & time
Go to Settings > System > Date & time.
Use network-provided time
Touch to  use network-provided time. Choose between:
•Use network-provided time
•Use GPS-provided time
•Off
Automatic time zone
Turn on  to enable the network-provided time zone.
If Use network-provided time is turned off, you can manually set the date and time:
•Touch Set Date to open a dialog in which you can manually set the date.
•Touch Set time to open a dialog in which you can manually set the time. If Automatic time zone is turned off, you can manually set the time zone:
•Touch Select time zone to select the region and time zone manually.
7
Use locale default
•Turn on  to enable locale default.
Use 24-hour format
•If Use locale default is off, you can turn on  to use 24-hour format.
3.3 Display
Make adjustments to the display settings and wallpapers to optimize your experience. Go to Settings > Display to alter the following settings.
Dark theme
The screen becomes black for easier viewing in dim lighting.
Night Light
This mode reduces blue light and adjusts the color temperature to relieve eye fatigue. You can custom schedule when to turn it on.
Auto-rotate screen
Select whether the screen rotates automatically or not.
Note: Using your device in landscape mode while wearing polarized sunglasses may cut light from the screen. Take your polarized sunglasses off or use your device in portrait orientation to continue use.
Wallpaper
•Touch Live Wallpapers to select moving images. Third party apps must be installed.
•Touch Photos to select from images that are stored on your device.
•Touch Styles & wallpapers to choose a wallpaper for your lock screen and/or homescreen from pre-loaded images.
3.4 Sound
Adjusting volume
•Press the volume keys that are located on the right side of the device to adjust the Ringtone & Notification volume.
•You can also go to Settings > Sound to adjust the volume for media, call, ring & notification and alarm.
Adjusting tones
Go to Settings > Sound > Phone ringtone.
Adjusting other sounds
All other sounds that are related to notification, alarm, dial pad, screen locking and charging can be adjusted to by doing the following:
8
Go to Settings > Sound > Advanced > Other Sounds and vibrations
3.5 Digital wellbeing & parental controls
•Use this menu to find out how much time you have spent on the phone and even on each app. You can customize the time limit for using the phone.
•In addition, parents can restrict their children’s usage time and manage their browsing habits.
4 Applications..................................................................
4.1 Call
Calling
•To make a call, touch 
•Suggested numbers are displayed as you enter numbers on the dial pad.
•Enter the desired number from the dial pad and touch  to place the call. You can also select a contact from Favorites
  , Recents
  or Contacts
  by touching the tabs.
•The number you entered can be saved to Contacts by touching
Create new contact.
•If you make a mistake, you can delete the incorrect digits by touching  .
.
•To hang up a call, touch  .
.
International call
To make an international call, touch and hold  to enter +, then enter the international country prefix followed by the full phone number and touch
  .
.
Send a message
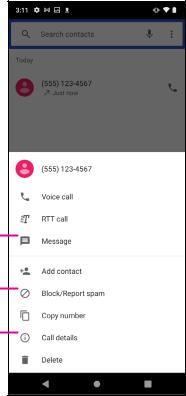
Block a number
View call details
Emergency call
If your phone has network coverage, dial the emergency number and
touch  . This works even without a SIM card and without typing the PIN code.
Answering or rejecting a call
When you receive a call:
•Slide  up to answer.
•Slide  down to reject.
•Touch  to reject the call by sending a preset message.
9
 Loading...