

Page 1
Page 2

CAUTION: Read these instructions before operating the dispenser.
This dispenser is designed for commercial use only. Personnel
operating the warmer should be thoroughly familiar with the
dispenser before using it.
ADD ONE QUART OF WATER BEFORE TURNING ON WARMER.
Each unit has been thoroughly tested in our plant to insure proper operation before it reaches
our Customers.
The pump is adjusted to dispense 1 oz. of condiment per stroke. (See instruction sheet on
"How to Adjust".)
THE WARMER IS DESIGNED FOR USE WITH A #10 CAN ONLY.
Check water level frequently, as water evaporates when heated. Be sure cheese or fudge is
sufficiently heated before pumping.
PUMP MODELS:
• Loosen the two knurled screws and turn latches 90.
• Remove pump from well area.
ALL MODELS:
• Fill the well area up to the water line:
• Open #10 can and peel off label.
• Place the #10 can into the well on top of metal spring or spacer provided.
• Plug in the warmer, turn toggle switch to the "ON" position which starts thermostat and light.
• Pre-heat cheese or fudge approximately 45 minutes with setting between 7 and 10, stirring
every 10 minutes, before inserting pump or ladle. Reset to 3 when ready.
WARRANTY
Every Cecilware pr oduct ha s been car efully inspected before shipm ent. The finest of m ateria ls and t he highest standards
of w orkmanship have been built in t o t he equ ipm ent.
Within 1 year of pur chase, should a ny Cecilw are pr oduct show de fect in fa ctor y w orkmanship or m ateria l, we agree t o
repair, at our option or repla ce w it hout cost t o user such part s w hich prove upon fa ctor y inspection t o have been so
defective. All equipment must be shipped t ransport at ion charges prepaid for accept ance. This warr ant y cove rs
replacem ent pa rt s only, labor charge s are covered for 9 0 days aft er installat ion.
This w arran ty does not apply under t he follow ing condit ion s: Neglect or abuse of equipm ent.
Excessive lim e condit ion I mproper installa t ion
Any out side m odif icat ion to equipme nt
Every Cecilware ur n body is covered for t hr ee yea rs. Th is w ar ranty cover s stainless ste el bodies and st ainless steel line rs.
Port able equipment such as Electric Fryer s, Food W ar mers, Electric Stoves, Dispensers, Plug- I n Urns, Coffee Brew ers and
Wa rm ers must be r et ur ned to the f act ory of m anufactur e or br ought t o a n a ut horized service stat ion for repair.
No ot he r w arranty, w ritten or verbal, ot he r t ha n t he for egoing is authorized. This warr anty is voided if repairs are not
done at an authorized service sta tion.
Page 3

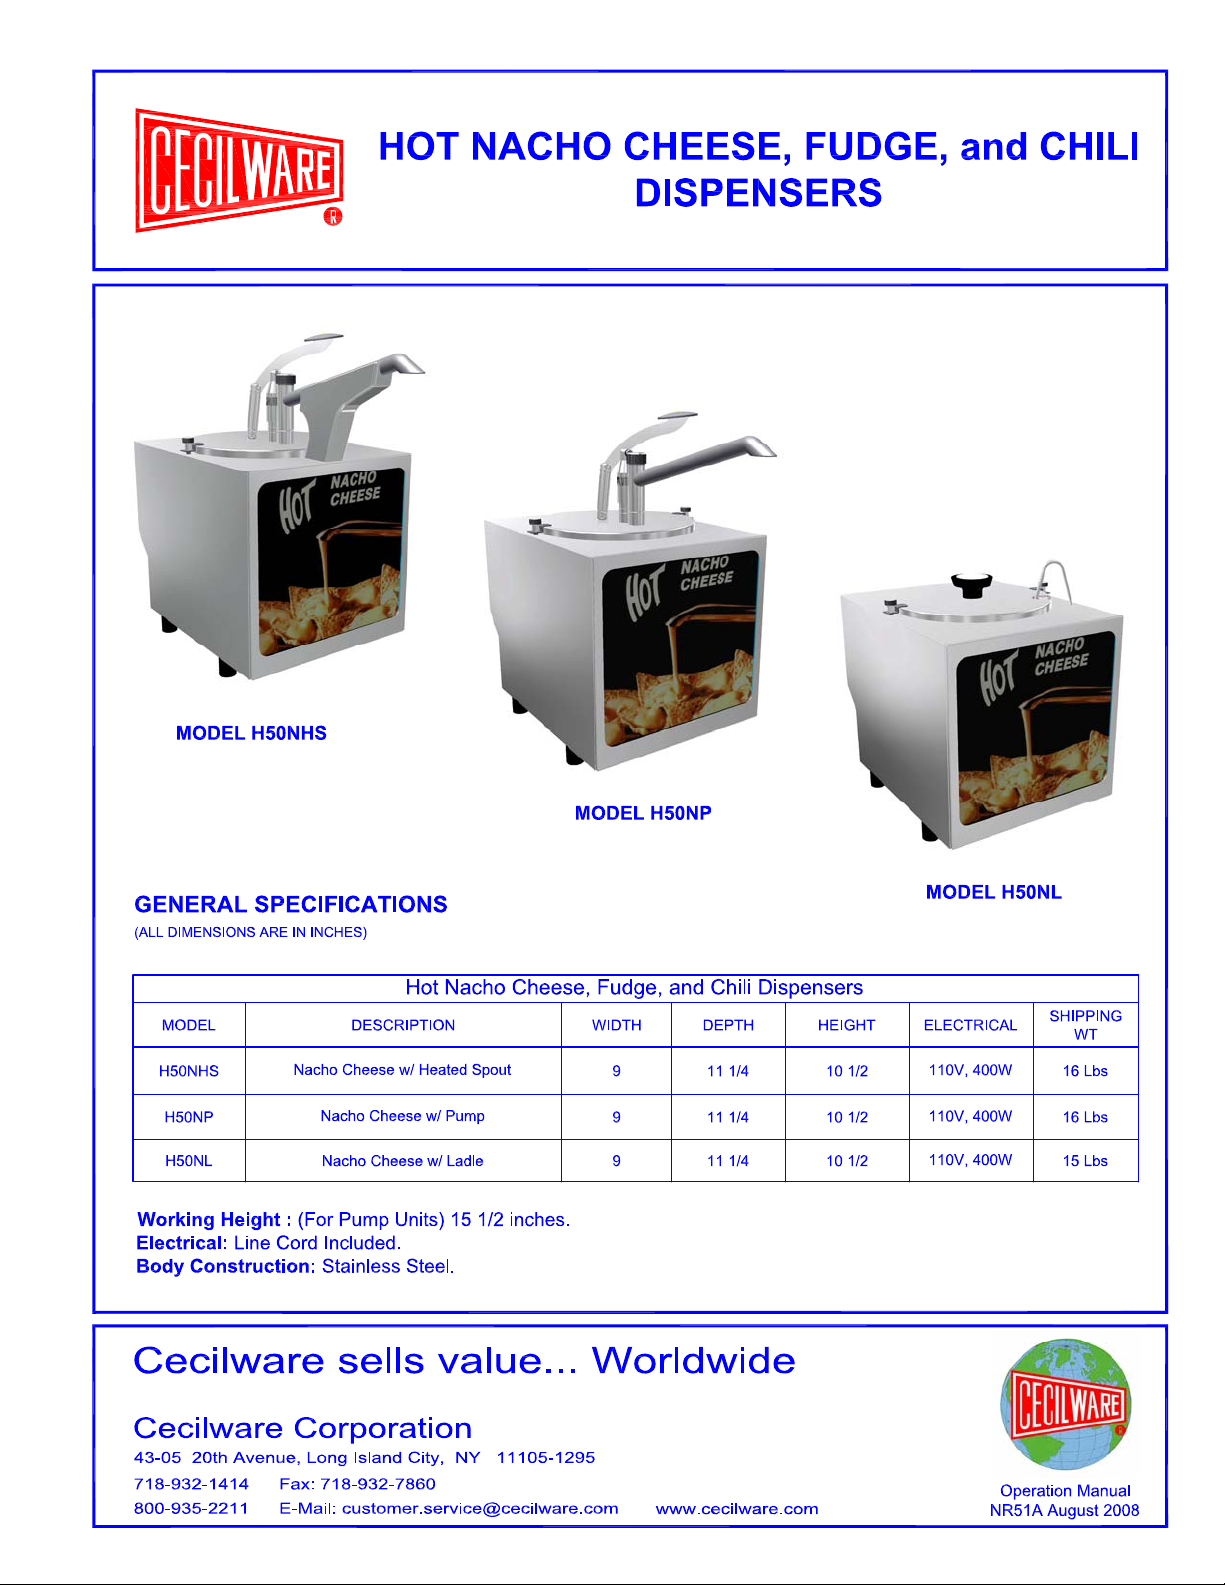
CECILWARE HOT NACHO CHEESE/ FUDGE
DISPENSERS
MODELS: H-50NP, H-50NHS, H-50NL
INSTALLATION AND OPERATING INSTRUCTIONS
PUMP MODELS
• Insert pump. (Be sure that the spout is cradled on the spout warmer, if Heated Spout Model.)
• Hold pump lever in "DOWN" position for approximately 40 seconds to "PRIME".
• Return latches to "LOCK" position and tighten knurled screws.
• WARNING: Thermostat does not turn heat completely off. Turn off toggle switch in back of unit
to turn off sign as well as thermostat.
THERMOSTAT CONTROL
Your Cecilware Hot Dispenser utilizes a thermostat heat control.
The Temperature should be set from #3 to #5. The normal working temperature should be
approximately 145ºF
To increase temperature, turn knob to the right.
To decrease temperature, turn knob to the left.
Do not leave temperature on high heat for long periods. This could cause the Nacho Cheese or
Fudge to overcook.
MODEL H-33 (PUMP)
ADJUSTMENT FOR PORTION CONTROL
1. Remove lever thumb screw (#2) and lift up handle.
2. To decrease amount dispensed, turn fulcrum (#3) clockwise. To increase, turn counter-clockwise.
3. Lines on lower shield (#4) are for reference only.
4. Return handles to slot in fulcrum. Be sure screw (#2) is put back through non-threaded hole first.
CLEANING INSTRUCTIONS
Disassemble pump daily and clean all parts with hot, soapy water as follows:
1. Remove cup lock spring (#6), turn and pull cup (#10) down.
2. Remove Ball (#7) out of delivery tube.
3. Wash all parts thoroughly in hot, soapy water and rinse. Re-assemble pump. Dispense hot, clean water
through pump.
4. Use brush to clean inside of delivery tube.
Page 4

Page 5
Page 6

Page 7

ITEM PART # DESCRIPTION
A
A
A
A
A
A
A
A
A
A
A
A
A
A
1
2
3
4
4
5
6
7
8
9
10
11
12
13
14
15
16
17
18
19
20
21
22
23
24
25
26
27
28
29
30
31
32
33
34
35
36
37
38
39
40
41
42
43
44
45
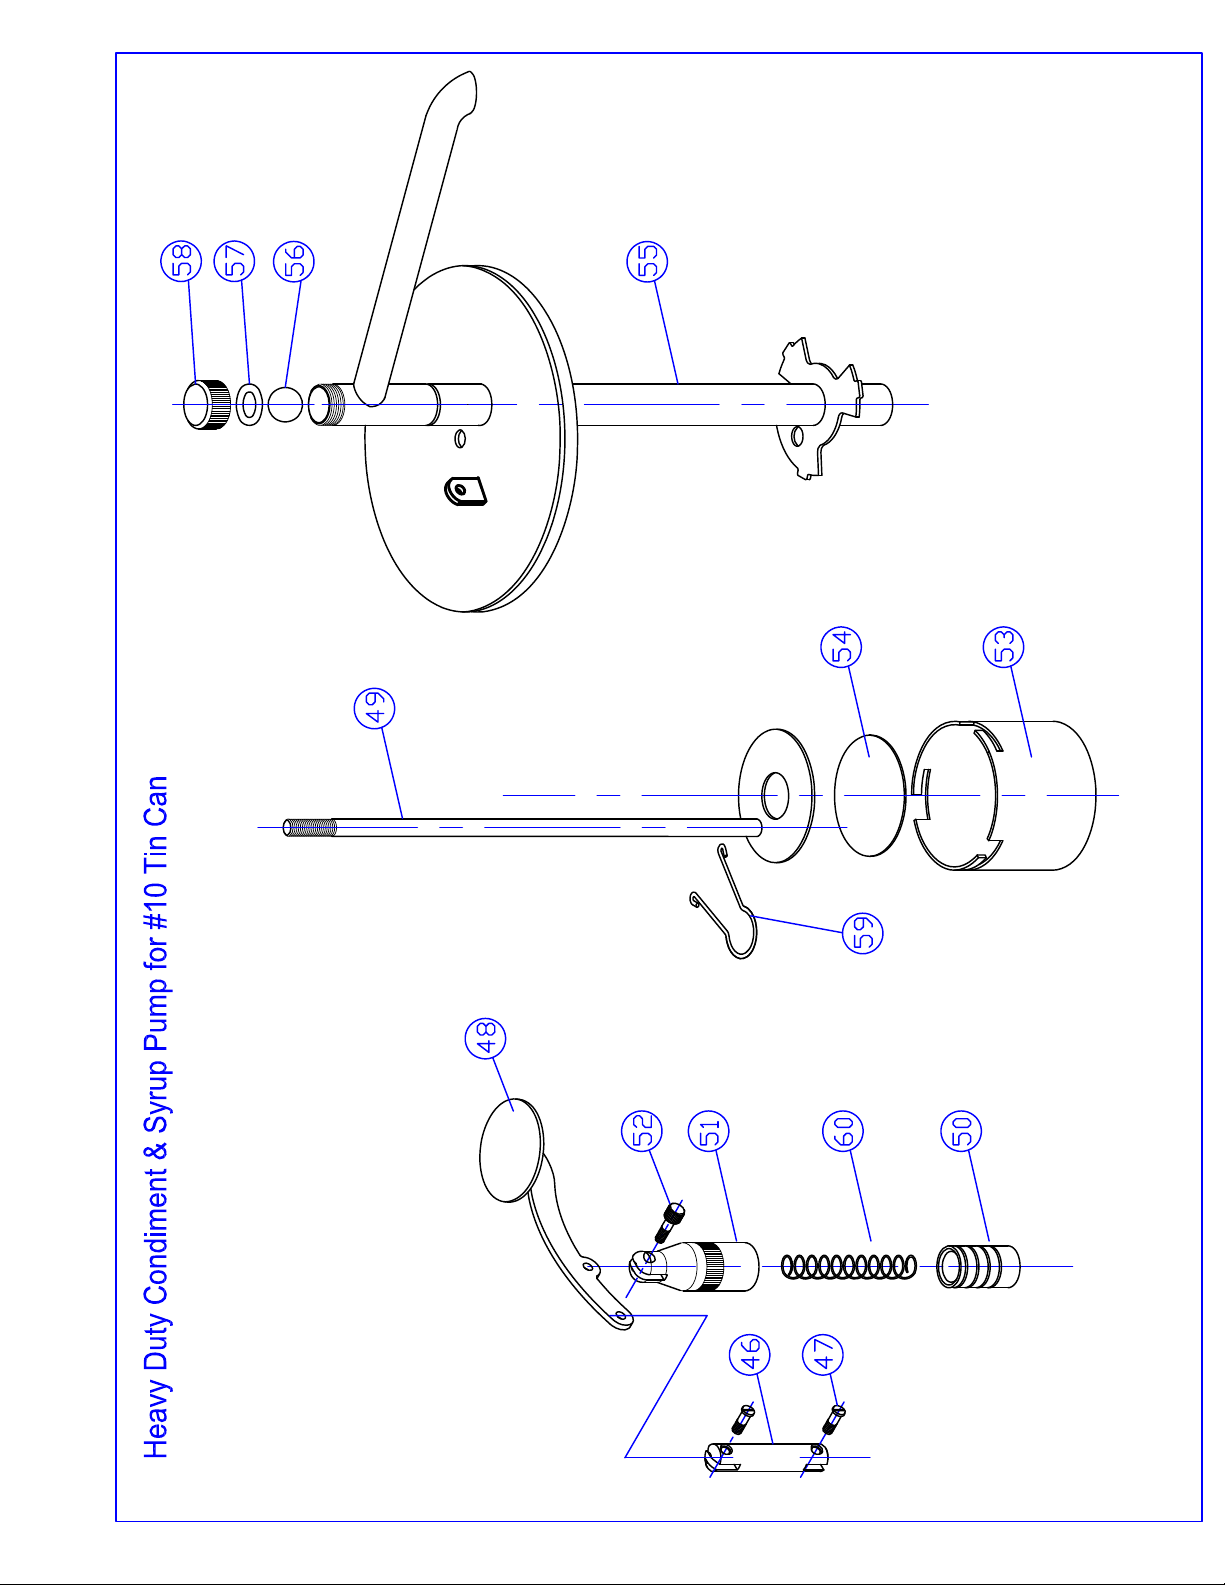
46
47
48
49
50
51
52
53
54
55
56
57
58
59
60
61
62
63
64
A116Q BODY HOUSING
A117Q BODY HOUSING (W/ HEATED SPOUT)
B012A BUSHING-CS/BT/SD
C032A CORD W/PLUG-120V 15A
C770A CORD W/PLUG-220V 15A
A131A COVER PLATE REAR
P811A SCREW 10-32X3/8
A221A ADJUSTMENT KNOB, BLACK
M218A SILICONE GROMMET 3/8 RED
P013A SCREW 8-32 X 3/8 B RH NP
N789A ON-OFF PLATE
P072A WASHER #10 EXT STAR
P010A NUT-8-32 HEX
L299A SWITCH TOGGLE
P002A HOLE PLUG
A520A ELEMENT, 120V 350W
A521A ELEMENT, 220V 350W
A130A EXTERIOR BOTTOM
A412A BUMPER BLK RUBBER
A442A SCREW, 10-32x1/2 RD HD
A119A ACCESS COVER
A114A WINDOW PANEL RETAIN-RIGHT
A115A WINDOW PANEL RETAIN-LEFT
A510A ADJUSTABLE THERMOSTAT
A310A THERMOSTAT BRACKET
A348A SCREW, 8-32x5/8 RD HD
P126A TINNERMAN CLIP 8-32
A651A LABEL "HOT FUDGE"
A652A LABLE "HOT NACHO"
A220A LENS 8 3/4"SQ
A403A SCREW, #10x3/8 TYPE A
P357A SCREW, 8-32x1 RD HD
A530A BULB 120V
A531A BULB 230V
A881A SOCKET DOUBLE W/ BRACKET
G269A HEATER CARTRIDGE 10W 120V
G270A HEATER CARTRIDGE 10W 220V
A133A HEATER HOUSING
A301A COVER RETAINER CLIP
A402A COVER THUMB SCREW
A550Q POT, BAINE MARIE W/ "Z" CLIP
N894A LABLE "CHILI DOG"
A421A SPRING COMPRESSION
A300A SPACER
A132A REINFORCEMENT BRKT
P429A NUT WIRE #10-427
2206
2005
611Q
4527
2500
2250
2038
210M
4500
914Q
8610
4118
2260
4206
A4210
A2202 LENS, PLASTIC KNOB
A2215 KNOB, 3D W/ INSERT
A914C COVER, CONDIMENT
A9051 LADLE, 1 OZ
LINK 1 1
SCREW LINK 2 2
LEVER ARM ASSY-PUMPS 1 1
PLUNGER DISC SUB-ASSEMBLY 1 1
SHIELD, LOWER 1 1
FULCRUM 1 1
SCREW THUMB 1 1
CUP, NOTCHED 1 1
CUP VALVE DISC 1 1
COVER & SPOUT SUB-ASSEMBLY 1 1
BALL, 5/8" S.S. 1 1
O-RING BLACK #112 1 1
END CAP, KNURLED 1 1
CUP LOCK SPRING 1 1
SPRING, HEAVY
PARTS LIST
QTY
H50NHS H50NP H50NL
011
100
111
111
111
111
10 8 8
111
333
111
111
222
111
111
111
111
111
111
444
444
111
111
111
111
111
222
222
111
111
222
111
222
111
111
111
100
100
111
222
222
111
111
110
001
100
222
0
0
0
0
0
0
0
0
0
0
0
0
0
0
110
001
001
001
001
 Loading...