

Cecilware GB5-MF-HC-IT, GB5MF-IT Installation Manual
1
2
s
s
s
A
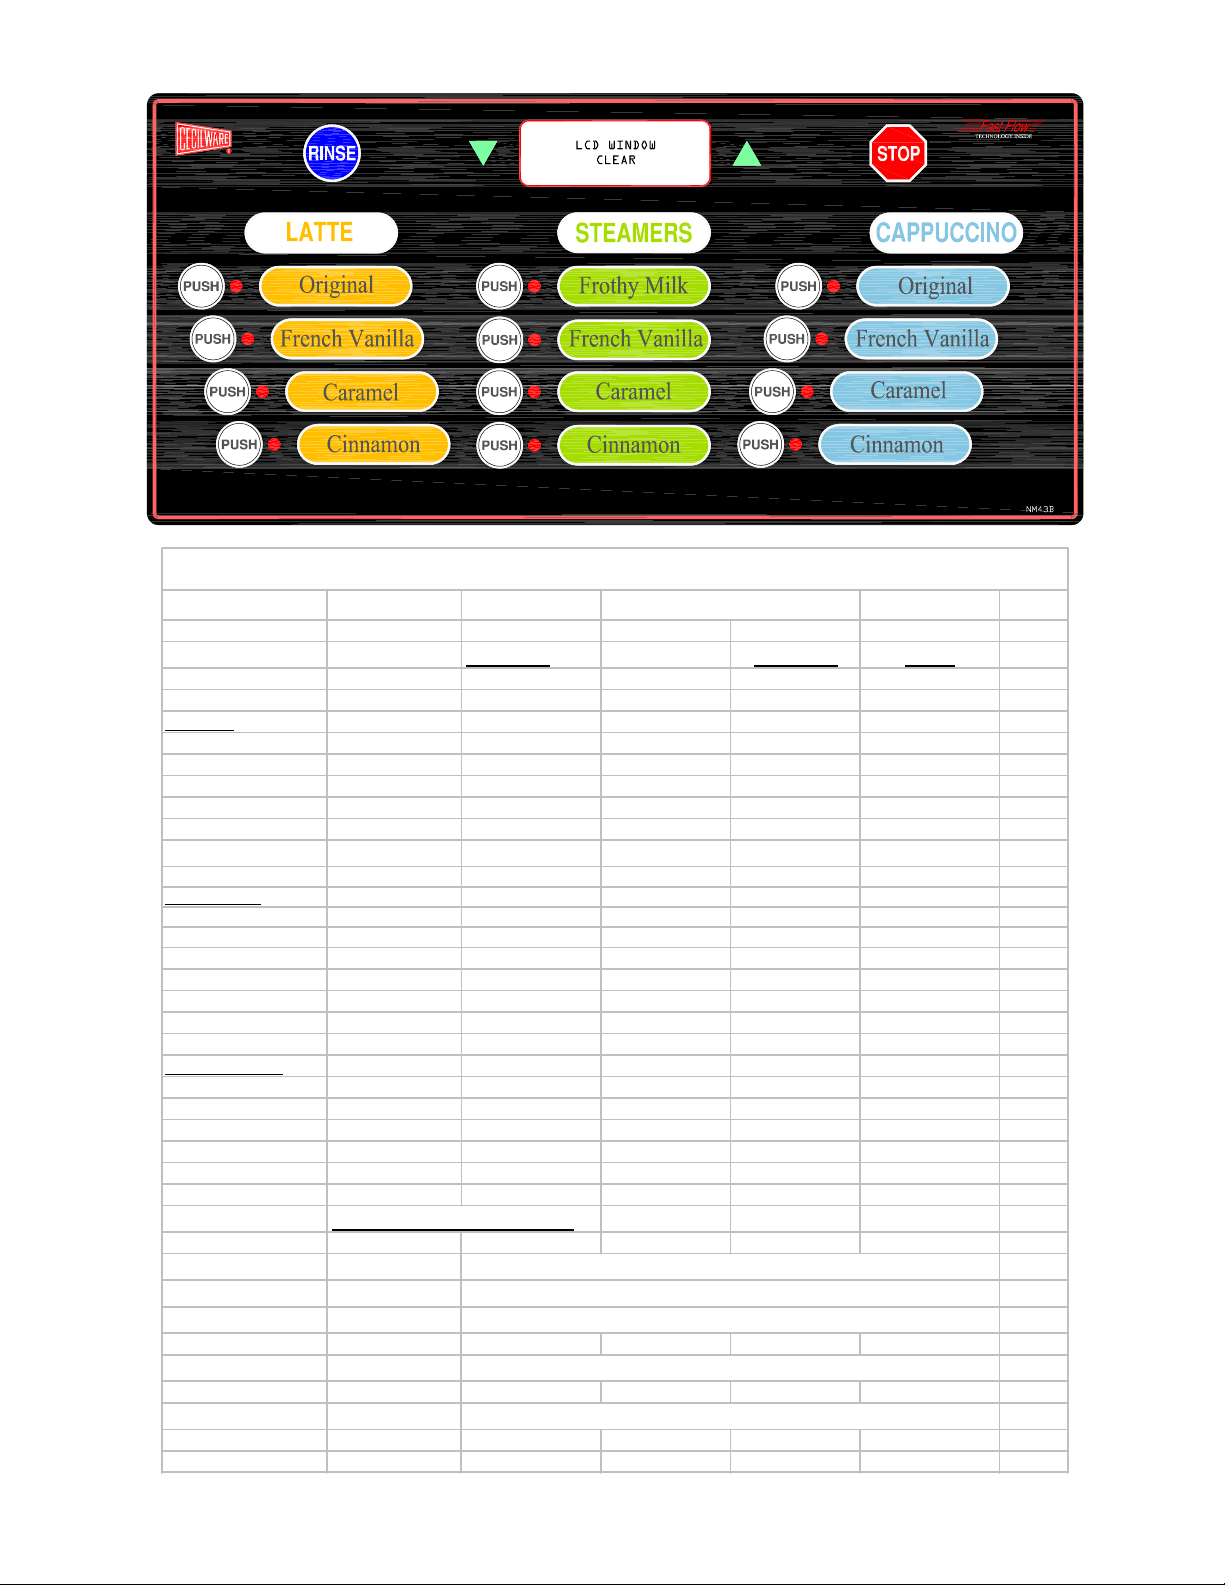
GB5-MF-IT FACTORY GRAM THROW SET T INGS
3
FOR 8 OZ. CUP
FLAVOR COFFEE MILK
VANI LLA CARAMEL CINNAMON
5 grams 4 grams 5 grams 1.4 grams 20 grams
LATTES:
ORIGINAL0 0 07060
Fr. VANILLA135 0 07060
CARAMEL 0 135 0 70 65
CINNAMON 0 0 120 70 60
VANI LLA CARAMEL CINNAMON COFFEE MILK
5 gram
STEAMERS:
FROTHY MILK 0 0 0 0 55
Fr. VANILL
CARAMEL 0 135 0 0 55
CINNAMIN 0 0 110 0 55
CAPPUCINO'S:
ORIGINAL 0 0 0 140 60
Fr.V ANILLA 135 0 0 140 60
CARAMEL 0 135 0 140 65
CINNAMON 0 0 120 140 65
110 0 0 0 55
VANI LLA CARAMEL CINNAMON COFFEE MILK
5 grams 4grams 5 grams 2.2 grams 20 grams
4 gram
5 gram
0 grams 20 grams
9/16/2005
ADJUSTMENT RANGE :
VANILLA
CARAMEL
CINNAMON
COFFEE
MILK
Use 23.0 pts. Of drink s trength to increase 1 gram of product
Use 23.0 pts. Of drink s trength to increase 1 gram of product
Use 18.25 pts. Of drink s trength to increase 1 gram of product
Use 58.0 pts. Of drink s trength to increase 1 gram of product
Use 2.15 pts. Of drink s trength to increase 1 gram of product
NN90A-A
s
s
A
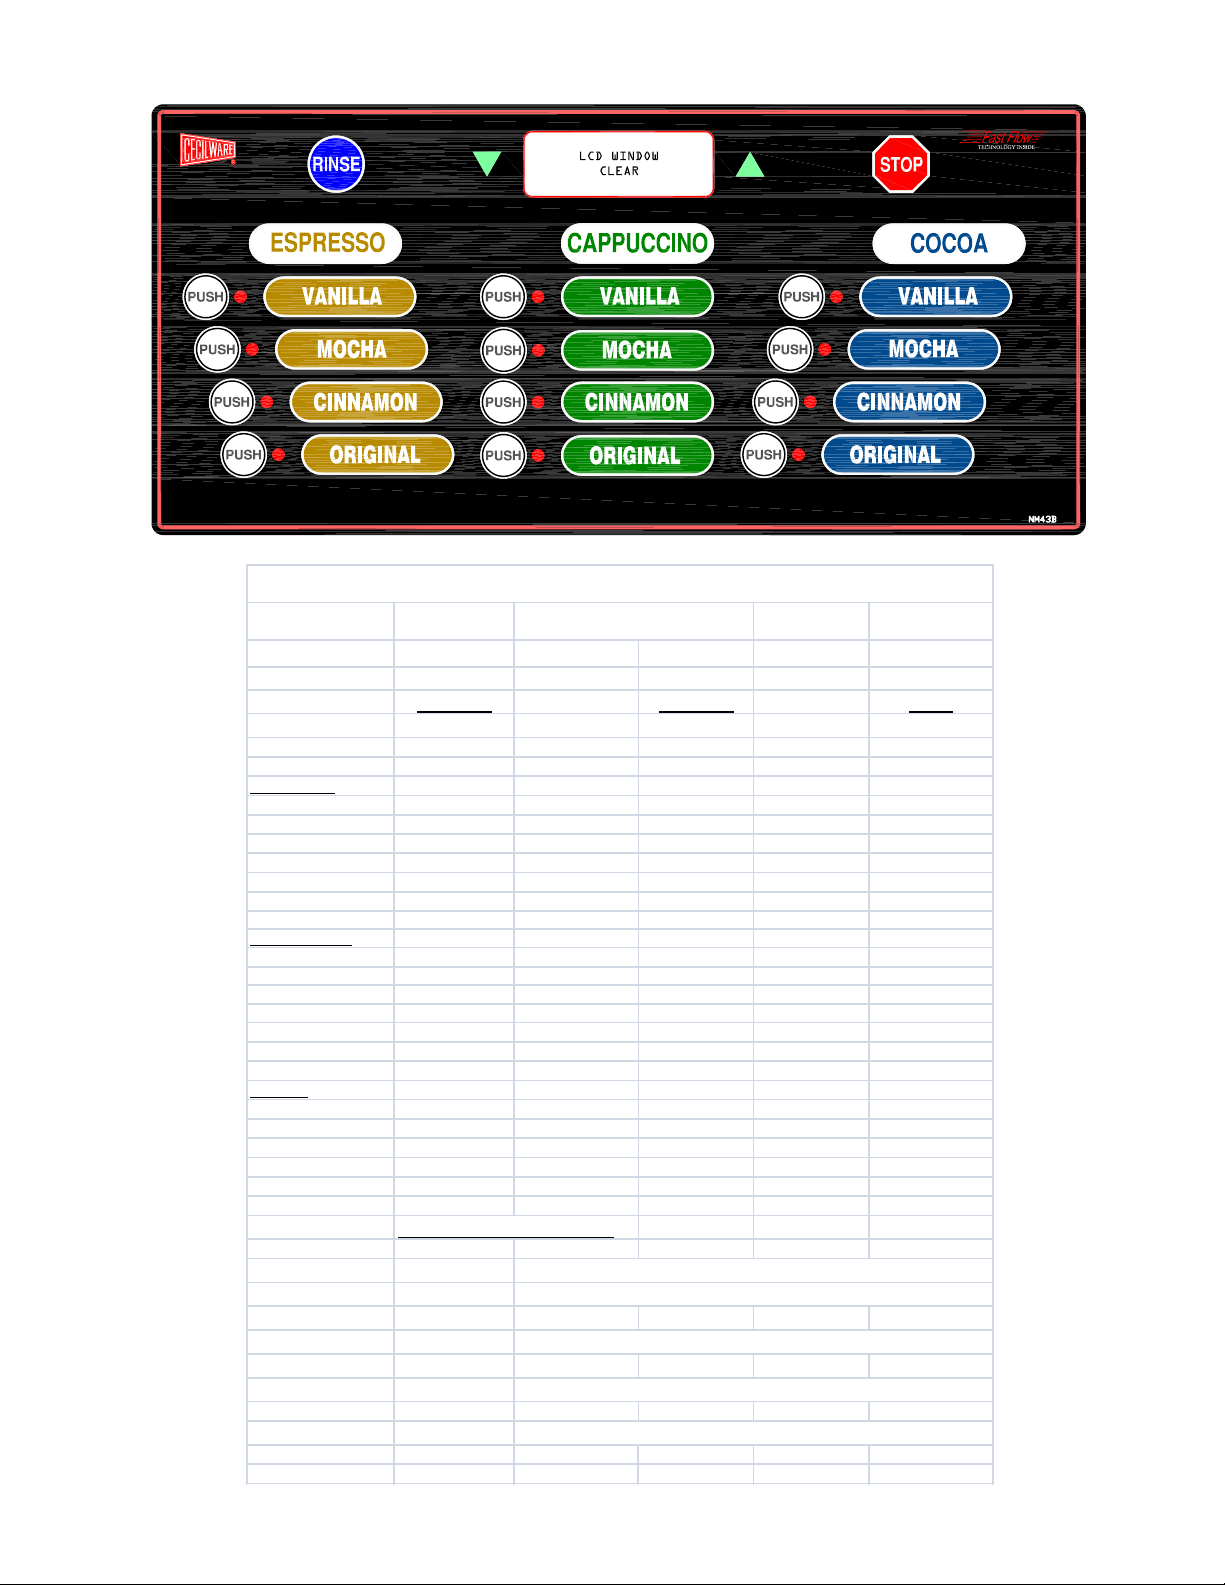
GB5-MF-HC-IT FACT ORY GRAM T HROW SET TINGS
4
FOR 8 OZ. CUP
CAFÉ
STATION
FLAVOR COFFEE MILK
VANILLA CINNAMON COFFEE COCOA MILK
ESPRESSO:
VANILLA 135 0 170 0 60
MOCHA 0 0 170 100 60
CINNAMON 0 135 170 0 60
ORIGINAL 0 0 185 0 60
CAPPUCCINO:
VANILLA 135 0 140 0 60
MOCH
CINNAMON 0 135 140 0 60
ORIGINAL 0 0 155 0 60
COCOA:
VANILLA 135 0 0 125 30
MOCHA 0 0 100 125 30
CINNAMON 0 125 0 125 30
ORIGINAL 0 0 0 150 10
4 grams 5 grams 3 grams 20 grams 20 grams
VANILLA CINNAMON COFFEE COCOA MILK
4 grams 5 gram
0 0 140 100 60
VANILLA CINNAMON COFFEE COCOA MILK
4 grams 5 grams 2 grams 40 grams 10 grams
3 grams 20 gram
12/2/2008
20 grams
ADJUSTMENT RANGE :
VANILLA
CINNAMON
COFFEE
COCOA
MILK
Use 23.0 pt s. Of drink strength to inc rease 1 gram of product
Use 18.25 pt s. Of drink strength to inc rease 1 gram of product
Use 58.0 pt s. Of drink strength to inc rease 1 gram of product
Use 2.0 pt s. Of drink strength to inc rease 1 gram of product
Use 2.15 pt s. Of drink strength to inc rease 1 gram of product
NR58A-B
5

6

UNPACKING INSTRUCTIONS
f
7
Carefully unpack the GB Machine and inspect immediately for shipping damage. Your GB Machine was shipped in a carton
designed to give it maximum protection in normal handling. It was thoroughly inspected before leaving the factory. In case of
damage, contact the shipper, not Cecilware.
INSTALLATION INSTRUCTIONS
Water Inlet Connection:
This equipment is to be installed to comply with the applicable Federal, State, or local plumbing codes having jurisdiction. In
addition:
1. A quick disconnect water connection or enough extra coiled tubing (at least 2x the depth of the unit) so that the machine
can be moved for cleaning underneath.
2. An approved back flow prevention device, such as a double check valve to be installed between the machine and the
water supply.
The GB beverage dispenser is equipped with a 3/4" Garden Hose Connector which is located on the back of the unit.
HIGHLY RECOMMENDED:
A WATER SHUT-OFF VALVE and A WATER FILTER, preferably a combination Charcoal/ Phosphate Filter, to remove odors
and inhibit lime and scale build up in the machine.
Note: In areas with extremely hard water, a water softener must be installed in order to prevent a malfunctioning of the
equipment and in order not to void the warranty.
After the machine has been unpacked and placed on a counter, pull out the drip tray. It should contain the following:
A Set of 4 Adjustable Leveling Legs and a ¼” Flare Water Inlet Fitting.
START-UP PROCEDURE
1. Connect the ¼" dia. copper waterline to the ¼" flare water inlet fitting of the valve.
2. Plug the power cord into a proper receptacle.
3. Activate the Power Switch (Toggle Up) located on the right side of the splash panel behind the door.
The power switch controls all power to the machine including the heater elements.
The door display panel will light up and the tank will start filling.
The LCD window will display this message briefly “CECILWARE, DISPENSER V#.## “.
4. The LCD window will display this message “Low Water Level”. Allow approximately 3 to 5 minutes for the tank to fill.
If the tank does not fill up within the first 5 minutes an error message will appear in the LCD window [SYSTEM ERROR, FILL
RESPONSE].
See Definition of Screen and Troubleshooting Guide.
5. The LCD window will display this message “Low Water Temp.” Allow up to 30 minutes for the water to reach a temperature o
190°F.
The heat up time will depend on the water inlet temperature, the input voltage and the wattage of the elements in the machine.
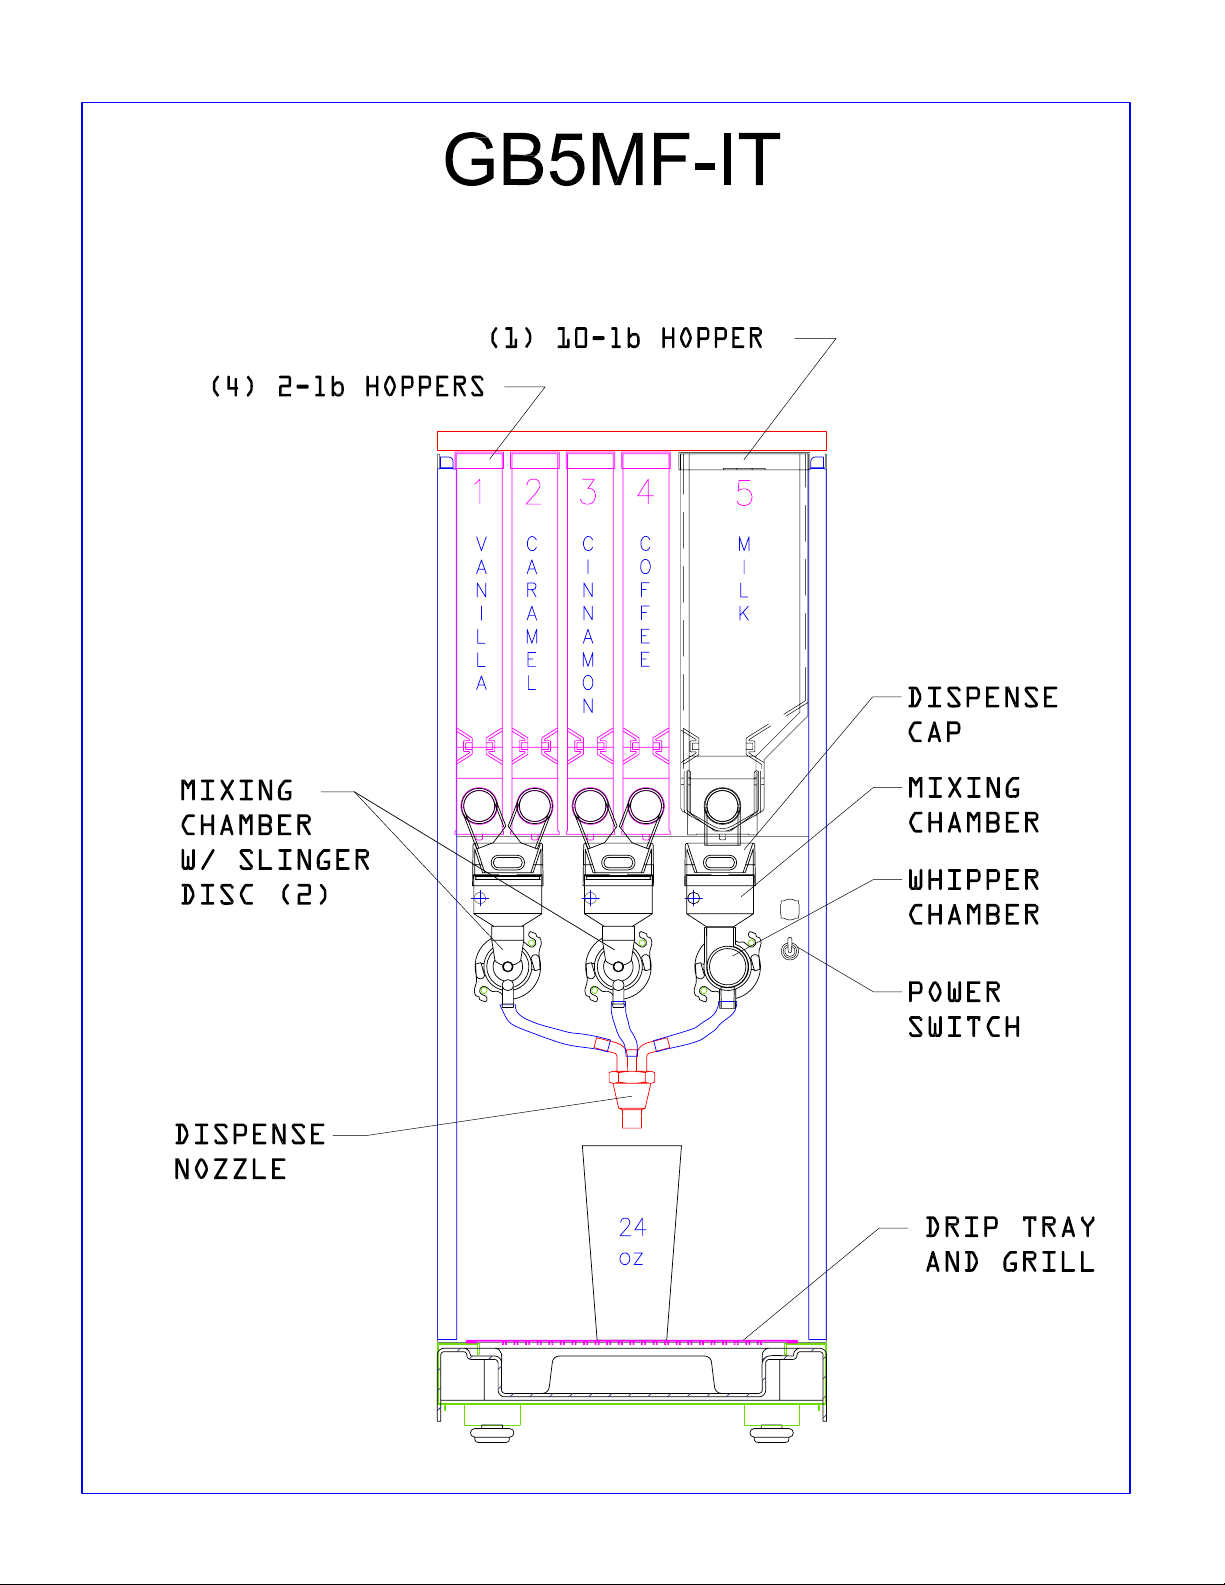
While the tank is heating up, remove the hoppers, load them with products and reposition them back in the machine. Be sure to
reposition the hoppers so that the 1/4” pin slides into the hole of the compartment base.
When the machine has reached the proper dispensing temperature, the LCD window will display, “Press & Release to Dispense”
and “Please select choice of Drink”.
8
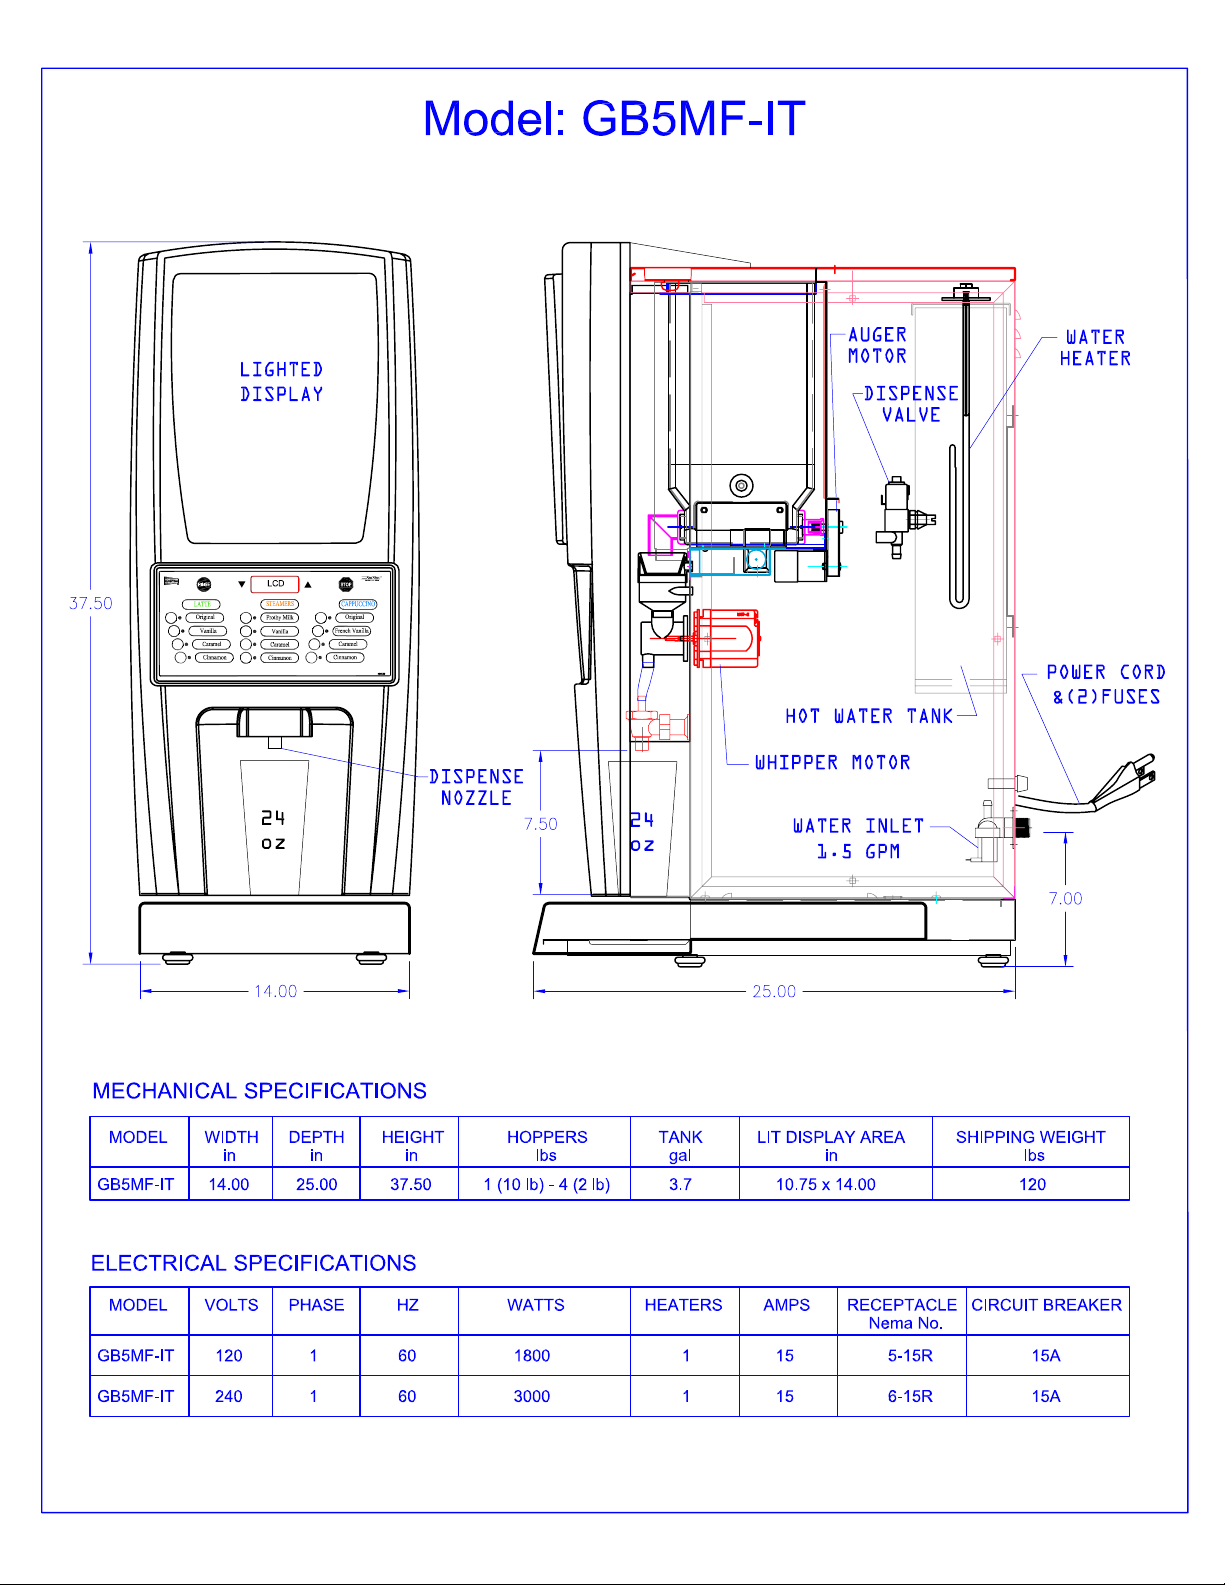
WATER LEVEL CONTROLS:
Under normal conditions and operation, the water level in the tank should not drop more than ½" from the probe.
If it does, the tank is not refilling fast enough. Check the water line and
Water Inlet Valve L462A
Water Level Probe K402Q [K402A & P410A]
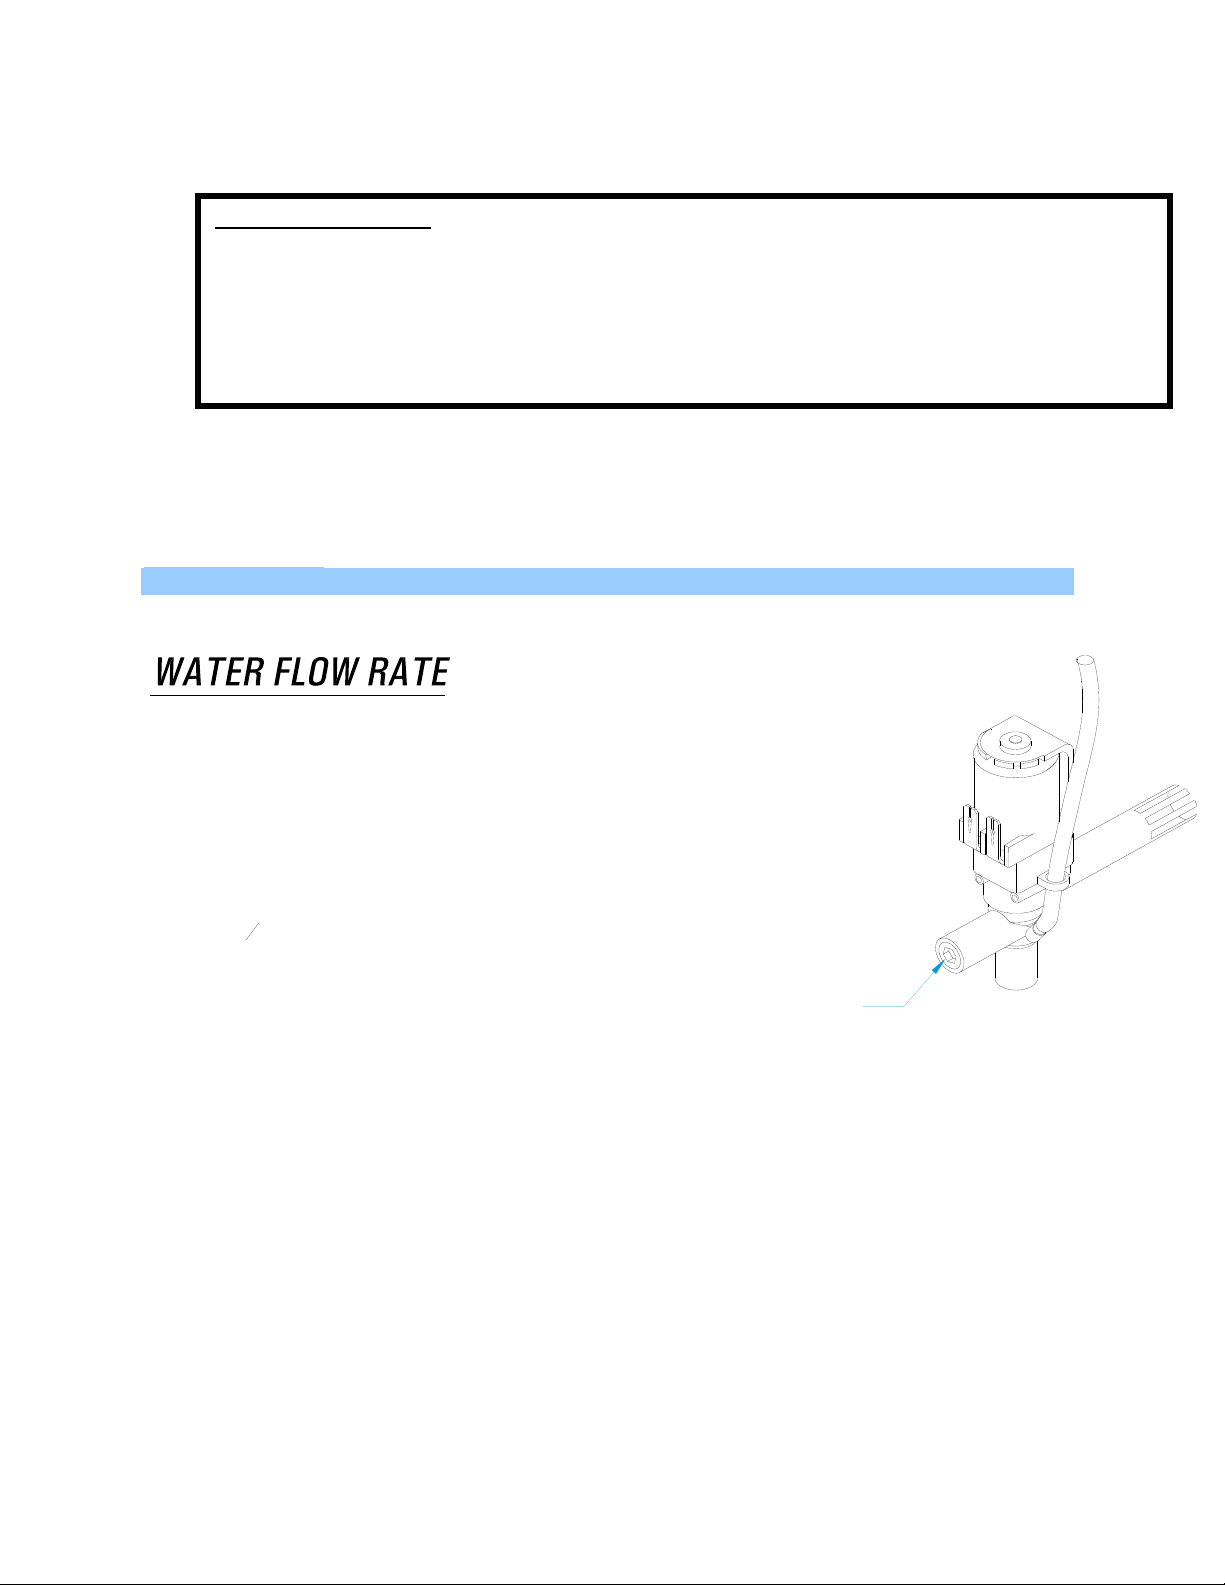
ADJUSTMENTS
water filter, they may need cleaning or replacing.
The Dispense Valves are factory adjusted for a proper Flow Rates.
[Approximate settings: 0.75 oz./sec for MILK; 0.375 oz./sec. for COFFEE and FLAVORS]
Exceeding this Flow Rate will cause the Mixing Chamber to overflow.
Note: To access the Water Dispense Valves, open door and remove Hoppers.
TO ADJUST WATER FLOW RATE:
1. Open door and remove hoppers. Locate Dispense Valve behind hoppers, mounted on tank.
2. Locate adjustment screw on Dispense Valve.
3
3. Using a
CLOCKWISE to decrease water flow, or
COUNTERCLOCKWISE to increase water flow.
4. Check water flow output, after each 1/4 turn.
" Allen Key or flat screwdriver rotate, 1/4 turn at a time,
16
WATER FLOW ADJUSTMENT
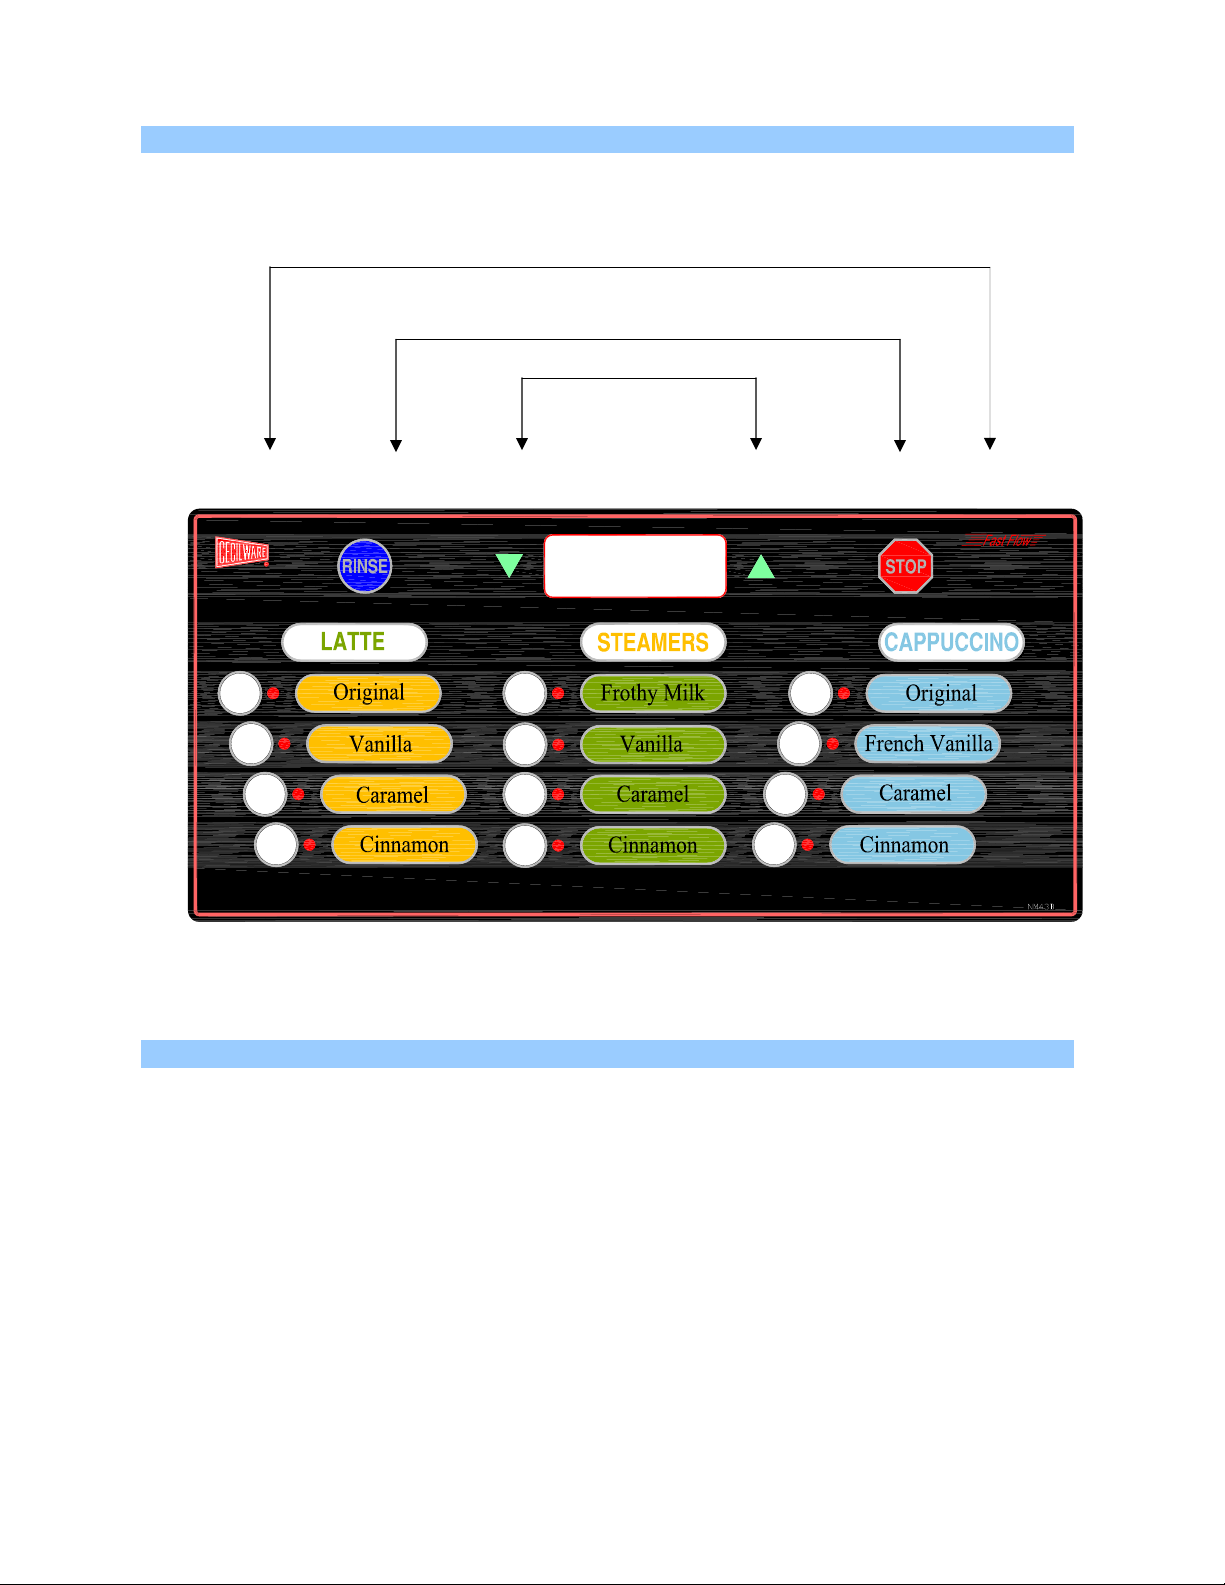
PROGRAMMING INSTRUCTIONS
9
To access SERVICE MODE – Press simultaneously
Center of CECILWARE LOGO and Center of FAST FLOW LOGO
To access PROGRAM MODE – Press simultaneously
RINSE and STOP
To decrease or increase parameter
LCD WINDOW
TECHNOLOGY INSIDE
PUSH
PUSH
PUSH
PUSH
PUSH
PUSH
PUSH
PUSH
LCD WINDOW
CLEAR
PUSH
PUSH
PUSH
PUSH
MODES OF OPERATION
1. Initializing Mode – This mode is only active during the first few seconds after a “power-on” or system reset. The main
function of this mode is to configure the system using the previously saved operating parameters.
2. Normal Mode – This mode becomes active immediately after Initializing Mode has completed its tasks. The main
functions of this mode are to monitor and report system status and control dispensing.
3. Rinse Mode – This mode becomes active when the Rinse key is depressed with any dispense key. The main function of
this mode is to allow the operator to initiate an individual Rinse for all mixing chambers.
4. Program Mode – This mode becomes active when the Rinse and the Stop keys are simultaneously depressed for more
than 1.5 seconds while in Normal Mode. The main function of this mode is to provide limited access to frequently used
system parameters. Pressing the Rinse and the Stop keys again will return the touchpad to normal mode.
5. Service Mode – This mode becomes active when the hidden keys under the “Cecilware Logo” and the “Fast Flow
Logo” are simultaneously depressed for more than 1.5 seconds while in Normal Mode. The main function of this mode is
to allow access to all system parameters that can be modified. Pressing the “Cecilware Logo” and the “Fast Flow Logo”
again will return the touchpad to normal mode.

Features and Benefits of the Digital Dispenser Controller
10
1. 100% Solid State Control for improved reliability
2. Modular design and reduced component count for ease of service
3. Optional sanitary features such as Rinse Lockouts and Rinse Warnings
4. Redundant system interlocks for uncompromising user safety
5. Large two line display for viewing system status and modifying parameters
6. Individual dispense counters and totalizers for product marketing information and inventory control
7. Advanced system diagnostics that continuously monitor the status of all motors, solenoids, sensors,
and heaters
to ensure proper operation and aid in identifying potential problems
8. Protection from heater burnout due to lack of water in the reservoir tank
9. Elimination of dry powder feed at the beginning of a dispense and product dilution at the end of a
dispense
10. Extremely accurate dispensing control utilizing DC servo-motor drive technology
11. Stable water temperature regulation with an adjustment resolution of one-degree Fahrenheit
12. Optional Low Water Temperature Lockout to prevent dispensing at water temperatures below an
adjustable threshold
13. Units of measure displayed in either English or Metric
14. Digital adjustment of serving sizes with a resolution of one-tenth of an ounce
15. Digital adjustment of gram throw with a resolution of one-percent-of-maximum
16. Audible alarm
17. User selectable “Portion Control” or “Free Flow” dispense modes
18. Optional power saving “sleep mode” for extended periods of inactivity
19. Easy to use menu-driven dispensing and rinsing instructions

PARAMETER DEFINITIONS FOR SYSTEM SOFTWARE
11
1. Dispense Total – This parameter indicates the total amount of water dispensed (in ounces or milliliters) for a mixing
chamber. The Dispense Total does not include Rinse Dispenses. The maximum Dispense Total value is 16,777,216
ounces; after which the value will begin again from zero. This parameter cannot be reset to zero. Default Values has no
effect on this parameter.
2. Dispense Counter – This parameter indicates the total number of cups dispensed for a selected Serving Size. The
Dispense Counter does not include Rinse Dispenses. The maximum Dispense Counter value is 49,999; after which the
value will begin again from zero. In Service Mode this parameter can be reset to zero by simultaneously depressing the
▼and ▲Keys. Default Values has no effect on this parameter.
3. Dispense Mode – This parameter determines whether the system dispenses in a continuous (Free Flow) or fixed size
(Portion Control) method. The default setting for this parameter is Portion Control
4. Serving Size – This parameter determines the amount of water dispensed for each Dispense Key when the Dispense
Mode is set to Portion Control. The default setting is 8.0 ounces. The minimum Serving Size is 2.0 ounces. The
maximum Serving Size is 64.0 ounces.
5. Gram Throw – This parameter determines the ratio of product to water during a Dispense for a selected Hopper. The
units of measure for Gram Throw are proportional to Auger Turns per ounce of water. At a Fill Constant of 1.00 ounces
per second the maximum Gram Throw is 100 and the minimum Gram Throw is 20. The maximum and minimum values
are scaled proportional to a Fill Constant of 1.00 ounces per second. For example: if the Fill Constant is set to 1.30
ounces per second the maximum Gram Throw would be (100*1.00)/1.3 = 77. This prevents the user from requesting a
Gram Throw that is beyond the capability of the Auger Motor. Auger Start and Stop Times have no effect on this
parameter. The default setting for this parameter will reset all gram throw settings to factory specs.
6. Auger Start Time – This parameter sets the time that the Auger starts to turn relative to the activation (opening) of the
Dump Valve. A positive value indicates an Auger starting at some time after the opening of the Dump Valve. A negative
number indicates an Auger starting at some time before the opening of the Dump Valve. The minimum Auger Start Time =
(-3.0) seconds. The maximum Auger Start Time is 3.0 seconds. The default value for this parameter is 0.3 seconds
7. Mixer Start Time – This parameter sets the time that the Mixer starts to turn relative to the activation (opening) of the
Dump Valve. A positive value indicates a Mixer starting at some time after the opening of the Dump Valve. A negative
number indicates a Mixer starting at some time before the opening of the Dump Valve. The minimum Mixer Start Time = (-
3.0) seconds. The maximum Mixer Start Time is 3.0 seconds. The default value for this parameter is 0.3 seconds.
8. Auger Stop Time – This parameter sets the time that the Auger stops turning relative to the de-activation (closing) of the
Dump Valve. A positive value indicates an Auger stopping at some time after the closing of the Dump Valve. A negative
number indicates an Auger stopping at some time before the closing of the Dump Valve. The minimum Auger Stop Time =
(-3.0) seconds. The maximum Auger Stop Time is 3.0 seconds. The default value for this parameter is 0.3 seconds.
9. Mixer Stop Time – This parameter sets the time that the Mixer stops turning relative to the de-activation (closing) of the
Dump Valve. A positive value indicates a Mixer stopping at some time after the closing of the Dump Valve. A negative
number indicates a Mixer stopping at some time before the closing of the Dump Valve. The minimum Mixer Stop Time = (-
3.0) seconds. The maximum Mixer Stop Time is 3.0 seconds. The default value for this parameter is 0.6 seconds.
10. Fill Constant – This parameter must be set for each of the Dump Valves. The maximum Fill Constant is 1.5 oz/sec. The
minimum Fill Constant is 0.1 oz/sec. The maximum and minimum values are scaled proportional to a Gram Throw of 100.
For example: if the highest Gram Throw setting is 77 then the maximum Fill Constant would be (100*1.00)/77 = 1.30. This
prevents the user from requesting a Gram Throw that is beyond the capability of the Auger Motor. The default settings
for this parameter are 0.25 ounces per second for LEFT & MIDDLE CHAMBER, and 1.00 oz/sec For RIGHT (Milk)
CHAMBER.
11. Rinse Dispense Time – This parameter determines the amount of time that the Dump Valve is open during a Rinse
Cycle. The minimum Rinse Time = 3 seconds. The maximum Rinse Time is 15 seconds. The default value for this
parameter is 6 seconds.
.
.
 Loading...