

Page 1

Oven
EN GUIDE TO INSTALLATION
Page 2

As part of our commitment to constantly improving our products, we reserve the right to make
changes to them based on technical advances to their technical and functional features and
appearance.
Warning:
Before installing and using your appliance, please carefully read this Guide to
Installation and Use, which will allow you to quickly familiarise yourself with its operation.
2
Dear Customer,
You have just acquired a CDA oven and we would like to thank you.
We have invested all our dedication and know-how in this appliance so that it
would best meet your needs. With innovation and performance, we designed it
to be always easy to use.
In the CDA product range, you will also find a wide choice microwaves, cooking
hobs, ventilation hoods, cookers, that you can coordinate with your new CDA
oven.
CDA
Page 3

3
1 / NOTICES TO THE USER
••
Safety Recommendations
___________________________________
4
••
Environment
______________________________________________
5
••
Child safety
________________________________________________
5
2 / INSTALLING YOUR APPLIANCE
••
Choice of location
__________________________________________
6
••
Building in
________________________________________________
6
••
Electrical connection
_______________________________________
7
••
Changing the power cable
___________________________________
8
3 / DESCRIPTION OF YOUR APPLIANCE
••
Introduction to your oven
____________________________________
9
••
Description of the accessories
_______________________________
10
••
Description of your programmer ______________________________ 11
4/USING YOUR APPLIANCE
••
Using the programmer
______________________________________
12
º
How to set the time_____________________________________ 12
º
How to change the time _________________________________ 12
º
Immediate cooking _____________________________________ 13
º
Programmed cooking ___________________________________ 14
º
Using the timer function _________________________________ 15
º
Display brightness _____________________________________ 16
5 / OVEN COOKING MODES_______________________________________ 17
6 / CARING FOR AND CLEANING YOUR APPLIANCE
••
Cleaning the outer surfaces
__________________________________
18
••
Cleaning the door
__________________________________________
18
••
Pyrolytic oven cleaning______________________________________ 19
••
Instructions and security ____________________________________ 20
••
Begin cleaning
_____________________________________________
21
••
End of cleaning
____________________________________________
22
7 / TROUBLESHOOTING __________________________________________ 23
••
Changing the bulb
_________________________________________
24
8 / AFTER-SALES SERVICE________________________________________ 25
TABLE OF CONTENTS
EN
Page 4

4
SAFETY RECOMMENDATIONS
— This oven was designed for use by private
persons in their homes. It is intended solely
for cooking foodstuffs. This oven does not
contain any asbestos-based components.
— This appliance is to be used by adults. Make
sure that children do not touch it and that
they do not treat it as a toy. Make sure that
they do not touch the appliance’s control
panel.
— When you receive the appliance, unpack or
have it unpacked immediately. Give it an overall inspection. Make note of any concerns or
reservations on the delivery slip and make
sure to keep a copy of this form.
— Your appliance is intended for standard
household use. Do not use it for commercial
or industrial purposes or for any other purpose than that for which it was designed.
— Do not modify or attempt to modify any of
the characteristics of this appliance. This
would be dangerous to your safety.
— Keep small children away from the appliance while it is in use. Thus you will prevent
them from burning themselves by tipping over
cookware. Moreover, the front of your appliance is hot during use and during cleaning
(pyrolysis).
— Never pull your appliance by the door handle.
— Before using your oven for the first time,
heat it up while empty for approximately
15 minutes. Ensure that the room is sufficiently ventilated. You may notice a particular
odour or a small amount of smoke. All of this
is normal.
— During cooking, ensure that the door of
your oven is firmly closed so that the seal can
properly fulfil its function.
— When in use, the appliance becomes hot. Do
not touch the heating elements located inside
the oven. You are at risk of incurring serious
burns.
— When inserting or removing your dishes
from the oven, do not bring your hands near to
the upper heating elements; use insulated
cooking mitts.
— After cooking, do not touch the cookware
(grid, turnspit, etc.) with bare hands
— Never place aluminium paper directly in contact with the bottom element (See the
“Description of your oven” chapter), the accumulated heat could cause deterioration of the
enamel.
— Do not place heavy items on the open oven
door; ensure that children cannot climb or sit
on it.
— To avoid damaging the control panel of your
appliance, do not leave the door open when
the oven is functioning or still hot.
— The oven must be turned off for all attempts
to clean the cavity.
— Intensive and prolonged use of the appliance
may require additional ventilation achieved by
opening the window or increasing the power
of the mechanical fan.
— In addition to the accessories provided with
your oven, only use dishes that are resistant to
high temperatures (follow manufacturer’s
instructions).
— After using your oven, ensure that all the
controls are in the off position.
— Never use steam or high-pressure devices to
clean the oven (requirement imposed by electrical safety).
— For your safety, your oven is equipped with
an AUTOMATIC STOP, if you forget to turn off
your oven by mistake. After 10 hours of operation, the AS (Automatic Stop) feature is activated and your oven stops running. AS
appears instead of the time and a series of 2
successive beeps is emitted for a short time.
••
Warning
Keep this user guide with your appliance. If the appliance is ever sold or transferred to another person, ensure that the
new owner receives the user guide. Please
become familiar with these recommendations before installing and using your oven.
They were written for your safety and the
safety of others.
11 //
NOTICES TO THE USEREN
Page 5

5
CARE FOR THE ENVIRONMENT
••
— This appliance’s packing materials are recyclable. Recycle them and play a role in protecting the
environment by depositing them in municipal containers provided for this purpose.
— Your appliance also contains many recyclable materials. It is therefore marked with this logo to
indicate that used appliances must not be mixed with other waste. Recycling of the appliances organised by your manufacturer will thus be undertaken in optimum conditions,in accordance with European directive 2002/96/CE relative to electrical and electronic equipment waste. Consult your city hall or your retailer to find the drop-off points
for used appliances that is nearest to your home.
— We thank you for your help in protecting the environment.
Warning
IInnssttaallllaattiioonn sshhoouulldd oonnllyy bbee ppeerrffoorrmmeedd bbyy qquuaalliiffiieedd iinnssttaalllleerrss aanndd tteecchhnniicciiaannss..
TThhiiss aapppplliiaannccee ccoommpplli
ieess wwiitthh tthhee ffoolllloowwiinngg EEuurrooppeeaann ddiirreeccttiivveess::
-- LLooww VVoollttaaggee DDiirreeccttiivvee 7733//2233//CCEEEE mmooddiiffiieedd bbyy ddiirreeccttiivvee 993
3//6688//CCEEEE ffoorr aattttrriibbuuttiioonn ooff CCEE
aapppprroovvaall..
-- EElleeccttrroommaaggnneettiicc CCoommppaattiibbiilliittyy DDiirreeccttiivvee 8899//333366//CCEEEE mmooddiiffiieed
d bbyy ddiirreeccttiivvee 9933//6688//CCEEEE ffoorr aattttrrii--
bbuuttiioonn ooff CCEE aapppprroovvaall..
-- CCEE RReegguullaattiioonn 11993355//22000044 ccoonncceerrnniinngg mmaatteerri
iaallss aanndd oobbjjeeccttss ddeessiiggnneedd ttoo ccoommee iinnttoo ccoonnttaacctt wwiitthh
ffooooddssttuuffffss..
1 / NOTICES TO THE USER
EN
Page 6
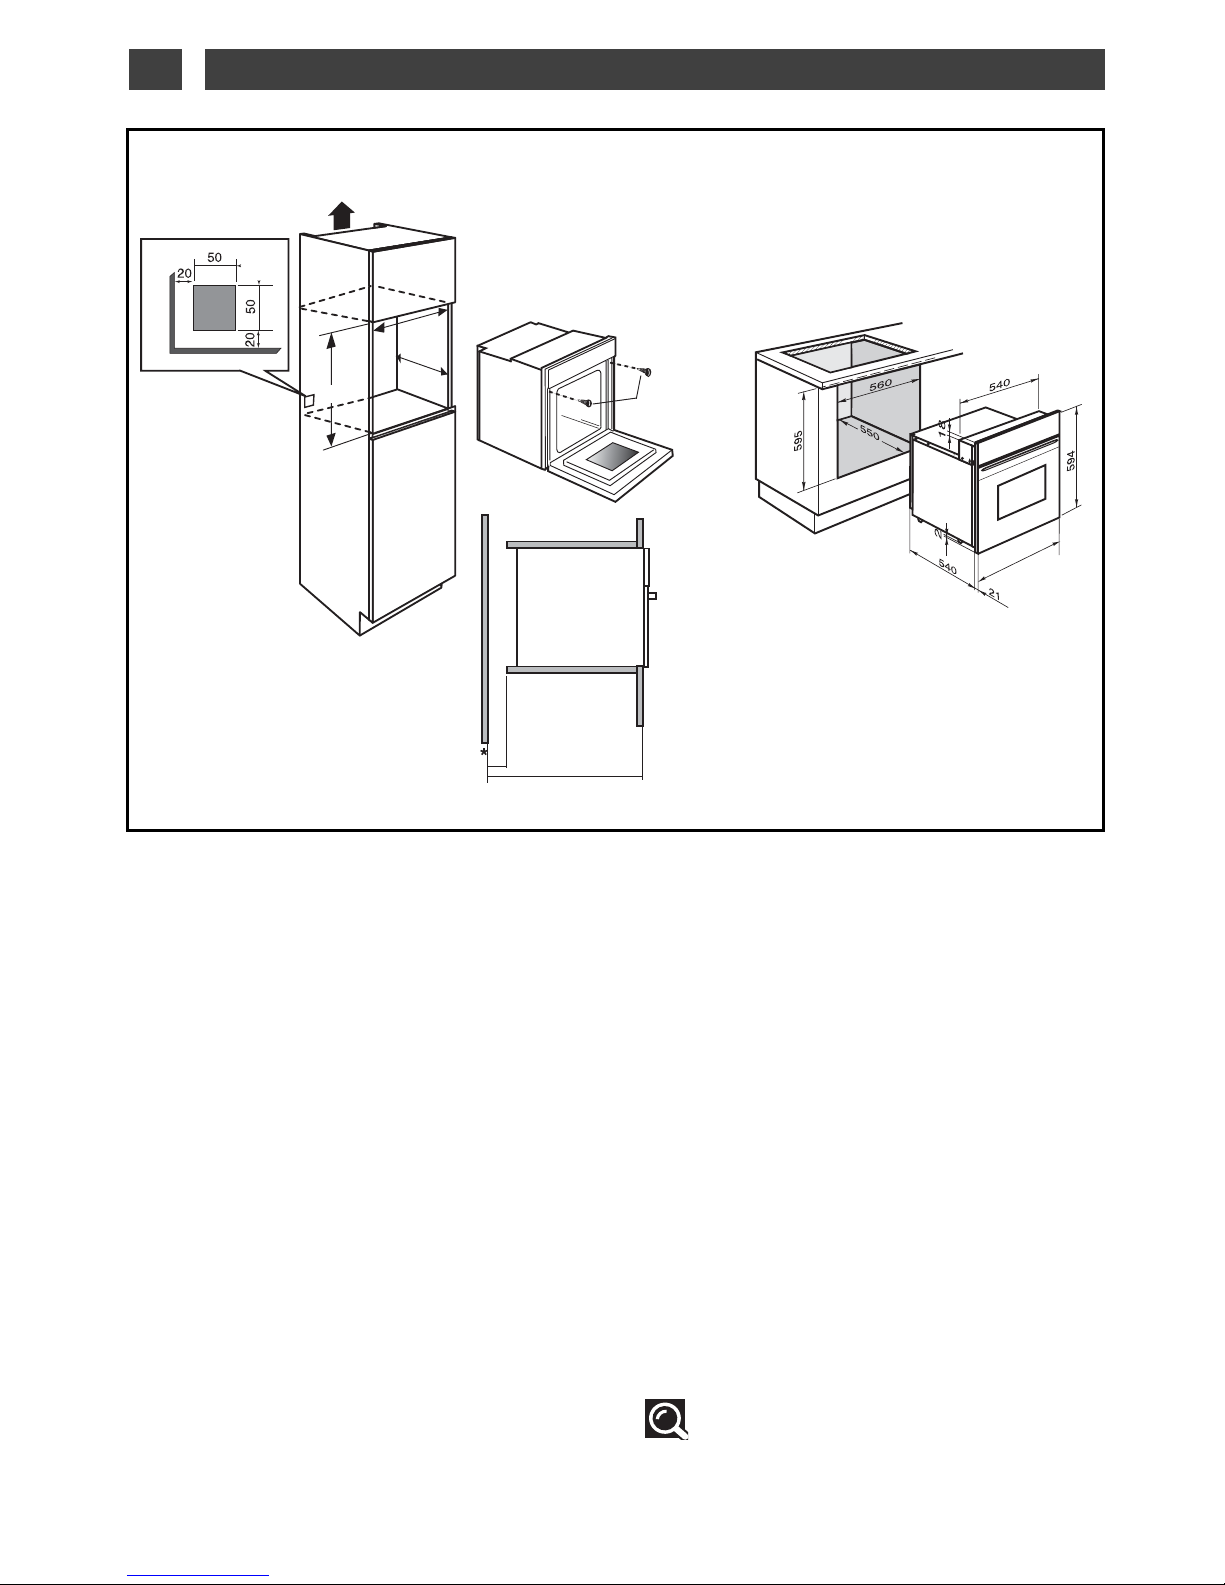
6
provided for this purpose on either side of the
front side panels (fig.1).
BUILD-IN
To do this:
1) Remove the rubber screw covers to access
the mounting holes.
2) Drill a Ø 2 mm hole in the cabinet panel to
avoid splitting the wood.
3) Attach the oven with the two screws.
4) Replace the rubber screw covers (they also
serve to absorb the shock caused by closing
the oven door).
(*) If the cabinet is open, its opening must be
70 mm (maximum).
Tip
To be certain that you have properly
installed your appliance, do not hesitate to
call on a household appliance specialist.
••
CHOICE OF LOCATION
The diagrams above indicate the dimensions
of a cabinet that would be acceptable for your
oven.
The oven can be installed under a work top or
in a column of cabinetry (open* or closed)
having the appropriate dimensions for built-in
installation (see adjacent diagram).
Your oven has optimised air circulation that
allows it to achieve remarkable cooking and
cleaning results if the following guidelines are
respected:
• Centre the oven in the cabinet so as to
guarantee a minimum distance of 5 mm between the appliance and the neighbouring
cabinet.
• The destination cabinet must be made of or
coated with a material that is heat resistant.
• For greater stability, attach the oven in the
cabinet with two screws through the holes
••
585
560
550
70
550
592
Fig. 01
2 / INSTALLING YOUR APPLIANCEEN
Page 7

7
••
ELECTRICAL CONNECTION
Monophase 20A Meter
220-240V~ 50Hz
Electrical outlet
2 prong receptacle
+ ground lead
CEI Standard 60083
Monophase line 220-240 V ~
Power cable
length 1.50 m
approximately
A fuse or differential cir-
cuit breaker
Electrical safety must be provided by a correct build-in. During build-in and maintenance
operations, the appliance must be unplugged
from the electrical grid; fuses must be cut off
or removed.
The electrical connections are made before
the appliance is installed in its housing.
Ensure that:
- the electrical installation has sufficient voltage,
-the electrical wires are in good condition
- the diameter of the wires complies with the
installation requirements.
Your oven must be connected with a power
cord (standardised) with three 1.5 mm
2
conductors (1 ph +1 N + ground) that must be
connected to a monophase 220-240 V
~ net-
work via a CEI 60083 standardised receptacle (1 ph +1 N + ground lead) or an all-pole
cut-off device, in compliance with installation regulations.
Warning
The safety wire (green-yellow) is con
nected to the appliance’s terminal and
must be connected to the ground lead of the
electrical set-up.
In the case of a hook-up with electrical outlet,
it must be accessible after installation.
The fuse in your set-up must be 16 amperes.
If the power cable is damaged, it must be replaced by a cable or a special kit available
from the manufacturer or its After-Sales Service Department.
2 / INSTALLING YOUR APPLIANCE
EN
Page 8

8
••
——
The power cable (H05 RR-F, H05 RN-F ou H05 VV-F) must be of sufficient length to be connect-
ed to the build-in oven while it sits on the floor in front of the cabinet.
To do this the appliance must be disconnected from the electrical network:
——
Open the inspection flap located at the lower right of the back cover by unscrewing the two
screws, then pivot the inspection flap.
——
Strip 12 mm along each wire of the new power cable.
——
Carefully twist together the strands.
——
Loosen the screws from the terminal board and remove the power cord to be replaced.
•
Introduce the power cable through the side of the cover in the cable clip located to the right of
the terminal board.
——
All the strands of the electricity wires must be captured under the screws.
——
The phase wire on the L terminal.
——
The green-yellow coloured ground wire should be connected to the terminal .
——
The neutral conductor (blue) on the N terminal.
——
Screw down tightly the screws on the terminal board and check the connection by pulling on each
wire.
——
Attach the cable with the cable clip located to the right of the terminal board.
——
Close the inspection flap using the two screws.
Warning
WWee ccaannnnoott bbee hheelldd rreessppoonnssiibbllee ffoorr aannyy aacccciiddeenntt rreessuullttiinngg ffrroomm aann iinneexxiisstteenntt,, ddeeffeeccttiivvee
oorr iinnccoorrrreecctt
ggrroouunndd lleeaadd..
IIff tthhee eelleeccttrriiccaall iinnssttaallllaattiioonn aatt yyoouurr rreessiiddeennccee rreeqquuiirreess aannyy cchhaannggeess iinn oorrddeerr ttoo hhooookk
uupp yyoouurr
AApppplliiaannccee,, ccaallll uuppoonn aa pprrooffeessssiioonnaall eelleeccttrriicciiaann..
IIff tthhee oovveenn mmaallffuunnccttiioonnss iinn aannyy wwaayy,, uunnpplluug
g tthhee aapppplliiaannccee oorr rreemmoovvee tthhee ffuussee ccoorrrreessppoonnddiinngg
ttoo tthhee sseeccttoorr tthheerree tthhee oovveenn iiss hhooookkeedd uupp..
CHANGING THE POWER CORD
2 / INSTALLING YOUR APPLIANCEEN
Page 9

9
••
INTRODUCTION TO YOUR OVEN
A
B
Programmer
Temperature selector
Function selector
C
D
E
Lamp
Shelf support indicator
Tip
This Guide to Installation and Use is valid for several models. Minor differences in
details and fittings may emerge between your appliance and the descriptions provided.
9
9
3
2
6
4
8
7
E
D
B
A
C
3 / DESCRIPTION OF YOUR APPLIANCE
EN
Page 10

10
REAR
FRONT
••
Anti-tipping safety grid (fig.1)
The grid can be used to hold all dishes and
moulds containing foodstuffs to be cooked or
browned.
It can be used for barbecues (to be placed directly on the grid).
ACCESSORIES
••
fig.1
3 / DESCRIPTION OF YOUR APPLIANCEEN
••
Multi-purpose 45 mm dish (fig.2)
When inserted in the supports under the grid,
it collects juice and fat from grilling, and can
be used half-filled with water as a double-boiler.
Avoid placing roasts or meat directly in the
dish because this is certain to cause significant spattering on the oven walls.
fig.2
fig.3
••
Sloped 45 mm dish equipped with
a special grid for grilling (fig.3)
It serves to collect juices and fat from cooking meat or fish placed directly on the grid
during a grill or pulsed grill sequence.
Never place this dish on the floor of the oven
(it may damage the enamel) unless it is in the
grill position (the bottom heating element
does not turn on when the oven is set for
grilling).
••
TTUURRNNSSPPIITT
(fig.4)
To use the rotisserie :
. Insert the multi-purpose dish at level 1 to collect the meat juice, or on the oven base if the
joint of meat is too large.
. Slide one of the clips onto the rotisserie spit.
Place the joint of meat on the spit. Slide the
second clip onto the spit and centre and press
the two clips down to clamp the joint in place.
. Place the rotisserie spit on the frame.
. Gently push the spit so that the pointed end
fits into the square recess at the back of the
oven.
. Unscrew and remove the handle. After cooking, screw the handle back onto the spit so
that you can remove the joint of meat without
any risk of burning your hands.
fig.4
Tip
To clean dishes coated with antiadhesive enamel, let them col before
cleaning them manually with a dish
soap. Avoid scouring sponges. Do not
cut on it with a knife or a metallic
pizza cutter; use plastic or silicone
utensils instead.
Page 11

11
INTRODUCTION TO THE PROGRAMMER
••
B
A
I
F
G
A
B
Time and duration display
Locked door indicator
ECO cooking indicator
Timer indicator
End of cooking indicator
C
D
F
Cooking time indicator
Touch controls for setting time
Selection touch control (duration and time)
Digital temperature display
G
H
C
D
E
E
I
H
3 / DESCRIPTION OF YOUR APPLIANCE
EN
Page 12

12
•
How to set the time
--
When supplied with electricity
The display flashes 12:00. (fig.1)
Set the time by pressing the + and - touch
controls (pressing and holding the touch
control makes the numbers advance more
quickly) (fig.2).
Example: 12:30
Press the “ ” touch control to enter.
The display stops flashing.
- To reset the clock time
The function selector must be in the 0 position (fig.1).
Press and hold the “ ” touch control for a
few seconds until the display is flashing
(fig.2), then release. Beeps are sounded to
indicate that it is now possible to set.
Adjust the clock setting with the + and - touch
controls (fig.3).
Press the “ ” touch control to confirm
(fig.4).
fig.1
fig.2
fig.2
Warning
If the “ ” touch control is not
pressed, the setting will
be automatically recorded after a few seconds.
fig.3
fig.4
9
9
3
2
6
4
8
7
fig.1
4 / USING YOUR APPLIANCEEN
Page 13

13
9
9
3
2
6
4
8
7
•Immediate cooking
— The programmer should display only the
time.
It should not be flashing (fig.1).
Turn the function selector to the position of
your choice.
Example: position (fig.2).
Your oven suggests the optimal temperature
for this type of cooking.
It is, however, possible to adjust the temperature by turning the temperature selection
knob toward ++or
--
(fig.3)
Example: temperature setting: 210°C (fig. 4).
PPllaaccee yyoouurr ddiisshh iinn tthhee oovveenn
based on the recommendations provided by the cooking
guide.
After these actions, the oven heats up and the temperature indicator flashes.
A series of beeps will be emitted when the oven
reaches the selected temperature.
The temperature stops flashing.
fig.2
fig.4
Warning
All cooking takes place with the door closed.
Warning
After a cooking cycle, the cooling fan continues to operate for a period of time to guar-
antee good oven reliability.
fig.1
fig.3
4 / USING YOUR APPLIANCE
EN
Warning
Do not hang a towel or cloth on the oven handle.
Page 14

14
--
Cooking with immediate start and pro-
grammed duration
- Select the desired cooking mode and adjust
the temperature (fig.1).
- Press the “ ” touch control until the cook-
ing time indicator begins flashing .
The display flashes 0:00 to indicate that you
can now adjust the setting (fig.2).
- Press the ++or --touch controls to set the desired time.
Example: 30 minutes of cooking (fig.
3).
The cooking time is automatically recorded after a few seconds.
The cooking time stops flashing.
The countdown of the duration begins immediately after it has been set.
AAfftteerr tthheessee tthhrreeee sstteeppss,, tthhee oovveenn hheeaattss uupp::
A series of beeps will be emitted when the
oven reaches the selected temperature.
At the end of cooking (end of programmed
time),
- The oven stops,
- The cooking time indicator and 0:00 flash
(fig.
4).
- A series of beeps is emitted for a few
moments. The beeps are definitively stopped
by pushing on any touch control.
The displays once again shows the time of
day when the function selector is returned to
0 (fig.5
).
fig.2
fig.3
PROGRAMMED COOKING
••
fig.1
fig.4
9
9
3
2
6
4
8
7
fig.5
4 / USING YOUR APPLIANCEEN
Page 15

15
--
Cooking with delayed start and desig-
nated cooking end time
PPrroocceeeedd aass wwiitthh ssttaannddaarrdd pprrooggrraammmmeedd ccooookk--
iinngg..
- After setting the cooking time, press the
“ ” touch control until the “ ” end of
cooking indicator flashes
The display flashes 0:00 to indicate that you
can now adjust the setting (fig.1).
- Press the ++or --touch control to set the desired cooking end time.
Example: end of cooking at 13:00 (fig.2).
The end of cooking time is automatically
recorded after a few seconds or when you
press the “ ” touch control.
The end of cooking time display stops flashing.
AAfftteerr tthheessee tthhrreeee sstteeppss,, tthhee oovveenn hhe
eaattiinngg iiss
ddeellaayyeedd ssoo tthhaatt ccooookkiinngg eennddss aatt 1133::0000..
At the end of cooking (end of programmed
time),
- The oven stops,
- The cooking time indicator and 0:00 flash
(fig.
3).
- A series of beeps is emitted for a few minutes. The beeps are definitively stopped by
pushing on any touch control.
The displays once again shows the time of
day when the function selector is returned to
0 (fig.4
).
fig.1
fig.2
fig.3
fig.4
PROGRAMMED COOKING
••
4 / USING YOUR APPLIANCE
EN
Page 16

16
-- YYoouurr oovveenn’’ss pprrooggrraammmmeerr ccaann bbee uusseedd aass aann
iinnddeeppeennddeenntt ttiimmeerr tthhaatt aalllloowwss yyoouu ttoo ccoouunntt
ddoowwnn aa ttiimmee wwi
itthhoouutt ooppeerraattiinngg tthhee oovveenn..
In this case, the timer display has priority over
the clock display.
- Press the “ ”
TOUCH CONTROL
(fig.1) until the
timer symbol flashes
-> 0.00 and a small hourglass flashes.
- Adjust the selected time by pressing the++or
--
touch controls. (fig.2).
- Press on the “ ” touch control to confirm
or wait a few seconds.
Warning
It is possible to change or cancel the timer programme at any time.
fig.1
fig.2
USING THE TIMER FUNCTION
••
SETTING THE DISPLAY BRIGHTNESS
••
You can adjust the brightness of your display. To
do this:
- Set and confirm the time on your programmer
as 00:10 (fig.1).
- Press simultaneously on the ++and --touch controls for 10 seconds until “CO” is displayed; you
are not in configuration mode (fig.2).
- Press the ++and
--
touch controls to obtain the
desired brightness.
After having adjusted the brightness to your liking, wait a few seconds and return your programmer to the current time of day.
fig.1
fig.2
The display stops flashing after a few seconds and the timer starts working, counting down the
time in seconds.
Once the time has expired, the timer emits a series of beeps to notify you.
The beeps are stopped by pushing on any touch control.
4 / USING YOUR APPLIANCEEN
Page 17

17
CCIIRRCCUULLAATTIINNGG HHEEAATT
(recommended temperature
118800°°CC
- Min. 35°C - Max. 235°C)
•
Cooking is controlled by the heating element located at the back of the oven and by the
fan.
•
Preheating unnecessary except for cooking programmes requiring very short times
(biscuits on several levels).
•
Recommended for preserving tenderness in meats, vegetables and fish and for multi-
ple cooking on up to three levels.
TTRRAADDIITTIIOONNAALL
(recommended temperature
224400°°CC
- Min 35°C Max - 275°C)
•
Cooking controlled by the upper and lower heating elements with no fan.
•
Requires preheating before the dish is placed in the oven.
•
Recommended for
ssllooww,, ggeennttllee ccooookkiinngg::
tender game meat, etc. To seal
rrooaassttss
of red
meat. To simmer in a
ccoovveerreedd sstteeww ppaann
dishes that were begun on the hob (coq au vin,
stew, etc.).
FFAANN GGRRIILLLL ++ TTUURRNNSSPPIITT
(recommended temperature
220000°°CC
min 180°C max 230°C)
•
Cooking controlled, alternately, by the upper element and by the fan.
•
Preheating is unnecessary. Roasts and poultry are juicy and crispy all over.
•
The spit keeps turning until the door is opened.
•
Slide the drip tray onto the bottom shelf support.
•
Recommended for all poultry and roasts on the spit, for cooking leg joints thorough-
ly, and cuts of beef. To keep fish steaks moist.
TTRRAADDIITTIIOONNAALL EECCOO
(recommended temperature
220000°°CC
- Min 35°C Max - 275. C)
•
Cooking controlled by the upper and lower heating elements with no fan.
•
This position makes it possible to save approximately 25% while maintaining cooking
properties. The ECO position is used for the energy label performance.
•
You will save energy throughout the cooking cycle, but the time may be slower.
PPUULLSSEEDD BBOOTTTTOOMM EELLEEMMEENNTT
(recommended temperature
220055°°CC
- Min 35°C Max - 275. C)
•
Cooking is controlled by the bottom element combined with a slight dose of the grill
and with the fan.
•
Cooking heat from the bottom with a small amount of heat from the top. Place the grid
on the lowest shelf support.
•
Recommended for
mmooiisstt ddiisshheess
(quiches, juicy fruit tarts, etc.). The crust will be thor-
oughly cooked on the bottom. Recommended for
ddiisshheess tthhaatt rriissee(ccaakkee,, bbrriioocchhee, kkoouuggllooff,,
eettcc..
) and
ffoorr ssoouuffffllééss
that will not be stuck by a crust formed on the top.
Cooking multiple items on up to three levels.
*
5 / OVEN COOKING MODES
EN
Page 18

18
LLOOWW TTEEMMPPEERRAATTUURREE SSTTAABBIILLIISSAATTIIOONN//BBRREEAADD DDOOUUGGHH
(recommended temperature
8800°°CC
- Min 35°C Max - 100°C)
•
Heat regulated by the upper and lower elements with use of fan.
•
Recommended for
rriissiinngg ddoouugghh ffoorr bbrreeaadd,, bbrriioocchhee,, kkoouuggllooff
, etc. while not exceeding
40° (plate heating, defrosting).
GGRRIILLLL MMEEDDIIUUMM ++ SSPPIITT
(recommended temperature
221100°°CC
min 180°C max 230°C)
•
Cooking is done by the upper element.
•
The double grill covers the entire grid surface.
•
They are recommended for grilling chops, sausages, toast or prawns placed on the
grid.
* Programme(s) used to obtain the results indicated on the energy label in compliance with
European standard EN 50304 and in accordance with European Directive 2002/40/CE.
5 / OVEN COOKING MODESEN
Page 19

19
CLEANING THE OUTER SURFACES
••
To clean the window of the electronic timer, as well as the oven door, use a soft cloth moistened
with a glass cleaner.
Do not use abrasive cleaning products or hard, metallic scrubbers to clean the oven’s glass
door, which could scratch the surface and cause the glass to shatter.
To preserve your appliance, we recommend that you use Clearit cleaning products.
Clearit offers you professional products and solutions designed for the daily care of your household appliances and kitchens.
They are on sale at your regular retailer, along with a complete line of accessories and consumable products.
PPrrooffeessssiioonnaall eexxppeerrttiissee
sseerrvviinngg iinnddiivviidduuaallss
- Open the door all the way and fix it in place
using the two red stops (fig.1).
They are supplied in your appliance’s plastic
pouch.
CLEANING THE DOOR
••
fig.1
fig.2
- Remove the first clipped in glass as follows:
Insert the other two red stops in the AAlocations provided for this purpose (fig.2).
Create a lever effect on these parts to unclip
the glass (fig.3).
- Clean the glass using a soft sponge and dish
soap.
Do not immerse the glass in water.
Do not use abrasive creams or scrubbing
sponges. Rinse with clean water and dry with
a lint-free cloth.
AA
AA
Warning
Before unclipping the glass, let the
appliance cool down.
6 / CARING FOR AND CLEANING YOUR APPLIANCE
EN
CLIC
CLIC
fig.3
Page 20

20
- This type of oven cleans by high-temperature destruction of the soiling that comes from spattering and spillover.
- The smoke produced is destroyed as it passes through a catalyser.
You should not wait until the oven is excessively coated in grease to initiate a cleaning cycle.
IInn wwhhaatt ssiittuuaattiioonnss sshhoouulldd ppyyrroollyyssiiss bbee uusseedd??
- When your oven smokes during preheating or smokes profusely during cooking.
- When your oven releases an odour even cold after various cooking programmes (lamb, fish,
barbecue, etc.).
Pyrolysis is not necessary after each cooking cycle, but simply when the level of dirtiness warrants it.
CCooookkiinngg pprrooggrraammss tthhaatt pprroodduuccee
lliittttllee ssooiilliinngg
CCooookkiinngg pprrooggrraammmmeess
tthhaatt pprroodduuccee ssooiilliinngg
CCooookkiinngg pprrooggrra
ammmmeess
tthhaatt pprroodduuccee hheeaavvyy ssooiilliinngg
Biscuits, vegetables, pastry,
quiches, soufflés, etc.
Meats, fish (in a dish), stuffed
vegetables
Large cuts of meat on the spit.
Splatter-free cooking: Pyrolysis
is not warranted.
Pyrolysis is warranted after three
cooking cycles.
Pyrolysis can be carried out after
cooking of this type, if there was
extensive spattering.
PYROLYTIC OVEN
••
- If necessary, remove the door’s inner glass
assembly. This assembly is composed of one
or two sheets of glass (depending on model),
each of which has a black rubber corner pad
(fig.4).
- After cleaning, reposition the four rubber
pads, taking care to follow the indications on
the glass:
* top left: L
* top right: R
Place your inner glass assembly in the door
so that L and R are located on the hinge side.
- If your oven is equipped with a single inner
sheet of glass, it must be located as close as
possible to the clipped glass.
- Clip in your last glass sheet by placing the
indication “PYROLYSIS” so that it faces you
(fig.5).
- Remove the red plastic stops.
Your appliance is again operational.
fig.4
CLAC
CLAC
fig.5
LL
RR
6 / CARING FOR AND CLEANING YOUR APPLIANCEEN
Page 21

21
Warning
- Before beginning pyrolysis,
rreemmoovvee aallll tthhee aacccceessssoorriieess iinnssiiddee tthhee oovveenn,, iinncclluuddiinngg aallll
ccooookkwwaarree..
Before beginning pyrolysis, clean any major spill residue that may have occurred to avoid the
risk of a fire or the production of excessive smoke.
- During pyrolysis, the surfaces become hotter than during normal use; children must be kept
away.
- Do not cover the interior of the oven with aluminium paper to avoid having to clean: by provoking overheating, this would damage the enamel that coats the cavity.
SAFETY RECOMMENDATIONS
••
6 / CARING FOR AND CLEANING YOUR APPLIANCE
EN
Page 22

22
To take advantage of the volume of heat already
built up in the oven and thus save energy:
Start a pyrolysis cycle after a cooking programme.
Remove the accessories from the oven and
clean any major spill residue.
Ensure that the programmer displays the time
of day and that it is not flashing (fig.1).
Simply position your cooking selector on the
“Pyrolysis” position or on the “ECO Pyrolysis” (fig.1).
The oven is unavailable for 2.5 hours (two hours
of pyrolysis and 30 minutes of cooling) during
“Pyrolysis” or for two hours (1.5 hours of pyrolysis and 30 minutes of cooling) during “ECO Pyrolysis” (this duration is not modifiable).
This time includes the cooling time until the
door can be unlocked.
9
9
3
2
6
4
8
7
fig.2
Warning
The door effectively locks a few minutes after the start of the cycle.
Pyrolysis stops automatically. When the temperature reaches approximately 275°C, it is
then possible to open the door.
STARTING CLEANING
••
END OF CLEANING
••
Pyrolysis stops automatically; it is then possible
to open the door.
At the end of the pyrolysis cycle, the display indicates 0:00.
Return the function selector to the 0 position.
(fig.3).
When the oven is cool, use a damp cloth to remove the white ashes. The oven is clean and
once again ready for the cooking application of
your choice.
fig.1
9
9
3
2
6
4
8
7
fig.3
6 / CARING FOR AND CLEANING YOUR APPLIANCEEN
Warning
Do not hang a towel or cloth on the oven handle.
Page 23

23
Tip
In all circumstances, if your efforts are not sufficient, contact the After-Sales Service
Department without delay.
IIff yyoouu hhaavvee aa ddoouubbtt aabboouutt tthhee ffuunnccttiioonniinngg ooff yyoouurr oovveenn
, this does not necessarily mean
that there is a malfunction.
IInn aannyy eevveenntt,, cchheecckk tthhee ffoolllloowwiinngg iitteemmss::
Warning
- Repairs to your appliance must be made only by professionals. Repairs not carried out
according to guidelines can be a source of danger to the user.
7 / TROUBLESHOOTING
EN
YYOOUU OOBBSSEERRVVEE
TTHHAATT……
PPOOSSSSIIBBLLEE CCAAUUSSEESS WWHHAATT SSHHOOUULLDD YYOOUU DDOO??
TThhee oovveenn iiss nnoott
hheeaattiinngg
- The oven is not connected.
- Your fuse is out of order.
- The selected temperature is
too low.
➡ Plug in your oven.
➡ Replace the fuse and check its value
(16A).
➡ Increase the selected temperature.
TThhee ppaaddlloocckk iiss
ffllaasshhiinngg
- Problem with the door’s locking mechanism.
➡ Call the After-Sales Service Department.
TThhee lliigghhtt iinn yyoouurr oovveenn
iiss nnoo lloonnggeerr wwoorrkkiinngg..
- The light is out of order.
- The oven is not connected or
the fuse is not working.
➡ Replace the bulb.
➡ Plug in your oven or replace the
fuse.
TThhee ppyyrroollyyssiiss
cclleeaanniinngg ccyyccllee ddooeess
nnoott bbeeggiinn..
- The door is not properly
closed.
- The locking system is defective.
➡ Make sure the door is closed.
➡ Call the After-Sales Service Depart-
ment.
YYoouurr oovveenn ssttaarrttss
bbeeeeppiinngg..
- During cooking.
- At the end of cooking.
➡ The recommended temperature of
your choice has been reached.
➡ Your programmed cooking cycle is
finished.
Page 24

24
Bulb
Unscrew
View port
The bulb is located on the ceiling of your oven’s
cavity.
a) Disconnect the oven.
b) Unscrew the view port (fig.1).
c) Unscrew the bulb in the same direction.
Bulb specifications:
- 15 W
- 220-240 V ~
- 300°C
- E 14 cap
d) Replace the bulb then reposition the view
port and reconnect your oven.
CHANGING THE BULB
••
Tip
To unscrew the view port and the light, use a rubber glove, which will make disas-
sembly easier.
Warning
- Disconnect your oven before performing any task on the bulb to avoid the risk of elec-
tric shock and, if necessary, let the appliance cool down.
fig.1
7 / TROUBLESHOOTINGEN
Page 25

66 //
KUNDENDIENST
DE
Any maintenance on your equipment should be undertaken by:
- either your dealer,
- or another qualified mechanic who is an authorized agent for the brand appliances.
When making an appointment, state the full reference of your equipment (model, type and serial
number). This information appears on the manufacturer's nameplate attached to your equipment.
Eingriffe an Ihrem Gerät dürfen nur:
- von Ihrem Händler oder
- von einem sonstigen Fachmann und Vertragshändler der Marke durchgeführt werden.
Geben Sie bei der Meldung einer Störung die vollständige Typenbezeichnung Ihres Gerätes an
(Modell, Typ, Seriennummer). Diese Angaben finden Sie auf einem an Ihrem Gerät angebrachten Schild.
66 //
AFTER-SALES SERVICE
EN
66 //
SERVICIO TÉCNICO
ES
Qualquer intervenção no seu aparelho deve ser realizada:
- quer pelo seu revendedor,
- quer por outro profissional qualificado autorizado pela marca.
Ao chamá-los, indique a referência completa do seu aparelho (modelo, tipo e número de série).
Estas informações figuram na placa de identificação fixada no aparelho.
Las intervenciones que requiera la máquina deberán ser efectuadas:
- por el revendedor,
- o por cualquier profesional cualificado depositario de la marca.
Al llamar, mencione la referencia completa de la máquina (modelo, tipo y número de serie).
Estos datos figuran en la placa de identificación situada en la máquina.
66 //
SERVIZIO POST-VENDITA E RELAZIONI CON I CONSUMATORI
IT
66 //
SERVICEDIENST
NL
Qualquer intervenção no seu aparelho deve ser realizada:
- quer pelo seu revendedor,
- quer por outro profissional qualificado autorizado pela marca.
Ao chamá-los, indique a referência completa do seu aparelho (modelo, tipo e número de série).
Estas informações figuram na placa de identificação fixada no aparelho.
De eventuele ingrepen in de machine moeten worden uitgevoerd :
- of door uw vakhandelaar,
- of door een andere gekwalificeerd technicus van dit merk.
Tijdens het telefoneren, dient u de complete referentie op te geven van uw machine (model,
type, serienummer). Deze informatie staat op het typeplaatje op de machine.
66 //
SERVIÇO PÓS-VENDA
PT
25
Page 26

99645541 03 /08
 Loading...