

Page 1
INSTRUCTION MANUAL
Dedicated Height Nucleic Acid
Sequencing Systems
Single Unit Dual Unit
DH-400-20 DDH-400-20
DH-500-20 DDH-500-20
DH-600-20 DDH-600-20
DH-400-33 DDH-400-33
DH-500-33 DDH-500-33
DH-600-33 DDH-600-33
Page 2

TABLE OF CONTENTS
Important User Information 3-4
Section 1 General Information
1.1 Introduction 5
1.2 Specifications 5
1.3 Safety 6
Section 2 Description of parts
2.1 Unpacking-Dedicated Height Sequencer 7
2.2 Unpacking-Dual Dedicated Height Sequencer 8
Section 3 Assembly
3.1 Unit assembly for Single Dedicated Sequencer 9-10
3.2 Unit assembly for Dual Dedicated Sequencer 10
3.3 Glass Plate Preparation 11
3.4 Methods for Sealing Glass Plate Sandwich 12-13
3.5 Pouring the Gel 14-15
Section 4 Electrophoresis
4.1 Pre-Electrophoresis 16-17
4.2 Loading Samples 17
4.3 Electrophoresis 18
4.4 Post Electrophoresis-Gel Processing 19-20
4.5 Recommended Buffers and Reagents 21
4.6 References and Suggested Reference Literature 22
Section 5 Tables: Power Settings, Troubleshooting, Comb Volumes
5.1 Recommended Power Settings 23
5.2 Troubleshooting Guide 24
5.3 Comb/Well Volumes 25-27
Section 6 Maintenance of Equipment
6.1 Care and Handling 28
6.2 Maintenance 28
Section 7 Ordering Information 29-37
Page
C.B.S. Scientific 2 Dedicated Height Sequencer
Page 3

S
ENGLI
H
IMPORTANT USER INFORMATION
This Instruction Manual will explain how to use this product safely and effectively. Please read and
carefully follow the instruction manual in its entirety.
The triangle/exclamation mark symbol alerts the user of the product to important
operational, maintenance, and/or warranty requirements.
The triangle/lighting bolt symbol alerts the user of the product to potentially hazardous
WARRANTY AND LIABILITY
This product was produced utilizing the highest practical standards of materials, workmanship, and design.
C.B.S. Scientific warrants that the product has been tested and will meet or exceed published
specifications. This warranty is valid only if the product has been operated and maintained according to
the instructions provided.
C.B.S. Scientific warrants this product to be free from defects in materials and workmanship under normal
service for one year from date of shipment. If the product proves defective during this period, C.B.S.
Scientific will repair or replace it at our option, free of charge, if returned to us postage prepaid. This
warranty does not cover: damage in transit, damage caused by carelessness, misuse or neglect, normal
wear through frequent use, damage caused by solvent corrosion, damage caused by improper handling or
user alteration, nor unsatisfactory performance as a result of conditions beyond our control. C.B.S.
Scientific shall in no event be liable for incidental nor consequential damages, including without limitation,
lost profits, loss of income, loss of business opportunities, loss of use and other related damages, however
caused, nor any damage arising from the incorrect use of the product.
electrical exposure.
Failure to adhere to the instructions could result in personal and/or laboratory hazards, as well as
invalidate any warranty. Always turn off the DC power source prior to disconnecting power cords
from the product. Disconnect power cords from the power source first, and then from the product.
For maximum safety, always operate this system in an isolated, low traffic area, not accessible to
unauthorized personnel. Never operate damaged or leaking equipment.
C.B.S. Scientific 3 Dedicated Height Sequencer
Page 4
FRANÇAIS INFORMATION IMPORTANTE À L'USAGE DES UTILISATEURS
Le présent manuel d'utilisation explique la manière de se servir efficacement du produit en conditions
de sécurité. Il est recommandé de soigneusement lire la totalité du manuel, avec ses consignes
et ses instructions.
Le triangle avec point d'exclamation est un symbole destiné à avertir l'utilisateur du produit de
l'importance de certaines exigences relatives au fonctionnement, à l'entretien et/ou à la
garantie.
Le triangle avec flèche en zigzag est un symbole destiné à avertir l'utilisateur du produit de la
possibilité d'exposition à des décharges avec danger de secousses électriques.
Tout manquement à l'observation des consignes et des instruc tions peut exposer les personnes
et les biens à des dommages corporels et/ou m atériels et peut annuler toute garantie. Il faut toujours
interrompre l'alimentation de courant continu avant de déconnecter les cordons d'alimentation du
produit. Déconnecter d'abord les cordons d'alimentation branchés sur la source de tension
(alimentation de secteur) puis ceux branchés sur le produit. Pour une sécurité m aximum, il faut toujours
faire fonctionner ce système dans un lieu isolé, peu fréquenté, où le personnel non autorisé n'a pas
accès. Ne jamais faire fonctionner un matériel endommagé ou affecté par des fuites.
GARANTIE ET RESPONSABILITÉ
Le produit a été fabriqué conformément aux norm es applicables les plus exigentes en matière de
matériaux, de main d'oeuvre, de conception et d'ingéniérie. C.B.S. Scientific garantit que le produit a
subi des essais et que ses performances r empliront les conditions des spéc ifications publiées ou leur
seront même supérieures. La présente garantie n'est valide que si le produit a fonctionné et a été
entretenu conformément aux consignes et instructions fournies.
C.B.S. Scientific garantit que le produit sera dépourvu de vices de matériaux et de main d'oeuvre, en
conditions de service normales, pendant un an à com pter de la date d'expédition. Au cas où le pr oduit
s'avérerait défectueux pendant cette période de garantie, C.B.S. Scientific réparera ou r emplacera le
produit, à sa discrétion et gratuitement, si le produit lui est retourné port payé d'avance. La garantie ne
couvre pas les dommages de transport; les dommages causés par l'im prudence, le manque de soins,
l'abus ou la négligence; l'usure normale résultant d'une utilisation fréquente; les domm ages causés par
la corrosion des solvants; et les dommages causés par la manipulation inadéquate ou des
changements apportés par l'utilisateur. La garantie ne couvre pas non plus les perf ormances non
satisfaisantes résultant de conditions hors du contrôle de C.B.S. Scientific. C.B.S. Scientific ne pourr a
en aucun cas être tenue responsable de dommages indirects, y compris, de m anière non limitative, la
perte de bénéfices, le manque à gagner, la perte d'occasions d'aff aires, l'impos sibilité d'usage ou tous
autres dommages associés, quelle qu'en soit la cause, ni de dom mages résultant de l'usage incorrect
du produit.
DEUTSCH WICHTIGE INFORMATION FÜR DEN BENUTZER
Diese Bedienungsanleitung beschreibt wie man dieses Produkt sicher und wirksam benutzt. Bitte lesen
und befolgen Sie alle Anweisungen in dieser Anleitung.
Das Dreieck mit Ausrufezeichen weist den Benutzer des Produktes darauf hin, daß
wichtige Bedienungs-, Wartungs- und/oder Garantievorschriften zu beachten sind.
Das Dreieck mit Zickzackblitz warnt den Benutzer des Produktes vor möglichen
Gefahren durch elektrische Spannungen.
Nichtbeachtung dieser Anweisungen kann zu persönlichen und/oder labortechnisc hen Schäden
führen und gleichzeitig alle Garantien als nichtig erklären. Die DC Stromzufuhr muß imm er, vor dem
Entfernen der Stromkabel vom Produkt, abges chaltet werden. Die Stromzufuhrkabel müssen zuerst
von der Steckdose und erst dann vom Produkt entfernt werden. Um höchste Sicherheit zu
gewährleisten sollte dieses System in einem abgesonderten und besonders ruhigen Ber eich eingesetzt
werden und vor Unbefugten sicher sein.
GARANTIE UND HAFTUNG
Dieses Produkt wurde unter Anwendung von Produkten mit höchster Qualität und aus Materialien m it
bester Verarbeitung und modernstem Des ign hergestellt. C.B.S Scientific gar antiert, daß das Produk t
getestet wurde und alle publizierten Spezifikationen übertrifft. Diese Garantie ist jedoch nur gültig,
wenn das Produkt nach der beigefügten Bedienungsanleitung bedient und gewartet wurde.
C.B.S. Scientific garantiert, daß dieses Produkt bei normaler Bedienung aus fehlerfreiem Material
besteht und fehlerfrei in der Ausführung ist. Diese Garantie gilt für ein Jahr ab Lieferdatum. Sollte das
Produkt in diesem Zeiraum fehlerhaft werden, bietet C.B.S. Scientif ic eine kostenlose Reparatur bzw.
kostenlosen Ersatz, einschließlich freiem Rückporto. Diese Garantie schließt folgendes aus:
Transportschaden, Schaden durch Nachlässigkeit, Mißbrauch oder Vernachlässigung, normale
Abnützung durch regelmäßigen Gebrauch, Schaden durch Säureangriff, Schaden durch falsche
Handhabung, Veränderung des Produktes durch den Benutzer, oder unzureichende Leistungen die sich
nicht im Verantwortungsbereich von C.B.S. Scientific befinden. C.B.S. Sc ientific kommt unter keinen
Umständen für folgende Schäden auf: Sachschadensverlust, Einkommensverlust, Verlust von
Geschäftsmöglichkeiten, Verlust der Anwendung und andere damit verbundene Schäden die auf irgend
eine Art und Weise entstanden sind, oder Schäden die aus falscher Anwendung des Produktes
entstanden sind.
SECTION 1
ESPAÑOL INFORMACIÓN IMPORTANTE PARA EL USUARIO
El presente instructivo explica la manera de usar este producto en forma segura y efectiva. Sírvase
leerlo en su totalidad y seguir detenidamente las indicaciones que contiene.
El símbolo del triángulo con exclamación llama la atención del usuario a requisitos
importantes para el uso y mantenimiento del producto, así como para la validez de la
garantía.
El símbolo del triángulo con rayo llama la atención del usuario a la posibilidad de
riesgos eléctricos.
El incumplimiento de las instrucciones aquí señaladas podría dar lugar a riesgos a la persona, al
laboratorio o a ambos y podría anular toda garantía. Siempre apague la fuente de corriente continua
antes de desenchufar los cables eléctric os del producto. Primero desc onecte los cables de la fuente
de energía y después del producto. Para mayor seguridad, siempre use este sistem a en un área
aislada, de poco movimiento de personas e inaccesible a personal no autorizado. Jamás use equipo
que presenta algún daño o fuga.
GARANTÍA Y RESPONSABILIDAD
Este producto fue fabricado de acuerdo con las normas más estrictas que sean factibles en cuanto a
materiales, mano de obra y diseño. C.B.S Scientific garantiza que se sometió el producto a pruebas y
que cumplirá o excederá las especif icaciones publicadas. Esta garantía s erá válida únicamente si se
usa y se da servicio de mantenimiento al producto de acuerdo con las instrucciones señaladas.
C.B.S. Scientific garantiza que este producto se encontrará libre de defectos de m ateriales y mano de
obra por un período de servicio normal de un año a partir de la fecha de embar que. Si el producto
resulta defectuoso durante este período, C.B.S. Scientific lo reparará o lo repondrá, a criterio de C.B.S.,
libre de cargos, si se devuelve el producto a C.B.S. porte pagado. Esta garantía no cubre daños
sufridos en tránsito, daños provocados por descuido, mal uso o negligencia, desgaste norm al como
consecuencia del uso excesivo, daños atribuibles a corrosión provocada por solventes, daños
causados por el uso indebido o alteraciones realizadas por el usuario ni rendimiento insatisfac torio
atribuible a circunstancias fuera del control de C.B.S. Scientific. C.B.S. Scientific en ningún caso
asumirá responsabilidad por daños incidentales o subsecuentes, inc luyendo, en forma no limitativa, la
pérdida de utilidades, de ingresos, de oportunidades comerciales o del uso del pr oducto y otros daños
afines, fuere cual fuere su origen, ni por daños derivados del uso incorrecto del producto.
ITALIANO INFORMAZIONI IMPORTANTI PER L’UTENTE
Questo manuale spiega come utilizzare questo prodotto in maniera sicura ed efficiente. Si pregai di
leggere e seguire con cautela le istruzioni di ogni parte di questo manuale.
Il triangolo contenete il simbolo di un punto esclamativo avverte l’utente di importanti
requisiti relativi al funzionamento, manutenzione e/o garanzia del prodotto.
Il triangolo contenete il simbolo di un lampo avverte l’utente del prodotto della
laboratorio, oltre a poter annullare la garanzia. Prima di distaccare il cordone d’alimentazione dal
prodotto, spegnere sempre la sorgente di corrente continua. Distacc are i cordoni d’alimentazione
prima dal lato della sorgente di tensione e poi dal lato del prodotto. Per maggior sicurezza, mettere
sempre in funzione il prodotto in un’area isolata con poco traffico che non s ia acces sibile al personale
non autorizzato. Non mettere mai in funzione un’apparecchiatura che sia danneggiata o abbia perdite.
GARANZIA E RESPONSABILITÀ
Questo prodotto è stato fabbricato seguendo gli s tandar d più elevati per i materiali, la manodopera e la
progettazione. La C.B.S. Scientific garantisce il prodotto è stato sottopos to a prova e raggiunge o
supera i valori pubblicati per i dati tecnici. Questa garanzia è valida solo se il prodotto è messo in
esercizio e soggetto a manutenzione secondo le istruzioni fornite.
La C.B.S. Scientific garantisce che questo prodotto è liber o di difetti di materiali e manodopera, in
normali condizioni d’esercizio, per la durata di un anno dalla data di spedizione. Se, in questo periodo, il
prodotto si dimostrerà difettoso, la C.B.S. Scientific, a suo giudizio, lo riparerà o sostituirà. Questa
garanzia non copre danni in transito, danni causati da negligenza, uso improprio, trascuratezza,
normale consumo derivante da uso frequente, o danni causati da s olventi corrosivi, danni causati da
maltrattamento o da modifiche apportate dall’utente e non copre pres tazioni insoddisfacenti c he siano il
risultato di condizioni al di fuori del controllo del fabbricante. La C.B.S. Scientific non sarà in ogni caso
responsabile per danni incidentali o consequenziali, incluso, senza limitazioni, perdite di profitto, perdita
di entrate, perdita di opportunità d’affari e altri danni relativi, comunque causati, e per danni risultati da
uso incorretto del prodotto.
possibilità di pericoli dovuti a corrente elettrica.
La mancata osservanza delle istruzioni può essere causa di pericolo alla propria persona ed al
C.B.S. Scientific 4 Dedicated Height Sequencer
Page 5

General Information
1.1 Introduction
The C.B.S. Scientific Dedicated Height Nucleic Acid Sequencers feature safety covers with
attached power leads, removable upper and lower reservoirs, epoxy-coated anodized aluminum
heat dispersion plates, buffer drainage ports and a clear acrylic bar clamp. The Dual Dedicated
Height Nucleic Acid Sequencers include the same features, with the convenience of divided upper
reservoirs, if independent runs are required. The Sequencers are available in either a single or
dual format and in 20cm or 33cm widths. Applications include Mutation Detection, Genotyping,
Differential Display, DNA Footprinting, SDS Page, Microsatelites, Rnase Protection and
Sequencing.
1.2 Specifications
Constructions:
Upper buffer chamber Acrylic
Lower buffer chamber/base Acrylic
Safety covers Acrylic
Electrodes Platinum wire .012" diameter
Upright/base Acrylic
Rotating base Acrylic
DC Power leads FR Urethane rated 7500VDC@
200mA, 65ºC
Bar Clamp Delrin and acrylic
Heat dispersion plate Epoxy coated anodized aluminum
Glass plates Soda-lime float glass or
Low fluorescence glass
Combs Polycarbonate, Mylar or White
Spacers Polycarbonate, Mylar or White
White spring clamps Polypropylene
Overall size
Nominal Unit Width 20cm unit 33cm unit
Single unit footprint:
Overall width 30.5cm 41.0cm
Overall height
32cm gel size 41.0cm 43.0cm
42cm gel size 51.0cm 53.0cm
52cm gel size 61.0cm 63.0cm
62cm gel size 71.0cm 73.0cm
Dual unit footprint:
Overall width 30.5cm 41.0cm
Overall height
32cm gel size 41.0cm 43.0cm
42cm gel size 51.0cm 53.0cm
52cm gel size 61.0cm 63.0cm
62cm gel size 71.0cm 73.0cm
Recommended nominal buffer volumes
Single units
upper reservoir 250ml 1500ml
lower reservoir
Dual units with Divided Upper Reservoirs
upper reservoir
lower reservoir
(per side) 300-500ml 400-600ml
(total volume/per side) 750/375ml 1500/750ml
(per side) 300-500ml 400-600ml
C.B.S. Scientific 5 Dedicated Height Sequencer
Page 6

1.3 Safety
Power to the Sequencing unit must be supplied by an external DC voltage power supply that must
be ground isolated so that the DC voltage output floats with respect to ground.
Current to the unit, provided from the external power supply, must enter the unit through the lid
assembly, providing a safety interlock to the user. Current to the unit is broken when the lid is
removed. Do not attempt to use the unit without the safety lid, and always turn the power
supply off before removing the lid, or when working with the unit in any way. Follow
safety precautions specified by the power supply manufacturer.
C.B.S. Scientific 6 Dedicated Height Sequencer
Page 7
C.B.S. Scientific 7 Dedicated Height Sequencer
Section 2
Description of Parts
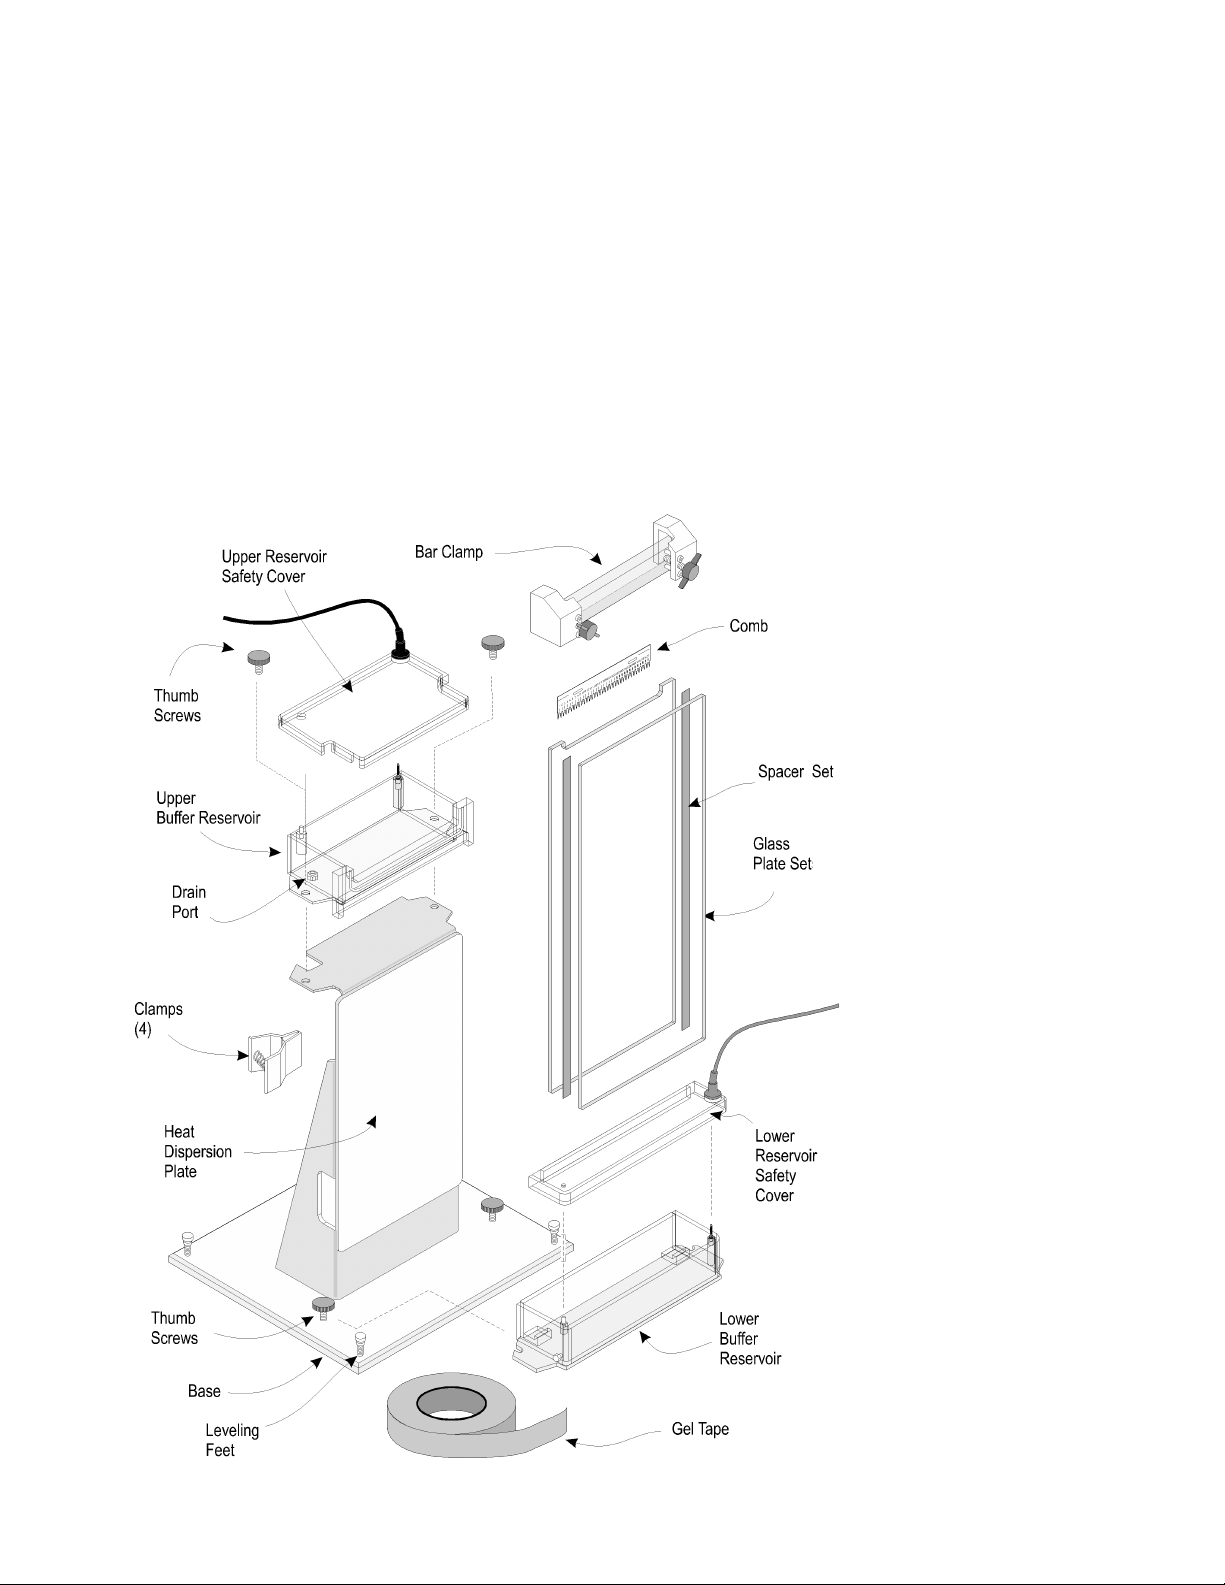
2.1 Unpacking- Dedicated Height Sequencer
Please verify that your sequencing unit comes complete with the following components:
• Buffer reservoirs, upper & lower with • Leveling base with leveling feet
safety covers with attached power leads • Bar Clamp
• Drain plugs installed in upper reservoir • 2 white nylon tubing adapters for buffer
• 4 white spring clamps drain ports
(Cat.# GPC-0001) • Epoxy-coated anodized aluminum heat dispersion
• 4 knurled black thumb screws plate
for securing lower reservoir to base
reservoirs
If a kit was ordered verify that you received the following accessories:
• 1 comb (sharktooth or rectangular) • 1 set spacers
• 1 set glass plates • 1 roll gel sealing tape, cat. # GT-72-10
• 2 wedge plate separators
cat. # WPS-100 (not shown)
Page 8
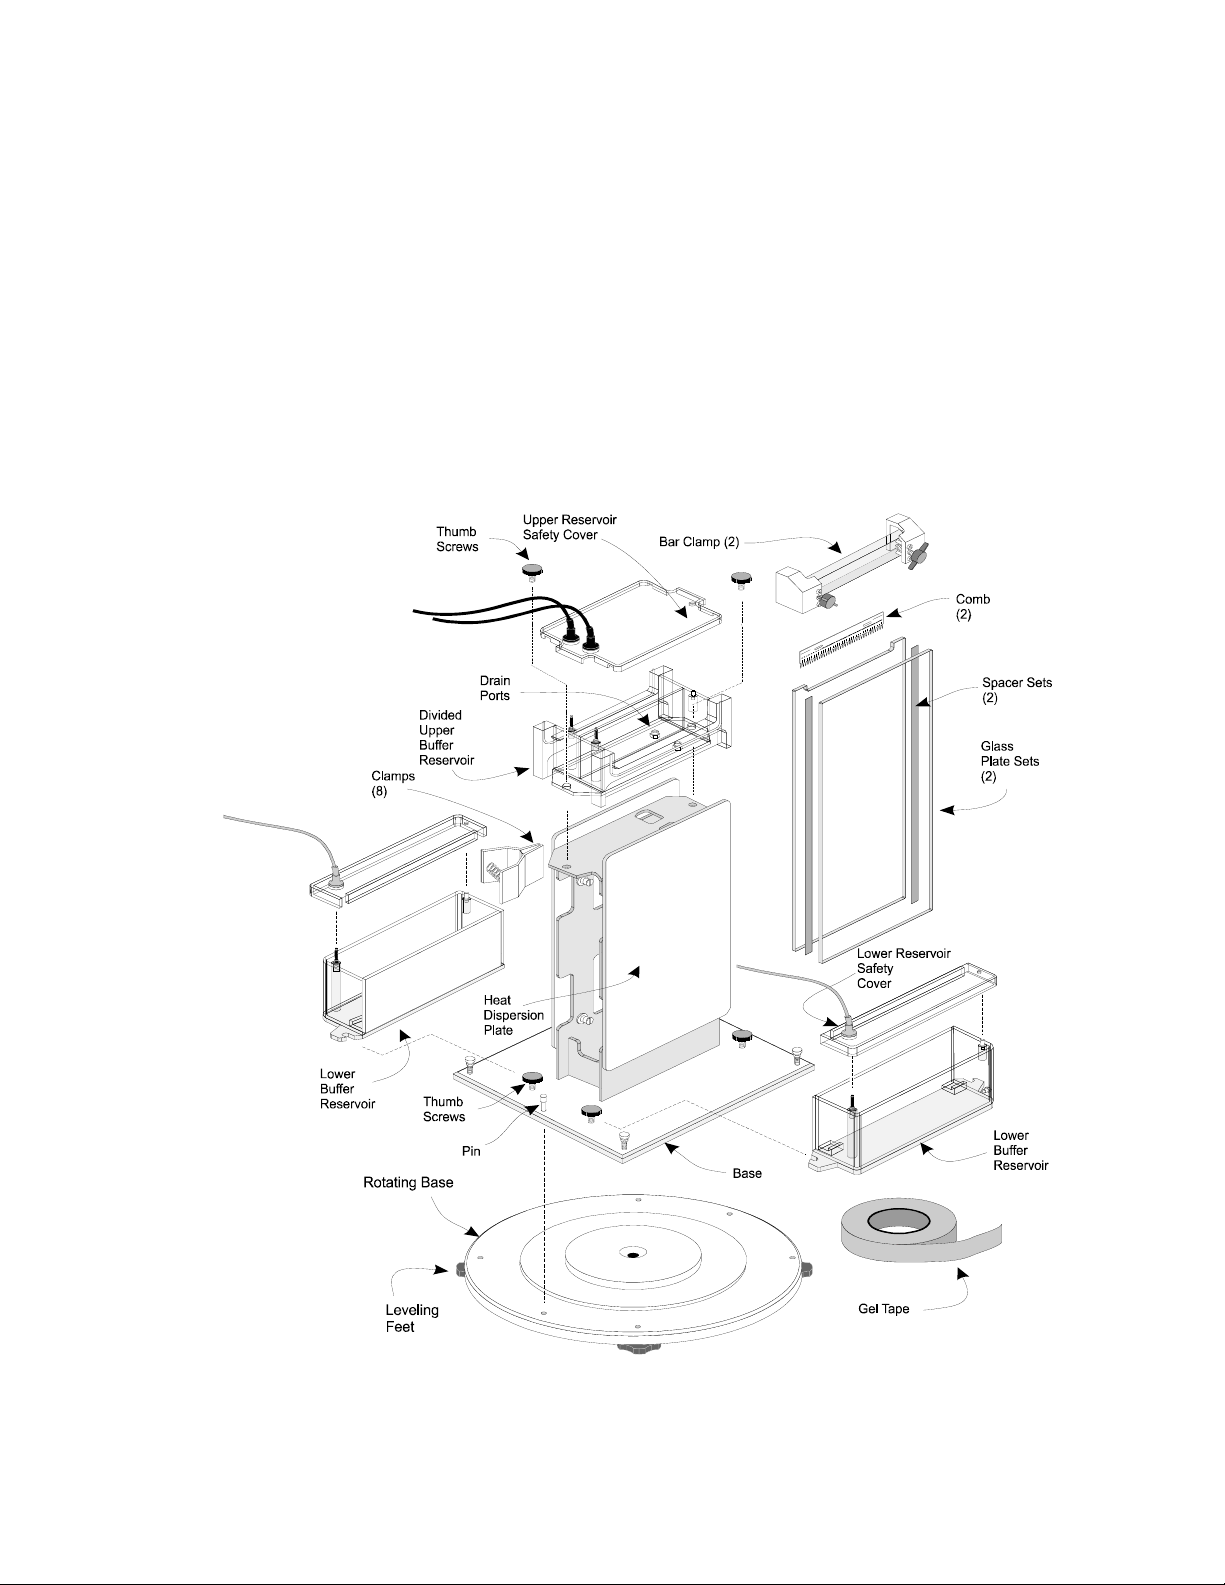
2.2 Unpacking- Dual Dedicated Height Sequencer
Please verify that your sequencing unit comes complete with the following components:
Buffer reservoirs, divided upper Rotating base with leveling feet
& lower with safety covers/power leads Bar Clamps (two)
Drain plugs installed in upper reservoir Four white nylon tubing adapters for buffer
Eight white spring clamps drain ports
(Cat.# GPC-0001) Epoxy-coated anodized aluminum heat dispersion
Six knurled black thumb screws plates (two)
for securing lower reservoir to base
reservoirs
If a kit was ordered verify that you received the following accessories:
Two combs (sharktooth or rectangular) Two sets spacers
Two sets glass plates One roll gel sealing tape, cat. # GT-72-10
Two wedge plate separators Two temperature strip, cat.# EGT-100 (not shown)
cat. # WPS-100 (not shown)
Section 3
C.B.S. Scientific 8 Dedicated Height Sequencer
Page 9
Assembly
3.1 Unit Assembly for Single Dedicated Height Sequencer
Place the Sequencer in a laboratory workspace for authorized personnel only. For protection
against possible damage, the aluminum plate and upper and lower reservoirs are shipped
detached from the unit. Do not attach reservoirs until after aluminum plate is installed. To
assemble follow steps below:
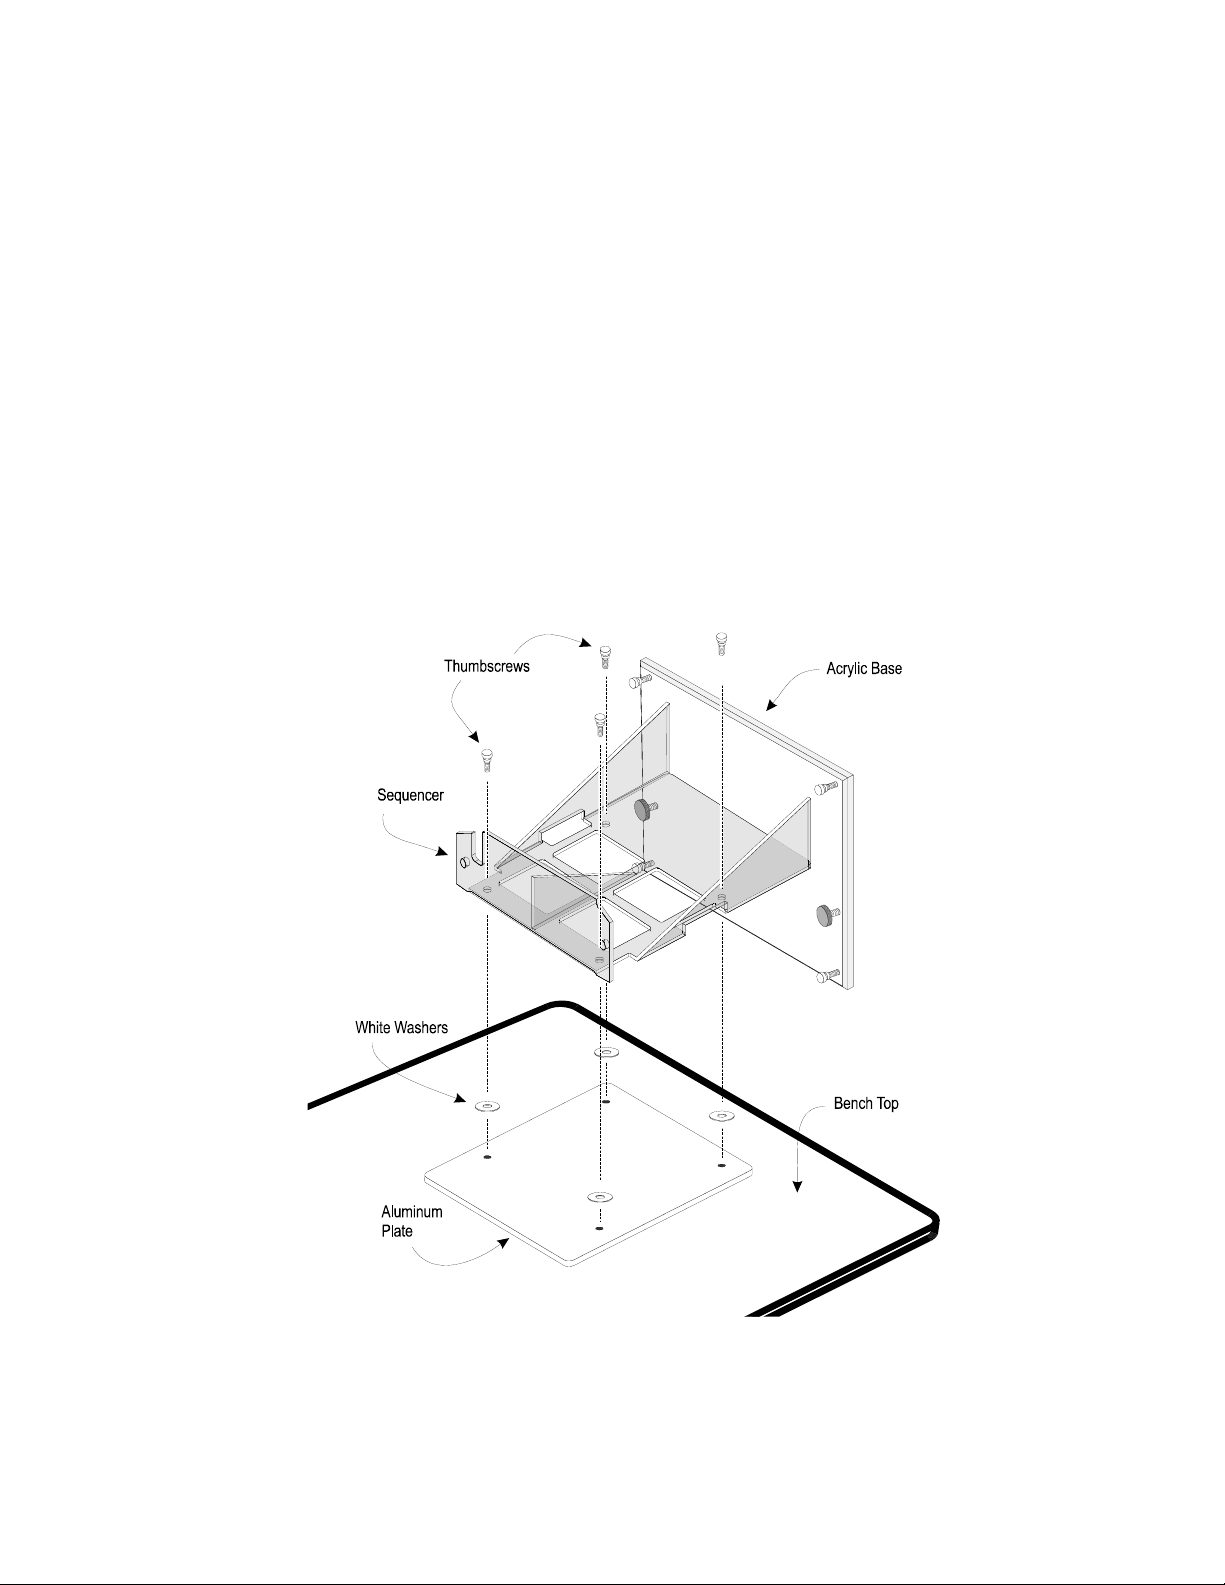
A. Aluminum plate installation (see diagram below).
1. The top-front portion of the aluminum plate will be identified. Place the aluminum
plate face down on the edge of the bench-top as illustrated below. Larger offset of
screw holes in aluminum plate should align with the top of the sequencer upright.
2. Place the four white washers on top of screw holes.
3. Place sequencer in horizontal position with base overhanging bench-top making sure
to support base of unit with one hand and line up the thumb screw holes with washer
and aluminum plate holes.
4. Support base of unit with one hand while attaching the 4 thumbscrews. Tighten
screws and return sequencer to upright position.
C.B.S. Scientific 9 Dedicated Height Sequencer
Page 10

3.1 Unit Assembly for Single Dedicated Height Sequencer-continued
B. Installation of reservoirs.
1. Attach lower reservoir (with red power lead) by loosening black thumb screws on base
of unit and sliding receptacle slots on reservoir around screw stem. Hand tighten.
2. Install upper reservoir (with black lead) by detaching upper black thumb-screws and
positioning oval slot on upper reservoir so that they line up with screw holes on the
base. White O-ring should be facing forward. Re-thread black screws through base
of unit and hand tighten allowing reservoir to slide freely on sequencer upright.
The upper reservoir remains free facilitating the clamping of the glass plate assembly
to the reservoir using the bar clamp. See Section 4.1.
3. Upper and lower reservoirs are shipped with drain plugs installed. Verify that the
drain plugs are secure. If you plan to use accessory Quick-Disconnect fittings (cat.#
QDC-B and QDC-I), or ball valve, remove the drain plugs. Wrap the end of the Quick
Disconnect Insert or valve with Teflon® tape and thread into the drain hole. Be sure
the Quick Disconnect Body is secure and the Quick Disconnect Insert snaps into
place.
4. Level the assembled sequencer using the four leveling feet supplied. Each sequencer
is shipped with an attached bubble level.
3.2 Unit Assembly for Dual Dedicated Height Sequencer
Place the Sequencer in a laboratory workspace for authorized personnel only. To assemble follow
steps below:
1. Attach lower reservoirs (with red power lead) by loosening black thumb screws on
base of unit and sliding receptacle slots on reservoir around screw stem. Hand
tighten.
2. Attach upper reservoir (with black leads) by detaching upper black thumb-screws and
positioning oval receptacles on base of upper reservoir so that they line up with screw
holes. White O-ring should be facing forward. Re-thread black screws through base
of unit and hand tighten.
3. Upper and lower reservoirs are shipped with drain plugs installed. Verify that the
drain plugs are secure. If you plan to use accessory Quick-Disconnect fittings (cat.#
QDC-B and QDC-I), remove the drain plugs. Wrap the end of the Quick Disconnect
Insert with Teflon tape and thread into the drain hole. Be sure the Quick Disconnect
Body is secure and the Quick Disconnect Insert snaps into place.
4. Level the assembled sequencer using the four leveling feet supplied. Each sequencer
is shipped with an attached bubble level.
C.B.S. Scientific 10 Dedicated Height Sequencer
Page 11

3.3 Glass Plate Preparation
1. Select a pair of glass plates (if using a notched set, one notched and one unnotched back
plate) for the appropriate gel height. Be sure the edges of the plates are nick or chip free.
2. It is vital that these plates are absolutely CLEAN ! Wearing gloves (and rinsing off any
residual powder), clean the glass plates thoroughly with a non abrasive detergent and a
plastic scouring pad. The cleaning solution should not leave a soap residue when rinsed
thoroughly.
3. Rinse the glass plates thoroughly with de-ionized water and wipe dry with a lint free paper
towel.
4. If desired, treat the inside (acrylamide contact) surface of one (usually the notched plate) or
both glass plates with a silanizing reagent, such as C.B.S. Scientific's Gel Repel, following
the manufacturer's instructions.
5. Immediately before assembling the glass plate 'sandwich', rinse the inside surfaces with 95%
ethanol and wipe dry with a lint-free paper towel. Avoid touching the inside surfaces with your
fingers. The wearing of gloves is highly recommended. Impeccably clean, dust-free plates
are essential for pouring gels without bubbles.
6. Assemble the glass plate sandwich in the conventional manner; place the back glass plate
inside-up on the bench, align the cleaned spacers at the sides, and place the notched plate
inside-down on the side spacers. **The use of metal “bulldog” clamps is not recommended.
C.B.S. Scientific 11 Dedicated Height Sequencer
Page 12

#GPC
000
3.4 Methods for sealing glass plate sandwich
(A) Gel Slider, ( B) Capillary Gel Casting or (C) Yellow tape
(A) C.B.S. Scientific's Gel Slider, Sequencing Gel Caster. This adjustable width unit
simplifies the pouring of problem-free sequencing gels for the novice or experienced
sequencer. Unit sold separately, see instructions for Gel Slider and skip section 3.5.
(B) Capillary Gel Casting. Depending upon user preference, capillary gel casting can be
performed (1) by using a bottom spacer at the bottom of the gel plate assembly, (2) by
taping the bottom section with yellow tape, or (3) by leaving the end completely open.
Assemble glass plate sandwich with side spacers on a level working surface.
1. If using a bottom spacer, offset the side spacers to accommodate the bottom
spacer, so the spacers line up with the edges of the back plate. Clamp
continuously with casting clamps (cat.# GPC-0002) as shown in illustration.
2. If using tape for the bottom section of the glass plate assembly, extend the tape
around the bottom corners in both directions to ensure an adequate seal. Apply
the tape as smoothly as possible to avoid forming air channels or bubbles along
the edges of the glass plates. Rub the tape firmly onto glass to eliminate air
channels and ensure a liquid-tight seal. Clamp the side sections of the glass plate
assembly with casting clamps (cat.# GPC-0002).
-
2
3. If leaving the bottom of the glass plate assembly open, clamp the side sections of
the glass plate assembly with casting clamps (cat.# GPC-0002).
C.B.S. Scientific 12 Dedicated Height Sequencer
Page 13

3.4 Methods for sealing glass plate sandwich - continued
(A) Gel Slider, ( B) Capillary Gel Casting or (C) Gel Sealing Tape
(C) Gel Sealing Tape. Seal the sides and bottom of the assembled glass plate sandwich
with gel sealing tape, as shown. Tape the sides first and then the bottom. Extend the tape
around the bottom corners in both directions to ensure an adequate seal. Apply the tape as
smoothly as possible to avoid forming air channels or bubbles along the edges of the glass
plates. Rub the tape firmly onto glass to eliminate air channels and ensure a liquid-tight seal.
To help prevent the glass plates from sliding apart while taping clamp one side and the
bottom of the sandwich with white spring clamps (cat. # GPC-0002).
C.B.S. Scientific 13 Dedicated Height Sequencer
Page 14

3.5 Pouring the Gel
Always wear gloves, eye protection and protective clothing.
1.
2. Prepare acrylamide gel solution using freshly made stock solutions or commercially available
pre-mix solutions. See section 4.5 Buffers. Most gel formulations allow approximately 10
minutes before polymerization, so proceed quickly.
Spacer thickness (mm) Minimum volume required (ml)
3. Mix by gently swirling, using a magnetic spin bar on a stirring plate. Do not mix vigorously.
NOTE: There is no reason to degas acrylamide solutions. This will significantly increase the
speed at which the acrylamide polymerizes. Draw up the solution into a 60cc syringe, 25ml
pipette or an Erlenmeyer flask.
4. If using the Capillary Gel Casting method, pour the gel with the gel plate sandwich in a
horizontal position, while tapping the top plate vigorously to disperse the gel solution.
Capillary action will force the gel towards the bottom and sides. Any small bubbles formed can
be removed easily by using the appropriate thickness bubble grabber.
5. If using the Gel Sealing Tape method, maintain the assembled plate sandwich at a 45 angle.
As the gel sandwich fills, gradually lower the top end of the glass plates until they rest almost
horizontally on the bench. The gel mold should be slightly overfilled to ensure complete
polymerization at the top. If a bubble forms while the gel is being poured, raise the glass
plates into a vertical position, and either tip the gel solution away from the bubble or carefully
tap the plate sandwich. Alternatively, bubbles can be removed by insertion of a bubble
grabber of the same thickness as the spacers being used and gently pulling the bubble or
debris out. Once all bubbles have been removed, return the glass plates to their previous
horizontal position.
0.2 50
0.4 65
0.5 90
0.75-1.0 120-180
C.B.S. Scientific 14 Dedicated Height Sequencer
Page 15

6. Before the acrylamide polymerizes, insert a comb into the top of the gel. The available types
of combs are: rectangular tooth combs, a casting comb the same thickness as a sharktooth
comb or the back side of a sharktooth comb as a casting comb. If you are using a rectangular
tooth comb, insert to edge of backing. If you are using a separate, one well casting comb with
a sharktooth comb, insert casting comb to edge of backing. If you are using a sharktooth
comb, insert the back side of the comb to the black lines (depth indicators) printed on the
comb (see figure below). The depth indicators are pre-determined and specific to each well
configuration.
7. If you decide to clamp “over” the casting comb, to ensure a preciously defined gel thickness,
use clamp cat. # GPC-0004. It is important the spring clamps be placed only over the
comb (and side spacers), clamping unsupported glass will distort the thickness of the
gel. See illustration above.
8. Cover the top and bottom of the gel plate assembly with plastic wrap so that as little air as
possible can contact the gel. Allow the gel to polymerize for 30 minutes to 1 hour depending
on the width of the gel poured. The gel can be poured the day before the run and stored at
room temperature for a maximum of 48 hours, if wrapped with a wet paper towels and then
with plastic wrap.
9. Leave the glass plates in their near-horizontal position until the acrylamide has polymerized.
After polymerization remove the clamps. Rinse surface of the glass plate assembly with deionized water to remove any excess gel. Carefully pull the comb from between the glass
plates. If using a rectangular comb skip to step 4.1-2. Rinse the top of the gel with
electrophoresis buffer to remove any unpolymerized acrylamide. Rinse the comb with
de-ionized water.
C.B.S. Scientific 15 Dedicated Height Sequencer
Page 16

Section 4
Electrophoresis
4.1 Pre-electrophoresis
1. Remove the gel sealing tape from the bottom of the gel sandwich, if tape was used. Rest the
bottom edge of the sandwich on the footing in the lower reservoir, notched plate inward. Using
mounting clamps (cat. # GPC-0001) attach the lower section of the glass plate assembly to
the upright of the sequencer. Do not clamp glass plate assembly to the upper reservoir until
the sharktooth comb is inserted.
2. If you are using a sharktooth comb, insert the comb (teeth-down) between the glass plates.
Insert the comb until the teeth just make contact with the surface of the gel. Do NOT allow
the teeth to pierce the gel. A very slight indentation of the gel should be visible when the
comb is properly inserted. Do not slide the comb laterally after it has come in contact with the
gel.
3. Slide the upper reservoir to the glass plate sandwich and clamp using the bar clamp. Preloosen black wing nuts so clamp assembly slides over glass plates and upper reservoir,
without disturbing the comb. Tighten wing nuts only enough to compress gasket. Do NOT
over tighten. See figures below.
C.B.S. Scientific 16 Dedicated Height Sequencer
Page 17

4. Verify that the upper buffer reservoir drain is secure. For the single 20cm wide sequencer,
fill the upper buffer reservoir with approximately 350ml of electrophoresis buffer. Make sure
no buffer is leaking from the upper buffer reservoir. Fill the lower reservoir with approximately
WARNING: No buffer should leak through or around the silicone gasket or down the side of
the gel assembly. Leakage may allow the upper reservoir to drain dry or cause
arcing and damage to the apparatus.
WARNING: Excessive power will cause the gel to overheat and crack the glass plates.
350ml of electrophoresis buffer. For the dual 20cm wide sequencer, fill the upper reservoir
375ml and the lower with 350ml. For the single 33cm wide sequencer, fill the upper buffer
reservoir with approximately 550ml of electrophoresis buffer. Make sure no buffer is leaking
from the upper buffer reservoir. Fill the lower reservoir with approximately 450ml of
electrophoresis buffer. For the dual 33cm wide sequencer, fill the upper reservoir 450ml
and the lower with 450ml. Be sure no bubbles obstruct buffer contact with the lower edge of
the gel. Note: Do NOT overfill buffer reservoirs or allow buffer to make contact with the
banana jacks.
5. Close the reservoir safety covers to the upper and lower reservoirs. Connect the female end
of the black power cord into the safety cover of the upper reservoir. Connect the female end
of the red power cord into the safety cover of the lower reservoir.
6. Be sure to attach Temperature Strip (cat. # EGT-100) to upper or middle of glass plate, to
monitor the temperature of the gel.
7. Connect the DC power leads to the power supply with the proper polarity. Make sure the
black leads are connected to the black cathode (-) and the red leads are connected to the red
anode (+).
8. If using a rectangular comb, rinse sample wells with upper reservoir buffer. Before loading
samples, pre-electrophorese the gel for 30 to 60 minutes (See Table 5.1 for recommended DC
power settings). Best results are achieved with a gel surface temperature of 45-50C.
4.2 Loading Samples
1. Prepare the samples by heating in an appropriate loading buffer 95C to 100C for 3-5
minutes, vortexing, and then chilling immediately on ice.
2. At the end of the pre-electrophoresis period, TURN OFF THE POWER SUPPLY AND
DISCONNECT BOTH DC POWER CORDS FROM THE POWER SUPPLY. Remove power
cords from both reservoirs. Open upper reservoir safety cover.
3. Immediately prior to loading the samples, rinse the wells of the gel thoroughly with
electrophoresis buffer. Use a sequencing loading tip or a syringe with a bent needle to wash
away urea that has diffused into the wells. Load samples in a loading pattern of your
preference. For sharktooth combs load 2-3ul of sample. (For rectangular tooth combs see
comb volumes, Table 5.3).
C.B.S. Scientific 17 Dedicated Height Sequencer
Page 18

4.3 Electrophoresis
1. After loading the samples, close the reservoir safety cover. Connect the DC power leads to
the unit then to the power supply with the proper polarity. Make sure the black leads are
connected to the black cathodes (-) and the red leads are connected to the red anode (+).
2. Turn on the power supply and set the voltage or wattage to the proper setting for the gel. Be
sure to follow manufacturer's instructions. (See Table 5.1 for recommended DC power
settings). As a general rule, the applied voltage is approximately 5-6V per cm of gel. Monitor
temperature using the Temperature strip (CBS Cat. # EGT-100).
3. Monitor the progress of electrophoresis by following migration of a marker dye front or by any
other preferred method.
4. When electrophoresis is complete, TURN POWER SUPPLY OFF. Disconnect both DC
power cords, first from the power supply.
C.B.S. Scientific 18 Dedicated Height Sequencer
Page 19

4.4 Post-Electrophoresis – Gel Processing
A. Removal of sequencing plate from gel unit.
1. Ensure power supply is OFF disconnect power cords from reservoirs.
2. Reduce buffer level in upper reservoir below level of notch (or drain entirely). If buffer
is not reused, drain buffer from lower reservoir. Be careful with lower reservoir buffer,
it will be radioactive if you have used 32P, 33P or 35S. Dispose of buffer according to
your institutions radioactive safety policies. Unincorporated nucleotides will have run
off the gel.
3. Un-clamp glass plate sandwich from upper reservoir. Wipe gel plate sandwich with a
small piece of paper towel and dispose of contaminated paper in your radioactive
waste receptacle for dry waste.
B. Transfer of gel onto blotting paper
1. Place the sequencing gel on the bench with the short (notched) side up. To
disassemble the gel sandwich remove the gel sealing tape from sides of the
sandwich. Using the C.B.S. Scientific Wedge Plate Separator, insert the wedge about
1/3 of its length between the glass plates, either just inside the "ear" at the top of the
plate, or just inside the spacer along the bottom of the plate. Continue to push with
steady force and the plates will release from the gel. If necessary, slightly twist the
wedge for accelerated results. Do not use corner of Wedge Plate Separator as it will
damage plastic. See illustration below.
C.B.S. Scientific 19 Dedicated Height Sequencer
Page 20

B. Transfer of gel onto blotting paper-continued
2. Place a sheet of pre-cut (slightly larger than gel) blot/chromatography paper to fit on
top of the gel and press down firmly and evenly over the entire gel surface. The gel
will come off the glass and stick to the paper as you lift the paper/gel sandwich slowly
and carefully away from the glass plate. NOTE: At this step, if you were using 35S
you could follow the alternative fixing procedure given if greater band resolution is
desired.
3. Place paper/gel sandwich on top of a perforated plate or screen and place the entire
assembly over a large tray or basin to catch fixative.
4. Slowly pour over the entire surface of the gel, a solution of 10% acetic acid and 10%
methanol. Allow to soak for 15-30 minutes, then tilt to drain.
5. Cover gel evenly with plastic wrap. Invert or flip to remove the screen and to secure
the excess plastic wrap on the backside of the gel (paper side). Avoid trapping
bubbles between plastic and gel. Bubbles can cause distortion on the autorad. If
necessary, cut the gel to fit the gel dryer. NOTE: Usually the top 10cm of the gel can
be removed since there is no readable DNA sequence in this region of the gel.
6. Place paper/gel on gel dryer and dry for 30-65 minutes with 80C heat and under
vacuum.
7. Place dried gel in X-ray cassette and expose to X-ray film for 12 to 16 hours for 32P
(@-20 to -70C; using 2 Bio-Speed intensifying screens) and 24 to 48 hours for 35S
@ room temperature using only 1 intensifying screen.
8. Develop/process autoradiogram manually or in an automated film processor and read
DNA sequence (CBS Personal Gel Reader, cat. # DQX-4000) on a light box (CBS cat.
# SQI-1104).
C. Fixing the gel directly on the glass plate
1. Pry apart glass plates as in step B-1. Place glass plate/gel assembly on top of a large
tray and proceed with steps 6-9.
C.B.S. Scientific 20 Dedicated Height Sequencer
Page 21

4.5 Recommended Buffers and Reagents
Pre-mixed acrylamide stock solutions are the method of choice. Use according to
manufacturer’s instructions.
EDTA solution
(0.5 M EDTA, pH 8.0, 100ml)
Na
Deionized H
Dissolve
10M NaOH. Adjust to pH 8.0. 5.0ml
Deionized H
Store at room temperature
Tris-borate-EDTA buffer, 5X
(5X TBE, pH 8.3, 1 liter)
Tris (FW 121.1) 0.45M 54.5g
Boric acid (FW 61.83) 0.45M 27.8g
EDTA solution (0.5 M, pH 8.0) 0.001M 20.0ml
Deionized H
Do not adjust pH. Store at room temperature
Acrylamide stock solution
(40%, 19:1 acrylamide:bisacrylamide, 250ml)
Acrylamide (FW 71.08) 95.0g
Bis* (FW 154.2) 5.0g
Deionized H
Store at 4C protected from light.
*N,N’ Methylenebisacrylamide
Ammonium persulfate solution
(10% APS, Initiator, 1ml)
APS (FW 228.2) 10% 0.1g
Deionized H
Fresh APS “crackles” when water is added. If yours does not, replace it with fresh
Sequencing gel acrylamide solution
(6%, 100ml)
Acrylamide stock solution, 40% 6% 15ml
Urea (FW 60) 7M 42g
TBE, 5X 1X 20ml
Add deionized H
Dissolve
Filter, dearate, and add:
APS, 10% solution 1ml
TEMED 60ul
Pour gel immediately.
EDTA•2H2O (FW 372.2) 0.5M 18.6g
2
O 70.0ml
2
O to 100.0ml
2
O to 100.0ml
2
O to 250.0ml
2
O to 1.0ml
2
stock. Prepare just prior to use.
O to 100.0ml
2
C.B.S. Scientific 21 Dedicated Height Sequencer
Page 22

4.6 References and Suggested Reference Literature
DNA SEQUENCING PROTOCOLS
ed. by H.G. & A.M. Griffin, Humana Press, N.J., 1993
MOLECULAR CLONING
E.F. Fritsch and T. Maniatis, Cold Spring Harbor Laboratory Press, 1989.
CURRENT PROTOCOLS IN MOLECULAR BIOLOGY
Kingston, D.D. Moore, J.G. Seidman, J.A. Smith and K. Struhl, Greene Publishing
Associates and Wiley-Interscience, New York, 1989.
DNA SEQUENCING
MOLECULAR BIOLOGY of the GENE
J.W. Roberts, J.A. Steitz and A. M. Weiner, The Benjamin/Cummings Publishing Co.,
Inc., Menlo Park, CA, 1987.
MOLECULAR BIOLOGY of the CELL
K. Roberts, and J.D. Watson, Garland Publishing, Inc., New York, 1989.
A Laboratory Manual, 2nd edition, ed. by J. Sambrook,
, T.A. Brown, IRL Press, Oxford, 1994.
in Methods in Molecular Biology, Volume 23,
ed. by F.M. Ausubel, R. Brent, R.E.
, Fourth Edition, J.D. Watson, N.H. Hopkins,
, 2nd edition, B. Alberts, D. Bray, J. Lewis, M. Raff,
C.B.S. Scientific 22 Dedicated Height Sequencer
Page 23

Section 5
Tables: Power Settings, Troubleshooting Guide, Comb Volumes
5.1 Recommended Power Settings
For 20cm wide unit
Gel Height Gel thickness Recommended
42 0.2mm 40-65 W 1200-2500V
52 0.2mm 40-65 W 1200-2500V
62 0.2mm 40-65 W 1200-2500V
82 0.2mm 40-65 W 1200-2500V
102 0.2mm 40-65 W 1200-2500V
42 0.4mm 40-65 W 1200-2500V
52 0.4mm 40-65 W 1200-2500V
62 0.4mm 40-65 W 1200-2500V
82 0.4mm 40-65 W 1200-2500V
102 0.4mm 40-65 W 1200-2500V
42 0.5mm 40-65 W 1200-2500V
52 0.5mm 40-65 W 1200-2500V
62 0.5mm 40-65 W 1200-2500V
82 0.5mm 40-65 W 1200-2500V
102 0.5mm 40-65 W 1200-2500V
wattage
Recommended
voltage
For 33cm wide unit
Gel Height Gel thickness Recommended
42 0.2mm 40-65 W 1200-2500V
52 0.2mm 40-65 W 1200-2500V
62 0.2mm 40-65 W 1200-2500V
82 0.2mm 40-65 W 1200-2500V
102 0.2mm 40-65 W 1200-2500V
42 0.4mm 40-65 W 1200-2500V
52 0.4mm 40-65 W 1200-2500V
62 0.4mm 40-65 W 1200-2500V
82 0.4mm 40-65 W 1200-2500V
102 0.4mm 40-65 W 1200-2500V
42 0.5mm 40-65 W 1200-2500V
52 0.5mm 40-65 W 1200-2500V
62 0.5mm 40-65 W 1200-2500V
82 0.5mm 40-65 W 1200-2500V
102 0.5mm 40-65 W 1200-2500V
wattage
Recommended
voltage
C.B.S. Scientific 23 Dedicated Height Sequencer
Page 24

5.2 Troubleshooting Guide
Problem/Condition Cause & Solution
ELECTRICAL
'No Load' power supply indicator
(no current)
'sparking' near top of gel check upper buffer level and refill
'sparking' near lower gel chamber check lower buffer level: too low or too high
Over heating of buffer and plates buffer: check concentration & date made
Upper well & gasket area not flush & tight against silicone seal: check clamps and bar clamp (if
GLASS PLATES
cracking at notched area
cracking across main area overheating (see ELECTRICAL section above)
LEAKS
upper buffer reservoir and sample wells/gasket area ensure notched or shorter plate tightly flushed against silicone gasket;
capillary leakage sides of gel plate sandwich (see 'no load' section above)
gel casting ensure spacers meticulously clean
DEFORMED SAMPLE WELLS
deformation when comb removed
BUBBLES
SEPARATION OF PLATES AFTER
ELECTROPHORESIS
sticking of gel to one or both plates
READ FRAMES
fuzzy/wavy
smeary re-pour gel using freshly purified gel components
SMILING
loose connection at DC source or at terminal: secure if not broken
press down firmly on both safety cover lids
loose electrode terminal: finger tighten, check for corrosion: clean
thoroughly
break in platinum wire: check for continuos wire
if sides of plate sandwich not taped - may be grounding; check for
leaks/streaking- wipe clean, check number and type of clamps; ensure
equal number and symmetrical spacing
incorrect buffer levels
gel hydrolyzed: recheck gel components; re-pour
hydrolyzed gel: date of gel stock solution; remake
set power conditions to run gel at approximately 50C
used)
clamps should not be positioned above gel loading area
check clamps for correct size, cat.# GPC-0001
optional bar clamp: too tight and uneven
use aluminum heat dispersion plate (cooling)
check clamps: check for proper size; avoid using metal bulldog-type
clamps
check for pre-existing scratches or chips along edges
check for proper plate alignment
thoroughly clean silicone gasket area; do not grease
replace
check tightness & clamp type
ensure that an equal number of white spring clamps are symmetrically
check clamp model number (GPC-0001 vs. GPC-0002)
ensure stainless steel spring in white clamp securely in place
spacers and sequencing comb identical thickness
bowed (not flat) plate set
Polymerization problem (see following section)
sloppy technique if using tape
check excess gel solution (if saved) for proper polymerization time
comb inserted too far
gel dried out near surface: rinse comb with buffer before removal of
comb
gel not polymerized
plates not cleaned thoroughly prior to casting
plates not cleaned thoroughly
plate (1) not silanized (recommend 'GEL REPEL’)
plate pried apart too quickly: separate slowly and carefully; use Wedge
plate separator, cat. # WPS-100
before loading samples, flush urea out of sample wells using pipette
tip or syringe with bent needle
use an aluminum heat dispersion plate
avoid loading samples in the two outermost wells on both sides
reduce power setting
gasket if worn, cracked or flattened
placed on both sides of plates
C.B.S. Scientific 24 Dedicated Height Sequencer
Page 25

5.3 Comb/Well Volumes
Sequencing Combs for 20cm wide units
Note: To calculate sample well volume expressed in millimeters (mm) divide maximum volume by tooth depth.
-Volume per tooth (microliters-l)
# of wells Tooth
width/mm
8 17.7mm
12 11mm
14 9mm
16 7.6mm
17* 6.6mm
20 5.6mm
28 4mm
32 3.4mm
35* 2.92mm
*Designed for multi-channel pipettor loading
Overall length of comb: 15.87cm
Tooth depth: 9.5mm
Spacing between teeth: 8-20 wells : 2.3mm
28-35 wells: 1.5mm
0.2mm thickness 0.4mm thickness 0.5mm thickness
33.6l 67l 84l
21l 41l 52l
17.3l 34l 43l
14.4l 28l 36l
12.5l 25l 31.3l
10.6l 21l 26.5l
7.8l 15l 19.5l
6.4l 12l 16.5l
5.5l 11.12l 13.9l
Sequencing Combs for 33cm wide units
Note: To calculate sample well volume expressed in millimeters (mm) divide maximum volume by tooth depth.
-Volume per tooth (microliters-l)
# of wells Tooth
width/mm
8 33.4mm
16 15.5mm
24 9.5mm
31* 6.6mm
34 6mm
50 4.1mm
60 3.1mm
63* 2.92mm
*Designed for multi-channel pipettor
Overall length of comb: 28.4cm
Tooth depth: 9.5mm
Spacing between teeth: 8-31 wells : 2.3mm
34-63 wells: 1.5mm
0.2mm thickness 0.4mm thickness 0.5mm thickness
63.4l 127l 158.6l
29.5l 59l 73.6l
18l 36l 45l
12.5l 25l 31.4l
11.4l 22l 28.5l
7.7l 15.5l 19.4l
5.8l 11.6l 14.7l
5.5l 11.1l 13.8l
Ultrathin Sharktooth Combs for 20cm wide units
Note: To calculate sample well volume expressed in millimeters (mm) divide maximum volume by tooth depth.
-Volume per tooth (microliters-l)
# of wells Tooth width/mm .075mm thickness
1 158.7mm
24 5.92mm
34* 4.5mm
38 4.02mm
52* 3.0mm
*Designed for multi-channel pipettor Point to Point Measurements:
24 well=5.92mm
34 well=4.50mm
38 well=4.02mm
52 well=3.00mm
47.6l
1.6l
1.2l
1.0l
.8l
Ultrathin Sharktooth Combs for 33cm wide units
Note: To calculate sample well volume expressed in millimeters (mm) divide maximum volume by tooth depth.
-Volume per tooth (microliters-l)
# of wells Tooth width/mm .075mm thickness
1 284mm
46 5.92mm
62* 4.5mm
68 4.02mm
94* 3.0mm
*Designed for multi-channel pipettor Point to Point Measurements:
85.20l
1.6l
1.2l
1.0l
.8l
C.B.S. Scientific 25 Dedicated Height Sequencer
Page 26

46 well=5.92mm
62 well=4.50mm
68 well=4.02mm
94 well=3.00mm
5.3 Comb/Well Maximum Loading Volumes-continued
SharktoothCombs for 20cm wide units
Note: To calculate sample well volume expressed in millimeters (mm) divide maximum volume by tooth depth.
-Volume per tooth (microliters-l)
# of wells Tooth
width/mm
1 158.7mm
24 5.92mm
34* 4.5mm
38 4.02mm
52* 3.0mm
70* 2.25mm
*Designed for multi-channel pipettor loading Point to Point Measurements:
24 well=5.92mm
34 well=4.5mm
38 well=4.02mm
52 well=3.00mm
70 well=2.25mm
0.2mm thickness 0.4mm thickness 0.5mm thickness
317.4l 634.8l 793.5l
4.5l 9.0l 11.3l
3.3l 6.6l 8.4l
2.8l 5.6l 7.0l
2.0l 4.0l 5.0l
1.4l 2.8l 3.4l
Sharktooth Combs for 33cm wide units
Note: To calculate sample well volume expressed in millimeters (mm) divide maximum volume by tooth depth.
-Volume per tooth (microliters-l)
# of wells Tooth
width/mm
1 284mm
46 5.92mm
62* 4.5mm
68 4.02mm
94* 3.0mm
126* 2.25mm
*Designed for multi-channel pipettor Point to Point Measurements:
46 well=5.92mm
62 well=4.50mm
68 well=4.02mm
94 well=3.00mm
126 well=2.25mm
0.2mm thickness 0.4mm thickness 0.5mm thickness
539.6l 1079.2l 1349l
4.5l 9.0l 11.3l
3.3l 6.6l 8.4l
2.8l 5.6l 7.0l
2.0l 4.0l 5.0l
1.71l 3.4l 4.2l
C.B.S. Scientific 26 Dedicated Height Sequencer
Page 27

5.3 Comb/Well Maximum Loading Volumes-continued
Preparative Combs for 20cm wide units
Note: To calculate sample well volume expressed in millimeters (mm) divide maximum volume by tooth depth.
-Volume per tooth (microliters-l)
# of wells Tooth
width
1 158mm
2 77.5mm
3 50mm
4 37.9mm
8 17.7mm
12 11mm
14 9.1mm
16 7.7mm
20 5.66mm
28 4mm
32 3.4mm
Overall length of comb: 15.87cm
Tooth depth: 9.5mm
Spacing between teeth: 8-20 wells: 2.3mm
28-35 well: 1.5mm
0.75mm
thickness
1125l 1501l 2251l 3002l 4503l
552l 736l 1104l 1472l 2208l
356l 475l 712l 950l 1425l
270l 360l 540l 720l 1080l
126l 168l 252l 336l 504l
78l 104l 156l 208l 312l
64l 86l 129l 172l 258l
54l 73l 109l 146l 219l
40l 53l 80l 106l 159l
28.5l 38l 57l 76l 114l
24l 32l 48l 64l 96l
1.0mm
thickness
Preparative Combs for 33cm wide units
1.5mm
thickness
2.0mm
thickness
3.0mm
thickness
Note: To calculate sample well volume expressed in millimeters (mm) divide maximum volume by tooth depth.
-Volume per tooth (microliters-l)
# of wells Tooth
width
3 93.1mm
5 54.3mm
6 45.4mm
8 33.4mm
12 21.5mm
16 15.5mm
24 9.55mm
31* 7.82mm
34 6.05mm
50 4.14mm
60 3.18mm
63* 2.92mm
*Designed for multi-channel pipettor loading.
Overall length of comb: 28.41cm
Tooth depth: 3-24 wells: 19.05mm
31-63 wells: 17.45mm
Spacing between teeth: 3-34 wells: 2.4mm
50-63 well: 1.5mm
0.75mm
thickness
1330.45l 1773.94l 2660.90l 3547.87l 5321.80l
775.53l 1034.03l 1551.05l 2068.07l 3102.10l
648.08l 864.11l 1296.16l 1728.22l 2592.30l
477.58l 636.84l 955.36l 1273.68l 1910.50l
307.09l 409.38l 614.17l 818.77l 1228.10l
221.74l 295.66l 443.48l 591.31l 886.97l
136.40l 181.93l 272.99l 363.86l 545.78l
76.17l 101.56l 152.34l 203.12l 304.68l
79.22l 105.57l 158.45l 211.15l 316.72l
54.27l 72.24l 108.36l 144.49l 216.73l
41.70l 55.49l 83.24l 110.98l 166.47l
38.22l 50.95l 76.43l 101.90l 152.85l
1.0mm
thickness
1.5mm
thickness
2.0mm
thickness
3.0mm
thickness
C.B.S. Scientific 27 Dedicated Height Sequencer
Page 28

Section 6
Maintenance of Equipment
6.1 Care and Handling
The components of the Sequencer are fabricated from FR ABS, acrylic, Delrin®, Polycarbonate,
glass and anodized aluminum. As with any laboratory instrument, adequate care ensures
consistent and reliable performance.
After each use, rinse buffer reservoirs, combs, spacers, clamps and glass plates with de-ionized
water. Wipe dry with a soft cloth or paper towel, or allow to air dry. Whenever necessary, all
components may be washed gently with water and a non-abrasive detergent, and rinsed and dried
as above. Never use abrasive cleaners, window sprays or scouring pads to clean the
components, as these cause damage to the plastic surfaces.
Additional cautions:
Do not autoclave or dry-heat sterilize the apparatus or components.
Do not expose the apparatus or components to phenol, acetone, benzene,
halogenated hydrocarbon solvents or undiluted laboratory alcohols.
Avoid prolonged exposure of the apparatus or components to UV light.
6.2 Maintenance
The following simple, routine inspection and maintenance procedures will help ensure both the
safety and the performance of the Nucleic Acid Sequencers. For ordering information of
replacement parts call 1-858-755-4959.
Inspect electrical connections and power cords regularly. If the banana plug connectors
to either the unit or the power supply do not exhibit reasonable friction or can be rocked
easily, replace the plugs or power cords.
If power cords show any signs of wear or damage (e.g. cracks, nicks, abrasions, or
melted insulation), replace them immediately.
Examine the banana jacks to ensure that they are tight and free of corrosion. If banana
jacks are corroded, they should be replaced.
C.B.S. Scientific 28 Dedicated Height Sequencer
Page 29

Section 7 Equipment and Accessories
Dedicated Height Sequencers
Cat.# Item
Single units:
DU-400-20 Nucleic Acid Sequencer, 20cm width, 42cm capability. Unit only.
DH-400-20 Nucleic Acid Sequencing kit, 20cm width, 42cm capability.
DU-500-20 Nucleic Acid Sequencer, 20cm width, 52cm capability. Unit only.
DH-500-20 Nucleic Acid Sequencing kit, 20cm width, 52cm capability.
DU-600-20 Nucleic Acid Sequencer, 20cm width, 62cm capability. Unit only.
DH-600-20 Nucleic Acid Sequencing kit, 20cm width, 62cm capability.
DU-400-33 Nucleic Acid Sequencer, 33cm width, 42cm capability. Unit only.
DH-400-33 Nucleic Acid Sequencing kit, 33cm width, 42cm capability.
DU-500-33 Nucleic Acid Sequencer, 33cm width, 52cm capability. Unit only.
DH-500-33 Nucleic Acid Sequencing kit, 33cm width, 52cm capability.
DU-600-33 Nucleic Acid Sequencer, 33cm width, 62cm capability. Unit only.
DH-600-33 Nucleic Acid Sequencing kit, 33cm width, 62cm capability.
All Single Dedicated Height Sequencing Kits include the following: 2 sets glass plates, 2 combs, 2 spacer sets
(wedge spacers excluded), 1 roll gel sealing tape, 2 wedge plate separators, 1 gel thermometer strip, 1 packet of Gel
Repel, and 4 white spring clamps.
Dual units:
DDU-400-20 Dual Nucleic Acid Sequencer, 20cm width, 42cm capability. Unit only.
DDH-400-20 Dual Nucleic Acid Sequencing kit, 20cm width, 42cm capability.
DDU-500-20 Dual Nucleic Acid Sequencer, 20cm width, 52cm capability. Unit only.
DDH-500-20 Dual Nucleic Acid Sequencing kit, 20cm width, 52cm capability.
DDU-600-20 Dual Nucleic Acid Sequencer, 20cm width, 62cm capability. Unit only.
DDH-600-20 Dual Nucleic Acid Sequencing kit, 20cm width, 62cm capability.
DDU-400-33 Dual Nucleic Acid Sequencer, 33cm width, 42cm capability. Unit only.
DDH-400-33 Dual Nucleic Acid Sequencing kit, 33cm width, 42cm capability.
DDU-500-33 Dual Nucleic Acid Sequencer, 33cm width, 52cm capability. Unit only.
DDH-500-33 Dual Nucleic Acid Sequencing kit, 33cm width, 52cm capability.
DDU-600-33 Dual Nucleic Acid Sequencer, 33cm width, 62cm capability. Unit only.
DDH-600-33 Dual Nucleic Acid Sequencing kit, 33cm width, 62cm capability.
All Dual Dedicated Height Sequencing Kits include the following: 2 sets glass plates, 2 combs, 2 spacer sets
(wedge spacers excluded), 1 roll gel sealing tape, 2 wedge plate separators, 2 gel thermometer strips, 2 packets of Gel
Repel, and 8 white spring clamps.
C.B.S. Scientific 29 Dedicated Height Sequencer
Page 30

C.B.S. Scientific 30 Dedicated Height Sequencer
SEQUENCING ACCESSORIES
RECTANGULAR COMBS (POLYCARBONATE)
20CM WIDE UNITS 33CM WIDE UNITS
Cat.# Comb Dimensions Cat.# Comb Dimensions
SG20-0208 0.2mm x 8 well SG33-0208 0.2mm x 8 well
SG20-0212 0.2mm x 12 well SG33-0216 0.2mm x 16 well
SG20-0214 0.2mm x 14 well SG33-0224 0.2mm x 24 well
SG20-0216 0.2mm x 16 well SG33-0231* 0.2mm x 31 well
SG20-0217* 0.2mm x 17 well SG33-0234 0.2mm x 34 well
SG20-0220 0.2mm x 20 well SG33-0250 0.2mm x 50 well
SG20-0228 0.2mm x 28 well SG33-0260 0.2mm x 60 well
SG20-0232 0.2mm x 32 well SG33-0263* 0.2mm x 63 well
SG20-0235* 0.2mm x 35 well
SG20-0408 0.4mm x 8 well SG33-0408 0.4mm x 8 well
SG20-0412 0.4mm x 12 well SG33-0416 0.4mm x 16 well
SG20-0414 0.4mm x 14 well SG33-0424 0.4mm x 24 well
SG20-0416 0.4mm x 16 well SG33-0431* 0.4mm x 31 well
SG20-0417* 0.4mm x 17 well SG33-0434 0.4mm x 34 well
SG20-0420 0.4mm x 20 well SG33-0450 0.4mm x 50 well
SG20-0428 0.4mm x 28 well SG33-0460 0.4mm x 60 well
SG20-0432 0.4mm x 32 well SG33-0463* 0.4mm x 63 well
SG20-0435* 0.4mm x 35 well
SG20-0508 0.5mm x 8 well SG33-0508 0.5mm x 8 well
SG20-0512 0.5mm x 12 well SG33-0516 0.5mm x 16 well
SG20-0514 0.5mm x 14 well SG33-0524 0.5mm x 24 well
SG20-0516 0.5mm x 16 well SG33-0531* 0.5mm x 31 well
SG20-0517* 0.5mm x 17 well SG33-0534 0.5mm x 34 well
SG20-0520 0.5mm x 20 well SG33-0550 0.5mm x 50 well
SG20-0528 0.5mm x 28 well SG33-0560 0.5mm x 60 well
SG20-0532 0.5mm x 32 well SG33-0563* 0.5mm x 63 well
SG20-0535* 0.5mm x 35 well
*Designed for multi-channel pipettor loading.
SHARKTOOTH COMBS
20CM WIDE UNITS 33CM WIDE UNITS
Cat. # Comb Dimensions point to point Cat. # Comb Dimensions
SK20-0201 0.2mm x 1 well casting comb SK33-0201 0.2mm x 1 well
SK20-0224 0.2mm x 24 well 5.92mm SK33-0246 0.2mm x 46 well
SK20-0234* 0.2mm x 34 well 4.50mm SK33-0262* 0.2mm x 62 well
SK20-0238 0.2mm x 38 well 4.02mm SK33-0268 0.2mm x 68 well
SK20-0252* 0.2mm x 52 well 3.00mm SK33-0294* 0.2mm x 94 well
SK20-0270* 0.2mm x 70 well 2.25mm SK33-02126* 0.2mm x 126 well
SK20-0401 0.4mm x 1 well casting comb SK33-0401 0.4mm x 1 well
SK20-0424 0.4mm x 24 well 5.92mm SK33-0446 0.4mm x 46 well
SK20-0434* 0.4mm x 34 well 4.50mm SK33-0462* 0.4mm x 62 well
SK20-0438 0.4mm x 38 well 4.02mm SK33-0468 0.4mm x 68 well
SK20-0452* 0.4mm x 52 well 3.00mm SK33-0494* 0.4mm x 94 well
SK20-0470* 0.4mm x 70 well 2.25mm SK33-04126* 0.4mm x 126 well
SK20-0501 0.5mm x 1 well casting comb SK33-0501 0.5mm x 1 well
SK20-0524 0.5mm x 24 well 5.92mm SK33-0546 0.5mm x 46 well
SK20-0534* 0.5mm x 34 well 4.50mm SK33-0562* 0.5mm x 62 well
SK20-0538 0.5mm x 38 well 4.02mm SK33-0568 0.5mm x 68 well
SK20-0552* 0.5mm x 52 well 3.00mm SK33-0594* 0.5mm x 94 well
SK20-0570* 0.5mm x 70 well 2.25mm SK33-05126* 0.5mm x 126 well
*Designed for multi-channel pipettor loading.
PRINTED MYLARSHARKTOOTH COMBS
20CM WIDE UNITS 33CM WIDE UNITS
Cat.# Comb Dimensions point to point Cat.# Comb Dimensions
MK20-0201 0.2mm x 1 well casting comb MK33-0201 0.2mm x 1 well
MK20-0224 0.2mm x 24 well 5.92mm MK33-0246 0.2mm x 46 well
MK20-0234* 0.2mm x 34 well 4.50mm MK33-0262* 0.2mm x 62 well
MK20-0238 0.2mm x 38 well 4.02mm MK33-0268 0.2mm x 68 well
MK20-0252* 0.2mm x 52 well 3.00mm MK33-0294* 0.2mm x 94 well
MK20-0270* 0.2mm x 70 well 2.25mm MK33-02126* 0.2mm x 126 wells
MK20-0401 0.4mm x 1 well casting comb MK33-0401 0.4mm x 1 well
MK20-0424 0.4mm x 24 well 5.92mm MK33-0446 0.4mm x 46 well
MK20-0434* 0.4mm x 34 well 4.50mm MK33-0462* 0.4mm x 62 well
MK20-0438 0.4mm x 38 well 4.02mm MK33-0468 0.4mm x 68 well
MK20-0452* 0.4mm x 52 well 3.00mm MK33-0494* 0.4mm x 94 well
MK20-0470* 0.4mm x 70 well 2.25mm MK33-04126* 0.4mm x 126 wells
MK20-0501 0.5mm x 1 well casting comb MK33-0501 0.5mm x 1 well
MK20-0524 0.5mm x 24 well 5.92mm MK33-0546 0.5mm x 46 well
MK20-0534* 0.5mm x 34 well 4.50mm MK33-0562* 0.5mm x 62 well
MK20-0538 0.5mm x 38 well 4.02mm MK33-0568 0.5mm x 68 well
MK20-0552* 0.5mm x 52 well 3.00mm MK33-0594* 0.5mm x 94 well
MK20-0570* 0.5mm x 70 well 2.25mm MK33-05126* 0.5mm x 126 wells
*Designed for multi-channel pipettor loading
Page 31

C.B.S. Scientific 31 Dedicated Height Sequencer
PREPARATIVE RECTANGULAR COMBS (TEFLON)
20CM WIDE UNITS
Cat.# Comb Dimensions Cat.# Comb Dimensions
SG20-0701 0.75mm x 1 well SG20-1516 1.5mm x 16 well
SG20-0702 0.75mm x 2 well SG20-1517* 1.5mm x 17 well
SG20-0703 0.75mm x 3 well SG20-1520 1.5mm x 20 well
SG20-0704 0.75mm x 4 well SG20-1528 1.5mm x 28 well
SG20-0708 0.75mm x 8 well SG20-1532 1.5mm x 32 well
SG20-0712 0.75mm x 12 well SG20-1535* 1.5mm x 35 well
SG20-0714 0.75mm x 14 well SG20-2001 2.0mm x 1 well
SG20-0716 0.75mm x 16 well SG20-2002 2.0mm x 2 well
SG20-0717* 0.75mm x 17 well SG20-2003 2.0mm x 3 well
SG20-0720 0.75mm x 20 well SG20-2004 2.0mm x 4 well
SG20-0728 0.75mm x 28 well SG20-2008 2.0mm x 8 well
SG20-0732 0.75mm x 32 well SG20-2012 2.0mm x 12 well
SG20-0735* 0.75mm x 35 well SG20-2014 2.0mm x 14 well
SG20-1001 1.0mm x 1 well SG20-2016 2.0mm x 16 well
SG20-1002 1.0mm x 2 well SG20-2017* 2.0mm x 17 well
SG20-1003 1.0mm x 3 well SG20-2020 2.0mm x 20 well
SG20-1004 1.0mm x 4 well SG20-2028 2.0mm x 28 well
SG20-1008 1.0mm x 8 well SG20-2032 2.0mm x 32 well
SG20-1012 1.0mm x 12 well SG20-2035* 2.0mm x 35 well
SG20-1014 1.0mm x 14 well SG20-3001 3.0mm x 1 well
SG20-1016 1.0mm x 16 well SG20-3002 3.0mm x 2 well
SG20-1017* 1.0mm x 17 well SG20-3003 3.0mm x 3 well
SG20-1020 1.0mm x 20 well SG20-3004 3.0mm x 4 well
SG20-1028 1.0mm x 28 well SG20-3008 3.0mm x 8 well
SG20-1032 1.0mm x 32 well SG20-3012 3.0mm x 12 well
SG20-1035* 1.0mm x 35 well SG20-3014 3.0mm x 14 well
SG20-1501 1.5mm x 1 well SG20-3016 3.0mm x 16 well
SG20-1502 1.5mm x 2 well SG20-3017* 3.0mm x 17 well
SG20-1503 1.5mm x 3 well SG20-3020 3.0mm x 20 well
SG20-1504 1.5mm x 4 well SG20-3028 3.0mm x 28 well
SG20-1508 1.5mm x 8 well SG20-3032 3.0mm x 32 well
SG20-1512 1.5mm x 12 well SG20-3035* 3.0mm x 35 well
SG20-1514 1.5mm x 14 well *Designed for multi-channel pipettor loading
PREPARATIVE RECTANGULAR COMBS (TEFLON)
33CM WIDE UNITS
Cat.# Comb Dimensions Cat.# Comb Dimensions
SG33-0703 0.75mm x 3 well SG33-1524 1.5mm x 24 well
SG33-0705 0.75mm x 5 well SG33-1531* 1.5mm x 31 well
SG33-0706 0.75mm x 6 well SG33-1534 1.5mm x 34 well
SG33-0708 0.75mm x 8 well SG33-1550 1.5mm x 50 well
SG33-0712 0.75mm x 12 well SG33-1560 1.5mm x 60 well
SG33-0716 0.75mm x 16 well SG33-1563* 1.5mm x 63 well
SG33-0724 0.75mm x 24 well SG33-2003 2.0mm x 3 well
SG33-0731* 0.75mm x 31 well SG33-2005 2.0mm x 5 well
SG33-0734 0.75mm x 34 well SG33-2006 2.0mm x 6 well
SG33-0750 0.75mm x 50 well SG33-2008 2.0mm x 8 well
SG33-0760 0.75mm x 60 well SG33-2012 2.0mm x 12 well
SG33-0763* 0.75mm x 63 well SG33-2016 2.0mm x 16 well
SG33-1003 1.0mm x 3 well SG33-2024 2.0mm x 24 well
SG33-1005 1.0mm x 5 well SG33-2031* 2.0mm x 31 well
SG33-1006 1.0mm x 6 well SG33-2034 2.0mm x 34 well
SG33-1008 1.0mm x 8 well SG33-2050 2.0mm x 50 well
SG33-1012 1.0mm x 12 well SG33-2060 2.0mm x 60 well
SG33-1016 1.0mm x 16 well SG33-2063* 2.0mm x 63 well
SG33-1024 1.0mm x 24 well SG33-3003 3.0mm x 3 well
SG33-1031* 1.0mm x 31 well SG33-3005 3.0mm x 5 well
SG33-1034 1.0mm x 34 well SG33-3006 3.0mm x 6 well
SG33-1050 1.0mm x 50 well SG33-3008 3.0mm x 8 well
SG33-1060 1.0mm x 60 well SG33-3012 3.0mm x 12 well
SG33-1063* 1.0mm x 63 well SG33-3016 3.0mm x 16 well
SG33-1503 1.5mm x 3 well SG33-3024 3.0mm x 24 well
SG33-1505 1.5mm x 5 well SG33-3031* 3.0mm x 31 well
SG33-1506 1.5mm x 6 well SG33-3034 3.0mm x 34 well
SG33-1508 1.5mm x 8 well SG33-3050 3.0mm x 50 well
SG33-1512 1.5mm x 12 well SG33-3060 3.0mm x 60 well
SG33-1516 1.5mm x 16 well SG33-3063* 3.0mm x 63 well
*Designed for multi-channel pipettor loading
REPLACEMENT SAFETY COVERS
20CM WIDE UNITS 33CM WIDE UNITS
Cat.# Description Cat.# Description
SG20-SC-BL Upper safety cover for Adjustable SG33-SC-BL Upper safety cover for Adjustable
SG20-SC-RD Lower safety cover for Adjustable SG33-SC-RD Lower safety cover for Adjustable
DASG20-SC-BL Upper safety cover for Dual DASG33-SC-BL Upper safety cover for Dual
DASG20-SC-RD Upper safety cover for Dual DASG33-SC-RD Lower safety cover for Dual
Page 32

C.B.S. Scientific 32 Dedicated Height Sequencer
LOW FLUORESCENCE GLASS PLATE SETS
20CM WIDE UNITS 33CM WIDE UNITS
Cat.# Plate Dimensions (w x h) Cat.# Plate Dimensions (w x h)
LFP20-020 20cm x 22cm LFP33-020 33cm x 22cm
LFP20-030 20cm x 32cm LFP33-030 33cm x 32cm
LFP20-040A 20cm x 42cm LFP33-040A 33cm x 42cm
LFP20-050 20cm x 52cm LFP33-050 33cm x 52cm
LFP20-060 20cm x 62cm LFP33-060 33cm x 62cm
LFP20-080A 20cm x 82cm LFP33-080A 33cm x 82cm
LFP20-100 20cm x 102cm LFP33-100 33cm x 102cm
GLASS PLATE SETS
20CM WIDE UNITS 33CM WIDE UNITS
Cat.# Plate Dimensions (w x h) Cat.# Plate Dimensions (w x h)
SGP20-020 20cm x 22cm SGP33-020 33cm x 22cm
SGP20-030 20cm x 32cm SGP33-030 33cm x 32cm
SGP20-040A 20cm x 42cm SGP33-040A 33cm x 42cm
SGP20-050 20cm x 52cm SGP33-050 33cm x 52cm
SGP20-060 20cm x 62cm SGP33-060 33cm x 62cm
SGP20-080A 20cm x 82cm SGP33-080A 33cm x 82cm
SGP20-100 20cm x 102cm SGP33-100 33cm x 102cm
MICROTROUGH GLASS PLATE SETS
20CM WIDE UNITS 33CM WIDE UNITS
Cat.# Plate Dimensions (w x h) point to point Cat.# Plate Dimensions (w x h)
MTV20-0324 20cm x 32cm, 24 troughs 5.92mm MTV33-0346 33cm x 32cm, 46 troughs
MTV20-0334* 20cm x 32cm, 34 troughs 4.50mm MTV33-0362* 33cm x 32cm, 62 troughs
MTV20-0338 20cm x 32cm, 38 troughs 4.02mm MTV33-0368 33cm x 32cm, 68 troughs
MTV20-0352* 20cm x 32cm, 52 troughs 3.00mm MTV33-0394* 33cm x 32cm, 94 troughs
MTV20-0370* 20cm x 32cm, 70 troughs 2.25mm MTV33-03126* 33cm x 32cm, 126 troughs
MTV20-0424 20cm x 42cm, 24 troughs 5.92mm MTV33-0446 33cm x 42cm, 46 troughs
MTV20-0434* 20cm x 42cm, 34 troughs 4.50mm MTV33-0462* 33cm x 42cm, 62 troughs
MTV20-0438 20cm x 42cm, 38 troughs 4.02mm MTV33-0468 33cm x 42cm, 68 troughs
MTV20-0452* 20cm x 42cm, 52 troughs 3.00mm MTV33-0494* 33cm x 42cm, 94 troughs
MTV20-0470* 20cm x 42cm, 70 troughs 2.25mm MTV33-04126* 33cm x 42cm, 126 troughs
MTV20-0524 20cm x 52cm, 24 troughs 5.92mm MTV33-0546 33cm x 52cm, 46 troughs
MTV20-0534* 20cm x 52cm, 34 troughs 4.50mm MTV33-0562* 33cm x 52cm, 62 troughs
MTV20-0538 20cm x 52cm, 38 troughs 4.02mm MTV33-0568 33cm x 52cm, 68 troughs
MTV20-0552* 20cm x 52cm, 52 troughs 3.00mm MTV33-0594* 33cm x 52cm, 94 troughs
MTV20-0570* 20cm x 52cm, 70 troughs 2.25mm MTV33-05126* 33cm x 52cm, 126 troughs
MTV20-0624 20cm x 62cm, 24 troughs 5.92mm MTV33-0646 33cm x 62cm, 46 troughs
MTV20-0634* 20cm x 62cm, 34 troughs 4.50mm MTV33-0662* 33cm x 62cm, 62 troughs
MTV20-0638 20cm x 62cm, 38 troughs 4.02mm MTV33-0668 33cm x 62cm, 68 troughs
MTV20-0652* 20cm x 62cm, 52 troughs 3.00mm MTV33-0694* 33cm x 62cm, 94 troughs
MTV20-0670* 20cm x 62cm, 70 troughs 2.25mm MTV33-06126* 33cm x 62cm, 126 troughs
MTV20-0824 20cm x 82cm, 24 troughs 5.92mm MTV33-0846 33cm x 82cm, 46 troughs
MTV20-0834* 20cm x 82cm, 34 troughs 4.50mm MTV33-0862* 33cm x 82cm, 62 troughs
MTV20-0838 20cm x 82cm, 38 troughs 4.02mm MTV33-0868 33cm x 82cm, 68 troughs
MTV20-0852* 20cm x 82cm, 52 troughs 3.00mm MTV33-0894* 33cm x 82cm, 94 troughs
MTV20-0870* 20cm x 82cm, 70 troughs 2.25mm MTV33-08126* 33cm x 82cm, 126 troughs
MTV20-1024 20cm x 102cm, 24 troughs 5.92mm MTV33-1046 33cm x 102cm, 46 troughs
MTV20-1034* 20cm x 102cm, 34 troughs 4.50mm MTV33-1062* 33cm x 102cm, 62 troughs
MTV20-1038 20cm x 102cm, 38 troughs 4.02mm MTV33-1068 33cm x 102cm, 68 troughs
MTV20-1052* 20cm x 102cm, 52 troughs 3.00mm MTV33-1094* 33cm x 102cm, 94 troughs
MTV20-1070* 20cm x 102cm, 70 troughs 2.25mm MTV33-10126* 33cm x 102cm, 126 troughs
GLASS PLATE ORDERING OPTIONS:
When ordering unnotched plate sets (rubber ears are included), add a “-UN” to the end of the Cat. #. Although glass plates are
listed as sets, individual pieces can be ordered. To order a notched only plate add a “-NO” to the end of the Cat. #. To order a
back only (rectangular) plate, add a “-BO” to the end of the Cat. #.
Page 33

C.B.S. Scientific 33 Dedicated Height Sequencer
MICROTROUGH CASTING COMBS
20CM WIDE UNITS 33CM WIDE UNITS
Cat.# Thickness x # troughs point to point Cat.# Thickness x # troughs
MCC20-0224 0.2mm x 24 troughs 5.92mm MCC33-0246 0.2mm x 46 troughs
MCC20-0234* 0.2mm x 34 troughs 4.50mm MCC33-0262* 0.2mm x 62 troughs
MCC20-0238 0.2mm x 38 troughs 4.02mm MCC33-0268 0.2mm x 68 troughs
MCC20-0252* 0.2mm x 52 troughs 3.00mm MCC33-0294* 0.2mm x 94 troughs
MCC20-0270* 0.2mm x 70 troughs 2.25mm MCC33-02126* 0.2mm x 126 troughs
MCC20-0424 0.4mm x 24 troughs 5.92mm MCC33-0446 0.4mm x 46 troughs
MCC20-0434* 0.4mm x 34 troughs 4.50mm MCC33-0462* 0.4mm x 62 troughs
MCC20-0438 0.4mm x 38 troughs 4.02mm MCC33-0468 0.4mm x 68 troughs
MCC20-0452* 0.4mm x 52 troughs 3.00mm MCC33-0494* 0.4mm x 94 troughs
MCC20-0470* 0.4mm x 70 troughs 2.25mm MCC33-04126* 0.4mm x 126 troughs
MCC20-0524 0.5mm x 24 troughs 5.92mm MCC33-0546 0.5mm x 46 troughs
MCC20-0534* 0.5mm x 34 troughs 4.50mm MCC33-0562* 0.5mm x 62 troughs
MCC20-0538 0.5mm x 38 troughs 4.02mm MCC33-0568 0.5mm x 68 troughs
MCC20-0552* 0.5mm x 52 troughs 3.00mm MCC33-0594* 0.5mm x 94 troughs
MCC20-0570* 0.5mm x 70 troughs 2.25mm MCC33-05126* 0.5mm x 126 troughs
*Designed for multi-channel pipettor loading.
SYSTEM “96” FOR 33CM WIDE UNITS ONLY
WITH MICROTROUGH ™ SYSTEM
MICROTROUGH ™ GLASS PLATES MICROTROUGH ™ PLUG COMBS*
Cat.# Spacer Dimensions Cat.# Spacer Dimensions
MTV96-0398 32cm (h), 98 microtroughs, 3.0mm ptp MCC96-0298 0.2mm x 98 well, 3.0mm ptp
MTV96-0498 42cm (h), 98 microtroughs, 3.0mm ptp MCC96-0398 0.3mm x 98 well, 3.0mm ptp
MTV96-0598 52cm (h), 98 microtroughs, 3.0mm ptp MCC96-0498 0.4mm x 98 well, 3.0mm ptp
MTV96-0698 62cm (h), 98 microtroughs, 3.0mm ptp *Necessary when using sharktooth combs with Microtrough
MTV96-0898 82cm (h), 98 microtroughs, 3.0mm ptp glass plates
RECTANGULAR TOOTH COMBS
SHARKTOOTH COMBS* WITH ATTACHED MICROTROUGH ™ PLUGS
Cat.# Comb Dimensions Cat.# Spacer Dimensions
MK96-0298 0.2mm x 98 well, 3.0mm ptp MRP96-0298 Rectangular/Plug Comb 0.2mm x
98 well
MK96-0398 0.3mm x 98 well, 3.0mm ptp MRP96-0398 Rectangular/Plug Comb 0.3mm x
98 well
MK96-0498 0.4mm x 98 well, 3.0mm ptp MRP96-0498 Rectangular/Plug Comb 0.4mm x
98 well
*With or without Microtrough™ System
WITHOUT MICROTROUGH ™ SYSTEM
STANDARD GLASS PLATES, NOTCHED RECTANGULAR TOOTH COMBS
Cat.# Spacer Dimensions Cat.# Comb Dimensions
SGP96-030 32cm (h) x 33cm (w) MG96-0298 0.2mm x 98 wells
SGP96-040 42cm (h) x 33cm (w) MG96-0398 0.3mm x 98 wells
SGP96-050 52cm (h) x 33cm (w) MG96-0498 0.4mm x 98 wells
SGP96-060 62cm (h) x 33cm (w) MG96-0798 0.75mm x 98 wells
SGP96-080 82cm (h) x 33cm (w) MG96-1098 1.0mm x 98 wells
MG96-1598 1.5mm x 98 wells
MG96-2098 2.0mm x 98 wells
SPACER PAIRS BOTTOM SPACERS
FOR 20CM & 33CM WIDE UNITS FOR 20CM & 33CM WIDE UNITS
(Polycarbonate) (Polycarbonate)
Cat.# Spacer Dimensions Cat.# Spacer Thickness
SGS-2020 0.2mm x 22cm SGS-20-.2 bottom spacer 0.2mm thick
SGS-2030 0.2mm x 32cm SGS-20-.4 bottom spacer 0.4mm thick
SGS-2040 0.2mm x 42cm SGS-20-.5 bottom spacer 0.5mm thick
SGS-2050 0.2mm x 52cm
SGS-2060 0.2mm x 62cm SGS-33-.2 bottom spacer 0.2mm thick
SGS-2080 0.2mm x 82cm SGS-33-.4 bottom spacer 0.4mm thick
SGS-2100 0.2mm x 102cm SGS-33-.5 bottom spacer 0.5mm thick
SGS-4020 0.4mm x 22cm
SGS-4030 0.4mm x 32cm
SGS-4040 0.4mm x 42cm FOR 20CM & 33CM WIDE UNITS
SGS-4050 0.4mm x 52cm Cat.# Spacer Thickness
SGS-4060 0.4mm x 62cm MKS-20-.2 bottom spacer 0.2mm thick
SGS-4080 0.4mm x 82cm MKS-20-.4 bottom spacer 0.4mm thick
SGS-4100 0.4mm x 102cm MKS-20-.5 bottom spacer 0.5mm thick
SGS-5020 0.5mm x 22cm
SGS-5030 0.5mm x 32cm MKS-33-.2 bottom spacer 0.2mm thick
SGS-5040 0.5mm x 42cm MKS-33-.4 bottom spacer 04.mm thick
SGS-5050 0.5mm x 52cm MKS-33-.5 bottom spacer 0.5mm thick
SGS-5060 0.5mm x 62cm
SGS-5080 0.5mm x 82cm
SGS-5100 0.5mm x 102cm
Page 34

C.B.S. Scientific 34 Dedicated Height Sequencer
MYLARSPACER PAIRS FOR 20CM & 33CM WIDE UNITS
Cat.# Spacer Dimensions Cat.# Spacer Dimensions
MKS-2020 0.2mm x 22cm MKS-3050 0.3mm x 52cm
MKS-2030 0.2mm x 32cm MKS-3060 0.3mm x 62cm
MKS-2040 0.2mm x 42cm MKS-3080 0.3mm x 82cm
MKS-2050 0.2mm x 52cm MKS-3100 0.3mm x 102cm
MKS-2060 0.2mm x 62cm MKS-4020 0.4mm x 22cm
MKS-2080 0.2mm x 82cm MKS-4030 0.4mm x 32cm
MKS-2100 0.2mm x 102cm MKS-4040 0.4mm x 42cm
MKS-3020 0.3mm x 22cm MKS-4050 0.4mm x 52cm
MKS-3030 0.3mm x 32cm MKS-4060 0.4mm x 62cm
MKS-3040 0.3mm x 42cm MKS-4080 0.4mm x 82cm
MKS-4100 0.4mm x 102cm
Preparative Spacer sets FOR 20CM & 33CM WIDE UNITS
20CM WIDE UNITS 33CM WIDE UNITS
(PVC, includes bottom spacer) (PVC, includes bottom spacer)
Cat.# Spacer Dimensions Cat.# Spacer Dimensions
SGS20-7520 0.75mm x 22cm SGS33-7520 0.75mm x 22cm
SGS20-7530 0.75mm x 32cm SGS33-7530 0.75mm x 32cm
SGS20-7540A 0.75mm x 42cm SGS33-7540A 0.75mm x 42cm
SGS20-7550 0.75mm x 52cm SGS33-7550 0.75mm x 52cm
SGS20-7560 0.75mm x 62cm SGS33-7560 0.75mm x 62cm
SGS20-7580 0.75mm x 82cm SGS33-7580 0.75mm x 82cm
SGS20-7510 0.75mm x 102cm SGS33-7510 0.75mm x 102cm
SGS20-1020 1.0mm x 22cm SGS33-1020 1.0mm x 22cm
SGS20-1030 1.0mm x 32cm SGS33-1030 1.0mm x 32cm
SGS20-1040A 1.0mm x 42cm SGS33-1040A 1.0mm x 42cm
SGS20-1050 1.0mm x 52cm SGS33-1050 1.0mm x 52cm
SGS20-1060 1.0mm x 62cm SGS33-1060 1.0mm x 62cm
SGS20-1080 1.0mm x 82cm SGS33-1080 1.0mm x 82cm
SGS20-1010 1.0mm x 102cm SGS33-1010 1.0mm x 102cm
SGS20-1520 1.5mm x 22cm SGS33-1520 1.5mm x 22cm
SGS20-1530 1.5mm x 32cm SGS33-1530 1.5mm x 32cm
SGS20-1540A 1.5mm x 42cm SGS33-1540A 1.5mm x 42cm
SGS20-1550 1.5mm x 52cm SGS33-1550 1.5mm x 52cm
SGS20-1560 1.5mm x 62cm SGS33-1560 1.5mm x 62cm
SGS20-1580 1.5mm x 82cm SGS33-1580 1.5mm x 82cm
SGS20-1510 1.5mm x 102cm SGS33-1510 1.5mm x 102cm
SGS20-2020 2.0mm x 22cm SGS33-2020 2.0mm x 22cm
SGS20-2030 2.0mm x 32cm SGS33-2030 2.0mm x 32cm
SGS20-2040A 2.0mm x 42cm SGS33-2040A 2.0mm x 42cm
SGS20-2050 2.0mm x 52cm SGS33-2050 2.0mm x 52cm
SGS20-2060 2.0mm x 62cm SGS33-2060 2.0mm x 62cm
SGS20-2080 2.0mm x 82cm SGS33-2080 2.0mm x 82cm
SGS20-2010 2.0mm x 102cm SGS33-2010 2.0mm x 102cm
SGS20-3020 3.0mm x 22cm SGS33-3020 3.0mm x 22cm
SGS20-3030 3.0mm x 32cm SGS33-3030 3.0mm x 32cm
SGS20-3040A 3.0mm x 42cm SGS33-3040A 3.0mm x 42cm
SGS20-3050 3.0mm x 52cm SGS33-3050 3.0mm x 52cm
SGS20-3060 3.0mm x 62cm SGS33-3060 3.0mm x 62cm
SGS20-3080 3.0mm x 82cm SGS33-3080 3.0mm x 82cm
SGS20-3010 3.0mm x 102cm SGS33-3010 3.0mm x 102cm
Page 35

C.B.S. Scientific 35 Dedicated Height Sequencer
WEDGE SPACER SETS FOR 20CM AND 33CM WIDE UNITS
EXPONENTIAL 1:3 RATIO EXPONENTIAL 1:5 RATIO
Top thickness 0.2mm Top thickness 0.2mm
Bottom thickness 0.6mm Bottom thickness 1.0mm
Cat.# Spacer Dimensions Cat.# Spacer Dimensions
SGS-2040-EW3 42cm (1pr. 20cm exponential SGS-2040-EW5 42cm (1pr. 20cm exponential
& 1pr. 22cm flat) & 1pr. 22cm flat)
SGS-2050-EW3 52cm (1pr. 30cm exponential SGS-2050-EW5 52cm (1pr. 30cm exponential
& 1pr. 22cm flat) & 1pr. 22cm flat)
SGS-2060-EW3 62cm (1pr. 30cm exponential SGS-2060-EW5 62cm (1pr. 30cm exponential
& 1pr. 32cm flat) & 1pr. 32cm flat)
SGS-2080-EW3 82cm (1pr. 60cm exponential SGS-2080-EW5 82cm (1pr. 60cm exponential
& 1pr. 22cm flat) & 1pr. 22cm flat)
SGS-20-EW3-0.6 20cm width bottom spacer SGS-20-EW5-1.0 20cm width bottom spacer
SGS-33-EW3-0.6 33cm width bottom spacer SGS-33-EW5-1.0 33cm width bottom spacer
EXPONENTIAL 1:3 RATIO EXPONENTIAL 1:5 RATIO
Top thickness 0.4mm Top thickness 0.4mm
Bottom thickness 1.2mm Bottom thickness 2.0mm
Cat.# Spacer Dimensions Cat.# Spacer Dimensions
SGS-4040-EW3 42cm (1pr. 20cm exponential SGS-4040-EW5 42cm (1pr. 20cm exponential
& 1pr. 22cm flat) & 1pr. 22cm flat)
SGS-4050-EW3 52cm (1pr. 30cm exponential SGS-4050-EW5 52cm (1pr. 30cm exponential
& 1pr. 22cm flat) & 1pr. 22cm flat)
SGS-4060-EW3 62cm (1pr. 30cm exponential SGS-4060-EW5 62cm (1pr. 30cm exponential
& 1pr. 32cm flat) & 1pr. 32cm flat)
SGS-4080-EW3 82cm (1pr. 60cm exponential SGS-4080-EW5 82cm (1pr. 60cm exponential
& 1pr. 22cm flat) & 1pr. 22cm flat)
SGS-20-EW3-1.2 20cm width bottom spacer SGS-20-EW5-2.0 20cm width bottom spacer
SGS-33-EW3-1.2 33cm width bottom spacer SGS-33-EW5-2.0 33cm width bottom spacer
WEDGE SPACER SETS FOR 20CM AND 33CM WIDE UNITS
LINEAR 1:2 RATIO LINEAR 1:2 RATIO
Top thickness 0.2mm Top thickness 0.4mm
Bottom thickness 0.4mm Bottom thickness 0.8m
Cat.# Spacer Dimensions Cat.# Spacer Dimensions
SGS-2040-W2 38.7cm length (pair) SGS-4040-W2 38.7cm length (pair)
SGS-2040A-W2 42cm length (pair) SGS-4040A-W2 42cm length (pair)
SGS-2050-W2 52cm length (pair) SGS-4050-W2 52cm length (pair)
SGS-2060-W2 62cm length (pair) SGS-4060-W2 62cm length (pair)
SGS-20-W2-.4 20cm wide bottom spacer SGS-20-W2-.8 20cm wide bottom spacer
SGS-33-W2-.4 33cm wide bottom spacer SGS-33-W2-.8 33cm wide bottom spacer
LINEAR 1:3 RATIO LINEAR 1:3 RATIO
Top thickness 0.2mm Top thickness 0.4mm
Bottom thickness 0.6mm Bottom thickness 1.2mm
Cat.# Spacer Dimensions Cat.# Spacer Dimensions
SGS-2040-W3 38.7cm length (pair) SGS-4040-W3 38.7cm length (pair)
SGS-2040A-W3 42cm length (pair) SGS-4040A-W3 42cm length (pair)
SGS-2050-W3 52cm length (pair) SGS-4050-W3 52cm length (pair)
SGS-2060-W3 62cm length (pair) SGS-4060-W3 62cm length (pair)
SGS-20-W3-.6 20cm wide bottom spacer SGS-20-W3-1.2 20cm wide bottom spacer
SGS-33-W3-.6 33cm wide bottom spacer SGS-33-W3-1.2 33cm wide bottom spacer
LINEAR 1:4 RATIO LINEAR 1:4 RATIO
Top thickness 0.2mm Top thickness 0.4mm
Bottom thickness 0.8mm Bottom thickness 1.6mm
Cat.# Spacer Dimensions Cat.# Spacer Dimensions
SGS-2040-W4 38.7cm length (pair) SGS-4040-W4 38.7cm length (pair)
SGS-2040A-W4 42cm length (pair) SGS-4040A-W4 42cm length (pair)
SGS-2050-W4 52cm length (pair) SGS-4050-W4 52cm length (pair)
SGS-2060-W4 62cm length (pair) SGS-4060-W4 62cm length (pair)
SGS-20-W4-.8 20cm wide bottom spacer SGS-20-W4-1.6 20cm wide bottom spacer
SGS-33-W4-.8 33cm wide bottom spacer SGS-33-W4-1.6 33cm wide bottom spacer
Page 36

C.B.S. Scientific 36 Dedicated Height Sequencer
ULTRATHIN MYLAR ACCESSORIES FOR 20CM & 33CM WIDE UNITS
20CM WIDE UNITS 33CM WIDE UNITS
SHARKTOOTH COMBS
Cat.# Comb Dimensions Cat.# Comb Dimensions
MK20-07501 75µ (0.075mm) x 1 well MK33-07501 75µ (0.075mm) x 1 well
MK20-07524 75µ (0.075mm) x 24 well MK33-07546 75µ (0.075mm) x 46 well
MK20-07534* 75µ (0.075mm) x 34 well MK33-07562* 75µ (0.075mm) x 62 well
MK20-07538 75µ (0.075mm) x 38 well MK33-07568 75µ (0.075mm) x 68 well
MK20-07552* 75µ (0.075mm) x 52 well MK33-07594* 75µ (0.075mm) x 94 well
*Designed for multi-channel pipettor loading.
SPACER SETS
Cat.# Spacer Dimensions
SGS-07530 75µ (0.075mm) x 32cm
SGS-07540 75µ (0.075mm) x 42cm
SGS-07550 75µ (0.075mm) x 52cm
ADDITIONAL ACCESSORIES FOR 20CM & 33CM WIDE UNITS
BUBBLE GRABBERS, PAIR
Cat.# Dimensions
SBG-2040 0.2mm x 42cm
SBG-2050 0.2mm x 52cm
SBG-2060 0.2mm x 62cm
SBG-2080 0.2mm x 82cm
SBG-2100 0.2mm x 102cm
SBG-4040 0.4mm x 42cm
SBG-4050 0.4mm x 52cm
SBG-4060 0.4mm x 62cm
SBG-4080 0.4mm x 82cm
SBG-4100 0.4mm x 102cm
SBG-5040 0.5mm x 42cm
SBG-5050 0.5mm x 52cm
SBG-5060 0.5mm x 62cm
SBG-5080 0.5mm x 82cm
SBG-5100 0.5mm x 102cm
SILICONE CORD REPAIR KIT QUICK DISCONNECT COUPLINGS
Cat.# Item Cat.# Item
SCK-500 Kit for Sequencing repairs for 3/16” cord QDC-B Quick Disconnect Coupling, body
SSC-005 White 3/16” Silicone Cord QDC-I Quick Disconnect Coupling, insert
SCK-400 Kit for Sequencing repairs for 5/32” cord QDC-P Quick Disconnect Coupling, body and insert
SSC-004 Beige 5/32” Silicone Cord BVD100 Ball Valve
GEL SEALING TAPE WHITE SPRING CLAMPS
Cat.# Item Cat.# Item
GT-72-10 1" wide x 72 yards GPC-0001 Large white clamp, jaws open
GT-72-15 1.5" wide x 72 yards GPC-0002 Large white clamp, jaws closed
GPC-0004 Multi-purpose clamp, jaws closed
GEL REPEL RUBBER EARS FOR UNNOTCHED PLATES
Cat.# Item Cat.# Item
SGR-0401 Gel Repel VFR-1000 Rubber ears, pair
GLASS PLATE SEPARATORS
Cat.# Item
WPS-100 Wedge Plate Separator, pair
BAR CLAMPS GLASS RACKS
Cat.# Item Cat.# Item
GPC-1000 Bar clamp for 20cm unit GRH-100B Glass rack, black
GPC-2500 Bar clamp for 25cm unit GRH-100BL Glass rack, blue
GPC-2000 Bar clamp for 33cm unit GRH-100G Glass rack, grey
GPC-4500 Bar clamp for 45cm unit GRH-100GR Glass rack, green
GRH-100R Glass rack, red
Page 37

C.B.S. Scientific 37 Dedicated Height Sequencer
SLIDING GEL CASTERS
Cat.# Item
GSL-1001 Casts glass plates 20cm-38cm (w) x 22cm-42cm (l)
GSL-2001 Casts glass plates 20cm-38cm (w) x 22cm-62cm (l)
DT-20 Drip Tray for 20cm wide glass plates
DT-33 Drip Tray for 33cm wide glass plates
POWER SUPPLIES
Cat.# Item
EPS-2000-II 0-2000V Constant Power Supply, 110V/60Hz, 300 Watts, 300mA Constant Power, CV, CC
EPS-2000-IIV 0-2000V Constant Power Supply, 220V/50Hz, 300 Watts, 300mA Constant Power, CV, CC
EPS-3000-II 0-3000V Constant Power Supply, 110V/60Hz, 300 Watts, 300mA Constant Power, CV, CC
EPS-3000-IIV 0-3000V Constant Power Supply, 220V/50Hz, 300 Watts, 300mA Constant Power, CV, CC
EPS-4000-II 0-4000V Constant Power Supply, 110V/60Hz, 300 Watts, 300mA Constant Power, CV, CC
EPS-4000-IIV 0-4000V Constant Power Supply, 220V/50Hz, 300 Watts, 300mA Constant Power, CV, CC
EPS-6000-II 0-6000V Constant Power Supply, 110V/60Hz, 300 Watts, 300mA Constant Power, CV, CC
EPS-6000-IIV 0-6000V Constant Power Supply, 220V/50Hz, 300 Watts, 300mA Constant Power, CV, CC
Note: Please consult the C.B.S. Scientific catalogue or customer service, 1-800-243-4959, for additional product
ordering information.
Page 38

NOTES
Page 39

NOTES
Page 40

CONTACT US
Telephone:
Local or International
858-755-4959
Toll Free: 858-755-0733
Fax: 858-755-0733
Check out our new and
improved online ordering!
www.cbsscientific.com
E-mail address:
sales@cbssci.com
Mailing address:
C.B.S. Scientific Company
P.O. Box 856
Del Mar, CA 92014
Shipping address:
C.B.S. Scientific Company
10805 Vista Sorrento Pkwy
Suite 100
San Diego, CA 92121
Credit Card Options:
Visa/Mastercard
Discover/American Express
 Loading...