

Cavalier CAV5 User Manual
CAV5 - QSG (English)- Booklet
size: 200mm x 100mm
folded size: 100 mm x 100mm
Color: 4C + 4C
Date: Oct 23, 2018
Material: 115gsm, Art paper
Questions?
Questions?
www.cavalieraudio.com
www.cavalieraudio.com
1-800-925-6224
1-800-925-6224
CAV5-181023-A
CAV5-181023-A For full warranty and full instructions visit: www.cavalieraudio.com/supportFor full warranty and full instructions visit: www.cavalieraudio.com/support
Back cover Front cover
Printed in China
Printed in China
WHATʼ S IN THE BOX:
The Air (CAV-5)
A/C Power Adaptor
WHAT YOU’LL NEED:
Wi-Fi network transmitting at 2.4GHz
Apple device running iOS 10 or later or
Android device running Lollipop 5.0 or later
connected to your preferred Wi-Fi network
Install the Cavalier app and Amazon Alexa
app (iOS or Android) for setup
and to enable Alexa voice control and Wi-Fi
streaming music services
THE AIR
BLUETOOTH/WIFI HOME SPEAKER SYSTEM
WITH WIRELESS CHARGING + ALEXA VOICE CONTROL
Model: CAV5
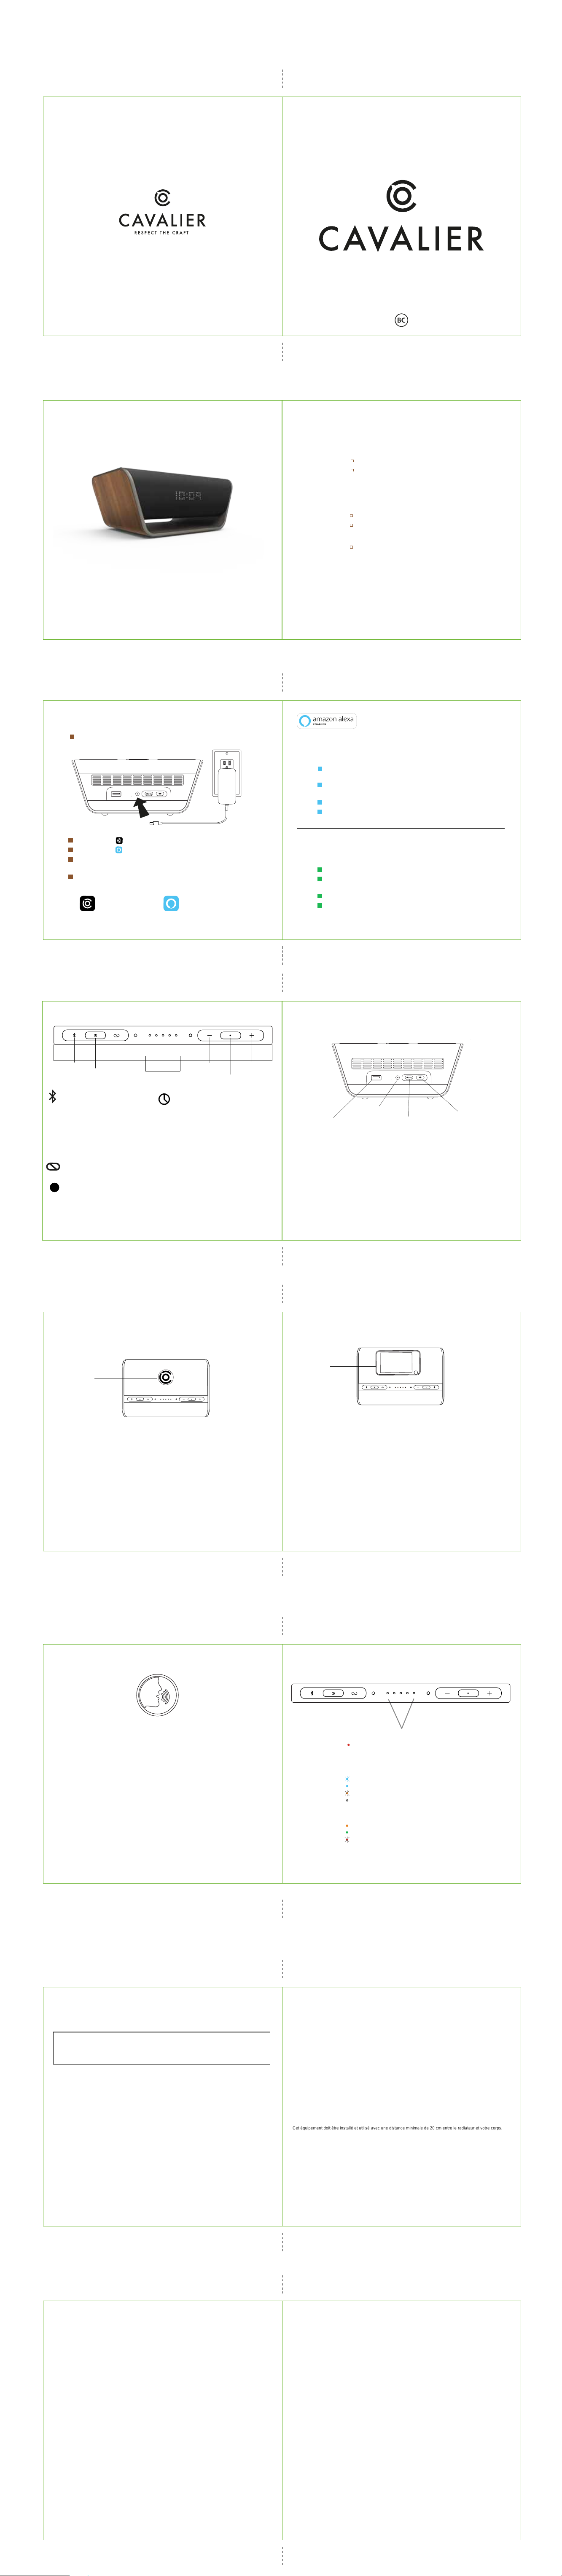
SETU P OVERVI E W
1
Plug included AC adaptor into the DC jack on back of unit. Connect other
end of cable into a working wall outlet.
TEST
TEST
RESET
RESET
Questions? www.cavalieraudio.com 1-800-925-6224
USING THE AMAZON ALEXA APP
WITH THE AIR
1
Open the Amazon Alexa app on your device to activate, access,
and manage Amazon Voice Services
2
Link Wi-Fi streaming music services (such as Pandora, TuneIn,
iHeartRadio, Spotify, and Amazon Music)
3
Enable your favorite Alexa Voice Skills
4
Setup compatible Smart Home devices
1
2
Download the Cavalier Audio app from the App Store or Google Play.
3
Download the Amazon Alexa app from the App Store or Google Play.
4
Follow Cavalier Audio in-app instructions for account setup and to
establish your speaker’s Wi-Fi connection.
5
Connect your Amazon account to enjoy the Alexa voice
capability of your CAV5.
Use the Cavalier Audio app to:
∙ CONNECT TO WI-FI
∙ SETUP ALEXA
∙ CUSTOMIZE CONTROLS
∙ AND MORE!
2
Bluetooth
Button
Bluetooth Button
Make your device "discoverable"
by turning on Bluetooth mode
• Press to enter Bluetooth Mode.
• Press and hold for 2 seconds to enter
Bluetooth Pairing Mode.
• Select 'Cavalier Air' to pair.
• Press and hold for 10 seconds to
clear/reset Bluetooth.
Press the Play/Pause Button to play/pause music
Press the - or + buttons to adjust volume
Mute Button
• Press to mute and unmute mics
(enables privacy for Alexa).
Smart Button
• Play / Pause = 1 Press
• Forward = 2 Press
• Reverse = 3 Press
• Alexa = Press + Hold
• Answer Call = 1 Press
• End Call = Press + Hold
• Ignore Call = Press + Hold
4
AIR
Alarm
Button
Mute
Button
Use the Amazon Alexa app to:
· MANAGE AMAZON ACCOUNT
· LINK STREAMING SERVICES
· ACTIVATE ALEXA SKILLS
· AND MORE!
TOP CONTROLS
Snooze
Alarm will re-activate
every 9 minutes for
up to an hour
• Press and hold to set alarm.
• Press + or - to adjust alarm time.
• Press alarm button again to confirm.
• Press + or - to choose AM or PM.
• Press alarm button again to confirm.
• Press + or - to choose a wake-to source:
Bluetooth (BT) or iHome tones (SND).
• If you choose BT, press alarm button
again to confirm.
• If you choose SND, press + or - to
choose a tone, then press the alarm
button again to confirm.
• Press + or - to adjust the alarm volume.
• Press alarm button again to confirm all
alarm settings.
• When alarm is armed, the button will
glow red.
• When alarm sounds, press to turn OFF.
*The AIR alarm does not require Alexa to
be active. Set up advanced alarm
scheduling via the Cavalier Audio app.
Volume
AIR Alarm Button*
Down
Smart
Button
Volume
Up
USING SPOTIFY CONNECT
WITH THE AIR
1
Connect your Air to your Wi-Fi network
2
Open up the Spotify app on your phone, tablet or laptop
using the same Wi-Fi network
3
Play a song and select Devices Available
4
Select your Air and start listening
The Spotify Software is subject to third party licenses found here: www.spotify.com/connect/third-party-licenses
REAR CONTROLS
USB Charging Port
When unit is
connected to AC
power, connect USB
cable (not included) to
charge devices.
Note: This is the
fastest, most
reliable method
for charging your
devices.
DC Jack
Clock Display
•
Press to cycle through
display brightness
levels: High, 6,5,4
3,2,1 and OFF.
•
Press and hold to
select 12/24 hour
display format. (Use +
or - to choose.)
•
Press Display again to
confirm.
•
Press + or - to adjust
clock.
•
Press Display again to
confirm.
•
Press + or - to select
AM or PM.
•
Press Display again to
confirm settings.
Wi-Fi
• Press for Wi-Fi mode.
• Press and hold for 5
seconds for Wi-Fi setup
mode.
• Press and hold for 15
seconds to clear/reset
Wi-Fi and Alexa.
3
5
WIRELESS CHARGING
Wireless
Charging
Area
Qi Compatible Phones:
This unit will wirelessly charge Qi compatible wireless charging phones. PMA
wireless charging system is not supported.
Qi Compatible Phone Cases:
WARNING: Remove metal protective or magnetic
charging. When charging phone, do not place magnetic-striped or other
metal objects on the charger. Doing so could damage the object or this unit.
Qi compatible phones with metallic looking finishes will charge normally.
6
case from phone before
WIRELESS CHARGING
Charge
Your
Phone
Here
How to Charge Your Phone:
Center Qi compatible device face up on marked charging target circle. The LED
status indicators will glow orange while your device charges, and green when
your device is fully charged.
Playing Music During Qi Charging:
The volume level will be limited during Qi charging. If you prefer to listen to music
at a high volume level while charging your device, we recommend using the
built-in USB port on the back of the unit.
Note: The charging phone may shift position while music is playing. Please use
caution. The wireless charging process generates heat that may cause phones and
chargers to get warm to the touch. This is natural for wireless charging devices.
7
ALEXA VOICE-ACTIVATED ALARMS
In addition to the AIR alarm function on the CAV5, you can also set alarms using Alexa
voice commands.
Alexa Tone Alarms
Ask Alexa to set your alarm time. You will wake to custom Alexa tones that can be
•
customized using the Alexa app.
When the alarm sounds:
•
•
•
Snooze.
Alexa Music/Streaming Alarms
•
•
•
8
Press the alarm button or say, ‘Alexa, stop’ to disable.
Hit the Snooze button on the CAV5, or say ‘Alexa, snooze’ to activate
Ask Alexa to set your alarm time to wake to Spotify, iHeart Radio, etc.
When the alarm sounds:
•
Press the Smart Button or say, ‘Alexa, stop’ to disable.
Say ‘Alexa, snooze’ to activate Snooze.
STATUS LEDS
White indicators display volume level
Red = mic muted
When mic is muted, the center LED will display status.
Bluetooth/Wi-Fi Indicator
Flashing blue = pairing
Solid blue = paired
Flashing orange = Wi-Fi setup/No Connection
LED OFF = Wi-Fi connected
Qi Charging
Solid orange = charging
Solid green = device is fully charged
Flashing red = charging error
9
FCC Information
FCC Radiation Exposure Statement
Model: CAV5
FCC ID:EMOCAV5
IC:986B-CAV5
The device has been evaluated to meet general RF exposure requirement.
This device complies with Part 15 of the FCC Rules, operation is subject to the following
two conditions: (1) This device may not cause harmful interference, and (2) this device
must accept any interference received, including interference that may cause undesired
operation.
• WARNING: Changes or modifications to this unit not expressly approved by the
party responsible for compliance could void the user’s authority to operate the
equipment.
• NOTE: This equipment has been tested and found to comply with the limits for a
Class B digital device, pursuant to Part 15 of the FCC Rules.
These limits are designed to provide reasonable protection against harmful interference
in a residential installation. This equipment generates, uses and can radiate radio
frequency energy and, if not installed and used in accordance with the instructions,
may cause harmful interference to radio communications.
However, there is no guarantee that interference will not occur in a particular installation.
If this equipment does cause harmful interference to radio or television reception, which
can be determined by turning the equipment off and on, the user is encouraged to try
to correct the interference by one or more of the following measures:
• Reorient or relocate the receiving antenna.
• Increase the separation between the equipment and receiver.
• Connect the equipment into an outlet on a circuit different from that to which the
receiver is connected.
• Consult the dealer or an experienced radio/TV technician for help.
This equipment should be installed and operated with minimum distance 20cm between the radiator & your body.
CAN ICES-3 (B)/NMB-3(B)
10
Canada Statement
This device complies with Industry Canada’s licence-exempt RSSs. Operation is subject
to the following two conditions:
(1) This device may not cause interference; and
(2) This device must accept any interference, including interference that may cause
undesired operation of the device.
This equipment should be installed and operated with minimum distance 20cm between the radiator & your body.
Le présent appareil est conforme aux CNR d’Industrie Canada applicables aux appareils
radio exempts de licence. L’exploitation est autorisée aux deux conditions suivantes :
(1) l’appa reil ne doit pas produire de brouillage;
(2) l’utilisateur de l’appareil doit accepter tout brouillage radioélectrique subi,
même si le brouillage est susceptible d’en compromettre le fonctionnement.
The device has been evaluated to meet general RF exposure requirement.
le dispositif a été évalué à satisfaire l'exigence générale de l'exposition aux rf.
Cet équipement doit être installé et utilisé avec une distance minimale de 20 cm entre le radiateur et votre corps.
11
Internal Rechargeable Lithium-ion Battery
This unit features an internal, non-replaceable backup battery for the alarm. If you
experience a temporary power outage, the backup battery will maintain your time
and alarm settings until AC power is restored.
WARNING/DISPOSAL OF UNIT
Do NOT attempt to change the battery. Doing so will void the warranty and could
cause injury and damage to your device.
To dispose of the unit, follow the instructions below:
• Never dispose of used batteries/electronics with ordinary solid wastes, since
they may contain toxic substances.
• Always dispose of used batteries/electronics in accordance with the prevailing
community regulations.
• Many electronics retailers now recycle batteries and other electronic components
at no charge.
GENERAL BATTERY PRECAUTIONS
• Never use or charge a battery if it appears to be leaking, discolored, deformed,
or in any way abnormal.
• Never disassemble the unit or attempt to remove battery as that could cause
leakage of alkaline solution or other electrolytic substances.
• Avoid charging a rechargeable battery when the temperature is not within 5°C -
35°C (41° - 95° Fahrenheit).
• Never expose a battery to any liquid.
• Never expose a battery to excessive heat such as direct sunlight or fire. Never
use a battery pack in an unventilated vehicle where excessive internal
temperatures may be encountered.
• Always keep batteries out of the reach of infants and small children.
12
IMPORTANT SAFETY INSTRUCTIONS
Please heed all warning, read and follow all instructions and keep these instructions
handy for future reference.
• Do not use this product near water and clean only with dry cloth.”
• Do not block any ventilation openings. Install in accordance with the
manufacturer’s instructions.”
• Heat – This product should be situated away from heat sources such as radiators,
heat registers, stoves or other appliances (including amplifiers) that produce
heat.”
• Only use attachments/accessories specified by the manufacturer.”
• Unplug this product during lightning storms or when unused for long periods of
time.”
• Damage Requiring Service – This product should be serviced by qualified service
personnel when:
- Plug has been damaged.
- objects have fallen into or liquid has been spilled into the enclosure.
- the unit has been exposed to rain.
- the unit has been dropped or the enclosure damaged.
- the unit exhibits a marked change in performance or does not operate normally”
• No naked flame sources, such as lighted candles, should be placed on this
product”
• This product is suitable for use in tropical and/or moderate climates.”
• WARNING: To reduce the risk of fire or electric shock, do not expose this
product to rain or moisture”
• The mains plug of power adaptor is used as the disconnect device, it shall
remain readily operable”
13
 Loading...