

Page 1

CavVelocity
CavVelocity DSL Modem with
Inline Phone Filter
Installation Instructions
Page 2

About Your DSL Service
You have just received the Cavalier Telephone DSL Self
Installation Kit. After you connect your computer to the
DSL modem and install the necessary Ethernet components in your computer, your DSL service will enable you
to be connected to the Internet at all times and place
calls on the same line.
Required Equipment for
Your DSL Connection
■ DSL Modem (provided)
■ Cabling (provided)
■ Ethernet Card (customer provided)
■ Line Filter (2 are provided, additional filters may be
obtained from a computer or electronics store)
Page 3
CavVelocity 6381 DSL Modem
with Inline Phone Filter
Installation Instructions
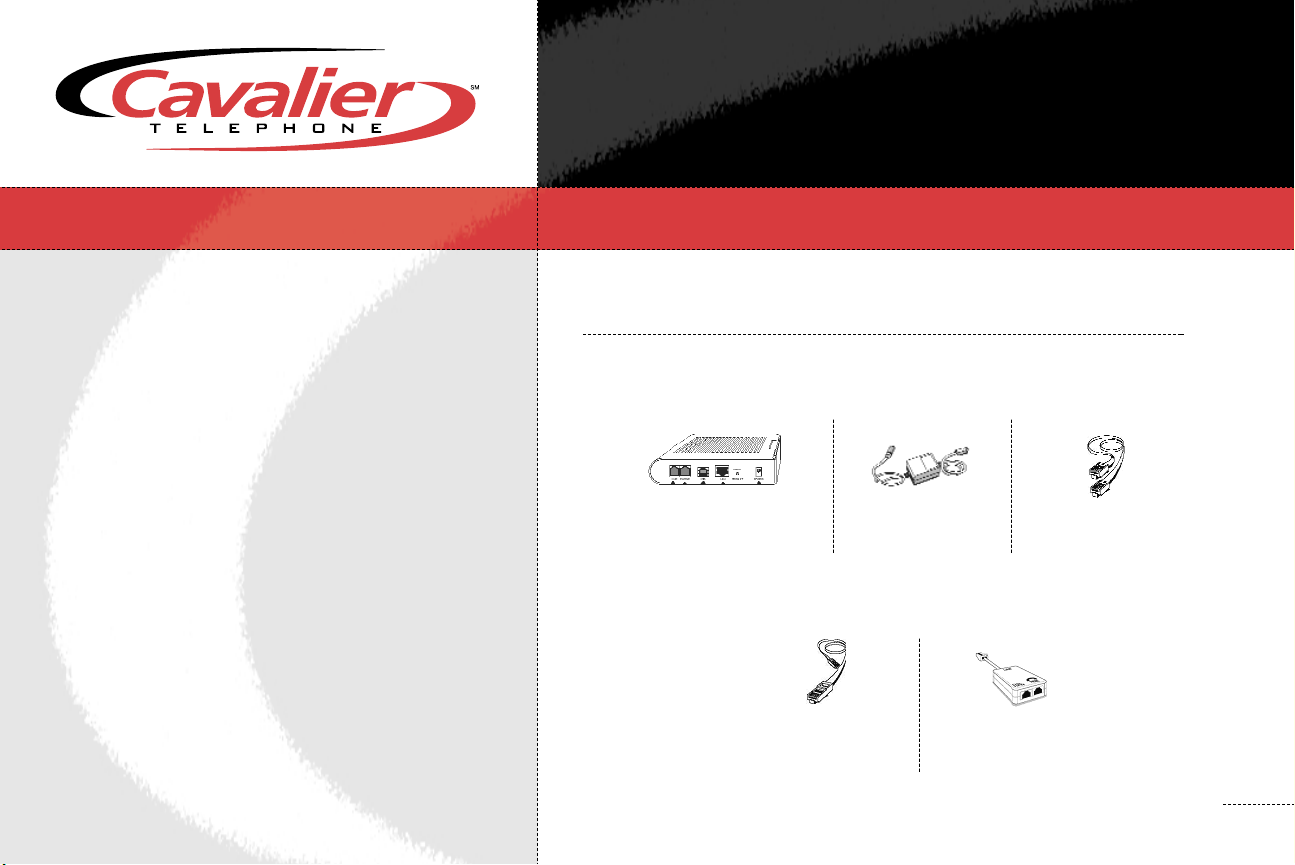
STEP 1 – Package Checklist
Verify that your package contains the following:
DSL Modem Power Supply RJ-11
Telephone Cable
RJ-45 Two
Ethernet Cable Telephone Filters
1
Page 4
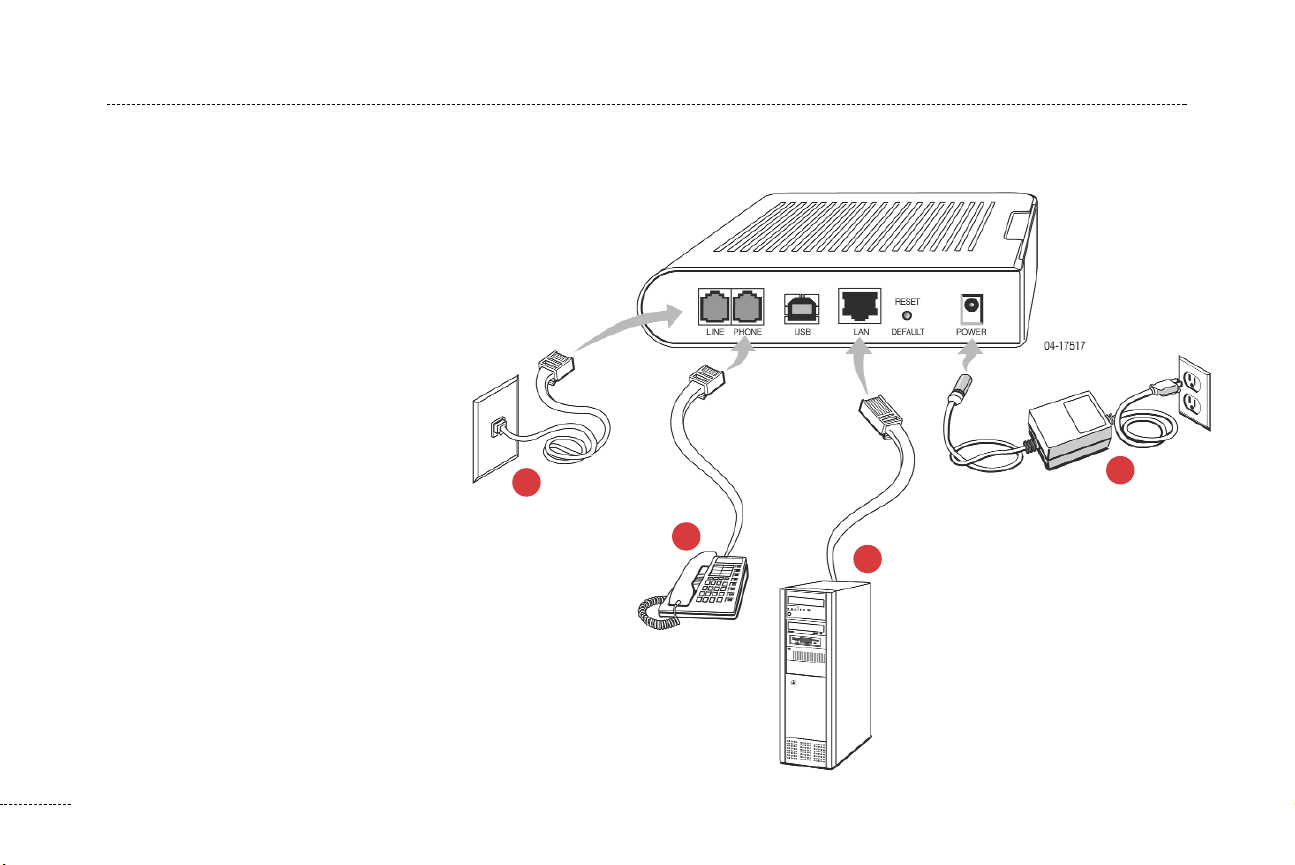
STEP 2 – Installing the CavVelocity 6381 DSL Modem
Place the CavVelocity 6381 DSL Modem on a flat surface with clearance for the rear connectors.
1. Connect the LINE port on the modem
to the Phone jack using the supplied
phone cable.
2. Connect the PHONE port on the
modem to a normal telephone
(optional, you may choose not to use
phone port).
3. Connect the LAN port on the modem
to a 10/100BaseT Ethernet Network
card on your PC using the supplied
Ethernet cable.
1
4
4. Connect the POWER port on the
modem to the supplied power supply
and plug into a wall outlet.
2
3
The modem hardware installation is
now complete.
2
Page 5

Steps for Telephone Service
Setting up Your PC for DSL
Connect a microfilter to each phone jack where you
are using a telephone or other device on the same
phone line as the DSL modem. DSL filters block the
DSL signal from reaching your phone, fax, and other
devices. EXCEPT for your DSL modem, every device
sharing the phone number that has DSL needs a filter.
Unused jacks do not need a filter.
If you skip this step, you could experience noise and reduced phone
service quality. If you are using a two-line phone, you must purchase
and use a dual-line microfilter. Dual-line microfilters and additional
microfilters can be purchased at most computer or electronics retailers.
Some common devices that need DSL filters:
■ Regular phones
■ Cordless phones
■ Caller ID units
■ Answering machines
■ Fax machines
■ Dial-up modems
■ Satellite TV dialers
■ Meter readers
■ Monitored security systems that use the DSL phone line (check
with your security company to determine if this is necessary)
When starting your PC (98, ME, 2000, XP, Macintosh), check for:
■ Ethernet card properly installed and working
■ Power, line and Ethernet lights are on and functioning on your
DSL modem. If you have line light and power light, but no
Ethernet light, check the Ethernet cable going from your modem
to your network card in your PC to make sure that it is tightly
installed. If it is secure and there is still no Ethernet light, pull out
the Ethernet cable from your DSL modem as well as out of the
PC, and re-insert cable.
Note: An ethernet cable was provided in your DSL package. We
suggest that you disconnect your computer from any hub or router
and connect it directly to the DSL modem. This will eliminate any
issue associated with these devices. After installation you may reinstall these devices, however should the service fail to function properly with them installed, you will need to contact the support
department for the manufacturers equipment.
At this point with the computer connected directly to the DSL modem
and the modem connected to the jack you should have an Ethernet
light on your DSL modem. If not, check to see if your network card
is installed properly, or if the cable is connected correctly. Should
you not have an Ethernet light at this point contact our support
desk at 877-459-9182.
Settings:
Once you have an Ethernet light, you are ready to configure the
TCP/IP settings on your computer
3
Page 6
Setup Instructions for Windows XP
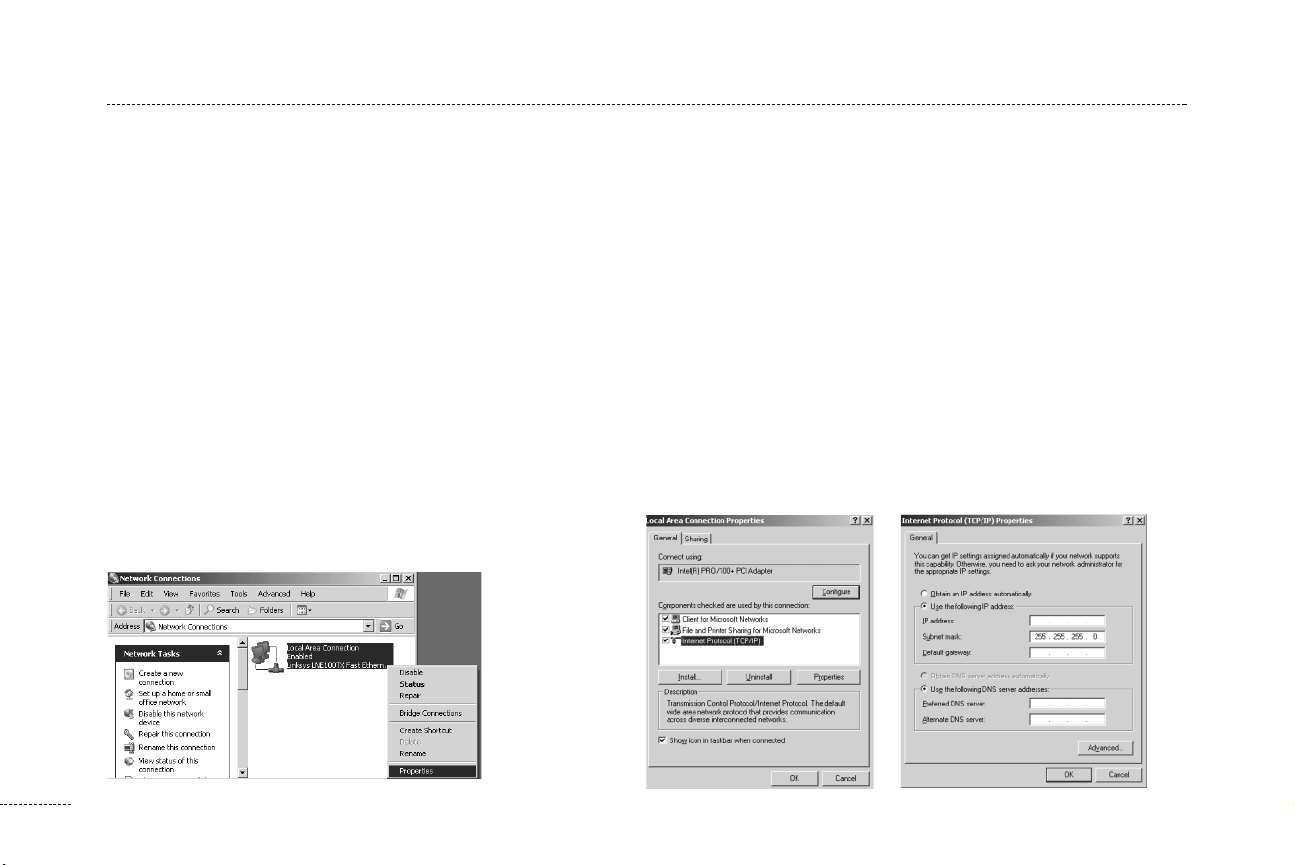
1. Click your Start button, Run. In the run bar type NCPA.CPL.
Click the OK button
2. A Network Connections window will open (Fig 1.1)
■ Right click on Local Area Connection, left click on
Properties
3. The Local Area Connection Properties window will open up
(Fig 1.2)
■ Double click on Internet Protocol (TCP/IP)
4. The Internet Protocol (TCP/IP) Properties window will open
(Fig 1.3)
■ Click on Use the following IP address
■ Enter your IP address from the welcome letter in the IP
address box
■ Enter 255.255.255.0 in the Subnet mask box
■ Enter your default gateway from the welcome letter in the
Default Gateway box
■ Click on Use the following DNS server addresses
■ Add the primary and secondary DNS numbers below based
upon your state
• VA & MD: 64.83.0.10
• VA & MD: 64.83.1.10
• PA: 209.137.171.10
• PA: 209.137.171.20
• DE: 209.137.160.7
• DE: 209.137.160.3
5. Click the OK button
6. Click the OK button at the Local Area Connection Properties window
7. You should now be connected to the internet, open up Internet
Explorer to surf the web
Figure 1.1
4
Figure 1.2
Figure 1.3
Page 7
Setup Instructions for Windows 2000
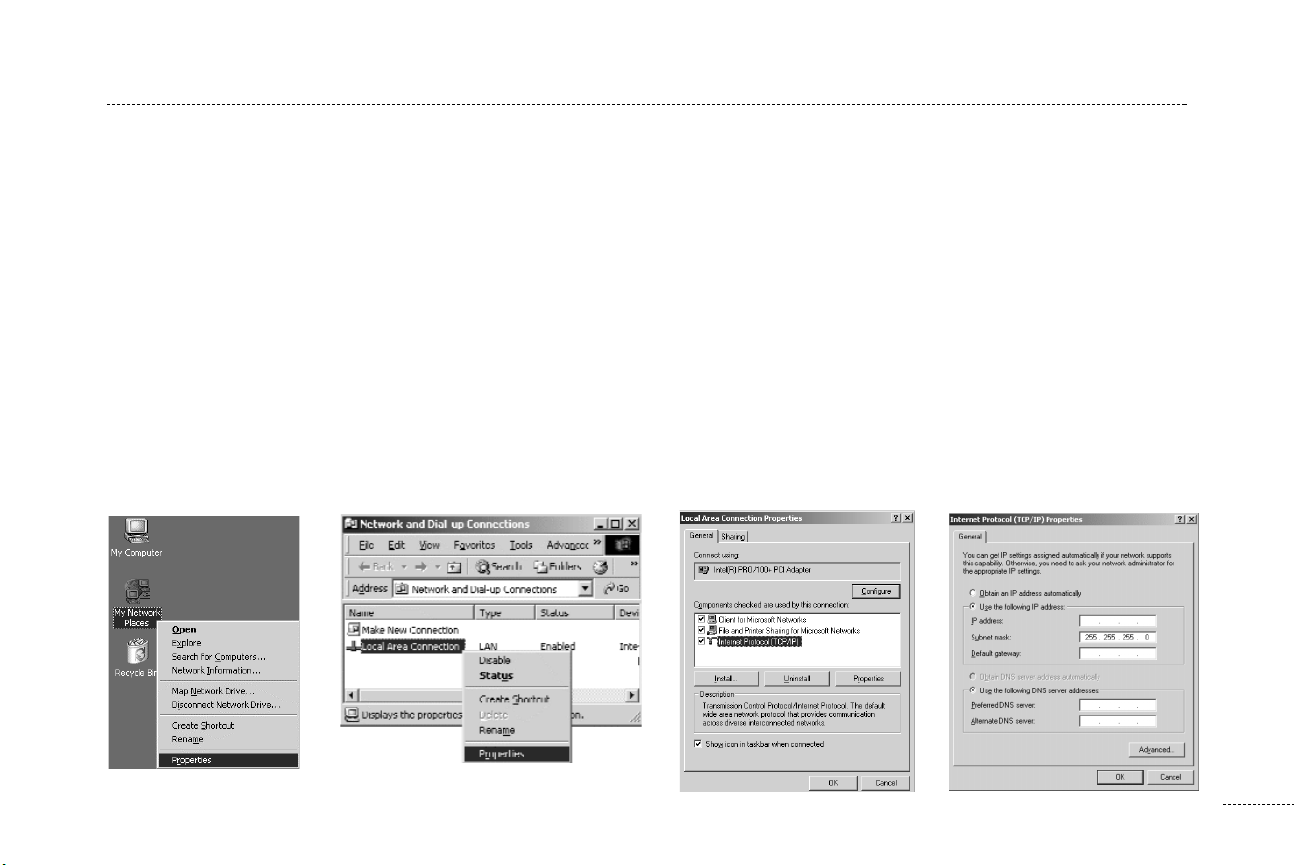
1. Right click on My Network Places, click on Properties (Fig 2.1)
2. A Network and Dial-Up Connections window will open up (Fig 2.2)
■ Right click on Local Area Connection, left click on Properties
3. A Local Area Connection Properties window will open up (Fig 2.3)
■ Double click on Internet Protocol (TCP/IP).
4. The Internet Protocol (TCP/IP) Properties window will open (Fig 2.4)
■ Click on Use the following IP address
■ Enter your IP address from the welcome letter in the IP address box
■ Enter 255.255.255.0 in the Subnet mask box
■ Enter your default gateway from the welcome letter in the
Default Gateway box
■ Click on Use the following DNS server addresses
■ Add the primary and secondary DNS numbers below
based upon your state
• VA & MD: 64.83.0.10
• VA & MD: 64.83.1.10
• PA: 209.137.171.10
• PA: 209.137.171.20
• DE: 209.137.160.7
• DE: 209.137.160.3
5. Click the OK button
6. Click the OK button at the Local Area Connection
Properties window
7. You should now be connected to the internet, open up
Internet Explorer to surf the web.
Figure 2.1
Figure 2.2
Figure 2.3
Figure 2.4
5
Page 8
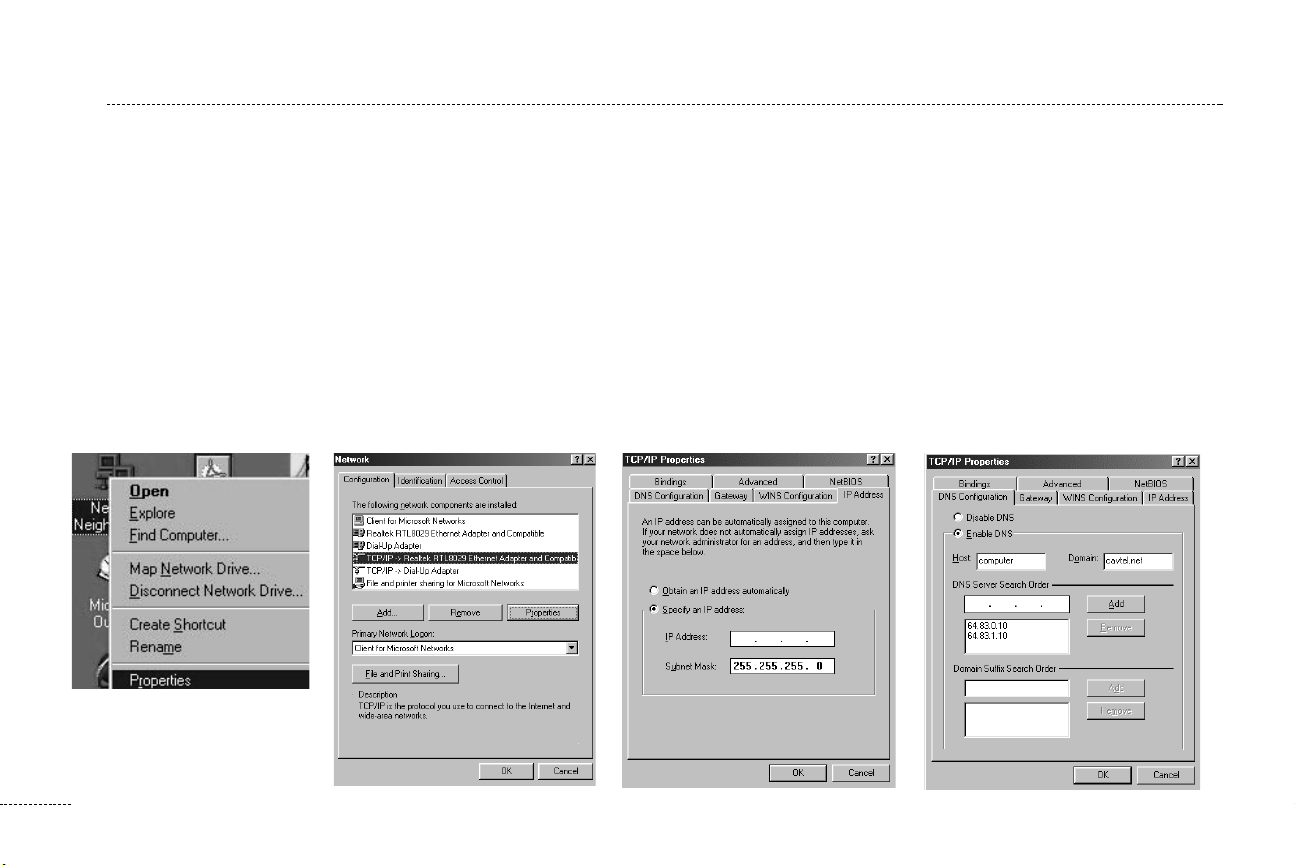
Setup Instructions for Windows 98/ME
1. Right click on Network Neighborhood, left click on Properties
(Fig 3.1).
2. Click on the Configuration tab (Fig 3.2)
■ Go to TCP/IP for Ethernet card
3. Click on the IP Address tab (Fig 3.3)
■ Click on Specify an IP address
■ Enter the IP Address from your welcome letter in the IP
Address field
■ Enter the Subnet Mask of “255.255.255.0” in the Subnet
mask field
Figure 3.1
4. Click on the DNS Configuration tab (Fig 3.4)
■ Click on Enable DNS
■ Type in the Host name (“My Computer”)
■ Type in the Domain, which is cavtel.net
■ Add the primary and secondary DNS numbers below based
upon your state
• VA & MD: 64.83.0.10
• VA & MD: 64.83.1.10
• PA: 209.137.171.10
• PA: 209.137.171.20
• DE: 209.137.160.7
• DE: 209.137.160.3
Figure 3.2
6
Figure 3.3
Figure 3.4
Page 9
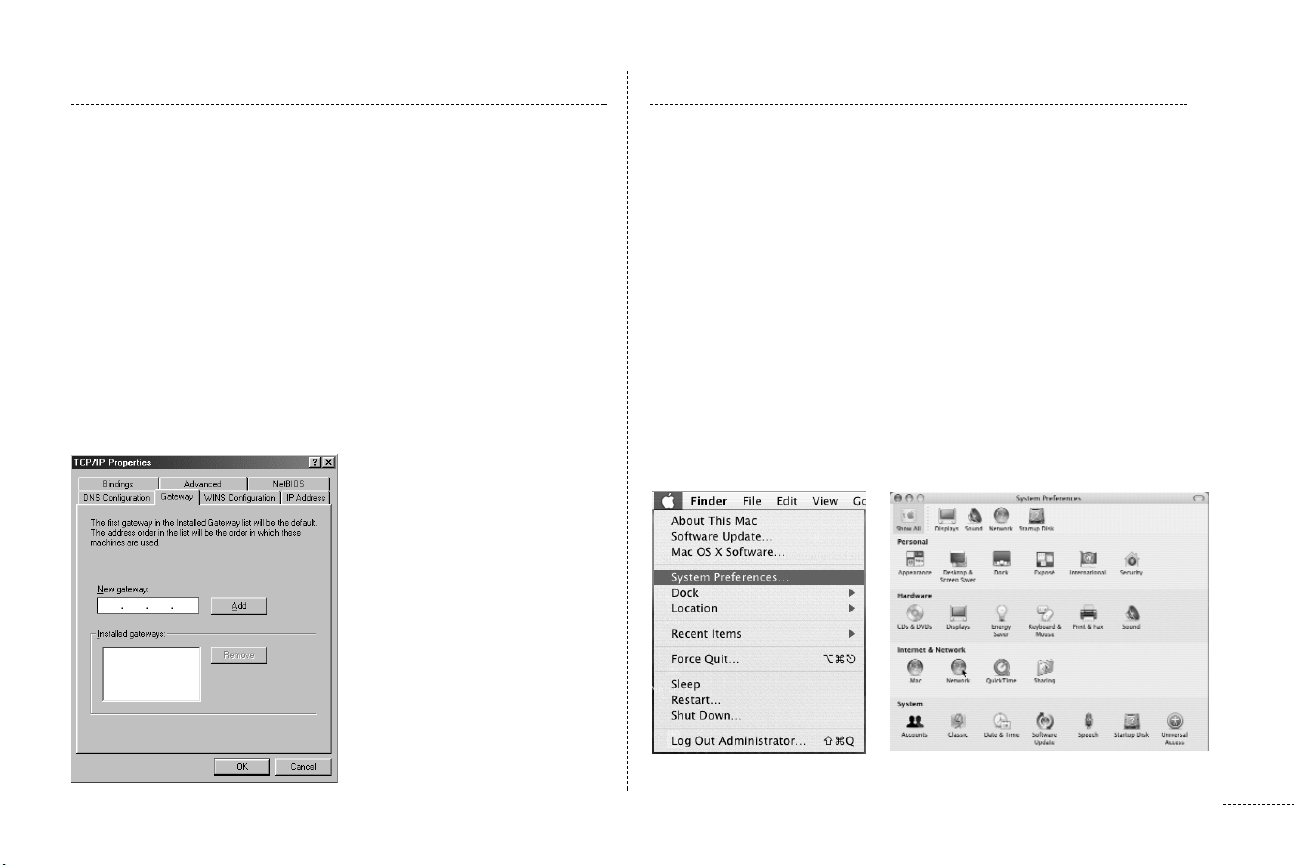
Setup Instructions for Macintosh OS X (10.3)
5. Click on the Gateway Tab (Fig 3.5)
■ Add the Gateway Address provided in your welcome letter
6. Click the OK button
7. Click OK at the Network window
8. You’re computer may ask you for your Windows disk, if so,
insert disc and follow the instructions
9. You should now be connected to the internet, open up Internet
Explorer to surf the web.
Note: Screenshots may be different, depending on your version of
the OS X operating system.)
1. Click on the Apple Menu in the top, left corner of your screen
and select System Preferences. (Fig 4.1)
2. Click on Network (Fig 4.2)
3. Click on the Show pull-down menu, and select Built-in Ethernet
(may be different depending on your computer model) (Fig 4.3)
4. Click the Configure pull-down menu and select Manually
■ Enter the IP address from your welcome letter in the
IP Address field
Figure 3.5
Figure 4.1
Figure 4.2
7
Page 10
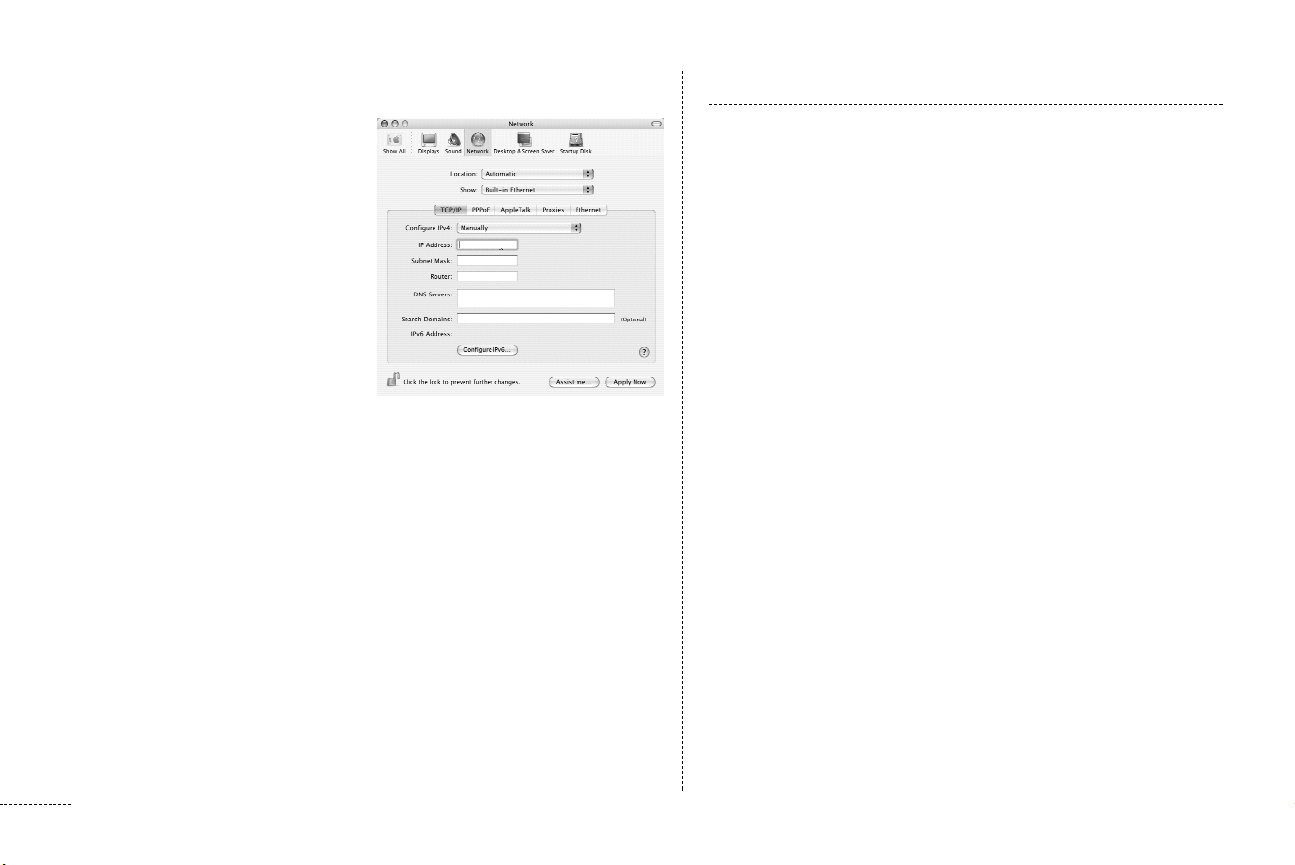
■ Enter 255.255.255.0 in the Subnet Mask field
■ Enter your default gateway
from the welcome letter in
the Router field
■ In the DNS Servers field,
enter the DNS server’s
address depending on your
state
• VA & MD: 64.83.0.10
• VA & MD: 64.83.1.10
• PA: 209.137.171.10
• PA: 209.137.171.20
• DE: 209.137.160.7
• DE: 209.137.160.3
Figure 4.3
Network Test
To check to see if you are connected to our network:
■ Go to Start, Run, type in “command” and ping your DNS Server
IP (ie. “ping 64.83.0.10”) The DNS Server IP is provided in your
welcome packet.
■ If you get a reply back you are ready to “ping” someone else.
Try yahoo.com by typing in “ping yahoo.com.
reply back from yahoo.com you are in service.
If you do not get a reply back from your default gateway:
■ Double check all of your settings, make sure that all the neces-
sary information such as your IP address, Subnet Mask,
Gateway, and DNS numbers are in the TCP/IP settings for your
Ethernet card.
”
If you get a
5. Click Apply Now, and then close the window
6. You should now be connected to the Internet, open up you web
browser (Internet Explorer, Safari, Netscape) to surf the web.
8
Once connected, if you are not able to surf the Internet using
Internet Explorer do the following:
■ Open Internet Explorer, choose the Tools option, select
Internet Options, Click on the Connections tab, be sure Never
Dial a Connection is checked. Click the LAN Settings button,
be sure no options are checked
If you have reason to believe that your DSL is not working, please
call 877-459-9182. Our help desk technicians are available from
8am to midnight seven days a week.
Page 11

If you’ve followed the instructions and it’s still not working, please try the following steps:
IF none of the lights are lit:
1. Make sure that you are using the power supply provided with the
modem.
2. Try plugging into another wall outlet (one that is known to be
functioning).
IF the “Line” light is not lit:
1. Make sure that you’re using the telephone cable provided with the
modem. Any other type of cable could prevent the line light from
illuminating.
2. Make sure that the telephone cable is connected directly to the
wall jack. It must not run through any filters or splitters.
3. Unplug the power supply from the modem, and unplug the line
cable from the modem and from the wall jack. Wait 30 seconds.
Plug the line cable back into the wall and modem, then plug the
power cable back into the modem.
IF the “Ethernet” light is not lit:
*If you are using a router, please refer to the instruction manual for
your router, or contact the router manufacturer.
1. Unplug the Ethernet cable from the modem and computer. Plug
both ends back in, making sure that there is a snug connection.
2. Try rebooting the computer. If the ethernet light blinks once during
the reboot, the ethernet card is not functioning properly. The card
CavVelocity
may need to be reinstalled or replaced. Please refer to the
instruction manual for your ethernet card, or contact the manufacturer for your ethernet card to ensure the drivers for the card
are installed and functioning properly.
IF the correct lights are lit, but you can’t ping your
DNS Server IP:
*If you are using a router, please refer to the instruction manual for
your router, or contact the router manufacturer.
1. Make sure that you are pinging the IP address of your DNS Server.
2. Double check your TCP/IP settings. Make sure that you have
everything entered correctly.
3. Unplug the modem, let it sit there for at least 30 seconds, then plug
it back in.
4. Try pinging your assigned IP address. This IP address resides on the
ethernet card in your computer. If you cannot ping this address, then
check your TCP/IP settings (IP address, Subnet Mask, Gateway and
DNS). Make sure everything is entered correctly.
5. Reboot and check the settings again. If your Ethernet card keeps
dropping the settings after every reboot, the card may need to be
reinstalled or replaced. Please refer to the instruction manual for
your ethernet card, or contact the manufacturer for your ethernet
card to ensure the drivers for the card are installed and functioning
properly.
9
Page 12

ISP Technical Help Desk – 877-459-9182
 Loading...