

Cattara ZETTA User Manual
e Electric Grill
c Elektrický gril
s Elektrický gril
„ZETTA“
item 13 052
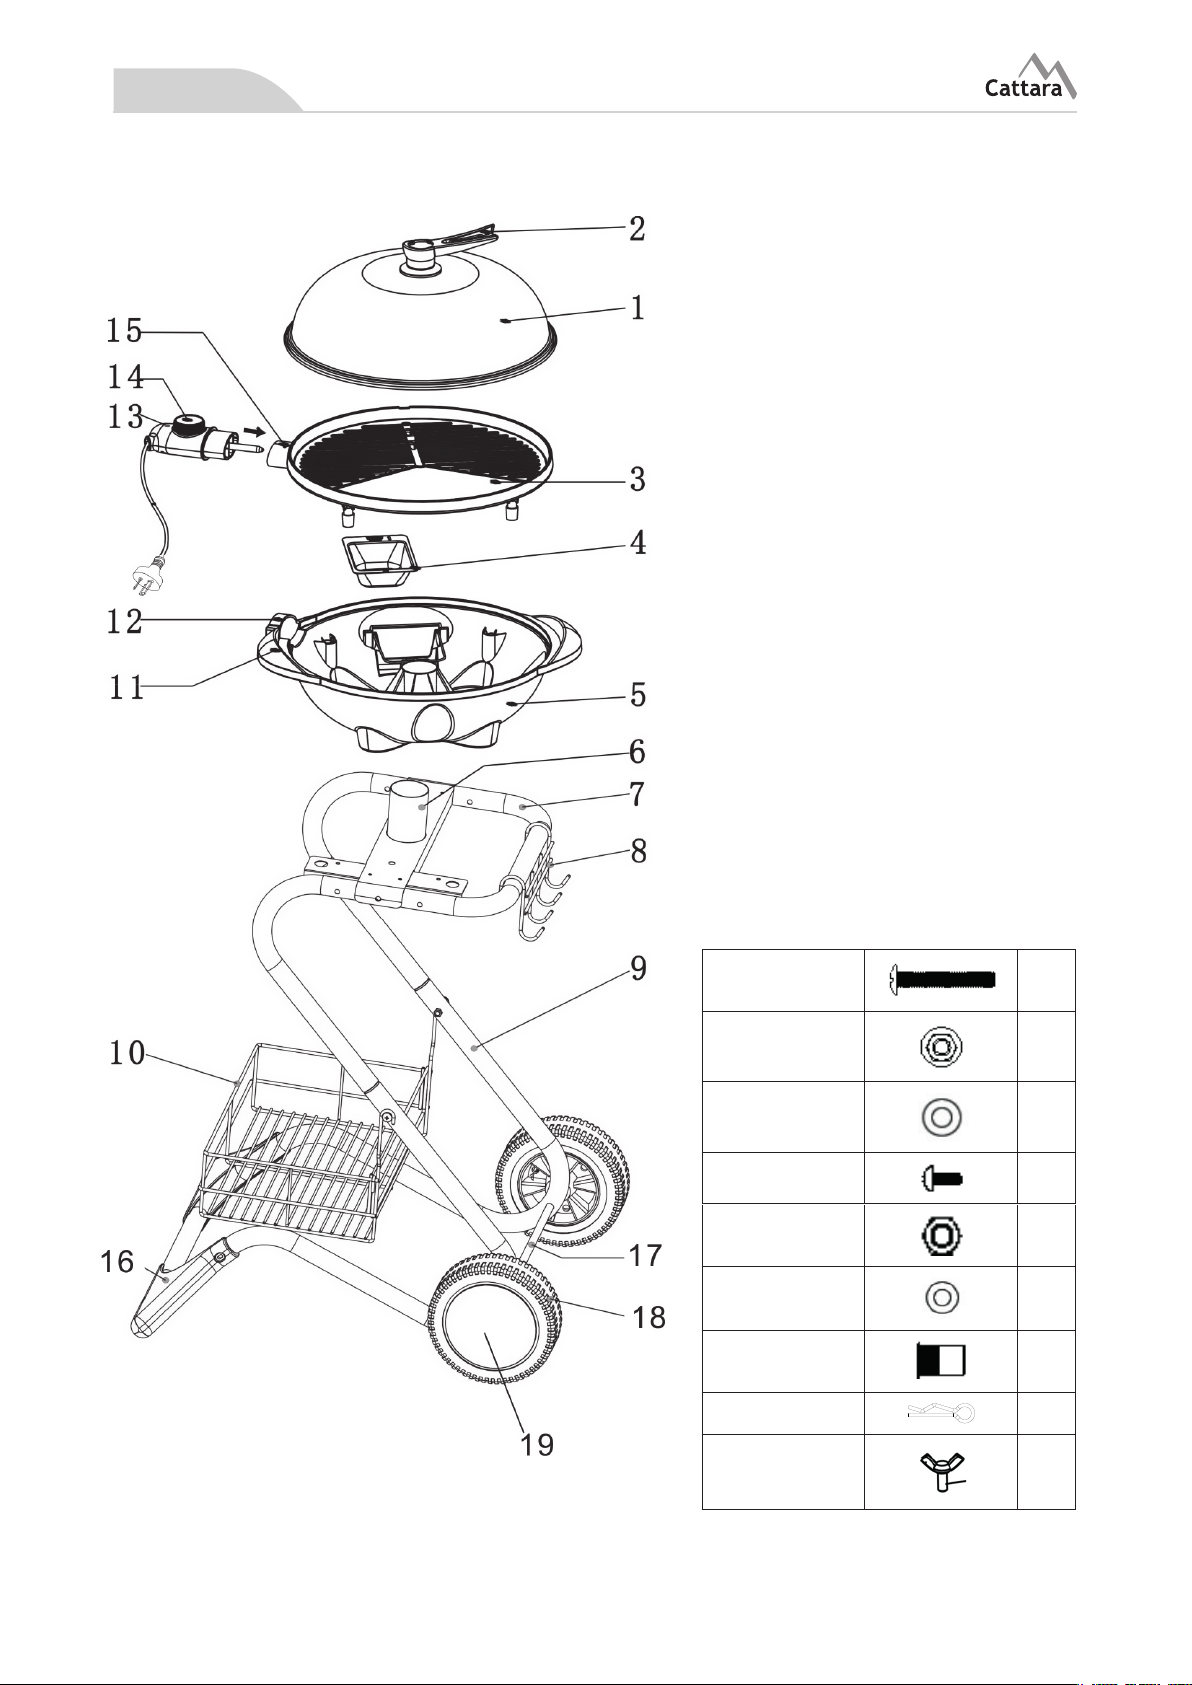
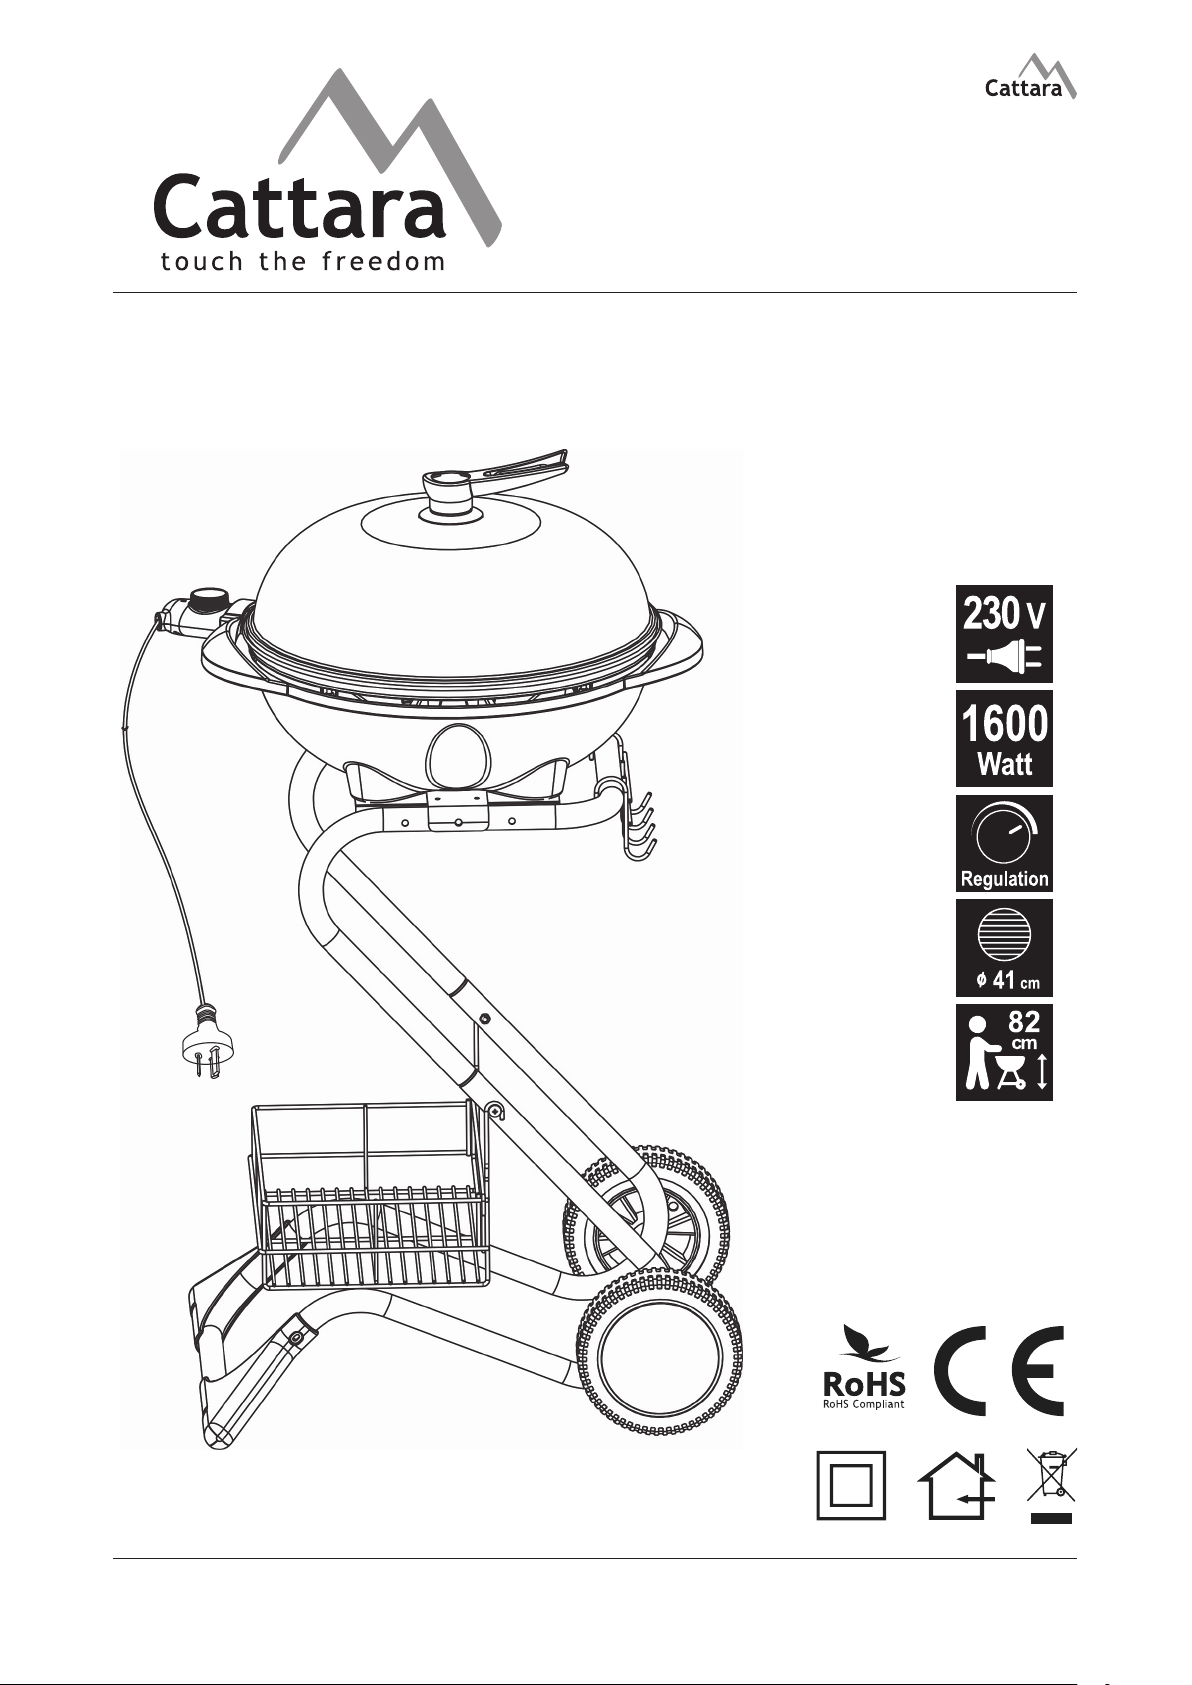
e
Item description
1. Roasting hood
2. Hood handle
3. Hotplate
4. Grease cup
5. Base
6. Stand tube
7. Upper tube
8. Tool holder
9. Base tube
10. Condiment basket
11. Base handle
12. Opening for appliance
socket
13. Detachable temperature Regulator with
power cord
14. Temperature indicator
lamp
15. Power inlet socket
16. Feet
17. Axle
18. Wheel
19. Wheel cap
M6x30 screw 6
M6 Nut
Flat washer(for M6(
M4x6 screw
M4 nut
Flat washer(for
M4)
M6 knurled
nut
R pin 2
Buttery screw
4
4
6
2
2
2
1
-2-
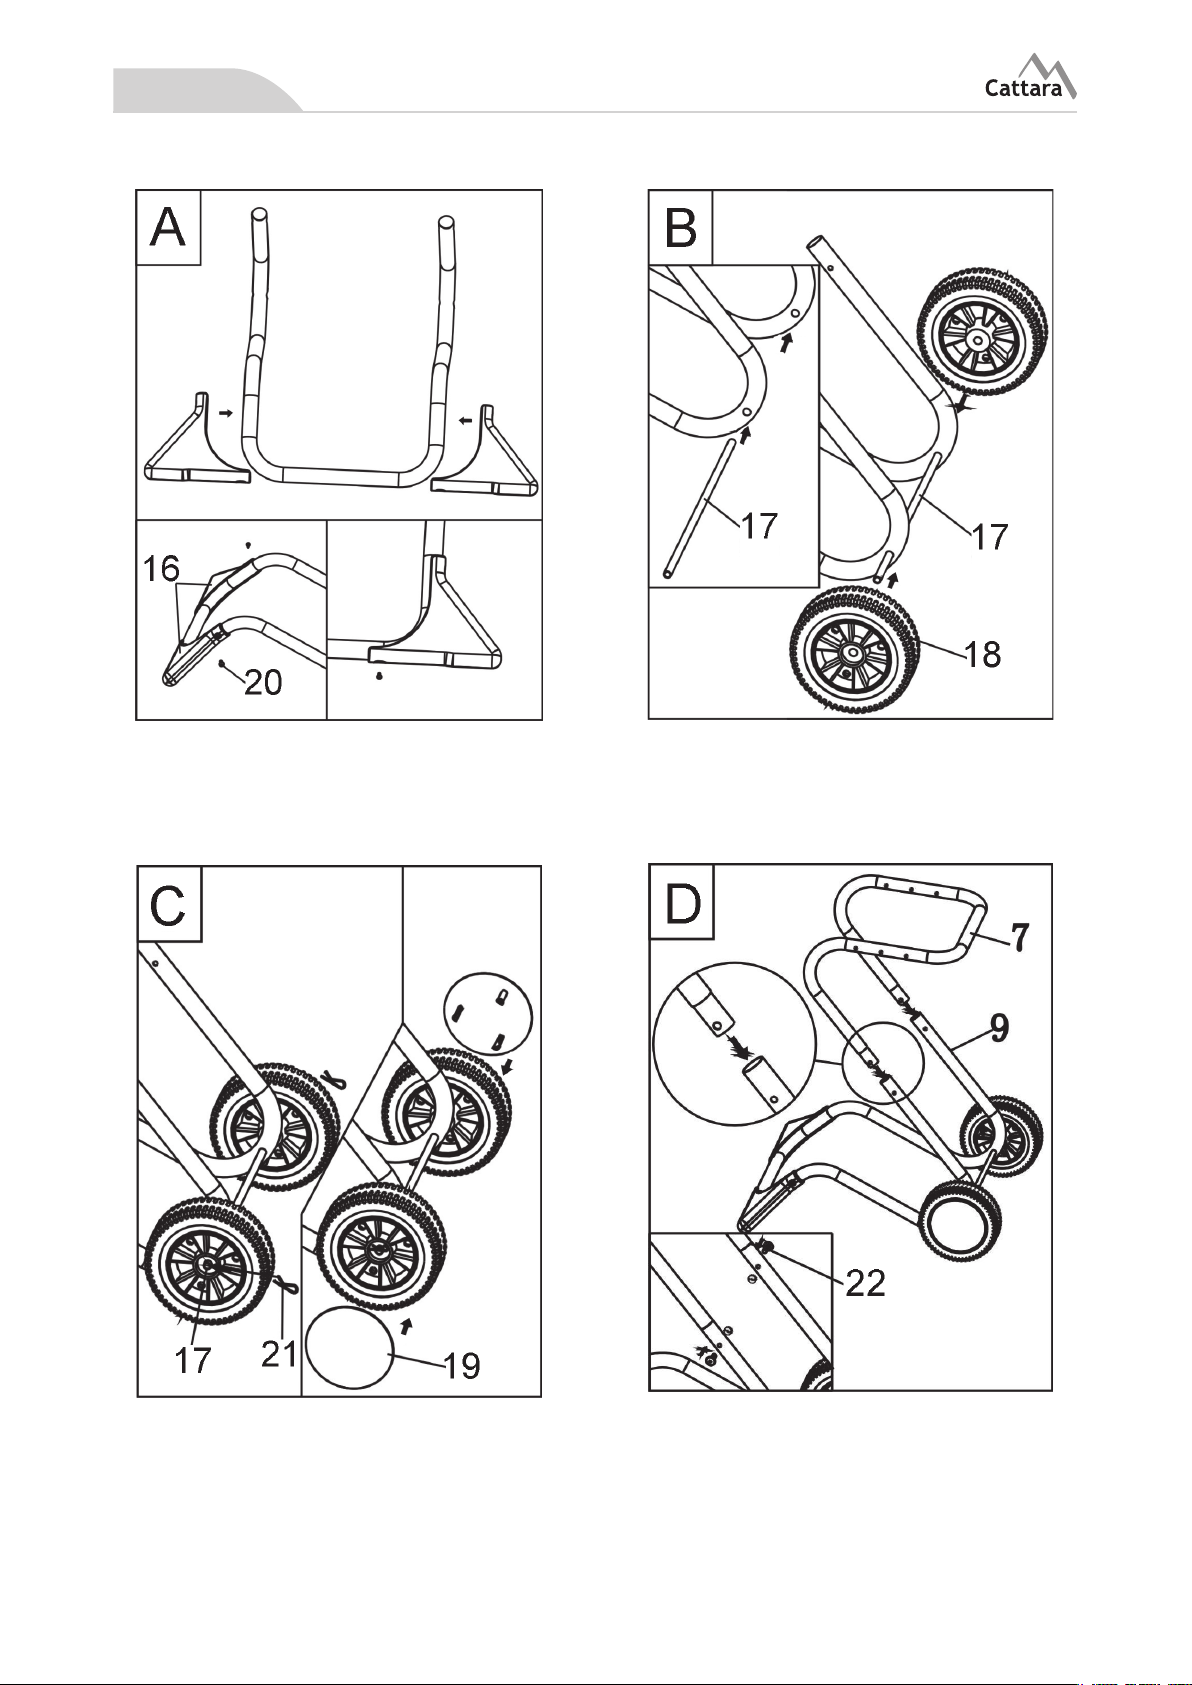
e
Installation instructions
Fit the feet (16) to the base tube (9). Fix in
place with two M4*6 screws (20). Left and
right side are the same.
Put the axle (17) through the two holes In
the base tube as shown. Attach the wheels
(18) to the axle.
Insert the R pin (21) through the holes in
the ends of the axle to lock the wheels.
Press the wheelcaps (19) onto the wheels.
Insert the upper tube (7) to the base tube
(9) Insert the M6 ×30 screws (22) from the
outside through the holes in the two tubes.
Then Tighten up with the M6 knurled nuts
and washers provided.
-3-
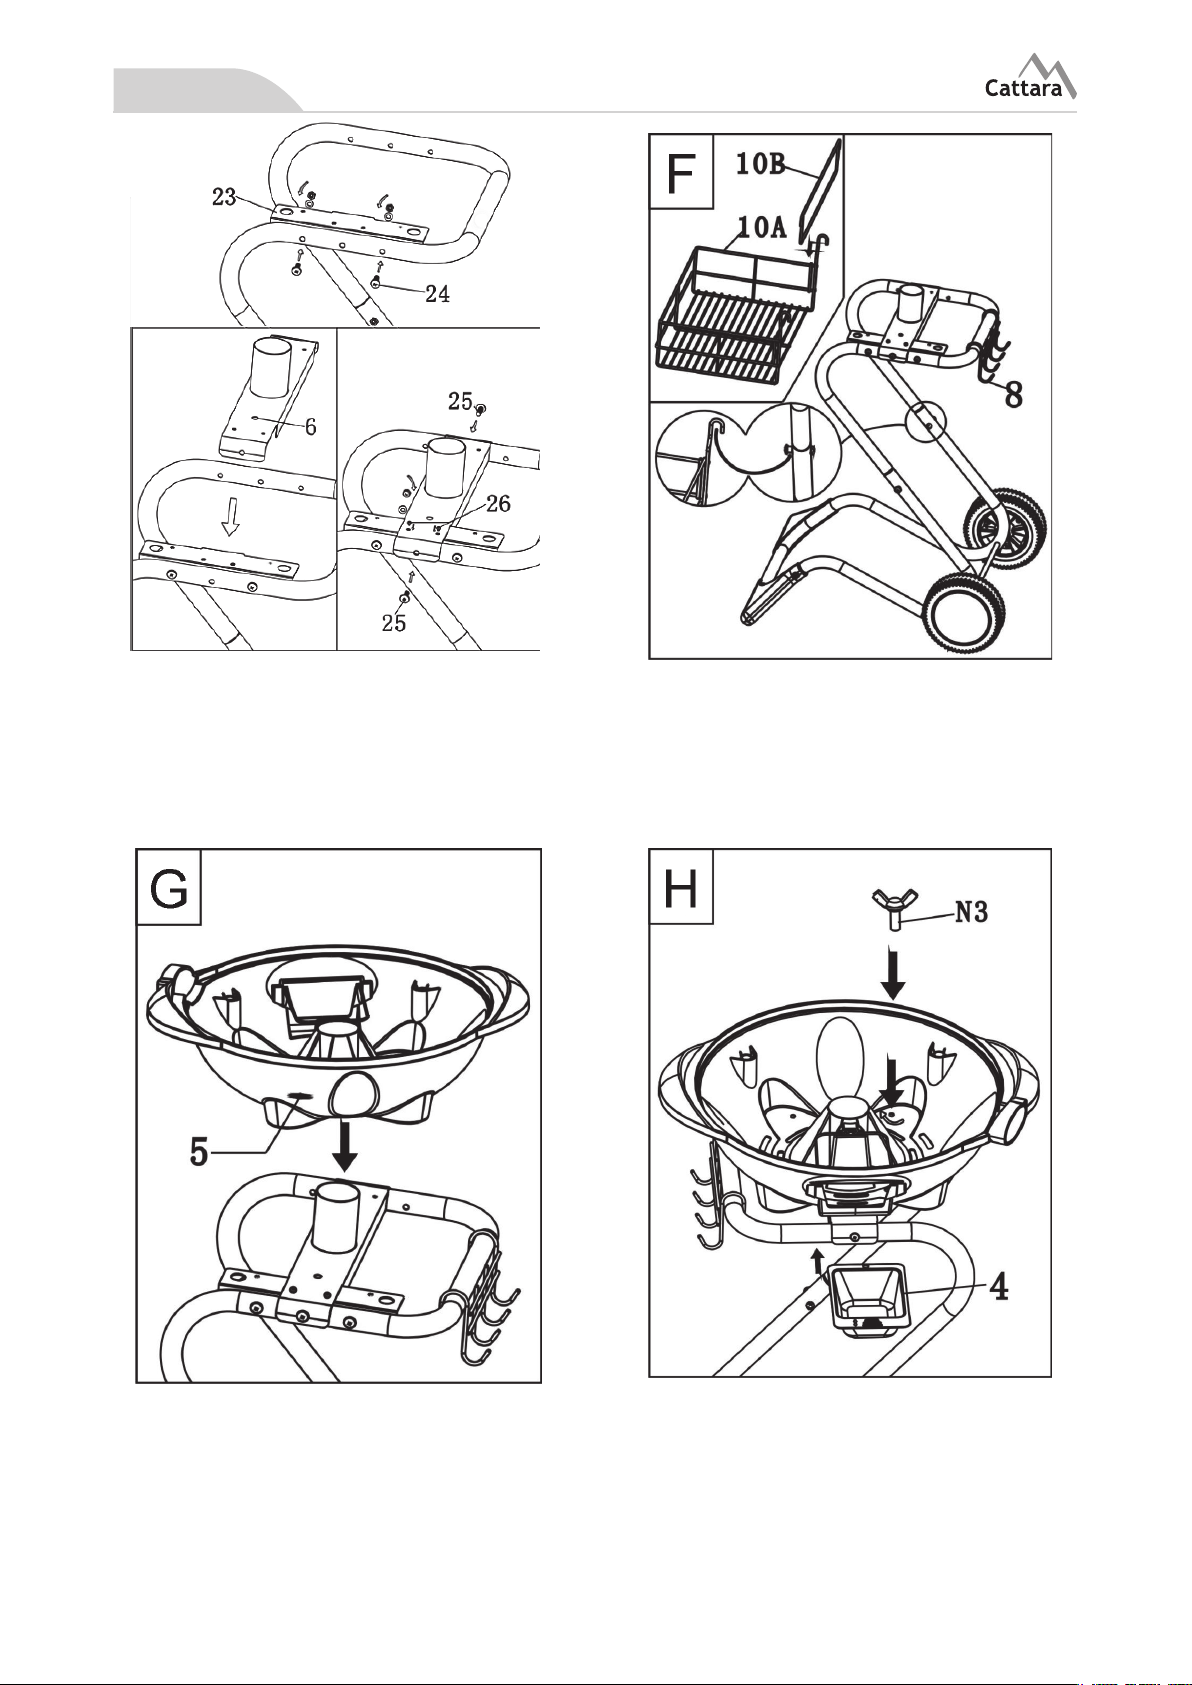
e
Install the bracket(23) onto the upper tube (7)
with 2pcs of M6X30 screws (24). Please do not
screw up the screws M6X30 (24), just put it into
the holes. Install the stand tube (6) on to the
bracket(23).Note the slot on the stand tube
which is going to x the BBQ base. Fix the stand
tube in place with two M6X30 screws(25).
Join the two parts (10A) and (10B) as shown.
Hang to the outside of set screws (22). Place
the tool holder (8) on the upper tube as
shown.
Set the bbq base (5) into the stand tube
(6). By aligning the base with the slot and
pushing the bbq all the way down. When
remo-ving the bbq base step softly on the
base tube (9) hold the han-dles of the bbq
base and lift it o.
Put the grease cup (4) into the bracket
provided for it in the back of the BBQ base.
Push the grease cup into the correct po-
sition in the middle of the bowl-shaped
base. It’s recommended to install a buttery
screw (N3) to lock the base to the trolley.
-4-
e
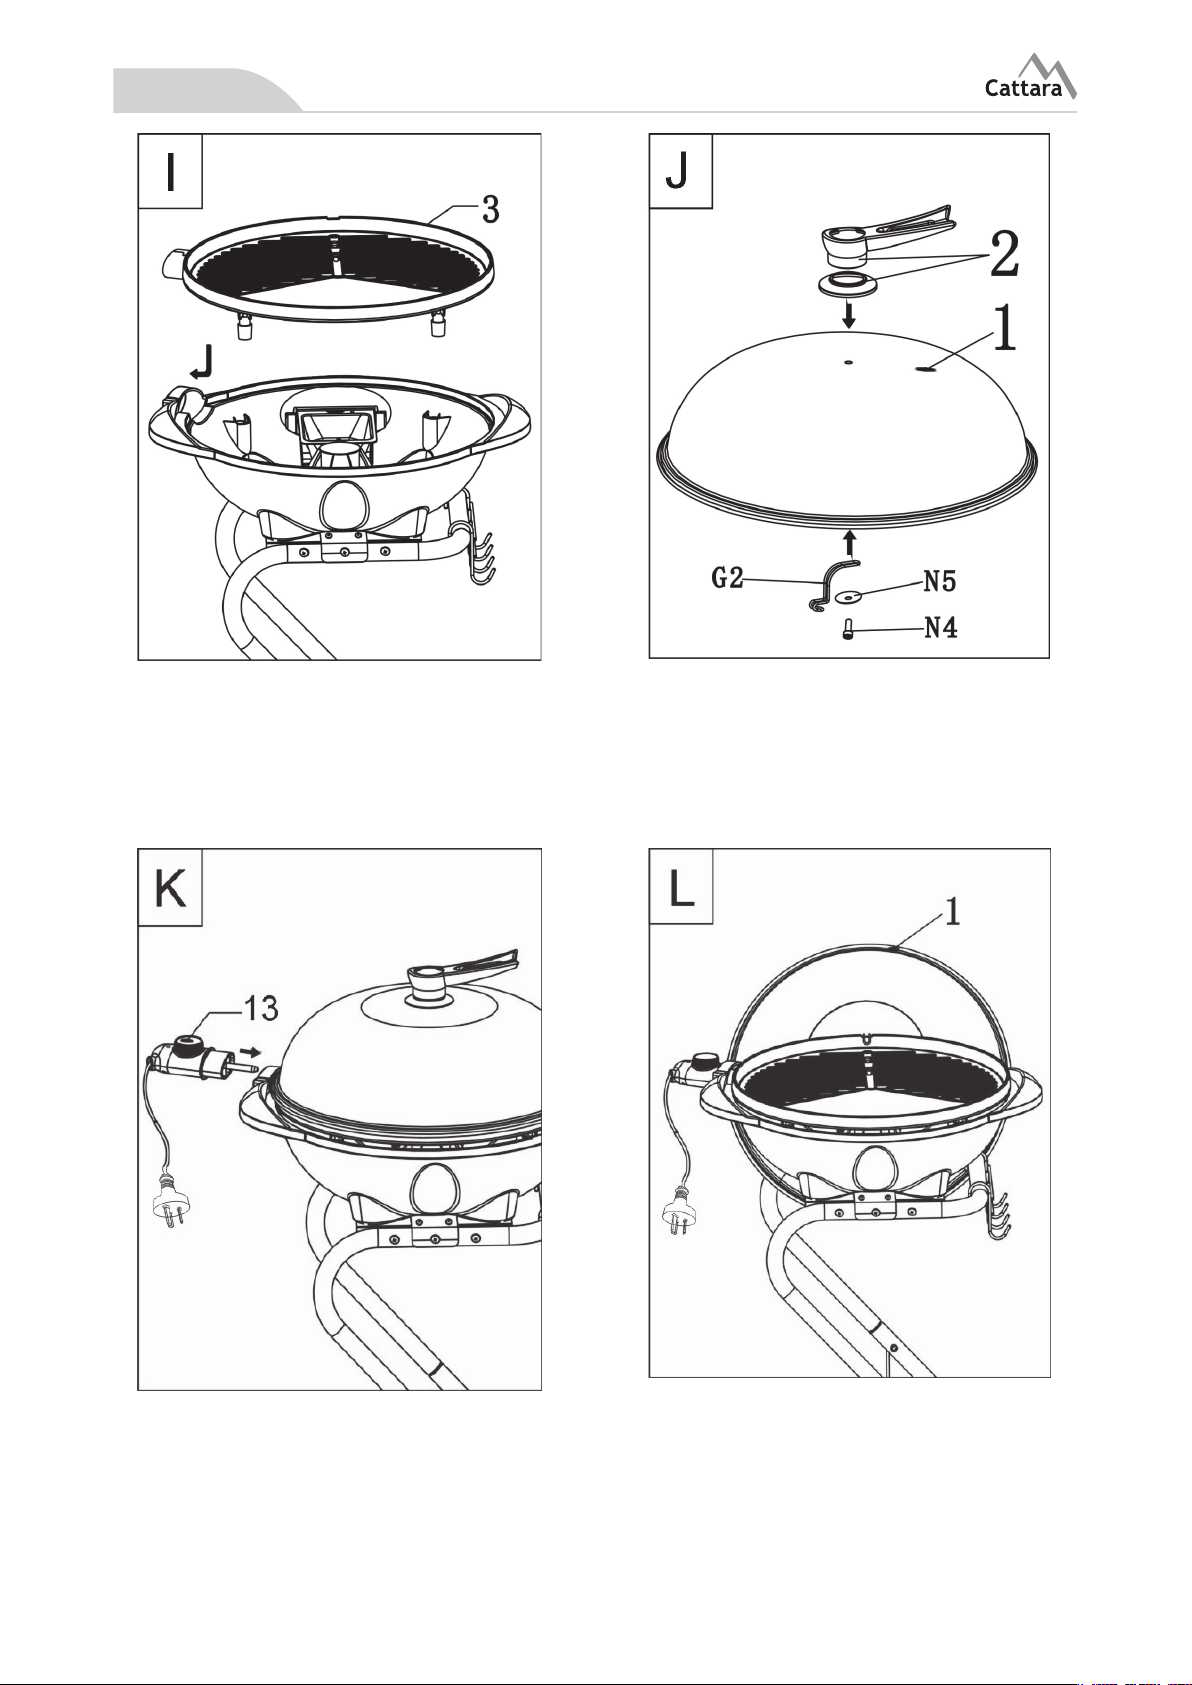
Place the hotplate (3) in the BBQ (5). Insert
the power inlet socket (15) of the hotplate
into the opening for the power cord with
the hotplate tilted upwards, then lower
the hotplate onto BBQ base. Before taking
the hotplate out , make sure it is cool and
disconnected from the power.
Use a M5x18 screw (N4) through the inside
of the hood with silicone washer and lid
hook (G2) into the hood handle. Tighten the
hood clockwise to x the handle. While assembling, keep the hood handle and hook
aligned
Insert the temperature regulator with ca-
ble(13) into the power inlet socket. Plug in
the appliance When inserting or removing
the power cord hold the handle of the bbq
base to avoid pushing over the appliance.
The roasting hood can act as a wind shield
by clipping the hook onto the hotplate.
-5-

e
Please read these instructions carefully. They
will give you important advice for the use,
security and maintenance of this appliance.
Keep these instructions and, should the situation arise, pass them on to other users.
The appliance must only be used for the intended purpose according to these instructions.
Observe any local regulations.
Dispose of the packaging thoughtfully.
SAFETY WARNINGS:
• Only the appropriate connector must be
used.
• The supply cord should be regularly exam-
ined for signs of damage, and if the cord
is damageds, the appliance must not be
used.
• The appliance is to be connected to a socket-outlet having an earthing contact (class
I).
• This appliance can be used by children
aged from 8 years and above and persons
with reduced physical, sensory or men-
tal capabilities or lack of experience and
knowledge if they have been given supervision or instruction concerning use of the
appliance in a safe way and understand
the hazards involved. Children shall not
play with the appliance. Cleaning and user
maintenance shall not be made by chil-
dren without supervision
• Keep the appliance and its cord out of
reach of children less than 8 years.
• Appliances are not intended to be operat-
ed by means of an external timer or separate remote-control system.
• If the supply cord is damaged, it must be
replaced by the manufacturer, its service
agent or similarly qualied persons in or-
der to avoid a hazard.
• The connector must be removed before
the appliance is cleaned and that the
appliance inlet must be dried before the
appliance is used again.
may be high when the appliance is operating.
• Please check the device and the electri-
cal wire timely, and stop using if you nd
some problems of the device.
• Never immerse the appliance with heat-
ing element(the appliance should be
switched o at mains when not in use.
• Use only one appliance per plug and always use an earthed extension cable, with
cross section of at least 1.0mm2
• Do not touch the appliance (cover or grill
plate) when cooking in order to prevent
any risk of burning.
• The temperature of the surface will be
very high when using, please keep it away
from tinder.
• This appliance is only use for cooking.
• Never place your appliance on a fragile
surface
• Charcoal or similar combustible fuels must
not be used with this appliance.
• This appliance is intended to be used in
household and similar applications such
as sta kitchen areas in shops, oces and
other working environments, farm hous-
es, or by clients in hotels, motels and other
residential type environments.
• Remove the lid from the appliances during
use.
• Unplug and leave the appliance to cool.
• Appliance and inlet did not immersed for
cleaning.
• The connector must be removed before
the appliance is cleaned and that the appliance inlet must be dried before the appliance is used again.
• Wash the iron mesh with a soft cloth or
brush in warm and abluent water, but
don’t wash it with abrasive.
• Don’t spill the water on the device directly
when cleaning, it may lead to conk out or
get an electric shock
• The temperature of accessible surfaces
-6-
e
INSTRUCTION FOR USE:
• Remove all packing materials from the
outside and inside of the barbecue
• Check that the voltage of your appliance is
the same as your mains
• Before each use ,unwind the ex completely
• In case and extension cable is necessary,
it must be earthed, and its cross section
must be at lest 1.0 mm2. When using and
extension cable, secure it safely so that
people do not trip over it.
• Before each use ,please check that the
drip tray and grill plate is xed well.
• The appliance is equipped with an adjustable thermostat, when using the grill plate,
position it on Max for pre-heating 10 min-
utes, then turn it to the position of your
choice.
• Take the detachable temperature regulator (13) out of the appliance socket.
• Clean the grill plate (3) and grease collecting bowl (4) with warm washing-up water
and damp cloth. Do not use steel wool
pads, brush or abrasives to avoid any
damages to the coating of grill.
• Wipe the base of the appliance (5) with a
damp cloth. Fat splashes can be removed
with a mild cleaning agent.
Note:
The grill plate has a non-stick coating. Do not
scratch this coating during either the grilling
or the cleaning stages. Protect the appliance
from dust and dirt if it is not to be used for a
prolonged length of time (wrap it in a plastic
bag). Store it in a dry place.
• The pilot light indicates that the appliance
is plugged whatever the setting.
• It is normal that there is some smoke in
the rst time, which could protect the layer as to protect the device.
• The appliance is only suitable for indoor
use
Cleaning and maintenance:
• Disconnect the appliance from the mains
electricity supply.
• Allow the grill to cool completely.
Technical data
Operating voltage 220-240 V ~ 50/60 Hz
Power consumption 1400 – 1600 W
Protection Class I
Degree of Protection IPX4
Grid diameter 30 cm
Grill height 82 cm
Type KYS-367SP
Manufacturer Guangdong Kangye Electric
Appliance Co.,Ltd
Electrical appliances should not be disposed of
with municipal waste. According to Directive
2002/96 / EC on waste electrical and electronic
equipment (WEEE / WEEE) and related national legislation, waste of electrical and electronic
equipment must be separated and recycled. Recycling as an alternative to disposal: the owner
of an electrical appliance is obliged to dispose of
the equipment at a collection point, or have to
ensure proper recycling. Electrical waste may be
disposed of at the waste disposal site operated in
accordance with the applicable national waste directives. This does not apply to accessories without electrical components.
-7-
 Loading...