

Page 1
English Ver.1.0e
for Windows 95/98
E
990925 v1.05
INTRODUCTION
Thank you very much for purchasing the Cat Eye MSC Download Kit.
MSC Download Kit contains the software “e-Train Data™” and the interface unit that connects
the Cat Eye MSC heartrate computers to your PC.
The data stored in your MSC heartrate computer is downloaded to your PC through “e-Train
Data™”. The downloaded data can further be arranged into a different format using other software.
This manual describes how to use “e-Train Data™”, as well as cautions that must be followed
during operation. Please read this manual carefully and understand it thoroughly before using
the MSC Download Kit. After reading through the manual, store it in a safe place.
Important
• Always follow the cautions that are marked with “Caution”.
• No part of this manual may be reproduced or transmitted without the prior written permission
of Cat Eye Co., Ltd.
• The illustrations in this manual may be different from the actual design due to the changes.
• The contents of this manual are subject to change without notice.
• If there should be any errors or inaccuracies in this manual, please contact our Cat Eye for
clarification.
*Windows is a registered trademark of Microsoft Corporation.
*IBM is a registered trademark of International Business Machines Corporation.
e-Train Data™
1
Page 2

Copyright
This software is owned by CAT EYE Co., Ltd., and its structure, organization, and code are the valuable
trade secrets of CAT EYE. The software is protected by Japanese and United Sates Copyright Law and
International Treaty provision. You must treat the software just as you would any other copyrighted material, such as a book. You shall agree not to modify, adapt, or translate the software. You also agree not to
reverse engineer, decompile, disassemble, or otherwise attempt to discover the source code of the software. CAT EYE Co., Ltd. does not grant you any intellectual property rights in the software.
ABOUT THIS MANUAL
The meaning of symbols in this manual:
Caution: Sections marked with this symbol are critical for the safe use of
Reference: Find useful information here.
• To use MSC Download Kit, you should be familiar with the operation and terms of Windows.
If you are using Windows for the first time, read the Windows documentation first and familiarize yourself with the operation of Windows.
• In this manual, the following terms are used:
MSC e-Train Data TM → e-Train Data
MSC heartrate computers → MSC-unit
• In this manual, the command names marked with [ ] indicates the names of menus and
check-items of dialog box. For instance, “Select [File] – [Open]” means to click [File] in the
menu bar and select [Open] from the pull-down menu.
• The following terms refer to the mouse techniques as follows:
Click ----------------- To press the left button once
Double click-------- To press the left button twice quickly
Drag ----------------- To hold down the left button and move the pointer
the device. Always follow the instruction given.
e-Train Data™
2
Page 3

CONTENTS
Introduction ------------------------------------------------------------------------------ 1
Important --------------------------------------------------------------------------- 1
About this manual --------------------------------------------------------------------- 2
The meaning of symbols in this manual ------------------------------------ 2
About e-Train Data™ ----------------------------------------------------------------- 4
What is e-Train Data? ----------------------------------------------------------- 4
Before you begin ----------------------------------------------------------------------- 5
Check your package ------------------------------------------------------------- 5
Check your equipment ---------------------------------------------------------- 5
Installing e-Train Data™ ------------------------------------------------------------- 6
Preparing interface unit -------------------------------------------------------------- 8
Names------------------------------------------------------------------------------- 8
Battery installation---------------------------------------------------------------- 8
Connecting with PC -------------------------------------------------------------- 9
Installing MSC-unit --------------------------------------------------------------- 9
Operating e-Train data™ ---------------------------------------------------------- 10
Starting e-Train data ----------------------------------------------------------- 10
Opening file ---------------------------------------------------------------------- 11
Exploring the main screen --------------------------------------------------- 12
Viewing a selected interval--------------------------------------------------- 13
Zooming the graph ------------------------------------------------------------- 14
Restoring the former graph -------------------------------------------------- 15
Viewing two or more files on the screen---------------------------------- 16
Changing the horizontal axis ------------------------------------------------ 18
To exit e-Train Data------------------------------------------------------------ 19
Downloading data ------------------------------------------------------------------- 20
Additional Functions ---------------------------------------------------------------- 23
e-Train Data™
3
Page 4
ABOUT e-Train Data™
What is e-Train Data?
e-Train Data is the software used to download data stored in MSC-unit to PC.
Main features:
Downloadable: -- e-Train Data downloads data of record memory, lap and heartrate target
Graphical: -------- Record memory data is displayed in the graph format on the screen.
Analyzable:------- You can analyze data in detail (interval analysis and zoom-up function).
Multi Window: --- More than two files can be displayed on the screen simultaneously.
Changeable: ----- You can change the horizontal axis of the graph between elapsed time and
Workable:--------- The downloaded data is in CSV (Comma Separated Value) format. By ap-
zone.
trip distance, by just a click of the toolbar.
plying other software, the data can be freely arranged into different format.
e-Train Data™
4
Page 5
BEFORE YOU BEGIN
Check your package
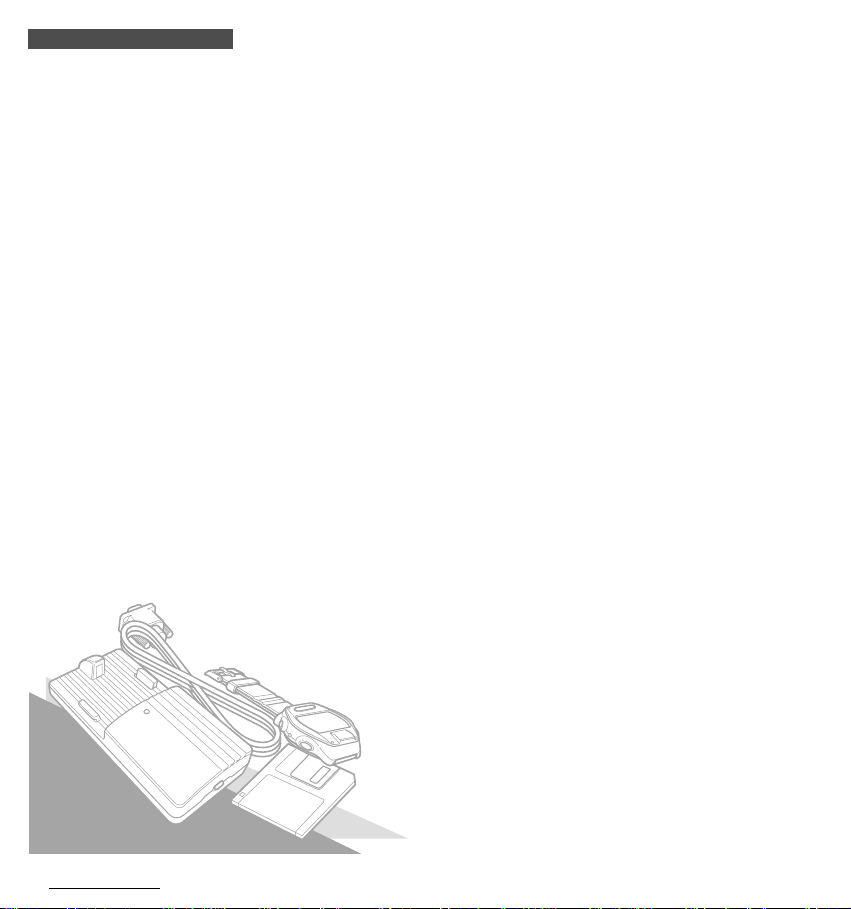
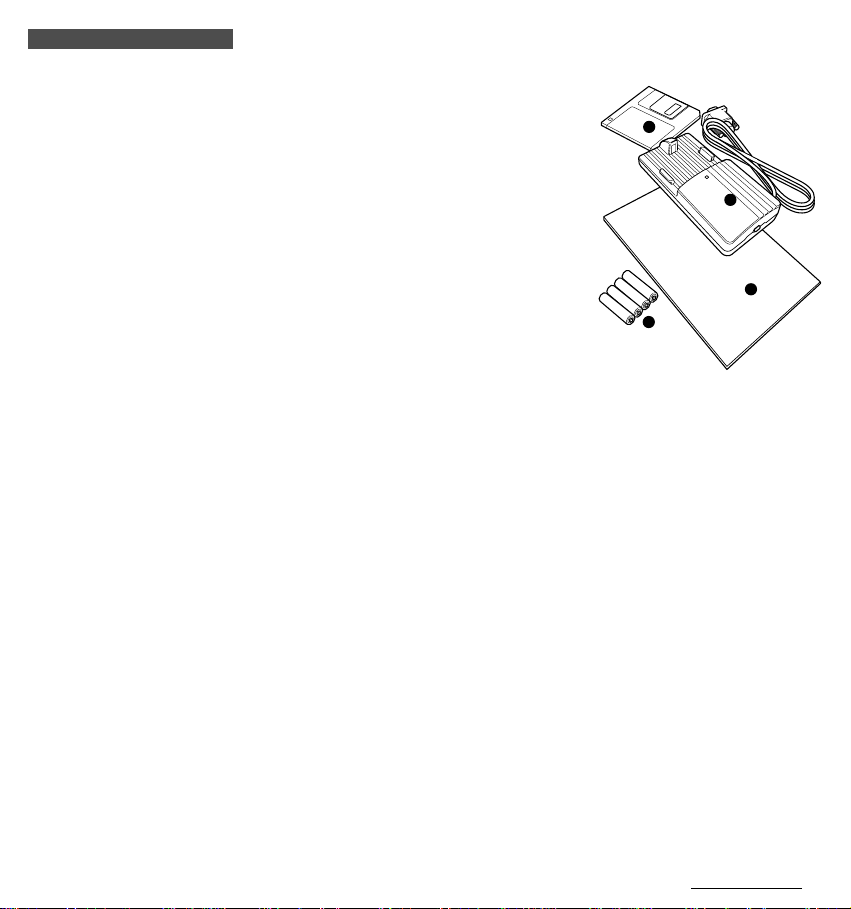
Your package includes the following items:
A. Floppy disc ---------------------------- 1
B. Interface unit -------------------------- 1
C. Dry battery AAA (LR03)------------ 4
D. Instruction Manual
Check your equipment
To install and use e-Train Data, you need:
• Computer------------------------ Windows95 or Windows98
RS232C serial port [9-pin] (to connect with the interface unit)
If you are using other than IBM (or IBM PC/AT), you need an
adapter for the serial port.
• Display --------------------------- 640x480dot or higher resolution
• Available hard disk space --- 2MB minimum
• Printer ---------------------------- For Windows95 or Windows98
• Mouse ---------------------------- For Windows95 or Windows98
A
B
D
C
e-Train Data™
5
Page 6
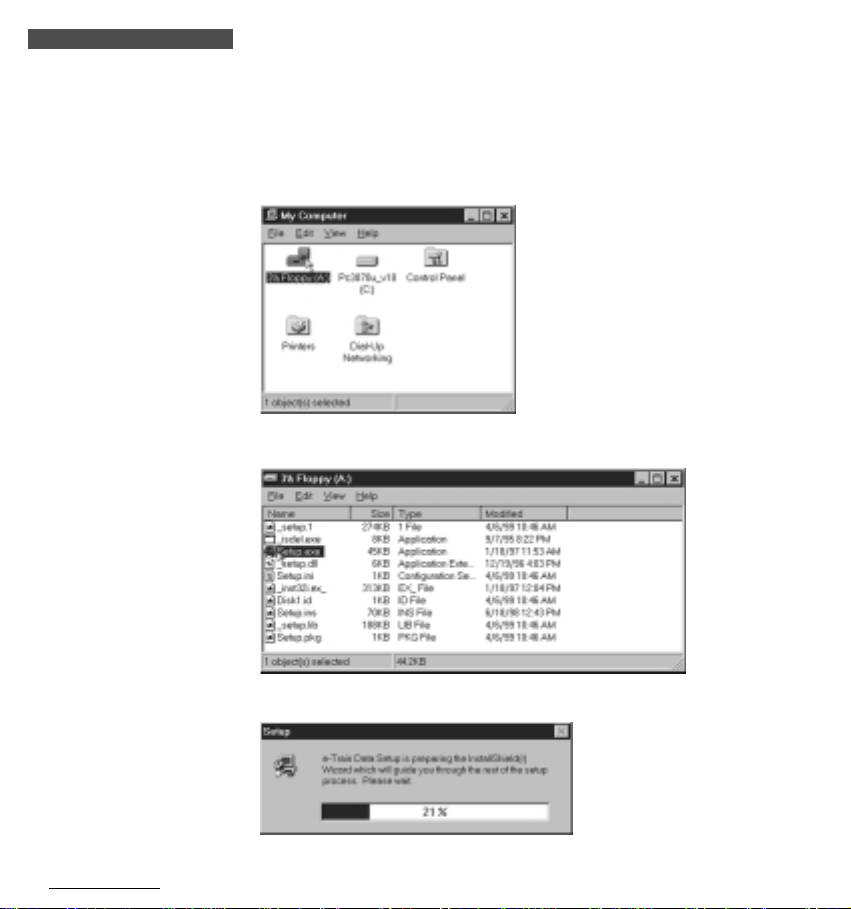
INSTALLING e-Train Data™
e-Train Data file is installed in the “Program file” unless you specify another file.
1. Start Windows95 or 98.
2. Insert the e-Train Data disk in your floppy disk drive.
3. Double-click “My Computer”. Double-click “3.5’ FD”.
Reference: You can also start from “Explore”.
4. Double-click the “Setup.exe” file.
e-Train Data™
6
5. You will see the setup dialogue box showing the install process.
Page 7
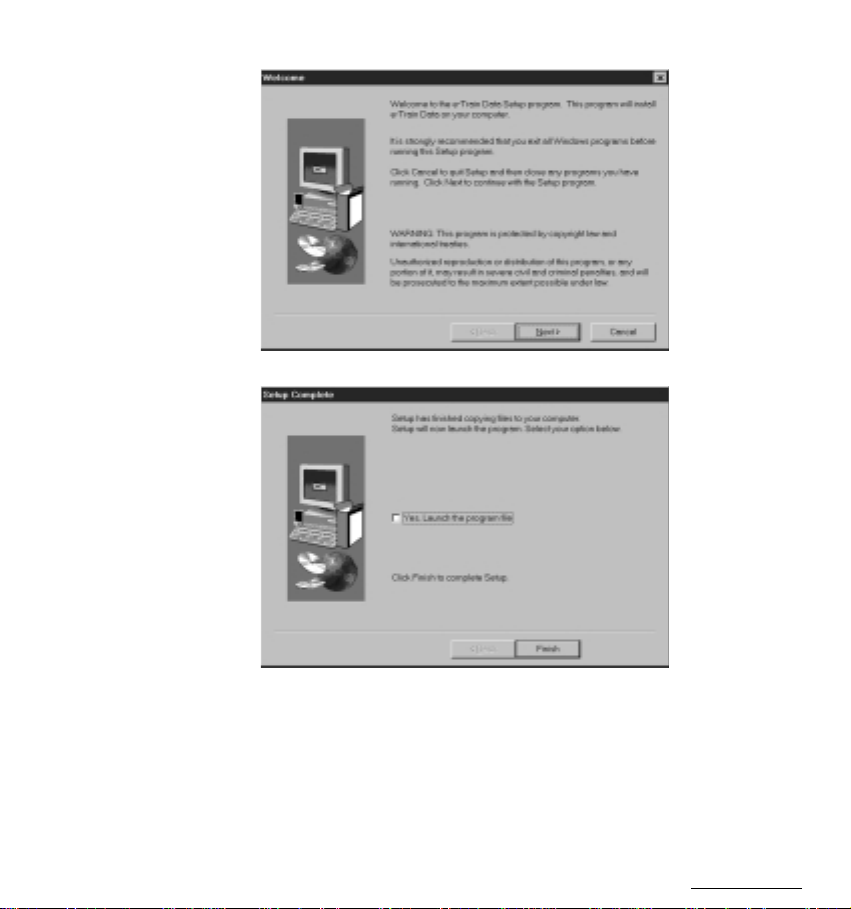
6. Select the directory where you will install the file, and click [Next]. A new folder is automati-
cally created.
7. When the install process is completed, the following dialogue box appears.
8. Click [Finish]. Installation is completed.
e-Train Data™
7
Page 8

PREPARING INTERFACE UNIT
Names
Release-button
Contacts
Infrared-ray receiver
AAA (LR03) dry batteries
Battery Cover
OFFON
Power Switch
Hook
Stage
Hook
®
DOWNLOAD
STAGE
POWER
Battery indicator
Battery Cover
OFFON
Power Switch
IR
C
Port Switch
Battery installation
Caution
Do not mix new and old batteries together.
Safely dispose of old batteries. Do not place them within children’s reach.
1. Open the battery cover and select the port switch inside. For models that transmit
data through contact (MSC-2Dx and MSC-3Dx), select “C” port. For (future) models
that transmit data by infrared ray, select “IR” port.
2. Install four AAA (LR03) dry batteries.
3. Turn the switch on, and see if the battery indicator turns on.
If not, re-install the batteries again, checking the correct polarity.
The interface unit continues to consume battery when the switch is on.
When not using, turn off the switch to save the battery life.
Reference:
The battery life is approximately 50 hours (alkaline battery). If the battery indicator does
not turn on, replace the batteries with new ones.
e-Train Data™
8
Page 9

PC’s RS232C terminal
(serial port)
Connecting with PC
Connect the cable of the interface unit to your PC’s RS232C terminal (serial port).
Caution
• If the cable is not securely connected to the terminal, the interface unit might fail to transmit
data.
• The 9-pin connector is applicable to IBM (or IBM PC/AT) computers. For other computers,
you may need an adapter.
Installing MSC-unit
1. Place your MSC-unit on the interface unit as illustrated.
Hook the bottom side1 of the unit, and push the other side2. The unit clicks into position.
2. Turn on the power switch3 and see if the battery indicator turns on.
Removing MCS-unit
After download is completed, turn off the switch and push the release-button. The MSC-unit will
pop out.
Hook
Stage
Battery indicator
Release-button
Power switch
e-Train Data™
9
Page 10

OPERATING e-Train Data™
Let’s start with the basic operation using the sample file.
Starting e-Train Data
1. Start Windows95 or 98.
2. Go to the Windows taskbar and click the [Start] button, and select [program]-[e-Train Data][e-train].
Then the following screen appears.
Caution
If e-Train Data does not start properly, re-install it again.
e-Train Data™
10
Page 11

Opening file
1. Click the [Open File] button on the tool bar. (Or choose [Open] from the [File] menu.)
The dialogue box appears.
2. Choose the sample file and click [Open].
The data of the sample file (record memory file) appears on the main screen.
e-Train Data™
11
Page 12

Menu Bar
Toolbar
Exploring the main screen
The lower part is the line-graph of the entire data.
The upper part is the table showing the maximum, minimum and average of the displayed
graph.
Maximum, minimum and
Elapsed time (or distance)
Open File Print Undo Change Exit
e-Train Data™
12
average data
Speed (blue)
Cadence (green)
Heartrate (red)
Close File Zoom Analysis Download
• Menu Bar
Click each menu and the commands appear in the pull-down box.
• Toolbar
You can quickly execute the following commands with these buttons:
Open File ------------- Opens an e-Train Data file
Close File ------------- Closes an e-Train Data file
Print -------------------- Opens the print dialogue box
Zoom ------------------ Zooms up the graph
Undo ------------------- Restores the graph to the previous size
Analysis --------------- Displays the data of the selected interval
Change --------------- Changes the horizontal axis between elapsed
Download ------------- Opens the download dialogue box
Exit --------------------- Finishes e-Train Data file
time and distance
• Graph
Line-graph shows the data of speed (blue), cadence (green) and heartrate
(red). The horizontal axis can be changed between elapsed time and distance.
Page 13

Time of start point
Time of end point
Viewing a selected interval
Let’s select the interval you want to see, by using [Analysis] button.
1. Click [Analysis] button.
2. Move the pointer on the graph and it becomes + pointer.
Choose the start of the interval and click the point.
A vertical line appears on the start point and its time appears at the top of the line.
↑ Start point
3. Choose the end of the interval and click the point.
A vertical line appears and its time appears on the top of the line.
Maximum, minimum & average data of
Maximum, minimum & average data
the entire graph
of the selected interval
Selected interval ↑ End point
At the same time, in the right columns of the table, maximum, minimum and average data of
the selected interval are shown.
e-Train Data™
13
Page 14

Time of start point
Time of end point
Maximum, minimum & average
data of the zoomed-up area
Zooming the graph
You can zoom up a specific part of the graph.
1. Click the [Zoom] button on the toolbar.
(Or choose [Zoom In] from the [Edit] menu.)
2. Move the pointer on the graph and it becomes + pointer.
Click your desired start point.
A vertical line appears and its time appears on the top of the line.
↑ Start point
3. Click your desired end point.
Then the graph zooms up the selected interval.
The left columns of the table show maximum, minimum and average data of the zoomed-up area.
e-Train Data™
14
Reference: You can further continue zooming-up into the closer detail. Unless the number of
the data point becomes less than ten, you can continue zooming-up further and
further. If the total points become less than ten, the alert message as shown in the
left appears.
Page 15

Restoring the former graph
1. Click the [Undo] button on the tool bar.
(Or choose [Undo] from the [Edit] menu.)
Reference: [Undo] function restores the graph to the previous one. If you repeated zoomingup several times, click [Undo] the same times until the graph returns to the original.
e-Train Data™
15
Page 16

[Vertical]
[Horizontal]
Viewing two or more files on the screen
You can open two or more files and view them at the same time on the screen.
1. Click [Windows] and select the viewing mode from [Horizontal][Vertical][Cascade].
e-Train Data™
16
Page 17

[Cascade]
2. In [Cascade] mode, the clicked file comes up to the front.
e-Train Data™
17
Page 18

Trip Distance
Changing the horizontal axis
1. Click the [Change] button on the toolbar.
The horizontal axis changes from time to distance.
2. Click the [Change] button again.
The horizontal axis returns to time.
e-Train Data™
18
Elapsed Time
Page 19

To exit e-Train Data
1. Click the [Exit] button on the toolbar.
(Or choose [Exit] from the [File] menu.)
e-Train Data™
19
Page 20

Memory Record
readout screen
MODE
Memory Record File screen
SET/AT
M
X
P
T
M
DOWNLOADING DATA
Connect the interface unit to the PC according to the instruction in “PREPARING INTERFACE
UNIT” and switch it on. Install the MSC-unit on the interface unit.
1. Start Windows95 or 98.
2. Go to the Windows taskbar and click the [Start] button.
Select [Program][e-Train Data][e-train]. e-Train Data opens.
3. Choose [Option] on the menu bar and choose [Com 1] - [Com 5] according to your communication port.
(Check your communication port in your Window’s “Control Panel”. Refer to your Window’s
documentation.)
4. Click the [Download] button on the toolbar.
The download dialogue box appears.
LP
SET/AT
Lap Data
readout screen
(S)
(S)
C
M
X
S
A
V
S
D
ST
SET/AT
O
DO
Heartrate Taget Zone
readout screen
e-Train Data™
20
Memory Record
MODE
readout screen
Memory Record File screen
SET/AT
M
X
P
T
M
LP
(S)
D
ST
O
DO
SET/AT
Lap Data
readout screen
M
X
A
V
S
SET/AT
Heartrate Taget Zone
readout screen
5. On your MSC main unit, navigate to the readout screen of the data you want to
download.
S
Note: You can download 3 different data files.
• Memory Record: Speed, Distance, Time, Heart Rate (Cadence 3Dx)
• Heart Rate Target Zone
• Lap Memory Data
Page 21

6. Hold down LAP button for more than 2 seconds. MSC-unit starts downloading and the data is
transmitted to PC.
Reference: If an error occurs while downloading, the alert message appears. In this case,
7. Save the data in your PC as follows:
Record memory data:
When the download finishes, the downloaded data is displayed in the graph format.
When you close the file, the “save” dialogue appears.
Specify where you want to save the data, name it and save. The data is saved in CSV format.
Lap data and Heart Rate Target Zone data:
When the download finishes, the “save” dialogue appears.
Specify where you want to save the data, name it and save. The data is saved in CSV format.
8. Download is completed.
Switch off the interface unit and remove the MSC-unit.
Reference: If you want to continue to download other data, repeat the process 4. to 7.
restart e-Train Data and download again.
e-Train Data™
21
Page 22

File Open Open Opens a file
Save Save Saves a file
Close Close Closes a file
(If there are more than two files opening, they are
closed by the reverse order of the opening)
Print Ctrl+P Print Prints the data
Exit Exit Finishes e-Train Data
Edit Zoom In Zoom In Zooms up the graph
Undo Undo Restores graph to the former size
Option Com1-Com5 COM1 - COM5 Selects the communication port
Windows Horizontal Horizontal Displays files widthwise
Vertical Vertical Displays files lengthwise
Cascade Cascade Displays files in cascades
Help About About Checks the current version of your e-Train data
e-Train Data™
22
Important
If you should have questions about this download kit, please ask by e-mail or by fax.
For upgraded version of e-Train Data, please see our web site: http://www.cateye.com.
Page 23

Current
Move your cursor anywhere inside the graph area, and the
"Current" column displays the
data that the cursor points.
Mark-Line
Click anywhere inside the graph
area, and a vertical mark-line appears on the graph and the
"Mark" column displays the data
of that point.
Additional Functions
The following functions are newly added to the e-Train data software.
current data
mark-line data
mark-line
graph data
pop-up menu
Pop-up Menu
Click the right button of your mouse in any part of the graph area, and a pop-up menu appears:
• Heart Rate, Speed, Cadence: -- Check each function and it is displayed on the graph. (Uncheck them to
deselect.)
• Heart Rate Range (
• Gauge (
• Information (
• Mark-Line Off (M): ----------------- The mark-line on the graph is cleared.
G):--------------------------- Increase / decrease the graduations of the time-axis (or distance-axis).
R):------------ Select the graph's heartrate range from 1: 0-200, 2: 0-250, 3: 0-300.
F): --------------------- A dialogue box appears where you can input date, name and memo.
e-Train Data™
23
 Loading...