

Page 1
1
Page 2

Product Notices
2011 by Catchwell, Inc. All rights reserved.
No part of this manual can be replicated nor copied by any means – all electronic or mechanical means such as digital
media or paper, etc. -- without prior written consent from Catchwell. The contents of this manual can be subject to
change without prior notice.
Software will be provided literally “as is.” All software including firmware, applications, etc. have been appropriately
licensed. In regard to all the provided software, Catchwell assigns users non-transferable, non-exclusive license.
Except for the cases set forth hereunder, a user is not allowed to transfer the license to a third party in the form of
sublicense or by other means. All or partial modification, merge, integration of the software except for the cases
allowed by the copyright laws are prohibited. Hereby, a user shall agree with not violating the laws regarding
decompile, disassembly, decoding, and reverse engineering of all or a part of the licensed software without prior
consent from Catchwell.
Catchwell holds rights to modify the product or software in order to improve the stability, features, and design of the
product.
Catchwell does not accept any liability whatsoever for any incidental or consequential loss or damage arising from the
use of applications, products, circuits or other software mentioned in this manual.
Catchwell and its logo and Catchwell and its logo are trademarks. Microsoft, Windows CE, Windows Mobile,
Bluetooth, Wi-Fi, GSM, etc. are all the properties of their respective owners.
Catchwell ™
B-405, Bundang
http://www.catchwell.com
Techno Park, 148, Yatap-dong, Bundang-gu, Seongname-si, Gyeonggi-do
2 3
Page 3

Table of Contents
Product Notices ........................................2
Table of Contents ......................................3
Information on this manual .......................5
Precautions for Users ...............................6
Chapter 1. Getting Started
Product Components ................................9
Unpacking the product ............................ 11
Accessories .......................................
Accessory components
Accessories for individual use ................13
Installing the SIM card ............................ 15
Installing the main battery ....................... 16
Install the battery .................................16
Charging the battery ............................... 17
Charging temperature ............................. 17
How to check remaining power i
battery
How to take care of the battery ............... 19
Changing power settings ........................ 19
Changing backlight settings .................... 20
Turning off the wireless function .............20
MicroSD(Micro Secure Digital) card .......22
Adjusting the hand strap .........................22
Removing the screen protection cover
.....................................................18
.......................12
n the
.....12
... 22
Personal folder
System folder ......................................37
Adjusting Volume .................................... 39
Display of battery level ............................40
Resetting CW30 ......................................41
How to perform a soft reset .................41
How to perform a hard reset ...............41
Turning on or off ba
Locking CW30
Locking with a password .........................43
Function buttons ..................................... 45
Data entry ............................................... 46
Viewing pictures and videos ................... 46
Taking a picture .......................................47
Video recording .......................
....................................36
cklight ......................42
........................................43
................48
Chapter 3. Data Capture
Overview ................................................. 50
Laser scanning .......................................50
Things to be considered for scanning ..... 50
Scanning barcodes .................................51
Image decoding ...................................... 52
Operation modes .................................... 52
Image scanning ......................
................53
Chapter 2. Using CW30
Overview ................................................. 24
Start Screen ............................................ 24
Title bar ................................................... 24
Notifications.........................................25
Connectivity.........................................25
Status-indicating icons ........................26
Audio .........................
Battery level
Home Screen .......................................... 28
Classic Home Screen ............................. 29
Soft key indicator bar ..............................30
Start Screen ............................................ 30
Settings folder ......................................... 34
Connections folder .................
........................................27
..........................27
.............35
Chapter 4. Using the phone
Overview ................................................ 55
Using the phone application ...................55
Turning on or off the phone .....................55
Audio mode ............................................. 56
Using wired headsets .............................56
Using Bluetooth headsets ....................... 56
Adjusting audio volume .............
Making a phone call
Using the Phone Dialer ........................... 58
Using Contacts .......................................58
Using Call History ................................... 59
Making emergency calls ......................... 59
Answering Calls ......................................60
Handling incoming calls ..........................60
Smart Di
aling .......................................... 60
................................57
..............57
3
Page 4

To search for phone numbers .................61
How to find contacts ...............................61
To mute the microphone during a call .....62
How to mute or unmute the microphone
during a call ............................................62
Creating a memo .................................... 62
How to check the memo created
during a call ............................................63
Using Speed D
How to add an item to Speed Dial
Editing or Deleting Speed Dial shortcut ..65
Using Call History ................................... 66
Managing Call History .........................66
Modifying Call History View .................66
Resetting the recent call counter ............ 67
Deleting all Call History ........................... 68
Viewing call d
Using Call History menu
Switching calls on CW30 ........................ 70
Text message ..........................................71
Viewing text messages .......................71
Sending text messages .......................72
ial ....................................63
..........64
etails .................................69
.........................70
Chapter 5. Using a GPS Navigation
Overview ................................................. 75
Installing a software ................................75
Setting up GPS on CW30
Operation ............................................76
GPS maps on a microSD card ............76
Answering calls while using GPS ........76
When you lose GPS signals in a car ...77
Auxiliary GPS .......................................... 77
.......................75
Soft reset .............................................81
Pause ....................
Restart
Power states of Bluetooth ....................... 81
Using Microsoft Bluetooth Stack ............. 81
Turning on or off the Bluetooth
Wireless mode ....................................82
Bluetooth activation .............................82
Bluetooth deactivation .........................83
Searching for Bluetooth d
vailable Services ..................................86
A
Serial Port Services.............................87
ActiveSync using serial port services ..89
A2DP/ AVRCP Services ......................90
.................................................81
..............................81
evices .........83
Chapter 7. Maintenance and
Troubleshooting
Maintenance ........................................... 92
Safety instructions on battery .................92
Cleaning ...............................
Screen
Scanner window ..................................93
Connectors ..........................................93
Cradle..................................................94
.................................................93
...............93
Chapter 6. Using Bluetooth
Overview ................................................. 79
AFH (Adaptive Frequency Hopping) ....... 79
Security ................................................... 80
Composition of Bluetooth ........................ 80
The ports supported by Microsoft
Bluetooth Stack ....................................... 81
Hard reset ...........................................81
4 5
Page 5

Information on this manual
The contents of this manual contain the version of Windows Mobile running on CW30.
The illustrations contained in this manual may be different from actual screens.
Technical Support
If you find any problem in the product, please contact Technical Support Team of Catchwell (tel:+82-31-788-5324).
Or you can visit our Q&A bulletin board at our web site (http://www.catchwell.com) for further inquiry.
When you make an inquiry, please have the followings ready:
- Serial number of the product
- Model number
- Supplier information, the user’s contacts, and the place where the user works
If a problem reported to the Technical Support Team of Catchwell has not resolved, a user may have to send the
product to Catchwell for services and Catchwell doesn’t provide the user with a replacement device unless there is a
signed agreement between the user and Catchwell. Catchwell does not accept liability for damages that may result
from improper packaging when the user sends the product to Catchwell.
If you purchased the product from a supplier of Catchwell, please contact the supplier for product support.
5
Page 6
Precautions for Users
The following is the information for the safety of users and for preventing the product from being damaged. Please
read the followings carefully and use the product accordingly.
Power
• In the event of abnormal sounds, smells, or smoke, please contact Customer Support after unplugging the product
from the power outlet and removing the battery.
• Do not touch the power plug with wet hand.
• Do not charge the battery while thundering or lightening, and unplug the cradle from the power outlet.
• Do not use the device in rainy or wet places.
• When the surface of the product is wet, turn off the product and remove the battery from the product, then wipe off
water with a cloth or a dry towel before use.
• Use the cradle when you charge the battery, if possible.
Installation and storage
• Do not store the product inside a car to avoid possible theft.
Keep PDA and its stylus out of the reach of children to avoid injury.
•
• If PDA is not going to be used for prolonged periods of time, insert it into the cradle for continuous power supply.
About using this product
• When you use the battery for the first time, please use the battery after being fully charged.
• Before resetting the device, please backup programs and data in advance.
• Before proceeding with software reset, please backup currently-using programs and data to a safer place. As the
saved data will be safe, data or
• Do not place any heavy object on the product.
• Do not use the product in humid or dusty places or near heat sources (heaters, cigarette light)
• Be careful neither to drop the product nor to give it an excessive shock.
• If the touch screen gets dirty with foreign materials, clean it before use.
• When using the touch screen, do not use sharp objects (pens, steel wires, and screwdrivers), and only use the
stylus and dedicated accessories coming with the products.
• Only use the provided batteries, power adapter, and cradle.
• In regard to the damages resulting from other software installed by a user after purchasing the product, Catchwell
shall not warrant the product.
• Be careful to prevent the surface of a battery from being in contact with metallic objects.
• If the product has features like laser or flash, do not level them at the eyes of people or animals. In so doing, their
sight may be impaired.
files currently being used may be deleted.
6 7
Page 7

About communication
• Do not use PDA nor make a call while driving a car to avoid an accident.
• Do not touch the product or its power plug with wet hand or you may get shocked by electricity. Turn off the
product in aircraft or in hospital. The electromagnetic waves of the product may interfere with electric aviation
devices or medical equipments.
• Turn off the product in the areas exposed to the risk of explosion. Especially, it is safer to power off the product
while gassing up a car.
• Be wary of using a headset (earphones). The use of headphones at high volume for prolonged periods of time
may impair hearing ability.
Warranty
• Please do not arbitrarily attempt to disassemble, repair, and modify the main unit of the product. In such cases,
warranty of the product will be invalidated.
7
Page 8

Chapter 1. Getting Started
Product Components ..........................9
Unpacking the product ...................... 11
Accessories .......................................12
Accessory components .........................12
Accessories for individual use ...........13
Installing the SIM card.......................15
Installing the main battery .................16
Install the battery ................................... 16
Charging the battery..........................17
Charging temperature .......................17
How to check remaining power
in the battery .....................................18
How to take care of the battery .........19
Changing power settings...................19
Changing backlight settings ..............20
Turning off the wireless function........20
MicroSD(Micro Secure Digital) car
Adjusting the hand strap
Removing the screen protection cover
...................22
d ..22
..22
Page 9
1
Getting Started
Product Components
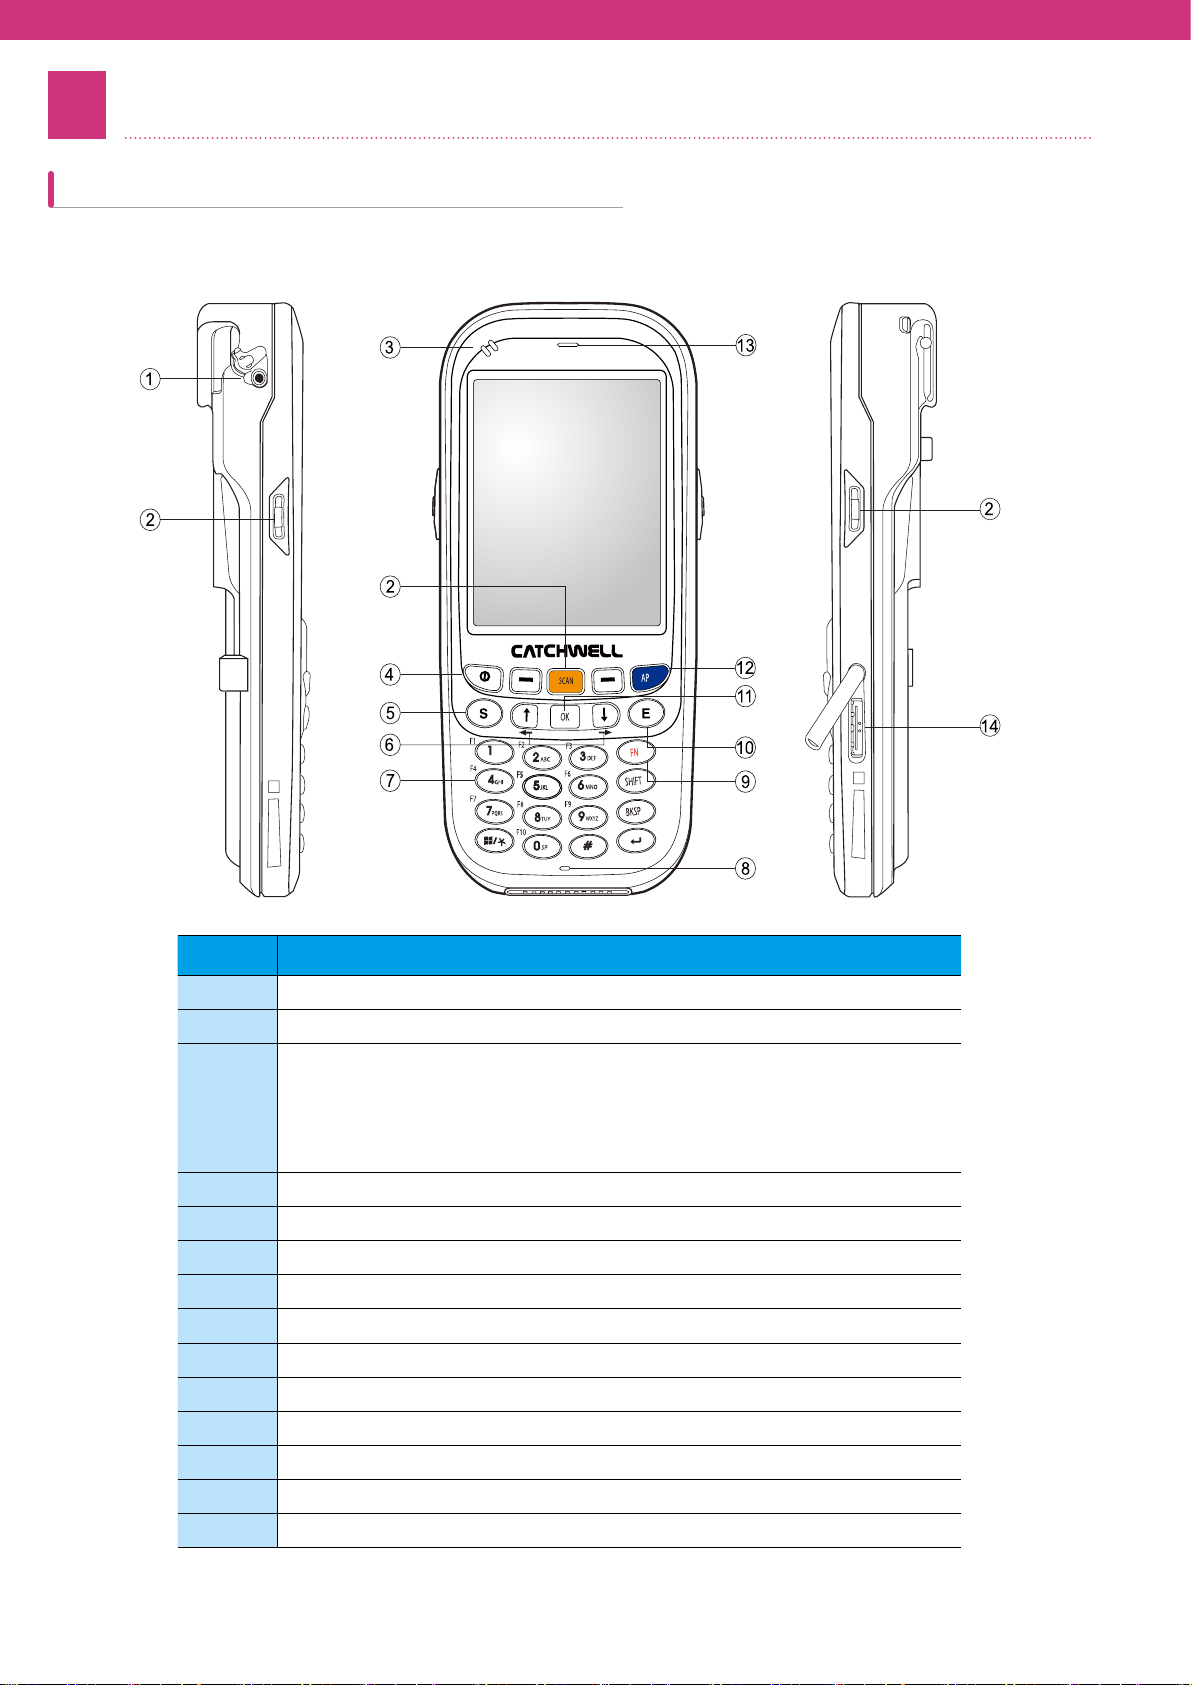
This chapter will explain each part of the product and its accessories.
No Contents
① Ear phone jack
② Scan button
Statue LED
- Charging : red LED turn on
③
④ Power button
⑤ Send button
⑥ Direction button
⑦ Numeric and Alphabet button
⑧ Microphone
⑨ Function botton
⑩ End button
⑪ Select / run / ok button
⑫ Keymap mode button
⑬ Front speaker
⑭ 24pin connector
- Operation : blue LED turn on
- Full charging : green LED turn on
- Connecting error : Blink red LED
9
Page 10
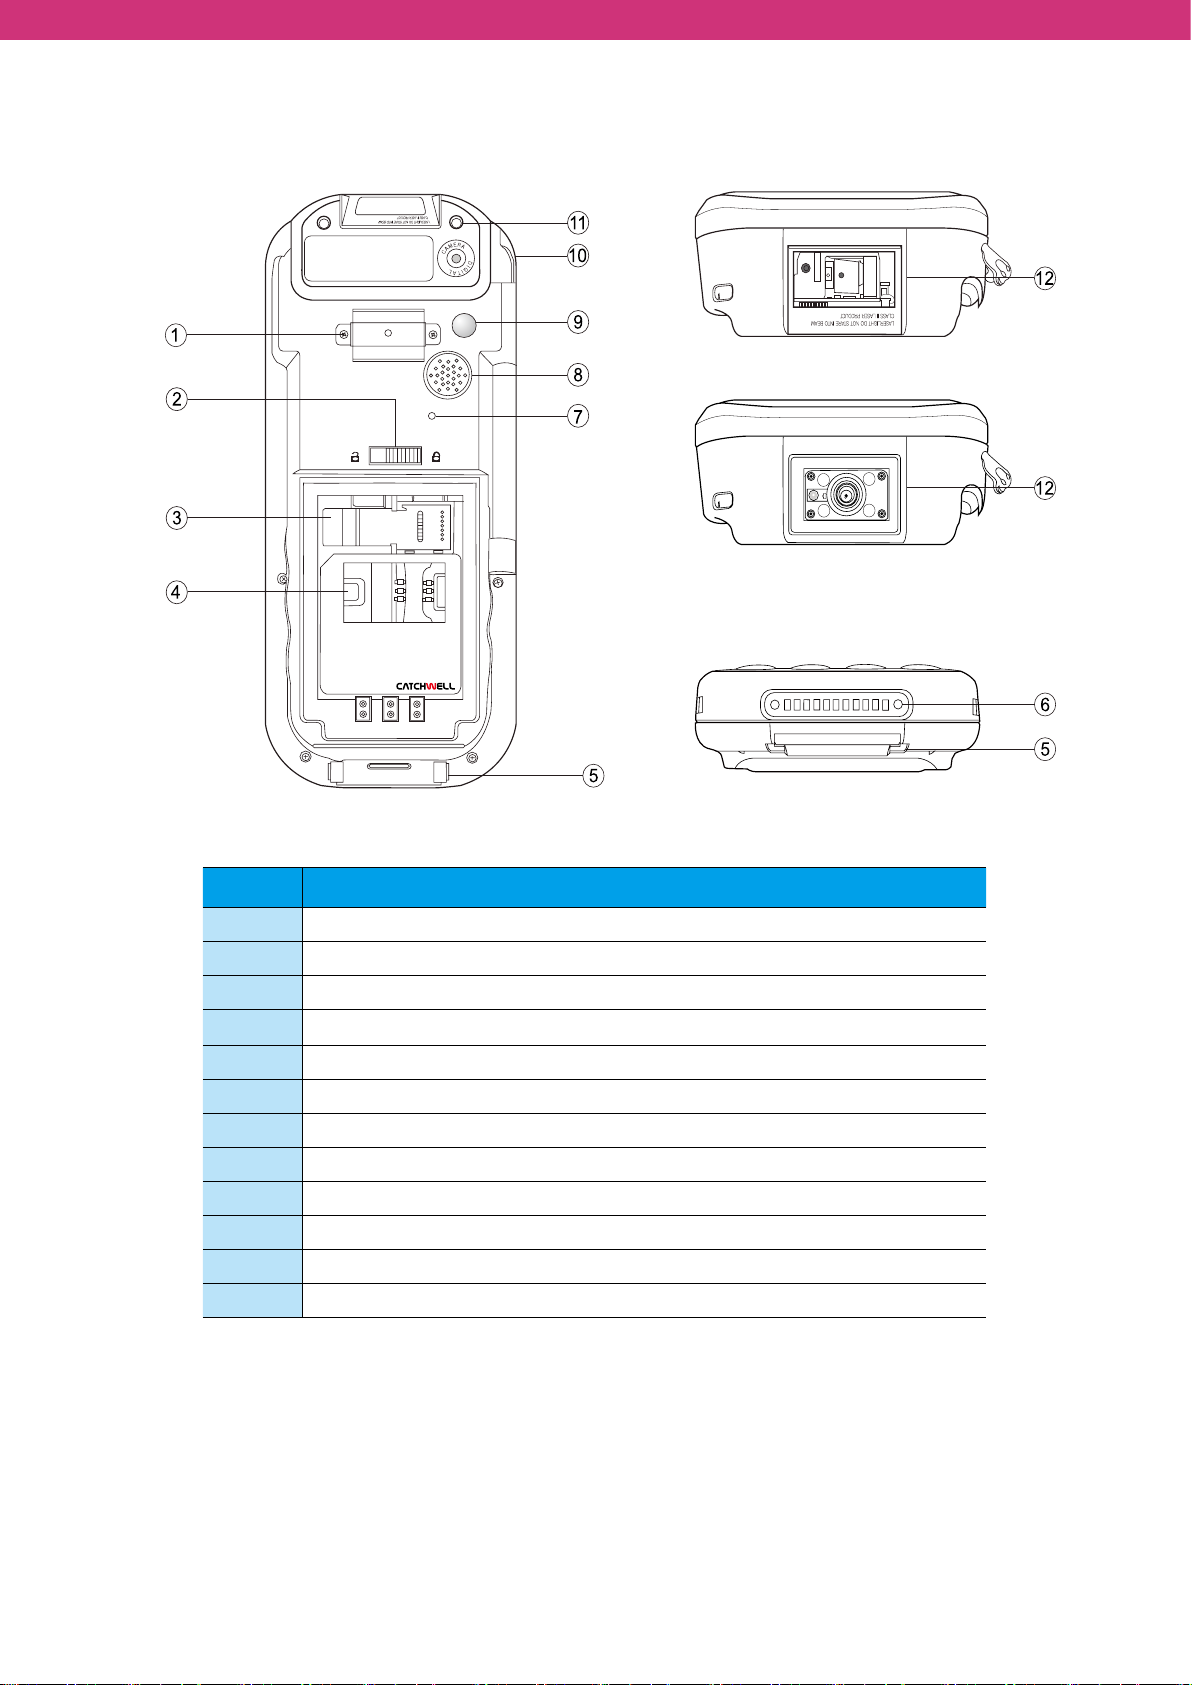
No Contents
① Handbelt
② Battery Lock latch
③ SD memory slot
④ USIM slot
⑤ Handbelt slot
⑥ Battery charging connector
⑦ Reset button
⑧ Rear speaker
⑨ Flash LED
⑩ Stylus holder
⑪ Digital camera
⑫ Barcode scanner
Page 11
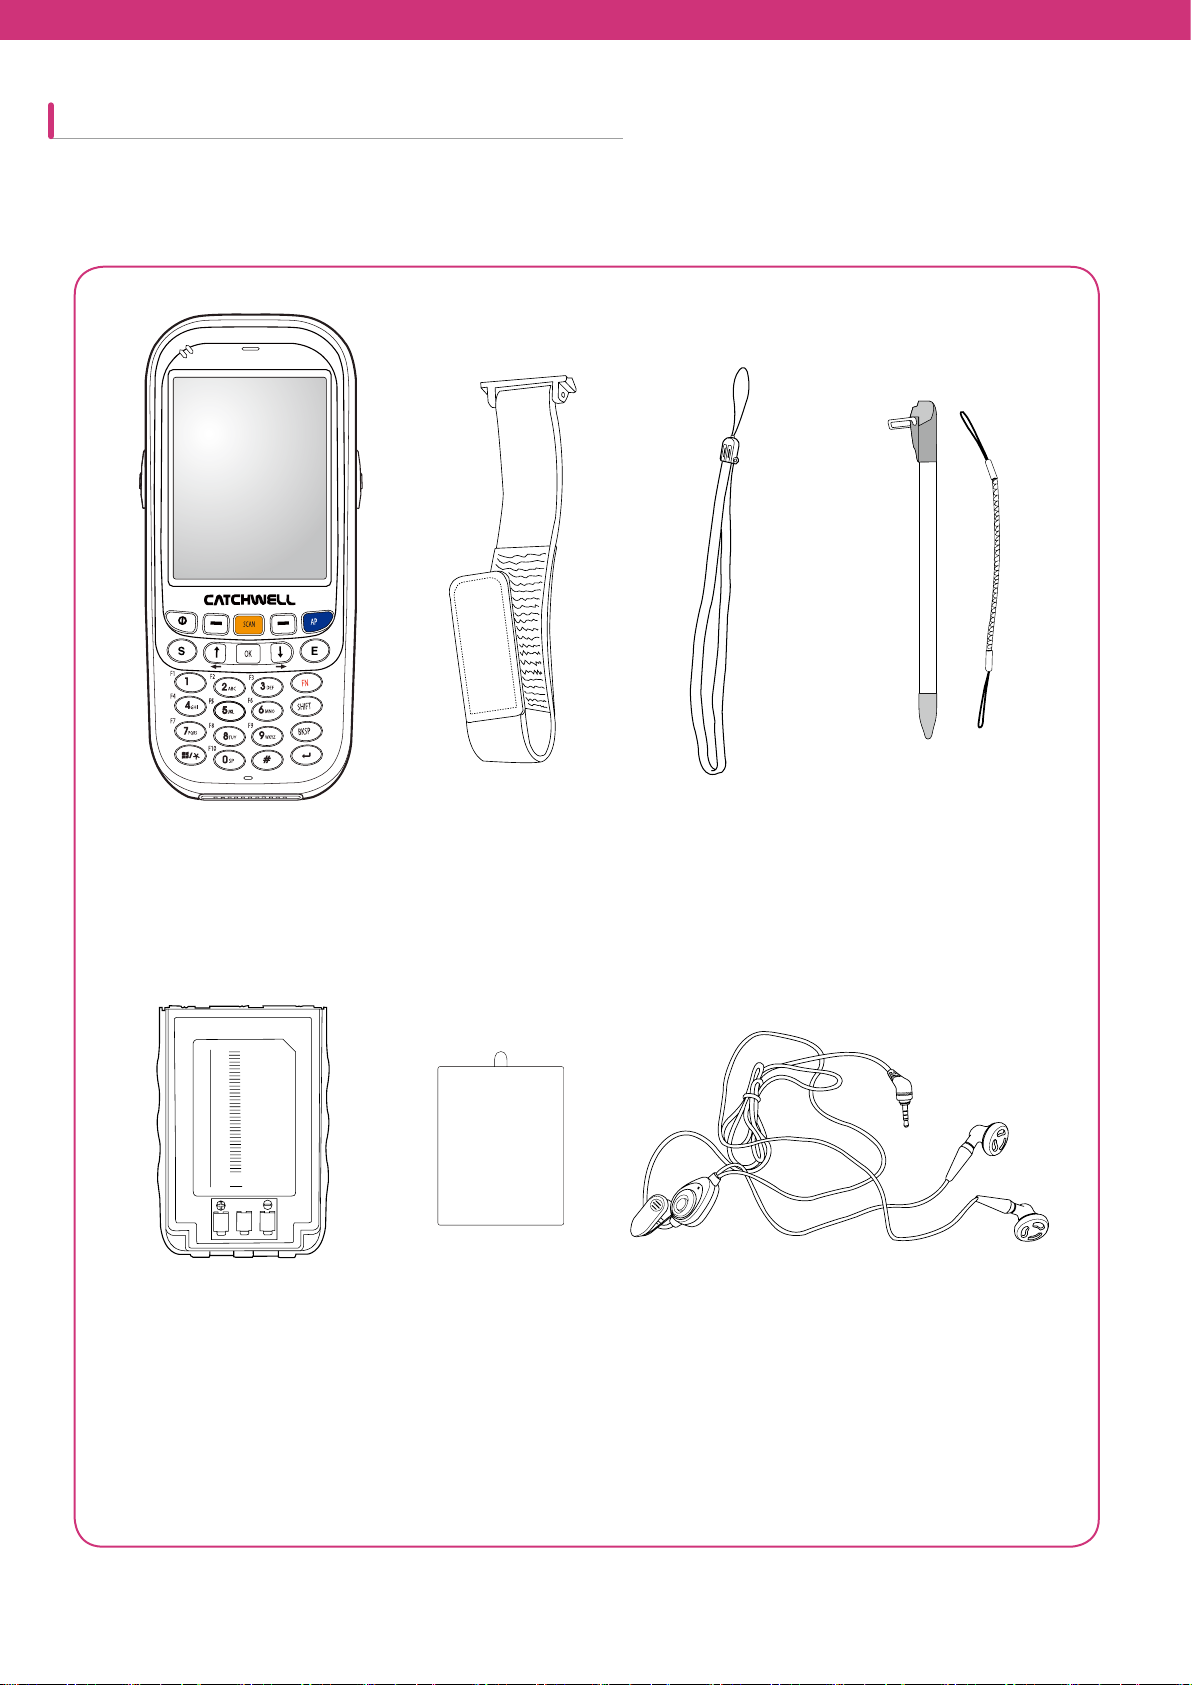
Unpacking the product
Please check whether or not there is any damaged or missing component in the box. If there is any problem, please
contact the supplier.
Main unit of PDA
Li-ion polymer battery
Hand strap
Protective film
Waist strap
Earset: if it has a phone function
Stylus and its string
11
Page 12
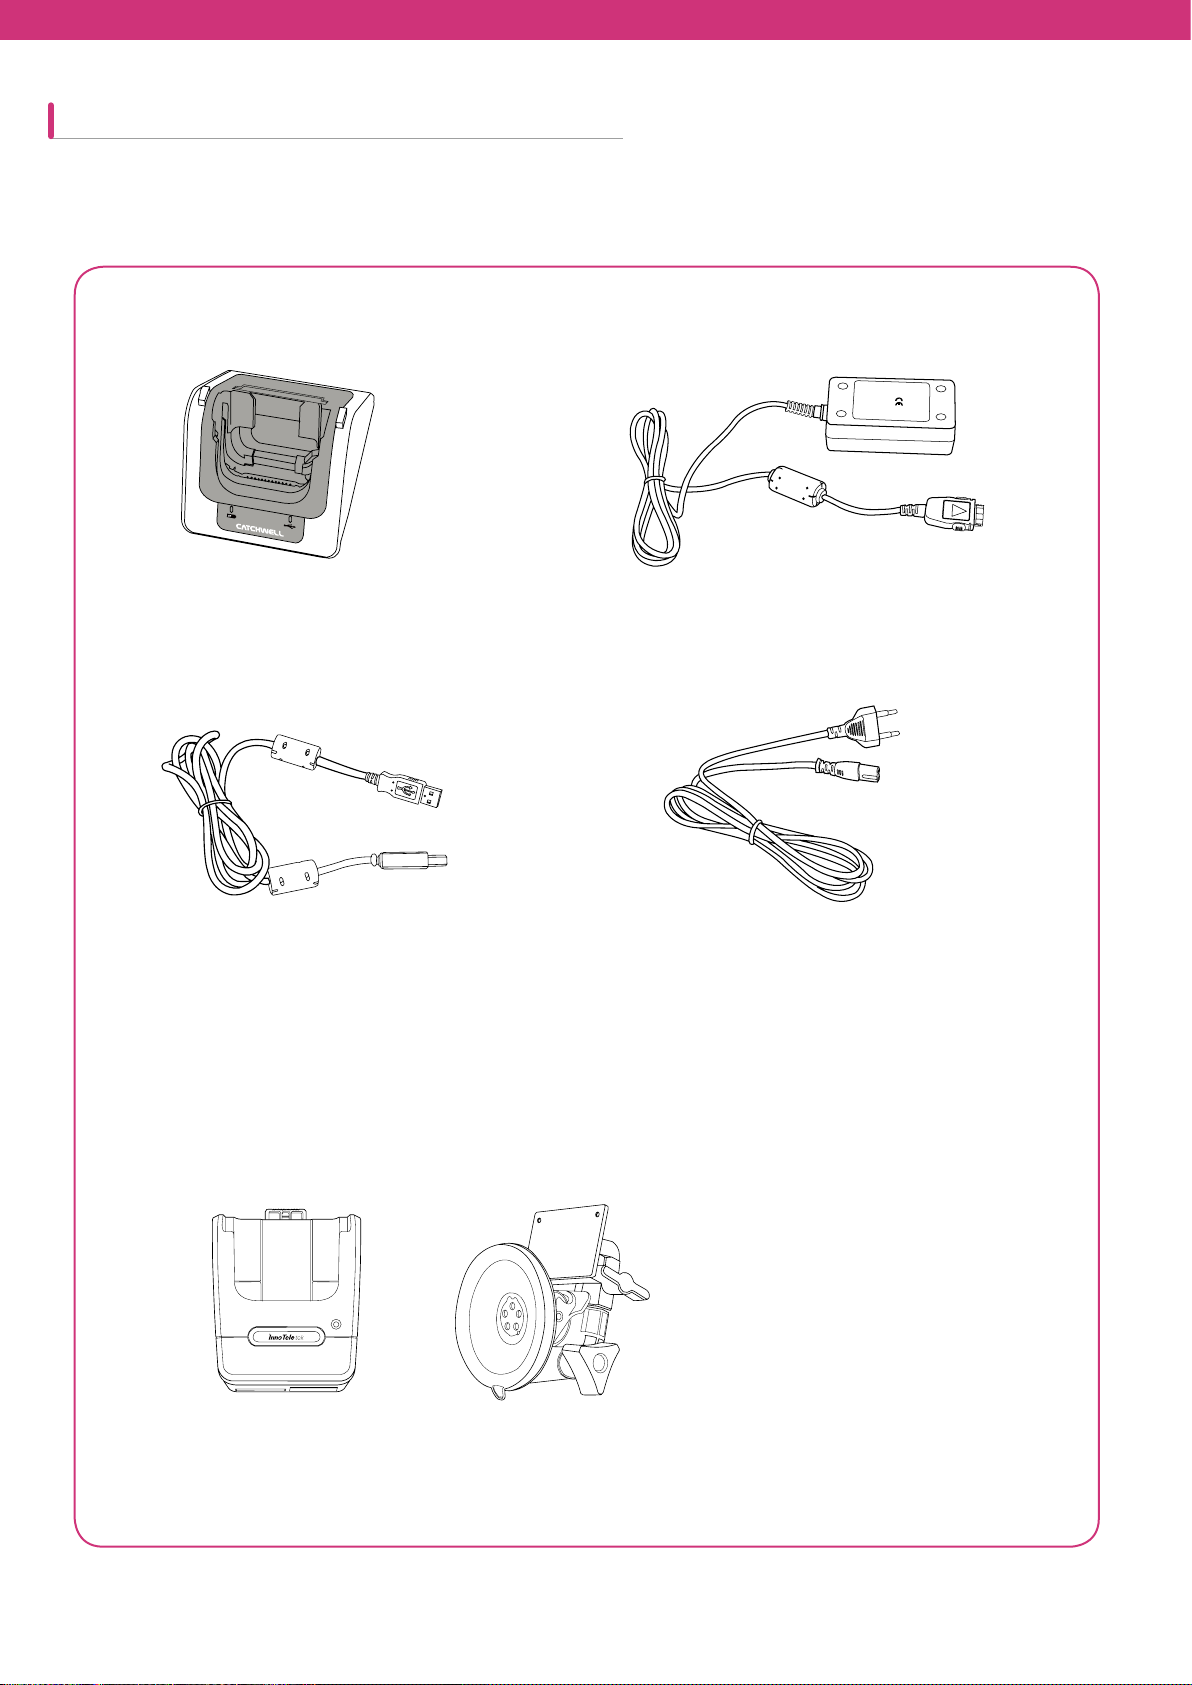
Accessories
DC 5
V
DC 5
V
Accessory components
• 1-slot cradle
DC 5
V
Cradle for charging and communication
USB cable
• Cradle components for the use in a car
Power adapter
Power cord
Cradle for car use Car mount kit
Page 13
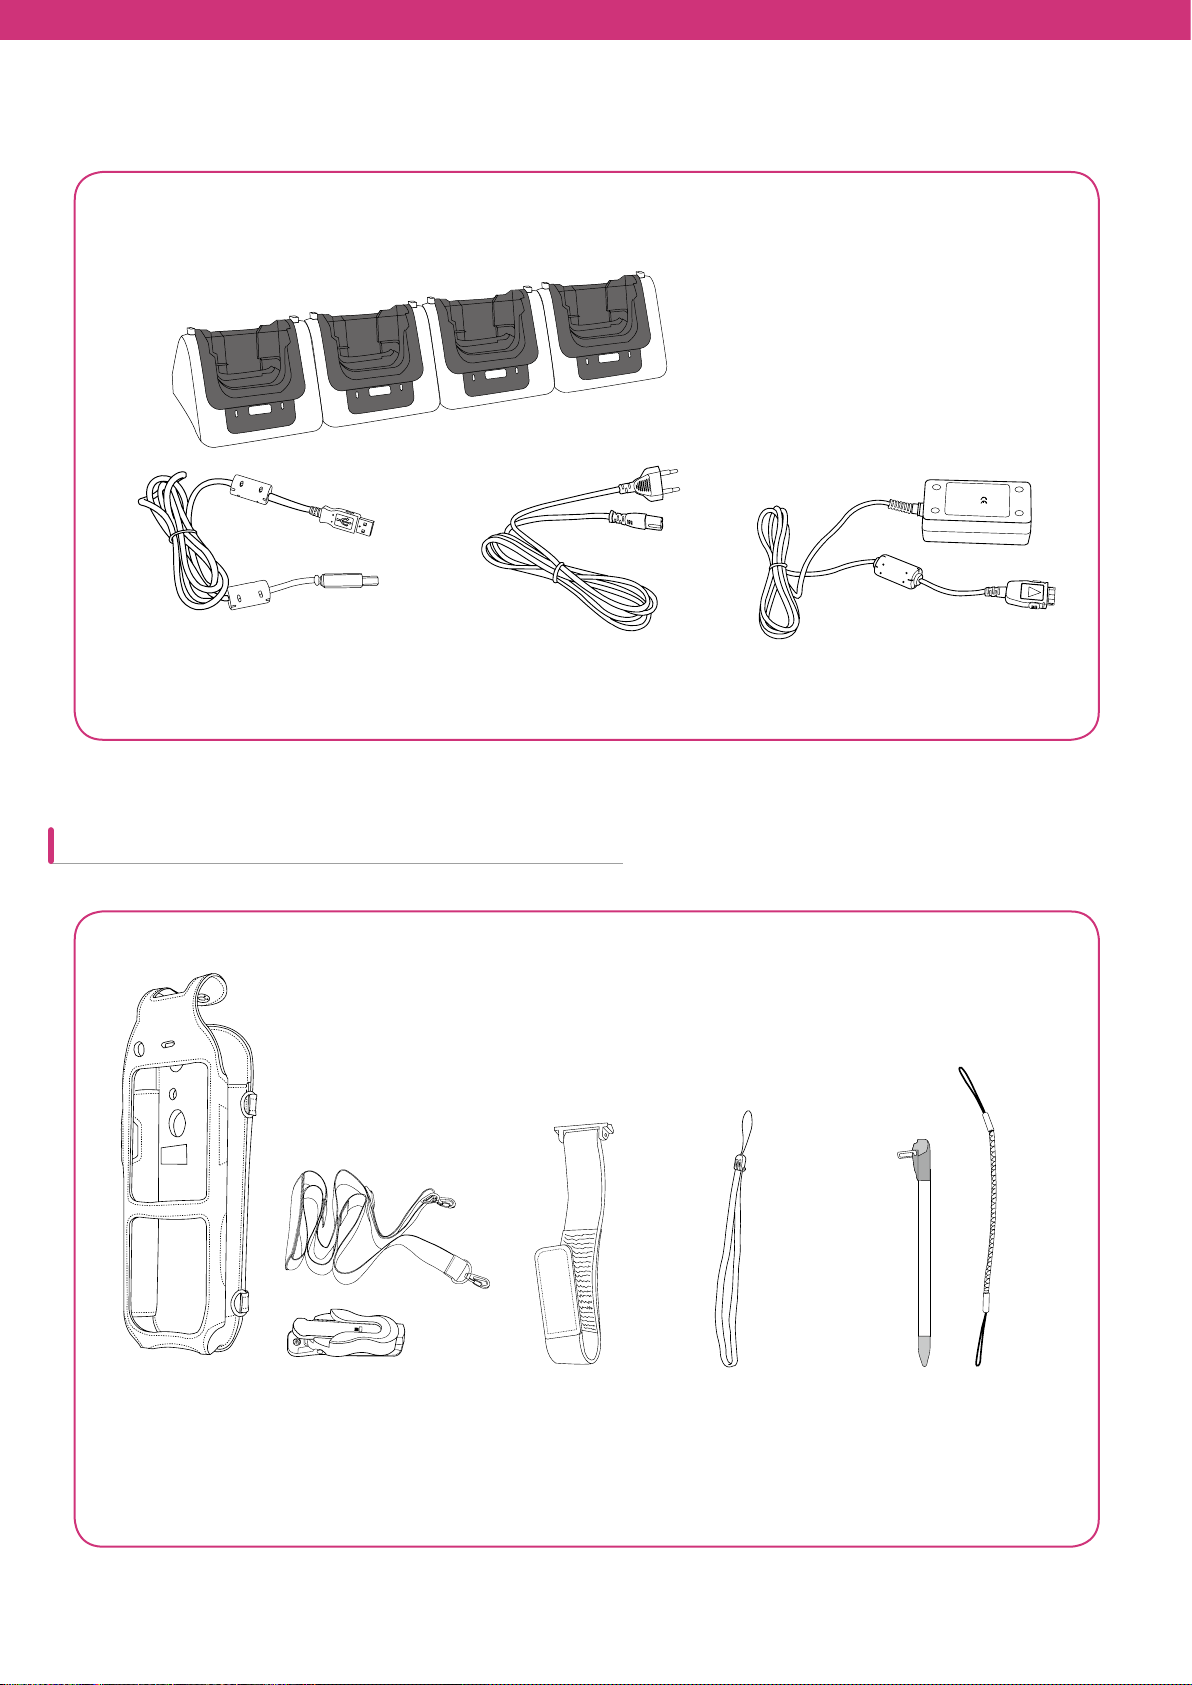
DC 5
V
• 4-slot cradle components
4-slot cradle
Power adapter
Accessories for individual use
DC 5V
USB cable Power cord
Leather case Hand strap Stylus
Waist strap
Stylus string
13
Page 14
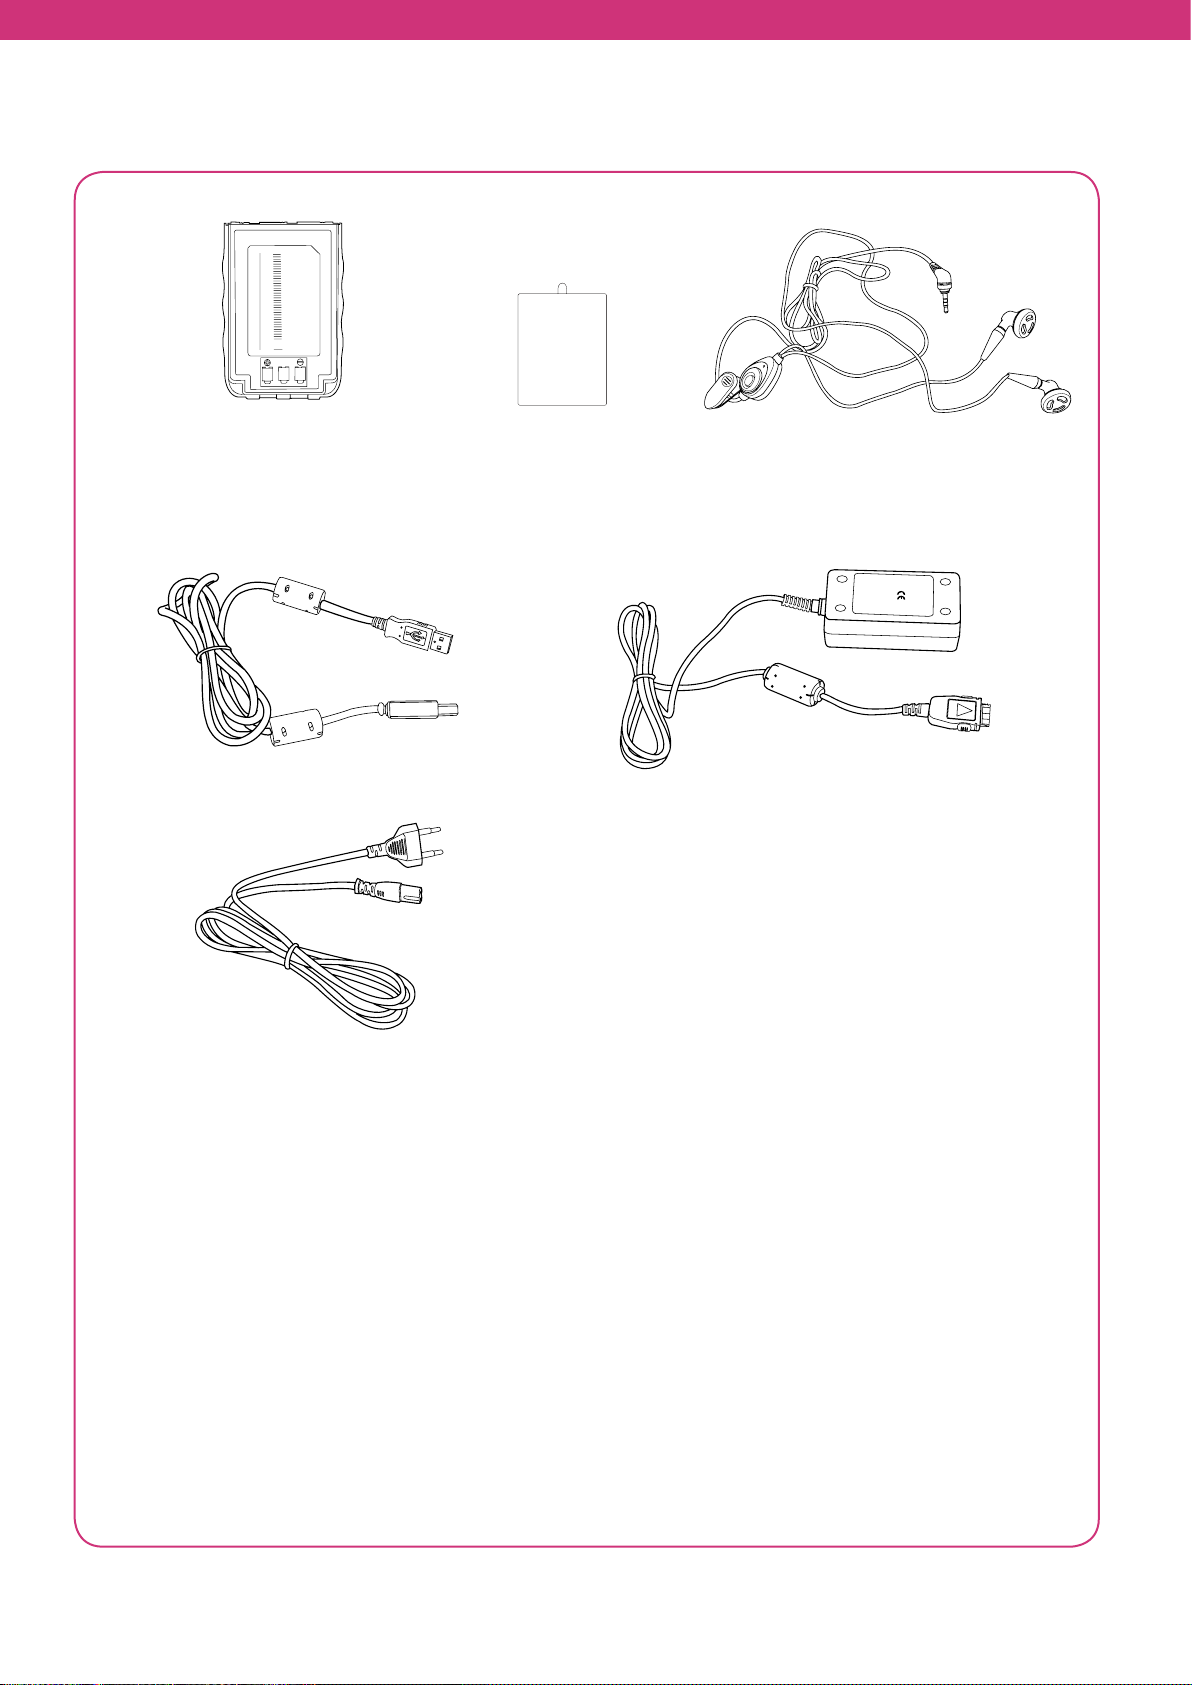
Li-ion polymer battery
Protective film Earset
DC 5V
USB cable
Power cord
Power adapter
14 15
Page 15
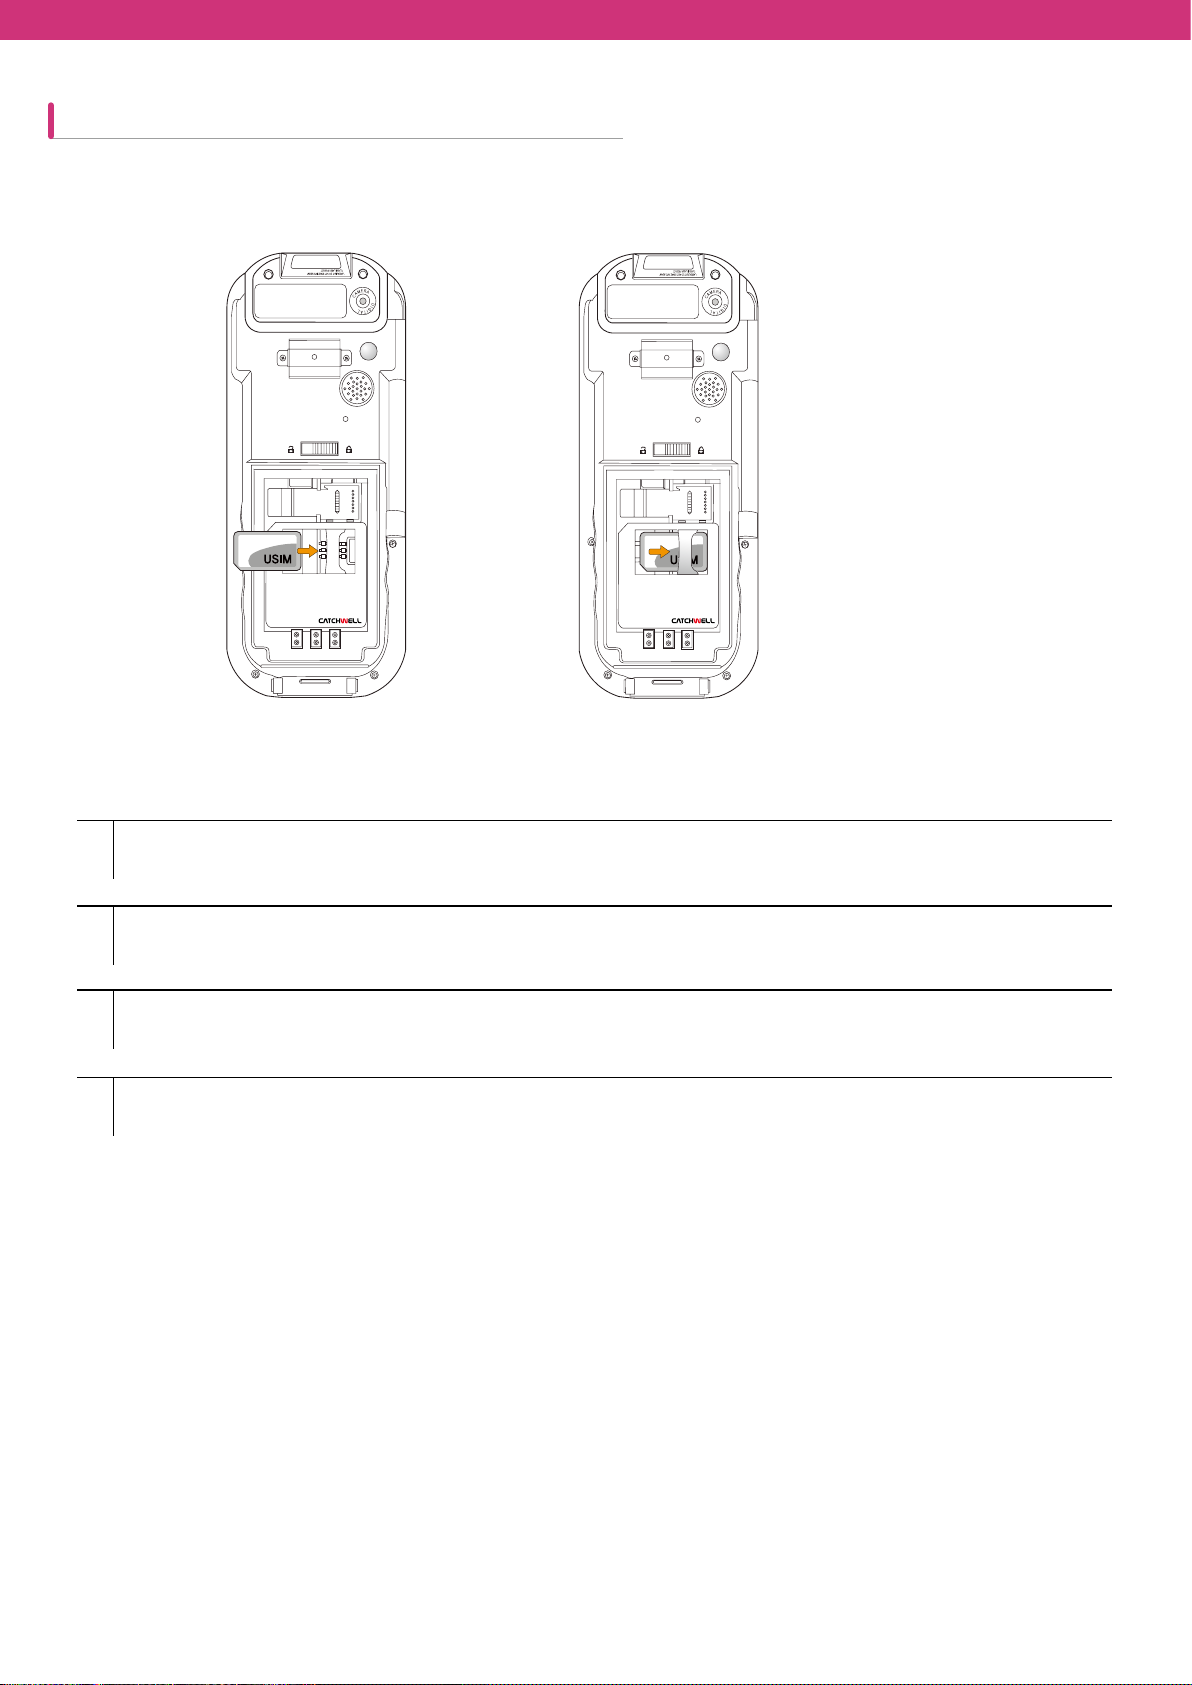
Installing the SIM card
1
1
2
1
2
3
Please refer to the manual provided by your service provider for further information on SIM card.
After installing a SIM card for the first time or after replacing it,
Turn on the device
1
Press tap on Wireless Manager on Today Screen.
2
Make sure the phone is turned on
3
Make a call for checking cellular connection.
4
15
Page 16
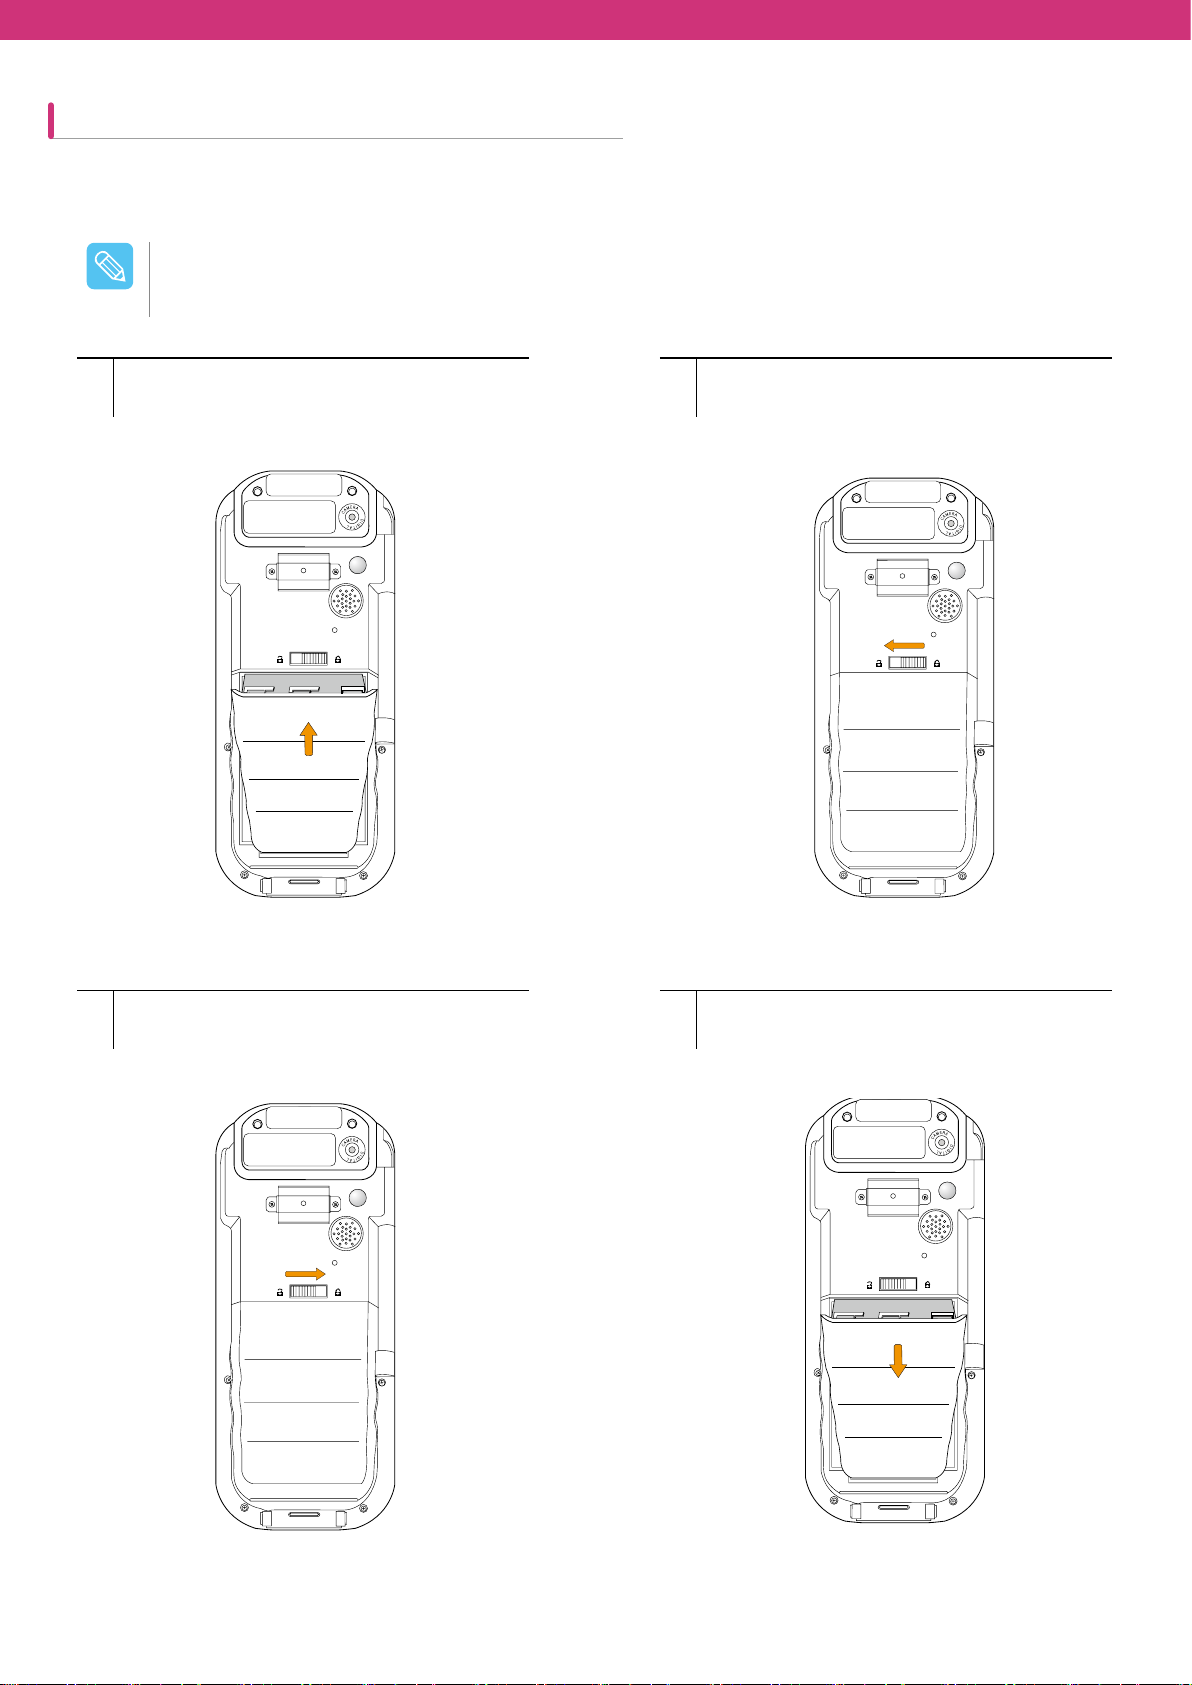
Installing the main battery
Install the battery
• One battery comes with the product. You can buy extra battery separately.
Caution
Insert the battery from the bottom to fit into
1
the slot of the device on the bottom.
Press down the top of the battery toward the
2
device and slide the latch to the left to fix the
battery with the device.
Press down the top of the battery and slide
1
the latch to the right to release the battery
from the device.
Hold the sides of the battery and pull out.
2
16 17
Page 17
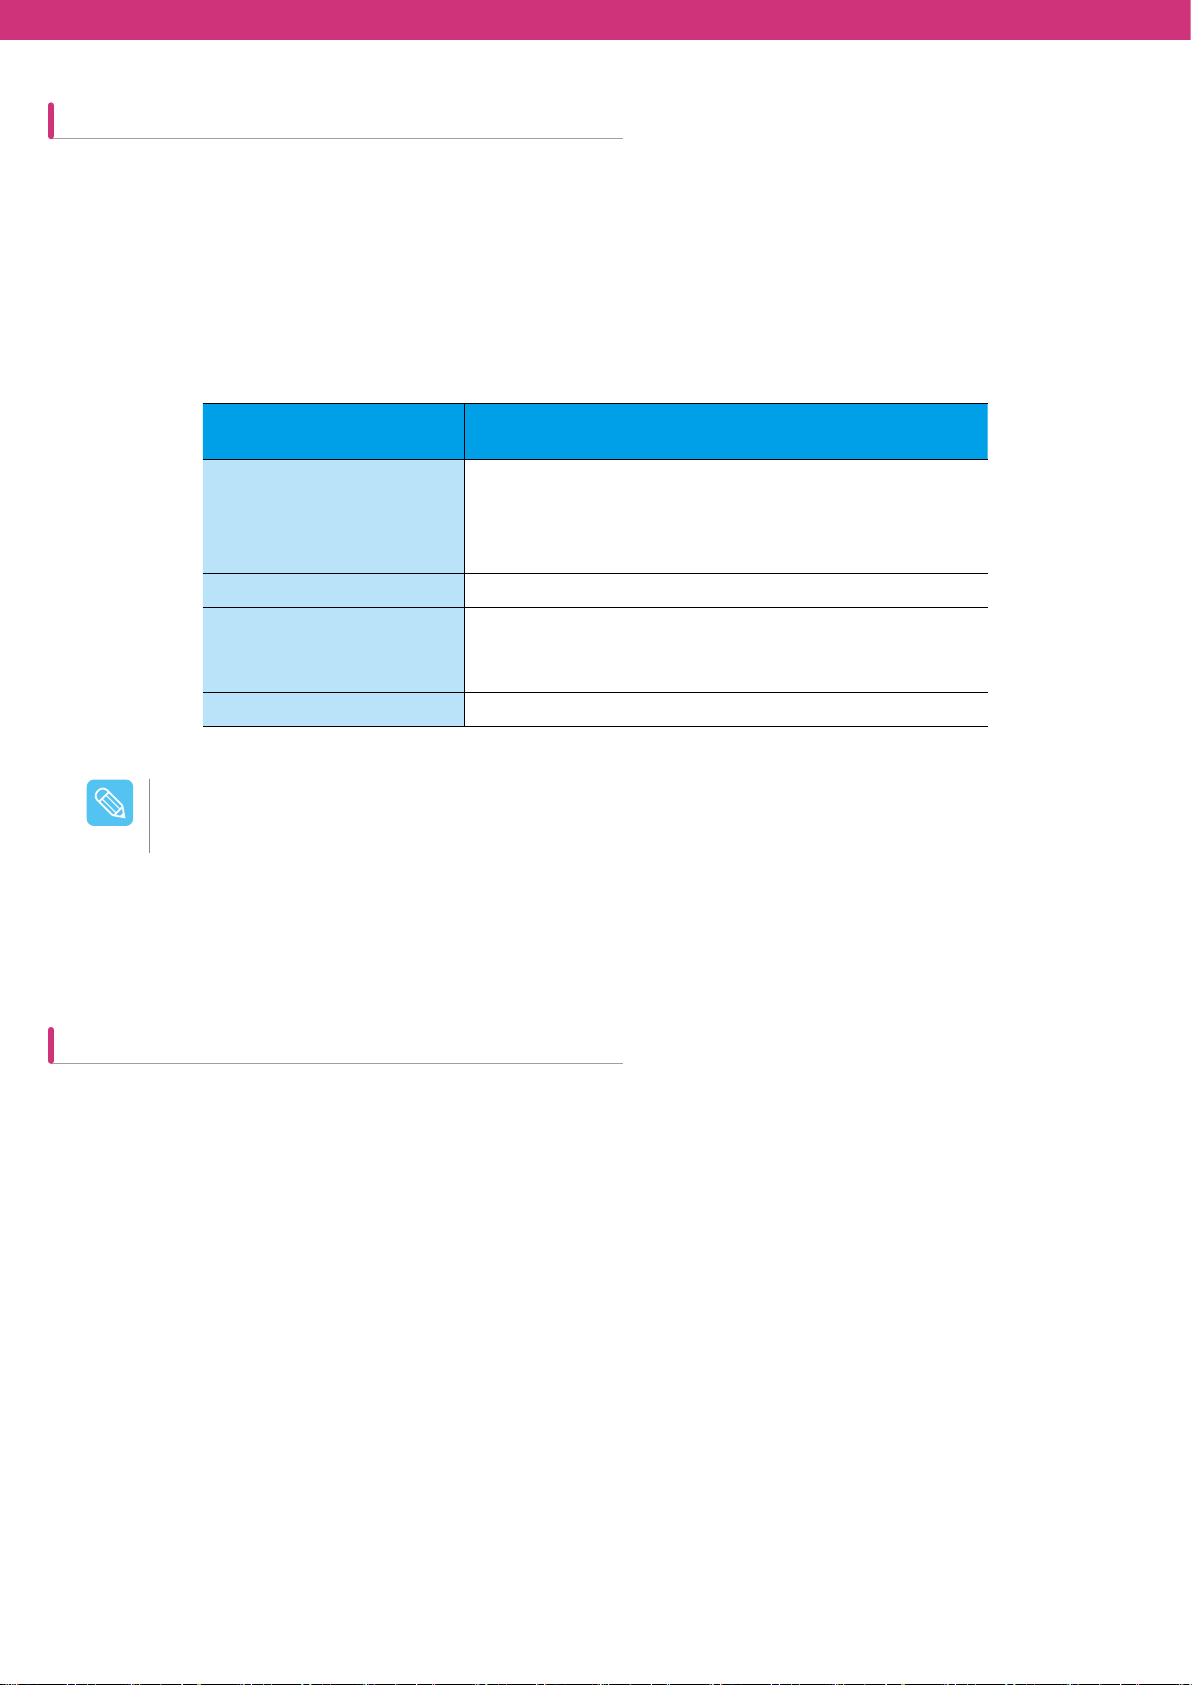
Charging the battery
Before using the battery for the first time, please fully charge the battery until yellow light is on LED, which indicates
charging status. Use only the adapter and cable that came with cradle when charging the battery.
In order to charge the backup battery inside the product, we recommend that you charge the battery more than 24
hours before using the product for the first time. Charging may take longer if the battery is installed in a PDA that is
turned on.
Charging indicator LED (PDA LED, cradle, etc.)
Caution
Charging/battery level
indicator LED
Unable to charge in PDA / The battery is not
Turned off
Red is on Charging
Red flashes
Yellow is on Chargi
Please charge the battery for more than 24 hours before the first use.
•
properly inserted into the cradle or power is off/ The
power of the charger or cradle is disconnected.
Charging error – Ambient temperature is too low or
too high. Poor contact between the battery and the
charging terminals due to foreign materials, etc.
ng complete
Description
Charging temperature
Charging temperature ranges from 0
C
°
to 40
(32℉ ~ 104℉).
C
°
17
Page 18

How to check remaining power in the battery
To check the charging status of CW30, tap Start > Settings > Systems > Power and open Power Screen.
Check automatic power-off after a certain period of time by tapping “Advanced” tab in order to expand battery running
time.
18 19
Page 19
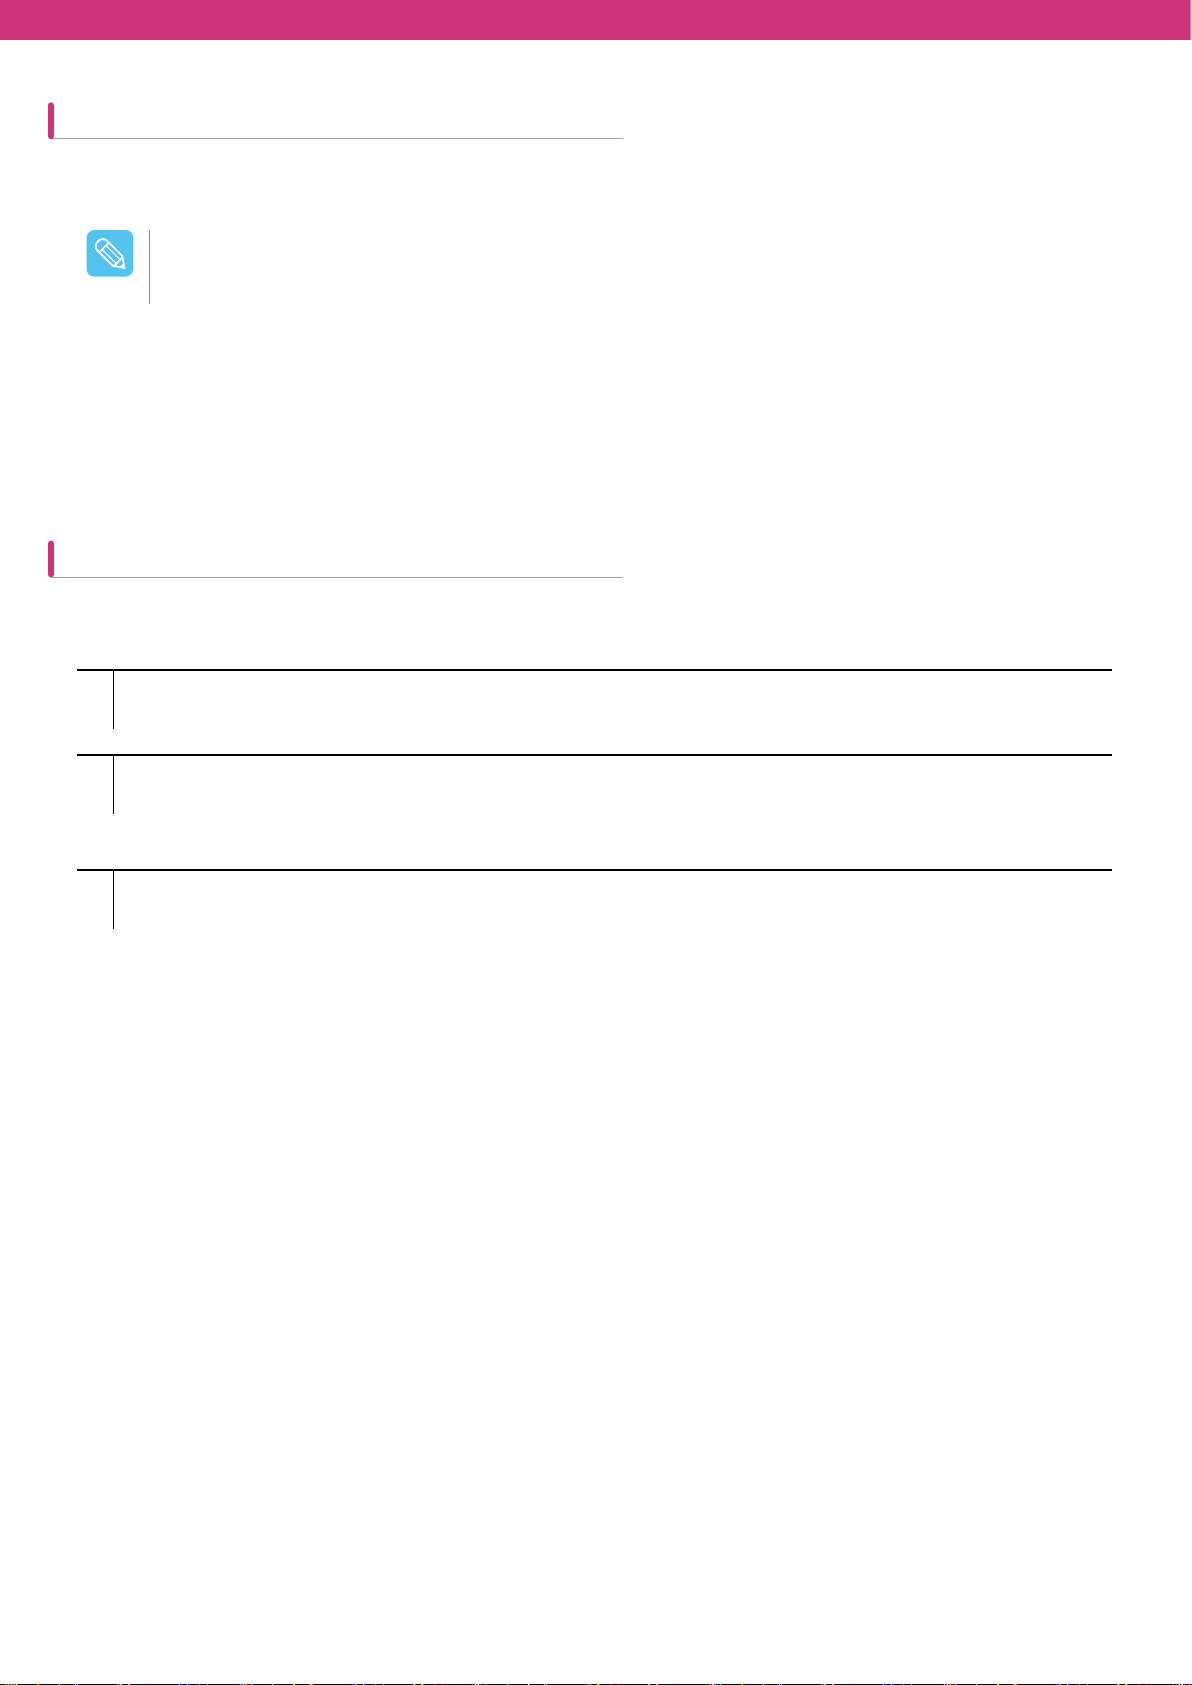
How to take care of the battery
1
1
2
Please follow the battery saving instructions below.
• The default settings for WWAN, WLAN and wireless Bluetooth are set at Off.
Caution
Leave CW30 connected to the power when it is not in use.
Set the power to turn itself off when it is not used for a specific time.
Set the back light to turn itself off when it is not used for a specific time.
Turn off every wireless task when it is not in use.
Turn off the power of CW30 to charge at a faster speed.
Changing power settings
How to set CW30 so that it is turned off when it is not used for a specific time
Start > Settings > Power icon > Advanced tab
1
On battery power: Turn off screen if device not used for (When battery power is used: turning off the device
2
when it is not used for the following time period) Select the X mark and select one of 1 min~5 min from the
dropdown menu.
Select OK.
3
19
Page 20

Changing backlight settings
1
1
2
How to set CW30 so that only the backlight is turned off when it is not used for a specific time
Start > Settings > System > Backlight icon > Battery Power tab
1
On battery power: Disable backlight if device is not used for (When batter power is used: turning off the backlight
2
when it is not used for the following time period) Select the X mark and select one of 1 min~5 min from the
dropdown menu.
Select OK.
3
Turning off the wireless function
The Microsoft Windowns Mobile 6 device includes Wireless Manager which allows every wireless function of the
device to be activiated, deactivated and composed at one place.
To open Wireless Manager, press Wireless Manager or press Connectivity icon on the Home screen.
20 21
Page 21
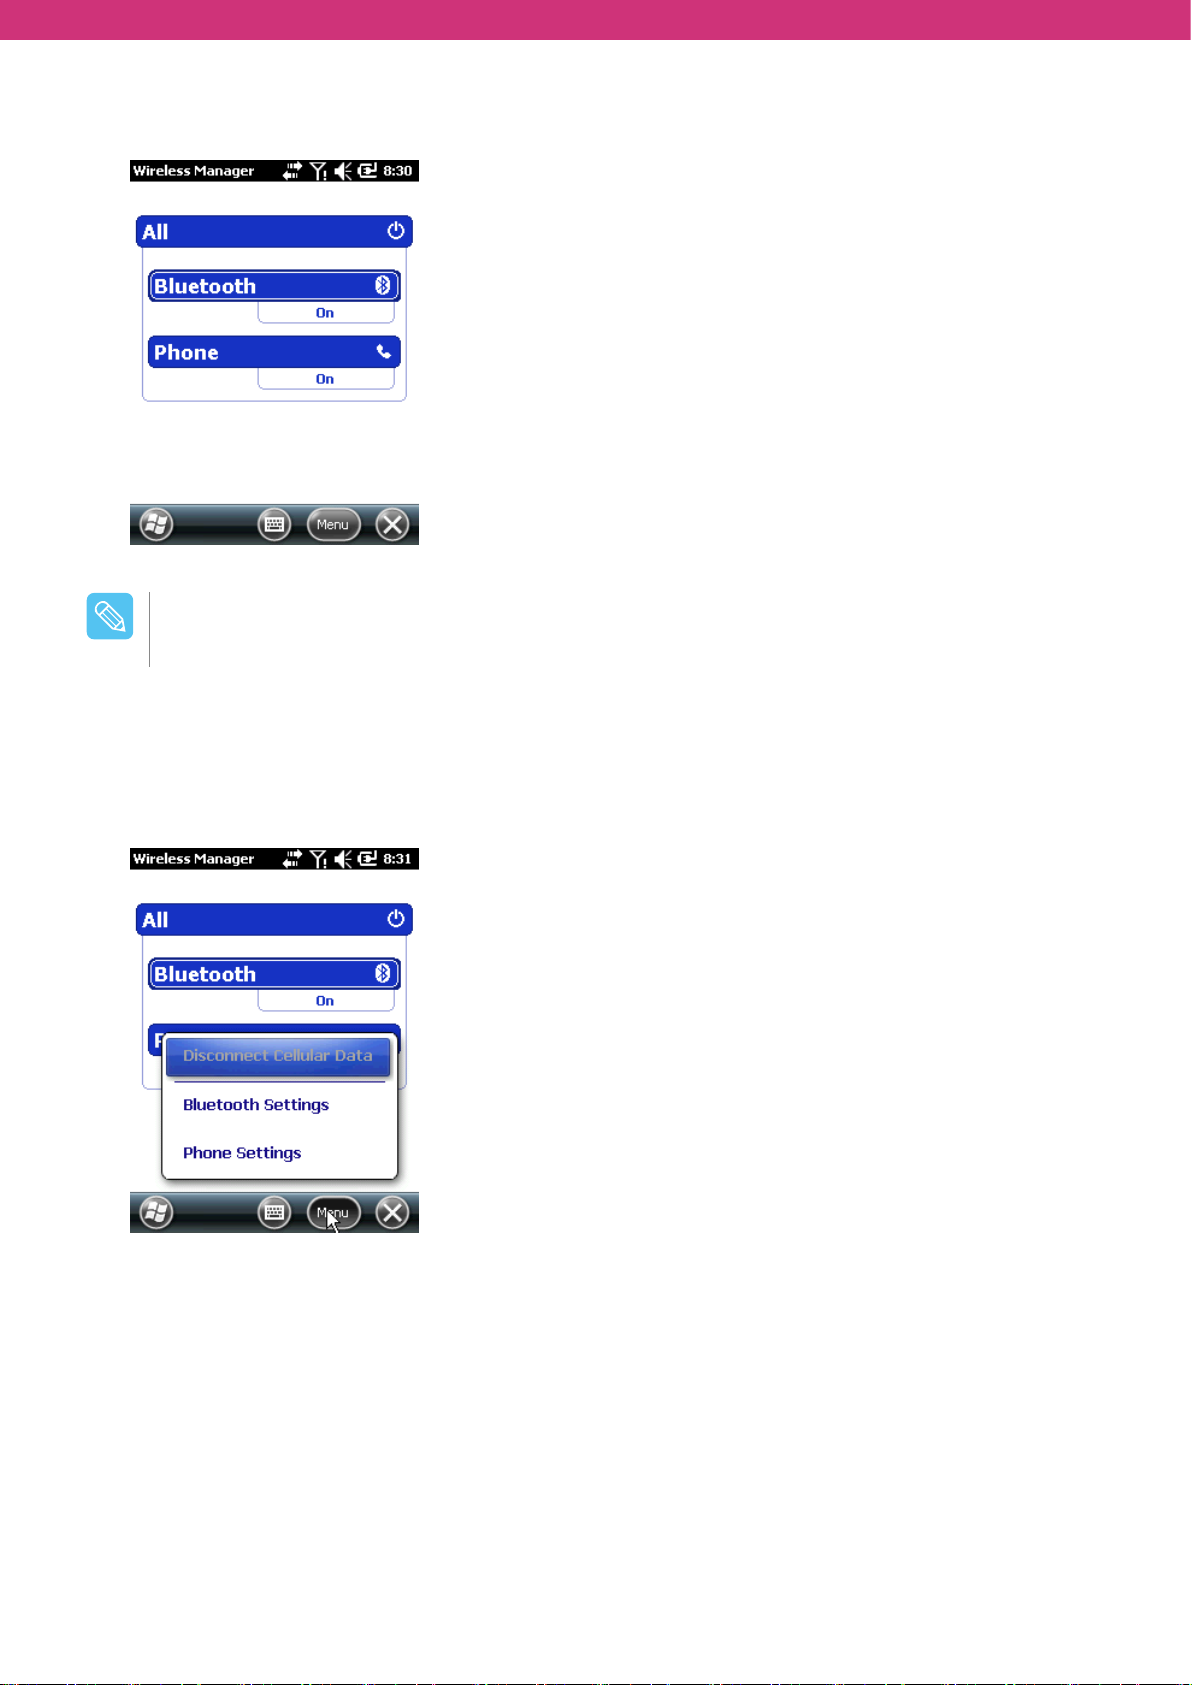
Select Wireless Manager.
• Wireless Connectivity option may differ depending on the composition.
Caution
Press specified button to activate or deactivate wireless network.
Press ALL button to activate or deactivate every wireless connection.
Press Menu to compose connectivity settings.
21
Page 22
MicroSD(Micro Secure Digital) card
1
1
2
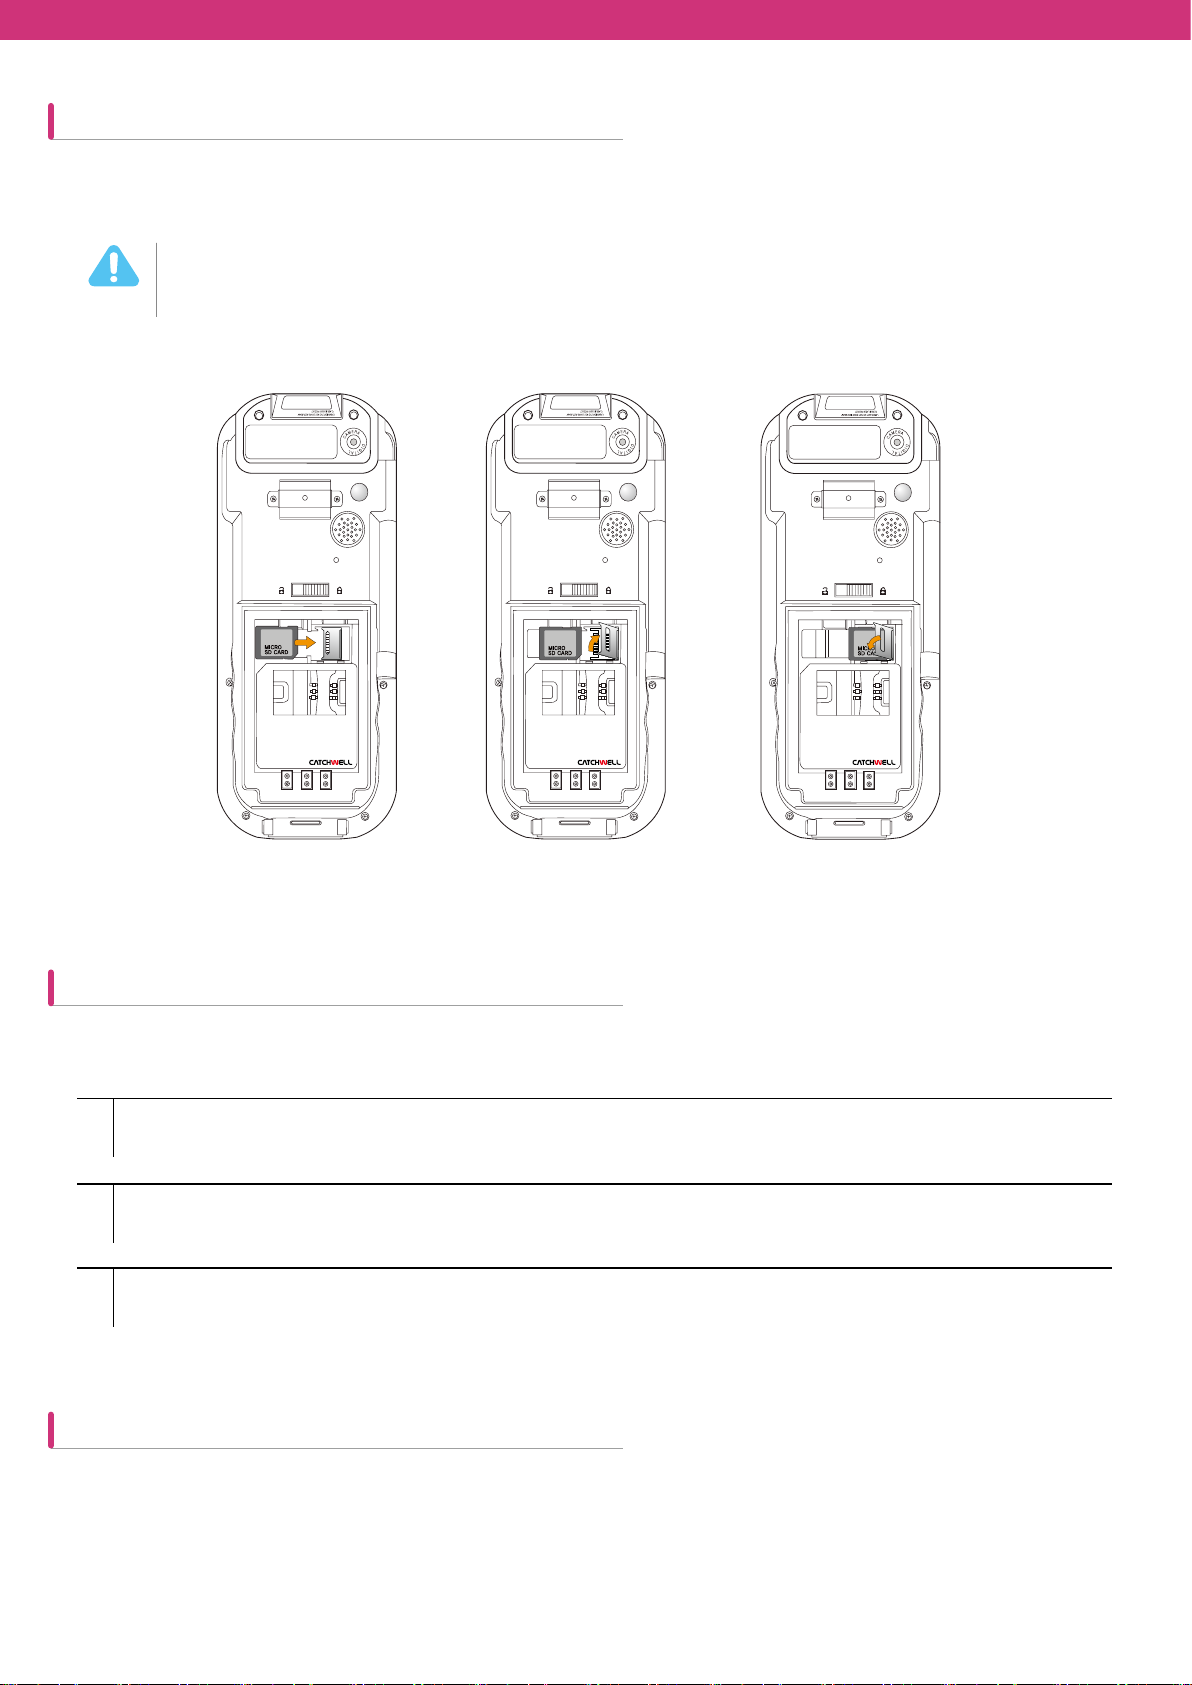
The MicroSD card slot provides an additional saving device function. This slot is located at the bottom of the battery
mounting part.
• To prevent MicroSD from damages is careful about static electricity or other damages. It is
Warning
recommended to follow the appropriate ESD preventive measures for static electricity.
[Installing MicroSD]
Removing MicroSD is in the reverse order.
Adjusting the hand strap
Adjust the hand strap for the convenient use of the device for a long period of time.
Connect the hand strap to the end of the device beneath the battery cover.
1
Adjust the length of the hand strap by passing the Velcro through the hole.
2
Press both sides of the strap together to get fixed.
3
Removing the screen protection cover
The screen protective cover is installed at factory before shipment in order to minimize abrasion that may occur during
shipment.
Remove the screen protective cover before use. After removing it, attach protective film to the screen immediately.
22
Page 23

Chapter 2. Using CW30
Overview ...........................................24
Start Screen ......................................24
Title bar .............................................24
Notifications ..........................................25
Connectivity ..........................................25
Status-indicating icons ..........................26
Audio .....................................................27
Battery level
..........................................27
Home Screen ....................................28
Classic Home Screen........................29
Soft key indicator bar ........................30
Start Screen ......................................30
Settings folder ...................................34
Connections folder ................................35
Personal folder ......................................36
System folder
........................................37
Adjusting Volume ..............................39
Display of battery level ...................... 40
Resetting CW30 ................................ 41
How to perform a soft reset ................... 41
How to perform a hard reset ................. 41
Turning on or off backlight .................42
Locking CW30 ...................................43
Locking with a password
...................43
Function buttons................................45
Data entry..........................................46
Viewing pictures and videos ..............46
Taking a picture .................................47
Video recording .................................48
Page 24
2
Using CW30
Overview
This chapter will explain how to use the buttons of CW30 and status icons, including the basic instructions on turning
on CW 30, resetting, data entry and capture.
The default wireless status of CW30 is as follows:
• Wireless LAN – Off
• Bluetooth – Off
• Phone – Off
Start Screen
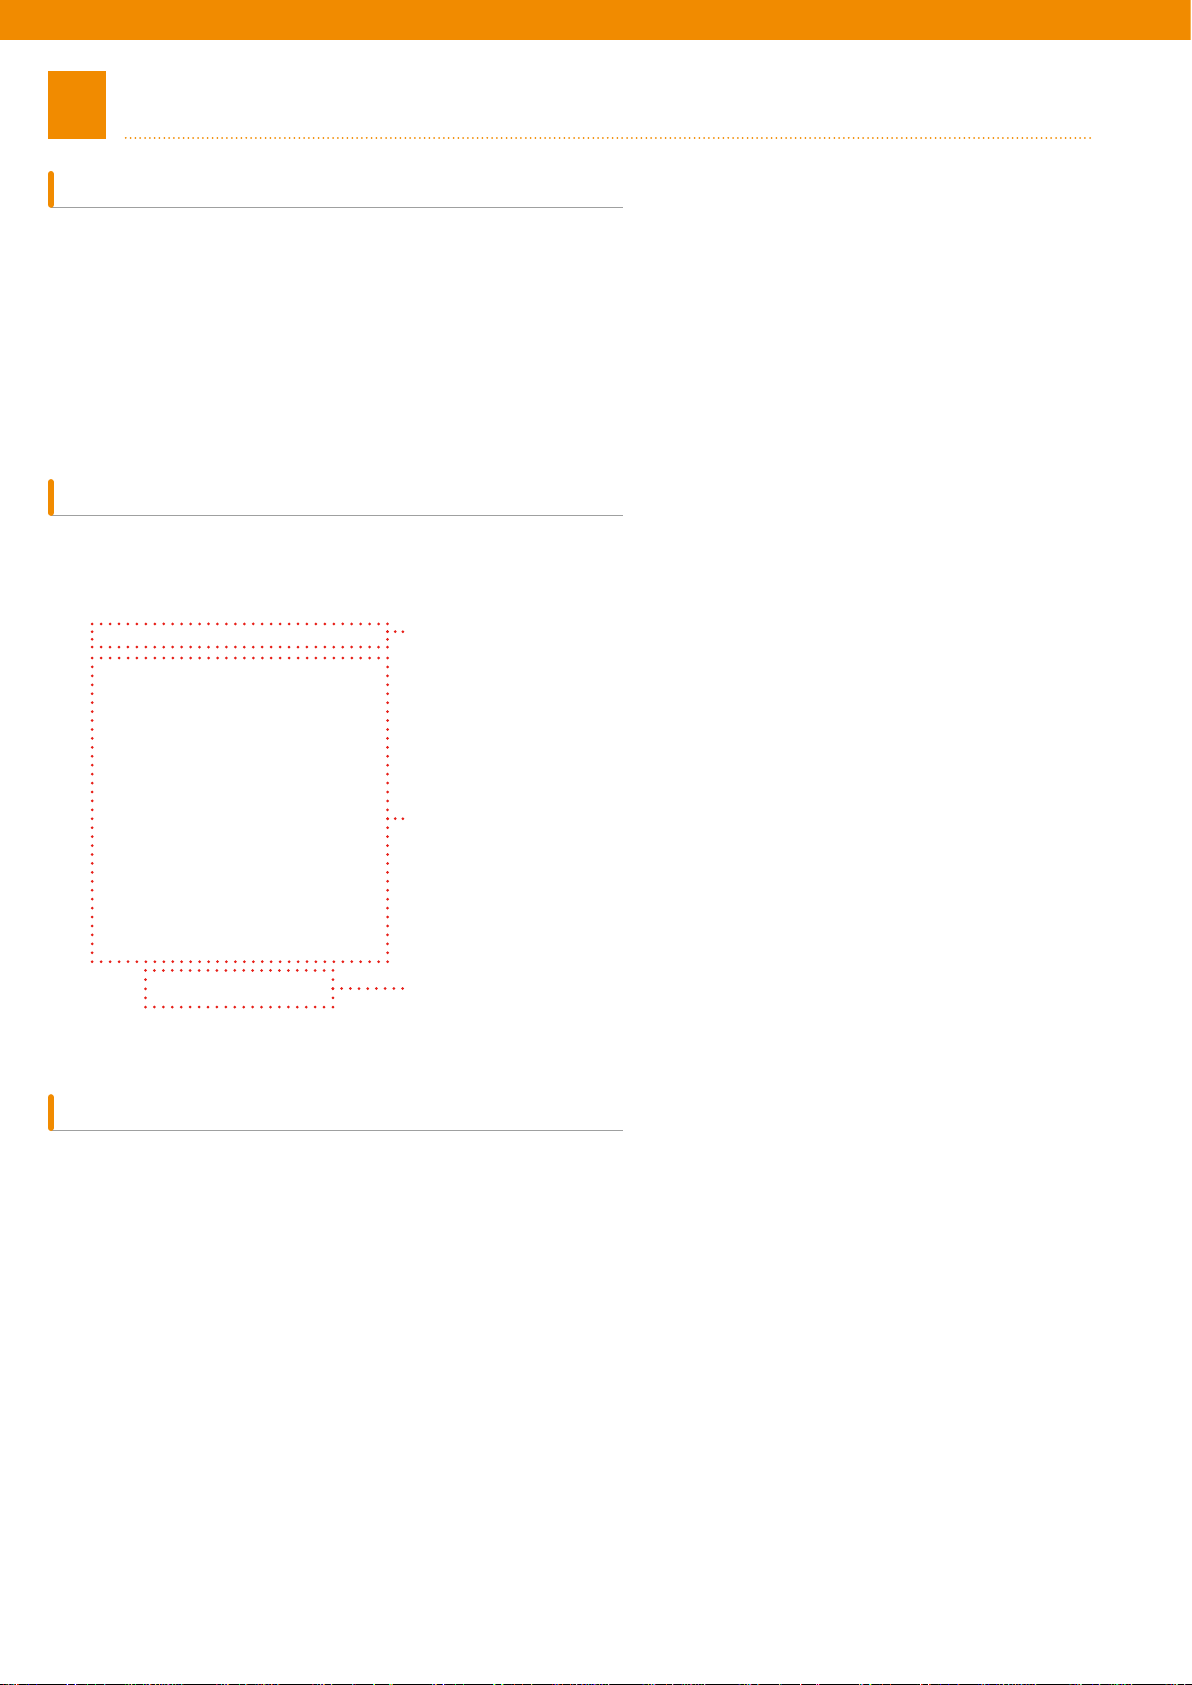
The Home Screen is composed of status bar at the top, the Home Screen in the middle, and soft keys at the bottom.
The descriptions on
those elements are as follows:
Title bar
Title bar
In the title bar
Home Screen
soft key
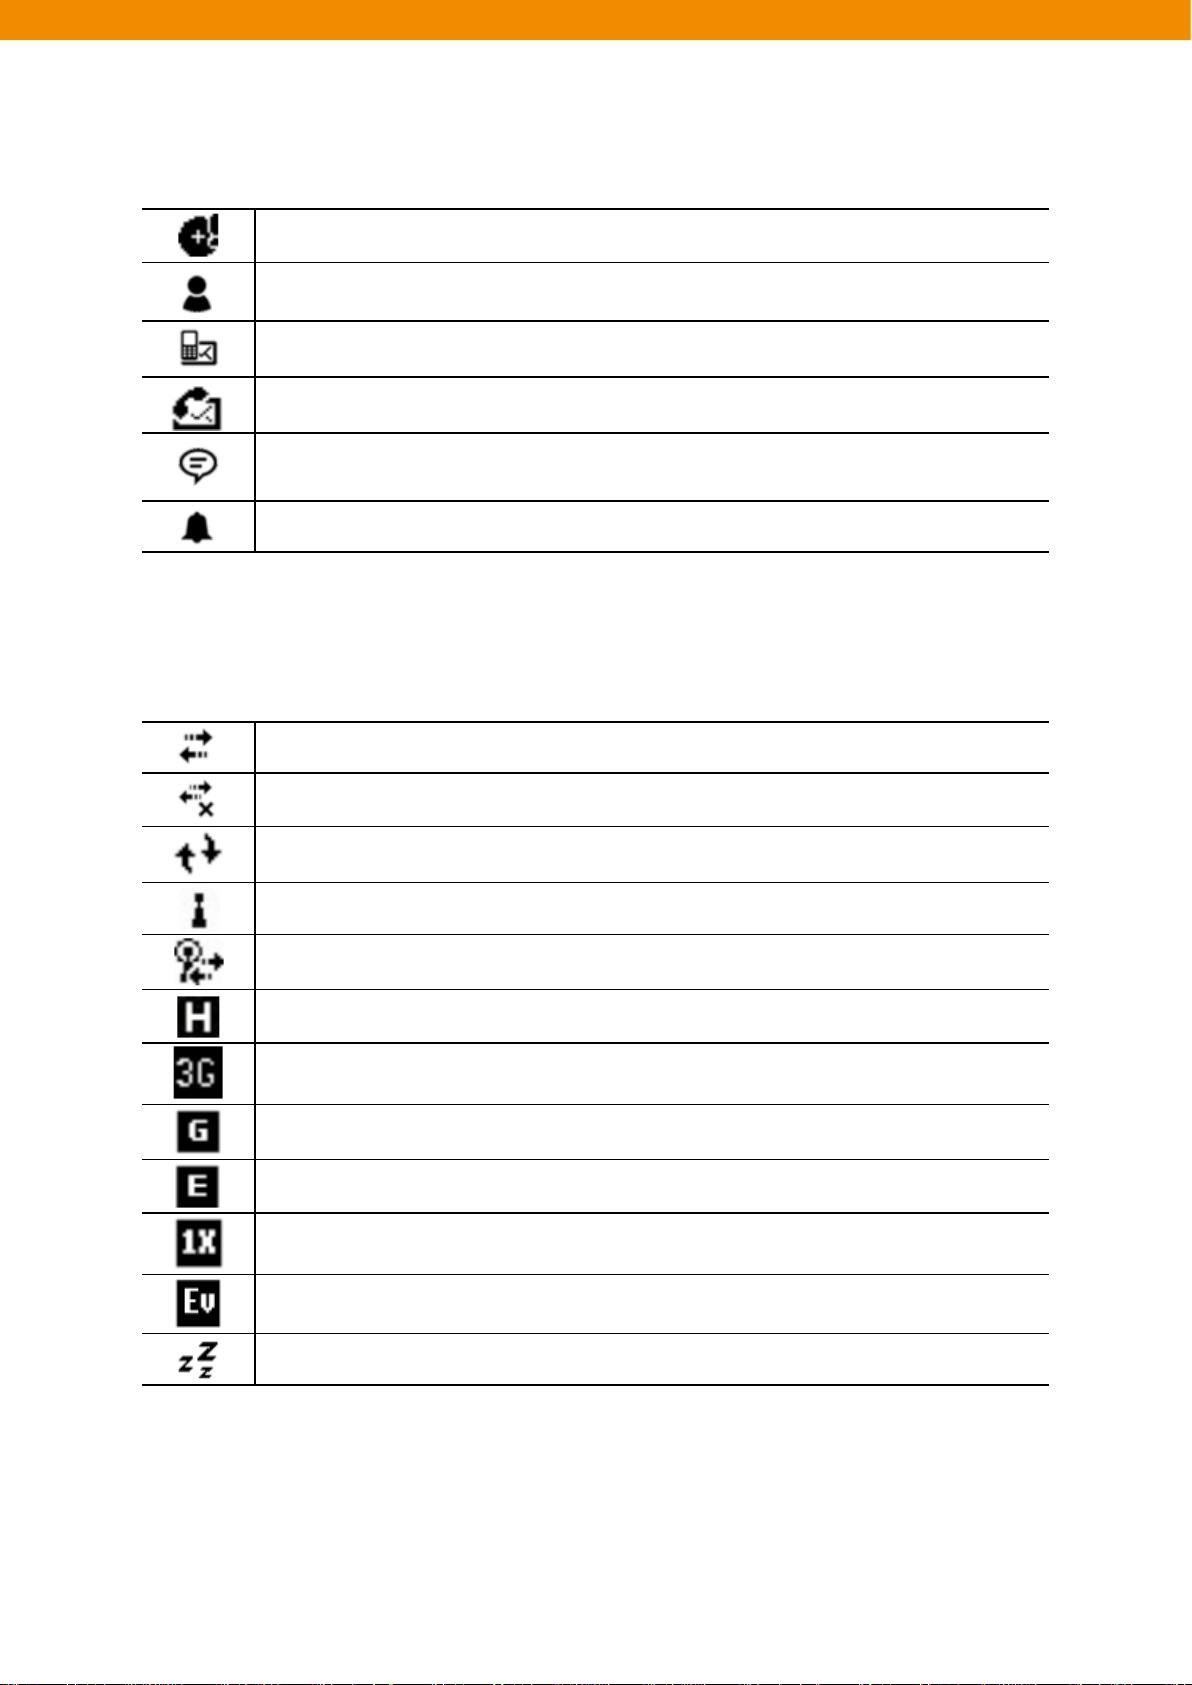
, status-indicating icons may be listed in table 2-1.
Page 25
Notifications
Connectivity
The backup battery is low.
Received more than one instant message.
Received more than one email or text message.
Received more than one voice message.
There are more notifications than indicated. Tapping this icon will display the rest
notifications.
Notifications of upcoming appointments
Table 2-1
Connected.
Not connected.
Synchronization in progress.
Wi-Fi is available.
Wi-Fi is in use.
HSDPA is available.
3G is available.
GPRS is available.
EGPRS is available.
1XRTT is available.
EVDO is available.
Idling state or no data received during EVDO connection
Table 2-1
25
Page 26
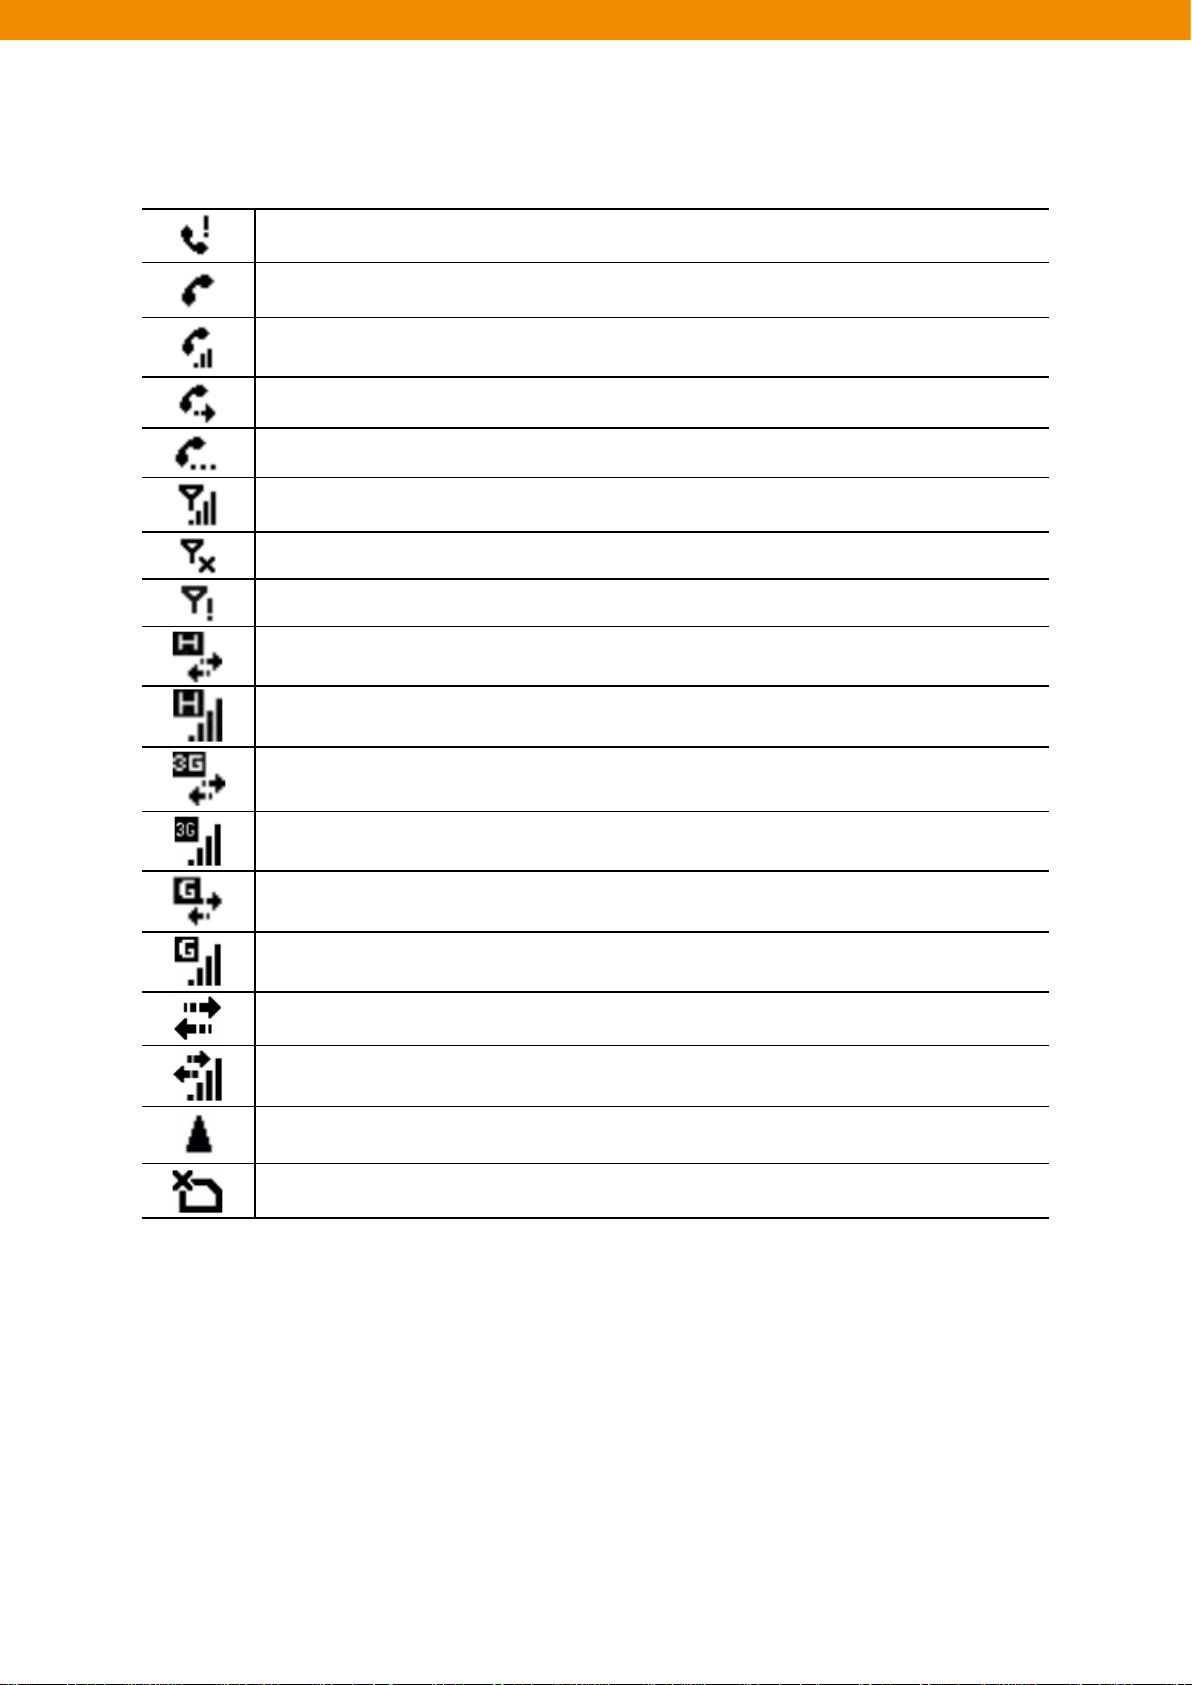
Status-indicating icons
There are missed calls.
Dialing without SIM card.
Call is in progress.
Calls are forwarded.
Call on hold
Antenna/Signal icons: Connected to a wireless network and signal strength is okay.
Antenna/Signal icon: Not connected to a wireless network
Antenna/Signal icon: No service or signal search is not available
Connecting to HSDPA.
HSDPA is in use.
Connecting to 3G.
3G is in use.
Connecting to GPRS.
GPRS is in use.
Connecting to EVDO.
EVDO is in use.
Roaming in progress.
No SIM card installed.
Table 2-1
26 27
Page 27
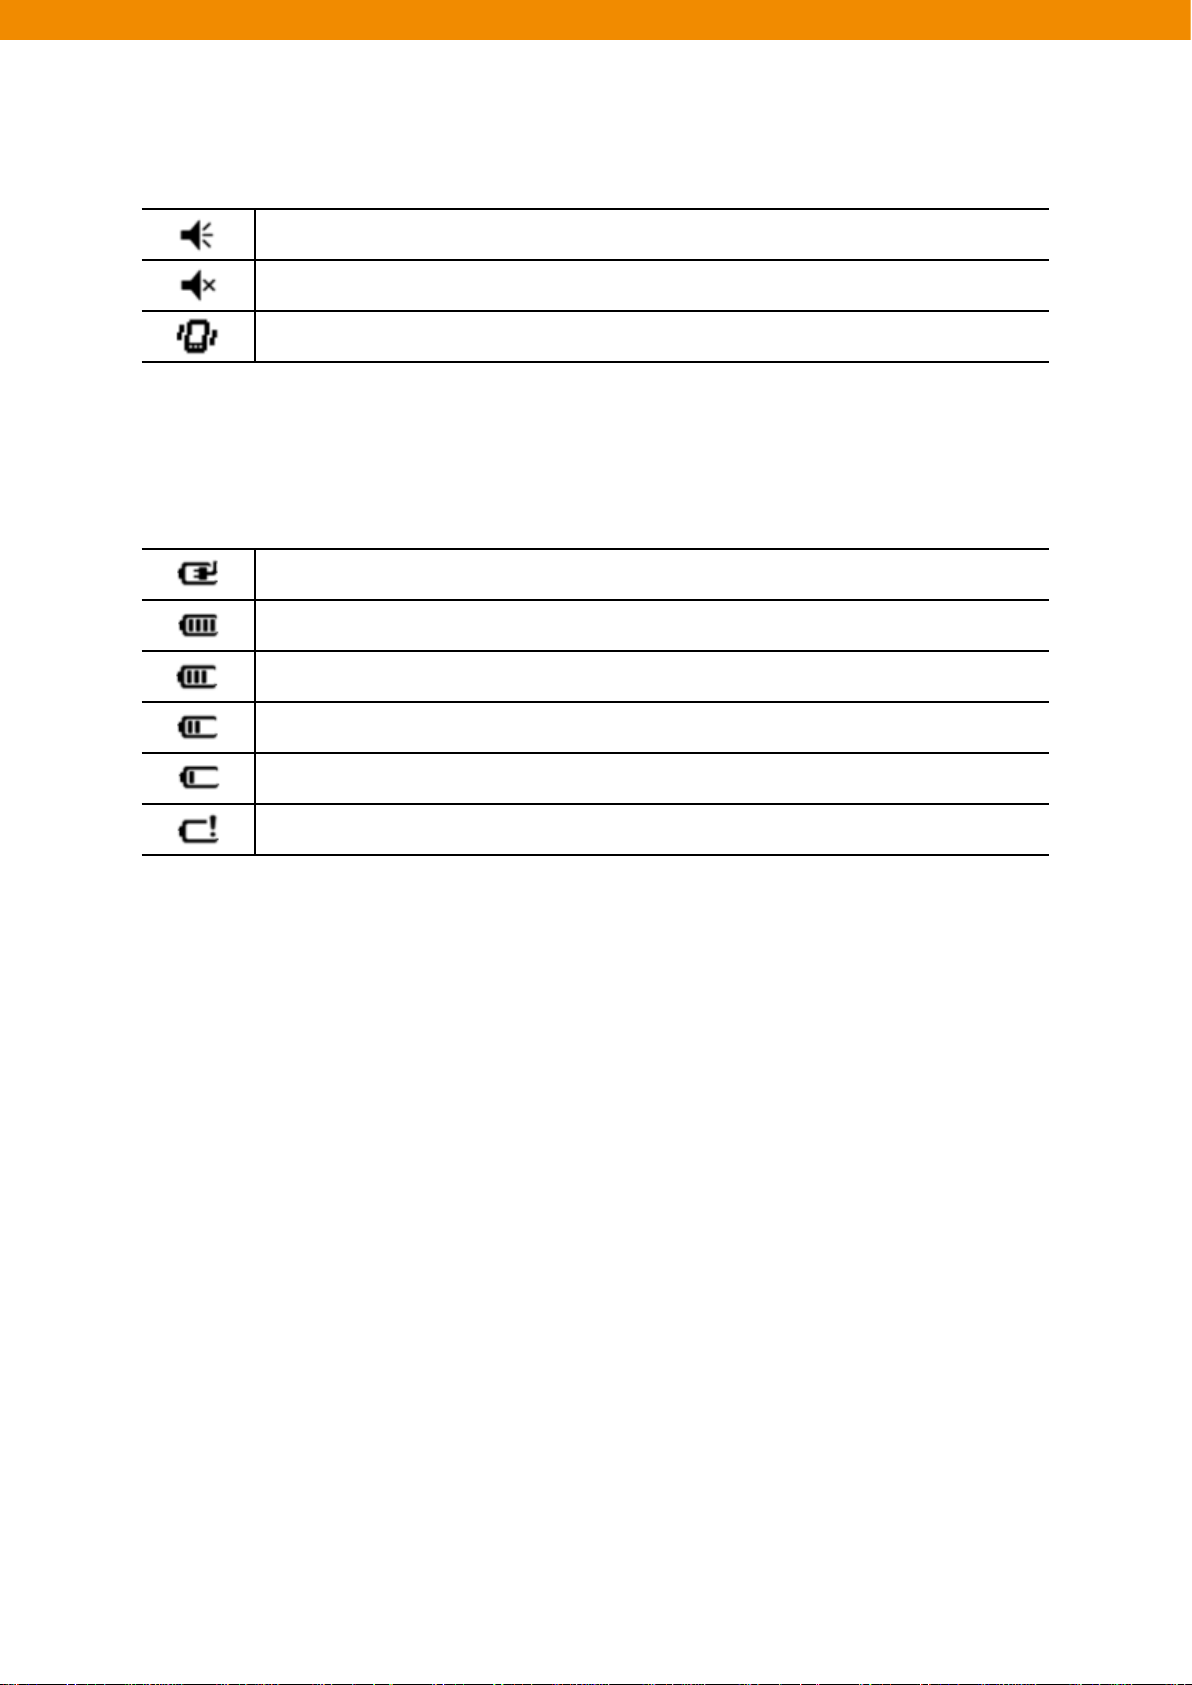
Audio
Battery level
All sound is on
All sound is off
Vibration mode is on
Table 2-1
Main battery charging.
Main battery fully charged
Main battery charged enough
Main battery is half full
Main battery is low
Main battery is very low
Table 2-1
27
Page 28
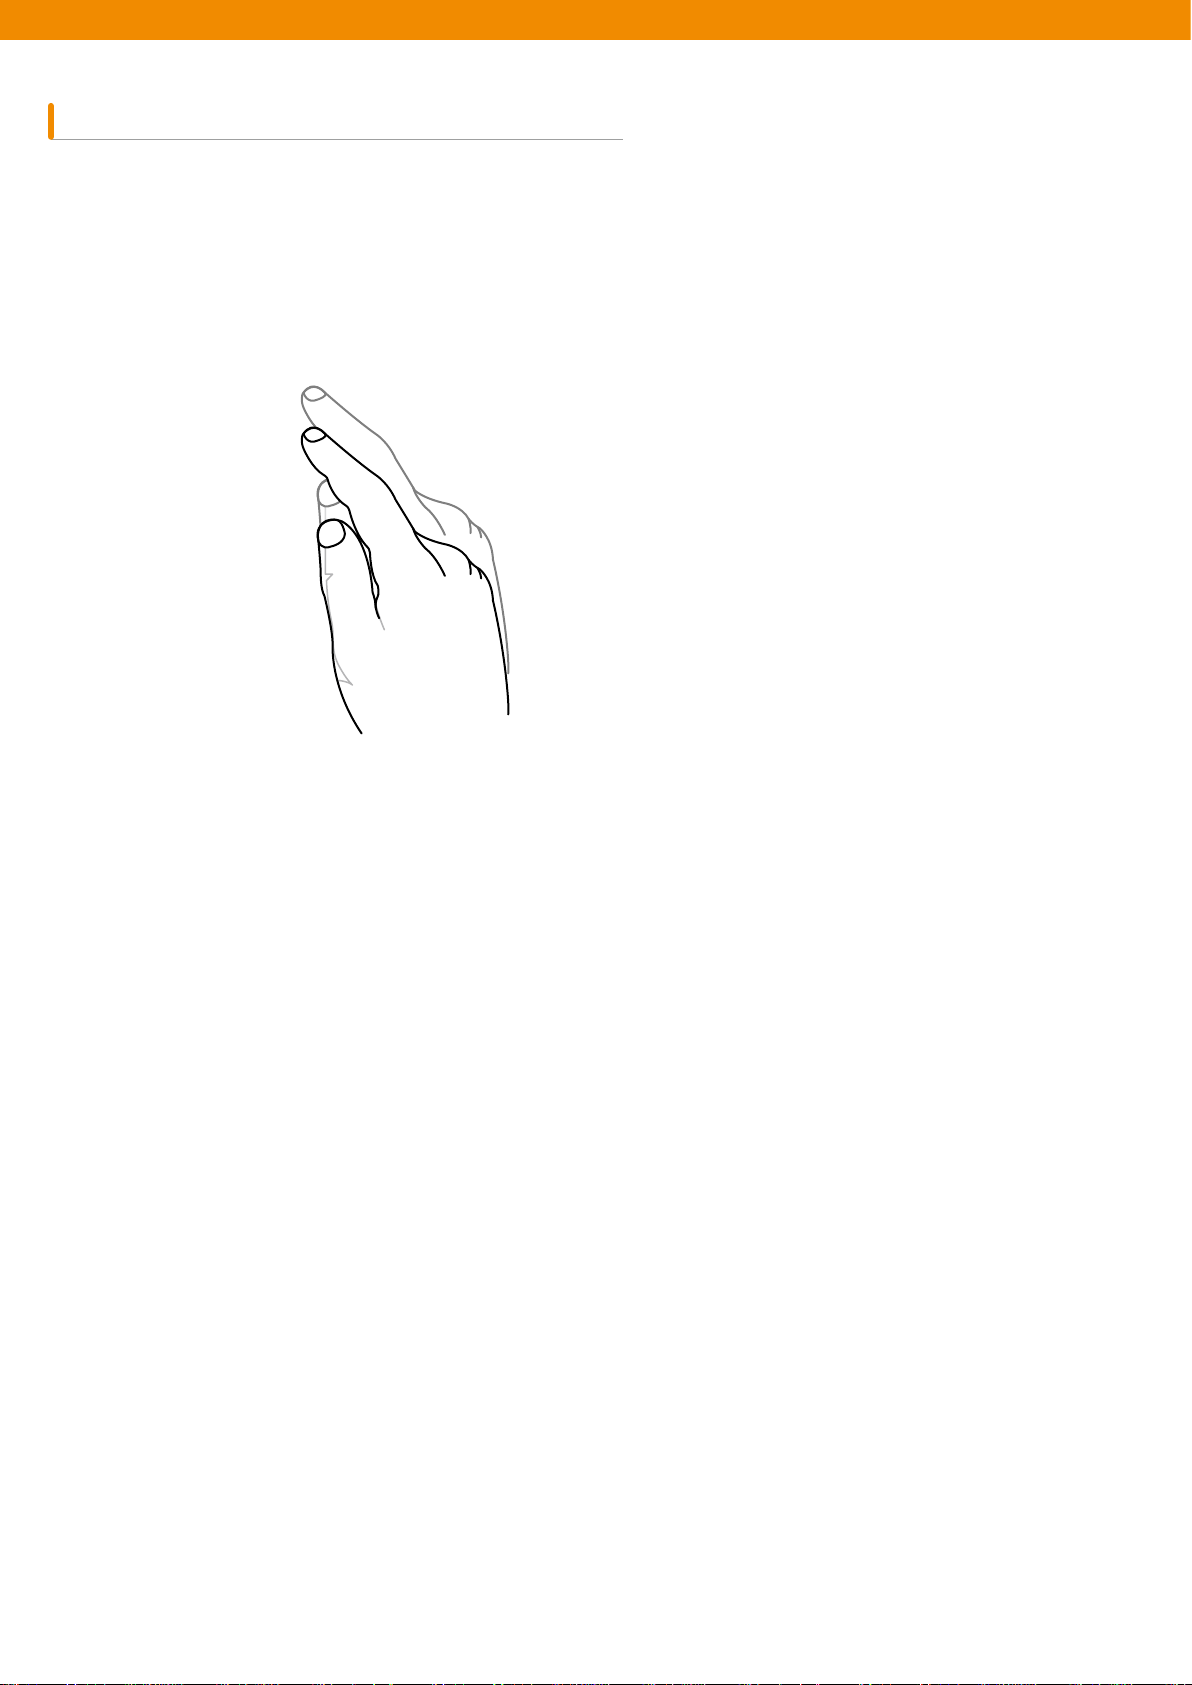
Home Screen
The Home Screen showing the list of applications and information status indicating bar is scrollable. The application
and its additional information are highlighted in Information status bar.
The home screen moves up and down if you scroll the screen up and down while pressing and holding on the screen
with your finger. And the information on the selected application will be displayed on the status bar as the names
below information status indicating bar moves.
[Scrolling the Home Screen up and down with the finger]
In addition, you can move your finger up and down by skipping the names of applications while pressing and holding
on the information status indicating bar. When you stop holding on your finger on the screen, the information status
display bar and the name of the application will be displayed at the center of the screen.
[Moving information status display bar] [An example of information status display bar]
To customize Ho
the
Appearance tab and change the screen properties using the Property tab.
me Screen, tap Start > Setting > Home icon. You can customize the background of the screen using
28 29
Page 29

Classic Home Screen
You can change the Home Screen into the classic layouts used for Windows Mobile 6.5.
[Home Screen in classic layout]
To change the screen to the classic layouts, go to Start > Setting > Home tab.
[Setting Home Screen]
Uncheck the checkbox that was pre-checked by Windows and select other options.
Then press OK.
Note: Task bar is only available in the classic layout.
29
Page 30
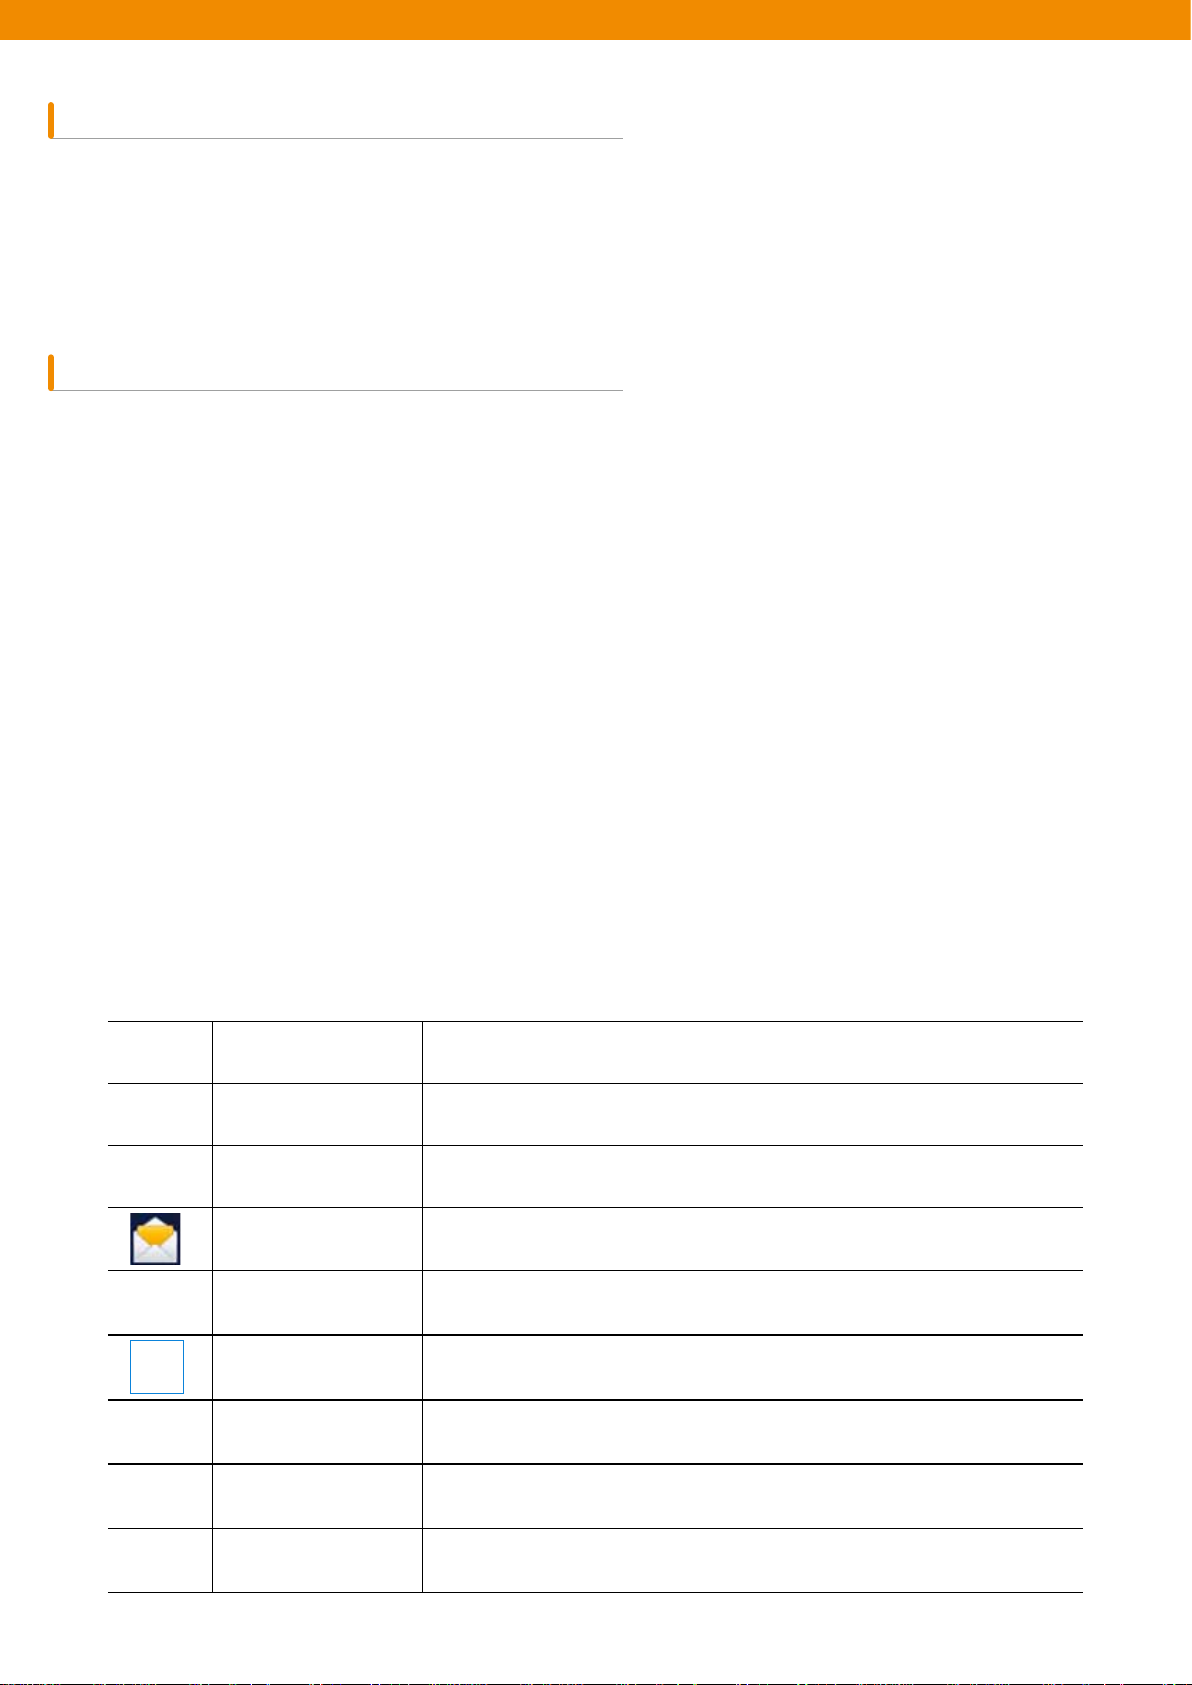
Soft key indicator bar
The soft key indicator bar is displayed at the bottom of the screen, and there are two post-key buttons. This button
shows a user a task and menu depending on situations and can be dynamically changed. For example, the soft key
of viewing the list of Contacts is New menu. If a user starts to create a new contact on that screen, that soft key will be
changed to Complete and Menu.
Start Screen
The user applications and folders are displayed on the Start Screen. Figure 203 shows basic applications and folders
displayed on the Start Screen.
[Program and folders at Start scrren][Start screen]
Home Closing Start menu and displaying the Home Screen.
Phone
Text Sending and receiving SMS text messages.
E-mail Sending and receiving emails.
Contacts Sharing contacts with friends and peers.
Internet Explorer
Calendar Managing appointments and request meetings.
Settings Opening the configuration folder. See Configuration Folder in page 10.
Making calls, Answering calls, changing calls, and configuring call
conference.
Browsing web and WAP sites and downloading new programs and files
from the Internet.
Getting Started Launching Start applications.
30 31
Page 31
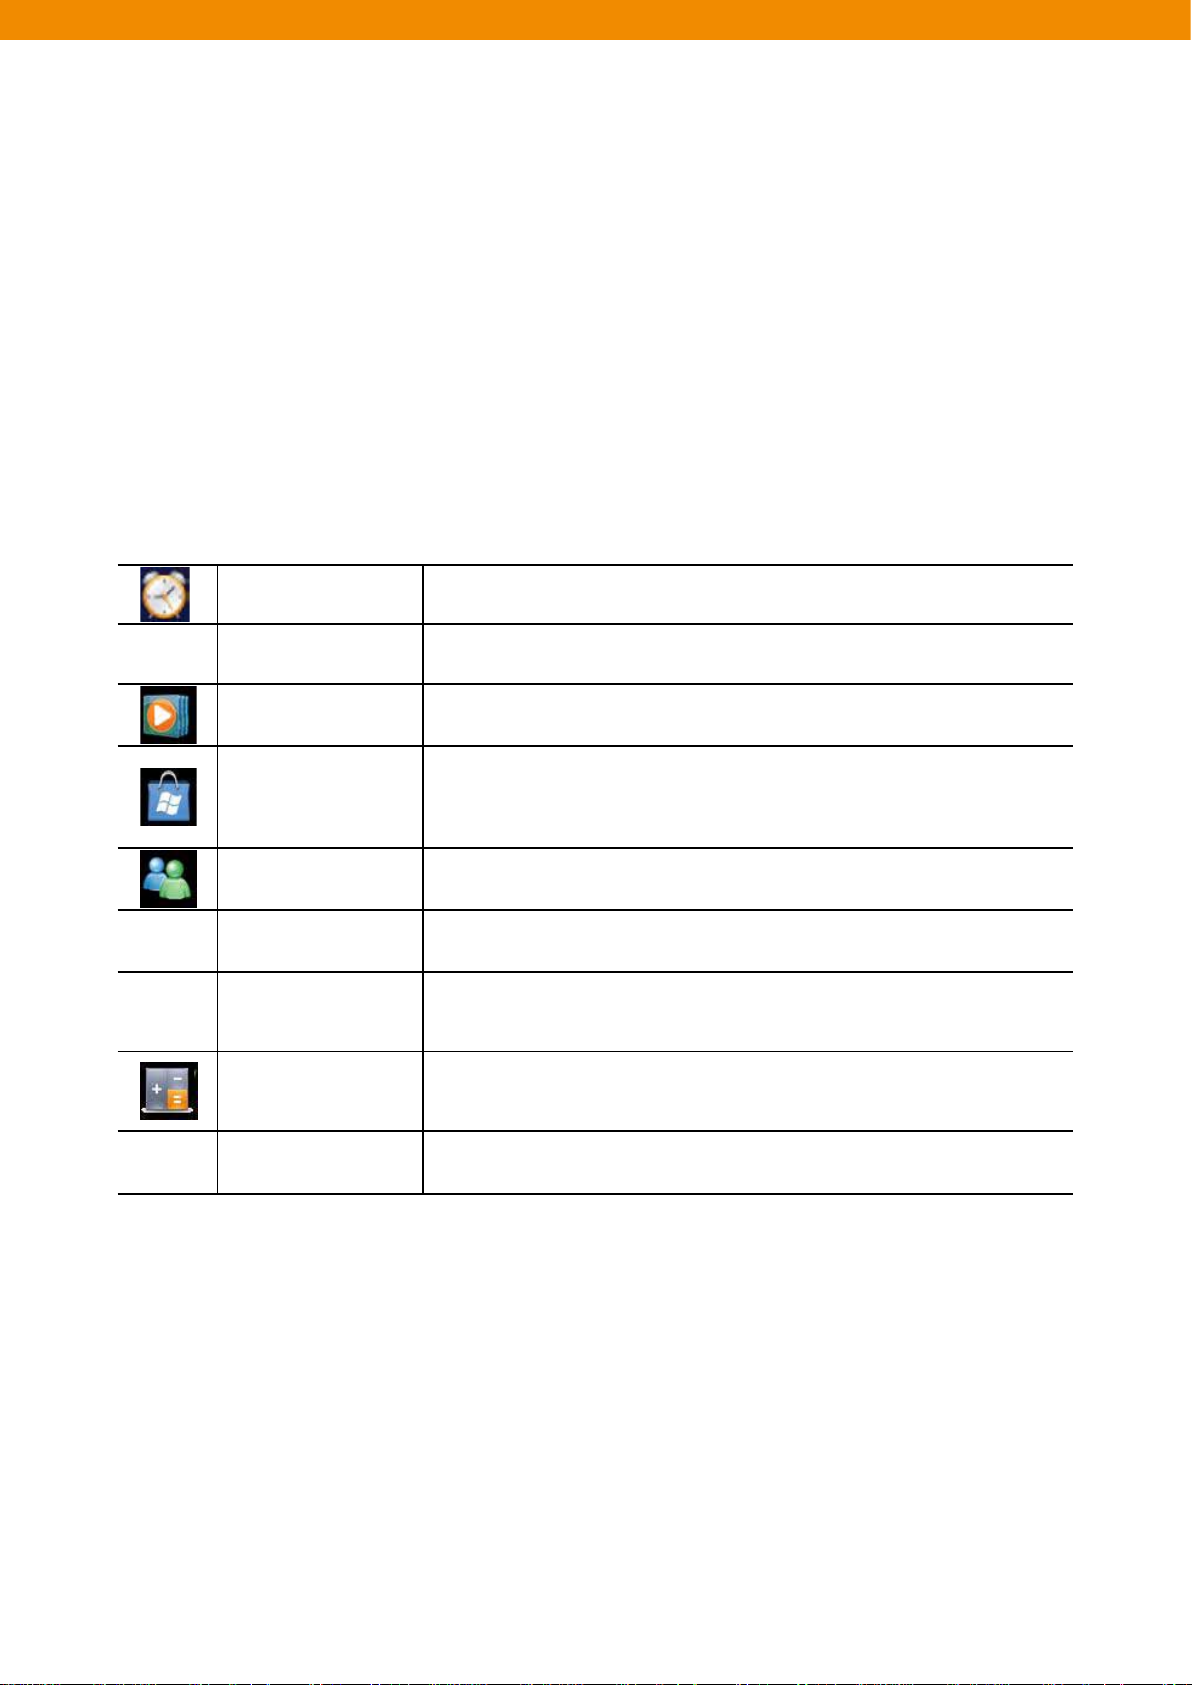
Alarms Setting local time of each country and alarms
Picture & videos Viewing and managing pictures, animation, gif, and video files.
Windows Media Playing audio and video files.
Purchasing or downloading applications from the Marketplace. You
Marketplace
Messenger A mobile version of Windows Live Messenger.
MSN Weather Checking nearby weather forecast.
can reconnect to it after upgrading via the Internet using ActiveSync, if
it is your first time use.
Windows Live
Calculator
MSN Money Manage finances of a user
If you want to search for information on the web, use the Windows
Live™.
Performing basic arithmetic calculations including addition,
subtraction, multiplication, and division
31
Page 32
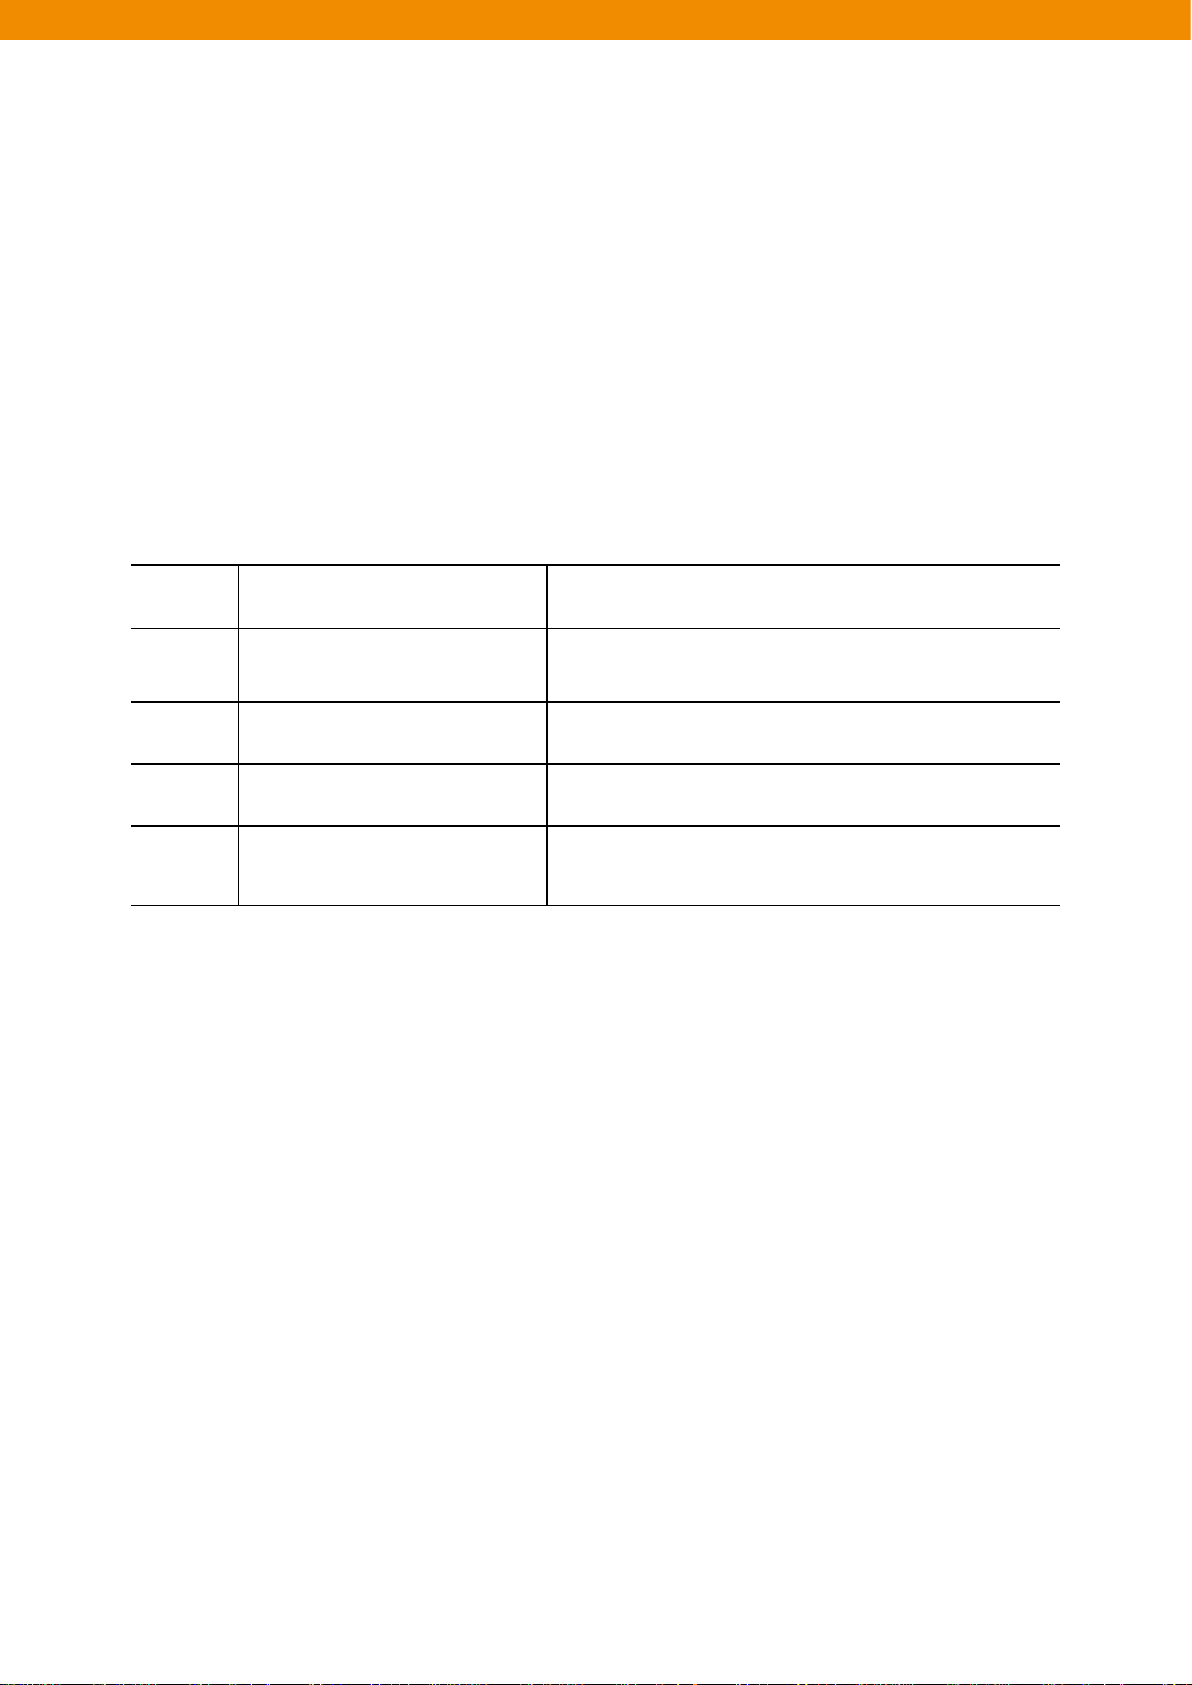
Game Launching games.
Notes
Tasks Managing tasks
File Explorer Configuring and managing files in the device
Internet Sharing Share the Internet connection using CW30
Creating handwriting memos or pictures or voice
recoding files.
32 33
Page 33
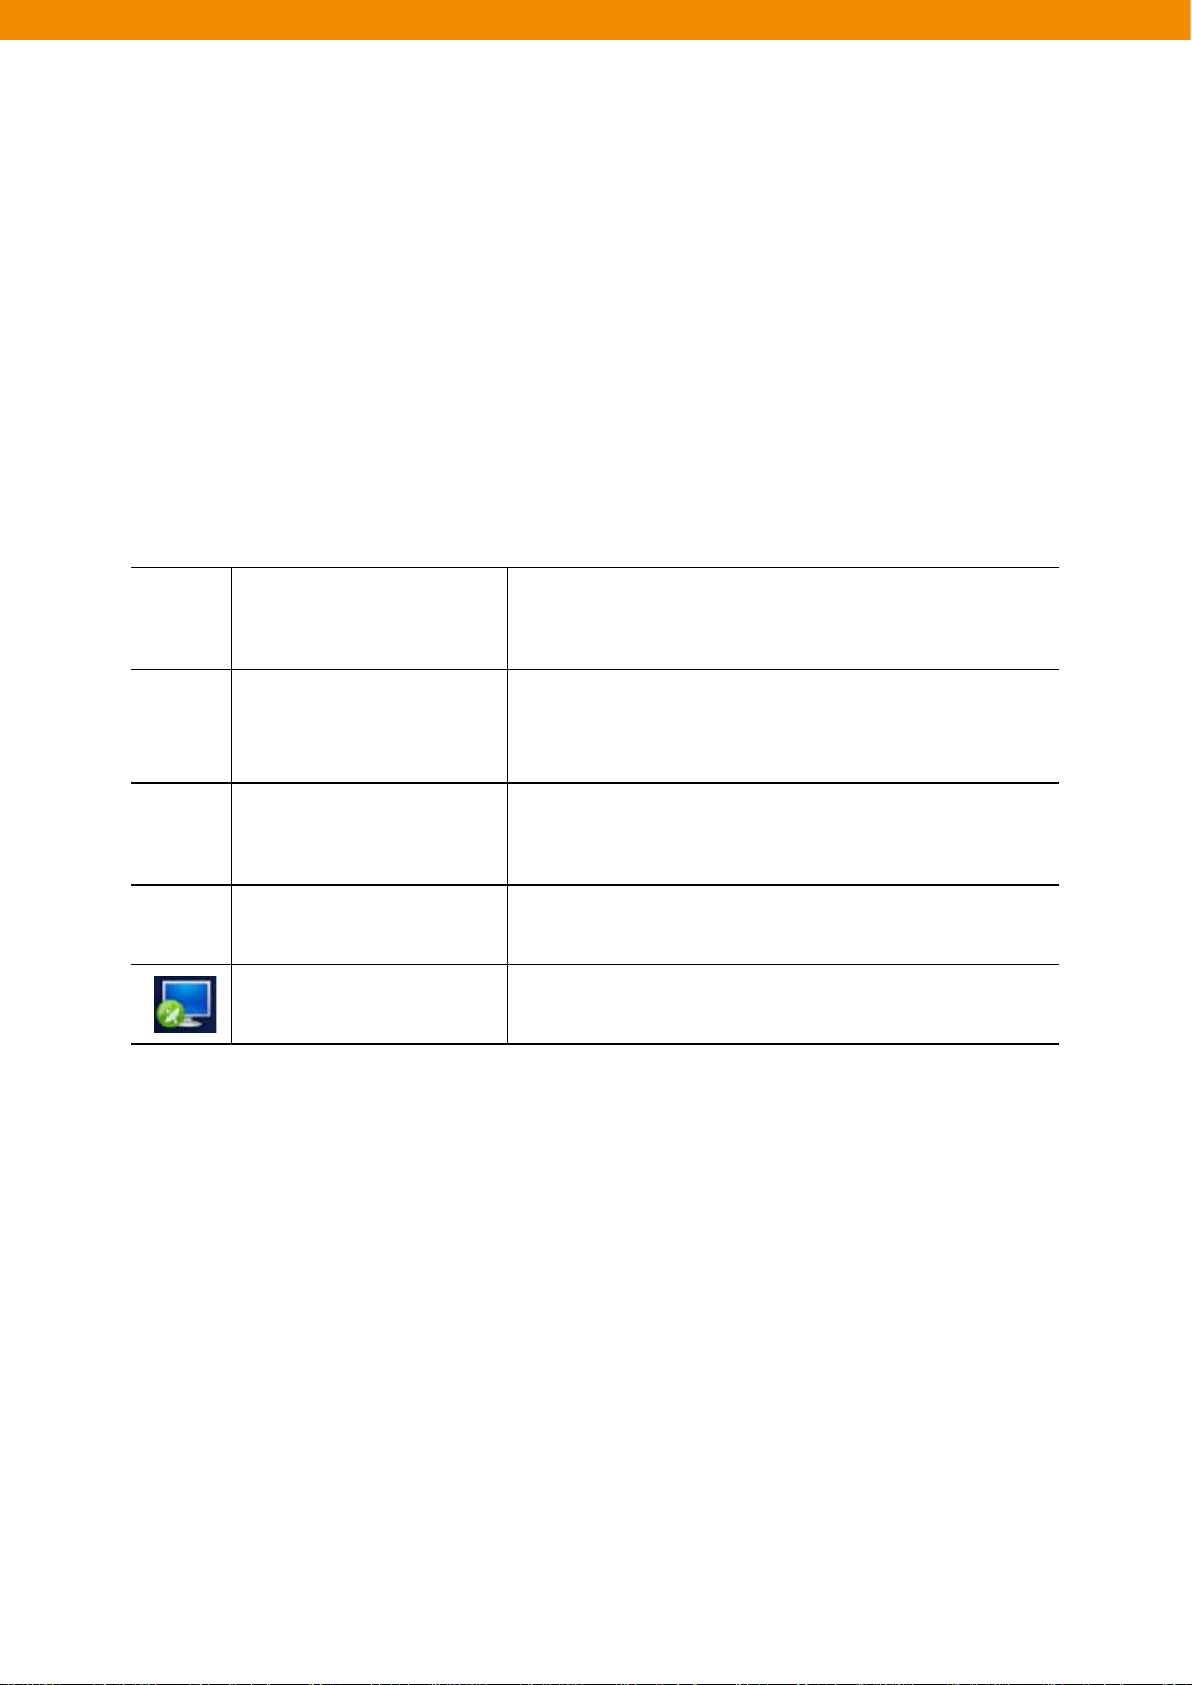
Active Sync
Task Manager
Contact Search
Synchronizing information between CW30 and a host
computer or Exchange
Viewing memory usage and CPU allocation status. You can
end running processes using this. For further information,
please refer to user’s manual of Microsoft application for
Windows Mobile 6.
Searching for contacts, data, or other information in CW30.
For further information, please refer to user’s manual of
Microsoft applications for Windows Mobile 6.
Help
Remote Desktop Mobile
Displaying online help on the current screen or program.
Remote Desktop Mobile : Run Remote Desktop Mobile
33
Page 34
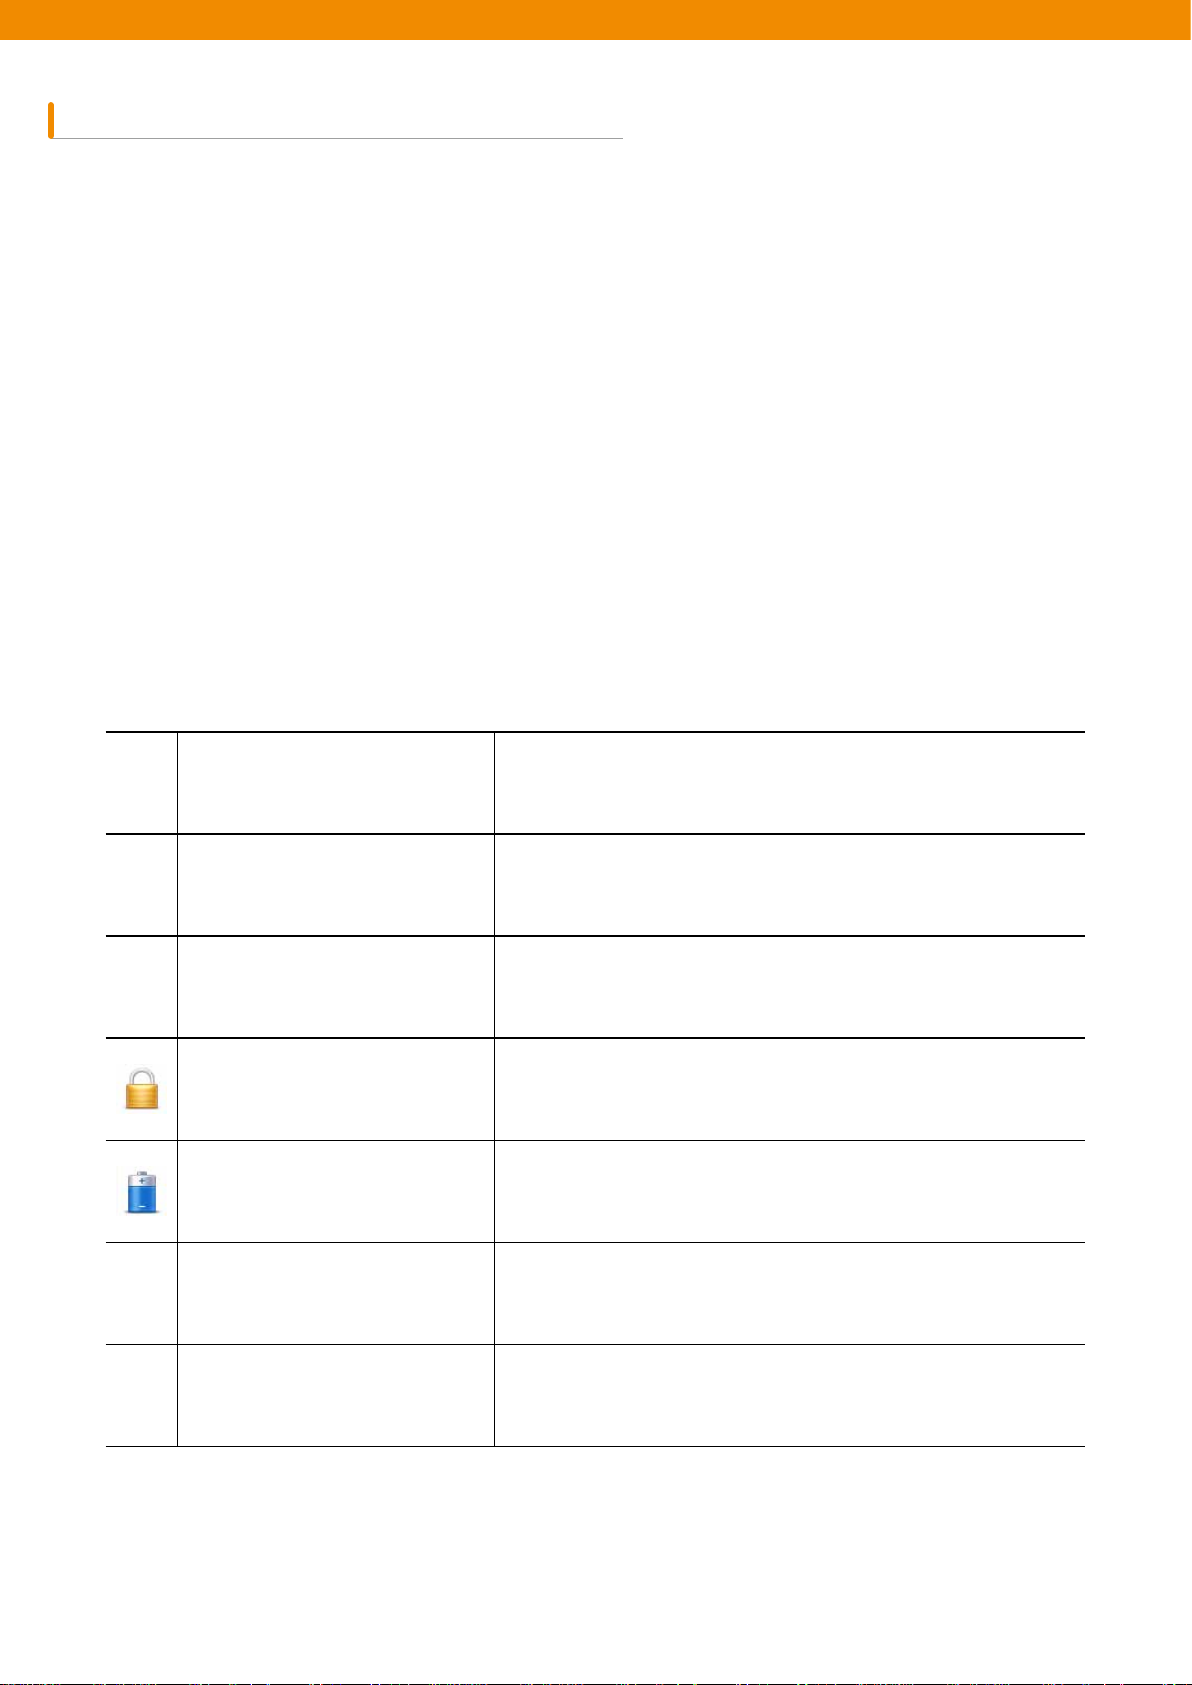
Settings folder
Pre-installed configuration applications are listed in Table 2-4. Choose Start > Settings to open Settings folder.
[Table 2-4. Configuration applications inside the Settings folder]
Bluetooth
Clock & Alarms
Home
Locks Setting a password for CW30.
Power
Sounds & Notifications
Opening Bluetooth applications, setting CW30 to visible mode,
and searching for other Bluetooth devices within range.
Setting the clock of device to the data and time of local
residence or if you are on travel, you can set them to the
corresponding area. You can set alarm for specific date and
time.
Customizing the appearance of the Home Screen and
displayed information on the screen.
Checking remaining battery power and saving power by setting
up the expiry time of display.
Selecting sounds for various events and alarms and set how to
alarm for each event.
Connections Connection applications are contained (see the below).
34 35
Page 35
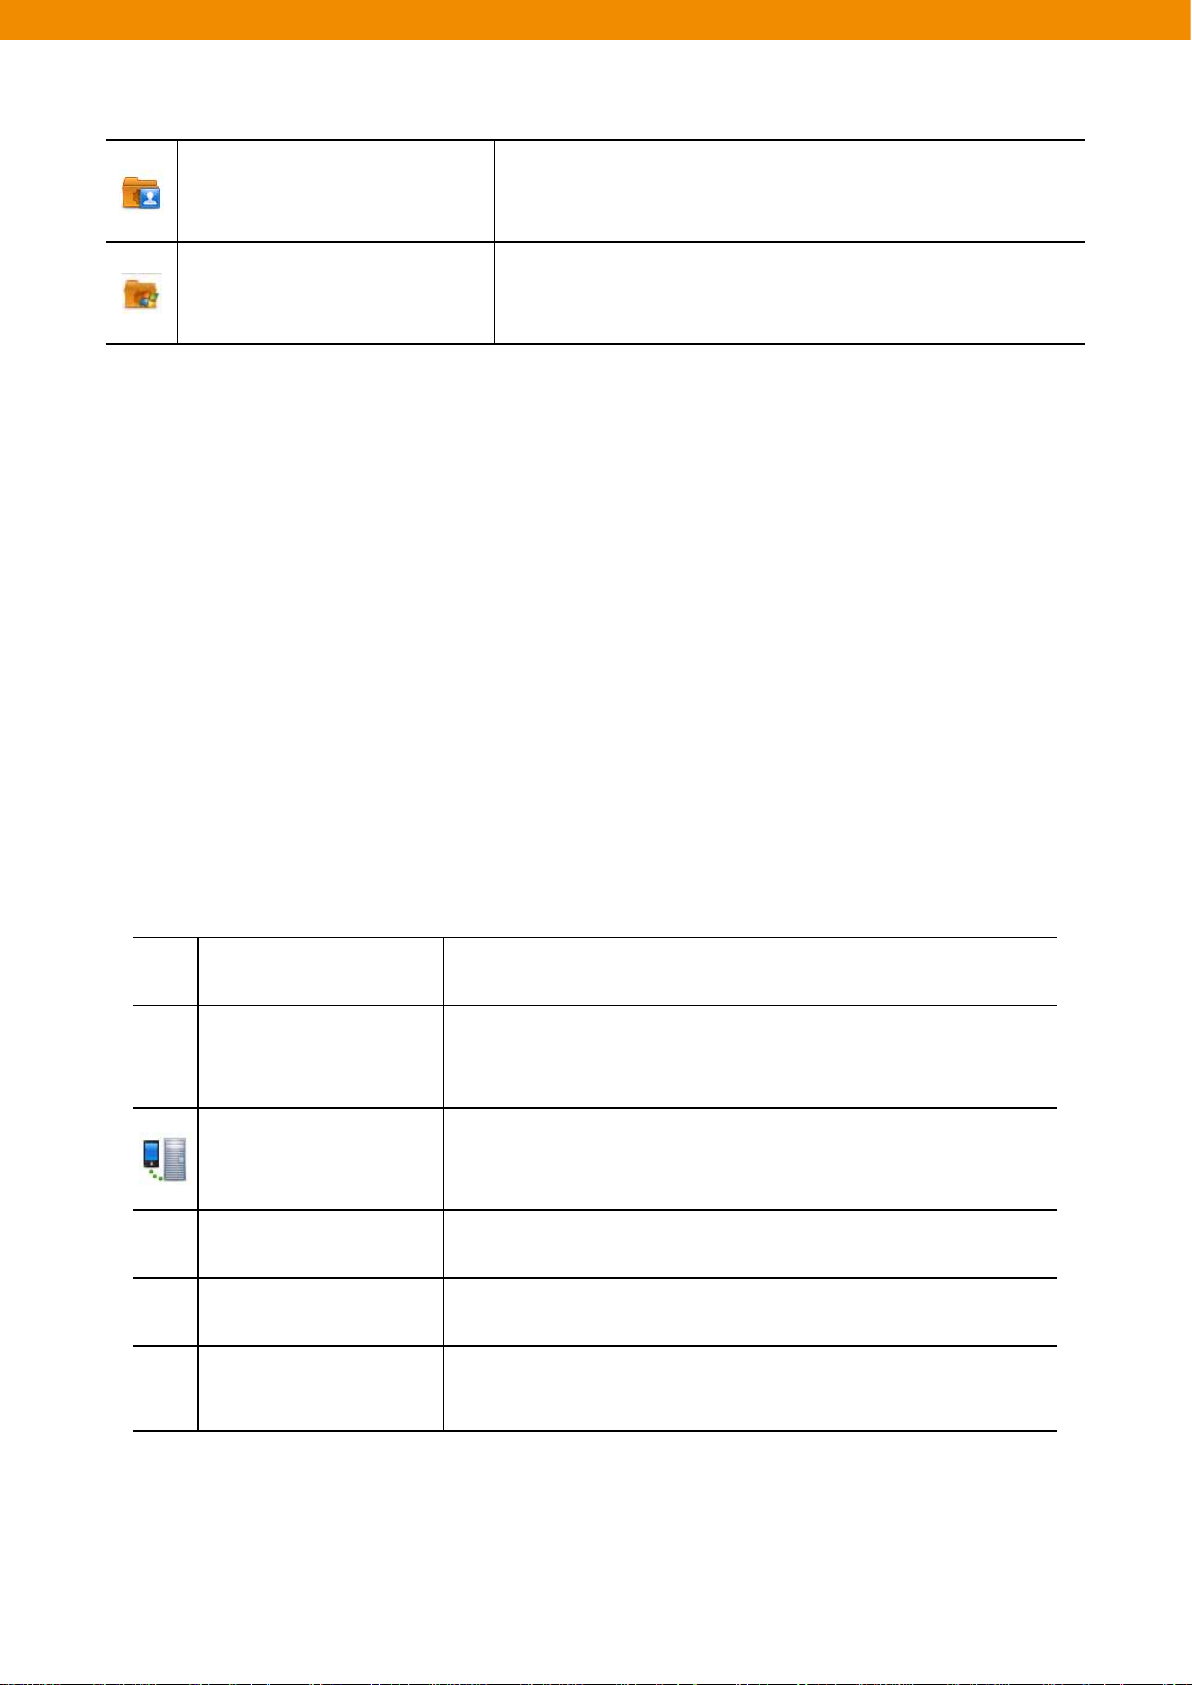
Personal Personal applications are contained (see the below).
System System applications are contained (see the below).
Connections folder
Beam A feature related to IrDA (however, it is not supported on CW30)
In order for the device to connect to the Internet or private local
Connections
Domain Enroll
USB – PC Activating or inactivating and enhanced network connection.
Wi-Fi
Wireless Manager
networks by configuring more than of connection types – Dial-up,
GPRS, Bluetooth, Modem, etc.
For the management and security of a registered device, enroll
the device in Active Directory. For further information, refer to
user’s manual of Microsoft applications for Windows Mobile 6.
Configuring a wireless network connection and user-defined
settings.
Activating or inactivating a wireless connection of CW30 and
configuring user-defined Wi-Fi or Bluetooth settings.
35
Page 36
Personal folder
Owner Information Entering CW30 owner’s information.
Phone Configures the phone settings
36 37
Page 37
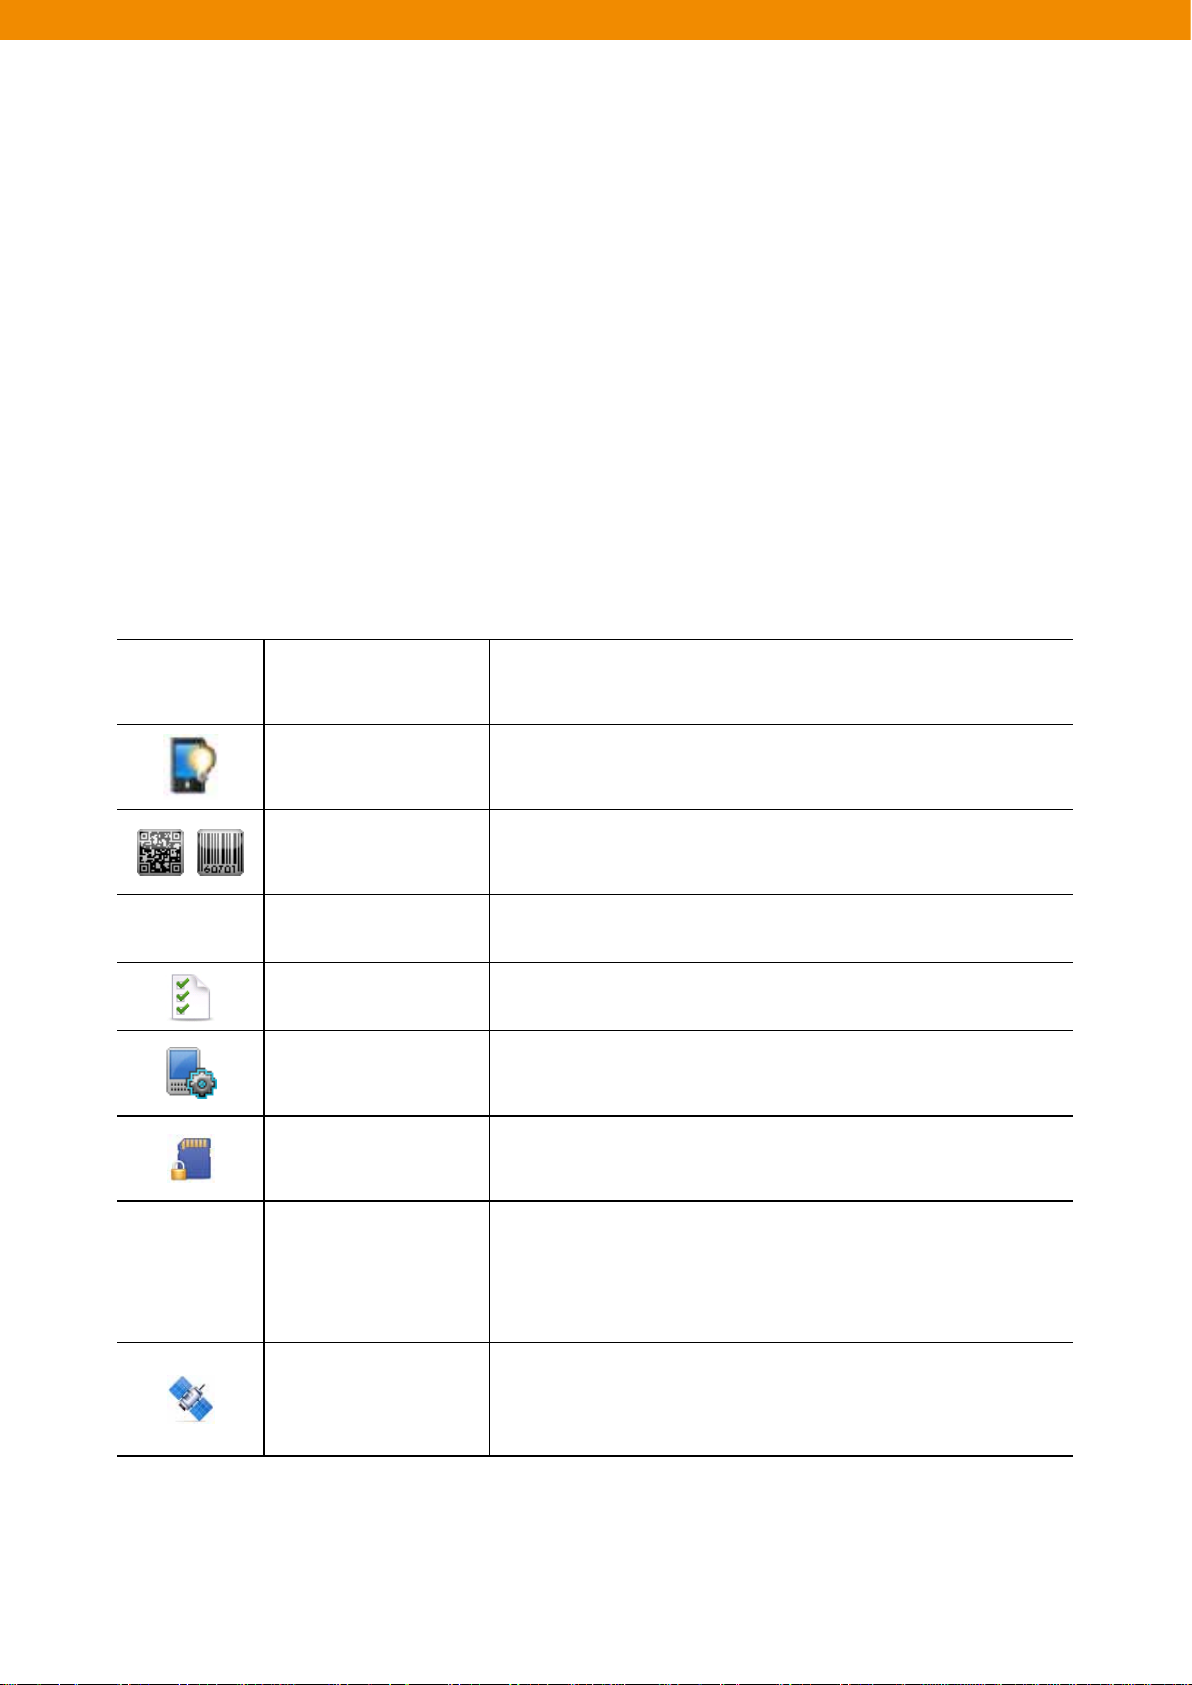
System folder
About
Backlight
/
Barcode
Certificates Verifying the certificate information installed in CW30.
Customer Feedback
Device Profile
Encryption
Error Reporting
Viewing the basic system information such as the version of
Windows Mobile R, the type of processor used for CW30, etc.
Setting the expiry time of display backlight and adjusting
brightness.
Setting Barcode message modes, gun modes, decoding
sounds, etc.
Submitting a user’s comment on Windows Mobile 6 software.
Verifying the build information of CW30 and the other module
information.
Encrypting files in a storage card. The encrypted files can be
only read on this device.
Activating and inactivating the error reporting feature of the
device. Once this function is activated, any occurrence of
error will be recorded in a text file including the status of the
program and the computer, and if a user wants, it will be
reported to Technical Support Team at Microsoft.
External GPS
Configuring an appropriate GPS communication port, if
necessary. If there is any program accessing GPS data in the
device, or in case of connecting GPS receiver to the device,
you have to perform this task in advance.
37
Page 38
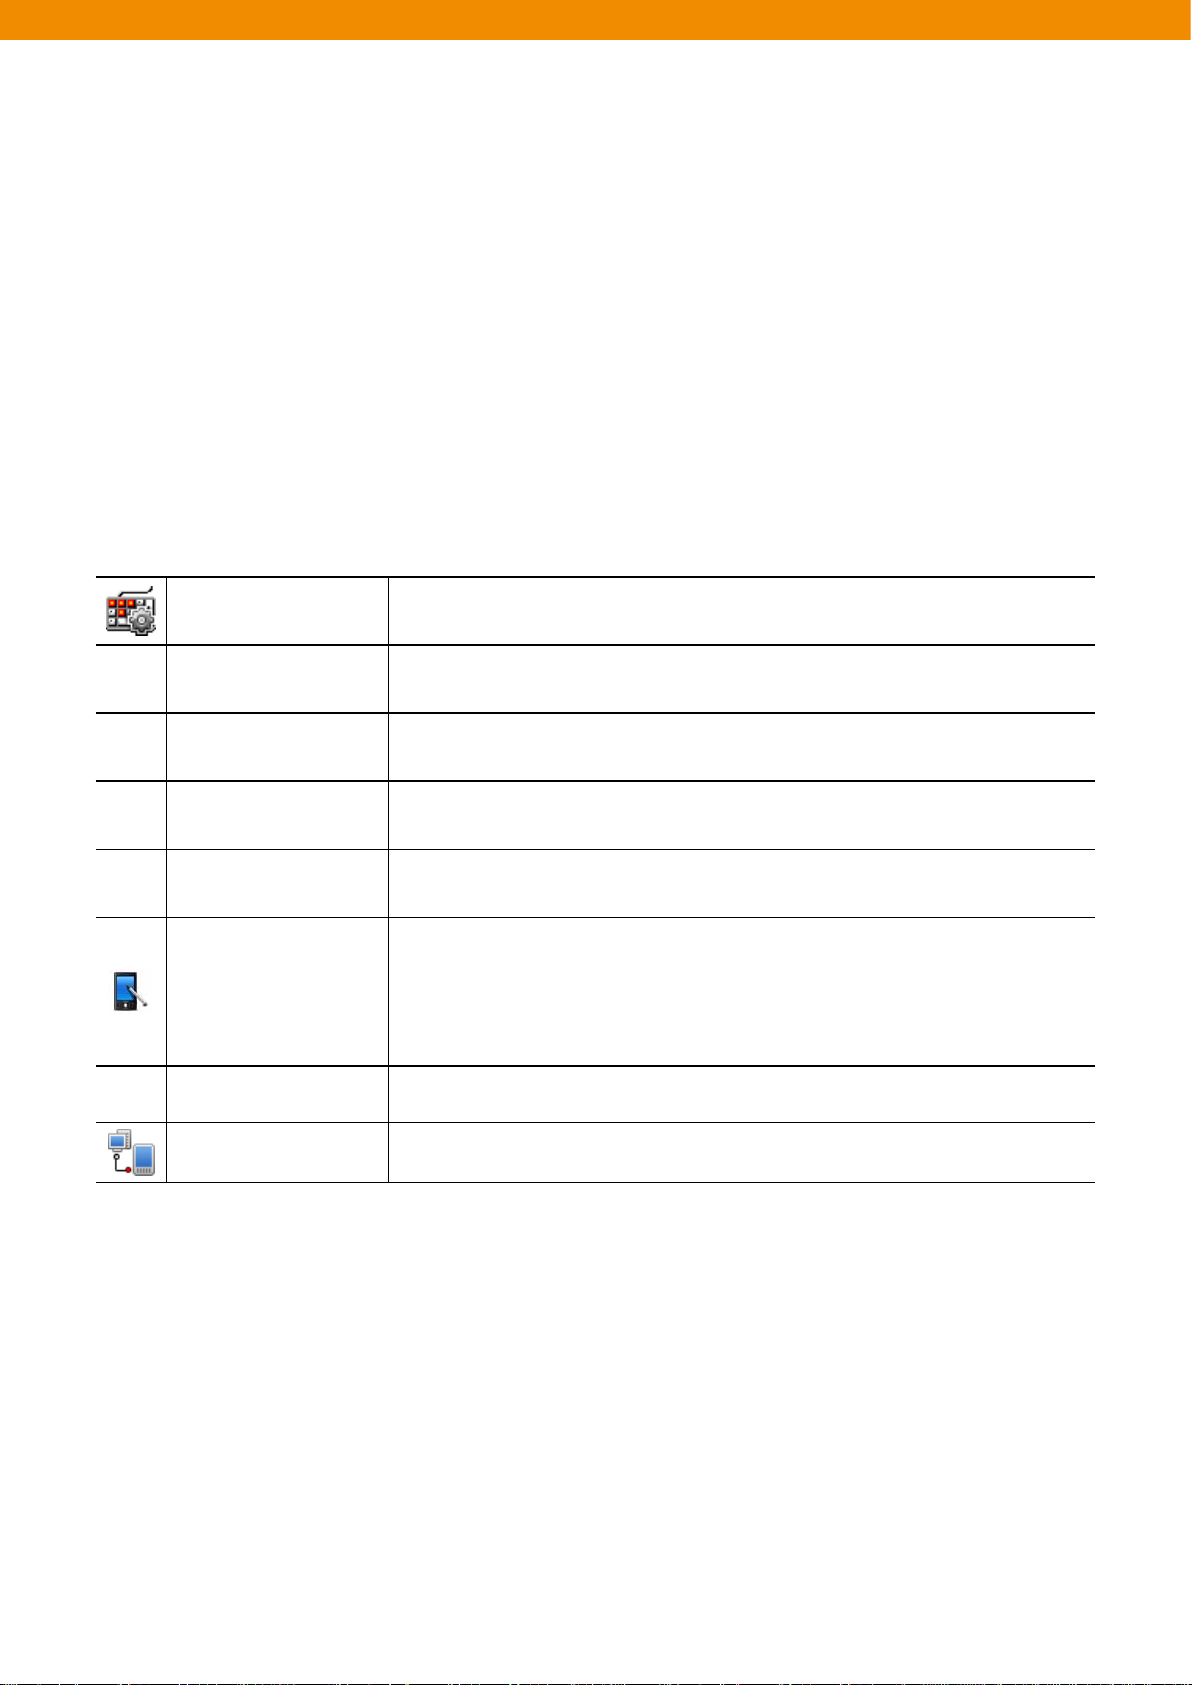
Keypad Configuring keypad shortcuts and key maps.
Managed Programs Displaying installed applications in CW30 using Mobile Device Manager.
Memory
Regional Settings
Remove Programs Removing programs installed in CW30.
Screen
Task Manager Stopping running programs.
USB Connections Configuring how to operate when establishing a USB connection.
Checking memory allocation status and memory card information; aborting
currently-running programs.
Configuring CW30 locale settings according to each region including how to
display numbers, currencies, date/time, or time format.
Changing display direction; compensating for the display after the change;
changing text size.
- Screen Orientation: Select Portrait Mode or Landscape Mode
- Calibration of Screen: Calibrate the screen for accurate touch operation.
- Font Size: Adjust the font size displayed on the screen.
38 39
Page 39

Adjusting Volume
1
1
2
How to adjust volume using speaker icon on the Navigation Bar.
Tap the speaker icon to open the volume dialogue box.
1
[Figure 2-8. Volume dialogue box]
Adjust volume moving the slide bar by dragging it.
2
Turn on or off the volume by selecting turn-off or turn-on radio button.
3
You can adjust system volume via Sounds and Alarms window or use the up-and-down button located on the
side of CW30.
39
Page 40

Display of battery level
Battery icon on the Navigation Bar indicates battery power level. If the main battery is lower than the pre-specified
level, the corresponding icon displays the level; when battery dialogue box appears, it displays the main battery level.
[Figure 2-9. Battery level dialogue box]
On the Home Screen, the battery icon is always displayed on the Navigation Bar, indicating battery level. The
message will be displayed until it is dismissed.
[Figure 2-10. Battery icon on the title bar]
Or you can check battery level by opening the power window.
40 41
Page 41
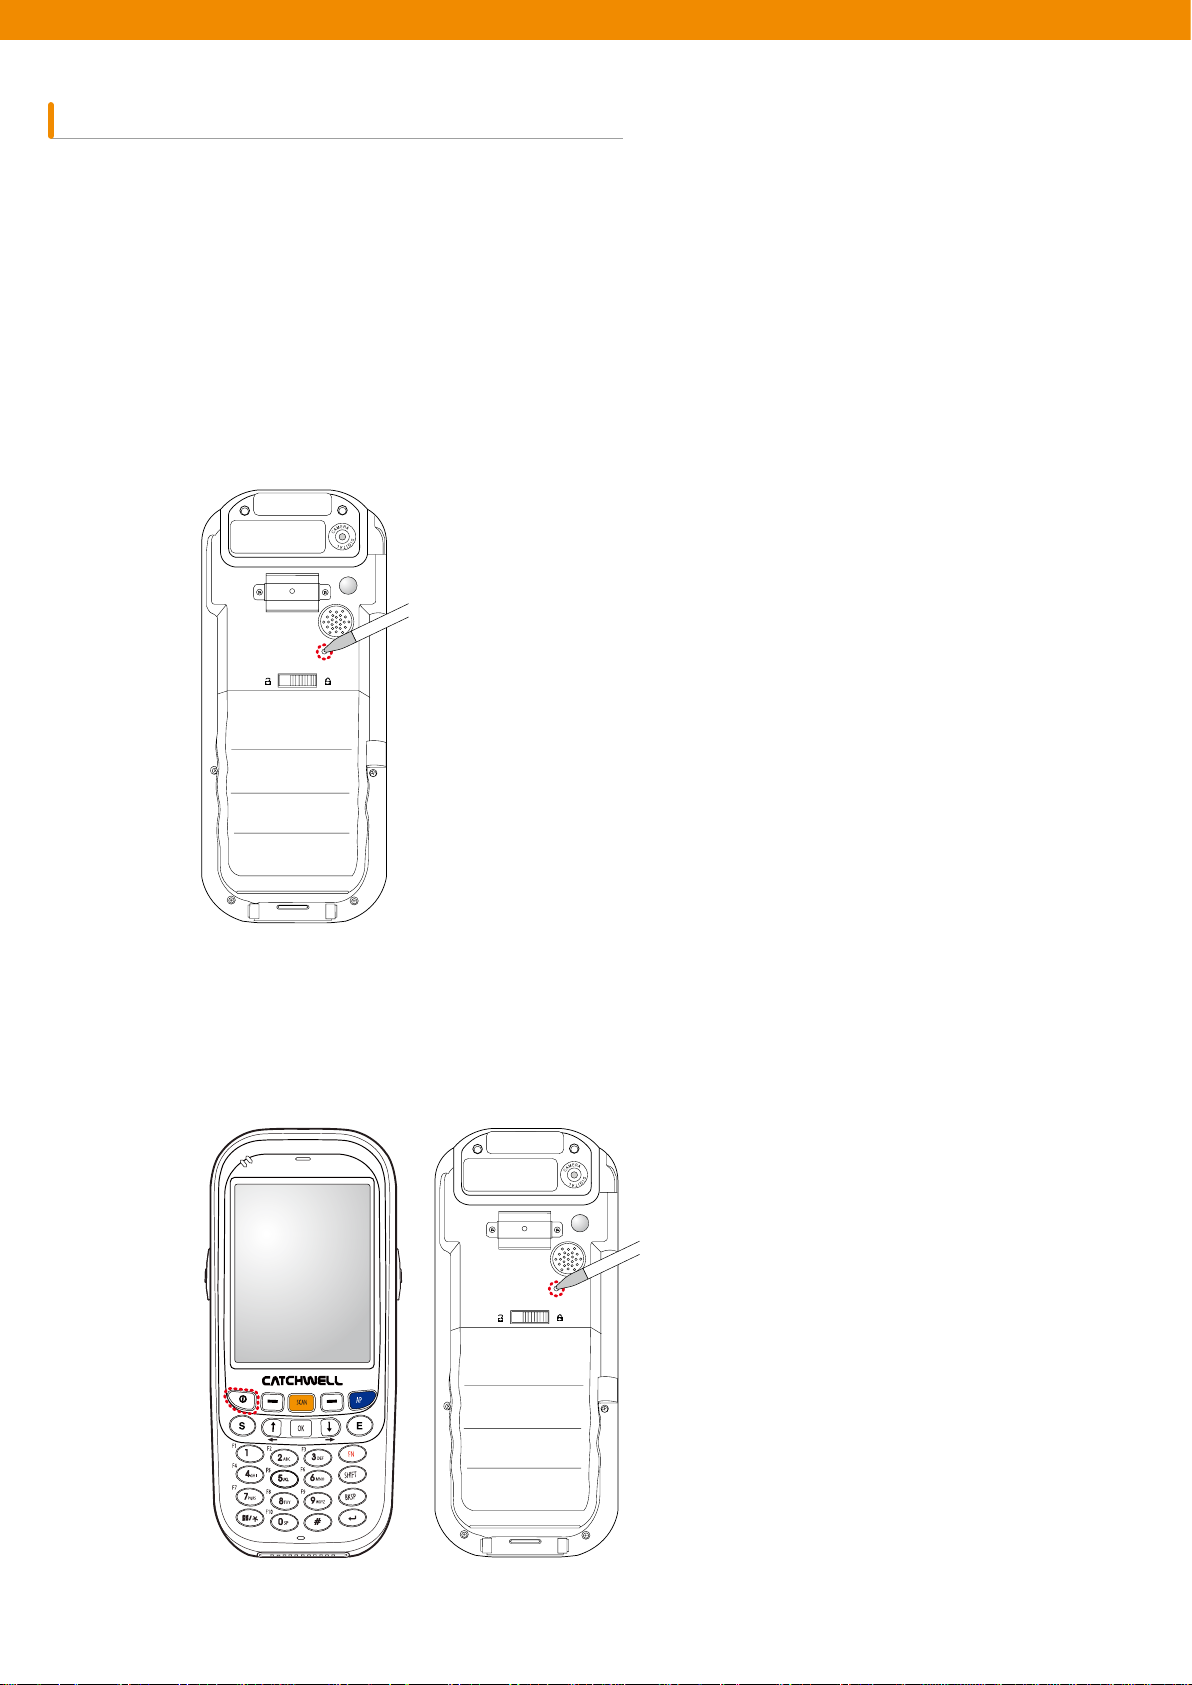
Resetting CW30
There are two kinds of resets: Soft rest and hard reset. A soft reset will restart CW30 after closing all running
programs. A hard reset, also, restarts CW30 along with resetting the clock. The data stored in flash memory or storage
card will remain intact.
If CW30 is not working properly, perform a soft reset first. If the problem persists, perform a hard reset.
How to perform a soft reset
Press the reset button at the back of the device (over the battery cover) with a stylus.
How to perform a hard reset
Quickly press the reset button at the back of the device (over the battery) with a stylus while pressing power button at
the front.
41
Page 42
Turning on or off backlight
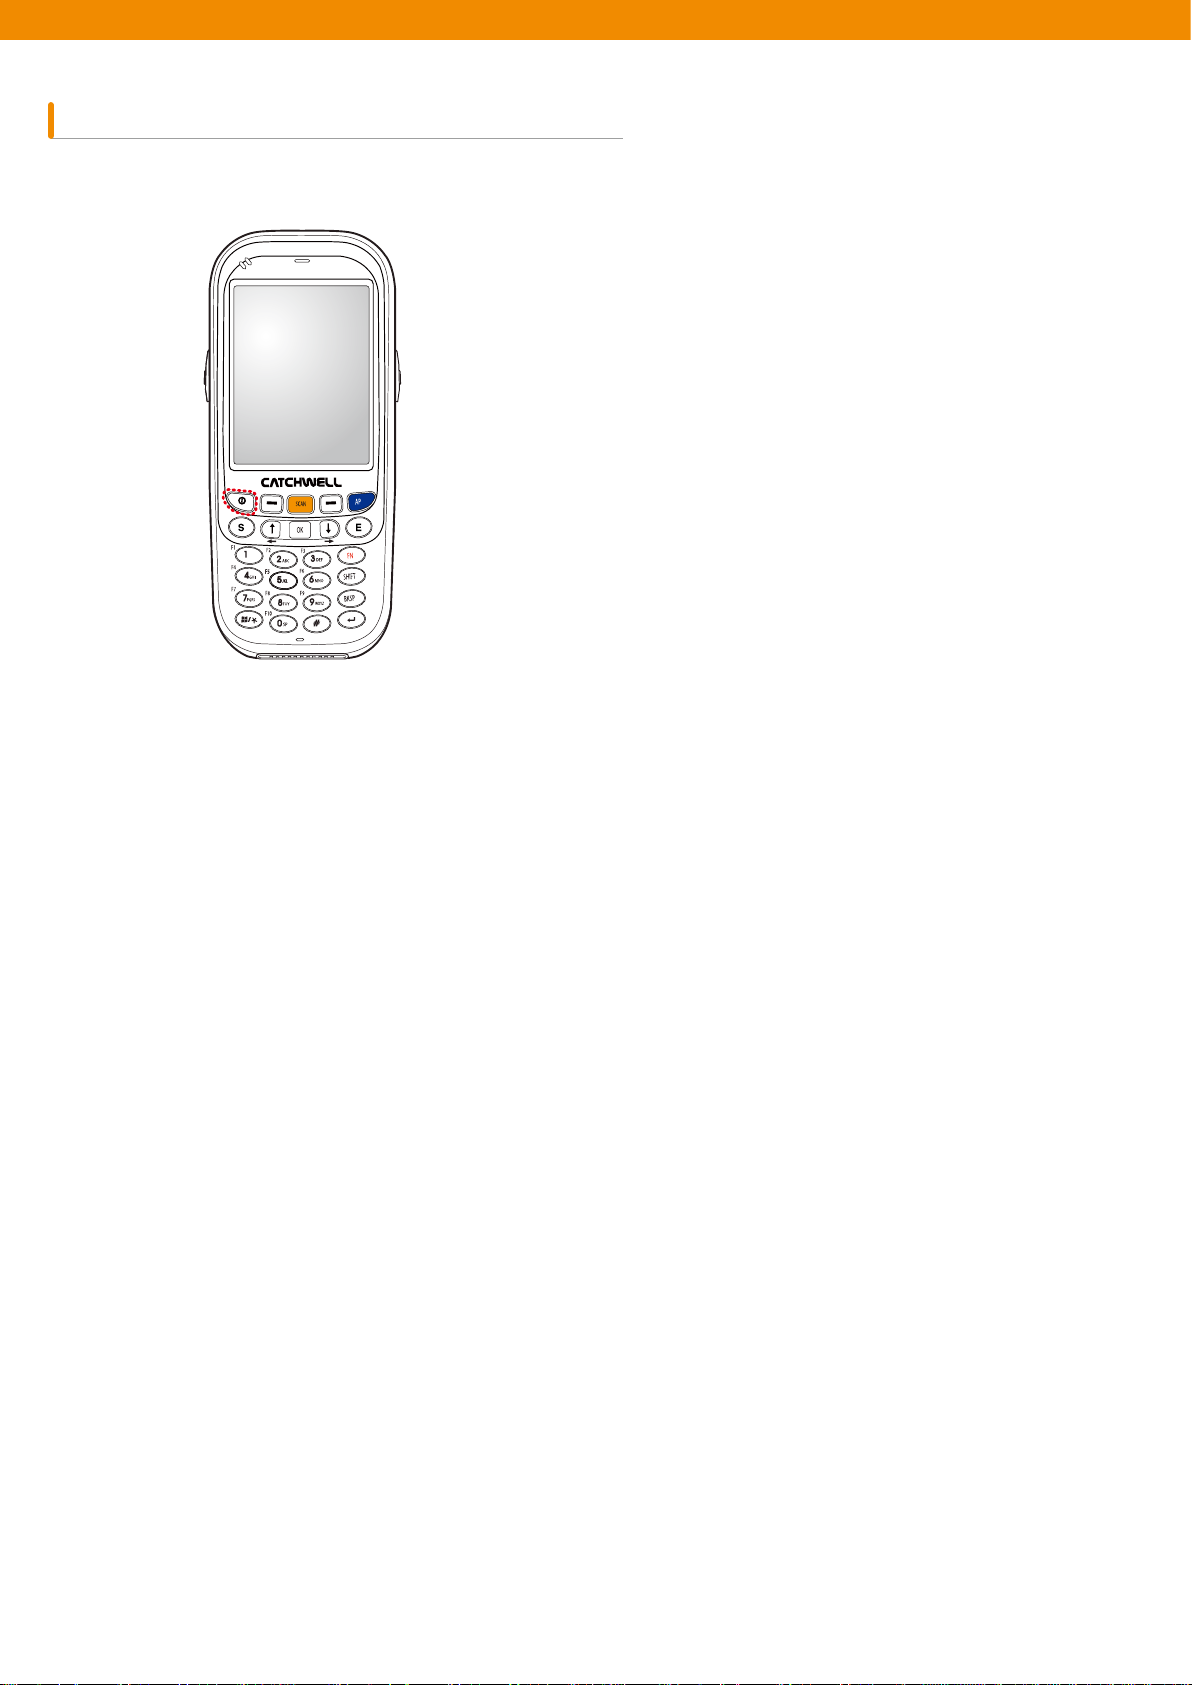
Press power button at the front of the device for a short while.
42 43
Page 43
Locking CW30
Prevent unauthorized use of the device by using the device-locking feature. When locked, CW30 will not respond to
all input from the screen or keyboard.
To lock CW30, tap Lock icon that looks like a lock beneath the Start.
To unlock CW30, slide the lock button to the left or to the right.
[Figure 2-18. Device-unlock window]
If CW30 is locked with a password, a message asking a password will be prompted.
Locking with a password
This feature protects CW30 from unauthorized access by setting a password in the password window.
Note: if the device is configured to be connected to a network, a user must strengthen network security using
complicated (hard to
computers being used for cracking passwords are becoming more powerful than ever.
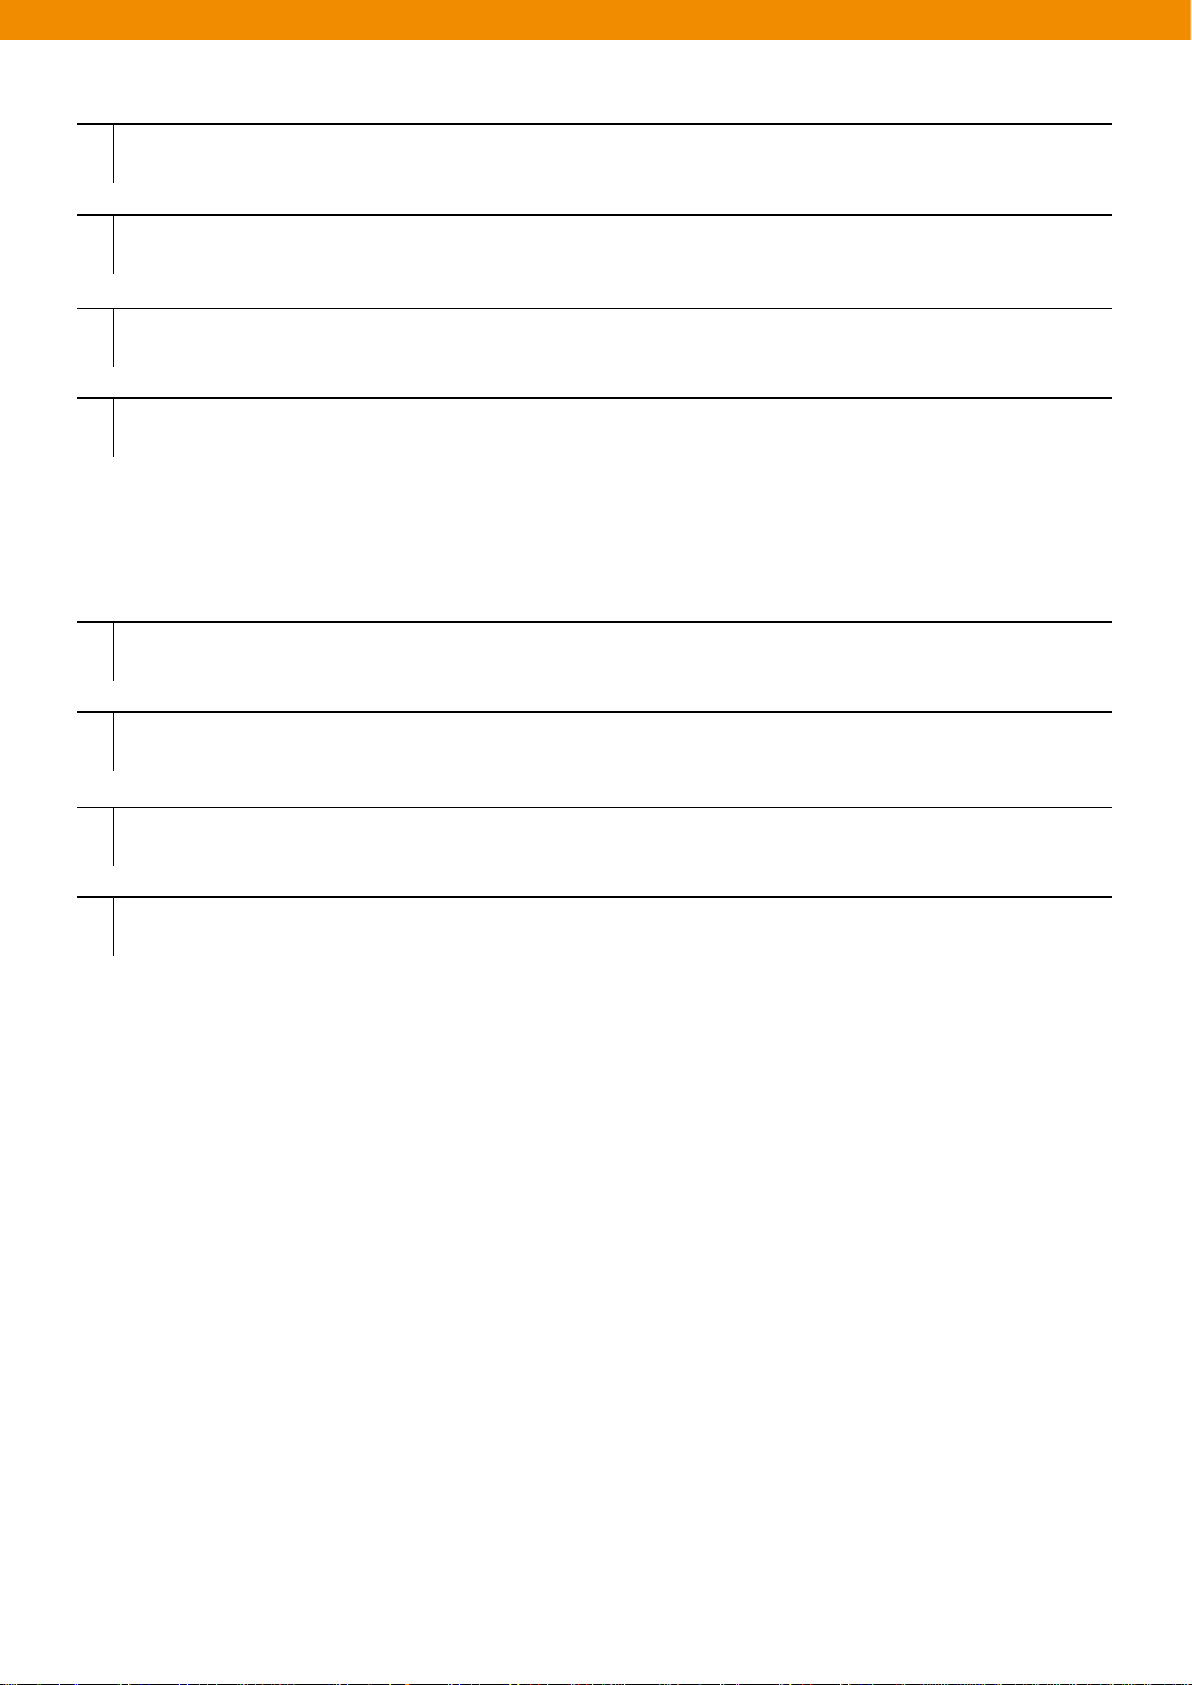
Go to Start > Setting > Lock > Password tab.
1
figure out) password. The tools for cracking password are advancing day by day, and the
[Figure 2-19. Password window and password tab]
43
Page 44
1
1
2
1
2
3
1
2
3
4
5
1
2
3
4
5
6
1
2
3
4
5
6
7
1
2
3
4
5
6
7
8
1
2
3
4
Activate password protection by checking confirm column, if the device is not going to be used for a specified
2
period of time.
Select time value that forces protective function to be activated, if the device is not used for a specific period of
3
time from the drop-down menu.
Password type: Select simple PIN or a complicated combination of English alphabets and numbers.
4
Simple passwords can be created by entering 4 digit numbers.
5
How to create a complicated password
• Password: Enter 7 digit numbers to create a complicated password. A complicated password must be
Tap Confirm.
6
composed of more than 7 characters, including at least 3 elements out
letters, numbers, and a punctuation mark.
•
Confirm: Reenter the password
of uppercase letters, lowercase
If you want to enter a
7
Enter a hint for recalling the password into the text box.
8
ap Confirm.
T
9
When a user tries to access CW30 after a certain period of unused time, a password screen will be prompted. This
window is also prompted when CW30 is connected with a host computer via the cradle or via the communication
cable.
hint to easily recall the password in the future, tap Hint column.
Enter the password to unlock the device.
Tap Unlock button to unlock the device and go to the Home Screen or you can go to Contacts window by tapping the
Contacts button or go to Message window after unlocking the device by tapping the email button.
44 45
Page 45

Function buttons
• Emergency phone calls can be made even if CW30 is locked. Refer to the detailed information.
Caution
The buttons of CW30 have special functions.
Function buttons
• Power: You can turn on or off CW30 screen by pressing the red power button. When the screen is turned off, CW
enters stand-by mode. For further information, refer to How to turn on CW30 in page 7. Or a user can reset CW30
by performing a soft reset or a hard reset. Refer to CW reset in page 16.
A user may scan barcodes or capture images. Refer to Data Capture in chapter 3. Or a user may open
•
applications or perform specific functions. Refer to user’s manual of applications for Microsoft Windows Mobile 6
to open the applications.
• Up/Down: Increase or decrease the volume of CW30.
• Task: A user is able to launch an application or perform a specific function. Refer to user’s manual of applications
for Microsoft Windows Mobile 6 to launch the application.
• To lock the Windows, press and hold “E” key on the keypad / To unlock it, please refer 2-18.
To activate and deactivate the vibrator, press and hold “*”.
A user can use a stylus for selecting items and entering information when using CW30. A stylus is for CW30 what a mouse
is for a computer.
• Press: Tab the option button on the screen once with the stylus to open menu items.
• Press and hold: If you press and hold on an item, a list displaying available tasks appears. Tap a desired task on
the displayed pop-up menu.
•
Drag: A user can select text and images by dragging them with the stylus holding on the screen. In order to select
several items drag them from a list.
• When taking notes, you’d better to use the end of the stylus where a spring is installed, and when you
tap the screen, it is recommended to use other end of the stylus. Press the power button and tap the
Warning
keypad with your finger.
45
Page 46
Data entry
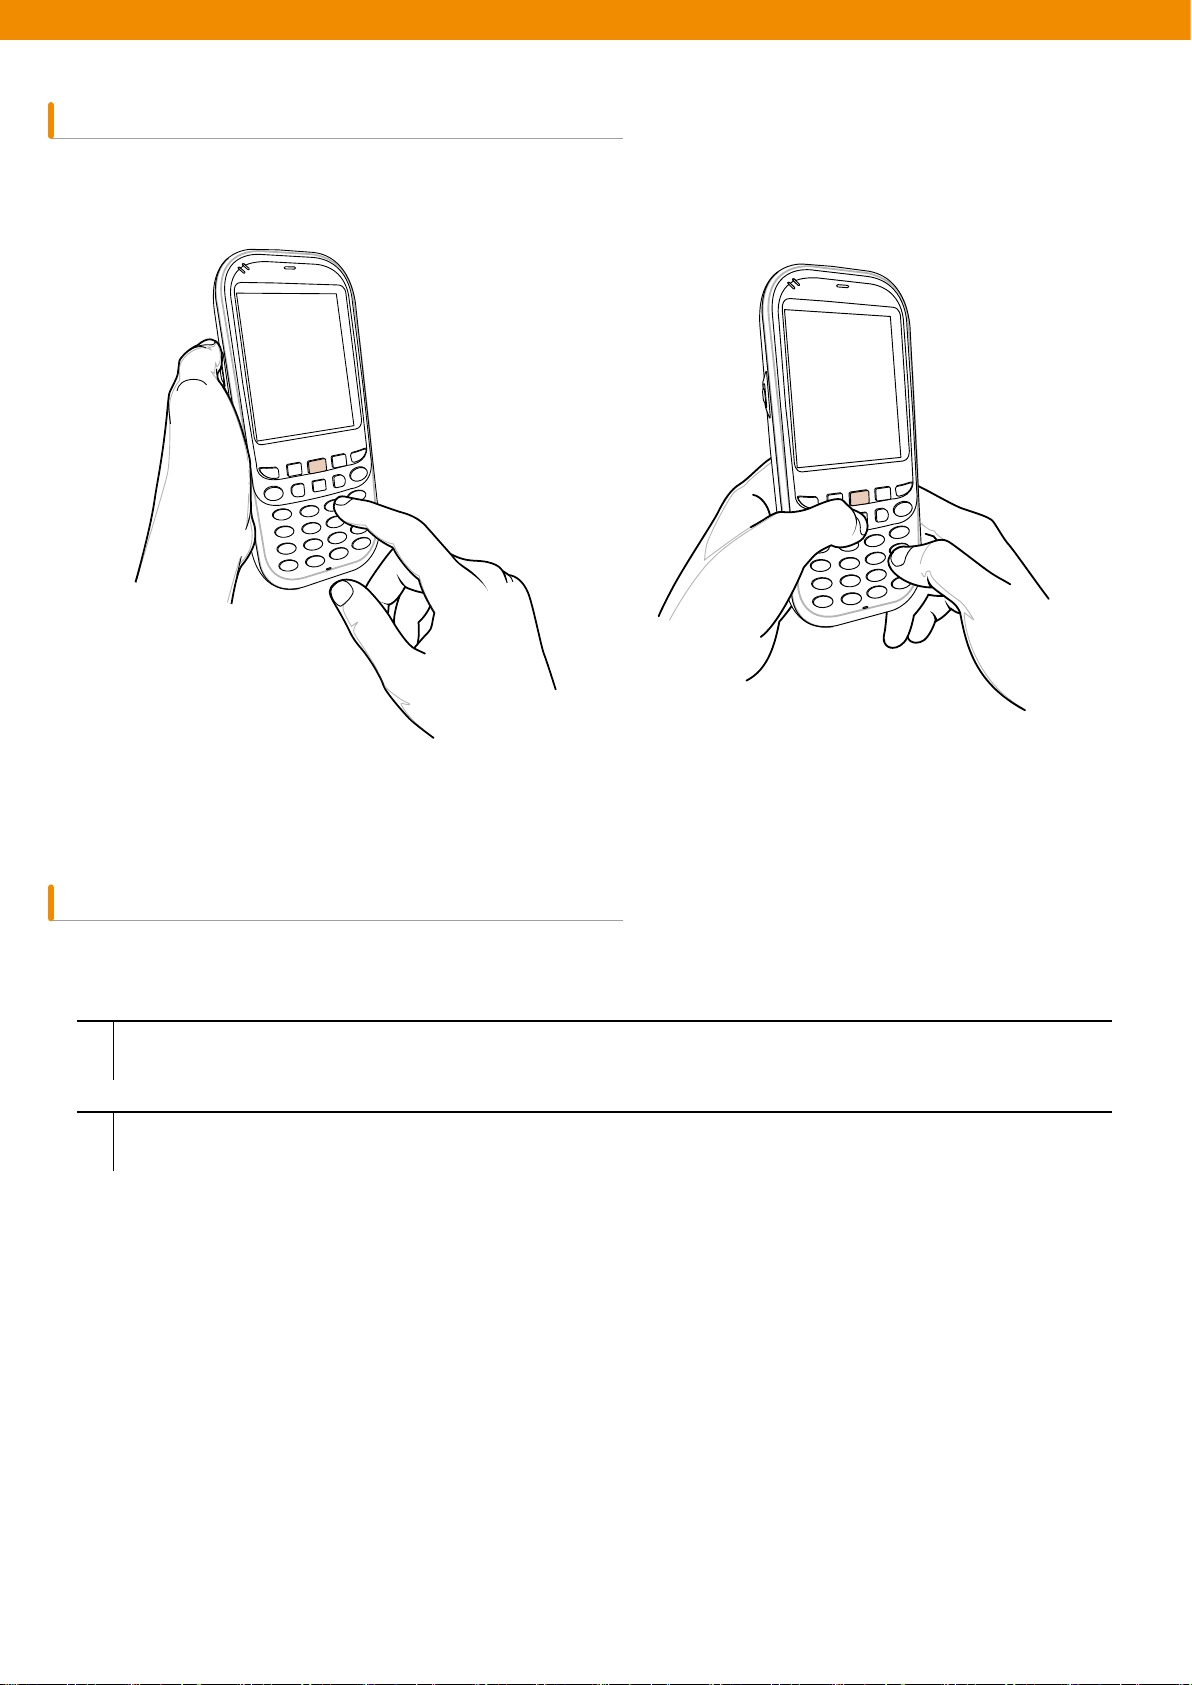
1
When you enter data using the keypad, you can use just one hand or use both hands (see figure 2-22).
Entering data using one hand Entering data using both hands
Viewing pictures and videos
How to view pictures and video clips
Tap Start > Pictures and Videos icon
1
Choose pictures or video clips you want to view.
2
46 47
Page 47
Taking a picture
1
1
2
1
2
3
1
2
3
4
1
2
3
4
5
How to take a picture
Tap Start > Pictures and Videos icon.
1
Choose camera on the navigation bar.
2
Check the image in the view finder, and, if necessary, adjust settings.
3
To turn on the Autofocus function, press and hold
4
To turn off the Autofocus function, Press and hold
5
Press Enter key to take a picture.
6
key for more than two seconds.
“↑”
key for more than two seconds.
“↓”
47
Page 48
1
2
3
Video recording
1
1
2
How to create video clips
Tap Start > Pictures and Videos icon
1
Tap camera icon on the navigation bar
2
Choose Menu > Videos to set the shooting mode to video.
3
Available recording time will be displayed on the screen.
• The default video recording time is limited to 30 seconds.
Caution
Start recording by tapping Enter key
4
Stop recording by tapping Enter key again
[Pictures & Videos] [Taking pictures] [Video recording]
48
Page 49

Chapter 3. Data Capture
Overview ...........................................50
Laser scanning ..................................50
Things to be considered for scanning ..50
Scanning barcodes ...........................51
Image decoding.................................52
Operation modes...............................52
Image scanning .................................53
Page 50
3
Data Capture
Overview
CW30 provides two kinds of data capture modes:
• Laser decoding
• Image decoding
•
To perform data capture mode, a scanning application must be installed in CW30.
Caution
Laser scanning
The barcode scanning features of CW30 are as follows:
• Recognizing various linear barcodes such as Code39, Codel128, or 1-dimension barcodes, etc.
• User-defined setting mode customizable for users’ working environments.
Things to be considered for scanning
Generally, scanning is a very simple task composed of leveling, scanning, and decoding. Therefore, a user can
be familiar with the process after a few trials. However
scanning performance:
Distance
• All scanning devices have their optimal recognition range (minimum or maximum distance from a barcode).
• This range may differ in barcode sizes or in the type of scanning devices. If a scanning task is performed within
the range, scanning will be fast and reliable, but if the task is performed within too close distance or too far
distance, the success rate will decrease.
When scanning, move CW30 forward and backward in order to find an optimal operation range.
•
Angle
• Scanning at too tilted angle is more likely to fail in recognition.
• The bigger a barcode is, the greater distance between the barcode and CW30 should be.
• The shorter the distance between barcodes, the closer the use of CW30.
, the followings should be noted beforehand to optimize the
Page 51
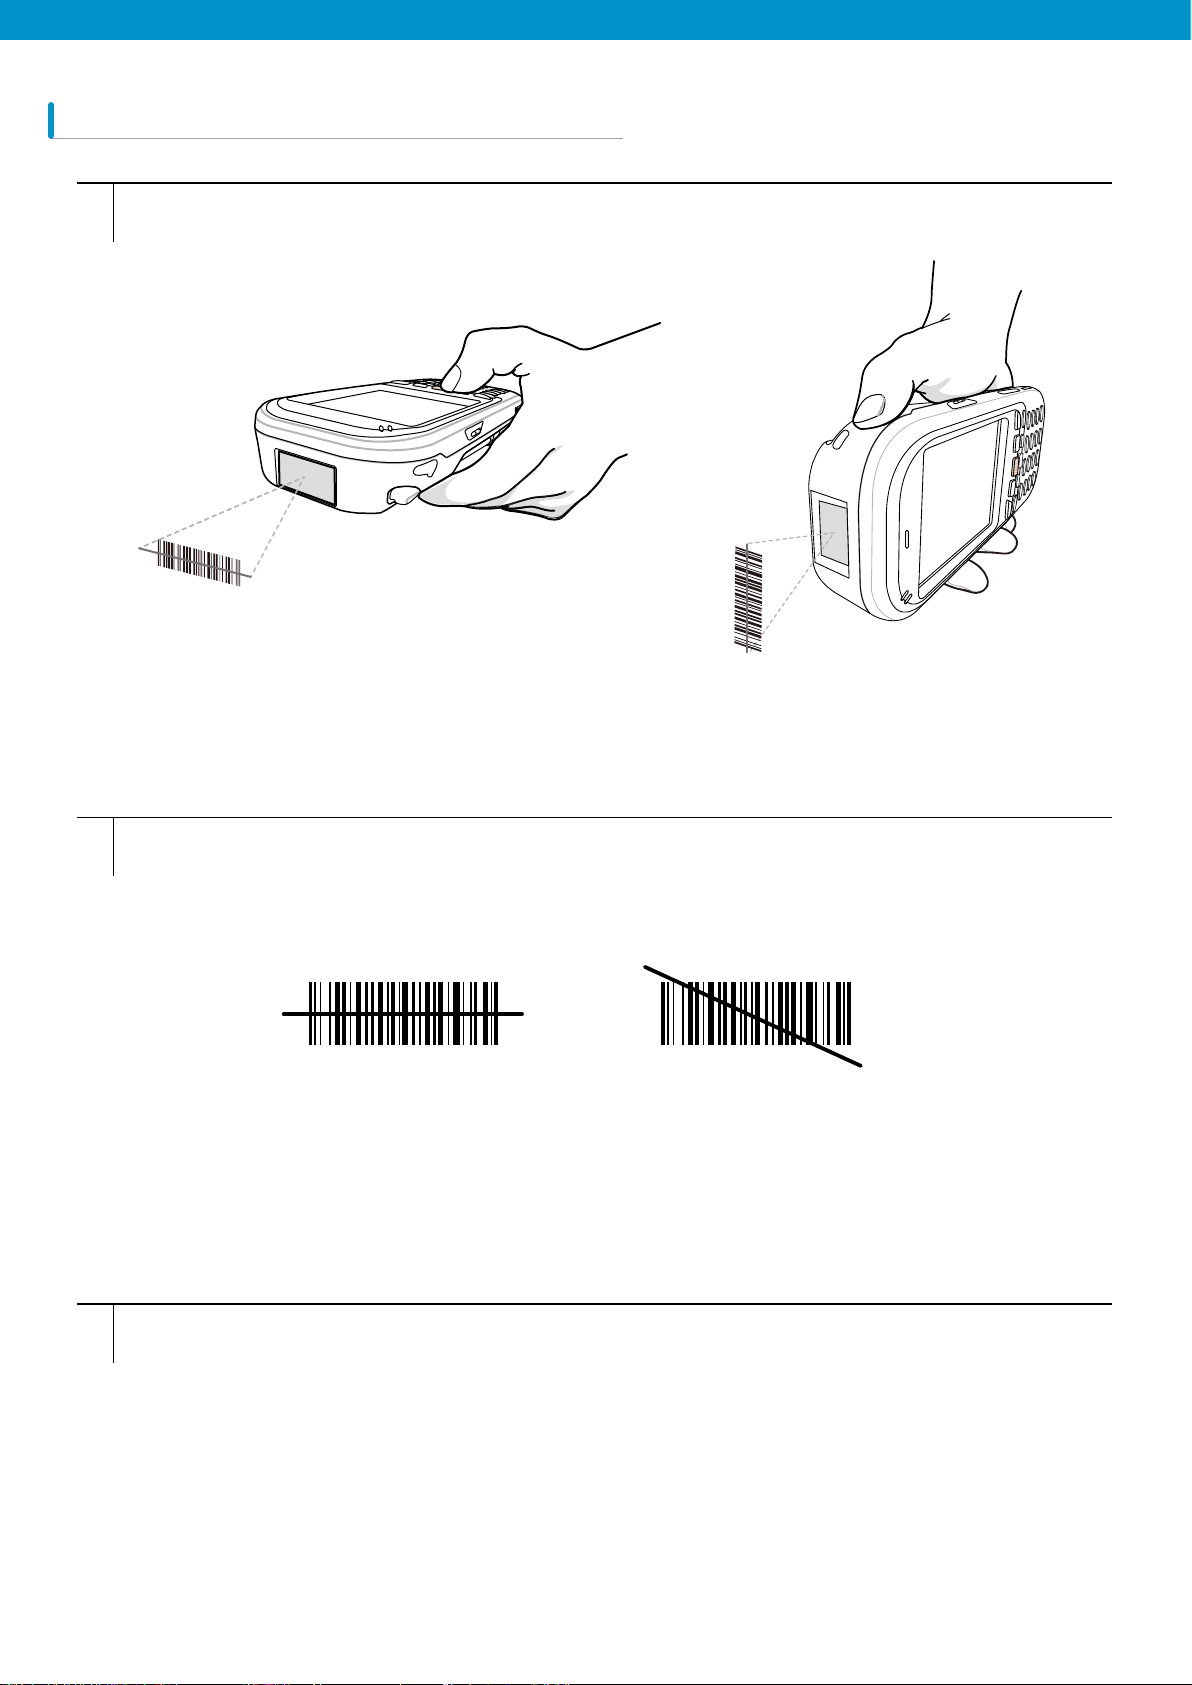
Scanning barcodes
1
2
1
Check a scanning application is running in CW30.
1
[[Figure 3-1 1D Laser Scanning]
Laser beam comes out of the end of CW30 while the scan button is pressed. The red scan beam should cover
2
the entire barcode. The laser beam indicates that scanning is under way, and if an alarm goes off and the laser
is turned off indicates that the barcode was successfully decoded.
Correct Incorrect
[[Figure 3-2 How to use 1D scanner]
Release the scan button.
3
51
Page 52

Image decoding
The features of CW30 to which an image scanner is integrated are as follows:
• Recognizing linear barcodes such as Code39 and Code128, including 2-D barcodes such as PDF417 and QR
code.
• Photographing images for various applications
• Intuitive aimer
The image scanner photographs barcodes using digital camera technologies and saves the photographed images,
and then extracts data with an optimal decoding algorithm.
Operation modes
The CW30 to which an integrated image scanner is integrated supports 4 operations mode. Each mode can be
changed on the barcode setting menu.
•
Decode Only: Decodes a barcode. The scanner remains decoding mode while pressing the scan button or until
decoding is completed.
• Image Decode: Simultaneously proceeding barcode decoding with barcode-image filming.
• Image Only: Only photographing barcode images.
Multi-scan Mode: Decoding multiple barcodes quickly and conveniently. New barcodes can be decoded while
•
keeping the scan button pressed.
52 53
Page 53
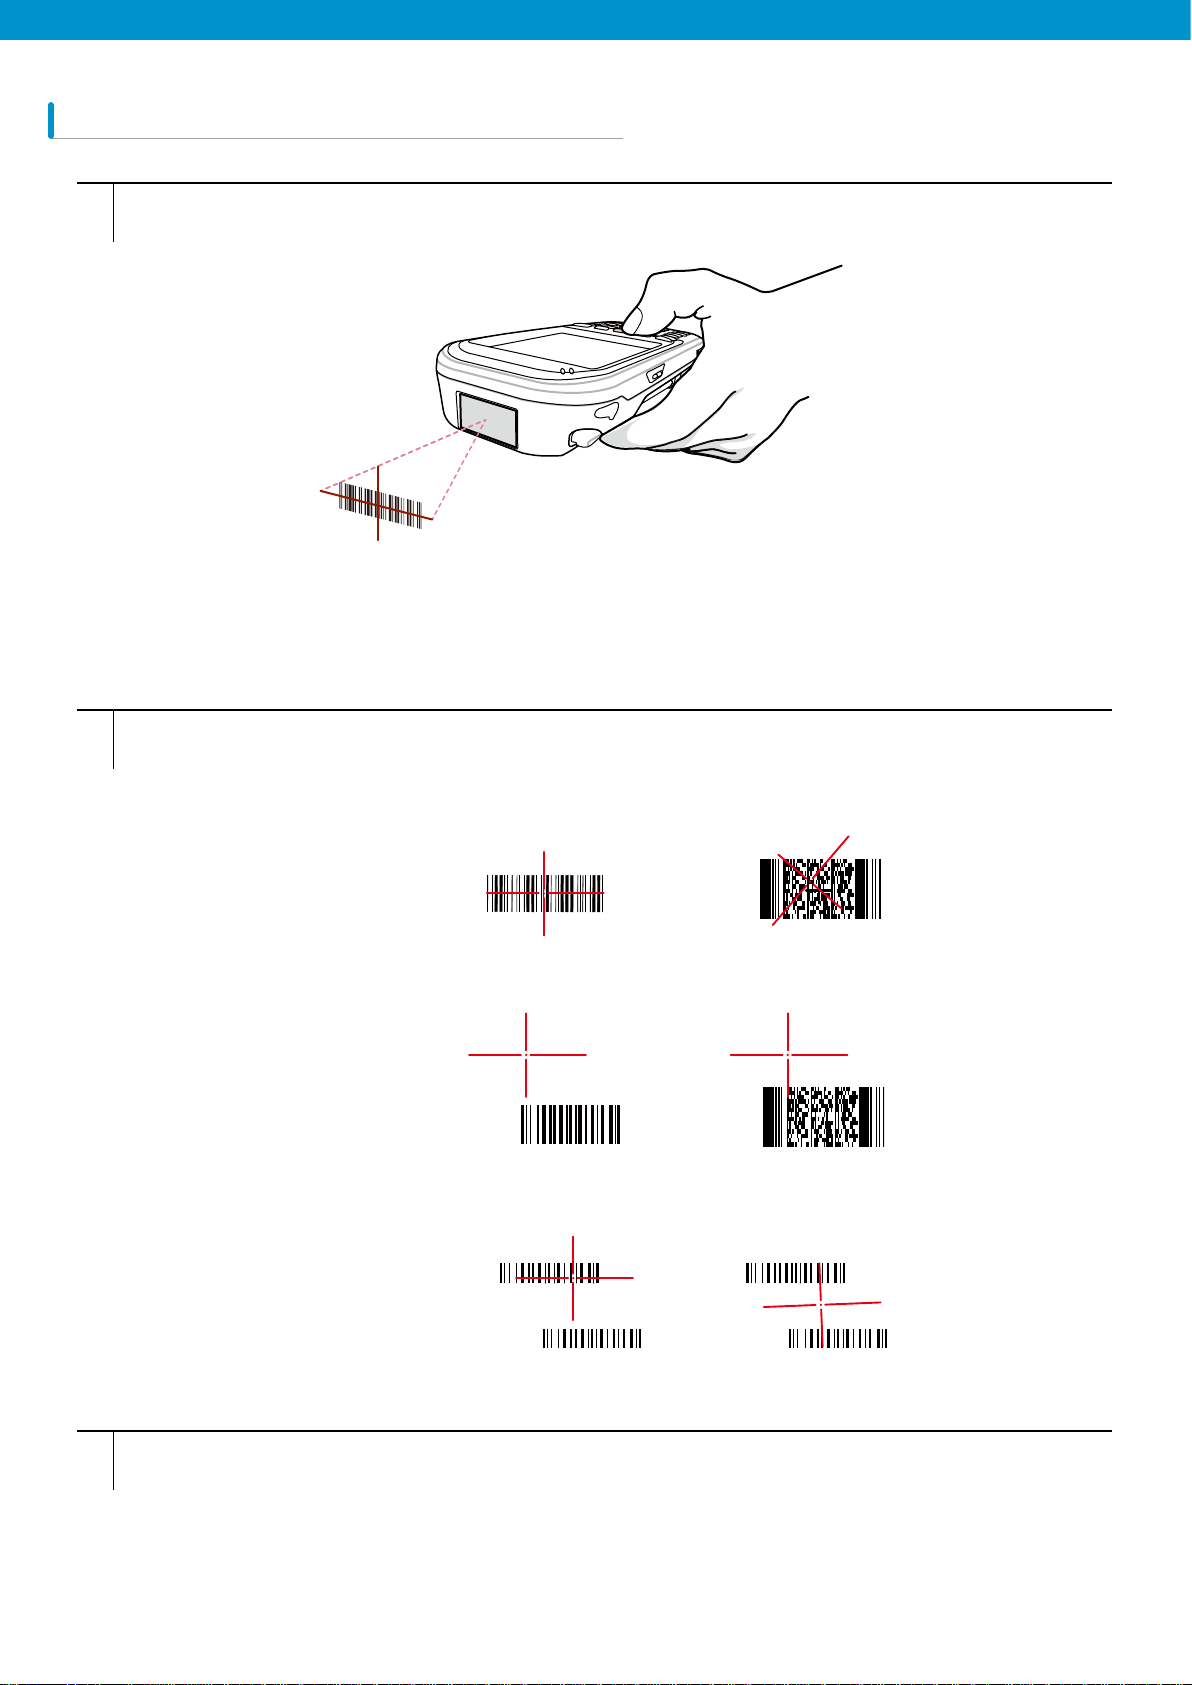
Image scanning
1
1
2
Check an application necessary for scanning is running in CW30.
1
[Figure 3-3 2D Image Scanning]
Pressing the scanning button turns on the aiming pattern helping to level at a target. Move the aiming pattern to
2
the center of a barcode area. The red laser beams indicates that scanning is under way, and an alarm goes off,
meaning that decoding of the barcode was successful.
√
X
Release the scan button.
3
√
53
Page 54

Chapter 4. Using the phone
Overview ..........................................55
Using the phone application ..............55
Turning on or off the phone ...............55
Audio mode .......................................56
Using wired headsets ........................56
Using Bluetooth headsets .................56
Adjusting audio volume ..................... 57
Making a phone call ......................
Using the Phone Dialer
.....................58
....57
Using Contacts ..................................58
Using Call History..............................59
Making emergency calls....................59
Answering Calls ................................60
Handling incoming calls ....................60
Smart Dialing.....................................60
To search for phone numbers ...........61
How to find con
o mute the microphone
T
tacts ..........................61
during a call .......................................62
Creating a memo...............................62
How to check the memo
created during a call ..........................63
Using Speed Dial ..............................63
How to add an item to Speed Dial.....64
Editi
ng or Deleting Speed
Dial shortcut
......................................65
Using Call History..............................66
Managing Call History ...........................66
Modifying Call History View ..................66
Resetting the recent call counter.......67
Deleting all Call History .....................68
Viewing call details ............................69
Using Call History menu..........
Switching calls on CW30
..........70
...................70
Text message ....................................71
Viewing text messages ......................... 71
Sending text messages ......................... 72
How to mute or unmute the
microphone during a call ................... 62
Page 55

4
Using the phone
Overview
Using CW30, a user can make a call, save contacts, manage phone call records, send text messages, save received
messages, etc. In addition, a user can browse the web via a dial-up network to send data in real time using various
office applications.
Using the phone application
Regardless of running programs, a user can use the phone application anytime he wants.
In order to use the phone application, choose Start > Phone or just tap the green button on the keypad of CW30.
Turning on or off the phone
The phone can be activated or deactivated via the Wireless Manager in a Windows Mobile 6.5 device. Wireless can
be launched by choosing Start > Settings > Connections.
Choose the Wireless Manager
Menu > the settings of each device.
. Turn on or off a device by selecting its name. To configure connection settings tap
55
Page 56
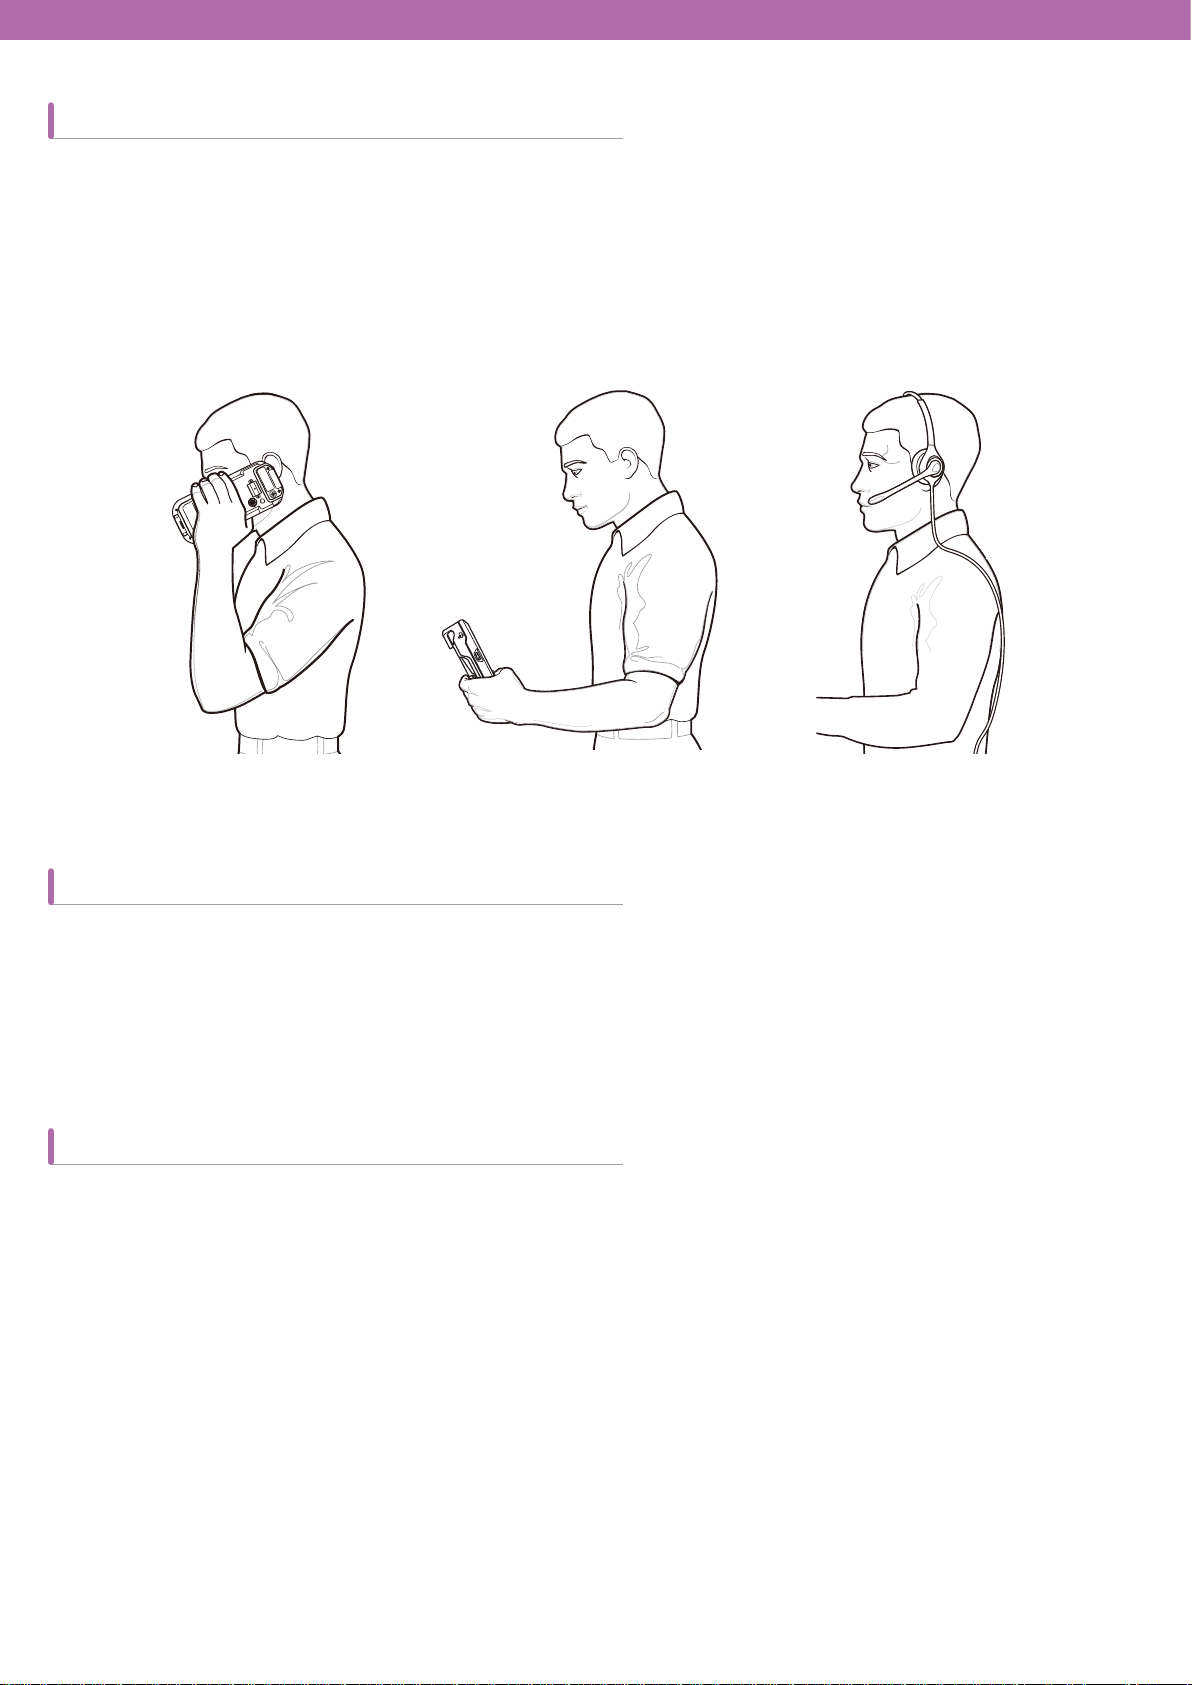
Audio mode
You can select one of three audio modes of CW30 when making a phone call.
• Handset mode: You can use a speaker at the front side of CW30. This is the default mode.
• Speaker mode: a user can use this mode like a speaker phone.
• Headset mode: a user can connect a headset to CW30 or use a Bluetooth headset for making a call.
The default mode is handset mode. A user can listen to audio media via a headset or a Bluetooth headset by
connecting them to CW30.
[Handset mode] [Speaker mode] [Headset mode]
Using wired headsets
Headsets can be used for audio applications. CW30 Connect a headset to the earphone jack located on the side of
CW30.
speaker any more.
Adjust volume appropriately before connecting the headset. When connected, sound doesn’t come out of the
Using Bluetooth headsets
A Bluetooth headset can be used for audio applications for audio communication. Bluetooth Refer to chapter 6 – Using
Bluetooth—to
When connected, sound doesn’t come out of the speaker any longer.
When making a phone call, the use of Bluetooth hand-free profile is recommended instead of using Headset profile.
For more details, refer to chapter 6 – Using Bluetooth.
find out how to connect headsets to CW3. Adjust volume appropriately before turning on the headset.
56 57
Page 57

Adjusting audio volume
Adjust ring volume by pressing volume control settings or volume button located on the top, and adjust audio volume
while making a phone call.
To adjust volume, tap speaker icon that comes up after tapping the title bar. Adjust volume by moving the slide up and
down.
Making a phone call
• Making an emergency call is possible even if the SIM card is not installed. Refer to page 7 for more
Caution
A user can make a call via voice call, contacts, call list, and text message box on CW30.
details.
57
Page 58
Using the Phone Dialer
1
1
1
2
1
2
1
2
3
Making a phone call using the phone program
Choose Tap Start > Phone or Tap the green Talk key on the keypad of CW30.
1
Tap a number that you wish to call from the Phone program.
2
Press Send or the green Talk key on the keypad of CW30.
3
To stop an outbound call or terminate a call, press End or tap the red End key on CW30 keypad.
4
• When wrong keys are pressed, erase the numbers by tapping Delete key( ) one by one.
Caution
Using Contacts
A
user can make a call using Contacts
How to make a call from the Contacts screen.
Tap Start > Contacts
1
Select a contact and press and hold on it for a short while in the contacts list.
2
Choose Call Work or Call Home or Call Mobile.
3
58 59
Page 59
Using Call History
1
1
2
1
2
3
How to make a call using Call History
Tap Start > Phone or Tap the green Talk key on CW30 keypad.
1
Tap a Call History on the Phone keypad.
2
Start voice call by tapping the phone icon next to the number.
3
To make a call or terminate a call, tap End or tap the red End Call key on CW30 keypad.
4
Making emergency calls
You can use an emergency call even if the SIM card is not installed. For more details on the installation of the SI
card, refer to SIM Card Installation on page 3.
• Emergency calls can be unavailable depending on network environments.
Caution
M
59
Page 60

Answering Calls
When you have an incoming call, a pop-up window will appear. If a bell sound is set, the phone will ring.
To answer the call, tap Phone > Receive or tap the green Talk key on CW30 keypad.
T
o ignore the incoming call, press Ignore. Then the service provider you are using will notify the caller that you are
unable to answer the call.
To end the call, tap End Call or tap the red END on CW30 keypad.
Handling incoming calls
• To answer an incoming call when you are already on a call, tap Stand-by key to switch to stand-by mode.
• You can use other programs of CW30 while you are on a call. If you want to switch to Phone screen, tap Talk or
Start > Phone.
• You can add the number you are on a call or a number on the Call History to Contacts by tapping Menu > Contact
> Save.
• To answer another incoming call while you are talking on the phone, tap Answer or Send after disconnecting the
current call by tapping End on Phone keypad and tap Answer or Send key.
• To answer a stand-by call during a call, answer the call after tapping Answer or Send to switch the current call to
stand-by mode.
To end the call, tap End Call.
Smart Dialing
When you start to enter numbers or letters, the device automatically shows you filtered list of contacts and phone
numbers after searching for the contact items and the numbers from call history. Then you can choose a contact from
the filtered list.
Tap a phone number to make a call. At this point, a contact matching the entered number will be displayed on the
contacts panel.
60 61
Page 61

To search for phone numbers
1
1
2
1
2
3
1
2
3
4
• You can search for phone numbers by entering on or two numbers at the beginning.
• By entering more than three numbers at the beginning, you can search for saved contacts and phone numbers
from SIM card.
How to find contacts
• Enter the first letter of the name in contacts.
• If there are many matching items, you can narrow your search by adding extra letters.
How to make a call or send a text message using Smart D
Enter numbers or letters at the beginning.
1
Search for contacts or numbers that you wish to find from the Smart Dialing panel.
2
When you choose a contact, tap Talk to make a call.
3
If you want to send a text message after selecting a contact, tap Menu > Text Message.
4
You can select other phone numbers of that contact by tapping the name in the contact after selecting it.
5
ialing.
61
Page 62
To mute the microphone during a call
1
1
2
If you mute the microphone during a call, you can hear the voice of the other, but the other can’t hear your voice.
How to mute or unmute the microphone during a call
Tap Start > Phone or tap the green Talk key on CW30 keypad.
1
Make a call.
2
Tap Mute on the screen to mute the audio. The mute icon will appear on the screen.
3
Creating a memo
To create a memo during a call, tap Menu button on the screen, then select Create Memo.
62 63
Page 63
How to check the memo created during a call
1
1
2
1
2
3
1
2
3
4
Tap Start > Phone or tap the green Talk key on CW30 keypad.
1
Tap Call History on the Phone keypad.
2
Press and hold on a call record including a memo or the memo icon.
3
Tap View Memo.
4
Tap OK to end.
5
• You can check the Memo program directly by choosing Start > Memo.
Caution
Using Speed Dial
You can make a call with a single tap by creating a speed dial entry. After assigning a number to Contacts, you can
add the number to the Speed Dial.
63
Page 64

How to add an item to Speed Dial
1
1
2
1
2
3
1
2
3
4
How to add a number to Speed Dial on the Phone keypad
Check if there are contacts and numbers that you wish to add to the Speed Dial in the Call History.
1
Tap Start > Phone or tap the green Talk key on CW30.
2
Tap Speed Dial > Menu > New.
3
Select an item you wish to add to Speed Dial from the Contacts list.
4
Select a new Speed Dial number from the Location column. The first number of the Speed Dial is reserved for
5
voice mail.
64 65
Page 65

1
1
2
1
2
3
1
2
3
4
5
Tap OK to add the contact to Speed Dial list.
6
Editing or Deleting Speed Dial shortcut
Tap Start > Phone or tap the green Talk key on CW30.
1
Tap Speed Dial button.
2
Press Edit… or an item to be deleted for a short while.
3
Tap Edit… or Delete.
4
65
Page 66
Using Call History
1
1
2
1
2
3
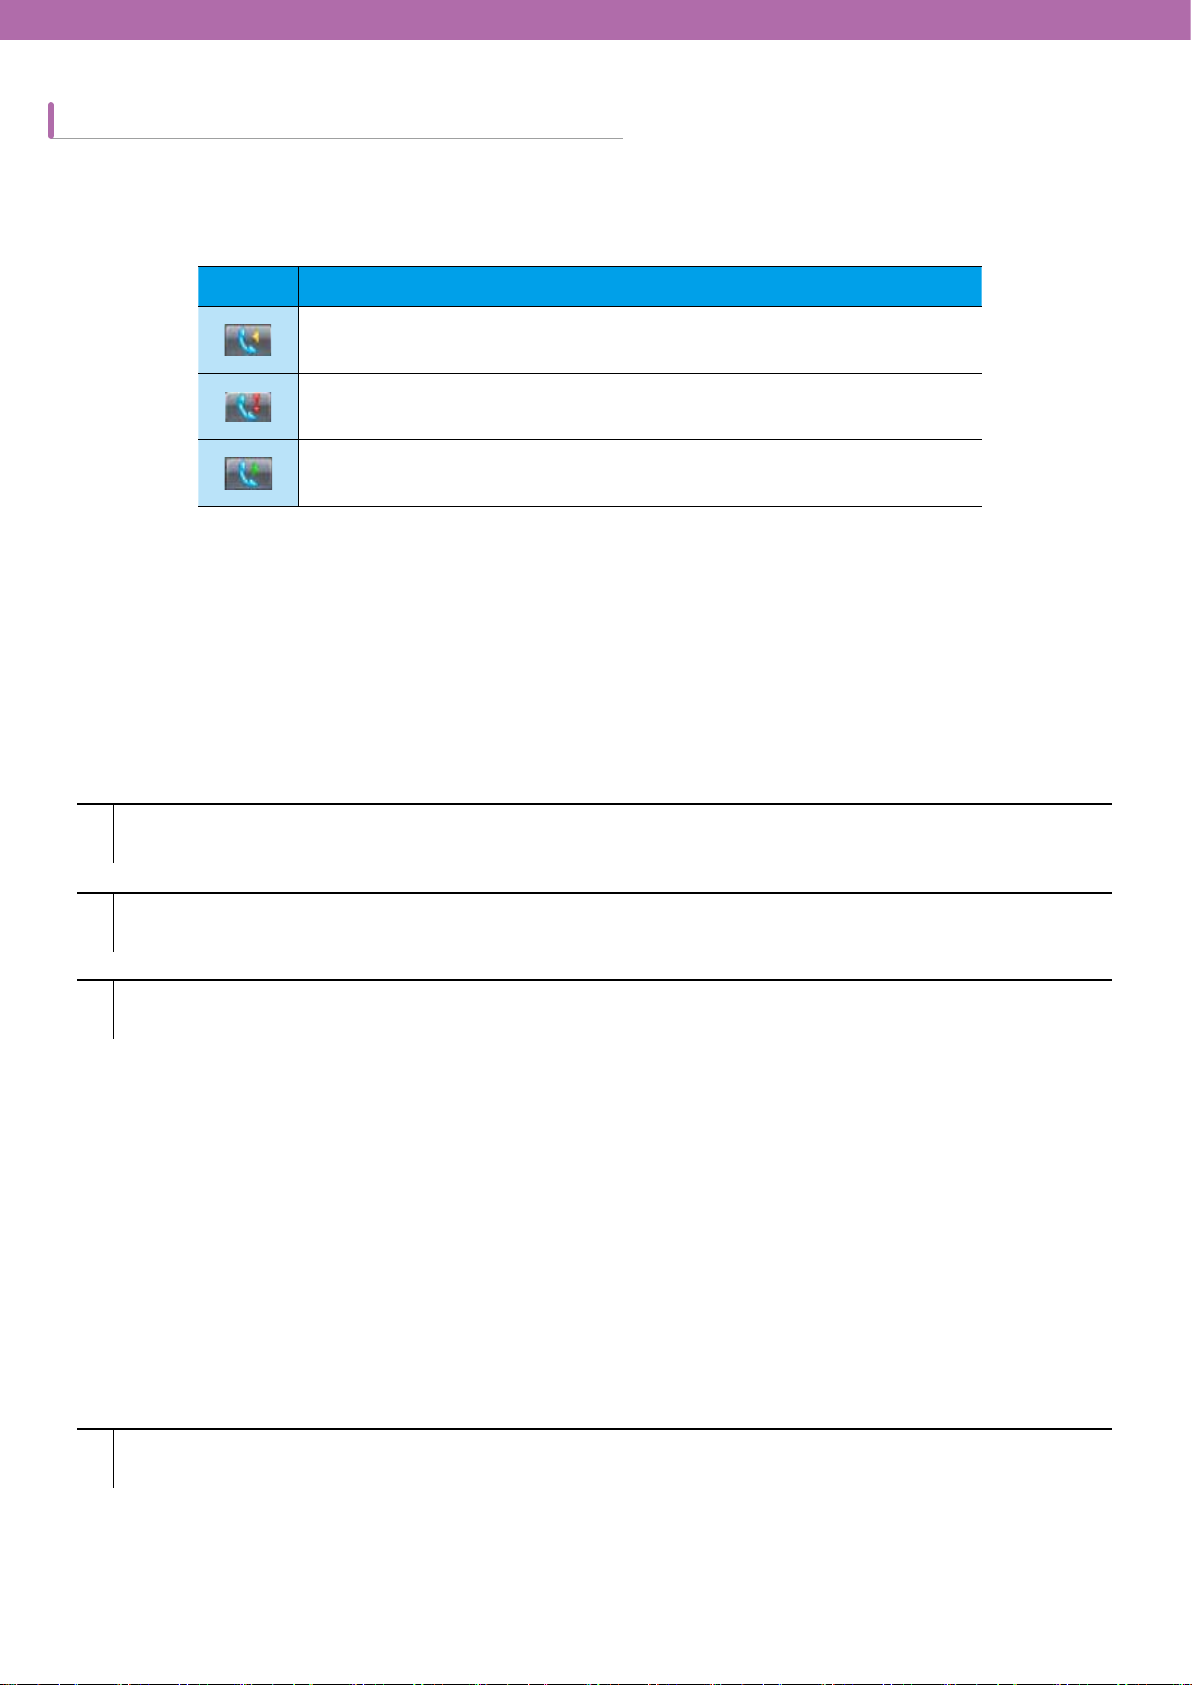
You can check recent calls or make a call to the numbers using Call History. In Call History, the duration of all
received, sent, missed calls and talk time are displayed. The icons displayed in the Call History screen are listed in
Table 4-1.
아이콘 설명
This icon is displayed next to the contact information on all incoming
calls.
This icon is displayed next to the contact information on all missed
calls.
This icon is displayed next to the contact information on all outgoing
calls.
Managing Call History
You can manage your call history such as resetting talk time and deleting call history.
Modifying Call History View
Tap Start > Phone or tap the green Talk key on CW30 to display the phone keypad.
1
Tap Call History button on the phone keypad.
2
Tap Menu > Filter to display the menu.
3
You can only display missed, outgoing, and incoming calls on the menu.
4
66 67
Page 67
Resetting the recent call counter
1
1
2
1
2
3
1
2
3
4
Tap Start > Phone or tap the green Talk key on CW30 keypad.
1
Tap Call History on the phone keypad.
2
Tap Menu.
3
Choose Call Timers.
4
Tap Reset (Not counters of all calls are initialized).
5
67
Page 68

Deleting all Call History
1
1
2
1
2
3
1
2
3
4
Tap Start > Phone or tap the green Talk key on CW30 keypad.
1
Tap Call History on the phone keypad.
2
Tap Menu icon.
3
Choose Delete All Calls.
4
Tap OK.
5
68 69
Page 69
Viewing call details
1
1
2
Tap Start > Phone or tap the green Talk key on CW30 keypad.
1
Tap Call History on the phone keypad.
2
Choosing an item will lead you to the call details screen.
3
Caution
• If more than two calls are in progress, only the first one will be recorded.
69
Page 70
Using Call History menu
1
1
2
1
2
3
1
2
3
4
1
2
3
4
5
1
1
2
1
2
3
You can send voicemails, save contacts, delete history, and voice calls using Call History menu.
Tap Start > Phone or tap the green Talk key on CW30.
1
ap Call History on the phone keypad.
T
2
Press and hold on the desired item in the list for a while.
3
Choose an item on the menu.
4
Switching calls on CW30
How to switch calls between two calls:
Tap Start > Phone or tap the green Talk key on CW30 keypad.
1
When the first call is connected, Stand-by button will be displayed on the keypad.
2
Tap the Stand-by button to switch the first call to stand-by mode.
3
Proceed with the second call.
4
After being connected to the second call, a switching button will be displayed on the keypad.
5
To end each call,
6
tap End on the phone keypad or tap the red End Talk key on CW30 keypad.
70 71
Page 71

Text message
You can send or receive text messages using Text Message features.
Viewing text messages
How to view text messages
Regardless of using voice call, you can check your text messages. You will be notified by New Text Message
Notification window when you have a new text message.
[Notification of new text message]
On the new text message screen, you can make a call, save or read or delete messages. If you are subscribed to
Caller’s Number Identification Service, you can identify the caller by comparing the number with the information saved
on Contacts.
Even if the phone is disabled, you can still read received text messages.
Tab Start > Text Message.
1
71
Page 72
1
1
2
Text Message window will appear.
1
2
Tap a text message in the message list.
3
• When the phone is turned off, you have to turn it on to make a call or to send a new message.
Caution
Sending text messages
How to create a new text message
Tap Start > Text Message
1
Tap Create New Text Message.
2
• You can check the size of the message you are writing via character counter.
• If you want to know whether the receiver has received your message, choose Message Transmission Check
Request after tapping Menu > Message Option.
72 73
Page 73
1
2
1
2
3
1
2
3
4
You can enter the receiver’s number into the receiver’s number column or enter the number by searching for the
3
number from Contacts after tapping Menu > Add Receivers
Enter a message into the message area.
4
When completed, tap Send button.
5
When the phone is turned on, a message notifying you to turn on the phone will be prompted. You can turn on the
phone to send a message or save a message at the temporary folder by tapping OK. The message saved at the
temporary folder will be sent when you turn on the phone.
If you are out of the communication service area, a message will be saved at Temporary message box and be sent
when you are back to the service area.
• As the message saved at temporary message box remains there, you have to send the message
Caution
manually when you are back to the service area (necessary to check the
…
relevant features).
73
Page 74

Chapter 5. Using a GPS Navigation
Overview ...........................................75
Installing a software ..........................75
Setting up GPS on CW30 .................75
Operation ..............................................76
GPS maps on a microSD card ..............76
Answering calls while using GPS .......... 76
When you lose GPS signals in a car ..... 77
Auxiliary GPS ....................................77
Page 75
5
1
1
2
1
2
3
Using a GPS Navigation
Overview
CW30 adopted a GPS (Global Positioning System) technology using SiRF III chipset. GPS technology is based
on GPS satellites that transmit digital wireless signals constantly orbiting the Earth. Those wireless signals contain
precise time data, and this signal is used for identifying the location of a user.
• The user is responsible for the safe use of CW30 in a car by correctly fixing it on a safe place free from
Warning
blocking vision or causing accidents, injuries, or damages. A driver must drive safely, attending
traffics, and take special care not to risk safe driving by using this device. To use this device while driving
is dangerous.
to all
Installing a software
A GPS navigation software released by a third party is necessary, and several evaluation copies of such software
are available from various manufacturers. For instance, to use V
VisualGPSce/.
If you want to purchase a GPS navigation software, please ask the GPS manufacturer that the software you are going
to buy is compatible with CW30 before purchasing or downloading or installation.
isualGPS, please visit http://www.visualgps.net/
For the installation and configuration of applications, please refer to the user’s manual for the relevant application.
Setting up GPS on CW30
The basic features of CW30 are as follows:
Choose Start > Settings > System > External GPS.
1
Set GPS program port to COM4 from the program tab.
2
Set GPS program port to COM9 from the hardware tab.
3
Set baud rate to 9600 from the hardware tab.
4
Several programs can access GPS data simultaneously
API or COM8.
. Each program must access GPS data using Microsoft GPS
75
Page 76
Operation
1
1
1
2
1
2
3
Though there is a default setting, it is subject to change.
It may take from a few seconds to several minutes before receiving satellite signals. The outdoor location where
there are no obstacles blocking the sky is ideal. If such a location is not available, it may take longer time to receive
the signals or CW30 may be unable to calculate the initial position quickly. In case of indoor use, the access to GPS
signals may be restricted or impossible.
• When you using a GPS navigation program, make s
mode. If CW30 is in temporary pause mode, power to the GPS module will be cut of
Caution
GPS maps on a microSD card
There are GPS navigation software vendors who are selling GPS maps on microSD cards. In case of using microSD
for navigation software:
Remove the battery from CW30.
1
Push up the SD card slot located inside the battery compartment at the back of PDA to the right.
2
Insert the SD card into the slot.
3
use GPS, the GPS receiver has to search for effective GPS signals again; as a result, the retrieval of
location information will be delayed.
ure CW30 is not switched to temporary pause
f. To continue to
Push the slot where SD card is inserted to the left by pulling it down.
4
Answering calls while using GPS
When there is an incoming call while using a GPS navigation program:
Tap Answer button to receive the call.
1
After finishing the call, tap Talk End button to restart the audio of GPS software.
2
Caution
• When receiving incoming calls while using GPS on CW30, the GPS navigation software will be muted
until the call is finished
76 77
Page 77

When you lose GPS signals in a car
If the window of your car is heating-wired, it may affect the GPS performance of CW30 by blocking the GPS signals. To
strengthen GPS signals, install CW30 to the place exposed to the sky without any obstacles.
For a quick reception of the GPS signal, CW30 requires a clear view of the sky
Auxiliary GPS
If there is no internal GPS in the device, a user may use a Bluetooth GPS. For the details on how to set up a Bluetooth
device, refer to chapter 6 – Bluetooth.
For how to use them, see the user’s manuals released by each vendor.
77
Page 78

Chapter 6. Using Bluetooth
Overview ...........................................79
AFH (Adaptive Frequency Hopping) ...79
Security .............................................80
Composition of Bluetooth .................. 80
The ports supported by Microsoft
Bluetooth Stack .................................81
Hard reset .............................................81
Soft reset ............................................... 81
Pause
Restart ..................................................81
....................................................81
Power states of Bluetooth .................81
Using Microsoft Bluetooth Stack .......81
Turning on or off the Bluetooth
Wireless mode ...................................... 82
Bluetooth activation ............................... 82
Bluetooth deactivation ........
Searching for Bluetooth devices
...................83
...........83
Available Services .............................86
Serial Port Services ..............................87
ActiveSync using serial port services .... 89
A2DP/ AVRCP Services ........................90
Page 79

6
Using Bluetooth
Overview
A device equipped with Bluetooth technology can send and receive data within the frequency range (802.15.1) of
2.4GHz ISM (Industry Scientific and Medical) by communicating wirelessly with radio frequency in FHSS (frequencyhopping spread spectrum). Bluetooth wireless technology is, in particular, designed for short-range communication (10
m / 30 ft) and low-power consumption.
CW30, equipped with Bluetooth technology, is able to exchange information (e.g.
Bluetooth-support devices such as phones, printers, access points, or other mobile computers. To use CW30 as a
modem, you can establish a dial-up modem connection between a computer and CW30.
files, appointments, tasks) with other
AFH (Adaptive Frequency Hopping)
AFH (Adaptive Frequency Hopping), a way of avoiding fixed frequency interference, can be applied to Bluetooth voice.
In order for
and connecting to devices, AFH is not used. Refrain from using Bluetooth pairing or search when an important
802.11b communication is underway. The AFH for Bluetooth consists of four major components:
• It is a way of detecting interference according to the pre-defined channel masks or standards of each channel.
Link management– It distributes adjusted AFH information over the rest of Bluetooth network
•
• Modification of hopping order– It prevents interference by selectively reducing the number of hopping channels.
• Channel maintenance –It is a way of re-evaluating channels periodically.
When AFH is activated, Bluetooth communication hops to near high-speed 802.11b channels instead of passing
through them.
Bluetooth wireless connection of CW30 is working at Class 2 device power level.
mW and the estimated distance is 10 m (32.8 ft). The distance depending on power levels may differ in the measured
environments such as open space or closed office space, etc. Therefore, it is difficult to define the right distance due
to the differences in power and devices.
AFH to operate correctly, all devices of piconet (Bluetooth network) must support AFH. When searching
The maximum output power is 2.5
79
Page 80

Security
In the current Bluetooth specifications, the security level is defined to the level of link and the security level of
applications is not defined. Therefore, application developers may define security mechanisms to meet specific
requirements. The security at the level of applications is implemented per each user, whereas the security at the
level of link is implemented between devices. The Bluetooth specifications define security algorithms and procedures
necessary to certificate devices and, if necessary, to encrypt the data flow of link between devices. The certification of
devices is a fundamental feature of Bluetooth; however, the encryption of link is selective.
The synchronization between Bluetooth devices are performed by generating initialization keys used for link keys
required for certifying devices. Basically, a Bluetooth stack responds without a key when a key is requested (the
response to the key-requesting event is the user’s role).
response transactions. In Bluetooth technology, other PIN numbers or passwords used for generating 128 bit keys
for security and encryption can be re-used. Encrypted keys are extracted from the link keys used for certifying
synchronized devices. Also, the constraints in distance and high-speed frequency hopping of Bluetooth wireless
technology make eavesdropping difficult.
Recommendations are as follows:
• Synchronization should be conducted under secured environments.
• Do not save PIN code at industrial PDA. Store it somewhere else personally.
• Implement a security at the level of applications.
Microsoft stack supports smart synchronization. For the details, see Microsoft MSDN.
The certification of Bluetooth devices are based on attempt-
Composition of Bluetooth
In principle, CW30 is con
The available services via Microsoft Bluetooth stack is listed in Table 6-1.
Microsoft Bluetooth Stack
OBEX Object Push Services
Hands-Free Audio Gateway Services
Serial Port Services
Personal Area Networking Services
PBAP Services
Dial-Up Networking Services
HID Client Services
A2DP/AVRCP Services
figured to use Microsoft Bluetooth stack.
[Table 6-1. Bluetooth services]
80 81
Page 81
The ports supported by Microsoft Bluetooth Stack
COM5
COM9
For more details on ports, contact Technical Support Team at Catchwell.
Power states of Bluetooth
Hard reset
Using Microsoft Bluetooth Stack
If you perform a hard reset, the Bluetooth wireless condition before hard reset remains.
Soft reset
Using Microsoft Bluetooth Stack
If you perform a soft reset, the Bluetooth wireless condition before hard reset remains.
Pause
If there is an active Bluetooth paring, the Bluetooth wireless connection enters low-power consumption mode to
maintain the active paring. If there is no active pairing, the Bluetooth wireless connection will be disconnected.
Using Microsoft Bluetooth Stack
• Under the condition that the Bluetooth pairing between CW30 and other Bluetooth device is active,
if there is no data exchange between the devices, CW30 will be timed out. However
Caution
button of CW30 is pressed, CW30 will be temporarily suspended (except for the case of making a call),
and CW30 will be awake from the suspend mode right after receiving data from the Bluetooth device.
For example, if redialing is made from a headset, the suspension will be disengaged.
Restart
If Bluetooth was on before temporary suspension, it will be powered on when CW30 restarts.
In the next chapter, how to use Microsoft Bluetooth Stack will be explained.
, once the power
81
Page 82
Turning on or off the Bluetooth Wireless mode
1
1
2
Turn off Bluetooth wireless connection to save battery or when you enter an area where wireless connection is
restricted (e.g. aircraft). When wireless connection is turned off, no other Bluetooth devices can detect or connect
to CW30. To exchange information with other Bluetooth devices within the operation range, turn on the Bluetooth
wireless connection. The communication using Bluetooth wireless connection is only available within the close
distance.
• Turn off wireless connection when not in use to extend battery life.
Caution
Bluetooth activation
How to activate Bluetooth
Tab Bluetooth bar after tapping Wireless Manager or tap Start > Settings > Connection > Bluetooth icon.
1
[Figure 6-1. Bluetooth mode tab]
Select Turn on Bluetooth.
2
Tap OK.
3
82 83
Page 83

Bluetooth deactivation
1
1
2
1
1
2
1
2
3
How to deactivate Bluetooth
Tab Bluetooth bar after tapping Wireless Manager or tap Start > Settings > Connection > Bluetooth icon.
1
Deselect Turn on Bluetooth
2
Tap OK.
3
Searching for Bluetooth devices
CW30 can receive information from a detected device without connecting to it. But, when connected, the device
connected to CW30 will automatically exchange data with CW30 if Bluetooth wireless connection is activated.
How to find a Bluetooth device within the range
Activate Bluetooth on both devices.
1
Set the Bluetooth devices to detection and connection-enabled mode.
2
Check the distance between the devices is within 10 m (30 ft).
3
Choose Start > Settings > Connection > Bluetooth > Device.
4
[Figure 6-2 Bluetooth device tab]
83
Page 84

1
2
3
4
5
1
2
3
4
5
6
1
2
3
4
Tab Add New Device. Then CW30 will begin to search for a new Bluetooth device within the range.
5
[Figure 6-3. Searching for a Bluetooth device]
Choose a device from the list.
6
[Figure 6-4 Selecting a Bluetooth device]
Tap Next. A password input screen will appear.
7
84 85
Page 85
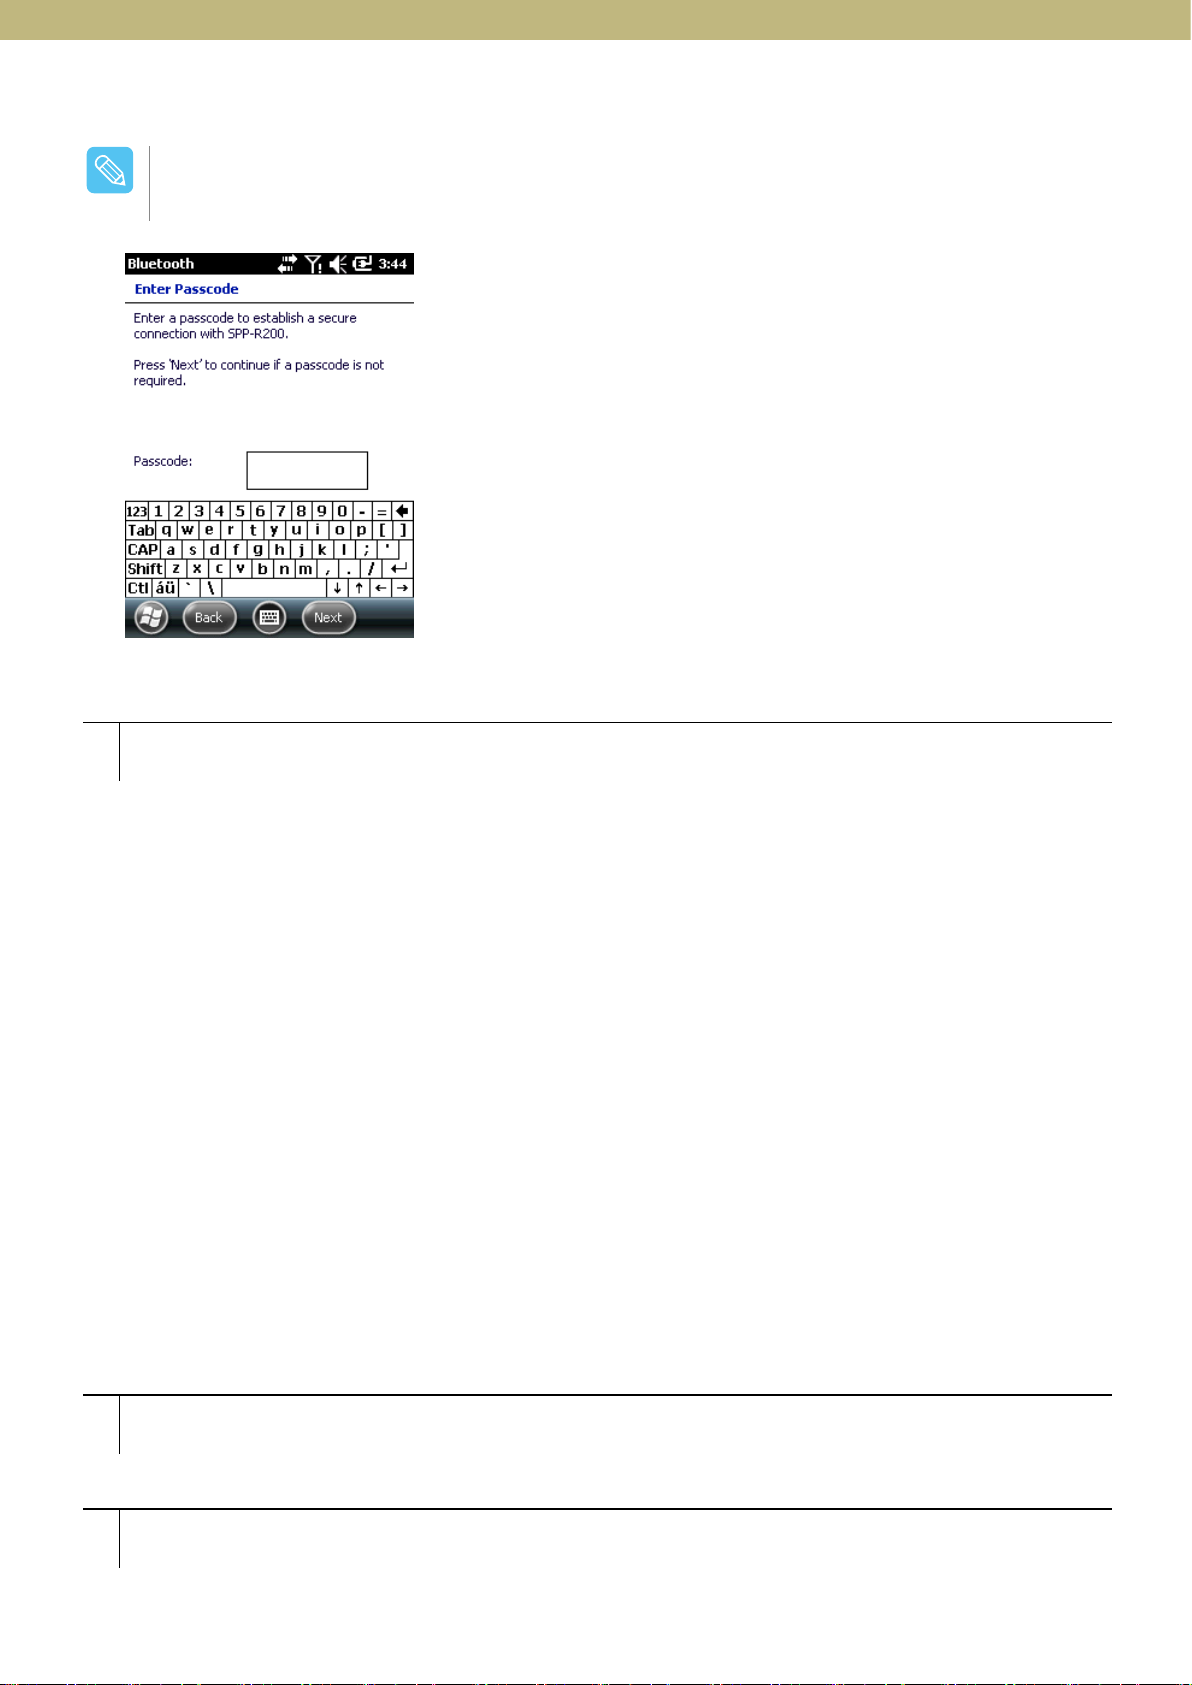
1
2
3
4
5
6
7
1
2
3
4
5
6
7
8
1
2
3
4
5
6
7
8
9
• If smart synchronization is pre-configured or pre-defined PIN is requested, the password input screen
Caution
[Figure 6-5. Entering a password]
8
will not appear.
Enter a password of other device. Then the device will be added to Bluetooth device list.
[Figure 6-6. Bluetooth paring set-up]
message requesting a password will appear. If there is a specific password for the device, enter the password
A
to the Password column and tap Next. If there is no password for the device, enter an arbitrary password and
tap Next. Bluetooth will attempts to establish a partnership with the device.
If there is a pre-defined password, the same message will appear in the other device requesting the password.
9
Enter the password to configure the synchronized connection (if the password of the device is entered, there is
no other tasks to perform on other device).
When connected, a list of appropriate and suppor
10
ting services will appear.
85
Page 86
1
1
2
1
2
3
1
2
3
4
1
2
3
4
5
1
2
3
4
5
6
1
2
3
4
5
6
7
8
9
10
1
2
3
4
5
6
7
8
9
10
11
Choose the service you want and tap OK. If you don’t select the service, it will not be synchronized even if the
11
device is synchronized. If you don’t choose a service, a message that keeps asking you to enter a password will
appear.
The device will appear in the list of the main panel. When the both devices accept their passwords, a reliable
12
(synchronized) partnership is established.
Available Services
Caution
For the information on available services, refer to the next paragraph.
• Some devices
may not require PIN depending on the certification of devices.
Caution
• The partnership with a Bluetooth headset is different from each headset, and the device only remembers
the last connected headset. If a problem occurs while making a connection to a headset, switch the
headset to detection mode. For more details, refer to user’s manual of the headset. Only WAN audio
will be transmitted to a headset. System audio will keep being transmitted to CW30 speaker. You can
answer or make a call using a hands-free profile.
Activate Bluetooth in both devices and turn on detection mode.
1
Check the distance between the devices is within 10 m (30 ft).
2
Tap Start > Settings > Connections > Bluetooth icon.
3
Tap New Device. CW30 will begin to search for a Bluetooth device within the range.
4
Enter the name of the headset, and tap Next. A password window will appear.
5
Enter a password for the headset.
6
Tap Next. CW30 will be connected to the headset. For the instructions on the communications with Bluetooth
7
devices, refer to the user’s manual of the headset.
86 87
Page 87
Serial Port Services
1
1
2
1
2
3
1
2
3
4
1
2
3
4
5
1
2
3
4
5
6
1
2
3
4
5
6
7
1
2
3
4
5
6
7
8
1
2
3
4
5
6
7
8
9
Wireless Bluetooth uses serial port connection as well as the wired serial cable connection. It configures applications
that will be used for connections to correct serial ports.
How to connect to serial ports
Activate Bluetooth on both devices and turn on detection mode.
1
Check the distance between two devices is within 10 m (30 ft).
2
Go to Start > Settings > Connections > Bluetooth > Device tab.
3
Tap Add New Devices. CW30 will start to search for a detectable Bluetooth device within the range.
4
Select a device from the list.
5
Tap Next. A screen asking a password will appear.
6
• If smart synchronization is pre-configured and a pre-defined PIN is being requested, no screen asking a
password will appear.
Caution
Enter a password and tap Next. The device will be added to the Bluetooth list.
7
Tap a serial device from the device list. Connection settings screen will appear
8
Select the serial port confirmation column.
9
Tap Save.
10
.
87
Page 88

1
2
3
4
5
6
7
8
9
10
1
2
3
4
5
6
7
8
9
10
11
1
2
3
4
5
6
7
8
9
10
11
12
1
2
3
4
5
6
7
8
9
10
11
12
13
1
2
3
4
5
6
7
8
9
10
11
12
13
14
Tap COM ports tab.
11
Tap New Outgoing Port. Add a Device screen will appear.
12
Select the serial device and tap Next.
13
Select a COM port from the drop-down menu.
14
15
Tap Finish.
88 89
Page 89
1
1
2
1
2
3
1
2
3
4
1
2
3
4
5
1
2
3
4
5
6
1
2
3
4
5
6
7
8
1
2
3
4
5
6
7
• This process alone will not create a partnership. To make a partnership again, the application must run
Microsoft Bluetooth Stack by opening the selected COM port.
Caution
ActiveSync using serial port services
As is the case with a wired serial cable connection, ActiveSync also uses a wireless Bluetooth serial port connection.
Therefore, an application required for connecting to the correct serial port must be configured.
How to configure Bluetooth ActiveSync
Configure Bluetooth features of the device prior to establish a Bluetooth ActiveSync connection.
• In order to strengthen security, the network bridge (especially Remote NDIS adapter Connection Bridge)
of a computer must be deactivated before connecting the device to a computer passing through the
Caution
The following instructions correspond to the computers running Windows XP higher than SP2.
Activate Bluetooth on both devices and turn on detection mode. Check the distance between two devices is
1
within 10 m (30 ft).
Internet or other networks. For further information on the network bridge, see Windows online help of the
computer.
Double click Start > Settings > Configuration Panel > Bluetooth device.
2
Check Search for a Bluetooth Device checkbox on Option tab and Allow a New Bluetooth Device to Connect to
3
This Computer checkbox.
Choose Receive (start connection from the device) options after clicking Add on COM port tab and click OK.
4
Click OK after checking the added COM port.
Click Start >
5
Click File > Connection Settings
6
Allow one connection out of the followings: Press Start > ActiveSync after selecting a COM port whose number
7
was checked in the previous step from the drop-down menu.
Choose a connection via Menu > Bluetooth.
8
Synchronization will
Home Screen. If certification is required, a password window will appear, then enter a password (PIN code) and
press Enter and repeat this procedure on the other device. The use of password is recommended for enhanced
security and the digit of a password should be between 1 to 16 characters combined with English letters and
numbers. If you are not going to use a password, just click Next.
ActiveSync.
automatically initiate and ActiveSync icon will appear at the bottom of the right corner on the
To disengage the ActiveSync connection, select ActiveSync icon on the Home Screen and click Disconnect.
9
89
Page 90
A2DP/ AVRCP Services
1
1
1
2
1
2
1
2
3
1
2
3
4
A2DP/ AVRCP are used for connecting to high-quality stereo headsets.
Activate Bluetooth on the both device and set the Bluetooth device into detection and connection mode.
1
Check the distance between two devices is within 10 m (30 ft).
2
ap Add a Device after selecting Start > Settings > Connections > Bluetooth. CW30 will start to search for a new
T
3
Bluetooth device within the range.
Select the stereo headset from the list and tap Next. A screen asking a password will appear. For further
4
information, refer to user’s manual of the device.
•
If smart synchronization is pre-configured and a pre-defined PIN is requested, the password screen will
not appear.
Caution
Tapping Connection will pair CW30 with the stereo headset.
5
The stereo headset applicable to hands-free service will be connected to the hands-free service after being connected
to A3DP service.
Tap Add a Device after choosing Start > Settings > Connections > Bluetooth. CW30 will begin to search for a
1
new Bluetooth device within range.
Select the stereo headset in the list. Tapping Next will take you to a password window. For more details, refer to
2
the user’s manual of the device.
• If smart synchronization is pre-configured and a pre-defined PIN is requested, that password screen will
not appear.
Caution
Tap Connection. CW30 will be paired with the stereo headset.
3
90
Page 91

Chapter 7. Maintenance and
Troubleshooting
Maintenance......................................92
Safety instructions on battery ............92
Cleaning ................................................93
Screen ................................................... 93
Scanner window .................................... 93
Connectors ............................................ 93
Cradle ..........................
.........................94
Page 92

7
Maintenance and Troubleshooting
This chapter will provide troubleshooting guidelines including instructions on the cleaning and storage of CW30.
Maintenance
Please follow the below instructions for trouble-free use of the device.
• Take special care to protect the screen of CW30 from being scratched. Only use a plastic pen designed for touch
screen or the provided stylus. Never use other pens or pencils or other sharp object for the screen.
•
The use of protective film is recommended (a sheet of film is included in the box).
• The advantages of using the protective film
- Protecting the screen from scratches or grooves.
- More realistic feeling in writing and touching
- Protecting the screen from damage caused by abrasion and foreign materials.
- Extending the lifespan of the touch screen.
• The screen of CW30 is made of glass. Do not drop CW30 or apply excessive shock to it.
•
Protect CW30 from drastic temperature change.
• When temperature is high, do not keep it on the dashboard of a car and keep it away from heat sources.
• Do not use or store CW30 at dirty, humid, or wet places.
• Use a soft lens-cleaning cloth for cleaning CW30. If the surface of CW30 screen gets dirty, clean it with a diluted
detergent.
• To maximize battery life and performance, replace the rechargeable battery periodically.
may differ in every user depending on how he or she uses it.
The lifespan of battery
Safety instructions on battery
• No debris, combustibles, chemicals are allowed near the battery on charging. Special caution is required in case
of charging the battery under non-commercial environments.
• Use the battery in accordance with the instructions on how to use, store, and recharge in this manual.
•
The use of improper battery may lead to fire and explosion. The charging temperature of the battery for mobile
devices ranges from 0°C to 40°C (32℉ ~ 104℉).
• Do not use incompatible batteries or chargers. The use of incompatible batteries or chargers may result the risks
such as fire, explosion, leakage, etc. If you have any question on battery or charger, contact Catchwell.
• Do not attempt to disassemble, open, bend, modify, puncture, or smash the product or the battery.
• If you drop the device in which the battery installed on the solid surface hard, the battery may be overheated.
• Special attention must be paid to avoid short circuit, contacting a metal conductor to the battery terminals.
• Special attention must be paid to avoid modification, restoration, inserting foreign materials into the battery,
exposing the battery to water or other liquids, fire, explosion, and other risks.
• Children’s handling of the battery should be supervised by parents.
• The used battery must be disposed of immediately as stipulated by the local regulations.
• Do not dispose of the battery in fire.
• In case of swallowing of the battery, consult the doctor immediately.
• If the battery leaks, be careful not to allow skin or eyes to be in contact with the leaking fluid, and if skin or eyes
are already in contact, rinse with a large amount of water and seek medical advice.
• If a trouble suspicious of the damage of the device or the battery occurs, contact Catchwell for check.
Page 93

Cleaning
1
1
2
1
2
3
Cleaning the exterior of the device
Use only computer-cleaning detergents or dedicated cleaners.
Screen
Use only computer-cleaning detergents or dedicated cleaners. Be careful not to allow liquid to pervade into the gaps
at the corner of screen. To avoid any scratch, wipe it off with a non-abrasive dry cloth.
Scanner window
Clean it regularly with a lens cleaner.
Connectors
Remove the battery.
1
Soak the end of a swap in isopropyl alcohol and rub connector pins with it.
2
Be careful not to leave any fluff at the surface of connectors.
3
Repeat this process about three times.
4
If isopropyl alcohol is not available, clean the connector pins with computer-cleaning detergent or a pencil eraser, and
be careful not to leave any foreign materials at the surface of the pins.
93
Page 94
Cradle
1
1
2
1
2
3
1
2
3
4
1
2
3
4
5
Remove the power cable from the cradle.
1
Soak the end of a swap in isopropyl alcohol and rub connector pins.
2
Be careful not to leave fluff at the surface of connectors.
3
Rub the connectors carefully, so that both sides of the connectors are surely cleaned; repeat this three times.
4
Remove the foreign materials inside the cradle with compressed air, etc.
5
Clean the exterior of the cradle with computer-cleaning detergents, etc.
6
As the level of contamination may vary depending on users’ operation environments, clean the device regularly.
information on Li-ion battery recycling in your area. Personal Communications Devices, LLC involvement in this program is
part our commitment to preserving our environment and conserving our natural resources. (RBRC™ is a trademark of the
Rechargeable Battery Recycling Corporation.)
FCC compliance information
This device complies with Part 15 of FCC Rules. Operation is subject to the following two conditions:
(1) This device may not cause harmful interference, and
(2) This device must accept any interference received.
Including interference that may cause undesired operation.
Information to User
This equipment has been tested and found to comply with the limits for a Class B digital device, pursuant to part 15 of
(a) For a Class A digital device or peripheral, the instructions furnished the user
shall include the following or similar statement, placed in a prominent location in the
text of the manual:NOTE: This equipment has been tested and found to comply with the
limits fora Class A digital device, pursuant to Part 15 of the FCC Rules.
These limits aredesigned to provide reasonable protection against harmful interference
whenthe equipment is operated in a commercial environment.
This equipment generates, uses, and can radiate radio frequency energy and,
if not installed and used in accordance with the instruction manual,
may cause harmful interference to radio communications.
Operation of this equipment in a residential area is likely to cause harmful interference
in which case the user will be required to correct the interference at his own expense.
CAUTION: The user who makes changes or modications to the unit without the express approval by the manufacturer will void user authority
to operate the equipment.
94
Page 95

LIMITED WARRANTY
CATCHWELL, Inc. ("CATCHWELL") warrants to the original end user purchaser ("You") that for the Warranty Period listed
below, the Product (excluding any third party software) will be free of defects in materials and workmanship under normal
use.
You must have proof of purchase before returning defective products to CATCHWELL. Returned products must be shipped
prepaid and packaged a
be insured or sent by a carrier who provides a tracking number of the package. CA
Product that is lost or damaged in transit. If CATCHWELL ships a replacement product to you before receiving the original
product and you fail to return the original product to CATCHWELL with
authorization is issued, CATCHWELL will charge you the current manufacturer's suggested retail price of such product.
Your exclusive remedy and CATCHWELL's entire liability under this warranty will be for CATCHWELL at its option to repair
or replace the Product or refund your purchase price less any rebates. CATCHWELL does not warrant against
data or images (including data stored on Product returned to CATCHWELL for service), and assumes no liability for such
loss.
ALL IMPLIED WARRANTIES OR CONDITIONS OF MERCHANTABILITY, SATISFACTORY QUALITY OR FITNESS FOR
A PARTICULAR PURPOSE ARE LIMITED TO THE DURATION OF THE APPLICABLE EXPRESS WARRANTY. ALL
OTHER EXPRESS OR IMPLIED CONDITIONS, REPRESENTATIONS AND WARRANTIES, INCLUDING AN
W
ARRANTY OF NON-INFRINGEMENT, ARE DISCLAIMED TO THE FULLEST EXTENT PERMITTED BY LAW.
There are inherent risks associated with any biometric sensor technology and security safeguard, including encryption
technology, and biometric sensors and security safeguards, by their nature, are capable of circumvention. CATCHWELL
cannot, and does not, guarantee that your data will not be accessed by
any warranties to that effect to the fullest extent permitted by law. You should not use this product to protect sensitive data
such as financial information or for accessing corporate networks.
Some jurisdictions do not allow limitations on how long an implied warranty lasts or at all, so the above limitation may not
apply to you. This warranty gives y
This limitation does not af
All third party software provided with the Product is provided "AS IS". You assume the entire risk as to the quality,
performance, accuracy and effect of such software, and should it prove defective, you, and not CATCHWELL, assume the
entire cost of all ne
O THE EXTENT NOT PROHIBITED BY LAW, IN NO EVENT WILL CATCHWELL BE LIABLE FOR ANY LOST IMAGES,
T
DATA, REVENUE OR PROFIT, OR FOR SPECIAL, INDIRECT, CONSEQUENTIAL, INCIDENTAL OR PUNITIVE
DAMAGES, HOWEVER CAUSED REGARDLESS OF THE THEORY OF LIABILITY, ARISING OUT OF OR RELATED
TO THE USE OF OR INABILITY TO USE THE PRODUCT, EVEN IF CATCHWELL HAS BEEN ADVISED OF THE
POSSIBILI
YOU FOR
TY OF SUCH DAMAGES. IN NO EVENT WILL CATCHWELL'S LIABILITY EXCEED THE AMOUNT PAID BY
THE PRODUCT.
ppropriately to prevent any damage in transit, and it is recommended that the package should
TCHWELL is not responsible for any
in thirty (30) days from the date the warranty service
unauthorized persons, and CATCHWELL
ou specific legal rights, and you may also have other rights, which vary by jurisdiction.
fect your statutory rights.
cessary servicing or repair.
loss of any
Y IMPLIED
disclaims
The foregoing limitations will apply even if any warranty or remedy provided under this Agreement fails of its essential
purpose.
Product Warranty Period
CATCHWELL CW20 / CW30 :
15 month from the manufactured date
Handheld Mobile Computer
Page 96

INDEX
1XRTT 25
3G 25, 26
A
A2DP/ AVRCP 90
About 37
Active Sync 33, 89
adapter 12, 13, 14
Adjusting Volume 39
Alarms 31
Answering Calls 60
Antenna 26
Audio mode 56
audio volume 57
Auxiliary GPS 77
B
backlight 20, 42
Backlight 37
backup battery 25
Barcode 37
Barcode scanner 10
battery 11, 14, 16
Battery 10
battery level 40
battery saving 19
Beam 35
Bluetooth 79
Bluetooth activation 82
Bluetooth deactiv
Bluetooth headsets 56
Bluetooth Stack 80, 81
ation 83
Charging the battery 17
Cleaning 93
Clock & Alarms 34
communication 7
Connected 25
Connections 34, 35
connector 9
Contacts 30, 58
cradle 13
Cradle 12
D
Device Profile 37
Digital camera 10
Direction 9
E
Ear phone 9
Earset 11, 14
EGPRS 25
email 25
E-mail 30
emergency calls 59
End 9
EVDO 25, 26
External GPS 37
F
find contacts 61
Flash 10
Function 9
Function buttons 45
C
Calculator 31
Calendar 30
Call 26
call details 69
Call History 59, 66
Call on hold 26
capture images 45
Certificates 37
Charging temperature 17
G
GPRS 25, 26
GPS 75
H
Handbelt 10
hand strap 22
Hand strap 11, 13
hard reset 41
Page 97

headsets 56
Home 30, 34
Home Screen 28
HSDPA 25, 26
O
ok 9
P
I
Idling state 25
Image decoding 50, 52
Image scanning 53
indicator bar 30
information status indicating bar 28
Installation 6
Internet Explorer 30
K
Keymap 9
Keypad 38
L
Laser decoding 50
Laser scanning 50
Leather case 13
Locking 43
Locks 34
M
password 43, 84, 85
PDA 11
Personal 35
phone 55
Phone 30, 36
phone call 57
Phone Dialer 58
phone numbers 61
pictures and videos 46
Picture & videos 31
PIN 85
Power 6, 9, 34, 45
Power cord 12, 13, 14
protective film 92
Protective film 11, 14
R
Regional Settings 38
Remote Desktop Mobile 33
Remove Programs 38
set 10
Re
Roaming 26
run 9
Maintenance 92
Marketplace 31
memo 62
Memory 38
message 25
Messenger 31
Microphone 9
MicroSD 22
microSD car
missed calls 26
mute the microphone 62
d 76
N
Notes 32
notifications 25
Notifications 25
S
Safety instructions 92
Scan 9
scan barcodes 45
Scanning barcodes 51
Screen 38
screen protection 22
SD memory 10
Searching for Bluetooth devices 83
Select 9
Send 9
Serial Port 87
Settings 30, 34
SIM 15, 26
soft reset 41
Page 98

sound 27
Sounds & Notifications 34
speaker 9, 10
Speed Dial 63
Start Screen 24, 30
Stylus 11, 13
Stylus holder 10
Switching calls 70
Synchronization 25
System 35
T
Taking a picture 47
Task Manager 33
Tasks 32
Text 30
Text message 71
Today 15
Turning on or off the phone 55
U
USB 12, 13, 14
USB Connections 38
USB – PC 35
V
Vibration 27
Video 48
W
Waist strap 11, 13
Warranty 7
Wi-Fi 25, 35
Windows Media
Wireless Manager 15, 20, 35
31
98
Page 99

Body worm operation
This device was tested for typical body-worn operations with the back of the phone
kept 20 mm. from the body. To maintain compliance with FCC RF exposure
requirements, use only belt-clips, holsters or similar accessories that maintain a 20
mm. separation distance between the user’s body and the back of the phone,
including the antenna. The use of belt-clips, holsters and similar accessories should
not contain
metallic components in its assembly. The use of accessories that do not satisfy these
requirements may not comply with FCC RF exposure requirements, and should be
avoided.
Page 100

SAR INFORMATION
THIS MODEL PHONE MEETS THE GOVERNMENT’S
REQUIREMENTS FOR EXPOSURE TO RADIO WAVES.
Your wireless phone is a radio transmitter and receiver. It is designed and manufactured not to
exceed the emission limits for exposure to radiofrequency (RF) energy set by the Federal
Communications Commission of the U.S. Government. These limits are part of comprehensive
guidelines and establish permitted levels of RF energy fo r the general population. The guidelines
are based on standards that were developed by independent scientific organizations through
periodic and thorough evaluation of scientific studies. The standards include a substantial safety
margin designed to assure the safet y of all persons, regardless of age and health. The exposure
standard for wireless mobile phones employs a unit of measurement known as the Specific
Absorption Rate, or SAR. The SAR limit set by the FCC is 1.6 W/kg. *
Tests for SAR are conducted with the phone transmitting at its h ighest certified power level in all
tested frequency bands. Although the SAR is determined at the h ighest certified power level, the
actual SAR level of the phone while operating can be well below the maximum value. This is
because the phone is designed to operate at multiple power levels so as to use only the power
required to reach the network. In general, the closer you are to a wireless base station antenna, the
lower the power output. Before a phone model is available for sale to the public, it must be tested
and certified to the FCC that it does not exceed the limit established by the government adopted
requirement for safe exposure. The tests are pe rformed in positions and locations (e.g., at the ear
and worn on the body) as required by the FCC for each model. The highest SAR value for this
model phone when tested for use at the ear is 0.544 W/Kg
described in this user guide, is 0.136 W/Kg
models, depending upon available accessories and FCC requirements). While there may be
differences between the SAR levels of various phones and at various positions, they all meet the
government requirement for safe exposure. The FCC has granted an Equipment Authorization for
this model phone with all reported SAR levels evaluated as in compliance with the FCC RF
exposure guidelines. SAR information on this model phone is on file with the FCC and can be found
under the Display Grant section of http://www.fcc.gov/ oet/fccid after searching on FCC ID:
ZP4CW30.
Additional information on Specific Absorption Rates (SAR) can be found on the Cellular
Telecommunications Industry Asso-ciation (CTIA) web-site at http://www.wow-com.com
United States and Canada, the SAR limit for mobile phones used by the public is 1.6 watts/kg
(W/kg) averaged over one gram of tissue. The standard incorporates a sub-stantial margin of safety
to give additional protection for the publ i c and to ac c ou nt for any va riation s in mea s urements.
. (Body-worn measurements differ among phone
and when worn on the body , as
. * In the
 Loading...