

Page 1
1
Page 2

Table of Contents
Table of Contents ......................................2
Safety Precautions ....................................4
Chapter 1 Read before Use.............6
Product Components ...................7
Product Components ................................ 7
Peripherals and Accessories ....................8
Accessories for individual use ..................9
device - Front View ................................. 10
Part Names and Functions ........10
device – Rear View ................................. 11
USIM Card Insertion ...............................12
USIM Card Removal ...............................12
Insertion/Removal of USIM Card ...
12
MicroSD Card Insertion .............13
Battery Insertion ......................................14
Battery Removal .....................................14
Insertion/Removal of Battery ....14
Charging the Battery ..................15
device Power On ....................................16
device Power Off ....................................16
device Power On/Off ..................16
Checking Battery Status .........................17
Battery Maintenance ..................17
Power Cut Setup .....................................18
Sleep Mode ............................................. 19
Backlight Setup .......................................20
Mouse .....................................................30
Owner Properties ....................................30
Stylus ......................................................31
System Properties ........
Password ................................................32
Certificates ..............................................32
Internet Options ......................................33
Input Panel ..............................................34
Storage Manager .................................... 34
Power Control Properties ........................35
Dialing ......................
Backlight .................................................36
Keyboard ................................................36
Remove Programs ..................................36
Barcode ..................................................37
Bluetooth Manager .................................37
Device Profile ..........................................37
KeyPad ................
PC Connection ........................................39
Record Settings ......................................39
Utility Manager ........................................40
..........................31
...............................35
...................................38
Screen Calibration ......................40
Wireless Setting ......................................40
Software Reset .......................................41
Reconfiguration 5 (Reset) ..........41
Hardware Reset ......................................42
Using the Stylus .........................42
Chapter 3 How to Use Phone .......43
System Specifications ...............21
Chapter 2 device Basic Usage .....22
Start Screen ................................23
Status Icon ..................................23
Opening [Control Panel] .........................24
Setting Up ...................................24
Region and Language Settings ..............25
Date/Time ...............................................25
Network and Dial-Up Connections ..........26
Display ....................................................28
Volume and Sound .................................29
Data Capture ..........................................44
Device Buttons for the Phone
Program ......................................44
Turning Phone On/Off ................45
Turning On ..............................................45
Turning Off ..............................................45
Phone Call / Receive ..................46
Making a Phone Call ............................... 46
Receiving a Phone Call .........................46
SMS Message .............................46
SMS message screen ............................. 46
2
Page 3

Sending Message ................................... 47
Recording Video .....................................69
Address Book .............................48
Adding Phone Number ...........................48
Edit Phone Number ................................48
Call History .................................49
Phone Setting .............................49
Version Information ................................. 49
Sound Set ............................................... 50
Display ....................................................50
Network Setting ......................................51
USIM .......................................................51
SMS ........................................................51
Call Option Management ........................ 52
Managing Phonebook .............................52
Chapter 4 How to Communicate
with Other devices.........................53
Bluetooth .....................................54
Adding Quick luancher list ......................56
Digital Camera ............................69
Chapter 6 How to Use
Applications ...................................70
Microsoft Word Pad ...................71
How to Use Keyboard .............................71
How to Use Transcriber .......................... 72
Starting Utility Manager ..........................73
Utility Manager ............................73
How to Set Up Start Program .................74
How to Set Up Quick Launcher ..............75
TroubleShooting .........................76
WI-FI Wireless Communication
How to Set up Wireless LAN
Configuration ..........................................57
IP Setting ................................................58
Wireless LAN Setting ..............................59
Connecting PC through Cradle ...............6
Connecting PC with USB Cable Directly 60
...56
Connecting devices Using
USB Cable ...................................60
Installing ActiveSync® on PC ..................61
Communication with PC ............61
How to Set up a Partnership ...................62
How to Set Up GPS ................................ 65
GPS Communications ................65
Chapter 5 How to Use Scanner
/Camera ..........................................66
Laser scanning (1D Scanner) ....67
0
Imager scanning
(1D/2D Scanner) ..........................68
Taking Picture .........................................69
3
Page 4

Safety Precautions
Following cautions are to ensure user’s safety and to prevent damage to the product. Please read them carefully
before use.
Power Supply
If any unusual sound, smell or smoke is detected, unplug the electric power cord immediately and contact the
customer support center.
Do not handle the electric power plug with wet hands.
When thunder or lightening struck outside, do not recharge the battery and unplug the electric power plug of the
cradle.
Do not use the product in an area with much humidity.
If the product gets wet, turn off the power, remove the battery from the main body and dry it with towel or cloth
before re-using it.
When recharging the battery, please use the cradle if possible.
After removing an old battery, please replace with a new one within a week.
Installation and storage
Do not leave the product inside a vehicle, it might be stolen.
Keep the product or stylus out of children’s reach. Children may get hurt.
When the product is not used for a long time, place the main body in the cradle for continuous power supply.
While in Use
Fully charge the battery before first use of the product.
Back up the data and programs in a different location before setting the product.
Unsaved data is to be lost.
Do not p
Do not use the product in an area with much humidity, lots of dust or excessive heat (heater, cigarette, etc.).
Do not drop the product or apply excessive force on it.
If any foreign material is on the touch screen, clean it well with a soft cloth.
Do not use a sharp object (pen, wire, screwdriver) while using the touch screen, and use the provided stylus or
tools designed for touch screen only.
Use genuine parts only such as battery, power adapter, and cradle provided.
The warrenty does not cover for the damage caused by other applications installed by user.
Please do not allow metal objects to touch the battery contact surface.
lace heavy objects on top of the product.
4
Page 5

Communication
Please do not manipulate your product nor make a phone call in your vehicle.
This may cause a traffic accident.
Please turn off the product while on an airplane. Electromagnetic waves from the product can affect the plane’s
control panel mechanics.
Please turn off the product at the hospital. Electromagnetic wave from the product can affect the medical
equipment.
Please obey explosives regulations. It is safe not to use the phone around the gas station.
Please be careful while using headset (earplug). Long-term exposure to sound at high volumes can damage
hearing.
If the product has flashlight function, do not use the product in front of a person (or
animal)’s eyes. This may impair the vision.
Repair and Maintenance
Do not open, repair or modify the product according to your taste. Doing so will void the warranty.
If a repair is needed, please contact one of our certified customer support centers, or contact the dealer where
you purchased the product.
5
Page 6

Chapter 1 Read before Use
Product Components ..................7
Product Components ..........................7
Peripherals and Accessories ...............8
Accessories for individual use .............9
device - Front View ...........................10
Part Names and Functions .......10
device – Rear View ........................... 11
USIM Card Insertion..........................12
USIM Card Removal .........................12
Insertion/Removal of USIM Card
..12
MicroSD Card Insertion .............13
Battery Insertion ................................14
Battery Removal................................14
Insertion/Removal of Battery....14
Charging the Battery .................15
device Power On ...............................16
device Power Off ...............................16
device Power On/Off .................16
Checking Battery Status....................17
Battery Maintenance .................17
Power Cut Setup ...............................18
Sleep Mode .......................................19
Backlight Setup .................................20
System Specifications ..............21
Page 7
1
Product Components
Product Components
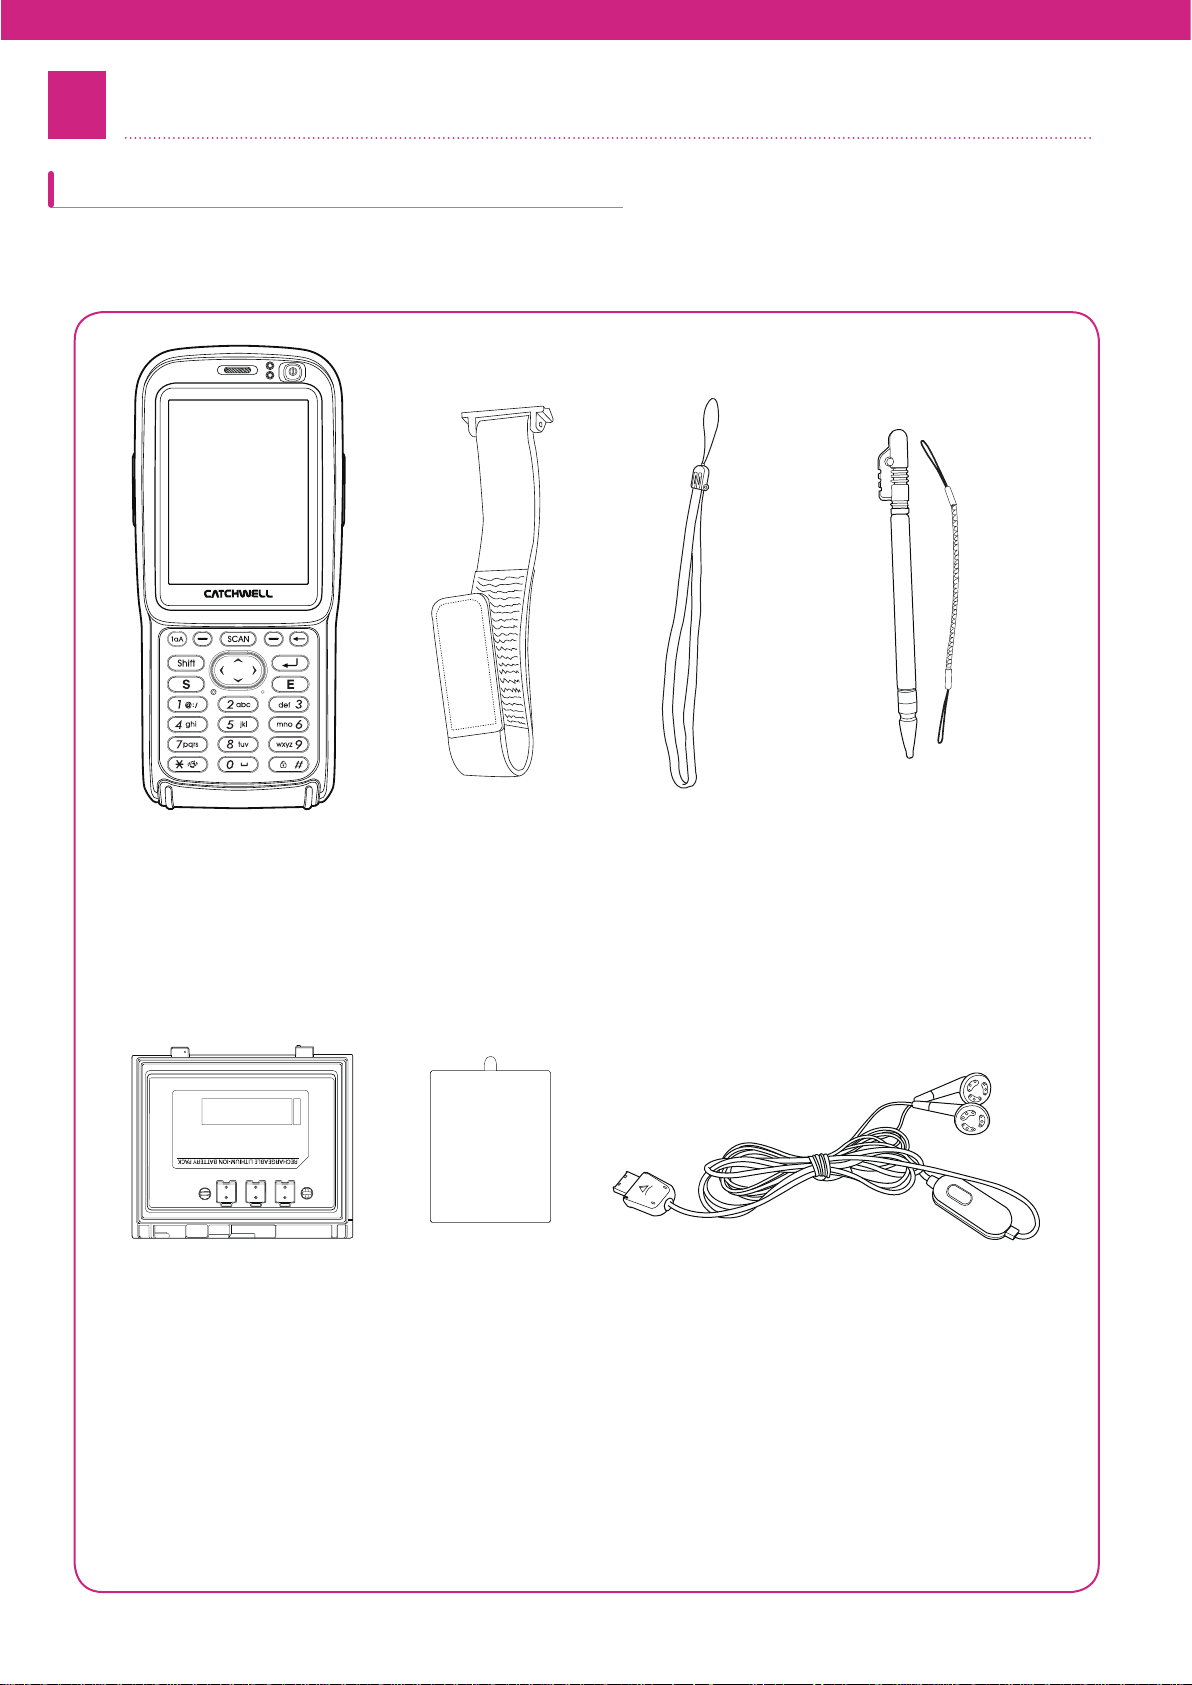
Please check to see if all of the following items are present in the product box. If anything is missing or broken, please
contact the place where you purchased the product. The provided components may vary depending on its options.
Main unit of PDA
Li-ion polymer battery
Hand strap
Protective film
Wrist Strap
Earset: if it has a phone function
Stylus and its string
7
Page 8
Peripherals and Accessories
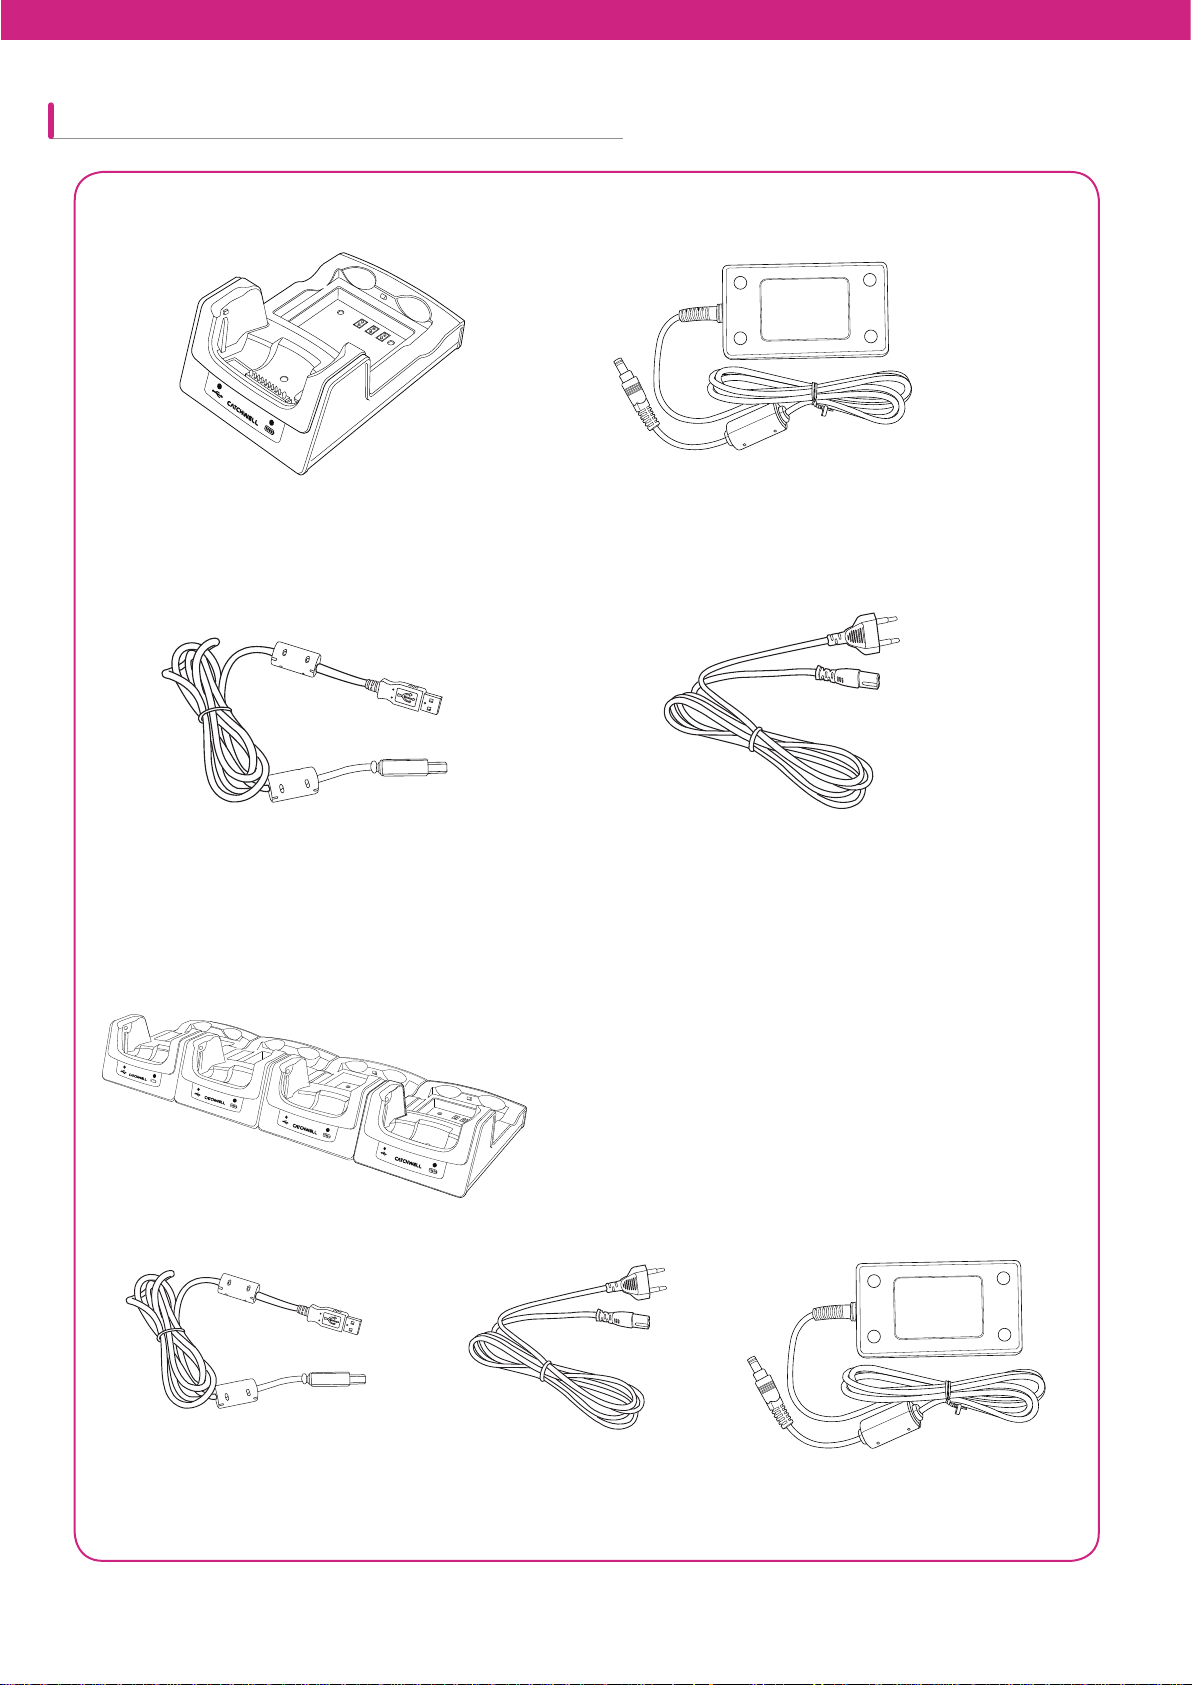
1-slot cradle
Cradle for charging and communication
USB cable
4-slot cradle components
Power adapter
Power cord
4-slot cradle
GG G
Power adapterUSB cable Power cord
8
Page 9
Accessories for individual use
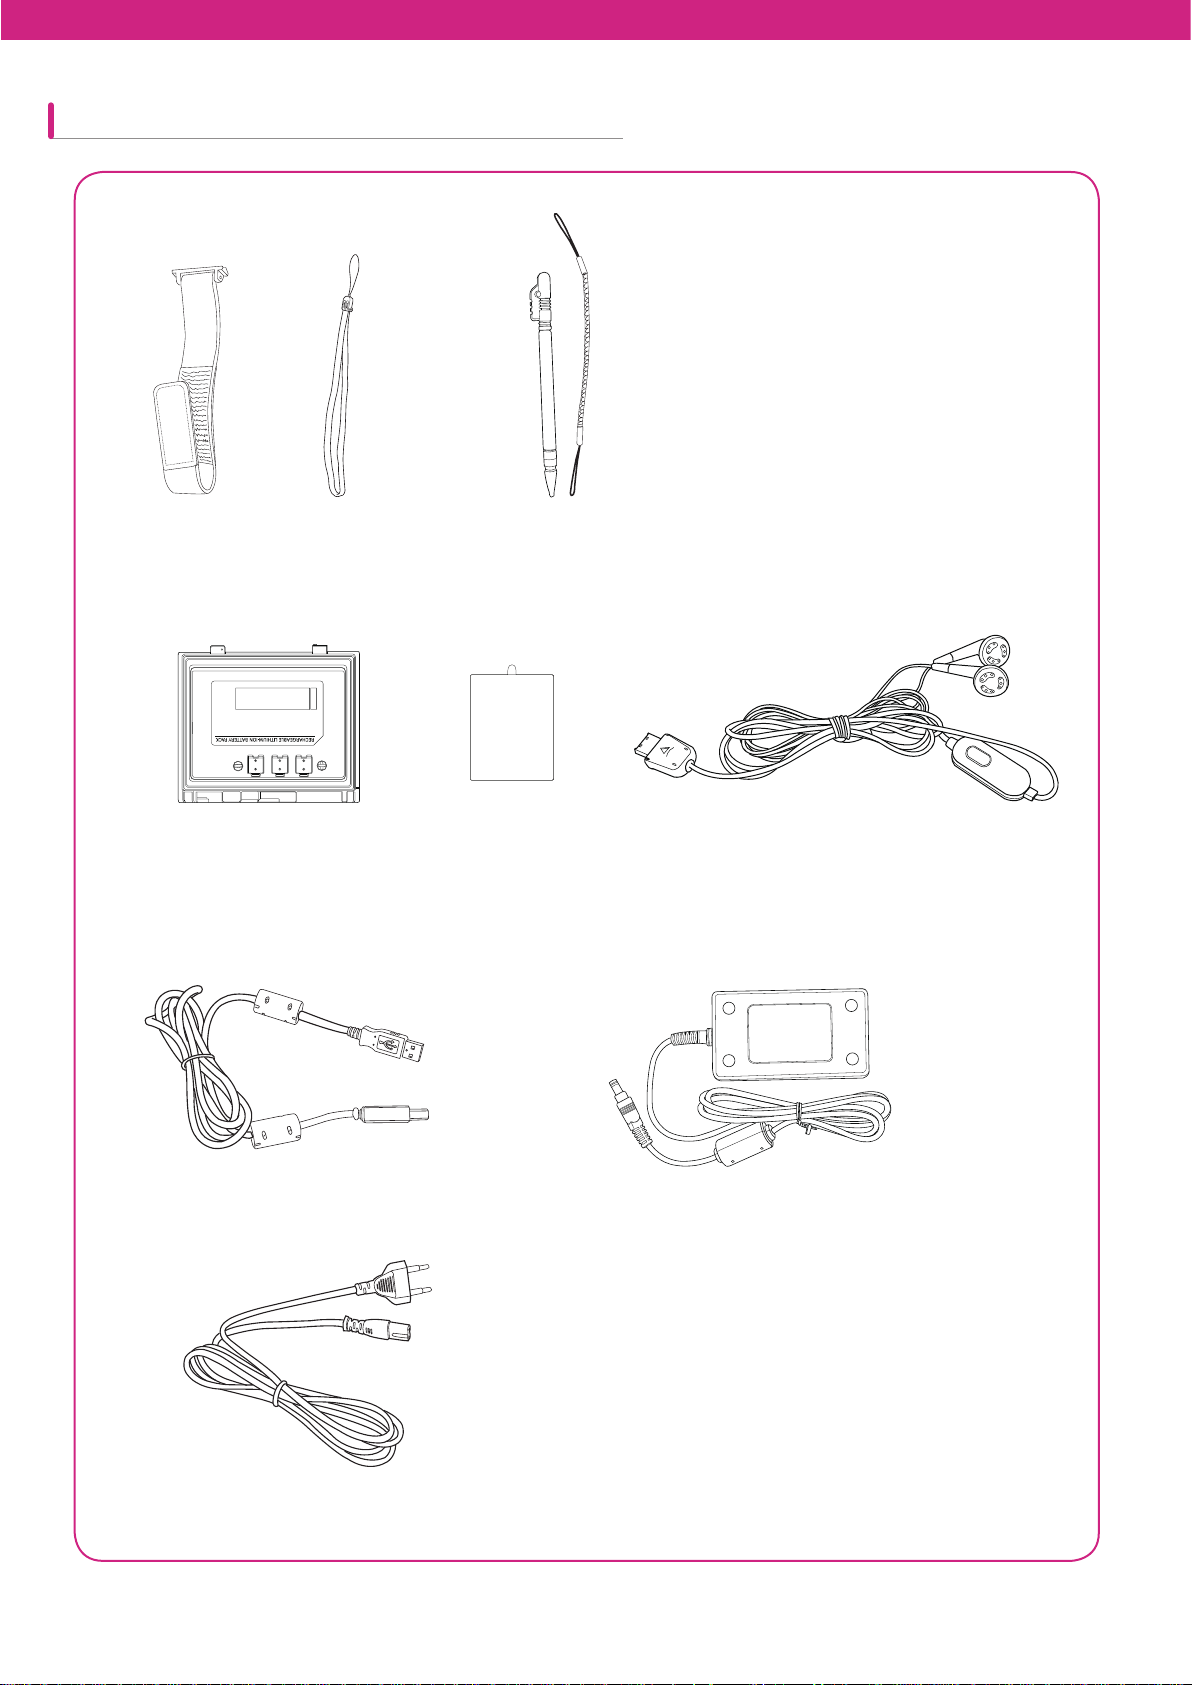
Hand strap
Li-ion polymer battery
Wrist Strap
Stylus
Stylus string
Protective film Earset
USB cable
Power cord
Power adapter
9
Page 10
2
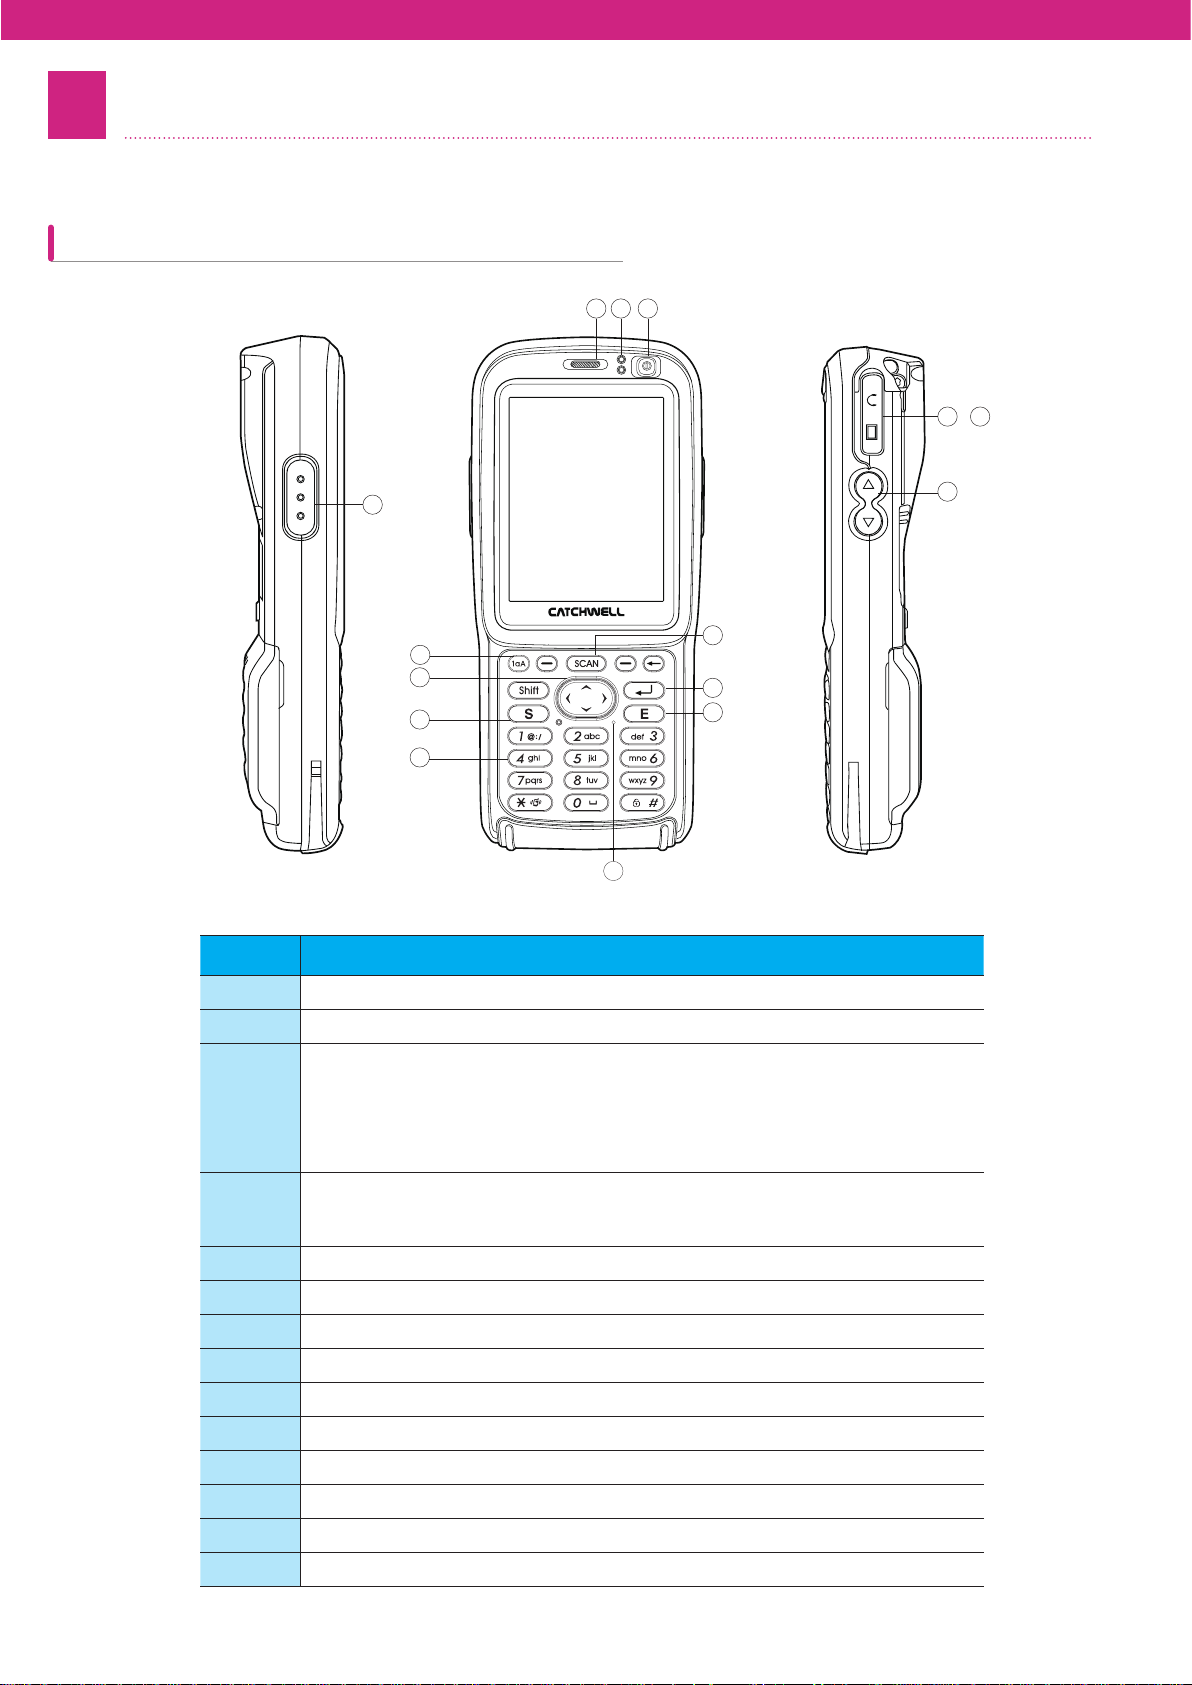
This section explains device parts’ names and their functions.
Part Names and Functions
device - Front View
12
3 4
13 1/
2
11
6
5
7
8
No Contents
Η
Θ
Ι
Κ
Λ
Μ
Ν
Ξ
Ο
Π
Ρ
Σ
Τ
Earphone Jack
Scan Button
Status LED
&KDUJLQJ5HG/('VWHDG\
3URFHVVLQJ%OXH/('ÀDVKLQJ
*UHHQ/('VWHDG\&KDUJHFRPSOHWH
5HG/('ÀDVKLQJ&RQWDFWHUURU
3RZHU%XWWRQ
6KRUWSUHVV%DFNOLJKWRQ
/RQJSUHVV6OHHSPRGH
&DOO6HQG%XWWRQ
1DYLJDWLRQ%XWWRQ8S'RZQ/HIW5LJKW
$OSKDQXPHULF.H\SDG
0LFURSKRQH
&DOO(QG%XWWRQ
2.%XWWRQ
.H\0DS0RGH&RQYHUVLRQ%XWWRQ
Front Speaker
SLQ&RQQHFWRU
9ROXPHEXWWRQ
14
2
10
9
10
Page 11
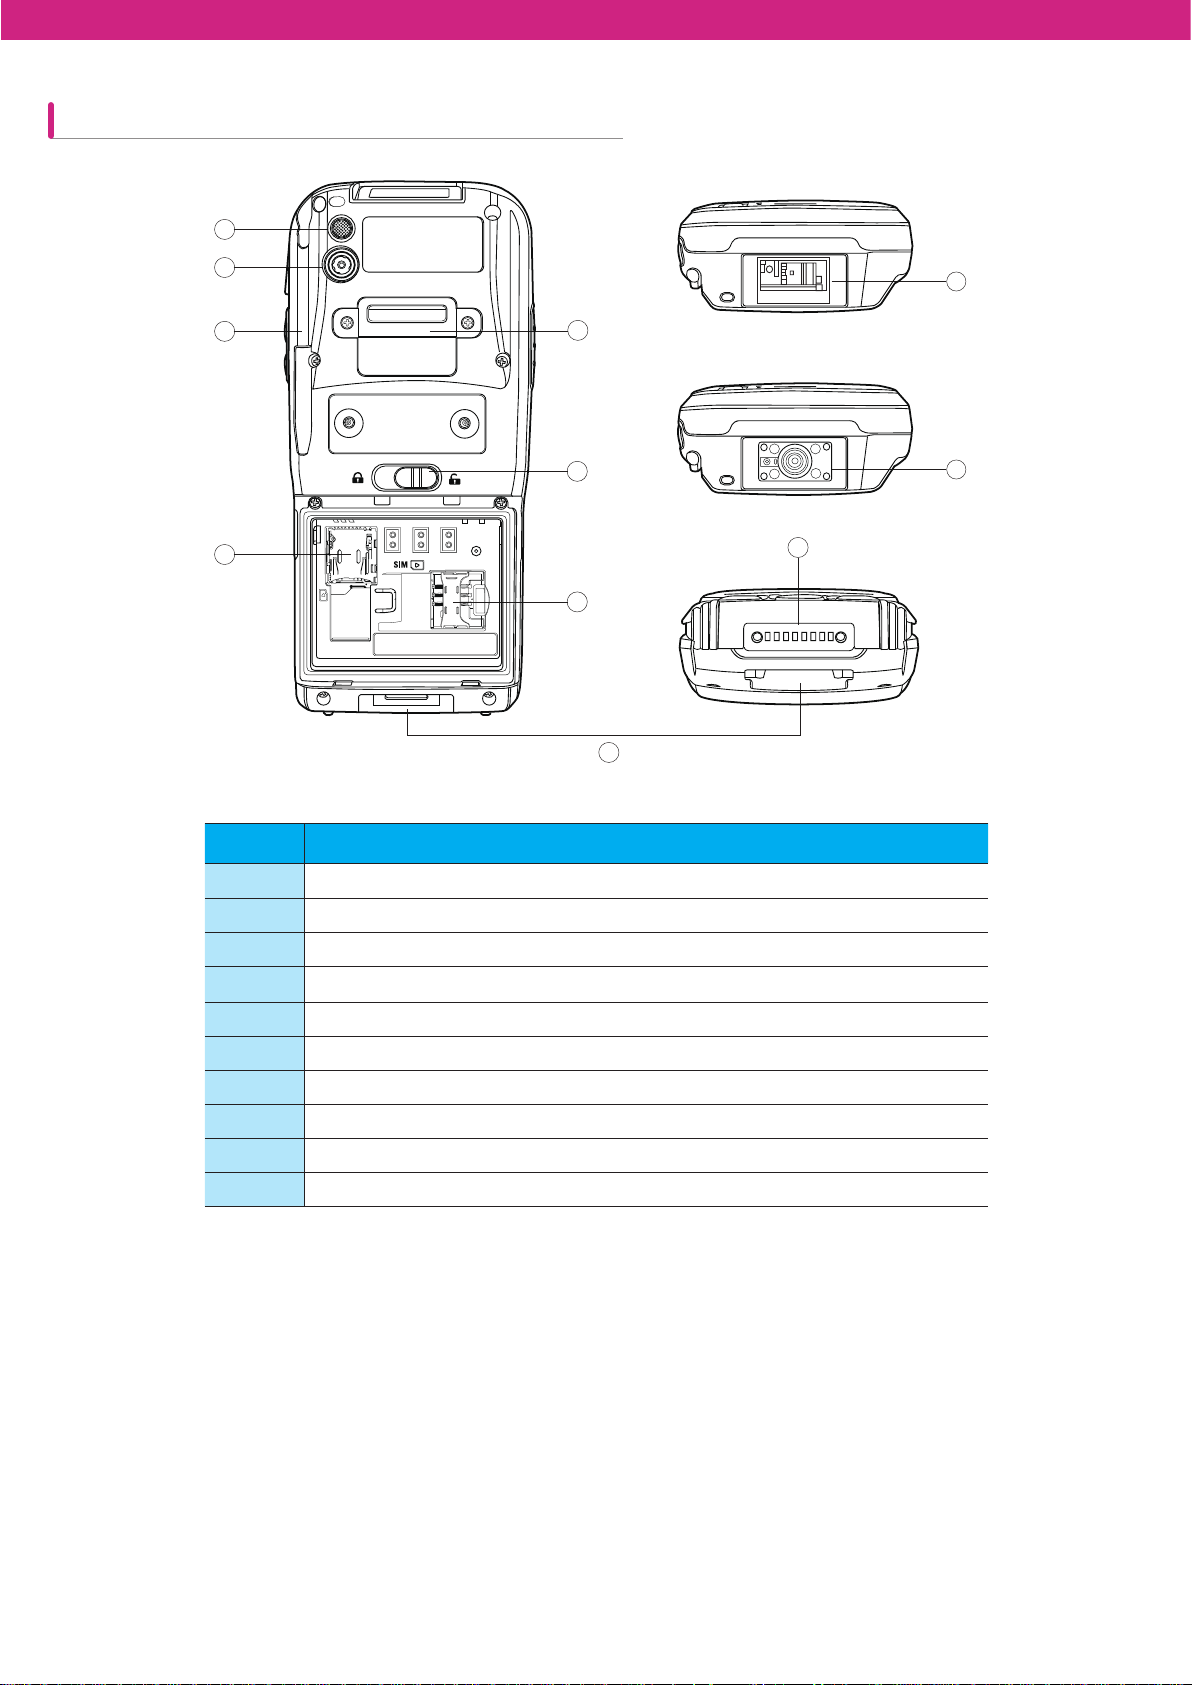
device – Rear View
7
9
8
3
1
2
4
5
No Contents
10
10
6
Η
Θ
Ι
Κ
Λ
Μ
Ν
Ξ
Ο
Π
:ULVW6WUDS0RXQW
%DWWHU\5HOHDVH/DWFK
0LFUR6'0HPRU\&DUG6ORW
86,06ORW
:ULVW6WUDS0RXQW
%DWWHU\&KDUJHU3RUW
3KRWR)ODVK
6W\OXV+ROGHU
'LJLWDO&DPHUD
%DUFRGH6FDQQHU6FDQQHUVKDSHPD\YDU\GHSHQGLQJRQWKHPRGHO
11
Page 12
3
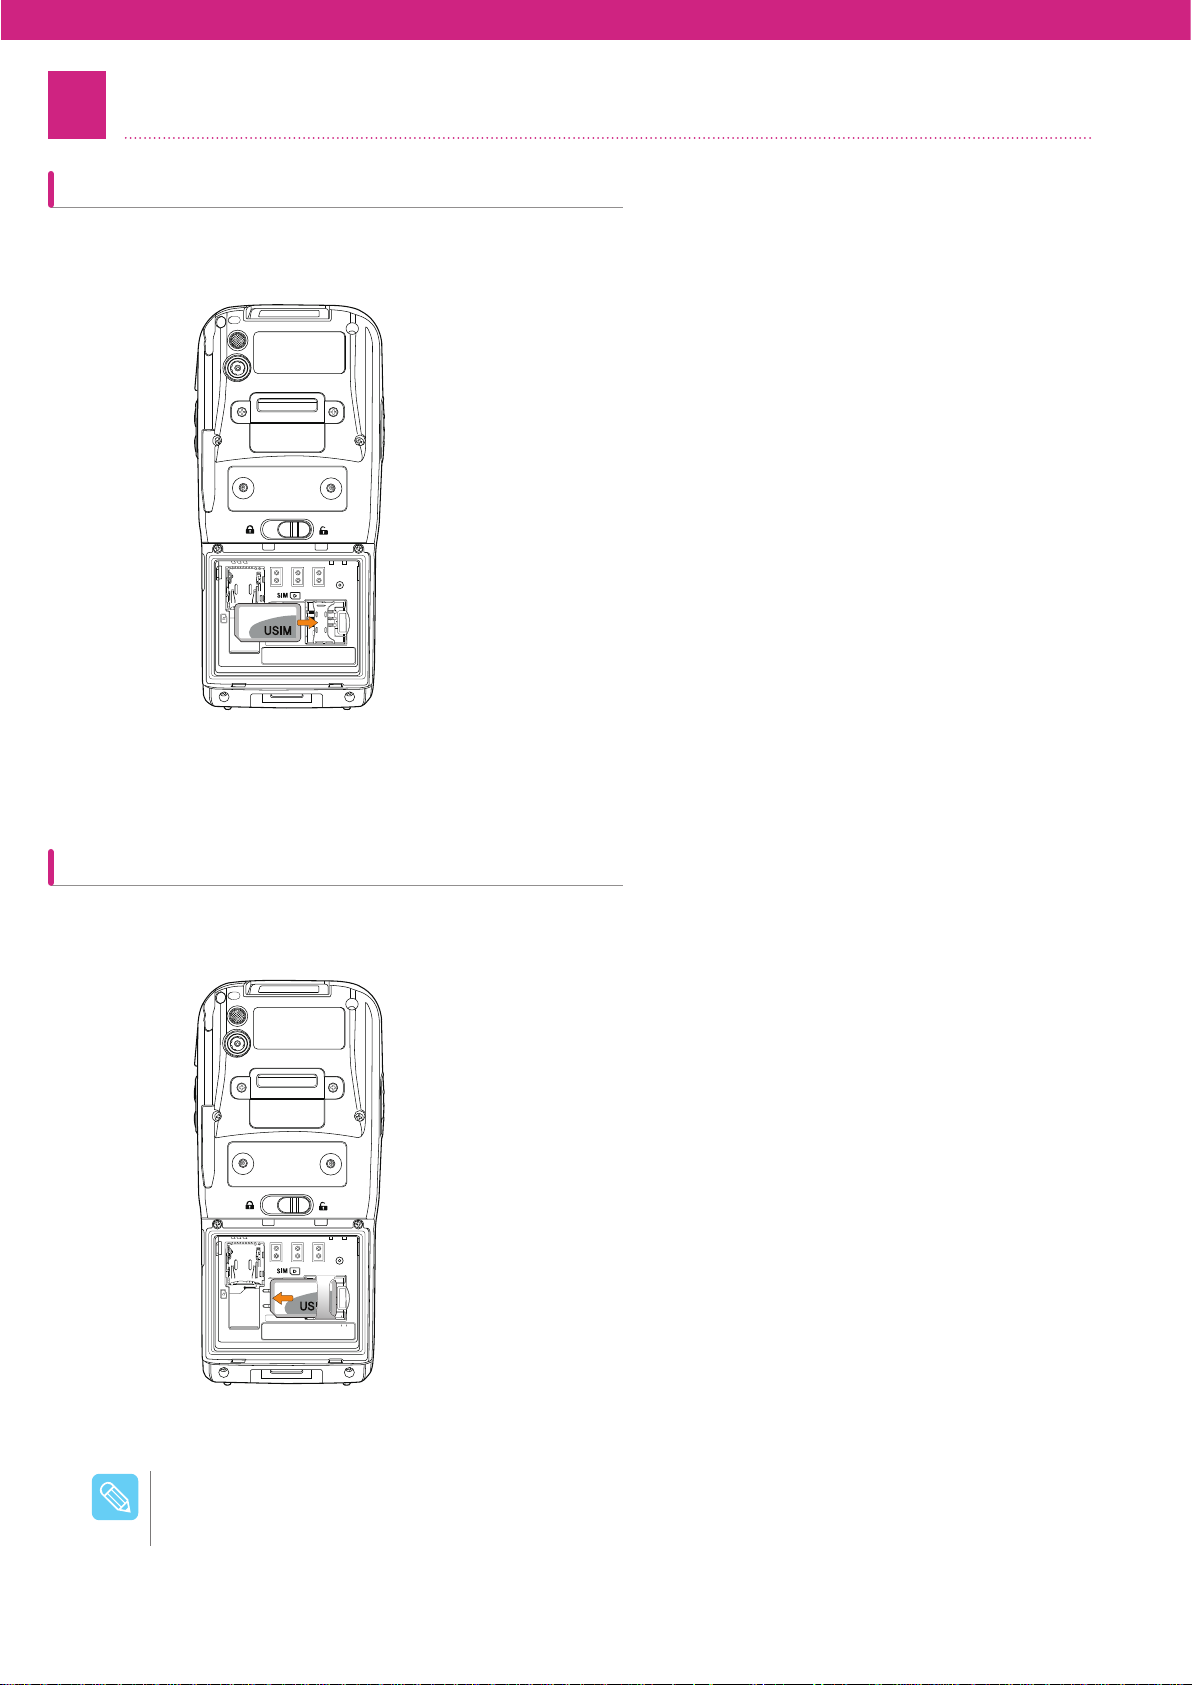
Insertion/Removal of USIM Card
USIM Card Insertion
Insert USIM card to the right.
USIM Card Removal
To remove the USIM card, while pressing down the Lock to the left side of the slot, push the USIM card to the left.
/PUF
Please make sure of correct orientation of USIM card when inserting. (The golden contact of the card
should face toward the device.)
12
Page 13
4
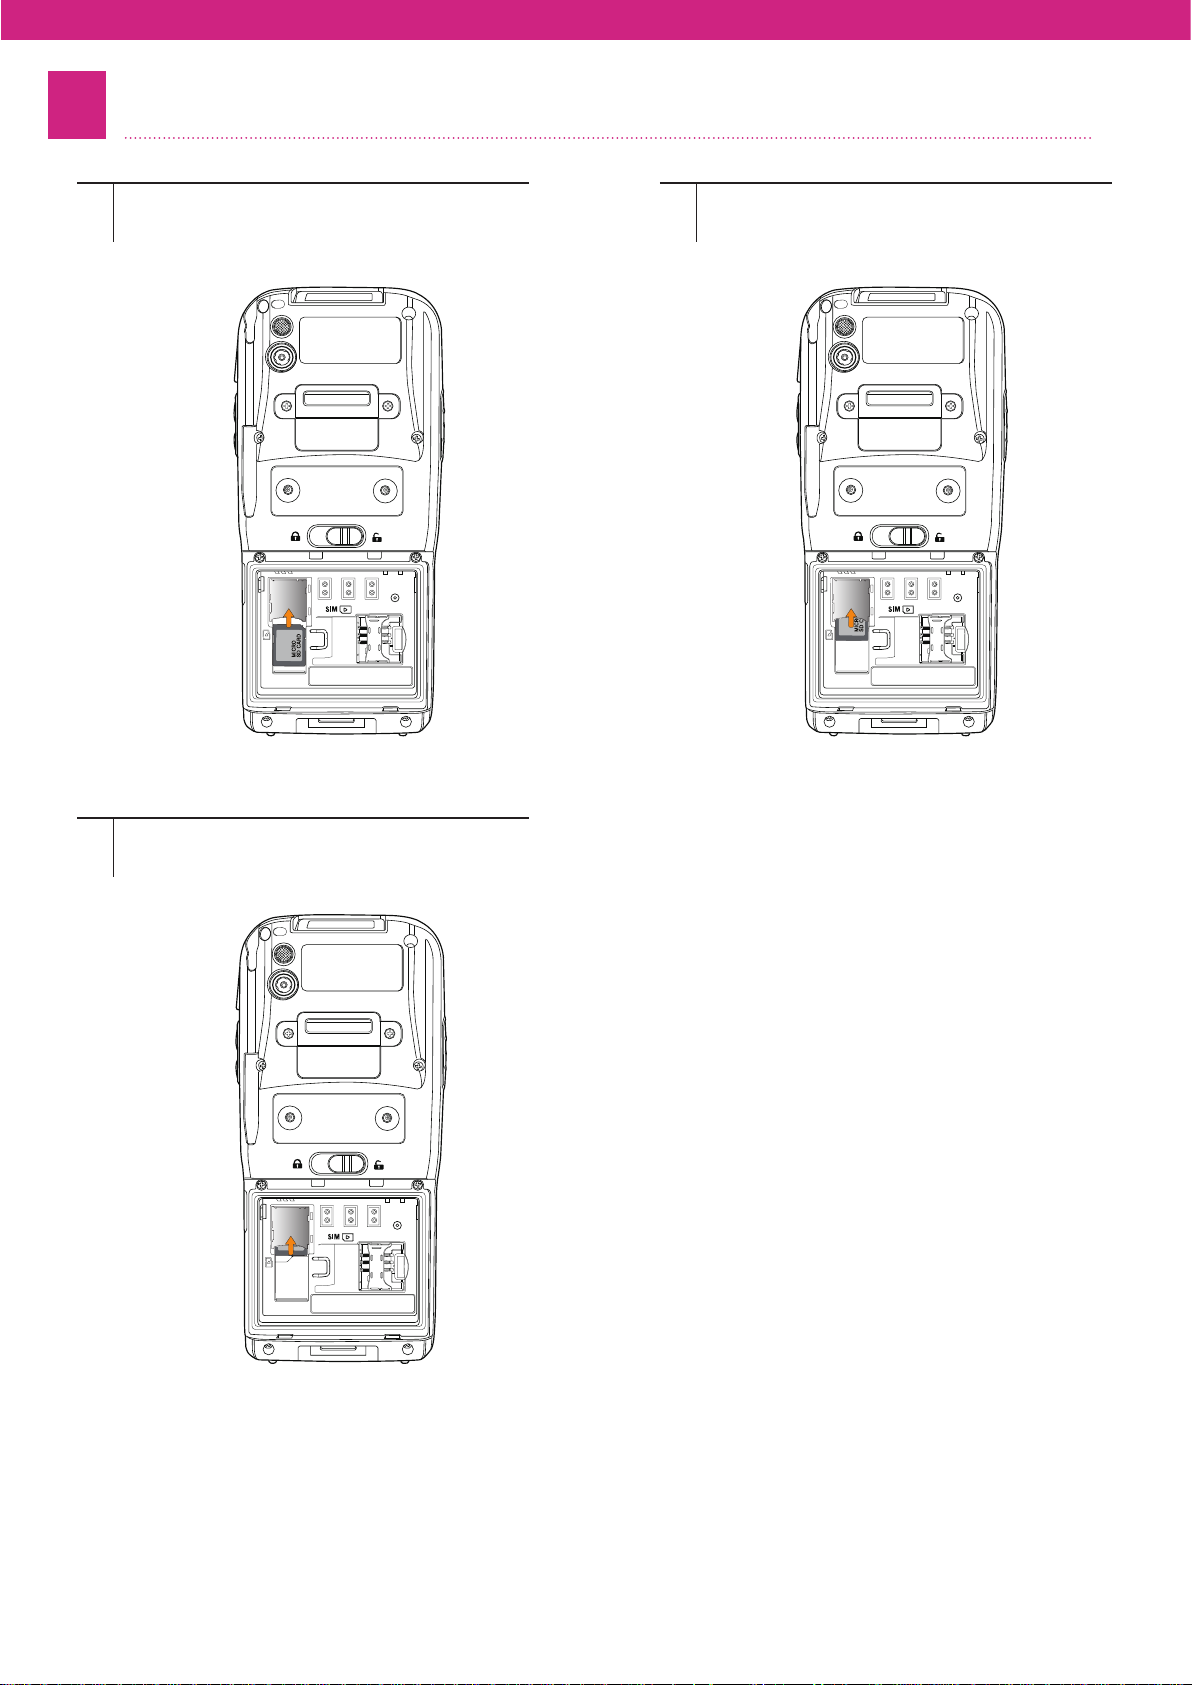
MicroSD Card Insertion
Find the MicroSD card slot in the battery bay
1
at the back of the device.
Insert the Micro SD card with metallic
2
contacts face down toward the device.
Push the card until click sounds.
3
13
Page 14
5
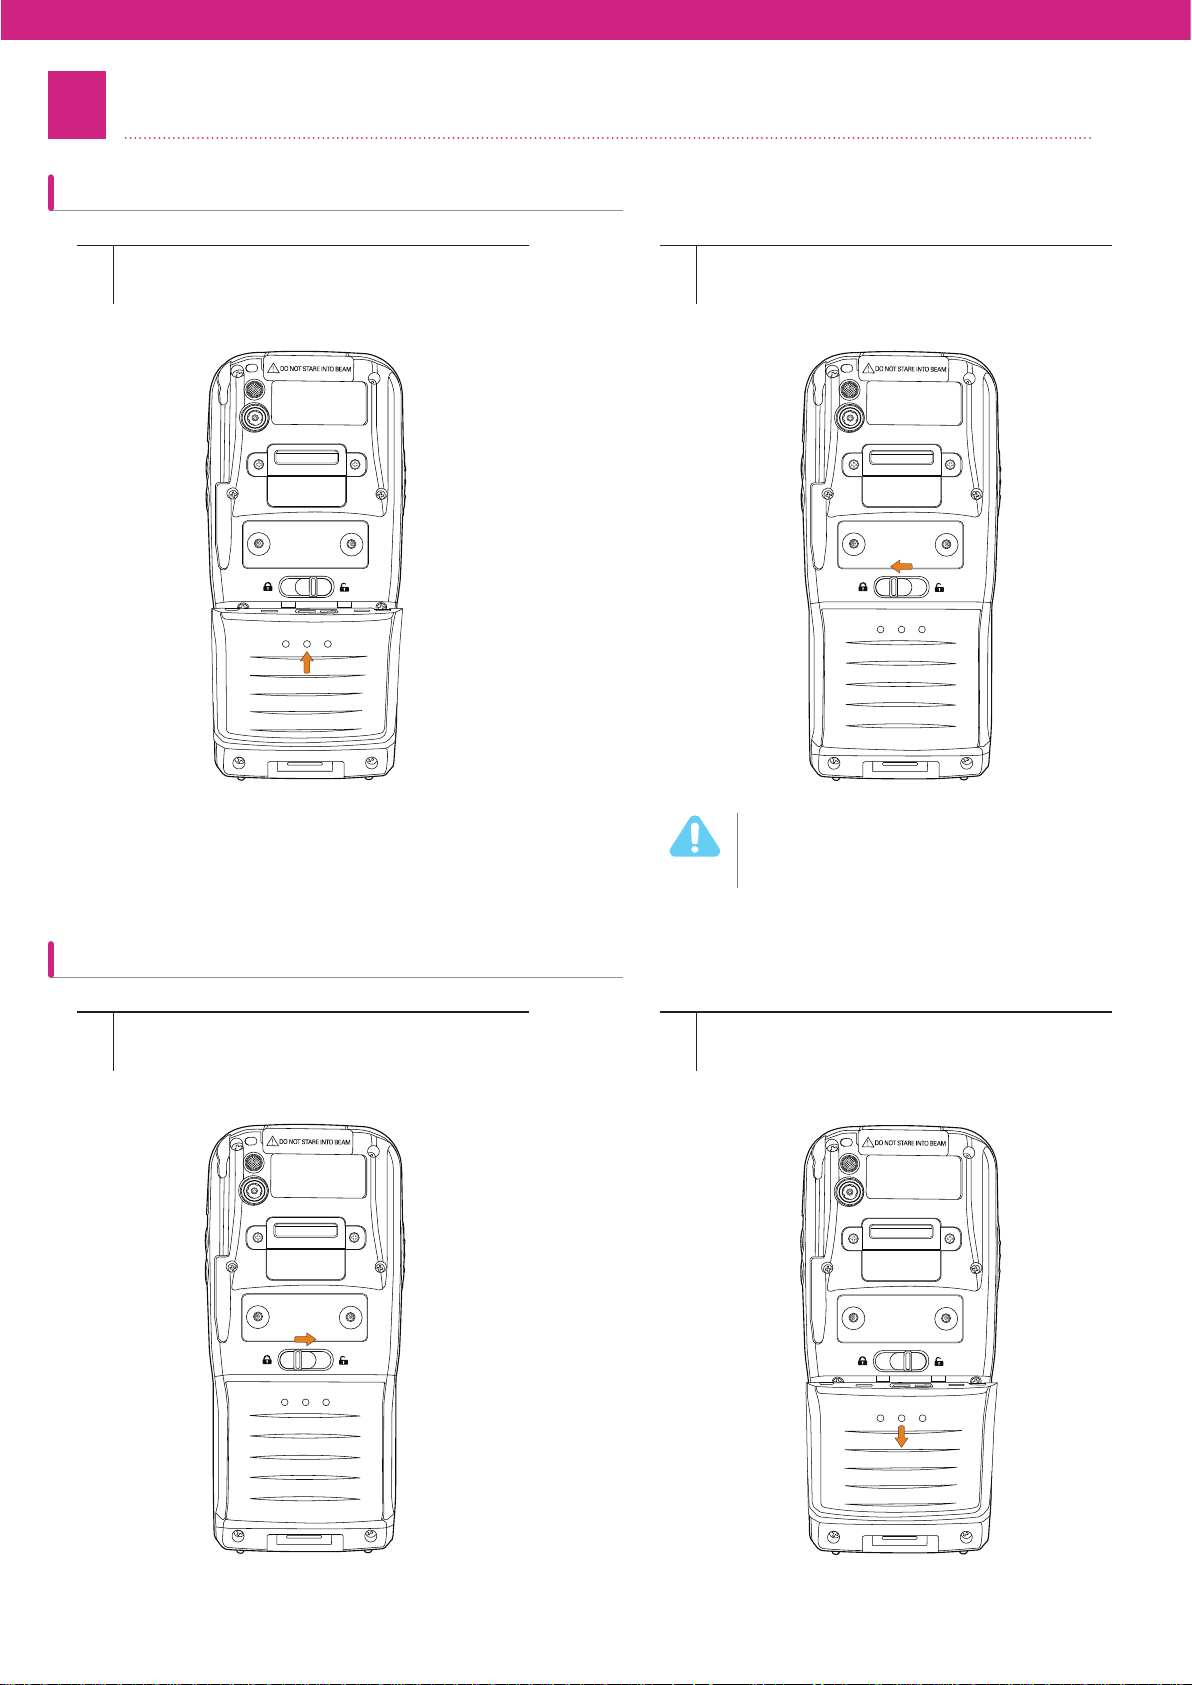
Insertion/Removal of Battery
Battery Insertion
Place the battery in the battery bay
1
and push and hold it.
Push the battery release latch to the left
2
while pressing the battery to lock it.
If you do not press the battery, it may
cause damage to the product (or
8BSOJOH
you).
Battery Removal
Remove the battery cover by pressing the
1
battery latch to the right at the back of the
device.
As in the picture below, hold the groove
2
of the battery and pull the cover down to
remove.
14
Page 15
6
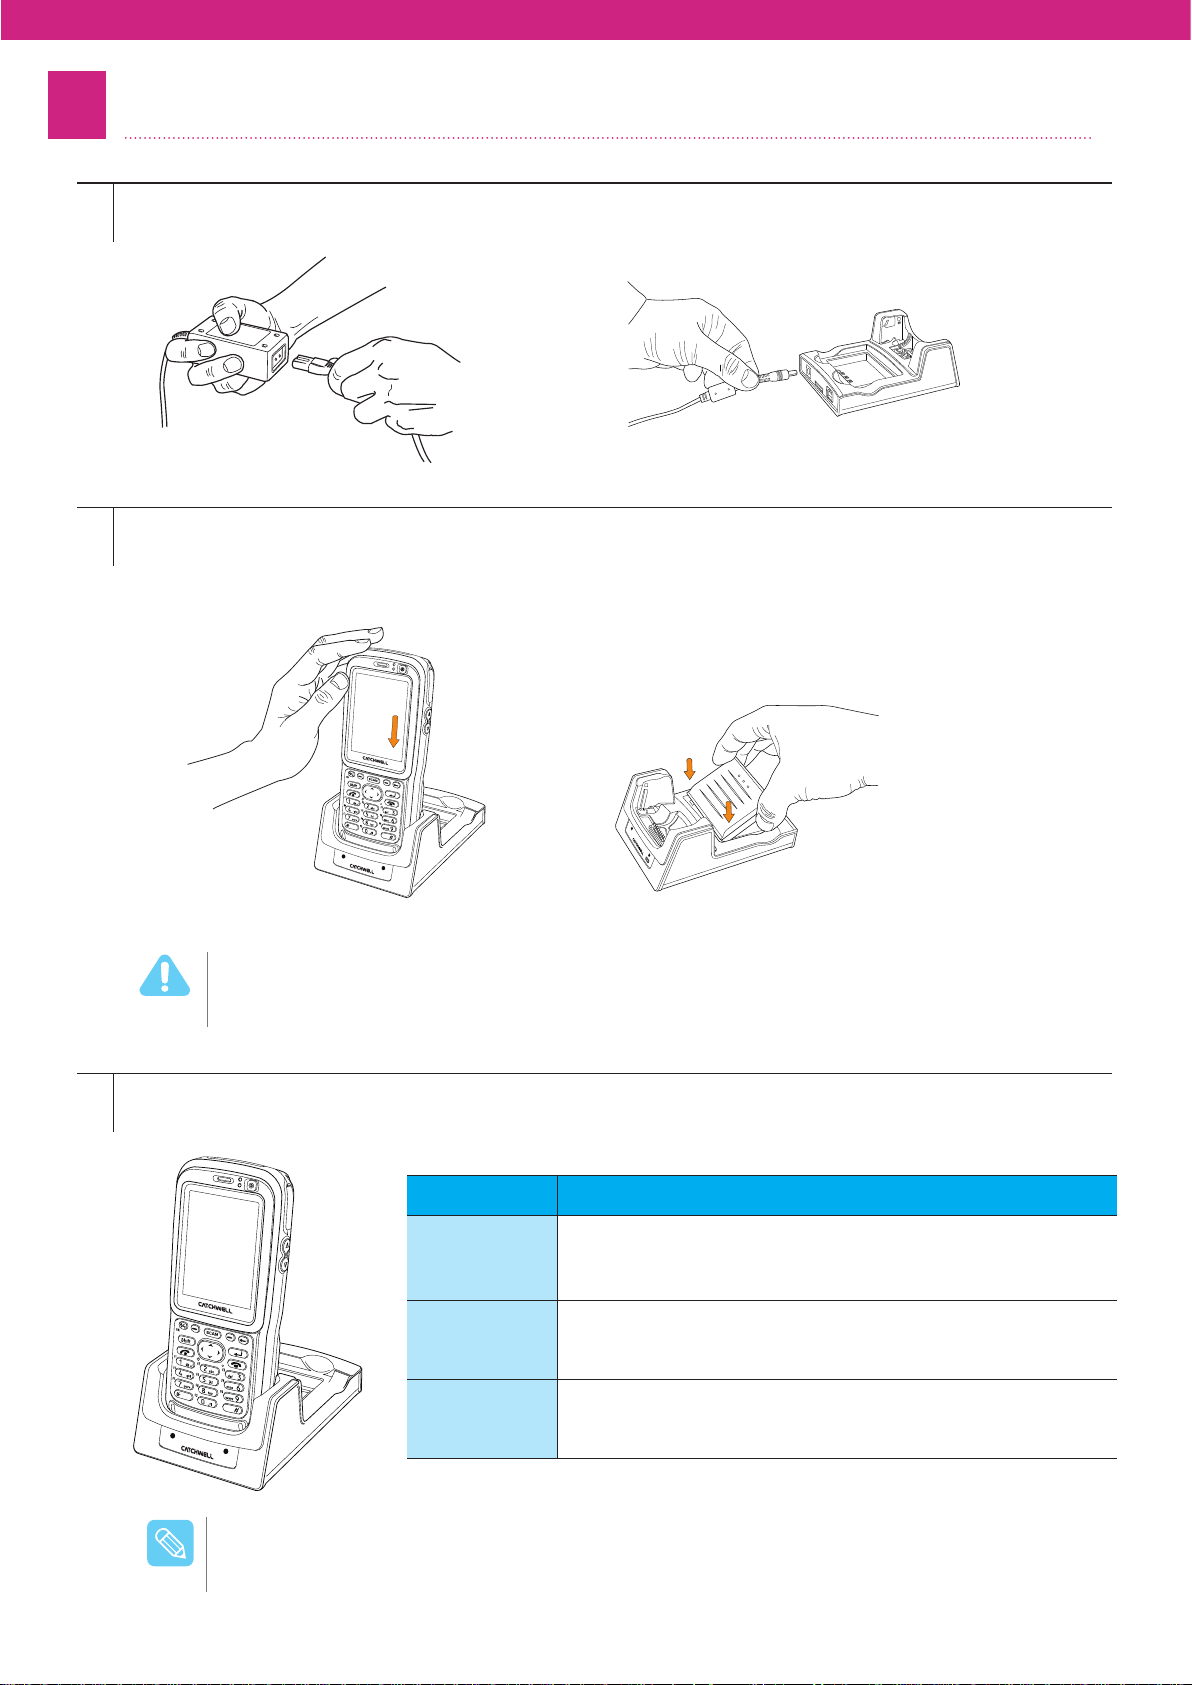
Charging the Battery
Connect the power cable to the power adapter, then connect it with the cradle’s plug-in area.
1
Dock the device into the cradle. A red status LED at the front of the cradle lights if the product is
2
correctly docked.
Charging the battery in the device Charging the battery only
Insert the battery in the sl
cradle. (Ensure the battery is correctly orientated.)
If you do not press the battery, it may cause damage to the product (or you).
8BSOJOH
A complete charge takes approximately four hours. To charge the battery quickly, press and hold the power
3
button to put the device in sleep mode before charging.
LED device LED Indicators
device LED
Indicators
Cradle LED
Indicator
(Left)
Cradle LED
Indicator
(Right)
- Red LED (steady): device battery is charging.
- Green LED (steady): device battery is fully charged.
- Red LED (flashing): Error in charging.
- Red LED (steady): Reserve battery is charging.
- Green LED (steady): Reserve battery is fully charged.
- Red LED (flashing): Error in charging.
- Green LED (steady):
your computer via USB cable.
The product is connected to
ot at the back of the
/PUF
Please Check the following if Red LED is blinking.
- There is a contact error between the device and cradle.
- Clean the cradle connector if any foreign material is on it.
15
Page 16
7
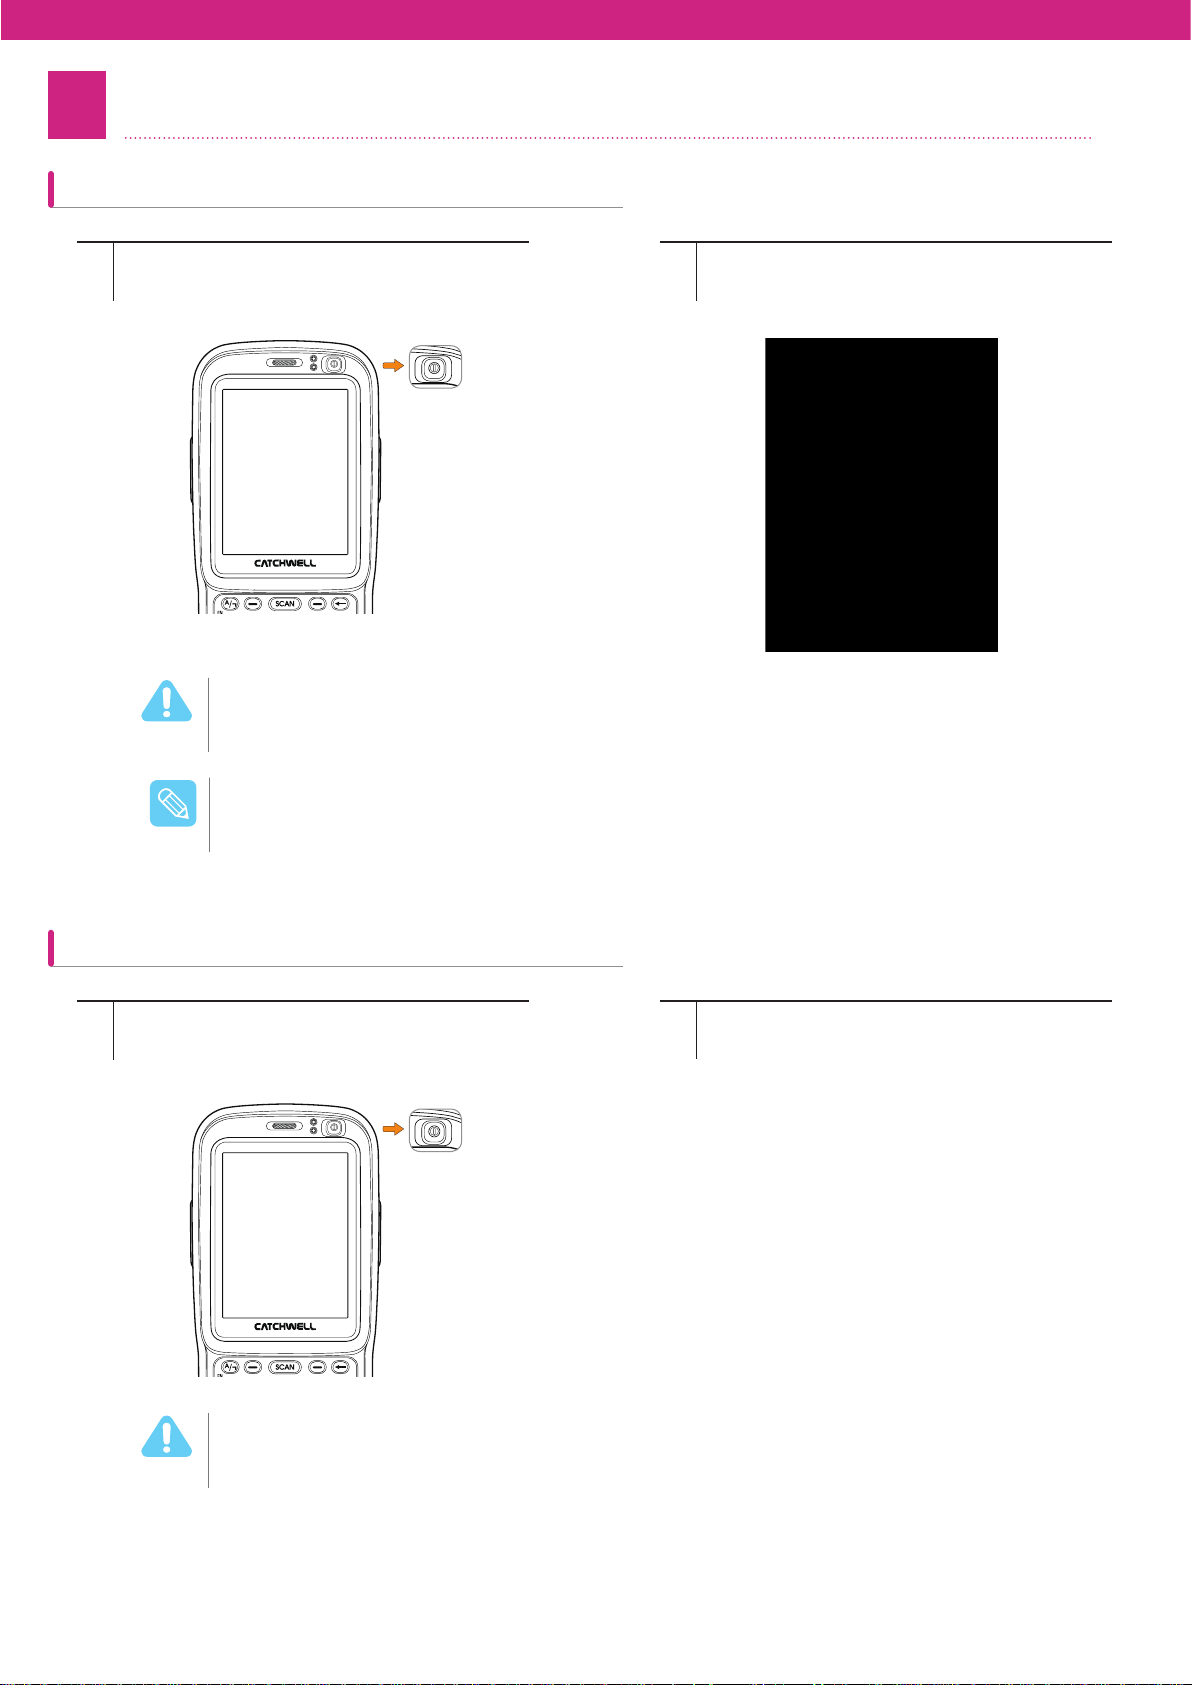
device Power On/Off
device Power On
Press the power button on the device shortly.
1
If the power button is pressed for more than 3 seconds, the device switches to the sleep mode
8BSOJOH
/PUF
(Suspend).
If the device does not start after pressing the power button, check if the battery is fully charged,
and if the battery is charged, perform hardware reset (cold booting). For more information, please
see “device basic usage” > “5. Reset.
After start, Windows® logo appears. (The
2
screen might differ depending on the model.)
”
device Power Off
Press and hold the device’s power button.
1
- Alternatively, click Windows Start > [Pause].
If the device will not be used for a long time, remove and store the battery separately. Please use
8BSOJOH
a fully charged battery when turning the device back on.
A moment later, device will turn off.
2
16
Page 17

8
Battery Maintenance
Checking Battery Status
Check the current battery status, and set the low battery warning level.
To change the power property, select [Start] >
1
[Settings] > [Control Panel].
At the Battery tab in the Power Control
3
Properties window, the battery level can be
checked, and the Low Battery warning level
can be set.
Click the [Power Control] icon.
2
/PUF
The Low Battery warning level can be set as 5, 10, 20, and 30%.
17
Page 18

Power Cut Setup
To increase the life span of the battery, you can set the device to turn off the power when it is not used for a certain
amount of time.
To change the power property, select [Start]
1
> [Settings] > [Control Panel].
At the Power Control Properties screen,
3
press Power Off tab, and set the device to
turn off the power when it is idle for a certain
time.
Click the [Power Control] icon.
2
8BSOJOH
/PUF
To turn the device back on, press the Power button.
See the Power section in Chapter 2 for more details.
18
Page 19
Sleep Mode
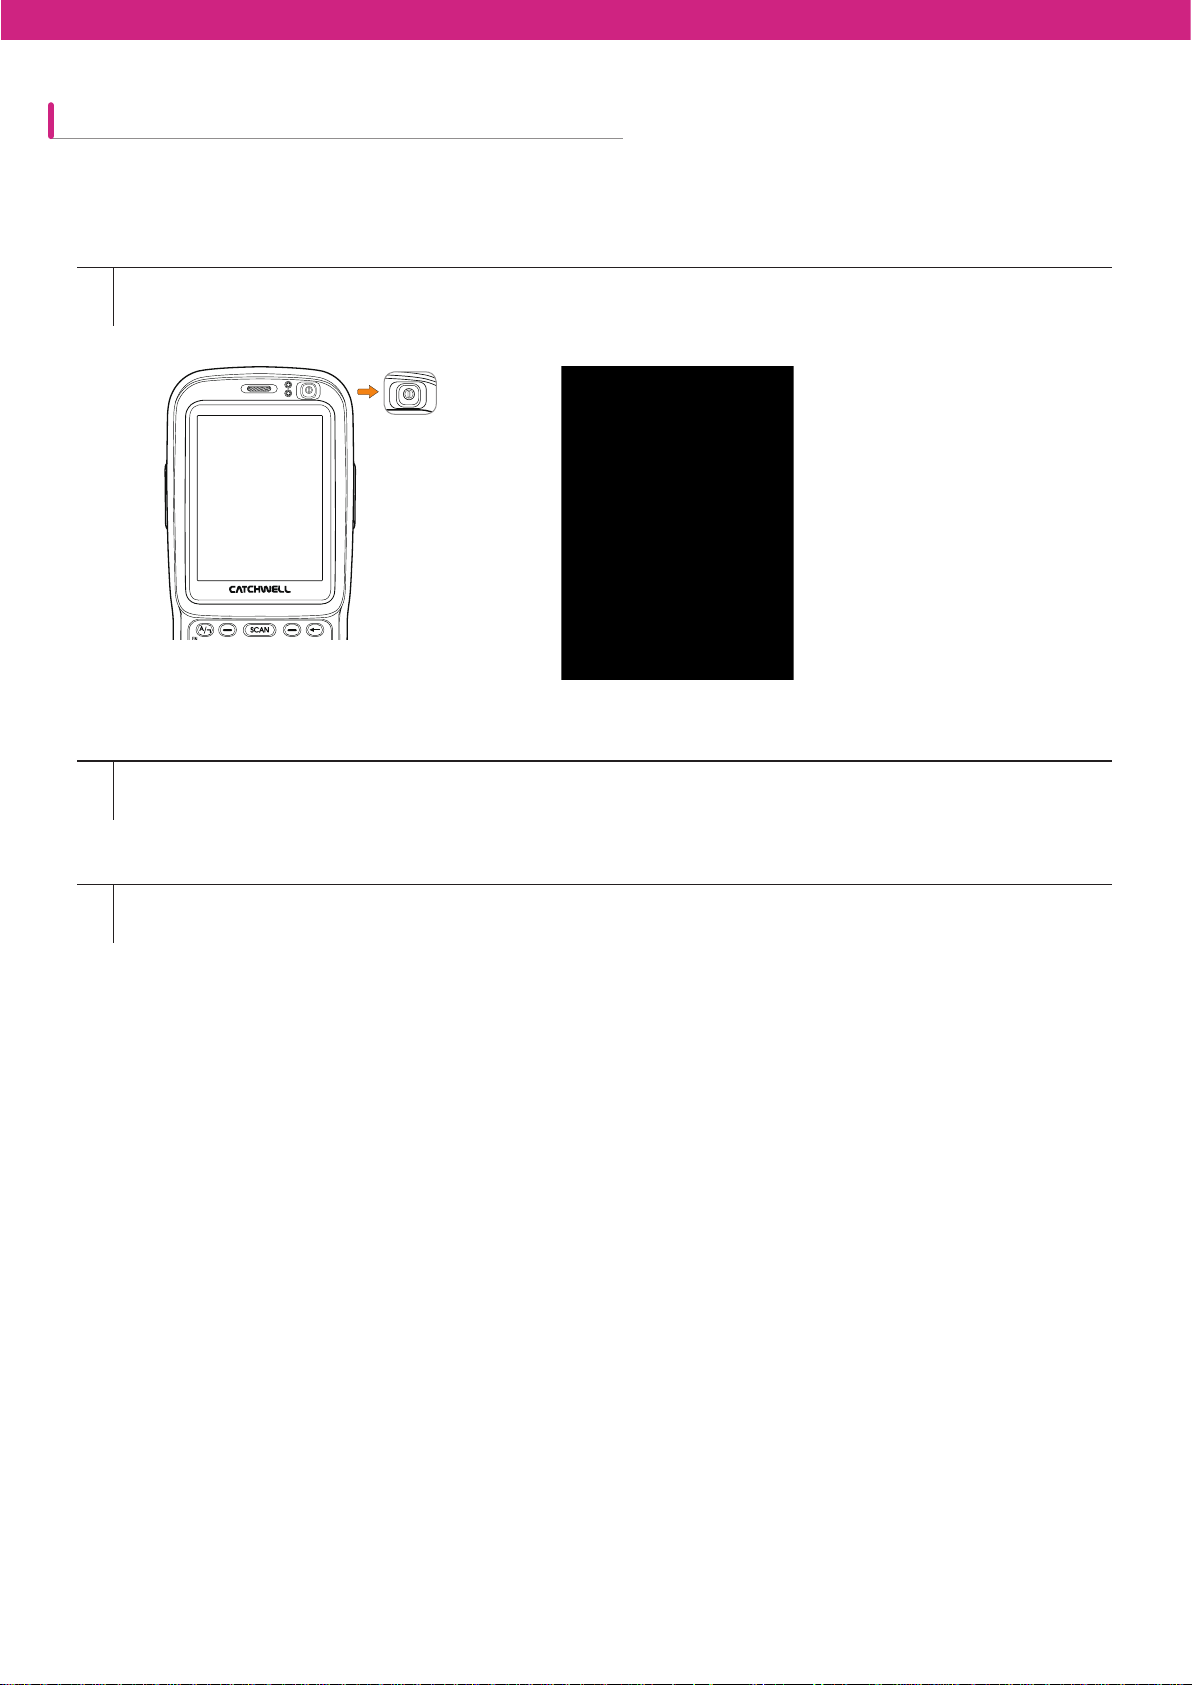
The sleep mode can be used when the device will not be used after a specified time.
* Sleep Mode: Sleep Mode saves the battery power when the device is not used after a designated period of time by
turning off LCD, keypad, and wireless LAN.
Press [Power] button for more than 3 seconds.
1
- or select Windows [Start] > [Suspend].
The device will switches to Sleep Mode.
2
The device will switches to Sleep Mode.
3
19
Page 20

Backlight Setup
To increase the battery life span, set the value for the device’s backlight.
To change the power property, select [Start]
1
> [Settings] > [Control Panel].
At the Power Control Properties screen,
3
press Power Off tab, and set the device to
turn off the power when it is idle for a certain
time.
Click the [Power Control] icon.
2
20
Page 21

9
System Specifications
CPU Marvell PXA320 (806MHz)
RAM 256MB
Flash ROM 512MB
OS
Scanner
LCD
LAN WLAN IEEE 802.11 b/g
PAN Bluetooth Bluetooth V2.0 Class II EDR
Capture
Camera
Battery Pack 3,300 mAh
Windows Mobile Windows Mobile 6.5
Windows CE.Net Windows CE 5.0
Laser(1D) Symbol SE950, IS4813
CMOS(1D/2D) HHP IT5xxx
Type Color TFT-LCD
Size 2.8”(Portrait)
Resolutions 240*320(QVGA)
WWAN Quad Band GSM/GPRS, Tri-Band HSDPA
RFID RFID HF(with NFC)
GPS Internal
Keypad
Quality 3.0M pixel
Flash Flash LED
Audio Speaker, Receiver, MIC, Earphone-Jack
20 Alpha/Numeric/Fuction, 2 Sca
Up/Down, 1 Power keys
n, 1 Navi and Volume
Expansion Port 20 Pin Expansion Port
Expansion
Slot
Interface
Charge Cradle And 20 Pin Expansion Port
Environm
Cradle 1, 4 Slot USB Client, Serial, Battery Charge Slot, Ethernet(Option)
ent
SD Micro SD(Inside Battery Slot)
USIM Inside Battery Slot
USB Client I/O Connector and 20 Pin Expansion Port
Serial I/O Connector and 20 Pin Expansion Port
Drop
Sealing IP 65
1.8m high, 6 sides, 2 time each (total 12 times against
concrete)
21
Page 22

Chapter 2 device Basic Usage
Start Screen ...............................23
Status Icon .................................23
Opening [Control Panel] ....................24
Setting Up ...................................24
Region and Language Settings ......... 25
Date/Time ..........................................25
Network and Dial-Up Connections ....26
Display ..............................................28
Volume and Sound ............................29
Mouse ...............................................30
Owner Properties ..............................30
Stylus ................................................31
System Properties .............................31
Password ..........................................32
Power Control Properties ..................35
Dialing ...............................................35
Backlight............................................36
Keyboard ...........................................36
Remove Programs ............................36
Barcode ..........................................
Bluetooth Manager ............................37
Device Profile ....................................37
KeyPad..............................................38
PC Connection ..................................39
Record Settings.................................39
Utility Manager ..................................40
...37
Screen Calibration .....................40
Wireless Setting ................................40
Software Reset..................................41
Certificates ........................................32
Internet Options.................................33
Input Pan
Storage Manager ..............................34
el ........................................34
Reconfiguration(Reset) .............41
Hardware Reset ................................42
Using the Stylus ........................42
Page 23
1
Start Screen
The Start screen appears when the device is turned on. The screen consists of background and taskbar.
My device
Recycle Bin
Start Button
Taskbar
2
Status Icon
It describes the status icons on the taskbar.
Name Icon Descri ption
Name Descri ption
My device
Recycle Bin
Start Button
Taskbar
Allows to see and to change folders and files in
the device
Contains the deleted files and data temporarily.
Can delete contents or recover them.
Can start various programs by pressing the Start
button.
Displays the open programs: Network
Connection, Running programs, and others.
Network
Status
Mobile
Wireless
Signal
Status
USB
Connection
Bluetooth
Status
Barcode
Mode
Quick
Launcher
Input
Setting
Time
Window
Displays the current network
Displays the Bluetooth connection status.
connection status.
(Connected:
Displays the wireless signal strength.
(CDMA or GSM)
Displays the USB connection status.
Displays the current barcode scan mode.
Displays the most widely used program setting
menus (Volume, Power, Backlight, Wireless,
WLanSetting).
Displays the input mode.
(Keyboard, writing recognition)
Displays the current time on the device.
Displays the running window.
Disconnected: )
23
Page 24

3
Setting Up
Set the date/time, network, dsplay, volume, power, system, and others.
Opening [Control Panel]
Select [Start] > [Settings] > [Control Panel].
1
[Control Panel] window appears. The viewing mode (Big icon, Small icon, Detailed, etc.) can be changed at the
2
[View] option, and the icons can be sorted.
Example) ‘By Name’ sorting
24
Page 25

Region and Language Settings
Set the locale, numbers, currency, time, and date.
Select [Start] > [Settings] > [Control Panel] > [Regional Settings].
1
Local
Select the country where the device
is being used.
Input
Select the device’s input language. Only the installed language appears,
and for other language, please contact the service engineer.
Language
Select the Windows language. Only English is installed so for
the other languages, please contact the service engineer.
Date/Time
Set the device’s local date, time, time zone, and the clock.
Select [Start] > [Settings] > [Control Panel] >
1
[Date/Time].
25
At Time Zone (Z), press select bar to find the
2
correct time zone.
Page 26

Use left/Right arrows to select year and
3
month.
Click the current date on the calendar to set
4
the date.
Write the current time in the time box.
5
Press [Apply] button or [OK] button to save
6
the changes.
Network and Dial-Up Connections
Connect the device to the network using various methods (Ethernet, Wireless LAN, and Modem). You can send or
receive email, access network server files, and search them using Internet or Intranet via network connection.
Setting Internet via Modem (Only if the modem is installed)
Select [Date/Time] > [Network and Dial-up
1
connections].
Click the Make New Connection.
2
Type a name for the connection, select Dial-Up
3
Connection, and then press [Next ].
Connect to the network using the modem if Wi-Fi
or wireless Internet is not available.
/PUF
26
Page 27

Select a modem on the device and press [Next >].
4
Press [Configure...] to open the screen and
5
configure settings as shown below.
- Contact the telecommunication provider for
the Preference values.
Press Call Options to set the special modem
6
commands, and then press [OK] on the
device Properties window.
Through modem, the network has been
8
established, and connections between
networks can be used.
After typing in Phone number, press [Finish].
7
(Ask your telecommunication provider for the
connection phone number).
8BSOJOH
The phone access number and connection setup method may differ depending on the
telecommunication provider. Check with the provider for the setting method before using the
connection.
27
Page 28

Display
To change the background image or active window’s color, open the Display Properties window. (Right click menus
appear when the stylus touches the screen for more than 1 second.)
Background
Follow the instructions below to change the background image.
Select [Start] > [Settings] > [Control Panel] >
1
[Display].
Press [Browse] and select an image for the
3
background.
Select the Background tab.
2
To set the image like tiles, select ‘Tile image
4
on the background’ menu.
Appearance
Set colors for window and text.
28
Page 29

Volume and Sound
Set the device’s volume and sound types.
Select [Start] > [Settings] > [Control Panel] > [Volume & Sound].
1
Volume
Press left/right arrow icons or move the slide
1
bar to set the desired volume.
Sounds
Select Event from the list.
1
Select cases, like Events (warnings, system
2
events), Applications, and Notifications (alarms,
reminders), in which the sounds will be enabled).
Select Sound from the list.
2
Check the sound from Preview.
To remove the Sound from the certain event,
3
select [None].
To remove the Scheme, select a Scheme
5
and press [Delete].
29
To save the changes for the different scheme,
4
press [Save As] and type the name for the
scheme.
Page 30

Mouse
Set the double click sensitivity of your stylus.
Select [Start] > [Settings] > [Control Panel] >
1
[Mouse].
Owner Properties
Set the device user information or network ID.
Select [Start] > [Settings] > [Control 1 Panel] > [Owner].
1
Owner Identification
Type name, company, address, work phone number, and home
phone number on the Identification tab. To display information
on the start screen, check “Display owner identification.
Double click the check patterned picture. Press
2
[OK] to auto-save the sensitivity speed.
Notes
Type additional information in the ‘Notes’
box.To display on the start screen, check
Display owner notes.
”
“
”
Network ID
Set the user name, password, and domain
provided by the network administrator.
30
Page 31

Stylus
Set the double tapping and calibration of the stylus.
Select [Start] > [Settings] > [Control Panel] > [Stylus Properties].
1
Double-Tap
Double-tap the check patterned picture to auto-save the
speed.
Calibration
Calibrate the stylus.
(See “4. Screen Calibration.”)
System Properties
Display the device’s system information, memory status, and others.
Select [Start] > [Settings] > [Control Panel] > [System].
1
General
Displays operating system, software version,
and computer hardware information.
Device Name
Sets the device name.
Memory
Copyrights
Select sizes for data storage memory and
program memory.
Check to see the information on the copyrights of
the system.
31
Page 32
Password
Set the password.
Select [Start] > [Settings] > [Control Panel] > [Password].
1
he password, the password window appears on the start screen when turning on the
/PUF
8BSOJOH
After setting t
power or after soft reset. The device can be accessed only when the correct password is entered.
To remove the password, delete the password in the Password Properties window.
If you check the password enabling option on the system start screen, be sure to remember the
specified password. Even if the hardware is reset, the password is not initialized. If you cannot
remember the password, please contact the certified service center.
Certificates
For trusted and safe communication, some programs require certificates.
Certificates are issued only from the official approval institute and valid for certain period of time.
/PUF
Select [Start] > [Settings] > [Control Panel] >
1
[Certificates].
The Windows CE administrator manages various storage areas for certificates.
Import
To add certificate or related key, press [Import] and select the
method to Import the certificate or key. This can be selected
from the file or smart card.
View
To see extension code, expiration date, or other
certificate-related information, press [View].
Remove
To delete the selected certificate, press [Remove].
32
Page 33

Internet Options
Set the Internet connection, security, and other properties to use the Internet.
Select [Start] > [Settings] > [Control Panel] > [Internet
1
Options].
General
Sets the start page, search page, and others.
Clear Cache: Deletes the saved system cashe.
Clear History: Deletes the list of previously
opened pages.
Security
Sets security options.
Connection
Sets the proxy server address, port, and other
Internet connection settings.
Privacy
Sets the level of private information blocking.
Advanced
Sets advanced Internet options.
Popup
Sets webpage popup blocking options.
33
Page 34

Input Panel
Change the input method for Keyboard or Transcriber and set the case options (upper case/lower case).
Select [Start] > [Settings] > [Control Panel] > [Internet
1
Options] > [Input Panel].
For more details, see “Chapter 6 Using Applications.
/PUF
”
Storage Manager
Use Storage Manager to set the flash ROM (Disk1). Disk1 is normally used to save data and files.
Select [Start] > [Settings] > [Control Panel] > [Storage].
1
Format
Formats the selected disk.
Dismount
Formats the selected disk’s partition.
New
Creates a new partition and gives it a name.
Delete
Deletes the desired partition. For this, select the partition,
pre
ss Dismount, and then press Delete.
8BSOJOH
Properties
Checks the created partition’s properties.
If you format the disk, all the data including files and programs are deleted and they cannot be
restored. Before use of this function, please consult your system administrator.
34
Page 35
Power Control Properties
Check the battery remaining amount, and set the warning level and power off time.
Main Battery
Shows the current amount of the main battery’s
power.
Low Battery Warning Level
Select the level for battery warning sign (5%,
10%, 20%, 30%) in case of low battery.
When the battery warning sounds, change the main battery immediately. Otherwise, a data loss,
8BSOJOH
/PUF
system error,or malfunction of specific parts can occur.
Power Off
Sets the automatic power off setting.
(See “Chapter 1 Battery Maintenance.”)
Dialing
Set the Dialing properties.
Select [Start] > [Settings] > [Control Panel] > [Dialing].
1
35
Page 36

Backlight
Set the screen’s brightness, backlight turn off, backlight on time, and keypad backlight.
Select [Start] > [Settings] > [Control Panel] > [Backlight].
1
Keyboard Remove Programs
Set the keyboard’s repeat delay and repeat
rate. The Key repeat rate can be checked by
testing a key repeat performance.
Select [Start] > [Settings] > [Control Panel]
1 1
> [Keyboard].
You can remove installed programs. Select
program to delete from the list and press
[Remove].
Select [Start] > [Settings] > [Control Panel] >
[Remove Program].
Please make sure what you are about
to delete. Deleting some programs
may cause a fatal system error. Please
8BSOJOH
consult your system administrator
before deleting any programs.
36
Page 37

Barcode
This section explains how to set up barcode program. Press [Admin] and enter the password to set up the barcode
program. Please consult your administrator to change the properties.
Select [Start] > [Settings] > [Control Panel]
1
> [Barcode].
If any program is deleted, the device may not work properly. Be sure to consult your system
8BSOJOH
administrator in this case.
Bluetooth Manager Device Profile
This section explains how to connect Bluetooth
or change the set up values. (Not recommended
when using SPP Profile). See Chapter 4 1.
Bluetooth (77p)
This section explains how to display hardware
and software’s device information. Click
[Admin] and enter the password to re-load the
information or to save as a file. (Please consult
your administrator to change the properties.)
Select [Start] > [Settings] > [Control Panel]
1
> [Barcode] > [device Profile].
37
Page 38

KeyPad
This section explains how to set up various keypad options.
Select [Start] > [Settings] > [Control Panel] >
1
[Keypad].
Hotkey
Check list of hotkeys and can change them
(Ex: FN+F1).
KeyMap
Change or check currently using keys.
Press AP button on the keypad to change the
keymap.
(Number) > (Upper Case) > (Lower Case) >
(Number) repeated.
KeyMap may vary depending on suppliers or
regions.
MISC
Set up keypad’s reading time and other
related options.
Version
Displays current program version of
KeyPad.
38
Page 39

PC Connection
Set the PC connection properties to directly connect to the desktop computer. Select [Change Connection] to select
the connection method to the desktop computer.
Select [Start] > [Settings] > [Control Panel] >
1
[PC Connection].
Record Settings
Set the microphone, phone volume, and other extra volumes.
Mic Vol
Sets the device’s mainmicrophone
or earmicrophone’s volume.
Mic Gain
Sets the loudness of the
microphone volume during calls.
39
Page 40
Utility Manager Wireless Setting
Through Utility Manager, set the Start program
and Quick Launcher. Press [Admin] and enter the
password for Utility Manager.
(Please consult your administrator to change the
configuration.)
For more information about Utility
Manager, please see “How to
/PUF
use applications” in Chapter 6.
Set the wireless connections. You can set
the status for Wi-Fi, phone, Bluetooth, and
GPS to “On” or “Off.
Select [Start] > [Settings] > [Control Panel] >
1
[Wireless Setting]
”
4
Screen Calibration
You may require recalibration if the device does not respond precisely to the stylus.
Before screen calibration, put the device on
1
hold, or place it on the secured place.
Select [Calibration] tab > press [Recalibrate].
3
Press [Start]> [Settings] > [Control Panel] >
2
[Stylus].
Tap on targets that appear on the screen
4
with the stylus.
40
Page 41
The following screen appears after you tap all targets and the recalibration process is complete. Tap anywhere
5
on the screen to finish the process. Make sure recalibration has been performed correctly.
5
Reconfiguration (Reset)
If the screen freezes while using the device, or if the program does not work properly, the device can be reset. There
are two methods to reset the device to its original status: Software reset and Hardware reset.
Please make sure what you are about to delete. Deleting some programs may cause a fatal
8BSOJOH
system error. Please consult your system administrator before deleting any programs.
Software Reset
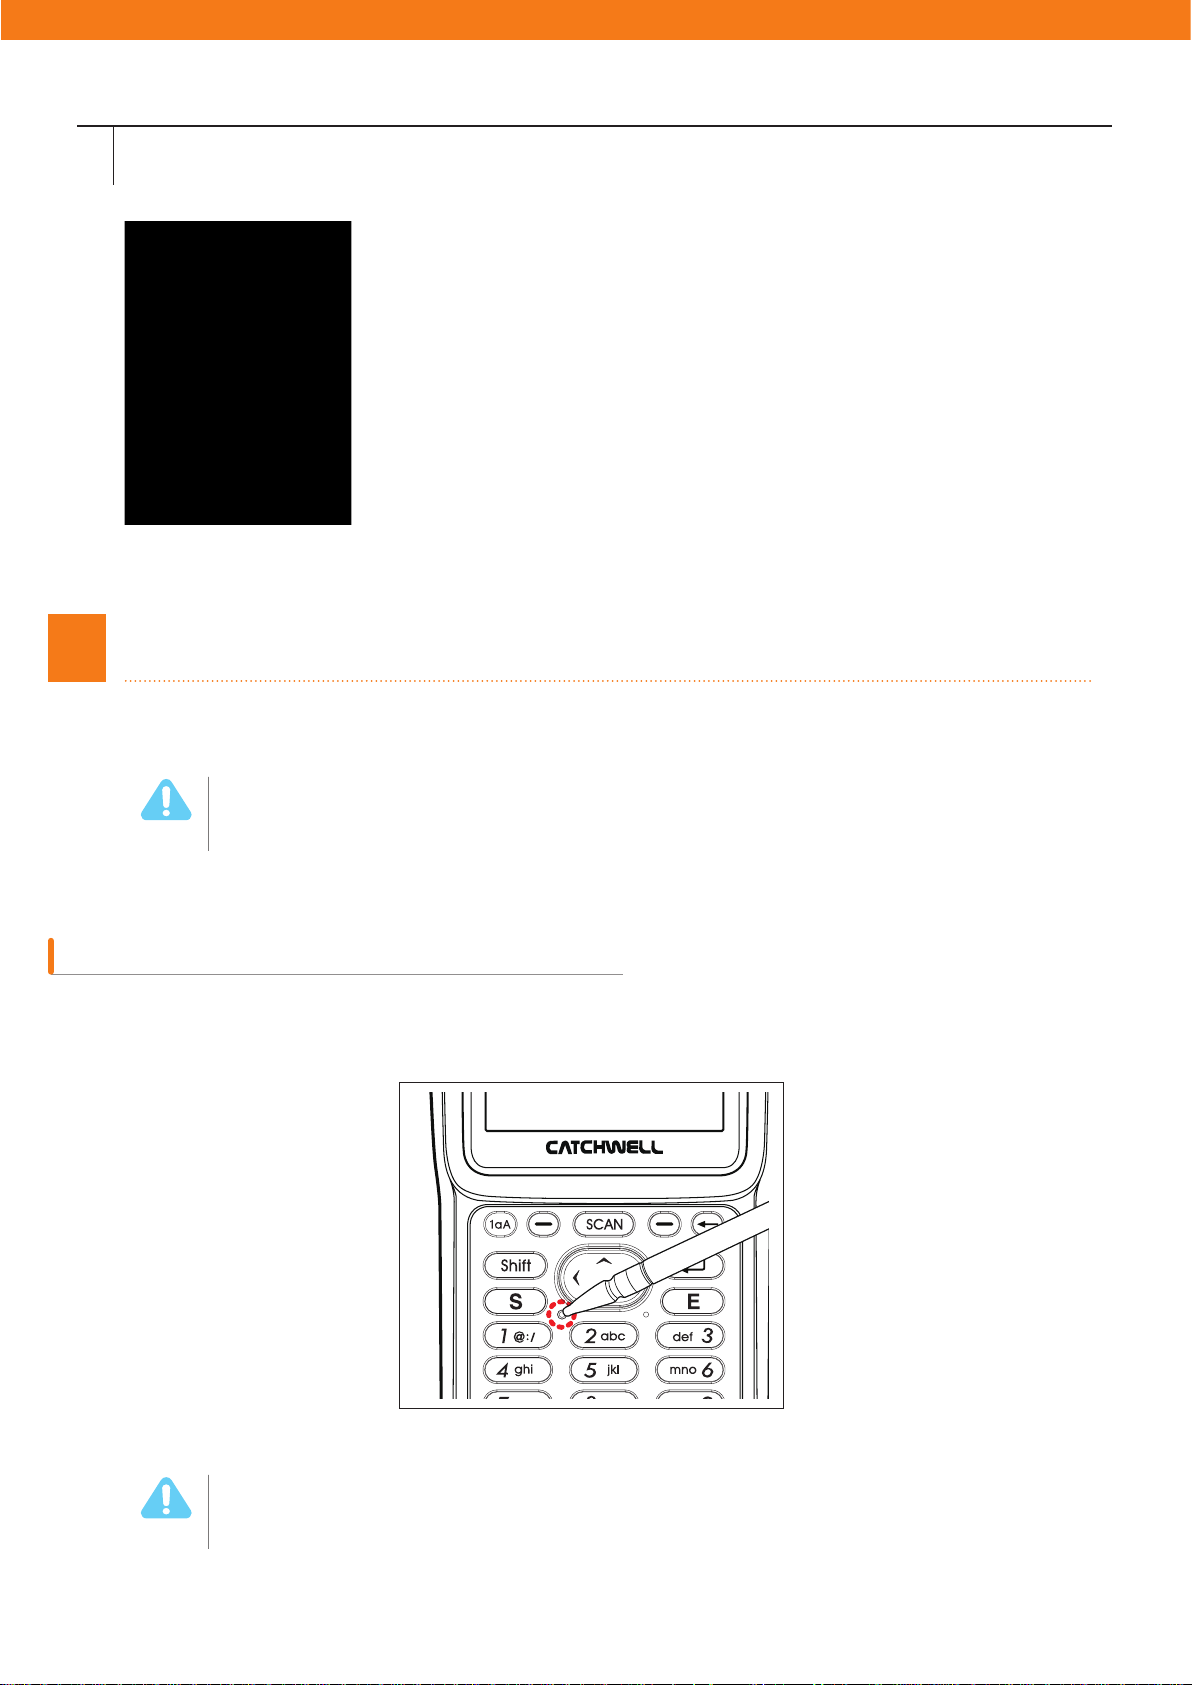
The software reset closes running programs and restarts the device. To start the software reset, press the Reset
button on the upper right corner of the battery compartment using the stylus.
8BSOJOH
Please back up running programs or data before performing the software reset. The software
reset does not affect any data stored but it can affect any data or file that is being created.
41
Page 42
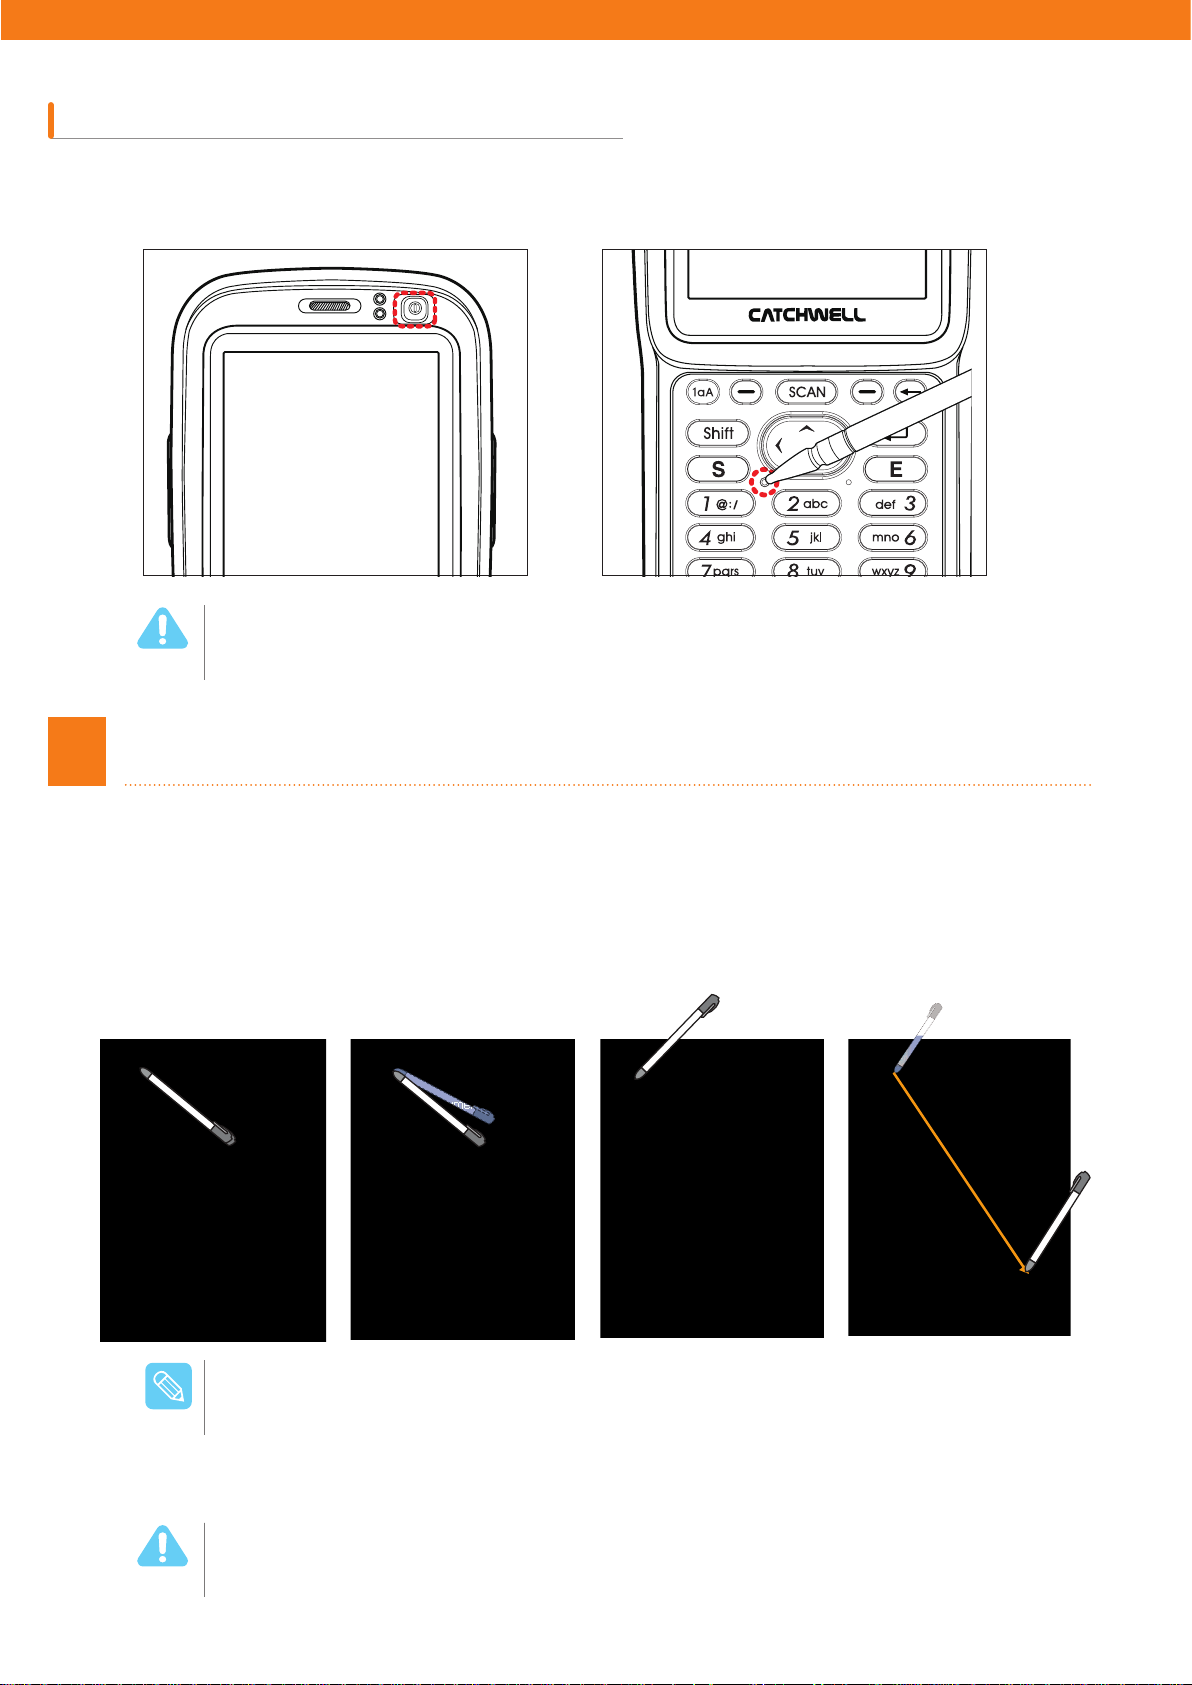
Hardware Reset
It is recommended to use the hardware reset if the device does not work properly even after performing the software
reset. To perform the hardware reset, press the Reset buttons on both the front and the back of the device at the
same time.
+
Do not perform the hardware reset frequently. It may cause damage or malfunction to the device.
8BSOJOH
6
Using the Stylus
Stylus is used to execute commands or input data from the touch screen.
Click
Tap an icon once (to make
a selection or launch an
application program).
Double-click
Double-tap an icon (to
open a folder or launch
an application program).
Press and Hold
Press and hold until the
command menu
on the screen
paste, delete files, make
keyboard entries, etc.).
appears
(to copy ,
Drag
Press, drag, and release
at the desired location
on the screen (to select
multiple icons or to
move icons).
/PUF
8BSOJOH
To ensure a prolonged use of the touch screen:
1. Clean it before use when any foreign material is on the screen.
2. Be careful not to make scratches while using the touch screen.
3. Use only the provided stylus or the touch screen dedicated stylus, and do not use sharp objects
(pen, wire, screwdriver, or others).
4. Use a genuine screen protective film, and replace it periodically.
Keep the device or the stylus out of children’s reach. Children may get hurt with the sharp end of
the stylus.
42
Page 43

Chapter 3 How to Use Phone
Data Capture .....................................44
Device Buttons for the Phone
Program .....................................44
Turning Phone On/Off ...............45
Turning On ........................................45
Turning Off ........................................45
Phone Call / Receive .................46
Making a Phone Call .........................46
Receiving a Phone Call ....................46
SMS Message.............................46
SMS message screen .......................46
Sending Message .............................47
Address Book ............................48
Adding Phone Number ......................48
Edit Phone Number ...........................48
Call History.................................49
Phone Setting ............................49
Version Information ...........................49
Sound Set .........................................50
Display ..............................................50
Network Setting .................................51
USIM .................................................51
SMS ..................................................51
Call Option Management ..................52
Managing Phonebook .......................52
Page 44
Data Capture
For more details, see page 108 “Chapter 6 Using Application Program > 1 WordPad explanation.
No Part Function
1
1
9
8
7
6
5
2
3
4
Η
Θ
Ι
Κ
Λ
Μ
Ν
Ξ
Ο
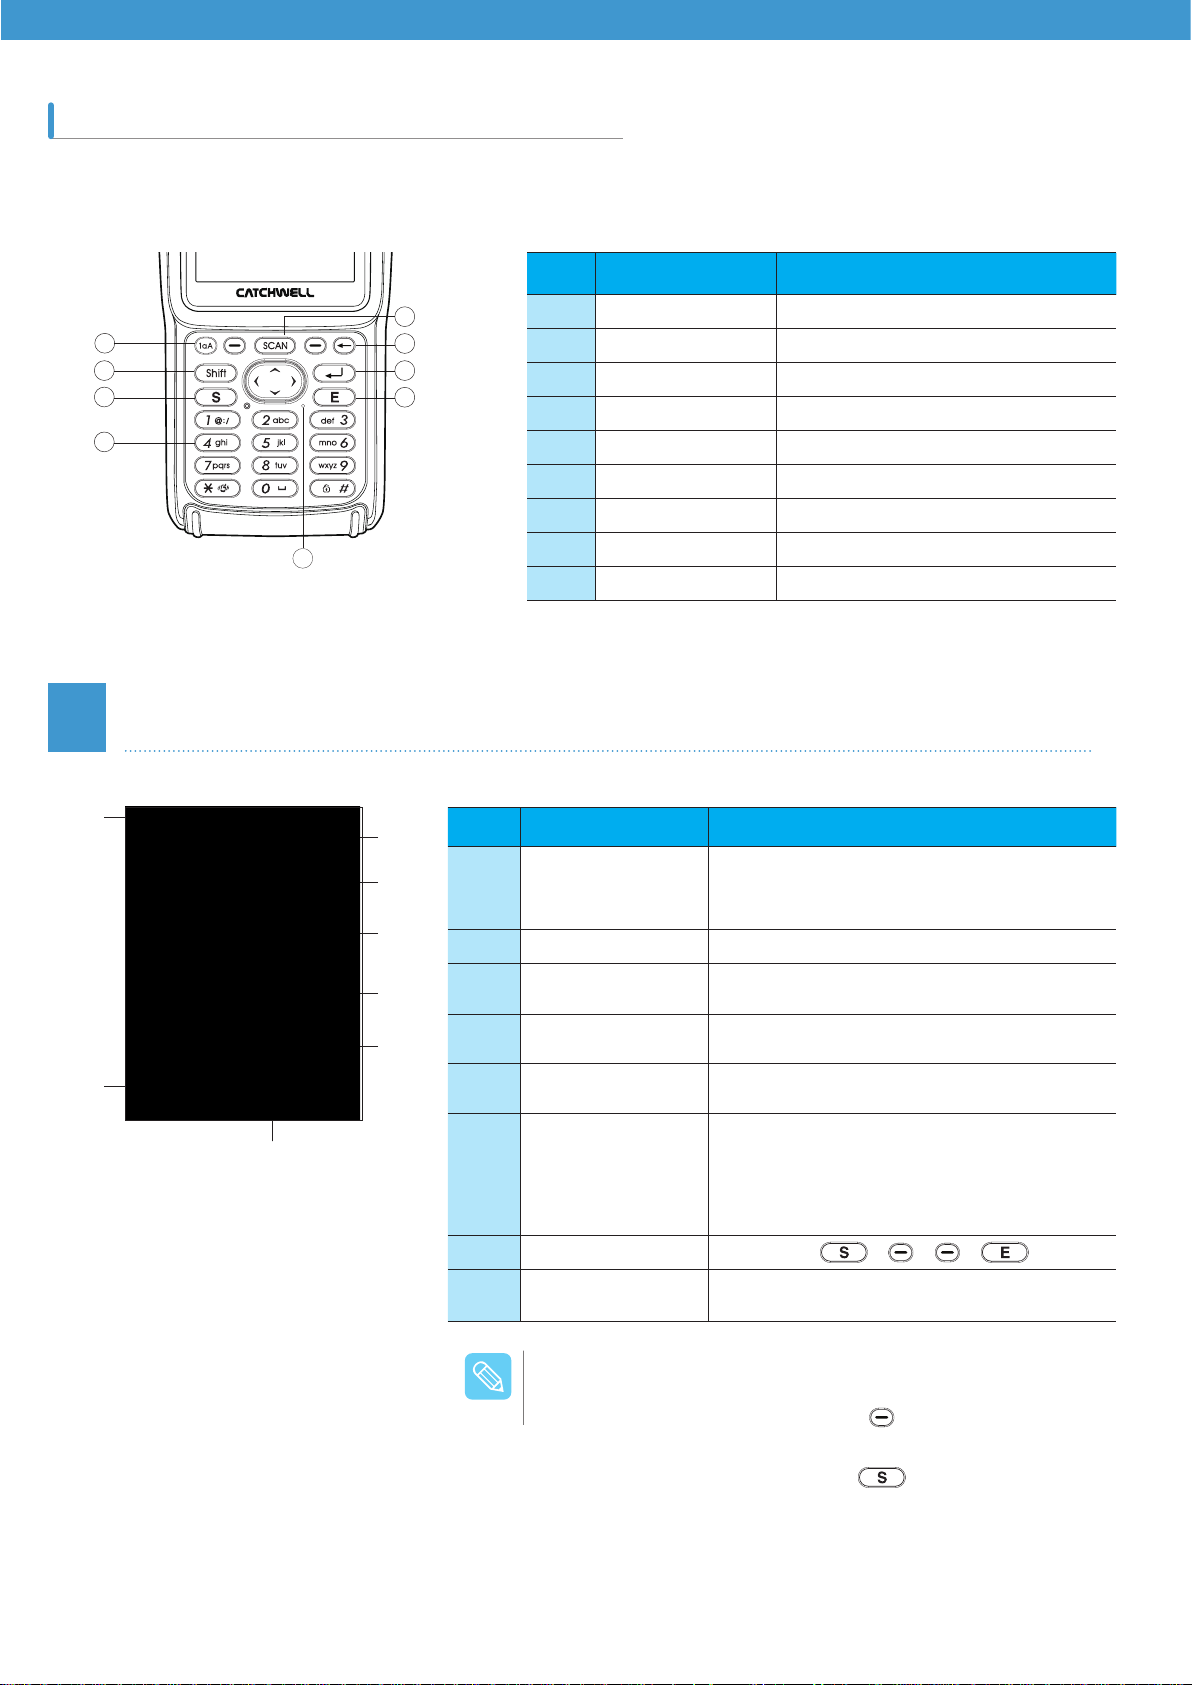
Device Buttons for the Phone Program
Scan button
Back space Erases a character backward.
Enter button Performs the line feed
End Call button Ends a call.
Mic Microphone hole
1~9 button Endters number or characters
Call button Makes a call.
Shift button Shift fuction
1aA button Change a chracter/ number
”
Ξ
Ν
Η
Θ
Ι
Κ
Λ
Μ
No Part Function
Displays the signal strength, call volume,
Η
Θ
Ι
Κ
Λ
Μ
Ν
Ξ
/PUF
Taskbar
Home Moves to the main screen.
Phone Number
Address Tab
Call History
Message Inbox
&RQ¿JXUDWLRQ
Hotkey Displays (
Call Method and
Signal Strength
By clicking the phone tray icon, the main screen can be active
(or inactive)
- In active mode, pressing the left [ ] button changes to
inactive.
- In inactive mode, pressing the [ ] button changes to
active.
PHVVDJHFRQ¿UPDWLRQPDQQHUPRGHORFN
and battery status.
Used to register, edit, and delete phone
numbers.
Checks the history of the received, sent,
and missed calls.
Creates a new message, or displays the
list of the sent/received messages.
Includes the setup information, volume
ettings, screen properties, network
settings, USIM environments, messages,
phone settings, phone book management,
SPAM blocking, and others.
) ( ) ( ) ( ) buttons.
Displays the call method and signal
strength.
44
Page 45
2
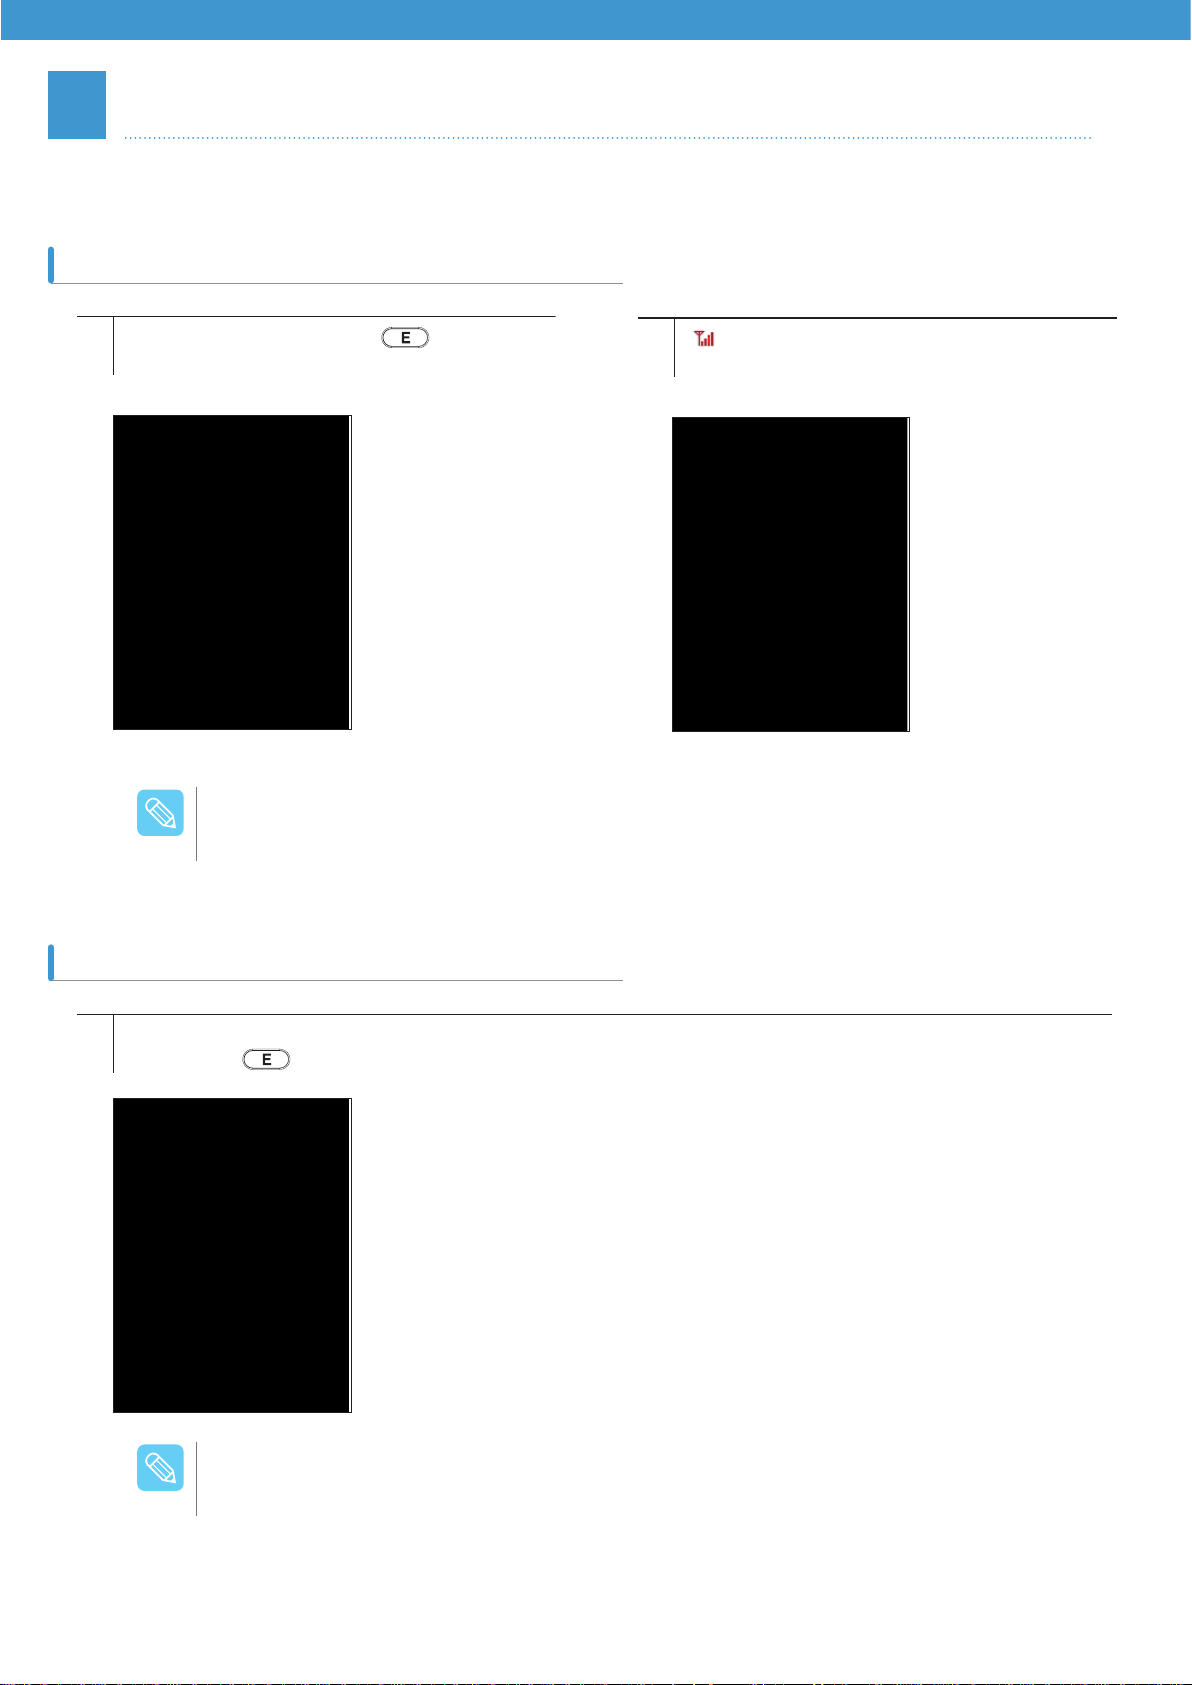
Turning Phone On/Off
Turn the phone function On or Off.
Turning On
Press and hold the device’s [ ] button.
1
[
2
] icon appears on the taskbar as shown
below and the phone number entry screen
appears.
When starting the phone program for the first time or restarting modem, modem goes through
reset process and it takes time before the device is ready to use. Do not perform other task while
/PUF
modem is being reset. When turning phone modem, if the USIM is inserted, USIM is automatically
recognized and phone function can be used.
Turning Off
While the modem is On, press and hold
1
the device’s [
] button.
/PUF
While the modem power is off, the phone call/receive and message send/receive are not available.
The caller is connected to the voice mail.
45
Page 46
3
Phone Call / Receive
Make and receive a phone call.
Making a Phone Call Receiving a Phone Call
Using the number pad, enter the phone number
and press the Call button [
To adjust the volume, press up/down buttons on the keypad.
/PUF
].
When a call is coming, press the [Connect] or
Call button [ ].
4
SMS Message
You can type or check a message.
SMS message screen
The SMS message screen consists of the following:
Icon Message Function
Sent Message Shows sent messages
Read Message Shows read messages
Unread Message Shows unread messages
46
Page 47
Sending Message
Select the Message tab on the right of the phone
1
program, and select [New SMS].
Enter the receiver’s phone number, then press the
3
[Add] button to add the number to the list.
Select the Message tab on the right of the phone
2
program, and select [New SMS].
Press the [
4
send the message.
] button and select [1. Send] to
/PUF
It can receive up to a maximum of 99 text messages. If a new text message is received when the
number exceeds the limit, the first received message is deleted.
Because it does not support MMS, it may not interoperate with the Device embedded camera and
other devices.
47
Page 48
5
Address Book
Add a phone number in the Address Book or modify the entry.
Adding Phone Number
Press [Address] tab and select [New Phone
1
Number].
A phone number can be added from the Call History list as well.
/PUF
Enter the name, group, and phone number,
2
then press the [
] button for saving.
Edit Phone Number
Press the [Address] tab and double click the
1
number (
]-Menu Popup, [ ]-Edit Address book).
[
]–Send, [ ]-Main Screen,
After the number appears, edit the entries and
2
press the [
] button to save the change.
48
Page 49

6
Call History
It displays recent 100 calls sent and received.
/PUF
Icon Type Description
Sent Mark sent calls
Received Mark received calls
Missed Mark missed calls
*Button Description: [ ]-Send, [ ]-Main Screen, [ ]-Menu
Popup, [
* The call history only shows detailed information on the subscription
of the caller identification service (CID). For information on how to
start the service, contact the mobile company.
*The numbers registered in the Address book appear with the name
of the Address book.
]-Detail.
7
Phone Setting
Set the basic phone options. The icons in the Setting menu are as follows:
Version Information
It displays information of the telephone and modem, and their versions.
49
Page 50
Sound Set
Set the sound options.
( [
]-Save Changes, [ ]-Main Screen).
Display
Set various options for the phone display.
([
]-Save Changes, [ ]-Main Screen)
Can select the phone’s
background. (Basic setting
is 1. Sunset.jpg)
Can select the language
for the device on the
Display setting screen.
50
Page 51

Network Setting
Configure the network settings and set the preferred network. Press [Select Band] to select a band from the list.
Communication might not be available if the network is set as Manual.
/PUF
USIM SMS
Set the values for USIM PIN or edit them. Add an SMS Center manually. (Normally, information
is obtained through the USIM card, so there is no need
for setup) Determine whether or not to delete old SMS
messages when memory is full.
51
Page 52

Call Option Management
Set the Call option.
All calls
Determines whether or not to
use the standby option while
receiving/diverting calls and
talking with someone.
Call diverting
Determines whether or not to
use the call diverting option.
Call waiting
Determines whether or not to
use the standby option while
talking.
Managing Phonebook
You can copy, move, or delete a phonebook
between the device and USIM.
52
Page 53

Chapter 4 How to Communicate with Other devices
Bluetooth ....................................54
Adding Quick luancher list.................56
WI-FI Wireless Communication 56
How to Set up Wireless
LAN Configuration .............................57
IP Setting ...........................................58
Wireless LAN Setting ........................59
Connecting PC through Cradle .........60
Connecting PC with USB
Cable Directly .....................
...............60
Connecting devices Using
USB Cable ..................................60
Installing ActiveSync® on PC .............61
Communication with PC ...........61
How to Set up a Partnership .............62
How to Set Up GPS ..........................65
GPS Communications ...............65
Page 54

1
Connect the device and a Bluetooth device. Before purchasing a Bluetooth printer, consult your administrator for
compatibility.
Bluetooth
Turn the power of Bluetooth device (Bluetooth
1
printer) on.
From Wireless Setting, check ‘On’ for Bluetooth
3
and press [Exit].
Select QuickLauncher from the taskbar or select
2
[Wireless Setting] in Control Panel.
Run SPPUI in \Storage\BTprinter.
4
When the next window appears, press [Inquiry] to
5
search for any Bluetooth device.
54
When a Bluetooth device appears, press
6
[Connect] for connection.
Page 55

Enter the PIN code and channel respectively (PIN:1234, Channel:1).
7
The PIN and channel number might differ depending on the Bluetooth device.
/PUF
The Bluetooth Status icon appears on the taskbar. To disconnect the Bluetooth device, select
8
9
Bluetooth icon from the taskbar or [SPPUI]
from [Programs] in the [Start] menu to open the
window as shown below, and press [Exit] or [Stop]
to disconnect the Bluetooth device.
A Bluetooth can be turned On/Off
/PUF
from Wireless Setting.
55
Page 56

2
Use the device’s wireless LAN function.
WI-FI Wireless Communication
Adding Quick luancher list
Select the Quick Launcher icon or [Wireless
1
Setting] from the [Control Panel].
Double click the Network icon in the taskbar.
3
Select On for Wi-Fi in the Wireless Setting
2
window and press [Exit].
From the list of networks (Access Point device or Ad-hoc device), select one that you are using and press
4
[Connect] to connect.(Network Key must be entered in case of secured wireless network).
56
Page 57
How to Set up Wireless LAN Configuration
Select On for Wi-Fi in the [Wireless Setting]
1
window.
From the list of networks (Access Point device or Ad-hoc device), select one that you are using and press
3
[Connect] to connect.(Network Key must be entered in case of secured wireless network).
Double click the Network icon in the taskbar.
2
57
Page 58

Check if the network is connected correctly.
5
If the desired network is not available, use [Add New] for setup and connection. In case of [Add New], the network
6
name must be entered.
IP Setting
After turning Wi-Fi “On” from the [Wireless
1
Setting], select [Start] > [Network and Dial-Up
Connections], and click the icon as shown below
(AR6K_SD1).
58
When the following screen appears, enter the IP
2
addresses for Fixed IP Address, Subnet ask, and
Name Server.
Page 59

Wireless LAN Setting
Use the Wireless LAN application programs.
Select WLANSetting from 1 the QuickLauncher.
1
Checking available SSID, setting wireless LAN, checking signal strength, testing Ping, and checking wireless LAN
3
information can be done.
Network Available List(SSID)
Power Mode Setting
The following screen appears.
2
Signal Strength
SSID(Service Set Identifier) It is
the unique ID for packets exchanged
through a wireless LAN. It identifies the
wireless LAN from other ones.
PING
It is the program used to check the
network connection status.
There are three different options No : The
power mode is not used. CAM(Constantly
Awake Mode)
Normal : The power mode is used by default
Max : The value for the power mode is the
maximum.
WLAN INFO
You can check t
driver version, and Mac address of the
wireless LAN.
he program version,
59
It displays the continuous type of graph
for the signals of the connected AP.
Information
It displays the Mac address and
then the roaming count
parentheses.
in the
Page 60
3
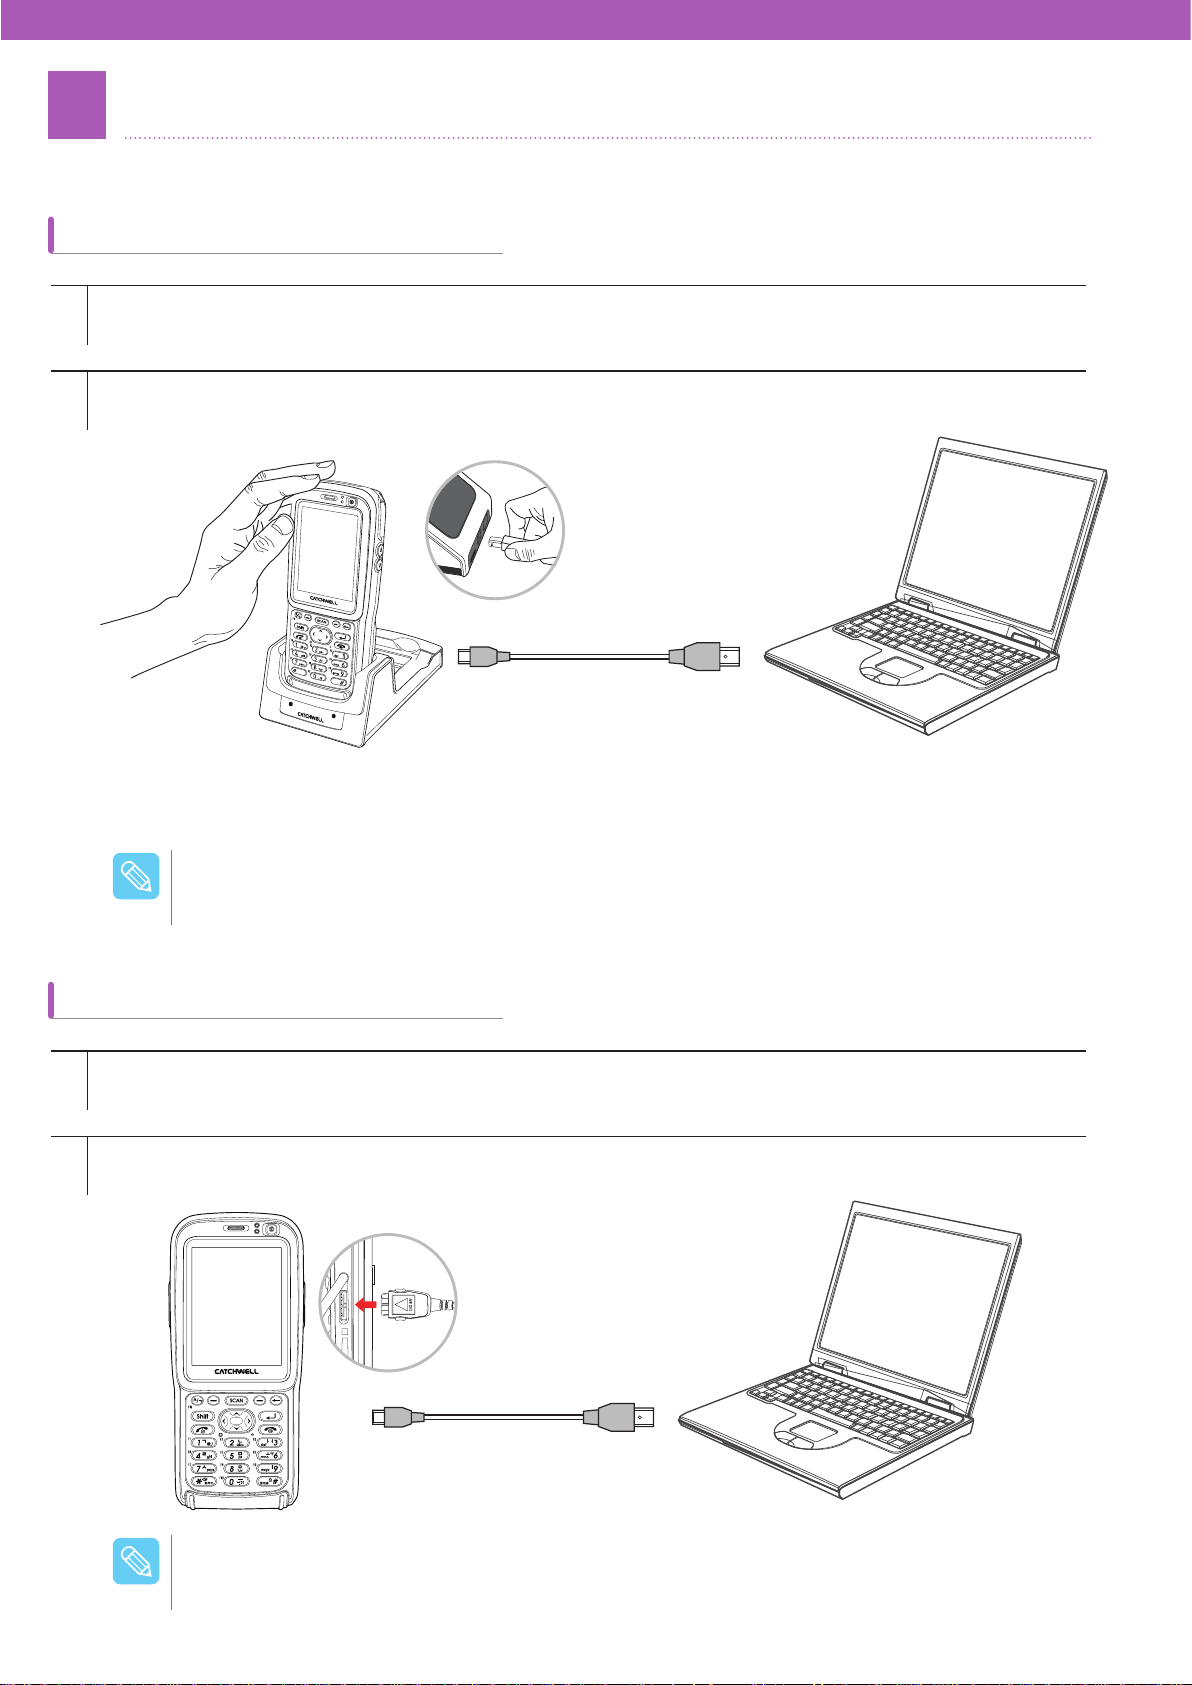
Connect PC to the device (It is recommended to install the ActiveSync program before connection).
Connecting devices Using USB Cable
Connecting PC through Cradle
Insert the device in the cradle.
1
Use the USB cable to connect between the USB port of your PC and the cradle.
2
After connecting the USB cable, sending data and connecting to the Internet can be done.
/PUF
Connecting PC with USB Cable Directly
Use the 24-pin USB cable for connection.
1
The device is automatically connected after automatic recognition.
2
/PUF
The 24-pin USB cable needs to be purchased separately.
60
Page 61

4
Through the ActiveSync program, the data can be transferred between the device and PC.
/PUF
Communication with PC
* What is ActiveSync?
ActiveSync
transfer, deletion, content synchronization/modification, and other features.
If any other device is connected to your PC before installation, please remove them before installation process.
®
is a communication program between PC and the device developed by Microsoft®, and it allows file
Use either cradle or 24-pin USB cable for connection between the device and PC.
Installing ActiveSync® on PC
Use the provided CD or visit Microsoft® website (http://www.microsoft.com/downloads) to install ActiveSync program on
your PC. It is recommended to install the latest version. If the PC has Microsoft® Windows Vista or the later version of
Windows, instead of ActiveSync®, install Windows Mobile device Center® (http://www.microsoft.com/windowsmobile/
ko-kr/help/v6-5/ Windows-Mobile-device-Center-touch.aspx).
Download the ActiveSync program on your PC (based on ActiveSync 4.5). When the following screen appears,
1
click [Install].
Click the downloaded ActiveSync program to begin the installation process.
2
61
Page 62

When the installation of ActiveSync is complete, the following screen appears.
3
How to Set up a Partnership
For the PC with ActiveSync installed, Internet access or file transfer can be done through partnership.
Connect the ActiveSync installed PC to the cradle using the USB cable.
1
The following screen appears when the device is inserted into the cradle.
2
62
Page 63

If the connection is successful, the Set Up a Partnership screen appears. Select either Yes(Y) or No(N) then press
3
[Next >].
If Yes(Y) is selected, the screen below appears. Check the items for synchronization and press [Next >].
4
63
Page 64

After synchronization, the Set up Complete screen appears as shown below. Press [Finish].
5
The mobile device are automatically installed on My Computer after first synchronization.
/PUF
When synchronization is complete, the connection window appears.
6
After synchronization is established, the following tasks can be performed.
1. Install a program for the work.
/PUF
2. Manage/Create backup for the work data.
3. Manage the phonebook and other contact information.
64
Page 65
5
Use GPS (Built-in GPS is optional).
GPS Communications
To use the Navigation function, the Navigation software needs to be installed separately. To purchase
/PUF
the software, contact your local distributor.
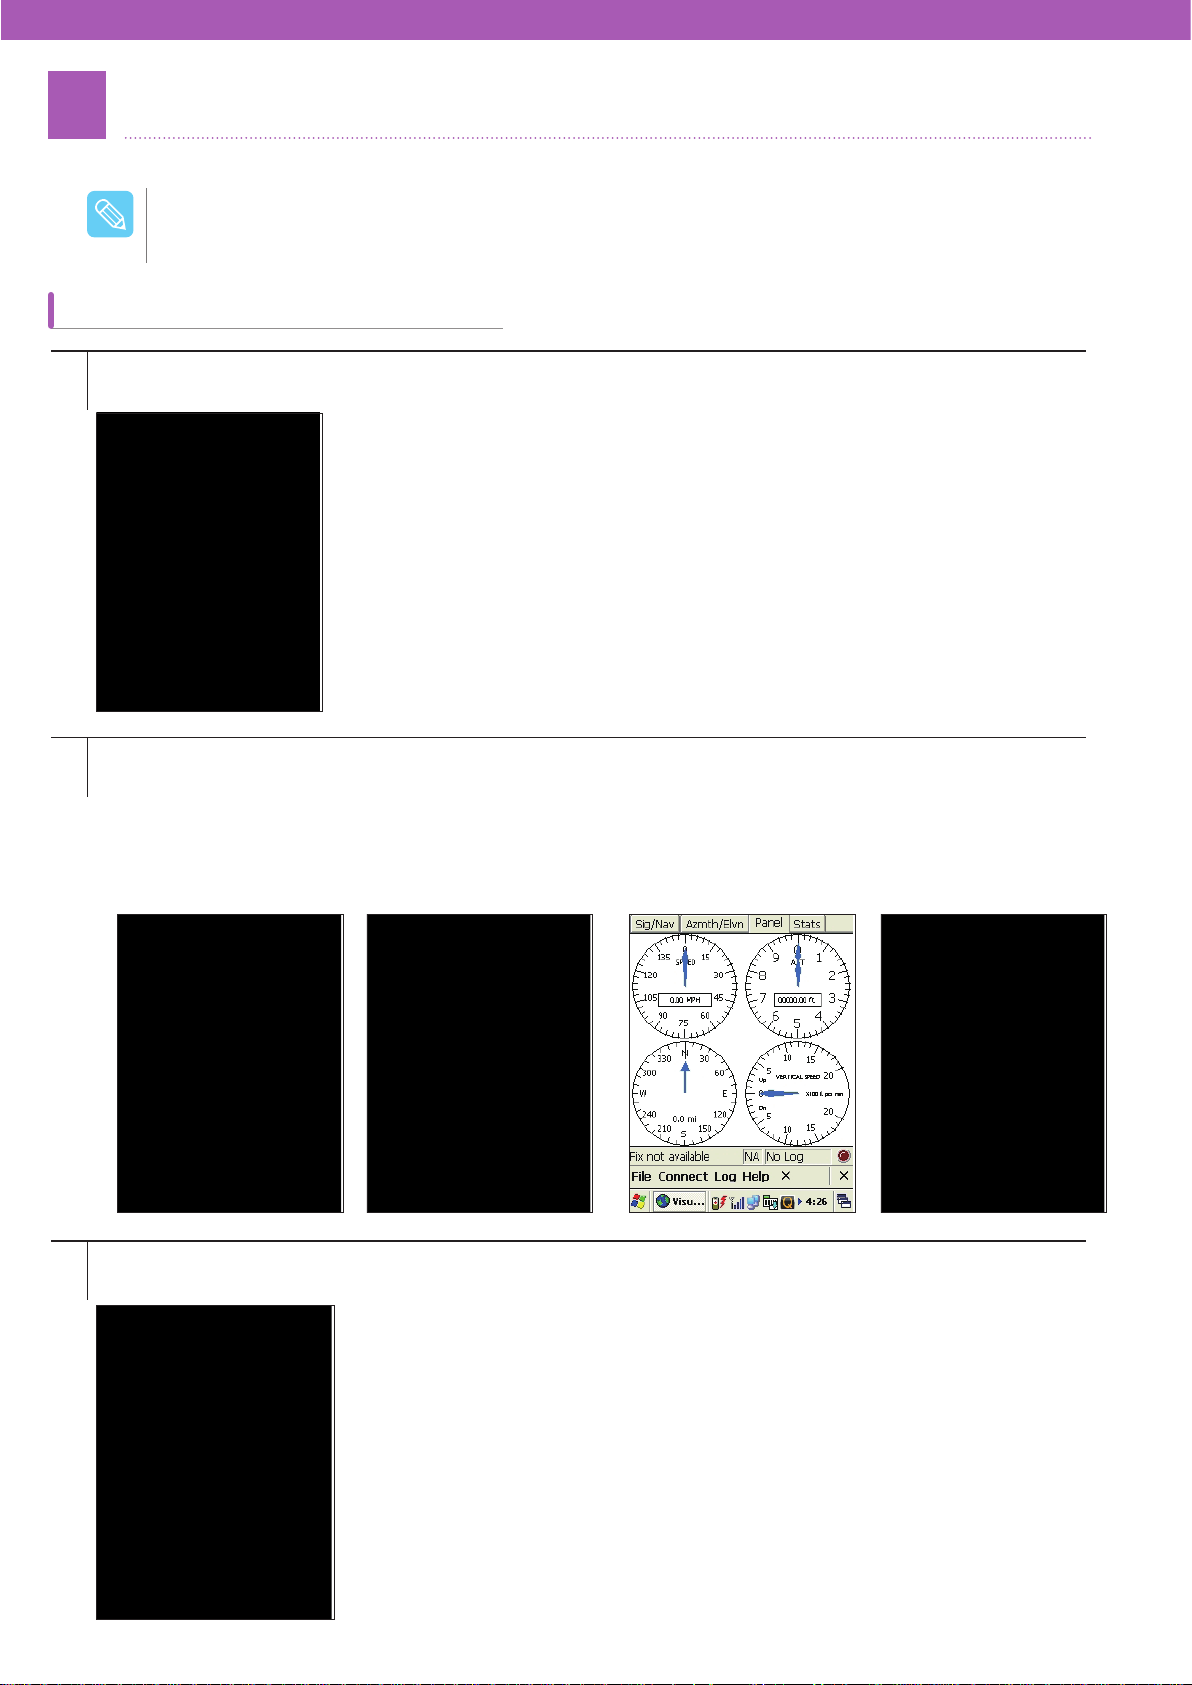
How to Set Up GPS
Select VisualGPSce from [Start] > [Programs] or [My device] > [Storage] > [GPS].
1
If the connection is good, the following screens appears with displaying the status of GPS.
2
Strengths of each signal appear
only when GPS signals are
received properly . (In case proper
signals are received: red light on
the bottom disappears.)
On the bottom menu, select Serial Port(Comm Port) to open the following screens.
3
Satellites for each GPS
signal appear.
Information on speed, altitude,
and others appears.
Statistical information of the
position and DOP appears.
- For built-in GPS: Set Port 1, 9600.
- For other Bluetooth GPS: Set Port 7, 9600
(For more details, please refer to the GPS device manual)
65
Page 66

Chapter 5 How to Use Scanner /Camera
Laser scanning (1D Scanner) ...67
Imager scanning
(1D/2D Scanner) .........................68
Taking Picture....................................69
Recording Video ................................69
Digital Camera ...........................69
Page 67
1
Use the barcode scanner or take digital photos.
1
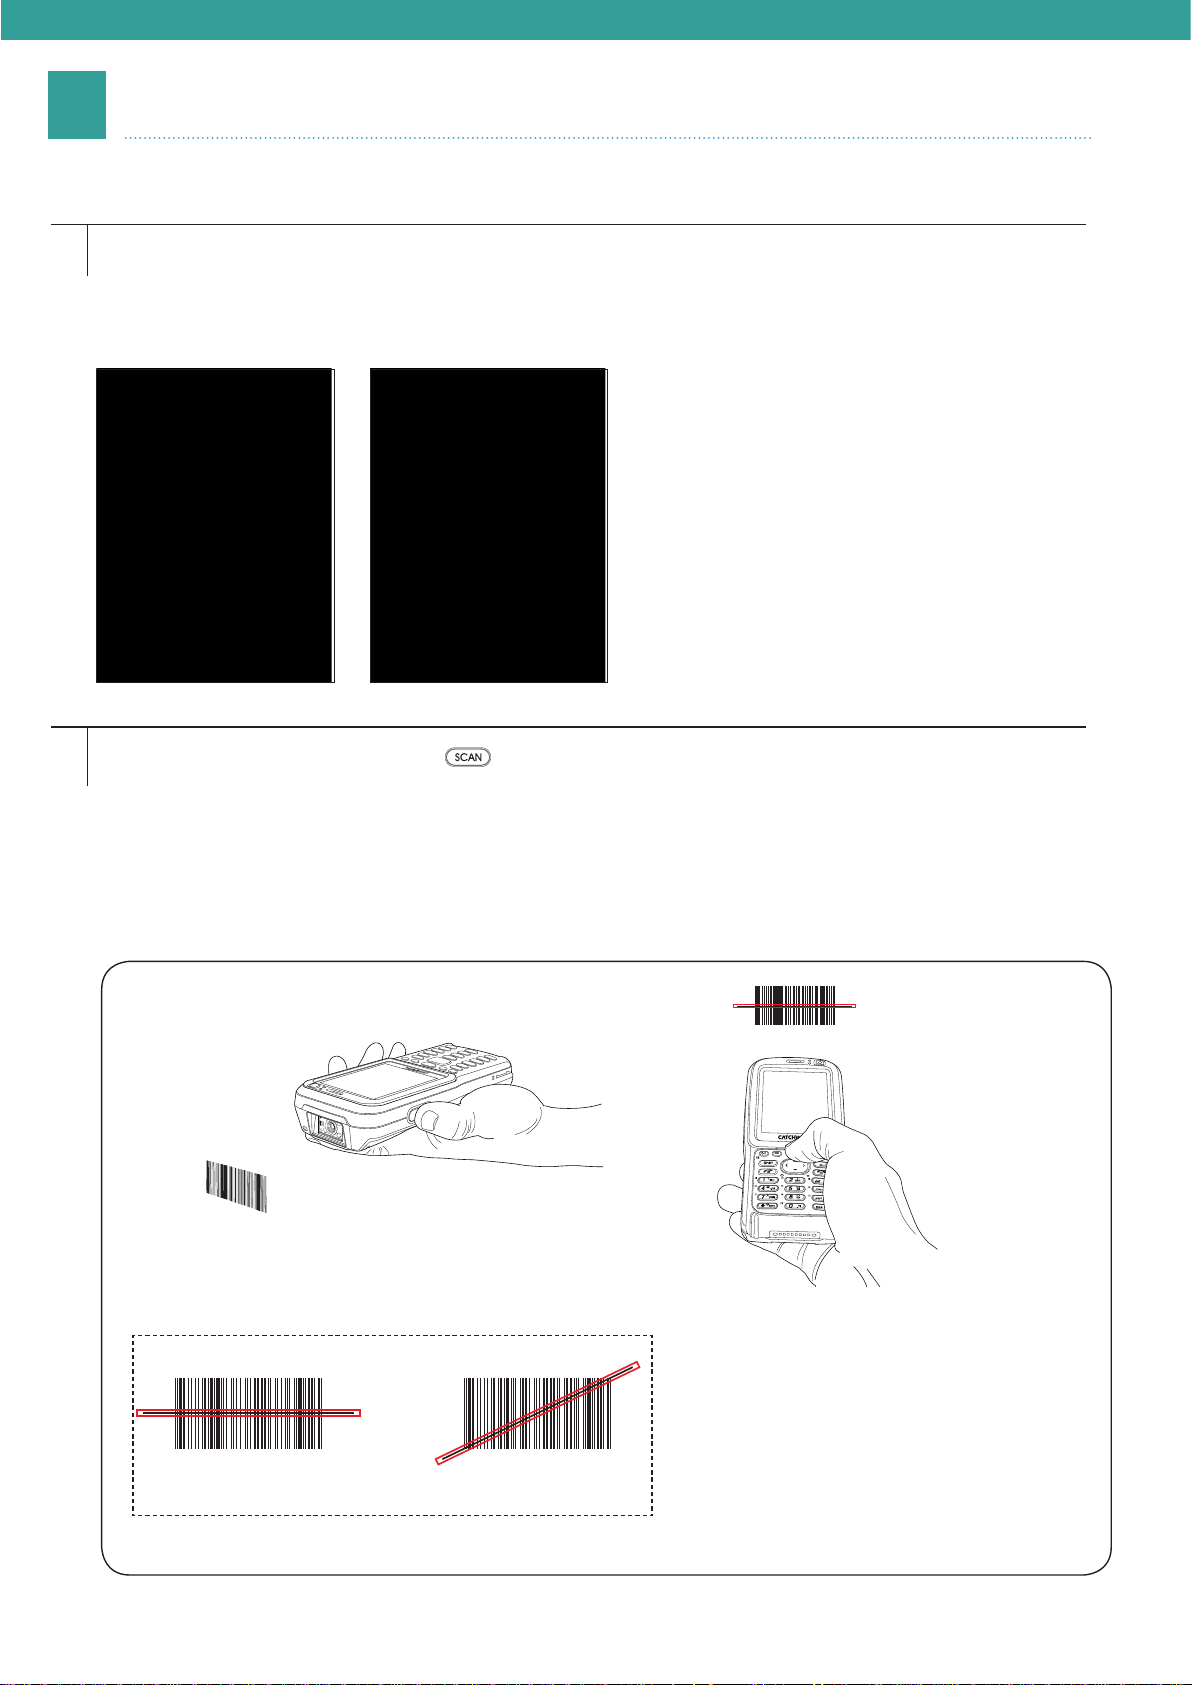
Laser scanning (1D Scanner)
Click the barcode icon on the taskbar to open the menu.
(Show Barcode Info Mode, Tigger Off Mode)
- Show Barcode Info Mode : Shows the barcode type and the value.
- Tigger Off Mode : Stops barcode scanning.
Press the scan button (Orange button [
2
device).
Scan method
- Laser beam is projected when the scan button is pressed.
- Align the horizontal laser beam with the center of the barcode.
- Keep a distance of approximately 10 cm from the barcode and at a horizontal level.
(The effective distance may vary depending on the type and size of the barcode.)
] on the center of the keypad, or the button on the side of the
(Correct) (Incorrect)
67
Page 68
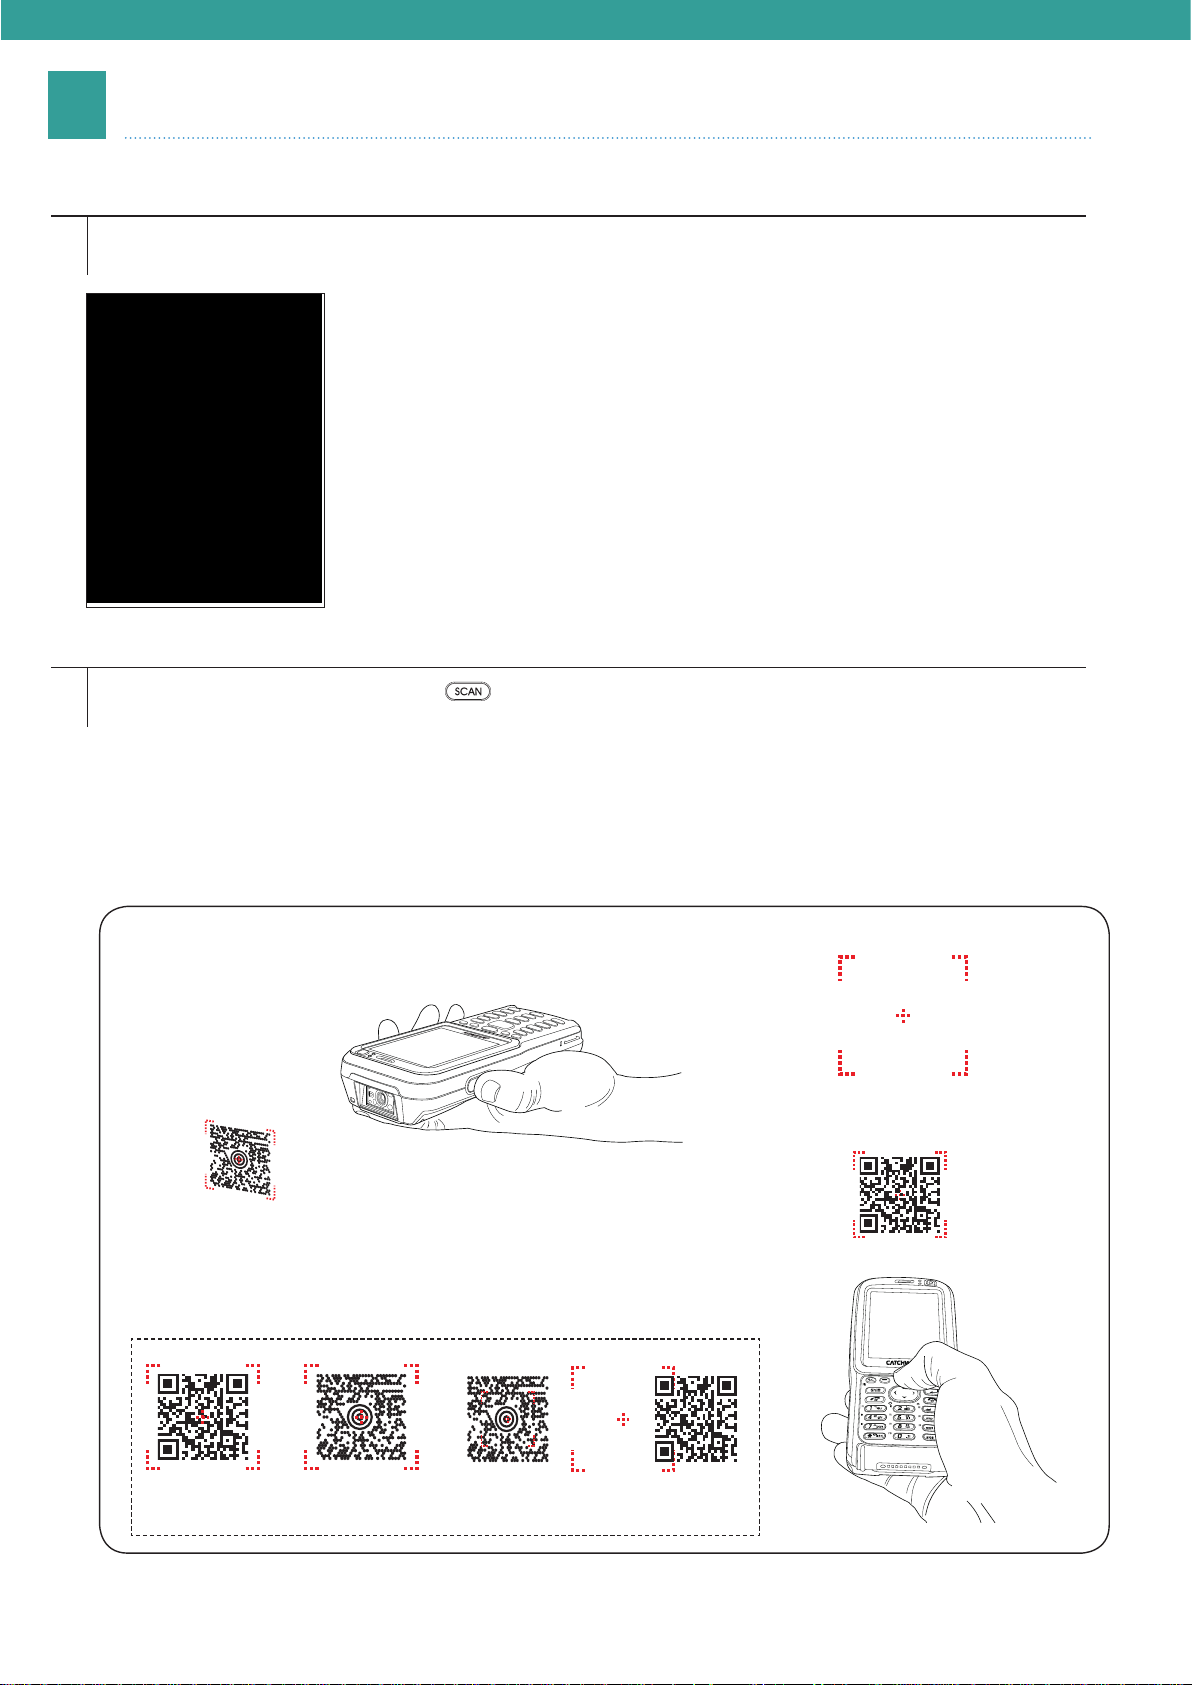
2
Scan 1D, 2D barcodes.
1
Imager scanning (1D/2D Scanner)
Click the barcode icon from the taskbar and select Scanning.
( Decode only, Image &Decode, MultiScan Mode)
Press the scan button (Orange button [
2
device).
Scan method
- Aimer appears when the scan button is pressed.
- Align the center of the aimer with the barcode.
- Move the aimer to fit the barcode inside the square frame.
- Keep a distance of approximately 10 cm from the barcode and at a horizontal level.
(The effective distance may vary depending on the type and size of the bar
] on the center of the keypad, or the button on the side of the
code.)
Aimer
(Correct)
(Incorrect)
68
Page 69
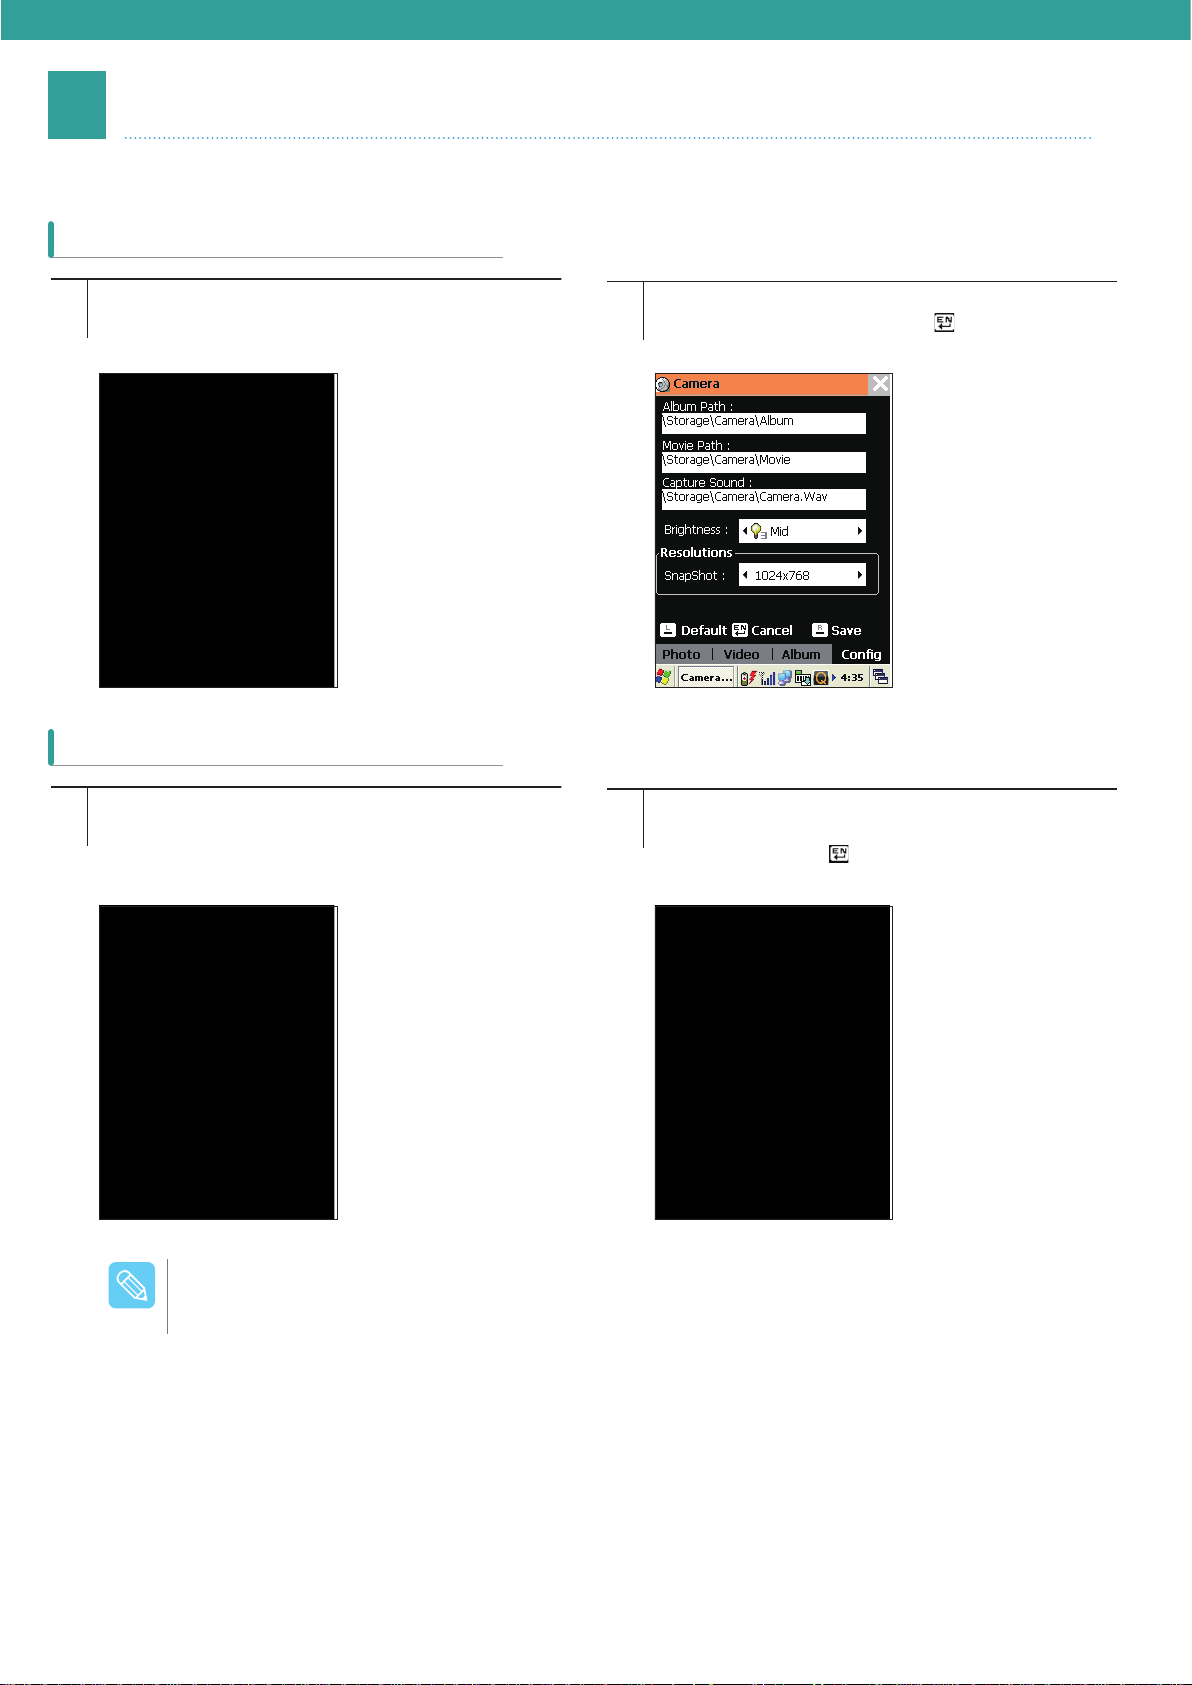
3
Take pictures and record videos.
Digital Camera
Taking Picture
To take pictures, Select camera program (\Storage\
1
camera). The screen below appears. Click the
screen for preview.
Recording Video
To record a video, select [Video] on the bottom of
1
the screen.
Set up Paths, Sound, Resolution and other options
2
from Config tab and press the [ ] button to take a
picture.
Set up Paths, Sound, Resolution and other options
2
from Config tab and press the Video tab. To record
a video, press the [
the recording time appears on the top.
] button. While recording it,
/PUF
Adjust the brightness in 5 level (1~5).
Press [ ] to show focus while taking pictures.
Supporting Resolutions are 640x480 / 800x600 / 1024x768 /
1600x1200 / 2048x1536.
The flash light can be turned on or off while taking pictures.
While using the flash function, press the [BKSP] button on the
Numeric pad to make the function active or not.
69
Page 70

Chapter 6 How to Use Applications
Microsoft Word Pad ...................71
How to Use Keyboard .......................71
How to Use Transcriber.....................72
Starting Utility Manager .....................73
Utility Manager ...........................73
How to Set Up Start Program............74
How to Set Up Quick Launcher .........75
Page 71
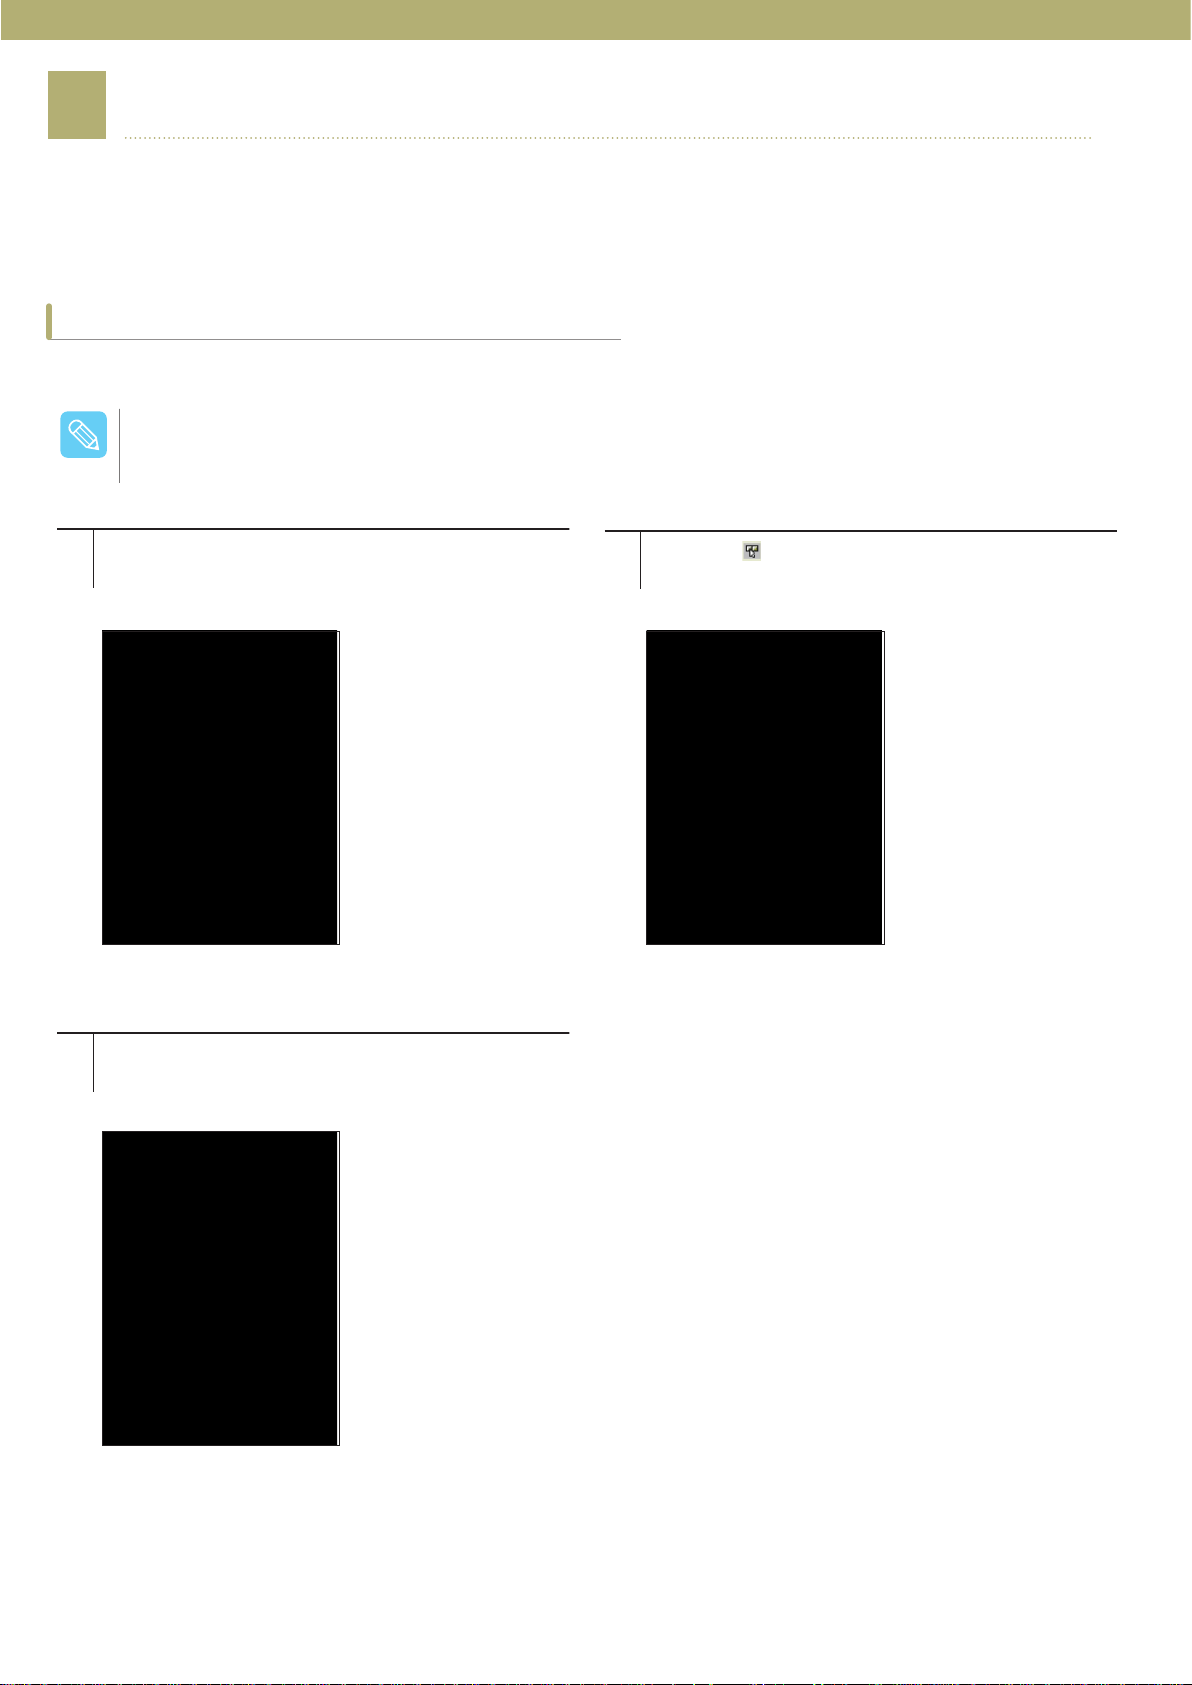
1
The device provides a basic writing program provided by Microsoft, and a document can be created using this program.
User can select one of keyboard and transcriber for the input method. (The document created in your device can be
uploaded to/downloaded from PC using MicrosoftActiveSync®).
Microsoft Word Pad
How to Use Keyboard
Use the virtual keyboard to create a document.
Arrange of keys on the virtual keyboard may differ depending on the language setting or can be
/PUF
modified without notice.
Click the WordPad icon in the main screen or by
1
selecting [Start] > [Programs] to open the program as
shown below.
Adjust the location of the keyboard for convenience.
3
Drag the keyboard to a different location using the
stylus.
Click the [ ] icon in the taskbar to show the
2
keyboard.
71
Page 72
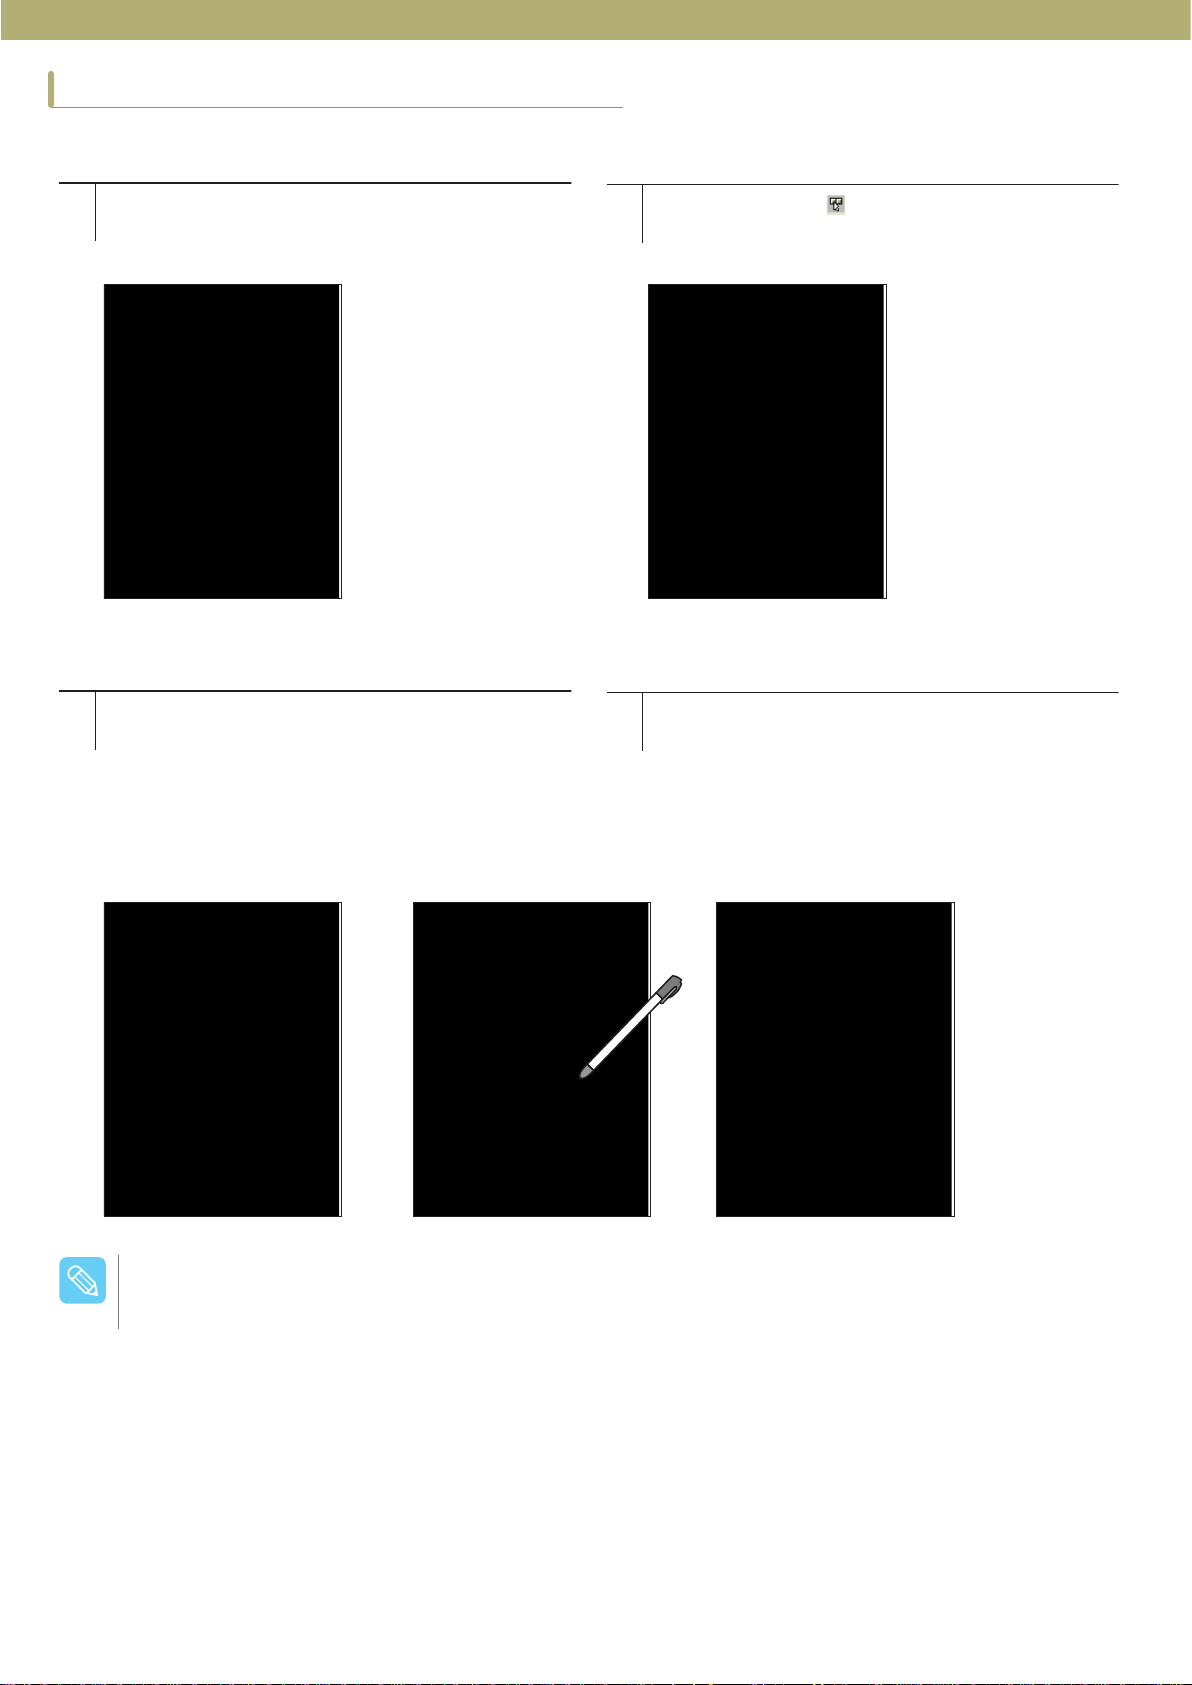
How to Use Transcriber
Use the stylus to write letters.
Click the WordPad icon in the main screen or by
1
selecting [Start] > [Programs] to open the program as
shown below:
The input menu appears on the bottom of the
3
screen. Use the stylus to write characters, and it is
automatically recognized.(The character type can
be selected from Input Character Type on the writing
area.)
Click and hold the [ ] icon on the task bar to open
2
the keyboard menu and select Transcriber.
The position of writing can be moved in case of
4
confusion. Drag the top of writing area to a different
location using the stylus.
/PUF
Write a letter at a time for better recognition when using the transcriber. If the letter is not written in cursive
and written in a different writing style, or more than two letters are written at a time, the writing might not be
recognized correctly. To change from Transcriber to Keyboard, in Step 2, select Keyboard.
72
Page 73

2
Configure the settings for the start program and Quick Launcher using Utility Manager.
Utility Manager
Faulty configuration can lead to a system malfunction. Please configure it after consulting your system
/PUF
administrator.
Starting Utility Manager
Use the stylus to write letters.
Select [Start] > [Settings] > [Control Panel] > [Utility
1
Manager].
Press the [Admin] button and enter the password
2
(admin password is 23646).
73
Page 74
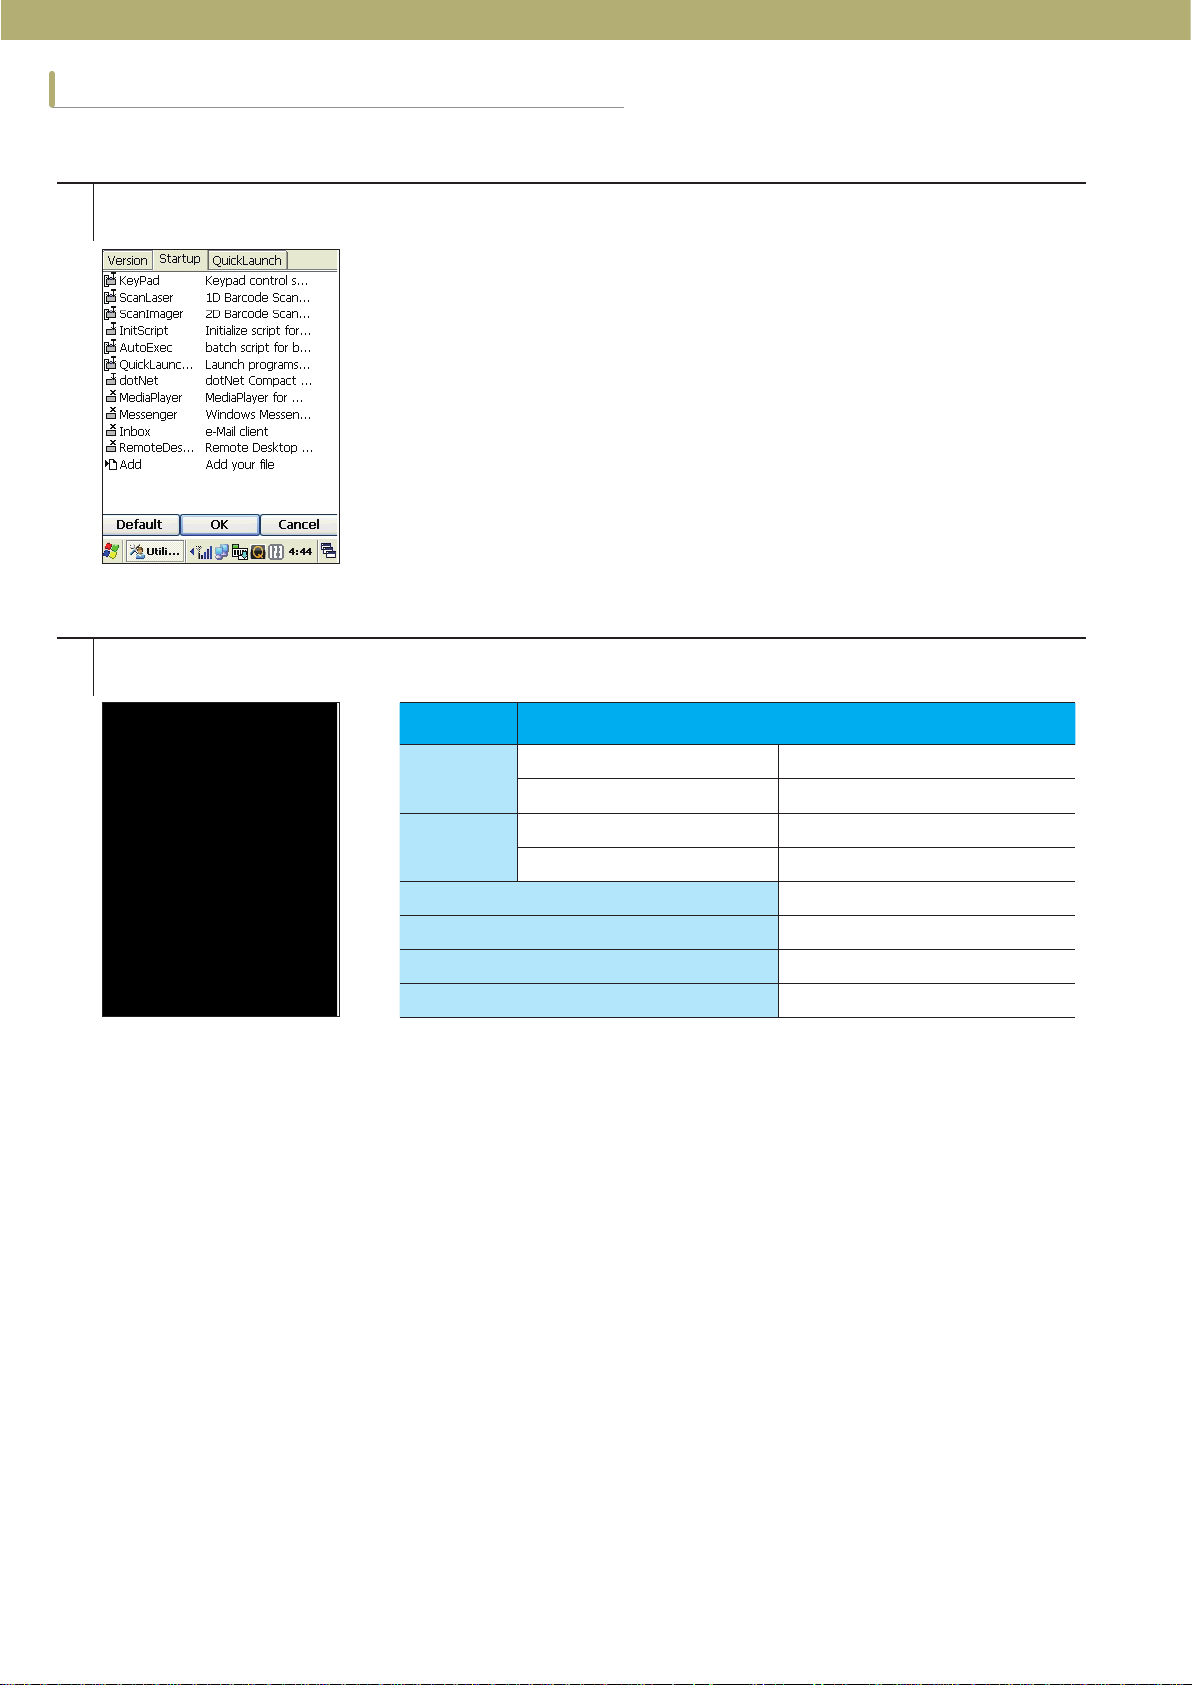
How to Set Up Start Program
Set the files that start automatically when the device boots up.
Select the Startup tab from the Utility Manager.
1
Press Add to select a start program and enter Type, RunType, and Name, then press [OK].
2
Type Description Function
Type
RunType
WarmBoot / ColdBoot Start on Booting
Name Program Name
Option Option Parameter
Description User Description
System System Program
User User Program
None Do not Execute
Path File Path
74
Page 75

How to Set Up Quick Launcher
Configure the settings for Quick Launcher programs on the taskbar.
The Quick Launcher menu is changed
1
after changing the configuration.
The Quick Launcher menu is changed
3
after changing the configuration.
Click the desired program to change
2
Name and Path, or press Add to add it
on the list.
75
Page 76
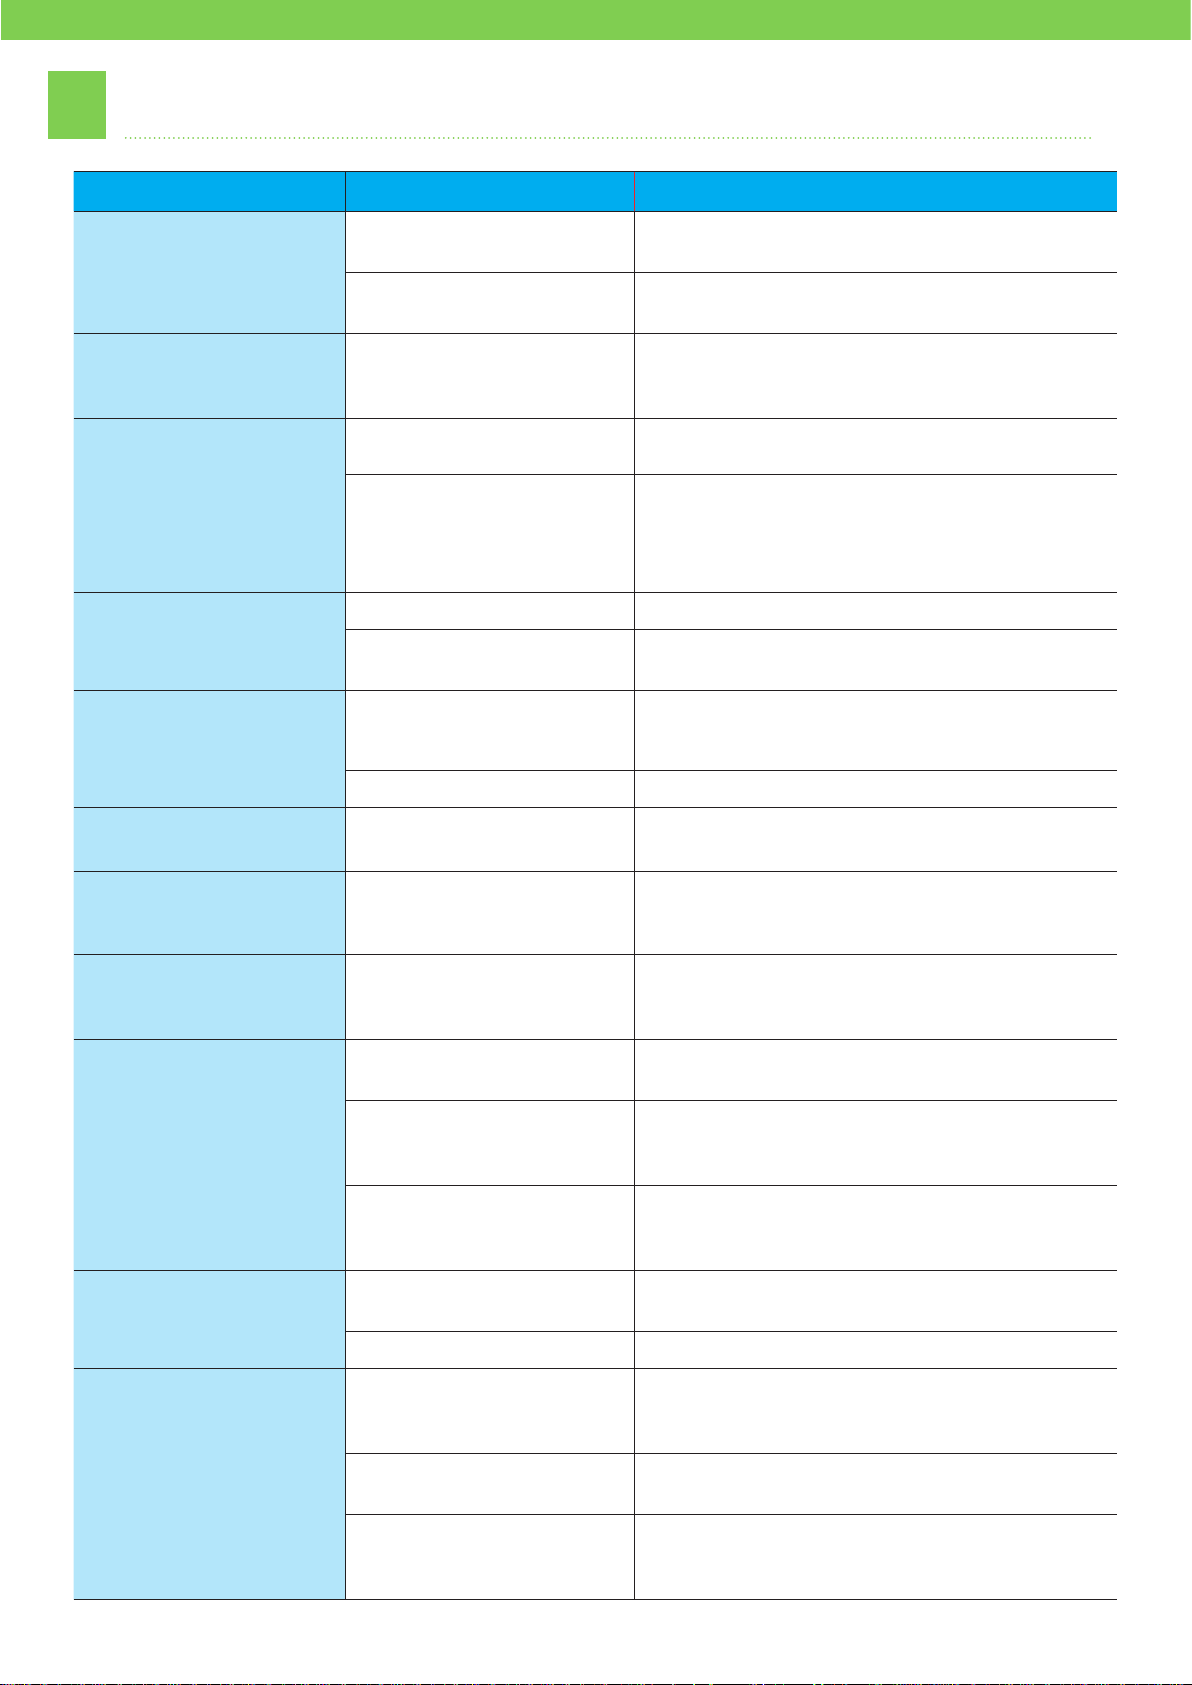
#
TroubleShooting
Case Symptom Solution
The system is not
bootable.
The device is
frequently shut down.
The battery cannot be
charged.
The screen does not
appear.
The wireless LAN does not
operate properly.
No battery or discharged
The reset is pressed.
The PDA is frequently
switched to the sleep
mode.
Battery damage or failure
The charge indicator (red)
blinks and charging is not
in progress.
The screen is dead.
The battery is discharged.
The wireless LAN is off.
The IP cannot be received.
Install a new battery or recharge the current
battery.
Remove the battery and contact with the purchased
site or manufacturer for services.
Select Start > Settings > Control Panel > Power
DQGFOLFNWKHFXVWRPFRQ¿JXUDWLRQWDEWRFKDQJH
the status change time.
Exchange batteries and then perform cold booting.
The terminal is not properly placed in the cradle or a
loose contact happens. Clean the connection area
and try again. If the symptom persists, contact with
the purchased site or manufacturer for services.
Press the power button.
Recharge the battery and turn on the power.
Otherwise, exchange batteries and try again.
Activate the wireless LAN by using the
WirelessLanSetting program.
Set the values for SSID and IP, and try again.
The touch screen does not
work properly.
Insufficient memory to
“
continue the execution of
the program” appears.
Close a task window
“
or increase the program
memory.” appears.
Internal memory is full”
“
appears.
After scanning, data entry
is not made.
Cannot click buttons and
icons.
So many application
programs are running.
Only one program is
running.
So many files are resident
in memory.
Memory setting problem
So many application
programs are installed.
The scan window is dirty
or impaired
No scanning program icon
There is no connection
sign displayed even though
connected.
Change the settings under Start > Settings >
Control Panel > Stylus > Calibration.
Terminate the programs that are not being used.
Under My Computer > Control Panel > System >
Memory, increase the program memory or delete
unnecessary programs.
Move the PDA programs to your PC or delete some
for free space.
Change the memory allocation size. Change the
memory allocation setting under Start > Settings >
Control Panel > System > Memory.
Select the programs to delete under Start >
Settings > Control Panel > Add/remove Programs
and press the Delete key.
Clean the scan window or replace it.
Restart the scanning program by performing reset.
Remove your PDA from the cradle, reinstall
ActiveSync, and try to connect it.
ActiveSync does not work
properly.
ActiveSync is not installed.
The program cannot be
installed under Windows 7.
76
Install the newest version of the program after
downloading it from the Microsoft website.
Install the program after downloading it from the
Windows Mobile Device Center in the Microsoft
website.
Page 77

No sound is heard.
The volume is too low or
no sound is heard.
Adjust the volume slider up or down under Start
> Settings > Control Panel > Sounds and Audio
Devices. Deselect Mute if selected. If the symptom
persists, contact with the purchased site or
manufacturer for services.
The speaker is clogged by
foreign materials.
A fluid flowed into the
terminal.
The screen is stopped and
no operation is allowed.
No connection to the
PC through the USB
cable
The program is stopped.
No connection
In case of using the USB
Setting problem
FCC compliance information
hub
Remove foreign materials from the speaker.
Promply remove the battery and contact with the
purchased site or manufacturer for services.
Press the reset. If the symptom persists, contact
with the purchased site or manufacturer for
services.
Check whether your computer and the device are
all On.
Check the USB cable connection status. When
connecting between the device and PC through the
USB cable, do not use the USB hub but connect
them directly.
Under Control Panel > PC Connection, check
whether “Enable direct connection to the desktop
computer” is checked.
This device complies with Part 15 of FCC Rules. Operation is subject t
(1) This device may not cause harmful interference, and
(2) This device must accept any interference received.
Including interference that may cause undesired operation.
o the following two conditions:
Information to User
For a Class A digital device or peripheral, the instructions furnished the user shall include the following or similar
statement, placed in a prominent location in the text of the manual:NOTE: This equi
to comply with the limits fora Class A digital device, pursuant to Part 15 of the FCC Rules.
These limits aredesigned to provide reasonable protection against harmful interference whenthe equipment is
operated in a commercial environment.
This equipment generates, uses, and can radiate radio frequency energy and, if not installed and used in accordance
with the instruction manual, may cause harmful interference to radio communications.
Operation of this equipment in a residential area is likely to cause harmful interference in which case the user will be
required to correct the interference at his own expense.
pment has been tested and found
$BVUJPO
The user who makes changes or modifications to the unit without the express approval by the
manufacturer will void user authority to operate the equipment.
77
Page 78

Body worm operation
This device was tested for typical body-worn operations with the back of the phone kept 20 mm. from the body. To
maintain compliance with FCC RF exposure requirements, use only belt-clips, holsters or similar accessories that
maintain a 20 mm. separation distance between the user’s body and the back of the phone, including the antenna.
The use of belt-clips, holsters and similar accessories should not contain metallic components in its assembly. The
use of accessories that do not satisfy these requirements may not comply with FCC RF exposure requirements, and
should be avoided.
78
Page 79

SAR INFORMATION
THIS MODEL PHONE MEETS THE GOVERNMENT’S
REQUIREMENTS FOR EXPOSURE TO RADIO WAVES.
Your wireless phone is a radio transmitter and receiver. It is designed and manufactured not to exceed the emission
limits for exposure to radiofrequency (RF) energy set by the Federal Communications Commission of the U.S.
Government. These limits are part of comprehensive guidelines and establish permitted levels of RF energy for
the general population. The guidelines are based on standards that were developed by independent scientific
organizations through periodic and thorough evaluation of scientific studies. The standards include a substantial
safety margin designed to assure the safety of all persons, regardless of age and health. The exposure standard for
wireless mobile phones employs a unit of measurement known as the Specific Absorption Rate, or SAR. The SAR
limit set by the FCC is 1.6 W/kg. *
Tests for SAR are conducted with the phone transmitting at its highest certified power level in all tested frequency
bands. Although the SAR is determined at the highest certified power level, the actual SAR level of the phone while
operating can be well below the maximum value. This is because the phone is designed to operate at multiple
power levels so as to use only the power required to reach the network. In general, the closer you are to a wireless
base station antenna, the lower the power output. Before a phone model is available for sale to the public, it
must be tested and certified to the FCC that it does not exceed the limit established by the government adopted
requirement for safe exposure. The tests are performed in positions and locations (e.g., at the ear and worn on the
body) as required by the FCC for each model. The highest SAR value for this model phone when tested for use at
the ear is 0.632 W/Kg and when worn on the body , as described in this user guide, is 0.254 W/Kg. (Body-worn
measurements differ among phone models, depending upon available accessories and FCC requirements). While
there may be differences between the SAR levels of various phones and at various positions, they all meet the
government requirement for safe exposure. The FCC has granted an Equipment Authorization for this model phone
with all reported SAR levels evaluated as in compliance with the FCC RF exposure guidelines. SAR information on
this model phone is on file with the FCC and can be found under the Display Grant section of http://www.fcc.gov/ oet/
fccid after searching on FCC ID: ZP4CW20.
Additional information on Specific Absorption Rates (SAR) can be found on the Cellular Telecommunications
Industry Asso-ciation (CTIA) web-site at http://www.wow-com.com. * In the United States and Canada, the SAR
limit for mobile phones used by the public is 1.6 watts/kg (W/kg) averaged over one gram of tissue. The standard
incorporates a sub-stantial margin of safety to give additional protection for the public and to account for any
variations in measurements.
79
Page 80

LIMITED WARRANTY
CATCHWELL, Inc. ("CATCHWELL") warrants to the original end user purchaser ("You") that for the Warranty Period listed
below, the Product (excluding any third party software) will be free of defects in materials and workmanship under normal
use.
You must have proof of purchase before returning defective products to CATCHWELL. Returned products must be shipped
prepaid and packaged appropriately to
be insured or sent by a carrier who provides a tracking number of the package. CATCHWELL is not responsible for any
Product that is lost or damaged in transit. If CATCHWELL ships a replacement product to you before receiving the original
product and you fail to return the original product to CATCHWELL within thirty (30) d
authorization is issued, CATCHWELL will charge you the current manufacturer's suggested retail price of such product.
Your exclusive remedy and CATCHWELL's entire liability under this warranty will be for CATCHWELL at its option to repair
or replace the Product or refund your purchase price less any rebates. CATCHWELL does not warrant against loss of any
or images (including data stored on Product returned to CATCHWELL for service), and assumes no liability for such
data
loss.
ALL IMPLIED WARRANTIES OR CONDITIONS OF MERCHANTABILITY, SATISFACTORY QUALITY OR FITNESS FOR
A PARTICULAR PURPOSE ARE LIMITED TO THE DURATION OF THE APPLICABLE EXPRESS WARRANTY. ALL
OTHER EXPRESS OR IMPLIED CONDITIONS, REPRESENTATIONS AND WARRANTIES, INCLUDING ANY IMPLIED
WARRAN
There are inherent risks associated with any biometric sensor technology and security safeguard, including encryption
technology, and biometric sensors and security safeguards, by their nature, are capable of circumvention. CATCHWELL
cannot, and does not, guarantee that your data will not be accessed by unauthorized per
any warranties to that effect to the fullest extent permitted by law. You should not use this product to protect sensitive data
such as financial information or for accessing corporate networks.
Some jurisdictions do not allow limitations on how long an implied warranty lasts or at all, so the above limitation may not
apply to you. This warranty gives you specific leg
This limitation does not affect your statutory rights.
All third party software provided with the Product is provided "AS IS". You assume the entire risk as to the quality,
performance, accuracy and effect of such software, and should it prove defective, you, and not CATCHWELL, assume the
entire cost of all necessary servic
TO THE EXTENT NOT PROHIBITED BY LAW, IN NO EVENT WILL CATCHWELL BE LIABLE FOR ANY LOST IMAGES,
DATA, REVENUE OR PROFIT, OR FOR SPECIAL, INDIRECT, CONSEQUENTIAL, INCIDENTAL OR PUNITIVE
DAMAGES, HOWEVER CAUSED REGARDLESS OF THE THEORY OF LIABILITY, ARISING OUT OF OR RELATED
TO THE USE OF OR INABILITY TO USE THE PRODUCT, EVEN IF CATCHWELL HAS BEEN ADVISED OF THE
POSSIBILITY OF SUCH DAM
YOU FOR THE PRODUCT.
TY OF NON-INFRINGEMENT, ARE DISCLAIMED TO THE FULLEST EXTENT PERMITTED BY LAW.
AGES. IN NO EVENT WILL CATCHWELL'S LIABILITY EXCEED THE AMOUNT PAID BY
prevent any damage in transit, and it is recommended that the package should
ays from the date the warranty service
sons, and CATCHWELL disclaims
al rights, and you may also have other rights, which vary by jurisdiction.
ing or repair.
The foregoing limitations will apply even if any warranty or remedy provided under this Agreement fails of its essential
purpose.
Product Warranty Period
CATCHWELL CW20 / CW30 :
15 month from the manufactured date
Handheld Mobile Computer
80
Page 81

INDEX
1D/2D Scanner 68
1D Scanner 67
4-slot cradle 8
A
ActiveSync 61
B
Backlight 20, 36
Barcode 37
battery 7, 9
Battery 14
Bluetooth 54
C
Call History 49
Connecting PC 60
Control Panel 24
Cradle 8
D
Dial-Up 26
Digital Camera 69
Display 28
E
K
Keyboard 71
KeyPad 38
L
Laser scanning 67
M
Maintenance 5
MicroSD 13
N
Network 26
P
Password 32
Phone 44
Phone Call 46
Phone Number 48
Phone Setting 49
Power adapter 8, 9
Power cord 8, 9
Power Off 16
Power On 16
Power Supply 4
Earset 7, 9
G
GPS 65
H
Hand strap 7, 9
Hardware Reset 42
I
Imager scanning 68
R
Receive 46
Record 39
S
Screen Calibration 40
Sleep Mode 19
SMS 46
Software Reset 41
Start Button 23
Stylus 7, 9, 42
81
Page 82

T
Taskbar 23
TroubleShooting 76
U
USB cable 8, 9
USIM 12
Utility Manager 40, 73
V
Volume and Sound 29
W
Windows Mobile device Center 61
Wireless LAN 57
Wireless LAN Setting 59
Wireless Setting 40
Wrist Strap 7, 9
82
Page 83

 Loading...