

CASTLES TECHNOLOGY VEGA3000 3G, VGA3000 2G User Manual

CASTLES TECHNOLOGY
Castles Technology Co., Ltd.
2F, No. 205, Sec. 3, Beixin Rd., XindianDistrict,
New Taipei City 23143, Taiwan R.O.C.
http://www.castech.com.tw
VEGA3000 EFT-POS
Book 2
User Manual
Confidential
Version1.0
Jan 2015

Revision History
Version
Date
Descriptions
1.0
May 27, 2014
Initial creation.
1.1
Jan 14, 2015
Add FCC Warning
Castles Technology Co., Ltd. Confidential • All Right Reserved. Pg. 2

Contents
1. Introduction .................................................................................................................. 5
1.1. Type of Terminal .................................................................................................. 5
2. Hardware Setup ............................................................................................................ 7
2.1. Parts of the Terminal ........................................................................................... 7
2.2. Inserting the Battery ........................................................................................... 10
2.3. Inserting the SAM Card ..................................................................................... 11
2.4. Inserting the Paper Roll ..................................................................................... 12
2.5. Inserting the GSM SIM Card .............................................................................. 13
2.6. Inserting the Memory card ................................................................................. 14
2.7. Power Supply Specifications .............................................................................. 15
2.8. Operating Ambient Temperature ........................................................................ 15
3. Basic Operation ......................................................................................................... 16
3.1. Program Manager .............................................................................................. 16
3.2. Download AP ..................................................................................................... 16
3.3. System Info........................................................................................................ 18
3.4. Memory Status .................................................................................................. 19
3.5. System Settings ................................................................................................. 20
3.6. Test Utility .......................................................................................................... 23
3.7. Factory Reset .................................................................................................... 26
3.8. Power Off .......................................................................................................... 27
3.9. Function Key Password Change ................................ ........................................ 28
3.10. Share Object Management ................................................................................ 29
3.11. CastlesTMS ....................................................................................................... 30
3.12. Font Mng ........................................................................................................... 31
3.13. Debug Tools ...................................................................................................... 32
3.14. ULD Key Hash ................................................................................................... 33
3.15. Hardware Detect ................................................................................................ 34
4. Secure File Loading ................................................................................................... 35
4.1. ULD Key System ............................................................................................... 35
4.1.1. ULD Manufacturer Key ........................................................................... 35
4.1.2. ULD User Key ........................................................................................ 37
4.1.3. Key Change ........................................................................................... 37
4.2. File Signing ........................................................................................................ 38
Castles Technology Co., Ltd. Confidential • All Right Reserved. Pg. 3

4.2.1. Signing Kernel Module ........................................................................... 38
4.2.2. Signing User Files .................................................................................. 40
4.3. File Loading ....................................................................................................... 44
4.3.1. Download by User Loader ...................................................................... 44
4.3.2. Download by Removable Media ............................................................. 47
4.4. Changing ULD User Key.................................................................................... 49
5. Font Management ...................................................................................................... 56
5.1. Loading New Font.............................................................................................. 56
5.2. Custom Font ................................................................................................ ...... 59
5.3. Using TrueType Font (TTF) ............................................................................... 67
6. Technical Notes ......................................................................................................... 69
6.1. Serial Cable PIN Assignment ............................................................................. 69
7. FCC Warning .............................................................................................................. 70
Castles Technology Co., Ltd. Confidential • All Right Reserved. Pg. 4
1. Introduction
This document provides a guideline on operating and configuringCastles VEGA3000
terminal.
The scope of this document includesetting up the terminal, basic operation, application
life cycle, and some advance features.
1.1. Type of Terminal
VEGA3000 terminal is portable type can be battery operated.
Portable type is designed as two pieces of hardware, handset and base unit.
Handset unit features major components, and also optional contactless reader,
WiFi, GRPS modem. Wired connection like power, modem, Ethernet, USB or
serial ports, are be located in base unit. There are additional power connection
and USB port on handset unit, allow the handset unit can be operated alone.
Handset Base
Front View Rear View Front View Rear View
Side View
Castles Technology Co., Ltd. Confidential • All Right Reserved. Pg. 5

To start up the terminal needs to press “Power Button” key after the adapter
connected.
Castles Technology Co., Ltd. Confidential • All Right Reserved. Pg. 6
2. Hardware Setup
VEGA3000
1 2 3
5
8 9 10
6 7 4
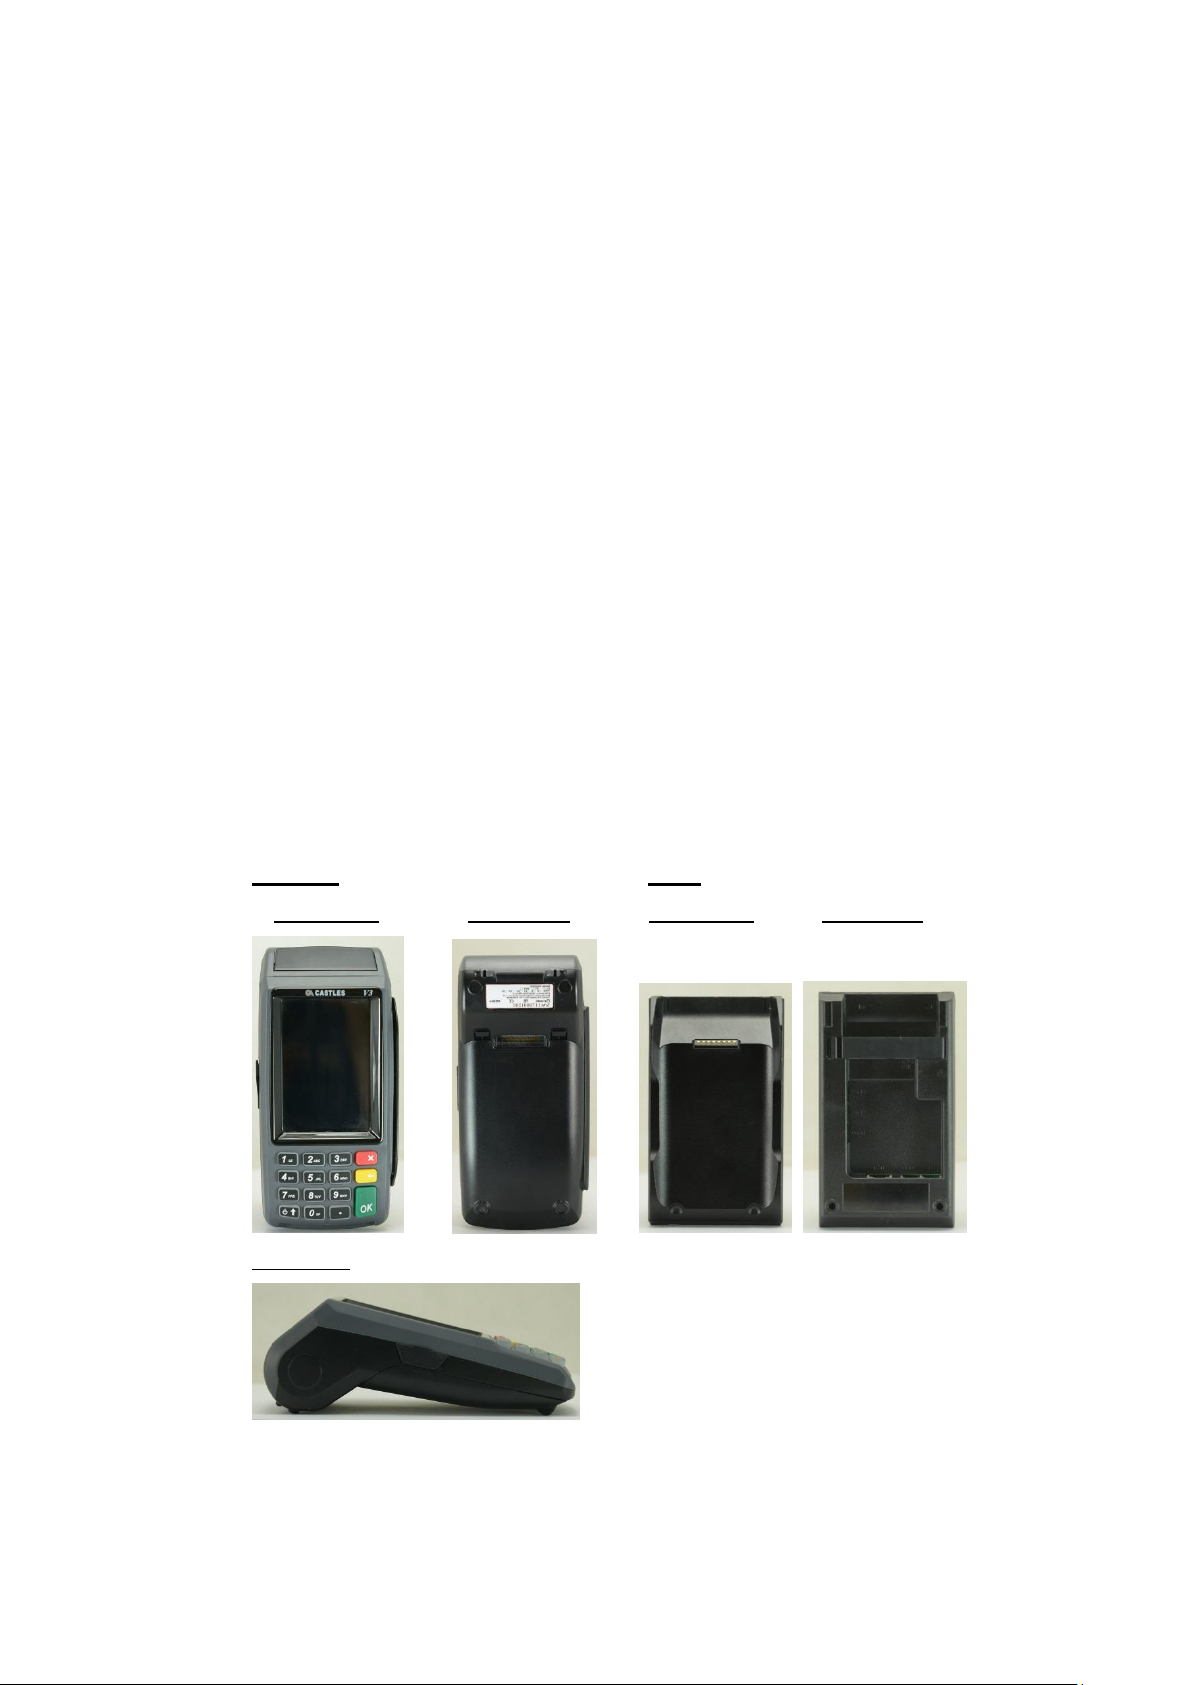
2.1. Parts of the Terminal
Front
1. LCD Display (Color TFT)
7. Magnetic Stripe Reader
2. Privacy Shields
3. Keyboard
4. Cancel Key
5. Clear Key
6. Enter Key
Castles Technology Co., Ltd. Confidential • All Right Reserved. Pg. 7
8. Smart Card Reader
9. Contactless Card Landing
Zone
10. Paper Roll Handle
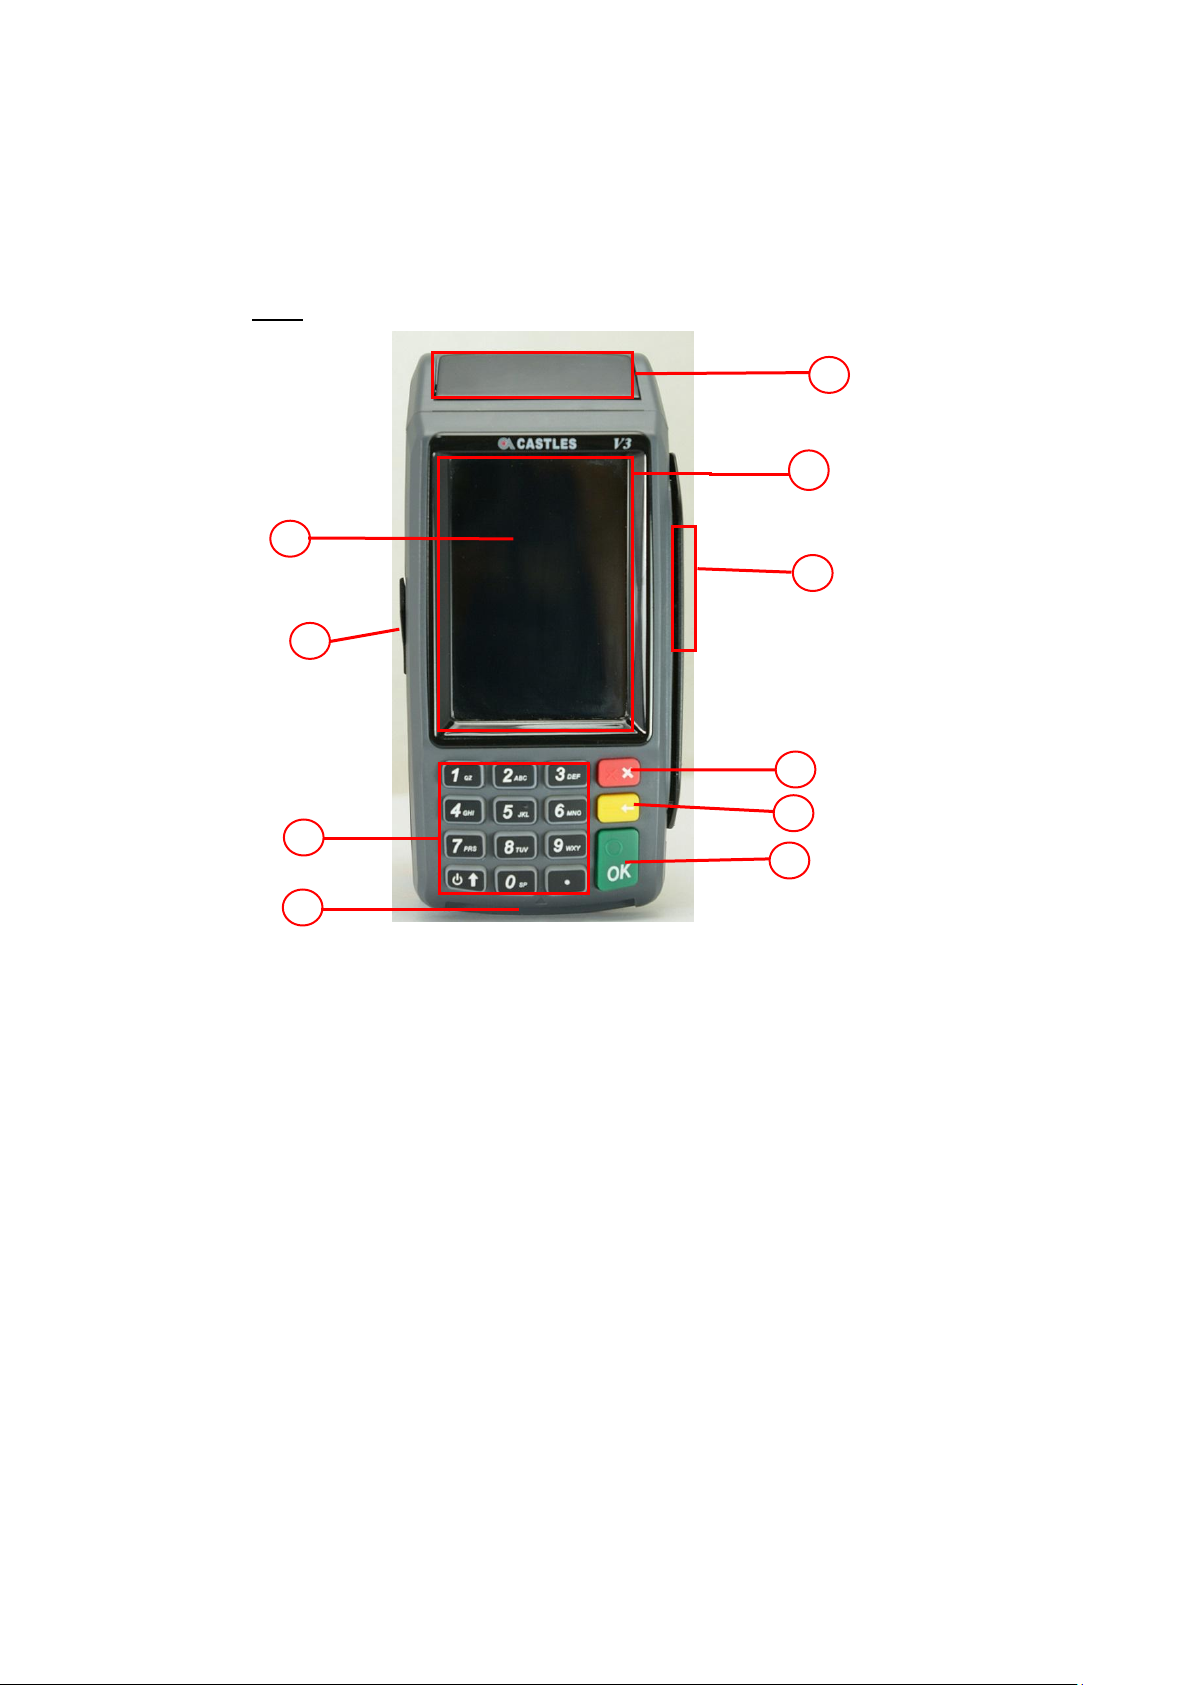
Rear
VEGA3000
VEGA3000
VEGA3000
Rechargeable
Battery
11
12
13
17
14
18
15
16
11. RechargeableBattery
Cover
12. Battery Cover Lock
13. Base Connector
14. SAM Slots
15. Micro SD Card Slot
16. GSM SIM Card Slots
17. RTC Battery
18. Battery Connector
Castles Technology Co., Ltd. Confidential • All Right Reserved. Pg. 8
VEGA3000 Portable
19
20
21
22
23
24
25
26
29
27
28
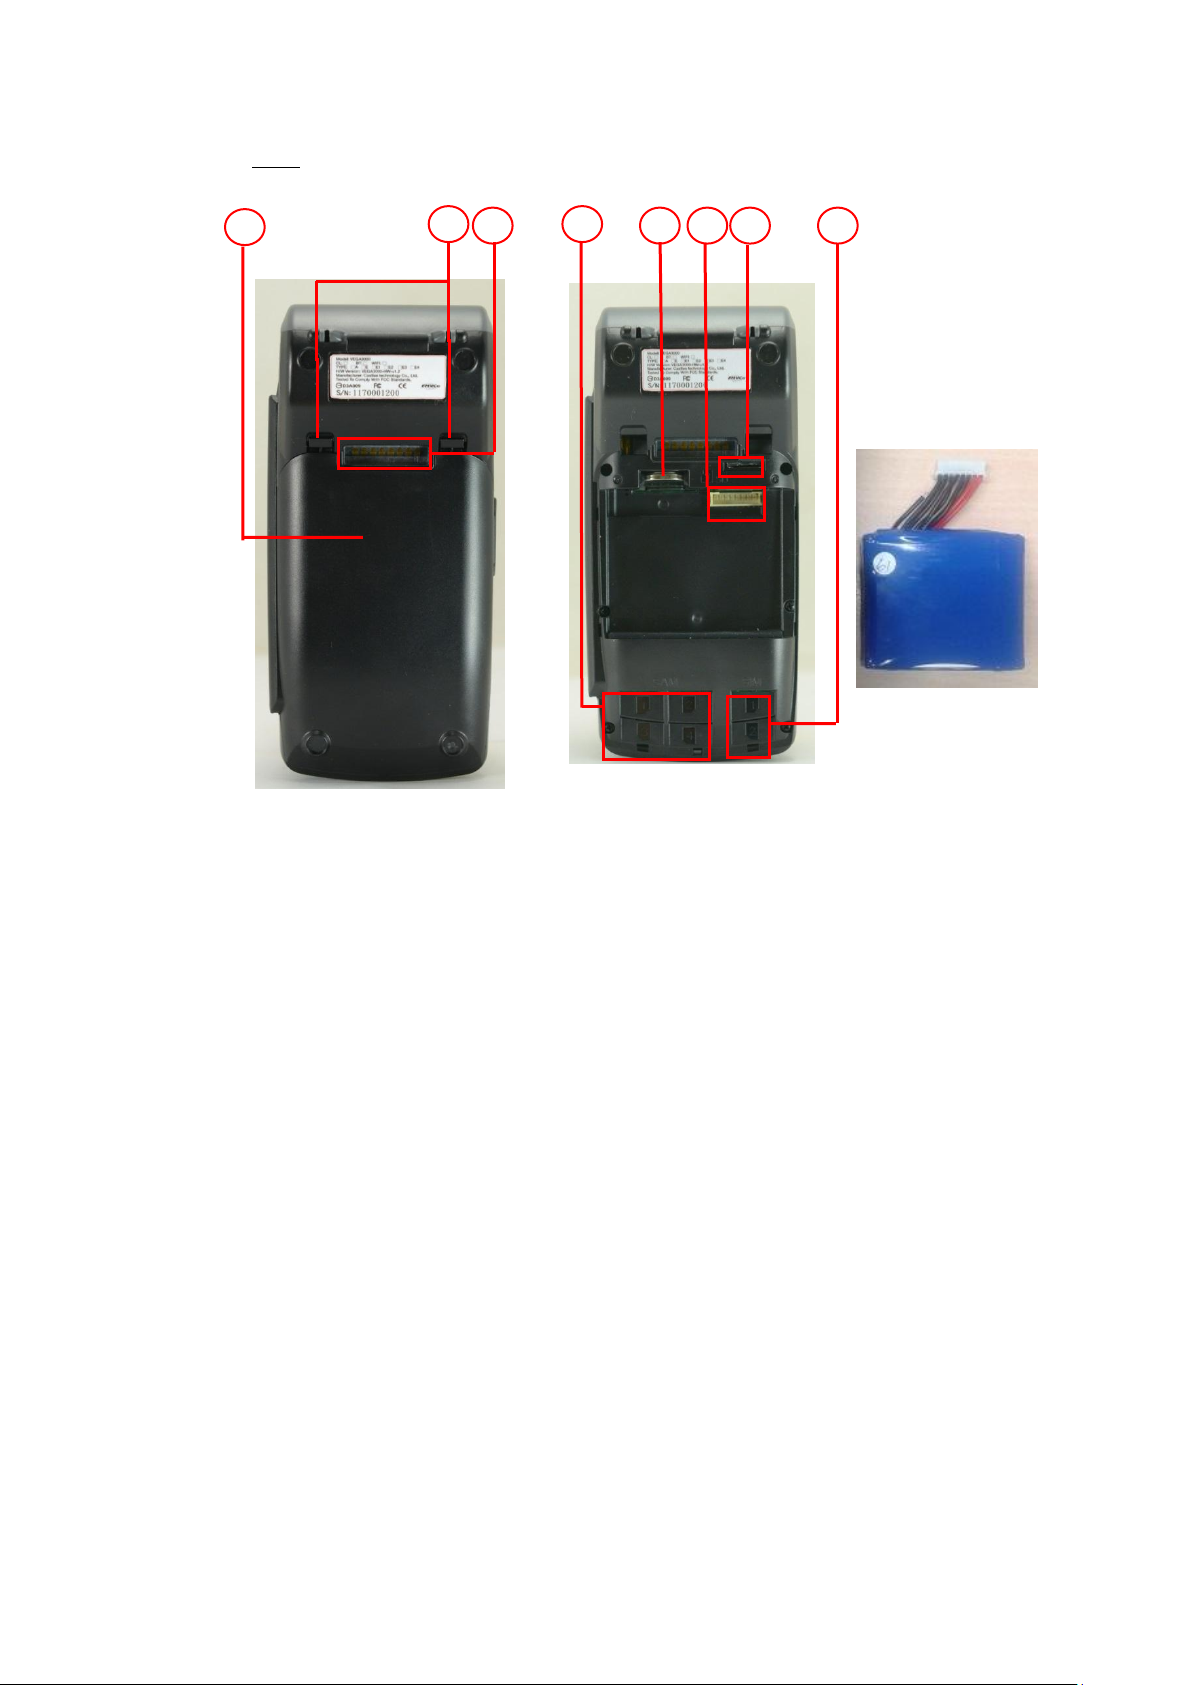
Side
19. Power Connector
20. USB Port
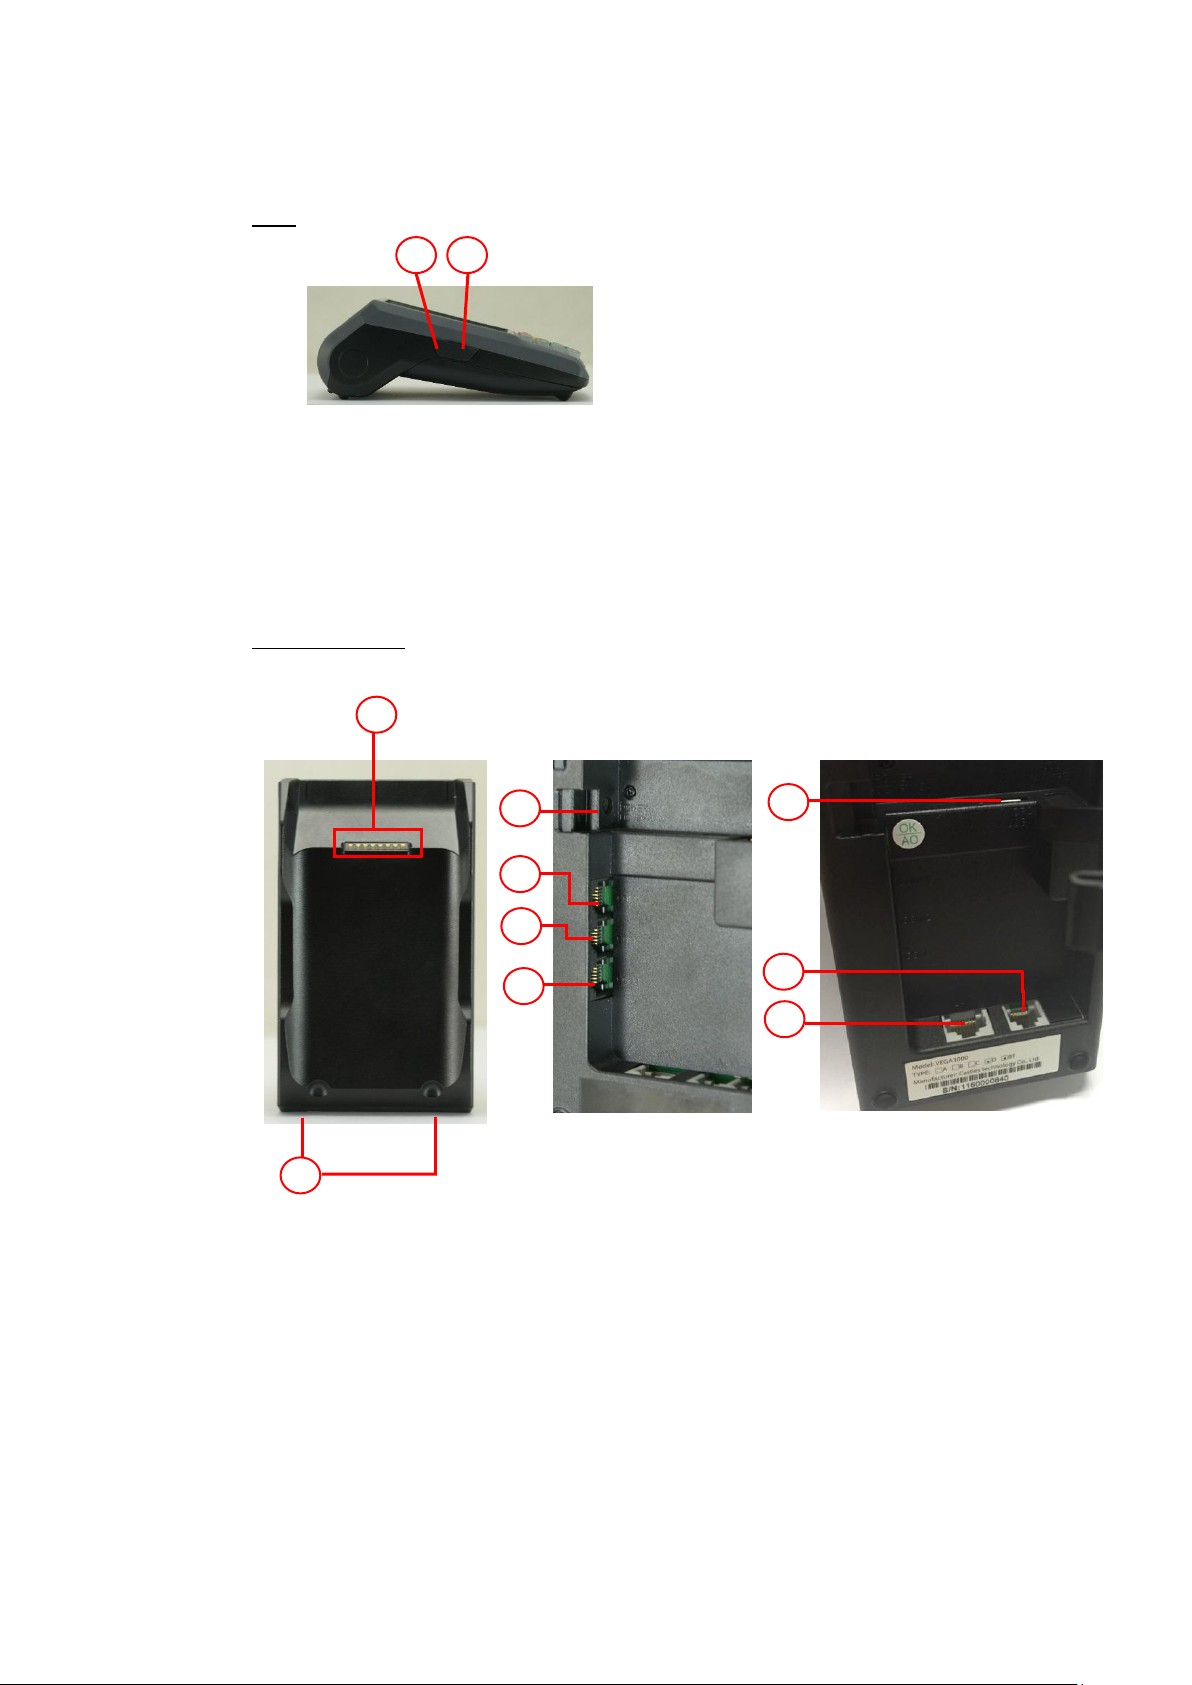
Base (Portable)
21. Base Connector
26. Com port 1
Castles Technology Co., Ltd. Confidential • All Right Reserved. Pg. 9
22. Base LED
23. Power Connector
24. Com port 3
25. Com port 2
27. Modem - Line Port
28. Ethernet Port
29. Micro USB Port

2.2. Inserting the Battery
Align
Step 2
Step 1
Step 1: Remove battery cover
Step 2: Insert battery into compartment, battery contact point must align with
batteryconnector.
Castles Technology Co., Ltd. Confidential • All Right Reserved. Pg. 10
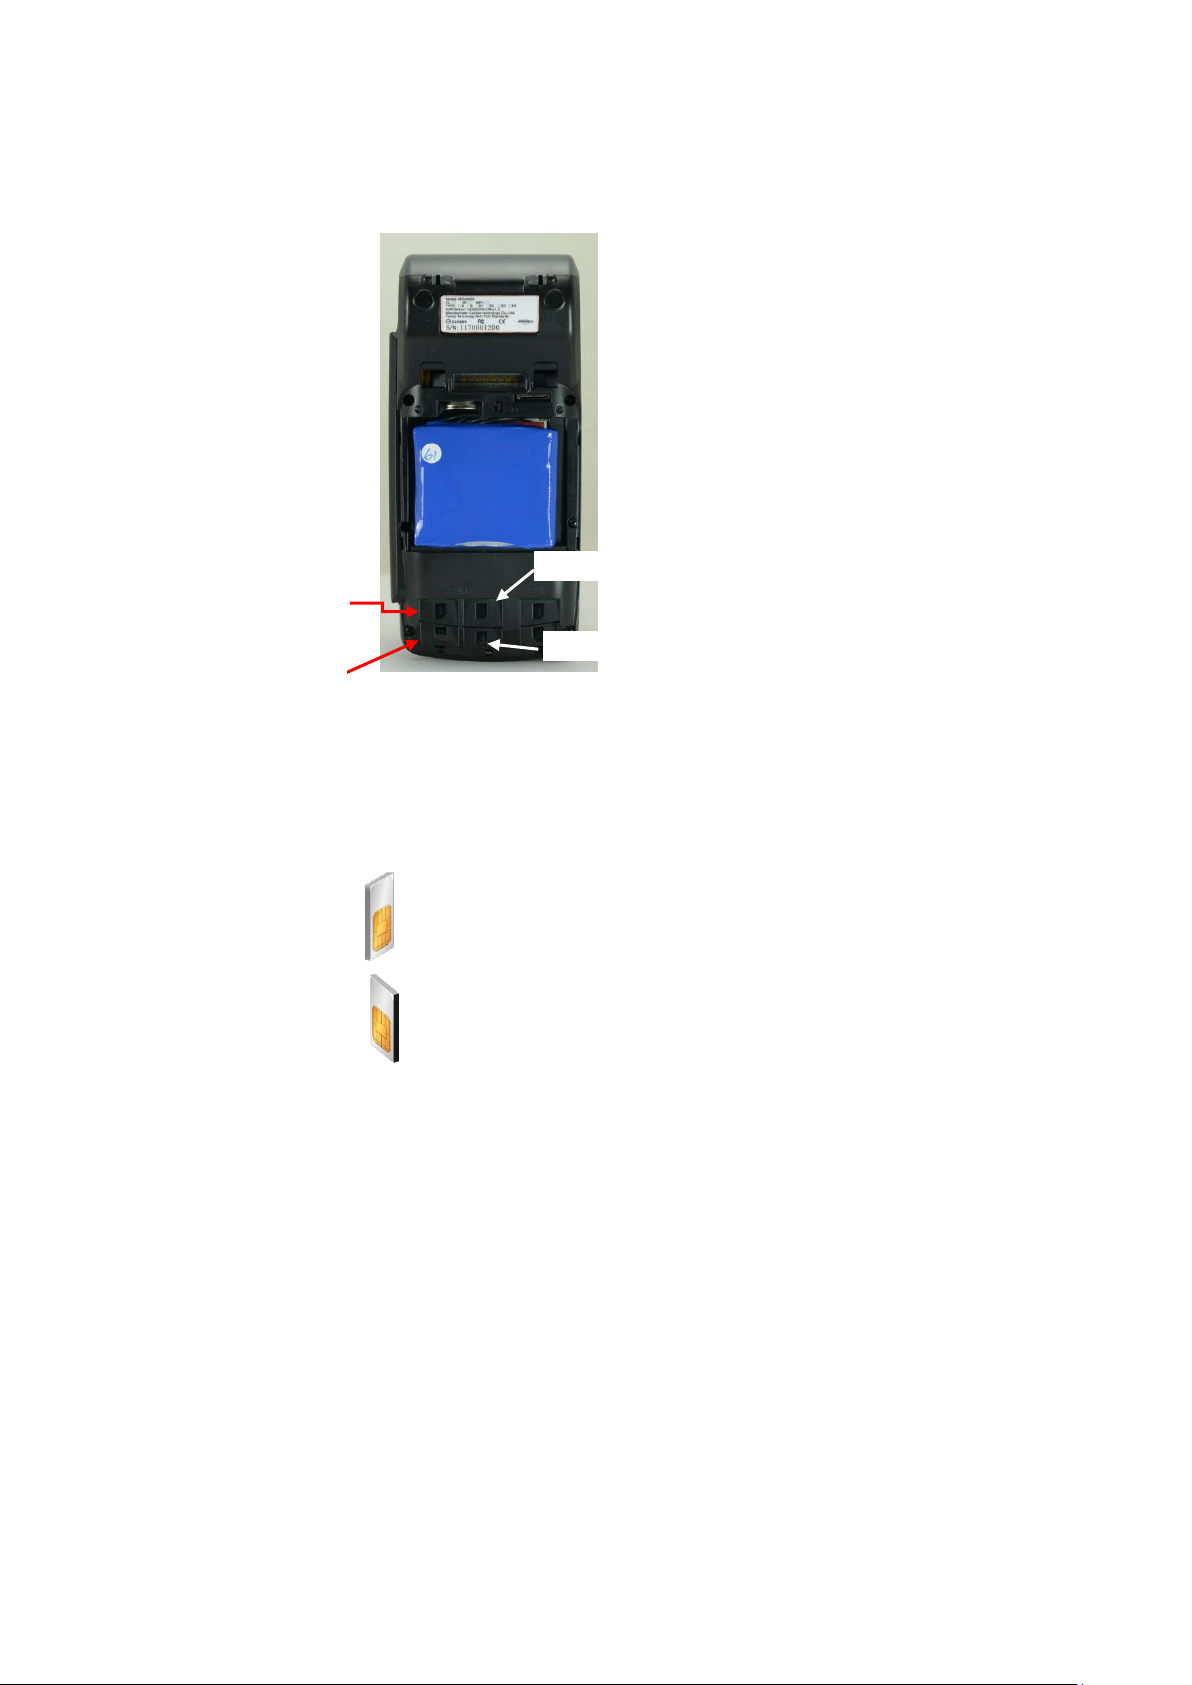
2.3. Inserting the SAM Card
VEGA3000 Portable
SAM1
SAM2
SAM3
SAM4
Step 1: Remove battery cover / back cover
Step 2: Insert SAM card into desire slot.
SAM 1 & 2:
Gold contact at lower side of card and facing right.
SAM 3 & 4:
Gold contact at lower side of card and facing left.
Castles Technology Co., Ltd. Confidential • All Right Reserved. Pg. 11
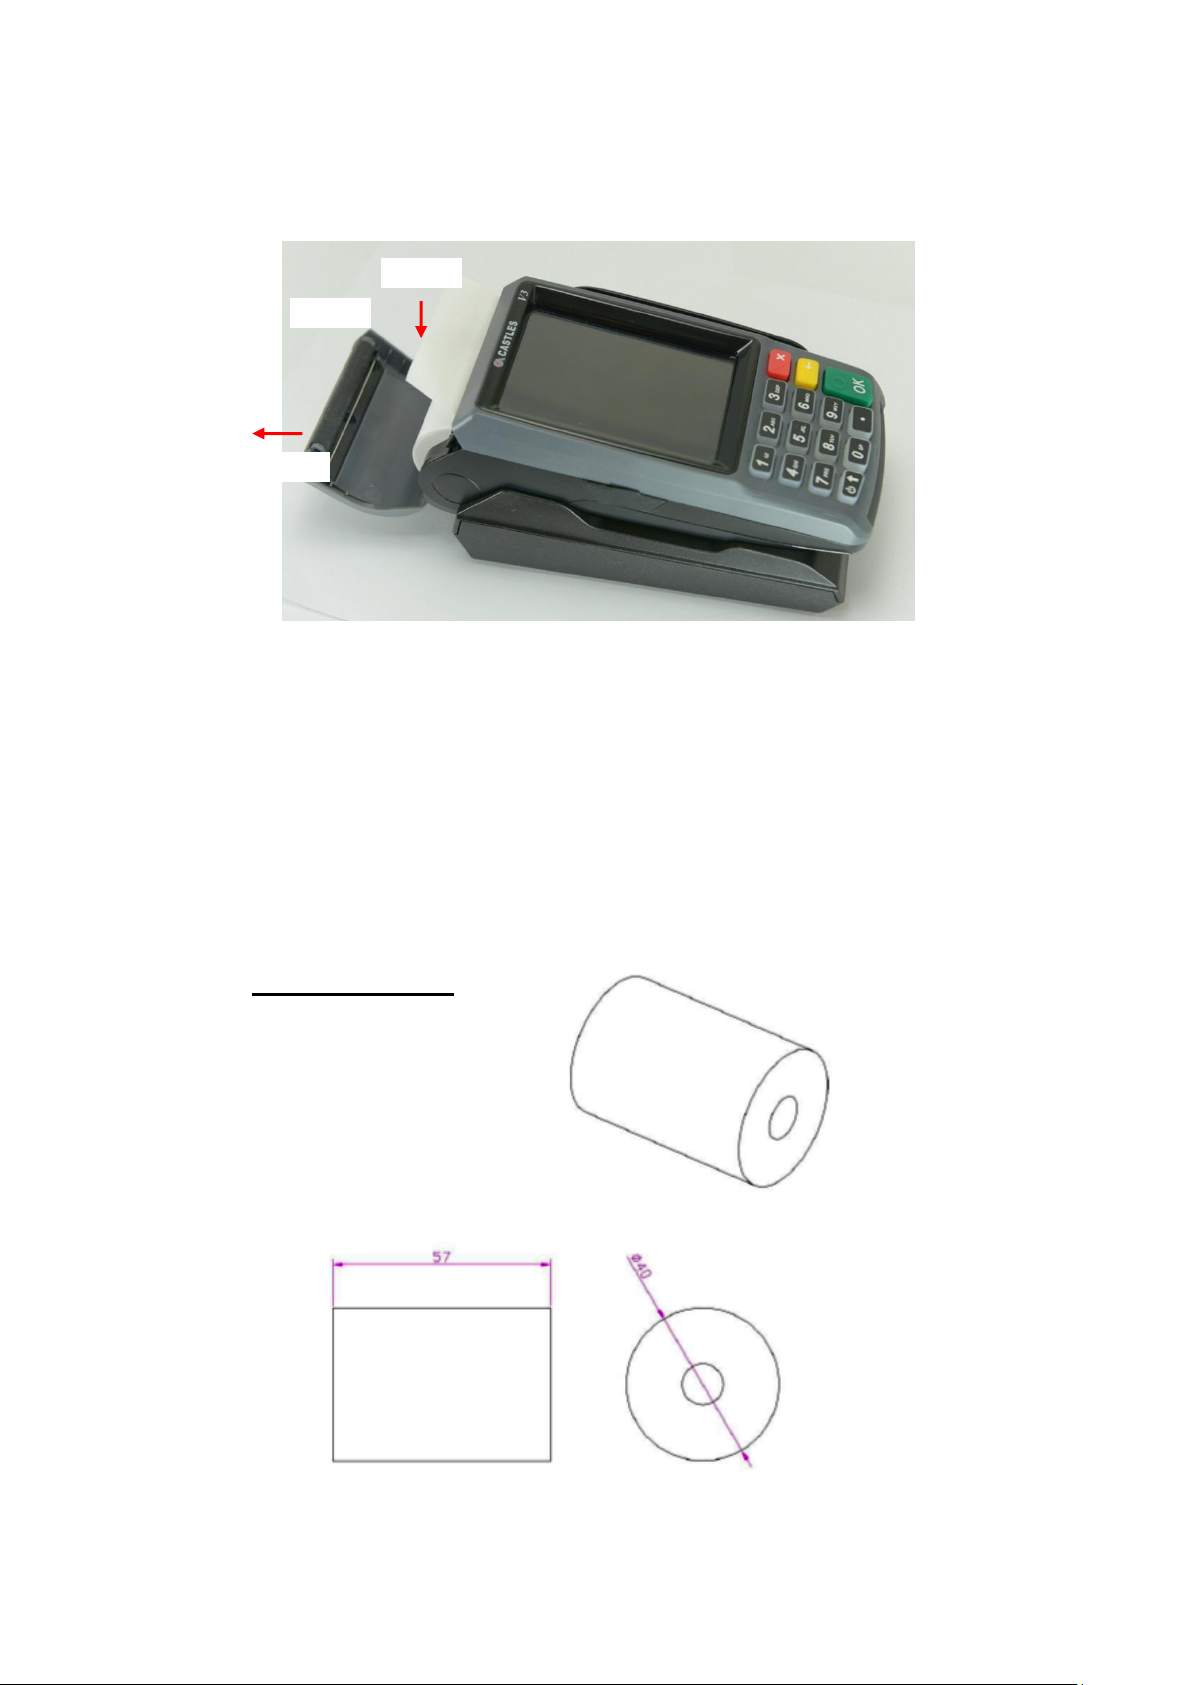
2.4. Inserting the Paper Roll
Step 2
Step 1
Step 3
Step 1: Pulluppaper roll box handle.
Step 2: Gentle open paper roll cover.
Step 3: Insert paper roll as direction showed.
Paper specification
Width: 57mm
Outside diameter: 40mm
Castles Technology Co., Ltd. Confidential • All Right Reserved. Pg. 12
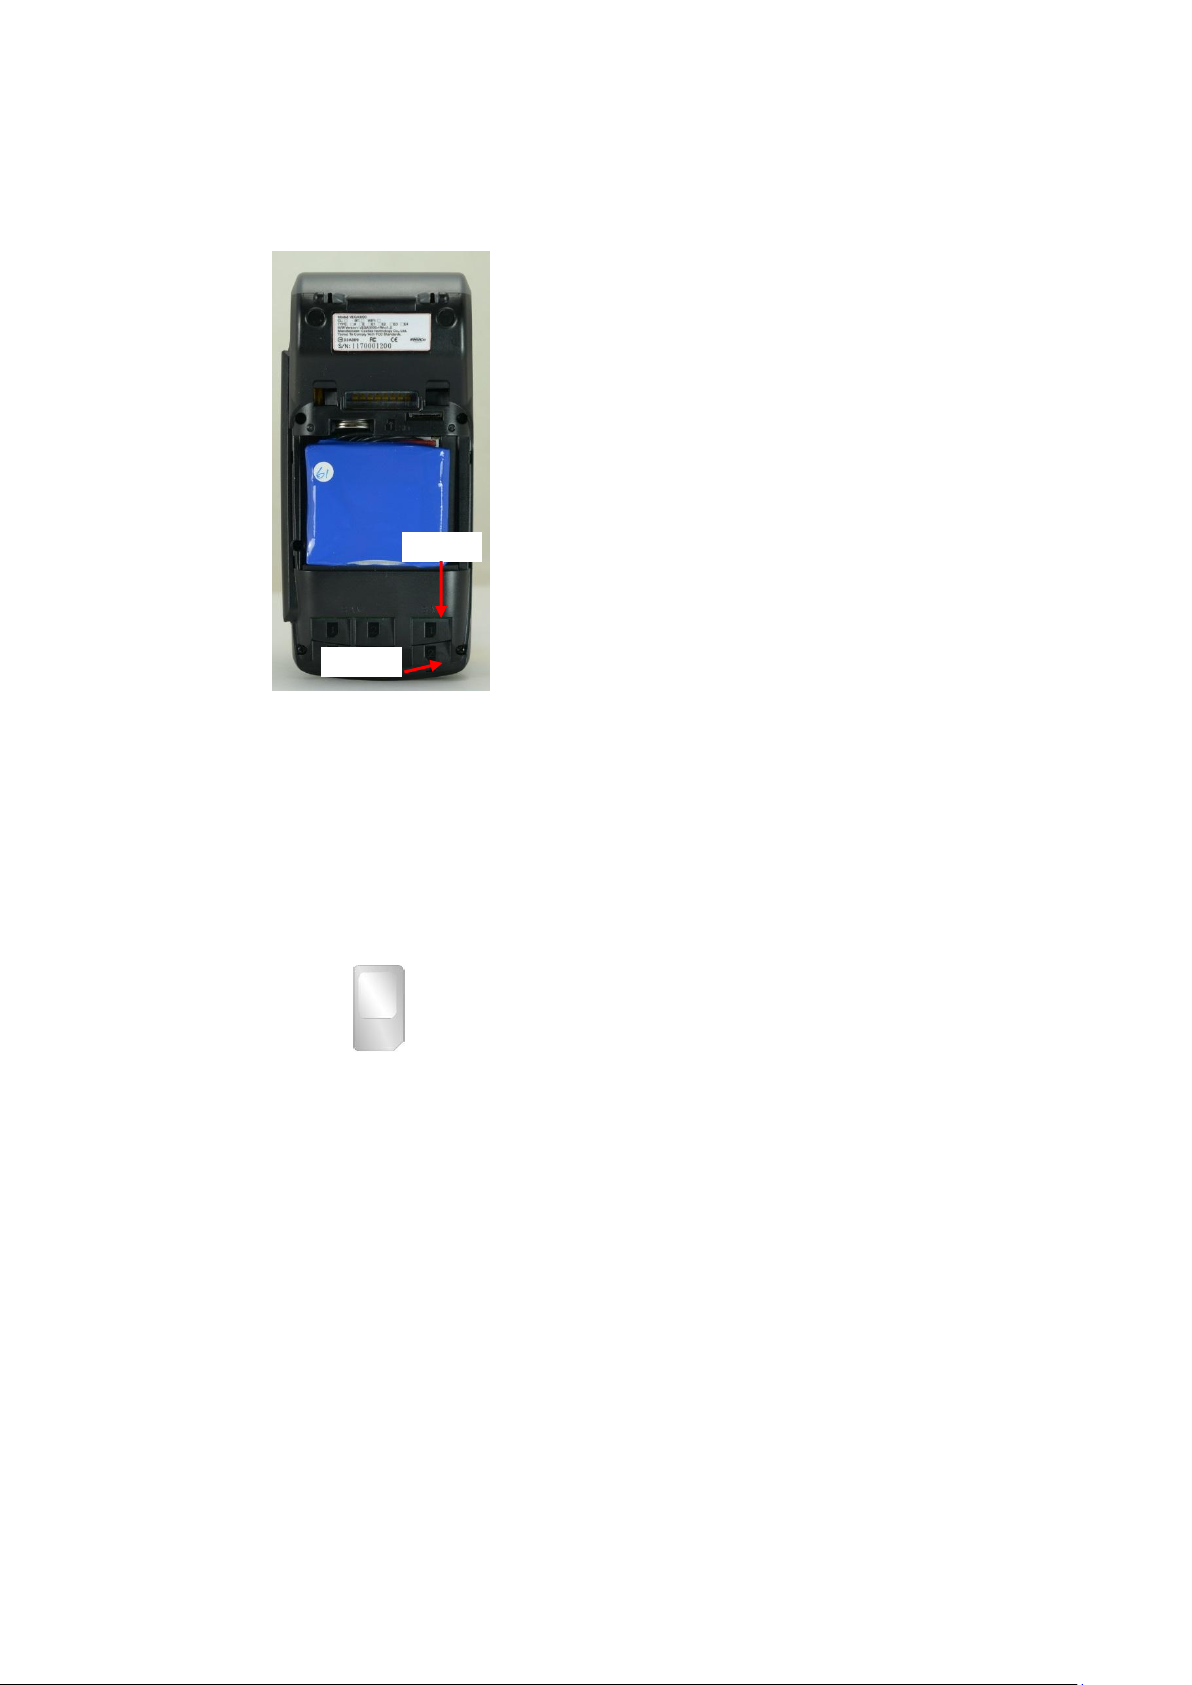
2.5. Inserting the GSM SIM Card
SIM2
SIM1
VEGA3000 Portable
Step 1: Remove battery cover / back cover
Step 2: Open SIM socket and insert GSM SIM card into desire slot.
SIM 1 & 2:
Gold contact at upper side of card and facing down.
Castles Technology Co., Ltd. Confidential • All Right Reserved. Pg. 13
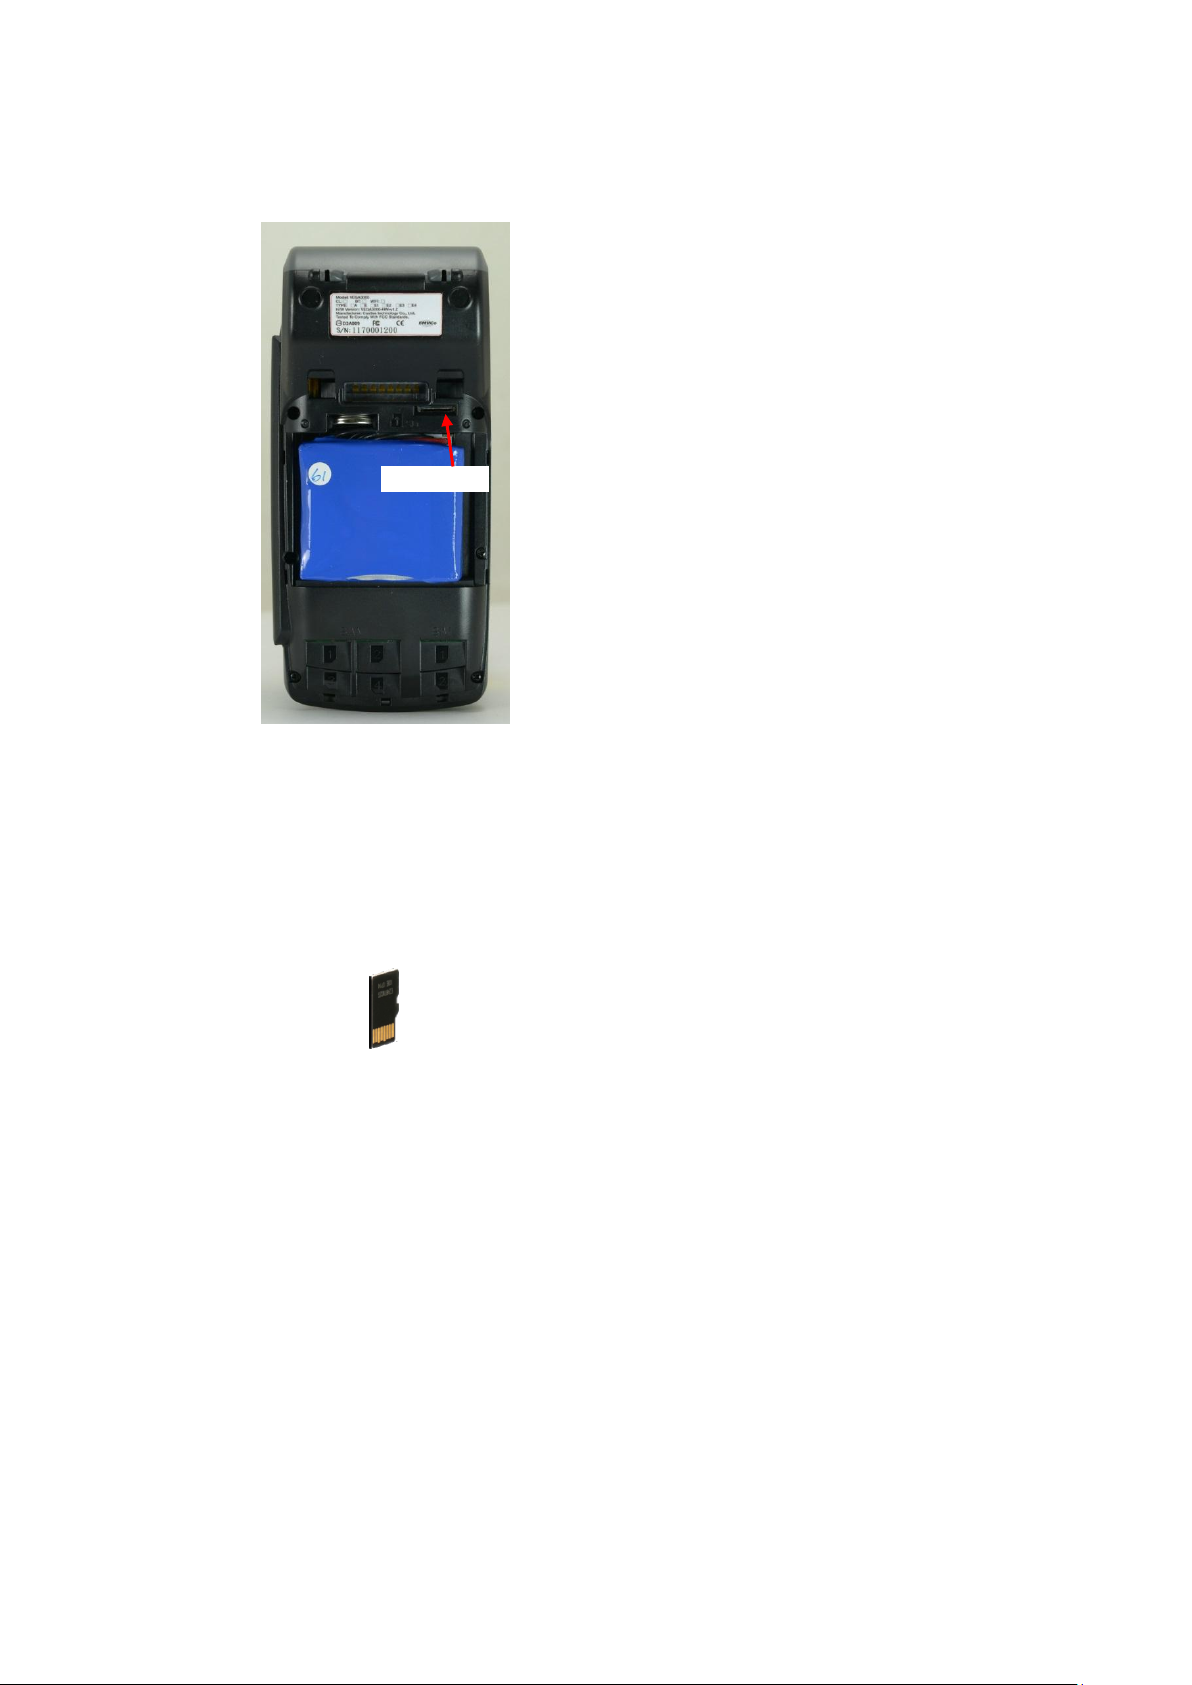
2.6. Inserting the Memory card
Micro SD
VEGA3000 Portable
Step 1: Remove battery cover / back cover
Step 2: Insert Micro SD memory card.
Micro SD :
Gold contact at lower side of card and facing right.
Castles Technology Co., Ltd. Confidential • All Right Reserved. Pg. 14

2.7. Power Supply Specifications
I/P: 9Vdc, 4A
2.8. Operating Ambient Temperature
Range : 0° ~ 50°
Castles Technology Co., Ltd. Confidential • All Right Reserved. Pg. 15

3. Basic Operation
Program Manager
-----------01/02
1.App1
2.App2
0:Download
System Menu
1.Download AP
2.System Info
3.Memory Status
4.Sys Settings
5.Test Utility
6.Factory Reset
7.Power Off
8.FK PWD Change
9.Share objMng
Down: Next Page
System Menu
1.Castles TMS
2.FontMng
3.Debug Tools
4.ULD KEY HASH
5.HW Detect
Up:Prev Page
3.1. Program Manager
Upon power on, terminal will enter Program Manager if not default application
selected. All user applications are list in Program Manager. User may select an
application and run the application or view the application info, delete the
application or set to default run upon power on. User may enter System Menu to
configure terminal settings.
Program Manager
Press[0] button to enter System Menu.
Press [1] button to toggle default application selection.
Press [2] button to delete application.
Press [3] button to view application info.
Press [OK] button to run application.
Press [Power] or [.] buttonas up and down bottonto select application.
System Menu
Page 1 Page 2
3.2. Download AP
Castles Technology Co., Ltd. Confidential • All Right Reserved. Pg. 16
Press [.] button to page 2.

Download user application or kernel modules firmware.
System Menu
1.Download AP
2.System Info
3.Memory Status
4.Sys Settings
5.Test Utility
6.Factory Reset
7.Power Off
8.FK PWD Change
9.Share objMng
Down: Next Page
Download EX
1.RS232 or USB
2.USB Disk
3.SD Card
Select DW Source
System Menu
Press [1] button to enter Download AP menu.
Download AP Menu
Select download source:
Press [1] button to select source as RS232 or USB connection and enter ULD
download mode.
Press [2] button to select source as USB disk.
Press [3] button to select source as SD card.
Castles Technology Co., Ltd. Confidential • All Right Reserved. Pg. 17

3.3. System Info
System Menu
1.Download AP
2.System Info
3.Memory Status
4.Sys Settings
5.Test Utility
6.Factory Reset
7.Power Off
8.FK PWD Change
9.Share objMng
Down: Next Page
SYSTEM INFO
---Kernel Ver--BIOS : VR0016
SULD : VRF014
LINUXKNL: VR0019
ROOTFS : VR0010
SYSTEM INFO
--- KOVer --SECURITY: VR0025
KMS : VR0024
DRV: VR0039
USB: N/A
SAM: VR0028
CL : VR0018
SC : VR0011
SYSTEM INFO
--- SOVer--UART : VR0014
USBH : VR0011
MODEM : VR0014
ETHERNET: VR0029
FONT : VR0025
LCD : VR0034
PRT: VR0020
RTC : VR0013
ULDPM : VR0022
PPP MODEM: VR0026
KMS: VR0025
FS : VR0015
GSM : VR0022
BARCODE : VR0013
SYSTEM INFO
--- SO Ver2 --TMS : VR0014
TLS : VR0011
CLVW : VR0019
CTOSAPI : VR0033
SYSTEM INFO
--- HWMVer --CRDL/ETHE:ONCHIP
CLM-MP : N/A
--- APVer --ULDPM : VR0028
SYSTEM INFO
HUSB ID:00000000
CUSBID:N/A
--Factory S/N--FFFFFFFFFFFFFFFF
View kernel module firmware information.
System Menu
Press [2] button to enter System Info menu.
System Info Menu
Castles Technology Co., Ltd. Confidential • All Right Reserved. Pg. 18
Page 1 Page 2 Page 3
Press [.] button to next page.
Page 4 Page 5 Page 6

Page 7
SYSTEM INFO
-EXT SO Ver P.1 CRDLMDL : VR0100
CACLENTRY: VR0100
CAMPP: VR0300
CAVPM : VR0012
CAEMVL2 : VR0013
CAEMVL2AP: VR0004
System Menu
1.Download AP
2.System Info
3.Memory Status
4.Sys Settings
5.Test Utility
6.Factory Reset
7.Power Off
8.FK PWD Change
9.Share objMng
Down: Next Page
MEMORY STATUS
--FLASH Memory-Total: 31616KB
Used : 22640KB
--SDRAM Memory-Total: 31872KB
Used : 10908KB
3.4. Memory Status
View terminal flash memory and RAM information.
System Menu
Press [3] button to enter Memory Status menu.
Memory Status Menu
Castles Technology Co., Ltd. Confidential • All Right Reserved. Pg. 19

3.5. System Settings
Setting
Descriptions
Key Sound
Enable (Y) or disable (N) the beep sound when
pressing any key.
Exec DFLT AP
Enable (Y) or disable (N) execution of default
selected application.
USB CDC Mode
Enable (Y) or disable (N) USB CDC mode.
FunKey PWD
Enable (Y) or disable (N) password protection to
access function key (0 ~ 3) in Program Manager.
PMEnter PWD
Enable (Y) or disable (N) password protection to
enter Program Manager.
SET USB Host
Enable (Y) or disable (N) USB host mode.
Base USB CDC
Enable (Y) or disable (N) USB CDC mode in base
unit. [Portable model only]
List SHR Lib
Enable (Y) or disable (N) to list all shared libraries
in Program Manager.
Key MNG Mode
<TBC>
Bat Threshld
Battery charging threshold value. [Portable model
only]
Null Cradle
Enable (Y) if base is null cradle. [Portable model
only]
Debug Mode
Enable (Y) or disable (N) console debug mode.
Debug Port
Serial port for console debug.
Mobil AutoON
Enable (Y) or disable (N) to auto turn on GSM
module after start up the terminal.
Bklit Auto Off
Enable (Y) or disable (N) Auto OffLCDBacklight
Bklit Off Time
Thresholdof Auto Off LCD Backlight
PWR KEY OFF
Enable (Y) or disable (N) Power key rebooting
GDB Mode
Enable (Y) or disable (N) GDB mode.
GDB Timeout
GDB connection timeout.
GDB Channel
GDB connection channel.
ETHER IP/PORT
GDB Ethernet connection setting.
RTC Time Zone
Set Time Zone of Real Time Clock.
NTP Enable
Enable (Y) or disable (N) Network Time Protocol.
View or change terminal system settings.
Castles Technology Co., Ltd. Confidential • All Right Reserved. Pg. 20

NTP Update Freq
Frequency of Network Time Protocol updating.
System Menu
1.Download AP
2.System Info
3.Memory Status
4.Sys Settings
5.Test Utility
6.Factory Reset
7.Power Off
8.FK PWD Change
9.Share objMng
Down: Next Page
SYS SETTINGS
Key Sound : Y
Exec DFLT AP: Y
-AP Name
USB CDC Mode: Y
FunKeyPWD :N
PMEnterPWD:N
SET USB Host: N
Base USB CDC: X
List SHR Lib: N
Key MNG Mode: 0
Bat Threshld: X
Null Cradle : X
Debug Mode :N
Debug Port :X
2: Next Page
System Menu
Press [4] button to enter System Settings menu.
System Settings Menu
Page 1
Press [Power] or [.]button to select setting.
Press [OK] button to change the setting value.
Castles Technology Co., Ltd. Confidential • All Right Reserved. Pg. 21
Press [] button to toggle Y N Y.
Press [2] button to next page.
 Loading...