

CastleNet Technology AVS920W Users Manual

Freeway DSL User’s Manual
ADSL2/2+ VoIP Wireless Router
Freeway DSL User’s Manual
Rev. 1.0
Dec. 2008

Freeway DSL User’s Manual
Table of Contents
1. INTRODUCTION .............................................................................................................. 1
1.1 GENERAL FEATURES .................................................................................................. 1
1.2 VOICE FEATURES .......................................................................................................1
1.3 SYSTEM REQUIREMENT .............................................................................................. 2
2. FREEWAY DSL OVERVIEW ........................................................................................... 3
2.1 LED DESCRIPTION ..................................................................................................... 3
2.2 PORTS AND BUTTONS................................................................................................. 4
2.3 INSTALLING YOUR FREEWAY DSL................................................................................ 4
3. INSTALLING USB DRIVER (OPTIONAL)....................................................................... 5
4. CONFIGURING TCP/IP.................................................................................................... 6
5. 5.1 LOGIN TO YOUR FREEWAY DSL............................................................................ 7
6. DEVICE INFO................................................................................................................... 8
6.1 SUMMARY .................................................................................................................. 8
6.2 WAN......................................................................................................................... 8
6.3 STATISTICS ................................................................................................................9
6.3.1 LAN...................................................................................................................... 9
6.3.2 WAN Service........................................................................................................ 9
6.3.3 ATM...................................................................................................................... 9
6.3.4 xDSL ..................................................................................................................10
6.4 ROUTE..................................................................................................................... 11
6.5 ARP........................................................................................................................ 11
6.6 DHCP..................................................................................................................... 11
7. ADVANCED SETUP....................................................................................................... 12
7.1 LAYER2 INTERFACE.................................................................................................. 12
7.1.1 ATM Interface .................................................................................................... 12
7.1.2 ETH Interface..................................................................................................... 14
7.2 WAN SERVICE......................................................................................................... 14
7.3 LAN......................................................................................................................... 17
7.4 NAT ........................................................................................................................ 18
7.4.1 Virtual Servers ................................................................................................... 18
7.4.2 Port Triggering................................................................................................... 20
7.4.3 DMZ Host........................................................................................................... 21
7.5 SECURITY – IP FILTERING......................................................................................... 22
7.5.1 Outgoing............................................................................................................. 22
7.5.2 Incoming............................................................................................................. 23
7.6 PARENTAL CONTROL ................................................................................................ 24
7.6.1 Time Restriction................................................................................................. 24
7.6.2 URL Filter........................................................................................................... 25
7.7 QUALITY OF SERVICE................................................................................................ 26
7.7.1 Queue Config..................................................................................................... 26
7.7.2 QoS Classification.............................................................................................. 28
7.8 ROUTING.................................................................................................................. 29
7.8.1 Default Gateway ................................................................................................ 29
7.8.2 Static Route ....................................................................................................... 29
7.8.3 RIP..................................................................................................................... 30
7.9 DNS........................................................................................................................ 30
7.9.1 DNS Server........................................................................................................ 30
7.9.2 Dynamic DNS (DDNS)....................................................................................... 30
7.10 DSL......................................................................................................................... 31
7.11 UPNP...................................................................................................................... 33
7.12 DNS PROXY ............................................................................................................ 33
7.13 PRINT SERVER ......................................................................................................... 33
7.14 INTERFACE GROUPING.............................................................................................. 35

Freeway DSL User’s Manual
LAN PORTS .......................................................................................................................... 37
7.15 IPSEC...................................................................................................................... 37
7.16 CERTIFICATE............................................................................................................ 39
7.16.1 Local.............................................................................................................. 39
7.16.2 Trusted CA..................................................................................................... 42
8. WIRELESS ..................................................................................................................... 43
8.1 BASIC ......................................................................................................................43
8.2 SECURITY ................................................................................................................ 44
8.3 MAC FILTER ............................................................................................................ 47
8.4 WIRELESS BRIDGE ................................................................................................... 48
8.5 ADVANCED............................................................................................................... 49
8.6 STATION INFO........................................................................................................... 50
9. VOICE............................................................................................................................. 51
9.1 VOIP ENDPOINT CONFIGURATION.............................................................................. 51
9.2 VOIP FUNCTION ....................................................................................................... 53
10. DIAGNOSTICS........................................................................................................... 55
11. MANAGEMENT.......................................................................................................... 56
11.1 SETTINGS................................................................................................................. 56
11.1.1 Backup........................................................................................................... 56
11.1.2 Update........................................................................................................... 56
11.1.3 Restore Default.............................................................................................. 56
11.2 SYSTEM LOG............................................................................................................ 57
11.2.1 Configure System Log................................................................................... 57
11.2.2 View System Log........................................................................................... 58
11.3 TR-069 CLIENT........................................................................................................ 58
11.4 INTERNET TIME......................................................................................................... 59
11.5 ACCESS CONTROL – PASSWORD............................................................................... 59
11.6 UPDATE SOFTWARE.................................................................................................. 60
11.7 REBOOT................................................................................................................... 61
12. WALL MOUNTING (OPTIONAL)............................................................................... 62
APPENDIX A. TROUBLESHOOTING.................................................................................... 63
APPENDIX B. SPECIFICATIONS .......................................................................................... 65

Freeway DSL User’s Manual
Changes or modifications not expressly approved by the party responsible
for compliance could void the user’s authority to operate the equipment.
Federal Communication Commission Interference Statement
This equipment has been tested and found to comply with the limits for a
Class B digital device, pursuant to Part 15 of the FCC Rules. These limits are
designed to provide reasonable protection against harmful interference in a
residential installation. This equipment generates, uses and can radiate radio
frequency energy and, if not installed and used in accordance with the
instructions, may cause harmful interference to radio communications.
However, there is no guarantee that interference will not occur in a particular
installation. If this equipment does cause harmful interference to radio or
television reception, which can be determined by turning the equipment off
and on, the user is encouraged to try to correct the interference by one of the
following measures:
- Reorient or relocate the receiving antenna.
- Increase the separation between the equipment and receiver.
- Connect the equipment into an outlet on a circuit different from that to which
the receiver is connected.
- Consult the dealer or an experienced radio/TV technician for help.
This device complies with Part 15 of the FCC Rules. Operation is subject to
the following two conditions:
(1) This device may not cause harmful interference, and
(2) This device must accept any interference received, including interference
that may cause undesired operation.
IMPORTANT NOTE:
FCC Radiation Exposure Statement:
This equipment complies with FCC radiation exposure limits set forth for an
uncontrolled environment. This equipment should be installed and
operated with minimum distance 20cm between the radiator & your body.
This transmitter must not be co-located or operating in conjunction with any
other antenna or transmitter.
FEDERAL COMMUNICATIONS COMMISSION
This device complies with Part 15 of the FCC Rules. Operation is subject to
the following two conditions :(1) this device may not cause harmful
interference, and (2) this device must accept any interference received,
including interference that may cause undesired operation.

Freeway DSL User’s Manual
1. Introduction
The AVS920W is a highly integrated IAD which enables ADSL2+, WLAN, VoIP, Switch, File
server and Printer Server together. It is positioned to enhance the user's triple play broadband
experience with excellent QoS and traffic management. This new generation of platforms not
only eases the deployment of DSL-based IAD but also provides new opportunities for the
service provider to derive additional value from the emerging VoIP and IP Video service.
The capabilities of the AVS920W allow for some highly advanced applications beyond just
typical DSL, but also WLAN access points, VoIP, File server and Printer server. AVS920W
also provides TR-069 CPE WAN Management Protocol which eases and reduces the
management effort of the service providers.
1.1 General Features
y Compliant to DSL Forum TR-048, TR-067 and TR-100 Interoperability Test
y Feature-Rich TR-069 supports Remote Registration / Remote Authentication / Remote
Configuration
y Complete solution for integration of ADSL, Router, Switch, WLAN and VoIP
y WPS support for easy WLAN client setup
y Outbound Proxy for NAT Traversal
y Integrated splitter into Annex A mode, no splitter is needed
y POTS Lifeline backup
y T.38 fax support
y SIP supported for VoIP signaling
y User can browse the Internet while talking on the phone and watch IPTV simultaneously
y Remote / Local configuration & management through Web / Telnet configuration &
management
y Three levels access account management
y Device management access control based on source IP addresses and incoming
interfaces
y System management includes SNMP, Telnet command line interface and web interface
1.2 Voice Features
y General
Display name and address
SIP Network re-registration
Analyzing network environment
Debugging options, especially SIP
y DTMF: Inband
y Basic
Tone generation / Detection
Echo cancellation
CID generation (Calling ID)
y Call Features
Hold / Retrieve
Transfer
Waiting
Completion on busy subscriber
Deflection
Forwarding unconditional
Forwarding busy
Forwarding no response
E.164 numbering plan support
Anonymous call
1

Freeway DSL User’s Manual
1.3 System Requirement
In order to use the Freeway DSL, you must have the following:
y ADSL service up and running on your telephone line, with at least one public Internet
address for your LAN
y One or more computers each containing an Ethernet network interface card (NIC) and/or a
single computer with a USB port
y An Ethernet hub/switch, if you are connecting the device to more than one computer on an
Ethernet network
y For system configuration using the supplied web-based program: a web browser such as
Internet Explorer v5.0 or later, Firefox v2.0 or later, or Netscape v6.1 or later
2

Freeway DSL User’s Manual
2. Freeway DSL Overview
2.1 LED Description
The front panel contains lights called LEDs that indicate the status of the Freeway DSL.
LED Color Status Description
On The device is power on.
Off The device is power off.
On
Blinking The data is sending/receiving via LAN port.
Off
On A powered d evice ha s connected to the USB port.
Blinking The data is sending/receiving via USB port.
Off No powered device has connected to the USB port.
On The wireless feature is enabled.
Blinking The IAD is sending/receiving wirelessly.
Off The wireless feature is disabled.
On
Blinking The associated telephone is off-hook.
Off
On
Off The device is not in PSTN mode.
On
Slow Blinking The device is trying to link with ADSL head-end.
Fast Blinking
Off The device is not linked with ADSL head-end.
On The device is succes sfully connected to the Internet.
Blinking
Off The device is not connected to the Internet.
The LAN port is connected to an powered Ethernet
device.
The LAN port is not connected to any Ethernet
device.
The associated phone port has registered with a
SIP proxy server.
The phone line is not registered or the associated
device is power off.
The device is successfully switched to PSTN line
when DSL line failed.
The device is successfully linked with ADSL headend.
The device is handshaking with the ADSL headend.
The device is sending/receiving data via the
Internet.
The device is failed to authenticate with the ISP due
to username or password error.
POWER
LAN1-4
USB1-3
WLAN
WPS
Phone1-2
PSTN
DSL
Internet
Green
Red On The device is booting up.
Green
Green
Green
Green On The WPS is in progress and success status.
Red On The WPS encounters problem or session overlap.
Green
Green
Green
Green
Red On
3

Freeway DSL User’s Manual
2.2 Ports and Buttons
The rear panel contains the ports for the Freeway DSL's data and power connections.
7 6 5
4
3
8 2 1
1. POWER: Connecter for a power adapter. Using a power supply with a different voltage
rating will damage this product. Make sure to observe the proper power requirements.
The requirement of adapter is 12VDC/ 1.5A.
2. ON/OFF: Power switch to power on/off the Freeway DSL.
3. LAN1-4: Connectors for Ethernet network devices, such as a PC, hub, switch or router.
4. USB1-2: Connects for USB supported printer.
5. USB3: Connector for USB equipped PC.
6. PHONE1-2: Connectors for telephone sets.
7. DSL: Connecter for accessing the Internet through ADSL line.
8. RST (RESET): Restore the default settings. You may need to restore the Freeway DSL to
its factory defaults if the configuration is changed, you loose the ability to enter the
Freeway DSL via the web interface, or following a software upgrade, and you loose the
ability to enter the Freeway DSL. To reset the Freeway DSL, simply press the reset
button for more than 8 seconds. The Freeway DSL will be reset to its factory defaults. The
reboot process will take a about 30 seconds and the Freeway DSL will become
operational again.
2.3 Installing your Freeway DSL
1. Locate an optimum location for the Freeway DSL.
2. For connections to the Ethernet and DSL interfaces, refer to the Quick Start Guide.
3. Connect the Power Adapter. Depending upon the type of network, you may want to put
the power supply on an uninterruptible supply. Use only the power adapter supplied with
the Freeway DSL. A different adapter may damage the product.
4
Freeway DSL User’s Manual
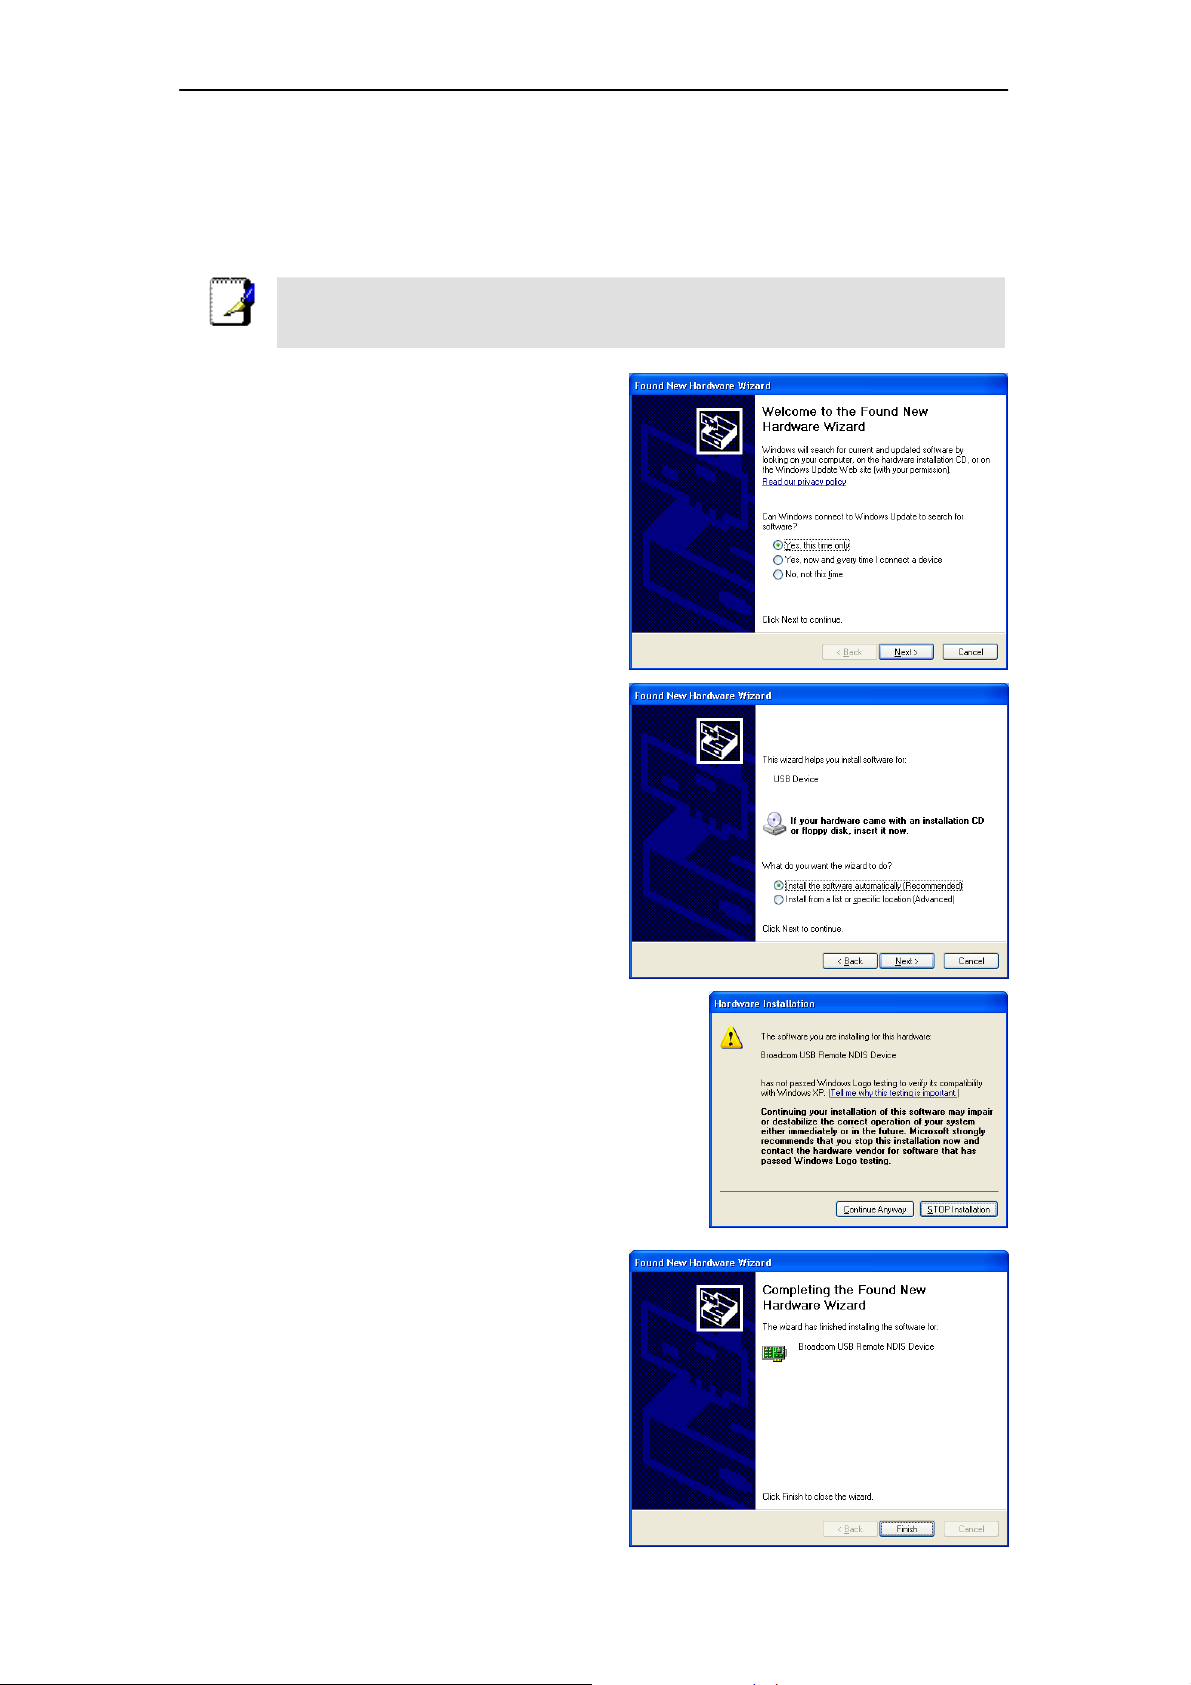
3. Installing USB Driver (optional)
You must install the USB driver before you can use the Freeway DSL via an USB connection.
Please follow the steps below (may vary for each computer) to complete the USB driver
installation on a Windows 2000/XP operating system.
DO NOT plug the USB cable into compute r before Fr eeway DSL compl ete the
Note
1. After connecting the Freeway DSL to
computer, the system will detect the new
hardware and show the Found New
Hardware Wizard window. Select Yes,
this time only and then click Next.
2. Insert the USB driver CD-ROM into
computer’s CD-ROM drive. Select Install
the software automatically
(Recommended) and then click Next.
Click Continue Anyway to continue the installation.
3. Click Finish to complete the installation.
boot-up process. (POWER LED lights up solid green).
5
Freeway DSL User’s Manual
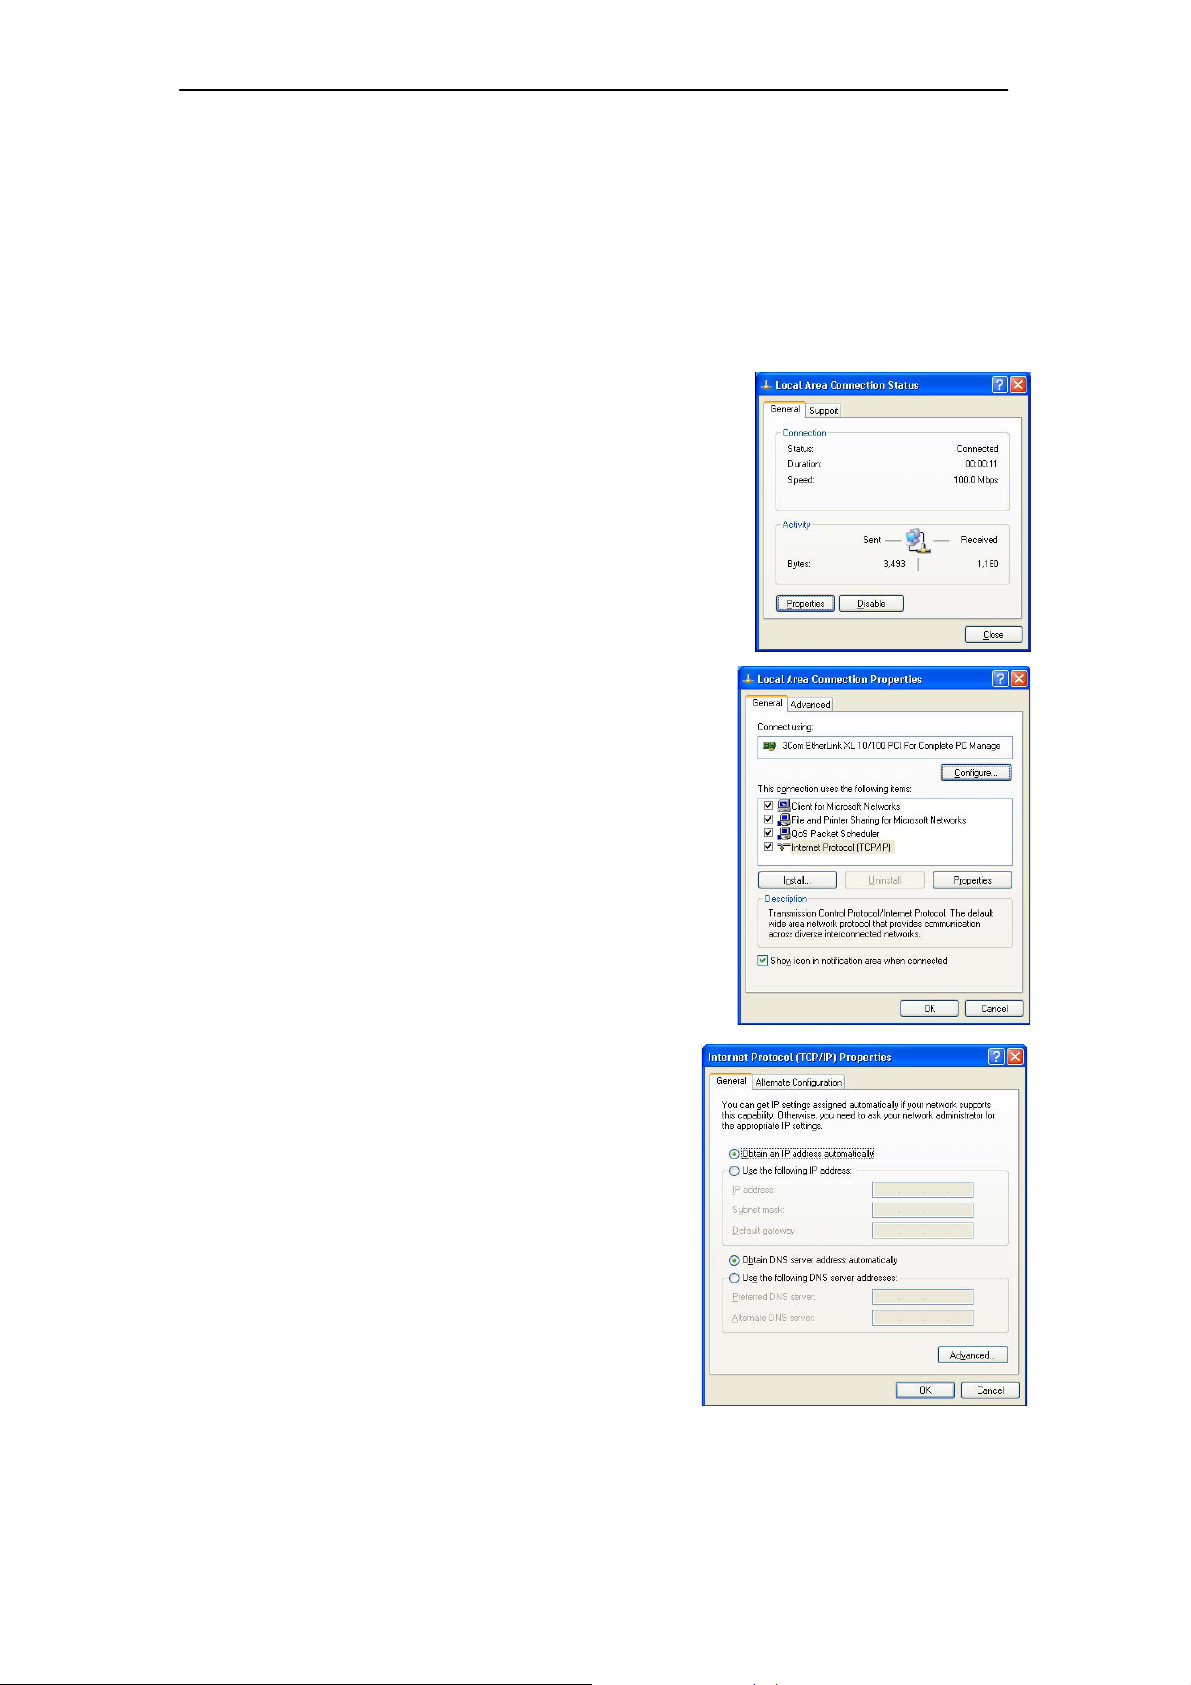
4. Configuring TCP/IP
This section will help you to establish a connection between a PC and the Freeway DSL.
Each computer that will be part of your network needs to communicate with the Freeway DSL.
To do this, you may need to configure each PC’s network settings to automatically obtain an
IP address.
This configuration assumes you have retained the default interface for Windows XP. If you
are running the ‘Classic’ interface, please follow the instructions for Windows XP.
1. Select Start > Settings > Control Panel.
2. Double-click Network and Dial-Up Connections.
3. Double-click the Local Area Connection appropriate for
your Ethernet adapter.
4. Click Properties.
The Local Area Properties window is displayed.
5. Ensure the box next to Internet Protocol (TCP/IP) is
selected.
6. Click to highlight Internet Protocol (TCP/IP) and click
Properties.
The Internet Protocol (TCP/IP) Properties window is
displayed.
7. Select Obtain an IP address automatically if you
are connecting the Freeway DSL to the PC via
Ethernet. Otherwise, select Use the following IP
address and specify an IP address within the
subnet such as 192.168.1.5 (assuming the IP
address of the Freeway DSL is 192.168.1.1) if you
are connecting the Freeway DSL to the PC via
USB.
8. Click OK twice to exit and save your settings.
6

Freeway DSL User’s Manual
5. 5.1 Login to Your Freeway DSL
This section guides you through configuring your Freeway DSL. You should have your
computers configured for DHCP mode and have proxies disabled on your browser. If you do
not get the page as shown below, you may need to delete your temporary Internet files by
flushing the cached web pages.
Follow the procedures below to login to your Freeway DSL.
1. Open your web browser. Type the default IP
address of the Freeway DSL http://192.168.1.1
and press Enter.
The Log In page appears.
2. Enter user name as admin and password as
admin (case sensitive).
3. Click OK.
The main page appears.
There are two default user name and password combinations. The user / user
name and password combination allow you to view the de vice statu s, but you
cannot change or save configurations. The admin / admin combination allows you
Note
This web page layout of Freeway DSL is shown as below.
to perform all functions. Passwords can be changed at any time. You can change
the password in Management->Access Control->Password page at any time.
7
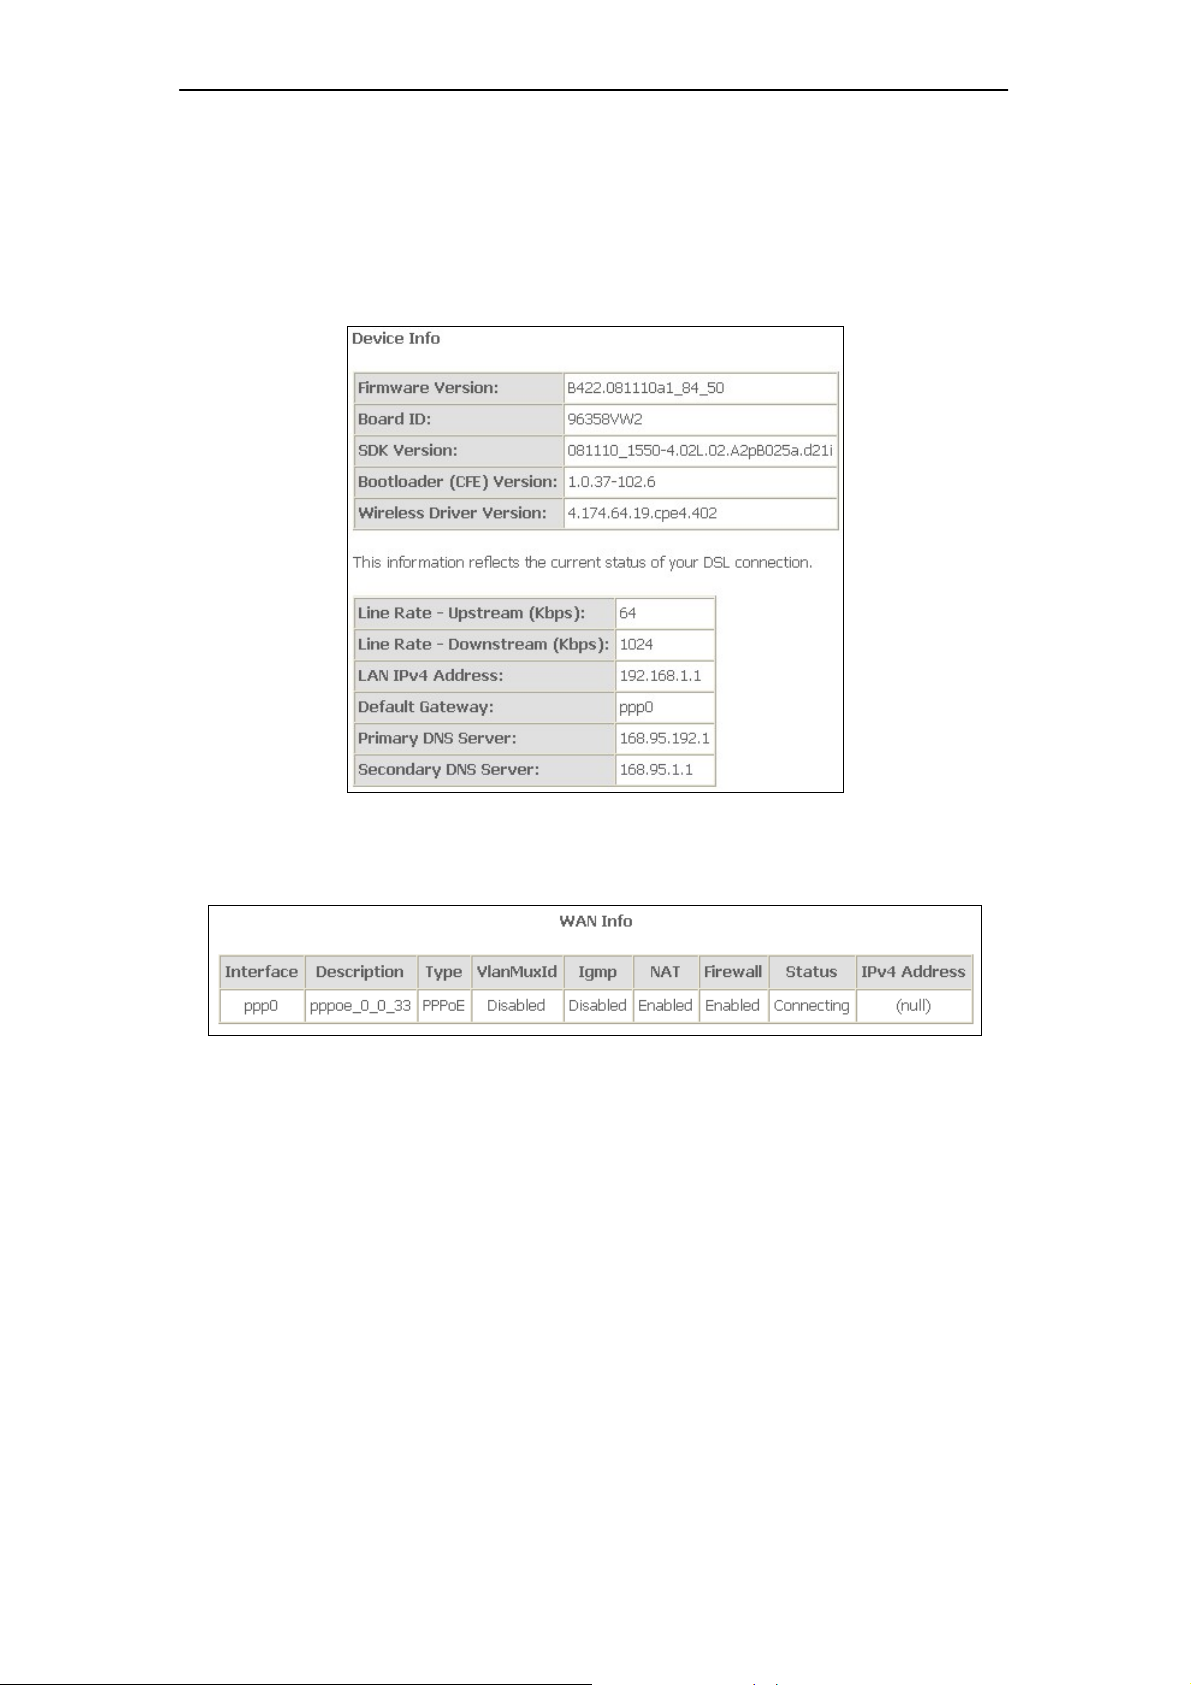
6. Device Info
This is the first page you see when entering the Web Application.
6.1 Summary
This page shows the status summary of the Freeway DSL.
Freeway DSL User’s Manual
6.2 WAN
This page shows the WAN information of Freeway DSL.
8
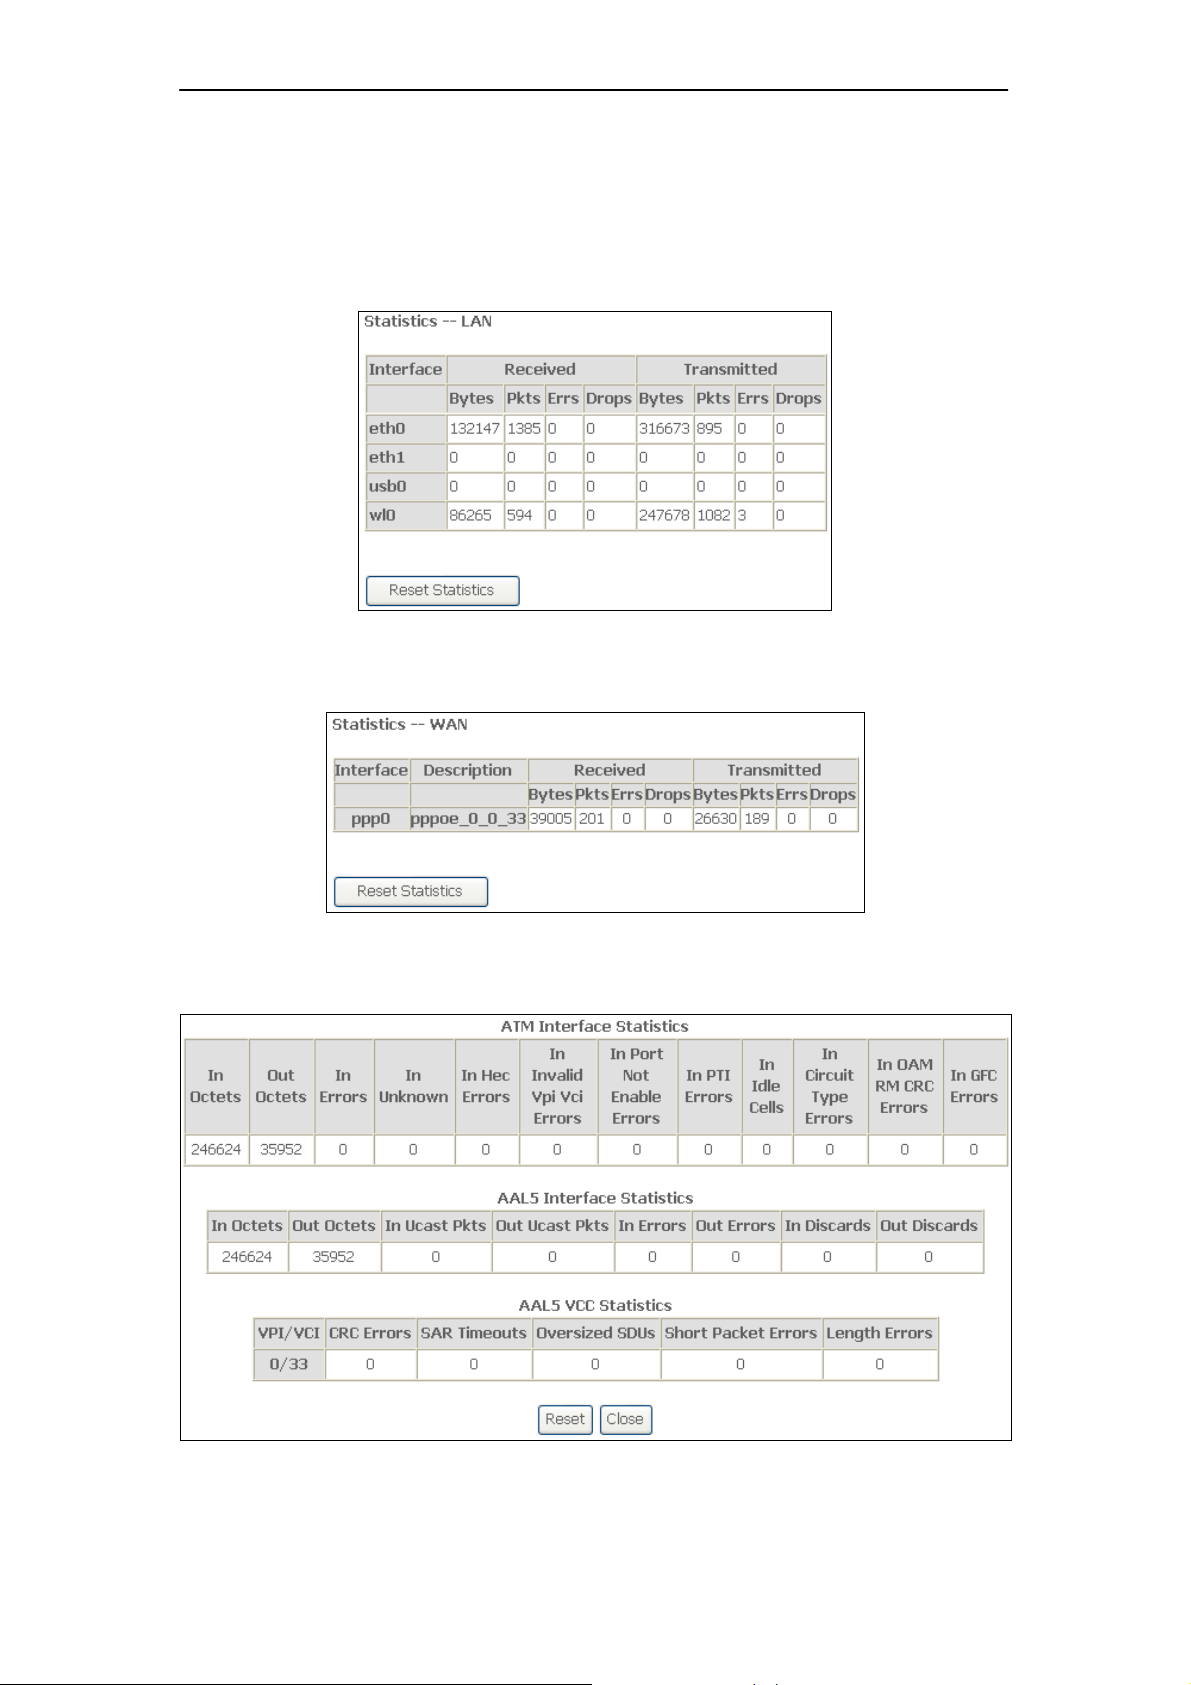
6.3 Statistics
This section shows the statistics information of Freeway.
6.3.1 LAN
This page shows the statistics of each connection on your LAN.
Freeway DSL User’s Manual
6.3.2 WAN Service
This page shows the WAN statistics information.
6.3.3 ATM
This page shows the ATM interface statistics information.
9
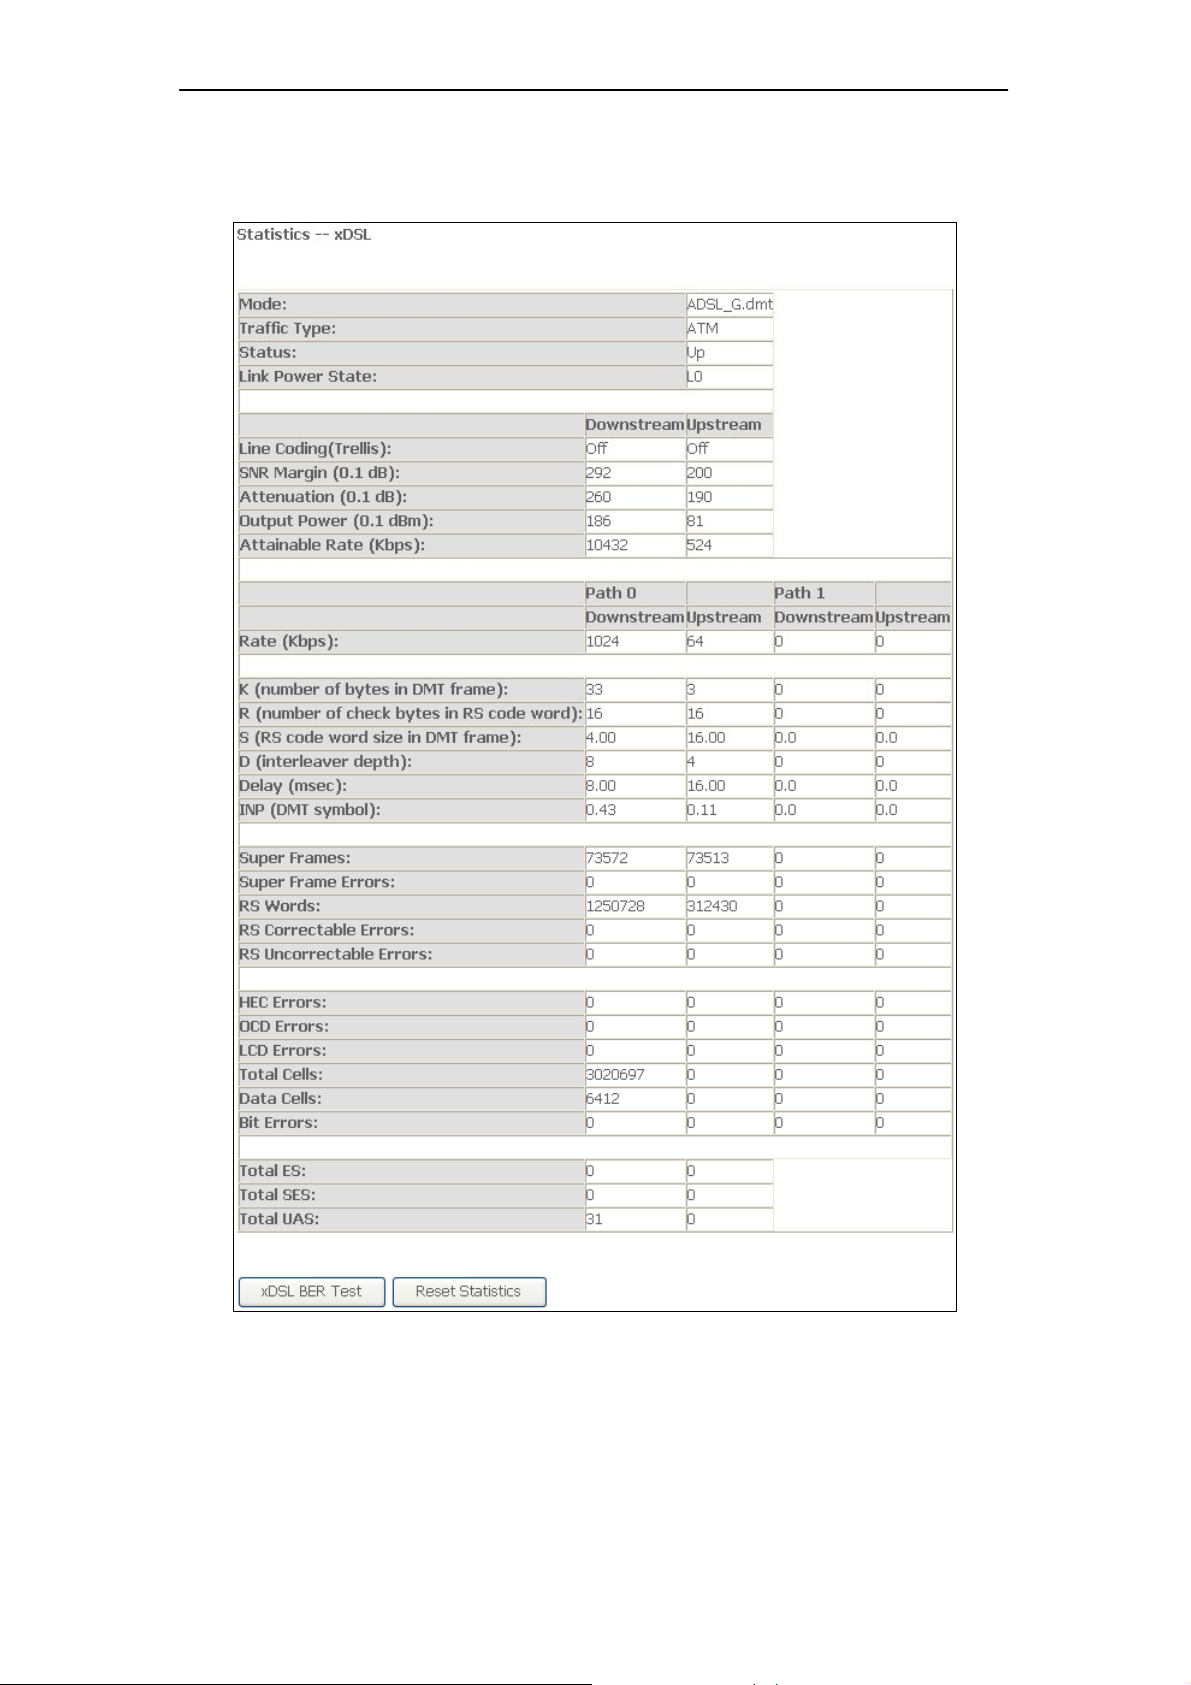
6.3.4 xDSL
This page shows the ADSL status and statistics.
Freeway DSL User’s Manual
10
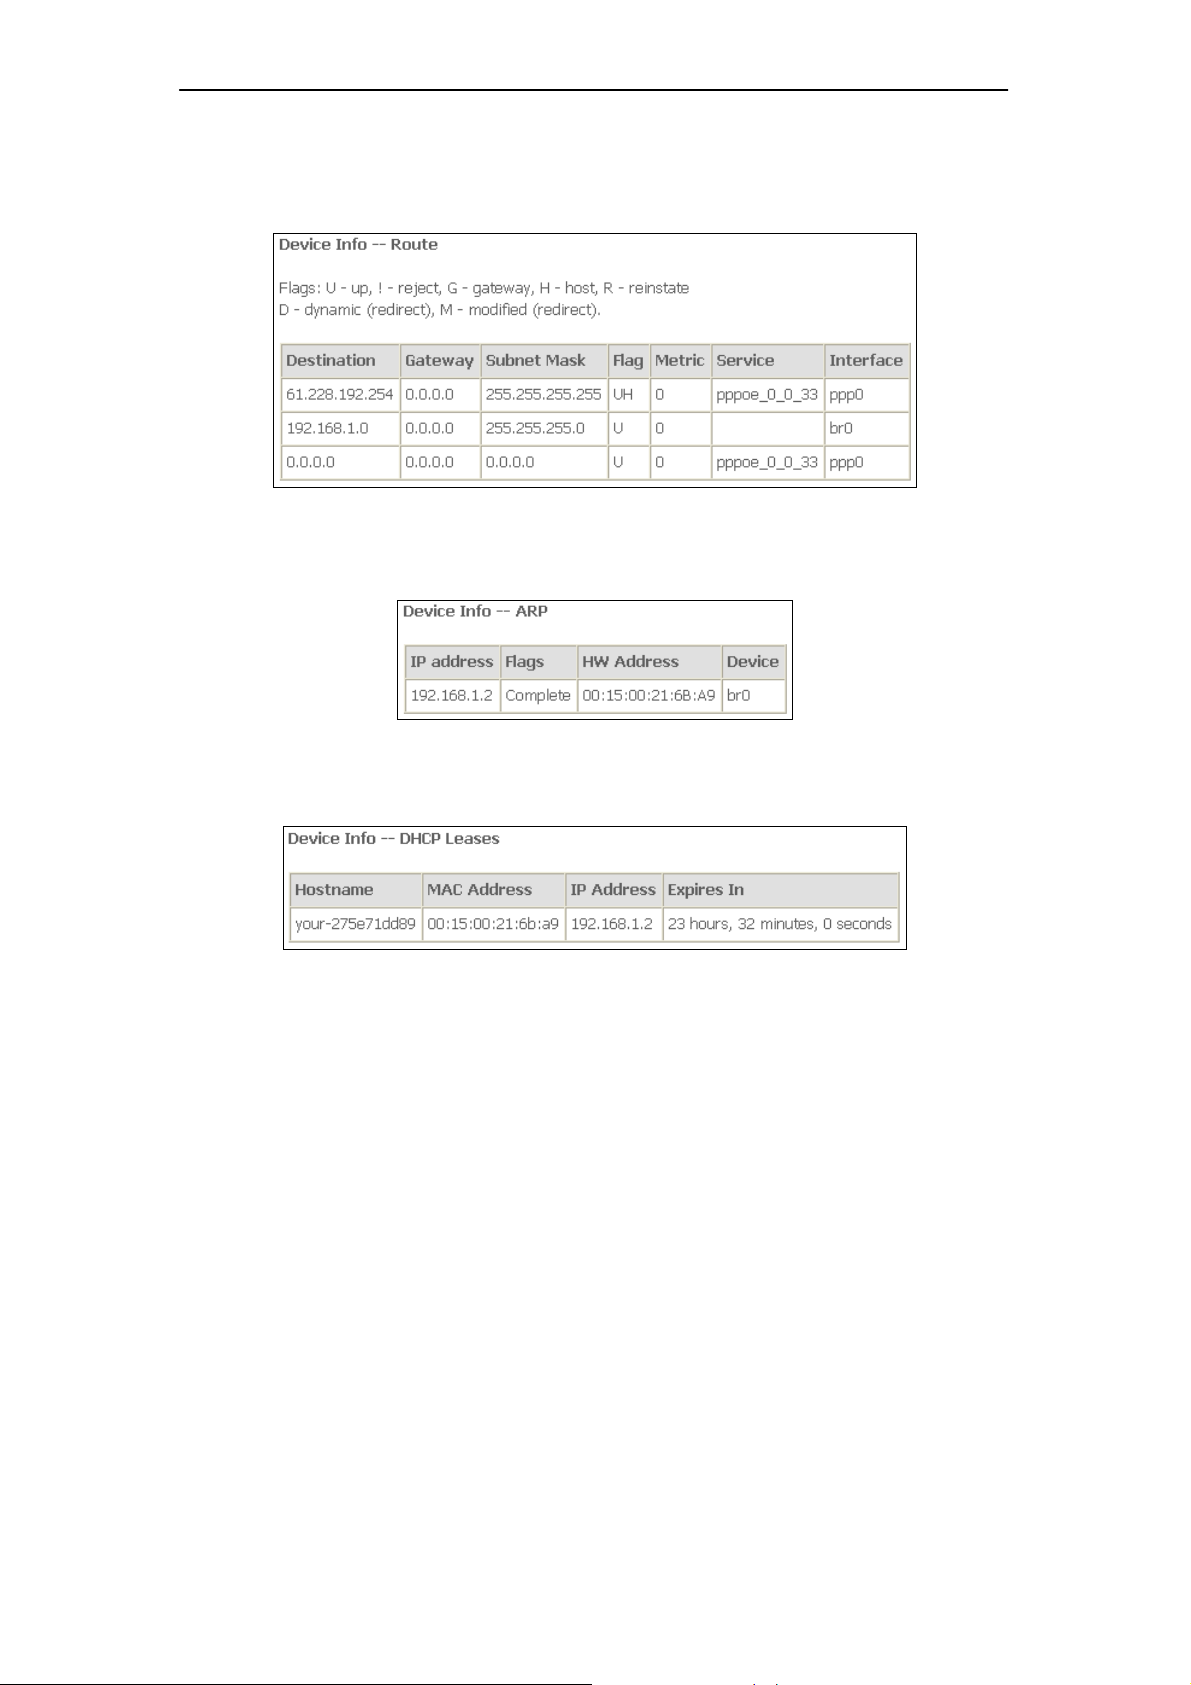
6.4 Route
This page shows the IP route for Freeway DSL.
Freeway DSL User’s Manual
6.5 ARP
This page shows the ARP (Address Resolution Protocol) table on Freeway DSL.
6.6 DHCP
This page shows the client devices which are assigned IP addresses by the Freeway DSL.
11
Freeway DSL User’s Manual
7. Advanced Setup
This section allows you to make specific configurations to your Freeway DSL such as NAT,
Quality of Service, DNS and so on.
7.1 Layer2 Interface
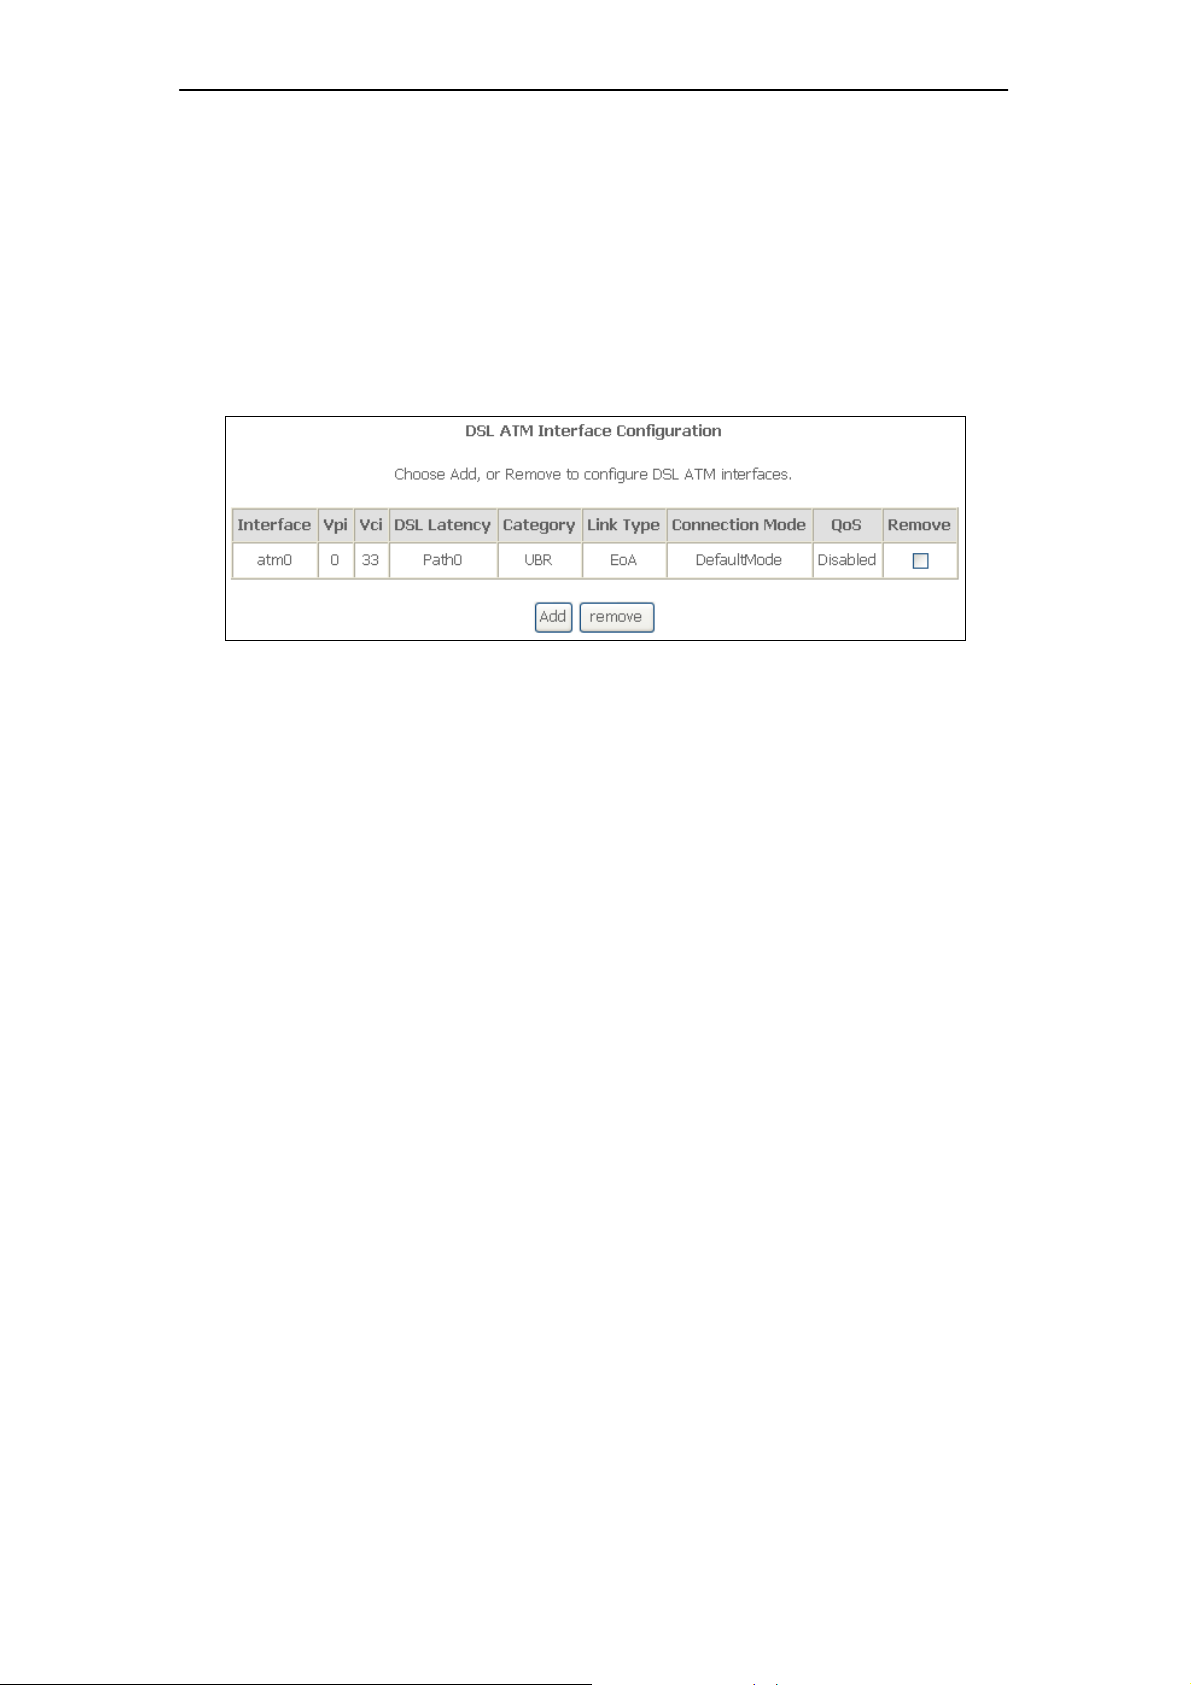
7.1.1 ATM Interface
This page shows the summary of the current ATM interfaces you have configured. You can
set up more than one connection profiles on your Freeway DSL.
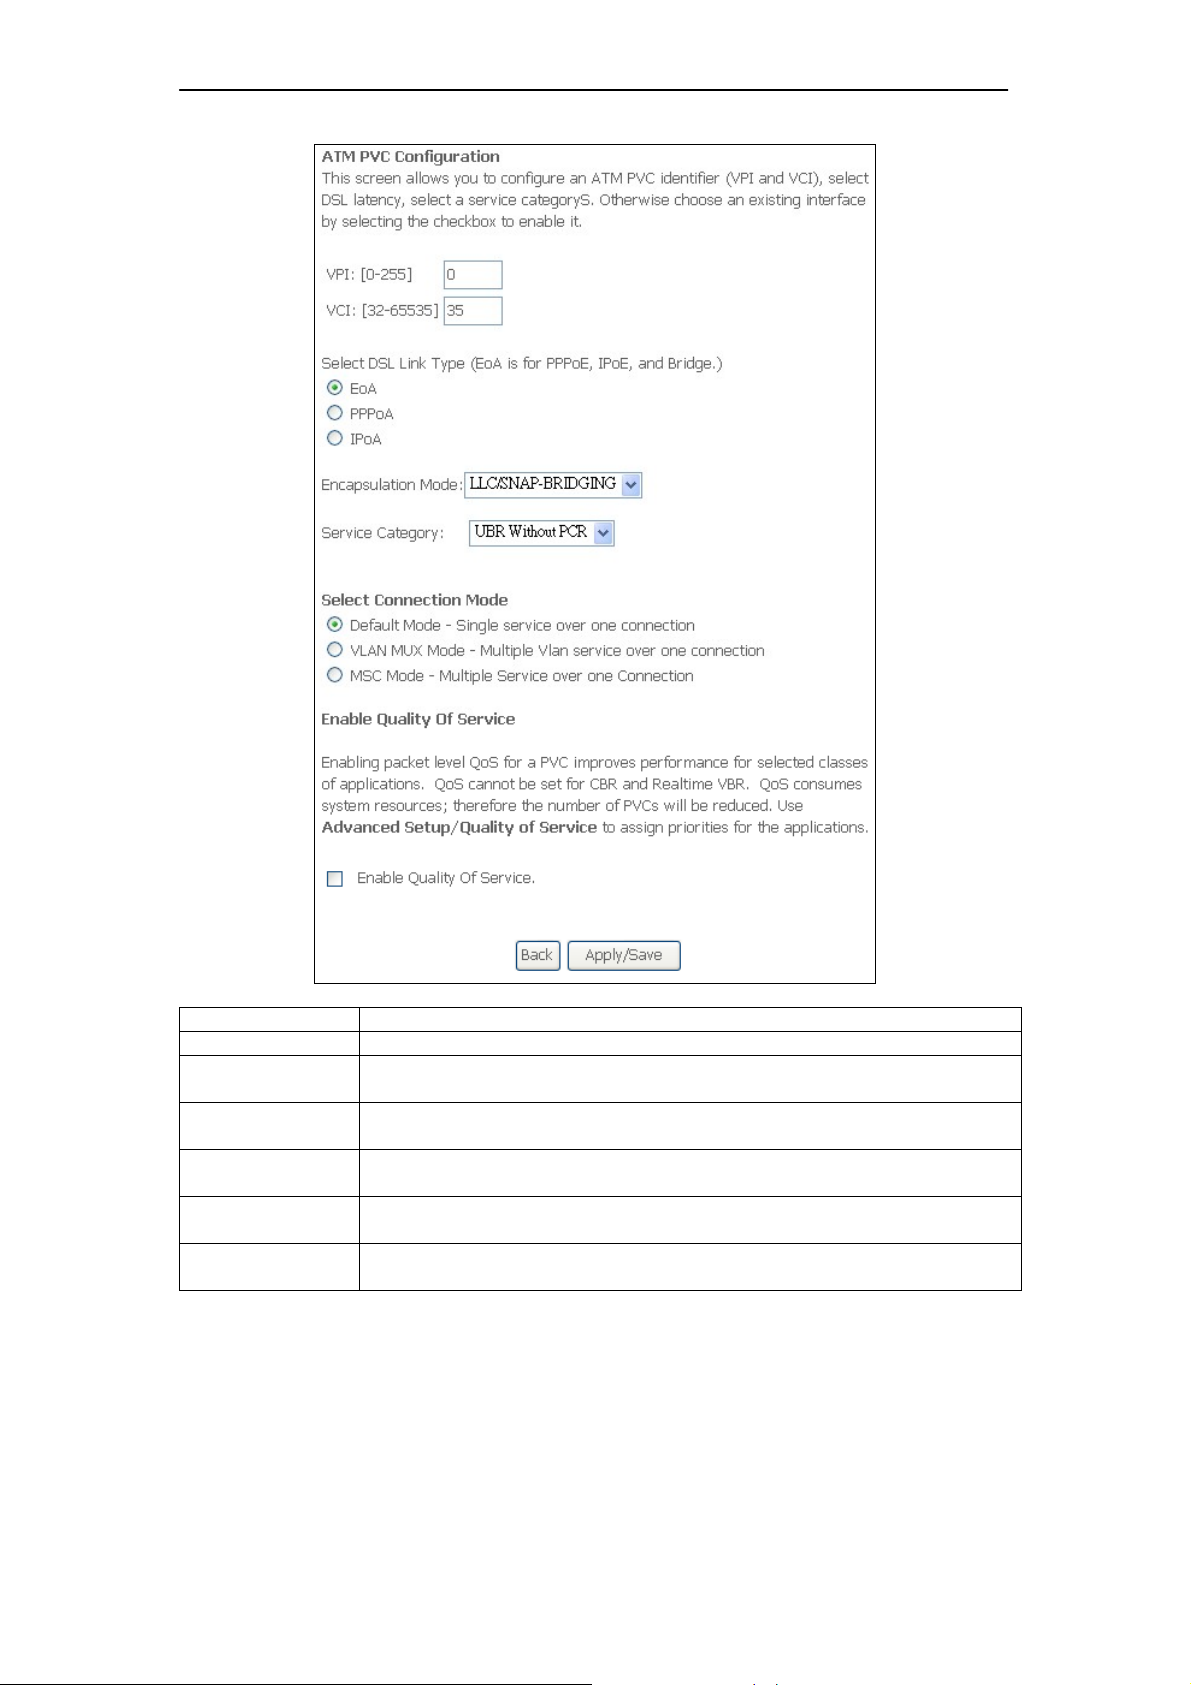
Click Add to create ATM interface. Enter the information provided by your ISP and then click
Save/Apply.
12
Freeway DSL User’s Manual
Field Description
VPI/VCI
DSL Link Type
Encapsulation
Mode
Service
Category
Connection
Mode
Enable Quality
of Service
Enter the PVC identifier (VPI and VCI) provided by your ISP.
Select the DSL link type for the connection. Your ISP should inform you
which type to use.
Select the encapsulation mode for the connection. Your ISP should
inform you which mode to use.
Select the encapsulation mode for the connection. If you are not sure
which type to select, just use the default type.
Select the connection mode according to your application.
Check to enable QoS feature. It improves the performance for selected
classes of applications.
13
Freeway DSL User’s Manual
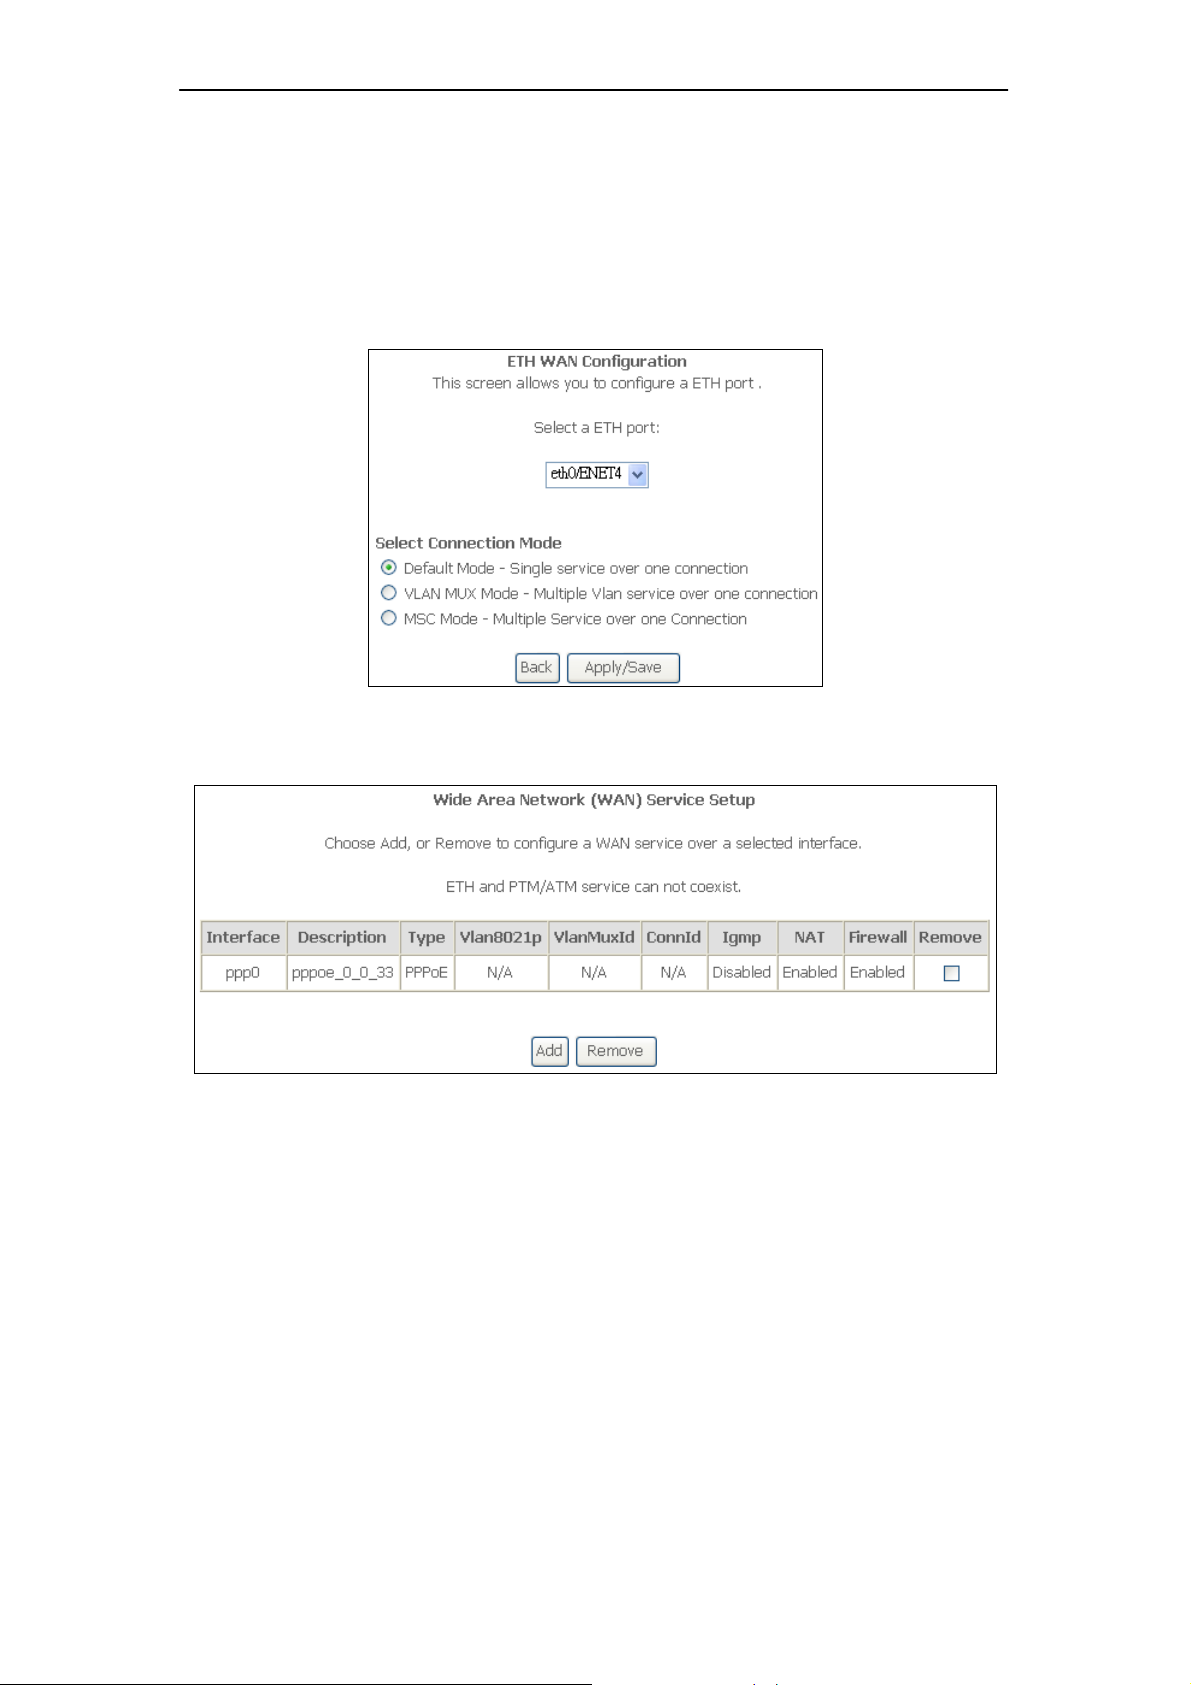
7.1.2 ETH Interface
This page shows the summary of the Ethernet configuration.
Click Add to configure ETH port. The following screen appears when you click Add. Select an
ETH port and a connection mode for the WAN connection. Then click Save/Apply.
7.2 WAN Service
This page shows the summary of the WAN service for a selected interface.
Click Add to select the WAN interface. Select an interface from the drop-down list and enter
the necessary information step by step.
14
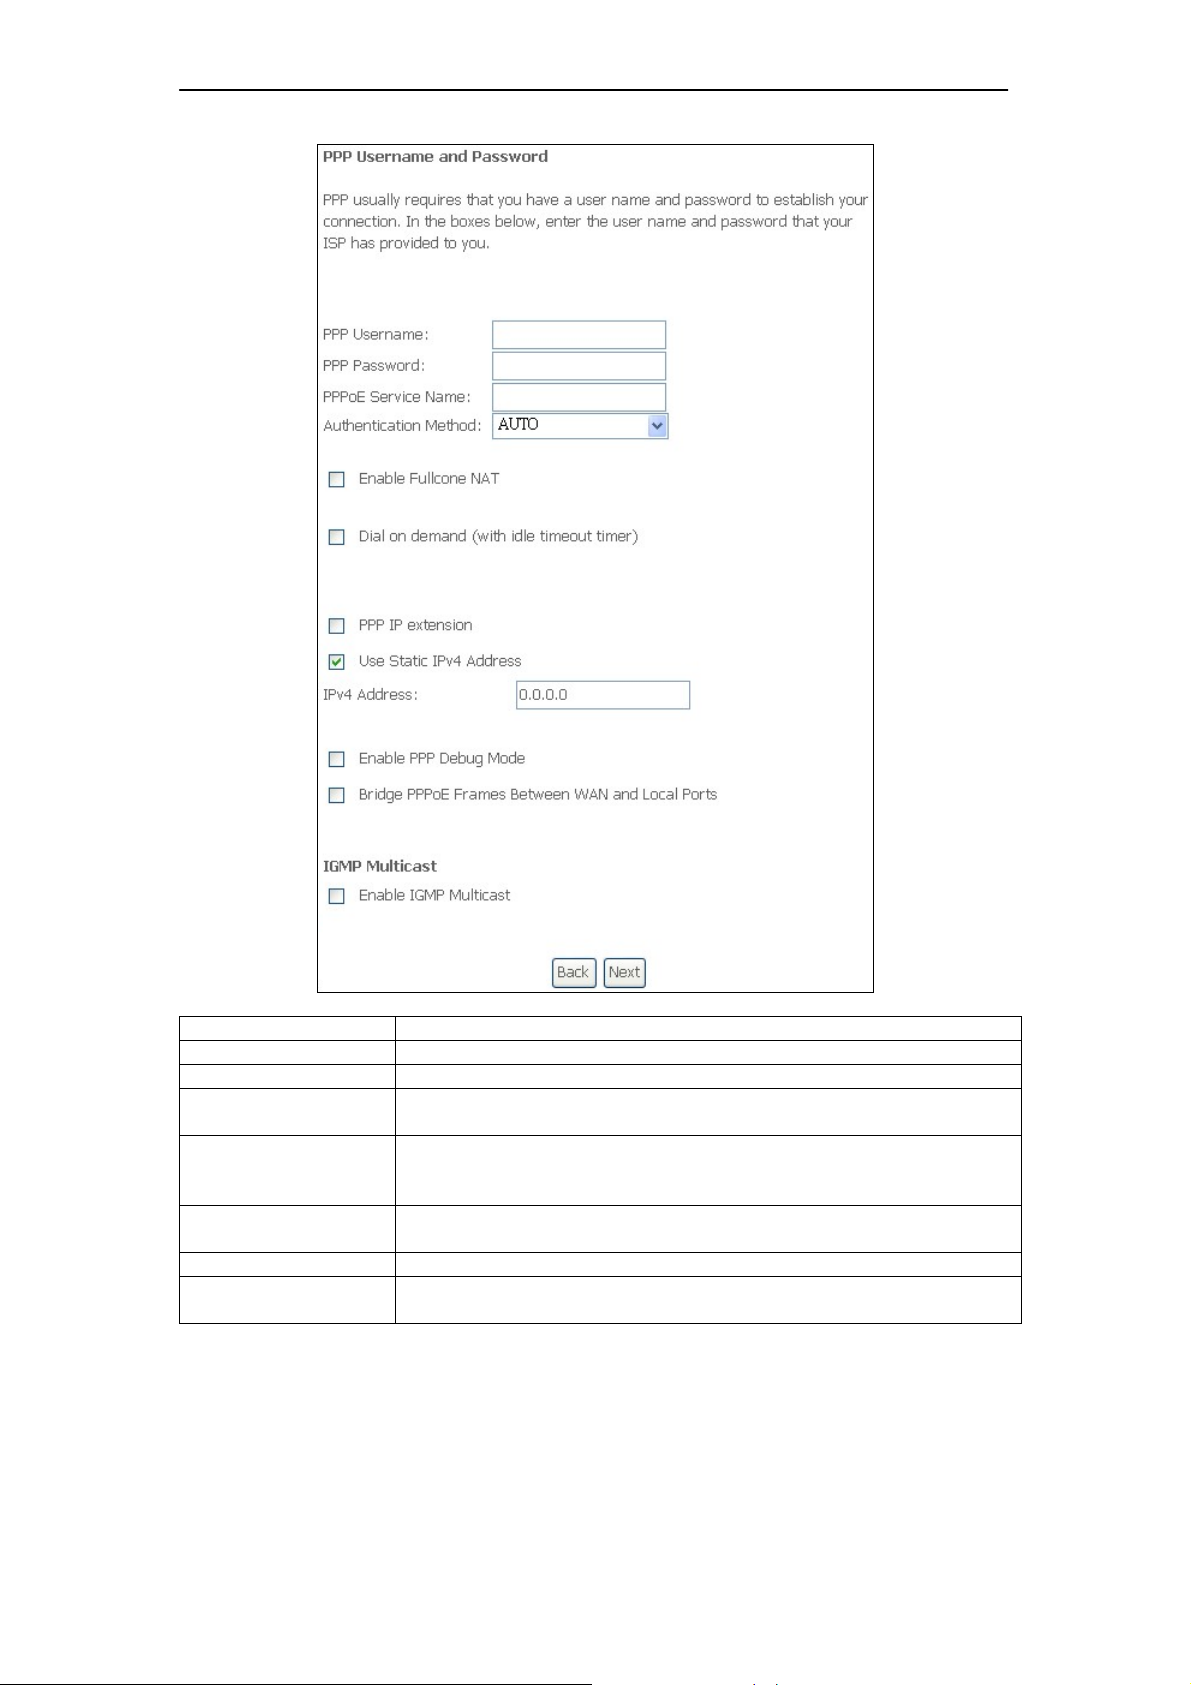
Freeway DSL User’s Manual
Field Description
PPP Username
PPP Password
PPPoE Service
Name
Authentication
Method
Enable Fullcone
NAT
Dial on Demand
Inactivity Timeout
(minutes)
Enter the username of your PPP account.
Enter the password of your PPP account
Enter the service name if required by the ISP.
Select the authentication method to be PAP, CHAP or MSCHAP.
Select “Auto” to allow the Freeway DSL to negotiate with PPP
server automatically.
Check to enable fullcone NAT feature.
Check to enable DOD feature.
Specify the inactivity timeout (in minute) for DOD feature.
15

Freeway DSL User’s Manual
Field Description
Obtain DNS Info from
a WAN Interface
Use the Following
Static DNS IP Address
The table below shows the summary of your WAN settings. Make sure they match the
settings provided by your ISP so that you can connect to the Internet.
Select and select your preferred WAN interface from drop-down
list. This allows the Freeway DSL to obtain the DNS server
information automatically.
Select and specify the primary and/or secondary DNS server(s) IP
address manually.
16
Freeway DSL User’s Manual
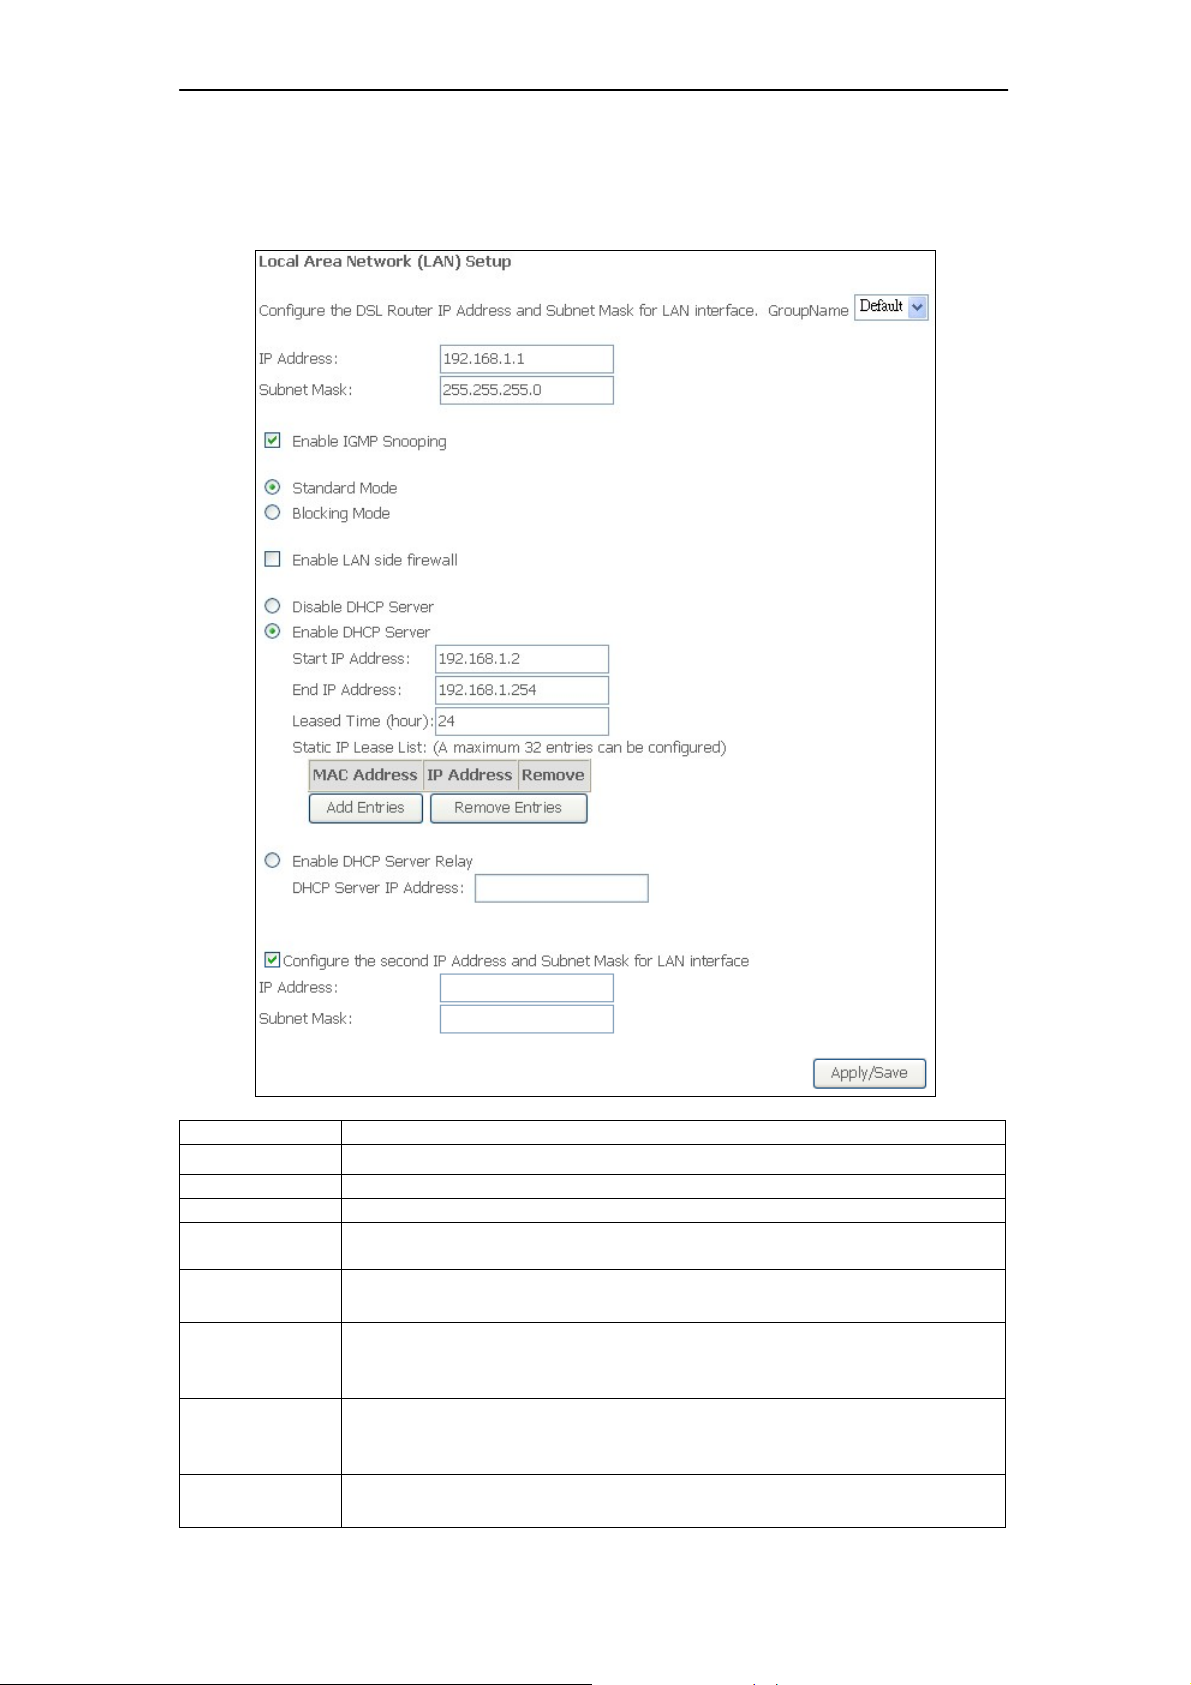
7.3 LAN
This page shows the current setting of LAN interface. You can set IP address/subnet mask
and DHCP server pool for the LAN interface.
Field Description
Group Name
IP Address
Subnet Mask
Enable LAN
Side Firewall
DHCP Server
Start/End IP
Address
Leased Time
(hour)
Static IP
Leased Time
Select a group name for this LAN.
Enter the IP address for this LAN.
Enter the subnet mask for this LAN.
Check to enable LAN side Firewall.
If Enabled, the Freeway DSL will assign IP addresses to PCs (DHCP
clients) on your LAN when they start up. The default setting is Enabled.
Configure the DHCP range used by the DHCP server when assigning IP
Addresses to DHCP clients. This range also determines the number of
DHCP clients supported.
Configure the amount of time the clients will be allowed to connect to
DHCP server. If set to 0, the allocated IP addresses will be effective
forever.
Click Add Entries to configure static LAN IP according to its MAC
address to the clients.
17
 Loading...