

Page 1
Original-
HCMG 25
Bedienungsanleitung
Mikrowelle, Grill und Heißluftofen
Artikel-Nr. 3354
Page 2

Braukmann GmbH
Raiffeisenstraße 9
D-59757 Arnsberg
Service-Hotline International:
Tel.: +49 (0) 29 32 / 80 55 4 – 99
Fax: +49 (0) 29 32 / 80 55 4 – 77
eMail: kundenservice@caso-germany.de
Internet: www.caso-germany.de
Dokument-Nr.: 3354 05.05.2014
Druck- und Satzfehler vorbehalten .
© 2014 Braukmann GmbH
caso HCMG 25 2
Page 3

1 Bedienungsanleitung ........................................................ 14
1.1 Allgemeines ......................................................................................................... 14
1.2 Informationen zu dieser Anleitung .................................................................... 14
1.3 Warnhinweise ...................................................................................................... 14
1.4 Haftungsbeschränkung ...................................................................................... 15
1.5 Urheberschutz ..................................................................................................... 15
2 Sicherheit ........................................................................... 15
2.1 Bestimmungsgemäße Verwendung .................................................................. 16
2.2 Allgemeine Sicherheitshinweise ........................................................................ 16
2.3 Gefahrenquellen .................................................................................................. 17
2.3.1 Gefahr durch Mikrowellen ............................................................................. 17
2.3.2 Verbrennungsgefahr ..................................................................................... 18
2.3.3 Brandgefahr .................................................................................................. 19
2.3.4 Explosionsgefahr .......................................................................................... 20
2.3.5 Gefahr durch elektrischen Strom .................................................................. 20
3 Inbetriebnahme .................................................................. 20
3.1 Sicherheitshinweise ............................................................................................ 21
3.2 Lieferumfang und Transportinspektion ............................................................ 21
3.3 Auspacken ........................................................................................................... 21
3.4 Entsorgung der Verpackung .............................................................................. 21
3.5 Aufstellung .......................................................................................................... 22
3.5.1 Anforderungen an den Aufstellort ................................................................. 22
3.5.2 Aufstellung des Gerät e s ............................................................................... 22
3.5.3 Vermeidung von Funkstörungen ................................................................... 23
3.6 Montage des Zubehörs ....................................................................................... 23
3.6.1 Glasdrehteller ............................................................................................... 23
3.6.2 Grillrost ......................................................................................................... 24
3.7 Elektrischer Anschluss ...................................................................................... 24
3.7.1 Verlängerungskabel ...................................................................................... 25
4 Aufbau und Funktion ........................................................ 25
4.1 Gesamtübersicht ................................................................................................. 25
4.2 Bedienelemente und Anzeige ............................................................................ 26
4.3 Signaltöne ............................................................................................................ 27
4.3.1 Warnhinweise am Gerät ............................................................................... 27
4.3.2 Türverriegelung ............................................................................................. 27
4.3.3 Kindersicherung ............................................................................................ 27
4.4 Typenschild ......................................................................................................... 28
caso HCMG 25 3
Page 4

5 Bedienung und Betrieb ..................................................... 28
5.1 Grundlagen des Mikrowellengarens .................................................................. 28
5.2 Betriebsarten ....................................................................................................... 29
5.3 Hinweise zum Mikrowellenkochgeschirr .......................................................... 29
5.4 Tür Öffnen/Schließen .......................................................................................... 30
5.5 Einschalten nach Programmwahl ...................................................................... 30
5.6 Schnellstart .......................................................................................................... 31
5.7 Ausschalten/Unterbrechen................................................................................. 31
5.8 Einstellen der Uhr ............................................................................................... 31
5.9 Küchenwecker Funktion .................................................................................... 32
5.10 Betriebsart "Mikrowelle" .................................................................................... 32
5.11 Betriebsart "Grill" und Kombinationsprogramme ............................................ 34
5.12 Betriebsart "Heißluft" ......................................................................................... 35
5.12.1 Betriebsart „Heißluft“mit Vorheizen ............................................................... 35
5.12.2 Betriebsart „Heißl u ft“ohne Vorheizen ............................................................ 36
5.13 Betriebsart "Mehrstufiges Garen" ..................................................................... 36
5.14 Betriebsart "automatisches Kochprogramm" .................................................. 37
5.15 Betriebsart "Auftauen" ....................................................................................... 39
5.15.1 Betriebsart "Auftaue n" nac h Gewicht ............................................................ 39
5.15.2 Betriebsart "Auftauen" nach Zeit ................................................................... 39
5.16 Funktionsabfrage ................................................................................................ 40
6 Reinigung und Pflege ........................................................ 40
6.1 Sicherheitshinweise ............................................................................................ 40
6.2 Reinigung............................................................................................................. 40
7 Störungsbehebung ............................................................ 42
7.1 Sicherheitshinweise ............................................................................................ 42
7.2 Störungsursachen und -behebung .................................................................... 42
8 Entsorgung des Altgeräte s ............................................... 43
9 Operating Manual .............................................................. 45
9.1 General ................................................................................................................. 45
9.2 Information on this manual ................................................................................ 45
9.3 Warning notices .................................................................................................. 45
9.4 Limitation of liability ........................................................................................... 46
9.5 Copyright protection ........................................................................................... 46
10 Safety .................................................................................. 46
10.1 Intended use ........................................................................................................ 46
10.2 General Safety information ................................................................................ 47
caso HCMG 25 4
Page 5

10.3 Sources of danger ............................................................................................... 48
10.3.1 Danger due to microwaves ........................................................................... 48
10.3.2 Danger of burns ............................................................................................ 48
10.3.3 Danger of fire ................................................................................................ 49
10.3.4 Danger of explosion ...................................................................................... 50
10.3.5 Dangers due to electrical power ................................................................... 50
11 Commissioning .................................................................. 51
11.1 Safety information ............................................................................................... 51
11.2 Delivery scope and transport inspection .......................................................... 51
11.3 Unpacking ............................................................................................................ 51
11.4 Disposal of the packaging .................................................................................. 51
11.5 Setup .................................................................................................................... 52
11.5.1 Setup location requirements: ........................................................................ 52
11.5.2 Installation of the appliance .......................................................................... 52
11.5.3 Avoiding radio interference ........................................................................... 53
11.6 Assembling the accessories .............................................................................. 53
11.6.1 Glass turntable.............................................................................................. 53
11.6.2 Grating .......................................................................................................... 54
11.7 Electrical connect io n .......................................................................................... 54
11.7.1 Extension cables ........................................................................................... 55
12 Design and Function ......................................................... 55
12.1 Complete overview ............................................................................................. 55
12.2 Operating elements and displays ...................................................................... 56
12.3 Signal tones ......................................................................................................... 57
12.4 Safety equipment ................................................................................................ 57
12.4.1 Warning notices on dev i ce ............................................................................ 57
12.4.2 Door latch ..................................................................................................... 57
12.4.3 Child-proof lock ............................................................................................. 57
12.5 Rating plate .......................................................................................................... 58
13 Operation and Handing ..................................................... 58
13.1 Principles of microwave cooking ...................................................................... 58
13.2 Operating modes: ............................................................................................... 59
13.3 Information on microwave cookware ................................................................ 59
13.4 Opening / closing door ....................................................................................... 60
13.5 Activation after selecting the programme......................................................... 60
13.6 Quick start ........................................................................................................... 61
13.7 Stop / Pause ......................................................................................................... 61
caso HCMG 25 5
Page 6

13.8 Setting the clock ................................................................................................. 61
13.9 Kitchen timer function ....................................................................................... 62
13.10 “Microwave” mode .............................................................................................. 62
13.11 ““Grill” mode and combination programmes ................................................... 64
13.12 “Convection” mode ............................................................................................ 65
13.12.1 Mode “Convection” with preheating .............................................................. 65
13.12.2 Operating mode “Convect ion” w i thout pr eh eating......................................... 66
13.13 “Multi-stage Cooking" Mode .............................................................................. 66
13.14 “Cooking Program” Mode .................................................................................. 67
13.15 “Automatic defrost” mode ................................................................................. 68
13.15.1 Mode “Defrosting” by weight ......................................................................... 68
13.15.2 Mode “Defrosting” by time ............................................................................ 69
13.16 Function display .................................................................................................. 69
14 Cleaning and Maintenance ............................................... 69
14.1 Safety information ............................................................................................... 69
14.2 Cleaning ............................................................................................................... 70
15 Troubleshooting ................................................................ 71
15.1 Safety notices ...................................................................................................... 71
15.2 Causes and rectification of faults ...................................................................... 71
16 Disposal of the Old Device ............................................... 72
17 Mode d´emploi ................................................................... 74
17.1 Généralités........................................................................................................... 74
17.2 Informations relatives à ce manuel ................................................................... 74
17.3 Avertissements de danger ................................................................................. 74
17.4 Limite de responsabilités ................................................................................... 75
17.5 Protection intellectuelle ...................................................................................... 75
18 Sécurité .............................................................................. 75
18.1 Utilisation conforme ........................................................................................... 75
18.2 Consignes de sécurités générales .................................................................... 76
18.3 Sources de danger .............................................................................................. 77
18.3.1 Dangers avec des micro-ondes .................................................................... 77
18.3.2 Danger de brulures ....................................................................................... 78
18.3.3 Danger d'incendie ......................................................................................... 79
18.3.4 Danger d'explosion ....................................................................................... 79
18.3.5 Dangers du courant électrique ...................................................................... 80
19 Mise en service .................................................................. 80
19.1 Consignes de sécurité ........................................................................................ 80
caso HCMG 25 6
Page 7

19.2 Inventaire et contrôle de transport .................................................................... 81
19.3 Déballage ............................................................................................................. 81
19.4 Elimination des emballages ............................................................................... 81
19.5 Mise en place ....................................................................................................... 81
19.5.1 Exigences pour l'emplacement d'utilisation .................................................. 81
19.5.2 Installation de l'appareil ....................................................................................... 82
19.6 Pour éviter le parasitage radio ........................................................................... 82
19.7 Montage des accessoires ................................................................................... 83
19.7.1 Plateau tournant en verre ............................................................................. 83
19.7.2 La Grille ........................................................................................................ 83
19.8 Raccordement électrique ................................................................................... 83
19.8.1 Rallonge de câble ......................................................................................... 84
20 Structure et fonctionnement ............................................ 85
20.1 Vue d'ensemble ................................................................................................... 85
20.2 Eléments de commande et d'affichage ............................................................. 86
20.3 Signaux sonores ................................................................................................. 87
20.4 Dispositifs de sécurité ........................................................................................ 87
20.4.1 Avertissements sur l'appareil ........................................................................ 87
20.4.2 Verrouillage de porte .................................................................................... 87
20.4.3 Sécurité enfant.............................................................................................. 87
20.5 Plaque signalétique ............................................................................................ 88
21 Commande et fonctionnement ......................................... 88
21.1 Fondamentaux de la cuisso n aux mi cro -ondes ............................................... 88
21.2 Modes de fonctionnement .................................................................................. 89
21.3 Indications sur la vaisselle pour micro-onde ................................................... 89
21.4 Ouvrir et fermer la porte ..................................................................................... 90
21.5 Mise en route après sélection d'un programme ............................................... 90
21.6 Démarrage rapide ................................................................................................ 91
21.7 Arrêt/Interruption ................................................................................................ 91
21.8 Réglage de la montre .......................................................................................... 91
21.9 Fonction alarme minuteur ...................................................................................... 92
21.9 Mode «micro-onde» ............................................................................................ 92
21.10 Mode "Grill" et programmes combinés ............................................................. 94
21.11 Mode «Air pulsé» ................................................................................................ 95
21.11.1 Mode "Air pulsé" avec précha u ffag e ............................................................. 95
21.11.2 Mode "Air pulsé" sans précha u ffag e ............................................................. 96
21.12 Mode «Niveaux multiples» ................................................................................. 96
21.13 Mode "Programme de cuisson automatique" ................................................... 97
caso HCMG 25 7
Page 8

21.14 Mode «Décongélation automatique» ................................................................. 98
21.14.1 Mode "Décongélation" suivant le poids ......................................................... 99
21.14.2 Mode "Décongélation " sui vant la durée ........................................................ 99
21.15 Consultation de fonction .................................................................................... 99
22 Nettoyage et entretien ....................................................... 99
22.1 Consignes de sécurité ........................................................................................ 99
22.2 Nettoyage ........................................................................................................... 100
23 Réparation des pannes ................................................... 101
23.1 Consignes de sécurité ...................................................................................... 101
23.2 Origine et remède des incidents ...................................................................... 101
24 Elimination des appareils usés ...................................... 102
25 Istruzione d´uso ............................................................... 104
25.1 In generale ......................................................................................................... 104
25.2 Informazioni su queste istruzioni d’uso .......................................................... 104
25.3 Indicazioni d’avvertenza ................................................................................... 104
25.4 Limitazione della responsabilità ...................................................................... 105
25.5 Tutela dei diritti d’autore .................................................................................. 105
26 Sicurezza .......................................................................... 105
26.1 Utilizzo conforme alla destinazione ................................................................. 106
26.2 Avvertenze generali di sicurezza ..................................................................... 106
26.3 Fonti di pericolo ................................................................................................ 107
26.3.1 Pericolo dovuto a microonde ...................................................................... 107
26.3.2 Pericolo di ustioni ........................................................................................ 108
26.3.3 Pericolo d’incendio ...................................................................................... 109
26.3.4 Pericolo d’esplosione .................................................................................. 109
26.3.5 Pericolo dovuto a corrente elettrica ............................................................ 110
27 Messa in funzione............................................................ 110
27.1 Avvertenze di sicurezza .................................................................................... 110
27.2 Insieme della fornitura ed ispezione trasporto ............................................... 111
27.3 Disimballaggio ................................................................................................... 111
27.4 Smaltimento dell’involucro .............................................................................. 111
27.5 Posizionamento ................................................................................................. 111
27.5.1 Requisiti del luogo di posizionamento ......................................................... 111
27.5.2 Installazione dell' ap parecchio ..................................................................... 112
27.5.3 A scanso di malfunzionamenti .................................................................... 112
27.6 Montaggio degli accessori ............................................................................... 113
27.6.1 Piatto rotante in vetro .................................................................................. 113
caso HCMG 25 8
Page 9

27.6.2 Griglia ......................................................................................................... 113
27.7 Connessione elett ri c a ....................................................................................... 114
27.7.1 Cavo di prolunga ......................................................................................... 114
28 Struttura e funzione ......................................................... 115
28.1 Panoramica complessiva ................................................................................. 115
28.2 Comandi e display ............................................................................................ 116
28.3 Suoni di segnalazione ...................................................................................... 117
28.4 Impostazioni di sicurezza ................................................................................. 117
28.4.1 Segnalazione d'avviso sull’apparecchio...................................................... 117
28.4.2 Chiusura porte ............................................................................................ 117
28.4.3 Sicura per bambini ...................................................................................... 117
28.5 Targhetta di omologazione............................................................................... 118
29 Utilizzo e funzionamento ................................................ 118
29.1 Fondamenti della cottura a microonde ........................................................... 118
29.2 Modalità di funzionamento ............................................................................... 119
29.3 Indicazioni sulle stoviglie per microonde ....................................................... 119
29.4 Aprire/Chiudere la porta ................................................................................... 120
29.5 Accensione dopo la selezione del programma .............................................. 120
29.6 Start rapido ........................................................................................................ 121
29.7 Spegnimento/Interruzione ................................................................................ 121
29.8 Impostazione dell’orologio ............................................................................... 121
29.9 Funzione sveglia per cucina ........................................................................... 122
29.10 Modalità di funzionamento “Microonde” ........................................................ 122
29.11 Modalità „Griglia” e programmi combinati ..................................................... 123
29.12 Modalità di funzionamento “Ventilato” ........................................................... 125
29.12.1 Modalità „Ventilato“ con preriscaldamento .................................................. 125
29.12.2 Modalità „Ventilato“ senza preriscaldamento .............................................. 126
29.13 Modalità di funzionamento, “cottura a diversi gradi” .................................... 126
29.14 Modalità „Programma automatico di cottura" ................................................ 127
29.15 Modalità di funzionamento, “Scongelamento automatico” ........................... 128
29.15.1 Modalità "Scongelam e nto" a peso .............................................................. 129
29.15.2 Modalità "Scongelamento" a tempo ............................................................ 129
29.16 Interrogazione della funzione ........................................................................... 129
30 Pulizia e cura .................................................................... 129
30.1 Avvertenze di sicurezza .................................................................................... 129
30.2 La pulizia ............................................................................................................ 130
31 Eliminazione guasti ......................................................... 131
caso HCMG 25 9
Page 10

31.1 Avvertenze di sicurezza .................................................................................... 131
31.2 Cause dei guasti e risoluzione ......................................................................... 131
32 Smaltimento dell’apparecchio obsoleto ....................... 132
33 Manual del usuario .......................................................... 134
33.1 Generalidades ................................................................................................... 134
33.2 Información acerca de este manual ................................................................ 134
33.3 Advertencias ...................................................................................................... 134
33.4 Limitación de responsabilidad ......................................................................... 135
33.5 Derechos de autor (copyright) ......................................................................... 135
34 Seguridad ......................................................................... 135
34.1 Uso previsto ...................................................................................................... 135
34.2 Instrucciones generales de seguridad ............................................................ 136
34.3 Fuentes de peligro ............................................................................................ 137
34.3.1 Peligro por microondas ............................................................................... 137
34.3.2 Peligro de quemaduras ............................................................................... 137
34.3.3 Peligro de fuego .......................................................................................... 138
34.3.4 Peligro de explosión ................................................................................... 139
34.3.5 Peligro de electrocución ............................................................................. 139
35 Puesta en marcha ............................................................ 140
35.1 Instrucciones de seguridad.............................................................................. 140
35.2 Ámbito de suministro e inspección de transporte ......................................... 140
35.3 Desembalaje ...................................................................................................... 140
35.4 Eliminación del embalaje ................................................................................. 141
35.5 Colocación ......................................................................................................... 141
35.5.1 Requisitos que debe reunir el lugar de montaje ......................................... 141
35.5.2 Colocación del aparato ............................................................................... 142
35.5.3 Cómo evitar radioperturbaciones ................................................................ 142
35.6 Montaje de los aparatos ................................................................................... 143
35.6.1 Plato giratorio.............................................................................................. 143
35.6.2 Parrilla ........................................................................................................ 143
35.7 Conexión eléctrica ............................................................................................ 143
35.7.1 Cable alargador .......................................................................................... 144
36 Estructura y funciones .................................................... 145
36.1 Panorámica del aparato .................................................................................... 145
36.2 Panel de control y pantalla ............................................................................... 146
36.3 Señales acústicas ............................................................................................. 147
36.3.1 Precaución con el aparato .......................................................................... 147
caso HCMG 25 10
Page 11

36.3.2 Enclaves de cierre ...................................................................................... 147
36.3.3 Seguro para niños ...................................................................................... 147
36.4 Placa de especificaciones ................................................................................ 148
37 Operación y funcionamiento .......................................... 148
37.1 Principios de la cocción con microondas....................................................... 148
37.2 Modos de funcionamiento ................................................................................ 149
37.3 Consejos acerca de la vajilla para microondas .............................................. 149
37.4 Apertura/Cierre de la puerta ............................................................................. 150
37.5 Inicio del programa seleccionado ................................................................... 150
37.6 Inicio rápido ....................................................................................................... 151
37.7 Apagado/Parada ................................................................................................ 151
37.8 Ajuste del reloj .................................................................................................. 151
37.9 Función de reloj de cocina ............................................................................... 152
37.10 Modo de funcionamiento "Microondas" ......................................................... 152
37.11 Modo "grill" y programas combinados ........................................................... 153
37.12 Modo de funcionamiento "Convección" ......................................................... 155
37.12.1 Modo “aire caliente” con precalentamiento ................................................. 155
37.12.2 Modo “aire caliente” sin precalentamiento .................................................. 156
37.13 Modo "cocinado en varias etapas " ................................................................. 156
37.14 Modo “programa de cocinado automático” .................................................... 157
37.15 Modo de funcionamiento "Descongelación automática" .............................. 158
37.15.1 Modo “descongelación” según peso ........................................................... 158
37.15.2 Modo "descongelació n " seg ún ti e mpo ........................................................ 159
37.16 Consulta de función .......................................................................................... 159
38 Limpieza y conservación ................................................ 159
38.1 Instrucciones de seguridad.............................................................................. 159
38.2 Limpieza ............................................................................................................. 160
39 Resolución de fallos........................................................ 161
39.1 Instrucciones de seguridad.............................................................................. 161
39.2 Causas de error y tratamiento ......................................................................... 161
40 Eliminación del aparato usado....................................... 162
41 Gebruiksaanwijzing ......................................................... 164
41.1 Algemeen ........................................................................................................... 164
41.2 Informatie over deze gebruiksaanwijzing ....................................................... 164
41.3 Waarschuwingsinstructies ............................................................................... 164
41.4 Aansprakelijkheid ............................................................................................. 165
caso HCMG 25 11
Page 12

41.5 Auteurswet......................................................................................................... 165
42 Veiligheid .......................................................................... 165
42.1 Gebruik volgens de voorschriften ................................................................... 165
42.2 Bronnen van gevaar .......................................................................................... 167
42.2.1 Gevaar door microgolven ........................................................................... 167
42.2.2 Verbrandingsgevaar ................................................................................... 168
42.2.3 Brandgevaar ............................................................................................... 169
42.2.4 Explosiegevaar ........................................................................................... 169
42.2.5 Gevaar door elektrische stroom .................................................................. 170
43 Ingebruikname ................................................................. 170
43.1 Veiligheidsvoorschriften .................................................................................. 170
43.2 Leveringsomvang en transportinspectie ........................................................ 170
43.3 Auitpakken ......................................................................................................... 171
43.4 Verwijderen van de verpakking ........................................................................ 171
43.5 Plaatsen ............................................................................................................. 171
43.5.1 Eisen aan de plek van plaatsing ................................................................. 171
43.5.2 Opstelling van het apparaat ........................................................................ 172
43.5.3 Voorkomen van frequenti es tor ing ............................................................... 172
43.6 Montage van onderdelen .................................................................................. 173
43.6.1 Glazen draaiplateau .................................................................................... 173
43.6.2 Grillrooster .................................................................................................. 173
43.7 Elektrische aansluiting ..................................................................................... 173
43.1.1 Verlengsnoer .............................................................................................. 174
44 Opbouw en functie .......................................................... 175
44.1 Algemeen overzicht .......................................................................................... 175
44.2 Bedieningspan eel en display ........................................................................... 176
44.3 Pieptonen ........................................................................................................... 177
44.4 Veiligheidsvoorzieningen ................................................................................. 177
44.4.1 Waarschuwingsinstructies op apparaat ...................................................... 177
44.4.2 Deurvergrendeling ...................................................................................... 177
44.4.3 Kinderslot .................................................................................................... 177
44.5 Typeplaatje ........................................................................................................ 178
45 Bediening en gebruik ...................................................... 178
45.1 Basis van het magnetron koken ...................................................................... 178
45.2 Soorten gebruik ................................................................................................. 179
45.3 Aanwijzingen magnetron kookgerei ................................................................ 179
45.4 Deur openen/sluiten .......................................................................................... 180
45.5 Inschakelen naar programmakeuze ................................................................ 180
caso HCMG 25 12
Page 13

45.6 Snelstart ............................................................................................................. 181
45.7 Uitschakelen/onderbreken ............................................................................... 181
45.8 Instellen van de klok ......................................................................................... 181
45.9 Keukenwekker functie ..................................................................................... 182
45.10 Gebruik “Magnetron” ........................................................................................ 182
45.11 Gebruik "Grill" en combinatieprogramma's ................................................... 183
45.12 Gebruik “Hete lucht” ......................................................................................... 185
43.1.2 Gebruik "hete lucht" zonder opwarmen ...................................................... 185
45.13 Gebruik “Meerdere fases koken” ..................................................................... 186
45.14 Gebruik "automatisch kookprogramma" ........................................................ 187
45.15 Gebruik “Automatisch ontdooien” .................................................................. 188
43.1.3 Gebruik "ontdooien" naar gewicht ............................................................... 188
43.1.4 Gebruik "ontdooien" op tijd ......................................................................... 189
45.16 Functieoproep ................................................................................................... 189
46 Reiniging en onderhoud ................................................. 189
46.1 Veiligheidsvoorschriften .................................................................................. 189
46.2 Reiniging ............................................................................................................ 190
47 Storingen verhelpen ........................................................ 191
47.1 Veiligheidsvoorschriften .................................................................................. 191
47.2 Oorzaken van de storingen en het verhelpen ................................................. 191
48 Afvoer van het oude apparaat ....................................... 192
caso HCMG 25 13
Page 14
1 Bedienungsanleitung
1.1 Allgemeines
Lesen Sie die hier enthaltenen Informationen, damit Sie mit Ihrem Gerät schnell vertraut
werden und seine Funktionen in vollem Umfang nutzen können.
Ihre Mikrowelle dient Ihnen viele Jahre lang, wenn Sie sie sachgerecht behandeln und
pflegen. Wir wünschen Ihnen viel Freude beim Gebrauch.
1.2 Informationen zu dieser Anleitung
Diese Bedienungsanleitung ist Bestandteil der Mikrowelle (nachfolgend als Gerät
bezeichnet) und gibt Ihnen wichtige Hinweise für die Inbetriebnahme, die Sicherheit, den
bestimmungsgemäßen Gebrauch und die Pflege des Gerätes.
Die Bedienungsanleitung muss ständig am Gerät verfügbar sein. Sie ist von jeder Person
zu lesen und anzuwenden, die mit der:
• Inbetriebnahme,
• Bedienung,
• Störungsbehebung und/oder
• Reinigung des Gerätes beauftragt ist.
Bewahren Sie diese Bedienungsanleitung auf und geben Sie diese mit dem Gerät an
Nachbesitzer weiter.
1.3 Warnhinweise
In der vorliegenden Bedienungsanleitung werden folgende Warnhinweise verwendet:
Ein Warnhinweis dieser Gefahrenstufe kennzeichnet eine drohende gefährliche
Situation.
Falls die gefährliche Situation nicht vermieden wird, führt dies zum Tod oder zu schweren
Verletzungen.
► Die Anweisungen in diesem Warnhinweis befolgen, um die Gefahr des Todes oder
schwerer Verletzungen von Personen zu vermeiden.
Ein Warnhinweis dieser Gefahrenstufe kennzeichnet eine mögliche gefährliche
Situation.
Falls die gefährliche Situation nicht vermieden wird, kann dies zu schweren Verletzungen
führen.
► Die Anweisungen in diesem Warnhinweis befolgen, um Verletzungen von Personen zu
vermeiden.
caso HCMG 25 14
Page 15
Ein Warnhinweis dieser Gefahrenstufe kennzeichnet eine mögliche gefährliche
Situation.
Falls die gefährliche Situation nicht vermieden wird, kann dies zu leichten oder
gemäßigten Verletzungen führen.
► Die Anweisungen in diesem Warnhinweis befolgen, um Verletzungen von Personen zu
vermeiden.
Ein Hinweis kennzeichnet zusätzliche Informationen, die den Umgang mit der Maschine
erleichtern.
1.4 Haftungsbeschränkung
Alle in dieser Anleitung enthaltenen technischen Informationen, Daten und Hinweise für
die Installation, Betrieb und Pflege entsprechen dem letzten Stand bei Drucklegung und
erfolgen unter Berücksichtigung unserer bisherigen Erfahrungen und Erkenntnisse nach
bestem Wissen.
Aus den Angaben, Abbildungen und Beschreibungen in dieser Anleitung können keine
Ansprüche hergeleit et werden.
Der Hersteller übernimmt keine Haftung für Schäden aufgrund:
• Nichtbeachtung der Anleitung • Nicht bestimmungsgemäßer Verwendung
• Unsachgemäßer Reparaturen • Verwendung nicht zugelassener Ersatzteile
• Technischer Veränderungen, Modi fik ati o nen des Ger ätes
Modifikationen des Gerätes werden nicht empfohlen und sind nicht durch die Garantie
gedeckt. Übersetzungen werden nach bestem Wissen durchgeführt. Wir übernehmen
keine Haftung für Übersetzungsfehler, auch dann nicht, wenn die Übersetzung von uns
oder in unserem Auftrag erfolgte. Verbindlich bleibt allein der ursprüngliche deutsche Text.
1.5 Urheberschutz
Diese Dokumentation ist urheberrechtlich geschützt.
Alle Rechte, auch die der fot o mech ani s ch en Wie d er g abe, der V ervielfältigung und der
Verbreitung mittels besonderer Verfahren (zum Beispiel Datenverarbeitung, Datenträger
und Datennetze), auch teilweise, behält sich die Braukmann GmbH vor.
Inhaltliche und technische Änderungen vorbehalten.
2 Sicherheit
In diesem Kapitel erhalten Sie wichtige Sicherheitshinweise im Umgang mit dem Gerät.
Dieses Gerät entspricht den vorgeschriebenen Sicherheitsbestimmungen. Ein
unsachgemäßer Gebrauch kann jedoch zu Personen-und Sachschäden führen.
caso HCMG 25 15
Page 16
2.1 Bes t immungsgemäße Verwendung
Dieses Gerät ist nur für den Gebrauch im Haushalt in geschlossenen Räumen zum
• Auftauen • Erhitzen • Garen • Grillen • Einkochen • Backen
von Lebensmitteln und Getränken bestimmt. Eine andere oder darüber hinausgehende
Benutzung gilt als nicht bestimmungsgemäß.
Gefahr durch nicht bestimmungsgemäße Verwendung!
Von dem Gerät können bei nicht bestimmungsgemäßer Verwendung und/oder
andersartiger Nutzung Gefahren ausgehen.
► Das Gerät ausschließlich bestimmungsgemäß verwenden.
► Die in dieser Bedienungsanleitung beschriebenen Vorgehensweisen einhalten.
Ansprüche jeglicher Art wegen Schäden aus nicht bestimmungsgemäßer Verwendung
sind ausgeschlossen.
Das Risiko trägt allein der Betreiber.
2.2 Allgemeine Sicherheitshinweise
Beachten Sie für einen sicheren Umgang mit dem Gerät die folgenden allgemeinen
Sicherheitshinweise:
► Kontrollieren Sie das Gerät vor der Verwendung auf äußere sichtbare Schäden.
Nehmen Sie ein beschädigtes Gerät nicht in Betrieb.
► Bei Beschädigung der Anschlussleitung muss eine neue Anschlussleitung durch eine
autorisierte Fachkraft installiert werden.
► Dieses Gerät kann von Kindern, die älter als 8 Jahre sind, sowie von Personen mit einer
geistigen, sensorischen oder körperlichen Behinderung benutzt werden, wenn sie über
den sicheren Betrieb unterrichtet worden sind und die möglichen Gefahren verstehen.
► Kinder dürfen mit dem Gerät nicht spielen.
► Reinigungs- und Wartungsarbeiten dürfen nicht von Kindern ohne Beaufsichtigung
durchgeführt werden.
► Benutzen Sie nur Küchengeräte und Gegenstände, die für den Einsatz in
Mikrowellengeräten geeignet sind.
► Das Gerät sollte regelmäßig gereinigt und Lebensmittelreste stets entfernt werden.
► Lesen und beachten Sie „Gefahr durch Mikrowellen“.
► Das Gerät darf nur entsprechend der beiliegende n Anw ei sung en ei n gebaut oder
aufgestellt werden.
► Das Gerät während des Betriebes nicht unbeaufsichtigt lassen.
► Betreiben Sie den Ofen nicht, wenn er leer ist. Das Gerät kann beschädigt werden.
► Das Gerät ist nicht zum Trocknen, Erwärmen oder Erhitzen von lebenden Tieren
vorgesehen.
caso HCMG 25 16
Page 17
► Speisenthermometer sind nicht für den Mikrowellenbetrieb geeignet.
► Verwenden Sie den Garraum nicht zu Aufbewahrungszwecken. Lassen Sie keine
Papierprodukte, Kochutensilien oder Lebensmittel im Garraum, wenn der Ofen nicht
verwendet wird.
► Lagern oder benutzen Sie das Gerät nicht im Freien.
► Benutzen Sie Gerät nicht in der Nähe von Wasser, in feuchten Kellerräumen oder in
der Nähe von Schwimmbecken.
► Dampfreiniger dürfen nicht am Gerät benutzt werden.
► Die Rückseite des Gerätes muss gegen eine Wand gestellt werden.
► Reparaturen dürfen nur von qualifiziertem Fachpersonal durchgeführt werden, die vom
Hersteller geschult sind. Durch unsachgemäße Reparaturen können erhebliche
Gefahren für den Benutzer entstehen.
► Eine Reparatur des Gerätes während der Garantiezeit darf nur von einem vom
Hersteller autorisierten Kundendienst vorgenommen werden, sonst besteht bei
nachfolgenden Schäden kein Garantieanspruch mehr.
► Defekte Bauteile dürfen nur gegen Original-Ersatzteile ausgetauscht werden. Nur bei
diesen Teilen ist gewährleistet, dass sie die Sicherheitsanforderungen erfüllen werden.
► Das Gerät ist nicht dazu bestimmt mit einer externen Zeitschaltuhr oder einer separaten
Fernsteuerung benutzt zu werden.
► LESEN SIE DIESE SICHERHEITSHINWEISE AUFMERKSAM UND HEBEN SIE SIE
FÜR SPÄTERE ZWECKE AUF.
2.3 Gefahrenquellen
2.3.1 Gefahr durch Mikrowellen
Die Einwirkung von Mikrowellen auf den menschlichen Körpe r ka nn zu
Verletzungen führen.
Beachten Sie die folgenden Sicherheitshinweise um sich oder andere nicht den
Mikrowellen auszusetzen:
► Niemals das Gerät mit geöffneter Tür betreibe n. Dur ch ei ne n fehl er h aften oder
manipulierten Sicherheitsschalter besteht die Gefahr sich direkt den Mikrowellen
auszusetzen.
► Platzieren Sie keine Gegenstände zwischen Ofenfront und Ofentür und vermeiden Sie
die Ablagerung von Schmutz oder Reinigungsmittelrückständen an den Dichtflächen
des Gerätes.
► Benutzen Sie das Gerät nicht, wenn:
- die Gerätetür verbogen ist - die Türscharniere lose sind
caso HCMG 25 17
Page 18
- sichtbare Löcher oder R is se am Gehäuse, an der Tür oder an den G arr aumwänden
vorhanden sind.
► Wenn die Tür oder die Türdichtung beschädigt sind, darf das Gerät nicht betrieben
werden, bis es von autorisiertem Fachpersonal repariert wurde.
► Entfernen Sie keine Abdeckungen am Gerät.
► Wegen der damit verbundenen Gefahren dürfen Reparaturen und Servicearbeiten, bei
denen die Strahlenschutzabdeckung entfernt wird, nur von einer Fachkraft ausgeführt
werden.
2.3.2 Verbrennungsgefahr
Das in diesem Gerät erhitzte Kochgut sowie das verwendete Kochgeschirr sowie die
Oberfläche des Gerätes können sehr heiß werden.
Beachten Sie die folgende n Sich er hei ts hinweise um sich oder andere nicht zu verbrennen
oder zu verbrühen:
► Beim Grillen mit und ohne Mikrowellenbetrieb werden der Garraum, der Grillheizkörper
und die Gerätetür heiß! Das Kabel ist daher von den Oberflächen fernzuhalten, und die
Lüftungsschlitze im Gerät dürfen nicht abgedeckt werden.
► Zugängliche Teile können bei Betrieb des Gerätes heiß werden; Kinder sind daher fern
zu halten.
► Beim Betrieb erhitzt sich das Gerät; die Heizelemente im Innern des Gerätes dürfen
daher nicht berührt werden.
► Das Gerät und zugängliche Teile erhitzen sich stark beim Betrieb. Die Heizelemente
sollen daher nicht berührt werden, und Kinder unter 8 Jahren sollten fern gehalten oder
ständig beaufsichtigt werden.
► Ziehen Sie Topfhandschuhe an beim Einschieben oder Herausnehmen von Bräunungs-
und Überbackungsgut sowie beim Hantieren im Garraum, wenn der Grill eingeschaltet
ist bzw. kurz vorher eingeschaltet war.
► Verwenden Sie den Ofen nicht zum Frittieren. Heißes Öl kann Ofenteile und
Kochgeschirr beschädigen und Verbrennungen verursachen.
► Beachten Sie, dass im Gerät im Mikrowellenbetrieb hauptsächlich die Speisen und
Flüssigkeiten in einem Behältnis erhitzt werden und nicht das Behältnis selbst.
Obwohl der Deckel eines Behältnisses nicht heiß ist, wenn Sie es aus dem Gerät
nehmen, entsteht beim Abnehmen des Deckels die gleiche Menge an Dampf und
Spritzern wie beim konventionellen Garvorgang.
► Prüfen Sie immer die Temperatur des Garguts, besonders, wenn Sie Lebensmittel
oder Flüssigkeiten für Babys erhitzen. Es ist empfehlenswert niemals Lebensmittel
oder Flüssigkeiten zu sich zu nehmen, die direkt aus dem Gerät kommen. Warten Sie
einige Minuten ab und rühren Sie die Lebensmittel oder die Flüssigkeit um, bis sich die
Hitze gleichmäßig verteilt hat.
caso HCMG 25 18
Page 19
► Bei bestimmten Lebensmitteln besteht Verbrennungsgefahr durch Siedeverzug. Warten
Sie bei Lebensmitteln die aus einer Mischung von Fett und Wasser bestehen, z. B.
Brühe, etwa 30 bis 60 Sekunden ab, bevor Sie die Lebensmittel aus dem Gerät
nehmen. Die Mischung kann sich so absetzen. Sie verhindern ein plötzliches Sieden,
wenn ein Löffel in das Lebensmittel oder die Flüssigkeit gestellt wird oder ein
Brühwürfel hinzug efügt wird.
Um Siedeverzug zu verhindern können Sie auch einen Löffel aus Metall vor dem Garen
in das Gefäß stellen. Achten Sie dabei darauf, dass der Löffel an keiner Stelle die
Wände des Gerätes oder den Grill berührt, da dies zu Schäden am Gerät führen kann.
2.3.3 Brandgefahr
Bei nicht sachgemäßer Verwendung des Gerätes besteht Brandgefahr durch
Entzündung des Inhaltes.
Beachten Sie die folgenden Sicherheitshinweise um Brandgefahr zu vermeiden:
► Beachten Sie, dass die Zeiten beim Garen, Erhitz en, Auft au en mit de m Gerät oft
erheblich kürzer sind als auf der Kochstelle oder im Backofen.
Zu lange Einschaltzeiten führen zum Austrocknen und eventuell zur Selbstentzündung
des Lebensmittels. Es bes te ht Br andg e fahr !
Brandgefahr besteht auch bei zu langem Trocknen von Brot, Brötchen, Blumen,
Kräutern.
► Überhitzen Sie Lebensmi ttel ni cht .
► Mit Körnern, Kirschkernen oder Gel gefüllte Kissen und ähnliche Dinge nicht im Gerät
erwärmen.
Diese Dinge können sich entzünden, auch wenn sie nach der Erwärmung aus dem
Gerät genommen werden.
► Erhitzen Sie keinen Alkohol im unverdünnten Zustand.
► Lassen Sie das Gerät nicht unbeaufsichtigt, wenn Sie Lebensmittel in Einwegbehältern
aus Kunststoff, Papier oder anderen brennbaren Werkstoffen erhitzen oder garen.
Einweg-Behälter aus K unsts t off müssen die unter "Hinweise zum
Mikrowellenkochgeschirr" aufgeführten Eigenschaften aufw ei s en .
► Schalten Sie das Gerät aus bzw. ziehen Sie den Stromstecker ab und halten Sie die
Tür geschlossen, wenn Sie Rauch feststellen, um die Flammen zu ersticken.
► Verwenden Sie das Gerät niemals zum Aufbewahren oder Trocknen von
entflammbaren Materialien.
caso HCMG 25 19
Page 20
2.3.4 Explosionsgefahr
Bei nicht sachgemäßer Verwendung des Gerätes besteht Explosionsgefahr durch
entstehenden Überdruck.
Beachten Sie die folgenden Sicherheitshinweise um die Explosionsgefahr zu vermeiden:
► Flüssigkeiten und andere Lebensmittel dürfen nicht verschlossenen Gefäßen erhitzt
werden, da die Gefäße explodieren können.
► Lassen Sie beim Erhitzen von Lebensmitteln in Plastikbehältern das Gerät wegen der
Entzündungsgefahr nicht unbeaufsichtigt.
► Entfernen Sie bei Babyflaschen Verschlusskappen und Saugern.
► Verwenden Sie zum Garen kein Geschirr mit hohlen Griffelementen und
Deckelknöpfen, in deren Hohlräume Feuchtigkeit gelangen kann, wenn diese
Hohlräume nicht ausreichend entlüftet sind.
► Eier in der Schale und ganze hart gekochte Eier nicht im Gerät erhitzen, da sie auch
nach dem Ende der Mikrowellenbehandlung noch explodieren können.
► Entfernen Sie verdrillte Drahtverschlüsse von Papier- oder Kunststoffbeuteln damit sich
kein Überdruck aufbauen kann.
2.3.5 Gefahr durch elektrischen Strom
Lebensgefahr durch elektrischen Strom!
Beim Kontakt mit unter Spannung stehenden Leitungen oder Bauteilen besteht
Lebensgefahr!
Beachten Sie die folgenden Sicherheitshinweise um eine Gefährdung durch elektrischen
Strom zu vermeiden:
► Bei Beschädigung der Anschlussleitung muss eine spezielle Anschlussleitung durch
eine vom Hersteller autorisierte Fachkraft installiert werden.
► Betreiben Sie dieses Gerät nicht, wenn sein Stromkabel oder -stecker beschädigt ist,
wenn es nicht ordnungsgemäß arbeitet oder wenn es beschädigt oder fallengelassen
wurde. Wenn das Stromkabel beschädigt ist, muss es vom Hersteller oder seiner
Serviceagentur oder einer ähnlich qualifizierten Person ersetzt werden, um Gefahren zu
vermeiden.
► Öffnen Sie auf keinen Fall das Gehäuse des Gerätes. Werden spannung sführ ende
Anschlüsse berührt und der elektrische und mechanische Aufbau verändert, besteht
Stromschlaggefahr. Darüber hinaus können Funktionsstörungen am Gerät auftreten.
3 Inbetriebnahme
In diesem Kapitel erhalten Sie wichtige Hinweise zur Inbetriebnahme des Gerätes.
Beachten Sie die Hinweise um Gefahren und Beschädigungen zu vermeiden.
caso HCMG 25 20
Page 21
3.1 Sicherheitshinweise
Bei der Inbetriebnahme des Gerätes können Personen- und Sachschäden auftreten!
Beachten Sie die folgende n Sicherheitshinweise um die Gefahren zu vermeiden:
► Verpackungsmaterialien dürfen nicht zum Spielen verwendet werden. Es besteht
Erstickungsgefahr.
► Auf Grund des hohen Gew i cht es des Ger ät e s den Transport sowie das A us packen und
Aufstellen mit zwei Personen durchführen.
3.2 Lieferumfang und Transportinspektion
Die Mikrowelle HCMG 25 wird standardmäßig mit folgenden Komponenten geliefert:
• Mikrowelle HCMG 25 • Rollring
• Glasdrehteller • Grillrost • Bedienungsanleitung
► Prüfen Sie die Lieferung auf Vollständigkeit und auf sichtbare Schäden.
► Melden Sie eine unvollständige Lieferung oder Schäden infolge mangelhafter
Verpackung oder durch Transport sofort dem Spediteur, der Versicherung und dem
Lieferanten.
3.3 Auspacken
Zum Auspacken des Gerätes gehen Sie wie folgt vor:
• Entfernen Sie alle Verpackungsteile und das Zubehör.
• Überprüfen Sie das Gerät auf mögliche Beschädigungen (Beulen, beschädigte Tür
usw.). Beschädigte Geräte dürfen nicht in Betrieb genommen werden.
• Gehäuse: Entfernen Sie den Schutzfilm auf der Außenfläche des Mikrowellengehäuses.
• Die hellbraune/silberne Abdeckung im Innenraum schützt das Magnetron und darf nicht
entfernt werden.
3.4 E nt s orgung der Verpackung
Die Verpackung schützt das Gerät vor Transportschäden. Die Verpackungsmaterialien
sind nach umweltverträglichen und entsorgungstechnischen Gesichtspunkten ausgewählt
und deshalb recycelbar .
Die Rückführung der Verpackung in den Materialkreislauf spart Rohstoffe und verringert
das Abfallaufkommen . Ent sor g en Si e nic ht mehr benöt igte Verpackungs mat er i ali en an den
Sammelstellen für das Verwertungssystem »Grüner Punkt«.
► Heben Sie wenn möglich die Originalverpackung während der Garantiezeit des Gerätes
auf, um das Gerät im Garantiefall wieder ordnungsgemäß verpacken zu können.
caso HCMG 25 21
Page 22
3.5 Aufstellung
3.5.1 Anforderungen an den Aufstellort
Für einen sicheren und fehlerfreien Betrieb des Gerätes muss der Aufstellort folgende
Voraussetzungen erfüllen:
• Das Gerät muss auf einer festen, flachen, waagerechten und hitzebeständigen
Unterlage mit einer au sr ei chenden Tragkraft für den Ofen und das erwartungsgemäß
schwerste im Ofen zubereitete Kochgut aufgestellt werden.
• Wählen Sie den Aufstellort so, dass Kinder nicht an heiße Oberflächen des Gerätes
gelangen können.
• Das Gerät ist nicht für den Einbau in einer Wand oder einem Einbauschrank
vorgesehen.
• Stellen Sie das Gerät nicht in einer heißen, nassen oder sehr feuchten Umgebung oder
in der Nähe von brennbarem Material auf.
• Lassen Sie das Kabel nicht über ei ne Tis ch- oder Arbeitsflächenkante herunter hängen.
• Die Steckdose muss leicht zugänglich sein, so dass das Stromkabel notfalls leicht
abgezogen werden kann.
• Der Einbau und die Montage dieses Gerätes an nichtstationären Aufstellungsorten (z.
B. Schiffen) dürfen nur von Fachbetrieben/Fachleuten durchgeführt werden, wenn sie
die Voraussetzungen für den sicherheitsgerechten Gebrauch dieses Gerätes
sicherstellen.
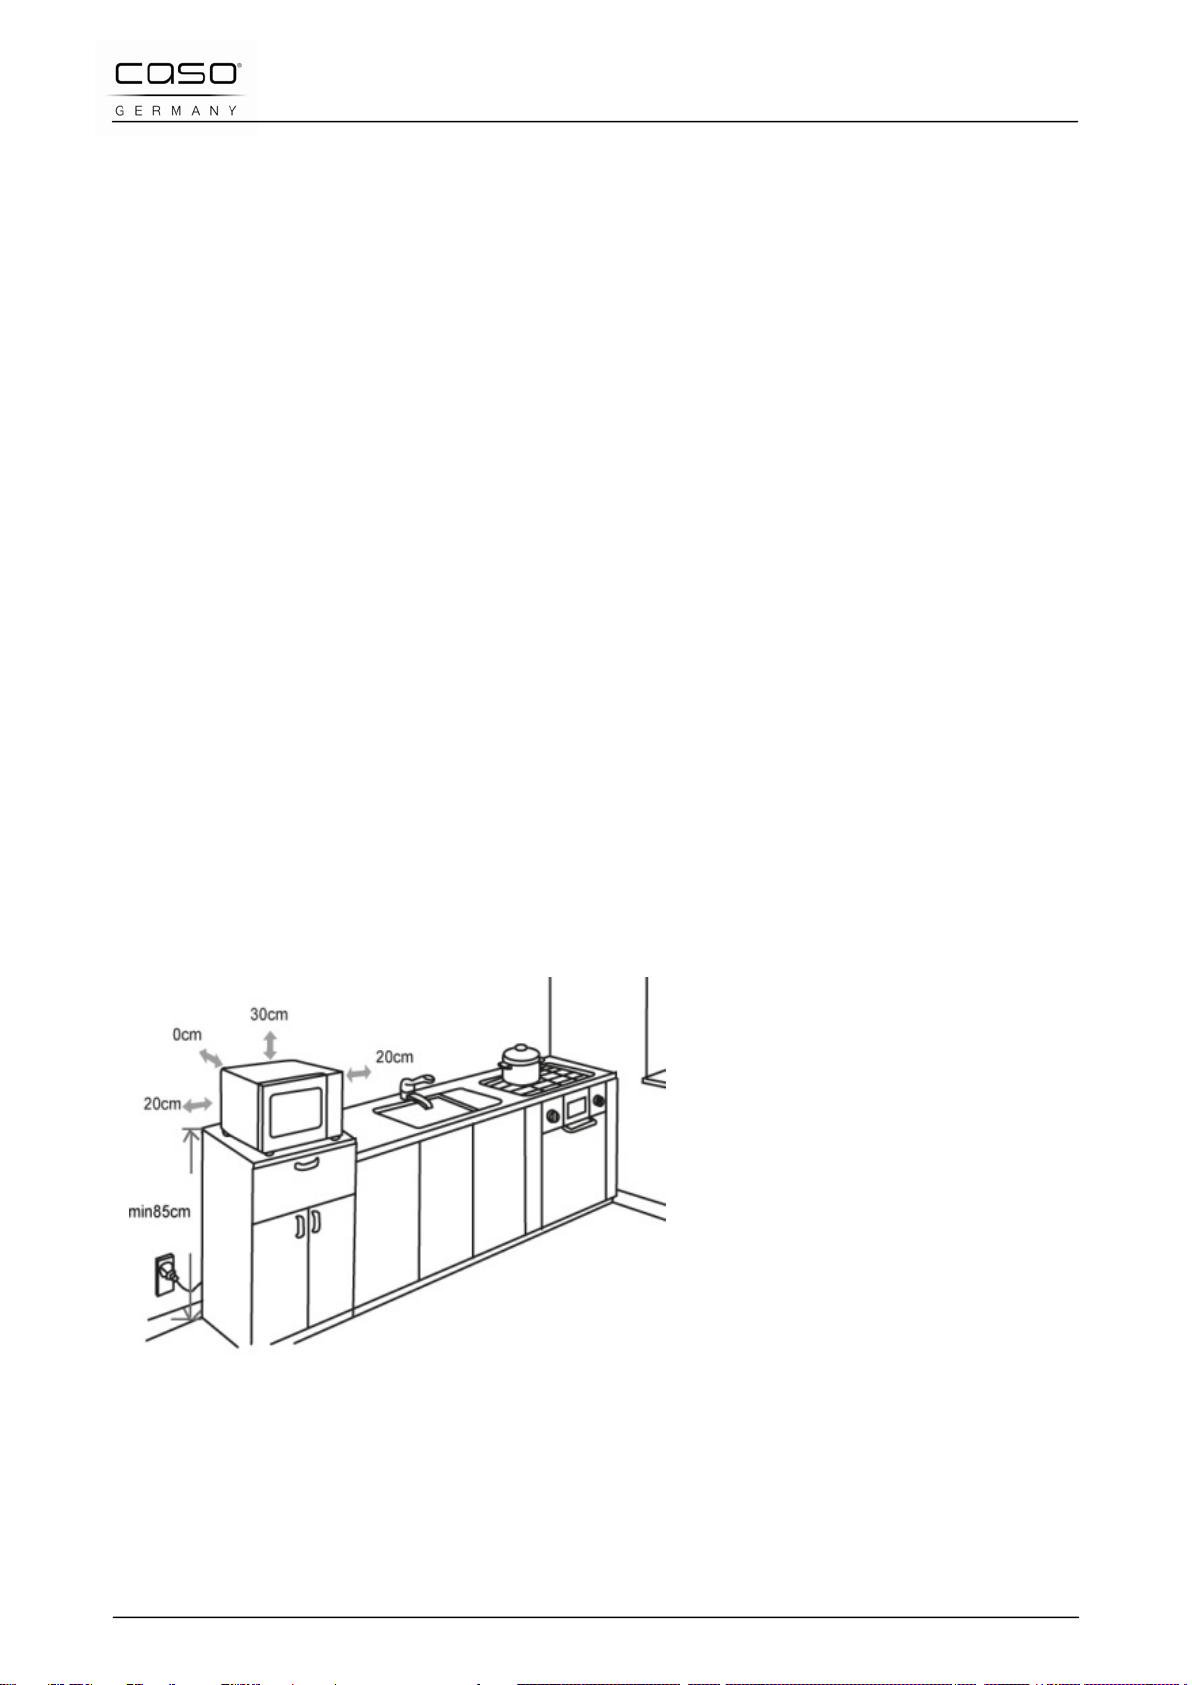
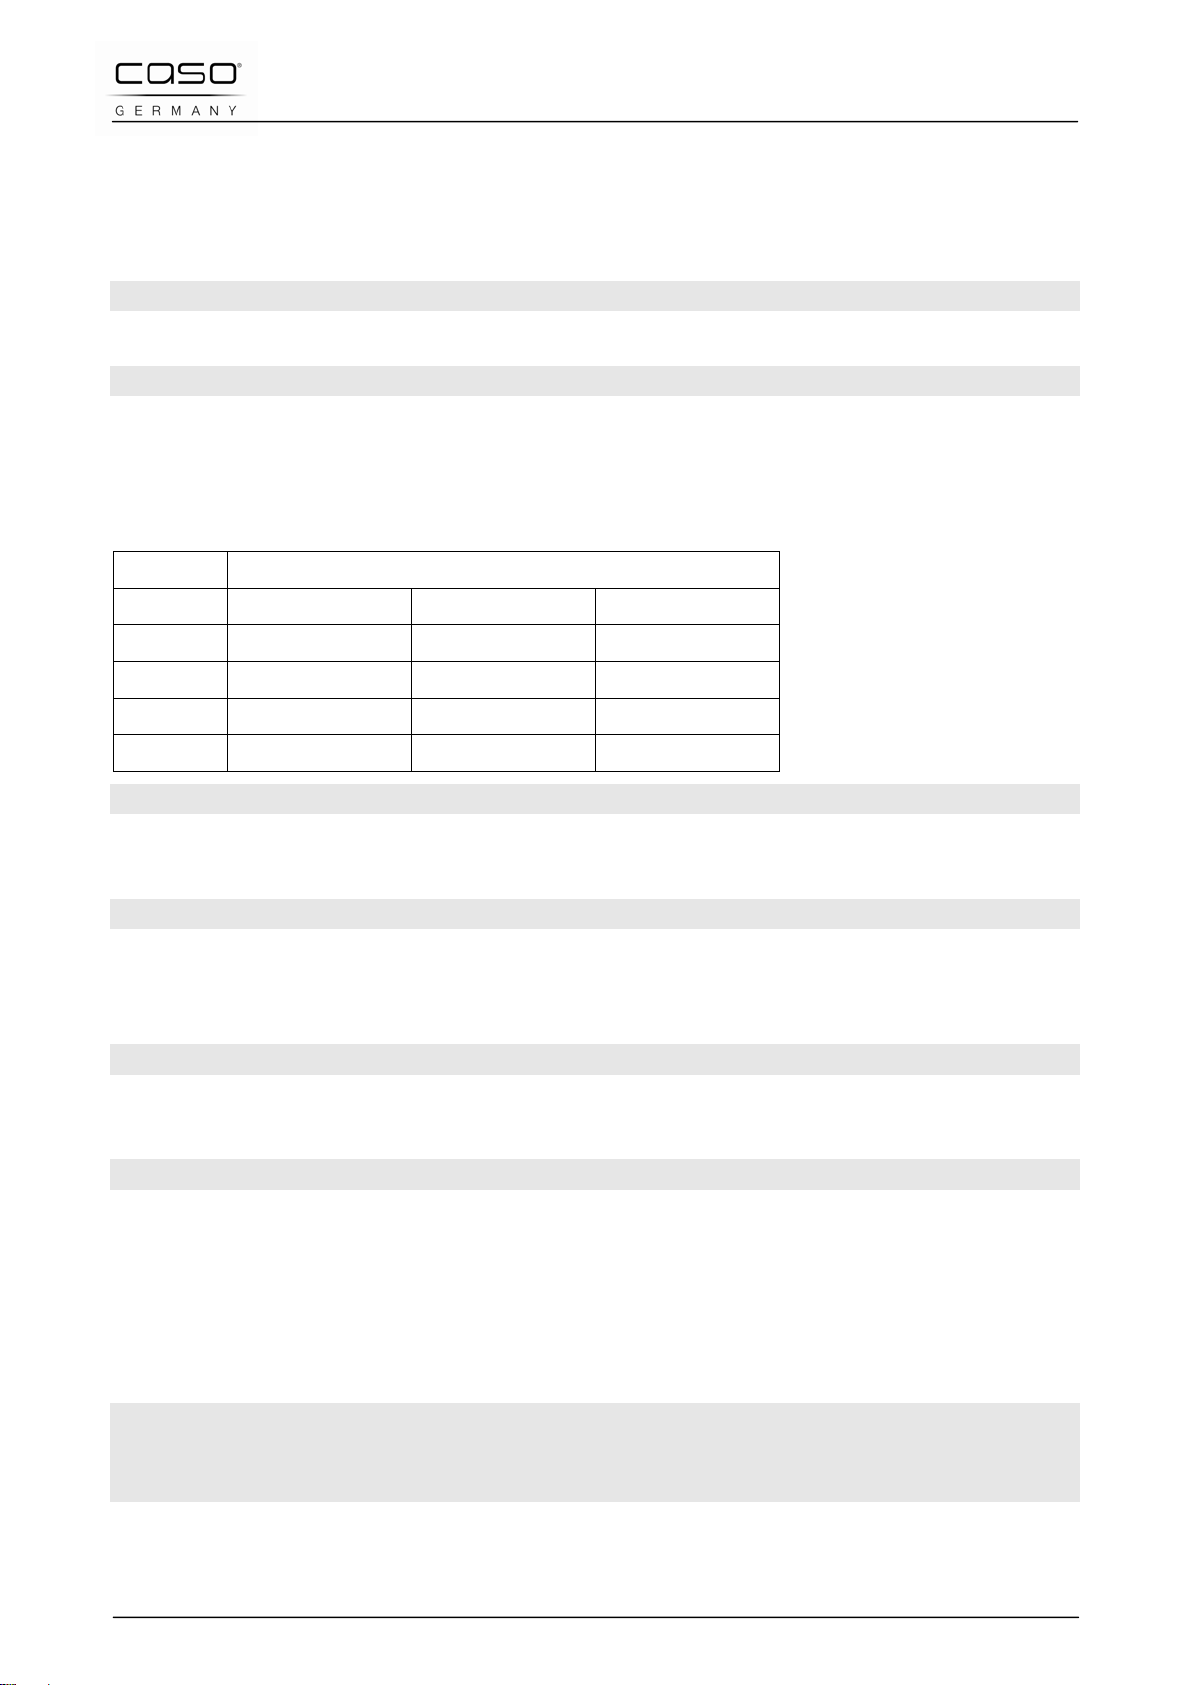
3.5.2 Aufstellung des Gerätes
1) Wählen Sie eine ebene Aufstellfläche mit genug Platz für die Lüftungsschlitze aus.
a) Die Aufstellfläche muss
mindestens 85 cm über dem
Fussboden sein.
b) Die Rückseite des Gerätes
muss zu einer Wand gerichtet
sein. Über dem Gerät ist ein
freier Abstand von 30 cm
erforderlich, der seitl iche
Abstand zu anderen Wänden
oder Einrichtungen muss
mindestens 20 cm betragen.
c) Nehmen Sie die Füße von der
Unterseite des Geräte s NICHT
ab.
d) Decken Sie keine Öffnungen am Gerät ab und blockieren Sie sie nicht.
e) Die Abdeckung der Lüftungsschlitze kann zur Schäden am Gerät führen.
f) Platzieren Sie das Mikrowellengerät so weit wie möglich von Radios oder
Fernsehern weg, da durch den Betrieb der Radio- und Fernsehempfang gestört
werden kann.
caso HCMG 25 22
Page 23
2) Stecken Sie den Stecker des Gerätes in eine normale Haushaltssteckdose ein.
Achten Sie darauf, dass die Spannung und Netzfrequenz des Gerätes (siehe
Typenschild) denen der häuslichen Stromversorgung entsprechen.
3.5.3 Vermeidung von Funkstörungen
Durch das Gerät können Störungen bei Radios, Fernsehern oder ähnlichen Geräten
auftreten.
Durch folgende Maßnahmen können Störungen beseitigt oder reduziert werden:
• Reinigen Sie die Tür und die Dichtungsoberflächen des Gerätes.
• Stellen Sie das Radio, den Fernseher etc. soweit wie möglich vom Ger ät ent f ernt au f.
• Schließen Sie das Gerät an einer anderen Steckdose an, so dass für das Gerät und
den gestörten Empfänger unterschiedliche Stromkreise verwendet werden.
• Verwenden Sie eine ordnungsgemäß installierte Antenne für den Empfänger, um einen
guten Empfang sicherzustellen.
3.6 Montage des Zubehörs
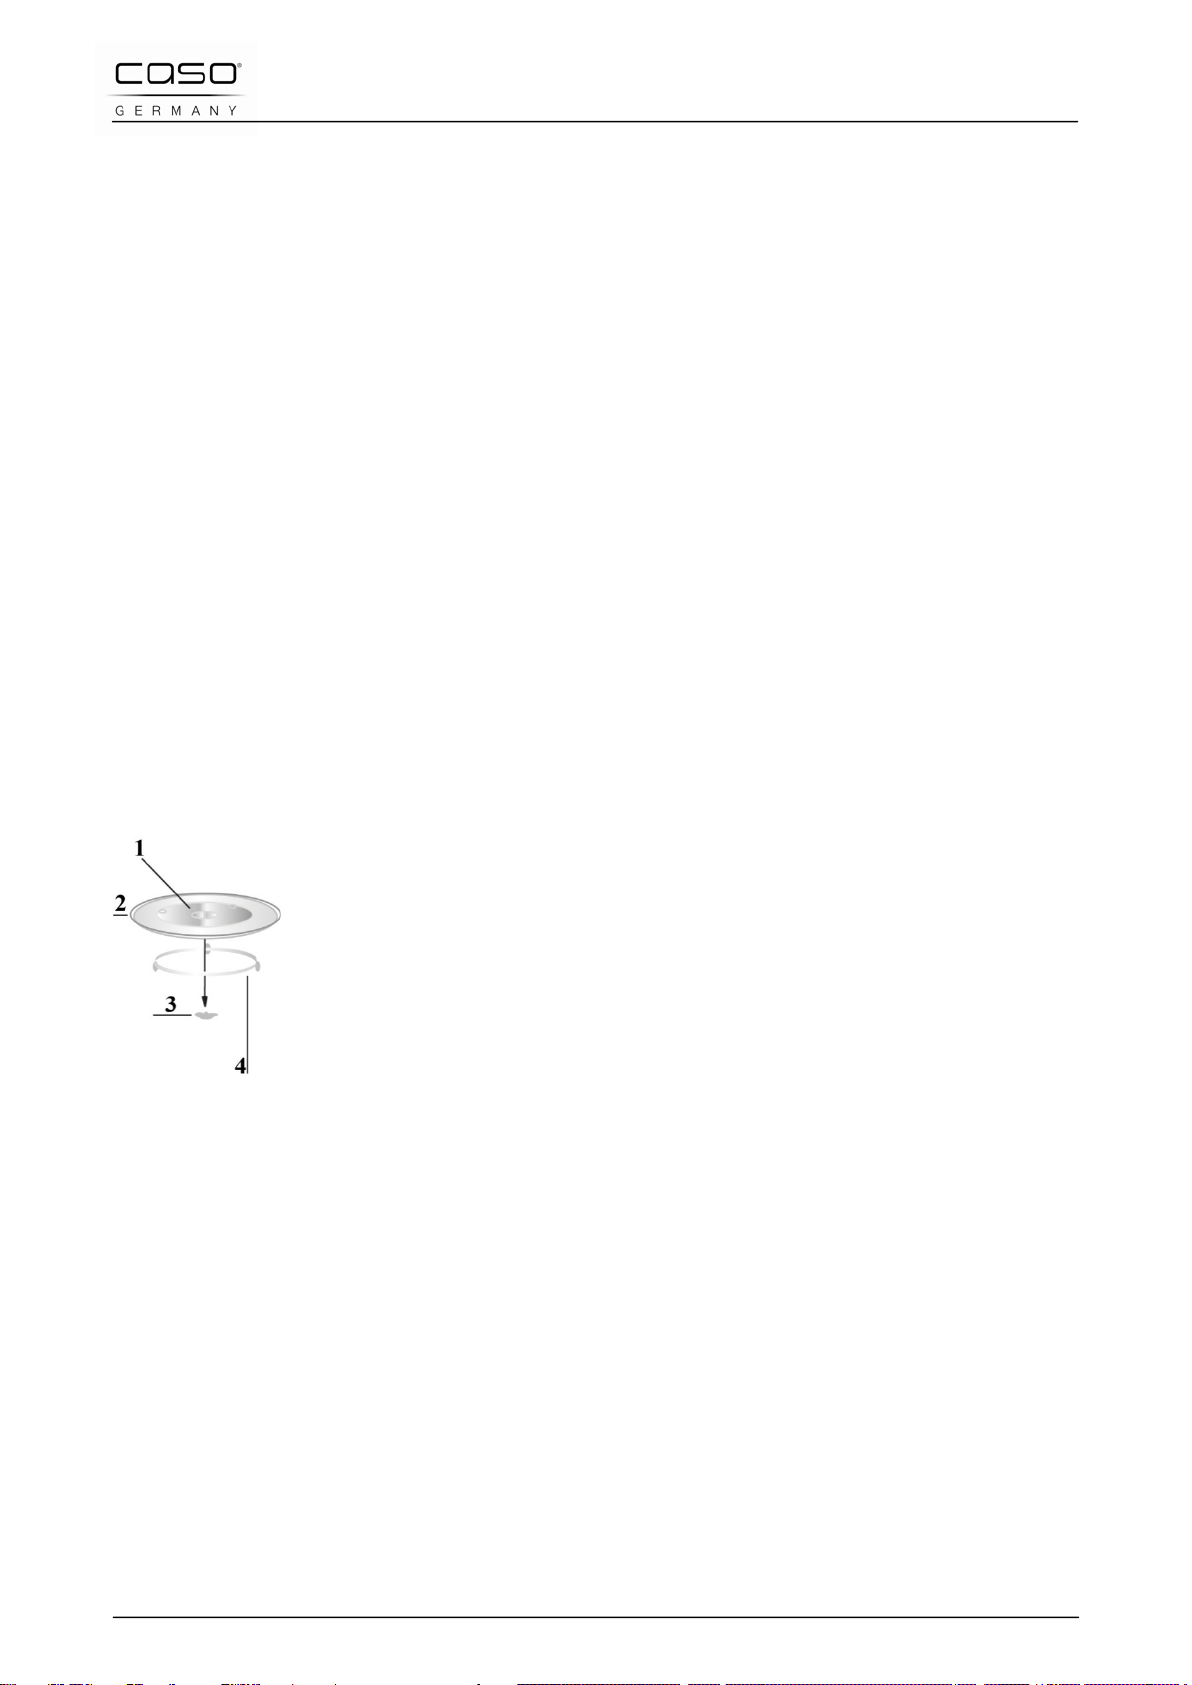
3.6.1 Glasdrehteller
• 1 Nabe (Unterseite)
• 2 Glas-Drehteller
• 3 Drehkreuz
• 4 Rollring
Den Glasdrehteller wie folgt montieren:
• Den Rollring einsetzen
• Den Glasdrehteller so einsetzen, dass die Nuten an der Unter sei te d es Glasdr e htel l er s
in das Drehkreuz einrasten.
• Den Drehteller nie falsch herum einsetzen. Er muss sich frei drehen können.
• Beim Kochen müssen immer der Drehteller und der dazugehörige Rollring benutzt
werden.
• Alle Speisen und Behältnisse werden zum Erhitzen immer auf den Drehteller oder den
Grillrost platziert.
• Wenn der Gl as-Drehteller oder der dazugehörige Rollring reißen oder zerbrechen,
wenden Sie sich umgehend an Ihr zuständiges Service Center.
caso HCMG 25 23
Page 24
3.6.2 Grillrost
• Den Grillrost auf den Glasdrehteller stellen.
► Den Grillrost nur im Grill-, Heißluft- und Kombinationsbetrieb C3 einset z en.
3.7 El ektrischer Anschluss
► G efahr durch Stromschläge
► Das Berühren interner Bauteile kann gravierende Verletzungen verursachen oder zum
Tod führen.
► Das Gerät darf nicht auseinander genommen w er den.
► Durch eine unsachgemäße Erdung kann es zu Stromschlägen kommen. Benutzen Sie
keine Steckdose, die nicht sachgemäß installiert und geerdet ist.
Für einen sicheren und fehlerfreien Betrieb des Gerätes sind beim elektrischen Anschluss
folgende Hinweise zu beachten:
• Vergleichen Sie vor dem Anschließen des Gerätes die Anschlussdaten (Spannung und
Frequenz) auf dem Typenschild mit denen Ihres Elektronetzes. Diese Daten müssen
übereinstimmen, damit keine Schäden am Gerät auftreten.
Im Zweifelsfall fragen Sie Ihre Elektro-Fachkraft.
• Die Steckdose muss über einen 16A -Sicherungsschutzschalter abgesichert sein.
• Der Anschluss des Gerätes an das Elektronetz darf maximal über ein 3 Meter langes,
abgewickeltes Verlängerungskabel mit einem Querschnitt von 1,5 mm² erfolgen. Die
Verwendung von Mehrfachsteckern oder Steckdosenleisten ist weg en der da mi t
verbundenen Brandge fahr v erbot en .
• Vergewissern Sie sich, dass das Stromkabel unbeschädigt ist und nicht unter dem Ofen
oder über heiße oder scharfkantige Flächen verlegt wird.
• Dieses Gerät muss geerdet sein. Bei einem Kurzschluss bietet die Erdung Schutz vor
Stromschlägen, da der elektrische Strom über eine Zusatzleitung abgeführt wird. Das
Gerät ist mit einem entsprechenden Kabel mit Erdungsleiter und einem
Schutzkontaktstecker ausgestattet. Der Stecker muss in eine sachgemäß installierte
und geerdete Steckdose eingesteckt werden.
• Die elektrische Sicherheit des Gerätes ist nur dann gewährleistet, wenn es an ein
vorschriftsmäßig installiertes Sc h utzleitersystem angesc hl ossen wird. Der Betrieb an
einer Steckdose ohne Schutzleiter ist verboten. Lassen Sie im Zweifelsfall die
Hausinstallation dur ch ei ne El ek tr o-F achk r a ft über pr ü f en.
Der Hersteller kann nicht verantwortlich gemacht werden für Schäden, die durch einen
fehlenden oder unterbrochenen Schutzleiter verursacht werden.
caso HCMG 25 24
Page 25
3.7.1 Verlängerungskabel
• Das Anschlusskabel ist kurz gehalten, damit es sich nicht verwirrt oder eine Stolperfalle
darstellt.
• Falls ein längeres Kabel oder ein Verlängerungskabel benutzt wird:
• 1) Die Belastbarkeit des Kabels oder des Verlängerungskabels muss mindestens der
elektrischen Geräteleistung entsprechen.
• 2) Beim Verlängerungskabel muss es sich um ein geerdetes dreiadri g es Kabel ha ndel n .
• 3) Das lange Kabel muss so verlegt sein, dass es nicht von Tisch- oder
Arbeitsflächenkanten herunter hängt, wo es von Kindern herunter gezogen werden
kann, und so, dass es keine Stolperfalle darstellt.
4 Aufbau und Funktion
In diesem Kapitel erhalten Sie wichtige Hinweise zum Aufbau und Funktion des Gerätes.
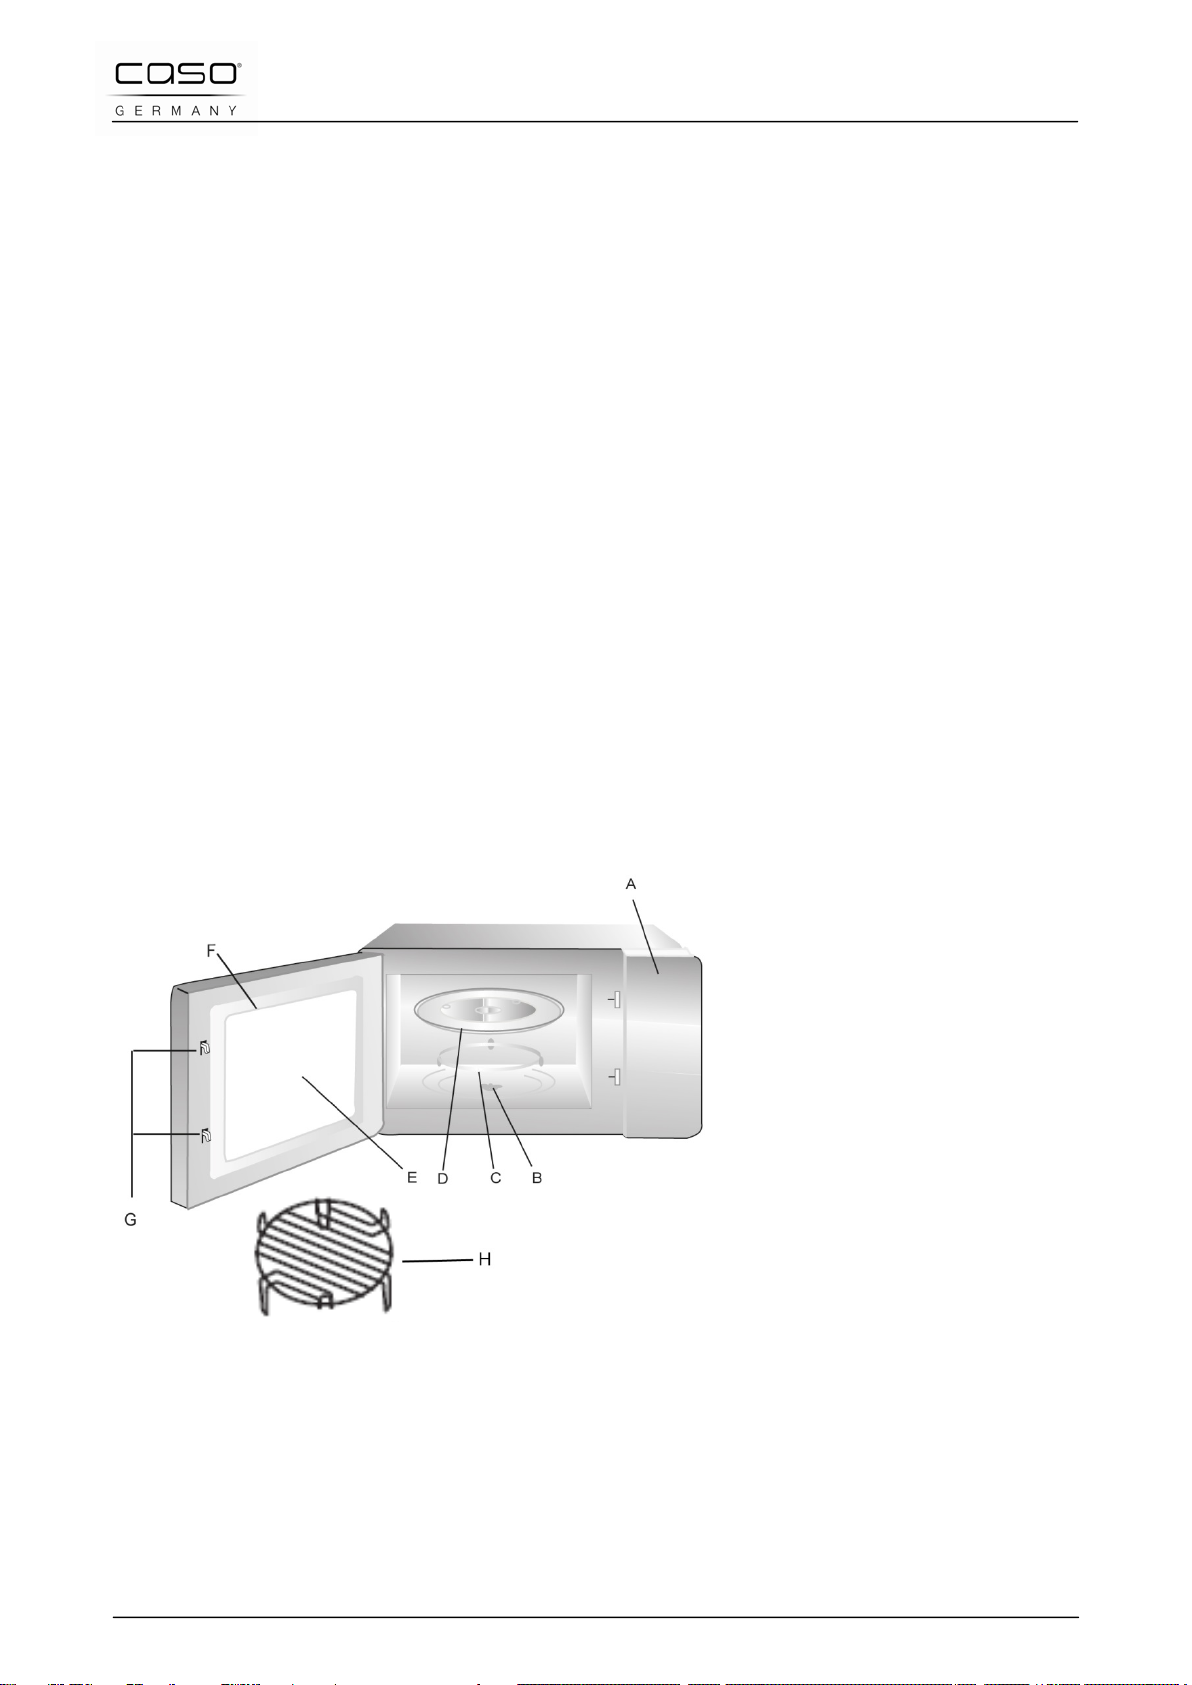
4.1 Gesamtübersicht
A) Bedienfeld
Garzeit, Leistung,
Funktionsanzeig e und ak tuel le
Zeit werden angezeigt.
B) Drehkreuz
C) Rollring
D) Glas-Drehteller
E) Sichtfenster
F) Tür
G) Sicherheitsverriegelung
H) Grillrost
caso HCMG 25 25
Page 26
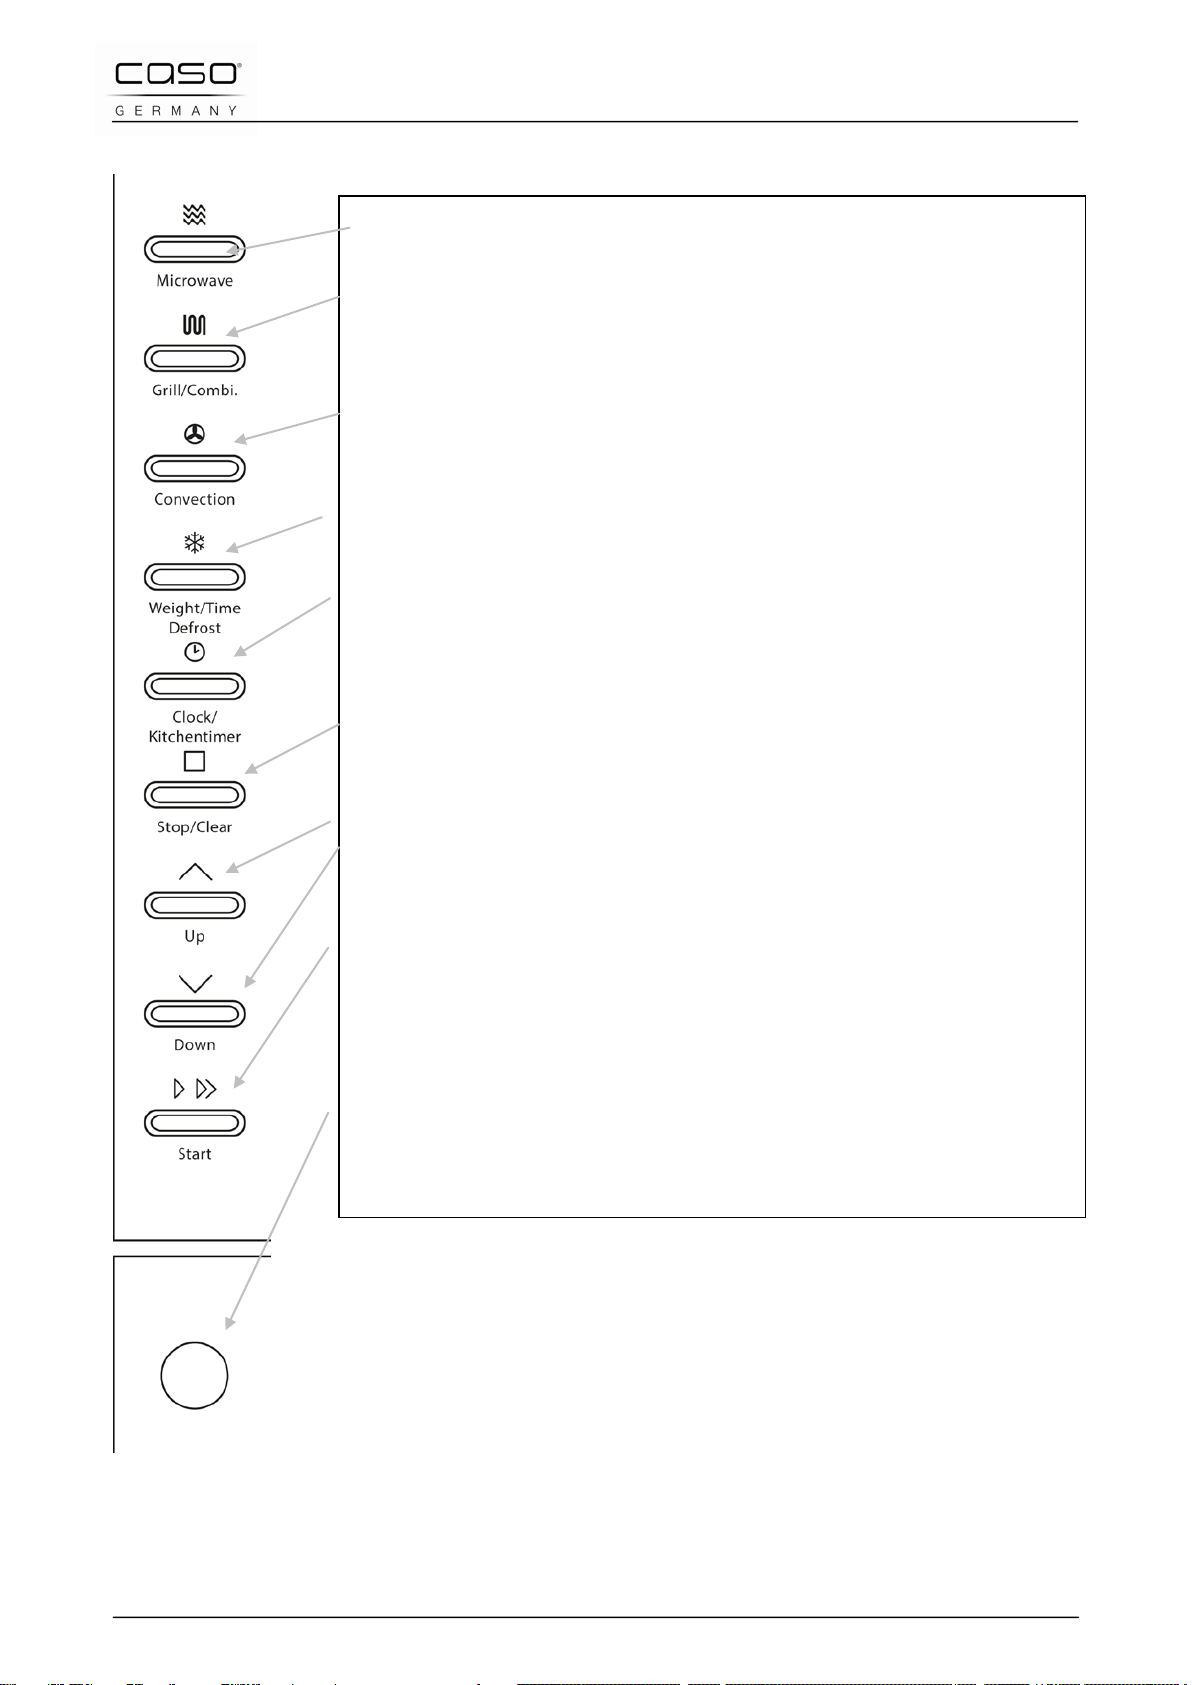
4.2 Bedienelemente und Anzeige
MICROWAVE: Zum Einstellen des Mikrowellenprogramms.
GRILL/COMBI.: Zum Einstellen des Grillprogramms und der
Kombinationsprogramme.
CONVECTION: Zum Programmieren der Heißluftt e mp er atur und
Vorheizfunktion.
WEIGHT/TIME DEFROST: Zum Einstellen des Auftauprogramms.
CLOCK/KITCHENTIMER: Zum Einstellen der Uhrzeit und des
Timers.
STOP/CLEAR: Zum vorübergehenden Stoppen des
Garprogramms oder zum Löschen aller vorherigen Einstellungen.
UP, DOWN: Zur Auswahl der Kochzeit, Leistungsstufen und zur
Anwahl der Kombinations- und Kochprogramme.
START: Zum Bestätigen und Start en des Garprogramms oder zum
Einstellen des Schnellstart-Garprogramms
DOOR: Zum Öffnen der Tür
caso HCMG 25 26
Page 27
4.3 Signaltöne
Das Gerät sendet zur akustischen Rückmeldung folgende Signaltöne aus:
• Ein Signalton: Das Gerät hat die Eingabe akzeptiert
• Zwei Signaltöne: Sie werden zum Wenden des Gargutes oder bei der Vorheizfunktion
zum Platzieren des Gargutes in den Ofen aufgefordert.
• Fünf Signaltöne: Das Ende der Garzeit ist erreicht.
• Kein Signalton: Das Gerät hat die Eingabe nicht akzeptiert. Die Eingabe prüfen und
erneut versuchen.
Sicherheitseinrichtungen
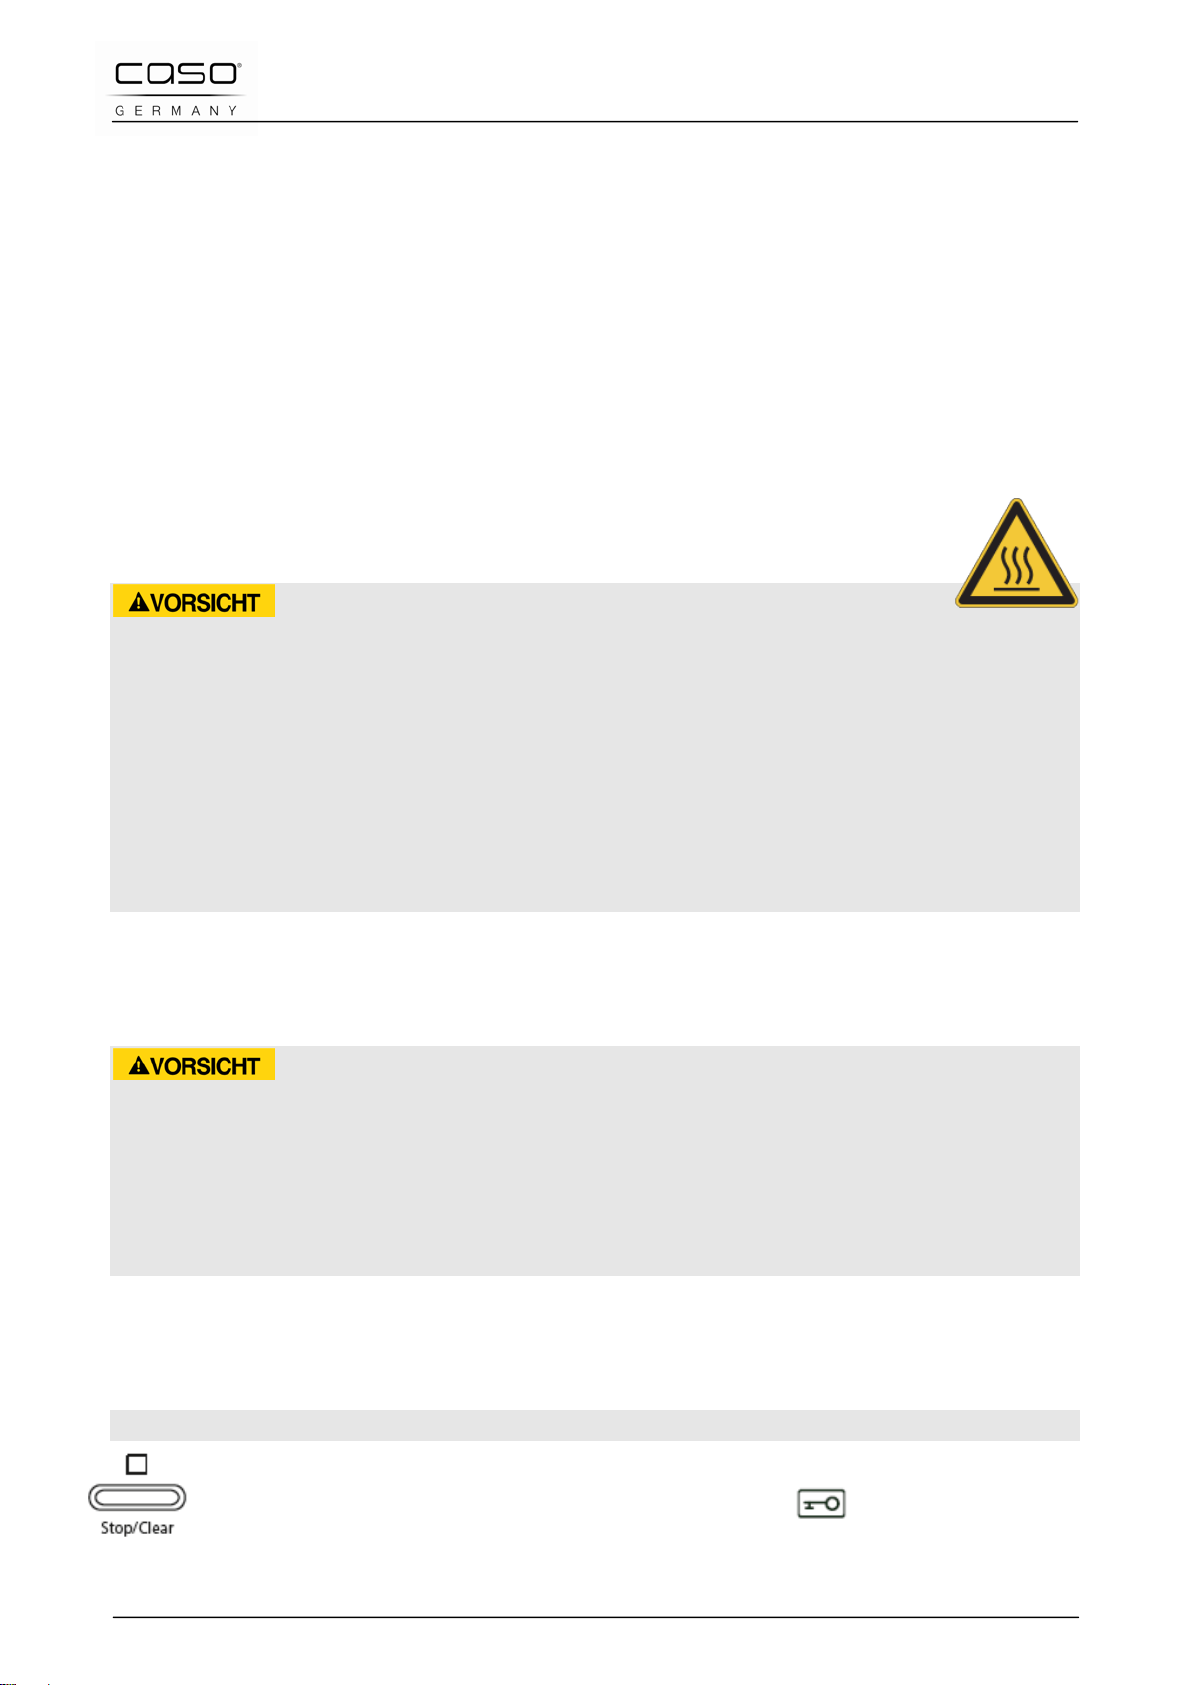
4.3.1 Warnhinweise am Gerät
Gefahr durch heiße Oberfläche!
An der hinteren oberen Gehäuseseite befindet sich ein Warnhinweis auf Gefahr durch
heiße Oberflächen. Das Gerät kann an der Oberfläche sehr heiß werden.
► Die heiße Oberfläche des Gerätes ni c ht ber ü hr en. Ver br en nu ngsgefahr!
► Stellen oder legen Sie keine Gegenstände auf das Gerät.
► Platzieren Sie das Mikrowellengerät nicht über ein Kochfeld oder ein anderes Gerät,
das Hitze erzeugt, da hierdurch das Mikrowellengerät beschädigt werden kann und die
Garantie verfällt.
4.3.2 Türverriegelung
In der Türverriegelung des Gerätes ist ein Sicherheitsschalter eingebaut, der den Betrieb
des Gerätes bei geöffneter Tür verhindert.
Gefahr durch Mikrowellen!
Ist diese Sicherheitseinrichtung defekt oder wird diese Sicherheitseinrichtung umgangen,
setzen Sie sich und andere direkt der Mikrowellenstrahlung aus.
► Das Gerät nicht betreiben, wenn der Sicherheitsschalter defekt ist.
► Diese Sicherheitseinrichtung nicht außer Kraft setzen.
4.3.3 Kindersicherung
Die Kindersicherung verhindert den unbeaufsichtigten Gebrauch des Gerätes durch
Kinder.
Aktivieren der Kindersicherung:
Drücken Sie die Taste STOP/CLEAR drei Sekunden lang, bis Sie einen
langen Signalton hören und die Funktionsanzeige aufleuchtet. Im
verriegelten Zustand sind alle Tasten deaktiviert.
caso HCMG 25 27
Page 28
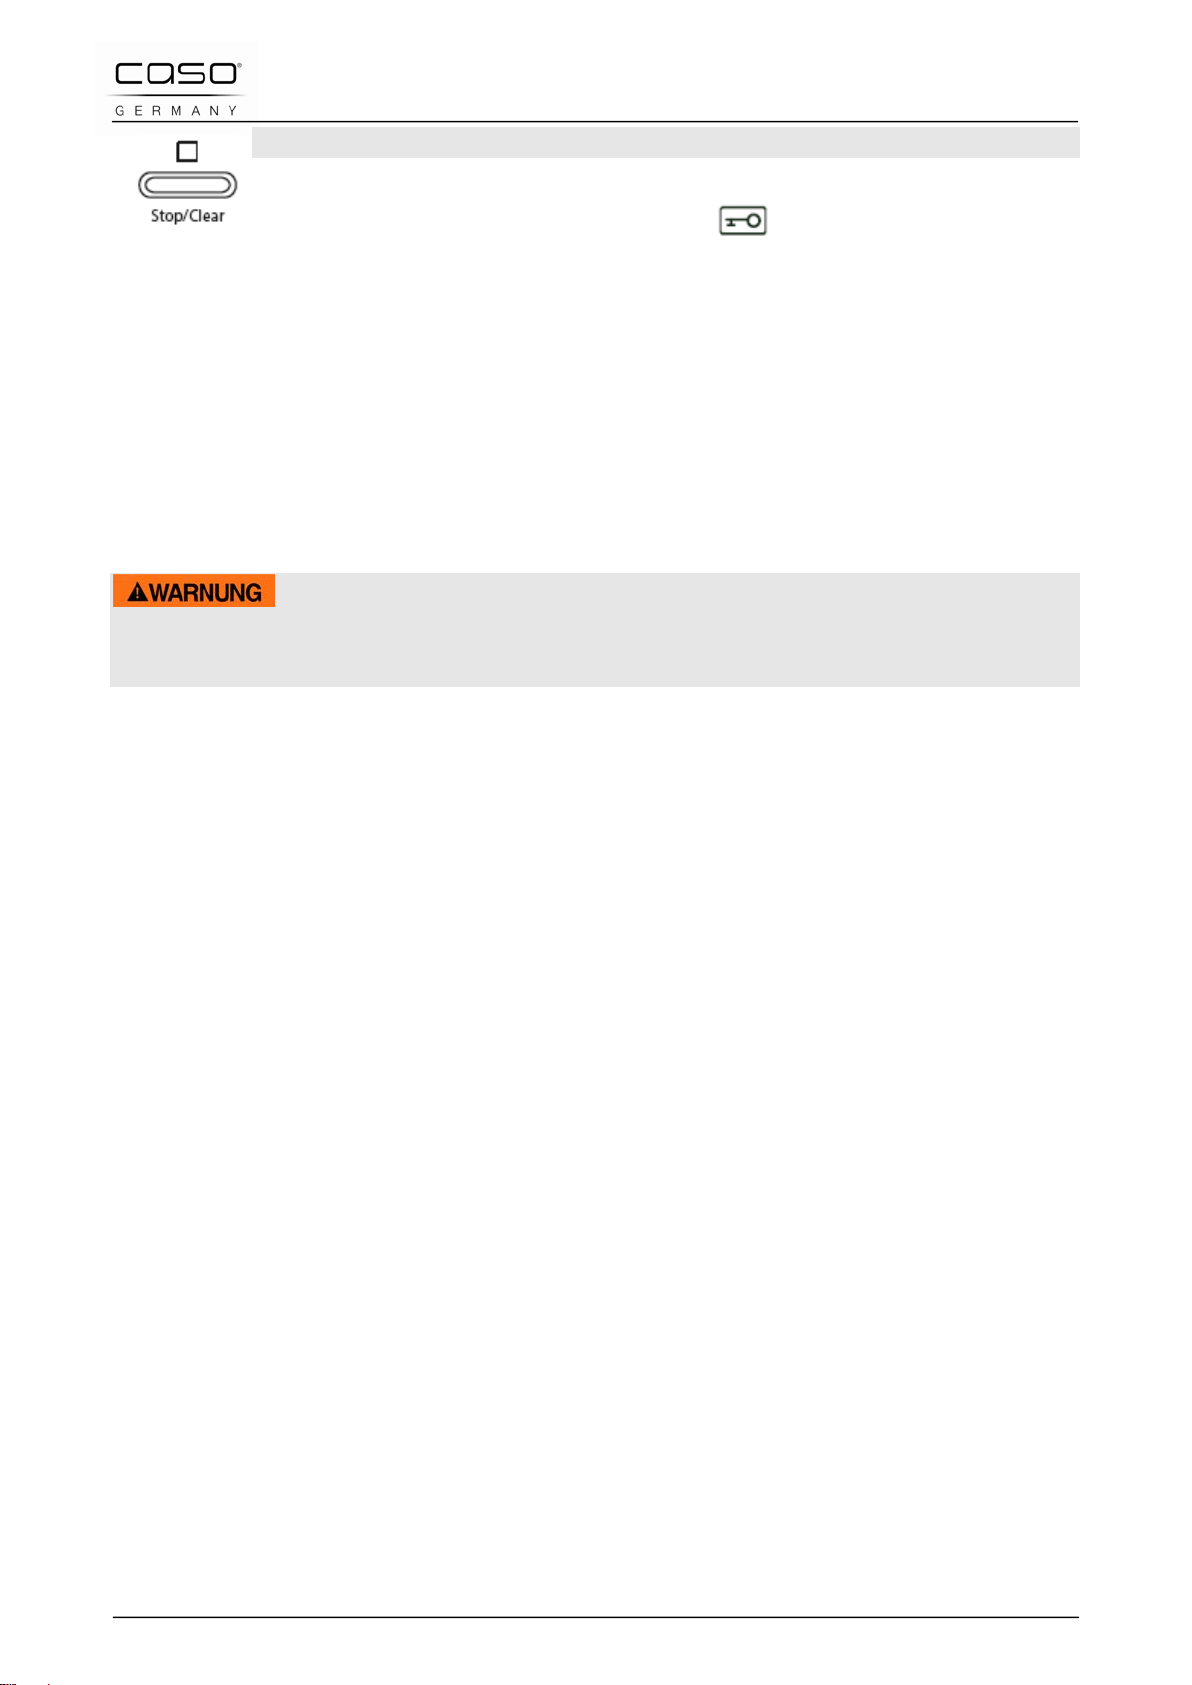
Deaktivieren der Kindersicherung:
Drücken Sie die Taste STOP/CLEAR drei Sekunden lang, bis Sie einen
Signalton hören und die Funktionsanzeige erlischt. Im entriegelten
Zustand sind alle Tasten wieder aktiviert.
4.4 Typenschild
Das Typenschild mit den Anschluss- u nd Leistungsdaten befin det sich an der Rückseite
des Gerätes.
5 Bedienung und Betrieb
In diesem Kapitel erhalten Sie wichtige Hinweise zur Bedienung des Gerätes. Beachten
Sie die Hinweise um Gefahren und Beschädigungen zu vermeiden.
► Das Gerät während des Betriebes nicht unbeaufsichtigt lassen, um bei Gefahren
schnell eingreifen zu können.
5.1 Grundlagen des Mikrowellengarens
• Die zur Garung/Erhitzung des Kochguts erforderliche Leistung und Zeit hängt unter
anderem von der Ausgangstemperatur, der Menge, und der Art und Beschaffenheit der
Speise ab. Verwenden Sie die kürzeste angegebene Garzeit und verlängern Sie den
Garvorgang nach Bedarf.
• Ordnen Sie das Kochgut sorgfältig an. Platzieren Sie die dicksten Bereiche am äußeren
Schüsselrand.
• Decken Sie das Kochgut während des Garens ab. Deckel beugen gegen Spritzer vor
und tragen zum gleichmäßigen Garen/Erhitzen bei.
• Während der Erhitzung sollten Sie das Kochgut mehrfach wenden, umschichten oder
umrühren, um eine gleichmäßige Temperaturverteilung zu erhalten.
• Eventuell vorhandene Keime in den Speisen werden nur bei einer ausreichend hohen
Temperatur (> 70 °C) und bei einer ausreichend langen Zeit (> 10 min) abgetötet.
• Lebensmittel mit fester Haut oder Schale, wie Tomate n, Würstchen, Pellkartoffeln,
Auberginen, mehrmals anstechen bzw. einkerben, damit entstehender Dampf
entweichen kann und die Lebensmittel nicht platzen.
• Eier ohne Schale dürfen Sie mit Mikrowellen nur dann garen, wenn die Haut des
Eidotters vorher mehrmals angestochen wird. Das Eidotter kann sonst nach dem
Garen mit Hochdruck herausspritzen.
• Schichten Sie Gerichte wie Fleischklöße nach der Hälfte der Garzeit von oben nach
unten und von der Mitte zum äußeren Rand hin um.
caso HCMG 25 28
Page 29
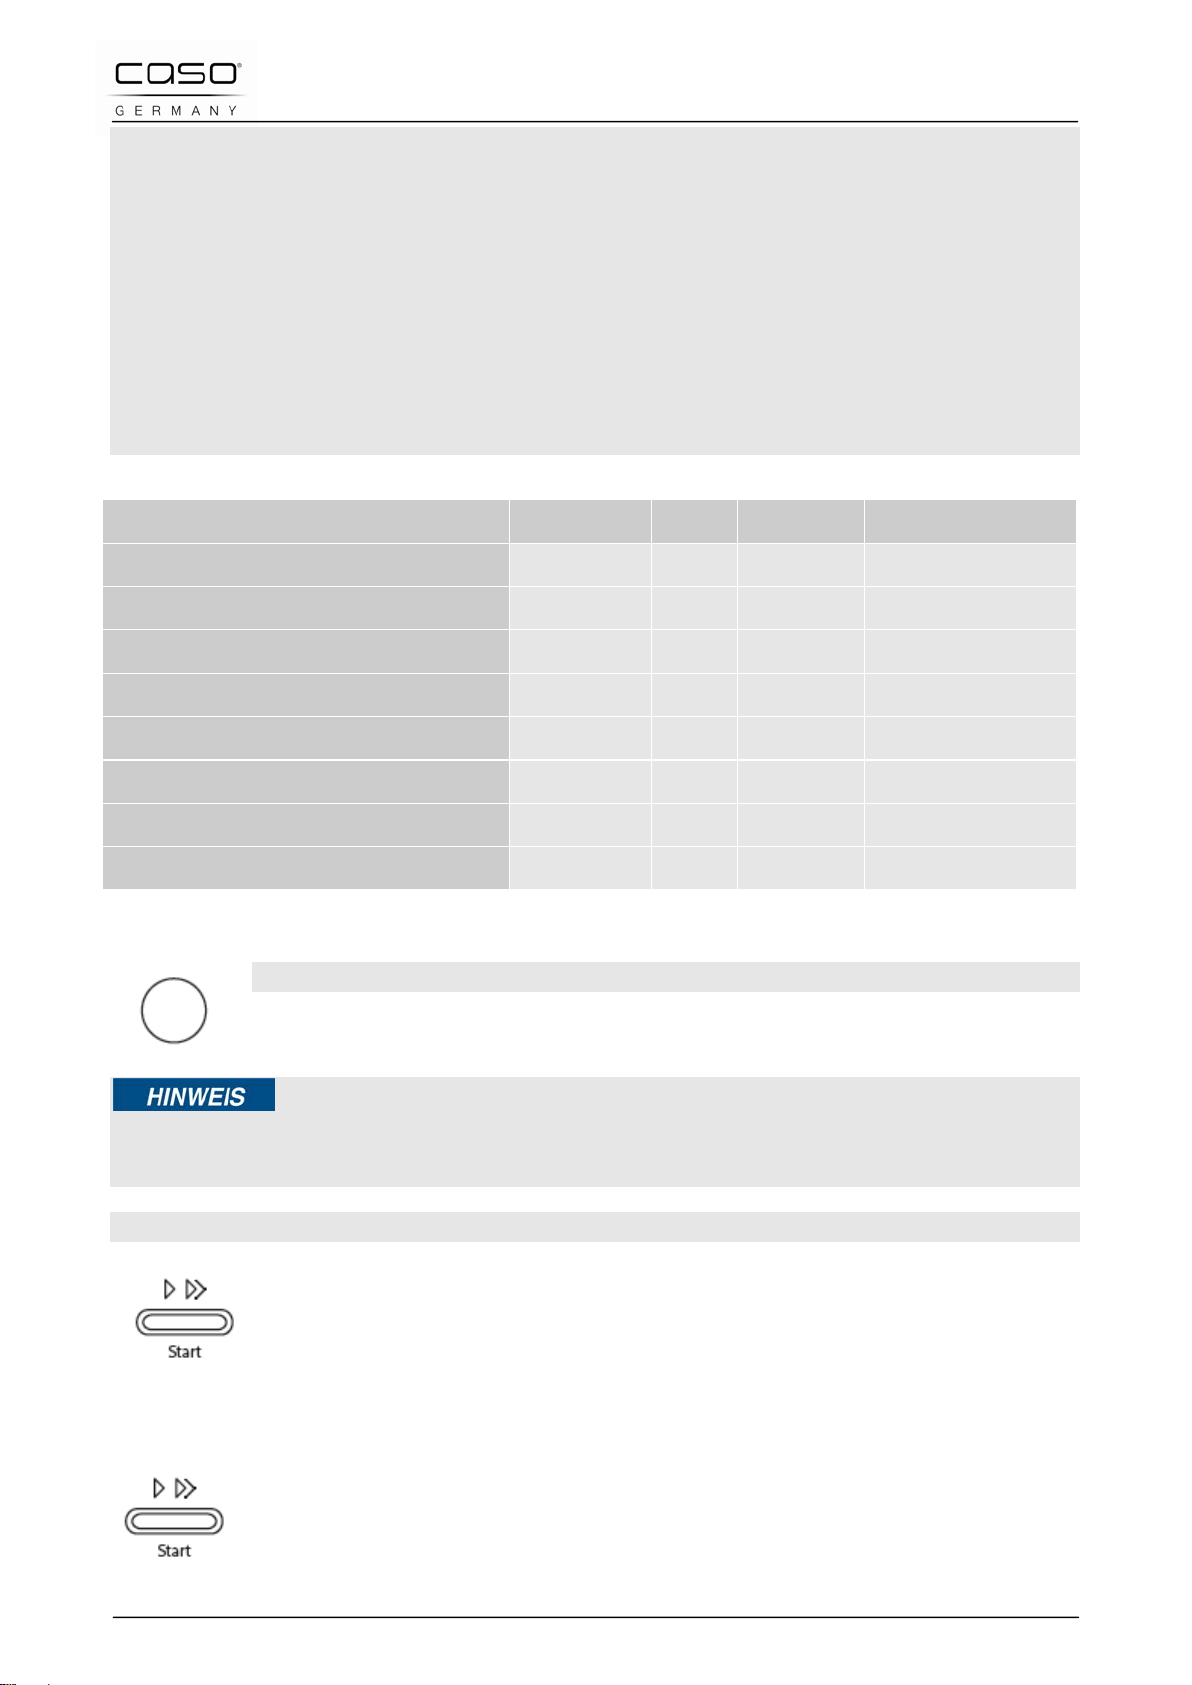
Display
Kombinationsprogramm
Mikrowelle
Grill
Konvektion
C-1
X X
C-2
X X
C-3
X X
C-4
X X X
5.2 Betriebsarten
Das Gerät kann in verschiedenen Betriebsarten betrieben werden. Die nachfolgende
Auflistung veranschaulicht die möglichen Betriebsarten des Gerätes:
Betriebsart „Mikrowelle“
Diese Betriebsart eignet sich zum normalen Erhitzen von Kochgut.
Betri ebsart „Grill und Kombinationsprogramme”
Die Betriebsart Grill (G -1) eignet sich zum Braten und Überbacken von Kochgut.
Die Kombinationsprogramme eignen sich zum gleichzeitigen Mikrowellengaren, Grillen
und Heißluftgaren.
Folgende Kombinationsprogramme sind möglich:
Be triebsart „Heißluft“
Bei dieser Betriebsart wird die heiße Luft im Garraum umgewälzt, um eine schnelle und
gleichmäßige Erwärmung des Kochguts zu erreichen.
Betriebsart „Mehrstufiges Garen“
Bei dieser Betriebsart können bis zu 2 automatische Abfolgen programmiert werden. Die
Reihenfolge und Dauer von Auftauen, Mikrowellengaren, Gril l- oder Heißluftbetrieb ist
einstellbar.
Betriebsart „automatisches Kochprogramm“
Bei dieser Betriebsart kann das Garpr og r am m aus 10 verschiedenen Menüs ausgewählt
werden.
Auftauautomatik
Diese Betriebsart eignet sich zum Auftauen von gefrorenem Kochgut. Sie könnnen
zwischen Auftauen nach Gewicht und Auftauen nach Zeit wählen.
5.3 Hinweise zum Mikrowellenkochgeschirr
Das ideale Material für Mikrowellenkochgeschirr ist für Mikrowellen durchlässig und erlaubt
der Energie, den Behälter zu durchdringen und das Kochgut aufzuwärmen.
Beachten Sie die folgenden Hinweise bei der Auswahl des richtigen Kochgeschirrs:
► Mikrowellen können Metall nicht durchdringen. Utensilien aus Metall und Kochgeschirr
caso HCMG 25 29
mit Metallverzierung sollten deshalb nicht verwendet werden.
Page 30
► Verwenden Sie beim Mikrowellengaren keine Produkte aus Recycling-Papier, da sie
kleine Metallfragmente enthalten können, die in einer Funkenbildung und/oder Feuer
resultieren könnten.
► Verwenden Sie rundes oder ovales statt quadratisches oder rechteckiges Kochgeschirr,
da das Kochgut in Ecken zum Überhitzen neigt.
► Schmale Streifen Aluminiumfolie können verwendet werden, um empfindliche Bereiche
gegen ein übermäßiges Erhitzen zu schützen. Verwenden Sie nicht zuviel Folie und
halten Sie einen Abstand von ca. 2,5 cm zwischen Folie und den Garraumwänden ein.
► Verwenden Sie keine Aluminiumfolie bei der Nutzung von Mikrowelle oder
Kombinationen mit Mikrowelle (siehe Tabelle).
Die folgende Tabelle dient als Anhaltspunkt zur Auswahl des richtigen Kochgeschirrs:
Kochgeschirr Mikrowelle Grill Heißluft Kombination
Hitzefestes Glasgeschirr
Nicht hitzefestes Glasgeschirr
Hitzefestes Keramikgeschirr
Mikrowellenfeste Kunststoffbehälter
Küchenpapier
Metallblech
Metallgestell
Aluminiumfolie und -behälter
5.4 Tür Öffnen/Schließen
Tür Öffnen
Drücken Sie die Taste Tür öffnen, um die Tür des Gerätes zu Öffnen. Sollte
das Gerät eingeschaltet sein, wird das aktuelle Garprogramm unterbrochen.
► Lassen Sie die Tür einen Moment geöffnet bevor Sie in den Garraum greifen, um die
angestaute Hitze entweichen zu lassen.
Tür Schließen
Schließen Sie die Tür bis die Türverrieg elung hörbar einrastet. Sollte ein
laufendes Garprogramm durch Öffnen der Tür unterbrochen worden sein,
wird das aktuelle Garprogramm nach Drücken der Taste START fortgesetzt.
5.5 Einschalten nach Programmwahl
Drücken Sie nach erfolgter Programmwahl die Taste START, um das
eingestellte Garprogramm zu starten.
caso HCMG 25 30
Page 31

5.6 Schnellstart
1) Schnellstart der Mikrowelle: Sie können für eine beliebige Zeit die
2) Im Standby Modus drücken Sie START um bei 100 % Leistung
3) In allen Mikrowellen-, Grill-, Heißluft- und Kombinationsprogrammen,
Mikrowellen direkt mit 100 % Leistung starten. Stellen Sie dafür mit
die Zeit ein und starten Sie dann mit START direkt die
Mikrowelle mit 100 % Leistung.
Speisen für 30 Sekunden aufz uhei ß e n. Je der D r uc k auf die Tas te
START erhöht die Erhitzungszeit um 30 Sekunden. Das Maximum sind
95 Minuten.
kann nach bereits erfolgter und bestätigter Programmeinstellung, die
Zeit durch jeden Druck auf die Taste START um je 30 Sekunden
verlängert werden.
Achtung: Diese Funktion steht weder beim Auftrauprogramm noch bei den automatischen
Kochprogrammen zur Verfügung.
5.7 Ausschalten/Unterbrechen
Um ein laufendes Garprogramm zu unterbrechen können Sie wie folgt vorgehen:
Drücken Sie die Taste STOP/CLEAR einmal. Das laufende Garprogramm
wird angehalten.
Öffnen Sie die Tür des Gerätes. Das laufende Garprogramm wird
angehalten.
► Um das unterbrochene Garprogramm fortzusetzen, drücken Sie nach
dem Schließen der Tür die Tast e START.
Um das unterbrochene Programm zu beenden, drücken Sie die Taste
STOP/CLEAR ein zweites Mal.
► Vor Beginn eines anderen Garvorganges müssen Sie die Anzeige
löschen und das System zurückstellen, indem Sie die Taste STOP/CLEAR
drücken.
5.8 E instellen der Uhr
Sobald das Gerät an den Strom angeschlossen ist, zeigt das Display 0:00 an
und der Summer ertönt ein Mal.
1) Drü c k en Sie CLOCK/KITCHENTIMER ein Mal, 00:00 wir anzeigt.
caso HCMG 25 31
Page 32

2) Drücken Sie oder um die Stunden im Bereich 023 (24 Stunden Uhr) einzustellen.
3) Drücken Sie CLOCK/KITCHENTIMER und die Minutenanzeige blinkt.
4) Drücken Sie oder um die Minuten im Bereich 059 einzustellen.
5) Drücken Sie CLOCK/KITCHENTIMER um die Einstellung der Uhr
abzuschließen. Der Doppelpunkt der Zeitanzeige blinkt.
Achtung: Wenn die Uhr nicht eingestellt wird, kann sie später nicht genutz werden. Wenn
Sie während der Uhrzeiteinstellung STOP/CLEAR drücken, kehrt das Gerät in seine
vorherige Einstellung zurück.
5.9 Küchenwecker Funktion
1) Drücken Sie CLOCK/KITCHEN TIMER zwei Mal, das Display zeigt
00:00 an.
2) Drücken Sie oder um die Weckzeit einzustellen
(maximal 95 Minuten).
3) Drücken Sie START um die Einstellung zu bestätigen.
4) Wenn die Weckzeit erreicht ist, ertönt der Summer fünf Mal. Wenn die
Uhrzeit eingstellt worden ist, zeigt das Display die aktuelle Zeit an.
Achtung: Die Zeitschaltuhr ist nicht abhängig von Ihrer UhrzeitEinstellung, es handelt sich um einen reinen Küchenwecker.
5.10 Betriebsart "Mikrowelle"
Beim Mikrowellengaren können Sie die Leistungsstufe und die Garzeit (maximal 95
Minuten) anpassen.
1) Drücken Sie MICROWAVE und das Display zeigt „P100“ an.
2) Drücken Sie MICROWAVE mehrmals oder die Taste n oder
bis die gewünschte Leistung angezeigt wird (P100, P80,
P50, P30, P10).
3) Drücken Sie dann START zur Bestätigung.
caso HCMG 25 32
Page 33

4) Drücken Sie oder um die Kochzeit zwischen
0:05 (5 Sekunden) und 95:00 (95 Minuten) einzustellen. Durch
erneutes Drück von START starten Sie den Kochvorgang.
5) Wenn das Ende der Garzeit erreicht ist, gibt das System fünf
Signaltöne aus.
Beispiel: Wenn Sie etwas für 20 Minuten bei 80 % der Mikrowellenleistung kochen
möchten, so gehen Sie wie folgt vor:
1) Drücken Sie MICROWAVE einmal, das Display zeigt „P100“ an.
2) Drücken Sie MICROWAVE erneut oder drücken Sie oder
um die Mikrowellenleistung auszuwählen.
3) Drücken Sie START um die Einstellung zu bestätigen, es wird „P80“
angezeigt.
4) Drücken Sie oder um die Kochzeit einzustellen,
bis die Anzeige 20:00 anzeigt.
5) Drücken Sie START um den Kochvorgang zu starten.
6) Wenn das Ende der Garzeit erreicht ist, gibt das System fünf
Signaltöne aus.
Achtung die Abstufung der Kochzeiteinstellung ist wie folgt:
0 -1 Minute: 5 Sekunden
1 – 5 Minuten: 10 Sekunden
5 – 10 Minuten: 30 Sekunden
10 – 30 Minuten: 1 Minute
30 – 95 Minuten: 5 Minuten
Mikrowellenleistungsübersicht:
Anzahl
1 2 3 4 5
Tastendrücke
Mikrowellenleistung 100 % 80 % 50 % 30 % 10 %
caso HCMG 25 33
Page 34

5.11 Betriebsart "Grill" und Kombinationsprogramme
Die Betriebsart „Grill“ eignet sich insbesondere für dünne Fleischscheiben, Steaks,
Koteletts, Kebabs, Würste und Hühnerteile.
1) Wählen Sie das Garprogramm „Grill“, indem Sie die Taste
GRILL/COMBI. einmal drücken. Das Display zeigt „G-1“ für die GrillFunktion an.
2) Drücken Sie GRILL/COMBI. erneut oder drücken Sie oder
um das gewünschte Kombinationsprogramm auszuwählen,
es wird „G-1“, „C-1“, „C-2“, „C-3“ oder „C-4“ angezeigt.
3) Drücken Sie START zur Bestätigung.
4) Drücken Sie oder um die Garzeit zwischen 0:05
(5 Sekunden) und 95:00 (95 Minuten) einzustellen. Drücken Sie
START um den Garvorgang zu starten.
5) Wenn das Ende der Garzeit erreicht ist, gibt das System fünf
Signaltöne aus.
Beispiel: Wenn Sie etwas für 10 Minuten grillen möchten, gehen Sie bitte wie
folgt vor:
1) Drücken Sie GRILL/COMBI. ein Mal, das Display zeigt „G-1“ an.
2) Drücken Sie START zur Bestätigung.
3) Drücken Sie oder um die Kochzeit einzustellen,
bis das Gerät 10:00 anzei g t.
4) Drücken Sie START um den Kochvorgang zu starten.
5)
► Nach Ablauf der halben Grillzeit summt das Gerät zwei Mal, um Sie darauf
hinzuweisen, dass Sie jetzt das Gargut wenden können. Öffnen Sie dafür
die Tür, wenden Sie das Gargut und schließen Sie die Tür wieder.
Drücken Sie START um den Gar-Vorgang fo rzusetzen.
► ACHTUNG: Das Gerät macht nach dem Summen keine Pause.
caso HCMG 25 34
Page 35

Tastendrücke
1
C-1
X X 2 C-2
X X 3 C-3
X X 4 C-4
X X X
Achtung: Anweisungen für Kombinationen
Anzahl
Display Mikrowelle Grill Heißluft
5.12 Betriebsart "Heißluft"
Beim Heißluftgaren wird die heiße Luft im Garraum umgewälzt, um das Kochgut schnell
und gleichmäßig zu bräunen und knusprig zu garen. Dieser Ofen kann auf zehn
unterschiedliche Gartemperaturen eingestellt werden. Die maximale Gar dau er beträgt 95
Minuten.
5.12.1 Betriebsart „Heißluft“mit Vorheizen
1) Drücken Sie CONVECTION ein Mal, im Display blinkt „150“.
2) Drücken Sie CONVECTION wiederholt oder drücken Sie
oder um die gewünschte Temperatur zwischen 150 – 240 °
auszuwählen.
3) Drücken Sie START um die Temperatur zu bestätigen.
4) Drücken Sie START erneut und das Gerät beginnt mit dem Vorheizen.
Sobald die Vorheiztemperatur erreicht ist, ertönt der Summer zweimal,
um Sie darauf aufmerksam zu machen, dass Sie das Gargut jetzt in
das Gerät stellen können. Die Vorheiztemperatur wird angezeigt und
blinkt. Stellen Sie das Gargut in das Gerät und schließen Sie die Tür.
5) Stellen Sie mit oder jetzt die Garzeit auf maximal
95 Minuten ein und bestätigen Sie mit START.
6) Wenn das Ende der Garzeit erreicht ist, gibt das System fünf
Signaltöne aus.
► Sie können die Garzeit erst eingeben, wenn die Vorheiztemperatur erreicht ist. Sie
müssen die Tür dann einmal öffnen, damit die Garzeit eingegeben werden kann. Wenn
die Garzeit nicht innerhalb von 5 Minuten nach Ertönen des zweimaligen Summens
eingegeben wird, schaltet das Gerät in den Standbymodus.
► Sie können die Heißlufttemperatur während des Garens prüfen, indem Sie die Taste
CONVECTION drücken.
caso HCMG 25 35
Page 36

Tasten-drücke Temperatur Tasten-drücke Temperatur
1 150 °C 6 200 °C
2 160 °C 7 210 °C
3 170 °C 8 220 °C
4 180 °C 9 230 °C
5 190 °C 10 240 °C
5.12.2 Betriebsa r t „Heißluft“ohne Vorheizen
1) Drücken Sie CONVECTION ein Mal, im Display blinkt „150“.
2) Drücken Sie CONVECTION wiederholt oder drücken Sie
oder um die gewünschte Temperatur zwischen 150 –240 °C
auszuwählen.
3) Drücken Sie START um die Temperatur zu bestätigen.
4) Drücken Sie oder um die Garzeit auf maximal 95
Minuten einzustellen.
5) Drücken Sie START, um den Garvorgang zu starten.
6) Wenn das Ende der Garzeit erreicht ist, gibt das System fünf
Signaltöne aus.
5.13 Betriebsart "Mehrstufiges Garen"
Bei dieser Betriebsart können bis zu 2 automatische Garabfolgen programmier t w er den.
Die Reihenfolge und Dauer von Auftauen, Mikrowellengaren, Grill(Kombinations)- oder
Heißluftbetrieb ist einstellbar.
Wenn Sie die Auftaufunktion verwenden möchten, muss diese als erste Funktion gewählt
werden.
► Die automatischen Kochprogramme sowie die Vorheiz-Funktion könne n nicht für das
mehrstufige Garen verwendet werden.
Beispiel: Wenn Sie Speisen für 5 Minuten auftauen möchten und diese dann bei 80 %
Mikrowellen-Leistung 7 Minuten kochen möchten, gehen Sie bitte wie folgt vor:
caso HCMG 25 36
Page 37

1) Drücken Sie zwei Mal, auf dem Display erscheint „d-2“ für das
Auftauen nach Zeit.
2) Drücken Sie oder um die Auftauzeit auf 5
Minuten einzustellen.
3) Drücken Sie auf MICROWAVE und stellen Sie die Leistung der
Mikrowellen mit oder auf 80 % ein, das Display
zeigt P80 an.
4) Drücken Sie START zur Bestätigung.
5) Stellen Sie mit oder die Garzeit auf 7 Minuten
ein.
6) Drücken Sie START um den Garvorgang zu starten.
7) Wenn das Ende der Garzeit erreicht ist, gibt das System fünf
Signaltöne aus.
► Bestätigen Sie zwischen dem Einstellen des ersten und zweiten Garprogramms nicht
die Zeit, da Sie dadurch das erste Garpr ogramm direkt starten würden. Gehen Sie nach
dem Einstellen der Zeit für das erste Garprogramm direkt zur Einstellung der Funktion
des zweiten Garprogrammes über.
5.14 Betriebsart "automatisches Kochprogramm"
Bei dieser Betriebsart k ann das Gar pr og r am m aus 10 verschiedenen Programmen
ausgewählt werden. Näher e In for ma ti on en entnehmen Sie der Tabell e.
1) Im Standby-Modus drücken Sie um die gewünschte
Funktion auszuwählen. Im Display erscheint „A1“, „A2“, „A3“ … „A10“.
2) Drücken Sie START um das gewünschte Programm zu bestätigen.
3) Wählen Sie mit oder das Gewicht bzw. die
gewünschte Menge an Serviereinheiten aus. Das Display zeigt die
caso HCMG 25 37
Page 38

Anzahl Serviereinheiten oder das Gewicht in Gramm an (siehe
200
200
300
300
400
400
1 (etwa 230g)
1
2 (etwa 460g)
2
3 (etwa 690g)
3
150
150
300
300
450
450
600
600
150
150
250
250
350
350
450
450
650
650
150
150
350
350
500
500
1 Tasse (240 ml)
1
2 Tassen (480 ml)
2
3 Tassen (720 ml)
3
Wasser hinzu)
Wasser hinzu)
Wasser hinzu)
50
50
100
100
Tabelle).
4) Drücken Sie START um den Garvorgang zu starten.
5) Wenn das Ende der Garzeit erreicht ist, gibt das System fünf
Signaltöne aus.
Auto Menu Übersicht
Menü Gewicht (g) Display Leistung
A1 Pizza
A2 Kartoffel
A3 Fleisch
A4 Fisch
A5 Gemüse
C-4
100 %
100 %
80 %
100 %
A6 Getränke /
Kaffee
A7 Pasta 50 (geben Sie
A8 Popcorn
caso HCMG 25 38
450ml kaltes
100 (geben Sie
800ml kaltes
150 (geben Sie
1200ml kaltes
100 %
50 80 %
100
150
100 %
Page 39

500
500
750
750
1000
1000
1200
1200
A9 Kuchen 475 475 Bei 180° vorheize n
A10 Huhn
C-4
A9 Kuchen
► Wenn Sie das Kuchenprogramm A9 auswählen, heizt das Gerät erst vor. Stellen Sie
den Kuchen bitte nicht so fort in das G erät. Erst wenn der Summer zwei
Mal ertönt, ist der Ofen auf 180 ° vorgeheizt. Stellen Sie jetzt den Kuchen
in das Gerät. Schließen Sie die Tür wieder und starten Sie den
Backvorgang mit START. Die Zeitschaltuhr läuft weiter und der Kuchen
wird gebacken.
5.15 Betriebsart "Auftauen"
Mit Hilfe des Menüs „Auftauen“ können Sie gefrorenes Kochgut schonend auftauen.
5.15.1 Betriebsart "Auftauen" nach Gewicht
1) Drücken Sie WEIGHT/TIME DEFROST ein Mal, das Display zeigt „d-1“
an.
2) Stellen Sie mit oder das Gewicht des Gargutes
ein. Das Display zeigt als erstes „100g“ an. Sie können das Gewicht
zwischen 100 – 2000 g einstellen.
3) Starten Sie den Auftauvorgang mit START.
4) Wenn das Ende der Garzeit erreicht ist, gibt das System fünf
Signaltöne aus.
5.15.2 Betriebsart "Auftauen" nach Zeit
1) Drücken Sie WEIGHT/TIME DEFROST zwei Mal, das Display zeigt „d-2“
an.
2) Drücken Sie oder um die Auftauzeit auf maximal 95
Minuten einzustellen.
3) Starten Sie den Auftauvorgang mit START.
4) Wenn das Ende der Garzeit erreicht ist, gibt das System fünf Signaltöne
aus.
caso HCMG 25 39
Page 40

5.16 Funktionsabfrage
1) Wenn Sie während dem Garvorgang CLOCK/KITCHEN TIMER
drücken, wir die eingestellte Uhrzeit angezeigt.
2) Wenn Sie MICROWAVE, GRILL/COMBI. oder CONVECTION
während dem jeweiligen Garvorgang drücken, bekommen Sie die
derzeitige Leistung angezeigt.
6 Reinigung und Pflege
In diesem Kapitel erhalten Sie wichtige Hinweise zur Reinigung und Pflege des Gerätes.
Beachten Sie die Hinweise um Beschädigungen durch falsche Reinigung des Gerätes zu
vermeiden und den störungsfreien Betrieb sicherzustellen.
6.1 Sicherheitshinweise
Beachten Sie die folgende n Sich er hei ts hinweise, bevor Sie mit der R ei ni g ung des Gerätes
beginnen:
► Der Ofen muss regelmäßig gereinigt und Kochgutrückstände entfernt werden. Ein nicht
in einem sauberen Zustand gehaltener Ofen wirkt sich nachteilig auf die Lebensdauer
des Geräts aus und kann zu einem gefährlichen Gerätezustand sowie Pilz- und
Bakterienbefall fü hren.
► Schalten Sie den Ofen vor dem Reinigen aus und ziehen Sie den Stecker aus der
Wandsteckdose.
► Der Garraum ist nach dem Benutzen heiß. Es besteht Verbrennungsgefahr! Warten Sie,
bis das Gerät abgekühlt ist.
► Reinigen Sie den Garraum nach der Verwendung, sobald er abgekühlt ist. Zu langes
Warten erschwert die Reinigung unnötig und macht sie im Extremfall unmöglich. Zu
starke Verschmutzungen können unter Umständen das Gerät beschädigen.
► Wenn Feuchtigkeit in das Gerät eindringt, können elektro ni s che Bauteile beschädigt
werden. Achten Sie darauf, dass keine Flüssigkeit durch die Lüftungsschlitze in das
Geräteinnere gelangt.
► Benutzen Sie keine aggressiven oder scheuernden Reinigungsmittel und keine
Lösungsmittel.
► Kratzen Sie hartnäckige Verschmutzungen nicht mit harten Gegenständen ab.
► Wegen der damit verbundenen Gefahren dürfen Reparaturen und Servicearbeiten, bei
denen die Strahlenschutzabdeckung entfernt wird, nur von einer Fachkraft ausgeführt
werden.
6.2 Reinigung
Ga r r aum und Türinnenseite
• Halten Sie den Garraum des Ofens sauber. Wischen Sie an den Wänden des Garraums haftendes verspritztes oder verschüttetes Kochgut mit einem feuchten Tuch ab.
caso HCMG 25 40
Page 41

Bei starker Verschmutzung des Ofens kann ein mildes Reinigungsmittel verwendet
werden.
• Wischen Sie Tür, Fenster und die Türdichtungen mit eine m feuch t e n Tuch ab, um
Spritzer und verschüttetes Kochgut zu entfernen. Rückstände an der Türdichtung
können dazu führen, dass die Tür nicht mehr richtig schließt und somit Mikrowellen
austreten können.
• Wischen Sie Dampf, der sich an der Ofentür niedergeschlagen hat, mit einem weichen
Tuch ab. Dies kann der Fall sein, wenn das Gerät in einer sehr feuc h ten U mg ebu ng
verwendet wird und ist normal.
• Gerüche lassen sich aus dem Ofen entfernen, indem Sie eine Tasse Wasser mit dem
Saft und der Schale einer Zitrone mischen, in eine tiefe mikrowellenfeste Schüssel
gießen und fünf Minuten im Mikrowellenbetrieb kochen. Wischen Sie den Ofen danach
gründlich mit einem weichen Tuch trocken.
• Lassen Sie nach der Reinigung des Innenraums die Ofentür offen, bis das Gerät innen
getrocknet ist.
• Reinigungstipp – Die Innenwände, an denen g ekoc hte Leb ensmittel haften, sind
folgendermaßen leichter zu reinigen: Legen Sie eine halbe Zitrone in eine Schüssel,
fügen Sie 300 ml Wasser hinzu und erhitzen Sie dies für 10 Minuten bei 100%
Mikrowellenleistung. Danach wischen Sie das Gerät mit einem weichen, trockenen
Tuch aus.
Gerätefront und Bedienfeld
• Reinigen Sie die Gerätefront und das Bedienfeld mit einem weichen angefeuchteten
Tuch.
• Achten Sie darauf, dass das Bedienfeld nicht nass wird. Verwenden Sie zum Reinigen
ein weiches, feuchtes Tuc h.
► Lassen Sie die Ofentür geöffnet, um ein versehentliches Einschalten des Gerätes zu
verhindern.
Aussengehäuse
• Die Außenflächen des Gerätes mit einem feuchten Tuch reinigen.
Drehteller, Grillrost und Rollring
• Das Zubehör (Drehteller, Grillrost und Rollring) müssen gelegentlich herausgenommen
und gereinigt werden. Waschen Sie das Zubehör in einer warmen Seifenlösung.
• Der Rollring sollte regelmäßig gereinigt werden, um einer übermäßigen
Geräuschentwicklung oder einer Störung der Drehbewegung vorzubeugen.
Der Rollring kann in einer milden Seifenlösung gewaschen werden. Achten Sie darauf,
den Rollring nach dem Reinigen wieder ordnungsgemäß einzulegen.
caso HCMG 25 41
Page 42

• Wischen Sie den Ofenboden mit einem milden Reinigungsmittel ab. Bei starker
Verschmutzung des Ofenbodens kann ein mildes Reinigungsmittel verwendet werden.
7 Störungsbehebung
In diesem Kapitel erhalten Sie wichtige Hinweise zur Störungslokalisierung und
Störungsbehebung. Beachten Sie die Hinweise um Gefahren und Beschädigungen zu
vermeiden.
7.1 Sicherheitshinweise
► Reparaturen an Elektrogeräten dürfen nur von Fachleuten durchgeführt werden, die
vom Hersteller geschult sind.
► Durch unsachgemäße Reparaturen können er hebl i che Gefahren für den Benutzer und
Schäden am Gerät entstehen.
7.2 S t örungsursachen und -behebung
Die nachfolgende Tabelle hilft bei der Lokalisierung und Behebung kleinerer
Störungen.
Fehler Mögliche Ursache Behebung
Das gewählte
Programm lässt sich
nicht starten.
Der Drehteller dreht
sich ruckartig.
Speise nach Ablauf der
eingestellten Zeit nic ht
genügend aufgetaut,
erhitzt bzw. gegart.
Gerätetür nicht geschlossen Gerätetür schließen
Netzstecker nicht eing es teck t Netzstecker einstecken
Sicherung nicht eingeschaltet Sicherung einschalten
Verschmutzungen zwischen dem
Drehteller und dem Garraumboden
Verschmutzungen am Rol l ri ng
Gefäß zu groß Anderes Gefäß verwenden
Zeit bzw. Leistungsstufe falsch
gewählt
Verschmutzungen
beseitigen
Zeit und Leistungsstufe neu
einstellen
Vorgang wiederholen
Das Gerät funktioniert,
aber die Garraumbeleuchtung nicht.
Während des
Mikrowellen-Betriebes
sind unnormale
Geräusche zu hören.
caso HCMG 25 42
Garraumbeleuchtung defekt.
Speise mit Aluminiumf ol i e
abgedeckt
Das Kochgeschirr enthält Metall
und es entstehen Funken im
Garraum
Garraumbeleuchtung vom
Service Instand setzen
lassen.
Aluminiumfolie entfernen
Geschirrhinweise beachten
Page 43

Die Zeit im Anzeigefeld
stimmt nicht.
Stromausfall Zeit neu einstellen
► Wenn Sie mit den oben genannten Schritten das Problem nicht lösen können, wenden
Sie sich bitte an den Kundendienst.
8 Entsorgung des Altgerätes
Elektrische und elektronische Altgeräte enthalten vielfach noch wertvolle
Materialien. Sie enthalten aber auch schädliche Stoffe, die für ihre Funktion
und Sicherheit notwendig waren.
Im Restmüll oder bei falscher Behandlung können diese der menschlichen Gesundheit
und der Umwelt schaden. Geben Sie Ihr Altgerät deshalb auf keinen Fall in den Restmüll.
► Nutzen Sie die von Ihrem Wohnort eingerichtete Sammelstelle zur Rückgabe und
Verwertung elektrischer und elektronischer Altgeräte. Informieren Sie sich
gegebenenfalls bei Ihrem Rathaus, Ihrer Müllabfuhr oder bei Ihrem Händler.
► Sorgen Sie dafür, dass Ihr Altgerät bis zum Abtransport kindersicher aufbewahrt wird.
caso HCMG 25 43
Page 44

Original
Item No. 3354
Operating Manual
Microwave, Grill and Convection Oven
HCMG 25
caso HCMG 25 44
Page 45

9 Operating Manual
9.1 General
Please read the information contained herein so that you can become familiar with your
device quickly and take advantage of the full scope of its functions.
Your microwave will serve you for many years if you handle it and care for it properly.
We wish you a lot of pleasure in using it!
9.2 Information on this manual
These Operating Instructions are a component of the microwave (referred to hereafter as
the Device) and provide you with important information for the initial commissioning,
safety, intended use and care of the device.
The Operating Instructions must be available at all ti mes at the device. This Operating
Manual must be read and applied by every person who is instructed to work with the
device: • Commissioning • Operation • Troubleshooting and/or
• Cleaning Keep the Operating Manual in a safe place and pass it on to the
subsequent owner along with the device.
9.3 Warning notices
The following warning notices are used in the Operating Manual concerned here.
DANGER
A warning notice of this level of danger indicates a potentially dangerous situati on.
If the dangerous situation is not avoided, this can lead to death or serious injuries.
► Observe the instructions in this warning notice in order to avoid the danger of death or
serious personal injuries.
WARNING
A warning notice of this level of danger indicates a possible dangerous situa tion.
If the dangerous situation is not avoided, this can lead to serious injuries.
► Observe the instructions in this warning notice in order to avoid the personal injuries.
ATTENTION
A warning notice of this level of danger indicates a possible dangerous situa tion.
If the dangerous situation is not avoided, this can lead to slight or moderate injuries.
► Observe the instructions in this warning notice in order to avoid the personal injuries.
PLEASE NOTE
A notice of this kind indicates additional information, which will simplify the handling of the
machine.
caso HCMG 25 45
Page 46

9.4 Limitation of liability
All the technical information, data and notices with regard to the installation, operation and
care are completely up-to-date at the time of printing and are compiled to the best of our
knowledge and belief, taking our past experience and findings into consideration.
No claims can be derived from the information provided, the illustrations or descriptions in
this manual. The manufacturer does not assume any liability for damages arising as a
result of the following :
• Non-observance of the manual • Uses for non-intended purposes
• Improper repairs • Technical alterations, modifications of the device
• Use of unauthorized spare parts
Modifications of the device are not recommended and are not covered by the guarantee.
All translations are carried out to the best of our knowledge. We do not assume any liability
for translation errors, not even if the translation was carried out by us or on our
instructions. The original German text remains solely binding.
9.5 Copyright protection
This document is copyright protected.
Braukmann GmbH reserves all the rights, including those for photomechanical
reproduction, duplication and distribution using special processes (e.g. data processing,
data carriers, data networks), even partially. Subject to content and technical changes.
10 Safety
This chapter provides you with important safety notices when handling the device.
The device corresponds with the required safety regulations. Improper use can result in
personal or property damages.
10.1 Int e nde d us e
This device is only intended for use in households in enclosed spaces for
• Defrosting • warming up • cooking grilling • reducing • baking
foods and beverages. Uses for a different purpose or for a purpose w hi ch ex ceeds this
description are considered incompatible with the intended or designated use.
Warning
Danger due to unintended use!
Dangers can emanate from the device if it is used for an unintended use and/or a different
kind of use.
► Use the device exclusively for its intended use.
► Observe the procedural methods described in this Operating Manual.
Claims of all kinds due to damages resulting from unintended uses are excluded.
The User bears the sole risk.
caso HCMG 25 46
Page 47

10.2 General Safety information
Please note
Please observe the following general safety notices with regard to the safe handling
of the device.
► Examine the device for any visible external damages prior to using it. Never put a
damaged device into oper ati o n.
► If the connection lead is damaged, you will need to have a new connection lead
installed by an authorized electrician.
► This appliance can be used by children aged 8 years and above and persons with
reduced physical, sensory or mental capabilities or lack of experience and knowledge if
they have been given supervision or instruction concerning use of the appliance in a
safe way and understand the hazards involved.
► Children shall not play with the appliance.
► Cleaning and user maintenance shall not be made by children without supervision.
► Do not use utensils that are not suitable for the use in microwave appliances.
► The appliance should be cleaned regularly and all food residues removed after each
use.
► Read and follow the instructions on “Danger due to microwaves”.
► The appliance may only be installed or fitted according to the instructions attached.
► Do not leave the device unsupervised when it is in operation.
► Do not operate the oven if it is empty. This could damage the device.
► The device is not intended for drying, warming up or heating up living animals.
► Food thermometers are unsuitable to be used when the microwave is in operation.
► Do not use the cooking chamber for storage purposes. Do not leave any paper
products, cooking utensils or foodstuffs in the cooking chamber when the oven is not
being used.
► Do not use or store the appliance outdoors.
► Do not use the appliance near water, in damp or humid basements or near swimming
pools.
► Do not use steam cleaners on the appliance.
► The rear of the appliance should be facing a wall.
► Only qualified electricians, who have been trained by the manufacturer, may carry out
any repairs that may be needed. Improperly performed repairs can cause considerable
dangers for the user.
► Only customer service departments authorized by the manufacturer may carry out
repairs on the device during the guarantee period, as otherwise the guarantee
entitlements will be null and void in the event of any subsequent damages.
► Defective components must always be replaced with original replacement parts. Only
such parts will guarantee that the safety requirements are fulfilled.
caso HCMG 25 47
Page 48

Please note
► Device is not intended to be operated by means of an external timer or separate
remote-control system.
► PLEASE READ THESE SAFETY INSTRUCTIONS CAREFULLY AND KEEP FOR
FUTURE REFERENCE.
10.3 Sour c e s of dange r
10.3.1 Danger due to microwaves
Warning
Exposure to microwaves on the human body can result in injuries.
Please observe the following safety notices in order not to expose yourself or others to
microwaves.
► Never operate the device when the door is open. Having a faulty or manipulated safety
switch results in the danger of exposing oneself directly to the microwaves.
► Never position any items between the front of the oven and the oven door and avoid
any dirt deposits or cleaning material residues directly on the sealing areas of the
device.
► Do not use the device under the following circumstances:
- if the device door is warped
- if the door hinges are loose
- if there are visible holes or cracks on the housing,
on t he door or on the walls of the cooking chamber
► If the door or door seals are damaged, the device must not be operated until it has been
repaired by an authorized person.
► Do not remove any of the coverings on the device.
► Due to the hazards of repair and maintenance work, for which the radiation shield cover
is removed any such work may only be carried out by a trained and qualified specialist.
10.3.2 Danger of burns
Warning
The culinary items being heated up in this device as well as the cookware that being
used and the surface of the device can become very hot.
Please observe the following safety notices in order not to burn or scald yourself or others.
► When grilling with or without operating the microwave, the cooking chamber, the grill
element and the device door will become hot! Keep the power cable away from any
surfaces and make sure the ventilation slots in the appliance are not covered up.
► Accessible parts can become hot during use oft he appliance; keep children at a safe
distance.
► During use the appliance will heat up; do not touch the heating elements inside the
appliance.
caso HCMG 25 48
Page 49

Warning
► The appliance and accessible parts will become very hot during use. Do not touch the
heating elements; keep children under the age of 8 years at a safe distances or under
supervision at all times.
► Use oven mitts when sliding in or removing items that are being browned as well while
foods/cookware are being handled within the cooking chamber, whenever the grill is
switched on or just before it is switched on.
► Do not use the oven for deep-frying. Hot oil can damage parts of the oven and the
cookware and cause burns.
► Please bear in mind that the foods and liquids in the device are mainly being heated
when the microwave is in operation, and not the container itself. Although the lid of a
container is not hot, the same amount of steam and spills can be created on removing
the lid as in a conventional cooking process when you remove it from the device.
► Always check the temperature of the cooked food, especially if you are heating up
foods or liquids for babies. It is advisable never to consume foods or liquids, directly
after they come out of the device. Wait a few minutes and stir the food or liquid, to allow
the heat to be distributed evenly.
► With certain foods, there is a danger of burns due to superheating. With foods
consisting of a mixture of fat and water, such as broth, wait about 30 to 60 seconds
before removing the food fro m the dev i ce. Thi s wi ll allow the mixture to settle. Thus, you
avoid sudden bubbling up when a spoon is inserted into the food or the liquid or after
adding a stock cube.
In order to prevent superheating, you can also place a metal spoon into the cooking
vessel prior to cooking. However, bear in mind that the spoon must not make contact
with any parts of the device walls or the grill, as this could result in damages to the
device.
10.3.3 Danger of fire
Warning
There is a danger of fire due to the ignition of the content in the event the device is
not used properly.
Observe the following safety notices to avoid dangers of fire:
► Please bear in mind that the times for cooking, heating up, defrosting using the device
are frequently considerably shorter than on a stov e top or in the oven.
Leaving the device on for too long will result in foods drying out and eventually selfigniting. There is then a danger of fire!
The danger of fire is also present if bread, rolls, flowers or herbs are being dried for too
long.
► Do not overheat food.
► Do not warm up pillows or similar items filled with grains, cherry pits or gel.
These items can ignite, even if they are removed out of the device after they are
warmed up.
caso HCMG 25 49
Page 50

Warning
► Do not warm up any alcohol in an undiluted state.
► Never the leave the device unsupervised if you are warming up or cooking foods in
disposable containers made of plastic, paper or other flammable materials.
Disposable containers made of plastic must have the properties shown under the
heading “Notices on microwave cookware”.
► Switch off the device or disconnect the power plug and keep the door closed if you
discover smoke, to smother the flames.
► Never use the device to store or dry flammable materials.
10.3.4 Danger of expl osion
Warning
There is a danger of explosion due to excess pressure that is created in the event
the device is not used properly.
Observe the following safety notices to avoid dangers of an explosion:
► Liquids and other food must not be heated in closed vessels as these may explode.
► When heating food in plastic containers do not leave the appliance unsupervised (risk of
ignition).
► Remove the sealing caps and nipples on baby bottles.
► Do not use dishes with hollow handles and buttons on lids for cooking in which liquid
can get inside the voids if these voids are not sufficiently vented.
► Do not cook eggs in the shell or extremely hard boiled eggs in the device as they can
still explode, even after the microwave operation has been completed.
► Remove twisted wire closures on paper or plastic bags so that no excessive pressure
can develop.
10.3.5 Dangers due to electrical power
Danger
Mortal danger due to electrical power!
Mortal danger exists when coming into contact with live wires or subassemblies!
Observe the following safety notices to avoid dangers due to electrical power:
► If the connection lead is damaged, you will need to have a special connection lead
installed by an authorized electrician.
► Do not operate this device if its power cable or plug is damaged, if it does not work
properly or if it is damaged or has been dropped. If the power cable is damaged, it will
need to be replaced by the manufacturer or his service agency or a similar qualified
person, to avoid any dangers.
► Do not open the housing on the device under any circumstances. There is a danger of
an electrical shock if live connections are touched and the electrical or mechanical
structure is altered. In addition, functional faults on the device can also occur.
caso HCMG 25 50
Page 51

11 Commissioning
This chapter provides you with important safety notices during the initial commissioning of
the device. Observe the following notices to avoid dangers and damages:
11.1 Safety information
Warning
Personal and property damages can occur during commissioning of the device!
Observe the following safety notices to avoid such dangers:
► Packaging materials may not be used for playing. There is a danger of suffocation.
► Transport, unpack and use two persons to set down the device because of the heavy
weight of the device.
11.2 Del ivery scope and transport inspection
As a rule, the HCMG 25 Microwave is delivered with the following components:
• HCMG 25 Microwave • Rolling ring
• Glass turntable • Grating • Operating Instructions
Please note
► Examine the shipment for its completeness and for any visible damages.
► Immediately notify the carrier, the insurance and the supplier about any incomplete
shipment or damages as a result of inadequate packaging or due to transportation.
11.3 Unpacking
To unpack the device, procee d as fol lows:
• Remove all packaging and accessories.
• Check the appliance for possible damages (dents, damaged door etc.). Damaged
appliances may not be used.
• Casing: Remove the protective film covering the outside surface of the appliance.
• The light brown/silver cover in the interior of the appliance protects the magnetron and
must not be removed.
11.4 Dis pos a l of the packaging
The packaging protects the device against damages during transit. The packaging
materials are selected in accordance with environmentally compatible and recyclingrelated points of view and can therefore be recycled.
Returning the packaging back to the material loop saves raw materials and reduces the
quantities of accumulated waste.
caso HCMG 25 51
Page 52

Take any packaging materials that are no longer required to “Green Dot” recycling
collection points for dis posal .
Please note
► If possible, keep the original packaging for the device for the durati o n of the guar antee
period of the device, in order that the device can be re-packaged properly in the event
of a guarantee claim.
11.5 Setup
11.5.1 Setup location requirements:
In order to ensure the safe and trouble-free operation of the device, the setup location
must fulfil the follow ing prer eq ui si tes :
• The device must be set up on a firm, flat, horizontal and heat-resistant surface with
sufficient load-bearing capacity for the oven and the maximum weight of the expected
food that is to be prepared in the ov en.
• Choose the setup location in such a way that children cannot reach any hot surfaces on
the device.
• The device is not intended to be installed in a wall or a built-in cupboard.
• Do not set up the device in a hot, wet or extremely damp environment or near
flammable material .
• Ensure that the power cable does not hang down over a table or counter edge.
• The electrical socket must be easily accessible so that the power lead can be
disconnected easily, in the case of an emergency.
• The installation and assembly of this device in non-stationary setup locations (e.g. on
ships) must be carried out by specialist companies / electricians, provided they
guarantee the prerequisites for the safe use of this device.
11.5.2 Installa tion of the appliance
1) Select a level surface
providing enough distance
between the ventilation
slots and walls or other
units.
a) The surface for placing
the appliance must be at
least 85 cm above the
floor.
b) The rear of the appliance
must be facing a wall.
Above the appliance a
clearance of 30 cm is needed, and on the sides at least 20 cm distance to other
walls or units are needed.
caso HCMG 25 52
Page 53

c) Do not remove the feet from the bottom of the appliance.
d) Do not cover or obstruct any openings in the appliance.
e) Covering the ventilation slots may cause damage to the appliance.
f) Place the microwave appliance as far away from radios of TVs to minimize any
interference to radio and TV reception.
2) Insert the power plug into a normal household outlet; check that voltage and
frequency of the appliance (see appliance rating label) matches that of the
household electrical supply.
11.5.3 Avoiding radio interfer ence
The device can cause the occurrence of interference in radios, televisions or similar
devices.
Such faults can be rectified or reduced as a result of employing the following measures:
• Clean the door and the sealing surfaces of the device.
• Set the radio, the television, etc as far as possible away from the device.
• Connect the device to a different electrical outlet, so that various power circuits are used
for the device and the receiver with the interference.
• Use a properly installed antenna for the receiver, to ensure good reception.
11.6 Assembling the accessories
11.6.1 Glass turntable
• 1 Hub (underside)
• 2 Glass turntable
• 3 Turntable drive
• 4 Rolling ring
Assemble the glass turntable as follow s :
• Insert the rolling ring
• Place the glass turntable inside the appliance so that the grooves on the underside of
the glass dish lock into the turntable drive.
• Never place the glass tray inside the appliance upside down; it must be able to revolve
freely.
• When cooking always use the glass turntable and the matching rolling ring.
• Always place all food and containers on the glass turntable or the grating for grilling.
• In case the glass turntable or the rolling ring crack or break please contact your Service
Centre.
caso HCMG 25 53
Page 54

11.6.2 Grating
• Place the grating on the glass turntable.
► Use the grating only for grilling, convection and combination operation C3.
11.7 Electri cal connection
DANGER
► Risk of electrocution
► Touching internal compponents may cause serious, severe and fata l injur i es.
► Do not disassemble the appliance.
► Improper grounding can cause electrical shocks. Do not use a power outlet if it is not
properly installed and g r ounded .
In order to ensure the safe and trouble-free operation of the device, the following
instructions must be observed for the electrical connection:
• Before connecting the device, compare the connection data (voltage and frequency) on
the rating plate with those of your electrical network. This data must agree in order that
no damages occur in the device
If in doubt, ask your qualified electrician.
• The electrical outlet must be protected by a 16A safety cut-out switch.
• The connection between the device and the electrical network may employ a 3 meter
long (max.) extension cable with a cross-section of 1.5 mm². The use of multiple plugs
or gangs is prohibited because of the danger of fire that is involved with this.
• Make sure that the power cable is undamaged and has not been installed under the
oven or over hot or sharp surfaces.
• This appliance must be electrically grounded. In case of a short circuit grounding will
protect against electric shocks because the electrical current is diverted through the
grounding lead. The appliance is fitted with an appropriate cable with a ground lead
and a grounded safety plug. The plug must be inserted into a properly installed and
grounded outlet.
• The electrical safety of the device is only guaranteed if the device is connected to a
properly installed protective conductor system. Operations using an electrical outlet
without a protective conductor are prohibited. If in doubt, have the house installation
checked over by a qualified electrician.
The manufacturer cannot be made responsible for damages that are caused by a
missing or damaged protective conductor.
caso HCMG 25 54
Page 55

11.7.1 Extension cables
• The power cable is kept intentionally short to reduce the risk of tangling or presenting a
tripping hazard.
• If a longer cable or an extension cable is required:
• 1) The power rating of the cable or extension cable must be no less than the rating of
the appliance.
• 2) The extension cable must a three-lead (grounded) cable.
• 3) Arrange the long cable so that it does not hang down from table or counter tops
where it can be pulled by children and that it does not present a tripping hazard.
12 Design and Function
This chapter provides you with important safety notices on the design and function of the
device.
12.1 Compl e t e over vi e w
A) Operating panel
Cooking time, power, function
and current time are display ed.
B) Turntable drive
C) Rolling ring
D) Glass tu rntable
E) Oven window
F) Door
G) Protective door latch
H) Grating
caso HCMG 25 55
Page 56

12.2 Operating elements and displays
MICROWAVE: Select and set the microwave
programme.
GRILL/COMBI.: Select the grill programme and the
combination programmes.
CONVECTION: Programme the air temperature and
preheating function .
WEIGHT/TIME DEFROST: Select the defrost
programme.
CLOCK/KITCHENTIMER: Set the clock and the timer.
STOP/CLEAR: Pause the cooking programme or
delete/clear all previous settings.
UP, DOWN: Select the cooking time, power levels and
select the combination and cooking programmes.
START: Press to confirm and start the cooking
programme or to quick-start cooking programme.
DOOR: Press to open the door.
caso HCMG 25 56
Page 57

12.3 Signal tones
The appliance will emit the following signal tones as acoustic feedback:
• One signal tone: The appliance has accepted the entry
• Two signal tones: Either you are requested to turn the cooking goods or, when
preheating, to place the cooking goods into the oven.
• Five signal tones: End of the cooking time.
• No signal tone: The appliance has not accepted the entry, check and try again.
•
12.4 Saf ety equipment
12.4.1 Warning notices on device
ATTENTION
Danger due to hot surface!
There is a warning notice referring to dangers due to hot surfaces located on the back
upper side of the housing. The surfaces of the device can become extremely hot.
► Do not touch the hot surfaces of the device. Danger of burns!
► Do not set or lay any items on the device.
► Do not place the microwave appliance above a cooker, hob or another devices
producing heat, as this would damage the microwave appliance and render the
warranty void.
12.4.2 Door latch
A safety switch is installed in the door latch of the device, which prevents the device from
being operated when the door is open.
ATTENTION
Danger due to microwaves!
If this safety device is defective or if this safety device is bypassed, you can directly
expose yourself and others to microwave radiation.
► Do not operate the device if the safety switch is defective.
► Do not disable this safety device.
12.4.3 Child-proof lock
The child-proof lock prevents children from using the device without supervision.
Activating the child-proof lock:
Press the STOP/CLEAR button for three seconds until a signal tone is heard
and the function display lights up. In the locked state, all the buttons
are disabled.
caso HCMG 25 57
Page 58

De-activating the child-proof lock:
Press the STOP/CLEAR button for three seconds until a signal tone is heard
and the illumination on the function display goes out. In the locked
state, all the buttons are disabled.
12.5 Rating plate
The rating plate with the connection and performanc e data c an be fo unded on the back of
the device.
13 Operation and Handing
This chapter provides you with important notices with regard to operating the device.
Observe the following notices to avoid dangers and damages :
Warning
► Do not leave the device unsupervised when it is in operation, so that you can intervene
quickly in the event of dangers.
13.1 Pr inciples of microwave cooking
• The power levels and time required for cooking / warming up food items depends on the
starting time, the quantity and the type and consistency of the food, etc. Use the
shortest indicated cooking time and extend the cooking procedure as necessary.
• Arrange the food carefully. Position the thickest areas on the external edge of the bowl.
• Cover the food while it is cooking. Lids protect against spatters and also contribute
towards cooking/warming up the food evenly.
• During warming, the food should be turned, rearranged or stirred repeatedly, in order for
the temperature to be distributed evenly.
• Any existing germs in the food are only killed off if the temperature is sufficiently high
enough (> 70°C) and if the time used is sufficiently long enough (> 10 m in).
• Foods with a firm skin or shell, such as tomatoes, sausages, potatoes in the skin,
eggplants must be pierced or punctured repeatedly so that any developing steam can
escape and so that the food does not burst.
• Eggs without their shell may only be cooked in the microwave if the skin of the egg yoke
has been pierced repeatedly first. Otherwise, the egg yoke can squirt out with
excessive pressure after cooking.
• Rearrange layers of foods such as meat balls from top to the bottom and from the
middle to the outside edge.
caso HCMG 25 58
Page 59

Display
Combination programme
Microwave
Grill
Convection
C-1
X X
C-2
X X
C-3
X X
C-4
X X X
13.2 Operating modes:
The unit is to be operated in various operating modes. The following list shows the
operating modes that are possible with the device:
“Microwave” mode
This operating mode is suitable for the normal reheating of food.
“Grill and combination programmes” mode
The “Grill” (G1) mode is suitable for roasting and gratinating food.
The combination programmes are suitable for simultaneous microwaving, grilling and
convection cooking.
The following combination programmes are available:
“Convection” mode
In this operating mode, the hot air in the cooking chamber circulates in order to warm the
food quickly and evenly.
„Multi-Stage Cooking“ Mode
This mode allows you to program up to 2 automatic sequences. It is possible to set the
sequence and duration of defrosting, microwave cooking and grilling or hot air mode.
“Automatic cooking programme” mode
This mode allows you to select the cooking program from 10 different menus.
Automatic defrost
This operating mode is suitable for defrosting frozen foo d. You can select whether t o
defrost by weight or time.
13.3 Inf ormation on microwave cookware
The ideal material for microwave cookware is permeable for microwaves and allows the
energy to penetrate the container and warm up the food.
Please observe the following tips when selecting the correct cookware:
► Microwaves cannot penetrate metal. Theref ore, you should not use utensils ma de o f
► For microwave cooking, do not use any products made from recycled paper, as they
caso HCMG 25 59
metal or cookware with metal trim.
could contain tiny metal fragments, which could cause sparks and/or result in fire.
Page 60

► Use round or oval instead of square or rectangular cookware, as otherwise the food
could tend to overheat in the corners.
► You can use narrow strips of aluminium foil to protect sensitive areas against excessive
heating. But do not use too much foil and maintain a distance of approx 2.5 cm between
the foil and the walls of the cooking chamber.
► Do not use any aluminium foil when using the microwave or combinations with the
microwave (see following table).
The following table is intended as a basis for selecting the correct cookware:
Micro-
Cookware
Heat-resistant glass dishes
Non heat-resistant glass dishes
Heat-resistant ceramic dishes
Microwave-resistant plastic
container
Kitchen roll
Metal sheet
Metal rack
Aluminium foil and container
wave
Grill Convection Combina-
tion
13.4 Opening / closing door
Open door
Push the door opener to open the door of the device. If the device is switched
on, the current cooking programme will be interrupted.
Please note
► Leave the door open for a moment before reaching into the cooking chamber, to allow
the accumulated heat to esca pe.
Close doors
Close the door until the door latch audibly locks in place. If a current cooking
programme was interrupted as a result of opening the door, the current
cooking programme will be continued after pressing the button START.
13.5 Activation after selecting the programme
After selecting the program, press START to start the preset cooking
programme.
caso HCMG 25 60
Page 61

13.6 Quick start
1) Quick start of the microwave: You can start the mircowave diectly with
full power for any period of time.
Use to set the time and then press START directly to start
the microwave on full pow er.
2) Press START in standby mode to heat food at full power for 30
seconds. Press START again to increase the time by 30 seconds
which each pressing, the maximum is 95 minutes.
3) In all microwave, grill convection and combination programmes it is
possible to increase the tim e in 30 second increments by pressing
START (repeatedly) also after a programme has been selected and
confirmed.
Attention: This function is not available for the defrost ing and the automatic cooking
programmes.
13.7 Stop / P a us e
In order to interrupt an ongoing cooking programme, you can proceed as follows:
Pres the STOP/CLEAR button once. The cooking programme that is in use
will be stopped.
Open the door of the device. The cooking programme that is in use will be
stopped.
Please note
► To continue the interrupted cooking program, press the button START
after closing the door.
To terminate the interrupted program, press the button STOP/CLEAR a
second time.
Please note
► Before beginning a different cooking process you must delete the
display and reset the system by pressing the button STOP/CLEAR.
13.8 Set t ing the clock
As soon as the appliance is connectied to electrical power the display
will show 0:00 and the buzzer will sound once.
1) Press CLOCK/KITCHENTIMER once, 00:00 is displayed.
caso HCMG 25 61
Page 62

2) Press or to set the hours in the range 0-23 (24
hour clock).
3) Press CLOCK/KIT CHENTIMER and the minutes will flash.
4) Press or to set the minutes in the range 0-59.
5) Press CLOCK/KITCHENTIMER to conclude setting the clock. The
colon in the clock display will flash.
Attention: If the clock has not been set it is not available later. In case you press
STOP/CLEAR while setting the clock the appliance will return to the previous state.
13.9 Ki t c he n ti m er funct ion
1) Press CLOCK/KIT CHEN TIMER twice, 00:00 is displayed.
2) Press or to set the waking time (maximum 95
minutes).
3) Press START to confirm the setting.
4) When the waking time is reached the buzzer will sound five times. If
the clock has been set, the current time is displayed. Attention: The
timer is independent of the clock setting, it is simply a kitchen timer
counting down the minutes.
13.10 “Microwave” mode
When microwaving you can adjust the power level and the cooking time (maximum 95
minutes).
1) Press MICROWAVE ans “P100” is displayed.
2) Press MICROWAVE repeatedly or the buttons or
until the desired power level is displayed (P100, P80, P50,
P30, P10).
3) Press START to confirm the setting.
caso HCMG 25 62
Page 63

4) Press or to set t he cooking time between 0:05
(5 seconds) to 95:00 (95 minutes) Press START again to start the
cooking process.
5) When the end of the cooking time has been reached the system will
sound five signal tones.
Example: If you want to cook something for 20 minutes at 80% power level
proceed as follows:
1) Press MICROWAVE once, “P100” is displayed.
2) Press MICROWAVE again or press or to select
the microwave power level.
3) Press START to confirm the setting, “P80” is displayed.
4) Press or to set the cooking time until “20:00” is
displayed.
5) Press START to start the cooking process.
6) When the end of the cooking time has been reached the system will
sound five signal tones.
Attention: The increments for the cooking times are as follows:
0 – 1 minute: 5 seconds
1 – 5 minutes: 10 seconds
5 – 10 minutes: 30 seconds
10 – 30 minutes: 1 minute
30 – 95 minutes: 5 minutes
Microwave power levels:
Number of presses on the button 1 2 3 4 5
Microwave power level 100 % 80 % 50 % 30 % 10 %
caso HCMG 25 63
Page 64

13.11 ““Grill” mode and c om bination programmes
button presses
1
C-1
X X 2 C-2
X X 3 C-3
X X 4 C-4
X X X
The “Grill” operating mode is especially suitable for thin slices of meat, steaks, chops,
kebabs, sausage and chicken pieces.
1) Select the cooking programme “Grill” by pressing GRILL/COMBI once.
“G1” is displayed to indicate the grill function.
2) Press GRILL/COMBI. again or press or to select
the desirect combination programme, “G-1”, “C-1”, “C-2”, “C-3” or “C-4”
is displayed.
3) Press START to confirm.
4) Press or to set the cooking time between 0:05 (5
seconds) and 95:00 (95 minutes).
5) Press START to start the cooking process.
6) When the end of the cooking time has been reached the system will
sound five signal tones.
Example: If you want to grill something for 10 minutes proceed as follows:
Press GRILL/COMBI. once, and “G1” is displayed. Press START to confirm.
Press or to set the cooking time until the appliance displays “10:00”.
Press START to start the cooking process.
Please note
► Half way through the grill time the buzzer will sound twice to request
that you now turn the goods in the grill. Open the door, turn the food over,
and close the door again. Press START to continue the grilling process.
► ATTENTION: The appliance will not stop after sounding the buzzer.
Attention: Instructions for combinations
Number of
caso HCMG 25 64
Display Microwave Grill Convection
Page 65

13.12 “Convection” m ode
In this operating mode, the hot air in the cooking chamber circulates in order to warm and
brown the food quickly and to cook it so it is crispy. This oven can be set to ten different
cooking temperatures. The maximum cooking time is 95 minutes.
13.12.1 Mode “Convection” with preheating
1) Press CONVECTION once, “150” will flash on the display.
2) Press CONVECTION repeatedly or press or to
select the desired temperature between 150° and 240°.
3) Press START to confirm the temperature.
4) Press START again and the appliance will start preheating. When the
preheating temperature has been reached the buzzer will sound twice
request that you now place the food to be cooked into the oven. The
preheating temperature will flash in the display. Place the food in the
oven and close the door.
5) Press or to set the cooking time to a maximum
of 95 minutes and confirm by pressing START.
6) When the end of the cooking time has been reached the system will
sound five signal tones.
Please note
► You can only entr the cooking time when the preheating temperature has been reached.
You must open the door once so the cooking time canbe entered. If the cooking time is
not entered within 5 mminutes after the dual buzzing the appliance will switch to
standby mode.
► You can check the convection temperature during the cooking process by pressing the
button CONVECTION.
Button presses Temperature Button presses Temperature
1 150 °C 6 200 °C
2 160 °C 7 210 °C
3 170 °C 8 220 °C
4 180 °C 9 230 °C
5 190 °C 10 240 °C
caso HCMG 25 65
Page 66

13.12.2 Operating mode “Convection” without prehea ti ng
1) Press CONVECTION once, “150” will flash in the display.
2) Press CONVECTION repeatedly or press or to
select the desired temperature between 150° and 240°C.
3) Press START to confirm the temperature.
4) Press or to set the cooking time to a maximum
of 95 minutes.
5) Press START to start the cooking process.
6) When the end of the cooking time has been reached the system will
sound five signal tones.
13.13 “Multi-stage Cooking" Mode
In this mode you can program up to up to 2 automatic cooking sequences. The sequence
and duration of defrosting, microwaving, grill (combination) or convection cooking can be
adjusted.
If you intend to use the defrost funct ion, this must be programmed as the firs t func ti o n in
the sequence.
Please note
► The automatic cooking programmes and the preheating function cannot be used for
multi-stage cooking.
• Example: If you want to defrost food for 5 minutes and then microwave the food at 80%
power level for 7 minutes proceed as follows:
1) Press twice and “d-2” will be displayed to indicate defrosting
by time.
2) Press or to set the defrosting time to 5 minutes.
3) Press MICROWAVE and set the power level for microwaving to 80%
by pressing or until the display shows “P80”.
4) Press START to confirm.
caso HCMG 25 66
Page 67

200
200
300
300
400
400
1 (approx. 230g)
1
2 (approx. 460g)
2
3 (approx. 690g)
3
5) Adjust the cooking time by pressing or to 7
minutes.
6) Press START to start the multi-stage cooking process.
7) When the end of the cooking time has been reached the system will
sound five signal tones.
Please note
► Please do not confirm the time setting between programming the first and second
cooking programme bec ause that would automatically start the first programme. After
setting the time for the first cooking programme directly enter the function for the second
cooking programme.
13.14 “Cooking Program” Mode
In this operating mode, the cooking programme can be selected from 10 different menus.
Please refer to the table on the next page for more detailed information.
1) In standby mode press to select the des i red function. The
display will show “A1”, “A2”, “A3” … “A10”.
2) Press START to confirm the selected programme.
3) Using or select the weight or the desired number
of portions. The nuber of portions or the weight in grams will be
displayed (see table below).
4) Press START to start the cooking process.
5) When the end of the cookig time has been reached, the system will
sound five signal tones.
Auto Menu Overview
Menu Weight (g) Display Power level
A1 Pizza
A2 Potatoes
caso HCMG 25 67
C-4
100 %
Page 68

150
150
300
300
450
450
600
600
150
150
250
250
350
350
450
450
650
650
150
150
350
350
500
500
1 cup (240 ml)
1
2 cups (480 ml)
2
3 cups (720 ml)
3
water)
water)
water)
50
50
100
100
500
500
750
750
1000
1000
1200
1200
A3 Meat
A4 Fish
A5 Vegetables
A6 Beverages /
coffee
A7 Pasta
50 (add 450 ml cold
100 (add 800 ml cold
100 %
80 %
100 %
100 %
50 80 %
100
A8 Popcorn
A9 Cake
A10 Chicken
150 (add 1200 ml cold
475 475 Preheat at 180°
150
100 %
C-4
Please note: A9 Cake
► If you select the cake programme A9 the appliance will first preheat; do not place the
cake into the iven right away, but wait for the buzzer to sound twice (the preheating
temperature of 180° has been reached) and now place the cake in the
oven. Close the door again and start baking by pressing START. The
timer will continue and the cake is baked.
13.15 “Automatic def rost” mode
You can gently defrost frozen food with the help of the “Automatic defrost” menu.
caso HCMG 25 68
13.15.1 Mode “Defrosting” by weight
1) Press WEIGHT/TIME DEFROST once, the di spl ay will show “d-1”.
Page 69

2) Use the or buttons to set the weight of the
defrosting goods. The display will start with “100g”. You can set the
weight between 100 and 2000g.
3) Start defrosting by pressing START.
4) When the end of the defrosting time has been reached, the system will
sound five signal tones.
13.15.2 Mode “Defrosting” by time
1) Press WEIGHT/TIME DEFROST twice, the display will show “d-2”.
2) Use the or buttons to set the defrosting time to a
maximum of 95 minutes.
3) Start defrosting by pressing START.
4) When the end of the defrosting time has been reached, the system will
sound signal tones.
13.16 Function di s play
1) If during cooking you press CLOCK/KITCHEN TIMER the set time
is displayed.
2) If during cooking you press MICROWAVE, GRILL/COMBI. or
CONVECTION the current power level is displayed.
14 Cleaning and Maintenance
This chapter provides you with important notices with regard to cleaning and maintaining
the device. Please observe the notices to prevent damages due to cleaning the device
incorrectly and to ensure trouble-free operation.
14.1 Safety information
Attention
Please observe the following safety notices, before you commence with cleaning the
device:
► The oven must be cleaned and food residues must be removed at regular intervals. If
the oven is not maintained in a clean condition, this will have a detrimental effect on the
service life of the device and can also result in a dangerous condition in the device as
well as in the growth of fungus and bacteria.
► Switch the oven off prior to cleaning it and unplug the plug from the wall power outlet.
► The cooking chamber is hot after it is used. There is a danger of burns! Wait until the
device has cooled down.
caso HCMG 25 69
Page 70

Attention
► Clean the cooking chamber after use as soon as it has cooled down. Extended waiting
unnecessarily complicates cleaning and can make it impossible in extreme cases.
Excessive accumulations of dirt can even damage the device under certain
circumstances.
► If dampness penetrates into the device, this can damage the electronic components.
Please ensure that no liquid can enter the interior of the device through the ventilation
slots.
► Do not use any aggressive or abrasive cleaning agents or solvents.
► Do not scrape off stubborn dirt with hard items.
► Because of the hazards involved in repair or maintenance work for which the radiation
safety cover must be removed, any such work may only be carried out by a skilled and
qualified specialist.
14.2 Cleaning
Cooki ng chamber and inside of door
• Keep the cooking chamber of the oven clean. Wipe off any spattered or spilt food from
the walls of the cooking chamber with a damp cloth.
If the oven is excessively dirty, you can use a mild cleaning agent.
• Wipe the door, window and the door gaskets with a damp cloth, to remove any spatters
and spilt food. Residues on the door gasket can mean that the door does not close
properly any more, which will cause the microwaves to escape.
• Wipe off any steam, which has settled on the oven door, with a soft cloth. This may be
the case if the device is used in an extremely damp environment and is normal.
• Smells can be removed from the oven by mixing a cup of water with the juice and the
skin of a lemon, pouring this into a deep microwave-proof bowl and allowing it to cook
in Microwave mode for five minutes. Then, dry off the oven thoroughly with a soft cloth.
• After cleaning the interior space, leave the oven door open until the interior of the device
is completely dry.
• Cleaning hint – If there are cooked food residues stuck to the inside walls of the oven,
there is an easy way to clean these: Place half a lemon into bowl, add 300 ml water
and microwave this for 10 minutes at full power. Then simply wipe the inside of the
appliance clean with a soft and dry cloth.
Front of device and operating panel
• Clean the front of the device and the operating panel with a soft, slightly damp cloth.
• Please bear in mind that the operating panel does not get wet. Use a soft, damp cloth
for cleaning.
Please note
► Leave the oven door open to prevent the device from being re-started accidentally.
caso HCMG 25 70
Page 71

Exterior housing
• Clean the exterior surfaces of the device with a damp cloth.
Turntabl e, grating and rolling ring
• The accessories (turntable, grating and rolling ring) must occasionally be removed and
cleaned. Wash the accessories in warm soapy water.
• The rolling ring should be cleaned regularly to prevent excessive noise development or
a rotational malfuncti o ns .
The rolling ring can be washed in a mild soapy solution . Please remember to put the
rolling ring back again properly after cleaning it.
• Wipe the bottom of the oven with a mild cleaning agent. If the floor of the oven is
excessively dirty, you can use a mild cleaning agent.
15 Troubleshooting
This chapter provides you with important notices with regard to operating the device.
Observe the following notices to avoid dangers and damages :
15.1 Safet y notices
Attention
► Only qualified electricians, who have been trained by the manufacturer, may carry out
any repairs on electrical equipment.
► Improperly performed repairs can cause considerable dangers for the user and
damages to the device.
15.2 Causes and r e ctification of faults
The following table assists in localizing and rectifying minor faults.
Error Possible cause Action
Device door is not closed Close device door
The selected program
will not start.
Power plug is not plugged in Plug in mains plug!
Fuse is not activated Activate fuse
Dirt between the turntable and
The turntable turns
jerkily.
caso HCMG 25 71
the base of cooking camber
Dirt on rolling ring
Cooking vessel too large Use different cooking vessel
Remove dirt
Page 72

Food is not sufficiently
defrosted, warmed up
or cooked after preset
time has elapsed.
The device functions
but the cooking
chamber lighting does
not work.
Incorrectly selected time or
power level
Defective cooking chamber light.
Re-set time and power level
Repeat process
Have Service dept repair
cooking chamber light.
Abnormal noises can
be heard during
operation of
microwave.
The time in the display
field is not correct.
Food is covered with aluminium
foil
The cookware contains metal
and sparks are being created
within the cooking chamber
Power failure Re-set time
Remove aluminium foil
Observe information on
cookware!
Attention
► If you are unable to solve the problem with the steps shown above, please contact
Customer Service.
16 Disposal of the Old Device
Old electric and electronic devices frequently still contain valuable materials.
However, they also contain damaging substances, which were necessary for
their functionality and safety.
If these were put in the non-recyclable waste or were handled incorrectly, they could be
detrimental to human health and the environment. Therefore, do not put your old device
into the non-recyclable waste under any circumstances.
Please note
► Utilise the collection point, established in your town, to return and recycle old electric
and electronic devices. If necessary, contact your town hall, local refuse collection
service or your dealer for information.
► Ensure that your old device is stored safely away from children until it is taken away.
caso HCMG 25 72
Page 73

N°. d'art. 3354
Mode d'emploi ori gi nal
Micro-onde, grill et four à air pulsé
HCMG 25
caso HCMG 25 73
Page 74

17 Mode d´e mpl oi
17.1 Généralités
Veuillez lire les indications de ce manuel afin de vous familiariser rapidement avec
l'appareil et afin de pouvoir utiliser l'ensemble de ses fonctions.
Votre micro-onde vous sera fidèle de nombreuses années si vous l'utilisez et l'entretenez
conformément. Nous vous souhaitons beaucoup de plaisir lors de son utilisation.
17.2 Informations relatives à ce manuel
Ce mode d'emploi appartient au mi cr o-onde (nommé par la suite l'appareil) et vous donne
des indications importantes pour la mise en service, la sécurité, l'utilisation con forme et
l'entretien de l'appareil.
Le mode d'emploi doit être en permanence disponible près de l'appareil. Il doit être lu et
mis en application par toute personne effectuant :
• sa mise en service, • son utilisation, • sa réparation et/ou • son entretien.
Veuillez conserver ce mode d'emploi, et le transmettre au propriétaire suivant de l'appareil.
17.3 Avertissements de danger
Dans le présent mode d'emploi vous pourrez trouver les avertissements suivants :
Danger
Un avertissement à ce niveau de danger signale un risque de situation dangereuse.
Si cette situation danger eus e n'es t pas év i tée, elle peu t ent r aî ner la mort ou des bles sur es
dangereuses.
► Il faut suivre les instructions données dans cet avertissement afin de prévenir tout
danger de mort ou de blessures graves pour les personnes.
Attention
Ce niveau de risque indique la présence possible d'une situation de danger.
Si cette situation dangereuse n'est pas évitée, elle peut entraîner des blessures graves.
► Il faut suivre les instructions données dans cet avertissement afin de prévenir tout
danger de blessures graves.
Prudence
Ce niveau de risque indique la présence possible d'une situation de danger.
Si cette situation dangereuse n'est pas évitée, elle peut entraîner des blessures légères ou
superficielles.
► Il faut suivre les instructions données dans cet avertissement afin de prévenir les
blessures de personne s.
caso HCMG 25 74
Page 75

Remarque
Cette indication est accompagnée d'informations complémentaires pour faciliter l'utilisation
de l'appareil.
17.4 Limite de responsabilités
Tous les renseignements techniques, données et instructions d'installation, de
fonctionnement et d'entretien contenus dans ce manuel sont parfaitement actuels au
moment de la publication et tiennent compte de notre expérience réalisée jusqu'ici et de
nos connaissances actuelles en toute bonne foi. Les indications, illustrations et
descriptions contenues dans ce manuel ne peuvent donner lieu à aucun recours.
Le constructeur décline toute responsabilité pour les dommages causés par :
• le non respect du mod e d'empl oi • l'utilisation non confor me
• des réparations non professionnelles • l'utilisation de pièces non autoris ées
• des modifications tec h ni q ues, modifications de l’appareil
Les modifications de l’appareil ne sont pas recommandées et ne sont pas couvertes par la
garantie. Les traductions ont été réalisées avec la meilleure fidélité possible. Nous
déclinons toute responsabilité pour les erreurs de traduction, même si la traduction a été
réalisée par nos soins ou sur notre demande. Seul le texte original en alle man d f ait force
de loi.
17.5 Protection intellectuelle
Cette documentation est protégée par la loi sur la propriété intellectuelle.
Tous droits de reproduction aussi photomécaniques, de multiplication et de diffusion du
texte, dans sa totalité ou en partie, au moyen de processus spéciaux (par exemple
informatique, sur support électronique ou en réseau), sont réservés à la Sté. Braukmann
GmbH. Modifications techniques et de contenu réservées.
18 Sécurité
Ce chapitre vous indiquera des consignes de sécurité importantes pour l'utilisation de cet
appareil.
Cet appareil répond aux directives de sécurité prescrites. Une utilisation non conforme
peut toutefois entraîner des dommages sur les personnes et matériels.
18.1 Uti lisation conforme
Cet appareil est conçu uniquement pour une uti li s ati on mé nag èr e à l' i ntér i eur de locaux ,
afin de
• Décongeler
• réchauffer
• cuire
caso HCMG 25 75
Page 76

• griller
• réduire cuire au four des denrées alimentaires et des boissons.
Toute autre utilisation est considérée comme non conforme.
Attention
Danger en cas d'utilisation non conforme !
En cas d'usage non conforme et/ou non approprié l'appareil peut devenir une source de
danger.
► Utiliser l'appareil uniquement de façon conforme.
► Respecter les procédures décrites dans ce mode d'emploi.
Tout recours en garantie est supprimé en cas de dommages causés par une utilisation
non conforme.
L'utilisateur est entièrement responsabl e des r is q ues encourus .
18.2 Consignes de sécurités générales
Remarque
Pour une utilisation en toute sécurité de l'appareil veuillez observer les consignes
générales de sécurités suivantes :
► Avant son utilisation s'assurer qu'il ne comporte pas de défauts visuels. Ne jamais
mettre en marche un appareil détérioré.
► En cas de dégradation du cordon de raccordement il faut faire installer un nouveau
câble par un électricien agréé.
► Cet appareil peut être utilisé par les enfants âgés de plus de huit ans et par les
personnes atteintes d'un handicap mental, sensoriel ou physique si elles ont au
préalable été instruites de sa manipulation en sécurité et comprenne nt ses év entuels
dangers.
► Les enfants ne doivent pas jouer avec l'appareil.
► Le nettoyage et l’entretien ne doivent pas être faits par des enfants sans surveillance.
► N'utilisez que des ustensiles de cuisine et des objets compatibles avec les appareils à
micro-ondes.
► L'appareil doit être régulièrement nettoyé et il faut toujours vider les restes d'aliments
qu'il contient.
► Lisez et respectez le point "Dangers avec des micro-ondes".
► Cet appareil ne doit être intégré ou installé que dans le respect des instructions jointes.
► Pendant son fonctionnement ne pas laisser l'appareil sans surveillance.
► Ne pas utiliser le four lorsqu'il est vide. L'appareil peut se dégrader.
► L'appareil n'est pas prévu pour le séchage, le réchauffage ou échauffer des animaux
vivants.
► Les thermomètres alimentaires ne sont pas prévus pour un usage avec le micro-onde.
caso HCMG 25 76
Page 77

Remarque
► Ne pas utiliser la chambre de cuisson à des fins de conservation des aliments. Ne pas
laisser de papiers, ustensiles de cuisine ou des produits alimentaires dans la chambre
de cuisson quand le four n'est pas utilisé.
► Ne pas ranger ou utiliser l'appareil à l'air libre.
► N'utilisez pas l'appareil à proximité d'eau, dans des caves humides ou à proximité de
piscines.
► Ne pas utiliser de nettoyeurs à vapeur pour entretenir l'appareil.
► Le dos de l'appareil doit être appuyé contre un mur.
► Les réparations doivent être effectuées uniquement par un professionnel qualifié, formé
par le constructeur. Des réparations incorrectes peuvent entraîner de graves dangers
pour l'utilisateur.
► Pendant la période de garantie les réparations doivent être effectuées uniquement par
un service après-vente agréé par le constructeur, sinon en cas de dommages le recours
en garantie est supprimé.
► Les pièces défectueuses doivent être remplacées uniquement par des rechanges
d'origine. Ces pièces sont seules capables de répondre aux exigences de sécurité.
► L’appareil ne doit jamais être utilisé avec un contrôleur externe ou une télécommande .
► LISEZ ATTENTIVEMENT LES CONSIGNES DE SECURITE ET CONSERVEZ-LES
POUR UN USAGE FUTUR.
18.3 Sour c e s de danger
18.3.1 Dangers avec des micro-ondes
Attention
Les effets des micro-ondes sur le corps humains peuvent entraîner des blessures.
Pour éviter de subir les effets des micro-ondes, veuillez observer les consignes de
sécurité suivantes :
► Ne jamais faire fonctionner l'appareil avec sa porte ouverte. Si l'interrupteur de sécurité
est défectueux ou manipulé il se peut que vous soyez exposé directement aux microondes.
► Ne pas disposer d'objet entre la face frontale du four et la porte et évitez le dépôt de
salissures ou de restes de produits nettoyants sur les joints de l'appareil.
► Ne pas utiliser l'appareil lorsque :
- la porte de l'appareil est déformée
- les charnières de porte sont brisées
- sont présents des trous ou des fiss ur es sur le carter,
- sur la porte ou sur les parois de la chambre de cuisson.
► Sie la porte ou les joints de la porte sont endommagés, l’appareil ne doit pas être
exploité, jusqu'à ce qu'il ait été réparé par une personne qualifié.
caso HCMG 25 77
Page 78

Attention
► Ne retirer aucun habillage de l'appareil.
► Suite aux dangers encourus, les réparations et opérations d'entretien nécessitant le
retrait du blindage anti-rayonnem ents ne doi vent être faites que par un profess i o nnel .
18.3.2 Danger de brulures
Attention
Les aliments réchauffés dans l'appareil ainsi que les instruments de cuisine utilisés
et la surface de l'appareil peuvent devenir très chauds.
Pour éviter que vous ou d'autres se brûlent ou s'ébouillantent observez les consignes de
sécurité suivantes :
► Lorsque vous grillez avec ou sans les micro-ondes, la chambre de cuisson, le corps de
chauffage du grill et la porte de l'appareil sont très chauds ! Le câble doit donc être tenu
éloigné des surfaces et les fentes d'aération de l'appareil ne doivent pas être couvertes.
► Les pièces accessibles peuvent chauffer pendant le fonctionnement de l'appareil et
doivent donc être hors de portée des enfants.
► L'appareil chauffe en fonctionnant et il faut donc éviter de toucher les éléments
chauffants de l'intérieur de l'appareil.
► L'appareil et les pièces accessibl es c ha u f fent for t e men t en fonc ti on n ant. Il faut donc
éviter de toucher les éléments chauffants et les enfants de moins de 8 ans doivent donc
être tenus à distance ou surveillés en permanence.
► Mettez des gants isolants pour sortir ou entrer les plats à cuire ou à gratiner , ou pour
manipuler dans la chambre de cuisson quand le grill est en marche ou était en marche
peu de temps avant.
► Ne pas utiliser le four pour frire. L'huile chaude peut endommager des pièces du four ou
le plat de cuisson et provoquer des brulures.
► Veuillez noter que l'appareil en mode à micro-ondes chauffe principalement les aliments
et les liquides dans un récipient, mais pas le récipient lui-même.
Malgré que le couvercle du récipient ne soit pas chaud, lorsqu'on retire le récipient de
l'appareil et qu'on soulève le couvercle on s'expose à la même quantité de vapeur et de
projections qu'avec une cuisson conventionnelle.
► Vérifiez toujours la température des choses cuites, particulièrement quand il s'agit
d'aliments ou de liquides pour bébé. Il est recommandé de ne jamais ingurgiter des
aliments ou des liquides qui sortent directement de l'appareil. Attendez quelques
minutes et tournez les aliments ou liquides jusqu'à ce que la chaleur se répartisse
régulièrement.
► Avec certains aliments il existe des risques de brulure par retard d'ébullition. Pour les
aliments composés de gr ai ss e et d'eau, par e xemple du bouillon, il faut attendr e env i r on
30 à 60 secondes avant de les retirer de l'appareil. Le mélange a ainsi de se reposer.
On évite une ébullition s oud ai ne des al i me nts ou li q ui des en y introduisant une cuillère
ou un bouillon-cube.
Pour éviter le retard d'ébullition on peut aussi introduire une cuillère métallique dans le
caso HCMG 25 78
Page 79

récipient avant la cuisson. Faire attention que la cuillère ne touche en aucun endroit les
parois de l'appareil ou le grill, cela peut provoquer sinon des dégâts sur l'appareil.
18.3.3 Danger d'incendie
Attention
En cas d'utilisation non conforme de l'appareil cela peut provoquer un incendie pa r
inflammation du contenu.
Pour éviter tout risque d'incendie veuillez observer les consignes de sécurité suivantes :
► Veuillez noter que pour cuire, réchauffer, ou décongeler avec l'appareil les délais sont
souvent plus courts que sur une cuisinière ou dans le four.
Des délais trop longs peuvent entraîner le dessèchement et éventuellement l'auto
inflammation des alime nts . Da ng er d'incendie !
Danger d'incendie lors d'un séchage trop long de pain, petits pains, fleurs ou herbes.
► Ne surchauffez pas les aliments.
► Ne pas réchauffer dans l'appareil des graines, noyaux de cerises, coussins remplis de
gel ou des objets semblables.
Ces objets peuvent s'enflammer même lorsque vous les sortez de l'appareil après les
avoir réchauffés.
► Ne par échauffer de l'alcool à l'état non dilué.
► Ne pas laisser l'appareil sans surveillance lorsque vous échauffez ou cuisez des
aliments en emballage perdus en plastique, papier ou d'autres matériaux inflammables.
Les récipients perdus en plastique doivent posséder les caractéristiques indiquées au
point «Indications sur la vaisselle pour micro-ondes».
► Si vous observez de la fumée, arrêtez l'appareil ou retirez le connecteur de la prise et
laissez la porte fermée pour étouffer les flammes.
► Ne jamais utiliser l'appareil pour ranger ou sécher des matériaux inflammables.
18.3.4 Danger d'explos i on
Attention
En cas d'utilisation non conforme de l'appareil danger d'explosion à cause de la
surpression interne.
Pour éviter les risques d'explosion veuillez observer les consignes de sécurité suivantes :
► Les liquides et autres aliments ne doivent pas être chauffés dans des récipients fermés
qui pourraient exploser.
► Quand vous chauffez des aliments dans des récipients en plastique, ne laissez pas
l'appareil sans surveillance du fait des risques d'inflammation.
► Sur les biberons retirez le capuchon d'obturation et la tétine.
► Pour cuire, ne pas utiliser des pots possédant des poignées creuses ou un couvercle à
poignée où de l'humidité peut s'introduire, et dont l'humidité ne peut pas s'échapper.
caso HCMG 25 79
Page 80

Attention
► Ne pas chauffer dans l'appareil les œufs dans leur coquille car ils peuvent exploser
même après le traitement aux micro-ondes.
► Retirer les fermetures à fil torsadé des sachets en papier ou en plastique, afin d'éviter la
création d'une surpression.
18.3.5 Dangers du courant électrique
Danger
Danger de mort par électrocution !
Danger de mort en cas de contact avec des câbles ou des pièces sous tension !
Pour éviter les risques d'électrocution veuillez observer les consignes de sécurité
suivantes :
► En cas de câble de raccordement détérioré il faut faire installer un câble spécial par un
spécialiste agréé par le constructeur.
► Ne pas utiliser l'appareil lorsque le câble électrique ou le connecteur sont détériorés,
lorsque l'appareil ne fonctionne pas correctement ou qu'il à fait une chute. Pour éviter
tout danger le câble électrique doit être échangé par le constructeur ou son service AV
ou une personne spécialement qualifiée.
► N'ouvrez en aucun cas le carter de l'appareil. Danger d'électrocution si l'on touche des
raccordements sous tension ou que l'on modifie la construction mécanique ou
électrique. D'autre part l'appareil peut connaître des dysfonctionnements.
19 Mise en service
Ce chapitre est consacré à des indications importantes concernant la mise en service de
l'appareil. Observez les indications pour éviter les dangers et les détériorations.
19.1 Consi gne s de s é cur ité
Attention
Lors de la mise en service de l'appareil peuvent se produire des dommages pour les
biens et les personnes !
Pour éviter les dangers veuillez observer les consignes de sécurité suivantes :
► Ne pas utiliser les matériaux d'emballage pour jouer. Danger d'étouffement.
► En raison du poids important de l'appareil il faut le transporter, le déballer et le mettre
en place par deux personnes.
caso HCMG 25 80
Page 81

19.2 Inventaire et contrôle de transport
Le four à micro-onde HCMG 25 est livré de façon standard avec les composants suivants :
• Four micro-onde HCMG 25 • Anneau à roulettes
• Plateau tournant en verre • La Grille • Mode d'emploi
Remarque
► Vérifier l'intégralité de la livraison et les éventuels défauts visuels.
► En cas de livraison incomplète ou de dégâts en raison d'un emballage insuffisant ou du
transport veuillez en avertir immédiatement l'expéditeur, l'assurance et le livreur.
19.3 Déballage
Pour déballer l'appareil procédez comme suit :
• ● Retirez tous les emballages et les accessoires.
• ● Vérifiez l'absence de détérioration de l'appareil (déformations, porte endommagées,
etc.) Ne pas mettre les appareils endommagés en marche.
• ● Caisson : Enlevez le film protecteur de la surface du caisson du micro-onde.
• ● Le recouvrement marron clair/argent posé à l'intérieur protège le magnétron et ne doit
pas être retiré.
19.4 El im ination des emballages
L'emballage protège l'appareil contre les dégâts de transport. Les matériaux d'emballage
ont été choisis selon des critères environnementaux et de techniques d'élimination, c'est
pourquoi ils sont recyclables.
Le retour des emballages dans le circuit des matières épargne les matières premières et
restreint le volume des déchets. Eliminez les emballages inutiles dans les points de
collecte destinés au système de recyclage avec le logo «Point vert».
Remarque
► Veuillez si possible conserver l'emballage original pendant la durée de la garantie de
l'appareil afin de pouvoir emballer correctement l'appareil en cas de recours en
garantie.
19.5 Mise en place
19.5.1 Exigences pour l'emplacement d'utilisation
Pour un fonctionnement sûr et sans problème de l'appareil, son emplacement d'utilisation
doit être choisi selon les critères suivants :
• L'appareil doit être disposé sur un support solide, plat, à niveau et résistant à la chaleur
dont la capacité de charge est suffisante pour le four et pour les choses les plus
lourdes devant être cuites dans le four .
caso HCMG 25 81
Page 82

• Choisir un emplacement de sorte que les enfants ne puissent pas accéder aux surfaces
chaudes de l'appareil.
• L'appareil n'est pas prévu pour une installation dans une niche de mur ou dans un
élément de cuisine.
• Ne disposez pas l'appareil dans un environnement chaud, mouillé ou très humide ou à
proximité de matériaux inflammables.
• Ne laissez pas pendre le câble au bord d'une table ou d'un plan de travail.
• La prise de courant doit être facilement accessible, de sorte à pouvoir débrancher
facilement le câble en cas d'urgence.
• L'installation et le montage de cet appareil sur des emplacements mobiles (par exemple
un bateau) doivent être exécutés uniquement par des entreprises / personnes
professionnels qui garantissent les exigences de sécurité d'utilisation de cet appareil.
19.5.2 Installation de l'appareil
1) Choisissez pour le poser une
surface plane où il y a assez
de place pour les fentes
d'aération.
a) Cette surface doit se situer au
moins 85 cm au-dessus du
sol.
b) Le dos de l'appareil doit être
appuyé contre un mur. Une
distance libre de 30 cm audessus de l'appareil est
indispensable, l'écart latéral
par rapport aux autres murs ou aménagements devant être d'au moins 20 cm.
c) NE RETIREZ PAS les pieds du dessous de l'appareil.
d) Ne couvrez pas et ne bloquez pas les ouvertures de l'appareil.
e) La couverture des fentes d'aération peut provoquer une détérioration de l'appareil.
f) Placez l'appareil à micro-ondes aussi loin que possible des postes de radio ou
téléviseurs car son fonctionnement peut perturber la réception radio et télé.
2) Branchez la fiche de l'appareil dans une prise domestique normale. Veillez à ce que
la tension et la fréquence de secteur de l'appareil (voir plaque signalétique)
correspondent à celles de l'alimentation électrique de la maison.
19.6 Pour éviter le parasitage radio
L'appareil peut provoquer un parasitage de radios, télévisions ou des appareils
semblables.
On peut éliminer ou réduire ce parasitage en observant les points suivants :
• Nettoyer la porte et les surface de joints de l'appareil.
• Disposez la radio, la télévision, etc., aussi loin que possible de l'appareil.
caso HCMG 25 82
Page 83

• Branchez l'appareil dans une autre prise, de sorte que l'appareil et le récepteur parasité
utilisent des circuits él ect r iques différents.
• Utilisez, pour le récepteur, une antenne installée correctement, afin d'obtenir une bonne
réception.
19.7 Montage des accessoires
19.7.1 Plateau tournant en verre
• 1 Bossage (dessous)
• 2 plateau tournant
• 3 Tourniquet
• 4 Anneau roulant
Monter le plateau tournant de la manière suivante :
• Disposer l'anneau à roulettes
• Poser le plateau tournant en verre de manière à ce que les rainures qu'il comporte sur
son dessous s'enclenchent dans le tourniquet.
• Ne jamais insérer le plateau tournant à l'envers. Il doit pouvoir tourner librement.
• Pour chauffer, il faut toujours utiliser le plateau tournant avec l'anneau roulant
correspondant.
• Pour les chauffer, les aliments et récipients doi vent toujours être posés sur le plate au
tournant.
• Si le plateau tournant en verre ou l'anneau roulant correspondant cassent ou se
fendent, adressez-vous immédiatement à votre centre de SAV.
19.7.2 La Grille
• Disposer la grille sur la plateau tournant en verre.
► N'utiliser la grille qu'en mode grill, air pulsé et combiné C3.
19.8 Raccordement électrique
DANGER
► Danger d'électrocution
► Tout contact avec des éléments internes peut entraîner des lésions graves ou la mort.
► Ne pas démonter l'appareil.
► Il y a un risque de décharges électriques si l'appareil n'est pas mis correctement à la
terre. N'utilisez aucune prise qui ne soit pas correctement installée et mise à la terre.
caso HCMG 25 83
Page 84

Pour une utilisation de l'appareil sûre et sans panne, il faut observer les indications
suivantes pour le raccordement électrique :
• Avant de brancher l'appareil il faut comparer les données de raccordement (tension et
fréquence) de la plaque signalétique avec celles de votre réseau. Ces données doivent
correspondre, afin de ne pas exposer l'appareil à des dégradations.
En cas de doute renseignez -vous auprès d'un électricien.
• La prise de réseau doit être protégée par une protection de 16A.
• Le branchement de l'appareil doit être raccordé au réseau électrique par un câble d'un
maximum de 3 mètres avec des conducteurs d'une section de 1,5 mm². Il est interdit
d'utiliser des multiprises ou des barrettes de prises multiples en raison des dangers
potentiels.
• Assurez-vous que le câble électrique est en parfait état et qu'il n'est pas disposé sous le
four ou des surfaces chaudes ou des bords coupants.
• Cet appareil doit être mis à la terre. En cas de court-circuit, la mise à la terre vous
protège des décharges électriques car le courant électrique est évacué par un câble
supplémentaire. L'appareil est équipé d'un câble ada pté avec conducteurs de terr e et
fiche de contact de sécurité.
• La fiche doit toujours être branchée dans une prise correctement installée et mise à la
terre.
• La sécurité électrique de l'appareil est garantie uniquement lorsqu'il est raccordé à un
circuit électrique avec un système de protection installé en toute conformité. Il est
interdit de l'utiliser avec une prise non protégée. En cas de doute faites vérifier
l'ensemble de l'installation électrique par un électricien.
Le constructeur ne peut pas être tenu responsable pour les dégâts causés par un
conducteur de masse abse nt ou int er r ompu.
19.8.1 Rallonge de câble
• ●Le câble de branchement est court pour éviter qu'il s'emmêle ou qu'on trébuche
dessus.
• ●Si vous utilisez un câble plus long ou une rallonge :
1) La capacité du câble ou de la rallonge doit correspondre au moins à la puissance
électrique de l'appareil.
2) La rallonge doit être un câble à trois fils mis à la terre.
3) Le câble long doit être posé de manière à ne pas pendre du bord de la table ou du
plan de travail où des enfants pourraient tirer dessus et pour qu'on ne risque pas de s'y
prendre les pieds.
caso HCMG 25 84
Page 85

20 Structure et fonctionnement
Ce chapitre est consacré à des indications importantes sur la structure et le
fonctionnement de l'appareil.
20.1 Vue d' e ns em ble
A) Champ de commande
Le temps de cuisson, la
puissance, les fonctions et
l'heure momentanée s' affichent.
B) Tourniquet
C) Anneau roulant
D) Plateau tournant
E) Fenêtre du four
F) Porte
G) Verrouillage de sécurité porte
H) Grille
caso HCMG 25 85
Page 86

20.2 El é m e nt s de comma nde e t d' aff ichage
MICROWAVE: Pour le réglage du programme de micro-
ondes
GRILL/COMBI. : Pour le réglage du programme de grill et
des programmes combinés
CONVECTION Pour la programmation de la température de
l'air pulsé et la fonction préchauffage.
WEIGHT/TIME DEFROST Pour le réglage du programme
de décongélation.
CLOCK/KITCHENTIMER: Pour le réglage de l'heure et du
minuteur.
STOP/CLEAR Pour stopper temporairement le programme
de cuisson ou pour effacer tous les réglages en cours.
UP, DOWN Pour sélectionner le temps de cuisson, les
niveaux de puissance et les programmes combinés ou de
cuisson.
START Pour confirmer et lancer le programme de cuisson
ou pour régler le programme de cuisson à démarrage rapide.
DOOR : Appuyer pour ouvrir la porte.
caso HCMG 25 86
Page 87

20.3 Si gna ux s onores
L'appareil émet les signaux sonores suivants pour envoyer des messages acoustiques :
• ● Un signal sonore : L'appareil a accepté la saisie.
• ●Deux signaux sonores : Il vous est demandé de tourner l'aliment ou, en cas de
fonction de préchauffage, de mettre l'aliment dans le four.
• ●Cinq signaux sonores : Le temps de cuisson est écoulé.
• ● Pas de signal sonore : L'appareil n'a pas accepté la saisie. Vérifier la saisie et
recommencer.
20.4 Dis pos itifs de sécurité
20.4.1 Avertissements sur l'appareil
Prudence
Danger, surfaces très chaudes !
En haut à l'arrière du carter se trouve un avertissement indiquant la présence de surfaces
très chaudes. La surface de l'appareil peut devenir très chaude à cet endroit.
► Ne pas toucher la surface chaude de l'appareil. Risque de brulure !
► Ne pas disposer ou ranger des objets sur l'appareil.
► Ne posez pas l'appareil à micro-ondes sur une plaque de cuisson ou un autre appareil
générant de la chaleur car vous pourriez l'endommager et perdre ainsi la garantie.
20.4.2 Verrouillage de porte
Dans le verrouillage de la porte de l'appareil se trouve un interrupteur de sécurité qui
empêche le fonctionnement de l'appareil quand la porte est ouverte.
Prudence
Danger, micro-ondes !
Si ce dispositif de sécurité est défectueux ou détourné de sa fonction, vous vous exposez
et vous exposez les autres directement aux micro-ondes.
► Ne jamais faire fonctionner l'appareil quand l'interrupteur de sécurité est défectueux.
► Ne jamais mettre ce dispositif de sécurité hors service.
20.4.3 Sécurité enfant
La sécurité enfant empêche une utilisation de l'appareil par les enfants sans surveillance.
Activer la sécurité enfant :
Appuyer pendant trois s econ des la touc he STOP/CLEAR, jusqu'à entendre un
bip sonore et que l'affichage de fonction s'allume. A l'état verrouillé
toutes les touches sont neutralisées.
caso HCMG 25 87
Page 88

Désactiver la sécurité enfant :
Appuyer pendant trois s econ des la touche STOP/CLEAR, jusqu'à entendre
un bip sonore et que l'affichage de fonction s'éteint. A l'état
déverrouillé toutes les touches sont de nouveau actives.
20.5 Pl a que si gnalétique
La plaque signalétique indiquant les données de raccordement et de puissance se trouve
à l'arrière de l'appareil.
21 Commande et fonctionnement
Ce chapitre est consacré à des indications importantes sur la commande de l'appareil.
Pour éviter tout risque et dégradations veuillez observer les indications.
Attention
► Pendant son fonctionnement ne pas l'laisser l ' appareil sans surveill ance, a fin de pouv oi r
intervenir rapidement en cas de danger.
21.1 Fondame nt a ux de la cuisson aux micro-ondes
• La puissance et la durée nécessaire pour la cuisson/l´échauffement des aliments
dépendent entre autre s de la température de départ, de la quantité et du type et de la
consistance des aliments. Utiliser la durée de cuisson indiquée la plus courte et
prolonger la durée si nécessaire.
• Disposer soigneusement les aliments. Disposer les morceaux les plus épais vers le
bord du plat.
• Couvrir les aliments pendant la cuisson. Le couvercle protège contre les projections et
procure une cuisson/un échauffement plus réguliers.
• Pendant l'échauffement il est conseillé de retourner, désagréger ou de tourner plusieurs
fois les aliments, afin d'obtenir une répartition régulière de la température.
• Les éventuels germes présents dans les aliments ne seront détruits que par une
température suffisamment élevée (> 70 °C) et par une durée suffisamment importante
(> 10 min).
• Piquer ou entailler plusieurs fois les aliments possédant une peau ou une enveloppe
solide comme les tomates, saucisses, pommes de terre, aubergines, afin que la vapeur
qui se produit puisse s'échapper et que les produits n'éclatent pas.
• On peut cuire les œufs sans coquille dans le micro-onde uniquement après avoir piqué
plusieurs fois le jaune. Le jaune d'œuf peut sinon éclater après la cuisson et répandre
des projections.
• Après la moitié de la durée de temps de cuisson retourner et déplacer du centre vers
les bords les mets comme les boulettes de viande.
caso HCMG 25 88
Page 89

Affichage
Programme combiné
Micro-onde
Grill
Convection
C-1
X X
C-2
X X
C-3
X X
C-4
X X X
21.2 Modes de fonctionnement
L'appareil peut être utilisé avec différents modes de fonctionnement. La liste ci-dessous
donne un aperçu des différents modes possibles :
Mode «Micro-onde»
Ce mode sert à l'échauffement normal des aliments.
Mode " Progr ammes de grill et combinés"
Le mode grill (G-1) convient pour rôtir et gratiner les plats.
Les programmes combinés conviennent pour cuire aux micro-ondes, faire griller et faire
cuire à l'air pulsé.
Les programmes combinés suivants sont possibles :
Mode «Air pulsé»
Dans ce mode l'air chaud est pulsé dans la chambre de cuisson afin d'obtenir un
échauffement rapide et régulier des aliments.
Mode «Multi-modes»
Ce mode permet de programmer jusqu'à 2 modes de cuisson à la suite. La séquence et la
durée de la décongélation, de la cuisson au four micro-onde, au four à chaleur tourna nt e
ou au gril sont réglables.
Mode "Programme de cuisson automatique"
Ce mode permet de sélectionner le programme de cuisson parmi 10 menus différents.
Décongélation automatique
Ce mode permet la décongélation d'aliments congelés. Vous pouvez choisir entre
décongélation suivant le poids ou suivant la durée.
21.3 Indications sur la vaisselle pour micro-onde
Le matériaux de vaisselle idéal pour micro-onde doit être per m éa bl e aux micr o-ondes et
permet à l'énergie des ondes de pénétrer dans le récipient pour échauffer les aliments.
Dans le choix de la vaisselle idéale pour micro-onde veuillez observer les conseils
suivants :
► Les micro-ondes ne peuvent pas traverser le métal. C'est pourquoi il ne faut pas utiliser
caso HCMG 25 89
des ustensiles métalliques et de la vaisselle comportant des ornements métalliques.
Page 90

► Pour la cuisson au micro-onde n'utilisez pas de produits en papier recyclé car ils
peuvent comporter des petits fr agments de métaux capables de provoquer des
étincelles et/ou de s'enflammer.
► Dans le micro-onde utilisez des récipients ronds ou ovales plutôt que des récipients
carrés ou rectangulaires, car dans les coins les aliments ont tendance à surchauffer.
► On peut utiliser des bandes de papier d'aluminium pour protéger les zones sensibles
conte un échauffement trop important. Ne pas utiliser trop d'aluminium et conserver une
distance d'environ 2,5 cm entre la feuille d'aluminium et les parois de la chambre du
four.
► Avec les micro-ondes ou des combinaisons avec le micro-onde, ne pas util i ser de
feuilles d'aluminium (voir tableau).
Le tableau suivant est une référence pour l'utilisation de la vaisselle de cuisson adaptée :
Micro-onde Grill Air pulsé Combi-
Vaisselle
naison
Verre résistant à la chaleur
Verre non résistant à la chaleur
Céramique résistante à la chaleur
Plastique résistant aux micro-ondes
Papier de cuisine
Tôle métallique
Plat métallique
Barquettes et feuilles d ' al umini u m
21.4 Ouvrir et fermer la porte
Ouvrir la porte
Pour ouvrir la porte de l'appareil apuyer l´ouvrir la porte. Si l'apparei l étai t en
marche, le programme de cuisson actuel sera interrompu.
Remarque
► Laisser la porte ouverte un instant avant d'introduire les mains dans le four afin que la
chaleur accumulée puisse s'échapper.
Fermer la porte
Fermer la porte jusqu'à entendre le clic du verrouillage. Si un programme de
cuisson avait été interrompu par l'ouverture de la porte, il pourra être continué
en pressant la touche START.
21.5 Mis e en rout e après s él e c ti on d' un programme
Après avoir sélectionné le programme presser START, afin de démarrer le
programme de cuisson.
caso HCMG 25 90
Page 91

21.6 Démarrage rapide
1) Démarrage rapide du micro-onde : Vous pouvez faire fonctionner
l'appareil à 100 % de sa puissance pendant la durée que vous
souhaitez. Pour ce faire, réglez l'heure et lancez ensuite le
micro-onde à 100 % de sa puissance en appuyant sur START.
2) En mode veille, appuyez sur START pour chauffer des plats à 100 %
de puissance pendant 30 secondes. Tout appui sur la touche START
augmente le temps de chauffage de 30 secondes. Le maximum est de
95 minutes.
3) Dans tous les programmes de mi cr o-ondes, grill, air pulsé et combinés,
une fois que le réglage du programme est déjà fait et confirmé, on
prolonge la durée de 30 secondes chaque fois qu'on appuie sur la
touche START.
Attention : Cette fonction n'est pas disponible en pr og r am me déc ongélation ou en
programme de cuisson automatique.
21.7 Arrêt/Interruption
Pour interrompre le programme de cuisson en cours, on peut opérer comme
suit :
Exercer une pression unique sur la touche STOP/CLEAR. Le programme en
cours sera stoppé.
Ouvrir la porte de l'appareil. Le programme en cours sera stoppé.
Remarque
► Pour continuer le programme de cuisson interrompu, presser la touche
START après avoir refermé la porte.
Pour arrêter le programme interrompu, presser à nouveau la touche
STOP/CLEAR.
Remarque
► Avant le début d'un autre programme de cuisson il faut effacer
l'affichage et remettre le système à zéro en pressant la touche
STOP/CLEAR.
21.8 Réglage de la montre
Dès que l'appareil est branché sur le secteur, l'écran affiche 0:00 et le
minuteur émet un signal sonore.
1) Appuyez une fois sur CLOCK/KITCHENTIMERl, 00:00 s'affiche.
caso HCMG 25 91
Page 92

2) Appuyez sur ou pour régler l'heure dans la
fourchette de 0 à 23 (horlog e de 24 heures) .
3) Appuyez sur CLOCK/KITCHENTIMER, l'affichage des minutes
clignote.
4) Appuyez sur ou pour régler les minutes dans la
fourchette de 0 à 59.
5) Appuyez sur CLOCK/KITCHENTIMER pour terminer le réglage de
l'heure. Le point double de l'horloge clignote.
Attention : Si l'heure n'est pas réglée, on ne pourra pas l'utiliser plus tard.
Si, pendant le réglage de l'heure, vous appuyez sur STOP/CLEAR,
l'appareil revient à son réglage précédent.
21.9 Fonction alarme minuteur
1) Appuyez deux fois sur CLOCK/KITCHEN TIM E R, l'écr an a f fich e 00:00.
2) Appuyez sur ou pour régler l'alarme (maximum
95 minutes).
3) Appuyez sur START pour confirmer le réglage.
4) Une fois que l'heure de l'alarme est atteinte, le minuteur émet cinq
signaux sonores. Quand l'heure a été réglée, l'écran affiche l'heure
momentanée. Attention : L'horloge ne dépend pas de votre réglage
d'heure, c'est une simple alarme de minuterie de cuisine.
21.9 M ode «m icro-onde»
En cas de cuisson aux micro-ondes, vous pouvez adapter le degré de puissance et le
temps de cuisson (maximum 95 minutes).
1) Appuyez sur MICROWAVE et l'écran affiche "P100".
2) Appuyez plusieurs fois sur MICROWAVE ou les touches
ou jusqu'à ce que la puissance souhaitée apparaisse
(P100, P80, P50, P30, P10).
3) Appuyez ensuite sur START pour confirmer.
caso HCMG 25 92
Page 93

4) Appuyez sur ou pour régler le temps de cuisson
entre 0:05 (5 secondes) et 95:00 (95 minutes). Vous lancez la cuisson
en appuyant à nouveau sur START.
5) Une fois que le temps de cuisson est écoulé, le système émet cinq
signaux sonores.
Exemple : Si vous voulez faire cuire quelque chose pendant 20 minutes à
80 % de la puissance du micro-onde, procédez comme suit :
1) Appuyez une fois sur MICROWAVE et l'écra n affic he "P100".
2) Appuyez à nouveau sur MICROWAVE ou sur ou
pour sélectionner la pui ss ance des mic r o-ondes.
3) Appuyez sur START pour confirmer le réglage et "P80" s'affiche.
4) Appuyez sur ou pour régler le temps de cuisson
jusqu'à ce que l'écran affiche 20:00.
5) Appuyez sur START pour lancer la cuisson.
6) Une fois que le temps de cuisson est écoulé, le système émet cinq
signaux sonores.
Attention : les graduations du réglage de temps de cuisson sont les
suivantes :
0 -1 minute : 5 secondes
1 – 5 minutes : 10 secondes
5 – 10 minutes : 30 secondes
10 – 30 minutes : 1 minute
30 – 95 minutes : 5 minutes
Récapitulatif des puissances du micro-onde :
Nombre d'appuis sur la
1 2 3 4 5
touche
Puissance du micro-onde 100 % 80 % 50 % 30 % 10 %
caso HCMG 25 93
Page 94

21.10 Mode "Grill " et progr a m m e s combinés
la touche
1
C-1
X X 2 C-2
X X
3
C-3
X X
4
C-4
X X X
Le mode «Grill» est particulièrement adapté pour des tranches de viande fines, steaks,
côtelettes, kébabs, saucisses et morceaux de poulet.
Sélectionnez le programme "Grill" en app uyant une fois sur la touche
GRILL/COMBI. L'écran affiche "G-1" pour la fonction grill.
1) Appuyez à nouveau sur GRILL/COMBI. ou appuyez sur ou
pour sélectionner le programme combiné souhaité, "G-1",
"C-1", "C-2", "C-3" ou "C-4" s'affiche.
2) Appuyez sur START pour confirmer.
3) Appuyez sur ou pour régler le temps de cuisson
entre 0:05 (5 secondes) et 95:00 (95 minutes). Appuyez sur START pour
lancer la cuisson.
4) Une fois que le temps de cuisson est écoulé, le système émet cinq
signaux sonores.
Exemple : Si vous voulez faire cuire quelque chose pendant 10 minutes,
procédez comme suit :
1) Appuyez une fois sur GRILL/COMBI., l'écran affiche "G-1".
2) Appuyez sur START pour confirmer.
3) Appuyez sur ou pour régler le temps de cuisson
jusqu'à ce que l'écran affiche 10:00.
4) Appuyez sur START pour lancer la cuisson.
Remarque
► Une fois que la moitié du temps de cuisson est écoulée, l'appareil envoie deux
signaux sonores pour vous informer que vous pouvez maintenant retourner
l'aliment. Pour ce faire, ouvrez la porte, retournez l'aliment et refermez la
porte. Appuyez sur START pour poursuivre la cuisson.
► ATTENTION : Après les bips, l'appareil ne fait pas de pause.
Attention : Instructions pour les combinaisons
Nombre d'appuis sur
caso HCMG 25 94
Affichage Micro-onde Grill Convection
Page 95

21.11 Mode «Air pulsé»
Lors de la cuisson à l'air pulsé, l'air chaud circule dans la chambre de cuisson pour brunir
et rôtir régulièrement les aliments. Ce four peut être réglé sur dix niveaux différents de
température. Le temps de cuisson maximal est de 95 min utes.
21.11.1 Mode "Air pulsé" avec préchauffage
1) Appuyez une fois sur CONVECTION, l'affichage clignote su "150".
2) Appuyez à nouveau sur CONVECTION ou appuyez sur
ou pour sélectionner la température souhaitée entre 150 et
240 °.
3) Appuyez sur START pour confirmer la température.
4) Appuyez à nouveau sur START et l'appareil commence à préchauffer.
Dès que la température est atteinte, la minuterie émet deux signaux
sonores pour vous dire que vous pouvez maintenant mettre le plat
dans l'appareil. La température de préchauffage s'affiche et clignote.
Mettez le plat dans l’appareil et refermez la porte.
5) Avec les touches ou , réglez maintenant le temps
de cuisson à 95 minutes au maximum et confirmez par START.
6) Une fois que le temps de cuisson est écoulé, le système émet cinq
signaux sonores.
Remarque
► Vous ne pouvez rentrer le temps de cuisson qu'une fois que la température de
préchauffage est atteinte. Vous devez alors ouvrir la porte une fois pour pouvoir
indiquer le temps de cuisson. Si le temps de cuisson n'est pas saisi dans les 5 minutes
suivant les deux bips, l'appareil passe en mode veille.
► Vous pouvez vérifier la température de l'air pulsé pendant la cuisson en appuyant sur la
touche CONVECTION .
Appuis sur la touche Température Appuis sur la touche Température
1 150 °C 6 200 °C
2 160 °C 7 210 °C
3 170 °C 8 220 °C
4 180 °C 9 230 °C
5 190 °C 10 240 °C
caso HCMG 25 95
Page 96

21.11.2 Mode "Air pulsé" sans préchauffage
1) Appuyez une fois sur CONVECTION, l'affichage clignote su "150".
2) Appuyez à nouveau sur CONVECTION ou appuyez sur ou
pour sélectionner la température souhaitée entre 150 et
240 °.
3) Appuyez sur START pour confirmer la température.
4) Appuyez sur ou pour régler le temps de
cuisson à un maximum de 95 minutes.
5) Appuyez sur START pour lancer la cuisson.
6) Une fois que le temps de cuisson est écoulé, le système émet cinq
signaux sonores.
21.12 Mode «Niveaux mul t iples»
Avec ce mode de fonctionnement, on peut programmer jusqu'à 2 successions
automatiques. L'ordre et la durée de la décongélation, de la cuisson aux micro-ondes, du
passage au grill (combiné) ou du mode air pulsé est réglable.
Si vous voulez utiliser la fonction décongélation, vous devez la choisir en premier.
Remarque
► ► Les programmes de cuisson automatiques et la fonction préchauffage ne peuvent
pas être utilisés pour la cuisson à niveaux multiples.
Exemple : Si vous souhaitez décongeler des aliments pendant 5 minutes puis les faire
cuire à une puissance de 80 % de micro-ondes pendant 7 minutes, procédez comme suit :
1) Appuyez deux fois sur et l'écran affiche "d-2 " pour la déc ong él ati o n s ui v ant le
temps.
2) Appuyez sur ou pour régler le temps de décongélation à 5
minutes.
caso HCMG 25 96
Page 97

200
200
300
300
400
400
3) Appuyez sur MICROWAVE et réglez la puissance des micro-ondes
avec ou à 80 % et l'écran affiche P80.
4) Appuyez sur START pour confirmer.
5) En appuyant sur ou , réglez le temps de cuisson
à 7 minutes.
6) Appuyez sur START pour lancer la cuisson.
7) Une fois que le temps de cuisson est écoulé, le système émet cinq
signaux sonores.
Remarque
► ► Entre le réglage du premier et du deuxième programmes de cuisson, ne confirmez
pas le temps car vous lanceriez ainsi directement le premier programme de cuisson.
Après avoir réglé l'heure pour le premier programme de cuisson, pas sez directement au
réglage de la fonction du deuxième programme de cuisson.
21.13 Mode "Programme de cuisson automati que "
Dans ce mode de cuisson on peut sélectionner le programme parmi 10 menus différents.
Pour plus de renseignement consulter le tableau de la page suivante.
1) En mode veille, appuyez sur pour sélectionner la fonction
souhaitée. L'écran affiche "A1", "A2", "A3" … "A10".
2) Appuyez sur START pour confirmer le programme souhaité.
3) Avec ou , sélectionnez le poids ou la quantité
souhaitée d'unités de service. L'écran affiche le nombre d'unités de
service ou le poids en grammes (voir tableau).
4) Appuyez sur START pour lancer la cuisson.
5) Une fois que le temps de cuisson est écoulé, le système émet cinq
signaux sonores.
Récapitulatif du menu auto
Menu Poids (g) Affichage Puissance
A1 Pizza
C-4
caso HCMG 25 97
Page 98

1 (environ 230 g)
1
2 (environ 460 g)
2
3 (environ 690g)
3
150
150
300
300
450
450
600
600
150
150
250
250
350
350
450
450
650
650
150
150
350
350
500
500
1 tasse (240 ml)
1
2 tasses (480 ml)
2
3 tasses (720 ml)
3
d'eau froide)
d'eau froide)
d'eau froide)
50
50
100
100
500
500
750
750
1000
1000
1200
1200
A2 Pommes de terre
A3 Viande
A4 Poisson
A5 Légumes
A6 Boissons / Café
A7 Pâtes
50 (rajoutez 450 ml
100 %
100 %
80 %
100 %
100 %
50 80 %
A8 Pop-corn
A9 Gâteau
A10 Poulet
100 (rajoutez 800 ml
150 (rajoutez 1200 ml
475 475 Préchauffer à 180°
100
150
100 %
C-4
A9 Gâteau
► Si vous sélectionnez le programme gâteau A9, l'appareil préchauffe
d'abord. Ne mettez pas tout de suite le gâteau dans l'appareil. Le fo ur
n'est chauffé à 180 ° qu'une fois que le minuteur a émis deux bips.
Mettez maintenant le gâteau dans le four. Refermez la porte et lancez la
cuisson par START. Le minuteur continue à tourner et le gâteau cuit.
21.14 Mode «Décongélation automati que »
Le menu «Décongélation automatique» permet de décongeler avec précaution les
aliments congelés.
caso HCMG 25 98
Page 99

21.14.1 Mode "Décongélation" suivant le poids
1) Appuyez une fois sur WEIGHT/TIME DEFROST et l'écran affiche "d-1".
2) Avec ou , réglez le poids de l'aliment. L'écran affiche
d'abord "100 g". Vous pouvez régler le poids entre 100 et 2000 g.
3) Démarrez la décongélation en appuyant sur START.
4) Une fois que le temps de cuisson est écoulé, le système émet cinq signaux
sonores.
21.14.2 Mode "Décongélation" suivant la durée
1) Appuyez deux fois sur WEIGHT/TIME DEFROST et l'écran affiche "d-2".
2) Appuyez sur ou pour régler le temps de décongélation
à 95 minutes au maximum.
3) Démarrez la décongélation en appuyant sur START.
4) Une fois que le temps de cuisson est écoulé, le système émet cinq signaux
sonores.
21.15 Consultation de fonction
1) Si, pendant la cuisson, vous appuyez sur CLOCK/KITCHEN TIMER, l'heure
réglée s'affiche.
2) Si vous appuyez sur MICROWAVE, GRILL/COMBI. ou CONVECTION
pendant la cuisson concernée, la puissance momentanée s'affiche..
22 Nettoyage et entretien
Ce chapitre est consacré à des indications importantes sur le nettoyage et l'entretien de
l'appareil. Pour éviter la dégradation de l'appareil par un nettoyage incorrect et pour son
bon fonctionnement veuillez observer les conseils ci-dessous.
22.1 Consi gne s de s é cur ité
Prudence
Avant de commencer le nettoyage de l'appareil veuillez observer les consignes de sécurité
suivantes :
► Le four doit être régulièrement nettoyé et il faut éliminer les restes d'aliments cuits. Si
l'appareil n'est pas maintenu dans un état permanent de propreté, cela a des effets
négatifs sur sa durée de vie et peut rendre l'appareil dangereux et provoquer
l'apparition de moisissures et d'attaques bactériennes.
► Avant le nettoyage arrêter l'appareil et retirer le connecteur de la prise murale.
caso HCMG 25 99
Page 100

Prudence
► Après son utilisation la chambre du four est chaude. Attention, risques de brulures !
Attendre que l'appareil soit froid.
► Nettoyer la chambre du four après utilisation quand le four est refroidi. Ne pas attendre
trop longtemps car cela rend le nettoyage plus difficile, et éventuellement impossible.
Un encrassement trop important peut le cas échéant dégrader l'appareil.
► La pénétration d'humidité dans l'appareil peut détériorer les composants électroniques.
Faire attention qu'aucun liquide ne pénètre à l'intérieur de l'appareil par les ouvertures
de ventilation.
► Ne pas utiliser de produits nettoyants agressifs ou abrasifs et aucun solvant.
► Ne pas gratter les salissures résistantes avec des objets acérés.
► Suite aux dangers encourus, les réparations et opérations d'entretien nécessitant le
retrait du blindage anti-rayonnem ents ne doi vent être faites que par un profess i o nnel .
22.2 Nettoyage
Chambr e du four et intérieur de la porte
• Maintenir la chambre du four propre. Essuyer à l'aide d'un chiffon humide les restes
d'aliments collés, aspergés ou tombés sur les parois du four.
Quand le four est fortement enc r ass é on peu t util i ser un prod ui t nettoyant doux.
• Essuyer la porte, la fenêtre et les joints de porte à l'aide d'un chiffon humide, afin
d'éliminer les taches et les restes d'aliments. Les restes sur le joint de la porte peuvent
empêcher celle-ci de se refermer complètement et permettre ainsi des fuites de microondes.
• Essuyer la vapeur qui s'est déposée sur la porte du four à l'aide d'un chiffon humide.
Cela peut se produire quand l'appareil est utilisé dans un environnement humide, et
c'est tout à fait normal.
• On peut éliminer les odeurs désagréables dans le four en y déposant un saladier
adapté au micro-onde contenant de l'eau à laquelle on a mélangé le jus et la peau d'un
citron, et en cuisant cinq minutes en mode micro-onde. Sécher ensuite le four à fond à
l'aide d'un chiffon doux.
• Après le nettoyage de l'intérieur du four laisser la porte ouverte jusqu'à ce l'appareil soit
sec à l'intérieur.
• Conseil de nettoyage - Les parois intérieures sur lesquelles des aliments cuits adhèrent
se nettoient plus facilement comme suit : Posez un demi-citron dans un plat, rajoutezici 300 ml d'eau et faites le chauffer pendant 10 à 100 % de puissance. Essuyez
ensuite l'appareil avec un chiffon sec et doux.
Face frontale de l'appareil et champ de commande
• Nettoyer la face frontale et le champ de commande à l'aide d'un chiffon doux humidifié.
caso HCMG 25 100
 Loading...