

Page 1
■ To set up for projection
Install the bundled software (PJ Camera Software) on the computer you plan to use.
1
Place the CASIO CD-ROM that comes bundled with the
YC-400 package into the computer’s CD-ROM drive.
• This should cause the “CASIO Multi PJ Camera” screen to appear on
your computer screen automatically.
2
Click the tab for your language.
3
Click the [Install] button for “PJ Camera Software” (top option).
4
Follow the instructions that appear on your screen to install the software.
5
After installation is complete, restart the computer.
• Configure your computer monitor’s resolution setting for XGA (1024 × 768) or SVGA (800 × 600). Using any
other resolution setting will cause an error message to appear when you try to start up PJ Camera Software.
Set up the PJ Camera Stand.
1
Unfold the PJ Camera Stand as shown below.
2
Attach the PJ
Camera to the
camera stand.
Connect the power cord and cables as shown below.
Important!
• Be sure to connect the bundled AC adaptor to the PJ Camera Stand.
• Operating the PJ Camera on battery power without connecting the AC adaptor to the PJ Camera Stand can run
down battery and so projection becomes impossible.
• Note that the YC-400 does not come with an RGB cable. To connect a projector to your computer, use the RGB
cable that comes bundled with the projector or purchase a commercially available cable.
• For full details about connections, see the documentation that comes with your computer and projector.
Turn on power.
1
On the PJ Camera Stand, press the [ ] (power) button.
• If you are starting up the system for the first time, a “Found New Hardware Wizard” dialog box will appear (in
the case of Windows XP). Select the “Install the software automatically (Recommended)” check box, and then
click [Next]. If the “CASIO MULTI PJ CAMERA has not passed Windows logo testing” dialog box appears,
click [Continue Anyway]. If the “Digital Signature Not Found” dialog box appears, click [Yes].
• Turning on power will cause the PJ Camera Software to start
automatically and display the dialog box shown nearby.
2
Leaving “Business Document” selected as the startup mode, click the [OK] button.
• This will close the dialog box, and cause the PJ Camera to start auto adjustment.
After your computer restarts, this icon (PJ Camera Software icon) will be
displayed in your computer’s task tray in the lower right corner of the screen.
Unfold these parts until
you hear them click into
place.
Load the battery into the PJ Camera and then
attach the camera bracket to the bottom of the PJ
Camera.
Press the PJ Camera against the
camera bracket until it clicks securely
into place.
Use a coin or some similar
object to securely tighten this
screw.
USB cable
Computer
Projector
RGB cable
Projecting a Document Image
Using the Operation Bar
After completing the procedure under “To set up for projection” on the other side of this sheet, move
the mouse pointer ( ) to the top of the screen on your computer display. This will cause the PJ
Camera Software operation bar to appear.
You can control the PJ Camera Software using the buttons and menus of the operation bar.
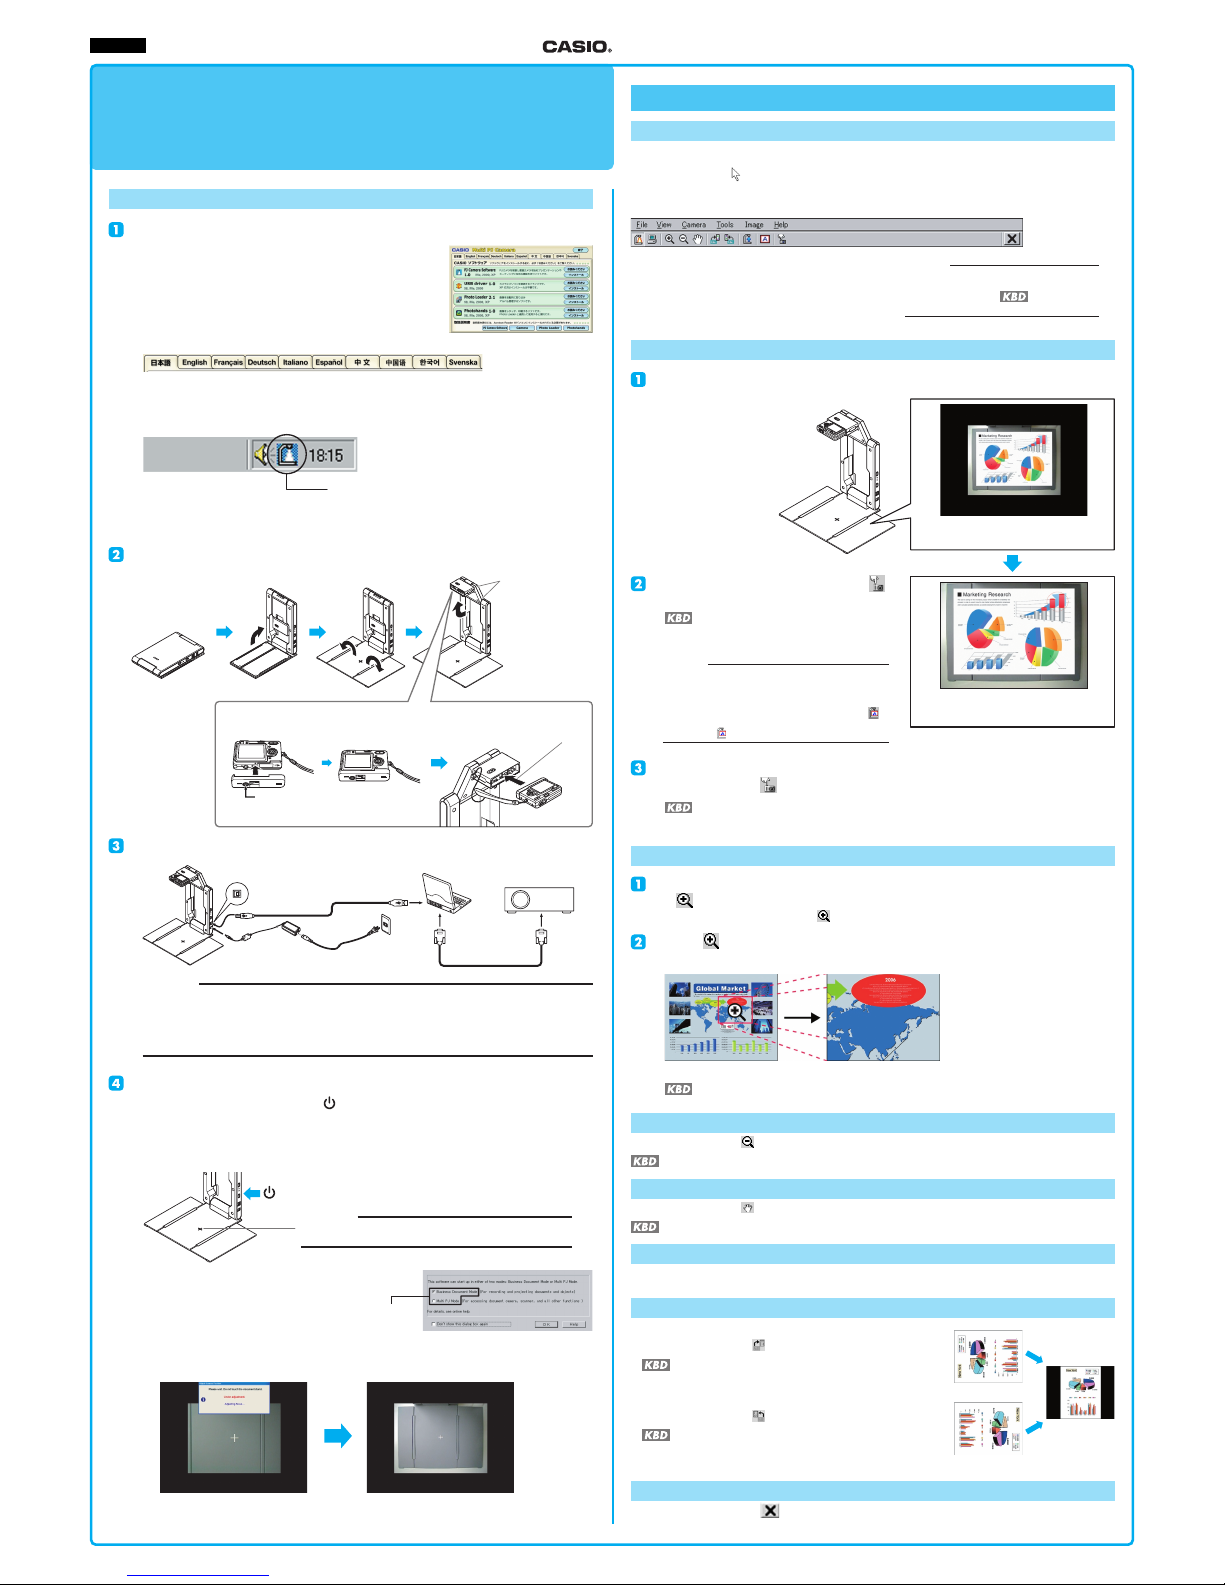
■ To project a document image
Place the document you want to project onto the PJ Camera Stand’s document stage.
Display the operation bar, and then click .
• This will project an image of the document.
Instead of clicking the button above, you
could press the [Enter] key on your computer
keyboard.
To project the image of another document, replace the document on the document
stage and then click .
After projecting the images of two or more documents, you can use the left or up arrow key to scroll to
a previous document, and the right or down key to scroll forward through projected images.
■ To zoom in on the projected document image
While the image of a document is being projected, display the operation bar and then
click
.
• This changes the mouse pointer to .
Move the pointer to the part of the image that you want as the center of the
zoomed image, and then click.
• This will enlarge the projected image. You can perform this operation up to nine times.
You can also zoom in on the projected image by holding down the computer’s [Ctrl] key and pressing [앖].
■ To zoom out on the projected document image
On the operation bar, click and then click the screen.
You can also zoom out on the projected image by holding down the computer’s [Ctrl] key and pressing [앗].
■ To scroll a zoomed document image
On the operation bar, click and then drag the screen.
You can also scroll the projected image pressing one of the arrow keys on the computer keyboard.
■ To return a zoomed image to its normal size
Press the [Delete] key on the computer keyboard ([Del] key on some computers).
Rotating the Projected Image
● To rotate the projected image 90 degrees right
On the operation bar, click .
You can also rotate the projected image right by holding down the
computer’s [Ctrl] key and pressing [씮].
● To rotate the projected image 90 degrees left
On the operation bar, click .
You can also rotate the projected image left by holding down the
computer’s [Ctrl] key and pressing [씯].
■ To quit PJ Camera Software
On the operation bar, click .
■
Tip
■
You can also perform operation bar button
operations from you computer keyboard, if you
want. Sections marked
contain
information about keyboard operations.
Document Camera
Presentation
Zoom In
Zoom Out
Scroll
Rotate Right
Rotate Left
Show Document Monitor
Trapezoid Correction
Shutter
The image that appears on your
computer screen is called the monitor
image.
The projected image, which is the image
data recorded by the PJ Camera, is the
document camera image.
Multifunctional Camera System YC-400
Business Document Startup Mode Quick Guide
English
Important!
• The camera uses this cross mark for auto adjustments. Make sure
there is nothing on the document stage at this time.
Check to make sure that “Business Document”
is selected as the startup mode.
Document projection setup is complete
when your computer screen appears as
shown above.
∗
The PJ Camera Software’s Business Document startup mode is for recording and projecting images of paper
documents and three-dimensional objects. This Quick Guide provides basic information and procedures for
projecting in the Business Document Startup Mode.
■
Tip
■
When Trapezoid Correction is turned on, PJ Camera
Software will correct the orientation of the projected
image, up to a point, so the projected image appears
straight, even if the document on the document stage is
not straight. To turn on Trapezoid Correction, click the
(Trapezoid Correction) button on the operation bar so it is
depressed ( ).
 Loading...