

Page 1
When
case
closed
1
before correction after correction
1
2
Install YC400’s software from
CD-ROM bundled with this
product on a Computer
*After the computer starts up, make sure PJ Camera
Software icon is in the Windows taskbar.
AUTO
Recording area
Recording area
Image projection area
Image projection area
Preview list area
(thumbnails of all images stored in computer)
Play list area
(assort images for projection in sequence)
Preview list area
(all images stored on camera unit)
Play list area
(Assort images for projection in sequence)
Camera unit removed
from YC400 can be
used as stand-alone
digital camera
※In case of recording area same as projection area, click Projection Area Capture button
to capture handwritten combined with original projection image as an image file
http://world.casio.com/
[
Projection Area Capture
]
[
Board Area Capture
]
※Click Specify Contour button for manual correction
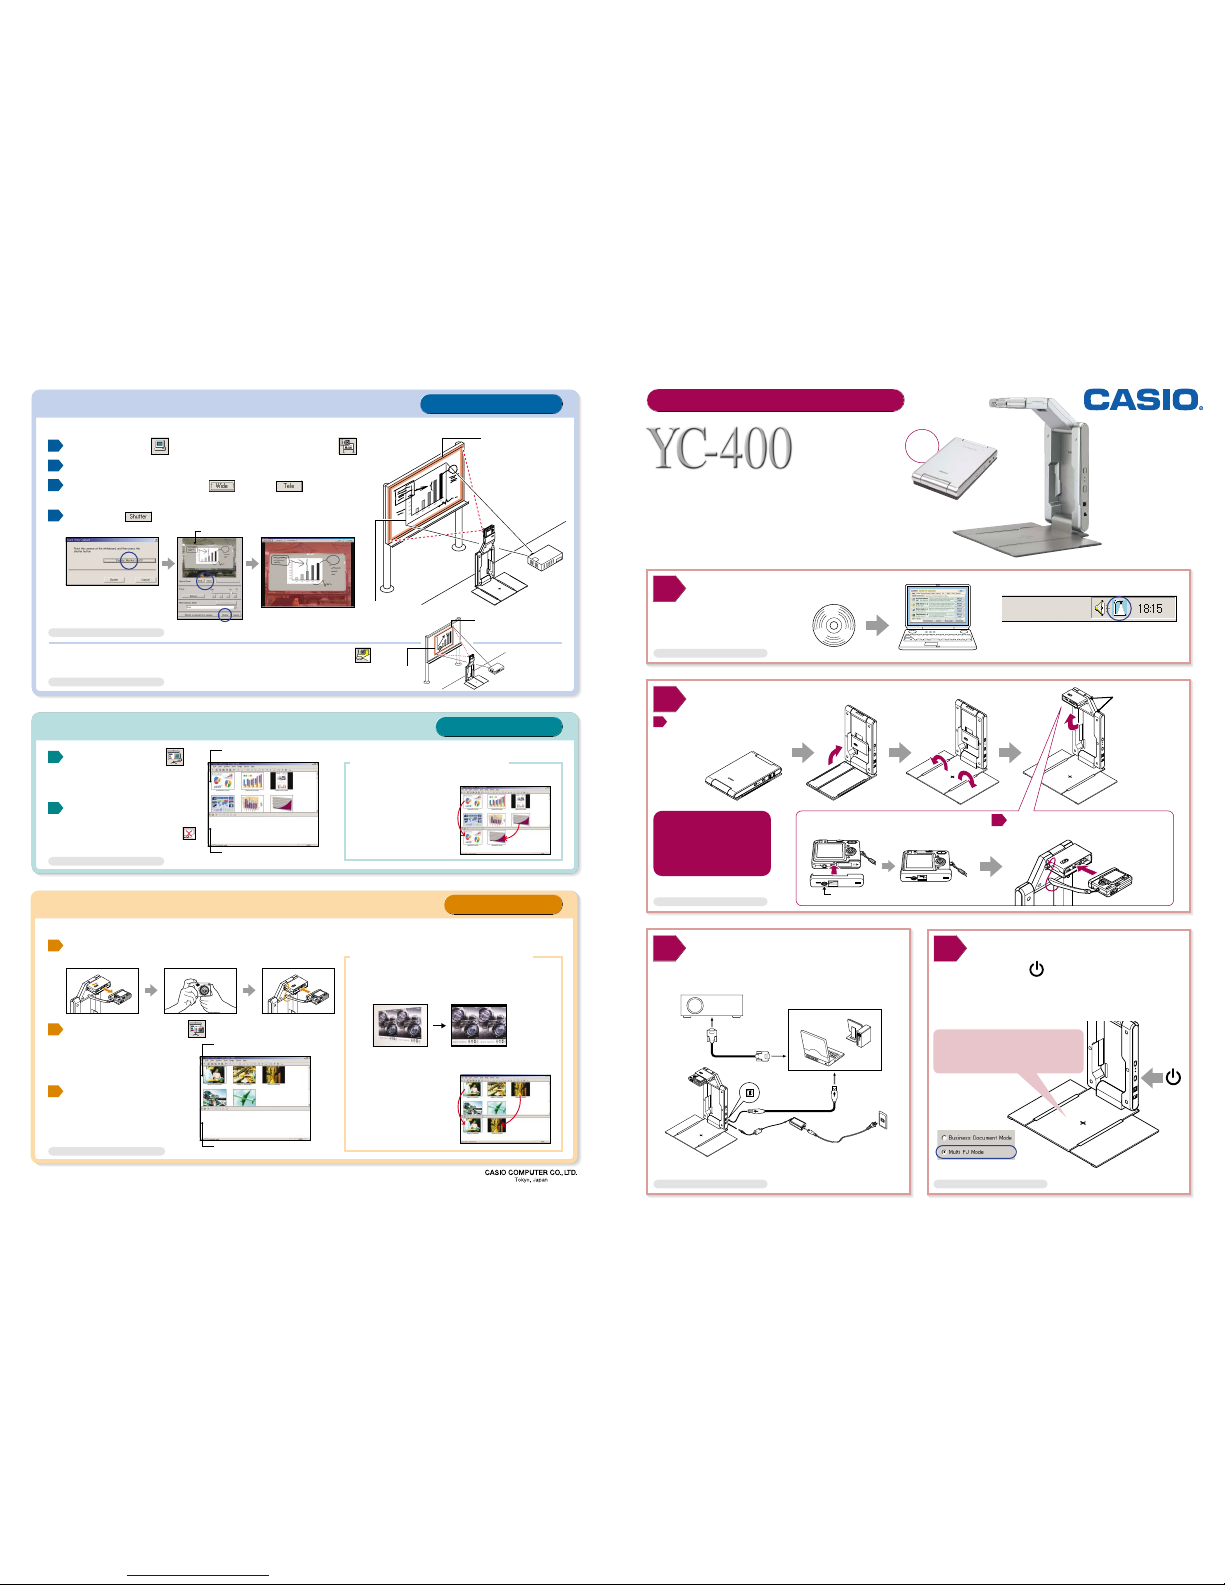
INSTALL SOFTWARE
*For more information, see YC-400 User's Guide
*For more information, see YC-400 User's Guide
*For more information, see Software User's Guide
*For more information, see Software User's Guide
*For more information, see Software User's Guide
*For more information, see Software User's Guide
1
2
SET UP YC-400
Unfold stage and stand of YC-400
Capture and record information on whiteboard
Capture and record handwriting information on whiteboard combines with projection image on the same whiteboard
Project imaged stored in camera unit by attached back to YC-400’ stand without transferring data from camera
1
1
2
1
2
2
3
3
4
Project stored image on computer
Thumbnail of image files on
preview list area appears
Click Full Screen/Full Screen Off
to go back to preview list area
Project images recorded by detached camera unit
●Assort stored images for projection in sequence
Useful function of PC image mode
Automatically correct distortion in a image
in Business Shot Mode
Useful function of Camera image mode
●Correct image taken from diagonal angle
●Assort images for
projection in sequence
2
Image preview dialog box
Board Area Capture Mode
Select PC image mode
Camera Image Mode
4
START UP PJ Camera Software
Never touch YC-400 while the automatic
camera position adjustment operation is
being performed because Auto Sensor is
in process.
※All operations of YC-400 are controlled
by PJ Camera Software
Turn on power button on YC400 stand, PJ camera
Software will start up automatically and
a dialog will appear.
Click Presentation and select Board Area Capture Mode
Point camera part at the whiteboard
Adjust capturing frame by wide and tele button
on Window of Board Area Capture
Click shutter button on dialog box to capture image
Click PC Image Mode
button
Double-click a thumbnail
for projection
Attach back camera unit into YC-400’s stand after
recording images
Click Camera Image Mode button
Double-click a thumbnail
for projection
Select images on preview list,
and drag and drop them to
play list area
Select images on preview
list area, and drag and drop
them to play list area
Preview list of images recorded
by camera unit appears
Attach camera unit to YC400 stand
until it clicks securely
Insert camera battery (NP-20) bundled
with this product into camera unit
※At folding of YC-400,
camera unit is to be
removed to avoid
unnecessary damages
Unfold arm for camera unit
until it snaps
Attach bracket screwing by using like a coin
RGB Cable
USB Cable
Computer
Projector
Connect YC-400, projector and computer
YC-400 and computer connected by USB cable bundled with this product
3
CONNECTION
*RGB Cable is not bundled with this product
※ Make sure that you are using the AC adaptor to supply
power to the camera when using the document stand.
Image recording under battery power may not be possible
when battery power is low.
*For more information, see YC-400 User's Guide *For more information, see YC-400 User's Guide
Before correction
Dialog Box
Select Multi PJ Mode
Multifunctional Camera System
Multifunctional Camera System
RJA515228-005
Quick Guide
Multi PJ Startup Mode
*The Multi PJ startup mode provides access to all of the features and
functions (document camera, scanner, etc.) of the PJ Camera Software.
This Quick Guide provides you with a comprehensive overview of
what you can do with the PJ Camera Software.
Page 2

■How to put document or object on the stage, and how to select suitable mode
Place document or object in the center of the document stage covering [+] mark
Click suitable buttons as per size of document or object
Click suitable buttons as per size of document or object
Small
document like
business card
3D object
Small
document like
business card
3D object
Trapezoid
Correction
Small
Document
3D Object
Small
Document
3D Object
Document like
letter size
Large
document like
newspaper
Document like
letter size
Large
document like
newspaper
ON OFF OFF
ON ON OFF
ONOFF
OFF OFF
ON OFF
ONOFF
Document Camera Mode Scanner Mode
Place document like letter size on the document stage
Never touch YC-400 while the
automatic camera position
adjustment operation is being
performed because Auto Sensor
is in process.
★Provide enough illumination for document or object
★Dark shadow will affect the sensor to capture properly
●Change images
●
Zoom-in, zoom-out image
Click Forward button to forward image, click Back
button to previous image
Click Rotate Left to rotate left for 90 degrees, click
Rotate Right to rotate right for 90 degrees
Click Save button, and indicate folder and file name
to store image
Click Zoom-In for close-up, click Zoom-Out for
normal size, click Scroll to move the image around
AUTO
●Store image
●Rotate image
Document Camera Mode
Scanner Mode
1
1
2
3 4
Q
u
it
S
h
u
t
te
r
3
D
O
b
je
c
t
S
m
a
ll D
o
c
u
m
e
n
t
T
r
a
p
e
z
o
id
C
o
r
r
e
c
tio
n
Full Screen/Full Screen Off*
F
o
r
w
a
r
d
B
a
c
k
C
o
r
r
e
c
t B
r
ig
h
t
n
e
s
s
S
p
e
c
ify
C
o
n
t
o
u
r
R
o
ta
te
L
e
ft
R
o
ta
te
R
ig
h
t
F
it Im
a
g
e
S
c
r
o
ll
Z
o
o
m
O
u
t
Z
o
o
m
I
n
S
a
v
e
P
r
e
s
e
n
t
a
tio
n
S
c
a
n
n
e
r
C
a
m
e
r
a
Im
a
g
e
P
C
Im
a
g
e
D
o
c
u
m
e
n
t
C
a
m
e
r
a
B
o
a
r
d
A
r
e
a
C
a
p
t
u
r
e
P
r
o
je
c
t
i
o
n
A
r
e
a
C
a
p
t
u
r
e
Reference of Toolbar button
Capture and record
information on
whiteboard area
Record document or
object and project
its image
Conduct presentation
using images stored
on computer
Conduct presentation
using images stored
on camera memory
Record document or
object as graphic data
on computer
■
By moving mouse pointer to the top center of the computer screen, the operation bar combines a menu bar and tool bar appears
before correction after correction
Record document or object and project its image
Record images of document or object on computer
Click Scanner Mode button
to enter Scanner Mode
Place document or object
on the stage
Press start button to start scanning
Scan item automatically by replacing a new documents or object
Click stop button to finish
auto scanning
Inclination, distortion, color and tones of document and object are automatically corrected and projected
Even when document is placed roughly,
it is recorded as proper full-resolution image
Useful function
Document stage
N
e
w
s
p
a
p
e
r
s
i
z
e
Newspaper size
L
e
t
t
e
r
s
i
z
e
Letter size
N
e
w
s
p
a
p
e
r
s
i
z
e
L
e
t
t
e
r
s
i
z
e
Business
Card
size
Bu
sin
ess
C
a
r
d
s
i
z
e
Document stage
*For more information, see Software User's Guide
*For more information, see Software User's Guide
(Once scanning is completed, its image is
listed as first on preview list area)
Scanning Window
Adjust frame size according
to scanning object
Thumbnail of recorded images
after correction
before correction after correction
AUTO
AUTO
Replace document
By replacing document or object, record it and project
its image automatically
*When “Document Camera Mode” is selected, “Show Document Monitor” button appears instead of “Full Screen/Full Screen Off” button.
 Loading...