

Page 1

DATA PROJECTOR
XJ-UT310WN
Network Function Guide
z Be sure to read the “Safety Precautions” and “Operating Precautions” in the “Setup Guide”
document that comes with the Data Projector, and make sure you use this product correctly.
z Keep this manual in a safe place for future reference.
z Visit the site below for the latest version of this manual.
http://world.casio.com/manual/projector/
EN
1
Page 2

z DLP is a registered trademark of Texas Instruments of the United States.
z Microsoft, Windows, and Windows Vista are registered trademarks or trademarks of Microsoft
Corporation in the United States and other countries.
z HDMI, the HDMI Logo and High-Definition Multimedia Interface are trademarks or registered
trademarks of HDMI Licensing, LLC.
z Mac OS is a trademark or registered trademark of Apple, Inc. in the United States and other
countries.
z XGA is a registered trademark of IBM Corporation of the United States.
z PJLink is a pending trademark or a registered trademark in Japan, the United States, and other
countries and areas.
z Crestron is a registered trademark of Crestron Electronics, Inc. of the United States.
z AMX is a registered trademark of AMX LLC of the United States.
z Android is a trademark or registered trademark of Google Inc.
z Other company and product names may be registered product names or trademarks of their
respective owners.
z Portions of this product are based in part on the work of the Independent JPEG Group.
z The contents of this User’s Guide are subject to change without notice.
z Copying of this manual, either in part or its entirety is forbidden. You are allowed to use this
manual for your own personal use. Any other use is forbidden without the permission of CASIO
COMPUTER CO., LTD.
z CASIO COMPUTER CO., LTD. shall not be held liable for any lost profits or claims from third
parties arising out of the use of this product or this manual.
z CASIO COMPUTER CO., LTD. shall not be held liable for any loss or lost profits due to loss of
data due to malfunction or maintenance of this product, or any other reason.
z The sample screens shown in this manual are for illustrative purposes only, and may not be
exactly the same as the screens actually produced by the product.
2
Page 3

Contents
Network Function Overview........................................... 7
What the network function lets you do... ...............................................7
Software Required to Use Network Functions.......................................8
Scope of this Manual’s Content .................................................................................. 8
Projecting Computer Screen Contents Over a LAN
Connection ...................................................................... 9
Workflow from LAN Connection to Projection .......................................9
Connecting the Wireless Adapter to the Projector...............................10
Establishing a Direct Wireless LAN Connection
between the Projector and a Computer ...............................................11
Wireless LAN Connection Overview .......................................................................... 11
Using a Projector Built-in SSID (Simple or Generic)
to Establish a Wireless LAN Connection ...................................................................12
To use a projector simple connection SSID
to establish a wireless LAN connection and project .............................................. 12
To use a projector generic SSID to establish a wireless LAN connection
and project ............................................................................................................. 15
Using a User SSID to Establish a Wireless LAN Connection ....................................18
To create a user SSID............................................................................................. 19
To use a user SSID to establish a wireless LAN connection and project .............. 22
Connecting the Projector to an Outside Network without Terminating
a Direct Wireless LAN Connection with a Computer................................................. 25
To connect the projector to a wireless LAN access point
without terminating a direct wireless LAN connection with a computer................ 26
To establish a wired LAN connection between the projector
and a router while maintaining a direct wireless connection
between the projector and a computer.................................................................. 28
Establishing a Connection between the Projector
and Computer Via a Wireless LAN Access Point .................................29
Connection Overview................................................................................................. 29
Connection Procedures .............................................................................................30
To connect the projector to a wireless LAN access point...................................... 30
To establish a connection between the projector and computer
and project via a wireless LAN access point.......................................................... 33
3
Page 4

Connecting the Projector to a Computer via a Wired LAN ..................35
Wired LAN Connection Overview .............................................................................. 35
Wired LAN Connection Procedures...........................................................................36
To use a LAN cable to connect a computer directly to the projector .................... 36
To establish a wired LAN connection between the projector
and a computer via a router ...................................................................................38
Using Network Connection .......................................... 39
Network Connection Window ..............................................................39
Network Connection Operations..........................................................40
Network Connection Button Operations.................................................................... 40
Network Connection Function Menu Operations ...................................................... 41
Outputting Computer Audio from the Projector Speaker .......................................... 42
Projecting a Video Stream .........................................................................................43
To project a video stream....................................................................................... 43
Remotely Controlling a Computer from a Smart Device ........................................... 44
To start PC remote ................................................................................................. 44
To exit PC Remote .................................................................................................44
Other Network Connection Operations .....................................................................45
To terminate the current wireless LAN connection and re-connect.......................45
To delete connection information (passphrase) stored by Network Connection ... 45
Projector Network Settings.......................................... 46
Using the Projector Setup Menu ..........................................................46
To display wired LAN information .......................................................................... 47
To display wireless LAN information ...................................................................... 48
To change the SSID ............................................................................................... 49
To change the IP settings....................................................................................... 50
To initialize network settings ..................................................................................51
4
Page 5

Using the Projector Admin Pages ........................................................52
Logging In to the Projector Admin Pages over a Wireless LAN Connection............. 53
To log in to the Projector Admin pages over a wireless LAN connection.............. 53
Logging In to the Projector Admin Pages Over a Wired LAN Connection ................54
To log in to the Projector Admin pages over a wired LAN connection .................. 54
To change the computer IP address based on the projector’s IP address
and connect by wired LAN..................................................................................... 55
To change the projector’s IP address based on the computer’s IP address
and connect by wired LAN..................................................................................... 56
To establish a wired LAN connection between the projector and a computer ...... 57
Supported Operations after Logging In to the Projector Admin Pages..................... 58
To display the system status.................................................................................. 58
To configure Control Panel page network settings................................................ 59
To configure Network Settings page network settings .......................................... 60
To change the password for logging in to the Projector Admin pages.................. 62
To initialize all settings on the Projector Admin pages...........................................63
To input information for connecting to a Crestron controller ................................. 63
To log out from the Projector Admin pages ........................................................... 63
Remotely controlling the Projector Over a LAN Connection ..................................... 64
To remotely control the projector from a computer connected via a LAN............. 64
Control Panel Page Remote Control Items................................................................66
Projector File Viewer Operations................................. 67
Uploading a File to Projector Internal Memory.....................................67
Logging In to the Transfer File Page.......................................................................... 67
To log in to the Transfer File page over a wireless LAN connection...................... 67
To log in to the Transfer File page over a wired LAN connection ..........................69
To log out from the Transfer File page................................................................... 69
To change the password for logging in to the Transfer File page.......................... 69
Supported Operations while Logged In to the Transfer File Page............................. 70
Projector File Viewer Operations..........................................................71
Displaying the Viewer Control Page ..........................................................................71
To display the Viewer Control page over a wireless LAN connection.................... 71
To display the Viewer Control page over a wired LAN connection........................ 72
To return to the projector top page from the Viewer Control page........................ 72
Viewer Control Page Operations ............................................................................... 73
5
Page 6

Appendix ........................................................................ 74
Using the Token Wizard .......................................................................74
To install Network Connection on a USB flash drive .............................................74
To use a USB token to connect a computer
to the projector via a wireless LAN......................................................................... 75
Projecting Via a Wireless LAN Connection
with Various Different Devices..............................................................75
Using the Network Connection to Project from a Mac OS........................................ 75
Using C-Assist to Project from a Smart Device.........................................................76
Using MobiShow to Project from a Smart Device .....................................................76
Troubleshooting ...................................................................................77
Wireless LAN Connection between the Projector and a Computer .......................... 77
Projector Admin Pages ..............................................................................................78
Transfer File Pages ....................................................................................................78
6
Page 7

Network Function Overview
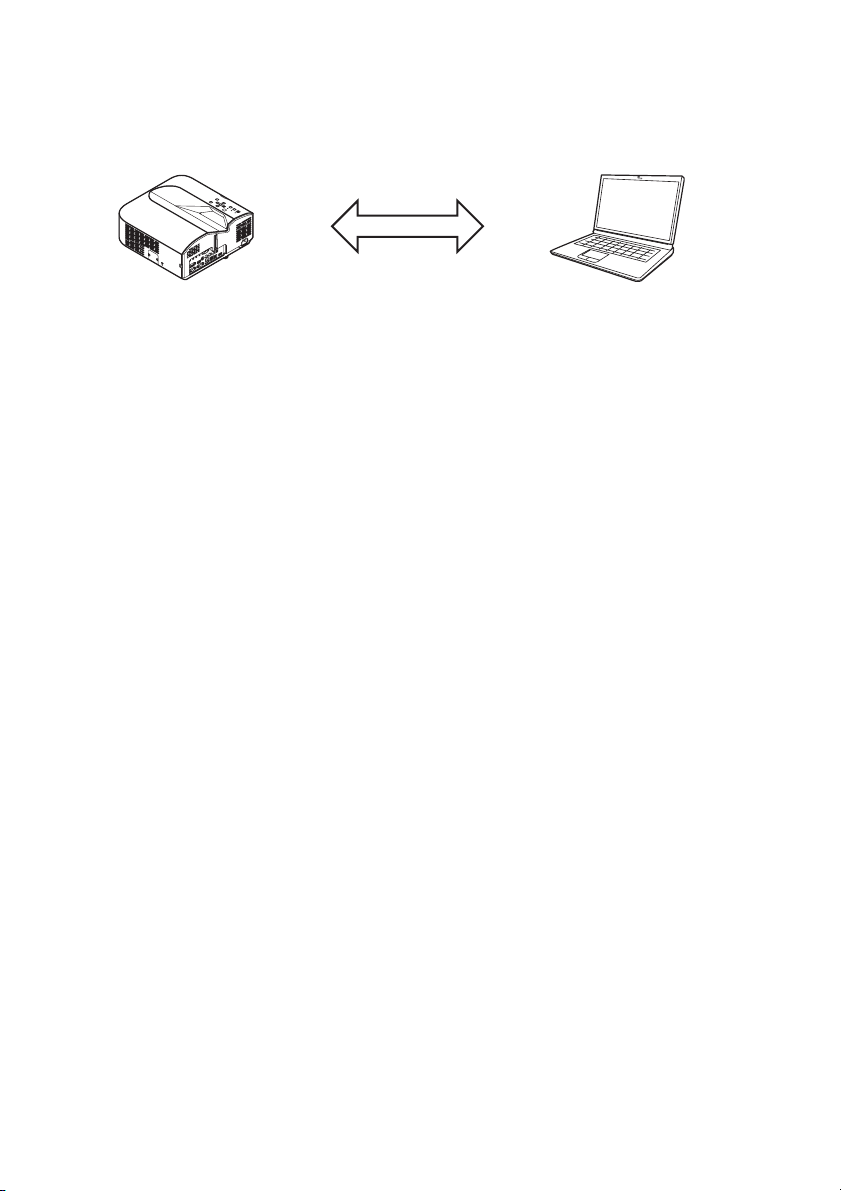
What the network function lets you do...
z Connect a computer to the projector over a wireless LAN and project an image of the
computer screen
Computer screen images can be projected by the projector without a cable connection. Connecting
the projector to a computer via a wireless LAN access point enables projection while the computer
is connected to an outside network (Internet or Intranet).
z Connect a computer to the projector over a wired LAN and project an image of the computer
screen
A computer can be connected directly to the projector by cable, or indirectly via a router for
projection of the computer screen contents. The computer whose screen contents are being
projected can also be connected to an external network (Internet or intranet).
z Use a wireless LAN connection to simultaneously project screen images from four computers
The projected image can be divided into four segments for simultaneous projection of the screens
of four computers over a LAN connection.
z Use a LAN connection to project the main screen or extended screen of a computer (Network
Connection)
The screen area that extends off the right side of a desktop displayed on a laptop computer can be
projected as the extended screen.
z A movie playback image can be projected alone as a separate screen over a LAN connection
(Network Connection)
Movie data can be sent to the projector over a LAN for playback projection without exiting the
normal desktop display on a computer.
z Output of computer audio over a LAN connection (Network Connection)
In addition to computer screen images, computer audio can also be output by the projector.
z Transfer files to projector internal memory from a computer connected via a LAN
Various types of files can be transferred from a computer via a LAN to projector internal memory for
playback using the projector’s File Viewer.
z Remotely control the projector from a computer connected via a LAN
Input source switching and other normal projector operations can be performed from a computer
connected via a LAN.
Note
z For more information about Network Connection, see “Software Required to Use Network
Functions” below.
7
Page 8

Software Required to Use Network Functions
The software required to use network functions depends on the type of device to be connected to the
projector via a LAN, as shown in the table below.
Device Software
Computer running Windows Network Connection (for Windows)
Computer running Mac OS Network Connection (for Mac OS)
Visit the website at the URL below to download the software.
http://www.casio-intl.com/support/
Important!
z Before installing the above software on a computer, be sure to visit the CASIO website for
information about minimum system requirements, downloading, usage conditions, and other
precautions you need to observe.
z For information about how to install the above software, see its download web page.
Scope of this Manual’s Content
The procedures in this manual are presented based on a Windows computer running Network
Connection.
If you are using a different type of device, see the software user documentation that can be obtained
from the download page of each type of software.
8
Page 9
Projecting Computer Screen Contents Over a LAN
Connection
This section covers everything you need to know for establishing a LAN connection between the
projector and a computer, and projecting the computer’s display contents.
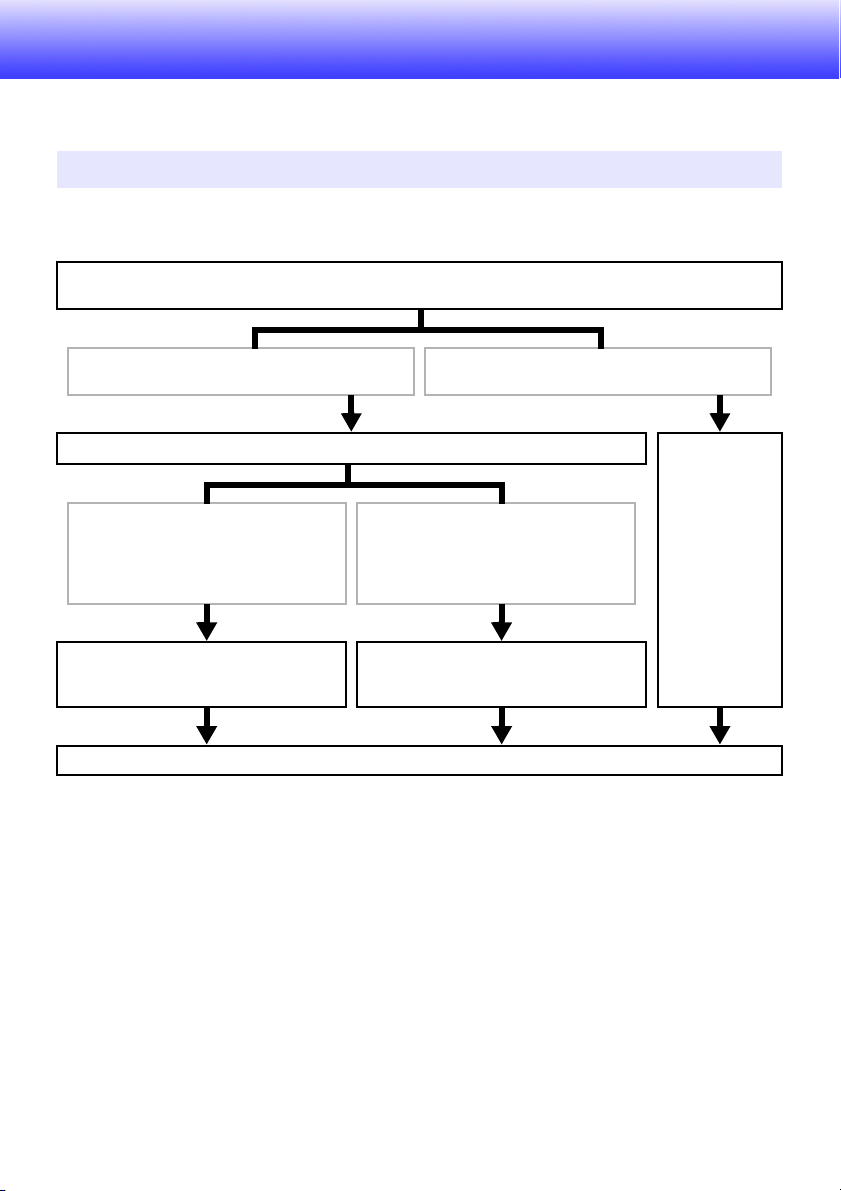
Workflow from LAN Connection to Projection
There are a number of different ways to establish a LAN connection between the projector and a
computer. The workflow below describes what you need to do to create a LAN connection.
Install Network Connection on the computer*
“Software Required to Use Network Functions” (page 8)
Establish a wireless LAN connection between the
projector and computer
“Connecting the Wireless Adapter to the Projector” (page 10)
z If you want to simplify the connection
process
z If you want to connect a computer
without connecting to an external
network (Internet or Intranet)*
“Establishing a Direct Wireless LAN
Connection between the Projector and a
Computer” (page 11)
2
“Using Network Connection” (page 39)
Establish a wired LAN connection between the
projector and a computer
z If you want to use an existing wireless
LAN access point (wireless router)
z If you want to connect a computer by
connecting to an external network
(Internet or Intranet)
“Establishing a Connection between the
Projector and Computer Via a Wireless LAN
Access Point” (page 29)*
1
“Connecting the
Projector to a
Computer via a
Wired LAN” (page
35)
3
*1 After installing Network Connection on one computer, you can use the computer to create USB
tokens that can be used for LAN connection of other computers to the projector. For details, see
“Using the Token Wizard” (page 74).
*2 After establishing a direct wireless LAN connection between the projector and computer, the
computer will be able to connect with an outside network (Internet or Intranet) via the projector. For
more information, see “Connecting the Projector to an Outside Network without Terminating a
Direct Wireless LAN Connection with a Computer” (page 25).
*3 To connect this way, you need first to establish a direct LAN connection between the projector and
computer, and then configure settings to connect the projector to the wireless LAN access point.
9
Page 10
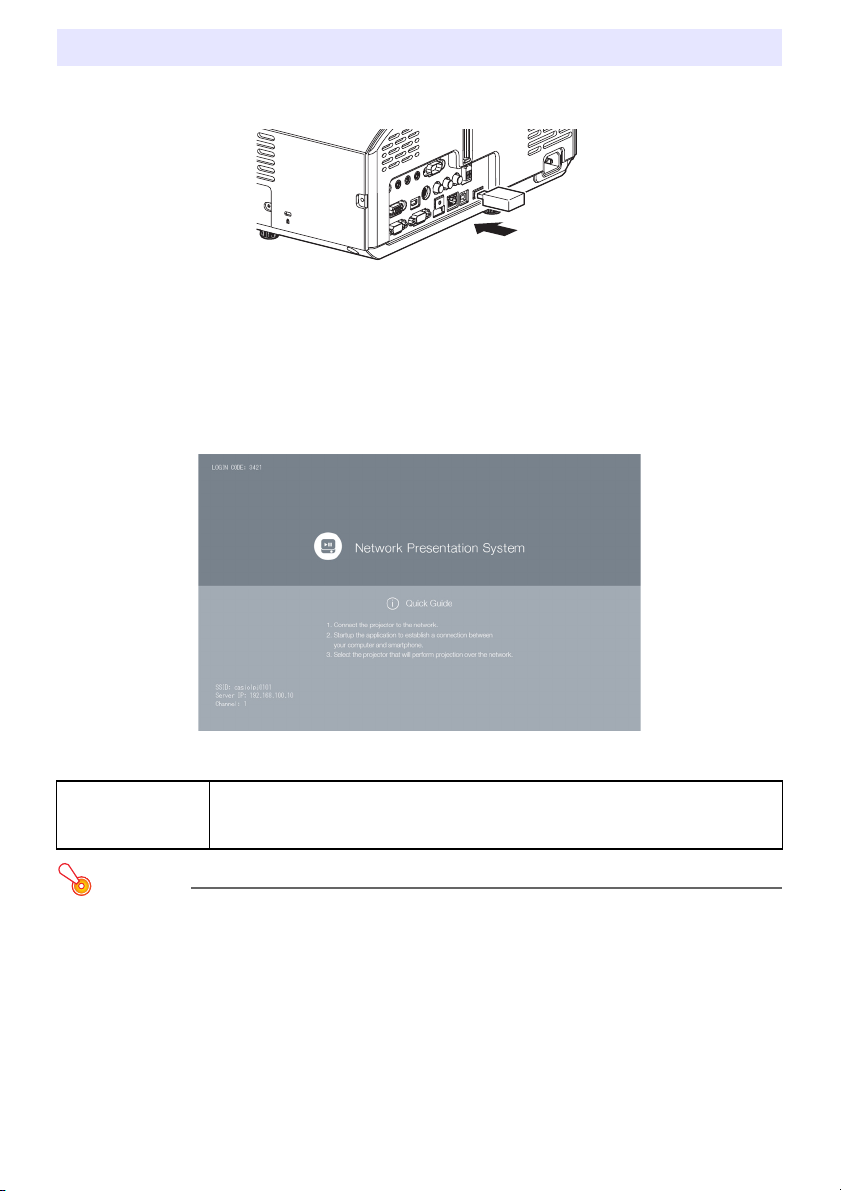
Connecting the Wireless Adapter to the Projector
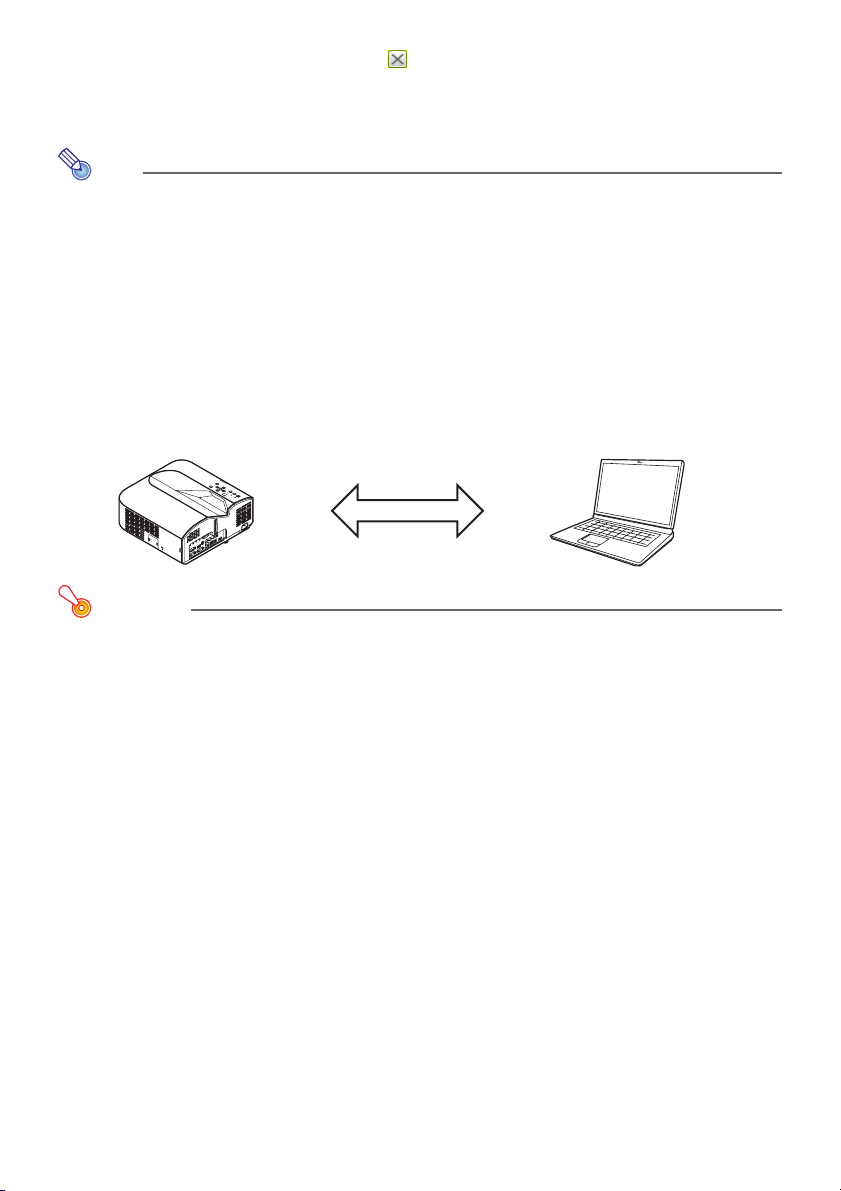
Connect the YW-40 wireless adapter that comes with the projector to the projector’s USB-A port, as
shown in the illustration below.
If “On” is selected for “Plug and Play” on the setup menu, the operations describe below will be
performed when the wireless adapter is connected to the projector.
z If the wireless adapter is connected while projector power is turned on
Upon connection, the input source will switch to “Network” and projection of the LAN connection
standby screen will start automatically.
z If the wireless adapter is connected and then projector power is turned on
Starting up the projector will cause the input source to switch to “Network” and projection of the
LAN connection standby screen to start automatically.
LAN Connection Standby Screen (Network Presentation System Screen)
Keep the wireless adapter that comes with the projector out of the reach of
*
Caution
small children. Accidental swallowing of the adapter can interfere with proper
breathing and create a life-threatening situation.
Important!
z Never try to use the wireless adapter that comes with the projector with any other type of
device.
10
Page 11

Establishing a Direct Wireless LAN Connection between the Projector and a Computer
Wireless LAN Connection Overview
The procedures in this section explain how to use Network Connection, which is installed on a
computer, to search for the SSID emitted by the projector and to establish a connection between the
computer and projector.
SSID Type
There are three different projector SSID types, each of which is described below. Note that the
connection method and required operations are different depending on SSID type.
SSID Type Description Applicable SSID
Simple Connection
1
SSID*
(Built in)
Generic SSID*1*
(Built in)
User SSID*
(Must be created.)
2
2
These are special-purpose SSIDs for using Network Connection on a
Windows computer to establish a wireless LAN connection with the
projector. This type of SSID is preset on the projector, so the name
and setting details cannot be modified. This SSID type makes it easy
to establish a wireless LAN connection between the projector and a
computer without configuring complex settings.
This type of SSID prompts for input of a passphrase to connect. This
type of SSID is preset on the projector, so the name and setting
details cannot be modified.
Requires creation of an SSID by you. Creation of only a single user
SSID is supported. You can also specify the encryption type and
passphrase input for connection.
casiolpj0001
casiolpj0002
casiolpj0003
casiolpj0004
casiolpj0101*
casiolpj0102
casiolpj0103
casiolpj0104
casiolpj0<any
character string>
3
*1 The projector performs wireless LAN communication using WPA-PSK AES encryption for
comparatively secure wireless data communication. Data sent between the projector and computer
is encrypted based on the projector built-in passphrase and login code.
*2 These SSIDs can also be used when establishing a wireless LAN connection between the projector
and a computer running Mac OS or a smart device (Android, iOS). For more information, see
“Projecting Via a Wireless LAN Connection with Various Different Devices” (page 75).
*3 Initial SSID setting.
Wireless LAN Connection and Projection
A single projector can have up to 8 computers connected via wireless LAN at the same time. However,
one computer screen image (full projection image size) or up to a maximum of four computer screen
(projection image divided into four parts) images can be projected at the same time.
For details about projection operations on a computer after it is connected, see “Using Network
Connection” (page 39).
11
Page 12
Using a Projector Built-in SSID (Simple or Generic) to Establish a Wireless LAN Connection
This section explains how to use Network Connection to search for a projector built-in SSID (simple or
generic) and establish a wireless LAN connection between the projector and computer. The
operations described here establish a wireless LAN connection between the projector and computer
and start projection of the computer screen.
Wireless LAN connection
To use a projector simple connection SSID to establish a
wireless LAN connection and project
Projector Operation
1.
Connect the wireless adapter to the projector (page 10) and then turn on the
projector.
z The input source will automatically switch to “Network” and projection of the LAN connection
standby screen will start.
z If projection of the LAN connection standby screen does not start, press the [INPUT] key. On
the “Input” dialog box that appears, use the [T] and [S] keys to select “Network” and then
press the [ENTER] key.
2.
Press the [MENU] key and then select the following: “Network Settings” 3
“Projector Wireless LAN Settings” 3 “SSID”. On the dialog box that appears,
select one of the following: casiolpj0001, casiolpj0002, casiolpj0003, or
casiolpj0004.
3.
Press the [ESC] key twice to return to “Network Settings”.
4.
Use the [T] key to select “Update Network Settings” and then press the [ENTER]
key.
z This will display a confirmation dialog box asking if you want to update network settings.
5.
Press the [S] key to select “Yes”, and then press the [ENTER] key.
z This applies the SSID change to the projector and closes the dialog box. Wait until the LAN
connection standby screen starts to be projected again.
z If multiple projectors are in use nearby, select a separate SSID for each projector.
12
Page 13
Computer Operation
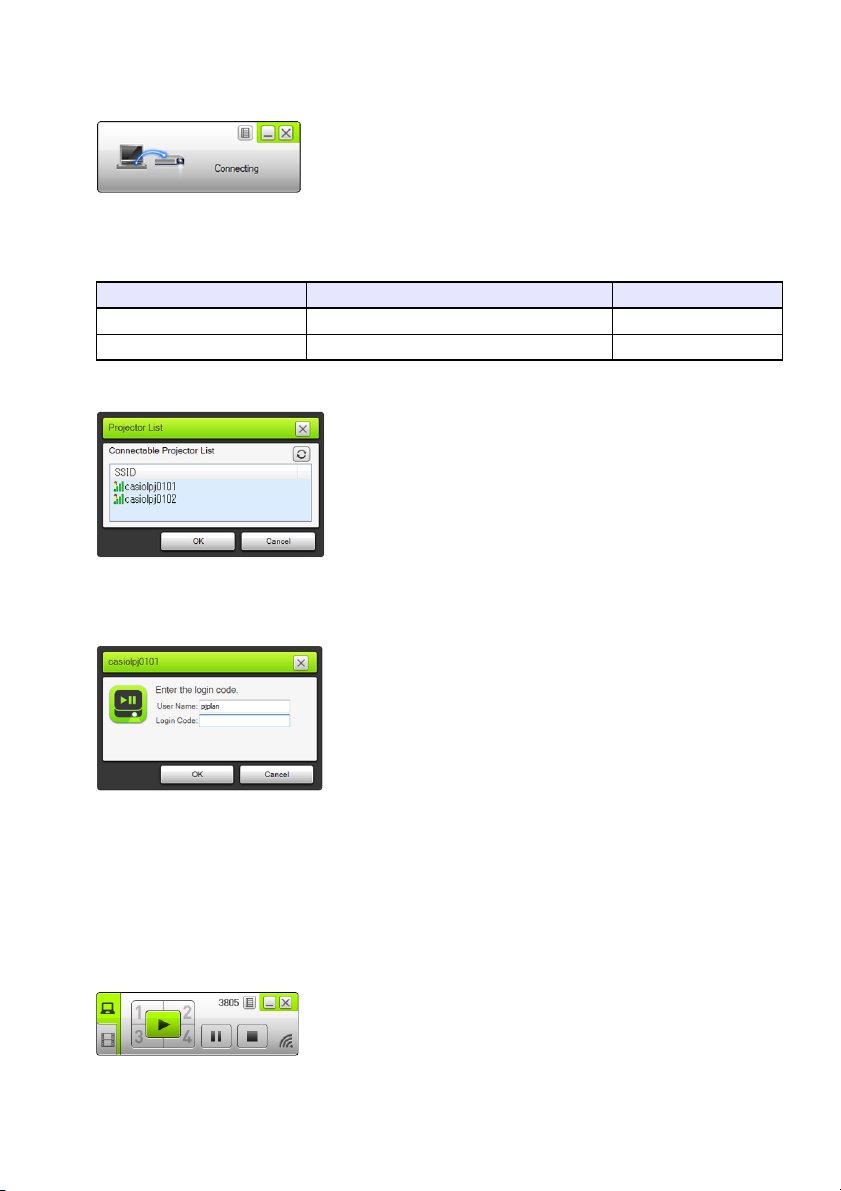
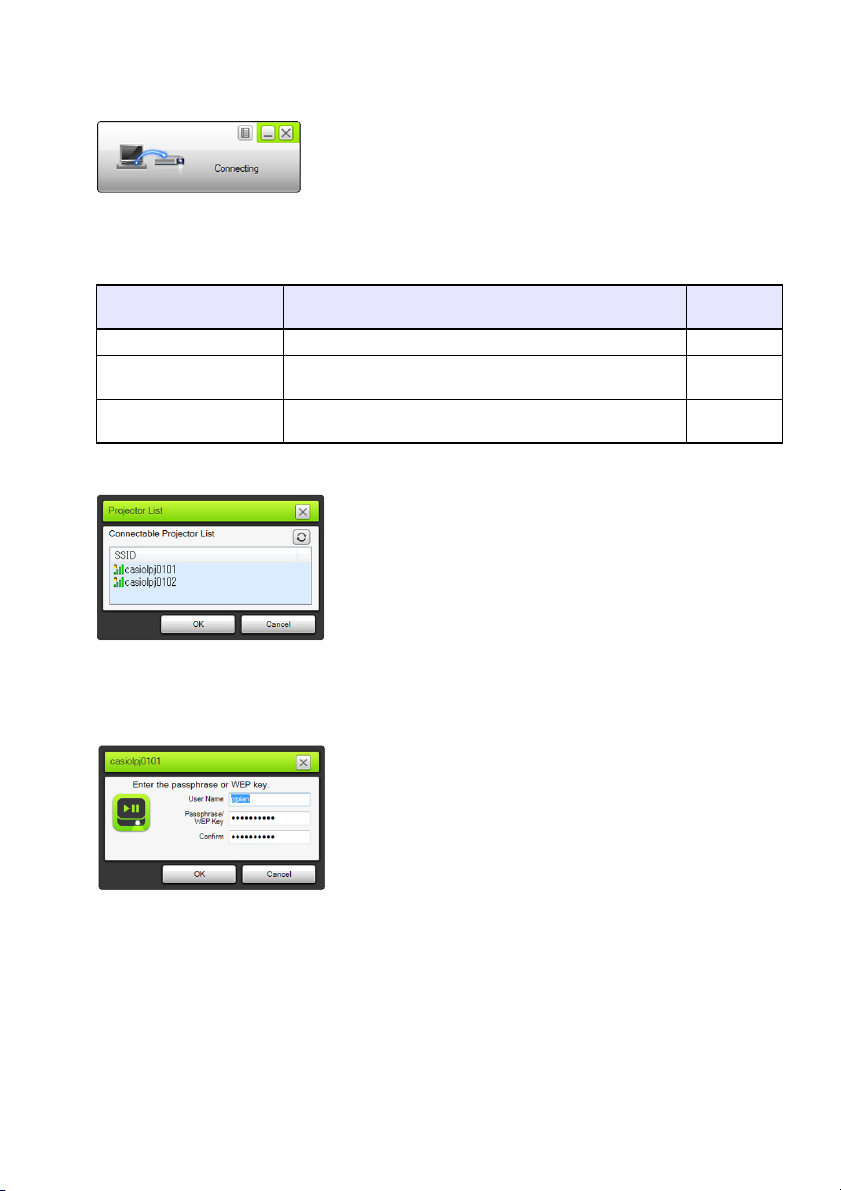
6.
Start up Network Connection.
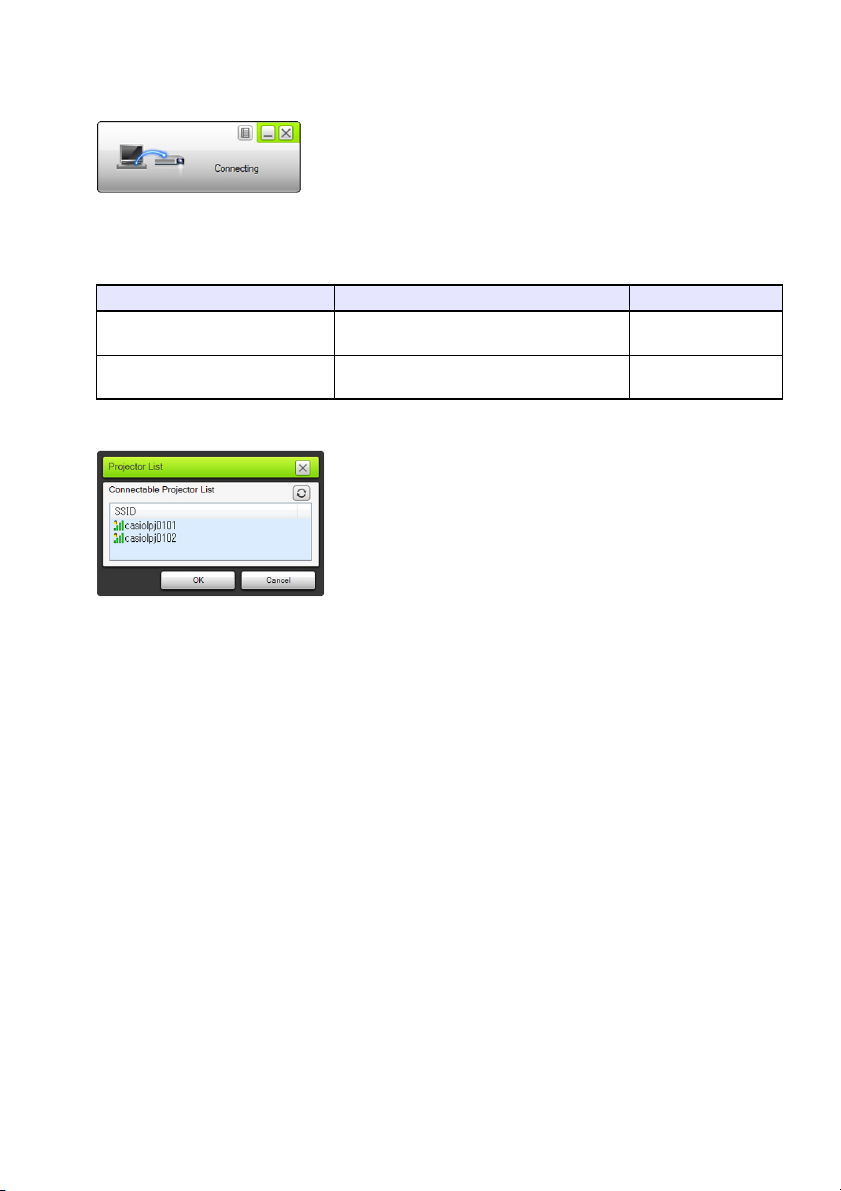
z The Network Connection window will appear with the message “Connecting”.
z If your computer is running Windows 7, 8 or 8.1 and the “Set Network Location” dialog box
appears, click [Cancel] to close the dialog box.
z One of the dialog boxes shown below will appear as soon as Network Connection finds the
projector to connect with.
If this dialog box appears: It indicates this status: Advance to this step:
“Projector List” Multiple connectable projectors were detected. Step 7
“Enter the login code.” Only one connectable projector was detected. Step 8
7.
Click the SSID of the projector you want to connect with, and then click [OK].
8.
On the “Enter the login code.” dialog box that appears, enter the user name and
login code.
z In the “User Name” box, you can enter any name up to 20 characters long. The user name you
enter here will be displayed as the user name on the projection screen.
z In the “Login Code” box, enter the four-digit number shown in the upper left corner of the LAN
connection standby screen that is being projected.
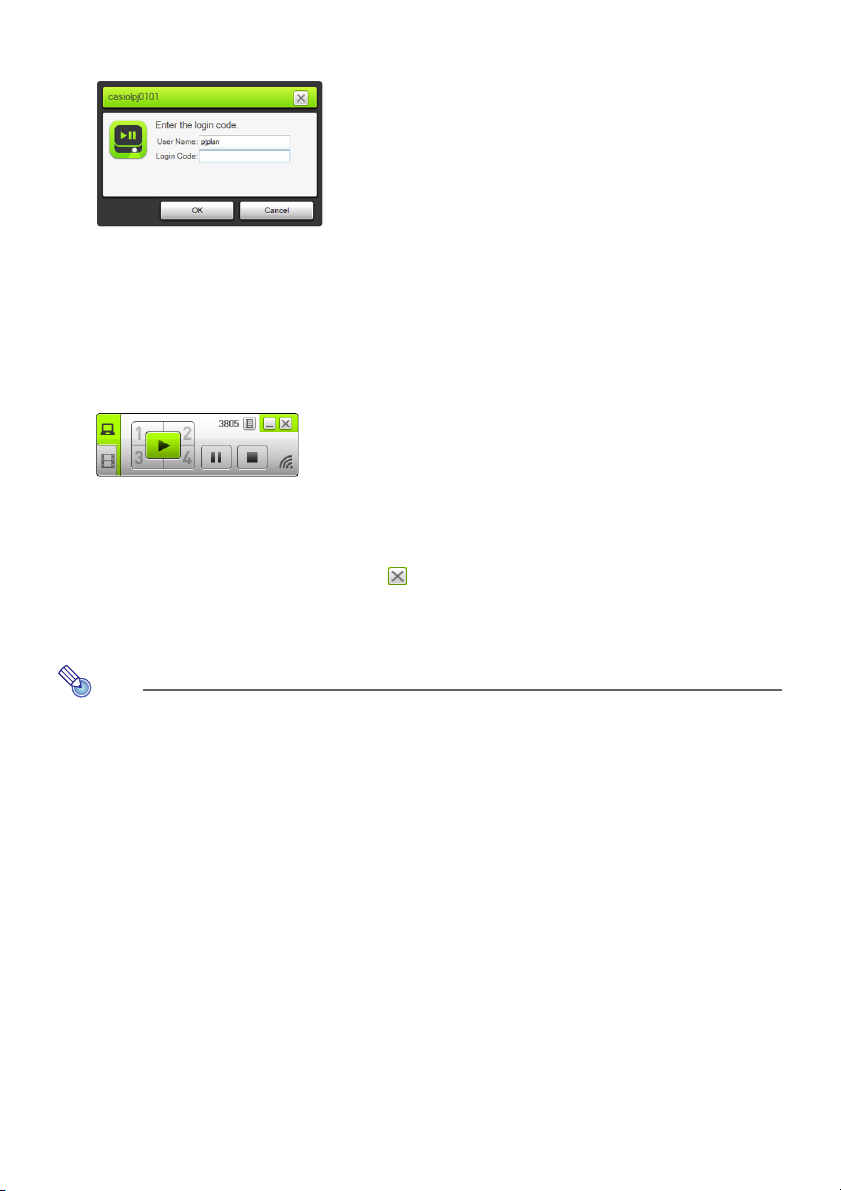
9.
When everything is the way you want, click [OK].
z While the projector is connected to a computer over a wireless LAN, a Network Connection
window like the one shown below will be displayed on the computer screen. The computer
screen image (main screen) will be projected.
z For details about Network Connection window operations, see “Using Network Connection”
(page 39).
13
Page 14

10.
To terminate the wireless LAN connection and discontinue computer screen
projection, click the close button ( ) in the upper right corner of the Network
Connection window.
z This closes the Network Connection window and returns the projected image to the LAN
connection standby screen.
Note
z The login code is updated to a new value each time the projector is started up. Each time you
perform the above procedure to connect, check the login code on the projection screen and
input the correct login code for the current startup.
z If the projector cannot be found in step 6 of the above procedure, the Network Connection
window appearance will change as shown below.
If this happens, check the points listed below, click [Reconnect], and then perform the above
procedure again from step 6.
z Check if the wireless adapter is correctly connected to the projector.
See “Connecting the Wireless Adapter to the Projector” (page 10).
z Check if the projector is turned on and projecting the LAN connection standby screen.
z Confirm that the SSID in the lower left corner of the LAN connection standby screen is any
one of the following: casiolpj0001, casiolpj0002, casiolpj0003, casiolpj0004.
If a different SSID is shown, perform the above procedure from step 2.
14
Page 15

To use a projector generic SSID to establish a wireless LAN
connection and project
Projector Operation
1.
Connect the wireless adapter to the projector (page 10) and then turn on the
projector.
z The input source will automatically switch to “Network” and projection of the LAN connection
standby screen will start.
z If projection of the LAN connection standby screen does not start, press the [INPUT] key. On
the “Input” dialog box that appears, use the [T] and [S] keys to select “Network” and then
press the [ENTER] key.
2.
Press the [MENU] key and then select the following: “Network Settings” 3
“Projector Wireless LAN Settings” 3 “SSID”. On the dialog box that appears,
select one of the following: casiolpj0101, casiolpj0102, casiolpj0103, or
casiolpj0104.
z This operation is not necessary if you plan on using only one projector without changing the
initial default SSID setting (casiolpj0101). Advance to step 6.
3.
Press the [ESC] key twice to return to “Network Settings”.
4.
Use the [T] key to select “Update Network Settings” and then press the [ENTER]
key.
z This will display a confirmation dialog box asking if you want to update network settings.
5.
Press the [S] key to select “Yes”, and then press the [ENTER] key.
z This applies the SSID change to the projector and closes the dialog box. Wait until the LAN
connection standby screen starts to be projected again.
z If multiple projectors are in use nearby, select a separate SSID for each projector.
15
Page 16
Computer Operation
6.
Start up Network Connection.
z The Network Connection window will appear with the message “Connecting”.
z If your computer is running Windows 7, 8 or 8.1 and the “Set Network Location” dialog box
appears, click [Cancel] to close the dialog box.
z One of the dialog boxes shown below will appear as soon as Network Connection finds the
projector to connect with.
If this dialog box appears: It indicates this status: Advance to this step:
“Projector List” Multiple connectable projectors were
“Enter the passphrase or WEP key.” Only one connectable projector was
7.
Click the SSID of the projector you want to connect with, and then click [OK].
detected.
detected.
Step 7
Step 8
16
Page 17
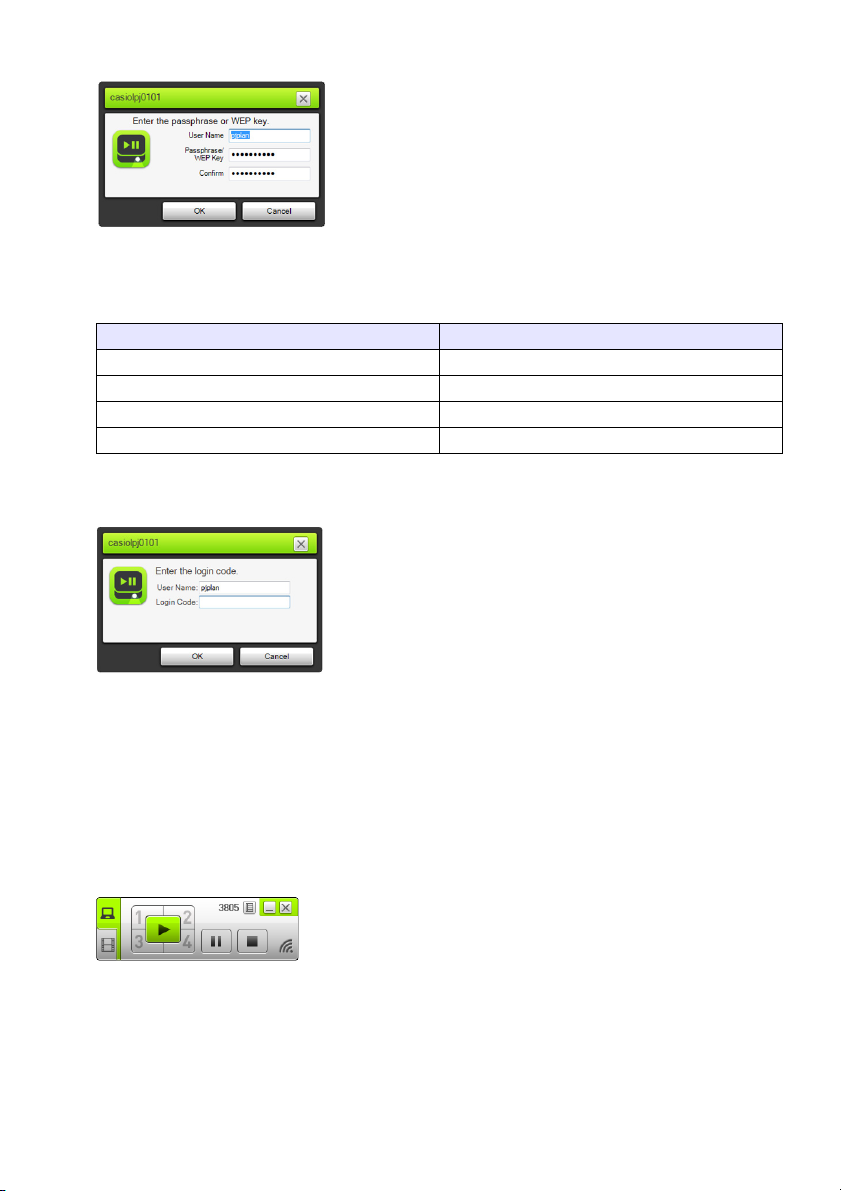
8.
On the “Enter the passphrase or WEP key.” dialog box that appears, enter the
user name and passphrase.
z In the “User Name” box, you can enter any name up to 20 characters long. The user name you
enter here will be displayed as the user name on the projection screen.
z In accordance with the SSID of the projector being connected to, input the characters shown
below into both the “Passphrase/WEP Key Input” and “Confirm” boxes.
SSID of Projector Being Connected Input Character String (Passphrase)
casiolpj0101 casiolpj01
casiolpj0102 casiolpj02
casiolpj0103 casiolpj03
casiolpj0104 casiolpj04
9.
When everything is the way you want, click [OK].
z This displays the dialog box shown below.
10.
In the “Login Code” box, enter the four-digit number shown in the upper left
corner of the LAN connection standby screen that is being projected.
z The user name you input in step 8 of this procedure will be shown in the “User Name” box, so
you can leave it as it is, if you want.
11.
When everything is the way you want, click [OK].
z While the projector is connected to a computer over a wireless LAN, a Network Connection
window like the one shown below will be displayed on the computer screen. The computer
screen image (main screen) will be projected.
z For details about Network Connection window operations, see “Using Network Connection”
(page 39).
17
Page 18
12.
To terminate the wireless LAN connection and discontinue computer screen
projection, click the close button ( ) in the upper right corner of the Network
Connection window.
z This closes the Network Connection window and returns the projected image to the LAN
connection standby screen.
Note
z After you perform the above operation, Network Connection will remember the passphrase
used for the last connection. Because of this, you will not need to input the passphrase again
if you re-connect the same computer to the projector (as long as the SSID has not been
changed).
z In the case of a wireless LAN connection using a generic SSID, settings can be configured to
eliminate the need for login code input. For information about how to configure settings, see
“To configure Control Panel page network settings” (page 59).
Using a User SSID to Establish a Wireless LAN Connection
You can create a user SSID and use it to establish a wireless LAN connection when you want to
accomplish any one of the following: connection using a specific security system, make a connection
more secure, or connect without configuring security settings (without a passphrase or log in code).
Wireless LAN connection
Important!
z To create a user SSID, you will need to first establish a LAN connection between the projector
and computer using one of the other connection methods.
z The projector can have only one user SSID assigned to it at a time. Each time you perform the
procedure under “To create a user SSID” the current user SSID (if there is one) is overwritten
by the new one.
18
Page 19
To create a user SSID
1.
Perform one of the operations below to connect a computer to the projector via
a LAN.
z “To use a projector simple connection SSID to establish a wireless LAN connection and
project” (page 12), steps 1 through 9
z “To use a projector generic SSID to establish a wireless LAN connection and project” (page
15), steps 1 through 11
z “To use a user SSID to establish a wireless LAN connection and project” (page 22), steps 1
through 11 (User SSID already created).
z “To use a LAN cable to connect a computer directly to the projector” (page 36), steps 1
through 9
2.
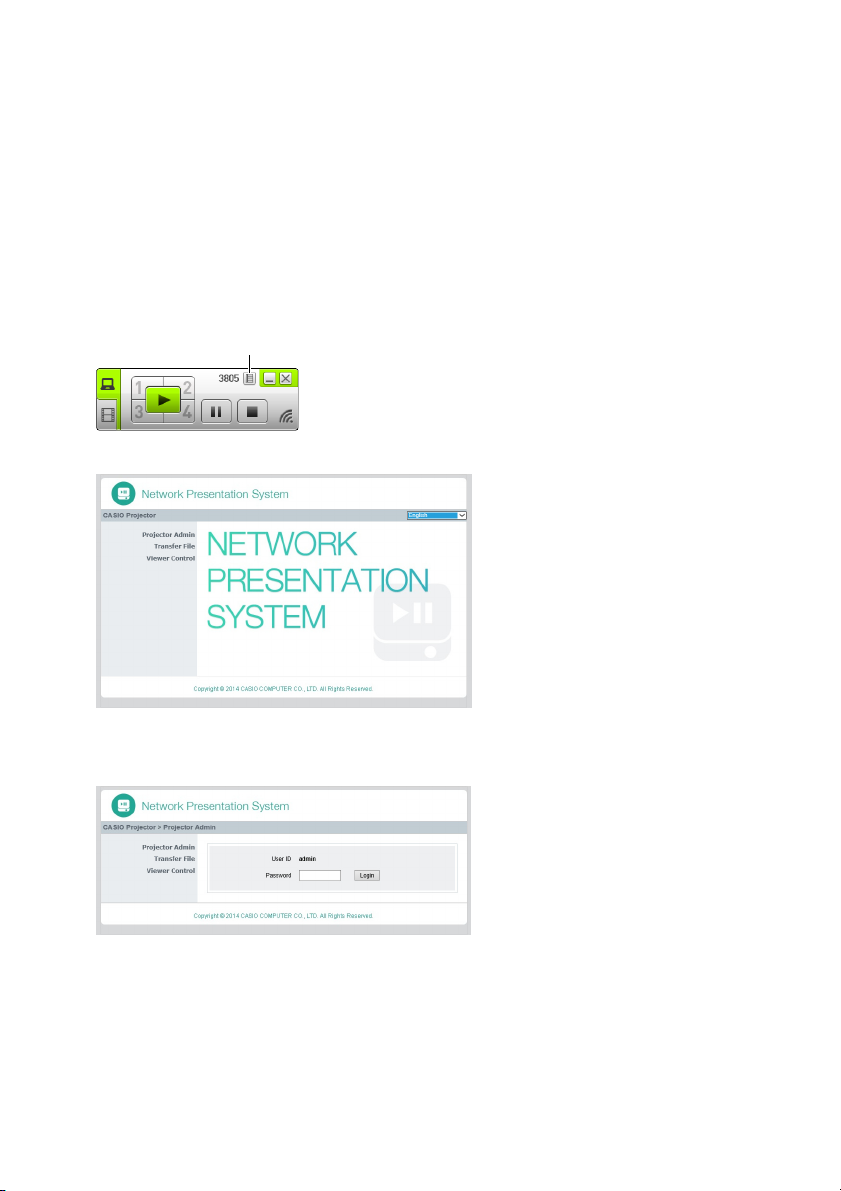
On the Network Connection window, click the function menu button and then
click [Admin Screen] on the menu that appears.
Function menu button
z This starts up the computer’s web browser and displays the projector’s top page.
3.
On the left pane, click “Projector Admin”. On the password input screen that
appears, enter the password.
z The initial default password is “admin”.
4.
Click the [Login] button.
z If login proceeds normally, the “System Status” page will appear.
19
Page 20
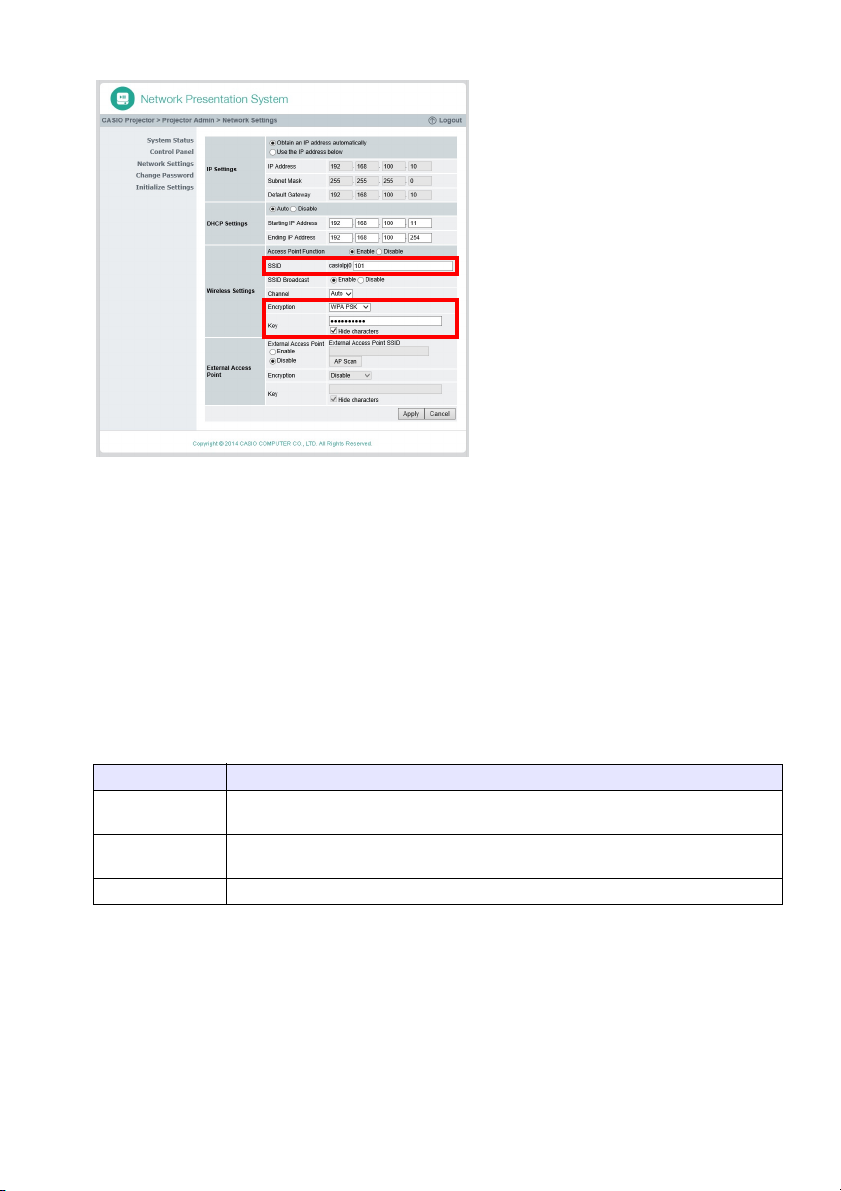
5.
On the left pane, click “Network Settings”.
z This displays the “Network Settings” page.
z Input and settings required for user SSID creation are those surrounded by the red
boundaries. You do not need to change other settings.
z For details about this page, see “To configure Network Settings page network settings” (page
60).
6.
In the “SSID” box, input the character string you want to use as the user SSID.
z The final user SSID will be in the format: casiolpj0<character string you input>
z You can enter up to 23 single-byte characters as the user SSID. Note that none of the
following can be used as the text input portion of a user SSID: 001, 002, 003, 004, 101, 102,
103, or 104. This is because using these numbers would make the user SSID name the same
as a simple SSID or generic SSID.
7.
Select the encryption you want to use for wireless LAN communication.
z Click the [T] button to the right of the “Security” box and then select the desired security
protocol on the list that appears. The meaning of each option in the list is described below.
Security Description
WPA-PSK AES
WPA2-PSK AES
Disable Turns off wireless LAN security, so communications are not encrypted.
Performs communication encryption using WPA-PSK protocol. WPA (Wi-Fi Protected
Access) is a security function for encrypting communication data.
Performs communication encryption using WPA2-PSK protocol. TKIP and AES are
encryption protocols. WPA2 is a new standard of WPA.
20
Page 21

8.
Enter the passphrase.
z The passphrase entered in the “Passphrase/WEP Key Input” text box depends on the security
protocol you selected in step 7, as described below.
Security Input Character String
WPA-PSK AES
WPA2-PSK AES
Disable No input required.
z Each passphrase key character you input is indicated by an asterisk (*) in the applicable input
box. If you want to see the actual characters you input, clear the “Hide characters” check box.
z The passphrase you input will be required when you use the user SSID to establish a wireless
LAN connection between the projector and a computer. Make sure you do not forget the
passphrase you input.
9.
To create a user SSID in accordance with your settings in steps 6 through 8, click
Enter the WPA-PSK or WPA2-PSK passphrase. Enter at least eight and up to 63
single-byte characters, or a hexadecimal value up to 64 digits long.
Example:
MyKey123 (Eight single-byte characters)
1111222233334444555566667777888899990000AAAABBBBCCCCDDDDEEEEFFFF
(64-digit hexadecimal value)
[Apply].
z This creates the user SSID and applies it to the projector.
z If the projector and computer are connected via wireless LAN, this terminates the wireless
LAN connection between the projector and computer, and changes the projection screen to
the LAN connection standby screen.
21
Page 22

To use a user SSID to establish a wireless LAN connection and
project
Projector Operation
1.
Connect the wireless adapter to the projector (page 10) and then turn on the
projector.
z The input source will automatically switch to “Network” and projection of the LAN connection
standby screen will start.
z If projection of the LAN connection standby screen does not start, press the [INPUT] key. On
the “Input” dialog box that appears, use the [T] and [S] keys to select “Network” and then
press the [ENTER] key.
2.
Select the user SSID you created with the procedure under “To create a user
SSID” (page 19).
In this case: Perform this operation:
Projector SSID was not changed after you performed
the operation under “To create a user SSID” (page
19).
Projector SSID was changed to a different one after
you perform the operation under “To create a user
SSID” (page 19).
3.
Press the [ESC] key twice to return to “Network Settings”.
4.
Use the [T] key to select “Update Network Settings” and then press the [ENTER]
key.
z This will display a confirmation dialog box asking if you want to update network settings.
Advance directly to step 6.
Press the [MENU] key and then select the following:
“Network Settings” 3 “Projector Wireless LAN
Settings” 3 “SSID”. On the dialog box that appears,
select the user SSID.
5.
Press the [S] key to select “Yes”, and then press the [ENTER] key.
z This applies the SSID change to the projector and closes the dialog box. Wait until the LAN
connection standby screen starts to be projected again.
22
Page 23
Computer Operation
6.
Start up Network Connection.
z The Network Connection window will appear with the message “Connecting”.
z If your computer is running Windows 7, 8 or 8.1 and the “Set Network Location” dialog box
appears, click [Cancel] to close the dialog box.
z One of the dialog boxes shown below will appear as soon as Network Connection finds the
projector to connect with.
If this dialog box appears: It indicates this status:
“Projector List” Multiple connectable projectors were detected. Step 7
“Enter the passphrase or
WEP key.”
“Enter the login code.” The user SSID “Security” setting is “Disable” and only one
7.
Click the SSID of the projector you want to connect with, and then click [OK].
The user SSID “Security” setting is something other than
“Disable” and only one connectable projector was found.
connectable projector was found.
Advance to
this step:
Step 8
Step 10
z If the “Enter the passphrase or WEP key.” dialog box appears, go to step 8. If the “Enter the
login code.” dialog box appears, go to step 10.
8.
Enter the passphrase.
z Enter the user SSID passphrase (the character string you input in step 8 under “To create a
user SSID”) into both the “Passphrase/WEP Key Input” and the “Confirm” boxes.
23
Page 24
9.
When everything is the way you want, click [OK].
z This displays the dialog box shown below.
10.
In the “Login Code” box, enter the four-digit number shown in the upper left
corner of the LAN connection standby screen that is being projected.
11.
When everything is the way you want, click [OK].
z While the projector is connected to a computer over a wireless LAN, a Network Connection
window like the one shown below will be displayed on the computer screen. The computer
screen image (main screen) will be projected.
z For details about Network Connection window operations, see “Using Network Connection”
(page 39).
12.
To terminate the wireless LAN connection and discontinue computer screen
projection, click the close button ( ) in the upper right corner of the Network
Connection window.
z This closes the Network Connection window and returns the projected image to the LAN
connection standby screen.
Note
z After you perform the above operation, Network Connection will remember the passphrase
used for the last connection. Because of this, you will not need to input the passphrase again
if you re-connect the same computer to the projector (as long as the SSID has not been
changed).
z In the case of a wireless LAN connection using a user SSID, settings can be configured to
eliminate the need for login code input. For information about how to configure settings, see
“To configure Control Panel page network settings” (page 59).
24
Page 25

Connecting the Projector to an Outside Network without Terminating a Direct Wireless LAN Connection with a Computer
While there is a direct wireless LAN connection between the projector and a computer, the projector
can connect with a wireless access point that is connected to an outside network (Internet or Intranet),
without terminating the connection with the computer.
Wireless LAN access point
(or router)
Wireless LAN connection
Or wired LAN connection
Wireless LAN connection
Important!
z This type of connection makes it possible for the computer to use the network (Internet or
Intranet) service connected to by the wireless LAN access point or router. The network
environment that can be connected to from the computer depends on the wireless LAN
access point or router.
z This type of connection assumes that a DHCP server is running on the network to which the
wireless LAN access point or router belongs.
25
Page 26

To connect the projector to a wireless LAN access point
without terminating a direct wireless LAN connection with a
computer
1.
Perform one of the operations below to connect a computer to the projector via
a wireless LAN.
z “To use a projector simple connection SSID to establish a wireless LAN connection and
project” (page 12), steps 1 through 9
z “To use a projector generic SSID to establish a wireless LAN connection and project” (page
15), steps 1 through 11
z “To use a user SSID to establish a wireless LAN connection and project” (page 22), steps 1
through 11 (After a user SSID has been created.)
2.
On the Network Connection window, click the function menu button and then
click [Admin Screen] on the menu that appears.
Function menu button
z This starts up the computer’s web browser and displays the projector’s top page.
3.
On the left pane, click “Projector Admin”. On the password input screen that
appears, enter the password.
z The initial default password is “admin”.
4.
Click the [Login] button.
z If login proceeds normally, the “System Status” page will appear.
26
Page 27

5.
On the left pane, click “Network Settings”.
z This displays the “Network Settings” page.
z Input and settings required here are those surrounded by the red boundaries. You do not need
to change other settings.
z For details about this page, see “To configure Network Settings page network settings” (page
60).
6.
If the “Obtain an IP address automatically” button looks like , click to change
it to .
7.
If the “Auto” button in the “DHCP Settings” area looks like , click to change it
to .
8.
Configure settings for connection to a wireless LAN access point from the
projector.
(1) If the “Enable” button in the “External Access Point” area looks like , click to change it to
.
(2) Click [Scan Access Point].
z “Select an access point.” is displayed in the “External Access Point SSID” box.
(3) Click the [T] button to the right of the “External Access Point SSID” box and then select the
SSID of the access point you want to connect with on the list that appears.
z The list that appears when you click the [T] button shows access points whose signals are
detected by the projector at that time, and up to eight previously connected access points.
z If you want to input an SSID manually, select the “Enter the key.” option on the list. Next,
enter the desired SSID in the “External Access Point SSID” box.
(4) In the “Key” box, input the passphrase or WEP key of the access point being connected with.
z You do not need to input anything if the access point you are using does not require
passphrase or WEP key input.
z Each passphrase or WEP key character you input is indicated by an asterisk (*) in the
applicable input box. If you want to see the actual characters you input, clear the “Hide
characters” check box.
(5) To save your connection settings, click [Apply].
z If the passphrase or WEP key is correct it should normally take anywhere from one minute
to a few minutes to establish a connection with the access point.
27
Page 28

9.
Use the remote controller that comes with the projector to check if the projector
is connected to the wireless LAN access point.
(1) Press the [MENU] key, and then select “Network Settings” 3 “Wireless LAN Info”.
(2) On the “Wireless LAN Info” dialog box that appears, check “External AP Connection Status”.
z If “Connected” is shown, it means that the projector is connected to the wireless LAN
access point. If “Disconnected” is shown, perform this procedure from step 1 again.
z When the external access point is operating as a DHCP server, terminating the connection
will cause the projector’s IP address to be changed to a value decided by the external
access point.
Note
z Once you configure the above settings and connect the projector to a wireless LAN access
point, the projector will automatically connect with the same wireless LAN access point
whenever you switch its input source to “Network”. This is true as long as the projector is
within the connection range of the wireless LAN access point, and as long as the settings of
the wireless LAN access point and projector settings have not been changed.
To establish a wired LAN connection between the projector and
a router while maintaining a direct wireless connection
between the projector and a computer
1.
Perform steps 1 through 7 under “To connect the projector to a wireless LAN
access point without terminating a direct wireless LAN connection with a
computer” (page 26).
2.
In the upper right corner of the “Network Settings” page, click “Logout” to log
out of Projector Admin.
3.
Use a LAN cable to connect the projector to the router.
28
Page 29

Establishing a Connection between the Projector and Computer Via a Wireless LAN Access Point
Connection Overview
A LAN connection can be established between the projector and computer by connecting both of
them to an existing wireless LAN access point inside of a company, etc.
Wireless LAN access point
Wireless LANWireless LAN
Important!
z This type of connection makes it possible for the computer to use the network (Internet or
Intranet) service connected to by the wireless LAN access point. The network environment
that can be connected to from the computer depends on the wireless LAN access point.
z This type of connection assumes that the wireless LAN access point functions as a DHCP
server or that a DHCP server is running on the network to which the wireless LAN access point
belongs.
29
Page 30

Connection Procedures
To connect the projector to a wireless LAN access point
1.
Perform one of the operations below to connect a computer to the projector via
a LAN.
z “To use a projector simple connection SSID to establish a wireless LAN connection and
project” (page 12), steps 1 through 9
z “To use a projector generic SSID to establish a wireless LAN connection and project” (page
15), steps 1 through 11
z “To use a user SSID to establish a wireless LAN connection and project” (page 22), steps 1
through 11 (User SSID already created).
z “To use a LAN cable to connect a computer directly to the projector” (page 36), steps 1
through 9
2.
On the Network Connection window, click the function menu button and then
click [Admin Screen] on the menu that appears.
Function menu button
z This starts up the computer’s web browser and displays the projector’s top page.
3.
On the left pane, click “Projector Admin”. On the password input screen that
appears, enter the password.
z The initial default password is “admin”.
4.
Click the [Login] button.
z If login proceeds normally, the “System Status” page will appear.
30
Page 31

5.
On the left pane, click “Network Settings”.
z This displays the “Network Settings” page.
z Input and settings required here are those surrounded by the red boundaries. You do not need
to change other settings.
z For details about this page, see “To configure Network Settings page network settings” (page
60).
6.
If the “Obtain an IP address automatically” button looks like , click to change
it to .
7.
If the “Disable” button in the “Access Point Function” area looks like , click to
change it to .
31
Page 32

8.
Configure settings for connection to a wireless LAN access point from the
projector.
(1) If the “Enable” button in the “External Access Point” area looks like , click to change it to
.
(2) Click [Scan Access Point].
z “Select an access point.” is displayed in the “External Access Point SSID” box.
(3) Click the [T] button to the right of the “External Access Point SSID” box and then select the
SSID of the access point you want to connect with on the list that appears.
z The list that appears when you click the [T] button shows access points whose signals are
detected by the projector at that time, and up to eight previously connected access points.
z If you want to input an SSID manually, select the “Enter the key.” option on the list. Next,
enter the desired SSID in the “External Access Point SSID” box.
(4) In the “Key” box, input the passphrase or WEP key of the access point being connected with.
z You do not need to input anything if the access point you are using does not require
passphrase or WEP key input.
z Each passphrase or WEP key character you input is indicated by an asterisk (*) in the
applicable input box. If you want to see the actual characters you input, clear the “Hide
characters” check box.
(5) To save your connection settings, click [Apply].
z At this point, the “Access Point Function” setting (step 7, above) automatically changes to
“Disable”. If the projector is connected to a computer via wireless LAN for the purpose of
configuring the above settings, this will terminate the connection.
z If the passphrase or WEP key is correct it should normally take anywhere from one minute
or a few minutes to establish a connection with the access point.
9.
Use the remote controller that comes with the projector to check if the projector
is connected to the wireless LAN access point.
(1) Press the [MENU] key, and then select “Network Settings” 3 “Wireless LAN Info”.
(2) On the “Wireless LAN Info” dialog box that appears, check “External AP Connection Status”.
z If “Connected” is shown, it means that the projector is connected to the wireless LAN
access point. If “Disconnected” is shown, perform this procedure from step 1 again.
z When the external access point is operating as a DHCP server, terminating the connection
will cause the projector’s IP address to be changed to a value decided by the external
access point.
Note
z Once you configure the above settings and connect the projector to a wireless LAN access
point, the projector will automatically connect with the same wireless LAN access point
whenever you switch its input source to “Network”. This is true as long as the projector is
within the connection range of the wireless LAN access point, and as long as the settings of
the wireless LAN access point and projector settings have not been changed.
32
Page 33

To establish a connection between the projector and computer
and project via a wireless LAN access point
Important!
z The procedure below assumes the conditions described below.
• The computer is already connected to the wireless LAN access point.
It makes no difference whether the computer is connected by wireless LAN (Wi-Fi) or wired
LAN (using a LAN cable). If the computer is connected by wired LAN connection, make sure
the computer’s wireless LAN function is disabled.
• Projector settings have already been configured using the procedure under “To connect the
projector to a wireless LAN access point” (page 30), and wireless LAN access point and/or
projector settings have not been changed since then.
• The projector is within range supported by the wireless LAN access point.
Projector Operation
1.
Connect the wireless adapter to the projector (page 10) and then turn on the
projector.
z The input source will automatically switch to “Network” and projection of the LAN connection
standby screen will start.
z If projection of the LAN connection standby screen does not start, press the [INPUT] key. On
the “Input” dialog box that appears, use the [T] and [S] keys to select “Network” and then
press the [ENTER] key.
Computer Operation
2.
Start up Network Connection.
z The Network Connection window will appear with the message “Connecting”.
z If your computer is running Windows 7, 8 or 8.1 and the “Set Network Location” dialog box
appears, click [Cancel] to close the dialog box.
z One of the dialog boxes shown below will appear as soon as Network Connection finds the
projector to connect with.
If this dialog box appears: It indicates this status: Advance to this step:
“Projector List” Multiple connectable projectors were detected on
the network.
“Enter the login code.” One connectable projector was detected on the
network.
Step 4
Step 5
3.
Click the IP address of the projector you want to connect with, and then click
[OK].
z For the projector’s IP address, check “Server IP” in the lower left corner of the projection
screen (LAN connection standby screen).
33
Page 34

4.
On the “Enter the login code.” dialog box that appears, enter the login code.
z In the “Login Code” box, enter the four-digit number shown in the upper left corner of the LAN
connection standby screen that is being projected.
5.
When everything is the way you want, click [OK].
z While the projector is connected to a computer over a wireless LAN, a Network Connection
window like the one shown below will be displayed on the computer screen. The computer
screen image (main screen) will be projected.
z For details about Network Connection window operations, see “Using Network Connection”
(page 39).
6.
To terminate the wireless LAN connection and discontinue computer screen
projection, click the close button ( ) in the upper right corner of the Network
Connection window.
z This closes the Network Connection window and returns the projected image to the LAN
connection standby screen.
Note
z When using the above type of connection, settings can be configured to eliminate the need for
login code input. For information about how to configure settings, see “To configure Control
Panel page network settings” (page 59).
34
Page 35

Connecting the Projector to a Computer via a Wired LAN
Wired LAN Connection Overview
The method you should use to connect the projector to a computer over a wired LAN depends on
whether or not the computer will also be connected to an outside network at the same time.
Wired LAN connection when it is not necessary to connect the computer to
an outside network
Use a LAN cable to connect the projector and computer, and configure IP address settings for both.
Wired LAN connection
For information about how to do this, see “To use a LAN cable to connect a computer directly to the
projector” (page 36).
Wired LAN connection when you also want to connect the computer to an
outside network
Use LAN cables to connect the projector and computer to the same router. In this configuration, the
computer can use the network (Internet or intranet) service connected to by the router. The network
environment that can be connected to from the computer depends on the router.
Router
Wired LAN connectionWired LAN connection
For information about how to do this, see “To establish a wired LAN connection between the projector
and a computer via a router” (page 38).
Note
z The Network Connection application is not required for wired LAN connection operations.
Network Connection is used when projecting computer screen contents after a wired LAN
connection is established.
35
Page 36

Wired LAN Connection Procedures
To use a LAN cable to connect a computer directly to the
projector
1.
Connect the computer to the projector with the LAN cable.
Projector Operation
2.
Press the [INPUT] key. This will display the “Input” dialog box.
3.
Use the [T] and [S] keys to select “Network” and then press the [ENTER] key.
4.
Check the IP address (“Server IP”) in the lower right corner of the LAN
connection standby screen.
z Here, we will use a projector IP address of 192.168.100.10 (projector initial default setting).
Computer Operation
5.
Change the IP address of the computer to 192.168.100.XXX (XXX is a value from
1 to 9 or 11 to 254).
z The steps up to this point are to establish a LAN connection between the projector and
computer. The steps from here are for projecting the computer screen.
6.
Start up Network Connection.
z The Network Connection window will appear with the message “Connecting”.
z If your computer is running Windows 7, 8 or 8.1 and the “Set Network Location” dialog box
appears, click [Cancel] to close the dialog box.
z A “Projector List” dialog box will appear as soon as Network Connection finds a projector to
connect to.
7.
Click the IP address of the projector you want to connect with, and then click
[OK].
z For the projector’s IP address, check “Server IP” in the lower left corner of the projection
screen (LAN connection standby screen).
36
Page 37

8.
On the “Enter the login code.” dialog box that appears, input the required login
code.
z In the “Login Code” box, input the four-digit number shown in the upper left corner of the LAN
connection standby screen that is being projected.
9.
When everything is the way you want, click [OK].
z This will cause the Network Connection window to change as shown below, and projection of
the computer screen image (main window) will start.
z For details about Network Connection window operations, see to “Using Network
Connection” (page 39).
10.
To discontinue computer screen projection, click the close button ( ) in the
upper right corner of the Network Connection window.
z This closes the Network Connection window and returns the projected image to the LAN
connection standby screen.
Note
z When using the above type of connection, settings can be configured to eliminate the need for
login code input. For information about how to configure such settings see “To configure
Control Panel page network settings” (page 59).
37
Page 38

To establish a wired LAN connection between the projector and
a computer via a router
Note
z The procedure below assumes that a DHCP server is running on the network to which the
router belongs, and that there is a LAN connection between the computer and router.
Projector Operation
1.
Use a LAN cable to connect the projector to the router to which the computer is
connected via the LAN
2.
On the projector, select “Auto” for “IP Settings”.
(1) Perform the following steps to display the IP Settings dialog box: [MENU] key 3
“Network Settings” 3 “Projector Wired LAN Settings”.
(2) Press the [W] key to select “Auto” for “IP Settings”.
(3) Press the [ESC] key to return to “Network Settings”.
(4) Select “Update Network Settings” and then press the [ENTER] key.
(5) In response to the network setting update dialog box that appears, press the [S] key to select
“Yes” and then press the [ENTER] key.
Computer Operation
3.
Perform the operation from step 6 under “To use a LAN cable to connect a
computer directly to the projector” (page 36).
38
Page 39

Using Network Connection
Network Connection is an application you can use to establish a LAN connection between a projector
and a computer, and to send display images, movies, and audio from a connected computer to the
projector.
Important!
z The explanations in this section assume there is already a LAN connection between the
projector and computer, and that the computer screen contents are being projected. Before
performing the procedures in this section, you should use the procedure under “Projecting
Computer Screen Contents Over a LAN Connection” (page 9) to establish a LAN connection
between the projector and computer.
Network Connection Window
The Network Connection window shown below is displayed while there is a LAN connection between
the projector and computer.
Login code
Function menu button
Project 1 screen button
Project PC screen button
Project video stream button
Project 4 screens button
Stop button
Pause button
Minimize button
Close button
Projection indicator
39
Page 40

Network Connection Operations
Network Connection Button Operations
While there is a LAN connection between the projector and a computer, you can use the buttons on
the Network Connection window to perform the operations described below.
To do this: Click this button:
Project a single computer screen that fills the entire
projection screen images (project 1 screen)
Divide the projection screen into four parts and project
four computer screens (project 4 screens)
Freeze the computer screen that is currently being
projected
(project 1 screen)
One of the following buttons*: , , ,
(pause)
Project a movie without displaying it on the computer
(project video stream)
Stop computer screen projection (stop)
Exit Network Connection (close)
* Clicking a button will project the computer screen image in the corresponding location: (1) Upper
left, (2) Upper right, (3) Lower left, (4) Lower right.
(project video stream)
For more information, see “Projecting a Video Stream”
on page 43.
12
34
40
Page 41

Network Connection Function Menu Operations
While there is a LAN connection between the projector and a computer, you can use the items on the
Network Connection function menu (which appears when you click the function menu button) to
perform the operations described below.
To do this: Select this function menu item: Refer to:
Prioritize display speed over projection
screen image quality
Prioritize projection screen image
quality over display speed
Output computer audio from the
projector speaker*
Switch from main screen projection to
extended screen projection*
Switch from extended screen projection
to main screen projection
Use a smart device for remote control
of a computer that is running Network
Connection
Configure projector network settings
Remotely control the projector over a
LAN connection
Upload a file to projector internal
memory
Change the wireless LAN connection to
another projector [Server Search]
Create a copy of Network Connection
on a USB flash drive
Delete connection information
(passphrase) stored by Network
Connection
Show the IP address and login code of
the projector connected via LAN
Display Network Connection version
information
Exit Network Connection [Exit] –
1
2
[Projection Setting] 3
[High-speed]
[Projection Setting] 3
[High-resolution]
[Audio Out]
[Select the Projection Screen] 3
[Extended Screen]
[Select the Projection Screen] 3
[Main Screen]
[PC Remote]
[Admin Screen]
[Admin Screen]
[Admin Screen]
[Token Wizard]
[Initialize]
[Info] –
[About] –
“Outputting Computer Audio from
the Projector Speaker” (page 42)
“Remotely Controlling a Computer
from a Smart Device” (page 44)
“Using the Projector Admin Pages”
(page 52)
“Remotely controlling the Projector
Over a LAN Connection” (page 64)
“Uploading a File to Projector
Internal Memory” (page 67)
“To terminate the current wireless
LAN connection and re-connect”
(page 45)
“Using the Token Wizard” (page 74)
“To delete connection information
(passphrase) stored by Network
Connection” (page 45)
–
–
–
*1 In the case of Windows XP, which does not support audio level mixer functions, a driver must be
installed to enable these functions. See “Add-on Driver Software for Windows” below.
*2 With Windows XP and Windows Vista, installation of driver software is required to enable these
functions. See “Add-on Driver Software for Windows” below.
41
Page 42

Add-on Driver Software for Windows
With Windows, use of some parts of the Network Connection requires installation of the driver
software shown in the table below. For information about how to obtain this software, go to the CASIO
website (http://www.casio-intl.com/support/).
To use this function: Install this driver software:
Audio output function VAC driver (for Windows XP version that does not support audio level
Extended screen output function VDD driver (for Windows XP and Windows Vista)
mixer functions)
Outputting Computer Audio from the Projector Speaker
You can use Network Connection to output computer audio from the projector speaker while a
computer screen is being projected over a LAN connection.
z To output computer audio from the projector speaker, select [Audio Out] on the Network
Connection function menu so there is check mark next to it.
Enabling projector speaker output will disable audio output from the computer speaker(s).
z To disable projector speaker audio output and re-enable output from the computer speaker(s),
select [Audio Out] on the function menu again to remove the check mark.
Note
z The function menu [Audio Out] item is unchecked (disabled) whenever you start up Network
Connection.
42
Page 43

Projecting a Video Stream
You can use Network Connection to play a movie and output the playback image to the projector for
projection. Only the movie’s video stream is displayed on the projection screen. You can leave the
normal desktop and Network Connection window (which are not projected) on the computer screen.
Supported Playback Files
AVI: 20 Mbps maximum 720/30P (MJPEG video, ADPCM audio)
MOV: 20 Mbps maximum 1080/30P (H.264 video, ADPCM audio or AAC audio)
MP4: 20 Mbps maximum 1080/30P (H.264 video, AAC audio)
To project a video stream
1.
On the Network Connection window, click (project video stream).
z This will cause the appearance of the Network Connection window to change as shown
below.
Project PC screen button
Select file button
z If the computer screen is being projected, pressing the above button returns the projection
screen to the LAN connection standby screen. If projection is being performed from another
computer, the projection screen will not change.
2.
Click (select file).
3.
Use the select file dialog box that appears to select the movie file you want to
Stop button
Play button
play and then click [Open].
z This starts playback of the file you selected and displays a full-screen view of the movie on the
projection screen.
4.
To stop movie playback, click (stop).
5.
To return to normal computer screen projection, click (project PC screen).
Note
z After stopping playback in step 4 of the above procedure, you can restart playback from the
beginning of the file (movie) by clicking (play).
z Video stream projection is always performed in full-screen view. In this case, the projection
screen cannot be divided into four parts as when projecting computer screen images.
z When projecting a video stream the audio of the movie is always output by the projector.
43
Page 44

Remotely Controlling a Computer from a Smart Device
This section explains how to use a smart device for remote control of a computer running Network
Connection.
Important!
z To perform remote control operation described here, your smart device will need to have
C-Assist (page 76) installed on it.
To start PC remote
1.
Perform one of the operations below to project computer screen contents via a
wireless LAN.
z “To use a projector simple connection SSID to establish a wireless LAN connection and
project” (page 12), steps 1 through 9
z “To use a projector generic SSID to establish a wireless LAN connection and project” (page
15), steps 1 through 11
z “To use a user SSID to establish a wireless LAN connection and project” (page 22), steps 1
through 11 (User SSID already created.)
2.
On the smart device, start up C-Assist and then perform the steps below.
(1) Log in to the projector.
(2) Enter PC Remote standby.
3.
On the Network Connection window, click the function menu button and then
click [PC Remote] on the menu that appears so there is a check mark next to it.
z This will cause an image of the computer screen to appear on the smart device’s touch
screen.
z The above indicates that you can use the smart device’s touch screen to perform computer
mouse operations. You can also use the smart device’s on-screen keyboard to input and edit
data on the computer.
4.
Control the computer from the smart device as required.
To exit PC Remote
On the Network Connection window, click the function menu button and then click [PC Remote] on
the menu that appears to clear the check mark next to it.
44
Page 45

Other Network Connection Operations
To terminate the current wireless LAN connection and
re-connect
1.
On the Network Connection function menu, select [Server Search].
z This terminates the current wireless LAN connection, and changes the projection screen to the
LAN connection standby screen.
2.
Perform one of the operations below.
z “To use a projector simple connection SSID to establish a wireless LAN connection and
project” (page 12)
z “To use a projector generic SSID to establish a wireless LAN connection and project” (page
15)
z “To use a user SSID to establish a wireless LAN connection and project” (page 22) (After a
user SSID has been created.)
To delete connection information (passphrase) stored by
Network Connection
1.
On the Network Connection function menu, select [Initialize].
2.
On the initialize confirmation dialog box that appears, click [OK] to initialize or
[Cancel] to cancel.
45
Page 46

Projector Network Settings
There are two types of projector network settings: basic settings that can be configured by the
projector alone, and more detailed settings that can be configured by using a computer connected to
the projector via a LAN connection to access the Projector Admin pages.
z For information about basic network settings that can be configured on the projector alone, see
“Using the Projector Setup Menu” (below).
z For information about using a computer web browser to configure detailed network settings, see
“Using the Projector Admin Pages” (page 52).
Using the Projector Setup Menu
You can use the “Network Settings” main menu, which is included in the projector setup menu, to
display information about and configure settings for the projector and external device LAN
connection.
The table below shows the menu items included in the “Network Settings” main menu.
Menu Item Description Refer to:
Wired LAN info Shows information about the current wired LAN
Wireless LAN Info Shows information about the current wireless LAN
Projector Wired LAN
Settings
Projector Wireless LAN
Settings
Remote On* Specifies whether the projector can be turned on via
PJLink Authentication Enables and disables PJLink connection
Update Network Settings Reflects on the projector changes made to “Projector
Initialize Network
Settings
connection status (IP address, DHCP setting, etc.)
connection (IP address, DHCP setting, security
settings, status of connection with external access
point, etc.)
Configure the IP address setting. “To change the IP settings”
Displays a dialog box for selecting the SSID and setting
the IP address for use when the projector is used as a
wireless LAN access point.
LAN while the projector is in standby (projector off with
power being supplied).
authentication.
Wireless LAN Settings”.
Returns network settings to their initial factory defaults. “To initialize network
“To display wired LAN
information” (page 47)
“To display wireless LAN
information” (page 48)
(page 50)
“To change the SSID” (page
49)
“To change the IP settings”
(page 50)
–
–
–
settings” (page 51)
* Projector standby power consumption depends on whether or not Remote On is enabled. For
information about power consumption in each standby state, see the “Setup Guide” that comes
with the projector.
You can perform the following procedures on the projector itself or using the remote controller that
comes with the projector.
46
Page 47

To display wired LAN information
1.
Press the [MENU] key to display the setup menu.
2.
Use the [T] key to select “Network Settings” and then press the [ENTER] key.
3.
Use the [T] key to select “Wired LAN info” and then press the [ENTER] key.
z This will display the Wired LAN info dialog box. The table below explains the information that
appears on the dialog box.
Item Name Description
Projector name Blank (no name specified) under initial default settings. The name can be
MAC Address Fixed wired LAN MAC address assigned to each projector
IP Address IP address currently assigned to the projector
DHCP Shows the current projector DHCP server function status (“Auto” or “Disable”).
4.
To close the dialog box and exit the setup menu, press the [MENU] key.
changed using the procedure under “To configure Control Panel page network
settings” (page 59).
47
Page 48

To display wireless LAN information
1.
Press the [MENU] key to display the setup menu.
2.
Use the [T] key to select “Network Settings” and then press the [ENTER] key.
3.
Use the [T] key to select “Wireless LAN Info” and then press the [ENTER] key.
z This displays the “Wireless LAN Info” dialog box. The table below explains the information that
appears on the dialog box.
Item Name Description
SSID Shows the projector’s current SSID (which is used for wireless LAN connection
Wireless MAC Address Fixed wireless LAN MAC address assigned to each wireless adapter.
IP Address IP address currently assigned to the projector.
DHCP Shows the current projector DHCP sever status (“Auto” or “Disable”).
Security Settings Shows the encryption system being used by the projector’s current SSID. For
External AP SSID Appears when “Enable” is specified for “External Access Point” on the “Network
External AP Connection
Status
with an external device).
information about the encryption system, see step 7 under “To create a user
SSID” (page 19).
Settings” page (page 30). When the projector is connected to an external
wireless LAN access point, shows that access point’s SSID. When not
connected, shows “No connection”.
Appears when “Enable” is specified for “External Access Point” on the “Network
Settings” page (page 30). When the projector is connected to an external
wireless LAN access point, shows “Connected”. When not connected, shows
“Disconnected”.
4.
To close the dialog box and exit the setup menu, press the [MENU] key.
48
Page 49

To change the SSID
1.
Press the [MENU] key to display the setup menu.
2.
Use the [T] key to select “Network Settings” and then press the [ENTER] key.
3.
Use the [T] key to select “Projector Wireless LAN Settings” and then press the
[ENTER] key.
4.
Make sure that “SSID” is selected and then press the [ENTER] key.
z This displays a list of selectable SSIDs.
Simple Connection SSIDs
Generic SSIDs
Current SSID
z If there is a previously created user SSID, it also will appear in the list.
5.
Use the [S] and [T] keys to select the SSID you want and then press the
[ENTER] key.
z The button to the left of the currently selected SSID will become .
6.
Press the [ESC] key twice to return to “Network Settings”.
7.
Use the [T] key to select “Update Network Settings” and then press the [ENTER]
key.
z This will display a confirmation dialog box asking if you want to update network settings.
8.
Press the [S] key to select “Yes”, and then press the [ENTER] key.
z This applies the SSID change to the projector and closes the dialog box.
49
Page 50

To change the IP settings
1.
Press the [MENU] key to display the setup menu.
2.
Use the [T] key to select “Network Settings” and then press the [ENTER] key.
3.
Use the [T] key to select “Projector Wireless LAN Settings” and then press the
[ENTER] key.
4.
Use the [T] key to select “IP Settings” and then press the [ENTER] key.
z You can perform the step below in place of steps 3 and 4 above, if you want.
Use the [T] key to select “Projector Wired LAN Settings” and then press the [ENTER] key.
5.
On the “IP Settings” dialog box that appears, configure the settings described in
the table below.
To do this: Perform this operation:
Specify auto acquisition of an IP
address
Specify the IP address manually Specify “Manual” for “IP Settings” and input an IP address manually (see
Input an IP address (1) Use the [T] key to select “IP Address” and then press the [ENTER] key.
Select “Auto” for “IP Settings”.
below).
z This displays the “Input IP Address” dialog box.
(2) Use the [W] and [X] keys to specify the first octet (three digits) of the IP
address. After the setting is the way you want press the [T] key.
(3) Repeat step (2) to specify octets two through four.
z A value within the following ranges can be specified for each octet:
1st: 1 to 223; 2nd: 0 to 255; 3rd: 0 to 255; 4th: 1 to 254. Specifying a
value outside the above ranges will cause the numbers of the value
to be dimmed. If you advance to step (4) while there is a dimmed
octet number will return the IP address setting to what it was
originally (before you started input).
(4) When the IP address is the one you want, press the [ESC] key.
6.
What you should do next to return to “Network Settings” depends on whether
you started this operation from “Projector Wireless LAN Settings” or “Projector
Wired LAN Settings”.
z Projector Wireless LAN Settings: Press [ESC] twice.
z Projector Wired LAN Settings: Press [ESC] once.
7.
Use the [T] key to select “Update Network Settings” and then press the [ENTER]
key.
z This will display a confirmation dialog box asking if you want to update network settings.
50
Page 51

8.
Press the [S] key to select “Yes”, and then press the [ENTER] key.
z This applies the IP setting change to the projector and closes the dialog box.
Note
z Using the above operation to select “Manual” for “IP Settings” will cause the DHCP settings
(page 60) to change to “Auto”. Selecting “Auto” for the DHCP settings causes the DHCP start
address and end address to be set automatically as described below.
Example: When 192.168.100.20 is input for the IP address
Start address:
192.168.100.21 (The IP address you input with 1 added to the 4th octet)
End address:
192.168.100.254 (The IP address you input with the 4th octet changed to 254)
If the 4th octet of the IP address you input is 253 or 254, the 4th octets of the start address
and end address will both be 254.
To initialize network settings
1.
Press the [MENU] key to display the setup menu.
2.
Use the [T] key to select “Network Settings” and then press the [ENTER] key.
3.
Use the [T] key to select “Initialize Network Settings” and then press the
[ENTER] key.
z This will display a confirmation dialog box asking if you want to initialize network settings.
4.
Press the [S] key to select “Yes”, and then press the [ENTER] key.
z This initializes network settings and closes the dialog box.
51
Page 52

Using the Projector Admin Pages
You can use a computer web browser to access the Projector Admin pages described below to view
information and settings, and to perform various operations.
Use this page: To do this: Refer to:
System Status View the projector’s firmware version and network
information (IP address, etc.)
Control Panel Configure the network settings below.
Projector name, use/do not use a login code, show/
hide user name setting, enabled/disable IEEE
802.11n, channel width setting
Operate the projector over a LAN. “Remotely controlling the
Network Settings Configure the network settings below.
IP address setting, enable/disable DHCP server
function, wireless LAN connection settings (enable/
disable Access Point Function, SSID settings,
security settings, etc.), settings for connection to an
external access point
Change Passwords Change the password used when logging into
Projector Admin.
Initialize Settings Return all Projector Admin settings to their initial
factory defaults.
Crestron Control For input of the information required for the projector
to connect to a Crestron controller.
“To display the system status”
(page 58)
“To configure Control Panel
page network settings” (page
59)
Projector Over a LAN
Connection” (page 64)
“To configure Network
Settings page network
settings” (page 60)
“To change the password for
logging in to the Projector
Admin pages” (page 62)
“To initialize all settings on the
Projector Admin pages” (page
63)
“To input information for
connecting to a Crestron
controller” (page 63)
52
Page 53

Logging In to the Projector Admin Pages over a Wireless LAN Connection
If there is a wireless LAN connection between the projector and a computer, you can perform a
Network Connection operation on the computer to log in to the Projector Admin pages.
To log in to the Projector Admin pages over a wireless LAN
connection
1.
Perform one of the operations below to connect a computer to the projector via
a wireless LAN.
z “To use a projector simple connection SSID to establish a wireless LAN connection and
project” (page 12), steps 1 through 9
z “To use a projector generic SSID to establish a wireless LAN connection and project” (page
15), steps 1 through 11
z “To use a user SSID to establish a wireless LAN connection and project” (page 22), steps 1
through 11 (User SSID already created).
2.
On the Network Connection window, click the function menu button and then
click [Admin Screen] on the menu that appears.
Function menu button
z This starts up the computer’s web browser and displays the projector’s top page.
3.
On the left pane, click “Projector Admin”. On the password input screen that
appears, enter the password.
z The initial default password is “admin”.
4.
Click the [Login] button.
z If login proceeds normally, the “System Status” page will appear.
53
Page 54

Logging In to the Projector Admin Pages Over a Wired LAN Connection
You can log in to the Projector Admin pages over a wired LAN without using Network Connection.
To log in to the Projector Admin pages over a wired LAN
connection
1.
Perform one of the operations below to connect a computer to the projector
over a wired LAN connection.
z “To change the computer IP address based on the projector’s IP address and connect by
wired LAN” (page 55)
z “To change the projector’s IP address based on the computer’s IP address and connect by
wired LAN” (page 56)
z “To establish a wired LAN connection between the projector and a computer via a router”
(page 38)
Projector Operation
2.
Press the [INPUT] key. This will display the “Input” dialog box.
3.
Use the [T] and [S] keys to select “Network” and then press the [ENTER] key.
z This will project the LAN connection standby screen.
4.
Check the IP address (“Server IP”) in the lower right corner of the LAN
connection standby screen.
Computer Operation
5.
Start up the computer’s web browser, input “http://<IP address you looked up in
step 4 above>” into the address bar, and then press [Enter].
z This will display the projector top page.
6.
On the left pane, click “Projector Admin”. On the password input screen that
appears, input the password.
z The initial default password is “admin”.
7.
Click [Login].
z If log in proceeds normally, the “System Status” page will appear.
54
Page 55

To change the computer IP address based on the projector’s IP
address and connect by wired LAN
1.
Use a LAN cable to connect a computer directly to the projector.
Projector Operation
2.
Select “Manual” for the projector IP setting.
(1) Perform the following steps to display the IP Settings dialog box: [MENU] key 3
“Network Settings” 3 “Projector Wired LAN Settings”.
z The initial default setting for “IP Settings” is “Auto”.
(2) Press the [X] key to select “Manual” for “IP Settings”.
z The projector IP address will be displayed in the “IP Address” line.
(3) Press the [ESC] key to return to “Network Settings”.
(4) Select “Update Network Settings” and then press the [ENTER] key.
(5) In response to the network setting update dialog box that appears, press the [S] key to
select “Yes” and then press the [ENTER] key.
Computer Operation
3.
Specify an IP address for the computer. Octets 1, 2, and 3 should be the same as
those for the projector’s IP address. For Octet 4, specify a value in the range of 1
to 254, which is different from that of the projector’s IP address.
z For example, if the projector IP address 192.168.100.10 (which is its initial default), you should
specify a computer IP address of 192.168.100.XXX, where XXX is a value from 1 to 9, or 11 to
254.
4.
Perform the operation starting from step 2 under “To log in to the Projector
Admin pages over a wired LAN connection” (page 54).
55
Page 56

To change the projector’s IP address based on the computer’s
IP address and connect by wired LAN
Note
z Use the procedure below when you know the computer’s IP address.
1.
Use a LAN cable to connect a computer directly to the projector.
2.
Specify the projector’s IP address manually.
(1) Perform the following steps to display the IP Settings dialog box: [MENU] key 3
“Network Settings” 3 “Projector Wired LAN Settings”.
z The initial default setting for “IP Settings” is “Auto”.
(2) Press the [X] key to select “Manual” for “IP Settings”.
(3) Use the [T] key to select “IP Address” and then press the [ENTER] key.
z This will display the Input IP Address dialog box.
(4) Use the [W] and [X] keys to change Octet 1 of the IP address so it is the same as the
computer’s IP address After the setting is the way you want press the [T] key.
(5) Repeat step (4) to specify Octets 2 through 4.
z Octets 2 and 3 should be the same as those of the computer’s IP address.
z Octet 4 should be a value in the range of 1 to 254, and different from Octet 4 of the
computer’s IP address.
(6) Press the [ESC] key to return to “Network Settings”.
(7) Select “Update Network Settings” and then press the [ENTER] key.
(8) In response to the network setting update dialog box that appears, press the [S] key to
select “Yes” and then press the [ENTER] key.
3.
Perform the operation starting from step 2 under “To log in to the Projector
Admin pages over a wired LAN connection” (page 54).
56
Page 57

To establish a wired LAN connection between the projector and
a computer
Note
z The procedure below assumes that a DHCP server is running on the network to which the
router belongs, and that there is a LAN connection between the computer and router.
1.
Use a LAN cable to connect the projector to the router to which the computer is
connected via the LAN
2.
On the projector, select “Auto” for “IP Settings”.
(1) Perform the following steps to display the IP Settings dialog box: [MENU] key 3
“Network Settings” 3 “Projector Wired LAN Settings”.
(2) Press the [W] key to select “Auto” for “IP Settings”.
(3) Press the [ESC] key to return to “Network Settings”.
(4) Select “Update Network Settings” and then press the [ENTER] key.
(5) In response to the network setting update dialog box that appears, press the [S] key to
select “Yes” and then press the [ENTER] key.
3.
Perform the operation starting from step 2 under “To log in to the Projector
Admin pages over a wired LAN connection” (page 54).
57
Page 58

Supported Operations after Logging In to the Projector Admin Pages
To display the system status
1.
Referring to “Logging In to the Projector Admin Pages over a Wireless LAN
Connection” (page 53), log in to the Projector Admin pages.
z This will display the “System Status” page. The table below explains the information that
appears on the page.
Item Name Description
Firmware Version This is the version of the projector’s firmware (built-in software).
IP Address IP address currently assigned to the projector.
Subnet Mask Subnet mask value currently configured on the projector.
Default Gateway Default gateway currently configured for the projector.
Wireless MAC Address Fixed wireless LAN MAC address assigned to each wireless adapter.
Wire MAC Address Fixed wired LAN MAC address assigned to each projector.
Projection Status Projection Standby: Standing by for projection over a LAN connection.
Number of Users Number of users currently projecting from computers via a LAN connection.
2.
To log out from the Projector Admin pages, click “Logout”.
Projecting: Projecting over a LAN connection.
58
Page 59

To configure Control Panel page network settings
Important!
z Network settings on the “Control Panel” page are divided between two groups.
Group 1: Projector Name, Login Code
Group 2: Show User Name, IEEE 802.11n (Wi-Fi), Channel Width
When performing the procedure below, you should configure settings only within a single
group and then apply them by clicking the applicable Apply button ([Apply1] for Group 1 or
[Apply2] for Group 2). Any changes you make in the group that does not match the Apply
button you click will not be applied.
1.
Referring to “Logging In to the Projector Admin Pages over a Wireless LAN
Connection” (page 53), log in to the Projector Admin pages.
2.
In the left pane, click “Control Panel”.
3.
On the “Control Panel” page that appears, configure the settings described in
the table below.
To do this: Perform this operation:
Change the projector name In the “Projector Name” box, input up to 16
Specify whether or not to require log in code input
when establishing a wireless LAN connection
Spe cify w hether to sho w or hide th e user na me of the
computer currently projecting on the projector over a
LAN
Specify whether projector power can be turned on
via LAN while the projector is in standby
Enable or disable PJLink connection authentication In the “PJLink Authentication” area, click “Enable” or
Enable or disable wireless LAN standard
IEEE802.11n
Specify whether wireless LAN channel width should
be set automatically or should be fixed (20 MHz)
single-byte characters (no symbols) for the projector
name.
In the “Login Code” area, click “Enable” (prompt for
login code input) or “Disable” (do not prompt for
login code input).
In the “Show User Name” area, click either “ON”
(show) or “Off” (hide).
In the “Remote On*” area, click “Enable” (enable
power on) or “Disable”.
“Disable”.
In the “IEEE 802.11n (Wi-Fi)” area, click either
“Enable” or “Disable”.
In the “Channel Width” area, click “20MHz” or
“Auto”.
* Projector standby power consumption depends on whether or not Remote On is enabled. For
information about power consumption in each standby state, see the “Setup Guide” that
comes with the projector.
4.
Reflect the changes you made on the “Control Panel” page on the projector.
To reflect the settings of these items: Click this button:
Projector Name, Login Code [Apply1]
Show User Name, IEEE 802.11n (Wi-Fi), Channel Width [Apply2]
z After you press [Apply1] or [Apply2], a dialog box will appear telling you that you need to
restart the projector in order to reflect the settings.
59
Page 60

5.
To restart the projector and reflect the changed settings, click [OK].
z To cancel projector re-start without changing settings, click [Cancel] instead of [OK].
z Clicking [OK] will reflect the changed settings and restart the projector. The LAN connection
between the projector and computer will be terminated at this time.
To configure Network Settings page network settings
1.
Referring to “Logging In to the Projector Admin Pages over a Wireless LAN
Connection” (page 53), log in to the Projector Admin pages.
2.
On the left pane, click “Network Settings”.
3.
On the “Network Settings” page that appears, configure the settings described
in the table below.
To do this: Perform this operation:
Specify auto acquisition of an IP
address from the external LAN
device
Specify the IP address manually (1) In the “IP Settings” area, click “Use the IP address below”.
Specify auto allocation of IP
addresses to computers and smart
devices by the projector
Specify no allocation of IP addresses
to computers and smart devices by
the projector
Enable wireless LAN connection to
the projector from a computer and/or
smart device (by enabling the built-in
access point function)
Disable wireless LAN connection to
the projector from a computer and/or
smart device (by disabling the built-in
access point function)
Create a user SSID In the “Wireless Settings” area, configure the “SSID”, “Security”, and
Enable/disable SSID broadcasting In the “Wireless Settings” area, select “Enable” or “Disable” for “SSID
Specify the channel for wireless LAN
communication
Specify auto selection of the wireless
LAN channel to be used
In the “IP Settings” area, click “Obtain an IP address automatically”.
(2) In the “IP Address” boxes, enter the IP address you want to assign to
the projector (Initial Default: 192.168.100.10).
(3) In the “Subnet Mask” boxes, enter a value that will be used to determine
range of IP addresses of the network (subnet) to which the projector will
belong (Initial Default: 255.255.255.0).
(4) In the “Default Gateway” boxes, input the IP address of the default
gateway (Initial Default: 192.168.100.10).
(1) In the “DHCP Settings” area, click “Auto”.
(2) Specify the range of automatically allocated IP addresses as required.
z In “Starting Address” and “Ending Address”, input a value in the
range of 11 to 254 for the fourth octet.
z Only the fourth octet can be specified by you. The other octets
cannot be changed.
In the “DHCP Settings” area, click “Disable”.
Change the “Wireless Settings” area “Access Point Function” setting to
“Enable”.
Change the “Wireless Settings” area “Access Point Function” setting to
“Disable”.
“Passphrase/WEP Key Input” settings.
For details, see steps 6 through 8 under “To create a user SSID” (page 19).
Broadcast”.
In the “Wireless Settings” area, click [T] on the right side of the “Channel”
box. On the list that appears, select a channel from 1 to 11.
In the “Wireless Settings” area, click [T] on the right side of the “Channel”
box. On the list that appears, select “Auto”.
60
Page 61

To do this: Perform this operation:
Connect the projector to an external
wireless access point
Do not connect the projector to an
external wireless access point
4.
To reflect “Network Settings” page changes on the projector, click [Apply].
z A dialog box will appear telling you that you need to restart the projector in order to reflect the
settings.
5.
To restart the projector and reflect the changed settings, click [OK].
z To cancel projector re-start without changing settings, click [Cancel] instead of [OK].
z Clicking [OK] will reflect the changed settings and restart the projector. The LAN connection
between the projector and computer will be terminated at this time.
In the “External Access Point” area, click “Enable” and configure settings
as required.
For details, see step 6 through 9 under “To connect the projector to a
wireless LAN access point” (page 30).
In the “External Access Point” area, click “Disable”.
61
Page 62

To change the password for logging in to the Projector Admin
pages
Note
z The procedure below can also be used to change the password for logging in to the “Transfer
File” page. For information about the “Transfer File” page, see “Uploading a File to Projector
Internal Memory” (page 67).
1.
Referring to “Logging In to the Projector Admin Pages over a Wireless LAN
Connection” (page 53), log in to the Projector Admin pages.
2.
On the left pane, click “Change Passwords”.
z This will display the “Change Passwords” page.
3.
Under “Projector Admin”, input up to eight single-byte characters for the new
password into both “New Password” and “Reinput Password”. Input the same
password into both boxes.
4.
Click [Apply].
5.
If necessary, use the steps below to change the password for logging in to the
“Transfer File” page.
(1) Under “Transfer File”, input the new password into both “New Password” and “Reinput
Password”. Input the same password into both boxes.
(2) Click [Apply].
6.
To log out from the Projector Admin pages, click “Logout”.
62
Page 63

To initialize all settings on the Projector Admin pages
1.
Referring to “Logging In to the Projector Admin Pages over a Wireless LAN
Connection” (page 53), log in to the Projector Admin pages.
2.
On the left pane, click “Initialize Settings”.
z This will display the “Initialize Settings” page.
3.
Click [Apply].
z This displays a dialog box asking if you want to restart the projector.
4.
To restart the projector and return its settings to their initial defaults, click [OK].
z To cancel projector re-start without initializing settings, click [Cancel] instead of [OK].
z Clicking [OK] will initialize settings and restart the projector. The LAN connection between the
projector and computer will be terminated at this time.
To input information for connecting to a Crestron controller
1.
Referring to “To log in to the Projector Admin pages over a wireless LAN
connection” (page 53) or “To log in to the Projector Admin pages over a wired
LAN connection” (page 54), log in to the Projector Admin pages.
2.
On the left pane, click “Crestron Control”.
3.
On the “Crestron Control” page that appears, input the information described
below.
IP Address: Input the Crestron controller IP address.
IP ID: Input the Crestron controller IP ID.
Port: Input the port number to be used for communication with the Crestron controller
(normally 41794).
4.
To apply the settings you input on the projector, click [Apply].
5.
To log out from the Projector Admin pages, click “Logout”.
To log out from the Projector Admin pages
In the upper right corner of the web browser window, click “Logout”.
This returns to the projector top page.
63
Page 64

Remotely controlling the Projector Over a LAN Connection
You can use the procedure below to control the projector from a computer or other external device
over a LAN connection.
To remotely control the projector from a computer connected
via a LAN
1.
Referring to “Logging In to the Projector Admin Pages over a Wireless LAN
Connection” (page 53), log in to the Projector Admin pages.
2.
In the left pane, click “Control Panel”.
z This will display the “Control Panel” page.
z Projector remote control items are those surrounded by the red boundaries above. For
detailed information about each of these items, see “Control Panel Page Remote Control
Items”.
z For information about items other than the above (Network Settings items), see “To configure
Control Panel page network settings” (page 59).
64
Page 65

3.
After you are finished with remote control operations, click “Logout” to log out
from the Projector Admin pages.
Note
z The projector supports the external devices and commands below.
External Devices and Commands Refer to:
All PJLink Class1 (Version 1.00) commands http://pjlink.jbmia.or.jp/english/
®
Crestron Electronics controller and software (RoomView
AMX Device Discovery http://www.amx.com/
) commands http://www.crestron.com/
65
Page 66

Control Panel Page Remote Control Items
Group Item Description
Refresh (Button) Click to refresh the screen with the latest information.
Projector Status Projector Status Shows the projector’s current status as either “ON” or “Standby”.
Projector
Control
Error Info Shows one of the following.
Power Off (Button) Click to turn the projector off.
Power On (Button) Click to turn on the projector. This operation is supported only when
Input Specifies the input source.
3D Click to enter or exit the 3D input mode.
Color Mode Specifies the color mode.
Blank Selecting “ON” for this setting temporarily blocks the image from the
Aspect Ratio Changes the aspect ratio of the projected image.
Brightness Input a value into the box and then click the [Apply] button. This will
Contrast Input a value into the box and then click the [Apply] button. This will
ECO Mode Switches the Eco mode.
Audio Volume Input a value into the box and then click the [Apply] button. This will
Mute Audio Specifies the mute setting. Audio is output while “OFF” is selected for this
Audio Out Specifies either output from the projector’s speaker or AUDIO OUT
Initialize (Button) Click to return all Network Projection Control items, except for the
No Error: Operating normally.
Temperature Error: Temperature error occurred.
Fan Error: Fan error occurred.
Light Error: Light source unit error occurred.
Other Error: Error other than above occurred.
“Enable” is selected for “Remote On”.
input source. “OFF” causes the image from the input source to be
projected.
change the projector’s “Brightness” setting accordingly.
change the projector’s “Contrast” setting accordingly.
change the volume setting accordingly.
setting, and muted when “ON” is selected.
terminal for audio.
Speaker: Audio output from the speaker
Line: Audio output from the AUDIO OUT terminal
“Projector Status” items, to their initial factory defaults.
66
Page 67

Projector File Viewer Operations
This section explains how to use a web browser to access projector internal memory to upload files
and to delete existing files. It also provides information about File Viewer operations you can perform
with a web browser.
Uploading a File to Projector Internal Memory
You need to log in to the “Transfer File” page in order to upload a file to projector internal memory.
Logging In to the Transfer File Page
If there is a wireless LAN connection between the projector and a computer, you can perform a
Network Connection operation on the computer to log in to the “Transfer File” page.
You can directly log in to the Transfer File page over a wired LAN without using Network Connection.
To log in to the Transfer File page over a wireless LAN
connection
1.
Perform one of the operations below to connect a computer to the projector via
a wireless LAN.
z “To use a projector simple connection SSID to establish a wireless LAN connection and
project” (page 12), steps 1 through 9
z “To use a projector generic SSID to establish a wireless LAN connection and project” (page
15), steps 1 through 11
z “To use a user SSID to establish a wireless LAN connection and project” (page 22), steps 1
through 11 (User SSID already created).
2.
On the Network Connection window, click the function menu button and then
click [Admin Screen] on the menu that appears.
Function menu button
z This starts up the computer’s web browser and displays the projector’s top page.
67
Page 68

3.
On the left pane, click “Transfer File”. On the password input screen that
appears, enter the password.
z The initial default password is “admin”.
4.
Click the [Login] button.
z If log in proceeds normally, the “Transfer File” page will appear.
68
Page 69

To log in to the Transfer File page over a wired LAN connection
See “To log in to the Projector Admin pages over a wired LAN connection” (page 54).
In step 6 of the procedure, click “Transfer File” instead of “Projector Admin”. Note that the initial
default password is “admin”.
To log out from the Transfer File page
In the upper right corner of the web browser window, click “Logout”.
This returns to the projector top page.
To change the password for logging in to the Transfer File page
Important!
z Projector Admin page login privileges are required to perform the procedure below.
1.
Referring to “Logging In to the Projector Admin Pages over a Wireless LAN
Connection” (page 53), log in to the Projector Admin pages.
2.
On the left pane, click “Change Passwords”.
z This will display the “Change Passwords” page.
3.
Under “Transfer File”, input up to eight single-byte characters for the new
password into both “New Password” and “Reinput Password”. Input the same
password into both boxes.
4.
Click [Apply].
5.
To log out from the Projector Admin pages, click “Logout”.
69
Page 70

Supported Operations while Logged In to the Transfer File Page
To do this: Perform this operation:
Upload a file to projector
internal memory
Delete files and/or folders
from projector internal
memory
Create a new folder inside
the currently displayed
folder
(1) Click [Browse] or [Select File].
z This displays the “Open File” dialog box.
(2) Click on the file (one only) you want to upload.
z Uploadable file formats are those supported for playback by the projector’s File
Viewer (JPEG, PNG, GIF, BMP, AVI, MOV, MP4, ECA, PtG, PDF).
(3) Click [Open].
z This closes the “Open File” dialog box and causes a button to appear to the
right of the file name you selected in step 1 above. (The actual positioning of
the button will depend on the web browser you are using.)
(4) To upload the selected file, click [Upload].
z “File transfer in progress” is displayed in the “Status” line in the upper left
corner of the page while transfer is in progress. This changes to “Complete”
when transfer is complete.
(1) On the list of files, select the check boxes of all the files and/or folders you want to
delete.
z You can select up to 10 check boxes at one time.
(2) To delete all of the files and/or folders whose check boxes are selected, click
[Delete File/Folder].
(3) On the delete confirmation dialog box that appears, click [OK] to delete or
[Cancel] to cancel the operation without deleting anything.
(1) Click .
(2) On the dialog box that appears, enter the name you want to assign to the folder
and then click [OK].
70
Page 71

Projector File Viewer Operations
This section explains the button operations you can use on a computer web browser to perform
projector File Viewer operations.
Displaying the Viewer Control Page
If there is a wireless LAN connection between the projector and a computer, you can perform a
Network Connection operation on the computer to display the “Viewer Control” page without inputting
a password.
You can directly log in to the “Viewer Control” page over a wired LAN without using Network
Connection.
To display the Viewer Control page over a wireless LAN
connection
1.
Perform one of the operations below to connect a computer to the projector via
a wireless LAN.
z “To use a projector simple connection SSID to establish a wireless LAN connection and
project” (page 12), steps 1 through 9
z “To use a projector generic SSID to establish a wireless LAN connection and project” (page
15), steps 1 through 11
z “To use a user SSID to establish a wireless LAN connection and project” (page 22), steps 1
through 11 (User SSID already created).
2.
On the Network Connection window, click the function menu button and then
click [Admin Screen] on the menu that appears.
Function menu button
z This starts up the computer’s web browser and displays the projector’s top page.
71
Page 72

3.
On the left pane, click “Viewer Control”.
z This displays the “Viewer Control” page like the one shown below, and starts projection of the
File Viewer main screen by the projector. For information about the operations you can
perform from this point, see “Viewer Control Page Operations” (page 73).
While File Viewer is being projected, these buttons
perform the same operations as the corresponding
buttons on the remote controller that comes with
the projector.
To display the Viewer Control page over a wired LAN
connection
See “To log in to the Projector Admin pages over a wired LAN connection” (page 54).
In step 6 of the procedure, click “Viewer Control” instead of “Projector Admin”.
To return to the projector top page from the Viewer Control
page
In the upper left corner of the web browser window, click “CASIO Projector”.
72
Page 73

Viewer Control Page Operations
To do this: Perform this operation:
Start File Viewer projection Click [Start Viewer].
Perform File Viewer remote controller
operations
Exit the Viewer Control page and return to
the projector top page
* File Viewer will not be exited if you click [EXIT] while it is projecting.
Click the desired buttons under [Start Viewer].
The keys have the same functions as the corresponding projector
remote controller key. For details about File Viewer operations, see
“Projecting with File Viewer” in the User’s Guide.
Click [EXIT]*.
73
Page 74

Appendix
Using the Token Wizard
You can use the Network Connection token wizard to copy Network Connection to a USB flash drive.
After you do that, you can run Network Connection on a computer that does not have the program
installed simply by plugging the USB flash drive (called a “USB Token”) into the computer’s USB port.
Using USB tokens is recommended when connecting to the projector from multiple computers.
To install Network Connection on a USB flash drive
Important!
z Using the procedure below to install Network Connection on a USB flash drive creates a file
named “autorun.inf” (which is a Network Connection auto run file) in the USB flash drive root
directory. If the USB flash drive root directory already contains a file with the same name, the
existing file will be renamed by adding “.bak” or a three-digit number (.001, .002, etc.) to the
end of its file name.
z Using the following procedure to install Network Connection on a USB flash drive will change
the name of the USB flash drive to “USB Token” and also change its icon to .
1.
On the Network Connection window, click the function menu button and then
click [Token Wizard] on the menu that appears.
z This displays the token wizard.
2.
Click [Next>].
z This displays a USB drive selection screen.
z If there is no USB flash drive connected to the computer, the message “USB memory could
not be detected.” will appear. If this happens, connect the USB flash drive and wait until its
USB flash drive name appears in the “USB Drive” box.
3.
If there are multiple USB flash drives connected to the computer, click the [T]
button to the right of the “USB Drive” box and select the name of the drive where
you want to install Network Connection.
4.
Click the [Next>] button.
z This installs Network Connection on the specified USB flash drive. The message “Wizard
ended normally.” appears on the display after installation is complete.
74
Page 75

5.
Click [Exit] to close the token wizard screen.
To use a USB token to connect a computer to the projector via
a wireless LAN
Connect the USB token to the computer’s USB port and then double click the Network Connection
icon in the token. After Network Connection starts up, you can perform the same operations you do
when Network Connection is installed on a computer.
Note
z You cannot use the token wizard when you start up Network Connection from a USB token.
Projecting Via a Wireless LAN Connection with Various Different Devices
Using the Network Connection to Project from a Mac OS
You can project the screen contents of a computer running a Mac OS (Mac OS X 10.6, 10.7, 10.8,
10.9) that is connected to the projector over a wireless LAN connection. The conditions below are
required in order to do so.
z On the projector, perform the required operation to change the projector’s SSID to a generic SSID
(casiolpj0101, casiolpj0102, casiolpj0103, casiolpj0104) or a user SSID. For more information, see
“To change the SSID” (page 49).
z Run Network Connection* on the Mac OS computer, and then log in to the projector from Network
Connection.
* You can download Network Connection for Mac OS from the CASIO projector support site located
at the URL shown below. The CASIO projector support site also includes information about required
computer environments and operation details.
http://www.casio-intl.com/support/
75
Page 76

Using C-Assist to Project from a Smart Device
Installing C-Assist on an Android or iOS smart device makes it possible to project smart device
images from the projector. C-Assist also makes it possible to use the smart device to control the
computer to which the projector is connected. The conditions below are required to perform these
operations.
z On the projector, perform the required operation to change the projector’s SSID to a generic SSID
(casiolpj0101, casiolpj0102, casiolpj0103, casiolpj0104) or a user SSID. For more information, see
“To change the SSID” (page 49).
z On the smart device, start up C-Assist and use C-Assist to log in to the projector.
* For an overview of C-Assist functions and information about how to obtain it, visit the CASIO
projector support site (http://www.casio-intl.com/support/).
Using MobiShow to Project from a Smart Device
MobiShow is client software developed by Awind for wireless projection. If MobiShow is installed on
an Android or iOS smart device, a wireless LAN connection can be established with the projector for
projection of smart device images from the projector. The conditions below are required in order to do
so.
z You need to obtain the version of MobiShow that is compatible with your smart device and install it
on the smart device.
• Before installing MobiShow, go to the CASIO projector support site
(http://www.casio-intl.com/support/) and check the information there about smart device
operating systems and MobiShow versions that are compatible with projector connection.
• You can obtain a copy of MobiShow from any site that carries applications for your smart device
(Google Play, iTunes, App Store, etc.)
z On the projector, perform the required operation to change the projector’s SSID to a generic SSID
(casiolpj0101, casiolpj0102, casiolpj0103, casiolpj0104) or a user SSID. For more information, see
“To change the SSID” (page 49).
z On the smart device, start up MobiShow and use MobiShow to log in to the projector.
Note
z MobiShow supports playback of JPEG files and PtG2 files (converted PowerPoint file) stored
on a smart device. For information about how to convert a PowerPoint file to a PtG2 file, visit
the CASIO website (http://www.casio-intl.com/support/).
76
Page 77

Troubleshooting
Wireless LAN Connection between the Projector and a Computer
Problem Cause and Required Action
I can’t establish a wireless
LAN connection between
the projector and a
computer.
The wireless LAN
connection between the
projector and computer
keeps dropping.
I can establish a wireless
LAN connection between
the projector and
computer, but the
computer screen contents
won’t project.
Projection image switching
is slow.
Wireless LAN connection
problems when multiple
projectors are being used
at the same time.
z If any other wireless LAN utility besides Network Connection is running on the
computer, close it.
z Try moving the projector closer to the computer. Also, make sure there is no wall or
other obstruction between the projector and computer.
z If a nearby microwave oven, Bluetooth device, or other device is interfering with the
wireless LAN signal, relocate the interfering device.
z If the projector is off, turn it on.
z If the projector does not have the wireless adapter connected, connect it (page 10).
z If the computer’s wireless LAN function is disabled, enable it.
z If any other wireless LAN utility besides Network Connection is running on the
computer, close it.
z Try moving the projector closer to the computer. Also, make sure there is no wall or
other obstruction between the projector and computer.
z If a nearby microwave oven, Bluetooth device, or other device is interfering with the
wireless LAN signal, relocate the interfering device.
z If something other than “Network” is selected as the projector’s input source,
press the [INPUT] key and then select “Network”.
z If computer screen contents won’t project while “Network” is selected as the input
source, click (Project 1 screen) on the Network Connection window.
z If the projection image has been frozen or cut off by pressing the [FREEZE] or
[BLANK] key on the projector’s remote controller, press the remote controller’s
[ESC] key to cancel the freeze/blank operation.
z On the Network Connection window, click the function menu button and then
check “Projection Setting”. If “High-resolution” is selected, change the setting to
“High-speed”.
z On the computer, exit all applications that you are not using.
z If your computer is running Windows Vista, 7, 8, or 8.1, disable Windows Aero
Check if more than one projector is assigned the same SSID number. Each projector
should have its own unique SSID. For information about the required operation, see
“To change the SSID” (page 49).
TM
.
77
Page 78

Projector Admin Pages
Problem Cause and Required Action
The Projector Admin pages do not appear
when I try to access them from Network
Connection.
I forgot the login password I specified for
the Projector Admin pages.
Transfer File Pages
Problem Cause and Required Action
The name of the file uploaded to the
projector using the Transfer File page is
shorter than the name of the file prior to
upload.
The network connection was lost while a
file is being uploaded to the projector using
the Transfer File page. The network
connection was immediately re-established
and the file that was being uploaded is
shown on the Transfer File page.
The network connection was lost while the
Transfer File page was displayed. The
network connection was immediately
re-established, but the file list on the
Transfer File page was blank.
The network connection was lost while the
Transfer File page was displayed. The
network connection was immediately
re-established, but files were missing from
the internal memory file list on the Transfer
File page.
The browser you are using may be configured to use a proxy server.
Since a proxy server configuration can make it impossible to access
the Projector Admin pages, you should change your browser
configuration. For information about proxy server settings, see the
help and other user documentation for your browser.
Perform the operation under “To initialize network settings” (page 51)
to return projector network settings to their initial defaults.
Up to 38 single-byte characters can be displayed for a file name by
the projector’s File Viewer, so a file with a longer name will cause
anything past the 38th character to be cut off automatically.
If you want the same file name to be used both prior to and following
upload, make sure it has no more than 38 characters.
The file uploaded to the projector’s internal memory is incomplete.
Using File Viewer to perform an operation on the file may result in
some of the file data being missing or the file may not display at all.
Delete the file from the projector’s internal memory and upload it
again.
This may be due to a temporary file recognition error. Exit the web
browser you are using to display the Transfer File page, and then
perform the operation under “To log in to the Transfer File page over
a wireless LAN connection” (page 67) or “To log in to the Transfer File
page over a wired LAN connection” (page 69) again.
This may be due to a temporary file recognition error. Perform the
steps below.
(1) Perform the required operation on the projector to exit File
Viewer.
(2) Turn the projector of and then back on again.
(3) Start up File Viewer and display the list of files in internal memory.
For details about the operation to display the File Viewer list of files in
internal memory, see “Starting Projection of Files Located in
Projector Internal Memory” in the User’s Guide.
78
Page 79

MA1405-A
 Loading...