

Page 1
DATA PROJECTOR
XJ-360
User’s Guide
• Make sure you read all of the precautions in the
printed “User’s Guide (Basic Operations)” first.
Also see the “User’s Guide (Basic Operations)”
for information about setting up the projector and
replacing its lamp.
• Keep this manual in a safe place for future
reference.
E
Page 2

• Digital Light ProcessingTM, DLPTM, Digital Micromirror DeviceTM, and DMDTM
are trademarks of Texas Instruments Incorporated of the United States.
• Microsoft, Windows, Windows NT, Windows XP, and the Windows logo are
registered trademarks or trademarks of Microsoft Corporation of the United
States in the United States and other countries.
• Apple and Macintosh are registered trademarks of Apple Computer, Inc. of
the United States.
• Other company and product names may be registered trademarks or
trademarks of their respective owners.
• The contents of this User’s Guide are subject to change without notice.
• Copying of this manual, either in part or its entirety, is forbidden. You are
allowed to use this manual for your own personal use. Any other use is
forbidden without the permission of CASIO COMPUTER CO., LTD.
• CASIO COMPUTER CO., LTD. shall not be held liable for any lost profits or
claims from third parties arising out of the use of this product or this manual.
• CASIO COMPUTER CO., LTD. shall not be held liable for any loss or lost
profits due to loss of data caused by malfunction or maintenance of this
product, or any other reason.
• The sample screens shown in this manual are for illustrative purposes only,
and appear differently from the screens actually produced by the product.
Page 3

Contents
Projection Operations ....................................................................4
Projecting onto a Screen ................................................................................... 4
Keystone Correction (KEYSTONE)................................................................... 8
Using Color Mode (COLOR MODE) ............................................................... 11
Adjusting the Volume Level (VOL +/–) ............................................................ 12
Muting the Image and Audio (MUTE).............................................................. 12
Enlarging the Projected Image (D-ZOOM +/–)................................................ 13
Freezing the Projected Image (FREEZE) ....................................................... 14
Displaying the Pointer ..................................................................................... 14
Using the Setup Menu ..................................................................16
Setup Menu Overview ..................................................................................... 16
Setup Menu Screen Operations ...................................................................... 19
Setup Menu Reference ................................................................................... 27
Image Adjustment ...................................................................................................... 27
Signal Settings ........................................................................................................... 30
Screen Settings.......................................................................................................... 31
Detailed Settings........................................................................................................ 35
Operational Info .........................................................................................................46
Appendix........................................................................................48
Remote Controller Signal Range .................................................................... 48
Projection Distance and Screen Size.............................................................. 49
Connecting to a Component Video Output Device ......................................... 50
Full-screen Display of an RGB Image............................................................. 51
Password Feature ........................................................................................... 52
Cleaning the Projector..................................................................................... 53
Reattaching the Lens Cover............................................................................ 54
Projector Troubleshooting ............................................................................... 56
Supported Signals ........................................................................................... 58
3
Page 4
Projection Operations
Projection Operations
Projecting onto a Screen
This section explains the basic steps for projecting an image.
Basic Flow
Set up the projector and point it at the screen.
User’s Guide (Basic Operations): Setting Up the Projector
Connect the computer or video device to the projector.
User’s Guide (Basic Operations): Connecting a Computer to the Projector
User’s Guide (Basic Operations): Connecting to a Standard Video Device
Turn on the projector and the connected computer or video device.
Press the [
User’s Guide (Basic Operations): Turning On the Projector
Preparing the Projector
Perform fine adjustment of the projection position and angle.
User’s Guide (Basic Operations): Adjusting the Projector Elevation Angle
] (power) key to turn on the projector.
Select the input source.
“Manually Selecting the Input Source” (page 6)
Adjust the projected image size and focus the image.
“Zoom and Focus” (page 7)
Start projection (presentation, video, etc.).
• Perform the required operation on the input source computer or video equipment.
Starting
• Use the projector’s various functions to adjust the projected image as required.
Projection
4
Page 5
Projection Operations
Auto Input Source Selection
When you turn on the projector, it checks the status of each input source (whether or not
the input source is sending a signal) in the sequence shown below. It automatically selects
the first input source it finds that is sending an input signal, and projects the applicable
image.
RGB terminal input
(RGB/Component)
If the RGB input terminal is connected to a computer and the S-VIDEO input terminal is
connected to a video deck and signals are being supplied by both, for example, the projector
automatically selects RGB input when it is turned on. The currently selected input source
name is shown in the upper right corner of the projection screen.
z If the projector does not find any input signal, the message “No signal input” appears in
place of the input source name.
z The input source that corresponds to input to the RGB input terminal is displayed in
accordance with the “Detailed Settings J Advanced Settings 2 J RGB Input” (page 44)
as shown below.
When the setting is “Auto”: “RGB” is displayed when the input signal to the RGB
When the setting is “RGB”: “RGB” is displayed.
When the setting is “Component”: “Component” is displayed.
z
Note that the projector does not select the input source automatically when “Off” is
selected for the “Detailed Settings
on the setup menu.
VIDEO terminal input
(VIDEO)
input terminal is RGB, “Component” is displayed in
the case of a component signal.
J
Advanced Settings 1 J Auto Input Detect” (page 40)
S-VIDEO terminal input
(S-VIDEO)
5
Page 6
Projection Operations
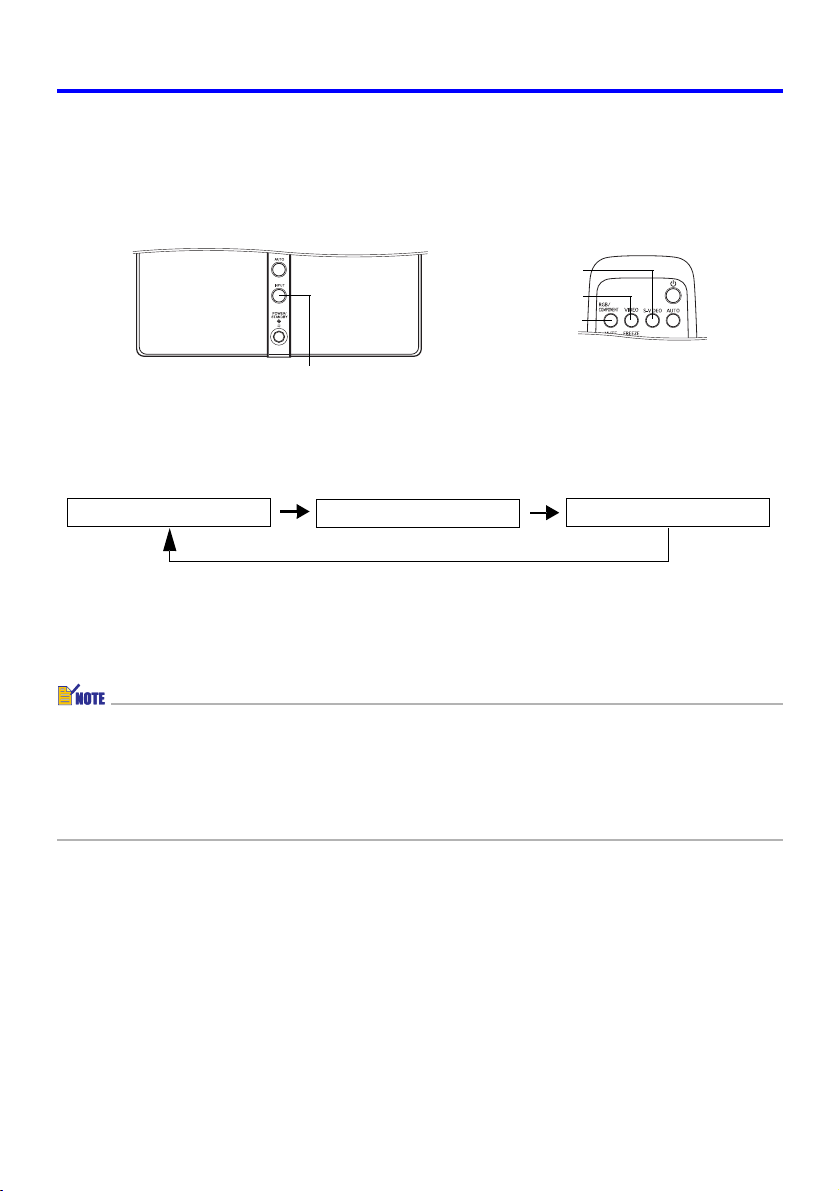
Manually Selecting the Input Source
The procedure you should use to select the input source depends on whether you are using
projector keys or remote controller keys.
[S-VIDEO] key
[VIDEO] key
[RGB/COMPONENT] key
[Projector]
[INPUT] key
[Remote Controller]
z To select the input source using projector keys, press the [INPUT] key on the projector to
cycle through input sources in the sequence shown below.
(RGB/Component)
(VIDEO)
(S-VIDEO)
z To select the input source using remote controller keys, press the [RGB/COMPONENT],
[VIDEO], or [S-VIDEO] key on the remote controller to select the input source you want.
The currently selected input source name is shown in the upper right corner of the projection
screen.
z If the currently selected input source is not sending an input signal, the message “No
signal input” appears in place of the input source name.
z The input source name when RGB/Component is selected as the input source is
displayed as “RGB” or “Component” in accordance with the “Detailed Settings J
Advanced Settings 2 J RGB Input” on the setup menu (page 44). For more information,
see the note under “Auto Input Source Selection” (page 5).
6
Page 7
Projection Operations
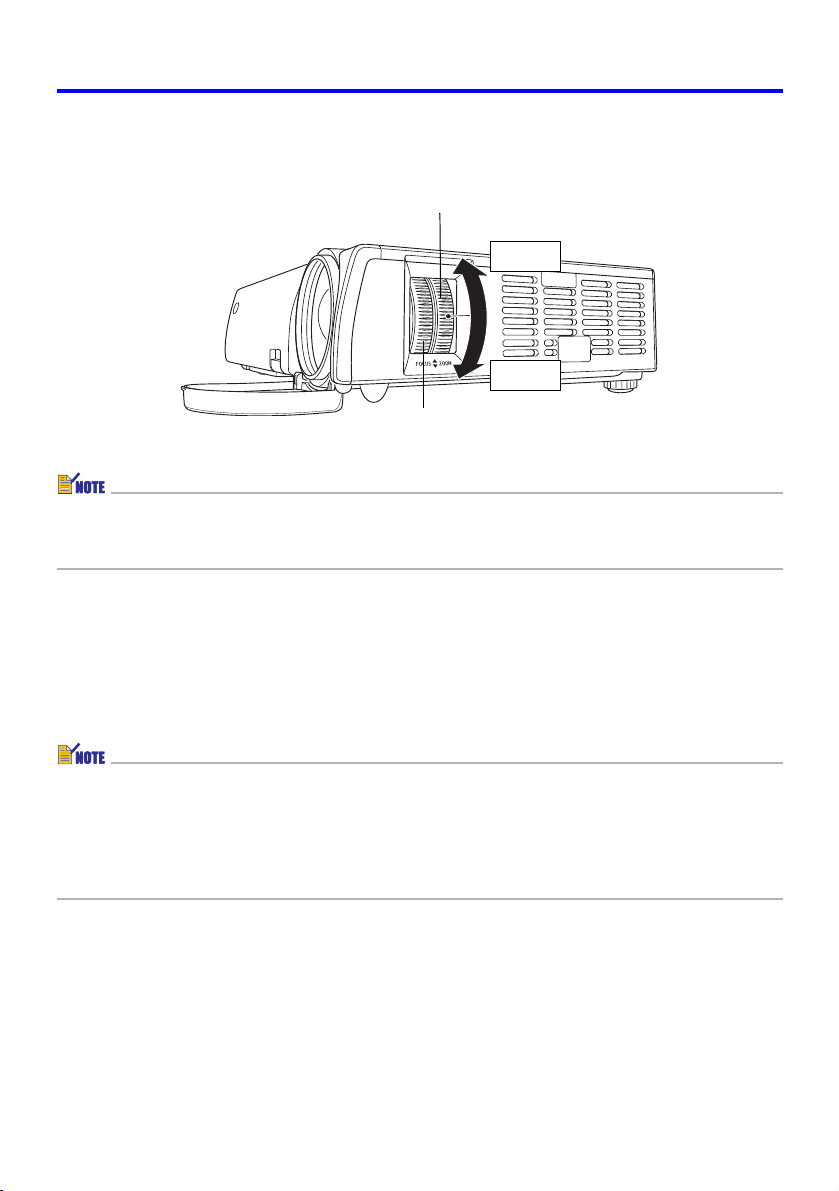
Zoom and Focus
Use the zoom ring to adjust the image size, and the focus ring to focus the image.
Zoom ring
Smaller
Larger
Focus ring
z It is best to have a still image on the screen when you focus the image.
z Performing zoom after focusing can cause the image to go out of focus. If this happens,
focus again.
Auto Adjustment of an RGB Image
When the input source is RGB (computer), the projector automatically adjusts vertical and
horizontal positioning, frequency, and phase whenever it detects an RGB signal (following input
source selection, power up, etc.). You can also execute an automatic adjustment operation by
pressing the [AUTO] key.
z You can turn off auto adjustment (page 41) when you want to disable auto adjustment
and maintain manual settings.
z The projected image may become distorted while an auto adjustment operation is in
progress.
z If an image is unclear following the auto adjustment operation, you can use the menu to
adjust items manually. For details, see “Signal Settings” on page 30.
7
Page 8
Projection Operations
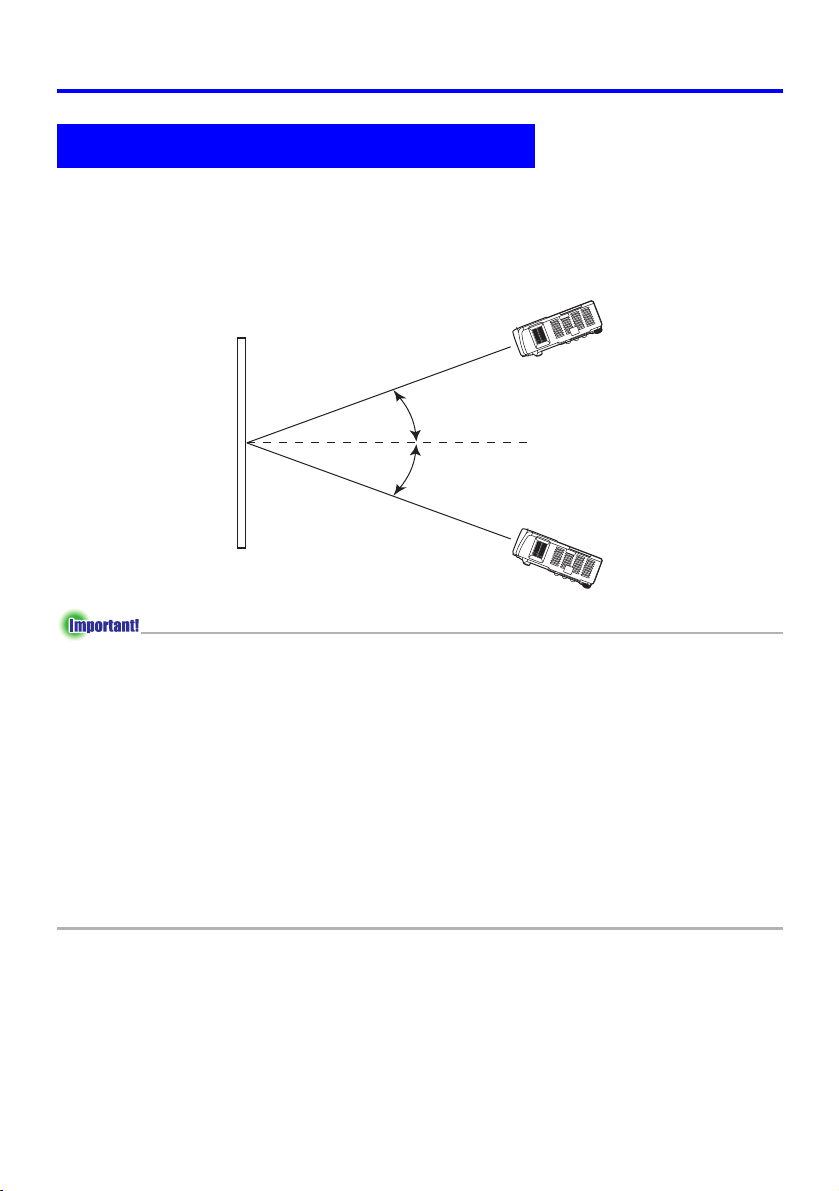
Keystone Correction (KEYSTONE)
When the projector is at an angle to the screen it is projecting on, the projected image may
have different length top and bottom edges. This phenomenon is called, “keystoning”. This
projector comes with functions for automatic as well as manual keystone correction, which
provides a regularly shaped projected image. The following shows the allowable angle that the
projector can be positioned relative to the screen.
Screen
Up to about 20
degrees
Up to about 20
degrees
z The angles shown in the above illustration are subject to the following conditions.
z Projection of an image from a computer (Resolution: 1024 × 768; Vertical Frequency:
60Hz)
z Resize Image To Fit: On
z Actual correction ranges are affected by the type of signal being projected, zoom, the
“Resize Image To Fit” setting, the aspect ratio setting, and other factors.
z Keystone correction can cause the corrected image to be smaller than the original
(uncorrected) image, or it can cause distortion of the image. If the projected image
becomes difficult to view, try moving the screen and/or projector so they are oriented
close to the configuration shown under “Setting Up the Projector” in the “User’s Guide
(Basic Operations)”.
z The projector does not support horizontal keystone correction. The center of the
projector’s lens should be aligned with the horizontal center of the screen (see “Setting
Up the Projector” in the “User’s Guide (Basic Operations)”).
8
Page 9
Projection Operations
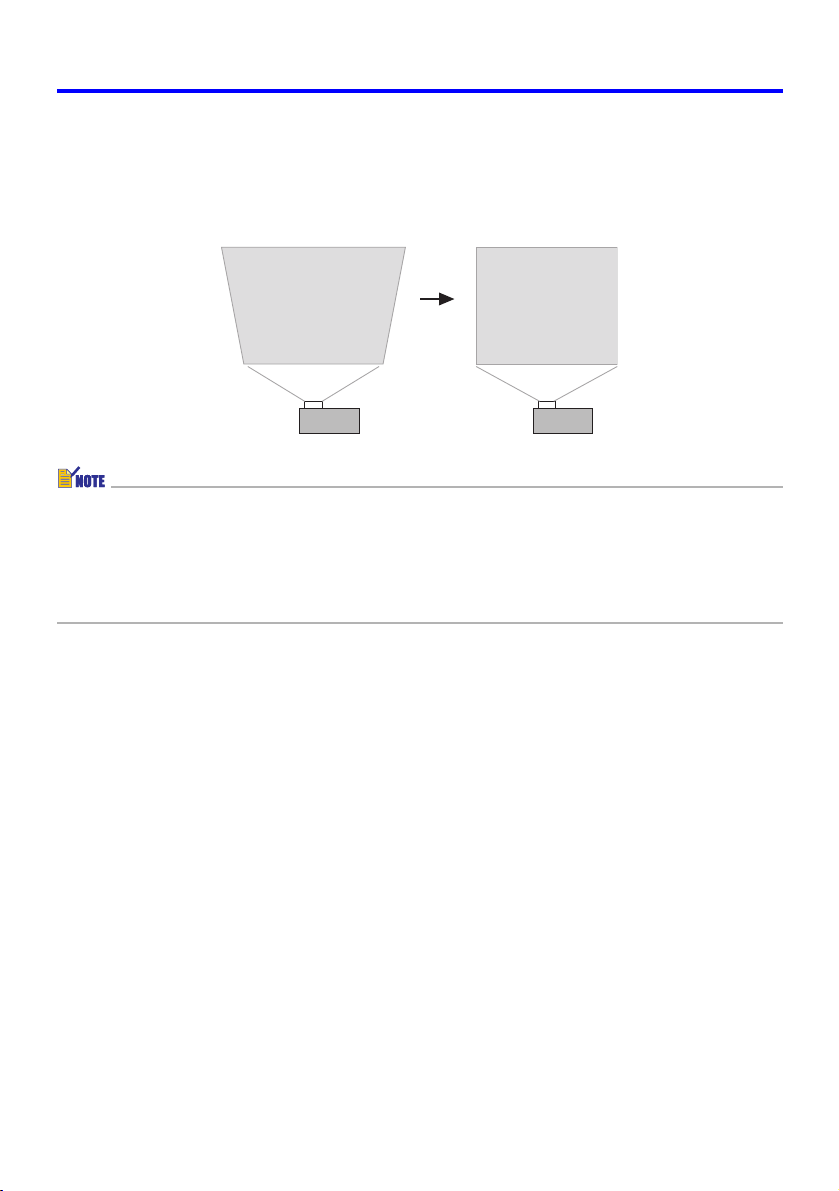
Automatic Keystone Correction
Automatic keystone correction correct the image to counteract the effects of vertical keystoning.
Performing auto keystone correction causes the message “Auto Keystone Corrected.” to appear
in the bottom center of the projected image.
z Auto keystone correction is performed by detecting the elevation angle of the projector.
This means that the surface you are projecting onto needs to be standing straight up. If
the surface you are projecting onto is not straight, use manual keystone correction to
correct the image.
z You can turn auto keystone correction on or off as required. For details, see “Detailed
Settings J Advanced Settings 1 J Auto Keystone Correction” on page 40.
9
Page 10
Projection Operations
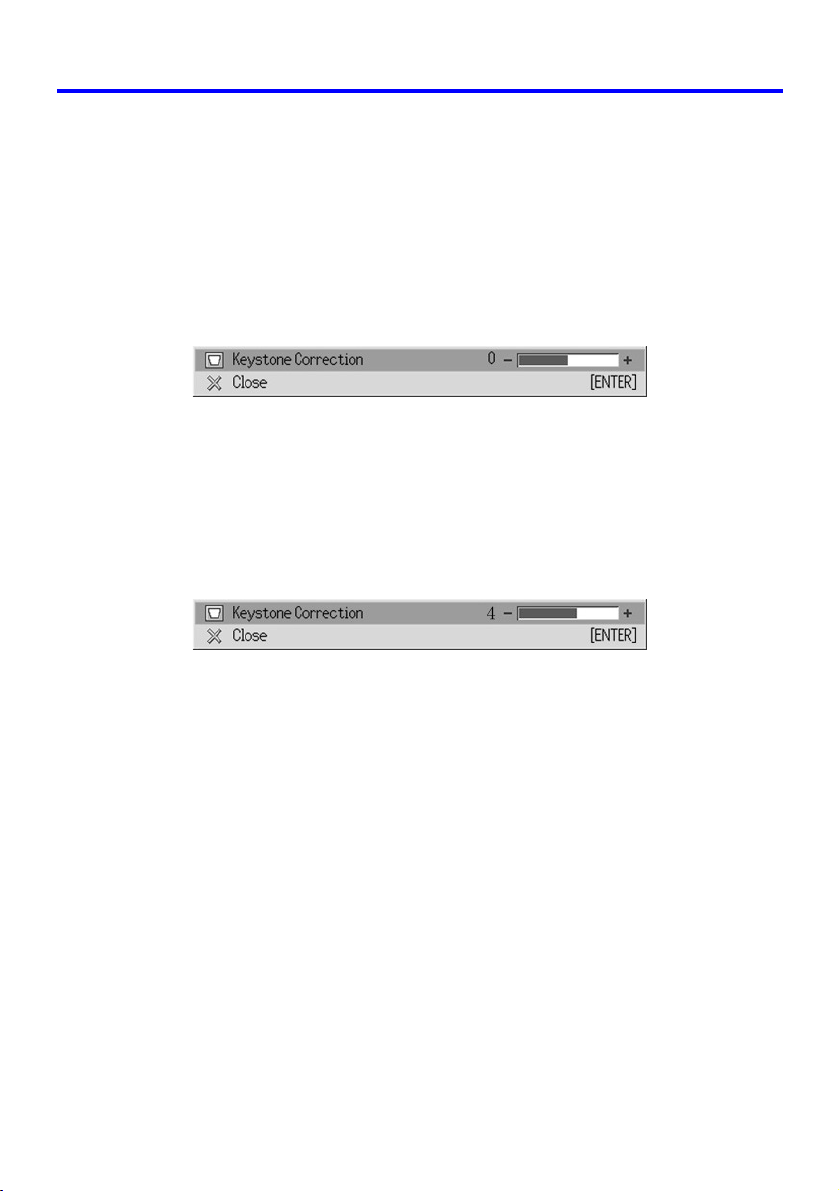
Manual Keystone Correction
Manual keystone correction can be used to correct for vertical keystoning.
To use manual keystone correction
1. Press the [KEYSTONE] key.
z This causes the keystone correction screen to appear on the projected image.
2. Use the [W] and [X] keys to correct for keystoning.
z Each press of [W] or [X] shifts the indicator on the currently selected bar left or right.
z Keystone correction is possible within the range that the indicator is able to move within
the selected bar. Depending on conditions, the indicator may not move all the way to
either end of the bar.
3. To close the setup screen, move the cursor to “Close”, and then press
the [ENTER] key.
z You can also close the setup screen by pressing the [ESC] or [KEYSTONE] key.
10
Page 11
Projection Operations
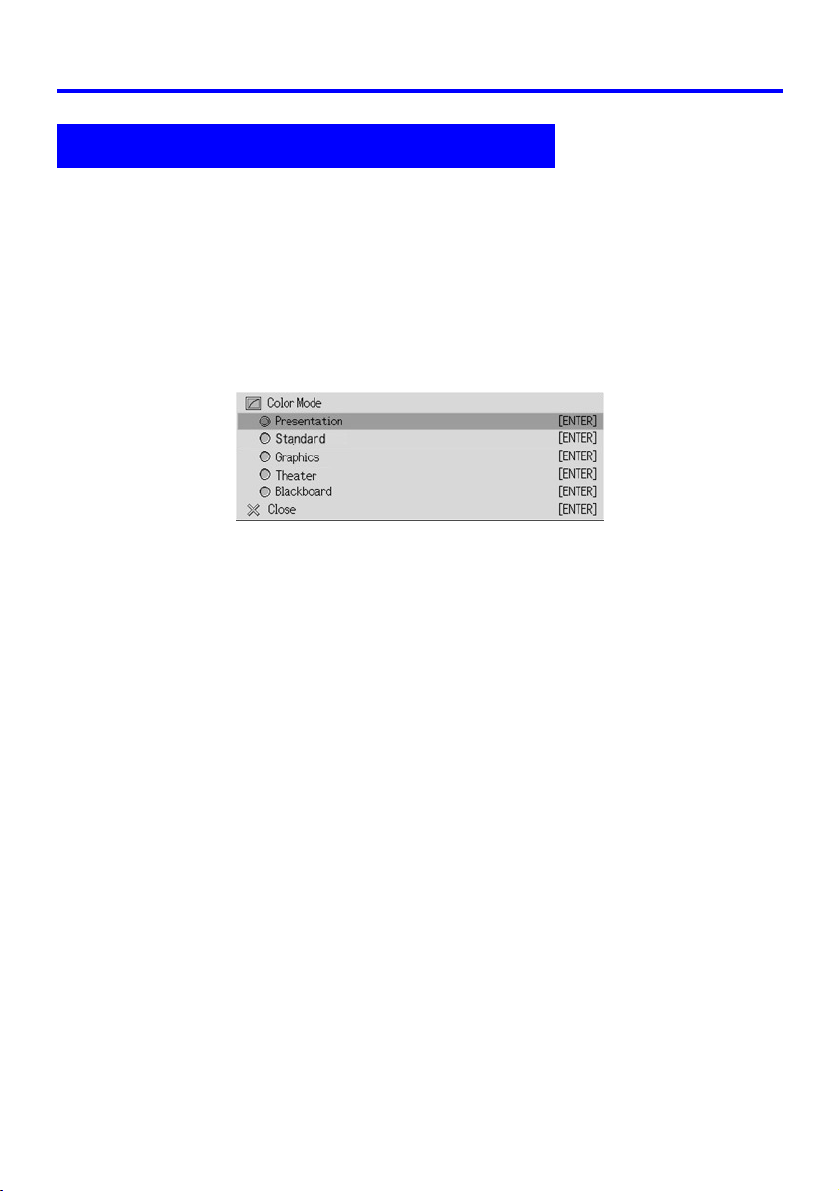
Using Color Mode (COLOR MODE)
The color mode setting lets you specify the type of image you will be projecting, so the
projector can optimize image color.
To change the color mode setting
1. Press the [COLOR MODE] key.
z This causes the color mode screen to appear on the projection image. The z mark
indicates the current color mode setting.
z For details about each of the settings, see “Image Adjustment J Color Mode” on
page 28.
2. Use the [S] and [T] keys to move the cursor to the setting you want,
and then press the [ENTER] key.
z This moves the z to item that is selected by the cursor, and applies the setting to the
image.
3. To close the setup screen, move the cursor to “Close”, and then press
the [ENTER] key.
z You can also close the setup screen by pressing the [ESC] or [COLOR MODE] key.
11
Page 12

Projection Operations
Adjusting the Volume Level (VOL +/–)
You can use the remote controller keys to adjust the volume level of the audio that is output
from the projector’s speaker.
To adjust the volume level
1. On the remote controller, press the [VOL +] or [VOL –] key.
z This causes the [Volume] screen to appear on the projected image.
2. Press the [VOL +] key or the [X] key to increase the volume, or the
[VOL –] or [W] key to lower the volume.
3. To close the setup screen, move the cursor to “Close”, and then press
the [ENTER] key.
z You can also close the setup screen by pressing the [ESC] key.
Muting the Image and Audio (MUTE)
The mute function causes the projected image to go to black screen, and stop output of the
audio from the speaker.
To mute the image and audio
1. On the remote controller, press the [MUTE] key.
z This causes the projected image to go to a black screen, and stops output from the
speaker.
2. To restore the image and audio, press the [MUTE] key again or press
the [ESC] key.
12
Page 13
Projection Operations
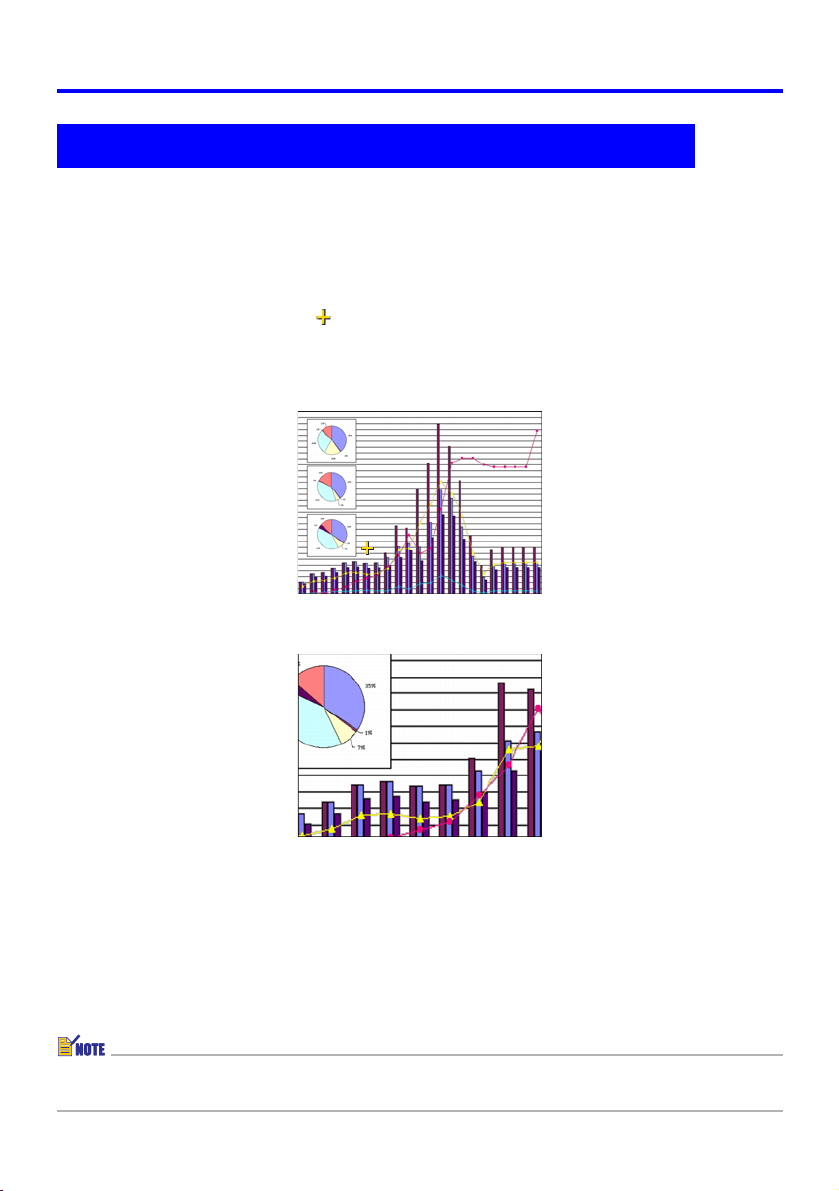
Enlarging the Projected Image (D-ZOOM +/–)
You can use the remote controller’s zoom keys to enlarge a specific part of the projected image.
To enlarge part of the projected image
1. On the remote controller, press the [D-ZOOM +] or [D-ZOOM –] key.
z This causes a cross cursor ( ) to appear on the projected image.
2. Use the remote controller’s cursor keys to move the cross cursor to the
part of the image that you want in the center of the enlarged image.
3.
On the remote controller, press the [D-ZOOM +] key to enlarge the image.
z Each press of the [D-ZOOM +] key enlarges the image one step. Pressing the
[D-ZOOM +] key will not affect the image if it is already its maximum size.
z You can back step through the image enlargements by pressing the [D-ZOOM –] key.
Yo u
can shift the zoomed image up, down, left, or right by pressing the applicable
z
remote controller
cursor key
.
4. To exit image enlargement and return the image to its original size,
press the remote controller’s [ESC] key.
z The [D-ZOOM] key can be used to zoom the projected image only when projecting an
RGB signal.
13
Page 14

Projection Operations
Freezing the Projected Image (FREEZE)
The freeze function stores the current projected image in projector memory, and projects it as
a still image.
To freeze the projected image
1. On the remote controller, press the [FREEZE] key.
z This freezes the image that was being projected when you pressed the [FREEZE] key.
2. To unfreeze the image, press the [FREEZE] key again or press the
[ESC] key.
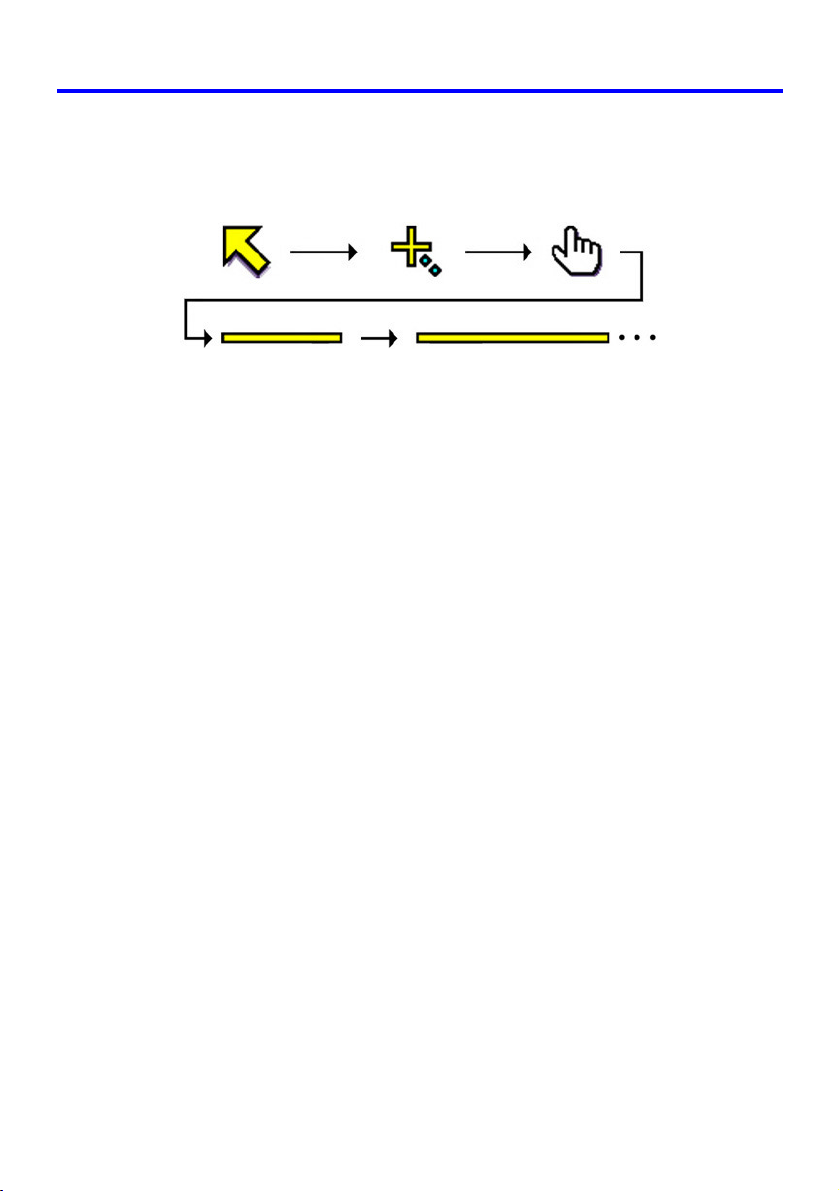
Displaying the Pointer
Use the procedures in this section to display the pointer and to select its shape (arrow, bar).
You can use the pointer to point to a specific location of the projected image during a
presentation.
To display the pointer
Press the [POINTER/SELECT] key to display the pointer in the projected image.
The following operations can be performed while the pointer is displayed.
z Pressing the [STYLE] key (the [ENTER] key functions as the [STYLE] key while the
pointer is displayed) rotates the pointer, causes it to blink, etc. If you are using an arrow
pointer, for example, each press of the [STYLE] key cycles through four different pointer
orientations.
z The cursor keys can be used to move pointer around the image. Holding down a cursor
key moves the pointer at high speed.
14
Page 15
Projection Operations
Selecting the Pointer Shape
Each press of the [POINTER/SELECT] key while the pointer is displayed cycles through the
pointer shapes in the sequence shown below.
To clear the pointer from the image
Press the [ESC] key.
15
Page 16
Using the Setup Menu
Using the Setup Menu
Setup Menu Overview
Pressing the [MENU] key while an image is being projected displays the setup menu on the
projected image. The setup menu can be used to configure a variety of different projector
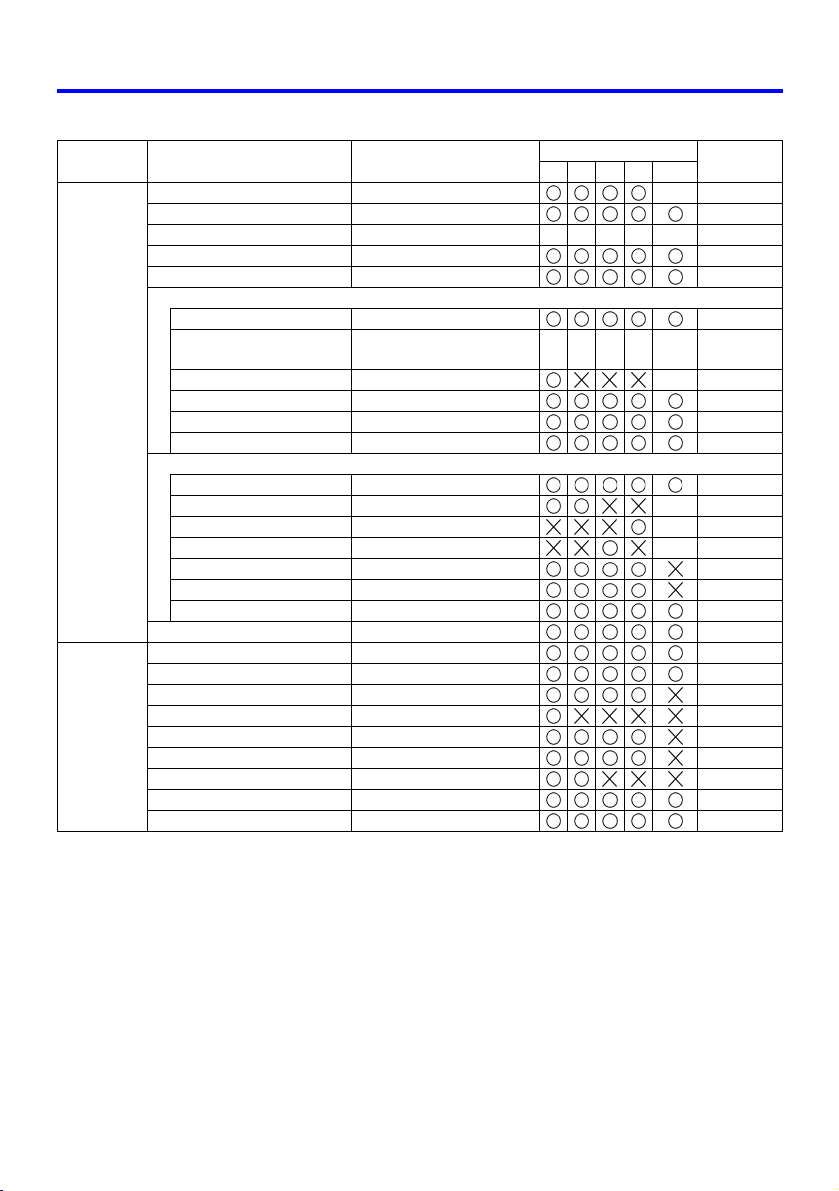
settings. The following table shows the menu items that are available in the Setup Menu.
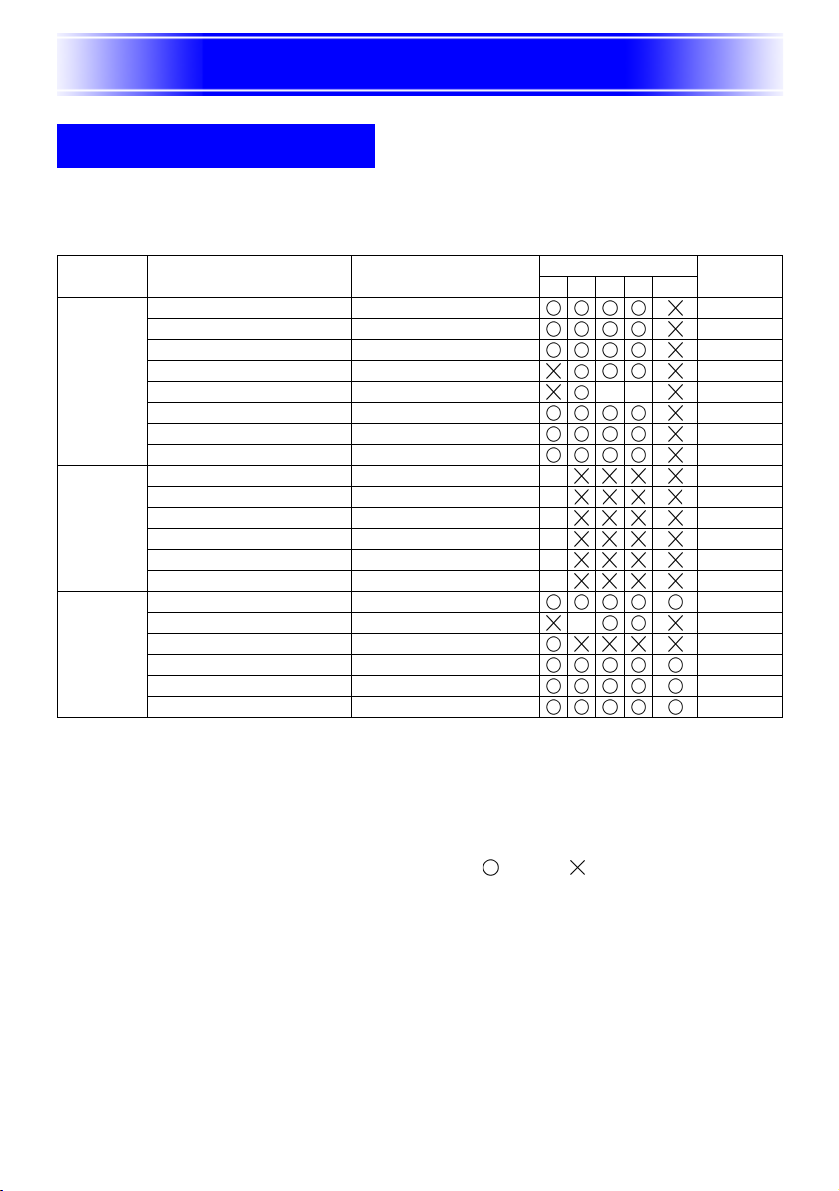
Main menu Sub-menu Sub-menu Item Type ∗1
Brightness Value Setting 27
Contrast Value Setting 27
Sharpness Value Setting 27
Image
Adjustment
Signal
Settings
Screen
Settings
∗1 This is the sub-menu item type. Refer to the pages noted below for more information.
Value Setting: Specifies a numeric value () page 22).
Selection: Allows selection from multiple options () page 22).
Setting Screen: Numeric value specification or option selection on a separate setting
Execution: Initializes a setting () page 24).
Information: Displays information only () page 24).
∗2 These columns indicate whether each item appears ( ) or not ( ) for each input
source (R = RGB, C = Component, S = S-VIDEO, V = Video, – = No input signal).
∗3 This setting can be configured only for an NTSC or NTSC4.43 signal.
∗4 This setting can be selected only when the aspect ratio of the input signal is 4:3.
∗5 This setting or operation is available only when digital zoom is not being used.
Saturation Value Setting 27
Tint Value Setting ∗3 ∗327
Color Mode Setting Screen 28
Color Balance Setting Screen 28
Restore Menu Defaults Execution 29
Vertical Position Value Setting
Horizontal Position Value Setting
Frequency Value Setting
Phase Value Setting
Noise Filter Selection
Restore Menu Defaults Execution
Keystone Correction Value Setting 31
Aspect Ratio Selection ∗432
Resize Image To Fit Selection 33
Projection Mode Selection 34
Ceiling Mount
Restore Menu Defaults Execution 35
screen () page 23).
∗11 Selection 34
Input source
RCSV –
∗5
∗5
∗5
∗5
∗5
∗5
∗2
See page
30
30
30
30
31
31
16
Page 17
Using the Setup Menu
Main menu Sub-menu Sub-menu Item Type
Volume Value Setting *635
Pointer Setting Screen 36
Low-noise Mode Selection ∗
Power On Password Special∗11 37
Change Password Special∗11 37
Advanced Settings 1
Auto Input Detect Selection 40
Auto Keystone
Correction
Auto Adjust Selection ∗741
Detailed
Settings
Operational
Info
∗6 This setting is for the currently selected input source.
∗7 This setting can be configured only when the input source is RGB.
∗8 This setting can be configured only when the input source is RGB/Component.
∗9 This setting can be configured only when the input source is VIDEO.
∗10 This setting can be configured only when the input source is S-VIDEO.
∗11 This is a special sub-menu item that is different from other types.
∗12 The Low-noise Mode is available only when “Ceiling Mount” is turned off.
∗13 “On” is disabled when “Ceiling Mount” is turned on.
Show Screen Text Selection 41
Startup Screen Selection 42
No Signal Screen Selection 42
Advanced Settings 2
Auto Power Off Selection 43
RGB Input Setting Screen ∗844
Video Signal Setting Screen ∗945
S-Video Signal Setting Screen ∗10 45
Image Enhancement 1 Selection 45
Image Enhancement 2 Selection 45
Language Setting Screen 46
Restore Menu Defaults Execution 46
Lamp Time Information 46
Input Signal Information 46
Signal Name Information 47
Resolution Information 47
Horizontal Frequency Information 47
Vertical Frequency Information 47
Scan System Information 47
Restore All Defaults Execution 47
Reset Lamp Time Execution 47
Selection ∗
Input source
RCSV –
12∗12∗12∗12∗12
13∗13∗13∗13∗13
See page
36
40
17
Page 18

Using the Setup Menu
Before Configuring Menu Settings
Always remember that the settings you configure on the setup menu are applied for the input
source (RGB, Component, S-VIDEO, VIDEO) that was selected when you displayed the setup
menu. Note the following important points.
z The items that appear on the setup menu depend on the currently selected input source
and other factors.
Some items apply to a certain specific input source, while some apply to multiple input
sources.
z Even for menu items that are common to multiple input sources, the setting range or
selectable options may differ according to the input source.
z With certain exceptions, there are basically two types of settings that can be configured
for multiple input sources. One type lets you configure different settings for each individual
input source. The other type applies a single setting to all input sources. The volume
level setting, for example, lets you configure a different setting for each input source, while
the keystone correction setting lets you configure a single common setting for all input
sources.
z In the case of settings that can be configured for each input source, you can configure
and save settings for the following signal types when the input source is a component
signal.
(1) 480i60 and 576i50 (2) 480p60 and 576p50 (3) 1080i60 and 720p60
When the input source is a 480i60 component signal, for example, changing the setting
for “Image Adjustment J Brightness” will cause the change to be reflected when the input
source is a 567i50 component signal as well. The change is not, however, reflected for
the 480p60 or 1080i60 signal.
z For details about how settings are saved, and other details, see “Setup Menu Reference”
on page 27.
18
Page 19

Using the Setup Menu
Setup Menu Screen Operations
This section explains projector operations you need to perform while configuring setup menu
settings. It also provides details about each sub-menu item type.
Basic Setup Menu Operations
The following is the general flow of the steps you need to perform when configuring setup
menu operations.
1. Select the input source whose settings you want to configure.
2. Press the [MENU] key.
z This causes the setup menu screen to appear in the upper left corner of the projected
image. At this time, only the main menu will be visible.
3. Press the [T] key.
z This will highlight the “Image Adjustment” on the main menu, indicating that it is
selected. Also, the “Image Adjustment” sub-menu will appear to the right.
Main menu
Sub-menu
Currently selected
menu item
z The items that appear in the sub-menu depend on the input source you selected in
step 1 and whether or not a signal is being input from the input source. For details,
see “Setup Menu Overview” on page 16.
19
Page 20

Using the Setup Menu
4. Use the [S] and [T] keys to move the highlighting to the main menu
item you want.
z The sub-menu for the currently selected main menu item will appear to the right.
5. Press the [X] key or the [ENTER] key.
z This will cause the item at the top of the currently displayed sub-menu to become
highlighted, indicating that it is selected.
6. Select the sub-menu item whose setting you want to change.
z Use the [S] and [T] keys to move the highlighting to the sub-menu item you want.
Configuring Advanced Settings 1 and Advanced Settings 2
The “Advanced Settings 1” and “Advanced Settings 2” sub-menus on the “Detailed Settings”
main menu provide access to further sub-menus for configuring various advanced settings.
Use the following steps to select items on the advanced settings sub-menus.
(1) Use the [S] and [T] keys to move the highlighting to “Advanced Settings 1” or
“Advanced Settings 2”.
(2) Press the [ENTER] key.
z This closes the main menu and switches to one of the special sub-menus shown below.
Advanced Settings 1 Sub-menu Advanced Settings 2 Sub-menu
(3) Use the [S] and [T] keys to move the highlighting to the sub-menu item you want.
20
Page 21

Using the Setup Menu
7. Use the currently selected sub-menu to change settings or select
options.
z The operations you need to perform depend on the sub-menu item type. For information
about item types, see “Setup Menu Overview” on page 16.
z For information about operations required for each item type, see “Sub-menu Operations”
on page 22.
z After configuring all of the settings you want for a particular sub-menu, you can use the
[S] and [T] keys to select another sub-menu and then configure its settings.
z To select a different main menu, move the cursor to “Back” and then press the
[ENTER] key, or press the [ESC] key. Next, perform steps 4 through 7 again.
8. To close the setup menu, move the cursor to “Close”, and then press
the [ENTER] key.
z Pressing the [MENU] key while the setup menu is displayed closes the setup menu,
regardless of the menu level that is currently displayed.
21
Page 22

Using the Setup Menu
Sub-menu Operations
This section explains steps you need to perform in order to configure settings for each submenu item type (value, selection, setting screen, execution, information).
Value Setting Type Sub-menu Item
This type of sub-menu item consists of a value and a bar graph.
Examples: Image Adjustment J Brightness; Screen Settings J Keystone Correction
Operation: Press the [W] key to make the value smaller, or the [X] key to make it larger.
Selection Type Sub-menu Item
This type of sub-menu item provides a number of options from which you can choose.
Examples: Screen Settings J Aspect Ratio; Detailed Settings J Advanced Settings 1 J
Operation: The currently selected option is indicated by a black button next to it. Use the
A value can be selected within the range that the indicator is able to move
within the selected bar. Depending on conditions, the indicator may not move
all the way to either end of the bar.
Auto Keystone Correction
[W] and [X] keys to move between the selections, which causes the buttons
next to them to become either black (selected) or white (deselected).
z For details about the options that are available for each selection type sub-menu item,
see “Setup Menu Reference” on page 27.
22
Page 23

Using the Setup Menu
Setting Screen Type Sub-menu Item
This type of sub-menu item displays a separate screen that you use to configure its settings.
Examples: Image Adjustment J Color Mode; Detailed Settings J Advanced Settings 2 J
Operation: The following example shows how to configure settings for Image Adjustment J
Language, etc.
Color Mode.
1. Perform steps 1 through 6 under “Basic Setup Menu Operations” on
page 19. Select the “Image Adjustment” main menu, and then select
the “Color Mode” sub-menu item.
2. Press the [ENTER] key.
z This displays the Color Mode selection screen shown below.
3. Use the [S] and [T] keys to highlight the item you want to select, and
then press the [ENTER] key.
4. After you are finished configuring settings, move the cursor to “Back”
and then press the [ENTER] key, or press the [ESC] key to return to
the previous sub-menu.
z After you are finished, press the [MENU] key to exit the setup menu.
z Note that the available settings and configuration procedures depend on the setting
screen. See “Setup Menu Reference” on page 27 for details about each sub-menu item.
23
Page 24

Using the Setup Menu
Execution Type Sub-menu Item
This type of sub-menu item returns a setting to its initial default value.
Examples: Image Adjustment J Restore Menu Defaults; Operational Info J Reset Lamp
) Initializing Settings (page 25)
) Resetting the Lamp Time (User’s Guide (Basic Operation))
Time
Information Type Sub-menu Item
This type of sub-menu item provides status and setup information.
Examples: Operational Info J Lamp Time; Operational Info J Input Signal
Refer to the following for details about the type of information that is available using the
information type sub-menu items.
) Operational Info J Lamp Time (page 46)
) Operational Info J Input Signal (page 46)
) Operational Info J Signal Name (page 47)
) Operational Info J Resolution (page 47)
) Operational Info J Horizontal Frequency (page 47)
) Operational Info J Vertical Frequency (page 47)
) Operational Info J Scan System (page 47)
24
Page 25

Using the Setup Menu
Initializing Settings
The setup menu lets you initialize the settings of a particular main menu item, or for all
setup menu items.
To initialize the settings of a particular main menu item
Example: To initialize the settings of the “Image Adjustment” main menu item.
z Performing the following procedure returns all of the sub-menu items under the currently
selected main menu item to their initial default settings.
1. Perform steps 1 through 6 under “Basic Setup Menu Operations” on
page 19. Select the “Image Adjustment” main menu, and then select
the “Restore Menu Defaults” sub-menu item.
2. Press the [ENTER] key.
z This displays a confirmation message asking if you want to initialize settings.
3. Use the [S] and [T] keys to select [Yes].
4. Press the [ENTER] key to initialize the menu’s settings, or the [ESC]
key to exit the initialize operation without doing anything.
z Pressing the [ENTER] key returns all of the sub-menu items on the currently selected
main menu to their initial default settings.
25
Page 26

Using the Setup Menu
To initialize all menu settings
z Performing the procedure below will initialize all settings, except for the following setup
menu sub-menu items.
z Power on password on/off setting (Detailed Settings J Power On Password) and the
current password
z Language Setting (Detailed Settings J Advanced Settings 2 J Language)
z Lamp Time (Operational Info J Lamp Time)
1. Perform steps 1 through 6 under “Basic Setup Menu Operations” on
page 19. Select the “Operational Info” main menu, and then select the
“Restore All Defaults” sub-menu item.
2. Press the [ENTER] key.
z This displays a confirmation message asking if you want to initialize all settings.
3. Use the [S] and [T] keys to select [Yes].
4. Press the [ENTER] key to initialize all menu settings, or the [ESC] key
to exit the initialize operation without doing anything.
z Pressing the [ENTER] key will initialize all settings and information, except for the items
described under “Important!” above.
26
Page 27

Using the Setup Menu
Setup Menu Reference
This section provides detailed explanations about the contents for all of the setup menu items.
z The titles in this section use the format: Main Menu Item J Sub-menu Item.
Image Adjustment
■ Image Adjustment J Brightness
This sub-menu adjusts the brightness of the projected image. A larger value produces a
brighter image.
z This setting is not possible when there is no input signal.
z A different setting can be configured and is stored for each input source.
■ Image Adjustment J Contrast
This sub-menu adjusts the contrast of the projected image. A larger value produces a
stronger contrast.
z This setting is not possible when there is no input signal.
z A different setting can be configured and is stored for each input source.
■ Image Adjustment J Sharpness
This sub-menu adjusts the sharpness of the projected image. A larger value makes the image
sharper, while a smaller value makes it softer.
z This setting is not possible when there is no input signal.
z A different setting can be configured and is stored for each input source.
■ Image Adjustment J Saturation
This sub-menu adjusts the color saturation of the projected image. A larger value increase
color saturation.
z This setting is not possible when the input source is RGB and when there is no input
signal.
z A different setting can be configured and is stored for each input source.
■ Image Adjustment J Tint
This sub-menu adjusts the tint of the projected image. A larger value makes the overall
image more bluish, while a smaller value makes the overall image more reddish.
z This setting is not possible when the input source is RGB and when there is no input
signal.
z A different setting can be configured and is stored for each input source.
27
Page 28

Using the Setup Menu
■ Image Adjustment J Color Mode
This sub-menu lets you select from among five different color settings to optimize projection in
accordance with image contents and projection conditions.
Input Source Specific Menu Items
Input Source Available Items (Parentheses indicate defaults.)
RGB (Presentation), Standard, Graphics, Theater, Blackboard
Component Presentation, Standard, Graphics, (Theater), Blackboard
S-VIDEO
VIDEO
No Signal None
Setting Explanations
Presentation: Select this setting for standard presentations in a well-lit area.
Standard: Select this setting when you want to highlight the colors during your
presentation.
Graphics: Select this setting when you want photographs and graphics to appear
Theater: Select this setting to bring out the dark portions of your images.
Blackboard: Select this setting for easy viewing when projecting onto a blackboard.
natural.
Setting Storage
A different setting is stored for each input source.
■ Image Adjustment J Color Balance
This sub-menu lets you independently adjust the red, green, and blue components of the
projection image.
z Color balance cannot be adjusted when there is no signal.
z A different setting can be configured and is stored for each input source.
28
Page 29

Using the Setup Menu
To adjust color balance
1. On the “Image Adjustment” main menu, select the “Color Balance” sub-
menu item, and then press the [ENTER] key.
z This causes the “Color Balance” sub-menu to appear, which shows the current settings
for each of the color components.
2.
Press the [ENTER] key.
z This displays the color balance setting screen.
3. Use the [S] and [T] keys to select the color you want to adjust (red,
green, blue), and then use the [W] and [X] keys to adjust it.
4. After you are finished configuring settings, move the cursor to “Back”
and then press the [ENTER] key, or press the [ESC] key to return to
the previous sub-menu.
z To exit the setup menu, press the [MENU] key.
■ Image Adjustment J Restore Menu Defaults
This sub-menu returns all of the sub-menu items on the Image Adjustment main menu to
their initial default settings.
z For details about the initialization procedure, see “To initialize the settings of a particular
main menu item” on page 25.
29
Page 30

Using the Setup Menu
Signal Settings
■ Signal Settings J Vertical Position
This sub-menu lets you adjust the vertical position of the input source image within the
projection area.
z This setting is possible only when RGB is selected as the input source and digital zoom
is not being used.
z “Image Adjustment” main menu item settings are saved for the current signal type only
(XGA/60Hz, SXGA/60Hz, etc.), and not for the input signal source. Note, however, that the
number of signal type settings that can be saved is limited. Exceeding the limit causes
the oldest setting to be deleted automatically.
■ Signal Settings J Horizontal Position
This sub-menu lets you adjust the horizontal position of the input source image within the
projection area.
z This setting is possible only when RGB is selected as the input source and digital zoom
is not being used.
z See “Signal Settings J Ve r tic a l Posi t i o n ” for details about how settings are saved.
■ Signal Settings J Frequency
This sub-menu lets you manually control the frequency of the image.
Normally, the projector is able to adjust the frequency automatically. If there are vertical bands
in the projected image, however, it means that automatic adjustment is not possible for some
reason. When this happens use this setting to adjust the image frequency.
z This setting is possible only when RGB is selected as the input source and digital zoom
is not being used.
z Settings are saved for each signal type (XGA/60Hz, SXGA/60Hz, etc.). Note, however, that
the number of signal type settings that can be saved is limited. Exceeding the limit
causes the oldest setting to be deleted automatically.
z If, for some reason, your manual frequency settings cause the image input from the
computer to disappear from the projection, you can press the [AUTO] key to perform an
auto adjust operation (page 7), which should cause the image to reappear.
■ Signal Settings J Phase
This sub-menu lets you manually control the phase of the image.
Normally, the projector is able to adjust the phase automatically. If there are color errors or
flickering in the projected image, however, it means that automatic adjustment is not possible
for some reason. When this happens use this setting to adjust the image phase.
z This setting is possible only when RGB is selected as the input source and digital zoom
is not being used.
z See “Signal Settings J Frequency” for details about how settings are saved.
30
Page 31

Using the Setup Menu
■ Signal Settings J Noise Filter
This sub-menu provides a choice of noise filter levels to remove digital noise from the
projected image when RGB is selected as the input source. Note that the noise filter may not
be able to remove certain types of digital noise.
z This setting is possible only when RGB is selected as the input source and digital zoom
is not being used. The setting is saved for the RGB input source only.
z Turning off the projector automatically returns this sub-menu to its initial default setting
(Normal).
Input Source Specific Menu Items
Input Source Available Items (Parentheses indicate defaults.)
RGB Low, (Normal), High
Component None
S-VIDEO
VIDEO
No Signal
■ Signal Settings J Restore Menu Defaults
This sub-menu returns all of the sub-menu items on the Signal Settings main menu to their
initial default settings, except for the phase setting.
z This operation is possible only when RGB is selected as the input source and digital
zoom is not being used.
z “Signal Settings” main menu “Vertical Position”, “Horizontal Position”, and “Frequency”
settings are initialized for the current signal type (XGA/60Hz, SXGA/60Hz, etc.) only.
z For details about the initialization procedure, see “To initialize the settings of a particular
main menu item” on page 25.
Screen Settings
■ Screen Settings J Keystone Correction
This sub-menu lets you correct for vertical keystoning of the projected image.
z Vertical keystone correction can be performed regardless of the currently selected input
source.
z A single setting is stored, which is applied to all input sources.
31
Page 32

Using the Setup Menu
■ Screen Settings J Aspect Ratio
This sub-menu lets you select the aspect ratio (ratio between the vertical and horizontal
dimensions) of the projected image.
Input Source Specific Menu Items
Input Source Available Items (Parentheses indicate defaults.)
RGB None
Component (4:3), 16:9
S-VIDEO
VIDEO
No Signal None
Setting Explanations
4:3: Sets the aspect ratio of the projected image to 4:3 (same as a standard TV
screen). This setting is normally used when S-VIDEO or VIDEO is selected as
the input source.
16:9: Sets the aspect ratio of the projected image to 16:9 (same as a movie screen
or high-definition TV screen). Using this setting when the input source image is
a 16:9 image that has been squeezed to a 4:3 image causes the image to be
projected with its normal 16:9 aspect ratio.
Setting Storage
A different setting is stored for each input source.
z When a component signal with an aspect ratio of 16:9 is sent from the input source, the
aspect ratio of the projected image is automatically switched to 16:9. In this case, this
setting cannot be changed.
z Using this projector to reduce, enlarge, or otherwise alter an image for business purposes
or public display may infringe upon the rights of the individual who holds the copyright of
the image.
32
Page 33

Using the Setup Menu
■ Screen Settings J Resize Image to Fit
When RGB is selected as the input source and the video resolution of the connected
computer is anything other than XGA (1024 × 768 pixels), “Resize Image To Fit” automatically
enlarges or reduces the input image so it matches the video resolution of the projector and
fills the entire screen.
Input Source Specific Menu Items
Input Source Available Items (Parentheses indicate defaults.)
RGB (On), Off
Component None
S-VIDEO
VIDEO
No Signal
Setting Explanations
On: When the input signal from the computer connected to the projector is not an
XGA signal, the image is automatically enlarged or reduced so it matches the
projector’s video resolution and fills the entire screen.
Off: Turns off resizing of the image input from the computer. If the image input from
the computer is smaller than XGA, the size of the projected image will also be
smaller. When the image input from the computer is larger than XGA, only the
center part of the image that corresponds to XGA size is projected.
z Resizing of an input image by “Resize Image To Fit” can call coarsening of the image or
can cause part of the image to be cut off. If this happens, try turning off “Resize Image
To F i t ”. Note, however, that turning off “Resize Image To Fit” can cause the projected
image to become smaller.
z The “Off ” setting is disabled in the case of resolution greater than XGA.
Setting Storage
This setting is possible only when RGB is selected as the input source. The setting is
saved for the RGB input source only.
33
Page 34

Using the Setup Menu
■ Screen Settings J Projection Mode
Use this sub-menu to specify whether projection will be from the front of the screen or the
back of the screen.
Input Source Specific Menu Items
Input Source Available Items (Parentheses indicate defaults.)
RGB (Front), Rear
Component
S-VIDEO
VIDEO
No Signal
Setting Explanations
Front: For projection from the front of the screen.
Rear: For projection from the back of the screen. This setting flips the front projected
image horizontally.
Setting Storage
A single setting is stored, which is applied to all input sources.
■ Screen Settings J Ceiling Mount
Use this sub-menu to configure the projector for use in an installation in which it is positioned
upside down.
Input Source Specific Menu Items
Input Source Available Items (Parentheses indicate defaults.)
RGB On, (Off)
Component
S-VIDEO
VIDEO
No Signal
Setting Explanations
On: Flips the projected image horizontally and vertically.
Off: Projects a normal image.
Setting Storage
A single setting is stored, which is applied to all input sources.
34
Page 35

Using the Setup Menu
z Turning on “Ceiling Mount” automatically turns off “Detailed Settings J Low-noise Mode”
(page 36). Note that the setting for “Low-noise Mode” remains “Off” even if you turn
“Ceiling Mount” back off again.
z The “Low-noise Mode” setting cannot be changed while “Ceiling Mount” is turned on.
z Turning on “Ceiling Mount” causes the “Detailed Settings J Advanced Settings 1 J Auto
Keystone Correction” setting to turn off automatically. “Auto Keystone Correction” will not
turn back on again automatically if you turn off “Ceiling Mount” again.
z The “Auto Keystone Correction” setting cannot be changed while “Ceiling Mount” is turned
on.
z Unplug the AC power cord from the power outlet if you do not plan to use it for a long
time.
z If you do not unplug the AC power cord when “Ceiling Mount” is turned on, the cooling
fan will continue to operate after you turn off the projector. This is normal and does not
indicate malfunction.
■ Screen Settings J Restore Menu Defaults
This sub-menu returns all of the sub-menu items on the Screen settings main menu to their
initial default settings.
z You can perform initialization even when there is no input signal. In this case, the
initialization is performed for the currently selected input source.
z Basically, initialization initializes the settings of the current input source. Note, however, that
the following settings are always initialized, regardless of the currently selected input
source.
Keystone Correction
Projection Mode
Ceiling Mount
z For details about the initialization procedure, see “To initialize the settings of a particular
main menu item” on page 25.
z Initializing these settings when “Detailed Settings J Advanced Settings 1 J Auto
Keystone Correction” is turned on causes automatic keystone correction to be performed
after initialization is complete, which causes “Keystone Correction” setting to show a
corrected value.
Detailed Settings
■ Detailed Settings J Volum e
This sub-menu can be used to adjust the volume level of the projector’s speaker. This setting
is also linked to volume settings made with the remote controller’s [VOL +] and [VOL –] keys.
z Changing this setting when there is no input signal changes the volume setting of the
currently selected signal source.
z A different setting is stored for each input source.
35
Page 36

Using the Setup Menu
■ Detailed Settings J Pointer
This sub-menu lets you specify the type of pointer that appears first when you press the
[POINTER/SELECT] key.
Input Source Specific Menu Items
Input Source Available Items (Parentheses indicate defaults.)
RGB Arrow 1, Arrow 2, Arrow 3, Bar 1, Bar 2, Bar 3
Component
S-VIDEO
VIDEO
No Signal
Setting Storage
A single setting is stored, which is applied to all input sources.
■ Detailed Settings J Low-noise Mode
The low-noise mode reduces the luminosity of the projection lamp and the speed of the
cooling fan, allowing quieter projector operation.
Input Source Specific Menu Items
Input Source Available Items (Parentheses indicate defaults.)
RGB (Off), On
Component
S-VIDEO
VIDEO
No Signal
Setting Explanations
Off (normal mode): This mode projects at normal luminosity.
On (low-noise mode): This mode reduces luminosity and fan motor speed for quieter
operation than the normal mode.
Setting Storage
A single setting is stored, which is applied to all input sources.
z Turning on “Screen Settings J Ceiling Mount” (page 34) automatically turns off “Low-
noise Mode”. Note that the setting for “Low-noise Mode” remains “Off” even if you turn
“Ceiling Mount” back off again.
z The “Low-noise Mode” setting cannot be changed while “Ceiling Mount” is turned on.
36
Page 37

Using the Setup Menu
■ Detailed Settings J Power On Password, Change Password
This sub-menu lets you turn the power on password on and off.
While the password is turned on, projector operation is impossible unless the correct password
is entered.
For more information about the power on password, see “Password Feature” on page 52.
Input Source Specific Menu Items
Input Source Available Items (Parentheses indicate defaults.)
RGB On, (Off)
Component
S-VIDEO
VIDEO
No Signal
Setting Explanation
On: Turns on the power on password, which requires input of a password to turn on
the projector.
Off: Turns off the password, which allows the projector to be operated without inputting
a password.
Setting Storage
A single setting is stored, which is applied to all input sources.
Initial Factory Default Password
The following is the 8-key operation you should perform to input the initial factory default
password.
[S][X][T][W][S][T][W][X]
z Note that the projector’s password is not really a “word”, but rather a series of remote
controller key operations.
z If you need to keep projector operation secure, be sure to change the initial factory
default password to a different one as soon as possible.
z The password can be input using the remote controller only. Optimum security is ensured
by turning on the password and keeping the remote controller with you.
z For information about what you should do if you forget your password, see “If you forget
your password...” on page 52.
37
Page 38

Using the Setup Menu
Using the Password Input Dialog Box
The password input dialog box will appear when any one of the following occurs.
z When you turn on the projector while the password is turned on.
z When you turn the password on or off.
z When you change the password.
When this dialog box is shown, perform a remote controller key operation for each of the
password input positions. The following explains how to input numbers.
z The cursor is flashing at the first (leftmost) input position.
z The cursor is used to select an input position for input.
z Use the remote controller cursor keys to input the password.
z Each time you perform a remote controller key operation, “” appears at the current
input position, and the cursor moves to the next input position to the right.
z A password can be from one to eight key operations long.
z After performing all of the key operations you want, press the [ENTER] key.
z To clear your input, press the [ESC] key.
To turn the power on password on and off
1. Perform steps 1 through 6 under “Basic Setup Menu Operations” on
page 19. Select the “Detailed Settings” main menu, and then select
the “Power On Password” sub-menu item.
2. Press the [ENTER] key.
z This displays a password input dialog box.
3. Input the current password.
z The initial factory default password is: [S][X][T][W][S][T][W][X].
z For information about how to input the password, see “Using the Password Input
Dialog Box” on page 38.
4. Press the [ENTER] key.
z If the password you input does not match the currently registered password, the
message “The password you input is wrong”. appears. Press the [ENTER] key to
return to step 3.
z If the password you input matches the registered password, pressing [ENTER] above
will display the message “The password you input is correct!”. Press the [ENTER]
key to advance to the next step.
38
Page 39

Using the Setup Menu
5. Use the [S] and [T] keys to turn the power on password on or off.
6. Press the [ENTER] key.
To change the power on password
1. Perform steps 1 through 6 under “Basic Setup Menu Operations” on
page 19. Select the “Detailed Settings” main menu, and then select
the “Change Password” sub-menu item.
2. Press the [ENTER] key.
z This displays a password input dialog box.
3. Input the current password.
z The initial factory default password is: [S][X][T][W][S][T][W][X].
z For information about how to input the password, see “Using the Password Input
Dialog Box” on page 38.
4. Press the [ENTER] key.
z If the password you input does not match the currently registered password, the
message “The password you input is wrong.” appears. Press the [ENTER] key to
return to step 3.
z If the password you input matches the registered password, pressing [ENTER] above
will display the message “The password you input is correct!”. Press the [ENTER]
key to advance to the next step.
5. Input the new password, and then press the [ENTER] key.
z This displays a dialog box for re-inputting the password for confirmation.
6. Re-input the same password you input in step 5, and then press
[ENTER].
z If the two passwords you input were identical, the message “Your new password has
been registered.” appears. Press the [ENTER] key.
z If the password you input here is different from the one you input in step 5, the
message “The password you input is wrong! Go back and input the correct
password.” appears. Pressing the [ENTER] key will display the new password input
dialog box. Repeat the above procedure from step 5.
39
Page 40

Using the Setup Menu
■ Detailed Settings J Advanced Settings 1 J Auto Input Detect
This sub-menu lets you specify whether auto detect of the input source should be performed
whenever the projector is turned on (page 5).
Input Source Specific Menu Items
Input Source Available Items (Parentheses indicate defaults.)
RGB (On), Off
Component
S-VIDEO
VIDEO
No Signal
Setting Explanations
On: Turns on auto detection of the input source whenever the projector is turned on.
Off: Turns off auto detection of the input source whenever the projector is turned on.
Setting Storage
A single setting is stored, which is applied to all input sources.
■ Detailed Settings J Advanced Settings 1 J Auto Keystone Correction
This sub-menu lets you specify whether auto keystone correction should be performed
whenever the elevation angle of the projector is changed (page 9).
Input Source Specific Menu Items
Input Source Available Items (Parentheses indicate defaults.)
RGB (On), Off
Component
S-VIDEO
VIDEO
No Signal
Setting Explanations
On: Turns on auto keystone correction.
Off: Turns off auto keystone correction.
Setting Storage
A single setting is stored, which is applied to all input sources.
z Turning on “Screen Settings J Ceiling Mount” (page 34) will cause “Auto Keystone
Correction” to turn off automatically. “Auto Keystone Correction” will not turn back on
again automatically if you turn off “Ceiling Mount” again.
z The “Auto Keystone Correction” setting cannot be changed while “Ceiling Mount” is turned
on.
40
Page 41

Using the Setup Menu
■ Detailed Settings J Advanced Settings 1 J Auto Adjust
This sub-menu lets you specify whether or not auto adjustment should be performed (page 7)
when RGB is selected as the input source.
Input Source Specific Menu Items
Input Source Available Items (Parentheses indicate defaults.)
RGB (On), Off
Component None
S-VIDEO
VIDEO
No Signal (On), Off
* Only when the currently selected input source is RGB.
Setting Explanations
On:
Turns on auto
source.
Off: Turns off auto adjustment.
adjustment
, which is performed when RGB is selected as the input
Setting Storage
This setting is saved for the RGB input terminal only.
■ Detailed Settings J Advanced Settings 1 J Show Screen Text
This sub-menu lets you specify whether the following information should be displayed.
z Input signal name
z Message display during input signal search
z Message when auto keystone correction is performed
Input Source Specific Menu Items
Input Source Available Items (Parentheses indicate defaults.)
RGB (On), Off
Component
S-VIDEO
VIDEO
No Signal
Setting Explanations
On: Selecting this option turns on information display.
Off: Selecting this option turns off information display.
Setting Storage
A single setting is stored, which is applied to all input sources.
41
Page 42

Using the Setup Menu
■ Detailed Settings J Advanced Settings 1 J Startup Screen
Use this sub-menu to specify whether or not a startup screen should be projected whenever
the projector is turned on.
Input Source Specific Menu Items
Input Source Available Items (Parentheses indicate defaults.)
RGB On, (Off)
Component
S-VIDEO
VIDEO
No Signal
Setting Explanations
On: Projects a startup screen.
Off: No startup screen is projected.
Setting Storage
A single setting is stored, which is applied to all input sources.
■ Detailed Settings J Advanced Settings 1 J No Signal Screen
This sub-menu lets you specify what should be projected when there is no input signal to the
projector.
Input Source Specific Menu Items
Input Source Available Items (Parentheses indicate defaults.)
RGB Blue, (Black)
Component
S-VIDEO
VIDEO
No Signal
Setting Explanations
Blue: Displays a blue screen when there is no input signal.
Black: Displays a black screen when there is no input signal.
Setting Storage
A single setting is stored, which is applied to all input sources.
42
Page 43

Using the Setup Menu
■ Detailed Settings J Advanced Settings 2 J Auto Power Off
This sub-menu lets you turn Auto Power Off (see “Turning Off the Projector” in the separate
“User’s Guide (Basic Operations)”) on or off.
Input Source Specific Menu Items
Input Source Available Items (Parentheses indicate defaults.)
RGB (On), Off
Component
S-VIDEO
VIDEO
No Signal
Setting Explanations
On: Turns on Auto Power Off.
Off: Turns off Auto Power Off.
Setting Storage
A single setting is stored, which is applied to all input sources.
43
Page 44
Using the Setup Menu
■ Detailed Settings J Advanced Settings 2 J RGB Input
This sub-menu lets you specify the type of input signal in accordance with the device
connected to the projector’s RGB terminal.
Input Source Specific Menu Items
Input Source Available Items (Parentheses indicate defaults.)
RGB (Auto), RGB, Component
Component
S-VIDEO None
VIDEO
No Signal (Auto), RGB, Component
* Only when the currently selected input source is RGB or
Component.
Setting Explanations
Auto: Select this setting for automatic switching between RGB and component in
accordance with the signal input to the RGB input terminal.
RGB: Select this setting when a computer is connected to the projector’s RGB
Component: Select this setting when the projector’s RGB input terminal is connected
input terminal. For details about connection, see “Connecting a Computer
to the Projector” in the separate “User’s Guide (Basic Operations)”.
the component video output terminal of a video device using an optionally
available YK-3 component video cable. For details about connection, see
“Connecting to a Component Video Output Device” on page 50.
Setting Storage
This setting is saved for the RGB input and the component terminals. It is ignored for all
other input terminals.
44
Page 45

Using the Setup Menu
■ Detailed Settings J Advanced Settings 2 J Video Signal, S-Video Signal
This sub-menu specifies the input signal for the projector’s VIDEO and S-VIDEO input
terminals.
Input Source Specific Menu Items
Input Source Available Items (Parentheses indicate defaults.)
RGB None
Component
S-VIDEO (Auto), NTSC, NTSC4.43, PAL, PAL-M, PAL-N, PAL60, SECAM
VIDEO
No Signal (Auto), NTSC, NTSC4.43, PAL, PAL-M, PAL-N, PAL60, SECAM
* Only when the currently selected input source is VIDEO or
S-VIDEO.
Setting Explanations
Auto: Select this setting to have the projector switch the video signal system
automatically in accordance with the input signal from the video device
that is connected to the VIDEO or S-VIDEO input terminal. This is the
setting you should normally use.
Other settings: Each setting selects the applicable video system. Use these settings
when you want to specify only one specific video signal for the VIDEO
and S-VIDEO input terminals.
Setting Storage
This setting is saved for the VIDEO and S-VIDEO input terminals only.
■ Detailed Settings J Advanced Settings 2 J Image Enhancement 1/
Image Enhancement 2
Image Enhancement 1/Image Enhancement 2 may improve the readability of an image
following keystone correction. You should select the Image Enhancement setting (1 or 2)
based on which one produces the desired results, the type of image you are projecting,
projection conditions, etc.
Input Source Specific Menu Items
Input Source Available Items (Parentheses indicate defaults.)
RGB On, (Off)
Component
S-VIDEO
VIDEO
No Signal None
45
Page 46

Using the Setup Menu
■ Detailed Settings J Advanced Settings 2 J Language
This sub-menu lets you specify the language to use for messages, setup menus, etc.
Input Source Specific Menu Items
Input Source Available Items
RGB English, French, German, Italian, Spanish, Swedish, Chinese
Component
S-VIDEO
VIDEO
No Signal
(Simplified), Chinese (Traditional), Korean, Japanese
Setting Storage
A single setting is stored, which is applied to all input sources.
z This setting is required the first time you turn on the projector. For more information, see
“Turning On the Projector” in the separate “User’s Guide (Basic Operations)”.
■ Detailed Settings J Restore Menu Defaults
This sub-menu returns all of the sub-menu items on the Detailed Settings main menu to their
initial defaults, except for the power on password on/off setting (Detailed Settings J Power On
Password), the password, and the language (Detailed Settings J Advanced Settings 2 J
Language).
z You can perform initialization even when there is no input signal. In this case, the
initialization is performed for the currently selected input source.
z The Auto Adjust item is initialized only when RGB is selected as the input source. All
other items are always initialized, regardless of the currently selected input source.
z For details about the initialization procedure, see “To initialize the settings of a particular
main menu item” on page 25.
Operational Info
■ Operational Info J Lamp Time
This sub-menu item shows the cumulative number of hours the current lamp has been used
to date.
Use this value as a reference when deciding whether or not the current lamp needs to be
replaced. For details about replacing the lamp, see “Replacing the Lamp” in the separate
“User’s Guide (Basic Operations)”.
■ Operational Info J Input Signal
This sub-menu item shows the currently selected input signal (RGB, Component, S-VIDEO, or
VIDEO). “----” is indicated here when there is no input signal.
46
Page 47

Using the Setup Menu
■ Operational Info J Signal Name
This sub-menu item shows the signal name of the signal input to the projector. The “Signal
Name” column of the table under “Supported Signals” on page 58 shows the signal names
that are displayed by this sub-menu item.
■ Operational Info J Resolution
This sub-menu item appears only when RGB is the input signal, and shows the resolution of
the RGB input signal in terms of vertical and horizontal pixels.
■ Operational Info J Horizontal Frequency
This sub-menu item appears only when RGB, Component, S-VIDEO, or VIDEO is the input
signal. It shows the horizontal frequency of the input signal.
■ Operational Info J Vertical Frequency
This sub-menu item appears only when RGB, Component, S-VIDEO, or VIDEO is the input
signal. It shows the vertical frequency of the input signal.
■ Operational Info J Scan System
This sub-menu item appears only when RGB or Component is the input signal, and shows
the scanning frequency of the input signal. The input signal is interlace or non-interlace for
RGB signal input, and interlace or progressive for Component signal input.
■ Operational Info
This sub-menu returns all of sub-menu items on the setup menu to their initial default
settings, except for the power on password on/off setting (Detailed Settings J Power On
Password), the password, the language (Detailed Settings J Advanced Settings 2 J
Language), and the lamp time (Operational Info J Lamp Time). This operation can be
performed regardless of the currently selected input source and regardless of whether or not
a signal is currently being input.
For details about this initialization procedure, see “To initialize all menu settings” on page 26.
Restore All Defaults
JJJJ
■ Operational Info J Reset Lamp Time
Use this sub-menu item to reset the lamp time to 0 hours. For details about replacing the
lamp and the initialization procedure, see “Replacing the Lamp” in the separate “User’s Guide
(Basic Operations)”.
47
Page 48

Appendix
Appendix
Remote Controller Signal Range
When performing an operation on the remote controller, point it at the remote control signal
port on the back or front of the projector. The following illustration shows the range of the
remote controller signal.
±
40 degrees
max.
9 meters
(29.53 feet)
max.
Front Back
degrees max.
±
40
9 meters
(29.53 feet)
max.
±
20
degrees max.
9 meters
(29.53 feet)
max.
±
degrees max.
9 meters
(29.53 feet)
max.
20
48
Page 49

Appendix
Projection Distance and Screen Size
z The allowable projection range is from 0.8 meter (2.62 feet) to 16.1 meters (52.82 feet),
which is the distance from the surface of the lens to the screen.
Screen Size 300
8.3 m to 16.1 m
(27.23 feet to 52.82 feet)
Screen
Size 30
0.8 m to 1.6 m
(2.62 feet to 5.25 feet)
Screen Size 60
1.6 m to 3.2 m
(5.25 feet to 10.50 feet)
16 m
(52.49 feet)
14 m
(45.93 feet)
12 m
(39.37 feet)
10 m
(32.81 feet)
8 m
(26.25 feet)
6 m
(19.69 feet)
4 m
(13.12 feet)
2 m
(6.56 feet)
The following table shows the relationship between the distance and projected image size.
Projection Size Approximate Projection Distance
Screen Size Diagonal (cm)
Minimum
Distance (m)
Maximum
Distance (m)
Minimum
Distance
(feet)
Maximum
Distance
30 76 0.8 1.6 2.62 5.25
40 102 1.1 2.1 3.61 6.89
60 152 1.6 3.2 5.25 10.50
80 203 2.2 4.3 7.22 14.11
100 254 2.7 5.3 8.86 17.39
120 305 3.3 6.4 10.83 21.00
150 381 4.1 8.0 13.45 26.25
200 508 5.5 10.6 18.04 34.78
250 635 6.9 13.4 22.64 43.96
300 762 8.3 16.1 27.23 52.82
z Note that the distances provided above are for reference only.
(feet)
49
Page 50

Appendix
Connecting to a Component Video Output Device
Some video devices are equipped with a component video output terminal. You can use an
optionally available component video cable (YK-3) to connect the RGB input terminal of the
projector to the component video output terminal of a video device.
z Always turn off the projector and the video device before connecting them.
Projector
RGB input
terminal
AUDIO input terminal
Commercially available audio cable
Optional component vi deo cable
(YK-3)
To AUDIO output
terminal
To Component video
output terminal
Video device
z Component video output terminals come in 3-terminal sets: Y·Cb·Cr or Y·Pb·Pr. Be sure to
match the colors of the plugs on the optional YK-3 component video cable with the colors
of the terminals (Green: Y; Blue: Cb/Pb; Red: Cr/Pr).
z You can use the optional YK-3 component video cable to connect to pin jack (RCA) type
component video output terminals. The projector does not support connection to any other
type of terminal.
z Note that connection only to an analog component video output terminal is supported.
Connection to a digital output terminal is not supported.
50
Page 51

Appendix
Full-screen Display of an RGB Image
The projector outputs images using XGA (1024 pixels × 768 pixels) video resolution. When
the input signal from the computer connected to the projector is not an XGA signal, “Resize
Image To Fit” automatically enlarges or reduces the image so it matches the projector’s video
resolution and fills the entire screen. The following shows how different input signals from a
computer are adjusted during projection.
Input Signal Example Projected Image
800 × 600
×
1024
768
1280 × 1024
When the input signal has a resolution of
1280 × 1024 (aspect ratio: 5:4), the original
image is compressed so it conforms to the
projection resolution of 1024 × 768 (aspect
ratio: 4:3). Because of this, the projected
image may appear slightly wider horizontally
than the original image.
z Resizing of an input image by “Resize Image To Fit” can call coarsening of the image or
can cause part of the image to be cut off. If this happens, try turning off “Resize Image
To F i t ”. See “Screen Settings J Resize Image to Fit” on page 33 for more information.
51
Page 52

Appendix
Password Feature
Using the Password Feature
The password feature lets you limit use of the projector to specific individuals. Note that the
password feature is not an anti-theft measure.
The projector is preset with an 8-key operation sequence at the factory as an initial default
password. To use the password feature for the first time, use the procedure explained in the
“Detailed Settings J Power On Password” on page 37 to input the initial default password.
Be sure to replace the initial default password with a unique password created by you as
soon as possible.
Remember that password operations are always performed using the remote controller, so you
should take care not to lose or misplace the remote controller.
Also note that you will not be able to input the password if the remote controller batteries
are dead. You should replace remote controller batteries as soon as possible after you notice
they are starting to run down.
If you forget your password...
You will not be able to use the projector if you forget the password for some reason. If you
forget the password, you will need to bring the following two items to your CASIO distributor
to have the password cleared. Note that you will be charged to have the password cleared.
1. Personal identification (original or copy of you driver’s license, employee I.D., etc.)
2. Projector unit
Note that your CASIO distributor will not be able to clear the password of your projector
unless you bring both of the items listed above.
Also, keep the projector’s warranty in a safe place.
z Clearing the password will return all other projector settings (except for the lamp use
time) to their initial factory defaults.
Keep a written record of your password!
You will not be able to use the projector if you forget its password. We strongly suggest that
you keep a written or other type of record of the password so you can look it up when
necessary.
52
Page 53

Appendix
Cleaning the Projector
z Always make sure that the projector has cooled sufficiently before cleaning it. If the
projector is turned on, perform the following steps before cleaning it.
1. Turn off the projector.
2. Check to make sure that the POWER/STANDBY indicator has changed to amber.
3. Unplug the power cord from the power outlet, and allow the projector to cool down for
about 60 minutes.
Cleaning the Projector Exterior
Wipe the exterior of the projector with a soft cloth that has been moistened in a weak
solution of water and a mild neutral detergent. Be sure to wring all excess moisture from the
cloth before wiping.
Never use benzene, alcohol, thinner, or any other volatile agent for cleaning.
Cleaning the Lens
Carefully wipe the lens with a lens cloth or lens cleaning paper, which you should be able to
purchase from a nearby eye wear or camera shop. When cleaning the lens, be very careful
to avoid scratching it.
Cleaning Intake and Exhaust Vents
Dust and dirt tend to collect around the intake vents located on the bottom of the projector.
Because of this, you should use a vacuum cleaner to clean away accumulated dust and dirt
periodically as shown below. When cleaning vents, you should set the vacuum clear to its
lowest power setting.
53
Page 54

Appendix
z Continued use of the projector after dust has accumulated around the intake vents can
cause overheating of internal components and lead to malfunction.
z Certain operating conditions also can cause dirt and dust to accumulate around the
projector’s other intake and exhaust vents (on the sides, etc.). If this happens, use the
same procedure as that described above to clean the side vents.
Reattaching the Lens Cover
Use the following procedure to reattach the lens cover if it should accidentally become
detached from the projector.
1. Positioning the lens cover so it is at an angle that is more than 90
degrees relative to the lens, insert left hinge
the slot on the left
1
.
of the lens cover into
3
1
3
2
4
2. Without changing the angle of the lens cover relative to the lens, use
the end (not the tip) of a pen or some similar instrument to gently
press the right hinge of the cover
into the slot on the right
2
.
inwards as you insert the hinge
4
Insert the right hinge
while pressing here.
54
Page 55

Appendix
z When reattaching the lens cover, make sure it is at an angle that is more than 90
degrees relative to the lens as shown in the illustration on the left. If you reattach the
lens cover while it is at an angle less than 90 degrees as shown in the illustration on
the right, the lens cover will not open and close correctly, and may become damaged.
55
Page 56

Appendix
Projector Troubleshooting
Check the following items whenever you experience any problem with the projector.
Problem Cause and Recommended Action See
The projector does not
turn on when I press the
[] (power) key.
The projector does not
project any image from
the connected device.
The projector does not
project the image correctly
from a connected
component device.
When RGB/Component is
selected as the input
source, the color of the
projected image or the
image itself is abnormal.
The projected image is
distorted
The projected image
becomes distorted when it
is zoomed with the [DZOOM] key.
If the POWER/STANDBY indicator is not lit, the
AC power cord may not be connected correctly.
J Make sure the AC power cord is connected
correctly to the projector and the power outlet
(see “Turning On the Projector”).
If the TEMP or LAMP indicator remains flashing
or lit, it means some type of error has occurred.
J See “Error Indicators” under “Indicators and
Alert Tones”.
The connected computer or video device may not
be turned on, or it may not be outputting a video
signal.
J Make sure the connected computer or video
device is turned on, and perform the required
operation on it to output a video signal.
The correct output source is not selected on the
projector.
J On the projector, select the input source that
corresponds to the device whose image you
are trying to project.
Images may not project correctly when you have
the component output of a video device
connected to the RGB input terminal of the
projector.
J Try using the projector’s VIDEO input terminal
or S-VIDEO input terminal (see “Connecting to
a Standard Video Device”).
The settings configured on the setup menu’s
“Detailed Settings J Advanced Settings 2 J RGB
Input” menu may not be compatible with the
device connected to the RGB input terminal.
J Use the setup menu to configure the “Detailed
Settings J Advanced Settings 2 J RGB Input”
menu settings to correct the problem.
Try pressing the applicable input source key
([RGB/COMPONENT], [VIDEO], [S-VIDEO]) on the
remote controller, or the [AUTO] key.
When certain projection signal types or zoom
factors are in use, pressing the [D-ZOOM] key to
zoom the projected image can cause the image
to become distorted.
J Try using a different zoom factor.
“User’s Guide
(Basic
Operations)”
“User’s Guide
(Basic
Operations)”
—
page 6
“User’s Guide
(Basic
Operations)”
page 44
page 7
page 12
56
Page 57

Appendix
Problem Cause and Recommended Action See
The aspect ratio of the
screen has changed
considerably.
A blue screen is
displayed.
The remote controller
does not work.
The TEMP or LAMP
indicator is flashing or lit.
The message “It is time
to replace the lamp.” is
being projected.
The message “The lamp
has exceeded its service
life!.” is being projected.
Using the [AUTO] key to perform automatic
adjustment in the case of RGB input can cause
the aspect ratio of the screen to change, and the
projected image to become larger. Whether this
happens depends on the slideshow, movie, or
other scene being projected.
J To return to the image to its original state, turn
off “Detailed Settings J Advanced Settings 1 J
Auto Adjust”, and then press the [RGB/
COMPONENT] key.
Certain operating conditions can cause the blue
screen to be displayed when the computer’s
resolution setting is high.
J Use a setting of 1024 × 768 / 60Hz.
The remote controller batteries may be dead.
J Replace the batteries (see “Loading Remote
Controller Batteries”).
The remote controller may be too far from the
projector.
J Make sure the remote controller is within the
allowable range when you operate it.
J See “Error Indicators” under “Indicators and
Alert Tones”.
It is time to replace the lamp.
J Replace the lamp (see “Replacing the Lamp”).
The allowable life for the lamp has been
exceeded, and the projector will not turn on.
J Replace the lamp (see “Replacing the Lamp”).
page 41
—
“User’s Guide
(Basic
Operations)”
page 48
“User’s Guide
(Basic
Operations)”
“User’s Guide
(Basic
Operations)”
“User’s Guide
(Basic
Operations)”
z Try performing the following steps, which can return the projector to normal operation.
1. Press the [ ] (power) key to turn off the projector.
2. After the projector’s cool down is finished and the fan is completely stopped, unplug
the AC power cord.
3. Plug the power cord back in and turn the projector back on again.
∗ If the power off confirmation message does not appear when you press the [ ]
(power) key, unplug the AC power cord and wait for at least 10 minutes. Then plug
the power cord back in and the projector back on again.
If normal operation does not resume after you perform the above steps, take the
projector to your retailer or authorized CASIO Service Center.
57
Page 58

Appendix
Supported Signals
RGB Signal
Signal Name Resolution
VESA 640 × 350/85 640 × 350 37.9 85
640 × 400/85 640 × 400 37.9 85
720 × 400/85 720 × 400 37.9 85
640 × 480/60 640 × 480 31.5 60
640 × 480/72 640 × 480 37.9 73
640 × 480/75 640 × 480 37.5 75
640 × 480/85 640 × 480 43.3 85
800 × 600/56 800 × 600 35.2 56
800 × 600/60 800 × 600 37.9 60
800 × 600/72 800 × 600 48.1 72
800 × 600/75 800 × 600 46.9 75
800 × 600/85 800 × 600 53.7 85
1024 × 768/60 1024 × 768 48.4 60
1024 × 768/70 1024 × 768 56.5 70
1024 × 768/75 1024 × 768 60.0 75
1024 × 768/85 1024 × 768 68.7 85
1152 × 864/75 1152 × 864 67.5 75
1280 × 960/60 1280 × 960 60.0 60
1280 × 1024/60 1280 × 1024 64.0 60
APPLE 640 × 480/67M13 640 × 480 35.0 67
832 × 624/75M16 832 × 624 49.7 75
1024 × 768/75M19 1024 × 768 60.2 75
NEC 640 × 400/56 640 × 400 24.8 56
Horizontal
Frequency (kHz)
Vertical
Frequency (Hz)
58
Page 59

Appendix
Component Signal
Signal Name
HDTV 1080i60 33.7 60
720p60 45.0 60
SDTV 576p50 31.3 50
576i50 16.6 50
480p60 31.5 60
480i60 15.7 60
Video/S-Video Signal
Signal Name
NTSC 15.7 60
NTSC4.43 15.7 60
PAL 15.6 50
PAL-M 15.7 60
PAL-N 15.6 50
PAL60 15.7 60
SECAM 15.6 50
* Listing of a device in the above table does not guarantee that you will be able to display
its images correctly.
* When “640 × 350/85” is the input signal, the “Operational Info” sub-menu items show 640 ×
400/85 information.
Frequency (kHz)
Horizontal
Frequency (kHz)
Horizontal
Frequency (Hz)
Vertical
Frequency (Hz)
Vertical
59
Page 60

MA0505-B
 Loading...