

Page 1

User Guide
Page 2

Contents
Getti ng Started with Your Phone ............................ 4
Phone Overview ...........................................................................4
Menu Overview ............................................................................9
Icon Reference ..........................................................................13
Feature Overview .......................................................................18
The Battery ................................................................................21
Turning the Phone On and Off ...................................................26
Making a call .............................................................................26
Answering a call ........................................................................27
Menu Access .............................................................................28
Using a Memory Card ...............................................................29
Connecting to the Headset Jack ...............................................32
Quick Access to Convenient Features ................. 33
Vibrate Mode .............................................................................33
Mute Function ............................................................................33
Volume Quick Adjustment .........................................................33
Speakerphone ...........................................................................34
Flashlight ...................................................................................34
Voice Dictation ..........................................................................34
Text to Speech ...........................................................................34
Motion Detection ........................................................................35
Enter ing and Editi ng Informat ion .......................... 36
Text Input ...................................................................................36
Text Input Modes .......................................................................37
RECENT CALLS ........................................................41
Accessing the Recent Calls submenu ......................................41
Making a Call from Recent Calls ...............................................42
Viewing Recent Call History ......................................................42
View Timers................................................................................43
CONTACTS .............................................................. 44
Adding a new Contact from idle mode ......................................44
Adding a Phone Number to an Existing Contact .......................47
Phone Numbers with Pauses .....................................................48
Accessing the Contacts submenu ............................................48
New Contact ..............................................................................49
1
Page 3

Contents
Contact List ................................................................................49
Groups .......................................................................................52
New PTT Contact .......................................................................53
PTT Contact List ........................................................................54
PTT Groups ................................................................................55
Temp PTT Group ........................................................................56
Backup Assistant .......................................................................57
Speed Dials ...............................................................................57
In Case of Emergency (ICE) ......................................................59
My Name Card...........................................................................60
Push to Talk ............................................................ 62
About Push to Talk .....................................................................62
Making a PTT Call ......................................................................63
Incoming PTT Call .....................................................................66
MEDIA CENTER ....................................................... 68
Search .......................................................................................68
Music & Tones ...........................................................................68
Picture & Video ..........................................................................74
Games .......................................................................................86
Mobile Web ................................................................................87
Browse & Download ..................................................................88
Extras .........................................................................................88
Info .............................................................................................88
VZ Navigator
MESSAG ING ............................................................ 90
Accessing the Messaging submenu .........................................90
New Message Alert ...................................................................90
New Message ............................................................................91
Messages ..................................................................................97
Drafts .......................................................................................101
Voicemail .................................................................................102
Mobile IM .................................................................................103
Social Beat ...............................................................................103
Email ........................................................................................103
Chat .........................................................................................104
Message Settings ....................................................................104
2
®
...........................................................................88
Page 4

Message Erase ........................................................................105
SETTINGS & TOOLS ..............................................107
My Verizon ...............................................................................107
Master Volume .........................................................................107
Tools .........................................................................................108
USB Mass Storage ..................................................................117
®
G’zGEAR
................................................................................117
Bluetooth Menu ........................................................................130
Keyguard Settings ...................................................................137
PTT Settings .............................................................................139
Sounds Settings .......................................................................140
Display Settings .......................................................................144
Phone Settings .........................................................................151
Call Settings .............................................................................160
Memory ....................................................................................165
USB Mode ...............................................................................167
Phone Info ................................................................................168
Set-up Wizard ..........................................................................170
Tutorial .....................................................................................171
Safet y .....................................................................172
TIA Safety Information .............................................................172
Safety Information for FCC RF Exposure .................................175
FDA Information .......................................................................178
Emergency Calls .....................................................................186
Compliance with Other FCC Regulations ................................188
General Safety .........................................................................189
Games .....................................................................................194
Camera ....................................................................................195
Accessibility .............................................................................196
RECYCLE YOUR CELL PHONE! .............................................200
12 MONTH LIMITED WARRANTY ......................... 202
Index...................................................................... 206
3
Page 5
Getting Started with Your Phone
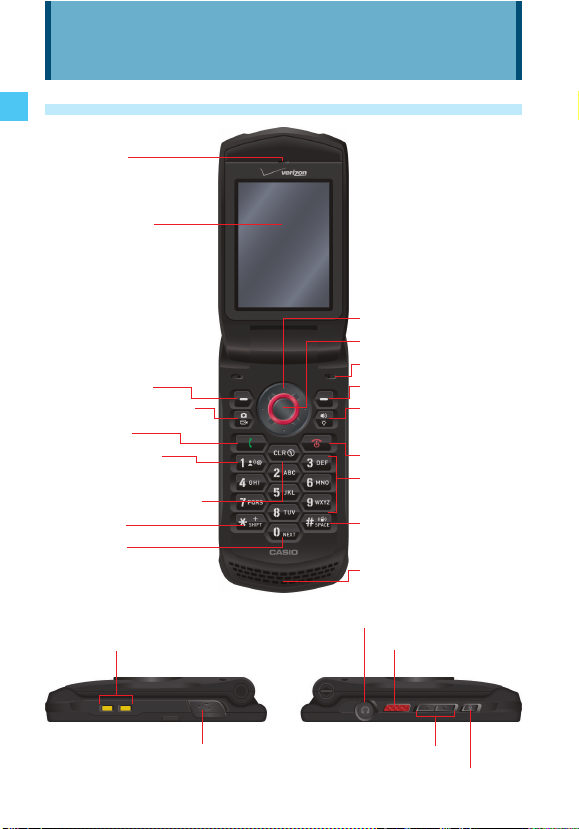
Phone Overview
1. Ea rpiece
2. Main Display
Getting Started with Your Phone
10. Directional Key
11. Center Select Key
12. Microphone
3. Left Soft Key
4. Camera/Video Key
5. Send Key
6. Voicemail Key
7. Clear/G’zGEAR Key
8. Shift Key
9. Next Key
21. Headset Jack
19. Charging Terminals 22. Red Side Key/
13. Right Soft Key
14. Speakerphone/
Flashlight Key
15. End/Power Key
16. Alphanumeric
Keypad
17. Vibrate Mode Key
18. Speaker
PTT Key
20. Charging/Data Port 23. Volume Keys
24. Bottom Side Key/Voice Commands Key
4
Page 6
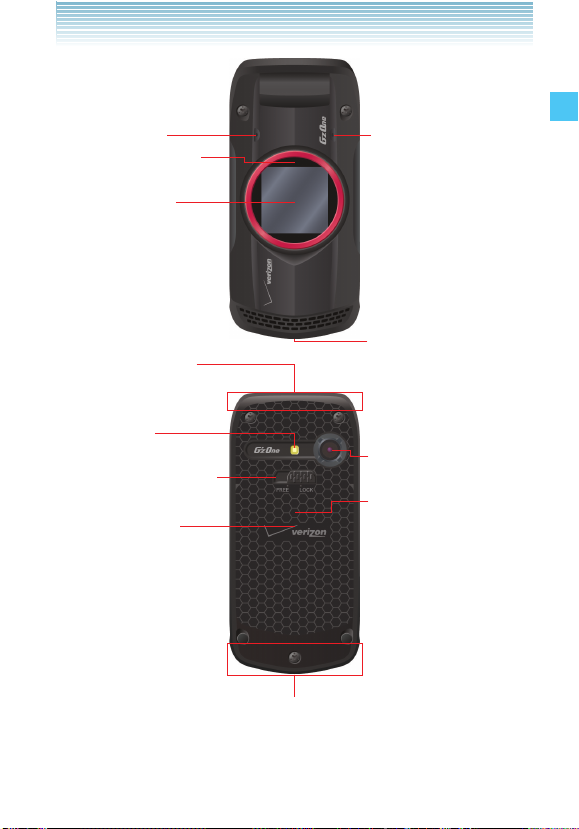
25. Secondary
Microphone
26. Charge Indicator
27. Front Display
29. Internal Antenna
Area*
30. Camera Flash/
Flashlight
31. Battery Cover Lock
32. Battery Cover
28. Temperature
Sensor
18. Speaker
33. Camera/
Camcorder Lens
34. Memory Card Slot
Getting Started with Your Phone
29. Internal Antenna Area*
* For best performance, do not touch these areas when using your
handset.
5
Page 7

1. Earpiece
2. Main Display
3. Left Soft Key
Press to display the Messaging menu, or to access the function
listed above the key.
4. Camera/Video Key
With the flip open, press to access the built-in camera. Press and
hold to access the camcorder.
5. Send Key
Press to place or answer a call, or from idle mode press to access
Getting Started with Your Phone
the All Calls list.
6. Voicemail Key
From idle mode, press and hold to connect to your voicemail.
7. Clear/G’zGEAR Key
When entering text or a phone number, press to delete a single
space or character, or press and hold to delete an entire word.
Within a menu, press to return to the previous menu. From idle
mode, press and hold to launch the G’zGEAR
®
application.
8. Shift Key
Press to enter an asterisk (*) character for calling features. When
entering text, press to change the character input type. When
making an international call, press and hold to enter a “+” sign for
international dialing.
9. Next Key
In T9 Word mode, press to display other matching words.
10. Directional Key
Allows you to scroll through phone menu options and provides a
shortcut to phone functions from idle mode.
11. Center Select Key
Press to access the MENU in idle mode. It also allows you to
accept choices when navigating through a menu.
12. Microphone
6
Page 8

13. Right Soft Key
Press to display Contacts, or to access the function listed above
the key.
14. Speakerphone/Flashlight Key
With the flip open, press to turn the Speakerphone on or off. Press
and hold to activate/dectivate the Flashlight.
15. End/Power Key
Press and hold to turn your handset on/off or press to end a call or
browser session. Within a menu, press to return to idle mode.
16. Alphanumeric Keypad
Use to enter numbers, letters and symbols, and to select menu
items.
17. Vibrate Mode Key
From idle mode, press and hold to activate/deactivate vibrate
mode. Press to enter the (#) character for calling features. In text
entry mode, press to accept a word and add a space.
18. Speaker
19. Charging Terminals
20. Charging/Data Port
Plug in the USB Cable here (included in box).
21. Headset Jack
2.5mm connector port
22. Red Side Key/PTT Key
In PTT Mode, press to access the PTT Contact List or press and
hold to make a PTT Call. When not in PTT Mode, press to access
the selected shortcut application.
23. Volume Keys
From idle mode with the flip open, press to adjust the master
volume. During a call, press to adjust voice volume.
Getting Started with Your Phone
7
Page 9

24. Bottom Side Key/Voice Commands Key
From idle mode, press to access Voice Commands or press and
hold to have the handset read out the unread messages one after
another with the synthetic voice.
25. Secondary Microphone
26. Charge Indicator
Appears red when charging. When charging completes, the red
indicator turns off.
27. Front Display
28. Temperature Sensor
Getting Started with Your Phone
29. Internal Antenna Area
For best performance, do not touch these areas when using your
handset.
30. Camera Flash/Flashlight
31. Battery Cover Lock
32. Battery Cover
33. Camera/Camcorder Lens
34. Memory Card Slot
Insert a microSD™ memory card (sold separately) to increase
memory capacity.
8
Page 10
Menu Overview
Search
Messaging
1. New Message
2. Messages*
3. Drafts
4. Voicemail
5. Mobile IM
6. Social Beat
7. Email
8. Chat
Recent Calls
1. Missed
2. Received
3. Dialed
4. Blocked**
5. All
6. View Timers
* When By Time is selected for Messages View in Message
Settings, the Inbox folder and Sent folder will appear in the
Messaging submenu instead of the Messages folder.
** Blocked appears only when Contacts Only or Block All is selected
for Calls under MENU > Settings & Tools > Phone Settings >
Security > Restrictions > Calls > Incoming Calls.
*** These options are available only when the PTT feature is turned on.
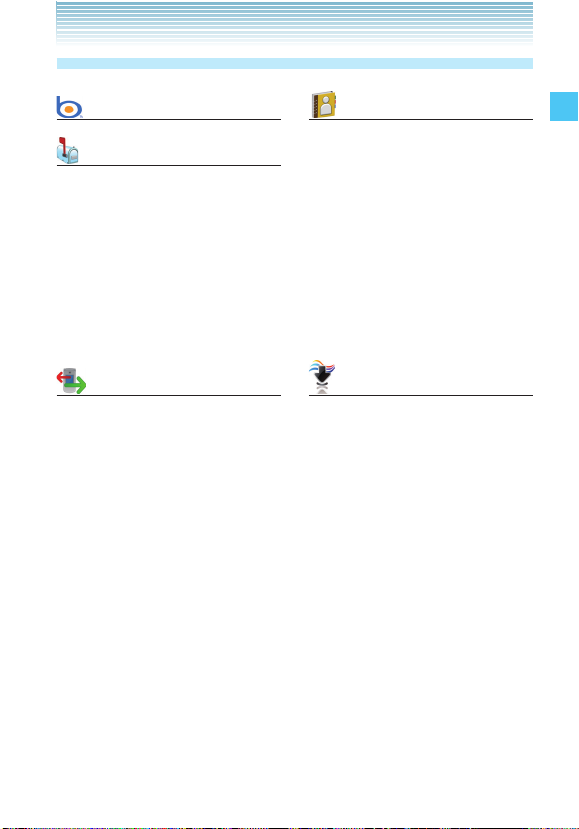
Contacts
1. New Contact
2. Contact List
3. Groups
4. New PTT Contact***
5. PTT Contact List***
6. PTT Groups***
7. Backup Assistant
8. Speed Dials
9. In Case of Emergency
10. My Name Card
Media Center
1. Search
2. Music & Tones
1.
V CAST Music | Rhapsody
2. Get New Ringtones
3. Get New Ringback Tones
4. My Ringtones
5. My Music
6. My Sounds
7. Sync Music
Getting Started with Your Phone
Getting Started with Your Phone
9
9
Page 11
3. Picture & Video
1. V CAST Videos
2. Get New Pictures
3. My Pictures
4. My Videos
5. Take Picture
6. Record Video
7. Online Album
4. Games
1. Get New Applications
Getting Started with Your Phone
Getting Started with Your Phone
5. Mobile Web
6. Browse & Download
1. Get New Applications
7. Extras
1. Get New Applications
My Pictures
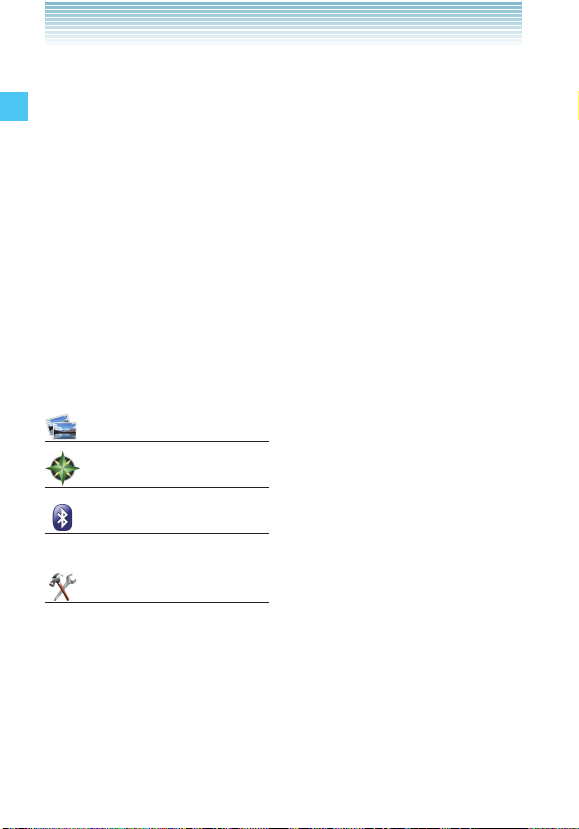
VZ Navigator
Bluetooth
1. Add New Devices
Settings & Tools
1. My Verizon
2. Master Volume
3. Tools
1. Voice Commands
2. Calculator
3. Calendar
4. Alarm Clock
5. Stop Watch
10
10
6. Countdown Timer
7. World Clock
8. Notepad
9. USB Mass Storage
10. G’zGEAR
1. Earth Compass
2. Walking Counter
3. Thermometer
4. Tides
5. Sunrise Sunset
6. Astro Calendar
7. Star Gazer
8. Setup
9. How To Use
4. Bluetooth Menu
1. Add New Devices
5. Keyguard Settings
1. Keyguard Timer
2. Unlock Options
6. PTT Settings
1. PTT Mode
2. PTT Alert
1. Tone
1. Get New Ringtone
2. Vibrate
3. PTT Tutorial
7. Sounds Settings
1. Easy Set-up
2. Call Sounds
1. Call Ringtone
1.
Get New Applications
2. Call Vibrate
Page 12

3. Caller ID Readout
3. Alert Sounds
1. TXT Message
2. Multimedia Message
3. Voicemail
4. Emergency Tone
5. Missed Call
6. PTT Alert
4. Keypad Volume
5. Digit Dial Readout
6. Service Alerts
1. ERI
2. Minute Beep
3. Call Connect
4. Software Update
7. Power On/Off
1. Power On
2. Power Off
8. Display Settings
1. Easy Set-up
2. Banner
1. Personal Banner
2. ERI Banner
3. Backlight
1. Display
1. Duration
2. Brightness
2. Keypad
4. Wallpaper
1. My Pictures
2. My Videos
3. Fun Animations
5. Display Themes
6. Main Menu Settings
1. Menu Layout
2. Replace Menu Items
3. Position Menu Items
4. Reset Menu Settings
7. Dial Fonts
8. Menu Font Size
9. Clock Format
1. Main Clock
2. Front Clock
10. Front Display
9. Phone Settings
1. Airplane Mode
2. Set Shortcuts
1. Set My Shortcuts
2. Set Directional Keys
3. Set Red Side Key*
3. Voice Commands
Settings
1. Confirm Choices
2. Sensitivity
3. Adapt Voice
4. Prompts
1. Mode
2. Audio Playback
3. Timeout
5. VoiceMode Training
Getting Started with Your Phone
Getting Started with Your Phone
* This option is available only when the PTT feature is turned off.
11
11
Page 13

6. Info
4. Language
5. Location
6. Current Country
7. Security
1. Edit Codes
2. Restrictions
Getting Started with Your Phone
Getting Started with Your Phone
3. Phone Lock Setting
4. Lock Phone Now
5. Restore Phone
8. System Select
9. NAM Selection
10. Motion Detection
1. G’zGEAR
2. My Pics/Videos
10. Call Settings
1. Answer Options
2. Auto Retry
3. TTY Mode
4. One Touch Dial
12
12
1. Phone Only
2. Calls & Services
1. Location Setting
2. Calls
1. Incoming Calls
2. Outgoing Calls
3. Messages
1. Incoming
Messages
2. Outgoing
Messages
4. Dial-Up Modem
5. Voice Privacy
6. PC Connections
7. DTMF Tones
8. PTT Mode
9. Assisted Dialing
11. Memory
1. Save Options
1. Pictures
2. Videos
3. Sounds
2. Phone Memory
1. Memory Usage
2. My Pictures
3. My Videos
4. My Ringtones
5. My Music
6. My Sounds
7. My Contacts
8. Move All To Card
3. Card Memory
12. USB Mode
13. Phone Info
1. My Number
2. SW/HW Version
3. Icon Glossary
4. Software Update
14. Set-up Wizard
15. Tutorial
1. Push to Talk (PTT)
2. G’zGEAR
3. Voice Dictation
4. Message Readout
Page 14
Icon Reference
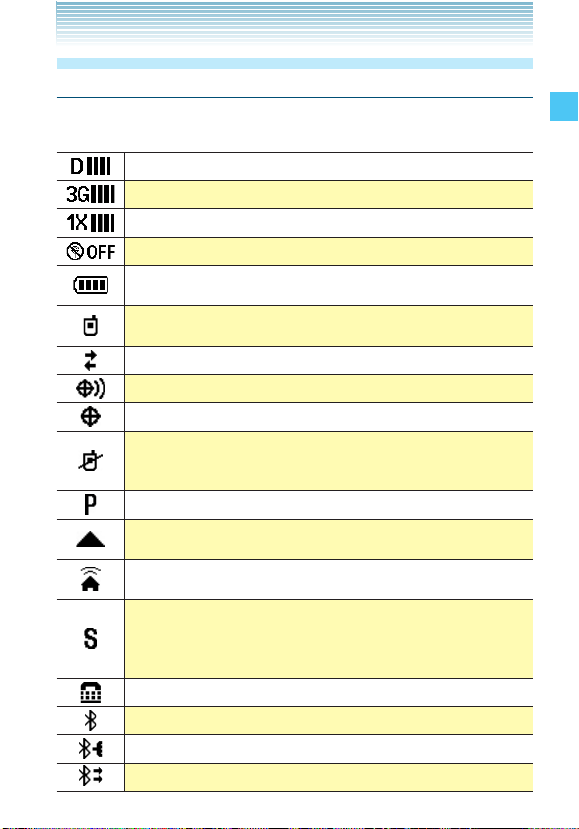
Screen Icons
When the handset is turned on, the main display displays icons
indicating the status of the handset.
Digital indicator. Digital service is available.
3G service indicator. 3G service is available.
1x service indicator. 1x service is available.
Airplane Mode
Battery Strength indicator. Indicates battery level. The
more bars, the stronger the charge.
In Call State. A call is in progress.
* No icon appears when the handset is in idle mode.
Data Session
Location On Mode
E911 Only Mode
No Service indicator.
Indicates the handset cannot receive a signal from the
system.
Voice Privacy
Roaming indicator. The handset is outside of the home
service area.
Network Extender (Femto Cell) indicator. The handset is
connected to the Network Extender.
SSL (Secure Sockets Layer) is a protocol developed
by Netscape Communications that uses encryption to
secure data through the public Internet from client to
server.
TTY mode On
®
Indicates Bluetooth
Indicates Bluetooth
Bluetooth
®
Discovery Mode is active.
mode is active.
®
is connected to another device.
Getting Started with Your Phone
13
Page 15
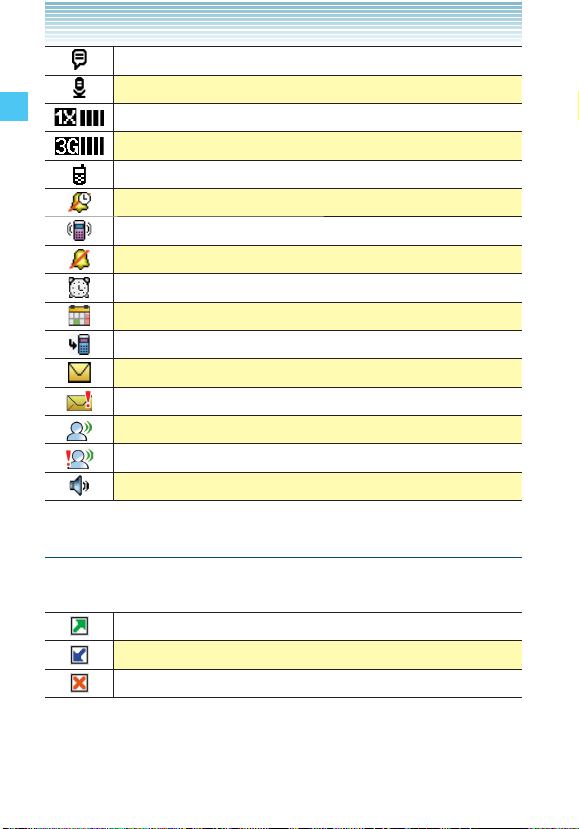
Voice Commands (Active)
Voice Commands (Listening)
1x and PTT services are available.
3G and PT T services are available.
PTT in use. A PTT call is in progress.
Alarm Only
Vibrate Only
Sound Off
Getting Started with Your Phone
Appears when an alarm is set.
Appears when a Calendar event is set.
Indicates you have missed calls.
Indicates you have a new message.
Indicates you have a high priority message.
Indicates you have a new voicemail.
Indicates you have a high priority voicemail.
Indicates Speakerphone mode is active.
Recent Call Icons
The following icons appear in the Recent Calls lists (Missed,
Received, Dialed, and All):
Indicates a dialed call.
Indicates a received call.
Indicates a missed call.
14
Page 16
Media Center Icons
The following icons appear in the Media Center:
Picture File
Picture Protected File
Ringtone File
Ringtone Protected File
Sound File
Sound Protected File
Video File
Video Protected File
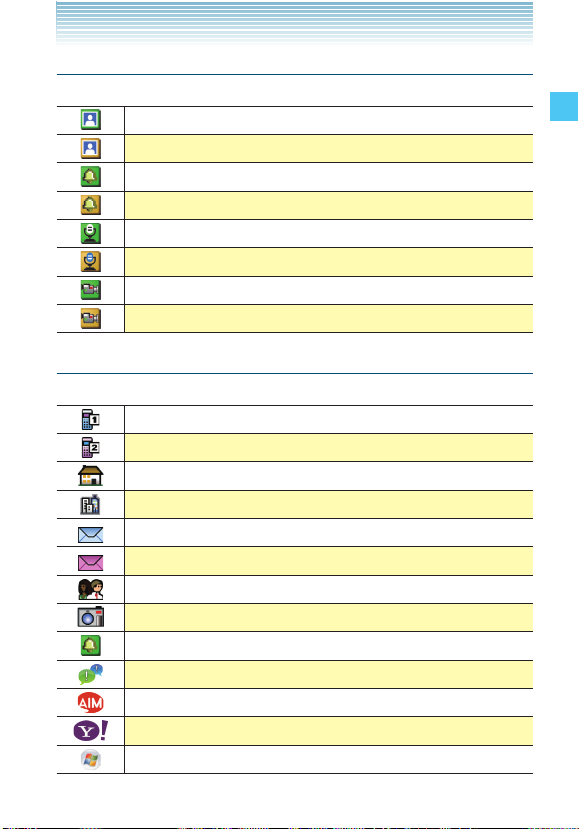
Contacts Icons
The following icons appear in Contacts:
Mobile 1
Mobile 2
Home
Business
Personal Email
Business Email
Group
Picture
Ringtone
IM Screen Name
AIM
Yah oo!
WL Messenger
Getting Started with Your Phone
15
Page 17
Home Address
Work Address
Company Name
Title in Company
Birthday
Notes
In Case of Emergency
Speed Dial
Getting Started with Your Phone
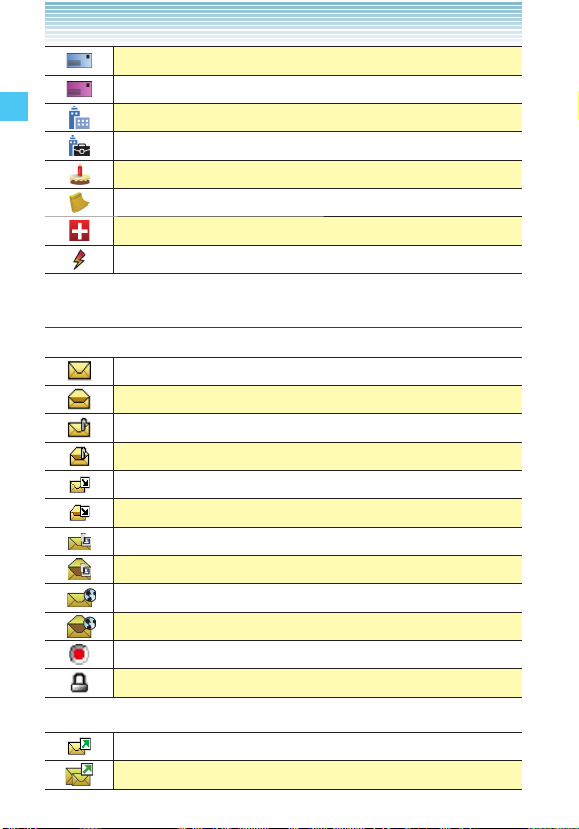
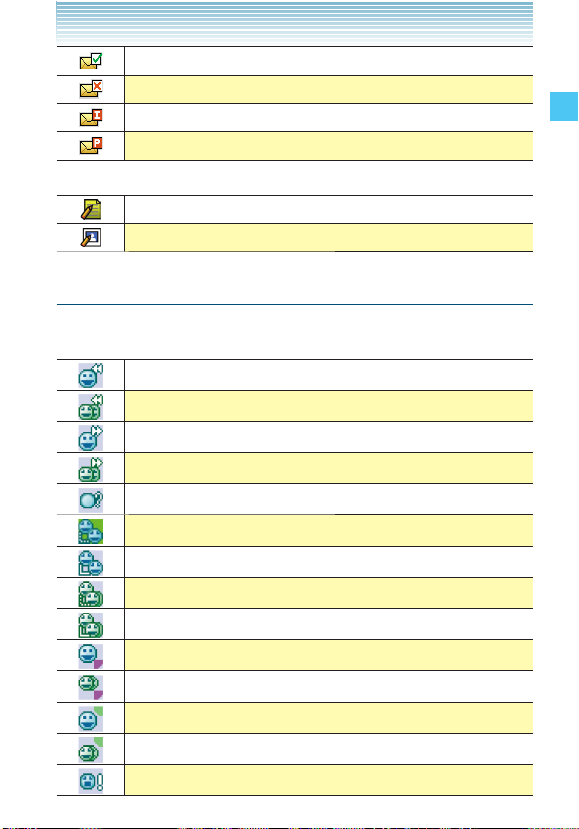
Message Icons
The following icons appear in the list of received messages:
New/Unread Text or Web Message
Opened/Read Text or Web Message
New/Unread Multimedia Message Notification
Opened/Read Multimedia Message Notification
New/Unread Downloaded Multimedia Message
Opened/Read Downloaded Multimedia Message
New/Unread Multimedia Message
Opened/Read Multimedia Message
New/Unread WAP Push Message
Opened/Read WAP Push Message
Priority
Locked Message
The following icons appear in the list of sent messages:
Sent Message
Multiple Messages Sent
16
Page 18
Delivered Message
Sent failed Message
Incomplete Delivery Message
Pending Message
The following icons appear in the Drafts message list:
Text Message Draft
Multimedia Message Draft
PTT Screen Icons
The following icons appear on the incoming/outgoing PTT call screen
or the PTT calls in the Recent Calls list:
Received calls list - individual
Received calls list - group
Dialed calls list - individual
Dialed calls list - group
Missed calls
Connecting to [individual name]
Connected to [individual name]
Connecting to [group name]
Connected to [group name]
Talking to [individual name]
Talking to [group name]
Listening to [individual name]
Listening to [group name]
Alerting [individual name]
Getting Started with Your Phone
17
Page 19
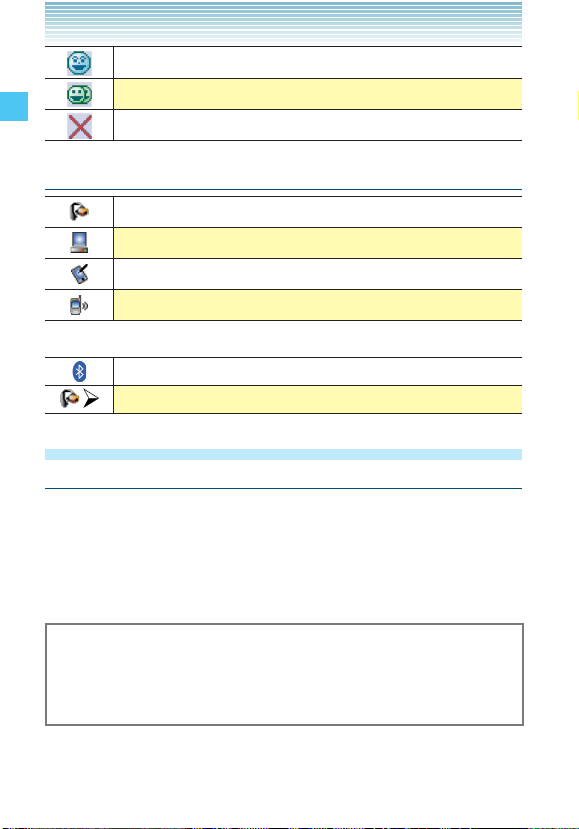
PTT Individual available
PTT Group available
PTT unavailable
Bluetooth® Icons
An audio device is paired with your handset
A PC is paired with your handset
Getting Started with Your Phone
When successfully connected, the following icons may appear:
A PDA is paired with your handset
Another handset is paired with your handset
A device is paired with your handset
A headset is connected with your handset
Feature Overview
Water Resistance
The CASIO G’zOne Ravine™ is water resistant. It provides reliable
performance for outdoor activities, and in wet conditions such as
driving rain or high humidity.
The tested device meets the requirements of the MIL-STD -810G (Rain
& immersion 1m, 30min) standard.
Warning!
The Water Resistance feature does not guarantee protection
against the usage of this device underwater. Do not use the
handset underwater.
18
Page 20

NOTE
To maintain water resistance:
•
Securely close the Charging/Data Port cover and the Headset
Jack cover.
•
Completely close the battery cover and slide the battery cover
lock to the LOCK position.
Shock Resistance
The rugged construction of the Ravine™ provides outstanding shock
and vibration resistance. The tested device meets the requirements of
the MIL-STD- 810G (Drop 1.5m) standard.
Warning!
The shock and vibration resistance features do not guarantee
protection against every type of shock and vibration. Your handset
may be damaged or malfunction depending on the severity of the
shock or vibration.
Dust Resistance
For additional peace of mind, the Ravine™ is also dust resistant. The
device was tested using silica flour at a temperature of 95°F and
meets the MIL-STD-810G (Dust) standard.
Getting Started with Your Phone
19
Page 21

NOTES
•
Your handset can be rinsed with clean water when dirty. To
ensure water resistance, make sure that all covers are securely
closed before rinsing.
•
Periodically, clean the Charging Terminals and the Battery
Terminals with a dry cloth or cotton swab. Dust may cause
electrical connection problems. Avoid wiping with excessive
force, which can damage the terminals.
Battery
Getting Started with Your Phone
Charging Terminals Battery Terminals
Warning!
•
Do not clean terminals inside the handset, or they may be
damaged.
•
If mud or sand is adhered to the handset, do not use it until wiping
completely.
•
Do not place the handset directly on sand. If sand gets into
the Earpiece or Speaker, sounds may be difficult to hear. Sand
getting into the handset’s hinge can cause problems such as
overheating.
20
Page 22
The Battery
The handset comes with a rechargeable battery.
Warning!
•
Use only approved batteries for the Ravine™. Wipe your handset
before opening the battery cover to prevent moisture or dust from
entering.
Failure to follow the below directions for installing/removing the
•
battery could result in product failure.
Fully charge the battery before using the handset for the first time.
•
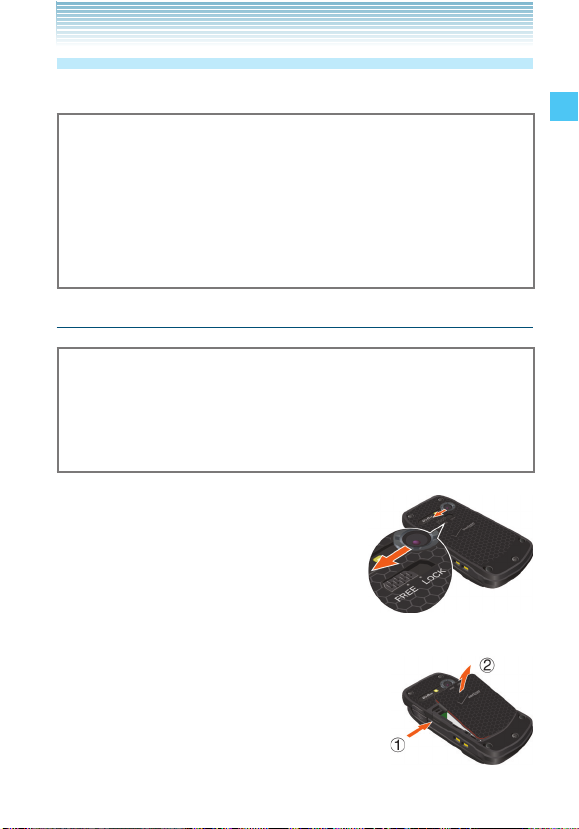
Installing the Battery
Warning!
Do not install the battery in humid places, like a bathroom, or
places where water or liquid can come into contact with the
handset or battery. Otherwise, the electrical circuits may short or
erode and cause the handset to malfunction.
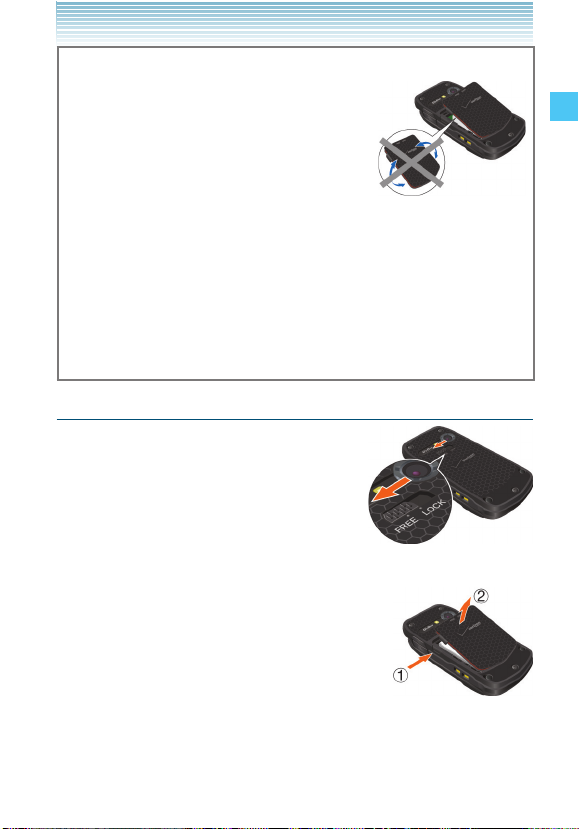
1. Slide the Battery Cover Lock to the FREE
position in the direction of the arrow
shown in the figure to the right.
2. Insert your finger in the groove and pull up
on the battery cover in the direction of the
arrow .
Getting Started with Your Phone
21
Page 23
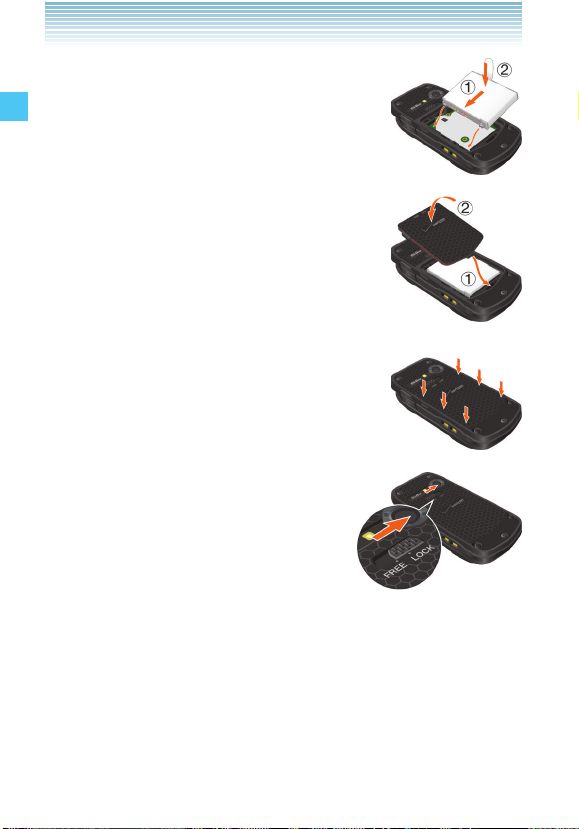
3. Slide the battery into the slot by aligning the
contacts and tabs and press down until
you hear the “click”.
4. Insert the battery cover tabs into the slots
and press the battery cover in the direction of
the arrow .
Getting Started with Your Phone
5. Press down firmly on the sides of the battery
cover at each arrow point, as shown to the
right.
6. Slide the Battery Cover Lock to the LOCK
position in the direction of the arrow
shown in the figure to the right.
22
Page 24
Warning!
Do not twist the battery cover as shown in
•
the figure to the right. Doing so can damage
the handset and the battery cover.
Do not press hard on the battery cover with
•
the battery cover tabs running over the
handset because you may damage the
battery cover tabs.
Be careful not to get the tab of the battery caught between the
•
edges of battery cover and the handset. Failure to do so will result
in the loss of water resistance.
If you are using a wrist strap (sold separately), be careful not to
•
get it caught between the battery cover and the handset. Failure
to do so will result in the loss of water resistance.
Removing the battery
1. Slide the Battery Cover Lock to the FREE
position in the direction of the arrow
shown in the figure to the right.
2. Insert your finger in the groove and pull up
on the battery cover in the direction of the
arrow .
Getting Started with Your Phone
23
Page 25
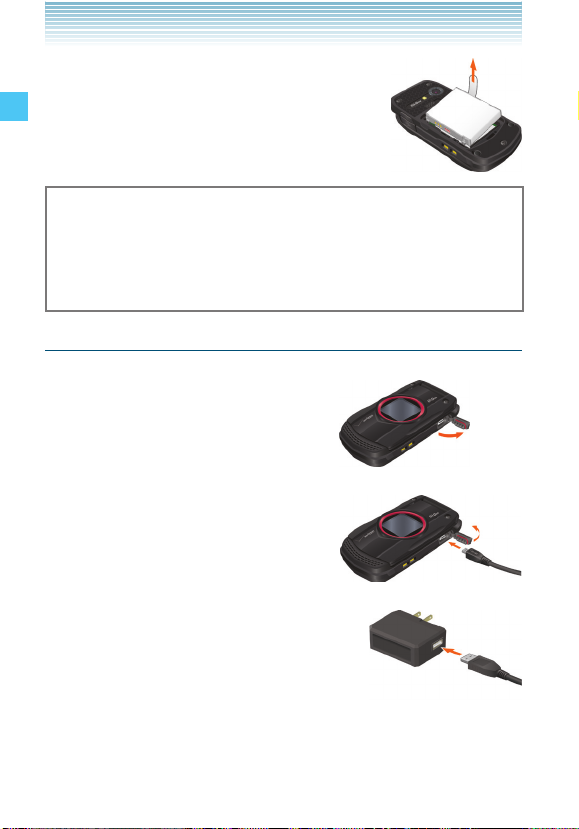
3. Remove the battery by pulling the tab up.
Warning!
Do not leave the removed battery in direct sunlight, or near
heat sources such as an open flame or stove. Otherwise, it may
malfunction or cause a fire by bursting or igniting. Do not hit, or
Getting Started with Your Phone
exert excessive shock on the battery, as it can ignite or break.
Charging the Battery
To charge your battery:
1. To open the Charging/Data Port cover,
insert your fingertip into the notch and
open the cover.
2. Connect the USB Cable (included in
box) to the Charging/Data Port.
3. Connect the opposite end of the USB
Cable to the USB port on the Wall Charger
(included in box).
24
Page 26
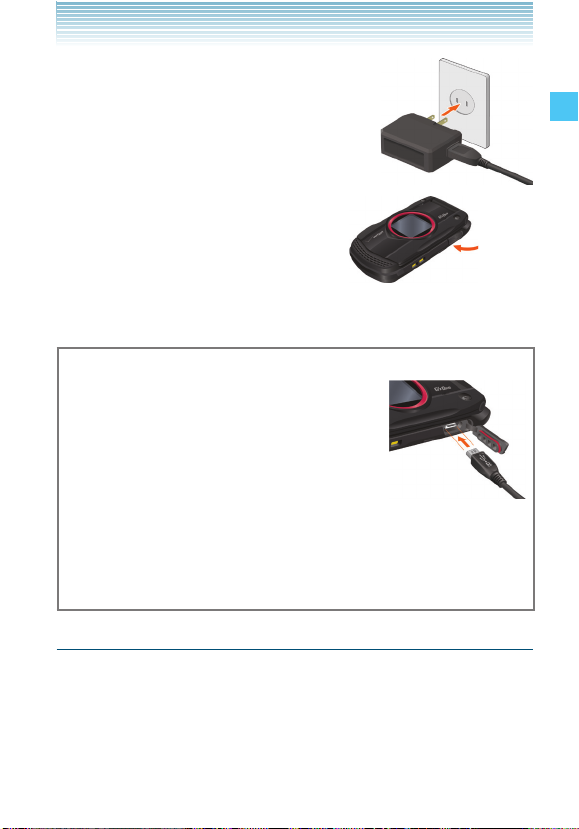
4. Plug the Wall Charger power plug into an
electrical outlet.
5. After the handset is completely charged,
unplug the USB Cable from the
Charging/Data Port, then close the
cover.
6. Make sure the port cover is completely closed.
Warning!
•
Hold the small connector with the USB
mark facing up.
When inserting the connector into the
Charging/Data port on the handset, hold the
connector straight against the port without
tilting it vertically or horizontally and gently
insert it.
Failure to completely reseal the Charging/Data Port cover after
•
charging may allow water or other liquids to enter the casing,
damaging the handset.
Battery Level
The battery level icon appears at the top of the main display. When
the battery level becomes low, the low battery sensor alerts you in
three ways: an audible tone will sound, the battery icon will begin to
blink, and BATTERY LOW will appear on the display. If the battery
level becomes too low, the phone automatically powers off and any
function in progress will not be saved.
Getting Started with Your Phone
25
Page 27
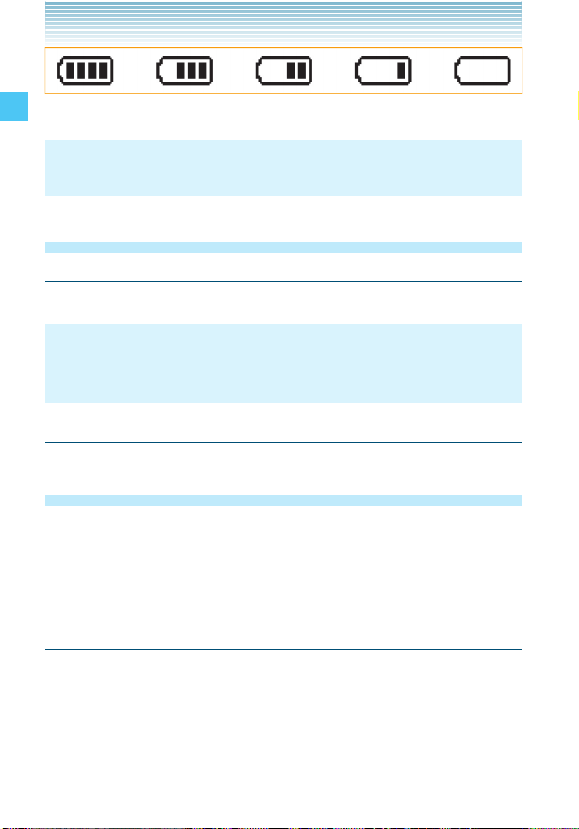
Fully Charged Fully Depleted
NOTE
Charging time varies depending upon the battery level.
Turning the Phone On and Off
Turning the Phone On
Getting Started with Your Phone
1. Press and hold the End/Power Key until the main display lights up.
NOTE
Avoid any unnecessary contact with the internal antenna area while
your handset is on.
Turning the Phone Off
1. Press and hold the End/Power Key until the main display turns off.
Making a call
1. From idle mode, enter the phone number (include the area code if
needed).
2. Press the Send Key to make the call.
3. Press the End/ Power Key to end the call.
Correcting Dialing Mistakes
If you make a mistake while dialing a number, press the Clear Key
once to erase the last digit entered, or press and hold the Clear
Key to delete all digits.
26
Page 28

Redialing Call
1. From idle mode, press the Send Key.
2. Scroll to the last number you dialed, then press the Send Key to
make a call.
Answering a call
NOTES
•
The default answer option is set to Flip Open and Any Key so
you can directly answer an incoming call by simply opening the
handset or pressing a key on the keypad. For information on how
to select an answer option, see page 161.
Caller ID displays the number of the person calling when your
•
phone rings. If the caller’s identity is stored in Contacts, the name
appears on the screen.
1. When the phone rings or vibrates, press the Send Key to answer
the incoming call.
2. Press the End/Power Key to end the call.
Call Waiting
If you are on a call and you receive another incoming call, you will
hear two beeps. With Call Waiting, you may put the active call on hold
while you answer the incoming call. To use Call Waiting:
1. To answer another call while on the phone, press the Send Key.
This places the first call on hold.
2. To switch back to the first caller, press the Send Key again.
Getting Started with Your Phone
27
Page 29

Menu Access
To display the Main Menu from idle mode, press the Center Select
Key [MENU].
To use the menu:
•
Press the Directional Key up, down, left or right to select your
desired menu item then press the Center Select Key [OK].
•
Or enter the number that corresponds to the menu or submenu item.
There are three Main Menu types: Ta b, List, and Grid.
NOTES
Getting Started with Your Phone
•
All directions in this manual assume that Menu Layout is set to
Grid, and Display Themes is set to Wireframe, which are the
default settings. If another setting or theme is set, navigating the
phone’s menus may be different.
•
For information about how to switch between Main Menu types,
see page 148.
Grid Menu
The Grid Menu has nine items.
1. From idle mode, press the Center Select Key [MENU].
2. Press the Directional Key up, down, left or right to select your
desired menu option then press the Center Select Key [OK].
NOTE
When navigating within menus and submenus or when configuring
your handset’s settings, you can return to the previous screen or
step by pressing the Clear Key . To return to idle mode, press
the End/Power Key.
28
Page 30
Using a Memory Card
The Ravine™ supports the use of a microSD™ memory card as a
source of external memory.
NOTE
The microSD™ memory card is sold separately.
Installing a Memory Card
Warning!
•
Whenever installing or removing a memory card, make sure the
handset is turned off and that the Wall Charger is not connected.
•
When installing or removing a memory card, avoid touching the
memory card contacts and avoid damaging the memory card.
Either can cause malfunction or loss of data.
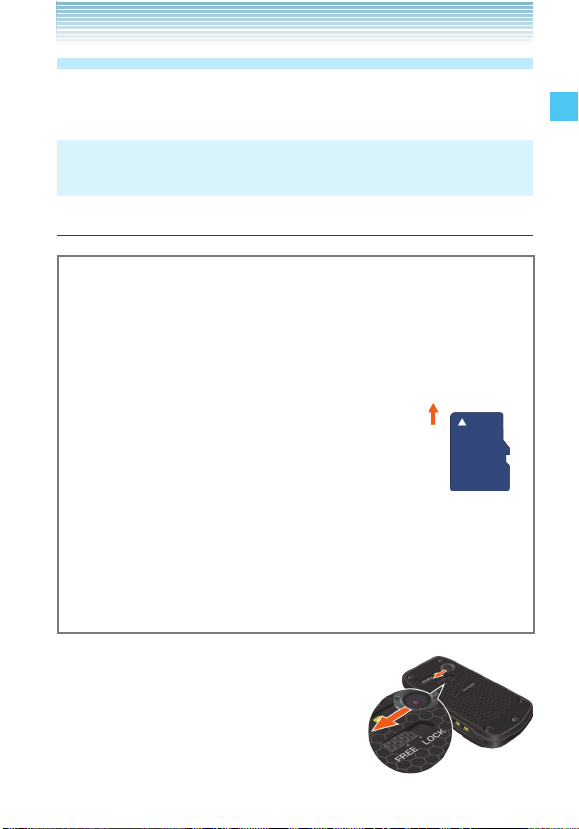
The front and back of the memory card look
•
different. When inserting the memory card, make
sure the correct side is facing up. If not, the
memory card may not fit in the memory card slot,
or the memory card and/or memory card slot
may be damaged.
Do not forcibly insert the memory card into the memory card slot.
•
Hold it with the contacts facing down and carefully insert it.
Failure to completely reseal the battery cover after installing may
•
result in damage if the handset is exposed to water.
Insert like this.
Getting Started with Your Phone
1. Slide the Battery Cover Lock to the FREE
position in the direction of the arrow
shown in the figure to the right.
29
Page 31

2. Insert your finger in the groove and pull up
on the battery cover in the direction of the
arrow .
3. Remove the battery by pulling the tab up.
Getting Started with Your Phone
4. Carefully press the memory card into
the memory card slot until it locks
into place.
5. Install the battery and replace the battery cover ensuring that you
slide the Battery Cover Lock to the LOCK position.
For information on how to install the battery and the bat tery cover, refer to
•
steps 3 through 6 of “Installing the Battery” on page 21.
Removing a Memory Card
Warning!
•
Never remove a memory card from the handset while it is being
accessed. Doing so can damage the memory card or the data
stored on it.
•
The memor y card is very small. Make sure you do not drop it.
•
Failure to completely reseal the battery cover after removing may
result in damage if the handset is exposed to water.
30
Page 32

1. Slide the Battery Cover Lock to the FREE
position in the direction of the arrow
shown in the figure to the right.
2. Insert your finger in the groove and pull up
on the battery cover in the direction of the
arrow .
3. Remove the battery by pulling the tab up.
4. Gently press the memory card inward, until
it pops out. Remove the memory card.
Getting Started with Your Phone
31
Page 33

5. Install the battery and replace the battery cover, as previously
instructed, ensuring that you slide the Battery Cover Lock to the
LOCK position.
Connecting to the Headset Jack
You can connect a compatible device equipped with a standard
2.5mm plug to your handset for safe, convenient, hands-free
conversations.
1. To open the Headset Jack cover,
insert your fingertip into the notch and
Getting Started with Your Phone
open the cover.
2. Plug the connector into the Headset
Jack.
Warning!
•
Do not forcibly insert/remove the connector into/from the Headset
Jack. Carefully insert/remove it.
Failure to completely reseal the Headset Jack cover after use may
•
result in damage if the handset is exposed to water.
32
Page 34

Quick Access to Convenient
Features
Vibrate Mode
Vibrate Mode mutes key tones and activates an alert for an incoming
call or message.
To activate and deactivate Vibrate Mode:
1. To activate Vibrate Mode from idle mode, press and hold .
2. To deactivate Vibrate Mode, press and hold again.
Mute Function
If you activate the mute function during a call, the person you are
speaking with cannot hear you or any sounds from your handset.
However, you are still able to hear them. To activate Mute:
1. During a call, press the Left Soft Key [Mute].
2. To unmute, press the Left Sof t Key [Unmute].
Volume Quick Adjustment
1. With the flip open, press the Volume Keys up or down
to select from: All Sounds Off, Alarm Only, Vibrate Only, Low,
Medium Low, Medium, Medium High and High.
2. Press the Center Select Key [OK] to save.
NOTES
•
With the flip open, press and hold the Volume Key Down
to enable Sounds Off mode. Sounds Off mode turns off all phone
sounds. Press and hold the Volume Key Up to revert back
to Normal Mode.
•
Keypad volume is adjusted through the Menu. For more details,
see page 142.
Quick Access to Convenient Features
33
Page 35

Speakerphone
To activate and deactivate the speakerphone:
1. To activate speakerphone from idle mode or during a call, press
the Speakerphone/Flashlight Key .
2. To deactivate, press the Speakerphone/Flashlight Key again.
Flashlight
To activate and deactivate the flashlight:
1. To activate from idle mode, press and hold the Speakerphone/
Flashlight Key .
2. To deactivate, press and hold the Speakerphone/Flashlight Key
again.
Quick Access to Convenient Features
Voice Dictation
The voice dictation mode allows you to enter text into the Text or
Subject field of a message or into the Notepad, by speaking instead
of typing characters. To use this mode, speak into the handset while
pressing and holding the Voice Commands Key . The spoken
phrases will be conver ted into text. For more details, see page 39.
NOTE
Before using Voice Dictation mode for the first time, you must
complete the voice training following the instructions on the screen.
Text to Spe ech
The handset reads out unread received messages one after another
for you with a synthetic voice. To activate this function, just press and
hold the Voice Commands Key either from idle mode or with the
flip closed. For more details, see page 99.
34
Page 36

Motion Detection
Using the Motion Detection function, you can control your handset just
by shaking it.
By default, the Motion Detection function is off. To use the Motion
Detection function:
1. From idle mode, press the Center Select Key [MENU], select
Settings & Tools, then press the Center Select Key [OK]. Press
Phone Settings.
2. Select Motion Detection, then press the Center Select Key [OK].
3. Select one of the following settings, then press the Center Select
Key [OK].
G’zGEAR / My Pics/Videos
4. Select On or Off, then press the Center Select Key [OK].
When shaking the handset, be sure to
hold the handset firmly as shown in the figure
to the right and shake it from right to left or
vice versa.
NOTE
When shaking the handset, make sure you do not hit the handset
against nearby objects.
Quick Access to Convenient Features
35
Page 37

Entering and Editing Information
Text Input
You can input and edit your Banner, Schedule, Contacts, and
Messages.
To perform the Text Input operation described in this chapter with
your handset, open the text entry screen following the steps below to
create a new Text Message:
1. From idle mode, press the Left Soft Key [Message], select New
Message and press the Center Select Key [OK].
2. Press TXT Message.
3. Enter the phone number or email address of the recipient, then
press the Center Select Key [OK] to go to the Text field.
Entering and Editing Information
Key Functions
Left Soft Key: Press to select one of the following text input
modes:
Voice/T9 Word/Abc/ABC/123/Palabra/Symbols/Add Quick
Tex t
Shift: Press to change case.
T9 Word: T9 Word m T9 WORD m T9 word
Abc text: Abc m ABC m abc
Palabra: Palabra m PALABRA m palabra
Next: When in T9 Word or Palabra mode, press to display
other words. Pressing after pressing displays other
punctuation and symbols.
Space: Press to complete a word and insert a space.
Clear: Press to delete a single space or character. Press and
hold to delete entire words.
36
Page 38

Voice Commands: Press and hold to activate the Voice Dictation
mode. Speak into the handset microphone while pressing and
holding this key. The spoken phrases will be converted into text
and entered into the text field. (Only when entering text into the
Text or Subject field of a message, or into the Notepad)
Text Input Modes
There are six modes for entering text, numbers, symbols, and
punctuation.
Using Abc (Multi-tap) Text Input
To enter words in this mode, you need to press each key repeatedly
until the desired letter appears. It can also be used to add words to
the T9 database.
Example: From the text entry screen, in Abc mode, press
, wait one second, then press
. “Vzw” is displayed.
NOTES
•
Abc is the default text entr y mode.
•
Press and hold the alphanumeric key to enter the number in Abc
mode.
Using T9 Word Mode Text Input
T9 Word mode incorporates a built-in-dictionary to determine a word
based on the entered characters. A word is entered more quickly
because you only need to press each key once per character.
To type the message “Call the office.” follow these steps from the text
entry screen:
1. Press the Left Soft Key, select T9 Word, then press the Center
Select Key [OK].
Entering and Editing Information
37
Page 39

2. Press .
3. Press to complete the word and add a space.
4. Press
.
“Call the office.” is displayed.
NOTES
•
After you have finished entering a word, if the word displayed
is not the one you want, press the Next Key to display
additional word choices.
•
Pressing after pressing to input a period displays
other punctuation and symbols.
Entering and Editing Information
Adding Words to the T9 Database
If a word is not in the T9 database, add it by using Abc (Multi-tap)
mode text entry. To add a new word, follow these steps from the text
entry screen:
1. From the text entry screen, in Abc mode, press
. “Kop” is displayed.
2. Press the Left Soft Key, select T9 Word, then press the Center
Select Key [OK].
3. Press and hold the Clear Key to erase the existing word.
4. Press . “Kop” is displayed.
5. Press to accept your choice and add a space.
Using 123 (Numbers) Text Input
To type numbers using one keystroke per number, follow these steps
from the text entry screen:
1. Press the Left Soft Key, select 123, then press the Center Select
Key [OK].
2. Press . “5551212” is
displayed.
38
Page 40

Using Symbol Text Input
To insert symbols or punctuation, follow these steps from the text
entry screen:
1. Press the Left Soft Key, select Symbols, then press the Center
Select Key [OK].
2. Press the Right Soft Key [Next] to view the next 12 symbols or Left
Soft Key [Prev] to view the previous 12 symbols.
3. Select the symbol you want to insert using the Directional Key, then
press the Center Select Key [OK] to select it.
Using Palabra Mode Text Input
Palabra mode is a T9 mode for Spanish input.
To type the message “Llame la oficina.” follow these steps from the
text entry screen:
1. Press the Left Soft Key, select Palabra, then press the Center
Select Key [OK].
2. Press .
3. Press to complete the word and add a space.
4. Press
“Llame la oficina.” is displayed.
Using Voice Dictation Mode Text Input
The voice dictation mode allows you to enter text into the Text or
Subject field of a message or into the Notepad, by speaking instead
of typing characters. Voice dictation can be done for up to 10
seconds at a time.
1. Speak into the handset microphone while pressing and holding the
Voice Commands Key .
2. The spoken phrases are converted into text and entered in the
Text field. Entered text is announced with a synthetic voice for your
confirmation.
Entering and Editing Information
39
Page 41

3. When entered text is correct, press the Center Select Key [OK]. If
incorrect, you can use the following procedure to correct it.
•
Press the Directional Key left or right to select the incorrect
word and press the Right Soft Key [List] to display the Choice
List. Select the correct word, then press the Center Select Key
[OK].
If the correct word is not found in the Choice List, select
[Spell Word] from the Choice List to type characters with
the Alphanumeric Keypad. In the middle of spelling a word,
candidate words are presented for you to select by scrolling with
the Directional Key up or down.
NOTES
Entering and Editing Information
•
Before using Voice Dictation mode for the first time, you must
complete the voice training following the instructions on the
screen.
•
Voice Dictation mode cannot be used when the handset is
connected to an audio device with Bluetooth
•
Voice Dictation mode supports only US English.
•
When you press the Left Soft Key, then select Voice, the message
“Press and Hold Voice Commands Key while speaking” appears
on the display.
®
.
40
Page 42

RECENT CALLS
The Recent Calls menu is a list of the last phone numbers or Contact
entries for calls (including PTT calls) you placed, accepted, missed,
or blocked. It is continually updated as new numbers are added to
the beginning of the list and the oldest entries are removed from the
bottom of the list.
Accessing the Recent Calls submenu
1. From idle mode, press the Center Select Key [MENU], select
Recent Calls, then press the Center Select Key [OK].
2. Select a submenu.
Missed: Displays a list of the 90 most recently missed calls.
Received: Displays a list of the 90 most recently received calls.
Dialed: Displays a list of the 90 most recently dialed calls.
Blocked*: Displays a list of the 90 most recently blocked calls.
All**: Displays a list of the 270 most recent calls.
View Timers: Displays the duration of selected calls.
If you select Blocked, enter the four-digit Lock Code. The default
•
Lock Code is the last 4 digits of your phone number.
* Blocked appears only when Contacts Only or Block All is
selected for Calls under MENU > Settings & Tools > Phone
Settings > Security > Restrictions > Calls > Incoming Calls. For
information about how to configure this setting, see page 157.
** Blocked calls are not displayed in the All Calls list.
RECENT CALLS
NOTE
Pressing the Send Key from idle mode takes you to the All Calls list.
41
Page 43

Making a Call from Recent Calls
1. From idle mode, press the Center Select Key [MENU], select
Recent Calls, then press the Center Select Key [OK].
2. Select one of the following call lists, then press the Center Select
Key [OK].
Missed/Received/Dialed/ Blocked/All
3. Scroll to an entry, then press the Send Key to make a call.
Viewing Recent Call History
1. From idle mode, press the Center Select Key [MENU], select
RECENT CALLS
Recent Calls, then press the Center Select Key [OK].
2. Select one of the following call lists, then press the Center Select
Key [OK].
Missed/Received/Dialed/ Blocked/All
3. Scroll to a call entry, then:
•
Press the Center Select Key [OPEN] to view the entry.
•
If you selected a non-PTT call, press the Right Soft Key
[Options] to select:
Save to Contacts: Stores the phone number in your Contacts.
(This option is not displayed for a phone number already
registered in the Contacts.)
Save to PTT Contacts: Stores the phone number in your PTT
Contacts. (This option is not displayed when PTT Mode is Off, or
for a phone number already registered in the PT T Contacts.)
Details: Displays the entry content. (This option is not available
for a phone number not registered in the Contacts)
Erase: Erases the entry from the call list.
Lock/Unlock: Locks or unlocks the entry in the call list.
Erase All: Erases all the entries in the selected call list.
View Timers: Displays the duration of the call.
42
Page 44

•
Press the Left Soft Key [Message] to select:
New TX T Message/New Picture Message/ New Video
Message/New Voice Message
•
If you selected a PTT call, press the Left Soft Key [Alert] to place
an alert PTT call. (The Left Soft Key [Alert] is not available when
PTT Mode is Off.)
•
If you selected a PTT call, press the Right Soft Key [Options] to
select:
New TX T Message/New Picture Message/ New Video
Message/New Voice Message/Save To Contacts /Save To
PTT Contacts/ Erase/Lock (Unlock)/Erase All/View Timers
•
If you selected a PTT Group or Temp PTT Group from the Dialed
Calls list, press the Right Soft Key [Options] to select:
Erase/ Lock (Unlock)/Erase All/View Timers
View Timers
To view the duration of selected calls:
1. From idle mode, press the Center Select Key [MENU], select
Recent Calls, then press the Center Select Key [OK].
2. Select View Timers, then press the Center Select Key [OK].
3. Scroll to a call list. Call timers include:
Last Call/All Calls /Received Calls/Dialed Calls/Roaming
Calls /Transmit Data / Received Data / Total Data /Last Reset/
Lifetime Calls/Lifetime Data Counter
Press the Left Soft Key [Reset] to reset the highlighted timer.
•
Press the Right Soft Key [Reset All] to reset all timers.
•
RECENT CALLS
43
Page 45

CONTACTS
CONTACTS
The Contacts menu allows you to store names, phone numbers and
other information in your handset’s memory. You may store up to
1,000 entries.
Adding a new Contact from idle mode
1. From idle mode, enter the phone number (up to 48 characters) you
want to register.
2. Press the Left Soft Key [Save].
CONTACTS
NOTES
•
When PT T Mode is On, press the Right Soft Key [Options] in step
2, then Save To Contacts.
•
Pressing the Right Soft Key [Options] allows you to access the
following options:
Add 2-Sec Pause : Inserts a 2-sec Pause into the number.
Add Wait: Inserts a Wait pause into the number.
Add From Contact: Adds a phone number which is stored in the
Contact List.
Add From Recent Call : Adds a phone number which is stored in
Recent Calls.
Save To Contacts: Stores the phone number in your Contacts.
(This option is not displayed when PTT Mode is Off.)
Save To PTT Contacts: Stores the phone number in your PTT
Contacts. (This option is not displayed when PT T Mode is Off.)
New TX T Message: Sends a text message to the entered phone
number.
New Picture Message: Sends a picture message to the entered
phone number.
New Video Message: Sends a video message to the entered
phone number.
44
Page 46

New Voice Message: Sends a voice message to the entered
phone number.
Assisted Dialing: Sets the Assisted Dialing setting. For more
detail, see page 164.
3. Press Add New Contact.
4. Select the type of phone number you want to save, then press the
Center Select Key [OK].
Mobile 1/Mobile 2/Home/Business
5. Scroll to the information field you want to enter. These fields
include:
Name/Mobile 1/Home/Business/Mobile 2/Personal Email/
Business Email/IM Screen Name/Picture/Ringtone/Group/
Home Address/Work Address/Company/Title/Birthday/ Notes
•
To add the name, scroll to the Name field, then enter a name for
the contact (up to 32 characters).
•
To add the phone number, scroll to the Mobile 1, Home,
Business, or Mobile 2 field, then enter the phone number (up to
48 characters).
•
To add an e-mail address, scroll to the Personal Email or
Business Email field, then enter an e-mail address (up to 48
characters).
•
To add the IM Screen Name, scroll to the IM Screen Name field,
then press the Left Soft Key [Set]. Select a service provider, then
press the Center Select Key [OK]. Enter the IM Screen Name (up
to 48 characters), then press the Center Select Key [OK].
•
To assign the Picture ID, scroll to the Picture field, then press the
Left Soft Key [Set]. Select a picture, then press the Center Select
Key [OK].
•
To assign the call ringtone, scroll to the Ringtone field, then
press the Left Soft Key [Set]. Select a ringtone, then press the
Center Select Key [OK].
CONTACTS
45
Page 47

•
To add the Contact entry into a group, scroll to the Group field,
then press the Left Soft Key [Set]. Select the Group, press the
Center Select Key [MARK], then press the Left Soft Key [Done].
•
To add the Home Address, scroll to the Home Address field,
then press the Left Soft Key [Set]. Enter the Street, City, State,
Zip Code, and Country, then press the Center Select Key [OK].
(Up to 11 characters for Zip Code and up to 32 for others)
•
To add the Work Address, scroll to the Work Address field, then
press the Left Soft Key [Set]. Enter the Street, City, State, Zip
Code, and Country, then press the Center Select Key [OK].
•
To add the company name, scroll to the Company field, then
CONTACTS
enter the company name (up to 32 characters).
•
To add a title, scroll to the Title field, then enter the title (up to 32
characters).
To add the birthday, scroll to the Birthday field, then press the
•
Left Soft Key [Set]. Enter the birthday, then press the Center
Select Key [OK].
To remove the added birthday, press the Right Soft Key
[Remove] with the Birthday field selected. Select Yes and press
the Center Select Key [OK].
To add notes, scroll to the Notes field, then enter the notes (up to
•
30 characters).
6. Select the entered phone number field and press the Right Soft
Key [Options] to select one of the following options:
Set Speed Dial/ Set As Default /Add 2-Sec Pause/Add Wait
•
To add the Contact entry to the Speed Dial list, press Set
Speed Dial. Select the desired Speed Dial digit by using the
keypad or by scrolling to highlight it, then press the Center Select
Key [SET]. Select Yes and press the Center Select Key [OK].
•
To set the phone number as the Default Number, press
Set As Default, then select Yes and press the Center Select Key
[OK].
46
Page 48

•
To add a pause to an existing number, press Add 2-Sec
Pause or Add Wait.
NOTE
The initial phone number entered when the new Contact is created
becomes the Default Number. If more than one number is entered
for the Contact entry, another number can be selected as the
Default Number.
7. Af ter entering the information as necessary, press the Center
Select Key [SAVE] to save the contact entry.
8. CONTACT SAVED appears on the display. The phone number
reappears on screen. Press the End/Power Key to exit, or press the
Send Key to make a call to the displayed phone number.
Adding a Phone Number to an Existing
Contact
1. From idle mode, enter the phone number (up to 48 characters) you
want to register.
2. Press the Left Soft Key [Save], then press Update Existing.
3. Scroll to the existing Contact entry you want to update, then press
the Center Select Key [OK].
4. Select the phone number type, then press the Center Select Key
[OK].
Mobile 1/Mobile 2/Home/Business
If a phone number is already assigned to the field you selected,
Entry is already assigned. Overwrite? appears on the display.
Select Yes to overwrite, then press the Center Select Key [OK].
5. CONTACT UPDATED appears on the display. The phone number
reappears on screen. Press the End/Power Key to exit, or press the
Send Key to make a call to the displayed phone number.
CONTACTS
47
Page 49

Phone Numbers with Pauses
Pauses are used for automated systems (e.g. voicemail or calling
cards). Insert a pause after a set of numbers then enter another set.
The second set of numbers is dialed after the pause. This feature
is useful for dialing into systems that require a code. There are two
different types of pauses you can use when registering a phone
number:
Wait (W): The handset stops dialing until you press the Left Soft
•
Key [Release] to advance to the next number.
2-Sec Pause (P): The handset waits 2 seconds before
•
automatically dialing the next set of numbers.
CONTACTS
Registering a Phone Number with Pauses
1. From idle mode, enter the phone number.
2. Press the Right Soft Key [Options], then press Add 2-Sec
Pause or Add Wait.
3. Enter the additional number(s) (e.g. PIN number or credit card
number).
4. Press the Left Soft Key [Save], then press Add New
Contact.
5. Complete any additional fields and press the Center Select Key
[SAVE].
Accessing the Contacts submenu
1. From idle mode, press the Center Select Key [MENU], select
Contacts, then press the Center Select Key [OK].
2. Select a submenu:
New Contact /Contact List/Groups/New PTT Contact*/PTT
Contact List*/PTT Groups*/Backup Assistant/Speed Dials/In
Case of Emergency/My Name Card
* These options are available only when the PTT feature is turned
on.
48
Page 50

NOTE
From idle mode, pressing the Right Soft Key [Contacts] functions
as a hot key to access the Contact List.
New Contact
To add a new number to your Contact List:
1. From idle mode, press the Center Select Key [MENU], select
Contacts, then press the Center Select Key [OK]. Press
New Contact.
2. Complete all the desired fields and press the Center Select Key
[SAVE] to create the contact entry.
NOTE
Using this submenu, the number is saved as a new Contact. To
save the number into an existing Contact, edit the Contact entry.
Contact List
To view your Contact List:
NOTES
•
From idle mode, pressing the Right Soft Key [Contacts] functions
as a hot key to access the Contact List.
•
Your handset is able to perform a dynamic search of the contents
in your handset’s memory. A dynamic search compares entered
letters or numbers against the entries in your Contact List, and
displays matches in alphabetical order. You can then select a
number from the list to call or edit. You may locate a contact by:
Searching by Letter
-
Scrolling Alphabetically
-
CONTACTS
49
Page 51

1. From idle mode, press the Center Select Key [MENU], select
Contacts, then press the Center Select Key [OK]. Press
Contact List.
The list of names in your contacts is displayed alphabetically.
2. Searching by Letter: Enter a name or beginning letters of a name in
the Go To Field at the bottom of the screen.
Scrolling Alphabetically: Press the Directional Key up or down
to scroll through your Contact List. You can select one of the
following options:
•
To view the contact information, press the Center Select Key
[VIEW].
CONTACTS
•
To edit the entry, press the Left Soft Key [Edit].
•
Press the Right Soft Key [Options] to select one of the following
options:
New Contact /Erase /New TXT Message/ New Picture
Message/New Video Message/ New Voice Message/Send
IM*/Send Email**/Set As ICE Contact (Unassigned ICE
contact)/Call/ Manage Contacts /Send Name Card /Save To
PTT Contacts***
* This option is available only when an IM Screen Name is registered
in Contacts.
** This option is available only when an e-mail address is registered
in Contacts.
*** This option is available only when the PT T feature is turned on.
Making a Call from Your Contacts
Once you have registered phone numbers into your Contact List, you
can make calls to those numbers quickly and easily.
1. From idle mode, press the Center Select Key [MENU], select
Contacts, then press the Center Select Key [OK]. Press
Contact List.
2. Select the Contact entry, then press the Center Select Key [VIEW].
50
Page 52

3. Select the phone number, then press the Send Key to make the
call.
NOTE
Selecting the Contact entry and then pressing the Send Key will
dial the Default Number of the Contact entry automatically. If
multiple numbers are saved in the Contact entry, select the number
you want to dial, then press the Send Key.
Viewing Location of Home Address or Work Address
on the Map
Once you have added the Home Address or the Work Address to your
Contact List, you can view the location of those addresses on the map
using the VZ Navigator
®
.
1. From idle mode, press the Center Select Key [MENU], select
Contacts, then press the Center Select Key [OK]. Press
Contact List.
2. Select the Contact entry, then press the Center Select Key [VIEW].
3. Select the Home Address or Work Address, then press the Right
Soft Key [Navigate].
4. Follow the on-screen prompts.
NOTES
•
To use VZ Navigator, you must set Location to On. See page 155.
•
Download, subscription, and airtime required for use; only in
National Enhanced Services Coverage Area; accuracy and
completeness of information is not guaranteed; information about
the location of the device will be used to deliver service.
CONTACTS
51
Page 53

Editing a Contact Entry
1. From idle mode, press the Center Select Key [MENU], select
Contacts, then press the Center Select Key [OK]. Press
Contact List.
2. Select the Contact entry, then press the Left Soft Key [Edit].
3. Edit the contact information as necessary, then press the Center
Select Key [SAVE] to update the contact entry.
Erasing a Contact Entry
1. From idle mode, press the Center Select Key [MENU], select
Contacts, then press the Center Select Key [OK]. Press
CONTACTS
Contact List.
2. Select the Contact entry, then press the Center Select Key [VIEW].
3. Press Left Soft Key [Erase], then select Yes and press the Center
Select Key [OK].
Groups
Groups allow you to classify phone entries into groups with up to 10
numbers in each group.
To view your grouped Contacts, add a new group, change the name
of a group, delete a group, or send a message to everyone in the
selected group:
1. From idle mode, press the Center Select Key [MENU], select
Contacts, then press the Center Select Key [OK]. Press
Groups.
2. You can select one of the following options:
•
To add a new group to the Groups list, press the Left Soft Key
[New], enter the group name, then press the Center Select Key
[SAVE].
•
To add Contacts to the group, select the existing group where
you want to add the contact, then press the Right Soft Key
[Options]. Press Add, then your contact entries will be
52
Page 54

displayed in alphabetical order. Select the contact you want to
add then press the Center Select Key [MARK]. When you have
added the desired contact(s), press the Left Soft Key [Done].
•
To view your grouped Contacts, select a group, then press the
Center Select Key [VIEW].
•
To access the following options, select a group, then press the
Right Soft Key [Options]:
New TX T Message/New Picture Message/ New Video
Message/ New Voice Message/Rename /Erase Group/Add
To access the following options, select a group and press
•
the Center Select Key [VIEW], then press the Right Soft Key
[Options]:
New TX T Message/New Picture Message/ New Video
Message/ New Voice Message/Erase Group
To change the group name, select the existing group name that
•
you want to change, then press the Right Soft Key [Options].
Press Rename, edit the group name, then press the
Center Select Key [SAVE].
To erase the group, select the existing group that you want to
•
erase, then press the Right Soft Key [Options]. Press Erase
Group, then select Yes and press the Center Select Key [OK].
New PTT Contact
NOTE
You must first enable the PTT feature in order to see the PT T
Contact List (see page 63).
CONTACTS
To add a new Push To Talk (PTT) Contact:
1. From idle mode, press the Center Select Key [MENU], select
Contacts, then press the Center Select Key [OK]. Press
New PTT Contact.
53
Page 55

2. Enter the name, then press the Directional Key down.
3. Enter the 10-digit phone number of the Verizon Wireless PT T
subscriber, then press the Directional Key down.
4. To add the new PTT Contact as a member of an existing PTT
Group, press the Left Soft Key [Add], select the PTT Group,
press the Center Select Key [MARK], then press the Left Soft Key
[Done].
5. Press the Center Select Key [SAVE] to save the contact entry.
PTT Contact List
To view your PTT Contact entries:
CONTACTS
1. From idle mode, press the Center Select Key [MENU], select
Contacts, then press the Center Select Key [OK]. Press
PTT Contact List.
2. Select the PTT Contact entry. You can select one of the following
options:
To place a barge PTT call to the selected individual, press and
•
hold the Red Side Key/PTT Key .
To place an alert PTT call to the selected individual, press the
•
Left Soft Key [Alert]. Then press and release the Red Side
Key/PT T Key .
Press the Right Soft Key [Options] to select one of the following
•
options:
New PTT Contact/Copy To Contacts /Temp PTT Group/
Erase /Edit /Call/ New T XT Message /New Picture Message/
New Video Message/New Voice Message /Sort
NOTE
From idle mode, pressing the Red Side Key/PT T Key
functions as a hot key to access the PTT Contact List.
54
Page 56

PTT Groups
1. From idle mode, press the Center Select Key [MENU], select
Contacts, then press the Center Select Key [OK]. Press PTT
Groups.
2. You can select one of the following options:
•
To add a new PTT Group to the PTT Groups list, press the Left
Soft Key [New], enter the PTT group name, then press the
Center Select Key [SAVE].
•
To view the PTT contacts included in the group, select a PTT
Group, then press the Center Select Key [VIEW].
•
To access the options menu, select a PTT Group, then press the
Right Soft Key [Options]. These options include:
Rename/Erase/Add/Sort
•
To change the PTT Group name, select the existing PTT
Group that you want to change, then press the Right Soft Key
[Options]. Press Rename, edit the PTT Group name, then
press the Center Select Key [SAVE].
•
To erase the PTT Group, select the existing group that you want
to erase, then press the Right Soft Key [Options]. Press
Erase, then select Yes and press the Center Select Key [OK].
•
To add PTT Contacts to the PTT Group, select the existing PTT
Group where you want to add the PTT Contact, then press
the Right Soft Key [Options]. Press Add, then your PTT
Contact entries will be displayed in alphabetical order. Select the
PTT Contact you want to add, then press the Center Select Key
[MARK]. Press the Left Soft Key [Done].
CONTACTS
55
Page 57

Temp PTT Group
A Temp PTT Group allows you to quickly communicate with multiple
contacts on a single PTT call. Temp PTT Groups can be created
directly on your phone and are not permanently saved to your PTT
Group list (unless you choose to save it).
The following operation assigns a PT T Contact to the Temp PT T
Group.
Adding PTT Contacts
1. From idle mode, press the Center Select Key [MENU], select
Contacts, then press the Center Select Key [OK]. Press
CONTACTS
PTT Contact List.
2. Press the Right Soft Key [Options], then press Temp PTT
Group.
3. Press the Center Select Key [ADD], select a PTT Contact entry,
press the Center Select Key [MARK], then press the Left Soft Key
[Done].
Viewing Temp PTT Group Members
1. From idle mode, press the Center Select Key [MENU], select
Contacts, then press the Center Select Key [OK]. Press
PTT Contact List.
2. Press the Right Soft Key [Options], then press Temp PTT
Group.
3. Select the Temp PTT Group entry. You can select one of the
following options:
•
Press the Left Soft Key [Remove] to remove the entry.
•
Press the Right Soft Key [Options] to select one of the following
options:
Remove All /New TX T Message/New Picture Message/ New
Video Message/ New Voice Message/Save As PTT Group
56
Page 58

Backup Assistant
Backup Assistant safeguards your handset’s contacts and
automatically saves a copy of the names, phone numbers, email
addresses, etc., stored in your handset. You can view, print, add,
delete, or edit your contacts online.
To set Backup Assistant on your handset:
1. From idle mode, press the Center Select Key [MENU], select
Contacts, then press the Center Select Key [OK]. Select Backup
Assistant and then press the Center Select Key [OK].
Backup Assistant launches, and the Welcome screen appears.
2. Follow the on-screen prompts.
Speed Dials
Speed Dialing is a convenient feature that allows you to make phone
calls quickly and easily. Assign your Contacts to Speed Dial locations
to use this calling feature.
NOTE
You will need to activate One-Touch Dialing to use Speed Dialing.
See page 162.
Setting a Speed Dial
To view the Speed Dials list and assign a phone number entered in
your Contacts to a Speed Dial number:
1. From idle mode, press the Center Select Key [MENU], select
Contacts, then press the Center Select Key [OK]. Select Speed
Dials and then press the Center Select Key [OK].
2. Select or enter the Speed Dial number, then press the Center
Select Key [SET].
3. Select the Contact, then press the Center Select Key [OK].
4. If multiple phone numbers are registered in the Contact, select
the phone number you want to assign to the selected Speed Dial
CONTACTS
57
Page 59

number, then press the Center Select Key [OK]. “Set Speed Dial to
Contact?” appears on screen.
5. Select Yes and press the Center Select Key [OK].
A confirmation message appears.
NOTE
“Speed Dial is already assigned. Overwrite?” will appear on screen
if you are selecting a speed dial location that is already assigned.
Select Yes or No and press the Center Select Key [OK].
Resetting a Speed Dial
CONTACTS
1. From idle mode, press the Center Select Key [MENU], select
Contacts, then press the Center Select Key [OK]. Select Speed
Dials and then press the Center Select Key [OK].
2. Select or enter the Speed Dial number, then press the Right Soft
Key [Remove].
3. Select Yes and press the Center Select Key [OK].
A confirmation message appears.
Single-Digit Speed Dialing
1. From idle mode, press and hold the Speed Dial digit.
2. Your handset recalls the phone number from your Contacts,
displays it briefly, and then dials it.
NOTE
1 : Speed Dial entry 1 (Voicemail), is already assigned.
Double-Digit Speed Dialing
1. From idle mode, press the first Speed Dial digit, then press and
hold the key of the last Speed Dial digit.
2. Your handset recalls the phone number from your Contacts,
displays it briefly, and then dials it.
58
Page 60

NOTE
95, 96, 97, 98 and 99 : Speed Dial entries 95(#Warranty Center),
96(#DATA), 97(#BAL), 98(#MIN) and 9 9(#PMT) are already
assigned to Verizon Wireless Account Information.
Triple-Digit Speed Dialing
1. From idle mode, press the first and second Speed Dial digits, then
press and hold the key of the last Speed Dial digit.
2. Your handset recalls the phone number from your Contacts,
displays it briefly, and then dials it.
NOTE
411 : Speed Dial entry 411 (Directory Assistance) is already
assigned.
In Case of Emergency (ICE)
Follow the procedure below to register a Contact to be contacted in
case of emergency, or to register a medical record number or other
personal info. Up to three different Contacts can be registered to ICE.
NOTE
Even when the handset is locked, the Contact or personal info
registered as ICE can be viewed without unlocking the handset by
pressing the Left Soft Key [ICE].
CONTACTS
Adding a Contact to ICE
To register to ICE:
1. From idle mode, press the Center Select Key [MENU], select
Contacts, then press the Center Select Key [OK]. Select In Case
of Emergency and then press the Center Select Key [OK].
59
Page 61

2. Select Contact 1, Contact 2, or Contact 3, then press the Center
Select Key [ADD].
3. To select from the Contact List, press From Contacts, select
the Contact entry, then press the Center Select Key [OK].
To add a new Contact, press New Contact, enter the
contact information, then press the Center Select Key [SAVE].
NOTES
For details about adding a new Contact, see page 44.
•
The contact name assigned as the ICE contact is displayed in
•
orange or red font in the Contact List.
CONTACTS
Entering Personal Info
To register a Medical Record Number or other information that may be
used in case of an emergency:
1. From idle mode, press the Center Select Key [MENU], select
Contacts, then press the Center Select Key [OK]. Select In Case
of Emergency and then press the Center Select Key [OK].
2. Select Personal Info, then press the Center Select Key [VIEW].
3. Select Note 1, Note 2, or Note 3, then press the Center Select Key
[ADD].
4. Enter the information, then press the Center Select Key [SAVE].
5. The information you entered now appears in place of Note 1, Note
2, or Note 3.
My Name Card
To register a name, telephone number, and e-mail address to My
Name Card:
1. From idle mode, press the Center Select Key [MENU], select
Contacts, then press the Center Select Key [OK]. Select My Name
Card and then press the Center Select Key [OK].
2. Press the Center Select Key [EDIT].
60
Page 62

3. Enter the name, then scroll to the information field you want to
enter. Information fields include:
Home/Business/Mobile 2/Personal Email/ Business Email/
IM Screen Name/Picture/ Ringtone/Home Address/Work
Address/Company/Title/Birthday/ Notes
4. After entering the necessary information, press the Center Select
Key [SAVE].
NOTES
The phone number shown in the Mobile 1 field is that of your
•
handset and cannot be changed.
Group field cannot be selected and edited for My Name Card.
•
My Name Card can be added to a message. See page 95.
•
CONTACTS
61
Page 63

Push to Talk
Push to Talk
The Push to Talk (PTT) feature on your phone allows you to use your
phone like a walkie-talkie to communicate with an individual or group
of individuals who are also Verizon Wireless Push to Talk subscribers.
NOTES
•
PTT Mode is Off by default, which means you are not able to send
or receive PTT calls and alerts. See page 63 for instructions on
how to turn on PT T Mode.
•
When PT T mode is On, pressing the Red Side Key/PTT Key
from idle mode with the flip open or closed displays the
Push to Talk
PTT contact list.
•
When PT T mode is On, pressing and holding the Red Side Key/
PTT Key from idle mode initiates a barge call to the last
number from which you sent/received a call.
About Push to Talk
Push to Talk calls may only be made with other Verizon Wireless Push
to Talk subscribers, and only from the National Enhanced Services
Rate and Coverage Area. A Push to Talk call is terminated by pressing
the End/Power Key or will automatically time out after 10 seconds of
inactivity. While you are on a Push to Talk call, voice calls received will
go directly to Voice Mail. When you are on a voice call, you cannot
receive a Push to Talk call. You cannot prevent others who have
your wireless phone number from entering you into their Push to Talk
Contact List. Only one person can speak at a time during Push to Talk
calls. When using your phone keypad to make a Push to Talk call,
you must enter the 10-digit phone number of the called party. Your
Push to Talk service cannot be used for any applications that tether
your phone to computers or other devices for any purpose. Push to
62
Page 64

Talk-capable phone and Calling Plan required. If you wish to switch
from a Push to Talk Calling Plan to another Calling Plan, you must first
stop using your Push to Talk-capable phone and purchase or provide
another compatible phone.
Making a PTT Call
You can make two types of PTT calls:
•
A barge call automatically connects to the other party. The called
party does not have the option to ignore the call.
An alert call is a call to notify a called party that the calling party
•
wants to talk using a tone. The called party has the option to answer
or ignore the call.
NOTE
You must first enable the PTT feature in order to see the PT T icons
and menus.
PTT Mode
You can use the following procedure to turn the PT T feature On or Of f.
When PT T is turned on, you will be able to send and receive PTT calls
or alerts.
1. From idle mode, press the Center Select Key [MENU], select
Settings & Tools, then press the Center Select Key [OK]. Press
PTT Settings, PTT Mode.
2. Select On or Off, then press the Center Select Key [OK].
Push to Talk
NOTE
The 3G or 1x service indicator icon on the top line of the main
display is highlighted to indicate that the PT T service is available
when turned On.
63
Page 65

Calling from PTT Contact List (Barge)
1. From idle mode, press the Red Side Key/PTT Key to
access your PTT Contact List.
2. Scroll to the PT T Contact entry you wish to call.
3. Press and hold the Red Side Key/PT T Key . Wait until the
“OK to Talk” tone sounds and the message “Talking to” appears on
the display. Speak while pressing down the Red Side Key/PT T Key
.
4. Release the Red Side Key/PTT Key to let the other party
talk.
5. Press the End/ Power Key to end the call.
Push to Talk
Calling from PTT Contact List (Alert)
You can send an alert to any user with Verizon Wireless PT T service.
The user may answer or ignore the alert.
1. From idle mode, press the Red Side Key/PTT Key to
access your PTT Contact List.
2. Scroll to the PT T Contact entry you wish to call.
3. Press the Left Soft Key [Alert]. The message “Press PT T Key to
Alert” will appear on the display.
4. Press and release the Red Side Key/PT T Key to alert the
selected individual.
The “PT T Outgoing Alert” tone will sound, and “Alerting” will
appear on the display.
5. If the called party answers the alert, “Listening to” appears on the
display and you will hear the called party speaking.
If the called party chooses to ignore the alert, or if the phone is
unavailable to accept a PT T call, an “Unavailable” message will
appear on your display.
6. When the called party finishes speaking, you will hear the “Floor
Available” tone and the “Connected to” screen will appear on your
display.
64
Page 66

7. Press and hold the Red Side Key/PTT Key to talk.
8. Release the Red Side Key/PTT Key to let the other party
talk.
9. Press the End/ Power Key to end the call.
Calling from Temp PTT Group (Barge)
1. From idle mode, press the Red Side Key/PTT Key to
access your PTT Contact List.
2. Press the Right Soft Key [Options], then press Temp PTT
Group.
3. Press and hold the Red Side Key/PT T Key . Wait until the
“OK to Talk” tone sounds and the message “Talking to” appears on
the display. Speak while pressing down the Red Side Key/PT T Key
.
4. Release the Red Side Key/PTT Key to let the other party
talk.
5. Press the End/ Power Key to end the call.
Calling from Keypad (Barge)
1. From idle mode, enter the 10-digit phone number of the Verizon
Wireless PT T subscriber you wish to contact.
2. Press and hold the Red Side Key/PTT Key . Wait until the
“OK to Talk” tone sounds and the message “Talking to” appears on
the display. Speak while pressing down the Red Side Key/PT T Key
.
If the phone number you entered has already been registered in
your PTT Contact List, the contact name will replace the phone
number entered on the display when you initiate the call by
pressing the Red Side Key/PTT Key .
3. Release the Red Side Key/PTT Key to let the other part y
talk.
4. Press the End/Power Key to end the call.
Push to Talk
65
Page 67

Calling from Keypad (Alert)
1. From idle mode, enter the 10-digit phone number of the Verizon
Wireless PT T subscriber you wish to alert.
2. Press the Left Soft Key [Alert].
3. Press and release the Red Side Key/PT T Key to alert the
individual.
The “PT T Outgoing Alert” tone will sound, and “Alerting” will
appear on the display.
If the phone number you entered has already been registered in
your PTT Contact List, the contact name will replace the phone
number entered on the display when the alert is initiated.
4. If the called party answers the alert, “Listening to” appears on the
Push to Talk
display and you will hear the called party speaking.
If the called party chooses to ignore the alert, or if the phone is
unavailable to accept a PT T call, an “Unavailable” message will
appear on your display.
5. When the called party finishes speaking, you will hear the “Floor
Available” tone and the “Connected to” screen will appear on your
display.
6. Press and hold the Red Side Key/PT T Key to talk.
7. Release the Red Side Key/PTT Key to let the other party
talk.
8. Press the End/ Power Key to end the call.
Incoming PTT Call
Incoming PTT (Barge)
1. When you receive a barge call, you will hear the calling party
speaking through the speakerphone. The calling party’s phone
number will appear on your display. If the calling party’s number
has already been registered in your PTT Contact List, the contact
name will replace the phone number on the display.
2. Press and hold the Red Side Key/PTT Key to talk.
66
Page 68

3. Release the Red Side Key/PTT Key to let the other part y
talk.
4. Press the End/Power Key to end the call.
Incoming PTT (Alert)
1. When you receive an alert, you will hear the “PT T Alert” tone. The
message “Incoming Alert” will be displayed with the phone number
or contact name of the calling party. The PTT Alert tone repeats
every 1 second until you answer or ignore the call. If you do not
answer an incoming alert within 10 seconds, the PTT call will be
automatically disconnected.
2. Answer or ignore the alert:
To answer the alert, press and hold the Red Side Key/PTT Key
and begin talking.
To ignore the alert, press the Right Soft Key [Ignore].
3. Release the Red Side Key/PTT Key to let the other part y
talk.
4. Press the End/Power Key to end the call.
Push to Talk
67
Page 69

MEDIA CENTER
Media Center provides customizable service right on your handset
that lets you access ringtones, play games, surf the web, get up-to-
the-minute information and more.
You can use Media Center and download applications anywhere on
the Verizon Wireless network, as long as you have a digital signal
available for your handset.
Search
Get free maps and local business listings right on your handset when
you need them. Quickly find nearby services. Directions to local
restaurants, movie theaters and businesses are at your fingertips with
Bing for mobile.
MEDIA CENTER
To search the Internet by using the Microsoft search engine Bing:
1. From idle mode, press the Center Select Key [MENU], select
Media Center, then press the Center Select Key [OK].
2. Press Search.
3. Follow the on-screen prompts.
NOTE
Megabyte charges apply for downloading and use. Downloading
the Bing application will require approximately 1 MB of data.
Music & Tones
You can personalize your phone’s ringtones and download music. You
can select from a wide variety of genres.
68
Page 70

Accessing the Music & Tones submenu
1. From idle mode, press the Center Select Key [MENU], select
Media Center, then press the Center Select Key [OK].
2. Press Music & Tones.
3. Select a submenu.
V CAST Music | Rhapsody/ Get New Ringtones/Get New
Ringback Tones/ My Ringtones/My Music/My Sounds/Sync
Music
V CAST Music with Rhapsody®
V CAST Music with Rhapsody® is a digital music service that lets you
listen to millions of songs from thousands of artists. Discover new and
old favorites in an extensive music catalog. Download
V CAST Music with Rhapsody
your new compatible phone, while managing your existing PC music
library all in one place.
Purchase songs on your V CAST Music with
I
Rhapsody
When you purchase music from your V CAST Music with Rhapsody®
capable device, you also get a second copy that can be downloaded
to your PC from the V CAST Music with Rhapsody
* Per-song charges apply.
®
capable device*
®
to sync tracks, albums, and playlists to
®
software.
1. From idle mode, press the Center Select Key [MENU], select
Media Center, then press the Center Select Key [OK]. Press
Music & Tones, V CAST Music | Rhapsody.
2. Browse and search the V CAST Music catalog, and select the song
you want.
3. To purchase the selected song, press the Center Select Key [Buy].
4. The CONFIRM PURCHASE screen appears with the price and the
title of the song being purchased. To agree to the purchase, press
the Center Select Key [Buy].
MEDIA CENTER
69
Page 71

5. Press the Center Select Key [OK] at the Download now? screen.
Choose to either save the song to phone memory or the memory
card, then press the Center Select Key [OK]. You will be able to
play the saved song by pressing the Left Soft Key [My Music] or
by pressing the Right Soft Key [Play].
NOTE
You may be charged for each track you download. You must be
within the Coverage Area to use V CAST. V CAST may not be
available in all areas.
Get New Ringtones
To connect to MEDIA CENTER and download various ringtones:
1. From idle mode, press the Center Select Key [MENU], select
MEDIA CENTER
Media Center, then press the Center Select Key [OK]. Press
Music & Tones, Get New Ringtones, Get New
Applications.
2. Follow the on-screen prompts to download.
Get New Ringback Tones
VZW Tones Deluxe allows you to browse, preview and download True
Tones. With over 5,000 tones we’ve got the content you want. From
Rap to Hip Hop, Rock to Pop, Alternative to Metal it’s all here. Check
the “Featured”, “What’s Hot” and “What’s New” categories for the
latest hits as content changes each week.
To launch the VZW Tones Deluxe application:
1. From idle mode, press the Center Select Key [MENU], select
Media Center, then press the Center Select Key [OK]. Press
Music & Tones, Get New Ringback Tones.
VZW Tones Deluxe launches.
2. Follow the on-screen prompts.
70
Page 72

NOTE
When you first start the application, you must accept the terms and
conditions to continue into the application. You will only have to do
this once.
My Ringtones
To select a desired ringtone, or download a new ringtone:
1. From idle mode, press the Center Select Key [MENU], select
Media Center, then press the Center Select Key [OK]. Press
Music & Tones, My Ringtones.
2. Scroll to a ringtone. You can select the following options:
Press the Center Select Key [PLAY] to play the ringtone and
•
press the Center Select Key [STOP] to stop playing the ringtone.
Press the Left Soft Key [Set As] to access the following options:
•
Ringtone: A confirmation message appears.
Contact ID: The SET AS CONTACT ID screen appears. Select
the Contact you want to assign the ringtone to, then press the
Center Select Key [OK].
Alert Sounds: Press the corresponding number key to set the
ringtone for one of the following:
All Messages/TXT Message/Multimedia Message/Voicemail/
PTT Alert
Press the Right Soft Key [Options] to access the following
•
options (These options are only available for a downloaded
ringtone.):
Erase: Erases the current ringtone from your phone.
Rename: Allows you to rename the ringtone’s title.
Lock/Unlock: Locks or unlocks the current ringtone in your phone.
Erase All: Erases all the ringtones in your phone.
File Info: Displays information on the selected ringtone.
MEDIA CENTER
71
Page 73

My Music
To play back and manage music stored in your phone’s memory or on
a memory card (sold separately):
1. From idle mode, press the Center Select Key [MENU], select
Media Center, then press the Center Select Key [OK]. Press
Music & Tones, My Music.
2. A Music Library screen will appear with all of the music stored in
your phone’s memor y or on the memory card. Select one of the
following menu options:
Play All/Shuffle/ Songs/ Playlists/Albums/Artists/Genres/Alerts
My Sounds
To select a desired sound:
1. From idle mode, press the Center Select Key [MENU], select
MEDIA CENTER
Media Center, then press the Center Select Key [OK]. Press
Music & Tones, My Sounds.
2. Scroll to a sound, then press the Center Select Key [PLAY] to hear
the sound. Press the Center Select Key [STOP] to stop playing the
sound.
3. Press the Right Soft Key [Options] to access the following options:
For DOWNLOADED or RECORDED SOUNDS:
Send: Sends the selected sound via Picture Message.
To O nli ne Alb um: Uploads the selected sound to Online Album
storage.
Rename: Allows you to rename the sound’s title.
Move: Moves the selected sound to the memory card. (Only when
a memory card is loaded in the phone)
Lock/Unlock: Locks or unlocks the selected sound in your phone.
Erase: Erases the selected sound.
Erase All: Erases all the sounds in your phone.
File Info: Displays information about the selected sound.
For PRELOADED SOUNDS:
72
Page 74

Send: Sends the selected sound via Picture Message.
To O nli ne Alb um: Uploads the selected sound to Online Album
storage.
File Info: Displays information about the selected sound.
Recording New Sounds
I
To record a new sound:
1. From idle mode, press the Center Select Key [MENU], select
Media Center, then press the Center Select Key [OK]. Press
Music & Tones, My Sounds, Record New.
2. Press the Center Select Key [OK] to begin recording. When done,
press the Center Select Key [STOP] to finish recording. The
recording is automatically saved to your My Sounds list.
3. Your recording is saved with a number. To rename your recording,
scroll to it with the Directional Key, then press the Right Soft Key
[Options].
4. Press Rename.
5. Press and hold the Clear Key to erase the number.
6. Enter the new name for your recording, then press the Center
Select Key [OK].
Erase Sound
I
To erase a sound:
1. From idle mode, press the Center Select Key [MENU], select
Media Center, then press the Center Select Key [OK]. Press
Music & Tones, My Sounds.
2. Select the sound you want to erase, then press the Right Soft Key
[Options].
3. Select Erase, then press the Center Select Key [OK]. “Erase
Sound?” will appear on your display.
4. Select Yes and press the Center Select Key [OK]. A confirmation
message appears.
MEDIA CENTER
73
Page 75

NOTE
Your handset comes with 5 preloaded sounds: clapping, crowd
roar, happy birthday, rainforest, and train. These cannot be erased.
Sync your music from your PC to your V CAST Music
with Rhapsody® wireless device
This option allows you to transfer music files from your PC. In order
to use this option, you must install V CAST Music with Rhapsody
your PC.
1. Open V CAST Music with Rhapsody
with Rhapsody
www.verizonwireless.com/music.
®
? Download it for free at
®
. Don’t have V CAST MUSIC
2. Plug in the USB cable (included in box) to your handset and
connect it to a USB port on your PC.
MEDIA CENTER
3. From idle mode, the SYNC MUSIC V CAST MOBILE PHONE display
appears. Your phone should display the message: Connected.
4. Drag and drop the song(s) you want to sync from My Library, to your
V CAST Music with Rhapsody
Once synchronization is complete, press the End/Power Key and
disconnect the USB cable.
®
handset, listed under the Sources tab.
Picture & Video
You can view, take and trade your digital pictures and video right from
your wireless phone.
Accessing the Picture & Video submenu
1. From idle mode, press the Center Select Key [MENU], select
Media Center, then press the Center Select Key [OK].
2. Press Picture & Video.
3. Select a submenu.
V CAST Videos/ Get New Pictures/ My Pictures /My Videos/ Take
Picture/Record Video/Online Album
74
®
on
Page 76

V CAST Videos
Get news and entertainment on your wireless device with streaming
video clips.
NOTE
Application fees may apply. You must be within the Coverage Area
to use V CAST. V CAST may not be available in all areas.
Browsing, Selecting, and Playing Video Clips
I
1. From idle mode, press the Center Select Key [MENU], select
Media Center, then press the Center Select Key [OK]. Press
Picture & Video, V CAST Videos.
2. Select one of the video clip categories.
3. Select the content provider then press the Center Select Key [OK]
to open the selected category.
4. If subcategory selection is allowed, select a subcategory then
press the Center Select Key [OK].
5. After reading the description of the video clip, press the Center
Select Key [VIEW].
6. The Video clip is played in streaming video.
I
Downloading a Video Clip
1. From idle mode, press the Center Select Key [MENU], select
Media Center, then press the Center Select Key [OK]. Press
Picture & Video, V CAST Videos.
2. Browse and search the V CAST Video catalog, and select the video
you want.
3. After reading the description of the video clip, press the Right Soft
Key [Options].
4. Press Save Video and press the Center Select Key [OK].
5. To agree to the charge and proceed, select Yes then press the
Center Select Key [OK].
MEDIA CENTER
75
Page 77

6. Select Phone Memory or Memory Card in Select Storage
Location and press the Center Select Key [OK] to start
downloading the video clip.
7. Af ter download is complete, the message “Download Complete
Play Video Now?” will appear on your phone’s display.
8. Select Yes and press the Center Select Key [OK] to play the video
clip.
9. The video clip is automatically stored in the My Videos folder.
NOTE
There is no guarantee you will be able to download any particular
video clip to your phone.
Deleting Video Clips
I
MEDIA CENTER
1. From idle mode, press the Center Select Key [MENU], select
Media Center, then press the Center Select Key [OK]. Press
Picture & Video, My Videos.
2. Select the video you want to delete, then press the Left Soft Key
[Erase].
3. Select Yes and press the Center Select Key [OK].
Get New Pictures
To connect to MEDIA CENTER and download a variety of Pictures
(images):
1. From idle mode, press the Center Select Key [MENU], select
Media Center, then press the Center Select Key [OK]. Press
Picture & Video, Get New Pictures, Get New
Applications.
The Media Center catalog appears.
2. Follow the on-screen prompts.
76
Page 78

NOTE
The downloaded application will be included in the list displayed
when you access: MENU > Media Center > Picture & Video >
Get New Pictures.
My Pictures
In My Pictures you can view all the pictures you have taken, store
selected images in your phone, send pictures to the Online Album,
delete images and access additional picture options.
1. From idle mode, press the Center Select Key [MENU], select
Media Center, then press the Center Select Key [OK]. Press
Picture & Video, My Pictures.
2. Select your desired picture, then press the Right Soft Key
[Options].
3. Select one of the following options:
Send: Sends the selected picture. (Picture Message/To Online
Album/Via Email/Via Bluetooth)
Set As: Assigns the selected picture to display for specific tasks.
(Wallpaper/Picture ID)
Tak e Pic tur e: Takes a new picture.
Get New Pictures: Downloads various pictures.
Manage Pictures: Allows you to manage the pictures stored in
the My Pictures folder. (Erase/Lock/Unlock/Move To Card/Move To
Phone).
Rename: Allows you to rename the selected picture.
File Info: Displays information about the selected picture. (File
Name/Date/Time/Resolution/Size)
Print Via Bluetooth: Prints the selected picture via Bluetooth
®
MEDIA CENTER
.
77
Page 79

NOTE
Using the Motion Detection function, while displaying a picture you
can display the next picture or the previous picture just by shaking
your handset. For more information on Motion Detection function,
see page 35.
Rotate
I
You can rotate the pictures stored in the My Pictures folder.
NOTES
•
The rotated picture is stored in the My Pictures folder as a
separate file.
Some images cannot be rotated due to copyright protection,
•
image size, or other reasons.
MEDIA CENTER
1. From idle mode, press the Center Select Key [MENU], select
Media Center, then press the Center Select Key [OK]. Press
Picture & Video, My Pictures.
2. Select your desired picture, then press the Center Select Key
[VIEW].
3. Press the Right Soft Key [Options], then press Rotate.
4. Press the Right Soft Key [Rotate(R)] or the Left Soft Key
[Rotate(L)], then press the Center Select Key [SAVE]. The rotated
picture is stored in the My Pictures folder.
I
Zoom
You can zoom into the pictures stored in the My Pictures folder.
NOTE
Only pictures taken with your handset can be zoomed.
78
Page 80

1. From idle mode, press the Center Select Key [MENU], select
Media Center, then press the Center Select Key [OK]. Press
Picture & Video, My Pictures.
2. Select your desired picture, then press the Center Select Key
[VIEW].
3. Press the Right Soft Key [Options], then press Zoom.
4. Press the Right Soft Key [Zoom+] or once zoomed press the Lef t
Soft Key [Zoom-]. Press the Directional Key up, down, left or
right while zooming to scroll the display.
Resize
I
You can resize the pictures stored in the My Pictures folder.
NOTES
The resized picture is stored in the My Pictures folder as a
•
separate file.
Only pictures taken with your handset can be resized.
•
1. From idle mode, press the Center Select Key [MENU], select
Media Center, then press the Center Select Key [OK]. Press
Picture & Video, My Pictures.
2. Select your desired picture, then press the Center Select Key
[VIEW].
3. Press the Right Soft Key [Options], then press Resize.
4. Select one of the following sizes, then press the Center Select Key
[OK].
160 × 120 / 320 × 240 / 640 × 480 / 1280 × 960 / 1600 × 120 0*
* The selectable size depends on the size of the image you are
editing.
The resized picture is stored in the My Pictures folder.
MEDIA CENTER
79
Page 81

Crop
I
You can crop the pictures stored in the My Pictures folder.
1. From idle mode, press the Center Select Key [MENU], select
Media Center, then press the Center Select Key [OK]. Press
Picture & Video, My Pictures.
2. Select your desired picture, then press the Center Select Key
[VIEW].
3. Press the Right Soft Key [Options], then press Crop.
4. Select one of the following sizes, then press the Center Select Key
[OK].
160 × 120 / 120 × 160 / 320 × 240 / 240 × 320 / 640 × 480 / 480 ×
640 / 1280 × 960 / 960 × 1280 / 1600 × 1200*
* The selectable size depends on the size of the image you are
editing.
MEDIA CENTER
5. Select the area to crop by pressing the Directional Key up,
down, left or right and press the Center Select Key [SAVE]. The
cropped picture is stored in the My Pictures folder.
NOTES
•
The cropped picture is stored in the My Pictures folder as a
separate file.
Only pictures taken with your handset can be cropped.
•
I
Erase Picture
1. From idle mode, press the Center Select Key [MENU], select
Media Center, then press the Center Select Key [OK]. Press
Picture & Video, My Pictures.
2. Select the picture you want to erase, then press the Left Soft Key
[Erase]. “Erase Picture from My Pictures and Settings?” will appear
on your display.
3. Select Yes and press the Center Select Key [OK]. A confirmation
message appears.
80
Page 82

Erase All Pictures
I
1. From idle mode, press the Center Select Key [MENU], select
Media Center, then press the Center Select Key [OK]. Press
Picture & Video, My Pictures.
2. Press the Right Soft Key [Options].
3. Press Manage Pictures, Erase.
4. Press the Right Soft Key [Mark All], then press the Left Soft Key
[Done]. “Erase pictures?” will appear on your display.
5. Select Yes and press the Center Select Key [OK]. A confirmation
message appears.
My Videos
In My Videos, you can view all the videos you have taken, store the
selected videos in your phone, send a video to the Online Album,
delete videos, and access additional video options.
1. From idle mode, press the Center Select Key [MENU], select
Media Center, then press the Center Select Key [OK]. Press
Picture & Video, My Videos.
2. Select your desired video, then press the Center Select Key
[PLAY] to play. While the video is playing, use the following keys to
control the video:
Volume Keys : Volume adjustment (lower/higher)
•
Left Soft Key [Mute/Unmute] : Mute/Unmute
•
Right Soft Key [File Info] : Displays information about the video.
•
(Name/Date/Time/Duration/Size)
Center Select Key : Pause/ Play
•
Directional Key ! up: Show full screen view/normal screen view
•
Directional Key down: Stop
•
Directional Key right: Fast Forward (while held down)
•
Directional Key left: Rewind (while held down)
•
MEDIA CENTER
81
Page 83

NOTES
Using the Motion Detection function, while displaying the
•
video thumbnails screen, you can display the next or previous
thumbnails just by shaking your handset. For more information on
Motion Detection function, see page 35.
•
When you press the Right Soft Key [Options] after selecting a
video recorded by your handset in My Videos, you can select the
following options:
Send: Sends the selected video. (Video Message/To Online
Album/Via Bluetooth)
Record Video: Records a new video.
V CAST Videos: Accesses V CAST Videos.
Set As Wallpaper: Sets the selected video as wallpaper.
Manage Videos: Allows you to manage the videos stored in the
MEDIA CENTER
My Videos folder. (Erase/Lock/Unlock/Move To Card/Move To
Phone)
Rename: Allows you to rename the selected video.
File Info: Displays information about the selected video. (Name/
Date/Time/Duration/Size)
View: Switches the view of the video list. (Thumbnail View/List
View)
•
When you select a video downloaded from V CAST Videos,
options different from the above will be displayed.
Erase Video
I
1. From idle mode, press the Center Select Key [MENU], select
Media Center, then press the Center Select Key [OK]. Press
Picture & Video, My Videos.
2. Select the video you want to erase, then press the Left Soft Key
[Erase]. “Erase video from My Videos?” will appear on your
display.
82
Page 84

3. Select Yes and press the Center Select Key [OK]. A confirmation
message appears.
Erase All Videos
I
1. From idle mode, press the Center Select Key [MENU], select
Media Center, then press the Center Select Key [OK]. Press
Picture & Video, My Videos.
2. Press the Right Soft Key [Options].
3. Press Manage Videos, Erase.
4. Press the Right Soft Key [Mark All], then press the Left Soft Key
[Done]. “Erase videos?” will appear on your display.
5. Select Yes and press the Center Select Key [OK]. A confirmation
message appears.
Tak e Pi ctur e
In Take Picture mode, you can take pictures with a picture size up to
2048 × 1536 pixels.
1. From idle mode, press the Center Select Key [MENU], select
Media Center, then press the Center Select Key [OK]. Press
Picture & Video, Take Pict ur e.
2. Press the Directional Key up or down to set the brightness.
3. Press the Directional Key left or right to zoom in or out on the
subject when the resolution is 1600 × 1200, 1280 × 960, 640 ×
480, 320 × 240 or 160 × 120.
4. Press the Right Soft Key [Options] to change the following
settings:
Resolution: Select a picture size. (2048 × 1536, 1600 × 1200,
1280 × 960, 640 × 480, 320 × 240, 160 × 120)
Self Timer: Select the camera’s timer interval. (Off / 3 Seconds / 5
Seconds / 10 Seconds)
Flash: Select a flash setting. (Off/On/Only This Shot)
Brightness: Adjust the brightness level. (–5 to +5)
MEDIA CENTER
83
Page 85

White Balance: Select a white balance setting. (Auto/Sunny/
Cloudy/Tungsten/Fluorescent)
Shutter Sound: Select a shutter sound. (Shutter/Silent)
Color Effects: Select a color effect. (Normal/Black & White/
Negative/Sepia/Green/Aqua)
Multishot: Select whether or not to take four consecutive pictures
at 320 × 240 resolution with a single shot. (Off/On)
Night Mode: Select Night mode. (Off/On).
Viewfinder: Select the main display or front display as the
viewfinder. (Main Display/Front Display)
Memory: Select the location to save the picture. (Phone/Memory
Card)
5. To take the picture, press the Center Select Key [TAKE].
6. Perform one of the following operations:
MEDIA CENTER
•
Press the Left Soft Key [Save] to save the picture in the My
Pictures folder.
•
Press the Center Select Key [SEND] to save the picture in the My
Pictures folder and create a Picture Message.
Press the Right Soft Key [Erase] to shoot again without saving
•
the picture.
NOTES
•
From idle mode, pressing the Camera/Video Key functions as
a hot key to Take Picture.
•
When using the flash, take the Picture within about 14˝ to 20˝ from
the subject.
From Take Picture mode, you can change to Record Video mode
•
by pressing the Camera/Video Key .
84
Page 86

Record Video
In Record Video mode you can record video at 320 × 240 size with
sound.
1. From idle mode, press the Center Select Key [MENU], select
Media Center, then press the Center Select Key [OK]. Press
Picture & Video, Record Video.
2. Press the Directional Key up or down to set the brightness.
3. Press the Directional Key left or right to zoom in or out on the
moving subject.
4. Press the Right Soft Key [Options] to adjust the following settings:
Recording Light: Select a lighting setting. (Off/On/Only This Shot)
Brightness: Adjust the brightness within the range. (– 5 to +5)
White Balance: Select a white balance setting. (Auto/Sunny/
Cloudy/Tungsten/Fluorescent)
Shutter Sound: Adjust the shutter sound setting. (On/Off)
Recording Time: Set the duration limit to 60 Seconds for Video
Message or 60 Minutes for Save.
Call Interruption: Select to block or allow interruption by an
incoming call, alert, etc. while recording. (Allow/Block)
Viewfinder: Select the main display or front display as the
viewfinder. (Main Display/Front Display)
Memory: Select the location to save the video. (Phone/ Memory
Card)
5. To begin recording, press the Center Select Key [REC]. To finish
recording, press the Center Select Key [STOP].
6. Perform one of the following operations:
•
Press the Left Soft Key [Save] to save the video in the My Videos
folder.
Press the Center Select Key [SEND] to save the video in the My
•
Videos folder and create a Video Message.
Press the Right Soft Key [Erase] to record again without saving
•
the video.
MEDIA CENTER
85
Page 87

NOTES
•
From idle mode, pressing and holding the Camera/Video Key
functions as a hot key to Record Video.
•
From Record Video mode, you can change to Take Picture mode
by pressing the Camera/Video Key .
Online Album
To access the Online Album:
1. From idle mode, press the Center Select Key [MENU], select
Media Center, then press the Center Select Key [OK]. Press
Picture & Video, Online Album.
The browser launches, and the Online Album sign-on screen
appears.
2. Follow the on-screen prompts.
MEDIA CENTER
Games
To download games and applications from the MEDIA CENTER server:
1. From idle mode, press the Center Select Key [MENU], select
Media Center, then press the Center Select Key [OK].
2. Press Games, Get New Applications.
3. Choose the software you want from the list displayed on the
screen. Follow the on-screen prompts to download.
Playing Downloaded Games
1. From idle mode, press the Center Select Key [MENU], select
Media Center, then press the Center Select Key [OK].
2. Press Games.
3. Select the application, then press the Center Select Key [PLAY].
4. Follow the on-screen prompts.
86
Page 88

Removing a Downloaded Game
1. From idle mode, press the Center Select Key [MENU], select
Media Center, then press the Center Select Key [OK].
2. Press Games.
3. Select the application you want to delete, then press the Right Soft
Key [Options].
4. Press Erase.
5. Select Yes, then press the Center Select Key [OK] to delete.
NOTE
To remove an application you have subscribed, press Cancel
Subscr. in step 4. This will cancel the subscription and remove the
application.
Mobile Web
Find the news you want or let it come to you. Now, a few seconds is all
it takes to get up-to-the- minute information.
Starting the Mobile Web
1. From idle mode, press the Center Select Key [MENU], select
Media Center, then press the Center Select Key [OK].
2. Press Mobile Web. The browser launches.
NOTE
From idle mode, you can directly access the Mobile Web feature by
pressing the Directional Key ! up.
MEDIA CENTER
Ending a Browser Session
End a Browser session by pressing the End/Power Key.
87
Page 89

Browse & Download
To download tools that can help you navigate to entertainment spots,
restaurants, and provide you with up-to-date weather information:
1. From idle mode, press the Center Select Key [MENU], select
Media Center, then press the Center Select Key [OK].
2. Press Browse & Download.
3. Press Get New Applications. Follow the on-screen prompts.
Extras
To download applications:
1. From idle mode, press the Center Select Key [MENU], select
Media Center, then press the Center Select Key [OK].
2. Press Extras.
3. Press Get New Applications. Follow the on-screen prompts.
MEDIA CENTER
Info
To view App. Memory, Phone Memory, View Log, and Help
information:
1. From idle mode, press the Center Select Key [MENU], select
Media Center, then press the Center Select Key [OK].
2. Press the Right Soft Key [Info].
3. Select one of the following settings, then press the Center Select
Key [OK].
App. Memory/Phone Memory/View Log/Help
VZ Navigator®
Now you can find the address of a great restaurant or the nearest
ATM. Check movie times. Discover the latest hot spots. And know
exactly how to get where you’re going. VZ Navigator puts all the
advanced features of the latest GPS devices and systems on your
wireless device — at a fraction of the price.
88
Page 90

1. From idle mode, press the Center Select Key [MENU], select VZ
Navigator, then press the Center Select Key [OK].
2. Follow the on-screen prompts.
NOTES
To use VZ Navigator, you must set Location to On. See page 155.
•
Download, subscription, and airtime required for use; only in
•
National Enhanced Services Coverage Area; accuracy and
completeness of information is not guaranteed; information about
the location of the device will be used to deliver service.
MEDIA CENTER
89
Page 91

MESSAGING
Accessing the Messaging submenu
1. From idle mode, press the Center Select Key [MENU], select
Messaging, then press the Center Select Key [OK].
2. Select a submenu.
New Message/Messages/ Drafts/Voicemail/Mobile IM/Social
Beat/ Email/Chat
NOTES
•
From idle mode, pressing the Left Soft Key [Message] functions
as a hot key to access the Messaging submenu.
•
When By Contact is selected for Messages View in Message
Settings, pressing the Left Soft Key [Message] displays the
Messages folder if you have a received message(s).
MESSAGING
When By Time is selected for Messages View in Message
•
Settings, the Inbox folder and the Sent folder will appear in the
Messaging submenu instead of the Messages folder.
By Contact is the default setting. If By Time is selected, navigating
the phone’s Messaging menu will be different.
New Message Alert
There are two ways your handset alerts you to new messages:
1. The handset displays a message on the screen.
2. The message icon ( ) appears on the idle screen. In the case of
a high priority message, the
icon will be displayed.
90
Page 92

New Message
Allows you to send messages (Text, Picture, Video, and Voice). Each
message has a destination (Address) and information (Message).
These are dependent upon the type of message you want to send.
NOTE
The voice dictation mode allows you to enter text into the Text
or Subject field of a message, by speaking instead of typing
characters. To use this mode, speak into the handset microphone
while pressing and holding the Voice Commands Key . The
spoken phrases will be converted into text. For more details about
the voice dictation mode, see page 39.
Sending a Text Message
1. From idle mode, press the Center Select Key [MENU], select
Messaging, then press the Center Select Key [OK]. Press
New Message, TXT Message.
2. Enter the phone number or e-mail address of the recipient.
By pressing the Right Soft Key [Add] in the To field you can
choose from the following:
From Contacts: Search for a phone number or e-mail address
which is stored in the Contact List.
Recent Calls: Search for a phone number stored in Recent Calls.
Groups: Search for a group stored in your Contacts.
To Contacts: Stores the phone number in the Contact List.
To PTT Contacts: Stores the phone number in the PTT Contact
List. (This option is available only when the PTT feature is turned
on.)
3. Press the Center Select Key [OK].
4. Type your message.
5. Press the Center Select Key [SEND] to send the message.
A sending screen appears.
MESSAGING
91
Page 93

NOTE
If you send a Text message to a phone without Text capabilities,
you will still be notified that the message was sent, however the
message will not be received.
Sending a Picture Message
1. From idle mode, press the Center Select Key [MENU], select
Messaging, then press the Center Select Key [OK]. Press
NewMessage, Picture Message.
2. Enter the phone number or e-mail address of the recipient.
By pressing the Right Soft Key [Add] in the To field you can
choose from the following:
From Contacts: Search for a phone number or e-mail address
which is stored in the Contact List.
Recent Calls: Search for a phone number stored in Recent Calls.
MESSAGING
Groups: Search for a group stored in your Contacts.
To O nli ne Alb um: Send a picture and/or a sound to Online Album
storage.
To Contacts: Stores the phone number in the Contact List.
To PTT Contacts: Stores the phone number in the PTT Contact List.
(This option is available only when the PT T feature is turned on.)
3. Press the Center Select Key [OK].
4. Type your message in the Text : field.
5. Scroll to the Picture field, then press the Left Soft Key [My Pics].
6. Select the picture you want to include in your message, then press
the Center Select Key [OK].
7. Scroll to and edit any additional fields as desired.
8. Press the Center Select Key [SEND] to send the picture message.
A sending screen appears.
92
Page 94

Sending a Video Message
1. From idle mode, press the Center Select Key [MENU], select
Messaging, then press the Center Select Key [OK]. Press
New Message, Video Message.
2. Enter the phone number or e-mail address of the recipient.
By pressing the Right Soft Key [Add] in the To field you can
choose from the following:
From Contacts: Search for a phone number or e-mail address
which is stored in the Contact List.
Recent Calls: Search for a phone number stored in Recent Calls.
Groups: Search for a group stored in your Contacts.
To O nli ne Alb um: Send a video to Online Album storage.
To Contacts: Stores the phone number in the Contact List.
To PTT Contacts: Stores the phone number in the PTT Contact List.
(This option is available only when the PT T feature is turned on.)
3. Press the Center Select Key [OK].
4. Type your message in the Text : field.
5. Scroll to the Video field and press the Left Soft Key [My Video].
6. Select the video you want to attach to your message, then press
the Center Select Key [OK].
7. Scroll to and edit any additional fields as desired.
8. Press the Center Select Key [SEND] to send the video message.
A sending screen appears.
Sending a Voice Message
1. From idle mode, press the Center Select Key [MENU], select
Messaging, then press the Center Select Key [OK]. Press
New Message, Voice Message.
2. The RECORD NEW screen appears. Press the Center Select Key
[OK] to record a voice message. Press the Center Select Key
[STOP] to finish recording.
MESSAGING
93
Page 95

3. Enter the phone number or e-mail address of the recipient.
By pressing the Right Soft Key [Add] in the To field you can
choose from the following:
From Contacts: Search for a phone number or e-mail address
which is stored in the Contact List.
Recent Calls: Search for a phone number stored in Recent Calls.
Groups: Search for a group stored in your Contacts.
To O nli ne Alb um: Send a voice to Online Album storage.
To Contacts: Stores the phone number in the Contact List.
To PTT Contacts: Stores the phone number in the PTT Contact
List. (This option is available only when the PTT feature is turned
on.)
4. Press the Center Select Key [OK].
5. Type your message in the Te xt: field.
6. Scroll to and edit any additional fields as desired.
MESSAGING
7. Press the Center Select Key [SEND] to send the voice message.
A sending screen appears.
Customizing the Message Using Options
You can customize a new Text Message, Picture Message, Video
Message or Voice Message, by pressing the Right Soft Key [Options]
to access the following features.
NOTE
Available options vary depending on the field you selected or the
types of a message you are sending.
94
Page 96

Inser t Quick Text : Inserts Quick Text into a message.
Add: Allows you to add a Graphic, Animation, Sound, Signature,
Name Card or Contact.
(The Add option only appears for a Text Message. The Signature
option appears only when Signature is set to Custom in Message
Settings and “No” is selected for the confirmation message “Insert
Signature for all Messages?”.)
Preview: Displays the Picture/Video message as it would appear to
the recipient. (This option only appears for a Picture/Video Message)
Review: Plays back the recorded sound to hear the Voice message
as it would be heard by the recipient. (This option only appears for a
Voice Message)
Save As Quick Text: Saves the text to the Quick Text list. Quick Text
can save up to 100 characters per phrase.
Format Text: Allows you to change the look of the text. You can
select the following options: Alignment, Font Size, Font Style, Tex t
Color or Background. (This option only appears for a Text Message)
Save As Draft: Saves the message into the Drafts folder.
Add Slide: Inserts multiple pictures into a message. (This option only
appears for a Picture Message)
Add Signature: Inserts the signature text into a message.
(This option only appears for a Picture/Video/Voice Message, and
only when Signature is set to Custom in Message Settings and “No”
is selected for the confirmation message “Insert Signature for all
Messages?”.)
Priority Level: Assigns a priority to the message. (High/Normal)
Callback #: Inserts a pre-programmed callback number in your
message. (This option only appears for a Text Message)
Remove Picture: Removes the picture from the message.
(This option only appears for a Picture Message)
Remove Sound: Removes the sound from the message.
(This option only appears for a Picture Message)
MESSAGING
95
Page 97

Remove Slide: Removes the slide from the message.
(This option only appears for a Picture Message)
Remove Video: Removes the video from the message.
(This option only appears for a Video Message)
Remove Recording: Removes the recorded voice message.
(This option only appears for a Voice Message)
Cancel Message: Cancels message editing and returns to the
Messaging submenu.
Using Contacts to Send a Message
To select an entry saved in your Contacts as the recipient instead of
manually entering the address:
1. From idle mode, press the Center Select Key [MENU], select
Messaging, then press the Center Select Key [OK]. Press
New Message.
MESSAGING
2. Press TXT Message or Picture Message or
Video Message or Voice Message.
3. Press the Right Soft Key [Add].
4. Press From Contacts.
5. Scroll to the Contact entry containing the destination, then press
the Center Select Key [MARK].
6. Press the Left Soft Key [Done] then press the Center Select Key
[OK] to go to the Text field.
NOTE
You can send a message to up to ten people at a time.
7. Scroll to and edit any additional fields as desired.
8. Press the Center Select Key [SEND] to send the message.
A sending screen appears.
96
Page 98

Messages
Your handset alerts you in the following 3 ways when you receive a
new Text, Picture, Video, or Voice message:
•
By displaying a message notification on the screen.
•
By sounding a beep or vibrating (if Vibrate Mode is set).
•
The message icon
high priority message, the
The Messages menu displays all messages sent and received from a
contact together.
1. From idle mode with the flip open, press the Center Select Key
[MENU], select Messaging, then press the Center Select Key
[OK]. Press Messages.
2. Select a contact. You can select one of the following options:
•
To view a list sorted by time of messages received from or sent to
the selected contact, press the Center Select Key [OPEN].
Then the statuses of all messages in the list are changed to
opened/read.
A new text message can be sent to the selected contact, by
entering text in the text box “Type to send a message” above the
message list and then press the Center Select Key [SEND].
•
To view contents of a message received from or sent to the
selected contact, press the Center Select Key [OPEN], select a
message, then press the Center Select Key [OPEN].
When you press while displaying a message, the handset
reads out the message with a synthetic voice.
•
To reply to the selected contact, press the Left Soft Key [Reply].
You can select one of the following options:
TXT Message/ Picture Message/Video Message/Voice
Message
•
Press the Right Soft Key [Options] to select one of the following
options:
appears on the idle screen. In the case of a
icon will be displayed.
MESSAGING
97
Page 99

Erase: Erases all messages sent to and received from the
selected contact. (All Messages incluing Unread/All Except
Unread Messages)
Add To Contacts: Stores the callback number, e-mail address,
and numbers from the address of the sender/recipient into your
Contacts. (This option is available only if the sender/recipient is
not in your Contacts.)
Add To PTT Contacts: Stores the callback number and
numbers from the address of the sender/recipient into your PT T
Contacts. (This option is available only when the PTT feature is
turned on.)
Manage Messages: Manages the message selected from
all messages sent to and received from the selected contact.
(Erase/Lock/Unlock/Mark as Read/Mark as Unread)
Sort Alphabetically: Temporarily sorts the list of contacts in
MESSAGING
alphabetical order by sender/recipient name. When the list of
contacts is sorted alphabetically, you can search the contact
by entering a name or beginning letters of a name in the Go To
Field at the bottom of the screen. (This option does not appear
when the list of contacts in the Messages folder is displayed in
alphabetical order.)
Sort by Time: Sorts the list of contacts by sent/received time.
(This option does not appear when the list of contacts in the
Messages folder is displayed by time.)
Messaging Menu: Returns to the Messaging submenu.
•
To create a new message, select New Message, then press
the Center Select Key [OK]. You can select one of the following
options:
TXT Message/ Picture Message/Video Message/Voice
Message
98
Page 100

NOTES
While a received message is being displayed, pressing the Send
•
Key will display the list of phone numbers, e-mail addresses, and
URLs included in the message.
Using the list, you can perform the following actions:
Select a phone number to make a call to that number.
Select an e- mail address to store it in the Contact List
Select a URL to access the website.
•
Locked messages cannot be deleted using Erase Messages and
Erase All functions.
•
If Auto Erase Inbox is set to Off, new messages cannot be
received when the storage space becomes full. Even if Auto
Erase Inbox is set to On, new messages cannot be received when
the storage space becomes full, if all messages in Inbox are
unread or locked. In that case, erase unnecessary messages.
Storage space may be affected by the combined size and content
•
of all messages.
Reading out Unread Messages with the Flip Open
The handset reads out unread received messages one after another
for you with the synthetic voice.
1. From idle mode, press and hold the Voice Commands Key .
2. The handset reads out the unread received messages (if any) one
after another. You can perform any of the following operations while
the handset is reading out a message:
•
Press the Directional Key right to go to the next message for
reading.
Press the Directional Key left to go back to the previous
•
message for reading.
Press the Left Soft Key [Again] to go back to the top of the
•
message currently being read.
MESSAGING
99
 Loading...