

Page 1

GETTING READY
GETTING READY
This section contains information about things you need to
know about and do before trying to use the camera.
About This Manual
This section contains information about the conventions
used in this manual.
■ Terminology
The following table defines the terminology used in this
manual.
This term as used in this
manual:
“this camera” or “the
camera”
“file memory”
“batteries”
“charger unit”
Means this:
The CASIO QV-R40 Digital
Camera
The location where the
camera is currently storing
images you record (page 51)
The Rechargeable nickelmetal hydride batteries
The CASIO BC-5H Charger
Unit
■ Button Operations
Button operations are indicated by the button name inside
of brackets ([ ]).
■ On-screen Text
On-screen text is always enclosed by double quotation
marks (“ ”).
■ File Memory
The term “file memory” in this manual is a general term that
refers to the location where your camera is currently storing
the images you record. File memory can be any one of the
following three locations.
• The camera’s built-in Flash memory
• An SD memory card loaded in the camera
• A MultiMediaCard loaded in the camera
For more information about how the camera stores images,
see page 129.
25
Page 2
GETTING READY
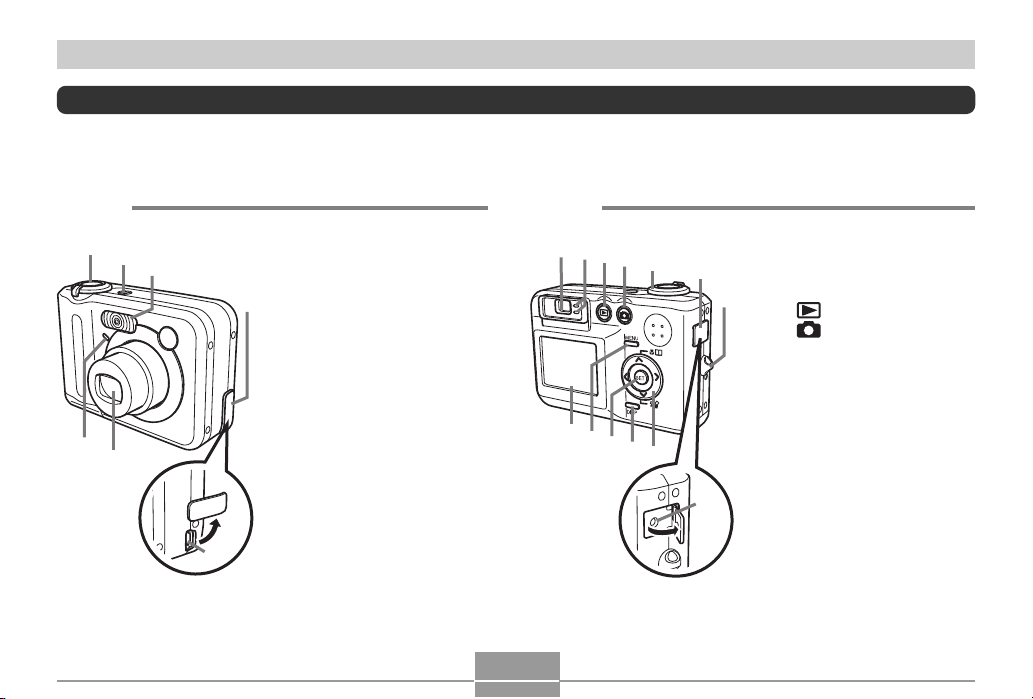
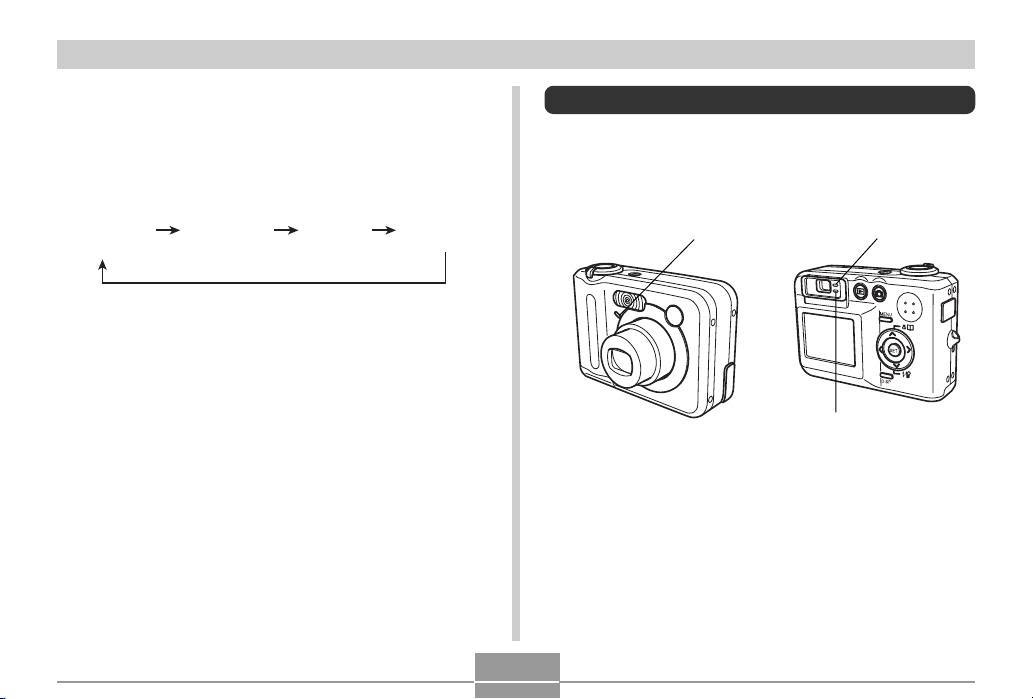
General Guide
The following illustrations show the names of each component, button, and switch on the camera.
■ Front ■ Back
5
1
6
2
3
7
4
1 Shutter release button
2 Power button
3 Flash
4 Terminal cover
5 Self-timer lamp
6 Lens
7 [USB] port
26
8
J
9
I
0
H
A
G
B
F
C
E
8 Viewfinder
9 Operation lamp
D
: [ ] (PLAY mode)
A [ ] (REC mode)
B Zoom controller
C Terminal cover
D Strap ring
E [DC IN 3V] terminal
F [][][][]
G [DISP] button
H [SET] button
I [MENU] button
J Monitor Screen
Page 3
GETTING READY
LK
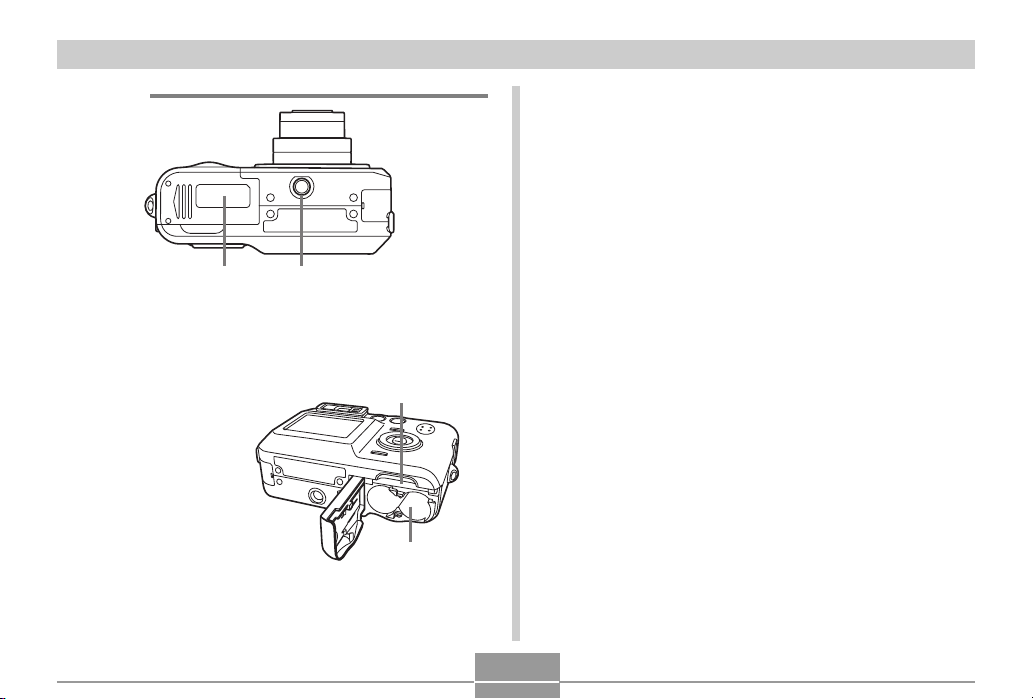
■ Bottom
K Battery compartment cover
L Tripod screw hole
* Use this hole when attaching to a tripod.
M
M Memory card slot
N Battery compartment
N
27
Page 4
GETTING READY
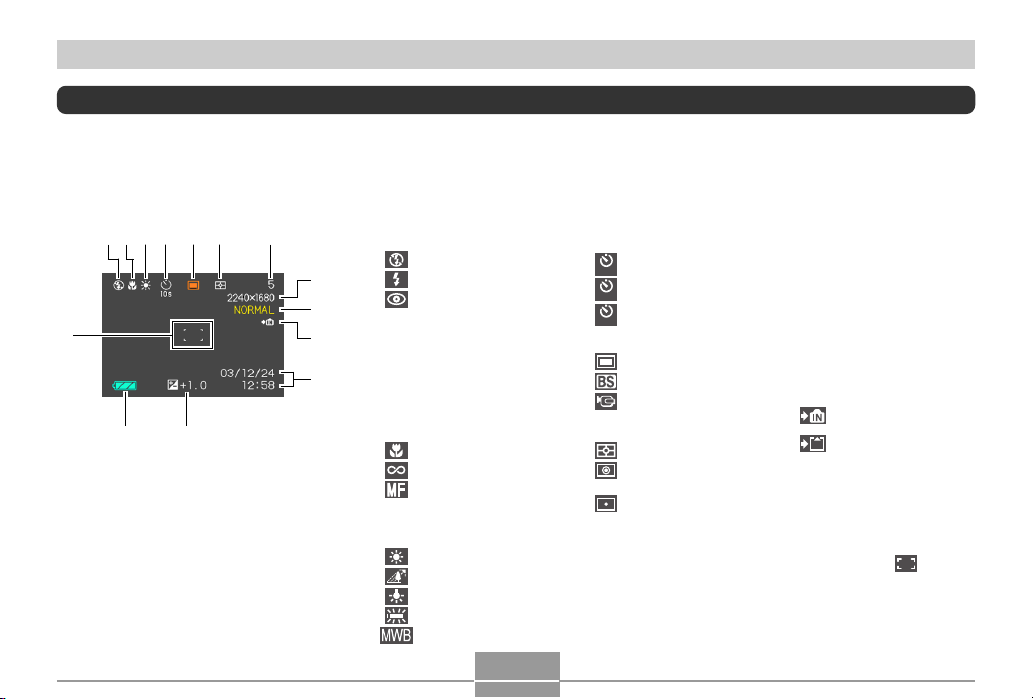
Monitor Screen Contents
The monitor screen uses various indicators and icons to keep you informed of the camera’s status.
REC mode
D
21
57
3 64
BC
1 Flash Mode indicator
None Auto
Flash Off
8
9
0
A
2 Focus Mode indicator
3 White balance indicator
Flash On
Red-eye reduction
• If the camera detects that
flash is required while auto
flash is selected, the flash on
indicator will appear when the
shutter release button is
pressed half way.
None Auto Focus
Macro
Infinity
Manual Focus
None Auto
Sunlight
Shade
Light Bulb
Fluorescent
Manual
28
4
Self-timer
None 1-Image
Self-timer 10 sec
10
s
Self-timer 2 sec
2
s
Triple self-timer
x3
5 REC modes
Snapshot
Best Shot
Movie
6 Metering Mode indicator
Multi-pattern Metering
Center-weighted
Metering
Spot Metering
7 Memory capacity
(Remaining number of
storable images)
8 Image size
2304 ҂ 1712 pixels
2240 ҂ 1680 pixels
1600 ҂ 1200 pixels
1280 ҂ 960 pixels
640 ҂ 480 pixels
Movie Recording: recording
time (seconds)
9 Quality
FINE
NORMAL
ECONOMY
0 Built-in memory selected
for data storage.
Memory card selected
for data storage.
A Date and time
B EV value
C Battery capacity
D Focus frame
• Focusing complete: Green
• Focusing failed: Red
Page 5

GETTING READY
1
5
2
3
4
1 Digital zoom indicator
2 Shutter speed value
• An out of range aperture or shutter speed
causes the corresponding monitor screen
value to turn amber.
3 Aperture value
4 ISO sensitivity
5 Zoom indicator
• Left side indicates optical zoom.
• Right side indicates digital zoom.
29
Page 6
GETTING READY
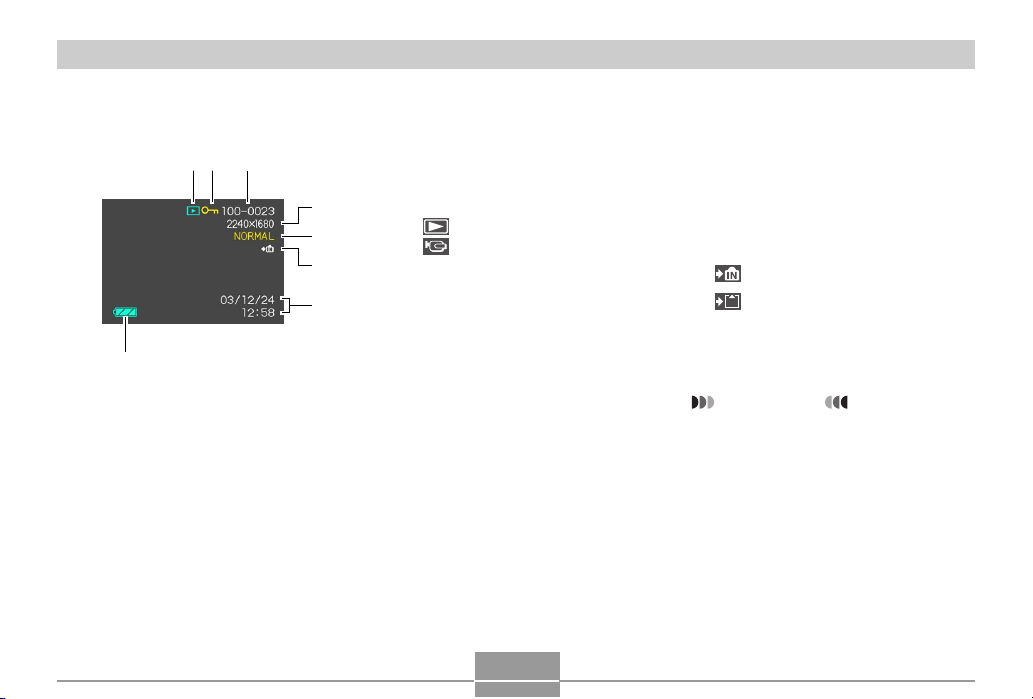
PLAY mode
12
3
8
4
5
6
7
1 PLAY mode file type
Snapshot
Movie
2 Image protection indicator
3 Folder number/File number
4 Image size
2304 ҂ 1712 pixels
2240 ҂ 1680 pixels
1600 ҂ 1200 pixels
1280 ҂ 960 pixels
640 ҂ 480 pixels
30
5 Quality
FINE
NORMAL
ECONOMY
6 Built-in memory selected for data
storage.
Memory card selected for data storage.
7 Date and time
8 Battery capacity
IMPORTANT!
• Some information may not
display properly if you display an
image that was recorded using a
different digital camera model.
Page 7
GETTING READY
Changing the Contents of the Monitor
Screen
Each press of the [DISP] button changes the contents of
the monitor screen as shown below.
Indicators
on
(page 28)
* You cannot turn off the monitor screen in the following modes:
PLAY mode, Best Shot mode, Movie mode.
Histogram
on
(page 82)
Indicators
off
Monitor
screen off
Indicator Lamps
You can find out the operational status of the camera at a
glance by checking the color of the indicator lamps, and
whether a lamp is lit or flashing. For details, see “Indicator
Lamp Reference” on page 164.
*
Green operation lampSelf-timer lamp
Red operation lamp
31
Page 8

GETTING READY
Attaching the Strap
Attach the strap to the strap ring as shown in the
illustration.
IMPORTANT!
• Be sure to keep the strap around your wrist when
using the camera to protect against accidentally
dropping it.
• The supplied strap is intended for use with this
camera only. Do not use it for any other purpose.
• Never swing the camera around by the strap.
Power Requirements
Your camera features a two-way power supply that lets you
use either AA-size batteries or household AC current. A set
of AA-size rechargeable nickel-metal hydride batteries is
supplied with the camera. The other items listed below are
available separately.
■ Batteries
• Two AA-size rechargeable
nickel-metal hydride batteries: HR-3UA
• Proper operation cannot be guaranteed if you use any
other type of battery other than that noted above.
The batteries are not charged when you purchase the
camera. You need to charge batteries before using the
camera for the first time (page 33).
• Two AA-size lithium batteries: FR6
• AA-size alkaline batteries (LR6) can be used if they are
the only option available to you. Note, however, that
alkaline batteries provide about ten minutes or so of
camera operation. Alkaline batteries may not provide any
operation when the temperature is 5˚C (41˚F) or lower.
32
Page 9
GETTING READY
■ Household Current
• AC Adaptor: AD-C30
Charging Batteries
You can use the steps below to charge the rechargeable
nickel-metal hydride batteries (HR-3UA) using the charger
unit (BC-5H) that comes with the camera.
Never try to use the charger unit to charge any other
type of batteries besides the specified rechargeable
nickel-metal hydride batteries (HR-3UA). Attempting to
use it to charge dry cells or other types of rechargeable
batteries creates the risk of battery leakage,
overheating, and explosion.
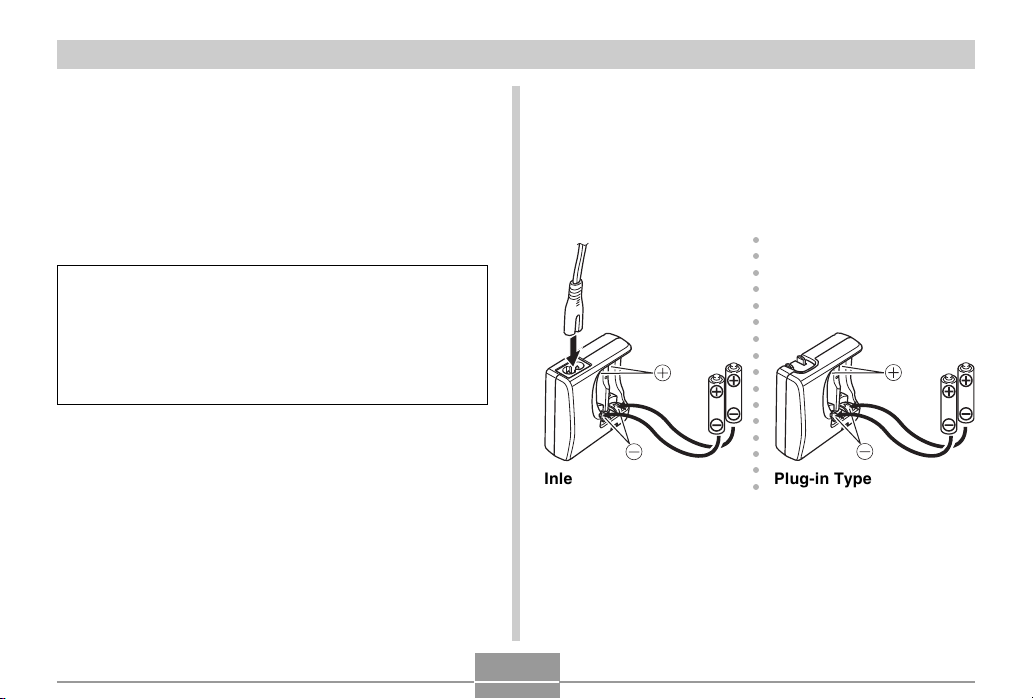
■ To charge the batteries
1.
Positioning the positive and negative
terminals of each battery as shown in the
illustration, attach the batteries to the charger
unit.
33
○○○○○○○○○○○○○○○○
Plug-in TypeInlet Type
Page 10
GETTING READY
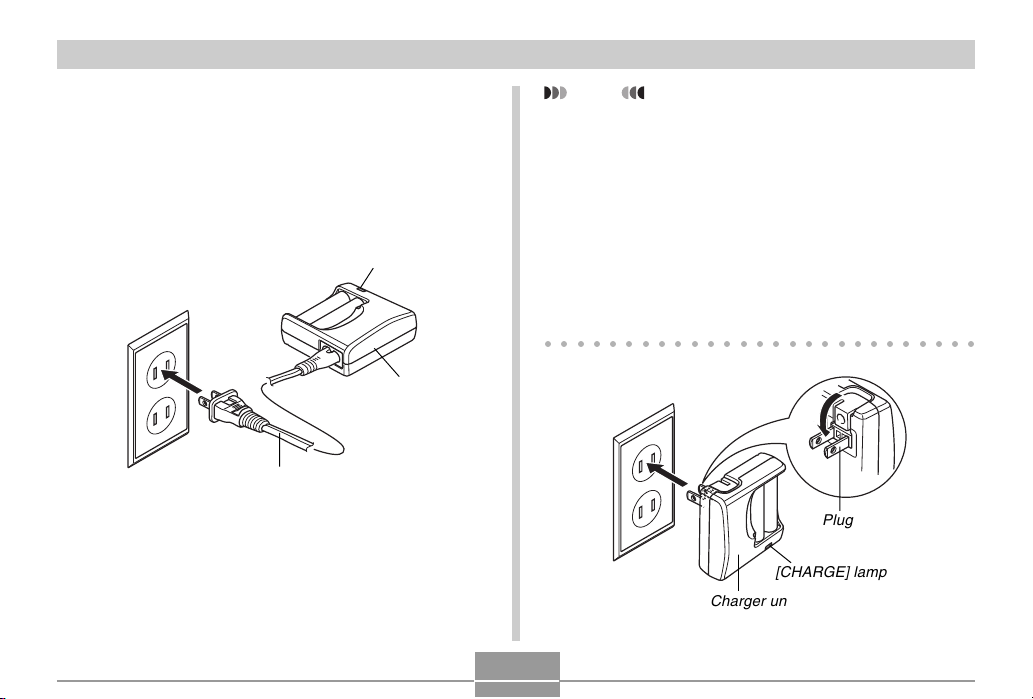
2.
Plug the charger unit into a household power
outlet.
• This will cause the [CHARGE] lamp to light.
• Charging will take about four hours.
• Note that the shape of the charger unit depends on
the area where you purchased the camera.
[CHARGE] lamp
Charger unit
AC power cord
NOTE
• The bundled charger unit is designed for operation
with any power supply in the range of 100V to 240V
AC. Note, however, that the shape of the AC power
cord plug varies according to country or geographic
area. If you plan to use the charger unit in a
geographic area where the power receptacle shape
is different from that in your area, replace the AC
power cord with one of the other ones that comes
with the camera, or purchase a commercially
available AC power cord that is compatible with the
power outlets in that area.
○○○○○○○○○○○○○○○○○○○○○○○○○○○
Plug
[CHARGE] lamp
Charger unit
34
Page 11

GETTING READY
NOTE
• The charger unit is designed for operation on power
ranging from 100V AC to 240V AC. Note, however,
that the shape of the power plug varies according to
country or geographic area. When traveling abroad,
it is up to you to find out if the shape of the charger
unit power plug is compatible with local power outlets
and to purchase any required adapters.
3.
The [CHARGE] lamp will go out when
charging is complete.
4.
After charging is complete, unplug the
charger unit from the power outlet, and
remove the batteries from it.
• Always unplug the charger unit from the power outlet
and remove the batteries whenever you are not
using it for charging.
IMPORTANT!
• If the [CHARGE] lamp starts to flash when you start
a charge operation, it means that charging cannot be
started yet because the surrounding temperature or
the temperature of the charger unit is outside the
range of about 0°C to 40°C (32°F to 104°F).
Charging will start automatically (indicated when the
[CHARGE] lamp stops flashing and remains lit) as
soon as temperature returns to normal.
• Charging batteries while they are still warm
immediately after removing them from the camera
can result in only partial charging. Give batteries time
to cool before charging them.
• Batteries discharge slightly even when they are left
without loading them into the camera. Because of
this, it is recommended that you charge batteries
immediately before you need to use them.
• The rechargeable batteries used with this camera
are specifically designed for use with digital
cameras. If you want to try to use them to power
another type of device, you should first check the
user documentation that comes with the device to
see if they are compatible.
• Though the actual service life of the rechargeable
batteries depends on the environment under which
they are used, you can expect to be able to recharge
them about 500 times before they need replacement.
35
Page 12

GETTING READY
• Charging the camera’s batteries may cause
interference with TV and radio reception. If this
happens, plug the charger into an outlet that is
further away from the TV or radio.
• Dirty charger contacts and/or battery terminals can
make proper charging impossible. Be sure to wipe
contacts and terminals occasionally with a dry cloth
to keep them clean.
■ Charger Unit Precautions
• The charger unit becomes slightly warm during
charging. This is normal and does not indicate
malfunction.
• Unplug the charger unit from the power outlet
whenever you are not using it.
■ Battery Precautions
Precautions During Use
• Use only the charger unit that comes with the camera
to charge the batteries. Never use any other type of
charger unit for charging.
• New batteries are not charged. Be sure to charge the
batteries before using them for the first time.
• Cold tends to shorten battery life, so the amount of
power provided by fully charged batteries may be
shorter in cold areas.
• Charge the batteries in a location where the
temperature is in the range of 10°C to 35°C (50°F to
95°F). Charging outside this temperature range can
cause charging to take longer than normal or even
cause charging to fail.
• Very limited operation following a full charge indicates
that the batteries have reached the end of their service
life. Replace the batteries with new ones.
Storage Precautions
• Though rechargeable nickel-metal hydride batteries
provide high power in a compact configuration, storing
them for long periods while they are charged can cause
batteries to deteriorate.
— Always remove the batteries from the camera when
you are not using it. Leaving batteries in the camera
can cause them to discharge and go dead or even
leak.
— Store batteries in a dry place where the temperature
is 20°C (68°F) or lower.
— If you store batteries for a long time, charge them
two or three times before using them again.
36
Page 13
GETTING READY
■ Optional Batteries
Use of SANYO Electric Co., Ltd. Rechargeable nickelmetal hydride batteries (HR-3UA) is recommended for this
camera. Proper operation cannot be guaranteed when
other brands of rechargeable batteries are used.
IMPORTANT!
• Never mix two batteries of different brands, ages, or
charge levels. Doing so creates the risk of shortened
battery life and can even damage the camera.
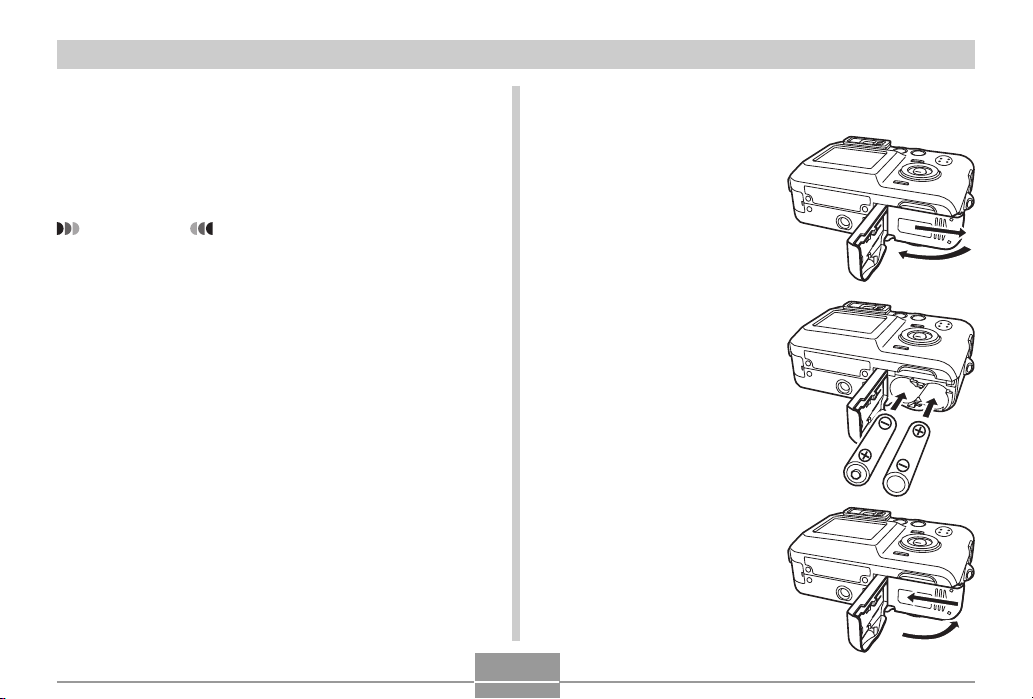
To load batteries
1.
Turn off the camera.
2.
Slide the battery
compartment cover on
the bottom of the
camera in the direction
indicated by the arrow
and then swing it open.
3.
Load batteries as
shown in the
illustration.
4.
While pressing down at
the point indicated by
the arrow in the
illustration, slide the
battery compatment
cover closed.
37
Page 14

GETTING READY
IMPORTANT!
• Use only the included rechargeable nickel-metal
hydride batteries or the specified type of AA-size
batteries.
To remove the batteries from the camera
1.
Slide the battery
compartment cover on
the bottom of the
camera in the direction
indicated by the arrow
and then swing it open.
2.
Carefully tilt the
camera until the
batteries slide out.
• Take care to avoid
dropping the batteries.
■ Low Battery Indicator
The following shows how the battery capacity indicator on
the monitor screen changes as battery power is used. The
indicator means that remaining battery power is low.
Note that you will not be able to record images while the
battery indicator is . Immediately replace or charge the
batteries whenever either of these indicators appears.
Charge Level High Low
Indicator
38
Page 15

GETTING READY
■ Battery Life Guidelines
The battery life guideline values given below indicate the
approximate amount of time at a standard temperature of
23°C (73°F) until power automatically turns off due to
battery failure. They do not guarantee that the batteries will
provide the amount of service indicated. Low temperatures
and continued use reduce battery life.
Type of Operation
AA-size
Rechargeable Ni-MH
Batteries HR-3UA
AA-size Lithium
Batteries FR6
Number of Shots*
(Recording Time)
220 shots (110 minutes)
180 shots (90 minutes)
1
• AA-size alkaline batteries (LR6) can be used if they are
the only option available to you. Note, however, that
alkaline batteries provide about ten minutes or so of
camera operation. Alkaline batteries may not provide any
operation when the temperature is 5˚C(41˚F) or lower.
Continuous
Playback*
230 minutes
290 minutes
2
• The above approximate guidelines are based on the
following battery types:
Rechargeable Nickel-Metal Hydride
: HR-3UA SANYO Electric Co., Ltd.
Lithium : Energizer
* Battery life varies with brand.
*1 Number of Shots
• Normal temperature: 23° C (73°F)
• Monitor Screen: On
• Zoom operation between full wide to full telephoto
every 30 seconds, during which two images are
recorded, one image with flash; power turned off and
back on every time 10 images are recorded.
*2 Continuous Playback Conditions
• Normal temperature: 23°C (73°F)
• Scroll one image about every 10 seconds
• The above values are based on new batteries starting from
a full charge. Repeated charging shortens battery life.
• Battery life is greatly affected by how much you use flash,
zoom and other functions, and how long you leave power
turned on.
• The following shows approximate battery life for
continuous recording while flash is off, when power is not
turned off.
AA-size rechargeable nickel-metal hydride batteries (HR3UA): 660 shots (110 minutes)
39
Page 16

GETTING READY
■ Tips to Make the Batteries Last Longer
• If you do not need the flash while recording, select
(flash off) for the flash mode (page 58).
• Enable the Auto Power Off and the Sleep features (page
44) to protect against wasting battery power when you
forget to turn off the camera.
■ Alkaline Battery Life
The actual life of alkaline batteries is affected by a variety
of factors, including the battery manufacturer, the amount
of time the batteries spend in storage before you use them,
temperature while you are recording, and photographic
conditions. As a rule, we recommend the use of
rechargeable nickel-metal hydride batteries, which have
longer lives than alkaline batteries.
AA-size alkaline batteries (LR6): 20 shots (10 minutes)
*1 Number of Shots
• Normal temperature: 23° C (73°F)
• Monitor Screen: On
• Zoom operation between full wide to full telephoto
every 30 seconds, during which two images are
recorded, one image with flash; power turned off and
back on every time 10 images are recorded.
• Alkaline batteries may not provide any operation when
the temperature is 5°C (41°F) or lower.
40
Page 17

GETTING READY
■ Battery Handling Precautions
Misuse of batteries can cause them to leak or explode,
which damages and corrodes the area around the batteries
and creates the danger of fire and personal injury. Make
sure you observe the following precautions when using
batteries.
• When loading batteries, make sure their positive (+) and
negative (–) ends are facing correctly.
• Never mix new batteries with old ones.
• Never mix batteries of different brands.
• Use only the batteries that are specified for this camera.
• Never try to take batteries apart and always take care to
avoid conditions where their two ends can become
connected to each other (shorting). Never expose
batteries to heat or throw them into fire.
• Dead batteries are susceptible to leakage, which can
cause serious damage to your camera. Remove batteries
from the camera as soon as you notice they are dead.
• Remove batteries from the camera if you do not plan to
use it for more than two weeks.
• The batteries that power the camera normally become
warm as you use them.
Using AC Power
You need to purchase the optionally available AC adaptor
(AD-C30) in order to be able to power the camera using AC
power.
1.
Connect the AC power cord to the AC
adaptor.
Terminal cover
[DC IN 3V]
AC adaptor
AC power cord
Plug
41
Page 18

GETTING READY
2.
Open the camera’s terminal cover and
connect the AC adaptor to the port marked
[DC IN 3V].
3.
Plug the AC power cord into an electrical
outlet.
NOTE
• The AC adaptor can be used with any power source
rated from 100V to 240V AC. If you plan to use the
AC adaptor in another country, it is up to you to
purchase the applicable AC power cord that matches
the configuration of power receptacles in that
country.
■ AC Adaptor Precautions
• Be sure to turn off power before connecting or
disconnecting the AC adaptor.
• Always turn camera power off before disconnecting the
AC adaptor, even if the camera has batteries installed. If
you don’t, the camera will turn off automatically when you
disconnect the AC adaptor. You also run the risk of
damaging the camera whenever you disconnect the AC
adaptor without first turning power off.
• The AC adaptor may become warm to touch after
extended periods of use. This is normal and is not cause
for alarm.
• After using the camera, turn it off and unplug the AC
adaptor from the AC outlet.
• The camera automatically switches over to AC adaptor
powered operation whenever the AC adaptor is plugged
into the camera.
• Always use the AC adaptor to power the camera
whenever it is connected to a computer.
• Never place a blanket or any other cover on the AC
adaptor. Doing so creates the risk of fire.
42
Page 19

GETTING READY
Turning the Camera On and Off
■ To turn on the camera
Press the power button, [ ] (REC) button, or [ ] (PLAY)
button. This will cause the green operation lamp to light
momentarily, and then power will turn on. The mode the
camera enters depends on which button you pressed to
turn it on.
To enter this mode at
startup:
REC
PLAY
Power button
Press this button to turn on the camera:
Power button or [ ] (REC) button
[
] (PLAY) button
Green operation lamp
[ ] (PLAY)
[ ] (REC)
IMPORTANT!
• If camera power is turned off by the Auto Power Off
feature, press the power button, [ ] (REC) or [ ]
(PLAY) to turn it back on again.
• Pressing the power button or [ ] (REC) to turn on
the camera also causes the lens to extend. Take
care to any interference with the lens operation or
allowing anything to strike the lens when it is
extended.
■ To turn off the camera
Press the power button to turn off the camera.
43
Page 20

GETTING READY
Configuring Power Saving Settings
You can configure the settings described below to
conserve battery power.
Sleep : Automatically turns off the monitor screen
Auto Power Off : Turns off power if you do not perform any
1.
Turn on the camera.
2.
Press [MENU].
3.
Use [] and [] to select the “Set Up” tab.
4.
Use [] and [] to select the feature whose
setting you want to configure, and then press
[].
if no operation is performed for a specified
amount of time in the REC mode.
Performing any button operation causes
the monitor screen to turn back on.
operation for a specified amount of time.
● See page 45 for information about how to use
menus.
To configure this feature: Select this setting:
Sleep Sleep
Auto Power Off Auto Power Off
5.
Use [] and [] to change the currently
selected setting, and then press [SET].
• Available Sleep settings are: “30 sec”, “1 min”, “2 min”,
and “Off”.
• Available Auto Power Off settings are: “2 min” and
“5 min”.
• Note that the Sleep feature does not operate in the
PLAY mode.
• Pressing any button while the camera is in the Sleep
state immediately turns the monitor screen back on.
• The Auto Power Off and Sleep features are disabled
in the following cases.
— When the camera is connected to a computer or
some other device through the USB cable
44
Page 21

GETTING READY
Using the On-screen Menus
Pressing [MENU] displays menus on the monitor screen
that you can use to perform various operations. The menu
that appears depends on whether you are in the REC
mode or the PLAY mode. The following shows an example
menu procedure in the REC mode.
1.
Press the power button or the [ ] (REC)
button.
• If you want to enter the PLAY mode instead, press
the [ ] (PLAY) button.
[ ]
[ ]
Power button
2.
Press [MENU].
[][
[MENU]
[SET]
][][
Tab
]
Settings
Selection cursor
(indicates the
currently selected
item)
45
Page 22

GETTING READY
● Menu Screen Operations
When you want to do this:
Move between tabs
Move from the tab to the
settings
Move from the settings to
the tab
Move between the settings
Display the options
available for a setting
Select an option
Register an option
selection and exit the menu
screen
Register an option
selection and return to the
menu screen
Exit the menu screen
Do this:
Press [] and [].
Press [].
Press [].
Press [] and [].
Press [] or press [SET].
Press [] and [].
Press [SET].
Press [].
Press the [MENU] button.
46
3.
Press [] or [] to select the tab you want,
and then press [SET] to move the selection
cursor from the tab to the settings.
4.
Use [] and [] to
select the feature
whose setting you
want to configure,
and then press [].
• Instead of pressing [],
you could also press
[SET].
5.
Use [] and [] to change the currently
Example: To select the
“REC Mode”
item.
selected setting.
Page 23

GETTING READY
6.
Perform one of the following operations to
apply the setting you configured.
To do this:
Apply the setting and exit
the menu screen.
Apply the setting and
return to feature selection
in step 4.
Apply the setting and
return to tab selection in
step 3.
• See “Menu Reference” on page 162 for more information
about menus.
Perform this key operation:
Press [SET].
Press [].
1. Press [].
2. Use [] to move back up to
tab selection.
Configuring Display Language and Clock
Settings
Be sure to configure the following settings before using the
camera to record images.
• Display language
• Home city
• Date Style
• Date and time
Note that the current date and time settings are used by
the camera to generate the date and time that are stored
along with image data, etc.
47
Page 24

GETTING READY
IMPORTANT!
• The camera’s clock settings are cleared whenever
power is totally cut off. This can happen if the
batteries go dead while the camera is not being
supplied power by the AC adaptor. The clock setting
screen will appear automatically the next time you
turn on power after the settings are cleared. Set the
date and time before using the camera.
• The current date and time settings will be cleared if
the batteries remain dead without being charged for
about two days.
• Recording images without configuring the clock
settings causes incorrect time information to be
registered. Be sure to configure the clock settings
before using the camera.
To configure display language and clock
settings
1.
Press the power button, the [ ] (REC) or the
[ ] (PLAY) button to turn on the camera.
2.
Use [], [], [], and
[] to select the
language you want,
and then press [SET].
: Japanese
English : English
Français : French
Deutsch : German
Español : Spanish
Italiano : Italian
Português : Portuguese
: Chinese (Complex)
: Chinese (Simplified)
: Korean
48
Page 25

GETTING READY
3.
Use [], [], [], and
[] to select the
geographical area
where you live, and
then press [SET].
4.
Use [] and [] to
select the name of the
city where you live,
and then press [SET].
5.
Use [] and [] to select the summer time
(DST) setting you want, and then press [SET].
6.
Use [] and [] to
change the date format
setting, and then press
[SET].
Example: October 23, 2003
To display the date like this:
03/10/23
23/10/03
10/23/03
7.
Set the current date
and the time.
Select this format:
YY/MM/DD
DD/MM/YY
MM/DD/YY
When you want to do this:
Keep time using summer time
(Daylight Saving Time)
Keep time using standard time
Select this setting:
On
Off
49
To do this:
Change the setting at the current
cursor location
Move the cursor between settings
Toggle between 12-hour and 24-
hour timekeeping
Do this:
Press [] and [].
Press [] and [].
Press [DISP].
Page 26

GETTING READY
8.
Press [SET] to register the settings and exit
the setting screen.
50
Page 27

BASIC IMAGE RECORDING
1200
1600
NORMAL
99
24
12
58
BASIC IMAGE RECORDING
This section describes the basic procedure for recording an
image.
Recording an Image
Your camera automatically adjusts shutter speed in
accordance with the brightness of the subject. Images you
record are stored in the camera’s built-in memory, or to a
memory card if you have one loaded in the camera.
• When an optionally available SD memory card or
MultiMediaCard (MMC) is loaded in the camera, images
are stored on the card (page 129).
1.
Press the power button or the [ ] (REC)
button to turn on the camera.
[ ]
Power button
51
• This causes an image or a message to appear on
the monitor screen.
• This enters the REC mode for image recording.
• If the camera is in the PLAY mode when it turns on,
the message “There are no files” will appear if you do
not have any images stored in memory yet. In
addition, the icon will be visible at the top of the
display. If this happens, press [ ] (REC) to enter
the REC mode.
2.
Compose the image
on the monitor screen
so the main subject is
within the focus
frame.
• The focusing range of
the camera in the Auto
Focus mode is
approximately 60cm
(2´) to infinity (∞) (page
65).
• You can compose images using either the monitor
screen or the optical viewfinder (page 55).
• When using the optical viewfinder to compose
images, you can use the [DISP] button to turn off the
monitor screen and conserve battery power.
Focus frame
1200
1600
NORMAL
0303/1212/24
:
12
99
IN
58
Page 28

BASIC IMAGE RECORDING
3.
Press the shutter release
button half way to focus the
image.
• When you press the shutter
release button half way, the
camera’s Auto Focus feature
automatically focuses the image,
and displays the shutter speed
and aperture values.
• You can tell whether the
image is focused by
observing the focus frame
and the green operation
lamp.
Shutter release
button
Green operation lamp
● Operation Lamp and Focus Frame Operation
When you see this:
Green focus frame
Green operation lamp
Red focus frame
Flashing green operation lamp
It means this:
The image is in focus.
The image is not in focus.
• Make sure you are not
blocking the lens or the
flash with your fingers
while recording an
image.
Lens
52
Flash
Page 29

BASIC IMAGE RECORDING
4.
After making sure that the
image is focused properly,
press the shutter release
button the rest of the way
down to record.
• The number of images that can
be stored in memory depends on
the resolution setting you are
using (page 172).
• Press the shutter release button gently to avoid
camera movement.
Shutter release
button
Recording Precautions
• Never open the battery compartment cover while the
green operation lamp is flashing. Doing so not only
causes the current image to be lost, it can also corrupt
images already stored in file memory and even lead to
malfunction of the camera.
• Never remove the memory card while an image is being
recorded to the memory card.
• Fluorescent lighting actually flickers at a frequency that
cannot be detected by the human eye. When using the
camera indoors under such lighting, you may experience
some brightness or color problems with recorded images.
• When “Auto” is selected for the ISO sensitivity setting
(page 84), the camera automatically adjusts its sensitivity
in accordance with the brightness of the subject. This can
cause some static noise to appear in images of relatively
dark subjects.
• When recording a dimly lit subject while “Auto” is selected
for the ISO sensitivity setting (page 84), the camera
increases sensitivity and uses a slower shutter speed.
Because of this, you need to guard against camera
movement if you have flash turned off (page 58).
• If unwanted light is shining on the lens, shade the lens
with your hand when recording the image.
53
Page 30

BASIC IMAGE RECORDING
About Auto Focus
• Auto Focus tends not to work well if the camera is moved
during recording, or when recording the types of subjects
listed below.
— Solid color walls or objects with little contrast
— Strongly backlit objects
— Polished metal or other brightly reflective objects
— Venetian blinds or other horizontally repeating patterns
— Multiple images that are varying distances from the
camera
— Subjects in poorly lit areas
— Moving subjects
• Note that a green operation lamp and focus frame do not
necessarily guarantee that an image is in focus.
• If Auto Focus does not produce the results you want for
some reason, try using focus lock (page 69) or manual
focus (page 68).
About the REC Mode Monitor Screen
• The image shown on the monitor screen in the REC
mode is a simplified image for composing purposes. The
actual image is recorded in accordance with the image
quality setting currently selected on your camera. The
image saved in file memory has much better resolution
and detail than the REC mode monitor screen image.
• Certain levels of subject brightness can cause the
response of the REC mode monitor screen to slow down,
which causes some static noise in the monitor screen
image.
54
Page 31

BASIC IMAGE RECORDING
Using the Optical Viewfinder
You can conserve battery power by turning off the
camera’s monitor screen (page 31) and using the optical
viewfinder to compose images.
Viewfinder frameShort distance
to subject
IMPORTANT!
• The frame that is visible inside of the viewfinder
indicates the image recorded at a distance of about
one meter (3.3´). When the subject is closer than one
meter, the recorded image will be different from what
you see inside the viewfinder frame.
• The monitor screen turns on automatically whenever
you select the Macro mode or Manual Focus mode.
Always use the monitor screen to compose images
in these modes.
Using Zoom
Your camera is equipped with two types of zoom: optical
zoom and digital zoom.
Optical Zoom
The range of the optical zoom factor is shown below.
Optical Zoom
Factor Range: 1X to 3X
1.
In the REC mode, slide the
(1X to 1.2X in the Macro Mode)
zoom controller left or
right to change the zoom
factor.
To do this:
Zoom out
Zoom in
Slide the zoom controller in this direction:
(Wide Angle)
(Telephoto)
55
Zoom Controller
Page 32

BASIC IMAGE RECORDING
Zoom out Zoom in
2.
Compose the image, and then press the
shutter release button.
Digital Zoom
Digital zoom is activated after you reach the maximum
optical zoom factor (3X). It enlarges the part of the image
at the center of the image screen. The range of the digital
zoom factor is shown below.
Digital Zoom Factor Range: 3X to 9.6X
1.
In the REC mode, press [MENU].
(in combination with optical
zoom)
NOTES
• The optical zoom factor also affects the lens
aperture.
• Use of a tripod is recommended to protect against
hand movement when using the telephoto setting
(zoom in).
56
2.
Use [] and [] to select the “REC” tab.
3.
Use [] and [] to select “Digital Zoom”, and
then press [].
4.
Select “On”, and then press [SET].
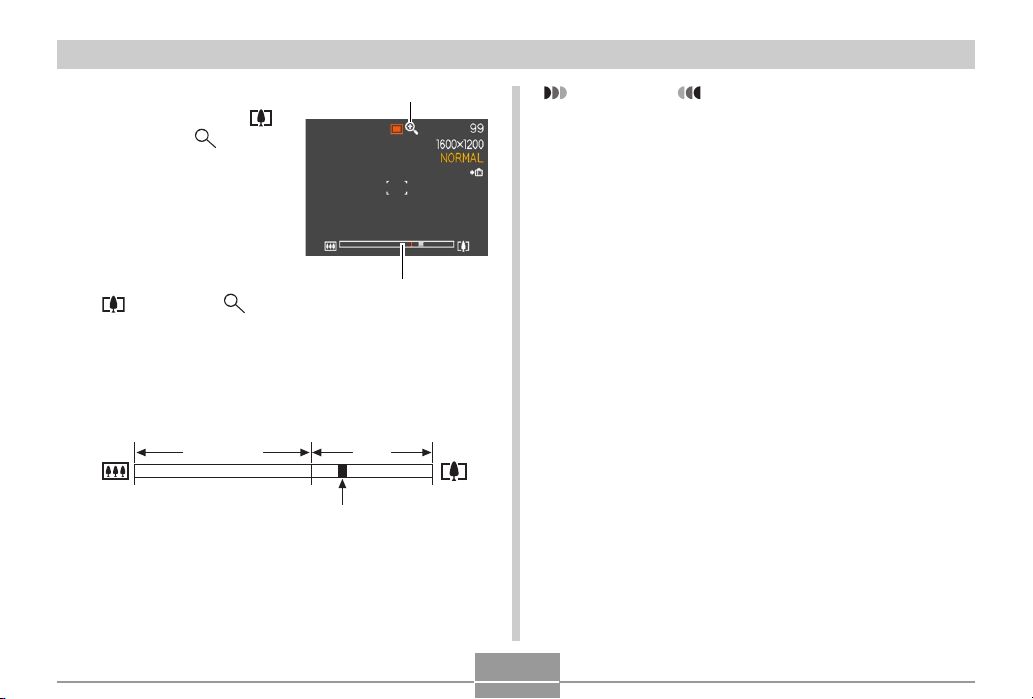
• Selecting “Off” disables digital zoom.
Page 33
BASIC IMAGE RECORDING
5.
Slide the zoom
Digital zoom indicator
controller towards
(Telephoto)/ to
change the zoom
factor.
• When zoom reaches
maximum optical zoom,
it stops momentarily.
Keep the zoom
controller pressed to the
(Telephoto)/ side
and zoom will switch
over to digital zoom.
• Switching to digital zoom causes the zoom indicator
to appear on the monitor screen. The zoom indicator
shows the current approximate zoom factor.
Optical Zoom
1x 3x 9.6x
6.
Compose the image, and then press the
Current zoom factor
Zoom indicator
Digital
Zoom
shutter release button.
IMPORTANT!
• Digital zoom is disabled whenever the monitor
screen is turned off (page 31).
• Using digital zoom can cause degradation of the
recorded image.
57
Page 34

BASIC IMAGE RECORDING
Using the Flash
Perform the following steps to select the flash mode you
want to use.
1.
In the REC mode, press [MENU].
2.
Press [] ( ) to select
the flash mode.
• Each press of [] ( )
cycles through the flash
mode settings shown below
on the monitor screen.
[
] ( )
Flash mode indicator
58
To do this:
Have the flash fire automatically when
required (Auto Flash)
Turn off the flash (Flash Off)
Always fire the flash (Flash On)
Fire a pre-flash followed by image
recording with flash, reducing the
chance of red-eye in the image (Redeye reduction)
In this case, the flash fires automatically
when required
3.
Record the image.
IMPORTANT!
• The flash unit of this camera fires a number of times
when you record an image. The initial flashes are
pre-flashes, which the camera uses to obtain
information that it uses for exposure settings. The
final flash is for recording. Make sure that you keep
the camera still until the shutter releases.
• Image recording may not be performed if you press
the shutter release button while the red operation
lamp is flashing.
Select this setting:
None
Page 35

BASIC IMAGE RECORDING
■ About Red-eye Reduction
Using the flash to record at night or in a dimly lit room can
cause red spots inside the eyes of people who are in the
image. This is caused when the light from the flash reflects
off of the retina of the eye. When red-eye reduction is
selected as the flash mode, the camera performs two preflash operations, one designed to cause the irises in the
eyes of any people in the image to close, and one for the
Auto Focus operation. This is followed by another flash
operation for actual recording of the image.
IMPORTANT!
Note the following important points when using redeye reduction.
• Red-eye reduction does not work unless the people
in the image are looking directly at the camera during
the pre-flash. Before pressing the shutter release
button, call out to the subjects so they all look at the
camera while the pre-flash operation is performed.
• Red-eye reduction may not work very well if the
subjects are located far away from the camera.
Flash Unit Status
You can find out the current flash unit status by pressing
the shutter release button half way and checking the
monitor screen and red operation lamp.
The indicator is also
shown on the monitor
screen when the flash
unit is ready to fire.
Red operation lamp
* Red operation lamp
When the red operation
lamp is this:
Flashing
Lit
It means this:
Flash unit is charging
Flash unit is ready to fire
59
*
Page 36

BASIC IMAGE RECORDING
Changing the Flash Intensity Setting
Perform the following steps to change the flash intensity
setting.
1.
In the REC mode, press [MENU].
2.
Use [] and [] to select the “REC” tab.
3.
Use [] and [] to select “Flash Intensity”,
and then press [].
4.
Select the setting you want, and then press
[SET].
To do this:
Fire the flash with strong intensity
Fire the flash with normal intensity
Fire the flash with weak intensity
• Flash intensity may not change if the subject is too
far or too close to the camera.
Select this setting:
Strong
Normal
Weak
Flash Precautions
Take care that your fingers do
not block the flash when you
hold the camera. Covering the
flash with your finger can
greatly reduce its
effectiveness.
• You may not be able to achieve the desired results using
a flash if the subject is too close or too far away.
• The flash takes anywhere from a few seconds to as long
as 10 seconds to attain full charge after being fired. The
actual time required depends on the battery level,
temperature, and other conditions.
• The flash does not fire in the Movie mode. This is
indicated by (Flash Off) on the monitor screen.
• The flash unit may not be able to charge when battery
power is low. Low battery power is indicated by (Flash
Off) on the monitor screen, and when the flash fails to fire
properly resulting in poor image exposure. When these
symptoms occur, charge the camera’s batteries as soon
as possible.
• When the red-eye reduction mode ( ) is selected, flash
intensity is adjusted automatically in accordance with the
exposure. The flash may not fire at all when the subject is
brightly lit.
Flash
60
Page 37

BASIC IMAGE RECORDING
• White balance is fixed while the flash is being used, so
sunlight, fluorescent lighting, or other sources of
illumination in the immediate area may affect the coloring
of the recorded image.
Using the Self-timer
The self-timer lets you select either a 2-second or 10second delay of the shutter release after you press the
shutter release button. A Triple Self-timer feature lets you
perform three consecutive self-timer operations to record
three images.
1.
In the REC mode, press [MENU].
2.
Use [] and [] to select the “REC” tab.
3.
Use [] and [] to select “Self-timer”, and
then press [].
4.
Use [] and [] to select the self-timer time
you want to use, and then press [SET].
• Selecting “Off” in step 4 disables the self-timer.
61
Page 38

BASIC IMAGE RECORDING
To do this:
Specify a 10-second self-timer
Specify a 2-second self-timer
Specify Triple Self-timer
Disable the self-timer
Select this setting:
10 sec
2 sec
X3
Off
• With the Triple Self-timer, the camera records a
series of three images in the sequence described
below.
1. The camera performs a 10-second countdown
and then records the first image.
2. The camera prepares to record the next image.
The amount of time required for preparation
depends on the camera’s current “Size” and
“Quality” settings, the type of memory (built-in or
card) you are using for image storage, and
whether or not the flash is charging.
3. After preparation is complete, the indicator “1sec”
appears on the monitor screen, and another
image is recorded one second later.
4. Steps 2 and 3 are repeated once more to record
the third image.
62
5.
Record the image.
Self-timer lamp
• When you press the
shutter release button,
the self-timer lamp
flashes and the shutter
releases after the selftimer reaches the end
of its countdown.
• You can interrupt an
ongoing self-timer
countdown by pressing
the shutter release
button while the selftimer lamp is flashing.
NOTES
• The “2 sec” self-timer setting is best when shooting
with a slow shutter speed, because it helps to avoid
blurring of images due to hand movement.
• In the case of the Triple Self-timer, the indicator
“1sec” appears on the monitor screen between the
recording of each image, indicating an interval of
about one second between image recording. The
actual amount of time required between images
depends on the camera’s current “Size” and “Quality”
settings, as well as the type of memory being used
and whether or not the flash is being used.
Page 39

BASIC IMAGE RECORDING
Specifying Image Size and Quality
You can specify the image size and image quality to suit
the type of image you are recording.
To specify the image size
1.
In the REC mode, press [MENU].
2.
Use [] and [] to select the “REC” tab.
3.
Use [] and [] to select “Size”, and then
press [].
4.
Use [] and [] to select the setting you
want, and then press [SET].
2304 x 1712 : 2304 x1712 pixels
2240 x 1680 : 2240 x1680 pixels
1600 x 1200 : 1600 x1200 pixels
1280 x 960 : 1280 x 960 pixels
640 x 480 : 640 x 480 pixels
NOTES
• If you plan to make large prints of your images or
otherwise use them in applications where highresolution is your top priority, select the “2304 x
1712” image size.
• If you plan to send images as e-mail attachments or
otherwise use them in applications where data
economy is your top priority, select the “640 x 480”
image size.
63
Page 40

BASIC IMAGE RECORDING
To specify image quality
1.
In the REC mode, press [MENU].
2.
Use [] and [] to select the “REC” tab.
3.
Use [] and [] to select “Quality”, and then
press [].
4.
Use [] and [] to select the setting you
want, and then press [SET].
To get this:
Very high quality, but large file size
Normal quality
Small file size, but low quality
Select this setting:
Fine
Normal
Economy
NOTE
• Use the “Fine” setting when image quality is your top
priority and file size is secondary. Conversely, use
the “Economy” setting when file size is your top
priority and image quality is secondary.
IMPORTANT!
• Actual file size depends on the type of image you
record. This means that the remaining image
capacity noted on the monitor screen may not be
exactly accurate (pages 28 and 172).
64
 Loading...