

Page 1
LCD Digital Camera
QV-5500SX
Owner’s Manual
If you need help with
your camera, please
call: 1(800)435-7732
QUICK REFERENCE
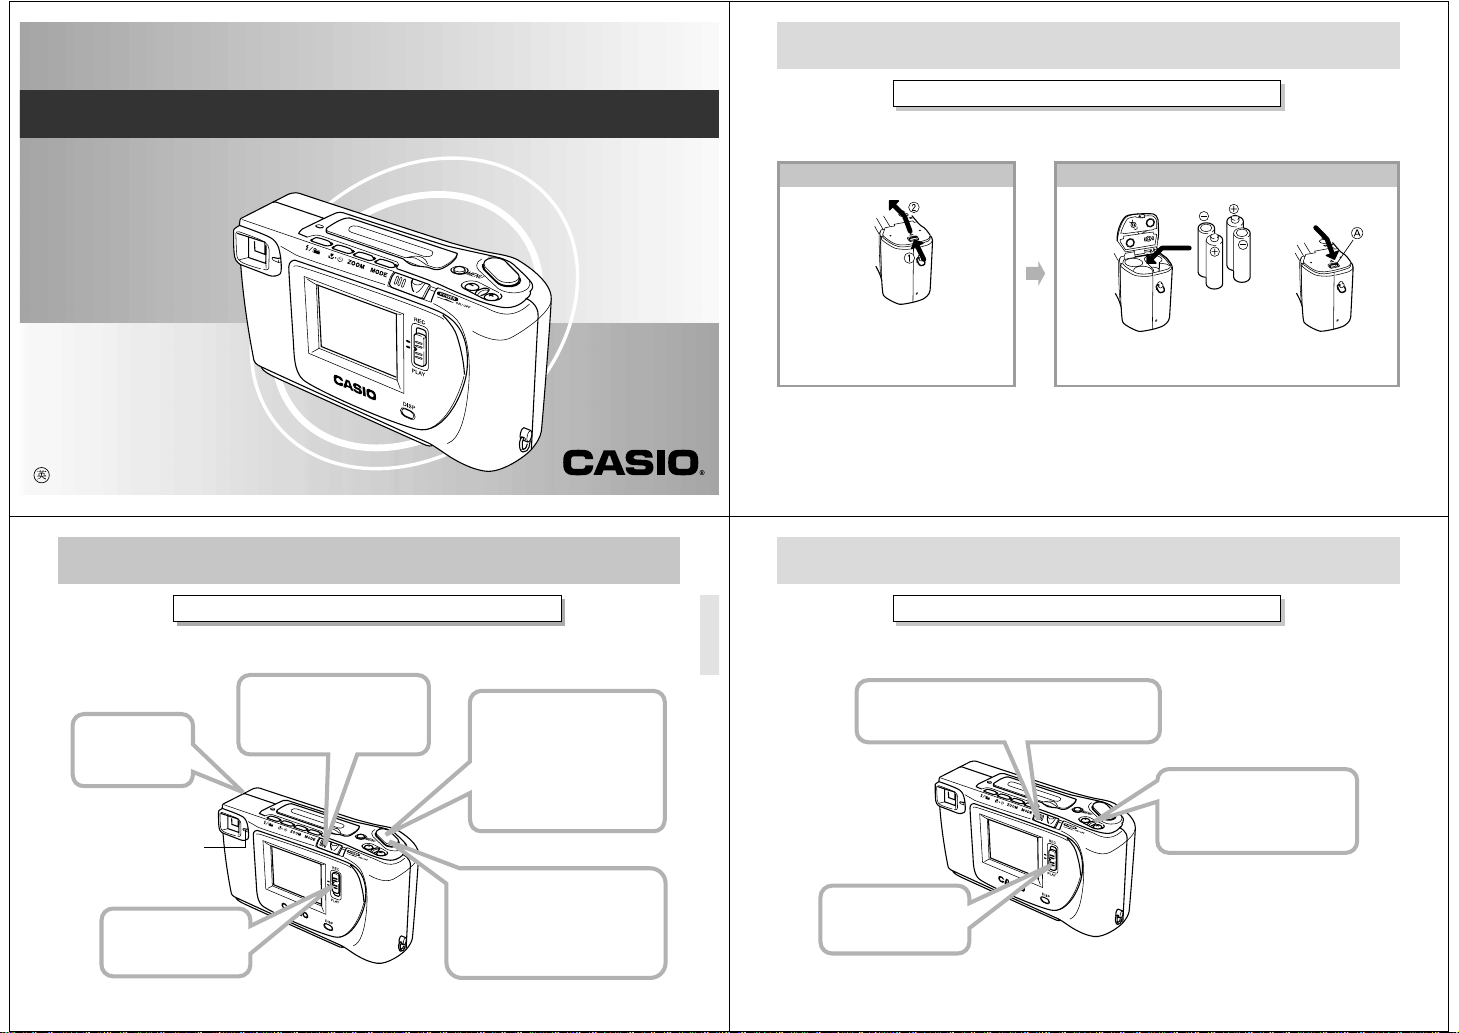
Loading Batteries (page 31)
Be sure to load the four AA size batteries that come with the camera before using it.
1
Press the battery compartment
lock on the bottom of the camera
11
1
(
) to open the battery compart-
11
ment cover (
•Be sure to use alkaline, lithium or Ni-MH batteries. Never use manganese batteries.
•Press down on the battery compartment cover at the point marked
cover locks into place with a click.
2
22
).
2
22
Load four batteries and close the battery compartment cover.
2
AA
A
in the above illustration until the
AA
Recording Images (page 38)
Be sure to correctly set the clock before recording images (page 36).
3
Slide the POWER Switch
1
Remove the
lens cap.
Operation
lamp
to the right to turn on the
camera.
2
Slide the Function
Switch to REC.
QUICK REFERENCE
4
After composing the
image on the monitor
screen, press the shutter
button about half way and
hold it there.
*
The camera’s Auto Focus feature
automatically focuses the image.
5
After confirming that the
Auto Focus operation is
complete (the operation lamp
lights green), press the
shutter button.
QUICK REFERENCE
Playing Back Images (page 65)
2
Slide the POWER Switch to the right.
• The image you recorded appears on the monitor screen.
3
Use [+] and [–] to scroll
through the images stored
in camera memory.
1
Slide the Function
Switch to PLAY.
3
4
Page 2
4
Double check to
make sure that
you really want to
delete the image
you selected.
Press MENU to exit
*
the image delete
operation.
Deleting Images (page 79)
2
Press MENU.
1
Slide the Function
Switch to PLAY.
QUICK REFERENCE
3
Use [+] and [–] to select “Delete”,
and then press the shutter button.
Use [+] and [–] to select “Select”,
and then press the shutter button.
Use [+] and [–] to select the image
you want to delete, and then press
the shutter button.
5
Press DISP.
Use [+] and [–] to select “YES”,
and then press the shutter button.
INTRODUCTION
CONTENTS
2 QUICK REFERENCE
9 FEATURES
12 PRECAUTIONS
16 UNPACKING
Connecting the Strap .................................................. 16
Using the Lens Cap .................................................... 17
Using the Soft Case.................................................... 17
18 GENERAL GUIDE
Lens ............................................................................ 18
Top and Display .......................................................... 19
Bottom ........................................................................ 20
22 SWITCHING BETWEEN THE REC
AND PLAY MODES
REC Mode Screen...................................................... 22
PLAY Mode Screen .................................................... 23
25 MONITOR SCREEN
Recording Mode ......................................................... 25
Playback Mode ........................................................... 26
27 MEMORY CARDS
To insert a memory card into the camera ................... 27
To remove a memory card from the camera............... 28
Formatting a Memory Card......................................... 29
5
6
Congratulations upon your selection of the QV-5500SX LCD Digital Camera.
To get the most out of the QV-5500SX, be sure to carefully read this manual and follow the instructions contained in it.
31 POWER SUPPLY
Using Batteries ........................................................... 31
Using AC Power ......................................................... 33
36 SETTING THE CURRENT DATE AND TIME
To set the date and time ............................................. 36
To select the date format ............................................ 37
38 RECORDING
Using the Shutter Button ............................................ 38
Basic Recording Operation......................................... 38
Using the Viewfinder for Recording ............................ 40
Using Focus Lock ....................................................... 41
Using Quick Shutter.................................................... 42
Using the Flash........................................................... 43
Resolution Settings..................................................... 45
Exposure Compensation ............................................ 46
48 OTHER RECORDING FUNCTIONS
Continuous Recording ................................................ 48
Using the Zoom Feature ............................................. 49
Using the Macro Feature ............................................ 50
Manual Focus ............................................................. 50
Movie Recording......................................................... 51
Panorama Recording.................................................. 53
Night Scene Mode ...................................................... 54
Using AEB (Auto Exposure Bracketing) ..................... 55
Using Multiple Exposure ............................................. 56
Using the Self-timer .................................................... 57
Using the Timer .......................................................... 58
Record Menu .............................................................. 59
65 PLAYBACK
Basic Playback Operation .......................................... 65
Playing Back a Movie ................................................. 66
Panorama Playback ................................................... 68
Using Zoom ................................................................ 70
Displaying Multiple Images ......................................... 71
Slide Show.................................................................. 72
Screen Saver .............................................................. 73
75 USING FOLDERS
Recording an Image in a Specific Folder.................... 75
Selecting a Folder to Playback Images ...................... 75
To Move a Single Image from
One Folder to Another ............................................ 75
To Move All the Contents in
One Folder to Another Folder ................................. 76
77 IMAGE PROTECTION
To Protect and Unprotect a Single Image................... 77
To Protect and Unprotect Folders............................... 78
To Protect and Unprotect All Images
on the Memory Card ............................................... 78
CONTENTS
79 DELETING IMAGES
To Delete a Single Image ........................................... 79
To Delete All the Images in a Folder........................... 80
To Delete All Unprotected Images .............................. 81
82 CONNECTIONS
VIDEO OUT Terminal ................................................. 82
DIGITAL Terminal........................................................ 83
84 CONNECTING TO OTHER EQUIPMENT
To Connect to a Television.......................................... 84
To Connect to a QV Color Printer............................... 85
Connecting to a Personal Computer .......................... 85
86 USING CompactFlash CARDS
WITH YOUR COMPUTER
Setting Up to Access CompactFlash Card
Contents From Your Computer............................... 86
Card Browser.............................................................. 89
93 TROUBLESHOOTING
97 MESSAGES
99 SPECIFICATIONS
CONTENTS
• CASIO COMPUTER CO., LTD. assumes no responsibility
for any damage or loss resulting from the use of this
manual.
• CASIO COMPUTER CO., LTD. assumes no responsibility
for any loss or claims by third parties which may arise
through the use of the QV-5500SX.
• CASIO COMPUTER CO., LTD. assumes no responsibility
for any damage or loss caused by deletion of data as a
result of malfunction, repairs, or battery replacement. Be
sure to back up all important data on other media to protect
against its loss.
• Windows is a registered trademark of Microsoft Corporation.
• Macintosh is a registered trademark of Apple Computer,
Inc.
• COMPACTFLASH™ and
marks of SanDisk Corporation.
• Other company, product and service names used herein
may also be trademarks or service marks of others.
7
8
logo are registered trade-
Page 3
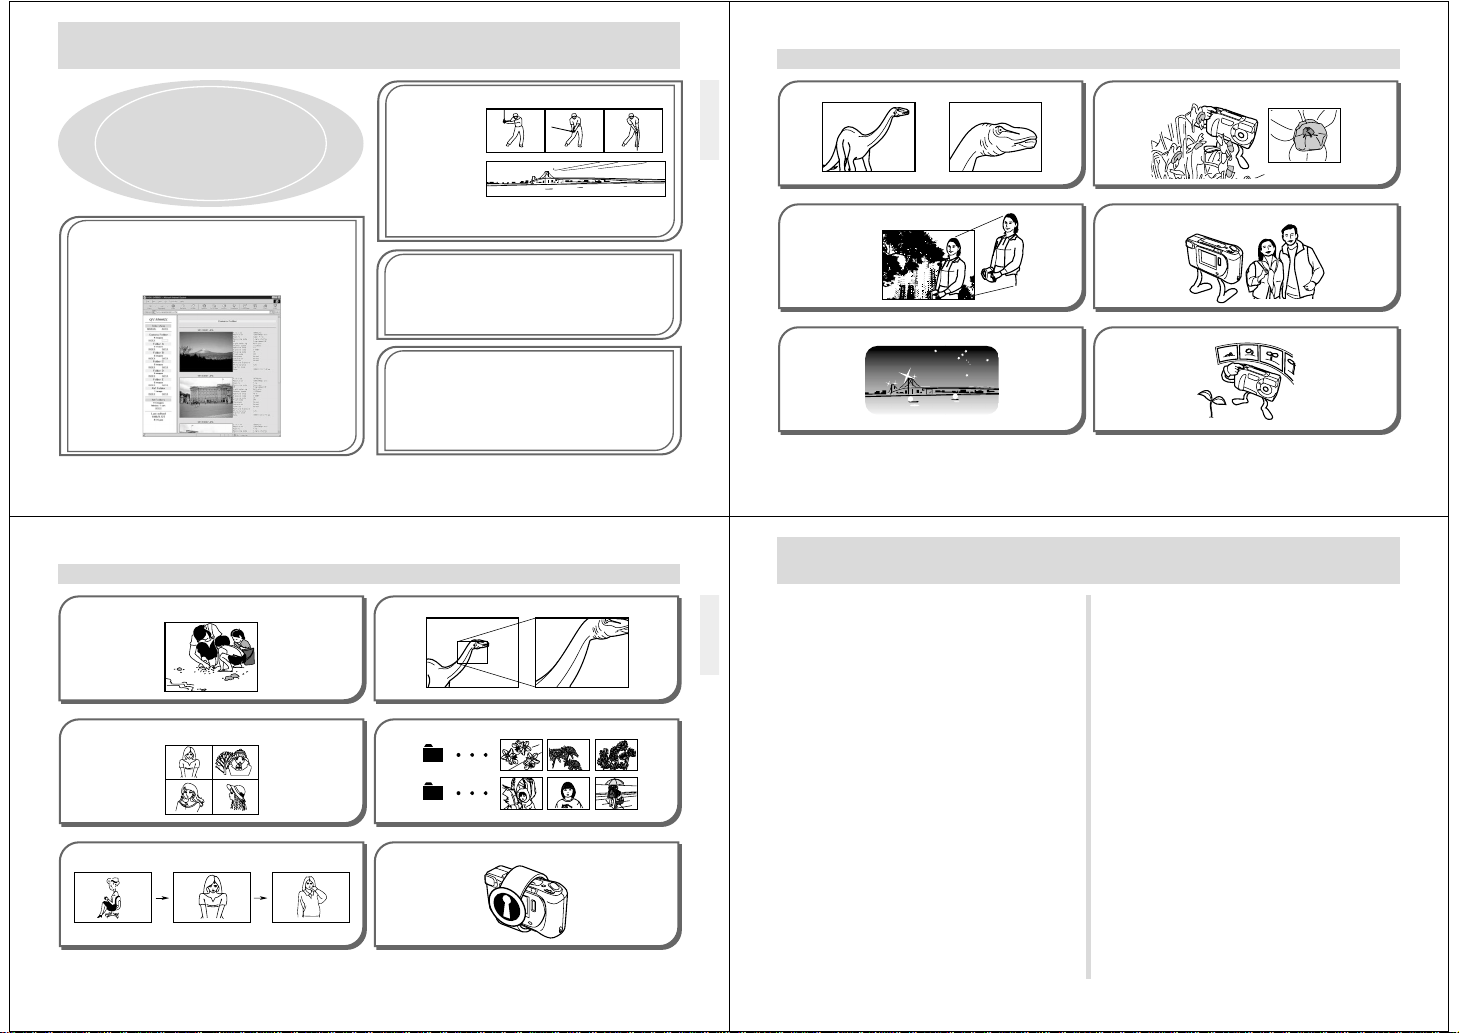
FEATURES
Hold down the shutter button to record high-resolution
images at a rate of one image per 0.5 second.
View high-resolution images on the built-in monitor screen
Simple image management (page 91)
Images are stored on a large-capacity CompactFlash memory
card. A new Card Browser feature produces thumbnails of all
images on a card quickly and easily.
Quick Shutter
Quick View
at a rate of two frames per second.
Movie and panorama images (pages 51, 53)
Movie Play
includes a buffer
that lets you
capture images of
events that
occurred before
you pressed the
shutter release.
A built-in function
lets you combine up to nine images
into breathtaking panoramas.
Easy-to-understand graphic interface
All camera operations can be performed on graphic based interactive menu screens. CASIO high-resolution HAST LCD
makes screen images clearer and more colorful than ever before.
CASIO original metering system
Light metering includes innovative multi-pattern metering.
Megapixel CCD
Images are recorded by a 1.31-megapixel CCD for amazing
resolution and clarity.
FEATURES
2X or 4X zoom
Multiple Exposure
Night Scene
page 49
page 56
page 54
Macro Feature
page 50
Self-timer
page 57
Timer
page 58
Date and Time Stamping
Multi-image Screen
Slide Show
99/5/12
page 36
page 71
page 72
Display Zoom
Folder Storage
FOLDER A
FOLDER B
Image Protection
FEATURES
page 70
page 75
page 77
11
9
10
PRECAUTIONS
General Precautions
Be sure to observe the following important precautions
whenever using the QV-5500SX.
All references in this manual to “this camera” and “the camera” refer to the CASIO QV-5500SX Digital Camera.
• Never try to take pictures or use the built-in display while
operating a motor vehicle or while walking. Doing so creates the danger of serious accident.
• Never try to open the case of the camera or attempt your
own repairs. High-voltage internal components create the
risk of electrical shock when exposed. Always leave maintenance and repair work up to authorized CASIO service
providers.
• Never fire the flash in the direction of a person operating a
motor vehicle. Doing so can interfere with the driver’s vision and create the danger of accident.
• Never fire the flash while it is too close to the subject’s
eyes. Intense light from the flash can cause eye damage if
it is fired too close to the eyes, especially with young children. When using the flash, the camera should be at least
one meter from the eyes of the subject.
• Keep the camera away from water and other liquids, and
never let it get wet. Moisture creates the danger of fire and
electrical shock. Never use the camera outdoors in the rain
or snow, at the seashore or beach, in the bathroom, etc.
12
• Should foreign matter or water ever get into the camera,
immediately turn power off, unplug the AC adaptor from the
power outlet, and contact your dealer or nearest CASIO
service provider. Using the camera under these conditions
creates the danger of fire and electrical shock.
• Should you ever notice smoke or a strange odor coming out
of the camera, immediately turn power off and unplug the
AC adaptor from the power outlet. Using the camera under
these conditions creates the danger of fire and electrical
shock. After making sure there is no more smoke coming
from the camera, take it to your nearest CASIO service provider for repair. Never attempt your own maintenance.
• If the camera’s case should ever become cracked due to
dropping it or otherwise subjecting it to rough treatment,
immediately turn power off, unplug the AC adaptor from the
power outlet, and contact your nearest CASIO service provider.
• Never use the camera inside of an air craft or in any other
areas where its use is prohibited. Doing so can result in an
accident.
• Physical damage and malfunction of this camera can
cause the image data stored in its memory to be deleted.
Be sure to always keep backup copies of data by transferring them to personal computer memory.
• Never open the battery compartment cover, disconnect the
AC adaptor from the camera or unplug it from the wall
socket while recording images. Doing so will not only make
storage of the current image impossible, it can also corrupt
other image data already stored in camera memory.
Page 4
Operating conditions
• This camera is designed for use in temperatures ranging
from 0°C to 40°C.
• Do not use or keep the camera in the following areas.
— In areas subject to direct sunlight
— In areas subject to high humidity or dust
— Near air conditioners, heaters, or other areas subject to
temperature extremes
— Inside of a closed vehicle, especially one parked in the
sun
— In areas subject to strong vibration
PRECAUTIONS
Condensation
• When you bring the camera indoors on a cold day or otherwise expose it to a sudden change of temperature, there is
the possibility that condensation can form on the exterior or
on interior components. Condensation can cause malfunction of the camera, so you should avoid exposing it to conditions that might cause condensation.
• To keep condensation from forming, place the camera into
a plastic bag before moving it into a location that is much
warmer or colder than your current location. Leave it in the
plastic bag until the air inside the bag has a chance to
reach the same temperature as the new location. If condensation does form, remove the batteries from the camera and leave the battery compartment cover open for a
few hours.
PRECAUTIONS
About the camera’s backlight…
• The camera is equipped with a fluorescent light source to
provide the back lighting for its LCD.
• The normal service life of the backlight is approximately six
years, when the camera is used for about two hours a day.
• Should the LCD image appear abnormally dark, take the
camera to your dealer or an authorized CASIO service provider to have the light source replaced. Note that you will
be charged for this replacement.
Under very cold conditions, the backlight may require more
•
time than normal to light, or reddish bands may appear in
the displayed image. These conditions do not indicate malfunction, and normal operation should return at higher temperatures.
Lens
• Camera performance can be adversely affected by fingerprints or dirt on the lens surface. Never touch the lens surface with your fingers.
• Should the lens become dirty, use a blower to blow off dirt
and dust, or a soft, dry cloth to wipe off the lens.
Monitor Screen
Recording
The image shown on the monitor screen during recording is
intended for composition purposes only, so its resolution
does not match that of the image as it is recorded. The image is recorded in accordance with the resolution setting
made with the procedure under “Resolution Settings” on
page 45. Monitor screen refresh speed varies according to
the relative brightness of the subject.
Playback
• This camera is designed for high-speed scrolling of images
during playback. Because of this, the playback image that
initially appears on the monitor screen does not show the
full resolution of the image as recorded. When you stop at
the image you want, the monitor screen refreshes and
shows the image in its full resolution.
• The message “PREVIEW” appears on a TV or CRT screen
when a preview image is on the screen during output to the
VIDEO OUT terminal.
GUIDELINES LAID DOWN BY FCC RULES FOR USE OF
THIS UNIT IN THE U.S.A. (not applicable to other areas).
This device complies with Part 15 of the FCC Rules. Operation is subject
to the following two conditions: (1) this device may not cause harmful interference, and (2) this device must accept any interference received, including interference that may cause undesired operation.
NOTICE
This equipment has been tested and found to comply with the limits for
a Class B peripheral, pursuant to Part 15 of the FCC Rules. These
limits are designed to provide reasonable protection against harmful
interference in a residential installation. This equipment generates,
uses and can radiate radio frequency energy and, if not installed and
used in accordance with the instructions, may cause harmful interference to radio communications. However, there is no guarantee that
interference will not occur in a particular installation. If this equipment
does cause harmful interference to radio or television reception, which
can be determined by turning the equipment off and on, the user is
encouraged to try to correct the interference by one or more of the
following measures:
• Reorient or relocate the receiving antenna.
• Increase the separation between the equipment and receiver.
• Connect the equipment into an outlet on a circuit different from that
to which the receiver is connected.
• Consult the dealer or an experienced radio/TV technician for help.
Changes or modifications not expressly approved by the party responsible for compliance could void the user's authority to operate the
equipment.
Properly shielded cables with ferrite core must be used for connection
to host computer and/or peripherals in order to meet FCC emission
limits.
THE SPECIAL CONNECTION CABLE THAT COMES WITH QV-Link SOFTWARE
FCC WARNING
THE SPECIAL VIDEO CABLE THAT COMES WITH THE CAMERA
----- THE CAMERA TO A VIDEO IN TERMINAL OF A COMPUTER
----- THE CAMERA TO A PROPER TERMINAL OF A COMPUTER
PRECAUTIONS
Declaration of Conformity
Model Number: QV-5500SX
Trade Name: CASIO COMPUTER CO.,LTD.
Responsible party: CASIO INC.
Address: 570 MT. PLEASANT AVENUE,
Telephone number: 973-361-5400
This device complies with Part 15 of the FCC Rules.
Operation is subject to the following two conditions:
(1) This device may not cause harmful interference, and
(2) this device must accept any interference received, including interference that may cause undesired operation.
CASIO COMPUTER CO.,LTD.
FOR HOME OR OFFICE USE
DOVER,NEW JERSEY 07801
QV-5500SX
Tested To Comply
With FCC Standards
13
15
14
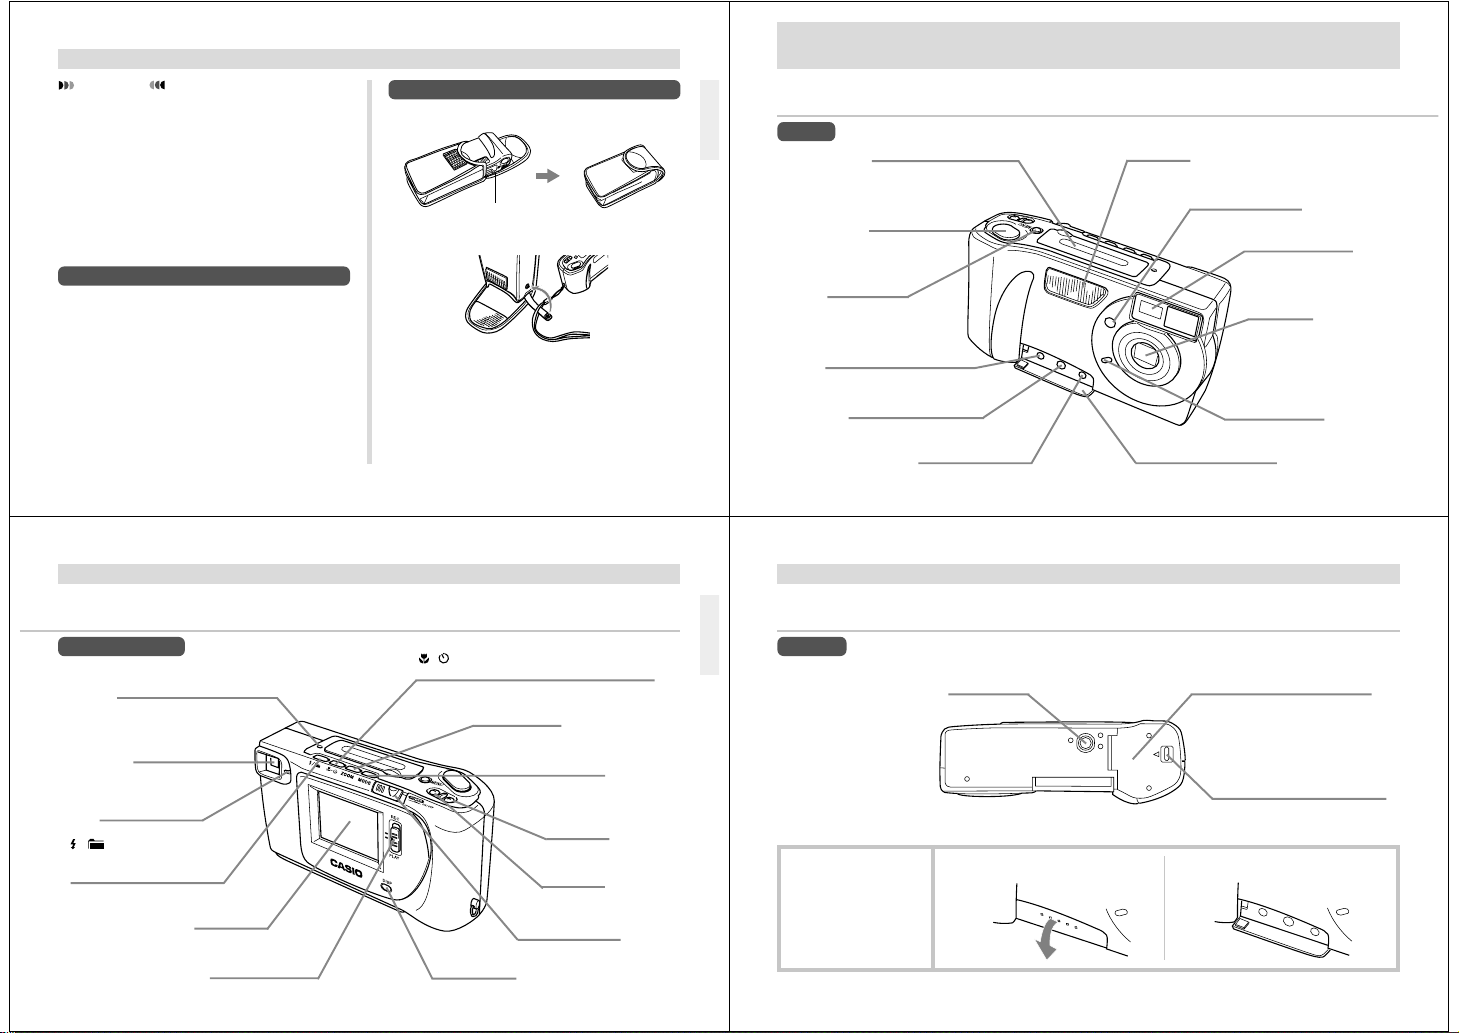
UNPACKING
Check to make sure that all of the items shown below are
included with your camera.
If something is missing, contact your dealer as soon as possible.
Soft caseCamera
Lens cap
attached to the lens
Video cable Manual
16
Strap
Connecting the Strap
Pass the wrist strap through the hole on the side of the camera as shown in the illustration.
Adjusting the Length of the Strap
Slide the stopper to adjust the length of the strap. This way
you can make it a short hand strap, or a longer shoulder or
neck strap.
Page 5
IMPORTANT!
• Be sure to keep the strap around your wrist whenever
using the camera to protect against accidentally dropping it.
• The supplied strap is intended for use with this camera only. Do not use for any other application.
• Never swing the camera around by the strap.
• Allowing the camera to swing freely from your neck
can result in damage to the camera due to its bumping
against other objects. It also creates the danger of the
camera becoming caught in a door or on other objects, resulting in personal injury.
Using the Lens Cap
Make sure the “CASIO” name on the lens cap is horizontal
when you attach the cap to the lens. The cap does not fit
securely and may fall off if attached with the “CASIO” name
at an angle.
UNPACKING
Using the Soft Case
Keep the camera in its soft case to protect it when not in use.
Monitor screen
facing down
Loop
The soft case protects the camera against damage when it is
dropped. Be sure to pass the strap through the loop on the
soft case and keep the camera in its case when you are not
using it.
17
GENERAL GUIDE
The following illustrations show the names of each component, button and switch on the camera.
Lens
18
MEMORY card slot cover
(page 27)
Shutter button
(page 38)
MENU button
(page 23)
AC Power terminal
(page 33)
VIDEO OUT terminal
(page 82)
DIGITAL terminal
(page 83)
Flash
(page 43)
Exposure sensor
Terminal panel cover
(page 20)
Distance sensor
Lens
Self-timer lamp
(page 21)
Top and Display
Power/card access lamp
(page 21)
Viewfinder
(page 40)
Operation lamp
(page 21)
/ (FLASH/FOLDER)
button
(pages 43, 75)
LCD
(page 25)
Function switch
(page 38)
·
(MACRO · SELF-TIMER) button
(pages 50, 57)
ZOOM button
(page 49)
MODE button
(page 22)
[+]
[–]
POWER switch
(page 38)
DISP button
(page 25)
GENERAL GUIDE
19
GENERAL GUIDE
Bottom
Terminal Panel
20
Opening the
Cover
Tripod hole
11
1
11
Battery compartment cover
(page 2)
Battery compartment lock
(page 2)
22
2
22
Page 6
Lamps
• The power/card access lamp is lit
whenever power is turned on, regardless of whether the monitor
screen is on or off.
• The power/card access lamp
flashes green while the memory
card is being accessed. Never remove the memory card while the
power/card access lamp is flashing.
• The Self-timer lamp flashes when
the self-timer is performing a timer
operation prior to releasing the
shutter.
• The Operation lamp shows the operational status of the camera as
described below.
Power/card
access lamp
Self-timer lamp
Operation lamp
GENERAL GUIDE
Operation lamp
Record Mode
Lamp
Color
Green
Amber
Red
Playback Mode (when connecting video cable)
Lamp
Color
Green
Red
Low Battery Warning
Flashes for about 3 seconds, after which camera power
turns off automatically.
On Flashing
Auto Focus operation
complete
Exposure warning
Cannot focus
Memory full
Cannot charge the flash
On
Playing back
Low battery
Please wait
(after power on)
Image store
operation in progress
Flash is charging
Memory error
Flashing
Please wait
(after power on)
21
SWITCHING BETWEEN THE REC AND PLAY MODES
Use the Function Switch to switch between the REC and
PLAY Modes.
REC
PLAY
• Use the REC Mode to record still images, movies, and panorama images.
• Use the PLAY Mode to view and edit images.
Function
switch
22
REC Mode Screen
Pressing the MODE button while in the REC Mode displays
the Record Menu. Use [+] and [–] to bring the icon of the
function you want to the bottom of the dial, and then press
the shutter button.
REC Mode Indicators
SINGLE
CONTINUOUS
MOVIE
PANORAMA
MULTIPLE
EXPOSURE
page 38
page 48
page 51
page 53
page 56
AEB
AEB
CUSTOM
TIMER
NIGHT SCENE
Remaining
number of
pages
page 55
pages 35,64
page 58
page 54
PLAY Mode Screen
Pressing the MENU button while in the PLAY Mode displays
the Playback Menu.
1.
Use [+] and [–] to select the category you want,
and then press the shutter button.
2.
Use [+] and [–] to select the function you want,
and then press the shutter button.
Function
Category
SWITCHING BETWEEN THE REC AND PLAY MODES
View Menu
Zoom
4 Images
9 Images
Slide Show
Zooms in on a specific area of
an image.
Displays 4 images on a single
screen.
Displays 9 images on a single
screen.
Automatically scrolls through
images.
Tools Menu
Protect
Move
Group
Protects an image against deletion.
Moves an image to another
folder.
Groups images into a movie or
panorama.
pages
67,69
page
70
page
71
page
71
page
72
page
77
page
75
23
SWITCHING BETWEEN THE REC AND PLAY MODES
Set Up Menu
Card Browser
Format
Date
Screen Saver
Video Out
Language
Generates an HTML file.
Formats a memory card.
Stamps the date and time on an
image.
Protects the screen against image “burn in.”
Converts an image to a format
for video output.
Changes the screen text language.
Delete Menu
Select
Folder
All
Use these functions when deleting images.
24
page
89
page
29
page
36
page
73
page
84
page
26
page
79
Page 7
MONITOR SCREEN
Pressing DISP causes various
indicators to appear on the
monitor screen. If the monitor
screen is turned off, press DISP
to turn on the monitor screen.
To turn off the monitor screen,
press the DISP button the required number of times. You
can then use the viewfinder to
compose images. Turning off
the monitor screen conserves
battery power.
DISP
Recording Mode
Macro mode
indicator
Flash Mode
Auto None
Flash On
Flash Off
Red-eye
reduction
Camera shake
indicator
Spot metering
area
Self-timer
Recording Mode
Zoom factor
Folder name
Remaining
number of pages
Mode
(Super Fine)
(Fine)
(Normal)
(Economy)
MONITOR SCREEN
Screen when shutter is pressed half way
Flash Mode ( )
Auto Focus Frame
• Focusing complete:
Green/White
• Focusing failed:
Red
Flash indicator appears to indicate that flash will be fired
(when auto flash is selected).
Playback Mode
Protect indicator
Battery capacity
Folder name
Pages
Date and time
(date and time of recording)
Mode
(Super Fine)
(Fine)
(Normal)
(Economy)
DISP button
indicator
* This area shows the movie length in seconds, the number of images making up a pan-
orama or the buffer status when using Quick Shutter.
MEMORY CARDS
This camera uses a memory card (CompactFlash cards) for
image memory.
Use the procedure below to insert the memory card into the
camera before you try to use it for the first time.
IMPORTANT!
• Make sure that the power of the camera is turned off
before you insert or remove a memory card.
• The power/card access lamp flashes green while the
memory card is being accessed. Never remove the
memory card while the power/card access lamp is
flashing.
• When inserting a memory card into the camera, make
sure that the card is oriented correctly. Make sure that
the correct side of the card is facing up, and that you
insert the correct end of the card into the camera.
EV shiftManual mode
Battery capacity
Image data*
Date and time
This information appears for two or
three seconds, and then disappears.
To insert a memory card into the camera
1.
Open the memory card
slot cover.
2.
As shown in the illustration, slide the memory
card into the slot and
push it in as far as it will
go.
3.
Close the memory card
slot cover.
Surface marked
with arrow
25
26
MEMORY CARDS
To remove a memory card from the camera
1.
Open the memory card
slot cover.
2.
Press the eject button
so it extends from the
camera.
3.
Press the eject button
once again to eject the
card.
Eject button
4.
Remove the memory
card.
Changing the Display Language
Use the following procedure to switch the display language
between English and Japanese.
1.
Slide the Function Switch to PLAY.
2.
Press MENU.
3.
Select “Set Up” “Language”.
4.
Select the display language you want.
IMPORTANT!
• Insert only memory cards into the memory card slot.
Inserting any other type of card can cause malfunction.
• Should water or any other foreign matter get into the
memory card slot, immediately turn off power, unplug
the AC adaptor, and contact your original retailer or
nearest CASIO Service Provider.
• Never eject the CompactFlash card while the card slot
is facing downwards. Doing so creates the danger of
the CompactFlash card falling, which can corrupt image data on the card.
27
5.
Close the memory card
slot cover.
28
Page 8
Formatting a Memory Card
You can format a memory card to delete all of the data
stored on it.
IMPORTANT!
• Formatting a memory card deletes all images on the
card, even if some or all of the images are protected.
• Data deleted by a memory card format operation cannot be recovered! Be sure to carefully check and confirm that you no longer need the data stored in a
memory card before formatting it.
To format a memory card
1.
Slide the Function Switch to PLAY.
2.
Press MENU.
3.
Select “Set Up” “Format”.
4.
In response to the confirmation message that
appears, select “YES” to start formatting the
card.
MEMORY CARDS
Memory Card Precautions
• Images cannot be recorded with this camera unless a
memory card is installed in it.
• Be sure to use only CASIO brand CompactFlash cards
(CF-4x/CF-8x/CF-15x/CF-30x/CF-48x). Proper operation
with other memory cards is not guaranteed.
• Static electricity, electrical noise, and other electrical phenomena can cause corruption or even total loss of the
data stored on a memory card. Because of this, you
should always make backup copies of important images
on other media (magnetic optical disk, floppy diskette,
computer hard disk, etc.).
• Memory card problems can be corrected by reformatting
the memory card (page 97). Reformatting a memory card
deletes all images stored on the card, but you can use a
computer to copy the images you want to keep to the
computer’s hard disk before reformatting your card. If you
plan to be recording images where you do not have access to a computer, it is a good idea to take along an extra
memory card or two just in case you experience an unexpected memory card problem.
MEMORY CARDS
• Formatting is recommended for any memory card that you
suspect contains corrupted image data (due to a DECODE ERROR, strange image colors, malformed images)
or newly purchased memory cards.
• Before starting a format operation, load a full set of new
batteries (alkaline or lithium) into the camera or connect
the AC adaptor to power the camera. Interruption of camera power during the format operation results in improper
formatting, making it impossible to use the memory card.
Memory Card Folder Precautions
• Folders (directories) are automatically created if the card
you are using does not already have similarly named folders (page 75).
• Up to 250 images can be stored in a single folder. Though
it is possible to put more than 250 images into a folder on
your computer, the camera will not display images past
250.
• Image files in camera memory are assigned names made
up of the date (first five characters) plus a three-digit number and the extension JPG/AVI. Names do not change
when you move or delete folders.
< Example >
001. JPG
Day: 01 to 31
Month: 1 to 9, A, B, C
Year: 98, 99, 00, 01 to 49
(OCT) (NOV) (DEC)
(2000)
POWER SUPPLY
The camera features a two-way power supply that lets you
use either batteries (AA-size alkaline, lithium or Ni-MH) or
household AC current.
Using Batteries
See page 2 for details about how to load batteries into the
camera.
Standard Battery Life
This camera can be powered using AA-size alkaline, lithium
or Ni-MH batteries.
The battery life reference values given below indicate the
amount of time at standard temperature (25°C) until power
automatically turns off due to battery failure. They do not
guarantee that batteries will perform the amount of service
indicated. Battery life is reduced by low temperatures and
continued use.
Type of
Operation
Continuous
Playback
Continuous
Recording
• The above figures are approximations only.
• The above guidelines are based on the following battery
AA-size Alkaline
Batteries LR6
110 minutes
300 shots
types:
Alkaline: MX1500 (AA) DURACELL ULTRA
Lithium: Energizer
Ni-MH (Nickel-metal hydride): CASIO NP-H3
AA-size Lithium
Batteries FR6
210 minutes
840 shots
AA-size Ni-MH
130 minutes
500 shots
• Battery life varies with brand.
• Figures are based on continuous recording under the following condition.
Flash turned off
Regardless of use of the camera’s flash, zoom function,
turning on and off the POWER Switch, as well as other operating conditions may affect the above values.
● About rechargeable batteries
• Use only the nickel-metal hydride batteries (NP-H3) that
are available from your dealer as options for this camera.
Proper camera operation is not guaranteed when other rechargeable batteries are used.
• Be sure to keep all four batteries together as a set at all
times, for both charging and powering the camera. Mixing
batteries from different sets can shorten overall battery life
and cause malfunction of the camera.
• Rechargeable batteries cannot be charged while they are
loaded in the camera.
Nickel-metal hydride Batteries (4-battery set)/Quick
Charger Set BC-1HB4
Nickel-metal hydride Batteries (4-battery set) NP-H3P4
● Tips for Prolonging Battery Life
/ button to turn off the flash when you are not
• Use the
using it.
29
31
30
POWER SUPPLY
Battery Handling Precautions
Incorrect use or handling of batteries can cause them to leak
or burst and seriously damage your camera. Be sure to note
the following important precautions to avoid problems with
batteries.
• Use only LR6 (AM-3) type alkaline or FR6 type
lithium or Ni-MH (nickel-metal hydride) dry cell
batteries with this camera. Never mix old batteries with new ones. Doing so can result in
bursting or leaking of batteries, creating the
danger of fire or personal injury.
CAUTION
• Always make sure that the positive (+) and
negative (–) ends of the batteries are facing
correctly, as noted by the markings on the
camera itself. Improper loading of batteries can
result in bursting or leaking of batteries, creating the danger of personal injury or soiling of
objects nearby.
• Remove batteries from the camera if you do not plan to use
it for more than two weeks.
• Never recharge batteries, never allow direct connection
between two ends of a battery, and never try to take batteries apart.
• Do not expose batteries to direct heat or dispose of them
by burning. Doing so can create the danger of explosion.
• Never mix batteries of different types.
32
• Dead batteries are susceptible to leakage, which can
cause serious damage to your camera. Remove batteries
from the camera as soon as you notice they are dead.
• The batteries that power this camera normally become
warm when they lose power. This does not indicate malfunction.
Low Battery Indicator
The battery capacity indicator “ ” (shown only while the
image information display is turned on) changes to “
whenever battery power goes low. If you continue to use the
camera while “
tomatically turn off. If this happens, replace all four batteries
with new ones as soon as possible.
” is on the display, camera power will au-
”
Page 9

Auto Power Off
(Battery Powered Operation Only)
Power automatically turns off whenever you do not perform
any camera operation for a specific period. See page 35 for
details about how you can specify the Auto Power Off time.
• To restore power, simply slide the POWER Switch again.
IMPORTANT!
The Auto Power Off function does not operate under the
following conditions.
• During Slide Show (page 72)
• While the camera is being operated from a computer
or printer over a cable connection (pages 82, 83).
• Whenever the AC adaptor is connected to the camera.
POWER SUPPLY
Using AC Power
Use the optional AC adaptor (AD-C620) to power the camera from standard AC power.
AC adaptor
AC outlet
AC Adaptor precautions
• Never use an electrical outlet whose voltage is
outside the rating marked on the AC adaptor.
Doing so can create the danger of fire or electrical shock. Use only the optional AC adaptor
specified for this camera.
• Should the cord of the AC adaptor become
CAUTION
damaged (exposed internal wiring), request a
replacement from an authorized CASIO service provider. A damaged AC adaptor cord creates the danger of fire or electrical shock.
AC power
terminal
33
POWER SUPPLY
• Always be sure to use the AD-C620 AC adaptor only. Using any other AC adaptor can cause
damage to the camera not covered by the warranty.
• When unplugging the AC adaptor from the wall
socket, be sure to grasp the adaptor (not the
CAUTION
cord).
• Avoid any undue bending, pulling, and twisting
of the AC adaptor’s cord, and never try to
lengthen the cord by splicing it with other wire.
• Be sure to turn power off before connecting or disconnecting the adaptor.
• Always turn camera power off before disconnecting the AC
adaptor, even if the camera has batteries installed. If you
don’t, the camera will turn off automatically when you disconnect the AC adaptor. Even so, you run the risk of damaging the camera whenever you disconnect the AC adaptor without first turning power off.
• The AC adaptor may become warm to the touch after extended periods of use. This is normal and is not cause for
alarm.
• After use turn off the POWER Switch of the camera and
unplug adaptor from the AC outlet.
• The camera automatically switches over to AC adaptor
powered operations whenever the AC adaptor is plugged
into the camera.
• Always use the AC adaptor to power the camera whenever
it is connected to a computer.
34
Power Save Settings
The settings described below let you specify sleep and auto
power off trigger times that help to conserve valuable battery
power.
SLEEP .................. The monitor screen enters a sleep state
AUTO
POWER OFF ........ Auto Power Off turns off camera power if
• AUTO POWER OFF takes priority when both SLEEP and
AUTO POWER OFF are both set for a 2-minute trigger
time. This means camera power turns off if no operation is
performed after two minutes.
if no operation is performed for a specified amount of time in the Record Mode.
Full power is restored when you press
the shutter button. You can specify 30
seconds, 1 minute, or 2 minutes before
the sleep state is triggered, or you can
turn off this setting entirely.
no operation is performed for a specified
amount of time. You can specify 2 minutes, 5 minutes, or 10 minutes before
AUTO POWER OFF is triggered, or you
can turn off this setting entirely.
To set SLEEP and AUTO POWER OFF trigger times
1.
Slide the Function Switch to REC.
2.
Press the MODE button and then select .
3.
Select “Power Save”.
4.
Use [+] and [–] to select “Sleep” or “Auto
Power Off”.
5.
Select the trigger time you want to set.
6.
When the settings are the way you want them,
press MENU.
POWER SUPPLY
Initializing Power Save Trigger Times
Use the following procedure to return SLEEP and AUTO
POWER OFF trigger time settings to their initial factory defaults (SLEEP: 1 minute, AUTO POWER OFF: 2 minutes).
IMPORTANT!
Note that performing the following procedure to initialize
the power save trigger time settings also initializes
mode memory (page 64).
To initialize power save trigger times
1.
Slide the Function Switch to REC.
2.
Press the MODE button and then select .
3.
Select “Restore”.
35
SETTING THE CURRENT DATE AND TIME
Use the following procedures to set the current date and
time, and to select the date format.
When you record an image, the time and date the image was
shot is registered in accordance with data from the camera’s
built-in clock. You can even use the TIME STAMP function to
“stamp” the date and time inside the image.
IMPORTANT!
• If you do not set the camera's built-in clock to the current date and time, all images are recorded with the
default date and time, which probably is not your correct current date and time. Be sure to correctly set the
clock before you use the camera.
• A flashing time display of 0:00 indicates that the time
and date (clock) settings have been cleared. Use the
procedure on this page to make the correct time and
date settings.
36
To set the date and time
1.
Slide the Function Switch to PLAY.
2.
Press MENU.
3.
Select “Set Up” “Date” “Adjust”.
4.
Set the current date and time.
• Use [+] and [–] to select the setting that is highlighted
on the monitor screen, and then press the shutter
button to advance to the next setting. Repeat this for
all of the settings on the monitor screen.
5.
After making all the settings on the monitor
screen, press MENU to register them.
time
date
Page 10

To select the date format
Example: May 12, 1999
You can select any one of the following formats for the above
date: 99/5/12, 12/5/99, 5/12/99.
1.
Slide the Function Switch to PLAY.
2.
Press MENU.
3.
Select “Set Up” “Date” “Style”.
4.
Use [+] and [–] to select the date format you
want, and then press the shutter button.
SETTING THE CURRENT DATE AND TIME
37
RECORDING
RECORDING
Using the Shutter Button
The following steps describe how to operate the shutter button so that Auto Focus has a chance to focus the image.
1.
Press the shutter button about half way.
• The Auto Focus feature automatically focuses the image.
2.
Press the shutter button as far as it will go to
record the image.
38
Basic Recording Operation
The following describes the basic operation for recording
images.
1.
Slide the Function
Switch to REC.
2.
Slide the POWER
Switch in the direction indicated by the
arrow.
• The POWER Switch returns to its original position
when you release it.
• If power turns off, slide the POWER Switch again to
turn it back on.
3.
After composing the image
on the monitor screen,
press the shutter button
about half way and hold it
there.
• The camera’s Auto Focus feature automatically focuses the
image.
REC
PLAY
• The operation lamp lights green when the Auto Focus
operation is complete.
• Take care to avoid blocking the lens with your fingers.
• If you plan to use the viewfinder to compose the image, press DISP several times until the monitor
screen turns off.
4.
After confirming that the Auto Focus operation
is complete, press the shutter button all the
way down to record the image.
• Images you record are stored in the CAMERA folder.
See page 75 for information about how you can
change to another folder to store images.
• After you record an image, the camera takes a few
seconds to store it in memory. If you try to change to
the Playback Mode while a save operation is in
progress, the message “Press DISP to cancel save”
appears on the monitor screen. Pressing DISP at this
time cancels the save operation.
CAUTION
• Never open the battery compartment cover, disconnect the AC adaptor from the camera, or unplug the
adaptor from the wall socket while the operation lamp
is flashing green. Doing so will not only make storage
of the current image impossible, it can also corrupt
other image data already stored in camera memory.
RECORDING
• Fluorescent lighting actually flickers at a frequency
that cannot be detected by the human eye. When using the camera indoors under such lighting, you may
experience some brightness or color problems with
recorded images.
IMPORTANT!
Auto Focus tends not to work well with the following
types of subjects.
• Solid color walls or objects with little contrast
• Strongly backlit objects
• Polished metal or other brightly reflective objects
• Venetian blinds or other horizontally repeating patterns
• Multiple images that are varying distances from the
camera
• Subjects in poorly lit areas
• 4X zoom images
These cases may make it impossible for Auto Focus to focus
properly, which is indicated by the red operation lamp. When
this happens switch to the Manual Mode for focusing (page
50). The following are the fixed focusing distances when
Auto Focus is unable to focus.
Well-lit Location: 1.5 meters (4.9´) minimum
With Flash: 1 to 2 meters (3.3´ to 6.6´)
39
RECORDING
Using the Viewfinder for Recording
The illustrations below show what you see when you look
through the viewfinder to compose an image for recording.
Auto Focus Frame
Focus range for 1m to
Close Up
Range
Frame
Focus Range Frame
This frame shows the focus range when the distance from
the lens to the subject is 1 meter (3.3´) to infinity.
Focus
Range
Frame
Focus range for 30cm
40
Close Up Range Frame
This frame shows the focus range when the distance from
the lens to the subject is 30 cm (11.8˝). You can use the
viewfinder for distances from 30 cm (11.8˝) to infinity. When
using Auto Focus, compose the subject so it is within the
Auto Focus Frame.
· to enter the Macro Mode or use the Manual
Press
Mode for distances less than 30 cm (11.8˝).
∞
• Entering the Macro Mode automatically turns on the monitor screen. Use the monitor screen to compose images in
the Macro Mode.
Page 11

Using Focus Lock
Normally, Auto Focus automatically focuses on the object
that is inside the Auto Focus Frame. Focus lock is a technique that lets you lock the focus on a subject and then move
the camera so the Auto Focus Frame is pointed at another
subject when you record. This keeps the original subject in
focus, even though a different object is within the Auto Focus
Frame.
• The Auto Focus Frame is shown on the monitor screen
only while the shutter button is being held half way down.
• Locking the focus also locks the exposure setting.
1.
Align the Auto Focus
Frame with the subject
you want to lock on and
press the shutter button
half way down.
• The Auto Focus frame turns
green or white when the image is in focus.
RECORDING
2.
While keeping the shutter button depressed
half way, move the camera and compose the image as you want.
3.
Press the shutter button all the way down to
record the image.
RECORDING
Using Quick Shutter
Pressing the shutter button sequentially records images at
0.5-second intervals (when flash is turned off). You can use
quick shutter for recording up to six normal images or five
Night Scene Mode images.
IMPORTANT!
• Note that you can use the viewfinder only (monitor
screen turned off) when recording images at a 0.5second interval. The interval is about one second
when the monitor screen is turned on.
• The power/card access lamp flashes while data is being written to the memory card. Never remove the
memory card from the camera while this lamp is flashing.
• Do not perform an image record operation while the
low battery indicator “
result in failure of part of the image to be recorded.
• It takes about 60 seconds for six images to be stored
in memory.
” is displayed. Doing so may
1.
Slide the Function Switch to REC.
2.
On the Record menu (page 59), select “Record
Options 1” and then turn on “Quick Shutter”.
• Turning on “Quick Shutter” causes “쑗쑗쑗쑗쑗쑗” to appear under the image folder name.
3.
Press the shutter button.
•The 쑗 marks sequentially change to 쎲 marks as im-
ages are recorded.
• Initially, images you record using quick shutter are
stored in a buffer. Any of the following conditions
causes images to be transferred from the buffer to the
memory card .
– Sliding the function switch to PLAY
– Pressing MODE or MENU
– When camera memory becomes full
– When the buffer becomes full (six images)
Using the Flash
You can use the built-in flash unit to provide illumination during recording.
1.
Slide the Function
Switch to REC.
2.
Press / .
• Each press of / cycles
through the flash mode in
the following sequence:
On Off Red-
Auto
eye Reduction.
Indicator
Flash Mode
None
Auto Flash
Flash On
Flash Off
Red-eye
Reduction
Flash is automatically enabled and
disabled in accordance with exposure conditions.
Flash is always fired, regardless of
exposure conditions.
Flash is never fired, regardless of
exposure conditions.
Fires a pre-flash followed by recording with flash, which reduces
the chance of red-eye.
/ button
Description
RECORDING
• The monitor screen goes blank and the operation lamp
flashes amber while the flash unit is charging.
Operation lamp
Camera Shake Indicator
The (camera shake indicator) appears on the monitor
screen whenever flash is turned off and shutter speed is
slow.
• If the camera shake indicator
use a tripod to steady the camera.
• Note that the camera shake indicator
in the Night Scene Mode (page 54).
appears, use the flash or
does not appear
Flash Indicator
When you press the shutter button half way, the flash icon
appears on the monitor screen to indicate that the flash will
fire when shutter button is pressed the rest of the way down.
41
43
42
RECORDING
IMPORTANT!
• Never use the flash in areas where combustible or explosive gas is present. Doing so creates the danger of
fire and explosion.
• Never fire the flash in the direction of a person operating a motor vehicle. Doing so can interfere with the
driver’s vision and create the danger of accident.
• Never fire the flash while it is too close to the subject’s
eyes. Intense light from the flash can cause eye damage if it is fired too close to the eyes, especially with
young children. When using the flash, the camera
should be at least one meter from the eyes of the subject.
• Make sure that you do not touch or block the flash or
light sensor with your fingers. Doing so can soil these
components and interfere with correct flash operation.
• Flash should be used for distances within the range of
about 0.7 meters to 2 meters (2.3´ to 6.6´). Flash does
not work well outside this range.
• Depending on operating conditions (type of battery
being used, temperature, etc.), it may take up to 10
seconds for the flash unit to charge.
• The flash is disabled during movie, continuous, and
AEB recording. The
this condition.
indicator flashes to indicate
44
• The flash unit will not charge when battery power is
low. The
indicator flashes red to warn you that the
flash will not fire correctly, which may affect exposure
of the image. Replace batteries as soon as possible
when this happens.
• Red-eye reduction may not work well when the camera is not pointed directly at the subject or when the
subject is far from the camera.
• In the Red-eye Reduction Mode, the flash is fired automatically in accordance with exposure. Because of
this, the flash will not fire in a well-lit area.
• White balance is fixed while the flash is being used, so
the coloring of the recorded image may be affected by
sunlight, fluorescent lighting, or other sources of illumination in the immediate area.
Page 12

Resolution Settings
The camera has four resolution modes: Super Fine ( ), Fine
), Normal ( ), Economy ( ).
(
• To determine the number of images that can be stored on a
memory card of a different capacity, multiply the capacities
in the table by the appropriate value.
• The actual number of images that can be stored in memory
cannot be specified precisely because the amount of
memory required for storage of each image differs according to image contents.
Setting Indicator
Resolution
Number of Images
8MB memory card
Number of Images
48MB memory card
(option)
File Size
(per image)
Computer
Output image
Super
Fine Normal Economy
Fine
14 19 33 55
88 123 207 342
500KB 352KB 200KB 112KB
1280 x 960 1280 x 960 1280 x 960 640 x 480
pixels pixels pixels pixels
RECORDING
• The figures in the left are approximations only. The actual
number of images depends on image subject matter.
Use the procedure under “Record Menu” on page 59 for
details on changing the resolution modes.
• Note that the maximum number of images that can be
stored in a single folder is 250. Because of this, even if you
are using a card that allows storage of more than 250 images, the camera’s monitor screen will show capacity for
up to 250 images only. You will be able to store the additional images by changing to another folder.
• The number of images that can be recorded may differ
when you use card browser (page 89).
RECORDING
Exposure Compensation
This camera features an program AE function that automatically changes shutter speed and aperture in accordance
with available light. In addition, you can also manually adjust
the exposure to compensate for backlighting, indirect indoor
lighting, dark backgrounds, and other special conditions.
To manually adjust the exposure
If the monitor screen is turned off, press the DISP button to
turn it on.
1.
Set the Function Switch to REC.
2.
Use [+] and [–] to perform exposure compensation.
• Pressing [+] or [–] displays an EV indicator that shows
the current exposure compensation setting.
• Pressing [+] makes the image on the monitor screen
brighter. Use it to adjust for dim indoor lighting and
backlighting.
• Pressing [–] makes the image on the monitor screen
darker. Use it to adjust for bright sunlight.
• The EV indicator turns red whenever the compensation value is at its limit.
3.
After adjusting the exposure, press the shutter
button to record the image.
NOTES
• Exposure compensation is generally expressed in
terms of an exposure compensation (EV) value. The
exposure compensation value is always set to zero
whenever you turn on the camera.
• Each press of [+] or [–] changes the exposure compensation value by 0.5EV. A change in either direction
is indicated on the monitor screen by arrows pointing
left (negative correction) or right (positive correction).
• The normal maximum range for exposure compensation is –2EV to +2EV. Under certain conditions, however, the camera may impose lower maximum values
when exposure compensation would result in an image that is too dark or too light.
• The exposure compensation value automatically reverts to zero whenever the shutter button is pressed.
You can manually reset the exposure compensation
value by using [+] and [–] to change the value back to
zero, which is indicated when the EV indicator disappears from the monitor. EV value is fixed during panorama recording.
RECORDING
45
47
46
OTHER RECORDING FUNCTIONS
OTHER RECORDING FUNCTIONS
This section describes more advanced recording operations
that are also provided by this camera.
Use the monitor screen for zoom, macro, movie, panorama,
manual, timer and multiple exposure recording operations.
Continuous Recording
Holding down the shutter button records up to six images at
0.5-second intervals.
IMPORTANT!
• The flash unit is disabled while Continuous Recording
is being used.
• Note that you can use the viewfinder only (monitor
screen turned off) when recording images at a 0.5second interval. The interval is about one second
when the monitor screen is turned on.
• The power/card access lamp flashes while data is being written to the memory card. Never remove the
memory card, batteries or AC adaptor from the camera while this lamp is flashing.
• Do not perform an image record operation while the
low battery indicator “
result in failure of part of the image to be recorded.
• It takes about 60 seconds for six images to be stored
in memory.
” is displayed. Doing so may
48
1.
Slide the Function Switch to REC.
2.
Press MODE, and then select (CONTINUOUS).
3.
Compose the image and then record it.
Continuous Recording Mode
Page 13

Using the Zoom Feature
The zoom feature lets you move in closer on subjects that
are located far from the camera. You can select either 2X or
4X zoom. In both cases, images are Economy “
[VGA size (640 x 480 pixels)].
1.
Slide the Function Switch to REC.
2.
Press ZOOM to display the current zoom setting in the lower right of the monitor screen.
• Press ZOOM again to cycle through the zoom settings
until the one you want is on the monitor screen.
3.
Compose the image and then record it.
” resolution
Zoom
setting
OTHER RECORDING FUNCTIONS
IMPORTANT!
• The focus range for Auto Focus depends on the digital
zoom setting as shown below.
Digital Zoom Focus Range
OFF 0.3m to ∞ (1.0´ to ∞)
2X 0.5m to ∞ (1.6´ to ∞)
4X 0.8m to ∞ (2.6´ to ∞)
• The camera may not be able to focus on an image
within the Auto Focus frame if the subject is closer
than the distances noted above. In such a case, the
Auto Focus frame changes to white when you press
the shutter button half way.
49
OTHER RECORDING FUNCTIONS
Using the Macro Feature
With the macro feature, you can record close up images of
subjects locate only 10cm (3.9˝) from the lens.
• Auto Focus is disabled while the Macro feature is in use.
• With the macro feature, use the monitor screen to compose the image. Do not use the viewfinder.
1.
Slide the Function Switch to REC.
2.
Press · to display the macro setting you
want to use.
• Each press of · cycles through the macro and
self-timer settings in the following sequence: SELF-
” MACRO “ ” MACRO + SELF-
TIMER “
/ ”
TIMER “
Macro
setting
3.
After composing the image on the monitor
screen, press the shutter button all the way
down to record the image.
50
Manual Focus
Manual Focus lets you manually adjust the focus of an image.
1.
Slide the Function Switch to REC.
2.
Use the Record Menu (page 59) to change the
“Focus” (Record Options 1) setting to
“Manual”.
Manual
Focus
indicator
3.
Manually measure the distance to the subject,
and then press [+] or [–].
• This causes the current focus distance to appear on
the screen.
4.
Use [+] and [–] to increase or decrease the distance value on the monitor screen, until the
one closest to distance you measured in step 3
is displayed.
5.
Press the shutter button.
• The operation lamp and the Auto Focus frame do not
appear while manual focus is in use.
OTHER RECORDING FUNCTIONS
Movie Recording
You can record movies that are approximately 3.2, 6.4, or
9.6 seconds long. You can also specify the file format (JPEG
or AVI), and the image size (320 x 240 pixels or 160 x 120
pixels). For details, see “Record Menu” on page 59.
There are two types of movie recording: PAST and NORMAL. PAST lets you capture images of events that occurred
before you pressed the shutter button while NORMAL
records what happens after you press the shutter button.
See “Record Menu” on page 59 for details on how to select
the movie length.
• AVI files can be displayed and saved on a computer that is
set up to support use of CompactFlash cards. For such a
computer, install QuickTime 3, which comes bundled with
the camera.
• AVI format movies cannot be displayed or saved on a computer using the bundled PC link software.
NORMAL
1.
Slide the Function Switch to REC.
2.
Press MODE and then select (MOVIE).
51
OTHER RECORDING FUNCTIONS
3.
Compose the image and then record it.
• Auto Focus automatically adjusts in accordance with
the movement of the subject.
• See “Playing Back a Movie” on page 66 for details on
playing back a movie.
PAST
1.
Slide the Function Switch to REC.
2.
Use the Record Menu (page 59) to change the
“Mode” (Movie) setting to “Past”.
3.
Press MODE and then select (MOVIE).
52
Movie
Recording
Mode
4.
Compose the image on the monitor screen and
then press the shutter button about half way.
• Auto Focus automatically adjusts in accordance with
the movement of the subject.
• The message “STAND BY” remains on the monitor
screen for a period that is equal to the movie length
you select (3.2, 6.4, or 9.6 seconds).
Recording is not performed if you press the shutter
button while this message is on the monitor screen.
5.
Keep the camera pointed at the action you
want to record, and press the shutter button all
the way down when you want to end recording.
• If you selected a movie length of 9.6 seconds, for example, pressing the shutter button records everything
that went on in front of the lens from about 9.6 seconds ago up to the point you pressed the shutter button.
Page 14

IMPORTANT!
• Flash is disabled during movie recording.
• Movie images that are uploaded to a personal computer and then download back to the camera cannot
be played back as a movie. Uploading a movie image
to a computer ungroups it, so you will not be able to
play it back when you download it back to the camera
unless you re-group them using the procedure on
page 67.
NOTE
Movie Length and Number of Images
Length
File Format: JPEG
3.2 seconds
6.4 seconds
9.6 seconds
File Format: AVI
3.2 seconds
6.4 seconds
9.6 seconds
* When using 8MB CF card.
320 x 240 160 x 120
6 sets (1088KB)
3 sets (2176KB)
2 sets (3264KB)
8 sets (896KB)
4 sets (1792KB)
3 sets (2100KB)
27 sets (272KB)
13 sets (544KB)
9 sets (816KB)
30 sets (224KB)
16 sets (448KB)
10 sets (672KB)
OTHER RECORDING FUNCTIONS
Panorama Recording
With panorama recording you record a series of images and
then link them to create a single panoramic effect.
1.
Slide the Function Switch to REC.
2.
Press MODE and then select (PANORAMA).
Panorama
Recording
Mode
53
OTHER RECORDING FUNCTIONS
3.
Compose the image and then record it.
• The right edge of the previous image you recorded remains on the monitor screen, so you can align it correctly with the next image.
• From the second image onwards, aim the camera further to the right and overlap the next image with the
previous one on the monitor screen.
• Up to nine images can be grouped into a panorama.
Press MENU when you want to stop a panorama recording operation.
• Aperture setting and white balance settings are locked
when you record the first image of a panorama, and
these settings are applied to all subsequent images in
that panorama.
• If you want to link more than 9 images into a panorama, upload the images to a computer and use your
computer application to link them.
• See “Panorama Playback” on page 68 for details on
playing back panoramas.
54
Night Scene Mode
The Night Scene Mode is for recording images in dark areas.
When recording images of people on a twilight or night time
background, you can use the flash in combination with the
Night Scene Mode for slow synchro recording.
1.
Slide the Function Switch to REC.
2.
Press MODE and then select (NIGHT SCENE).
3.
Compose the image and then record it.
IMPORTANT!
• The shutter speed is quite slow in the Night Scene
Mode, so you should be sure to use a tripod to hold
the camera steady. Note that the camera shake indicator does not appear in the Night Scene Mode.
• Slow shutter speed also causes slow monitor screen
refresh. Because of this, the image recorded may be
slightly different from the image that was on the monitor screen when you pressed the shutter button.
• Auto Focus is difficult in the dark. If you experience
problems, use manual focusing (page 50). There may
be some blurring of the image if the subject is fast
moving.
• In the Night Scene Mode, Quick Shutter records up to
five consecutive shots.
• The contrast of Night Scene Mode images is not affected by changes made using the Record Menu's
Contrast (Record Settings) settings.
OTHER RECORDING FUNCTIONS
Using AEB (Auto Exposure Bracketing)
When AEB is turned on, the same image is recorded using
three different exposure settings.
• This feature records three images at exposures of –0.5EV,
±0EV, and +0.5EV.
1.
Slide the Function Switch to REC.
2.
Press MODE, and then select
3.
Compose the image and then record it.
• Since the same image is recorded three times, the
record operation takes a bit longer than normal.
AEB
.
55
OTHER RECORDING FUNCTIONS
Using Multiple Exposure
Multiple exposure lets you record an image over another
one. You can record over an existing image already in
memory, or you can record two new images. You can also
use the Record Menu (page 59) to specify the brightness of
the combined images.
To record a new image over an existing image
1.
Slide the Function Switch to REC.
2.
Press MODE, and then select (MULTIPLE
EXPOSURE).
56
3.
Use [+] and [–] to move the image over which
you want to record another image to the center
of the monitor screen, and then press the shutter button.
4.
Use the semi-transparent image to compose
the new image, and then record it.
To record two new images
1.
Perform steps 1 through 2 under “To record a
new image over an existing image”.
2.
Use [+] and [–] to move “Recording” to the center of the monitor screen, and then press the
shutter button.
3.
Record the first image.
• This causes a semi-transparent version of the image
to remain on the monitor screen.
4.
Use the semi-transparent image to compose
the new image, and then record it.
Page 15

Using the Self-timer
You can use the self-timer for either of the two following recording operations.
10-second recording .... Records about 10 seconds after
2-second recording ...... Records about two seconds after
1.
Slide the Function Switch to REC.
2.
Use the Record Menu (page 59) to set the selftimer trigger time (Record Options 2).
the shutter button is pressed. Use
this method when you want to be
included in the image that is recorded.
the shutter button is pressed. Use
this method to avoid camera
movement caused when the shutter button is pressed.
OTHER RECORDING FUNCTIONS
3.
Press · .
• Each press of · cycles through the macro and
self-timer settings in the following sequence: SELFTIMER “
” MACRO “ ” MACRO + SELF-
/ ”
TIMER “
Self-timer
setting
4.
Compose the image and then record it.
• The self-timer lamp indicates the seconds as they are
counted down. In the case of 10-second recording,
the monitor screen automatically goes blank when the
countdown is started. The screen will turn back on after image recording is complete.
• To cancel ongoing Self-Timer operation, press the
shutter button.
57
OTHER RECORDING FUNCTIONS
Using the Timer
You can use the timer to perform any one of the following
operations.
• Interval Recording
Use this method to record a series of images at fixed time
intervals.
• Timer Recording
Use this method to record a single image after passage of
a fixed amount of time.
• Interval Timer Recording
Use this method to record a series of images at fixed time
intervals, starting after passage of a fixed amount of time.
1.
Slide the Function Switch to REC.
2.
Press MODE, and then select (TIMER).
3.
Specify the number of images (Shots), the interval between shots (Interval), and the record
start time (Start time).
• Shots ..........250 maximum
• Interval ........1 to 60 minutes
• Start time .... Current time to current time plus 24
• The Interval cannot be specified when 1 is specified
for Shots.
58
4.
Compose the image and then record it.
• When the start time you set is reached, the operation
lamp lights and image recording starts.
• The monitor screen of the camera turns off between
shots of a timer operation. If you turn on camera
power during this time, the message “TIMER CANCEL” appears and the timer operation is cancelled.
Record Menu
Use the Record Menu to make image quality, white balance,
movie length, and other settings.
Record Settings
Quality
Sharpness
Saturation
Contrast
Use this setting to specify the quality of the image.
■ Choices: Super Fine, Fine, Normal, Economy
(See page 45).
Use this setting to control the outline of a person's
face when recording a portrait.
■ Choices: Hard, Normal, Soft
Hard ..... Hard outline
Soft ....... Soft outline
Use this setting to control the depth of the colors of
an image.
■ Choices: High, Normal, Low
High ...... High color saturation
Low ....... Low color saturation
Use this setting to control the brightness of image
colors. Night Scene images are not affected by
contrast settings.
■ Choices: High, Normal, Low
High ...... High color brightness
Low ....... Low color brightness
Quick
Shutter
Focus
Metering
White
Balance
OTHER RECORDING FUNCTIONS
Record Options 1
Use this item to toggle Quick Shutter recording on
and off. When turned on, you can take a series of
shots at 0.5 second intervals.
Use this item to toggle between Auto and Manual.
Use this setting to select the metering method.
■ Choices: Multi, Center, Spot
Multi....... Takes readings across the entire im-
age, and provides balanced exposure
settings.
Center ...Takes reading at the center of the im-
age.
Spot .......
Takes reading at a very limited spot at
the center of the image. Peripheral
lighting does not affect this reading, so
exposure is based on the subject alone.
Use this item to select the white balance setting
that makes the colors of the subject appear most
natural.
■ Choices: Auto, Day Light, Shade, Tungsten,
Fluorescent, Manual
Day Light ........ Outdoors
Shade............. Blue tinted sunlight
Tungsten ........ Red tinted incandescent light
Fluorescent .... Green tinted fluorescent light
Manual ........... Sets up the camera for record-
ing of a white sheet of paper under currently available light
(page 62).
59
OTHER RECORDING FUNCTIONS
Color Use this setting to select the basic coloring of the
Self-timer
Grid
Time Stamp
Folder
Multiple
Exposure
image.
■ Choices: Color, B/W, Sepia
Record Options 2
Use this item to set the self-timer trigger time as
either 10 seconds or 2 seconds.
Use this setting to toggle a display grid on and off.
The grid can be helpful when composing an image.
Use this setting to toggle date and time stamping
of images on and off. Note that the date and time
cannot be deleted from an image once it is
stamped.
Use this item to specify the folder where recorded
images should be stored.
Use this setting to specify the brightness of two images combined using multiple exposure.
■ Choices: Bright, Dark, Average
Bright uses the brightness of the brighter of the
two images.
Dark uses the brightness of the darker of the two
images.
Average uses the average brightness of the two
images.
60
File Format
Size
Length
Mode
Movie
Use this setting to specify the file format of movies.
■ Choices: AVI, JPG
Use this setting to specify the size of each movie
frame.
■ Choices: Normal, Small
Normal... 320 x 240 pixels
Small ..... 160 x 120 pixels
Use this setting to specify the length of a movie.
■ Choices: 3.2, 6.4, 9.6 seconds
Use this setting to specify the movie mode.
■ Choices: Normal, Past
Page 16

To make Record Menu settings
1.
Slide the Function Switch to REC.
2.
Press MENU.
3.
Use [+] and [–] to select the category you want
to set.
Category
4.
Use [+] and [–] to select the item you want to
set.
Item
OTHER RECORDING FUNCTIONS
5.
Make the setting.
• If you want to change other settings, repeat steps 4
and 5.
• After you make the Record Menu settings you want,
select EXIT.
• For the Focus, Metering, and White Blance settings,
you can use the procedure under “Customizing
Record Mode Power On Settings” on page 63 specify
whether or not settings should be retained when camera power is turned off. All other settings are retained
when power is turned off.
OTHER RECORDING FUNCTIONS
Performing Manual White Balance
Certain lighting conditions can cause Auto white balance to
take a very long time or can result in a limitation of the adjustable range (color temperature). If you suspect your current lighting conditions are causing problems, try performing
manual white balance. This sets white balance to a level that
can be used under any lighting conditions.
The following procedure describes how to perform manual
white balance using a white piece of paper. For optimum results, you should use a special reflective plate that should be
commercially available from a local camera equipment
shop.
1.
Slide the Function Switch to REC.
2.
Press MENU.
3.
Select “Record Options 1” “White Balance”
“Manual”.
4.
Keeping the camera pointed at the white sheet
of paper, press DISP to make the manual white
balance settings.
• Pressing the shutter button at this time returns the
camera to the white balance setting that was obtained
the last time you performed this manual white balance
procedure.
5.
The manual white balance procedure stops automatically when it is done.
• If the manual white balance procedure does not end
automatically, press the shutter button to interrupt it.
6.
After the camera finishes making the white balance setting, it returns to the screen in step 3
above. Select “Exit” to exit the manual white
balance procedure.
Customizing Record Mode Power On Settings
A power on setting is one that is set by the camera automatically whenever you turn it on. Normally, the camera uses its
own built-in power on default settings. With the procedure
described here, however, you can tell the camera to save the
camera’s current Recording Mode, Flash, Focus, Metering
and White Balance settings in mode memory when it is
turned off, and to restore the setting when power is turned on
again. Settings stored in mode memory override the
camera’s preset defaults.
The following table shows the items whose settings you can
save in mode memory. Note that the procedure described
here only lets you select ON (save current setting in mode
memory) or OFF (use the camera’s preset default setting).
The procedures for changing current settings can be found
on the pages noted in the table.
Item ON
Recording
Mode
Flash
Focus
Metering
White Balance
Recording Mode when
power is turned off.
Current flash mode setting
(page 43).
Current focus mode setting:
Auto Focus, Manual Focus
(page 50), or Macro Mode
(page 50).
Current Manual Mode metering setting (page 59).
Current Manual Mode white
balance setting (page 59).
OTHER RECORDING FUNCTIONS
OFF
(camera preset)
Single
Auto
Auto
Multi
Auto
61
63
62
OTHER RECORDING FUNCTIONS
To turn power on default settings on and off
1.
Slide the Function Switch to REC.
2.
Press MODE, and then select .
3.
Select “Mode”.
4.
Select the item whose setting you want to
change.
5.
Select “On” or “Off”.
• Repeat steps 4 and 5 for other items if you want.
• After you are finished making the settings you want,
press MENU.
64
Initializing Mode Memory
Use the following procedure to initialize the mode memory.
IMPORTANT!
Note that performing the following procedure to initialize
mode memory also initializes power save trigger time
settings (page 35).
1.
Perform steps 1 through 2 under “To turn
power on default settings on and off”.
2.
Select “Restore”.
• The following table shows the mode memory status of
each item following the above procedure.
Item Initialized Setting
Recording Mode Off
Flash On
Focus Off
Metering Off
White Balance Off
• An item that is “On” stores its current setting in mode
memory when camera power is turned off, and restores the
setting when power is turned back on again.
• An item that is “Off” uses the camera’s preset power on
default setting.
Page 17

PLAYBACK
The following describes the different techniques that you can
use to playback recorded images.
Basic Playback Operation
The built-in monitor screen of the camera lets you play back
recorded images without connecting an external monitor.
1.
Slide the Function Switch
to PLAY.
2.
Use [+] and [–] to scroll through the images
stored in camera memory.
• Press [+] to scroll forward and [–] to scroll back. Holding down either button scrolls at high speed.
REC
PLAY
PLAYBACK
NOTES
• Sliding the Function Switch to PLAY immediately after
recording an image displays the image you just recorded first.
• Pressing the shutter button while a movie or panorama image is on the monitor screen starts playback
of the movie or panorama .
• The image that initially appears on the monitor screen
in the PLAY mode is a preview image. The full of image appears after a few seconds.
PLAYBACK
Playing Back a Movie
Use the following operation to play back a movie that was
recorded using the operation under “Movie Recording” on
page 51.
1.
Slide the Function Switch to PLAY.
2.
Use [+] and [–] to select the movie you want to
play back.
3.
Press the shutter button to start playing back
the movie.
• You can use [+] (forward) and [–] (reverse) while playing back a movie to change the playback direction.
• To enlarge the movie image so it fills the entire monitor screen, press DISP. Pressing the DISP again returns the image to its original small size.
• Pressing the shutter button during movie play pauses
playback. Press the shutter button again to resume
playback.
• While movie playback is paused, you can use [+] (forward) and [–] (reverse) to move frame-by-frame
through the movie.
4.
After the movie is complete, press MENU.
Regrouping Movie Images
When you record a movie, the camera automatically groups
images that make up the movie. Transferring a movie to a
personal computer causes its images to become ungrouped.
If you download the movie back to the camera, you will be
unable to play it back as a movie unless you use the following procedure to re-group the images.
• Only images recorded while “JPEG” is selected for the
Record Menu (page 60) “File Format (Movie)” item can be
grouped.
• Only images recorded using Economy Mode resolution
can be grouped.
• Non-movie from a computer or other source are grouped at
a size of 160 x 120 pixels.
To re-group movie images
1.
Slide the Function Switch to PLAY.
2.
Use [+] and [–] to display the first of the four
images that make up the movie you want to regroup.
3.
Press MENU.
4.
Select “Tools” “Group” “Movie”.
PLAYBACK
5.
Use [+] and [–] to scroll through the other images that make up the movie until the one you
want to use as the final image is on the display.
6.
Press the shutter button to re-group the movie
images.
• The movie playback screen (page 66) appears after
the re-grouping operation is complete.
To ungroup movie images
IMPORTANT!
AVI format movie files stored in the AVI folder cannot be
ungrouped.
1.
Perform steps 1 through 3 under “To re-group
movie images”.
2.
Select “Tools” “Group”.
3.
Press the shutter button.
65
67
66
PLAYBACK
Panorama Playback
Use the following operation to playback panoramas recorded using the operation under “Panorama Recording” on
page 53.
1.
Slide the Function Switch to PLAY.
2.
Use [+] and [–] to select the panorama you
want to play back.
3.
Press the shutter button to start panorama
playback.
• You can change the direction of a panorama that is
playing back by pressing [+] or [–].
68
• To enlarge the panorama image so it fills the entire
monitor screen, press DISP. Pressing the DISP again
returns the image to its original small size.
• Pressing the shutter button during panorama play
pauses playback. Press the shutter button again to resume playback.
• While panorama playback is paused, you can use [+]
(forward) and [–] (reverse) to move frame-by-frame
through the panorama.
4.
Press MENU to stop panorama playback.
Page 18

Regrouping Panorama Images
Transferring a panorama to a personal computer causes its
images to become ungrouped. If you download the panorama back to the camera, you will be unable to play it back
as a panorama unless you use the following procedure to regroup the images.
To re-group panorama images
IMPORTANT!
• You cannot group movie images or images of different
quality into a panorama.
• You can group up to nine images.
1.
Slide the Function Switch to PLAY.
2.
Use [+] and [–] to display the first of the images
that make up the panorama you want to regroup.
3.
Press MENU.
PLAYBACK
4.
Select “Tools” “Group” “Panorama”.
5.
Use [+] and [–] to scroll through the other images that make up the panorama until the one
you want to use as the final image is on the display.
6.
Press the shutter button to re-group the panorama images.
• The panorama playback screen (page 68) appears after the re-grouping operation is complete.
PLAYBACK
To ungroup panorama images
1.
Perform steps 1 through 3 under “ To re-group
panorama images” on page 69.
2.
Select “Tools” “Group”.
3.
Press the shutter button.
Using Zoom
The following operation lets you magnify an image to twice
its normal size. Note that you can zoom only a single still
image.
IMPORTANT!
Movie and panorama images cannot be zoomed.
1.
Slide the Function Switch to PLAY.
2.
Use [+] and [–] to select the image you want to
zoom.
3.
Press MENU.
4.
Select “View” “Zoom”.
5.
Specify the area.
• The portion of the selected area appears on the display at twice its normal size.
• Pressing ZOOM at this time increases the displayed
image to four times its normal size. Each press of
ZOOM toggles the image between two times and four
times its normal size.
• Use [+] and [–] to move the area selection frame left
and right. Use
down.
6.
To return the image to its normal size, press
any button besides [+], [–],
and DISP.
/ and · to move it up and
/ , · , ZOOM
PLAYBACK
Displaying Multiple Images
The following operation lets you simultaneously view either
four or nine images on the same screen. This capability is
especially useful when playing back to the screen of a connected TV, and can be used to display a catalog of products,
etc.
• The multi-image screen shows all 16 images of a movie on
a single screen.
1.
Slide the Function Switch to PLAY.
2.
Press MENU.
3.
Select “View” “4 Images” or “9 Images”.
• The first image of the set is the image that was on the
screen when you performed step 2 of this operation.
The other images are those that sequentially follow
the first one.
69
71
70
PLAYBACK
4.
Use [+] and [–] to scroll through images stored
in memory.
• To view a particular image in normal size, press DISP.
This causes an image number to appear in the upper
left corner of the monitor screen. Use [+] and [–] to
change to the number of the image you want to view
and then press the shutter button to display the image.
5.
After you are finished, press any button besides [+], [–], or DISP return to the normal
single-image display.
72
Slide Show
Slide Show automatically scrolls through the images stored
in memory. You can also specify how much time should be
allowed between each image.
IMPORTANT!
Auto Power Off (page 33) is disabled whenever Slide
Show is being used. This means you should not leave
Slide Show running when using batteries to power the
camera. Doing so can rundown batteries. Be sure to
stop Slide Show and turn off the camera after you are
finished.
Page 19

1.
Slide the Function Switch to PLAY.
2.
Press MENU.
3.
Select “View” “Slide Show”.
4.
To stop Slide Show, press any button besides
MENU.
• Pressing MENU while a Slide Show is in progress displays a screen that lets you change the interval within
the range of 5 to 30 seconds.
• Note that all buttons are disabled while an image
change is in progress. Wait until an image is stopped
on the monitor screen before performing a button operation, or hold down the button until the image stops.
• Slide Show shows only the images contained in the
current folder.
PLAYBACK
Screen Saver
The screen saver function automatically activates Slide
Show (which automatically scrolls through images) whenever you do not perform any operation for about five minutes
in the Playback Mode. This protects the camera’s monitor
screen and the screen of a connected TV against “burn in” of
a static image that is left displayed too long.
IMPORTANT!
• The screen saver is enabled only when the camera is
being powered by its optional AC adaptor. If you do
not perform any operation for five minutes under battery power, camera power automatically turns off
(Auto Power Off).
• The screen saver displays protected images only. The
screen saver is disabled if there are no protected images in memory.
• PC Link will not send images between the camera and
a personal computer while the screen saver is turned
on. Make sure you turn off the screen saver before
trying to perform any image transfer operation. Note
that the screen saver is turned on when you purchase
the camera.
PLAYBACK
To turn the screen saver on and off
1.
Slide the Function Switch to PLAY.
2.
Press MENU.
3.
Select “Set Up” “Screen Saver” “On”.
• To turn off the screen saver, perform the above procedure and select “Off”.
• The screen saver activates if you do not perform any
operation for about five minutes in the Playback
Mode.
• Press any key to exit the screen saver.
• When changing between images, the screen saver
uses the interval that is specified for Slide Show (page
72).
USING FOLDERS
Folders help you to group your images into any arrangement
you like. You can use folders, for example, to keep your personal images separate from images you need for business.
There are six folders from which to choose. Any image you
record is automatically placed into the currently selected
folder.
NOTE
You cannot create additional folders.
Recording an Image in a Specific Folder
Images you record are normally stored in the folder named
CAMERA. Movies recorded when AVI is selected as the
movie file format are always stored in the folder named AVI.
See “Record Menu” on page 59 for information about how
you can change to another folder to store images.
• Up to 250 images can be stored in a single folder.
Selecting a Folder to Playback Images
1.
Slide the Function Switch to PLAY.
2.
Each press of / sequentially selects available folders.
USING FOLDERS
To Move a Single Image from One Folder to
Another
IMPORTANT!
Make sure the folder that contains the image you want
to move is currently selected before you start the following procedure.
1.
Slide the Function Switch to PLAY.
2.
Press MENU.
3.
Select “Tools” “Move”.
4.
Select the folder to which you want to move the
image.
73
75
74
USING FOLDERS
5.
Select “Select”.
6.
Select the image you want to move.
• Selected images are indicated by ★.
• Repeat step 6 to select other images if you want.
7.
After all the images you want to move are selected, press DISP to move them.
76
To Move All the Contents in One Folder to
Another Folder
IMPORTANT!
Select the folder whose images you want to move before starting the following procedure.
1.
Perform steps 1 through 4 under “To Move a
Single Image from One Folder to Another” on
page 75.
2.
Select “Folder”.
Page 20

IMAGE PROTECTION
Use the following operations when you want to protect images against accidental deletion. A protected image cannot
be deleted until it is unprotected. You can protect and
unprotect a single specific image, all the image in a particular folder, or all images currently on the memory card.
IMPORTANT!
Formatting a memory card (page 29) deletes all images
on the card, even if some or all of the images are protected.
To Protect and Unprotect a Single Image
1.
Slide the Function Switch to PLAY.
2.
Press MENU.
3.
Select “Tools” “Protect”.
4.
Select “Select”.
5.
Select the image you want to protect.
• Selected images are indicated by .
• Repeat step 5 to select other images if you want.
6.
After all the images you want to protect are selected, press DISP to protect them.
IMAGE PROTECTION
To Protect and Unprotect Folders
IMPORTANT!
Select the folder whose images you want to protect before starting the following procedure.
1.
Perform steps 1 through 3 under “To Protect
and Unprotect a Single Image” on page 77.
2.
Select “Folder”.
3.
Select “Protect” or “Unprotect”.
• The indicator that is shown in the upper left corner
of the images when image information is turned on
(page 77) indicates they are protected.
indicator does not appear when images are not
• The
protected.
To Protect and Unprotect All Images on the
Memory Card
1.
Perform steps 1 through 3 under “To Protect
and Unprotect a Single Image”.
2.
Select “All”.
3.
Select “Protect” or “Unprotect”.
• The indicator that is shown in the upper left corner
of the images when image information is turned on
(page 77) indicates they are protected.
indicator does not appear when images are not
• The
protected.
DELETING IMAGES
Use the following operations when you want to delete images. You can delete a single specific image, all the images
in a particular folder or all images currently on the memory
card.
IMPORTANT!
• Image deletion cannot be undone. Before deleting an
image, make sure you no longer need it or you have a
back-up copy saved on you computer, on diskette, or
on some other medium.
• Be especially careful with “To Delete All Unprotected
Images” operation, which deletes all unprotected images in memory.
• A protected image cannot be deleted. See “Image
Protection” on page 77 for details on protecting and
unprotecting images.
To Delete a Single Image
1.
Slide the Function Switch to PLAY.
2.
Press MENU.
3.
Select “Delete”.
4.
Select “Select”.
5.
Select the image you want to delete.
• Protected images are not displayed.
• Selected images are indicated by
• Repeat step 5 to select other images if you want.
.
77
79
78
DELETING IMAGES
6.
After all the images you want to delete are selected, press DISP to delete them.
7.
Select “YES” to delete selected images.
NOTE
The camera does not maintain open spaces in its
memory. Deleting an images causes all images following the deleted image to be shifted up.
80
To Delete All the Images in a Folder
1.
Press / and then specify the folder whose
images you want to delete.
2.
Perform steps 1 through 3 under “To Delete a
Single Image” on page 79.
3.
Select “Folder”.
4.
Select “YES” to delete the contents of the
folder, or “NO” to abort the delete operation
without deleting anything.
• When the above procedure is performed while there
are protected images in memory, the first of the protected images appears on the monitor screen after the
unprotected images are deleted.
Page 21

To Delete All Unprotected Images
1.
Perform steps 1 through 3 under “To Delete a
Single Image” on page 79.
2.
Select “All”.
3.
Select “YES” to delete all unprotected images,
or “NO” to abort the delete operation without
deleting anything.
• When the above procedure is performed while there
are protected images in memory, the first of the protected images appears on the monitor screen after the
unprotected images are deleted.
DELETING IMAGES
CONNECTIONS
This camera is equipped with VIDEO OUT terminal for connection to a television or video deck, and a DIGITAL terminal for
connection to a computer or other equipment.
VIDEO OUT Terminal
• Television (page 84)
• Video Deck, Video Printer
You can connect to a video tape deck and
record image to tape. Or you can connect to
a video printer to produce hard copy printouts of your images.
INPUT
AUDIO
VIDEO IN
terminal of
other device
VIDEOLR
VIDEO OUT
Terminal
Special video
cable that comes
with camera
DIGITAL
Terminal
IMPORTANT!
• Be sure to turn off both the camera and other equipment before making any connections.
• Check the documentation that comes with your other
equipment for information you may need to know
when making connections.
• Leaving the same image displayed on a television or
computer display screen for very long periods can
cause the image to be “burned in” on the screen. When
this happens, a faint after-image remains on the
screen, even after you disconnect the camera. To avoid
this, you should not leave the same image displayed on
such a screen for very long periods.
• This camera does not support cable transfer of data
with other CASIO digital cameras.
Cables
The type of cable you
should use depends
on the type of
equipment to which
you are connecting.
DIGITAL Terminal
• Computer
(page 85)
• QV Color Printer
(page 85)
CONNECTIONS
81
83
82
CONNECTING TO OTHER EQUIPMENT
To Connect to a Television
You can playback images in camera memory on the screen
of a connected television.
Accessory
TV
1.
Connect one end of the video cable to the camera and the other end to the television.
2.
Set up the television for video input.
• See the documentation that comes with the television
for information about how to do this.
3.
Use the operations under “Playback” on page
65 to playback images on the television screen.
video cable
INPUT
VIDEO
LR
AUDIO
VIDEO IN terminal
VIDEO OUT
terminal
84
IMPORTANT!
• A television must have a video input terminal like the
one shown in the illustration to connect to this camera.
• Battery capacity (page 31) and other displays that normally appear on the camera’s monitor screen are also
displayed on the television screen.
• The monitor screen goes blank as soon as you connect the video cable to the camera.
Selecting the Video Output Signal Mode
You can select either of two common video output modes:
NTSC or PAL.
The video system you should use depends on the country
where you plan to use the output signal. In the United States
or Japan, for example, you should use NTSC, but in Europe
you need to use PAL.
Check with your local video or TV retailer if you are unsure
about which video mode you should use in your country.
1.
Slide the Function Switch to PLAY.
2.
Press MENU.
3.
Select “Set Up” “Video Out”.
4.
Select the video mode you want to use.
Page 22

To Connect to a QV Color Printer
You can use a QV Color Printer to produce printouts of your
image data.
Supported Printer Models: DP-300, DP-8000
DIGITAL COMMUNICATION
Data communication cable
(Comes with the QV Color Printer.)
• See the documentation that comes with the QV Color
Printer for details.
• Performing a print operation for a movie prints the individual frames that make up the movie.
• Printing a panorama prints the individual images that
make up the panorama.
• Movie images contained in an AVI folder cannot be
printed on a QV Printer.
DIGITAL terminal
CONNECTING TO OTHER EQUIPMENT
Connecting to a Personal Computer
PC Link Software
Special PC Link software available from CASIO makes image data transfers with a personal computer quick and easy.
The software is also designed to minimize loss of image
quality due to data transfer.
For details on how to connect to a personal computer and
exchange data, see the documentation that comes with the
PC Link software.
LK-22S for Windows and Macintosh
IMPORTANT!
• This camera does not fully support the software that
comes with the LK-1, LK-1A, LK-10V, LK-11 connection kits for Windows, and the LK-2, LK-2A, LK-2V,
LK-21 connection kits for the Macintosh. Never try to
use the software that comes with these connections
kits with this camera.
• When you download files from your computer to the
camera (using the Send To Camera or Send Files
pull-down menu command), the following message
appears on your computer screen: “are converted to
the CAM format”. This message does not apply to images downloaded to the QV-5500SX, and images are
transferred in JPEG format.
• AVI format movies cannot be displayed or saved on a
computer using the bundled PC link software.
85
USING CompactFlash CARDS WITH YOUR COMPUTER
USING CompactFlash CARDS WITH YOUR COMPUTER
Setting Up to Access CompactFlash Card
Contents From Your Computer
You can use any of the three methods described below to
access the contents of a memory card with your computer.
If you use your computer to change the fixed names of the
folders created by this camera, the camera will no longer display the renamed folders.
Other Desktop Computer Configurations
Some desktop computers require a separately available PC
card reader/writer and the optionally available CASIO CA-10
PC Card Adaptor to read memory card contents. See the
instructions that come with the PC card reader/writer and the
PC Card Adaptor for details on using this type of configuration.
CompactFlash Memory Card Slot
If your computer has a CompactFlash Memory Card Slot, insert the camera’s memory card into the slot.
PC Card Slot
In this case you need an optionally available CASIO CA-10
PC Card Adaptor. See the instructions that come with the PC
Card Adaptor and the documentation that comes with your
computer for details on using this type of configuration.
86
CompactFlash Card Precautions
CompactFlash Card Directory Tree
¥QVIMG02
QVCAM.QVS
INDEX.HTM
HTML
(Card Browser folder)
MENU.HTM
INDEX.HTM
CAMERA
(Image folder)
CAMERA.QVS
PREVIEW
yymdd001.JPG
yymdd002.JPG
...
HTML
(Card Browser folder)
INDEX.HTM
DATA.HTM
...
yymdd001.JPG
yymdd002.JPG
...
FOLDER A
FOLDER B
FOLDER C
FOLDER D
FOLDER E
AVI
(Movie folder)
AVI.QVS
(Folder management files)
PREVIEW
yymdd001.JPG
yymdd002.JPG
...
HTML
* (Card Browser folder)
INDEX.HTM
DATA.HTM
...
yymdd001.AVI
yymdd002.AVI
(Management file)
(Card Browser main files)
Files and folders required for
()
the Card Browser display
(Folder management files)
(Preview image folder)
(Preview image files)
(Preview image files)
(Folder HTML files)
(Folder HTML files)
(Image files)
(Image files)
(Image folder)
(Image folder)
(Image folder)
(Image folder)
(Image folder)
(Preview image folder)
(Preview image files)
(Preview image files)
(Folder HTML files)
(Folder HTML files)
(Movie files)
(Movie files)
USING CompactFlash CARDS WITH YOUR COMPUTER
• Management File
These files contain data about folder management and image sequence.
• CAMERA Folders
These folders are for storing image data. There are seven
CAMERA folders: CAMERA, FOLDER A, FOLDER B,
FOLDER C, FOLDER D, FOLDER E, AVI.
• Image Files
These JPEG files are images recorded by the camera. See
page 30 for details on how file names are generated.
• PREVIEW Folder
This folder is for storing preview images.
• Preview Image File
A preview image JPEG file is created whenever an image
is recorded. Preview images are used when scrolling
through images on the camera's monitor screen and in the
HTML image lists displayed on your computer's screen.
• HTML Files (INDEX)/(MENU)/(DATA)
These files are for displaying lists of images in camera
memory using a Web browser.
87
USING CompactFlash CARDS WITH YOUR COMPUTER
Image Files Supported by the Camera
• Image files recorded with the CASIO QV-5500SX Digital
Camera
• JPEG files stored using QV-LINK 2.6 (LK-22S)
(1280 x 960 pixels or 640 x 480 pixels JPEG file)
• JPEG files stored using QV-CRAFT
(1280 x 960 pixels or 640 x 480 pixels JPEG file)
Personal Computer
• This camera uses management files to manage the sequence and attributes of image files. Because of this, adding files, deleting files, changing management file contents, or changing file sequence and attributes with your
computer can cause movie and panorama images to become ungrouped. It can also result in slower image scrolling on the camera.
• When transferring CompactFlash card contents to a hard
disk, floppy diskette, MO disk, or other external storage,
keep everything in the QVIMG02 folder together. Changing
the name of the QVIMG02 folder to a date is a good way to
keep track of your images. However, be sure to change the
name of this folder back to QVIMG02 if you ever copy it
back to the memory card for playback on the camera. This
camera does not recognize any folder name besides
QVIMG02.
88
• The above is also true about the names of folders inside
the QVIMG02 folder. These folders must be returned to the
names assigned to them by the camera (CAMERA,
FOLDER A, etc.) whenever you copy the QVIMG02 folder
back to the memory card for playback on the camera.
• Never delete or modify the QVS file in any way.
• We also strongly recommend that after transferring data
from a CompactFlash card to other external storage that
you re-format the card and delete its contents before using
it to record more images.
Macintosh Precautions
• Initializing a CompactFlash card with this camera initializes
it to ATA format. Under ATA format, Apple Macintosh computers recognize files on the card as text files. Use PC EXCHANGE to associate the files on the card with QV-LINK
or some other application that can open JPEG files.
Page 23

Card Browser
Card Browser makes it possible to use a browser application
to view images recorded with the QV-5500SX.
• The HTML file generated by this camera is best viewed using Microsoft Internet Explorer 3.0 or later, or Netscape
Navigator 2.0 or later. It cannot be viewed using QV-LINK.
• QuickTime 3 is required to play back AVI movie files.
1.
Slide the Function Switch to PLAY.
2.
Press MENU.
3.
Select “Set Up” “Card Browser”.
USING CompactFlash CARDS WITH YOUR COMPUTER
4.
Specify the format.
There are three Card Browser formats.
TYPE 1 .....This is a powerful format that provides de-
tailed information about each image and
also includes a Slide Show feature.
TYPE 2 .....Thi s format is a viewer with a Slide Show
feature.
TYPE 3 .....This format provides basic image viewing.
Since it is the simplest option, you should be
able to use it with just about any browser,
regardless of version.
IMPORTANT!
•
Note that the TYPE 1 and TYPE 2 formats use Java
Script, so their use requires Microsoft Internet Explorer
4.01 or later, or Netscape Communicator 4.5 or later.
• In the case of TYPE 1 and TYPE 2, Slide Show displays Economy (640 x 480) and other image resolutions (1280 x 960) images in the same size, so image
details may appear relatively coarse.
• Turning on Card Browser causes an HTML file to be generated whenever you turn off camera power.
• Selecting “OFF” in step 4 of the above procedure turns off
Card Browser.
• Creation of an HTML file causes an INDEX.HTM file and
other files to be added to the QVIMG02 folder.
89
USING CompactFlash CARDS WITH YOUR COMPUTER
IMPORTANT!
• Though the camera’s monitor screen goes blank when
you turn off power, the operation lamp continues to
flash for some time as the camera internally generates
a Card Browser file (when Card Browser is turned on).
Performing any of the operations while the operation
lamp is flashing not only stops generation of the Card
Browser file, it can also result in corruption of the image data on the CompactFlash Card.
Note that a Card Browser file may be corrupted if batteries are low or if the CompactFlash Card becomes
full during file generation.
• If the CompactFlash card in the camera has a large
number of files on it, it may take quite a bit of time for
the camera to generate the required HTML files and
actually turn off after you slide the POWER switch towards OFF.
Because of this, we recommend that you normally
leave Card Browser turned off, except when you actually want to generate HTML files.
• This camera generates a Card Browser file whenever
you turn off power. When the card in the camera contains a large number of files, it may take some time for
the file generation operation to be performed. You can
turn off the Card Browser feature if you do not want a
file generated each time you turn off camera power.
90
• If you perform a timer operation while Card Browser is
turned on, files are not generated until the number of
shots specified for the timer's SHOTS setting are recorded. If you want to generate files for images recorded by a timer operation that is not yet complete,
turn the camera off, wait for the files to be generated,
and then turn the camera back on again. Note, however, that this also cancels the ongoing timer operation.
• The Card Browser's Slide show feature may produce
mosaic images and vertical lines on a system with the
following configuration.
* Browser: Microsoft Internet Explorer 4.0
* Color palette (Display Properties): High Color (16
bit)
* Desktop area (Display Properties): 800 by 600 pixels
When this happens, try changing to the following pre-
ferred settings.
* Browser: Netscape Communicator 4.5
* Color palette (Display Properties): True Color
* Desktop area (Display Properties): 1024 by 768 pix-
els
Note that changing the Display Properties Desktop
area setting to 1024 by 768 pixels may cause part of
the screen contents to moves outside the display
area.
How to use the HTML file
Viewing HTML File Contents
Load the CompactFlash card into a card slot of your computer (page 86). Now drop the INDEX.HTM file (in the
QVIMG02 folder) onto your Web browser to display a list of
all images contained on the CompactFlash card.
Image File nameFolder name
Clicking on a folder name displays the following data about
the images contained in the folder.
USING CompactFlash CARDS WITH YOUR COMPUTER
File name
Image
Image Information
File size (KB)
Resolution (pixels)
Quality
Recording mode
AE
Light metering
Shutter speed
Aperture stop
Exposure comp
Focusing mode
Flash mode
Sharpness
Saturation
Contrast
Multiple Exposure
White balance
Digital zoom
Date
Click Index to return to the image list.
Image
information
91
USING CompactFlash CARDS WITH YOUR COMPUTER
Saving an HTML File
• When transferring CompactFlash card contents to a hard
disk, floppy diskette, MO disk, or other external storage,
keep everything in the QVIMG02 folder together. Changing
the name of the QVIMG02 folder to a date is a good way to
keep track of your images. However, note that you should
never delete or modify the QVIMG02 file in any way.
• Before using the CompactFlash card again (after storing its
images on other media), delete all its current files or reformat the card.
92
Page 24

TROUBLESHOOTING
Symptom Probable Cause Action
No power
Sudden power failure
Power Supply
Battery life is too short
No recording when shutter
button is pressed
Auto Focus cannot focus
the image.
Recording
Power failure during selftimer operation
1. Batteries not loaded correctly.
2. Dead batteries
3. Wrong AC adaptor
1. Auto Power Off
2. Low battery power
3. Use of manganese batteries.
Use of the camera in cold temperatures.
1. Function Switch set to PLAY.
2. Flash unit is charging.
3. The message “MEMORY FULL” is on the monitor screen.
4. Insufficient memory card capacity or no memory
card loaded in camera.
1. Lens or distance sensor is dirty.
2. The object you want to focus is not in the focus
frame.
3. Conditions make it impossible to obtain proper
focus.
Low battery power
1. Correctly load batteries (page 2).
2. Replace all four batteries with a set of new ones
(page 2).
3. Use only recommended AC adaptor .
1. Turn power back on.
2. Replace all four batteries with a set of new ones
(page 2).
3. Replace manganese batteries with alkaline,
lithium or Ni-MH batteries.
Very cold temperatures can shorten battery life.
1. Set Function Switch to REC.
2. Wait until flash unit charging is finished.
3. Delete images you no longer need from camera
memory.
4. Load a memory card.
1. Clean off the lens or distance sensor.
2. Aim the camera so the object you want to focus
is in inside the focus frame.
3. Switch to the Manual Mode and focus manually.
Replace all four batteries with a set of new ones
(page 2).
93
TROUBLESHOOTING
Monitor screen image is out
of focus.
Poor color and brightness
when indoors
Part of the image is missing.
Recording
Cannot perform movie recording.
Recorded image is not
saved.
94
Symptom Probable Cause Action
1. Failure to focus the image while the camera is in
the Manual Mode.
2. Camera is in the Macro Mode.
3. Camera is in the Normal Mode while the subject
is too close.
Indoor fluorescent lighting
1. Blocking of the lens when recording.
2. Failure to correctly center the object when aiming through the viewfinder.
1. Movie Record Mode is not selected.
2. Insufficient camera memory capacity.
Loss of power before image is stored in memory
1. Focus the image before recording it.
2. Use the Normal Mode for scenery and group
shots.
3. Use the Macro Mode for close ups.
Shoot under incandescent or other non-fluorescent
lighting (page 39).
1. Hold the camera correctly, making sure that your
finger or the wrist strap is not blocking the lens.
2. Take particular care under the following conditions, which can cause the recorded image to be
slightly different from the image that appears in
the viewfinder.
• Macro photography
For more precise image composition, use the
LCD monitor screen instead of the viewfinder.
• Aiming at an angle that is diagonal to the
viewfinder’s optical axis.
It is best to point the lens directly at the subject,
and not at an angle.
1. Select the Movie Record Mode (page 51).
2. Delete images you no longer need from camera
memory.
Replace all four batteries with a set of new ones
(page 2).
Symptom Probable Cause Action
Colors of recorded image
are different from those on
the display when image was
composed.
No +/– button operation
during multi-page display
Cannot find an image.
Cannot use multi-page display.
Playback
Camera is connected to a
TV, but LCD monitor contents do not appear on TV
screen.
Images cannot be displayed
when downloaded back the
camera from a computer.
1. Reflection from sunlight or light from another
source
2. Image quality setting
Button operation during page change
1. Wrong folder
2. Memory card images recorded using a QV7000SX camera
No images in selected folder
1. Incorrect camera-TV connection
2. Wrong TV set up
3. Wrong video mode is selected.
The images were on a memory card when they
were opened on the computer for editing and then
resaved back to the memory card.
1. Reorient the camera so that light is not shining
2. Use the Recording Menu to change to a higher
Wait until an image is on the monitor screen before
performing a button operation.
1. Change to the folder that contains the image
2. Use another memory card. The file management
Check other folders for images.
1. Connect correctly using the video cable (page
2. Set up the TV correctly.
3. Change the video mode.
Use the QV-LINK application to download edited
images back to the camera.
TROUBLESHOOTING
directly into lens.
image quality for recording.
(page 75).
system of the QV-7000SX is different from the
one used by this camera, so cards recorded with
the QV-7000SX cannot be read.
84).
95
TROUBLESHOOTING
Delete operation does not
operate.
Deletion
Cannot select items in the
Playback Menu.
All buttons and switches do
not operate.
Slide Show starts even
though it is not selected.
Other
Nothing appears on the
monitor screen.
0:00 flashing on the time
display.
96
Symptom Probable Cause Action
All images are protected.
Some functions are not available for playback of
certain types of images.
• Malfunction due to static electrical charge or
strong impact.
• Camera is connected to a computer or QV Color
Printer.
Activation of the screen saver.
1. Monitor screen is turned off.
2. Video cable connected to the VIDEO OUT terminal.
The time and date (clock) settings have been
cleared for same reason.
Unprotect the images you want to delete (page 77).
Select a different function or change to the Record
Mode.
Remove batteries and disconnect the AC adaptor if
you are using one. Restore power and turn the
camera on. If this does not work, contact your
dealer or an authorized CASIO service provider.
Turn off screen saver (page 73).
1. Press the DISP button to turn on the monitor
screen.
2. Disconnect the video cable. The monitor screen
is disabled while it is connected.
Use the procedure on page 36 to set the time and
date.
Page 25

MESSAGES
CF ERROR
You must format the
CompactFlash card
before using it with
this camera.
FORMAT
Perform the following procedure whenever a
memory card starts to behave abnormally.
Important!
The procedure described below deletes all images stored in the memory card. Make sure all of
MENU
your important images are backed up onto a
computer hard disk or other storage medium before performing this procedure.
To reformat a memory card
1. Connect the AC adaptor to the camera and switch
to AC power or load a new set of batteries into the
camera.
• Power failure while a format operation is being
performed aborts the reformat operation.
2. Press MENU.
3. Use [+] and [–] to select “YES”, and then press the
shutter button.
• Select MENU if you want to abort the reformat
procedure without deleting anything.
• Completion of the format operation is indicated by
the message “NO IMAGE” appearing on the
monitor screen. This message also indicates that
the memory card was formatted successfully.
Insert memory card!
This camera cannot
display the image
you selected!
This folder is full!
MEMORY FULL
Delete unneeded
images.
NO FORMAT
There are no images
on this memory card!
There is no memory card installed in the camera.
The JPEG image file you are trying to display is ei-
ther corrupted or is a format that is not compatible
with this camera.
The folder you are trying to use is full.
Delete some images you no longer need.
Note that each folder can contain up to 250 images.
• Not enough memory for further recording. Delete
some images from memory card (page 79).
• QVIMG02 folder or other file (page 88) cannot be
created due to insufficient memory when downloading data from a computer to the memory card.
Use your computer to delete unneeded images to
free up memory card space for the images you are
downloading. You could also press the MENU
button and format the memory card in the camera,
but doing so deletes all image files currently
stored on the memory card.
The memory card is not formatted. Format the
memory card before trying to use it (page 29).
No images are stored in memory card.
97
MESSAGES
RECORD ERROR
MEMORY FULL
Change quality or
delete unneeded
images.
That file name is
already used.
Delete the existing
file or save the new
file in a different
folder.
98
This message appears when the image you are trying to record cannot be compressed for some reason. Try changing the angle of the camera to the
subject.
Not enough memory for recording in the current
resolution mode. Change to another resolution
mode, or delete some images from the memory card
(pages 45, 79).
The folder to which you are trying to move an image
file already contains another image file with the
same name. Change to another folder and try again.
SPECIFICATIONS
Recorded Image
File Format .........................Static, Panorama: JPEG standard;
Recording Medium ............ CompactFlash card
Standard Memory Capacity, Number of Image Files,
Computer Output Image Size
Static
S (1280 x 960) / 14 (500KB/image)
F (1280 x 960) / 19 (352KB/image)
N (1280 x 960) / 33 (200KB/image)
E (640 x 480) / 55 (112KB/image)
Movie: File Format AVI
3.2seconds (320x240) / 8sets (896KB)
6.4seconds (320x240) / 4sets (1792KB)
9.6seconds (320x240) / 3sets (2100KB)
3.2seconds (160x120) / 30sets (224KB)
6.4seconds (160x120) / 16sets (448KB)
9.6seconds (160x120) / 10sets (672KB)
Movie: File Format JPEG
3.2seconds (320x240) / 6sets (1088KB)
6.4seconds (320x240) / 3sets (2176KB)
9.6seconds (320x240) / 2sets (3264KB)
3.2seconds (160x120) / 27sets (272KB)
6.4seconds (160x120) / 13sets (544KB)
9.6seconds (160x120) / 9sets (816KB)
* When using 8MB CF card.
Image Deletion................... Single image; all images in a folder; all
Imaging Element................ 1/3-inch CCD (Total Pixels: 1.31 mil-
Movie: AVI/JPEG (for recording to
CompactFlash card)
images in memory (with image protection)
lion, Effective Pixels; 1.25 million)
Lens .................................... f/2.8; f = 5.47mm (equivalent to 36mm
lens for 35mm film)
Zoom ...................................Digital 2x, 4x
Focusing............................. External Phase Difference Auto Focus;
Focus Range ..................... 0.3m to ∞ (1.0´ to ∞) for Normal focus;
Exposure Control
Light Metering: ................ Multi-pattern, center point, spot by CCD
Exposure: ........................ Program AE
Exposure
Compensation: ................ –2EV to +2EV (1/2EV units)
Shutter ................................CCD electronic shutter; mechanical
manual focus with macro mode and focus lock
10cm for macro (approximately 10cm
to ∞ (3.9˝ to ∞) with manual focus),
from surface of protective lens filter
shutter, 1/8 to 1/500 second (1 second
in Night Scene Mode)
Aperture.............................. f/2.8, 4, 5.6, 8, 11, 16 auto
White Balance .................... Automatic, fixed (4 modes), manual
switching
Self-timer ............................ 10 seconds, 2 seconds
Built-in Flash
Flash Modes:................... AUTO, ON, OFF, Red eye reduction
Flash Range:...................Approximately 0.7 to 2 meters
Recording Functions ........
(2.3´ to 6.6´)
Continuous, quick shutter, AEB, multiple
exposure, night scene, single-image,
self-timer, movie, panorama, macro
99
SPECIFICATIONS
Monitor................................ 1.8" TFT, low-glare color HAST LCD
Viewfinder .......................... Monitor or optical viewfinder
Clock ................................... Built-in quartz digital timepiece for time
Input/Output Terminals ....DIGITAL IN/OUT, AC adaptor connec-
Power Supply.....................
Battery Life
The values noted below indicate the number of hours before battery failure under normal operating temperature (25°C). These
values are for reference only, and do not guarantee that any particular set of batteries actually will provide the service life indicated. Low temperatures shorten battery life.
Type of
Operation
Continuous
Playback
Continuous
Recording
• The above guidelines are based on the following battery types:
Alkaline: MX1500 (AA) DURACELL ULTRA
Lithium: Energizer
• Battery life varies with brand
Continuous recording values show the number of shots without
using the flash. The number of shots depends on use of the flash
and whether flash is turned on or off.
(122,100 pixels, 555 x 220)
and date recording and storage with image data; auto calendar up to 2049
tor, VIDEO OUT (NTSC, PAL)
Four AA-size alkaline or lithium batteries
Four AA-size nickel-hydrogen rechargeable batteries (NP-H3)
AC adaptor (AD-C620)
AA-size Alkaline
Batteries LR6
Approximately
110 minutes
Approximately
300 shots
AA-size Lithium
Batteries FR6
Approximately
210 minutes
Approximately
840 shots
100
Power Consumption ......... Approximately 7.3W
Dimensions ........................131(W) x 69(H) x 43(D) mm
Weight ................................. Approximately 250g (8.8oz.)
Standard Accessories ...... Strap; soft case; lens cap; video cable;
*This camera does not have a separate battery to power its clock.
Clock settings are cleared whenever power to the camera is cut off
(by batteries going dead while the camera is not connected to an
AC power outlet with the AC adaptor) for about 12 hours. After
power is resumed, either by loading fresh batteries or connecting to
an AC power outlet, you will have to set the correct time and date
again.
* The liquid crystal panel built into this camera is the product of preci-
sion engineering, with an effective pixel rate of 99.99%. This also
means, however that 0.01% of the pixels can be expected to fail to
light or to remain lit at all times.
(5.2˝(W) X 2.7˝(H) X 1.7˝(D))
(excluding batteries)
Owner’s Manual
Page 26

MEMO MEMO
Printed on recycled paper.
CASIO COMPUTER CO.,LTD.
6-2, Hon-machi 1-chome
Shibuya-ku, Tokyo 151-8543, Japan
K712FCM1PMJ
MA9912-003902A Printed in Japan
 Loading...