

Chapter
7
Quick-Memo is like having a digital memo pad on which you can sketch simple
line drawings or jot down reminders.
Quick-Memo
Entering the Quick-Memo Mode
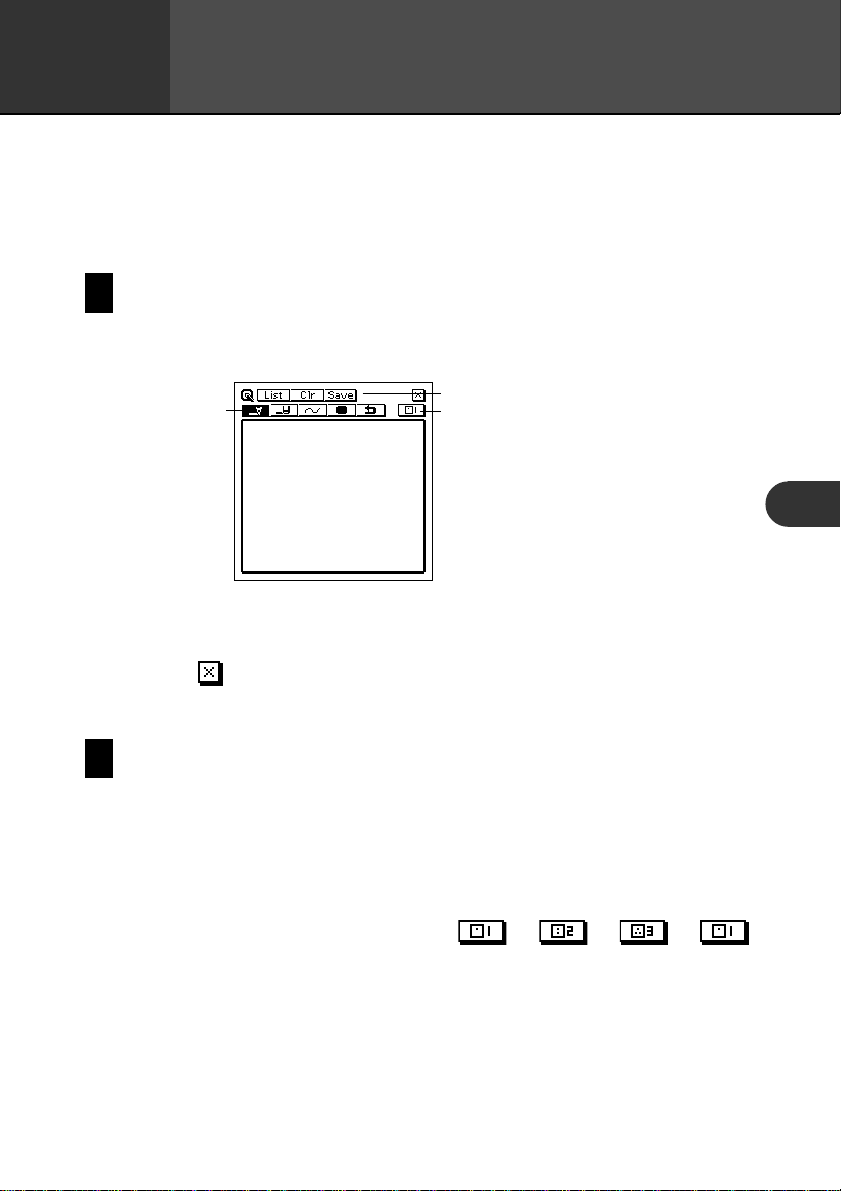
Tap the Quick-Memo icon below the PV Unit screen to enter the Quick-Memo
Mode.
1 Draw toolbar
2
1
• This is the Quick-Memo input screen, which appears first whenever you
enter the Quick-Memo Mode.
• Tap
Mode and return to the screen from which you originally entered it.
in the upper right corner of the screen to exit the Quick-Memo
2 Input toolbar
3
3 Quick-Memo category
button
7
Quick-Memo Categories
There are three Quick-Memo categories. As with categories in other modes, QuickMemo categories let you group your memos for easier management.
To select a Quick-Memo category
Tap the Quick-Memo category button to cycle through the Quick-Memo
categories in the following sequence:
etc.
The display shows the Quick-Memos that are stored under the currently
selected category.
fi fi fi ,
79
Using the Quick-Memo Drawing Tools
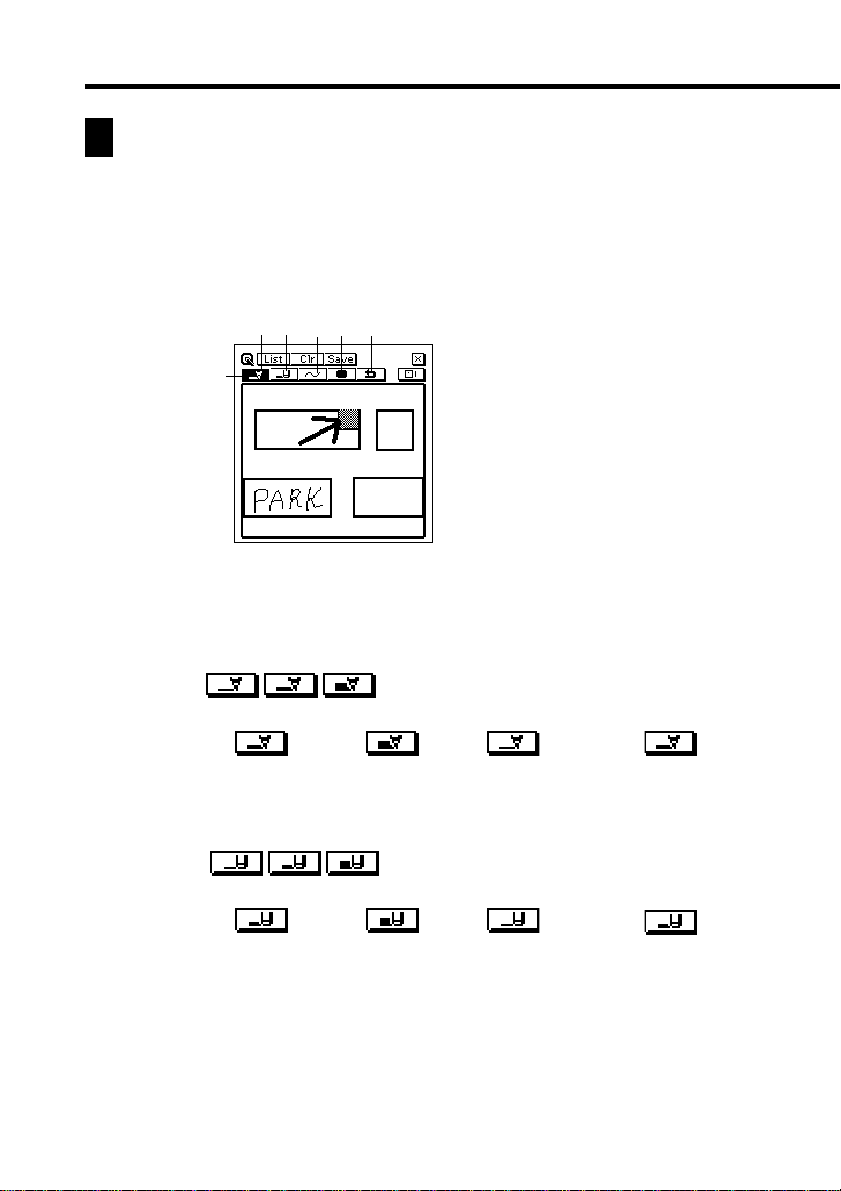
The following describes the functions of the Quick-Memo Drawing tools when
inputting Quick-Memo data.
T ap a drawing tool with the stylus to select it. The currently selected drawing tool
is highlighted on the toolbar. T apping some of the drawing tools also cycles through
a number of optional settings.
12 34 5
1 Pencil
6
Important!
A diagonal line may appear jagged on the display, even in the Quick-Memo list
(page 82).
Pencil Tool
• Tap this tool to cycle through line thickness in the sequence:
medium
• Dragging the stylus on the screen while this tool is selected draws a line.
• Note that you can control the type of line produced by the pencil tool
with the line tool, described below.
fi thick fi thin fi medium , etc.
2 Eraser
3 Line
4 Color
5 Undo
6 Selected tool
Eraser Tool
• Tap this tool to cycle through eraser thickness in the sequence:
medium
• Dragging the stylus on the screen while this tool is selected erases
anything along the line.
• Note that you can control the type of path produced by the eraser tool
with the line tool, described below.
80
fi thick fi thin fi medium , etc.

Chapter 7 Quick-Memo
Line Tool
• Tap this tool to cycle through the type of line or eraser path produced
when dragging the stylus on the display while the line tool or eraser tool
is selected. Each tap of this tool cycles through the line type in the
sequence: freehand
fi rectangle fi freehand , etc.
fi straight fi vertical/horizontal
Color Tool
• Tap this tool to toggle the darkness of the line between the following
settings: black
« gray .
Undo Tool
• Tap this tool to undo the last draw operation you just performed.
Creating a New Quick-Memo
Use the procedures in this section to draw the figures you want in a Quick-Memo.
To input a new Quick-Memo
1. Enter the Quick-Memo Mode.
2. Tap the
save the Quick-Memo.
3. Use the drawing tools to draw the figure you want.
• To clear all Quick-Memo screen contents, tap Clr.
(category) button to select the category where you want to
4. After you are finished, tap Save to save the Quick-Memo.
• If you want to input another Quick-Memo, tap New.
To draw a line or rectangle
1. Select the line tool for the type of figure (freehand, straight line, vertical/
horizontal line, rectangle) you want to draw.
81

2. Drag the stylus on the display to draw the figure.
Recalling a Quick-Memo
Use the following procedure to scroll through a list of Quick-Memos and find the
one you want. Then you can select a Quick-Memo in the list to view it.
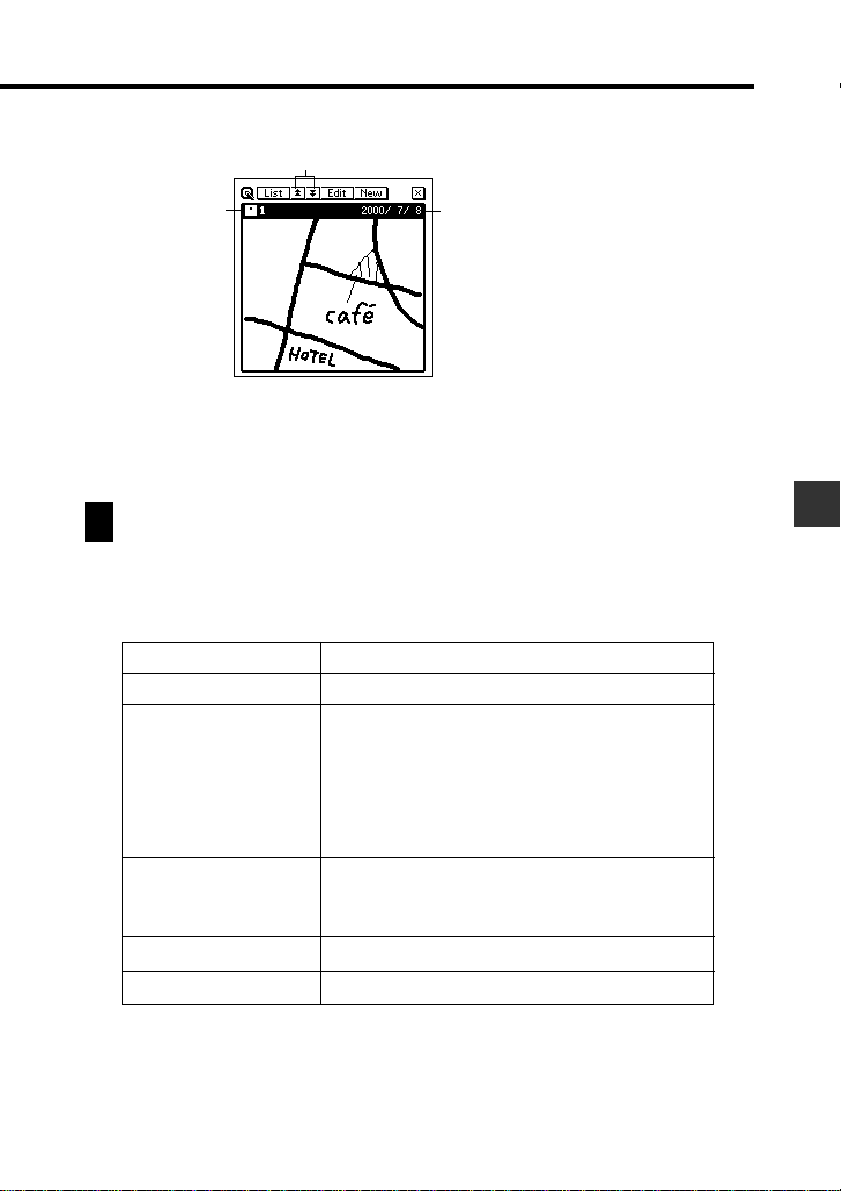
1. While the Quick-Memo input screen is on the display, tap List.
2
1
1 Category button
4
2 Scroll buttons
3
3 Selected Quick-Memo
4 Creation date
• This is the Quick-Memo list screen.
2. Tap the category button to specify the category whose Quick-Memos
you want to view. Selecting
displays the Quick-Memos in all
categories.
3. Use the scroll buttons to scroll through the Quick-Memos in the currently
selected category.
4. When the Quick-Memo you want to recall is on the screen, tap it with
the stylus to select it.
82
Chapter 7 Quick-Memo
5. Tap the selected Quick-Memo to change to its data display.
1
1 Scroll buttons
2
6. In the Quick-Memo data display, you can use the scroll buttons to scroll
back and forward to the data display of other memos.
7. After viewing the Quick-Memo, tap List to return to the list screen.
2 Category of displayed
3
Quick-Memo
3 Creation date
Screen Copy
The screen copy feature lets you copy an image of certain screens and store it as
a Quick-Memo screen. The following is a list of screens that you can copy with
the screen copy feature.
Mode
Contacts
Scheduler
Expense Manager
Memo
Currency Converter
Data that can be screen copied
All list and data screens
All calendar screens (1, 2, 3-month)
Weekly Scheduler
Daily Scheduler
To Do List
Reminder List
All data screens
Screens listing periodic totals by expense
types or payment types (page 69)
All list and data screens
All list and data screens
Conversion calculation screens
83

To record a screen copy
1. Display the data for which you want to record a screen copy.
2. T ap the Menu Bar icon to display the menu bar, and then tap Option –
Screen copy.
• The PV Unit switches to the Quick-Memo Mode, with the new screen
copy on the display. Make any additions or changes if you want, and
then store the image by tapping Save.
84
Chapter
8
Pocket Sheet gives you access to basic spreadsheet capabilities while on the go.
You can build your own spreadsheets from scratch, and even synchronize with
Microsoft
Pocket Sheet
®
Excel data on your computer.
Entering the Pocket Sheet Mode
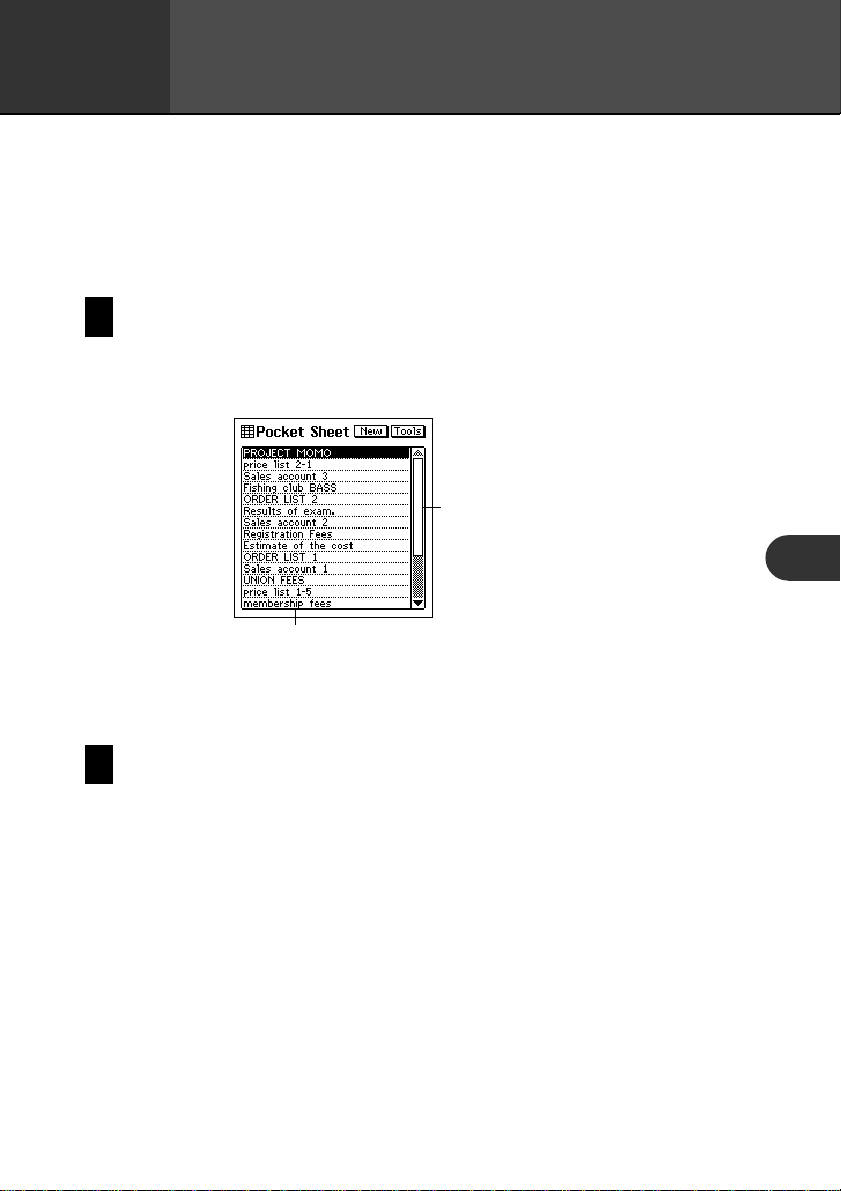
1. Tap the Menu icon to display the Mode Menu, and then tap Pocket
Sheet.
1 Sheet titles
2 Scroll bar
2
1
8
• This is the Pocket Sheet list screen, which appears first when you enter
the Pocket Sheet Mode.
Pocket Sheet Basics
With Pocket Sheet, you can open up a blank sheet and build the sheet you want
from scratch.
The following sections describe how to open a new sheet, and how to perform
some of the most basic sheet operations.
85
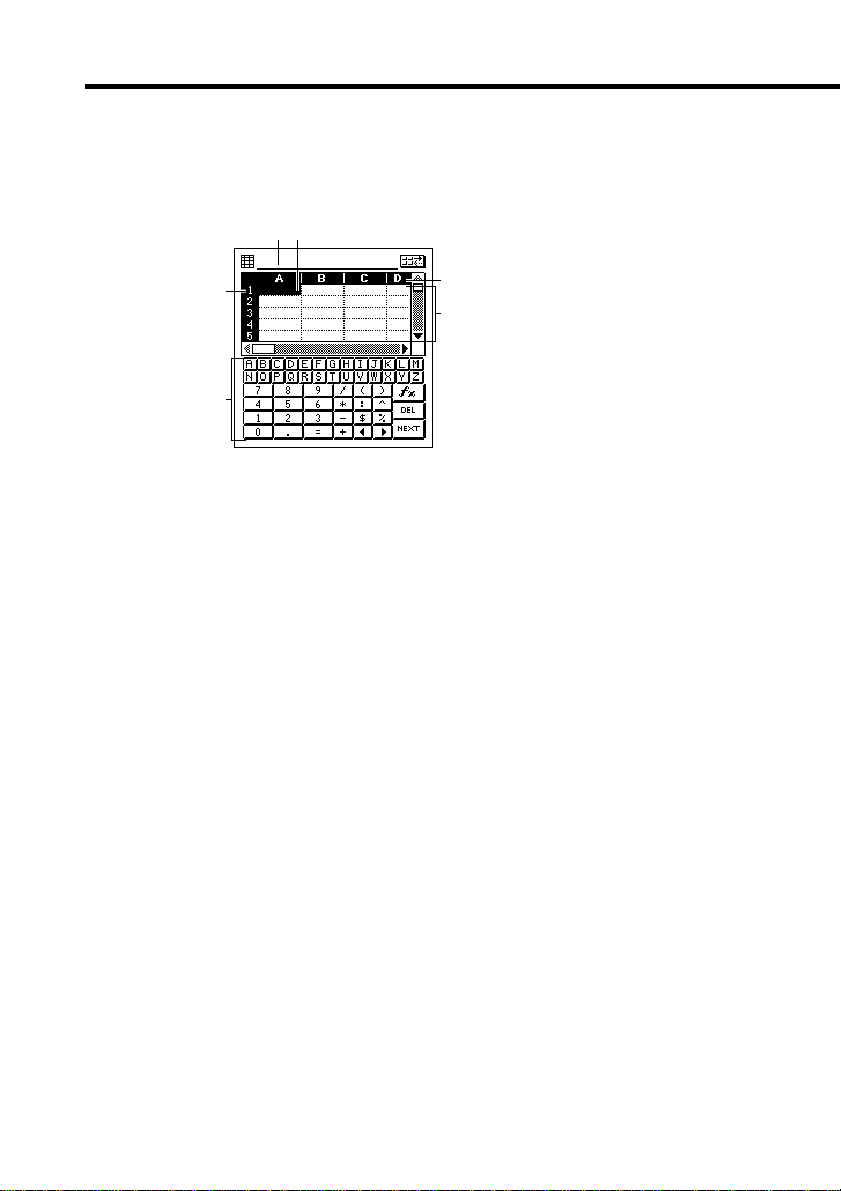
Creating a New Sheet from Scratch
1. Display the Pocket Sheet list screen.
2. Tap the New button.
34
1 Row numbers
2 Keyboard
1
2
5
3 Input field
6
4 Current cell
5 Column names
6 Cells
• Columns are named using the letters of the alphabet from A to Z, while
rows are numbered sequentially from 1 to 999.
• The maximum capacity for a single sheet is about 32KB (about 1,900
cells when each cell contains one character, without any format settings
or borderlines). The message “Sheet is too big!” appears on the display
whenever the contents of a file exceeds this limit.
If a sheet being received by the unit during a Pocket Sheet Sync operation
exceeds the maximum limit (about 32KB), the excess cell data is
automatically cut off. In this case, the sync operation ends normally,
with no indication that the data was cut off. This means you should
always check sheet contents visually after a sync operation is complete.
• A cell is referred to using its cell reference, which is made up of the
cell’s column name and row number. This means that the cell reference
of the upper left cell in the above sheet is A1, and the cell reference of
the lower right cell is D5.
• The active cell is the one that is currently selected for input. The active
cell is highlighted.
• The numeric keyboard appears first whenever you open a new sheet.
86
Chapter 8 Pocket Sheet
Making a Cell the Active Cell
You can make a cell active by tapping it with the stylus so it becomes
highlighted. You can also move the highlighting around the display using
the scroll bar as described below.
To do this:
Move the highlighting one cell left
Move the highlighting one cell right
Move the highlighting one cell up
Move the highlighting one cell down
• T apping the gray areas of the scroll bar scrolls the entire screen with the
highlighted active cursor in the same relative position in the newly
displayed screen.
Tap here on the Scroll
Bar:
H
J
K
L
Selecting a Range of Cells
While a sheet is open on the display, drag the stylus across the range of cells
you want to select. The cells become highlighted as you drag across them.
• Dragging straight left or right selects a range of cells in the same row.
• Dragging straight up or down selects a range of cells in the same column.
• Dragging diagonally selects a block of cells (multiple rows and columns).
Jumping to a Specific Cell in a Sheet
Important!
• You cannot jump to a cell located inside a row or column that is frozen. To
jump to such a cell, you must unfreeze the row or column first.
87
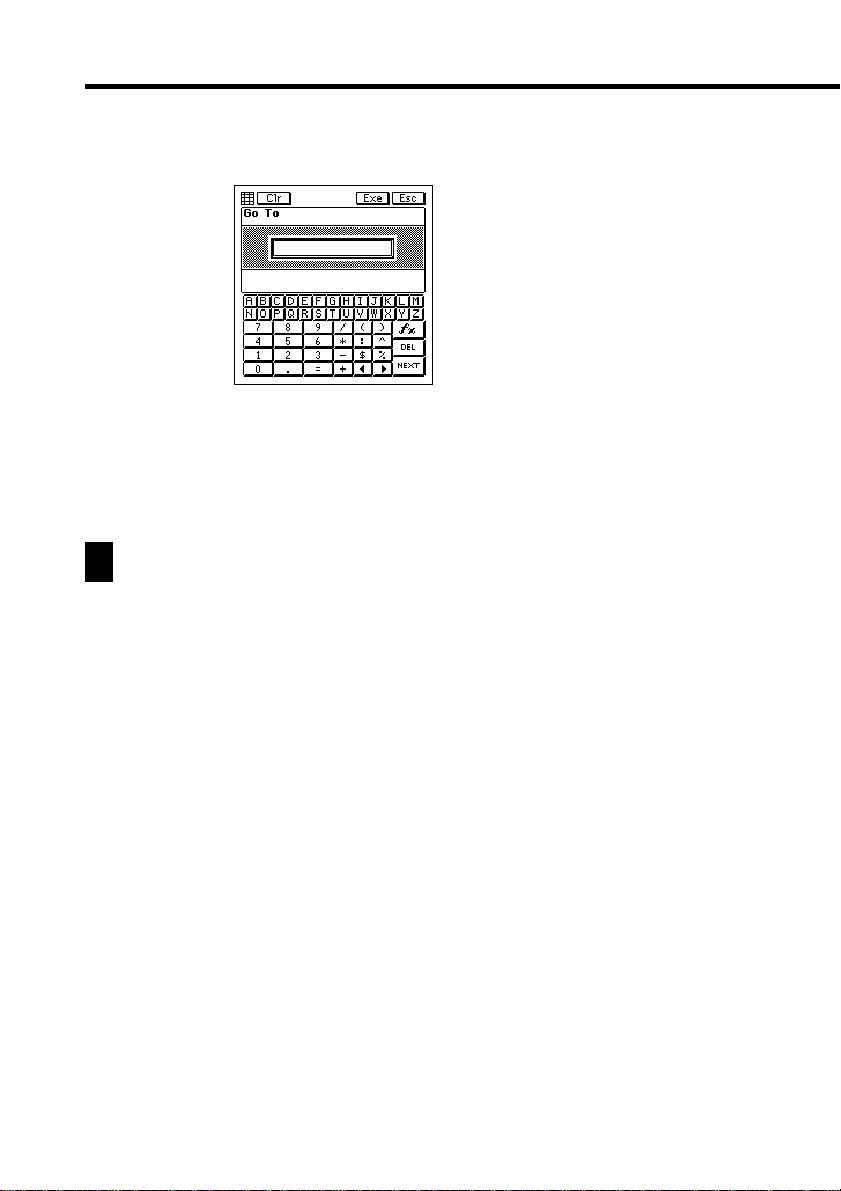
1. While a sheet is on the display, tap the Menu Bar icon to display the
menu bar, and then tap Edit – Go To to display the Go To screen.
2. Use the on-screen keyboard to type in the cell reference (column and
row) of the cell to which you want to jump.
• To jump to cell Z999, for example, type “Z999”.
3. Tap Exe to jump to the cell you specified.
Inputting Data Into a Cell
This section explains the rules and procedures for inputting text, values, and
mathematical expressions into sheet cells. It also contains detailed information
on the various cell functions that are available.
General Input Rules
The following are the general rules that you should observe whenever
inputting data.
• Anything you enter on the keyboard is input into the sheet’s active cell.
• You can input up to 256 characters into each cell.
• Mixing text and numbers inside the same cell causes everything in the
cell to be treated as text.
• Do not manually input commas as separators inside values. Doing so
interferes with correct display of calculation results. Use the procedure
under “Changing the Format Settings of a Cell” on page 95 to turn on
automatic comma separators.
88
Chapter 8 Pocket Sheet
Cell References
The term cell reference means calling the contents of one cell into another
cell. Pocket Sheet supports three types of cell references: relative, absolute,
and mixed. Whether a cell references is relative, absolute, or mixed does not
make affect the results it normally produces. The cell reference type matters
only when the contents of the cell are copied and then pasted into another
location. See “Copying a Relative Cell Reference” on page 109 and “Copying
an Absolute or Mixed Cell Reference” on page 109 for full information
about how cell references are affected by cut, copy, and paste operations.
Relative Cell References
As its name suggests, a relative cell reference is one that references a cell in
relation to the cell where the reference is made. Note the following examples.
Relative Cell
Reference
A1
A1:A10
A1:E1
Contents of cell A1
Contents of the column of cells from A1
through A10
Contents of the row of cells from A1 to E1
Meaning
Absolute Cell References
An absolute cell reference is one that references a specific cell, no matter
where it is located in relation to the cell where the reference is made. A
reference is made absolute by inserting a dollar sign in front of its column
name and row number. Note the following examples.
Absolute Cell
Reference
$A$1
$A$1:$A$10
$A$1:$E$1
Contents of cell A1. Both the column ($A) and
row ($1) references are absolute.
Contents of the column of cells from A1
through A10. All the column and row
references are absolute.
Contents of the row of cells from A1 to E1. All
the column and row references are absolute.
Meaning
89

Mixed Cell References
A mixed cell reference is one in which one component (column name or
row number) is relative, and the other component is absolute. Note the
following examples.
Mixed Cell
Reference
$A1
Contents of cell A1. The column reference ($A)
Meaning
is absolute, and the row reference (1) is
relative.
A$1
Contents of cell A1. The column reference (A)
is relative, and the row reference ($1) is
absolute.
Using the On-screen Keyboards
Opening a new sheet that does not contain any data or tapping the highlighted
cell within a sheet causes an on-screen keyboard to appear.
• Tapping the
button above the text keyboard changes to the numeric
keyboard.
• Tapping the
button above the numeric keyboard changes to the
text keyboard.
T ext Keyboard
• T apping displays a menu of built-in functions.
90
Numeric Keyboard

Chapter 8 Pocket Sheet
Inputting Mathematical Expressions
You can set up a cell to perform arithmetic operations (addition, subtraction,
multiplication, division), and other useful functions like SUM (sum of a
series of values), MIN (extracts the lowest value), and COUNT (counts the
number of values). You can also use parentheses to ensure that operations
are performed in the sequence you want.
• Inputting a mathematical expression causes its result to be displayed in
the cell. The mathematical expression itself appears in the input field
only.
• The results of mathematical operations are normally displayed flush right
in the cell.
• If the result of a mathematical expression is longer than the cell that
contains it, the contents of the cell are replaced by a string of # marks.
This is to let you know that the cell contains a value, but the value cannot
be displayed. If this happens, try making the cell wider (page 100).
To input a mathematical expression
1. Make the cell where you want to input the expression the active cell.
2. On the on-screen keyboard, tap =.
• Inputting = as the first character tells the PV Unit that what follows is a
mathematical expression.
3. Use the on-screen keyboard to input the mathematical expression you
want.
• Tapping the buttons above the keyboard inputs the corresponding
function. See “Examples” below for details.
4. After the content of the cell is the way you want, tap NEXT to store it.
91

Examples
The following are some examples of mathematical expressions you can input
into sheet cells.
Cell Contents
=1+2-3
=(1+2)*(3+4)
=(A1+B5)*2
=$A$1+B2
=2^3
=ABS(A1)
=AVERAGE(A1:D5)
=COUNT(A1:D5)
=COUNTA(A1:A7)
=EVEN(3)
=INT(8.9)
=MAX(A1:D5)
=MIN(A1:D5)
=MOD(3,2)
=ODD(2)
=ROUND(2.15,1)
=SQRT(A1*5)
=SUM(A1:D5)
Displayed Result
0
21
Result of expression using contents of cells A1
and B5
Contents of cell A1 + Contents of cell B2
8 (Raises left value to power specified by right
value.)
Absolute value of value in A1
Average of values in cells A1 through D5
Number of values in cells A1 through D5
Number of non blank cells in cells A1 through
A7
4 (Rounds up to the nearest even number.)
8 (Rounds down to the nearest integer.)
Greatest value of those in cells A1 through D5
Least value of those in cells A1 through D5
1 (Integer result when left value is divided by
right value.)
3 (Rounds up to the nearest odd number.)
2.2 (Rounds left value to decimal places
specified by right value.)
Square root of value in cell A1 multiplied by 5
Sum of contents of cells A1 through D5
92

Chapter 8 Pocket Sheet
Inputting Text
Text (letters and numbers) can be input into the active cell using the onscreen text input keyboard.
• Input make up entirely of numbers (including decimal point) is treated
as a numeric value. Inclusion of even a single non-numeric character
(alpha-character or symbol) causes the input to be treated as text.
• T ext is normally aligned in the cell flush left, while numbers are aligned
flush right.
• If a text string is longer than the cell, the extra text is allowed to extend
into the next cell to the right in the sheet display, as long as the
neighboring cell does not contain any data. If it does, the extra characters
are cut off in the sheet display.
• If an input value is longer than the cell that contains it, the contents of
the cell are replaced by a string of # marks. This is to let you know that
the cell contains a value, but the value cannot be displayed. If this
happens, try making the cell wider (page 100).
• If the first character in a cell is an equals sign (=), the text is considered
to be part of a mathematical expression.
93

Input Example
This section contains an example that illustrates a number of Pocket Sheet input
techniques.
Example Data
All of the operations in this section are performed using the data shown
below.
Example: To input the function below into cell C5.
=SUM(A2:B5)*C2
• This calculates the total of the values from cell A2 through cell B5, and
then multiplies it by the value in cell C2 (4).
1. Open a sheet and then tap cell C5.
2. Perform the following keys operations to input characters into the input
field.
SUM
3. Next, use the stylus to drag from cell A2 to cell B5, so all the required
cells become highlighted.
4. Remove the stylus from the screen to input the range of selected cells
into the input field.
5. Tap in the input bar to the right of the close parenthesis to move the
cursor there.
94

Chapter 8 Pocket Sheet
6. Type * into the input field.
7. Tap cell C2.
8. Tap any cell or the NEXT button to display the calculation result.
• The value in cell C5 shows the result of the function.
Controlling the Appearance of a Cell
This section explains how to make cell format settings that control the format of
data inside individual cells or a range of cells. The format settings are: numeric
value category (monetary unit, percent), number of decimal places, alignment,
text style (bold or normal), comma separators for values, and cell lock.
Changing the Format Settings of a Cell
1. Make the cell whose format you want to change the active cell (page
87).
• You can select a single cell or a range of cells.
2. T ap the Menu Bar icon to display the menu bar, and then tap Option –
Formats to display the Formats tab.
95

3. Make the format settings you want.
• See the following sections for information about the settings you can
make on the Formats tab.
4. After making the settings you want, tap Set to apply them.
• Tapping Esc exits the Formats tab without applying any changes you
have made in the settings.
Category
• Tap the L arrow next to Category box to display a list of numeric
value categories. You can specify whether a number should be treated as
simply a numeric value, a monetary value, or a percent. The following
shows the available settings and their meanings.
Category Setting
None
%
$
£
¥
• For the monetary units and percent, the applicable symbol is appended
automatically to the value in the cell.
• When percent is selected as the category setting, a value of 0.1 becomes
10%, 1 becomes 100%, 10 becomes 1000%, etc.
• Numeric value (no setting)
• Percent
• Dollar value
• British pound value
• Japanese yen value
• Euro value
Description
96

Chapter 8 Pocket Sheet
Edit
• T ap this button to display the euro currency symbol editing screen shown
below .
• Note that you can edit the euro currency symbol only. The symbols for
the other currencies are fixed.
• Use the on-screen keyboard to type up to three letters for the currency to
which you want to change. You could input DEM for German marks,
FRF for French francs, etc. After inputting the letters you want, tap Set
to save them.
• The letters you input above replace the euro symbol in the Category
list.
97

Decimal Places
• Tap the L arrow next to the Decimal Places box to display a list of
decimal place settings. You can specify anywhere from 0 to four decimal
places. Selecting Free specifies a free-floating decimal place, which
means the decimal point is located wherever you input it.
Alignment
• T ap the L arrow next to the Alignment box to display a list of alignment
settings. You can select from among General, Left, Center, and Right.
Selecting General causes text to be aligned left, and numbers aligned
right.
Bold
• T ap the check box to toggle bold text on (checked) and of f (unchecked).
Comma
• Tap the check box to toggle comma separators every three digits on
(checked) and off (unchecked).
98

Chapter 8 Pocket Sheet
Lock
• T ap the check box to toggle cell lock on (checked) and of f (unchecked).
• Note that the sheet where the locked cell is located must be a protected
sheet (page 112) for the cell’s locked status to be enforced. The content
of a cell can always be edited whenever the sheet where it is located is
unprotected, even if the cell is locked. The following shows the
relationship between the cell lock and sheet protection.
Cell Status
Locked
Locked
Unlocked
Unlocked
Sheet Status
Protected
Unprotected
Protected
Unprotected
Cell Content Editing
Not allowed
Allowed
Allowed
Allowed
Specifying Cell Border Lines
1. Select the range of cells whose borderlines you want to change.
• See “Making a Cell the Active Cell” on page 87.
2. T ap the Menu Bar icon to display the menu bar, and then tap Option –
Border.
99

3. Tap the borderline option you want to select.
To select this type of border line:
Bold outer lines only
Normal outer lines only
Normal outer lines and inner lines
Borderlines off
4. When the borderlines are the way you want, tap Exe to apply them and
to close the Border screen.
Tap this button:
Row and Column Operations
This section contains such information as how to change the width of a column,
how to insert rows and columns, and how to delete rows and columns.
Changing the Width of a Column
You can change the width of a column of cells either by dragging the
boundary to the width you want, or by specifying width value that represents
a number of display dots.
To change the width of a column by dragging its boundary
• In the black bar that shows the column names (A, B, C) at the top of a
sheet, drag either of the white boundary markers of the cell left or right
to change its width.
Drag here
• Y ou can drag a column boundary marker as far as the edge of the display
screen.
100

Chapter 8 Pocket Sheet
To change the width of a column by specifying a value
1. Make a cell in the column whose width you want to change the active
cell (page 87).
2. T ap the Menu Bar icon to display the menu bar, and then tap Option –
Width to display the Width dialog box.
Current width
(number of screen dots)
3. Tap K to increase the value or L to decrease it.
• You can set the width value in the range of 3 to 130.
4. When the setting you want is displayed, tap Set to apply it.
• T apping Esc closes the Width dialog box without applying any changes
you have made in the setting.
Scroll Freezing Rows and Columns
“Scroll freeze” is a technique you can use to stop rows, and columns from
scrolling when you tap the scroll bars on the screen. This is helpful when
you want to leave row and column titles frozen on the screen as you scroll
the data only.
You can freeze rows only or columns, or you can freeze rows and columns
at the same time.
101

To freeze columns only
Example: The following procedure describes how to freeze column A.
1. In the top row of the displayed sheet, tap cell in the column to the right
of the column you want to freeze.
• To freeze column A, for example, you would tap cell B in the top row.
To freeze both column A and column B, tap cell C.
2. T ap the Menu Bar icon to display the menu bar, and then tap Option –
Freeze.
Solid line indicates column
to the left is frozen.
To freeze a row only
1. In the far left column of the displayed sheet, tap the cell in the row
below the row you want to freeze.
• T o freeze row 1, for example, you would tap cell 2 in the far left column.
To freeze both rows 1 and 2, tap cell 3.
2. T ap the Menu Bar icon to display the menu bar, and then tap Option –
Freeze.
Solid line indicates row
above is frozen.
102

Chapter 8 Pocket Sheet
To freeze a row and column at the same time
1. Tap the cell below the row and to the right of the column you want to
freeze.
• To freeze column A and row 1, for example, you would tap cell B2.
2. T ap the Menu Bar icon to display the menu bar, and then tap Option –
Freeze.
To unfreeze rows and columns
If a row and/or column is frozen on the current sheet, tap the Menu Bar
icon to display the menu bar, and then tap Option – Freeze to unfreeze
them.
Inserting Rows
1. Select the location in the sheet where you want to input the rows.
• The number of cells you select determines the number of rows that are
inserted. Selecting C1 inserts a single row at row 1. Selecting C1 and
C2 inserts two rows at rows 1 and 2.
• Existing rows will be shifted downwards to make room for the newly
inserted rows.
2. T ap the Menu Bar icon to display the menu bar, and then tap Option –
Insert.
3. On the dialog box that appears, tap Rows to perform the row insert
operation in accordance with the cells you selected in step 1.
103

Inserting Columns
1. Select the location in the sheet where you want to input the columns.
• The number of cells you select determines the number of columns that
are inserted. Selecting C1 inserts a single column at column C. Selecting
C1 and D1 inserts two columns at columns C and D.
• Existing columns will be shifted right to make room for the newly inserted
columns.
2. T ap the Menu Bar icon to display the menu bar, and then tap Option –
Insert.
3. On the dialog box that appears, tap Columns to perform the column
insert operation in accordance with the cells you selected in step 1.
Deleting Rows and Columns
1. Select the location in the sheet where you want to delete rows or columns.
• The number of cells you select determines the number of rows or columns
that are deleted.
• Selecting C1 deletes row 1 or column C.
• Selecting C1 and D1 deletes columns C and D.
• Selecting C1 and C2 deletes rows 1 and 2.
• Remaining columns will be shifted to fill the room created by the deleted
rows or columns.
2. T ap the Menu Bar icon to display the menu bar, and then tap Option –
Delete.
3. On the dialog box that appears, tap Rows or Columns to perform the
delete operation in accordance with the cells you selected in step 1.
104

Chapter 8 Pocket Sheet
Sheet Operations
This section contains information about the procedures you need to perform when
working with sheets.
Opening a Sheet
1. Display the Pocket Sheet list screen.
2. Double-tap the title of a sheet to open it.
Displaying the Input Screen
You can use any one of the following two operations to change from a sheet
screen to the input screen.
• Tap the input field.
• Tap the currently selected (highlighted) cell.
To change back to the sheet screen from the input screen, tap Esc.
Saving a New Sheet
1. After inputting data into a sheet, tap the Menu Bar icon to display the
menu bar, and then tap Edit – Save.
2. Type in up to 32 characters for the name you want to assign to the sheet.
3. T ap Save to save the sheet.
105

Saving an Existing Sheet Under a New Name
1. Tap the Menu Bar icon to display the menu bar, and then tap Edit –
Save As.
2. Type in up to 32 characters for the name you want to assign to the sheet.
3. T ap Save to save the sheet.
Exiting a Sheet
While a sheet is on the display, tap Esc to exit.
• Instead of tapping Esc, you could tap the Menu Bar icon to display the
menu bar, and then tap Edit – Close.
• If there are unsaved edits in the sheet, tapping Esc displays a screen for
saving the sheet. Type in a name and then tap Save to save the sheet.
• If you want to quit without saving the sheet, tap Esc.
Renaming a Sheet
1. Display the Pocket Sheet list screen.
2. Tap the sheet you want to rename so it is highlighted.
3. Tap the Menu Bar icon to display the menu bar, and then tap Edit –
Rename item.
4. Input up to 32 characters for the new name you want to assign to the
sheet.
5. Tap Save to save the sheet under its new name.
106

Chapter 8 Pocket Sheet
Cut, Copy, Paste, Clear
The cut, copy, and paste operations in the Pocket Sheet Mode are somewhat
different from those in other modes.
Cutting Cell Data
1. Select the cell or range of cells that contains the data you want to cut.
• See “Making a Cell the Active Cell” on page 87.
2. Tap the Menu Bar icon to display the menu bar, and then tap Edit –
Cut.
• The data is removed from the cell and placed on the clipboard.
• The data includes format settings (page 95) as well as any text, numbers,
and mathematical expressions. The border specification, however, is not
included.
• You can use the Paste command (page 108) to paste the contents of the
clipboard into another cell or range of cells.
Copying Cell Data
1. Select the cell or range of cells that contains the data you want to copy .
• See “Making a Cell the Active Cell” on page 87.
2. Tap the Menu Bar icon to display the menu bar, and then tap Edit –
Copy.
• The data is copied to the clipboard, without affecting the selected original
cells.
• The copied data includes format settings (page 95) as well as any text,
numbers, and mathematical expressions. The border specification,
however, is not included.
• You can use the Paste command (page 108) to paste the contents of the
clipboard into another cell or range of cells.
107

Pasting Cell Data
Important!
• Pasting data into a cell or range of cells that already contains data causes the
current data to be replaced with the pasted data.
1. Select the cell or range of cells to which you want to paste the data
currently on the clipboard.
• See “Making a Cell the Active Cell” on page 87.
• Data can be placed onto the clipboard using the cut (page 107) or copy
(page 107) operation.
2. Tap the Menu Bar icon to display the menu bar, and then tap Edit –
Paste.
• The data is pasted from the clipboard into the currently active cells.
• The pasted data includes format settings (page 95) as well as any text,
numbers, and mathematical expressions. No border specification is
included.
Note
• A paste operation that causes the maximum number of rows (999) or columns
(26) to be exceeded causes the following message to appear: This operation
will push some data outside the sheet. Continue?
Tapping Yes executes the paste operation, which causes any data that runs off
the sheet to be deleted. Tapping No cancels the paste operation.
• Up to 256 characters can be pasted when pasting data from another application.
• The clipboard has a capacity of approximately 2KB.
108

Chapter 8 Pocket Sheet
Copying a Relative Cell Reference
With relative cell reference, the cell reference changes automatically to
maintain the same relationship between the calling cell and the cell being
called. Note the following example.
ABC
=A2+B2+C2+D2
1
2
3
4
5
Copying an Absolute or Mixed Cell Reference
Since absolute cell references are “absolute,” they remain the same even
when the expression is moved. With mixed cell references, the absolute part
remains the same, while the relative part changes according to the location
of the expression. Note the following example.
ABC
=$A$2+$B2+C$2+D2
1
2
3
4
5
PASTE
=B5+C5+D5+E5
PASTE
=$A$2+$B5+D$2+E5
Clearing Cell Data
1. Select the cell or range of cells whose data you want to clear.
• See “Making a Cell the Active Cell” on page 87.
2. Tap the Menu Bar icon to display the menu bar, and then tap Edit –
Clear.
109

3. On the dialog box that appears, tap the option you want to execute it.
• All clears both cell format settings (page 95) and contents.
• Formats clears the format settings of the cell without affecting the
contents. The borders of the cell are not cleared.
• Contents clears the contents (value, text, function) of the cell without
affecting format settings.
Searching for Data in a Sheet
Use the following procedure to search for specific data in a sheet.
Note
• The Pocket Sheet search function checks cell data only for the characters you
specify . It does not check calculation formulas and functions assigned to cells.
• The search starts from the cell that is currently selected in the sheet and
proceeds to the right of the selected cell.
• The contents of cells located inside a row or column that is frozen are not
searched. To search the contents of such cells, you must unfreeze the row or
column first.
To search for data in a sheet
1. In the Pocket Sheet Mode, open the sheet whose data you want to search.
2. T ap the cell from which you want to start searching so it is highlighted.
110

Chapter 8 Pocket Sheet
3. Tap the Menu Bar icon to display the menu bar, and then tap Edit Search.
• If you previously performed a search operation since opening the current
sheet, the text you searched for will be shown on the above screen.
4. Input up to 12 search characters.
5. Tap Exe to start the search.
Found data
• The message Data item not found! appears if there is no data in the
sheet that matches the text you specify.
6. To search for the next occurrence of the same data, tap Next. You can
repeat this step as many times as necessary.
7. After you are finished searching for data, tap Esc to close the search
screen.
111

Setting Sheet Calculation, Gridline, and Protect
Options
1. Display the sheet whose options you want to set.
2. T ap the Menu Bar icon to display the menu bar, and then tap Option –
Sheet to display the option setting dialog box.
3. Tap the check boxes to turn the options you want on (checked) and off
(unchecked).
• Check Auto Calculation when you want the calculations in the sheet
performed automatically whenever a value is changed. When Auto
Calculation is turned off, you can perform calculations manually by
executing Menu Bar – Option – Calc Now.
• Check Gridlines to display the sheets gridlines.
• Check Protect Sheet when you want to protect the contents of the sheet
from being changed. Note that sheet protection is related to cell locking
described under “Lock” on page 99.
4. After the settings are the way you want, tap Set to apply them.
Date and Size Information
You can use the following procedure to display a dialog box that shows the date
the sheet was created or modified, and the size of the sheet in bytes.
Displaying Date and Size Information
1. Display the Pocket Sheet list screen.
2. Select the name of the sheet whose date and size information you want
to view.
112

Chapter 8 Pocket Sheet
3. T ap the Menu Bar icon to display the menu bar, and then tap Option –
Date/Size.
• The date format (M/D/Y, D/M/Y, Y/M/D) is in accordance with the
system settings you make under “Setting the Date, Time, Calendar, and
Keyboard Formats” on page 168.
4. After you are finished viewing the information, tap OK to close the
dialog box.
Pocket Sheet Sync
Pocket Sheet Sync for Microsoft
stored in your PV Unit with data in files created using Microsoft Excel (95, 97,
2000). For details on using Pocket Sheet Sync, see the documentation contained
on the CD-ROM that comes with your PV Unit.
®
Excel 95/97/2000 synchronizes Pocket Sheet data
Computer System Requirements
The following are the minimum computer system requirements for running
Pocket Sheet Sync.
• Windows 95/98/NT (English, Spanish, German, French, or Italian)
• Excel 95/97/2000
113

Pocket Sheet Errors
The message #ERR appears inside of a cell any time one of the following
operations is attempted with the cell.
• Division by zero
• Any mathematical operation that produces a value that exceeds the
calculation limit
• Any mathematical operation in which a cell references itself
• Deletion of a row or column that contains a cell referenced by the cell
• A copy operation that causes the referenced cell to be outside the sheet
• Any copy operation, or row or column insert operation that causes the
length of a function to exceed 256 characters
• Mathematical error
• Adding a large number of mathematical expressions to a sheet for which
Auto Calculation is turned off can cause the #ERR message to appear.
• Parentheses can be nested up to 10 times inside a single calculation.
• Referencing of other cells within the same sheet is limited to 256 levels
per calculation.
Important!
• Referencing a cell that contains a calculation that has not yet been performed
may cause the referencing calculation to take a long time.
114
 Loading...