


Chapter
3
The Contacts Mode is the easy way to organize, store, and manage all your business
and personal contact data. Fields are provided for name, address, phone number,
fax number, e-mail address, and more. Business data is grouped under company
name, so you have instant at-a-glance access to information on everyone who
works for the same company.
The Phone Book lets you manage your mobile phone’s main memory data or
SIM card data.
Contacts
Entering the Contacts Mode
You can use any one of the three following methods to enter the Contacts Mode.
The method you use determines what appears on the screen first.
To enter the Contacts Mode from the icon menu
T ap the Contacts icon below the PV Unit screen to enter the Contacts Mode.
This displays the list screen of the data items contained in the category that
was on the display when you last exited the Contacts Mode.
To enter the Contacts Mode from the Action Menu
1. Press the Action control to turn on PV Unit power.
2. Rotate Action control to highlight the Contacts Mode list you want.
• You can select Latest calls, Business, or Personal.
3
3. Press the Action control to display the list you selected.
T o enter the Contacts Mode from the Mode Menu using the stylus
1. On the icon menu beneath the PV Unit display screen, tap Menu to
display the on-screen icon menu.
2. Tap Contacts.
• This displays the list screen of the data items contained in the category
that was on the display when you last exited the Contacts Mode.
49
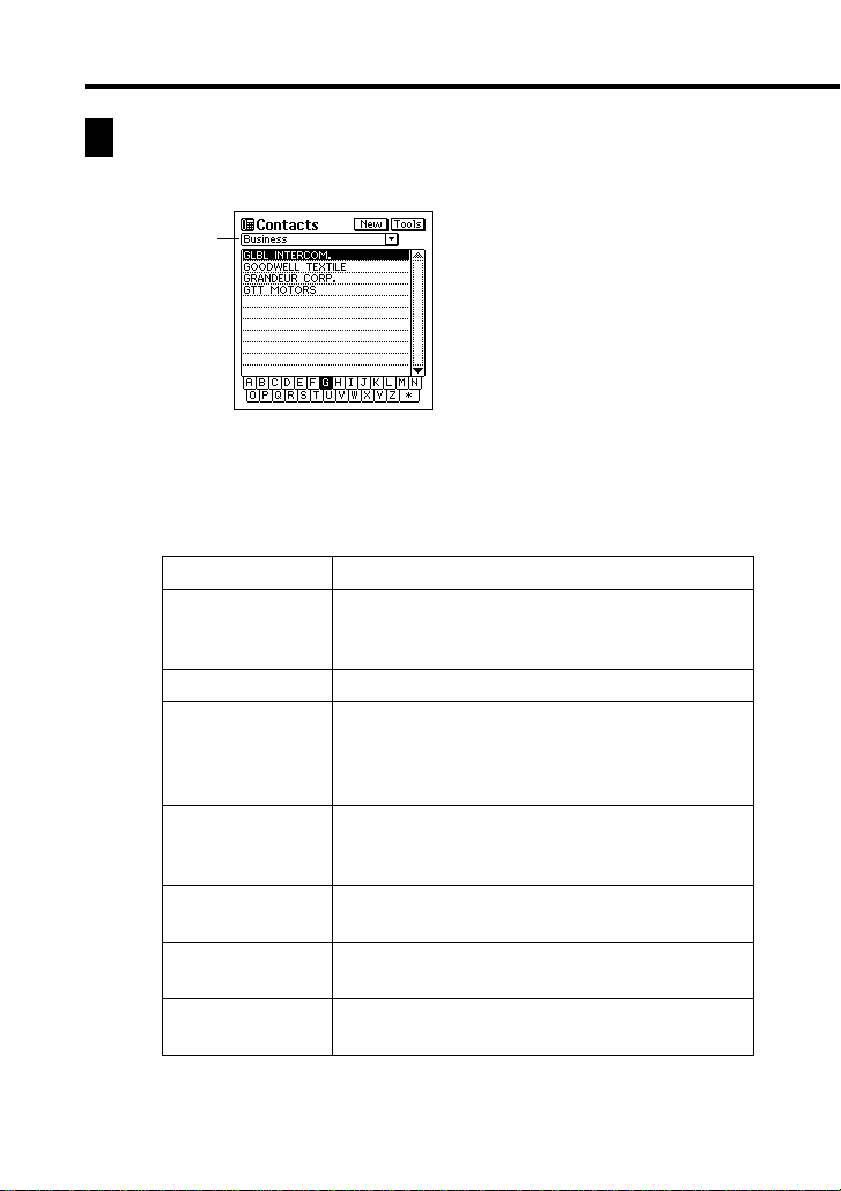
Changing the Display Category
1. Display a Contacts list screen.
Category
name box
• Note that you can change the display category only from a Contacts list
screen.
2. Tap the L arrow to the right of the category name box to open a list of
categories, and tap the one you want to select.
50
Category Name
Latest calls
All
Business
Personal
Untitled 1 - 3
Phone Book
(Phone)
Phone Book
(SIM)
List Contents
Last 16 Contacts data items whose data screens
you opened. See “Latest Calls List” below for
details.
All Contacts data, regardless of category
Company names of Contacts data stored under
the Business category. Selecting a company
name displays a list of employees and their
business phone numbers.
Personal names and home phone numbers of
Contacts data stored under the Personal
category
Free 1 and Free 2 fields of Contacts data stored
under the applicable Untitled category
Contacts data for the memory of your mobile
phone.
Contacts data for a SIM card used on your
mobile phone.
Chapter 3 Contacts
• The above describes the default list screen contents. You can change the
contents of the Personal, Untitled and Phone Book category lists, and of
the employee list that appears when you select a company name from
the Business category list. See “Changing Contacts List Screen Contents”
on page 55 for details.
Latest Calls List
Selecting an item in the Contacts list screen and then changing to the item’s data
screen causes that item to be added to the Latest calls list. An item is not added to
the Latest calls list if you scroll to its data screen from another data screen.
Note
• The contents of the Latest calls list are cleared whenever you perform a data
synchronization operation with your computer, when you delete all the data
items in a category, or when you delete all data items.
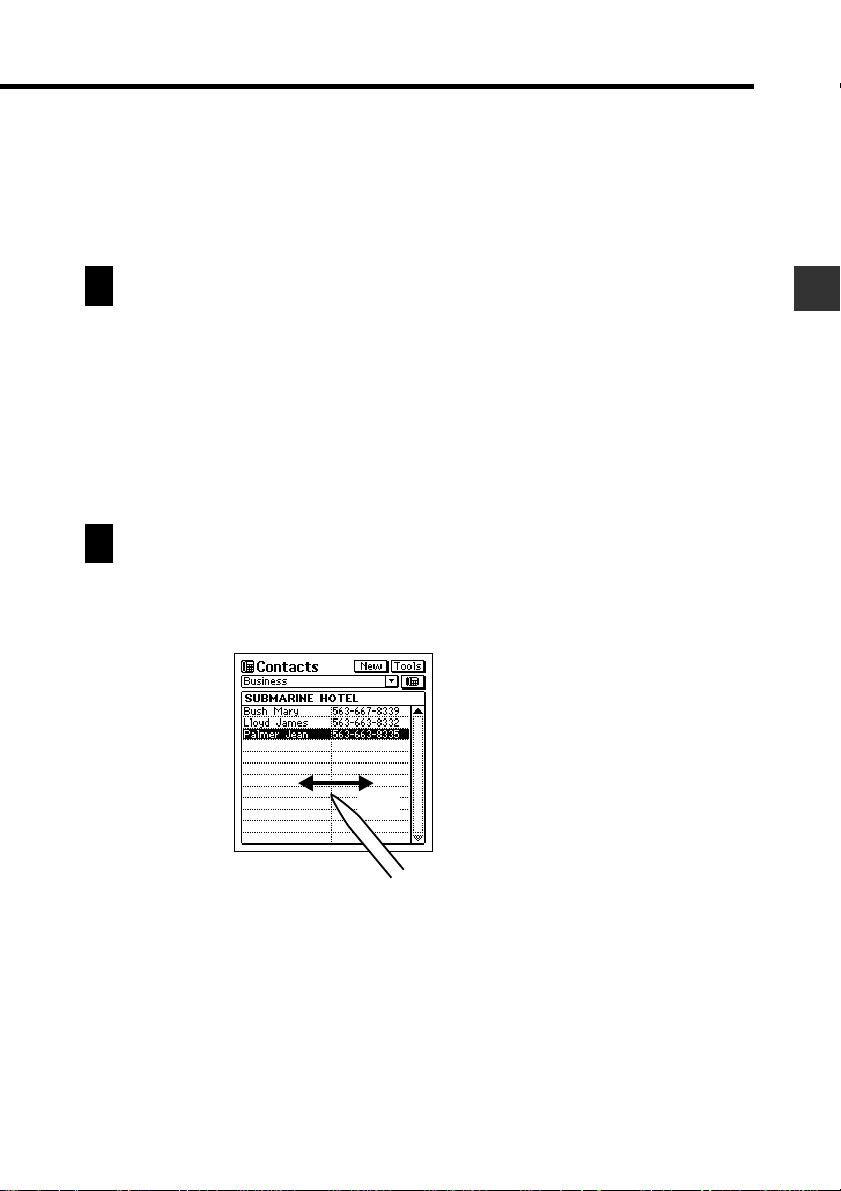
Resizing Contacts List Screen Columns
You can use the stylus to drag the separator line on a list screen left and right to
change the relative sizes of the columns.
Drag
51
Inputting New Contacts Data
The following procedure shows how to input new Business category data. Data
input procedures for Personal, Untitled, and Phone Book category data is identical.
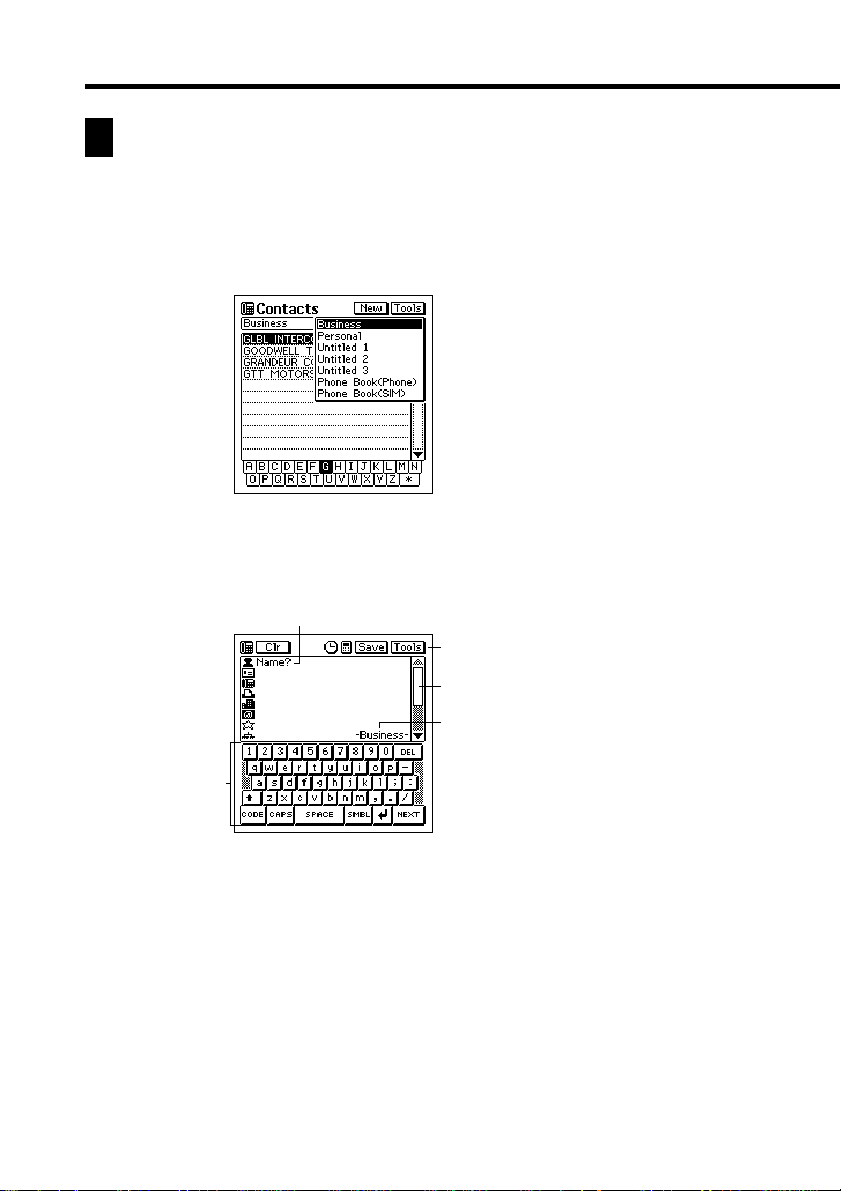
1. While a Contacts Mode list or data screen is on the display, tap the New
button.
2. Tap the category where you want to input the data.
• In this example, tap Business.
1
1 Prompt
3
2 Text keyboard
4
3 Data input toolbar
4 Scroll bar
5
5 Category name
2
3. Input the name of the person. Business, Personal and Phone Book data
is sorted automatically by name, so it is a good idea to input the last
name first.
• Note that you must input Name data for a Personal Item, Name and
Company data for a Business item, Name and Mobile data for a Phone
Book item, and data for the first entry (field) of an Untitled item. The
PV Unit will refuse to store the item when you tap Save below if it does
not contain the minimum required data.
52
Chapter 3 Contacts
4. Tap the other fields on the screen and input the data you want.
5. After you finish inputting all the data that you want, tap Save to store it.
Viewing Contacts Data
Use one of the following procedures to view the Contacts data you want.
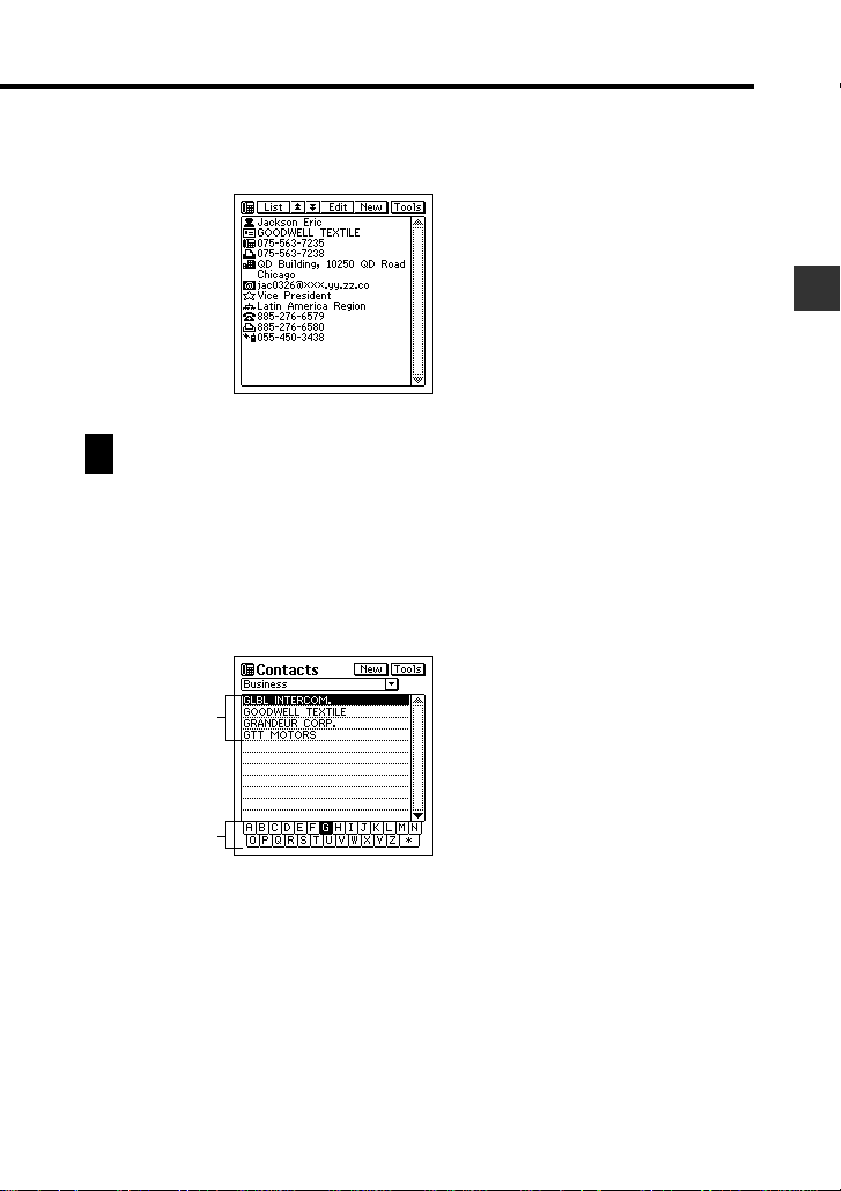
To view Business data
1. In a Contacts list screen, tap the L arrow to the right of the category
name box to open a list of categories.
2. Tap Business to change to the Business category.
Company
names
Index
3. Rotate the Action control to move the highlighting in the index at the
bottom of the screen to the letter that starts the name of the company
whose data you want to view.
53

4. Double-tap the name of a company to display a list screen (name and
business phone number) of all entries whose company entry matches
the company you selected.
1 Company name
1
2
2 Names
3 Phone numbers
3
5. Rotate the Action control to move the highlighting to the name of the
person whose data you want to view , and then press the Action control
to display the data screen for that person.
To view other data
1. In a Contacts list screen, tap the L arrow to the right of the category
name box to open a list of categories.
2. Tap the name of the category (besides Business) whose data you want
to view.
3. Rotate the Action control to move the highlighting in the index at the
bottom of the screen to the letter that starts the data that appears in the
left column of the list screen.
• The data that appears in the left column depends on the category you
selected.
4. Double-tap the data item in the list to display its data screen.
54

Chapter 3 Contacts
Changing Contacts List Screen Contents
You can specify one of the entries (fields) that appears in the list screens of the
Personal category , the three Untitled categories and Phone Book categories, and
of the employee list screen that appears when you select a company name from
the Business category list. The following table shows the entries (fields) in each
list screen that are fixed. All others are selectable.
Category
Business
(Employee List)
Personal
Untitled 1-3
Phone Book
Latest calls
All
Business
(Company List)
• You can make separate settings for each of the three Untitled categories.
• You can make separate settings for each of the two Phone Book categories
(Phone and SIM).
Fixed Entries (Fields)
Name
Name
Free 1
Name
All entries are fixed.
All entries are fixed.
All entries are fixed.
To change the contents of a category’s list
1. Display the Contacts list of the category whose contents you want to
change.
2. T ap the button under the Tools button to display a list of entries (fields)
that can be displayed in the list.
3. Tap the entry name that you want to display in the list together with the
fixed entry.
• You can specify only one field per list.
• T apping an entry name closes the list entry selection screen and displays
the list with the entry you selected.
55

Changing Contacts Input Screen Contents
Use the procedure described here to change the contents of the Contacts Mode
data input screen for each category . The following table shows the entries (fields)
in each input screen that are fixed. All others are selectable.
Category
Business
Personal
Untitled 1-3
Phone Book
• You can make separate settings for each of the three Untitled categories.
Fixed Entries (Fields)
Name
Company
Name
Phone (H)
Free 1
Free 2
Name
Mobile
To change the contents of a category’s input screen
1. Display the Contacts list of the category whose input screen’s contents
you want to change.
2. Tap the Menu Bar icon to display the menu bar, and then tap Option –
Prompt edit to display a list of entries (fields) that can be displayed in
category’s input screen.
Check boxes
• The above is the entry selection screen for the Business category .
56

Chapter 3 Contacts
3. Tap the check box next to an entry to toggle it between checked (display
entry) and unchecked (do not display entry).
• You can check or uncheck any of the displayed entries shown on the
screen.
4. After making the settings you want, tap Yes to save them and close the
entry selection screen.
Managing Untitled Categories and Free Entries
You can use the procedures described here to change the names of each of the
three Untitled categories, and the names of the 13 entries (fields) under each of
the Untitled categories.
Contacts Categories
There are seven categories in the Contacts Mode: the four preset categories
named Business, Personal, Phone Book (Phone), and Phone Book (SIM),
and three undefined categories named Untitled 1 through Untitled 3.
The Business, Personal, and Phone Book categories contain the identical
entries (fields). The difference between them is the sequence the fields that
appear on the display, and how data is sorted.
The Untitled categories contain entries that can be configured by you.
57

Contacts Field Names
Business Personal
Name* Name* Name* Free 1*
Company* Phone (H) Mobile* Free 2
Phone (B) Fax (H) Phone (H) Free 3
Fax (B) Mobile Fax (H) Free 4
Address (B) Address (H) Address (H) Free 5
E-mail E-mail E-mail Free 6
Position Company Company Free 7
Department Phone (B) Phone (B) Free 8
Phone (H) Fax (B) Fax (B) Free 9
Fax (H) Position Position Free 10
Mobile Department Department Free 11
Address (H) Address (B) Address (B) Free 12
Note Note Note Free 13
* Indicates entries on which data items are sorted.
• (B): Business
• (H): Home
Phone Book
(Phone, SIM)
Untitled 1 - 3
To edit Contacts Untitled category and Free entry names
1. In the Contacts Mode, display the list screen of the Untitled category
you want to edit.
2. Tap the Menu Bar icon to display the menu bar, and then tap Option –
Name edit.
3. Tap the category name or one of the entry names, and make any changes
you want. Repeat this step for as many names as you want to change.
• Y ou can assign category names up to 14 characters long, and entry names
up to 10 characters long.
4. After everything is the way you want, tap Save to store the data.
58

Chapter 3 Contacts
Copying Data Items Between Categories
Y ou can use the following procedure to copy data between the Personal, Business,
and Phone Book categories. After you copy the data, you can make changes to it
and create a new data item.
1. In the Contacts Mode, select the category from which you want to copy
data.
• Select Business, Personal, Phone Book (Phone) or Phone Book (SIM).
2. Select the data item you want to copy.
• You can select an item by displaying its data screen or by tapping the
item on a list screen.
3. Tap the Menu Bar icon to display the menu bar, and then tap Option –
Change data.
4. Tap the destination of copy.
• This copies the data and displays the newly created data item.
5. Make any changes in the data you want.
6. After you are finished, tap Save to save the copied data as a new data
item.
59

Exchanging Data with a Mobile Phone
The following procedures describe how to export Phone Book (Phone, SIM)
category data to a mobile phone and import mobile phone data into the Phone
Book category.
• The import and export operations exchange Name and Mobile field data only .
To export a single Phone Book category data item to mobile
phone memory
1. In the Contacts Mode, select the Phone Book (Phone or SIM) whose
data you want to export.
2. Select the item you want to export so it is highlighted.
3. Tap the Menu Bar icon to display the menu bar, and then tap Option –
Send.
4. Specify Phone as the receiver (Partner) and One item as the export
operation type (Transfer type), and then tap Exe.
• If you want to export to a SIM card, select SIM for Partner.
• This exports the data item to the mobile phone and add it to existing
mobile phone data.
• You can cancel the export operation by tapping Esc.
• You can export up to 25 characters per data item.
• Characters in a Name field that are not supported by the phone to which
a message is sent are replaced by other characters or spaces.
• The above operation exports only the following characters from the
Mobile field: numbers, w, x, +, *, #, ?.
60

Chapter 3 Contacts
To export all data from Phone Book (Phone) or Phone Book
(SIM) and replace data in mobile phone memory
1. In the Contacts Mode, select the Phone Book (Phone or SIM) whose
data you want to export.
2. Tap the Menu Bar icon to display the menu bar, and then tap Option –
Send.
3. Specify Phone as the receiver (Partner) and Replace all as the export
operation type (Transfer type), and then tap Exe.
• If you want to export to a SIM card, select SIM for Partner.
4. In response to the confirmation message dialog box that appears, tap
Yes to export all Phone Book category data and replace the data in phone
memory, or No to close the dialog box without doing anything.
• You can cancel the data export operation by tapping Esc.
• You can export up to 25 characters per data item.
• You can export up to 255 data items at one time.
• Characters in a Name field that are not supported by the phone to which
a message is sent are replaced by other characters or spaces.
• The above operation exports only the following characters from the
Mobile field: numbers, w, x, +, *, #, ?.
To import a single data item from a mobile phone memory
1. In the Contacts Mode, select the Phone Book (Phone) or Phone Book
(SIM) as the category into which you want to import the data.
2. Tap the Menu Bar icon to display the menu bar, and then tap Option –
Receive.
61

3. Specify Phone as the sender (Partner) and One item as the import
operation type (Transfer type), and then tap Exe.
• If you want to import from a SIM card, select SIM for Partner.
• This causes a list of mobile phone data to appear.
You can use the stylus to drag the separator line on a list screen left and right to
change the relative sizes of the columns.
4. Select the item you want to import so it is highlighted, and then tap Exe
on the tool bar to import the selected data item.
• This imports the data item from the mobile phone and merges it with
existing Phone Book data.
• You can cancel the import operation by tapping Esc.
• You can import up to 25 characters per data item.
• The above operation imports only the following characters to the Mobile
field: numbers, w, x, +, *, #, ?.
To import all data in mobile phone memory and replace Phone
Book category data
1. In the Contacts Mode, select Phone Book (Phone) or Phone Book (SIM)
as the category into which you want to import the data.
2. Tap the Menu Bar icon to display the menu bar, and then tap Option –
Receive.
3. Specify Phone as the sender (Partner) and Replace all as the import
operation type (Transfer type), and then tap Exe.
• If you want to import from a SIM card, select SIM for Partner.
62

Chapter 3 Contacts
4. In response to the confirmation message dialog box that appears, tap
Yes to replace data in the Phone Book category with phone memory
data or No to close the dialog box without doing anything.
• You can cancel the data import operation by tapping Esc.
• You can import up to 25 characters per data item.
• You can import up to 255 data items at one time.
• The above operation imports only the following characters to the Mobile
field: numbers, w, x, +, *, #, ?.
Exporting Contacts Data Into a Schedule Item
The following procedure lets you export Contacts data into the description text of
a Schedule item, which provides you with handy reference information about the
person you are planning to meet.
1. Display the data item (record) you want to export.
2. Tap New – Appointment.
3. Input the date, time, alarm time, and any additional description text you
want.
4. Tap Save to store the item.
• The applicable entries (fields) of the Contacts item are exported into the
Schedule item. See “Importing Contacts Data Into a Schedule Item” on
page 33 for details on which entries are exported.
• Note that Contacts data can be exported to create a new Schedule item
only . You cannot use this procedure to export into an existing Schedule
item.
63
 Loading...