

Page 1

Chapter
1
Getting Acquainted
Read this first!
• Be sure to read this part of the User’s Guide before doing anything else! It
includes important information that you need to know in order to use the
PV-750 (hereinafter referred to as the “PV Unit”) correctly.
• You can find more detailed information about other PV Unit operations in
“Chapter 14 – General Operations” on page 142 and “Chapter 16 – T echnical
Reference” on page 165.
Important!
Please keep this User’s Guide and all information handy for future reference.
Make backup copies of important data!
Your PV Unit employs flash memory, which makes it possible to store large
volumes of data and to recall data quickly and easily . Data is retained when power
is turned off and even when batteries go dead, but it can be corrupted or lost
entirely due to operational mistakes or malfunction. Data contents can also be
corrupted or lost due to strong electrostatic charge, strong impact, or extremes in
temperature and humidity. All of this means that you should always keep backup copies of important data by transferring it to a personal computer or by writing
it down somewhere.
1
11
Page 2

Important Precautions
Note the following important precautions whenever using your PV Unit.
• Never expose the PV Unit to fire.
• Avoid temperature extremes. Do not locate the PV Unit in direct sunlight,
near a window, near a heater, etc.
• In very low temperatures display response may slow down or fail entirely.
This condition is temporary and operation should resume under normal
temperatures.
• Avoid areas subject to excessive moisture, dirt, and dust.
• Avoid dropping the PV Unit and otherwise subjecting it to strong impact.
• Never bend or twist the PV Unit.
• Never try to take the PV Unit apart.
• Make sure nothing gets between the hard cover and the touch screen.
Besides creating the risk of scratching the touch screen, an object coming
into contact with the screen can cause power to turn on and run down
the batteries.
• Do not use a pen, pencil, or other sharp object to touch or press the
display.
• T o clean the exterior of the PV Unit, wipe it with a soft cloth dampened
in a weak solution of a mild neutral detergent and water. Be sure to
wring out any excess moisture from the cloth before wiping off the PV
Unit. Never use benzene, thinner, or any other volatile agent to clean
the unit. Doing so can remove the figures printed on the case or otherwise
damage the case finish.
• The contents of this manual are subject to change without notice.
• CASIO COMPUTER CO., LTD. assumes no responsibility for any loss
or claims by third parties that may arise from the use of this product.
12
Page 3

Chapter 1 Getting Acquainted
Data Errors
The PV Unit performs a self-check routine whenever you turn it on. The message
shown below appears if the PV Unit detects a problem with data stored in its
memory.
Once data is lost due to a data error it cannot be recovered. Data errors are generally
caused by one of the following problems.
• Interruption of battery power
• Severe electrostatic charge, strong impact, changes in temperature, or
changes in humidity
• Hardware problems
Once the data error message appears, the PV Unit will not accept any input or
editing of data. In order to return memory to normal (and permit further data
editing and input), you have to perform the RESET operation to clear all data.
Before doing so, you may want to recall important data and write it down (if you
don’t yet have a copy). You can then re-input the data after clearing PV Unit
memory.
Continued problems after performing the RESET operation can indicate a serious
hardware problem. Consult with your nearest CASIO dealer if problems persist.
To reset after viewing data
1. After the Data error message appears, tap Yes.
2. In response to the message that appears (Data error! Consult your
User’s Guide for correct procedure.), tap OK.
• This displays the pop up tool screen.
3. Now you can enter other modes to recall data and make handwritten
copies if you want.
4. After recalling the data you want, perform the RESET operation under
“Resetting the PV Unit” on page 169.
13
Page 4
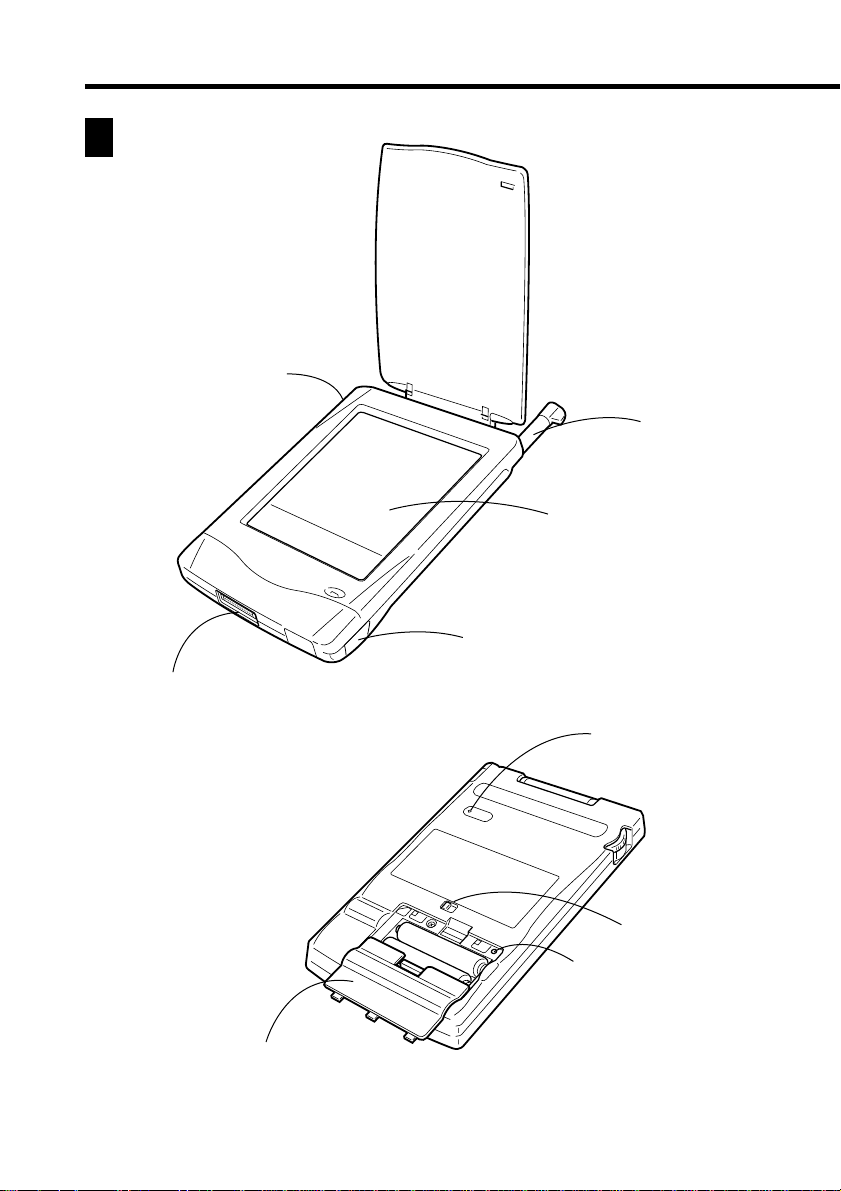
General Guide
Action control
Cradle contacts
Stylus
Touch screen
Infrared port
14
Battery compartment cover
RESET button
P
Battery switch
P button
Page 5

Chapter 1 Getting Acquainted
Power Supply
Your PV Unit can be powered by two AAA-size alkaline batteries.
Important!
• Normally the flash memory of the PV Unit retains its data even when power
is turned off and when batteries go dead. Mis-operation or other problems,
however, can cause data to become corrupted or lost. Always keep separate
copies of important data.
Low Battery Warning
The message shown below appears whenever battery power drops below a
certain level. Replace the batteries immediately after this message appears:
Batteries are getting weak! Replace them as instructed in the User’s
Guide.
Important!
• If you continue using the PV Unit after the low battery warning message
appears, power may suddenly turn off or the contrast adjustment screen
may suddenly appear. Should this happen, replace batteries immediately.
• Be sure to use alkaline batteries. Manganese batteries provide very short
battery life.
Battery Precautions
Incorrectly using batteries can cause them to burst or leak, possibly damaging
the interior of the PV Unit. Note the following precautions.
• Be sure to use alkaline batteries only to power this PV Unit.
• Be sure that the positive (+) side of each battery is
facing in the correct directions.
• Never mix batteries of different types.
15
Page 6

• Never mix old batteries and new ones.
• Do not expose batteries to direct heat, let them become shorted, or try to
take them apart.
• Never leave dead batteries in the battery
compartment.
• Remove the batteries if you do not plan to use the PV Unit for a long
time.
• Replace batteries at least once every year, no matter how much you use
the PV Unit during that period.
• About once a month, turn on the PV Unit and check its battery level. If
the low battery warning appears or if nothing at all appears on the display ,
replace batteries as soon as possible.
• Never try to recharge the batteries that come with
the PV Unit.
• Should a battery leak, clean out the battery compartment of the PV Unit
immediately, taking care to avoid letting battery fluid come into direct
contact with your skin.
Keep batteries out of the reach of small children. If swallowed, consult
with a physician immediately.
• Frequent data synchronization using the PC sync for Windows
application that comes with the PV Unit shortens battery life.
• The batteries that come with this unit discharge slightly during
shipment and storage. Because of this, they may require replacement
sooner than the normal expected battery life.
16
Page 7

Chapter 1 Getting Acquainted
To replace the batteries
Important!
• Always make sure the battery switch is in the NORMAL OPERATION
position at all times, except when replacing batteries.
1. Turn off PV Unit power.
2. Remove both of the old batteries and replace them with new ones,
referring to the procedure on pages 1 through 3.
To turn power on and off
1. Touch anywhere on the PV Unit screen or press the Action control to
turn on power.
2. To turn power off, tap Off with the stylus.
Auto Power Off
The Auto Power Off function automatically turns off power whenever
you do not perform any operation for a specified period. You can specify
1 minute, 3 minutes, or 6 minutes before Auto Power Off is triggered
(page 159).
Use the procedure described under “To turn power on and off” above to
turn power back on.
Using the Backlight
T apping the Light icon beneath the PV Unit screen illuminates the display screen
for about 15 seconds for easy viewing, even in the dark.
• Tapping the Light icon while the backlight is on turns it off.
• The backlight may fail to turn on when battery power is low and during data
communication.
Action Control and Stylus
Many of the PV Unit’s operations can be performed using either a stylus or the
Action control on the left side of the unit. The following describes the general
operations that can be performed with each.
17
Page 8

Stylus
The stylus takes the place of a computer mouse. You can perform all PV
Unit operations with the stylus. In this manual, all data input operations are
described using stylus operations.
You can perform the following basic operations with the stylus.
• Tap
Tap the tip of the stylus on the display to press a button, select an item,
select a data input field, etc.
• Double-tap
Tap the display twice in relatively quick succession.
• Drag
Touch the tip of the stylus to the screen, and drag it across the screen to
select a range of text, draw a line, etc.
Action Control
The Action control makes it possible to perform certain PV Unit operations
with one hand. In this manual, many data recall operations are described
using Action control operations.
You can perform the following basic operations with the Action control.
• Rotate
Rotating the Action control up and down causes the selection or data on the
screen to scroll up and down.
• Press
Pressing the Action control is much like a “click” on a computer mouse
button. Pressing the Action control executes the command that is highlighted
on the display, executes the function assigned to the button whose name is
enclosed by a dotted line (such as
screen, etc.
18
), switches between a list and a data
Page 9

Chapter 1 Getting Acquainted
Using the Icon Menu
The PV Unit has an icon menu beneath its display screen. You can tap these icons
to perform various functions no matter what mode you are using.
Icon Description
Off Turns off PV Unit power.
Light Turns on the backlight.
Menu Displays the Mode Menu.
Scheduler Enters the Scheduler Mode.
Contacts Enters the Contacts Mode.
Mail Enters the Mail Mode.
Quick-Memo Enters the Quick-Memo Mode.
Esc Exits the current operation.
Menu Bar Displays the menu bar.
Modes
With most PV Unit operations, you must first enter a mode before you can input
or view data. You can use any of the following methods to enter a mode.
• Tap an icon in the icon menu beneath the display screen
• Tap an on-screen icon in the Mode Menu
• Select a mode on the Action Menu with the stylus or Action control
19
Page 10

Note
• All the procedures in this User’s Guide are performed using the icon menu
whenever possible.
To enter a mode using the icon menu
Use the stylus to tap on the icon for the mode you want to enter.
To enter a mode using the on-screen icon menu
1. On the icon menu, use the stylus to tap the Menu icon to display the on-
screen icon menu.
• If there are too many icons to fit on one screen, a scroll button appears
on the right side of the display . Tap the scroll button to scroll the screen
and view other icons.
2. Tap the icon of the mode you want to enter.
To enter a mode using the Action Menu
1. Press the Action control to turn on PV Unit power and display the Action
Menu.
Scroll bar
20
Page 11

Chapter 1 Getting Acquainted
2. If the mode you want is not on the screen, scroll the menu up and down.
• See “Scroll Bars” on page 142 for details on using the scroll bar.
3. Enter the mode you want.
• You can enter a mode using either of the following methods.
• Tap on the mode name in the Action Menu.
• Use the Action control to highlight the name of the mode and then
press the Action control.
Customizing the Appearance of the Mode Menu
You can rearrange Mode Menu so the icons are in any order you want. The
following procedures describe how to swap the positions of two icons and how to
move an icon to a specific location.
Note that you cannot change the positions of icons on the Action Menu.
Swapping Two Icons
Use the following procedure to swap the positions of two icons.
1. On the Mode Menu, tap the Menu Bar icon to display the menu bar,
and then tap Option – Menu edit.
2. Tap Swap.
3. Tap the first of the two icons whose positions you want to swap to select
it.
4. Tap the second icon.
• Tapping the second icon swaps it with the first icon you tapped.
21
Page 12

Moving an Icon to a Specific Location
Use the following procedure to move an icon to a specific location on the
Mode Menu screen.
1. On the Mode Menu, tap the Menu Bar icon to display the menu bar,
and then tap Option – Menu edit.
2. Tap Move.
3. Tap the icon you want to move to select it.
4. T ap the icon at the location where you want the icon you tapped in step
3 to be.
22
 Loading...