

Casio PV-400PLUS - Cassiopeia Pocket Viewer Handheld Organizer, PV Applications Manager User Manual
Page 1

PV Applications Manager
User’s Guide
E
Page 2

– 2 –
• Microsoft, Windows, and Windows NT are either registered trademarks or
trademarks of Microsoft Corporation in the United States and/or other countries.
• Other company names and product names are registered trademarks of the
respective companies.
• We strongly recommend that you always maintain several copies of all important
data, including printouts, and that you store these copies in different locations.
Certain conditions can cause data to be lost or corrupted as it is being transmitted
over any type of cable, while it is stored on any type of electronic storage medium,
etc.
• The contents of this document are subject to change without notice.
• CASIO COMPUTER CO., LTD. assumes no responsibility for any damage or loss
resulting from the use of this manual.
• CASIO COMPUTER CO., LTD. assumes no responsibility for any loss or claims
by third parties which may arise through the use of PV Applications Manager.
Copyright Notice
Copyright © 2000 CASIO COMPUTER CO., LTD. All Rights Reserved.
Please note that the program and this manual are under copyright. No part of this
program or manual may be reproduced, changed, translated into other languages
or stored in a retrieval system in any form or by any means without prior consent
from CASIO COMPUTER CO., LTD.
Important!
• Keep this User’s Guide in a safe place for future reference.
Page 3

– 3 –
PV Applications Manager
PV Applications Manager is a utility that makes it easy to add and delete PV Applications*
on your CASIO PV Unit (except the PV-100, PV-170D, PV-180D, PV-200, PV-200A, PV200e, PV-400A and PV-400Plus)**. It also lets you back up and restore PV Application
data files.
* You cannot use PV Applications Manager to delete built-in PV Applications.
** as of July 2000
Note
You can download PV Applications from the CASIO Website located at http://
www.casio.co.jp/English/download/pv/.
Attention PV-250X and PV-450X Users!
Before you can use this software with a PV-250X or PV-450X, you must first update your
Pocket Viewer’s operating system. See “Updating the Pocket Viewer Operating System”
on page 12 for details.
System Requirements
The following are minimum system requirements for running PV Applications Manager.
• PC with a Pentium 75MHz or higher processor for Windows 98, 95 or NT
Workstation 4.0 or PC with a Pentium 133MHz or higher processor for Windows
2000 Professional.
• 64MB of RAM for Windows 2000 Professional, 16MB of RAM for Windows 98,
95 or NT Workstation 4.0.
• Microsoft Windows 2000 Professional, Windows 98, 95 (Service Pack 1 or
later) or NT Workstation 4.0 (Service Pack 3 or later).
• Available Hard Disk Space: At least 10MB.
• A CD-ROM drive for software installation (for CD-ROM distribution).
PV Applications Manager
Page 4
– 4 –
Getting Ready
Getting Ready
Before you can use PV Applications Manager, you must use the following procedures to
establish a link between your Pocket Viewer and computer.
To establish a link between Pocket Viewer and your computer
1. Connect the Pocket Viewer cradle cable to the serial port (RS-232C) of your computer.
• If the cable’s connector does not fit into your computer’s serial port, you need to
purchase an adapter. See the documentation that comes with your computer for
details.
2. Place the Pocket Viewer onto the cradle.
• See “Using the Cradle” in your Pocket Viewer User’s Guide for more information.
3. On your computer, double click the PVM.EXE file to start up PV Applications Manager.
• Double-click the PVM.EXE file.
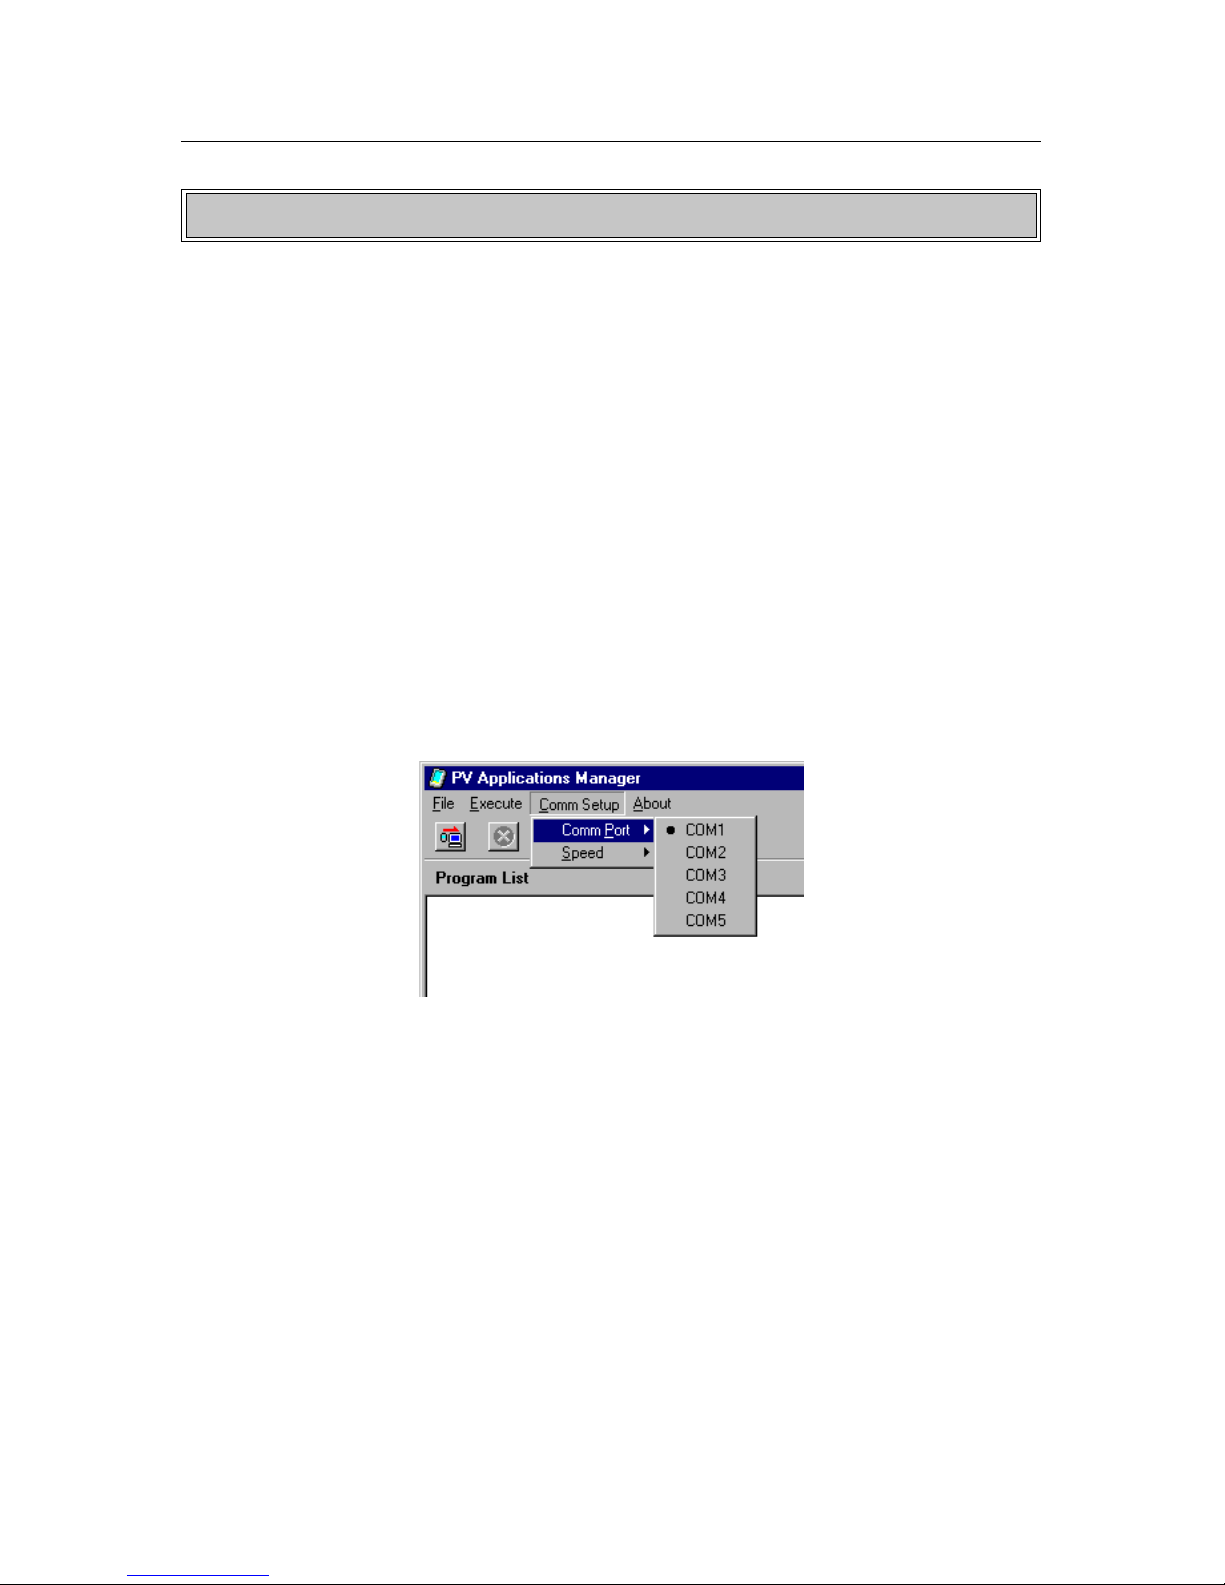
4. On the PV Applications Manager Comm Setup menu, click Comm Port, and then
select the serial port where the cradle is connected.
• To set the data communication speed, click Comm Setup and then Speed. Next,
select the speed you want on the sub-menu that appears. The initial default setting
is 38400 bps.
• Setting a higher speed makes data transfer between your computer and PV Unit
faster, but it also can increase the possibility of communication errors with some
computers. Experiment with different speeds until you find the one that works best
for you.
Page 5
– 5 –
Installing a PV Application on Pocket Viewer
You can install a PV Application on Pocket Viewer using drag and drop, the buttons
along the top of the PV Applications Manager window, or menu commands.
To install a PV Application using drag and drop
1. Perform the procedure under “To establish a link between Pocket Viewer and your
computer.”
2. On Pocket Viewer, tap Menu – Menu Bar – Option – Download to enter PV
Application download standby.
3. On your computer, use Windows Explorer to select the PV Application you want to
install.
Installing a PV Application on Pocket Viewer
Page 6

– 6 –
4. On your computer, drag the PV Application from Windows Explorer to the Program
List area of the PV Applications Manager window.
• This causes the dialog box shown below to appear.
5. Make any changes you want in the Program Name and Comment data, and then
click the SET button to install the PV Application.
6. Click OK to clear the dialog box.
Installing a PV Application on Pocket Viewer
Page 7

– 7 –
To install a PV Application using button operations
1. Perform the procedure under “To establish a link between Pocket Viewer and your
computer.”
2. On your computer, click the
button.
• Your computer reads Pocket Viewer memory contents and updates the PV
Applications Manager window Program List and Data List contents accordingly.
• To interrupt communication between your computer and Pocket Viewer, click the
button.
• Instead of clicking the button, you could click the Execute menu and then Import
from PV or Update PV.
• Instead of clicking the button, you could click the Execute menu and then Abort.
This causes a warning message dialog box to appear. Click the OK button to close
the dialog box.
3. Click the
button at the top of the PV Applications Manager window to display a
dialog box for selecting a PV Application file.
• Instead of clicking , you could right-click inside the Program List area and then
select Add File from the context menu that appears.
4. Select the application file you want to install on Pocket Viewer, and then click Open.
• This causes the dialog box shown below to appear.
5. Make any changes you want in the Program Name and Comment data, and then
click the SET button and click button to install the PV Application.
6. Click OK to clear the dialog box.
Installing a PV Application on Pocket Viewer
Page 8

– 8 –
Copying PV Application Data from Your Computer to Pocket Viewer
The data copy operation is very similar to the PV Application installation procedure. You
can copy data using drag and drop, the buttons along the top of the PV Applications
Manager window, or menu commands.
To copy PV Application data using drag and drop
1. Perform the procedure under “To establish a link between Pocket Viewer and your
computer.”
2. On Pocket Viewer, tap Menu – Menu Bar – Option – Download to enter PV
Application download standby.
3. On your computer, use Windows Explorer to select the PV Application data you
want to copy.
4. On your computer, drag the PV Application from Windows Explorer to the Data List
area of the PV Applications Manager window.
To copy PV Application data using button operations
1. Perform the procedure under “To establish a link between Pocket Viewer and your
computer.”
2. On your computer, click the
button.
• Your computer reads Pocket Viewer memory contents and updates the PV
Applications Manager window Program List and Data List contents accordingly.
• Instead of clicking the button, you could click the Execute menu and then Import
from PV or Update PV.
3. Click the
button at the top of the PV Applications Manager window to display a
dialog box for selecting a data file.
Copying PV Application Data from Your Computer to Pocket Viewer
Page 9

– 9 –
• Instead of clicking
, you could right-click inside the Data List area and then select
Add File from the context menu that appears.
4. Select the data file you want to transfer to Pocket Viewer, and then click Open and
click
button to start transfer of the data file.
5. Click OK to clear the dialog box.
Copying PV Application Data from Your Computer to Pocket Viewer
Page 10

– 10 –
Deleting PV Applications and Data
The following procedure can be used to uninstall (delete) a PV Application and to delete
a PV Application data file.
To delete a PV Application or data file
1. Perform the procedure under “To establish a link between Pocket Viewer and your
computer.”
2. On your computer, click the
button.
• Your computer reads Pocket Viewer memory contents and updates the PV
Applications Manager window Program List and Data List contents accordingly.
• Instead of clicking the button, you could click the Execute menu and then Import
from PV or Update PV.
3. Click the PV Application (Program List) or data file (Data List) you want to delete
so it is highlighted.
4. Click the
button.
• Instead of clicking , you could right-click and then select Delete File from the
context menu that appears.
5. Click OK to close the confirmation dialog box.
6. Click the
button to start the delete operation.
Deleting PV Applications and Data
Page 11

– 11 –
Backing Up and Restoring Data
You can create back up copies of PV Application data files on your computer to protect
against unintended loss of data. You can restore data from a backed up file whenever
necessary.
Important!
• This procedure is good for backing up single data files. Back up and restore can
take a long time when there is a large volume of data in memory. In such cases,
it is better to use PC sync to perform a back up.
• Make sure you periodically use PC sync to back up important data.
To back up a PV Application data file
1. Perform the procedure under “To establish a link between Pocket Viewer and your
computer.”
2. On your computer, click the
button.
• Your computer reads Pocket Viewer memory contents and updates the PV
Applications Manager window Program List and Data List contents accordingly.
3. In the Data List, click the PV Application you want to back up so it is highlighted.
• You can back up one data file at a time.
4. Right-click inside the Data List area and then select Backup from the context menu
that appears.
5. Assign a name to the backup file, and then click Save to save the data.
6. Click OK to clear the dialog box.
To restore a data file
Use the procedure under “Copying PV Application Data from Your Computer to Pocket
Viewer” to restore a data file.
Backing Up and Restoring Data
Page 12

– 12 –
Updating the Pocket Viewer Operating System
The following procedure makes it possible for you to update the operating system of
your Pocket Viewer when required. Visit the CASIO Website at http://www.casio.co.jp/
English/download/pv/ for information about Pocket Viewer operating system updates.
To update the Pocket Viewer operating system
1. Replace the batteries of your PV Unit with a fresh set.
2. Connect the Pocket Viewer cradle cable to the serial port (RS-232C) of your computer.
3. Place the Pocket Viewer onto the cradle.
4. Use the PC sync for Windows application that comes with your PV Unit to back up
the data in your PV Unit’s memory.
• After the back up procedure is complete, quit PC sync for Windows.
Important!
• Be sure you perform this step. Failure to back up risks permanent, unrecoverable
loss of the data.
5. On your computer, start up PV Applications Manager.
6. In PV Applications Manager, click the Execute menu and then OS Update to display
a dialog box for selecting the operating system update file.
Updating the Pocket Viewer Operating System
Page 13

– 13 –
7. Select the update file and then click Open to load the file.
• The progress of the load operation is indicated in the bar along the bottom of the PV
Applications Manager window.
• A message dialog box appears to let you know when file loading is complete.
8. Perform the following steps on your PV Unit.
• The steps you should perform depend on whether your Pocket Viewer is a PV-250X
or PV-450X model, or another model.
PV-250X or PV-450X Model Owners
1
. Tap Scheduler → Tools – icon to display the calculator.
2
. If M is displayed on the left side of the calculator display, tap MC to clear it.
3
. Input the following numbers on the calculator: 19010203
4
. Tap M+ so M is displayed on the left side of the calculator display.
5
. Tap Menu, Esc, Menu, Esc, Menu, Esc, Menu.
6
. Keep tapping Menu, Esc until the message TEST PROGRAM appears on
the display. When it does, continue with step 9, below.
Other (non PV-250X/450X) Model Owners
1
. Tap Scheduler → Tools – icon to display the calculator.
2
. If M is displayed on the left side of the calculator display, tap MC to clear it.
3
. Input the following numbers on the calculator: 19010203
4
. Tap M+ so M is displayed on the left side of the calculator display.
5
. Tap Menu five times.
6
. Keep tapping Menu until the message OS UPDATE appears on the display.
When it does, continue with step 9, below.
Updating the Pocket Viewer Operating System
Page 14

– 14 –
9. To start the actual update procedure, click OK on your computer screen and then
tap the Pocket Viewer screen once.
• A message dialog box appears to let you know when system updating is complete.
10. Click OK to close the dialog box.
11. At this time, the touch screen calibration screen should be on the PV Unit display.
Perform touch screen calibration.
12. Adjust display contrast.
13. In response to the reset confirmation message that appears, tap No.
14. Tap OK.
15. If necessary, start up PC sync for Windows on your computer and restore the data
you backed up in step 4.
Updating the Pocket Viewer Operating System
Page 15

– 15 –
Synchronize/Fix
Quit
Add Program or Data
Delete Program or Data
Button Name Description
• Reads Pocket Viewer memory contents
and updates the PV Applications
Manager window Program List and
Data List contents.
• Unlinks with Pocket Viewer.
• Displays a dialog box for selection of a
PV Application or data file to download it
to Pocket Viewer memory.
• Deletes the PV Application or data file
whose name is highlighted in the
Program List or Data List.
On-screen Button Reference
On-screen Button Reference
The following describes the function of each of the PV Applications Manager on-screen
buttons.
 Loading...