

Page 1

CETerm | CE3270 | CE5250 | CEVT220
User‘s Manual
For version 5.5
Page 2

NAURTECH EMULATORS & WEB BROWSER FOR WINDOWS CE / WINDOWS MOBILE
Copyright Notice
This document may not be reproduced in full, in part or in any form, without prior written
permission of Naurtech Corporation.
Naurtech Corporation makes no warranties with respect to the contents of this document and
specifically disclaims any implied warranties of merchantability or fitness for any particular
purpose. Further, Naurtech Corporation, reserves the right to revise this publication and to make
changes to it from time to time without any obligation to notify any person or organization of such
revision or changes.
Trademarks
CETerm®, CE3270™, CE5250™, CEVT220™ are trademarks of Naurtech Corporation.
Other product names mentioned in this manual may be trademarks or registered trademarks of
their respective companies and are hereby acknowledged.
Assumptions
This manual assumes you have a working knowledge of:
Microsoft Windows user interface metaphor and terminology.
Stylus based touch screen navigation terminology.
Basic programming and scripting concepts.
Dynamic HTML, the browser DOM, and JavaScript.
Basic operations and requirements of the host applications you want to access with the
Naurtech Emulators and Web Browser.
Software Version
This user's manual is for version 5.5 of Naurtech Terminal Emulation (TE) and Industrial
Web Browser. Additionally, two separate reference manuals are also provided for version
5.5. These provide programming specifics for the Web Browser and the Scripting
Automation, which are part of our products.
- Naurtech Web Browser Programming Guide
- Naurtech CETerm Scripting Guide
Both these manuals are available for download from the support section of our website at
www.naurtech.com.
CETerm | CE3270 | CE5250 | CEVT220 Page 2
Page 3

NAURTECH EMULATORS & WEB BROWSER FOR WINDOWS CE / WINDOWS MOBILE
Table of Contents
Assumptions .................................................................................................................................... 2
Preface ............................................................................................................................................ 6
Assumptions .................................................................................................................................... 6
Conventions used in this Manual..................................................................................................... 6
Online Searchable Knowledgebase ................................................................................................ 7
Introduction ...................................................................................................................................... 7
What‘s New is version 5.5 ............................................................................................................ 9
Feature Highlights & Benefits .................................................................................................... 10
Benefits of Naurtech Emulators & Web Browser ........................................................................... 17
System Requirements ................................................................................................................... 18
Supported ―Device Tailored‖ Terminals ......................................................................................... 19
Installation ...................................................................................................................................... 22
Quick Start ..................................................................................................................................... 23
Quick ―How To‖ Tips ...................................................................................................................... 24
Automatically submit a barcode (Postamble ENTER) ........................................................... 24
Change the font to fit rows and columns on the screen ......................................................... 24
Configure a session to automatically connect on startup ....................................................... 24
Setup Automatic login ............................................................................................................ 24
Remap hardware keys ........................................................................................................... 24
Configure Full Screen mode ................................................................................................... 25
Lock down the device ............................................................................................................. 25
Display Indicators ................................................................................................................... 25
Configure to display International language character sets ................................................... 26
Enable SSL / SSH security ..................................................................................................... 26
Exiting out from the registration dialog ................................................................................... 26
Automatic Licensing Registration ........................................................................................... 26
Evaluation Mode ............................................................................................................................ 27
Software Registration .................................................................................................................... 28
Product Version ............................................................................................................................. 30
Application Menu ........................................................................................................................... 31
Application Toolbar ........................................................................................................................ 33
Configuration ................................................................................................................................. 34
Connection ................................................................................................................................. 34
General ................................................................................................................................... 36
Network .................................................................................................................................. 38
Security ................................................................................................................................... 40
SSH General .......................................................................................................................... 41
Encryption............................................................................................................................... 48
User Keys ............................................................................................................................... 50
Server ..................................................................................................................................... 51
Proxy ...................................................................................................................................... 52
IBM Options ............................................................................................................................ 55
VT Modes ............................................................................................................................... 57
VT Options.............................................................................................................................. 58
VT Extensions ........................................................................................................................ 60
Display ....................................................................................................................................... 62
Hide / Show ............................................................................................................................ 64
Colors ..................................................................................................................................... 67
Cursor ..................................................................................................................................... 68
Font ........................................................................................................................................ 70
CETerm | CE3270 | CE5250 | CEVT220 Page 3
Page 4

NAURTECH EMULATORS & WEB BROWSER FOR WINDOWS CE / WINDOWS MOBILE
Printer ......................................................................................................................................... 71
Serial Config ........................................................................................................................... 72
Bluetooth Discovery ............................................................................................................... 73
Network Printer ....................................................................................................................... 73
Options ....................................................................................................................................... 75
Configure KeyBars and Keys ................................................................................................. 77
Configure Scripting ................................................................................................................. 85
General Settings ..................................................................................................................... 86
Editing Scripts ........................................................................................................................ 87
Access .................................................................................................................................... 88
Info Items ................................................................................................................................ 90
Manage (Automated Licensing) ............................................................................................. 92
Touch ...................................................................................................................................... 93
Scanner ...................................................................................................................................... 95
Symbology ................................................................................................................................. 97
Magnetic Stripe Reader ............................................................................................................. 99
Automated Licensing ............................................................................................................... 102
Session Interaction ...................................................................................................................... 104
Multiple sessions .................................................................................................................. 104
Password protection ............................................................................................................. 104
Connecting / Disconnecting from Host ................................................................................. 105
Auto-Launch when device boots .......................................................................................... 106
Auto-Start a host Session ..................................................................................................... 106
Network Check on Connect .................................................................................................. 106
Run a Script .......................................................................................................................... 107
Use barcodes to invoke Operations or Keystrokes .............................................................. 107
Display Indicators (RF & Battery Strength …) ...................................................................... 108
Display device parameters (Serial #, MAC address, Battery…) .......................................... 108
Play a different audio tone / sound on my device ................................................................ 109
Key Remapping and Configuration.............................................................................................. 110
Keyboard Key Remapping ................................................................................................... 110
Meta Keys............................................................................................................................. 112
Configurable KeyBar ............................................................................................................ 114
Remapping Application keys ................................................................................................ 120
3270 Host key descriptions .................................................................................................. 121
5250 Host key descriptions .................................................................................................. 122
VT Host key descriptions ...................................................................................................... 123
Default VT Keys Escape Sequence Table ........................................................................... 125
Creating Context Menus ....................................................................................................... 126
Hotkey shortcuts .......................................................................................................................... 127
Access Control / Device Lockdown ............................................................................................. 128
Device Lockdown ................................................................................................................. 128
Full Screen Mode ................................................................................................................. 129
Accessing configuration from Full Screen mode .................................................................. 129
International Character Set & Code Pages ................................................................................. 130
Code pages for IBM emulations (3270 & 5250) ................................................................... 130
Code pages for VT emulations ............................................................................................. 131
Asia Pacific language character sets ................................................................................... 131
HTML Browser Sessions ............................................................................................................. 133
Please refer to the Web Browser Programming Reference Guide for details on using CETerm to
build your Web Applications. This is available for download from our website.Macros .............. 134
Macros ......................................................................................................................................... 135
Recording ............................................................................................................................. 136
CETerm | CE3270 | CE5250 | CEVT220 Page 4
Page 5

NAURTECH EMULATORS & WEB BROWSER FOR WINDOWS CE / WINDOWS MOBILE
Playback ............................................................................................................................... 136
Creating a Mini-Macro .......................................................................................................... 137
Printing ......................................................................................................................................... 139
VT printing ............................................................................................................................ 139
Legacy Extended commands ............................................................................................... 139
Printing to a Network / 802.11x WiFi printer ......................................................................... 139
Hotspots ....................................................................................................................................... 140
Screen Panning ........................................................................................................................... 141
SmartPads ................................................................................................................................... 142
Text Input Tool ............................................................................................................................. 143
Command line options ................................................................................................................. 145
Online Help .................................................................................................................................. 146
Glossary ....................................................................................................................................... 147
Index ............................................................................................................................................ 151
Appendix A: ID Action Codes (IDA Codes) ................................................................................. 154
CETerm | CE3270 | CE5250 | CEVT220 Page 5
Page 6

NAURTECH EMULATORS & WEB BROWSER FOR WINDOWS CE / WINDOWS MOBILE
Preface
All of us at Naurtech Corporation constantly strive to deliver the highest quality products and
services to our customers. We are always looking for ways to improve our solutions. If you have
any comments, suggestions or feedback, please send this to us at support@naurtech.com.
Please also visit our website for tips, tricks, updates and other information.
Assumptions
This manual assumes you have working knowledge of:
Microsoft Windows user interface metaphor and terminology
Stylus based touch screen navigation terminology
Basic knowledge of concepts and terms for computer networking
Basic operations and requirements of the host and / or web applications you want to
access using our Emulators and Web Browser.
Basic Web Browser terminology
Basic knowledge of JavaScript
Conventions used in this Manual
This manual uses the following typographical conventions:
All user actions and interactions with the application are in bold courier font, as in
[Session][Configure]
Any precautionary notes or tips are presented as shaded text, as in
Tip: Text associated with a specific tip
represents new information introduced in this version.
All text associated with sample or configuration files is presented in special font, as in
# #################################################
# This is a sample configuration file for…
#
# #################################################
[options]
recursion=true
silent=true
checkonly=false
CETerm | CE3270 | CE5250 | CEVT220 Page 6
Page 7

Browser
VT
5250
3270
CETerm
√ √ √
√
CEVT220
√
√
CE5250
√
√
CE3270
√
√
NAURTECH EMULATORS & WEB BROWSER FOR WINDOWS CE / WINDOWS MOBILE
Online Searchable Knowledgebase
Although we continually strive to keep this manual up to date, you may find our online support
knowledgebase useful for the latest issues, troubleshooting tips and bug fixes. This is a
searchable knowledgebase and contains articles which provide tips and resolutions for the most
up to date features and issues. You can access the support knowledgebase from our website at:
www.naurtech.com support knowledgebase
Introduction
Naurtech Emulators and Web Browser allow users to connect to applications running on
IBM3270, AS/400, VT, or Web servers from ANY Windows CE or Windows Mobile handheld
device over ANY wired or wireless TCP/IP data network.
You can use our products to directly communicate with host applications running on legacy hosts
or web servers. No middleware gateway is required. Users can connect and log on to a legacy
host or web application from a handheld Windows CE device, enabling the device to function as a
wireless mobile terminal.
Please note the following about our products:
CETerm is three terminal emulation clients and an industrial Web Browser in a single application
package. You can simultaneously use any combination of terminal emulation and web browser
sessions to connect up to four host applications using 3270, 5250, VT220 or VT100 and HTML
(web) sessions.
Single emulation products (CEVT220, CE5250 and CE3270) only include support for the
respective terminal emulation. All single emulation products include a Web Browser and are
equivalent in all functionality to CETerm.
• All products support both Windows CE and Windows Mobile OS platforms
• The Web Browser is available with all products
• All single emulation products are equivalent in functionality to CETerm
CETerm | CE3270 | CE5250 | CEVT220 Page 7
Page 8

NAURTECH EMULATORS & WEB BROWSER FOR WINDOWS CE / WINDOWS MOBILE
Device tailored versions of CETerm product are available for specific terminal models from every
major hardware device manufacturer. These versions integrate with the peripherals available on
each device, such as barcode scanner, imager scanner, RFID reader, magnetic stripe reader and
Bluetooth printers.
Single emulation products are only provided for some of the popular Intermec and Motorola
(Symbol) terminal models. If you were using one of our single emulation products for your
terminal in the past, you can simply use CETerm now as it is available for all terminals.
This manual applies all Naurtech Emulators & Web Browser products. Throughout this manual,
we refer to CETerm. Except for some emulation details, the information applies fully to our
CE5250, CE3270, and CEVT220 products.
NOTE: Separate documentation is provided in our Web Browser Programming Reference
Manual which discusses web extensions, HTML meta-tags, and ActiveX controls etc. Please
refer to that manual if you are implementing web-based applications to be accessed using our
Industrial Web Browser.
NOTE: Separate documentation is also provided for our scripting functionality. All our
products provide a fully scriptable platform to automate application interaction, device and
peripheral control and data collection workflow. Please refer to the Naurtech CETerm
Scripting Guide for details.
Both these manuals can be downloaded from the Support Manuals section of our website.
CETerm | CE3270 | CE5250 | CEVT220 Page 8
Page 9

NAURTECH EMULATORS & WEB BROWSER FOR WINDOWS CE / WINDOWS MOBILE
What’s New is version 5.5
Here is a short list of new features added in version 5.5. In addition, this version includes several
small fixes and enhancements that had been added to the products since the previous major
release.
Support for newer OS versions and Terminal Models. Almost every hardware terminal
manufacturer has released one or more Windows CE based terminal since our last version
release. With version 5.5, we now offer device tailored versions of CETerm for all terminals
from all major hardware manufacturers running the latest Windows CE OS versions. It
includes support for their latest barcode scanner, wireless radio or other terminal
enhancement.
Secure Shell (SSH) Protocol. CETerm now contains a feature rich implementation of the
Secure Shell Protocol. Both SSH-1 and SSH-2 protocols are supported, with a broad range of
encryption and authentication options. Encryptions include AES-256, Blowfish, and TripleDES. Authentication can use traditional passwords or public-key infrastructure (PKI). Please
refer to the section on SSH Security for complete details.
Extensive Additions to CETerm Scripting. The CETerm Scripting feature was first
introduced with Version 5.1. Since then we have been adding extensive capabilities and
hardware support. We have integrated RFID hardware, both real and virtual serial ports,
and provided access to many Windows CE operating system features. With Scripting, you
can build a locked down launcher for multiple applications, integrate RFID with a TE
application or automate complex workflows as just a few examples. We use the industry
standard JavaScript language so you won‘t waste time learning a limited proprietary
language. Please see the CETerm Scripting Guide, which is a separate manual from this
one, for a full description of the features.
New Scripting Automation Objects. Here is a partial list of the new automation objects in
CETerm scripting:
1. OS.Event – Named Event access and script launching.
2. OS.File – File read, write, append, listing, copy, etc.
3. OS.Process – Launch and control other programs.
4. OS.Network – Ping, DNS, and FTP access.
5. OS.Window – Find and control running programs.
6. Device.SerialPort – Full integration of peripherals.
7. Device.Keyboard – Keyboard control, system wide HotKeys
8. Device.RFID – Control RFID reading and writing.
Please refer to the CETerm scripting Guide for details.
Additional Web Browser Extensions. The integrated Web Browser now supports
additional HTML META tags, JavaScript extensions and ActiveX controls to build more robust
data collection applications. These extensions allow you to control the device, its peripherals
and application settings directly from your HTML page. It is truly the most robust platform to
CETerm | CE3270 | CE5250 | CEVT220 Page 9
Page 10

Multiple host sessions
Simultaneously connect to
different hosts
Multiple Web Browser sessions
Maintain independent session
contexts
Easily switch between sessions
Supports up to FIVE simultaneous host sessions. Interactive, persession configuration settings are maintained. Users may connect
with any permutation of 3270, 5250, VT host or Web Browser
sessions.
Hotkeys and menu context are available to jump between these
sessions.
NAURTECH EMULATORS & WEB BROWSER FOR WINDOWS CE / WINDOWS MOBILE
build web based Data Collection applications. We continue to support Symbol Pocket
Browser and Intermec IBrowse Meta tags as well. The Web Browser is available for all
Windows Mobile and Windows CE devices.
RFID Integration. CETerm now fully integrates RFID support using the Scripting Engine to
make the RFID reader available to both TE and web browser sessions. All native capabilities
of the device RFID reader are accessible. The RFID data can be this data may require to be
parsed, validated and possibly reformatted prior to submitting it via a Terminal Emulation or
Web Browser session to the backend host application. Tight integration of CETerm with the
device RFID readers allows for this data processing to happen right on the device, as
opposed to the backend host application or some middleware. This also eliminates the need
to make any changes to the backend legacy host application for RFID enabled solutions.
Keyboard and Key Controls. CETerm contains extensive features to control the hardware
keys on a device. We have recently added features to prevent Windows Mobile from
hijacking function keys (such as the F6 and F7 keys for volume controls on Windows Mobile
devices). We have also added a ―Trap‖ feature to make it easier to select keys for remapping
when the key label is misleading. There are also new features which make it easier to use
phone-style keypads with IBM emulation.
More Network Awareness Features. We continue to strengthen the network awareness of
CETerm. There are new features to allow recovery when a browser session loses
connectivity during a page load. Using these features and Network Alerts for lost RF
connectivity will virtually eliminate dropped sessions without needing an expensive
middleware server. CETerm delivers a simpler operating environment and the lowest cost of
ownership.
Additional Updates. In addition to dozens of other enhancements, there is support for new
device platforms and current Windows CE versions from all major hardware vendors.
Feature Highlights & Benefits
CETerm | CE3270 | CE5250 | CEVT220 Page 10
Page 11

Custom Keyboard mapping
Remap any hardware key to any
application operation
Works for both TE and Browser
sessions
Minimize user re-training
Physical keys on the device can be re-mapped to invoke any
application operation or host key action. Keys can be remapped to:
another key
an application operation such as ―Print‖
a host specific key such as ―F4‖ or ―Field Exit‖
a text string such as ―My input string‖
a null operation (to disable the key)
Full Screen Mode
Additional rows for display area
Minimize production downtime
by preventing users from
changing device configuration
and application settings.
You can hide the Start Bar, the Application menu and toolbars so
that the end user has no control to navigate away from the
application. In addition you also get two precious rows of screen
real estate as part of your terminal display area.
Device Lockdown / Access Control
Provides administrators the
ability to lock down the device
so users cannot navigate away
from core business processes
Minimizes support costs
Simplifies business application
workflow
Device Lockdown allows administrators to prevent users from
exiting our application. You can hide the Windows CE ―Start‖
button, Start bar and also the application menu and tool bars so
that the whole device display area is occupied by the terminal
display. Administrators can ―lock out‖ users from the operating
system so as to prevent users from being able to change the
application and device configurations. This also prevents users
from running any other application on the device. The device may
be configured to automatically boot into our application and autoconnect to the host.
Industrial Web Browser
Web based applications
Multiple simultaneous Web
Browser sessions
Multi-purpose device
applications
Migration path from green
screen to newer web based
applications
Many customers view Windows Mobile / Windows CE devices as
multi-purpose handheld devices, using which they should not only
access their legacy host applications, but also web based
applications. The integrated Web Browser addresses specialized
data collection functionality requirements, such as key remapping,
device lockdown, RFID and scanner integration etc that are not
possible otherwise.
Scripting Workflow Automation Engine
A rich, scriptable platform to
customize and automate
business tasks
Integrated control of scanner
and RFID reader allows to
differentiate your data collection
solutions
CETerm includes a full JavaScript engine for both Terminal
Emulation and Browser sessions, which allows you to automate
and extend the behavior of your data collection application. You can
use pre-defined scripts and modify these to customize and your
everyday tasks.
NAURTECH EMULATORS & WEB BROWSER FOR WINDOWS CE / WINDOWS MOBILE
CETerm | CE3270 | CE5250 | CEVT220 Page 11
Page 12

Indicators
Visual Indicators are available in
full screen locked down
configuration. This allows more
screen real estate for the host
application display area.
Alert notifications if Indicator
strength falls below a configured
threshold
Visual Indicators for network RF signal, device battery strength,
keyboard state and browser ―page loading‖ animation can be
configured. You can display, position and control these indicators
for your Terminal Emulation and Web Browser sessions. You can
also configure to receive notification if the RF signal or battery
strength falls below a certain threshold. The same information may
also be displayed as a Keybar button.
Internationalization: Code Pages
Support for international
customers
All popular Western European languages are supported to display
and input language specific special characters. Single byte
language code pages are provided. Examples of supported code
pages are Swedish, French, German, Italian, Spanish, and Finnish
etc. Additional languages, which are represented by single byte
code pages, such as Thai, Cyrillic, Greek and Turkish are also
supported.
Multi-Byte Character set: Asia Pacific language support
Asia Pacific language support
UTF-8 encoding support for VT
emulations
Support for multi-byte character set (MBCS) languages, such as
Chinese (Traditional and Simplified), Japanese, Korean, Thai etc, is
provided only for VT emulation. VT emulations also support the
UTF-8 encoding and Single Byte Character Set (SBCS) encoding to
support other languages such as Greek and Hebrew. Equivalent
support for IBM emulations is not available yet.
Network Aware Features
Minimizes user interaction
during connection / re-
connection attempts
Maximizes user productivity
Users can configure to ―Check network on Connect‖ or ―Check
network on Resume‖ to ensure network availability prior to
establishing a connection if network coverage is lost or if the device
is resuming from a suspended state. Users can be prompted to
return to coverage area if network connectivity is lost while roaming
out of coverage.
For web browser sessions, which are stateless and do not require
persistent session connectivity, users can also enable ―Check
Network before Send‖ to ensure network availability before every
data send operation.
NAURTECH EMULATORS & WEB BROWSER FOR WINDOWS CE / WINDOWS MOBILE
CETerm | CE3270 | CE5250 | CEVT220 Page 12
Page 13

Configurable KeyBar & Context Menus
Can make any host key or
application operation available
from a KeyBar soft button
Customize KeyBar buttons to
associated with proprietary VT
escape sequences
The configurable KeyBar allows users to customize a set of soft
buttons to control and invoke any host specific keys or application
operation. Users can select from a set of pre-defined KeyBar
templates. In addition they can also configure up to six custom
templates of their own. Users can navigate between a selected set
of KeyBar templates.
A KeyBar can also be made to appear as a Context Menu, which
would appear when you tap and hold the stylus on the terminal
display screen.
Meta keys
More key remapping options on
devices with limited keys
Allows configuration of less key
presses to achieve an action
Meta keys are special keys that you can configure to act much like
the state keys "Shift", "Alt" and "Ctrl" on a regular keyboard. They
are used together with other keys to activate special actions. Meta
keys can be assigned to hardware keys for use in key remapping.
They are especially helpful on devices with limited number of
physical keys.
Auto-start Sessions
Eliminates intermediate manual
step
Minimizes retraining. Gives user
direct access to familiar host
application screen
Users may launch multiple host sessions when our application gets
started. This can simply be enabled via session specific checkbox
configuration.
Automatic login
Automates manual steps to
enhance device usability
Customized for your host
application
You can easily automate the login process to your host application.
Until now, we had suggested using a pre-recorded macro which
could be configured to launch automatically when a user session
connected to the host application. With version 5.5, we recommend
using scripting instead. An auto-login script can be configured to
launch when a session connects, and then if necessary, prompt the
user for a user id and password. Sample auto-login scripts are
discussed in the Scripting Guide.
HotSpots
Leverages the "touch screen"
interface of Windows CE to
allow enhanced usability
Minimizes need for host specific
keys
Can be customized for your host
application
A HotSpot is an invisible field on the terminal screen where a user
can tap with a stylus to execute a function. A Hotspot thus allows a
user to interact with the host application with minimal needs for the
special keypads. Instead the user can directly tap on the text in the
terminal display to invoke the desired operation.
The pre-defined HotSpots are static. With version 5.5, Dynamic
HotSpots customized for your host application are easily
implemented using a Script.
NAURTECH EMULATORS & WEB BROWSER FOR WINDOWS CE / WINDOWS MOBILE
CETerm | CE3270 | CE5250 | CEVT220 Page 13
Page 14

Dynamic Cursor View modes
Automatic scrolling to current
cursor location enhances user
productivity and usability
Lock row / column position of
display; backward compatibility
with pre-existing applications
Multiple cursor modes are available to support automatic scrolling,
so that the cursor / input field is visible. The terminal display window
will "track" and follow the cursor. In addition, you can lock a screen
display to a specific row and column. These view modes are
configurable for each session.
Legacy Extensions
Seamless migration from legacy
DOS / proprietary terminals to
Windows CE / Pocket PC
terminals
All our terminal emulations support proprietary protocols used by
legacy hardware terminal vendors so as to easily migrate
customers to new / upgrade terminals. These include ―Intermec
Extended Commands‖, ―Symbol IBM PRN‖, ―Telxon VT extensions‖
and ―LXE block mode‖ for terminal emulation. They include the
Symbol Palm Web Client, Symbol Pocket Browser and Intermec
iBrowse for Web Browser sessions.
Screen Panning
Faster alternative to scrolling
Easier “Touch screen” usability
Screen Panning allows an additional row and column on the display
by providing an alternative to horizontal and vertical scroll bars.
Imagine the host application screen as a large sheet under the
display on the handheld device. Screen Panning allows users to
"tap", ―hold‖ and "drag" the terminal display screen in any direction
to move hidden areas of the host display into view on the handheld
device without the use of scroll bars.
Configurable fonts
Enhanced readability on both
color and monochrome display
screens
Single tap font size change
Users can easily include new fonts for displaying the terminal text.
Any fixed-width true type font file (.ttf) may be placed on the device
and selected for terminal display. VT emulation also allows
proportional fonts. Font sizes can easily be increased or decreased
form the toolbar with a single stylus tap. Font weight can be
changed as well.
For Web Browser sessions, the font type, size and other attributes
are set in the web page being viewed.
Macro Record and Playback
Automates login steps to host
application
Automate host application
navigation
CETerm has the capability to record input keystrokes for a
connected host session and subsequently play the recorded
macros for easy, automated navigation through multiple host
screens. Only a single macro may be recorded and associated with
one host session. This macro may also be auto-launched upon a
session connection to get "auto-logon" capability.
Macro playback can sometimes be mis-timed due to network
propagation delays and changing host application response times.
With version 5.5, the recommended approach for automating your
tasks is using a Script.
NAURTECH EMULATORS & WEB BROWSER FOR WINDOWS CE / WINDOWS MOBILE
CETerm | CE3270 | CE5250 | CEVT220 Page 14
Page 15

Automated Licensing
Easier deployment as individual
devices do not have to be
registered manually
Simplifies the software license registration process by querying a
configurable Web server for an XML based registration file. The
license file can also reside locally on the device.
SmartPads
Access emulation specific host
keys
All host applications have specific keyboard requirements. The
Smartpad is a floating button pad, which provides support for
special emulation host keys. Depending upon the current
configured host emulation type, the appropriate Smartpad for that
emulation is displayed. The Smartpad supports all the popular
3270, 5250 and VT host keys.
Color Schemes
Enhanced readability in varied
lighting conditions
A color scheme is a collection of colors mapped to a set of terminal
text display attributes. Users can select from a pre-defined color
schemes or create a custom scheme based upon their preferences.
Non-color displays will default to a Black-on-White or White-onBlack scheme.
Color schemes only apply to TE sessions. All color display
configuration for web browser sessions is defined by the web page
being viewed.
Cold boot persistence
Minimizes support costs and
production down time
Windows CE devices are diskless devices, which lose all installed
applications and their registry configuration settings if the device
cold boots or completely looses battery charge. You can be setup
CETerm to self install and restore all device and application
configuration settings. Such setup varies by manufacturer and
terminal.
With the new Scripting Engine, cold boot persistence scripts can be
written specific for each terminal to reduce this setup into a single
key press.
Host Session password
Secure host session connection
Any host session may be password protected with the user being
prompted for a password when connecting that session.
Device / LU Name support
Allows to better management
and administration of SNA host
resources
For IBM emulations (3270 and 5250), logical unit device name
resource configuration is supported. This is used during connection
negotiations.
NAURTECH EMULATORS & WEB BROWSER FOR WINDOWS CE / WINDOWS MOBILE
CETerm | CE3270 | CE5250 | CEVT220 Page 15
Page 16

Integrated Demo modes
Easy demonstrations without
need for live host connection
Simulated host terminal screens are integrated within our Smart
Clients for evaluation and sales demonstrations. No server
component or network connection is required to run demo modes.
Simply set the host name to ―demo.naurtech.com‖ and connect.
Text Input Tool
Optimizes usability and user
productivity
User configurable strings allow
for individual customization
For Windows CE devices without keypads, data entry is usually
performed using a stylus with an integrated soft keypad. This
requires the user to spell-type text strings. This is a slow and
tedious process. The Text Input Tool addresses this issue by
allowing users to send text strings to the display window at the
current cursor location, without spell typing. A user can preload
often used text strings in the Input Tool, highlight the string and
―send‖ the selected string to the session display.
VT220 DEC Multinational & NRC support
Supports international
character sets for VT host
sessions
VT emulations fully support the DEC multinational character sets
and National Replacement Character sets (NRC). This support is
provided for over a dozen western European languages.
VT Line Mode / Block Mode
Optimized network bandwidth
usage for VT emulation sessions
This is a special optimization for VT host sessions. Data is buffered
locally within the device prior to sending it to the host. Line mode
optimizes usage of the network bandwidth and host resources.
VT Answerback String
Legacy application compatibility
This is a configurable text string that certain host applications
require to identify the terminal.
Hot Keys
User productivity
Predefined hot keys are available to interact with and invoke
emulator operations.
NAURTECH EMULATORS & WEB BROWSER FOR WINDOWS CE / WINDOWS MOBILE
CETerm | CE3270 | CE5250 | CEVT220 Page 16
Page 17

NAURTECH EMULATORS & WEB BROWSER FOR WINDOWS CE / WINDOWS MOBILE
Benefits of Naurtech Emulators & Web Browser
Terminal Emulation remains the well-proven, cost-effective solution for host access and
automatic data collection solutions that result in the fastest ROI. With the proliferation of webbased applications, the Web Browser is becoming the new standard to access business
processes and data. Our terminal emulator and web browser running on a handheld device
allows users to automate their business processes and to implement productivity solutions.
Here are some benefits of using Naurtech Emulators and Web Browser:
We provide a seamless migration path for accessing legacy green screen and newer web
based applications.
The data collection web browser sessions allow you to write custom applications in
HTML, giving you full control over the device and its attached peripherals. It provides
capabilities to build real world web based applications, which cannot be implemented
using the built in browser, which comes with the Windows CE operating system.
The built-in Scripting engine allows you to customize and automate your workflows for
both terminal emulation and web-based applications.
With our Terminal Emulation client running on the device, users do not have to make any
changes to their existing backend / host applications.
Combined with integrated support for barcode scanners and RFID readers, our TE and
Browser deliver a well-proven, optimized workflow solution for data collection and data
access.
Device tailored versions of our products are available for complete product families of
terminals from every major hardware device manufacturer. We are the only vendor with
such a breadth of offering in choosing a hardware platform.
We support all proprietary extensions that have proliferated within the industry. This
includes ―Extended Commands‖ from Intermec, proprietary TE extensions from Telxon
and Symbol, Block mode from LXE, HTML META tags from Symbol (Pocket Browser)
and Intermec (iBrowse). This gives our customers and partners a complete and concise
growth path
Easy to configure, painless to deploy, simple to manage.
A native smart client running on the device delivers a higher productivity, higher usability
solution. This is because the native client is able to conform to the ergonomics and form
factor of the device while interfacing with the attached peripherals.
You do not require any expensive middleware. No modifications are required to the host
applications.
CETerm | CE3270 | CE5250 | CEVT220 Page 17
Page 18

Windows CE Version
Windows CE 6.0, 5.0, 4.2 or Windows Mobile 6.0, 5.0 or 2003
Operating RAM on device
8 MB (Recommended 32MB or higher)
Connectivity
TCP/IP enabled LAN, WLAN (802.11B) or WWAN (GPRS),
Bluetooth
Desktop connectivity
ActiveSync 3.7 or higher but we recommend ActiveSync 4.5
Flash / Storage Card
Recommended 4MB
NAURTECH EMULATORS & WEB BROWSER FOR WINDOWS CE / WINDOWS MOBILE
System Requirements
Following are the system requirements to run Naurtech smart clients.
Version 5.5 no longer supports terminals with older Windows CE and Pocket PC OS platforms.
Any terminals running below Windows CE 4.1 or Windows Mobile 2003 are only supported with
an earlier version 5.1 of our product. Please contact us at support@naurtech.com if you have a
need for older terminals.
CETerm | CE3270 | CE5250 | CEVT220 Page 18
Page 19

Device Manufacturer
Device Model
OS Platform
Comments
CASIO
DT-X7
CE 5.0
IT-600
CE 5.0
DT-X11
CE 4.2
Both Laser and Imager versions
DT-X5
CE .NET 4.1
Only supported by CETerm version 5.0
DT-X11 / DT-X10
CE .NET 4.1
Only supported by CETerm version 5.0
IT-500
Only supported by CETerm version 5.0
Compsee
MAT 203 / 204
CE 5.0
CE .NET 4.2
Datalogic
Pegaso
CE 5.0
Jet
CE 5.0
CE .NET 4.2
Skorpio
CE 5.0
Kyman-NET
CE .NET 4.2
Viper-NET
CE .NET 4.2
Rhino-NET
CE .NET 4.2
PSC
Falcon 44xx
CE 5.0
CE .NET 4.2
Falcon 4220
CE .NET 4.2
CE 5.0
DENSO (T.D SCAN)
BHT-400
CE 5.0
BHT-200
CE 5.0
CE .NET 4.2
Fujitsu
iPAD
CE .NET 4.2
Gotive
H41 / H42
CE .NET 4.2
Hand Held Products
Dolphin 7850
WM 5.0
Dolphin 7600
CE 5.0
Dolphin 7900
WM 5.0
WM 2003
NAURTECH EMULATORS & WEB BROWSER FOR WINDOWS CE / WINDOWS MOBILE
Supported “Device Tailored” Terminals
Naurtech TE and Web Browser smart clients run on ANY Windows CE / Pocket PC device, from
Windows Based Terminals (WBT) to Pocket PC handhelds to vehicle mounted sub-notebook
computers and everything in between. "Device Tailored" versions are available for ruggedized
terminals with integrated support for barcode scanners and RFID readers. Complete product
families from all major hardware device manufacturers are supported. Here is a sampling of
devices supported with device tailored versions of Naurtech TE and Data Collection Web Browser
Smart Clients.
CETerm | CE3270 | CE5250 | CEVT220 Page 19
Page 20

Device Manufacturer
Device Model
OS Platform
Comments
Dolphin 9500
WM 5.0
WM 2003
Dolphin 7400
CE 3.0
Only supported by CETerm version 4.5
Kiosk 8560
CE 5.0
Intermec
CN2A
CE .NET 4.2
Only supported by CETerm version 5.1
CN2B
WM 5.0
WM2003
CN3
WM 5.0
CN30
WM 5.0
CK31
CE .NET 4.2
CK61
WM 5.0
CE 5.0
CK30
CE 4.2
No longer supported
700 Series
WM 5.0
WM 2003
CV30
WM 5.0
CV60
CE .NET 4.2
LXE
MX8
CE 5.0
MX7
CE 5.0
MX6
WM 2003
MX3X
CE .NET 4.2
CE 5.0
VX6
CE .NET 4.2
CE 5.0
HX2
CE 5.0
HX3
CE 5.0
VX7
XP Nordic ID
PL3000
CE 6.0
CE .NET 4.2
PL2000
CE .NET 4.2
Psion Teklogix
Ikon
WM 6.0
CE 5.0
WM 5.0
7525 / 7530 / 7535
CE 5.0
CE .NET 4.2
Workabout Pro
WM6.0
CE 5.0
WM 5.0
CE .NET 4.2
WM 2003
8525 / 8530
CE .NET 4.2
i.roc
WM 2003
Motorola (Symbol)
MC70
WM 5.0
WM 2003
MC35
WM 5.0
MC50
WM 5.0
NAURTECH EMULATORS & WEB BROWSER FOR WINDOWS CE / WINDOWS MOBILE
CETerm | CE3270 | CE5250 | CEVT220 Page 20
Page 21

Device Manufacturer
Device Model
OS Platform
Comments
WM 2003
MC9000
WM 5.0
CE 5.0
WM 2003
CE .NET 4.2
MC9090
CE 5.0
MC3000
WM 5.0
CE 5.0
WM 2003
CE .NET 4.2
PPT 8800
WM 2003
CE .NET 4.2
PDT 8100
WM 2003
VC 5090
CE 5.0
VRC 7900 / 8900
CE .NET 4.2
WT4000
CE 5.0
Unitech
PA982
CE 5.0
PA600
WM 5.0
HT660
CE 5.0
PA962
CE 5.0
CE .NET 4.2
PA950
WM 2003
PA961
CE .NET 4.2
MR650
CE 5.0
Bluebird Soft
BIP-5000
CE .NET 4.2
Mobile Compia
M3
CE 5.0
Generic / Non-scanner
Any
WM6.0
Any
WM 5.0
Any (XScale ARMV4I
Processor)
CE 5.0
Any (x86 Processor)
CE 5.0
Any
WM 2003
Any (XScale ARMV4
Processor / 2577)
CE .NET 4.2
Any (XScale
ARMV4T / ARMV4I
Processor / 1824)
CE .NET 4.2
Any (x86 Processor)
CE .NET 4.2
Win32
Windows XP
embedded
NAURTECH EMULATORS & WEB BROWSER FOR WINDOWS CE / WINDOWS MOBILE
CETerm | CE3270 | CE5250 | CEVT220 Page 21
Page 22

NAURTECH EMULATORS & WEB BROWSER FOR WINDOWS CE / WINDOWS MOBILE
Installation
All Naurtech Emulators and Web Browser products are packaged as a zip file and distributed
electronically. Once you download the product from our website, follow these instructions to
install the product to your handheld device.
After unzipping the downloaded file on the desktop, you should have the following files in your
local directory
CExxxx.cab
CExxxx.ini
License.txt
yyyy_readme.txt
Setup.exe
ReleaseNotes.htm
where xxxx is the product and platform descriptor for the target CE device. Multiple CAB
files may be present for different CPU targets. [e.g CETerm_WM50PPC_ARMV4I.CAB]
where yyyy is a manufacturer and device descriptor for a "device tailored" version of the
product. It has specific notes pertaining to the device tailored version.
Make sure your handheld device is connected to your desktop via a USB, serial or wireless
802.11x connection.
Make sure you have ActiveSync installed. Version 4.5 is recommended, although you may
also use earlier versions up to ActiveSync 3.7. You can get a free copy from Microsoft at:
http://www.microsoft.com/windowsmobile/activesync/activesync45.mspx
Make sure your device is connected to the desktop via ActiveSync.
Run Setup.exe on your desktop.
You will need to read and accept the EULA to proceed. Click the "Install>>" button if you
accept the license terms. This will launch the application manager to install the Naurtech
client on your device.
Once installed, you will see the application in your <Start><Programs> menu. For Windows
CE OS platform devices, you will also see a shortcut on the desktop.
NOTE: You can select the install location on your device from the Setup application. If you
want to preserve the application during a device cold boot, you may want to install it on a
Compact Flash or Secure Digital Disk, if available on the device.
NOTE: You can also copy the CAB file directly to the terminal and run it directly from there to
install the product.
CETerm | CE3270 | CE5250 | CEVT220 Page 22
Page 23

NAURTECH EMULATORS & WEB BROWSER FOR WINDOWS CE / WINDOWS MOBILE
Quick Start
This section is for advanced users who are comfortable with navigation within Windows CE and
are familiar with host terminal emulation and web browser terminology. Follow these steps to
connect to your host application with minimal configuration setup. For details on various
configuration parameters, it is recommended that you read through corresponding sections later
in the manual.
Install CETerm, CE3270, CE5250 or CEVT220 on to the device. Follow instruction in the
"Installation" section of the manual.
Make sure the device network settings are configured and the device is on the network. If you
are connecting over wireless LAN (802.11B), make sure your device is communicating with
the Access Point.
From the [Start] menu, run the Naurtech CETerm, CEVT220, CE5250 or CE3270.
Select [Session][Configure] from the application menu and select the "host type" that
you wish to connect to; i.e. 3270 mainframe, AS/400 5250 server, VT host or HTML for Web
browser application.
Enter the "Host Address" of the host system that you wish to connect to. This may either be a
DNS name alias or an IP address of the host system or a URL (Universal Resource Locator
such as http://www.myhostname.com) for your web based application.
Update the telnet port number, if your host application is configured to listen on a specific
port. If not, just use the default telnet port.
Select [OK]
Select [Session][Connect] from the application menu or tap the "Connect" button
on the Toolbar. Upon a successful connection, you should see the host application screen
displayed.
NOTE: There are built-in ―demo‖ modes available, which may be used to test the look and feel
of our application, even if you may not have a live network connection to connect to your host.
Simply set the ―Host Address‖ to demo.naurtech.com (default). Select the Host Type and
connect on that session. You can progress through pre-captured screens by pressing Enter or
one of the function keys.
CETerm | CE3270 | CE5250 | CEVT220 Page 23
Page 24

NAURTECH EMULATORS & WEB BROWSER FOR WINDOWS CE / WINDOWS MOBILE
Quick “How To” Tips
Automatically submit a barcode (Postamble ENTER)
All device tailored versions of Emulators and Web Browser directly interface with the barcode
scanner engines. If you would like to configure your barcode scanning such that a key operation
such as [Enter] or [Tab] or [Field Exit] etc is automatically appended after a barcode
scan, you can set the postamble in the scanner configuration. For [Enter] place a ―\r‖, for
[Tab] place a ―\t‖. Refer to barcode scanner configuration for a list of pre and post ambles.
Change the font to fit rows and columns on the screen
You can dynamically increase or decrease the font size of the displayed text in all terminal
emulation sessions. This allows you to configure the number of rows and columns such that they
fit on the display screen. Select [Display] -> [Font Up] or [Font Down] from the
application menu. You can also use the corresponding buttons on the toolbar. You must be
connected to a host session for the settings to take effect.
Configure a session to automatically connect on startup
You can configure any session to automatically connect when the client starts. To do so,
configure your session for a connection. Then enable ―Auto Connect‖ checkbox option from
[Session] -> [Configure] -> [Connection] -> [Advanced]. Each session can
maintain its separate setting.
You can also setup automatic launch of the application upon device boot, by placing a shortcut to
the application in the \Windows\Startup folder
Setup Automatic login
For automatic login capability, we recommend using a Script as it offers a more robust solution
and is less susceptible to dynamic changes such as propagation delays and host application
response time in your network environment. Automatic login script sample is provided in the
Scripting Guide manual.
You can also use Macros. This approach for automatic login was recommended prior to Scripting
functionality being available. Record a macro with all the steps to login to your host. You can then
configure the macro to be launched automatically once the session connects. Enable the ―Macro
on Connect‖ checkbox option from [Session] -> [Configure] -> [Connection] ->
[Advanced]. You can have only one macro associated with each session. Refer to the Macros
section in this manual for more details on how you can record a macro.
Remap hardware keys
You can re-map any physical keyboard key on the device to any other key, text string, application
operation or a script. You can also map the key to a NULL operation, which will prevent use of
that key. All key remapping is done on the device through application configuration settings. No
CETerm | CE3270 | CE5250 | CEVT220 Page 24
Page 25

NAURTECH EMULATORS & WEB BROWSER FOR WINDOWS CE / WINDOWS MOBILE
additional components are necessary. This remapping may be configured specific to either a
session or an emulation type (such as VT, 5250, 3270, HTML etc).
It is sometimes difficult to find out the VK code generated when a physical key is pressed. This is
important to know as it is the key code that needs to be remapped to another key. We have now
added a ―Key Trap‖ button on the configuration dialog that tells you the VK key code associated
with a specific key.
All key remapping configuration settings are performed from the dialog [Session] ->
[Configure] -> [Options] -> [Configure KeyBars and Keys]-> [Select
Keymap] / [Edit Keymap]. Refer to the key remapping section for detailed steps.
Configure Full Screen mode
You can configure the application such that the display area occupies the complete screen on the
device. The ―Start‖ bar, Application menu, toolbar and any KeyBars can all be hidden. To
configure full screen mode go to [Session] -> [Configure] -> [Display] ->
[Advanced] -> [Hide/Show] tab. Enable the checkbox ―Hide Menu Bar‖, ―Hide Keybar‖ and
―Hide Toolbar‖. Now go to [Session] -> [Configure] -> [Options] -> [Advanced]
-> [Access Control] and enable checkboxes ―Hide Start Bar‖.
You can get back to your configuration dialogs form the full screen mode via a special Context
Menu. If you double tap (on Windows Mobile) or tap and hold (on Windows CE) the stylus on the
top left vertical edge of the display screen, you will see a context menu appear. Choose the
―Configure‖ option to enter the configuration. Unhide the desired menu(s).
Lock down the device
You can prevent the users from being able to access any application menu or configuration
options. To do so, configure the device in full screen mode. Next enable the checkbox option
―Disable App Exit‖ from [Session] -> [Configure] -> [Options] -> [Advanced] ->
[Access Control] configuration settings. Also set an access control password here. The user
will be prompted for this password if an attempt is made to enter the configuration dialogs. Refer
to the Access Control section in this manual for more detailed instructions.
Display Indicators
You can display RF signal and battery strength Indicators, either as floating icons or as part of
KeyBar buttons. To display the Indicators, go to [Session] -> [Configure] ->
[Options] -> [Advanced] -> [Info Items]. Select the Indicator from the dropdown list.
For the selected Indicator, make sure you enable the ―Update‖ checkbox and the ―Enabled‖
checkbox under ―Screen Display‖. You can also select the status buttons to be displayed on a
Custom KeyBar. Refer to the Indicators section in this manual for more details.
CETerm | CE3270 | CE5250 | CEVT220 Page 25
Page 26

NAURTECH EMULATORS & WEB BROWSER FOR WINDOWS CE / WINDOWS MOBILE
Configure to display International language character sets
We fully support all European language codepages for all terminal emulations. We support multibyte character set languages, such as Chinese, Japanese, Korean, Hebrew etc for VT emulations
only.
For IBM emulations, you can select your language specific codepage table from our support
website. Once installed, the codepage will appear as a selectable option under [Session] ->
[Configure] -> [Connection] -> [Advanced] -> [IBM Options] settings.
For VT emulations, you must have the language specific codepage table installed on the device.
You can then select the encoding mode and the corresponding codepage from the options under
[Session] -> [Configure] -> [Connection] -> [Advanced] -> [VT
Extensions] settings.
Enable SSL / SSH security
You can encrypt all data exchanged with your host applications by configuring your session
connection to use SSL (Secure Sockets Layer) or SSH (Secure Shell Protocol). You can enable
either of these from the [Session] -> [Configure] -> [Connection] -> [Security]
configuration dialog. Additional settings for SSH must be configured. You should review the
details under the SSH configuration section.
Exiting out from the registration dialog
When running the software in evaluation mode, you may enter the registration dialog by pressing
the ―Register‖ button when you are notified that you are running an evaluation version. At this
point you are expected if enter a User ID and a registration key. The device unique License ID is
shown in the registration dialog. If you do not yet have your registration key and need to exit
back to the splash screen, press the cancel 'X' button or press the Esc key.
If you have three unsuccessful attempts to register your software license, you will be returned to
the splash screen.
Automatic Licensing Registration
Rather than having to type the user id and key to register your software license, you can use the
automated license registration. Your registration key(s) are also provided in an XML file format.
You can either place this file on a Web server or locally on your device. During the first
connection attempt, our application will automatically try to resolve and complete the registration.
You can then configure a reference to this file to automatically register the device. To configure
automated licensing, go to [Session] -> [Configure] -> [Options] -> [Advanced]
-> [Manage]. Under ―Server URL‖ enter the complete URL to the registration license XML file.
Please refer to the Automated Licensing section later in this manual.
CETerm | CE3270 | CE5250 | CEVT220 Page 26
Page 27
NAURTECH EMULATORS & WEB BROWSER FOR WINDOWS CE / WINDOWS MOBILE
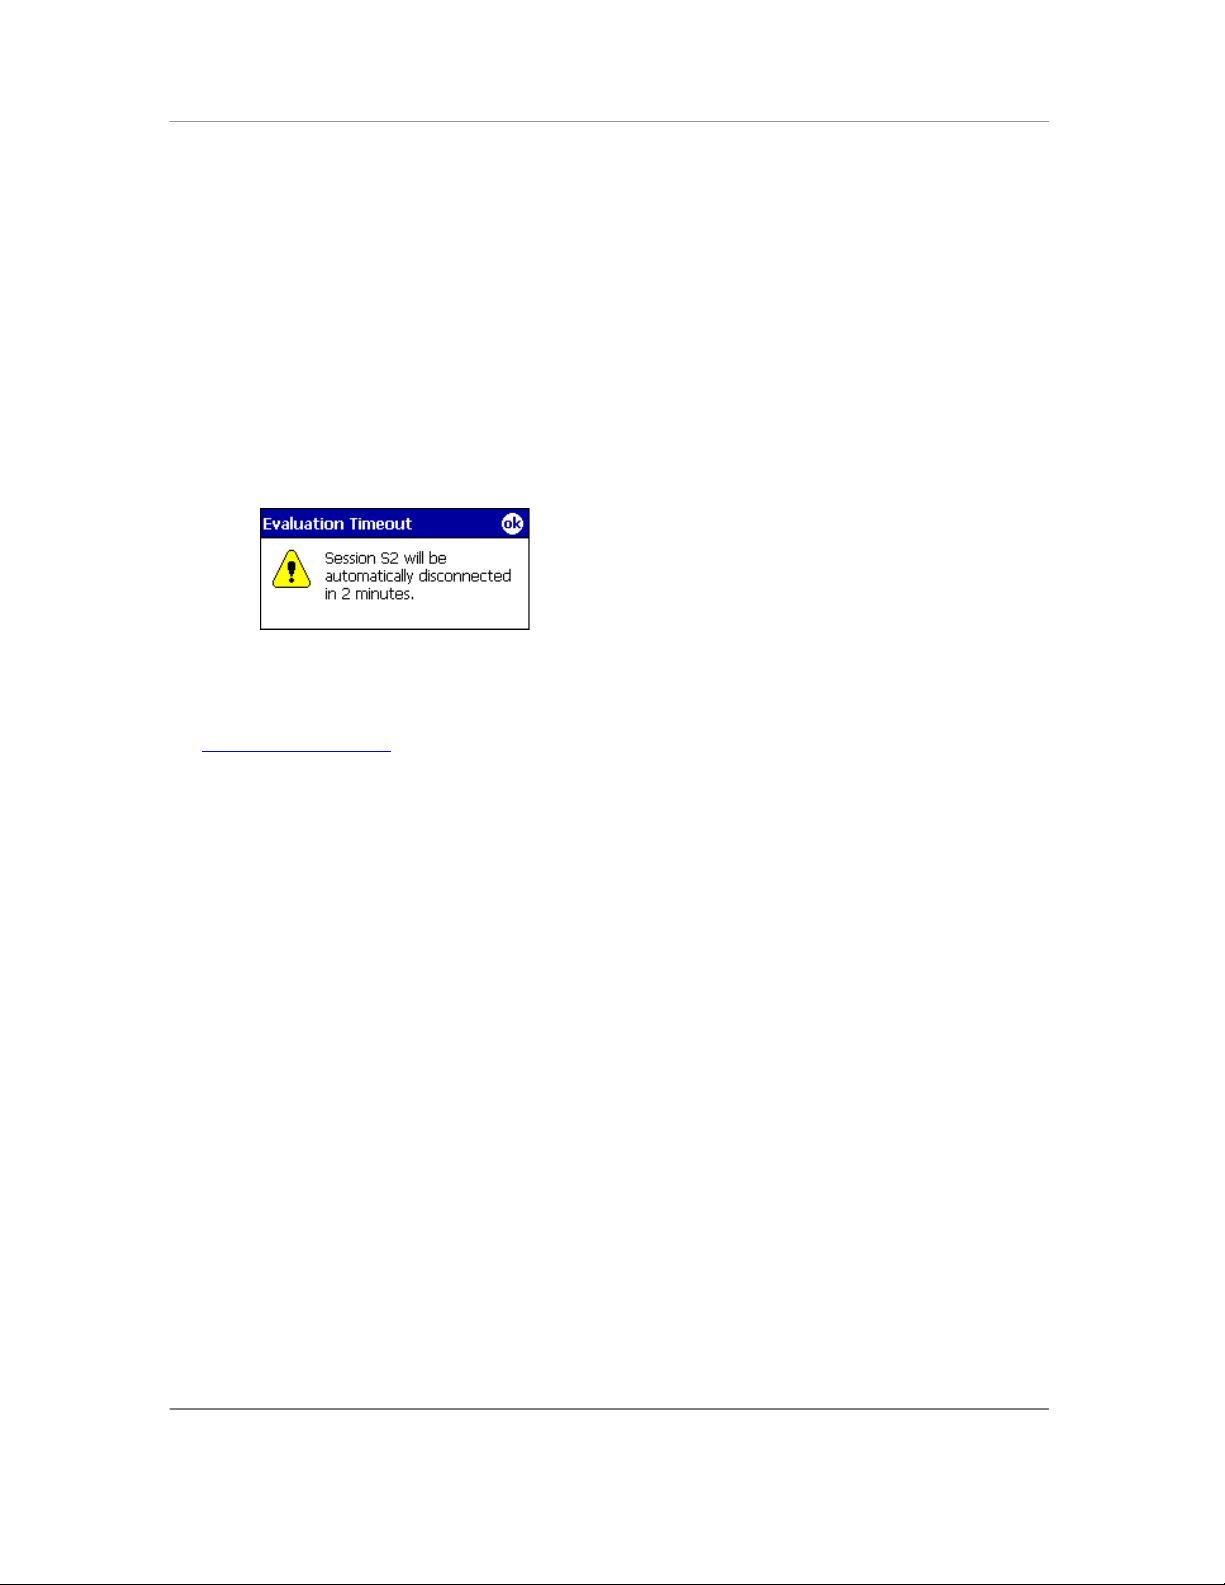
Evaluation Mode
You can download fully featured evaluation versions of our Emulators and Web Browser from our
website (www.naurtech.com). In the evaluation mode, there is a limitation on the number of host
connection attempts and the length of time for each ―connected‖ session. When running in
evaluation mode, users will be given a warning for the evaluation connection attempts and
connected time.
The evaluation period will expire once the number of host connection attempts are exhausted.
For each connected session during the evaluation mode, the session will be disconnected after a
fixed length of time. In evaluation mode, you are allowed to connect to at most two sessions
simultaneously.
These limitations and warnings are strictly part of the evaluation mode. They are not seen in a
registered version of the application. To register the application, you must purchase a legal
registration key and register your copy of the software installation. Contact our sales department
at sales@naurtech.com for more information.
CETerm | CE3270 | CE5250 | CEVT220 Page 27
Page 28
NAURTECH EMULATORS & WEB BROWSER FOR WINDOWS CE / WINDOWS MOBILE
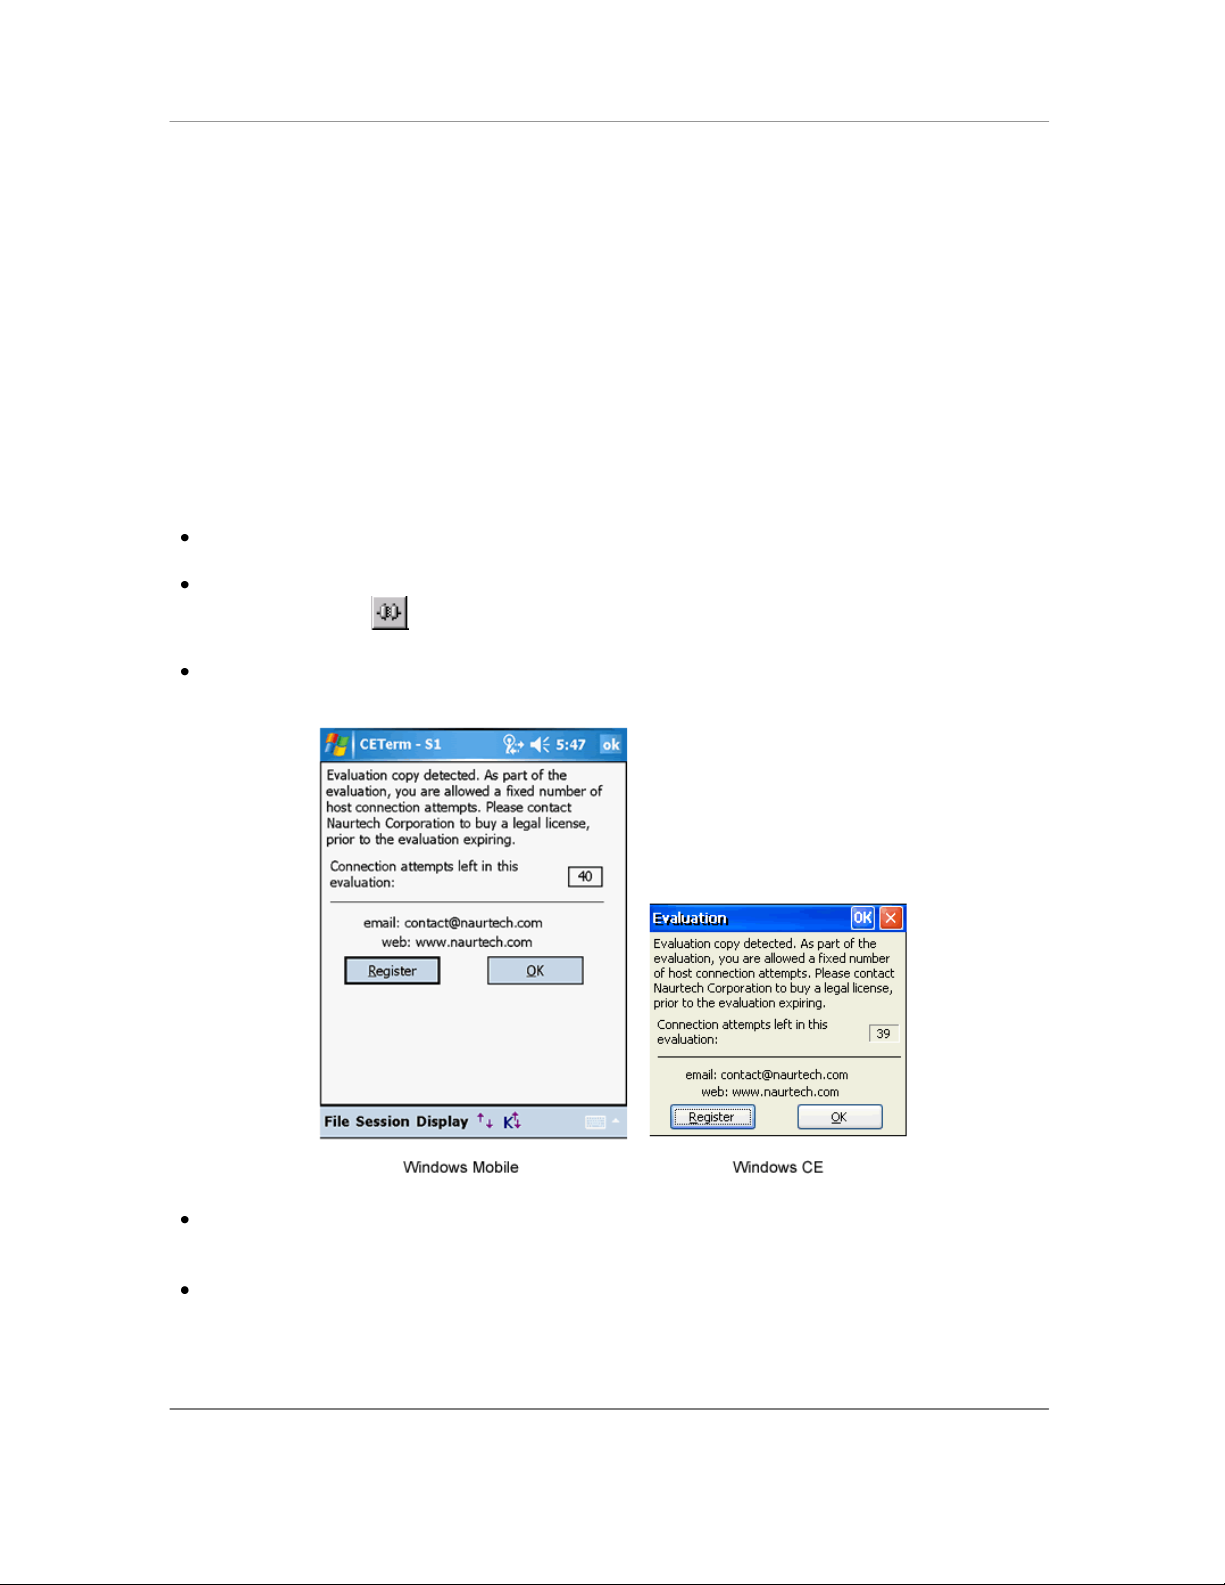
Software Registration
Although the evaluation versions of all our Emulators and Web Browser are fully featured, they
are restricted by evaluation limitations. Following the expiration of evaluation limits, the
application will fail to connect to the host and you must purchase a registration key to activate the
product. You can purchase registration keys by contacting your Systems Integrator / Reseller,
Distributor or Naurtech Corporation
Phone: +1. 425.837.0800
E-Mail: sales@naurtech.com
Web: http://www.naurtech.com
Once you have received your user id and associated registration key, follow these instructions to
register the product.
Launch the product application on your Windows CE / Pocket PC device
From the application menu, select [Session][Connect]. Alternatively, you may tap the
"Connect" button on the application ToolBar
If your copy of the product is not yet registered, you will receive the following dialog
Tap the "Register" button. This will display your device license ID and prompt you for your
User ID and Key to register your software license.
Enter the Registration Key using the soft keypad on the device. Note that your registration
key is provided as 4 hyphenated values such as aaaa-bbbb-cccc-dddd. Make sure you enter
these in the correct order as indicated in the picture below. You can also use automated
licensing using a license.xml file so you don‘t have to type your user id or key.
CETerm | CE3270 | CE5250 | CEVT220 Page 28
Page 29
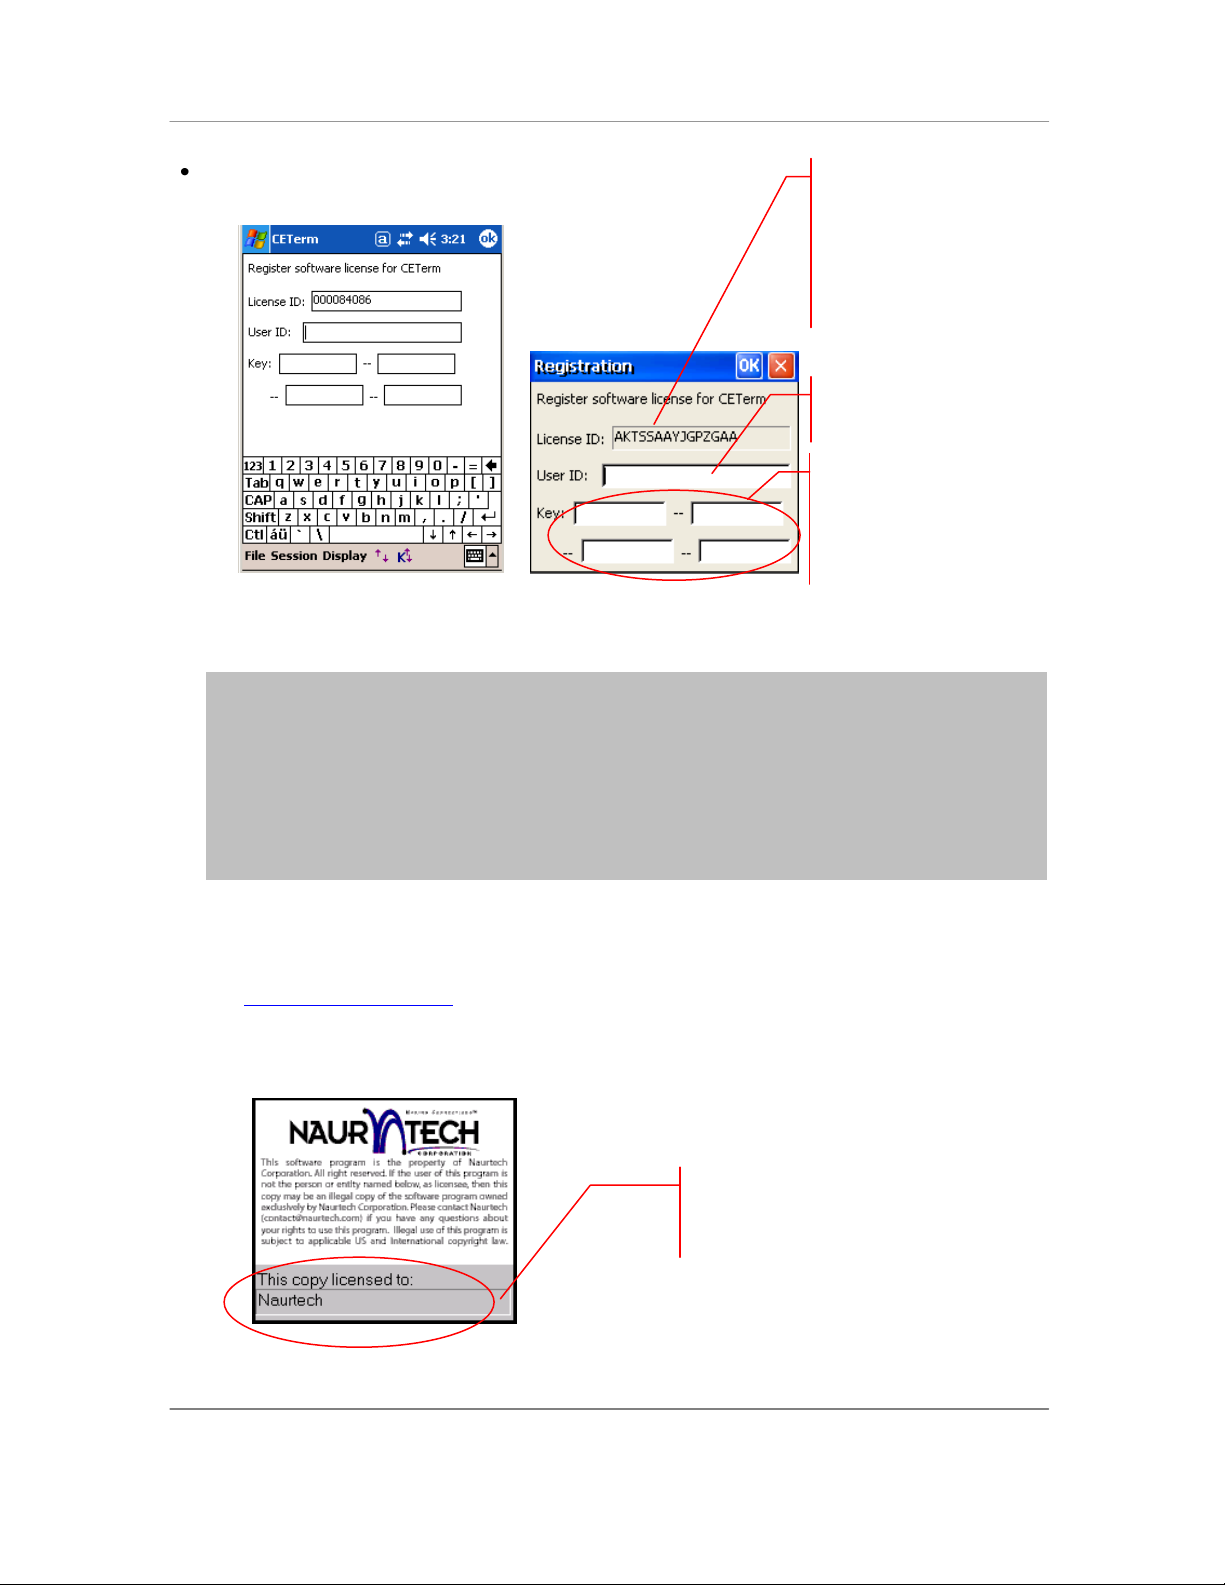
Once the registration is successful, your user
id will be displayed under the Splash screen
and in the File -> About dialog box.
Enter the registration key, which
you purchase from Naurtech here.
This is a unique key based upon
your device license ID.
This is a device unique License ID on
which your license registration key is
based on. It can be your device serial
number, MAC address or another unique
ID. You would have provided this
License ID to Naurtech when purchasing
the license.
Enter your User ID, (usually the
company name) here
NAURTECH EMULATORS & WEB BROWSER FOR WINDOWS CE / WINDOWS MOBILE
Tap OK
Windows Mobile Windows CE
NOTE: Your registration key is unique to your device License ID. It is case sensitive and must
be entered in the correct order.
NOTE: The registration key does not include any references to the number zero [0], capital
alphabet O, the number one [1] and lowercase letter L [l].
NOTE: If you do not yet have a registration key and would like to exit back to the splash
screen, press the cancel button 'X' or the Esc key. On Windows Mobile platform devices, you
must enter at least two characters in the User ID field. Tap OK. Repeat this step three times to
return to the splash screen.
If your User ID and Key are correct, your product will be registered. If the keys do not match, you
will be prompted with a failure message accordingly. Please make sure both the User ID and Key
are entered correctly. Both of these are case sensitive. If the problem persists, please send email to support@naurtech.com.
Once the product is registered, your User ID will appear on the Splash bitmap and in the File ->
About dialog box.
CETerm | CE3270 | CE5250 | CEVT220 Page 29
Page 30
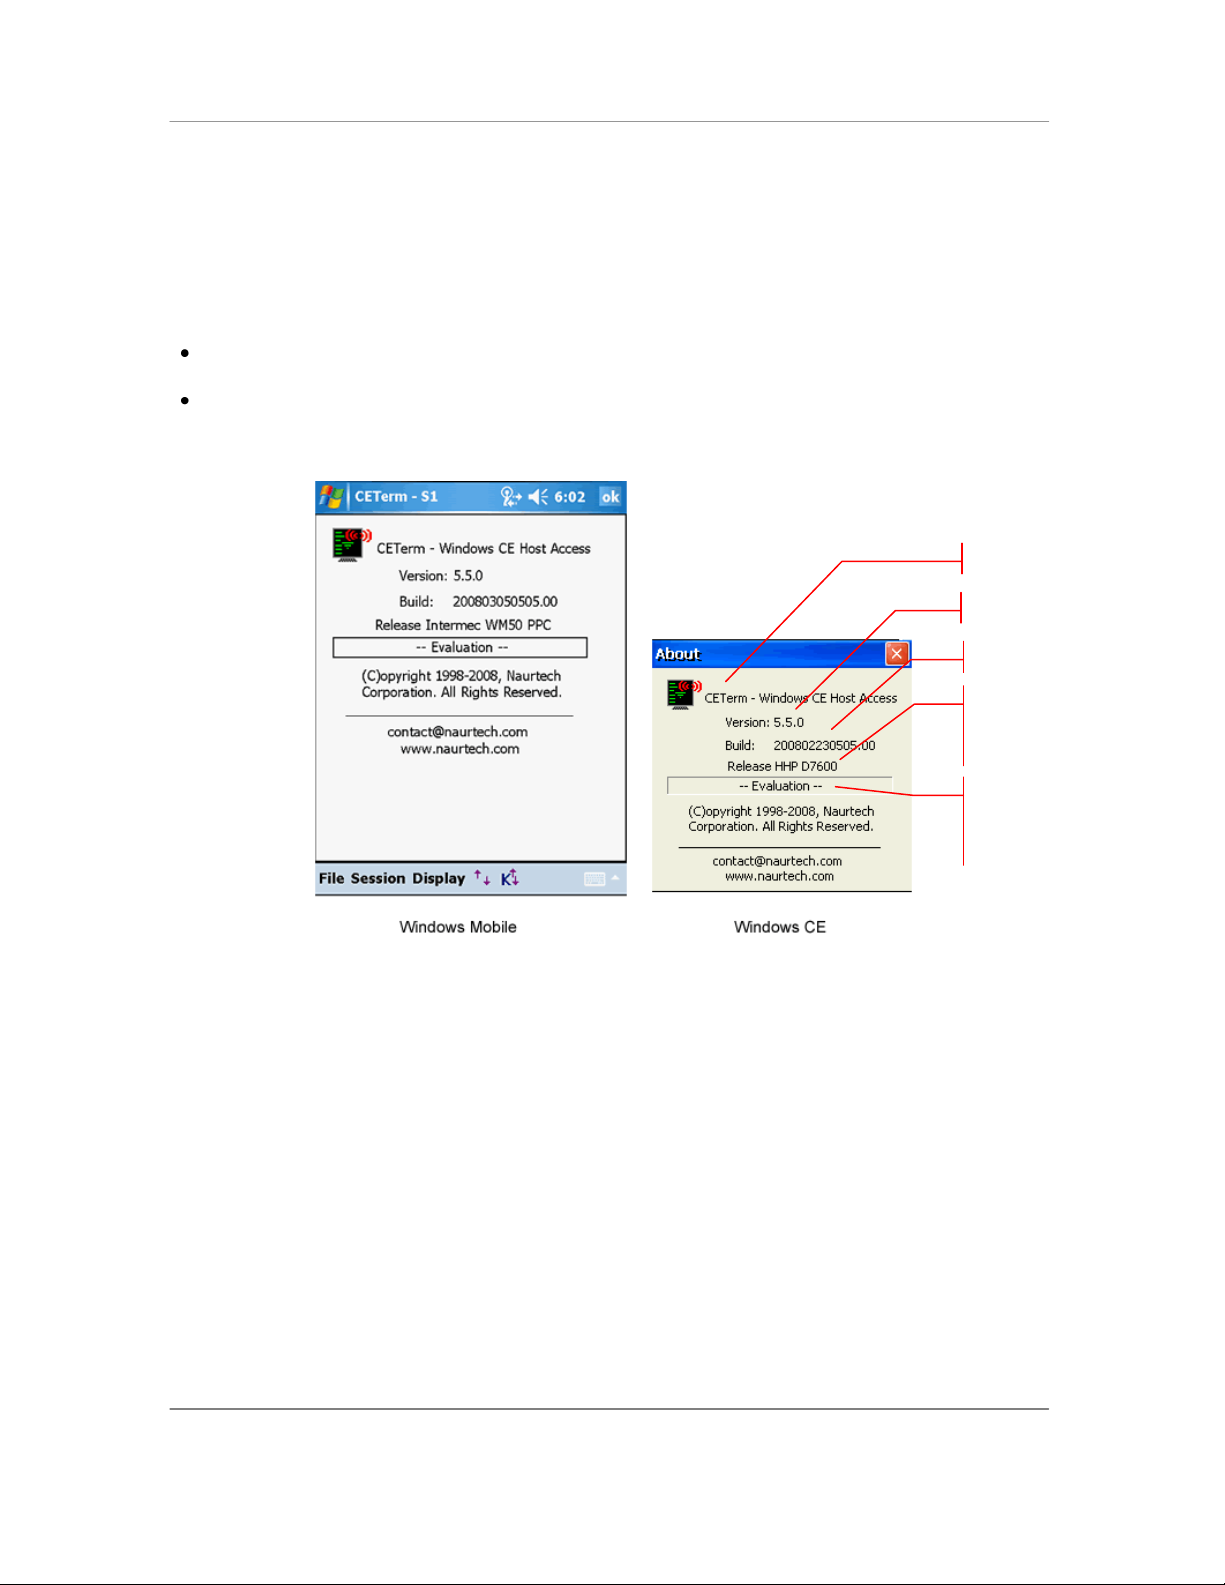
Build Label. For device
tailored versions
indicates device model
User ID of registered
software license. If copy is
not registered, this will say
―—Evaluation—―
NAURTECH EMULATORS & WEB BROWSER FOR WINDOWS CE / WINDOWS MOBILE
Product Version
You can check your product registration and version number in the ―About‖ dialog. Please keep
the product registration key handy. You may be asked to provide this for technical support issues.
Follow these steps to determine your product version number and licensing registration
information.
Launch the product application on your Windows CE / Windows Mobile device
From the application menu, select [File][About]. You will see the About dialog as shown
below. The build version and license registration information is shown.
CETerm | CE3270 | CE5250 | CEVT220 Page 30
Page 31

―Gripper‖. You can tap and drag these
with your stylus to show the complete
toolbar or Keybar
Toolbar
Toolbar gripper
Keybar gripper
Toggles the
application toolbar
on and off
Toggles the configurable
KeyBar on and off
Toolbar
Keybar
Soft Input Panel (SIP) / Soft Keyboard
NAURTECH EMULATORS & WEB BROWSER FOR WINDOWS CE / WINDOWS MOBILE
Application Menu
One of the benefits of using Windows CE / Windows Mobile platform devices is that they follow
the popular desktop ―Windows‖ metaphor. Naurtech Emulators and Web Browser follow the user
interface guidelines as recommended by Microsoft. Windows CE uses command bars, which
combine menus and toolbars together. The following image shows the application toolbar.
Windows Mobile
Windows CE
CETerm | CE3270 | CE5250 | CEVT220 Page 31
Page 32

Online application help
About the application, version,
build, registration etc.
Application exit. Can be
configured to be disabled.
Connect to / Disconnect from host
Open session configuration dialogs
Password protect a session. User
will be prompted for password prior
to making connection
Five simultaneous host sessions
>> << indicates
current active session.
indicates session is
connected
Increase / decrease terminal
text font size
Open the emulation specific
host key SmartPad
Open the text string Data Input tool
Open the macro script
playback / recorder
NAURTECH EMULATORS & WEB BROWSER FOR WINDOWS CE / WINDOWS MOBILE
The operations associated with application sub-menu options are shown below
NOTE: You can now run up to five host sessions simultaneously. These may be connected in
any combination of legacy host or Web server applications
CETerm | CE3270 | CE5250 | CEVT220 Page 32
Page 33

Single tap or drag to
change toolbar
visibility. Only
available on Windows
CE devices
Next active
session
Session Connect /
Disconnect
Session Configure
dialog
Increase font size
Decrease font size
Toggle SmartPad for
host specific keys
Toggle Text Input tool
Toggle Macro toolbar
NAURTECH EMULATORS & WEB BROWSER FOR WINDOWS CE / WINDOWS MOBILE
Application Toolbar
An integrated application toolbar is provided for touch screen navigation. For Windows CE
platform devices, this toolbar is available next to the Application menu. For Windows Mobile
platform devices, you can bring up the toolbar by invoking the toolbar button next to the
application menu. Below is a description of the toolbar buttons. You can also tap and hold the
toolbar button to get a ―toolbar tip‖ indicating its functionality.
CETerm | CE3270 | CE5250 | CEVT220 Page 33
Page 34

Connection
Host Type
Host Address
Terminal Device
Telnet Port
Advanced
General
IBM Options
VT Options
Auto Connect
IBM Codepage
Answerback Message
Auto Reconnect
Device / LU#
Keyboard
Macro on Connect
Error Row
Send Mode
Confirm Disconnect
Shift all Error Row content
Compatibility
Confirm Exit (Connected)
Suppress Auto Field Advance
User Pref Sup.
Exit on Disconnect
Suppress Backspace At End
VT Extensions
Check Network on Connect
3270 EAB
Multi-byte: Mode
Check Network on Resume
VT Modes
Multi-byte: Code Page
Check Network before Send
Background
Two Column DB Characters
Enable Socket Keep-alives
Columns
Extensions: Symbol TNVT
Network
C1 Controls
Extensions: Symbol CE VT
Network Check: Timeout
Backspace
Extensions: Telxon
Network Check: Host
Enter Key
Network Check: Action
Autowrap
Security
Local Echo
SSL: Enable SSL
SSL: Perform Certificate Checks
SSH: Enable SSH
SSH: Advanced
NAURTECH EMULATORS & WEB BROWSER FOR WINDOWS CE / WINDOWS MOBILE
Configuration
This section describes various configuration parameters for host connections. All these
parameters are set using the configuration dialogs accessed from the [Session]
[Configure] application menu. Except for "Connection" parameters, you can change or update
any parameters at any time, whether the host / browser session is connected or disconnected.
Every configuration setting is automatically saved to the last configured setting. All configuration
attributes are associated with the currently active session. Every session can have a different set
of configuration attributes.
NOTE: The positioning of some of the user interface widgets on the dialogs shown might
appear slightly different on your device. This is because Windows CE devices come in various
screen form factors and the placement of the user interface widgets is performed dynamically,
based upon the device screen dimensions and characteristics.
Connection
The table below shows the hierarchy of configuration settings for the Connection configuration
attributes. Each highlighted title represents a configuration dialog tab or a button.
CETerm | CE3270 | CE5250 | CEVT220 Page 34
Page 35

Session number being
configured
NAURTECH EMULATORS & WEB BROWSER FOR WINDOWS CE / WINDOWS MOBILE
Before you can connect to your host or web server application, at a minimum, you must know the
host name, IP address or URL of the host system. You must also configure the port number on
which the host application is expecting connection.
From the application menu, Select [Session][Configure] or tap the "Configure"
button on the toolbar.
A "Configure" dialog box will come up.
Choose the "Connection" tab. This is the first (and default) tab.
The following dialogs show the Connection tab of the host session configuration dialog.
NOTE: The default settings will change depending upon the current selection of "Host
Type".
Host Type: This is the type of session required to connect to your host / web server
application. Your choices are 3270, 5250, VT220 or HTML. The first three represent
terminal emulation sessions. The last option (HTML) represents a Web Browser session.
You may select any one emulation type for the session. If you have a single emulation
product (CE3270, CE5250 or CEVT220), only that emulation type will be selectable.
HTML host session types are available with all products. Other connection options may
change dynamically depending upon the host emulation type selected.
Host Address: This is the address of a host system or an intermediate gateway
managing connections to the host system. Enter the host name or numeric IP address,
CETerm | CE3270 | CE5250 | CEVT220 Page 35
Page 36

NAURTECH EMULATORS & WEB BROWSER FOR WINDOWS CE / WINDOWS MOBILE
using up to 64 characters. Default is demo.naurtech.com, which connects to a
simulated demo host. For HTML browser sessions, the host address should be the URL
(Universal resource Locator) of the host application site such as
“http://myIntranetApp.myCompany.com/start.php”. For HTML sessions, if
you are trying to view a page local to the device, the URL format should be
“file:///absolutepath/myPage.htm” where “absolutepath” is the absolute
path to the web page from the root folder.
Terminal Device: This is the terminal type string that determines a specific terminal to
emulate. This setting is applicable only for Terminal Emulation sessions. It does not apply
to Web Browser sessions. For 3270 emulations only model 2 screen geometry is
supported. CEVT220 supports VT52, VT100 and VT220 terminal types. Each host
emulation type has its own default terminal type.
Telnet Port: This is the TCP socket port number to be used to connect to the host
system. The default is 23. You may change this to the telnet port on which your host
application is listing. This setting does not apply to web browser (HTML) sessions.
Advanced
This button opens an advanced connection configuration dialogs.
General
This tab maintains general configuration settings relating to session connection and
reconnection.
Auto Connect: Checking this box will automatically connect this TE or Browser
session when the application is started. If you want to automatically connect to
your host configured for this session when the application starts, enable this
CETerm | CE3270 | CE5250 | CEVT220 Page 36
Page 37

NAURTECH EMULATORS & WEB BROWSER FOR WINDOWS CE / WINDOWS MOBILE
checkbox. You may have one or more host sessions configured for auto
connections.
Auto Reconnect: Checking this box will cause the emulator to attempt to
reconnect to the host if the connection is lost or closed by the host. This setting
has no affect on Web Browser sessions as Browser sessions are stateless and
establish a new connection for every data exchange.
Macro on Connect: Check this option if you want to automatically start playback
of a pre-recorded macro when the session connects. You may use this capability
for automatic login to a host application or automate any steps that require to be
performed upon session connection.
Confirm Disconnect: Check this option if you want to be prompted prior to
disconnecting a connected session. The prompt will force a user action before
proceeding ahead with disconnection of the host session.
Confirm Exit (Connected): Check this option if you want to be prompted prior to
exiting our application if one or more sessions are connected.
Exit on Disconnect: Check this option to exit the application when one or more
of the connected sessions disconnects. The disconnection may be triggered by
either the user or by the host.
Check Network on Connect: When enabled, the network signal presence and
availability will be automatically checked when an attempt is made to connect /
reconnect to the host. The user will be prompted if the device is out of RF range
or if the network cannot be detected.
Check Network on Resume: On certain devices, depending on your
configuration settings, the OS withdraws power from the WLAN card when the
device is suspended. This may be done to prolong battery life. When enabled,
CETerm | CE3270 | CE5250 | CEVT220 Page 37
Page 38

NAURTECH EMULATORS & WEB BROWSER FOR WINDOWS CE / WINDOWS MOBILE
this setting ensures presence of a network signal when the device is resuming
itself from a ―Suspend‖ state. The user will see a progress bar while CETerm
attempts the detect availability of a network. The user will be prompted if the
device is not associated, is out of RF range or if the network cannot be detected.
Check Network before Send: This setting in only applicable to Web Browser
sessions. It does not affect any of the terminal emulation sessions. When
enabled, the network signal presence and availability will be checked every time
before sending any data to the host server. The user will be prompted if the
device is out of RF range or if the network cannot be detected. Enable this
setting if your network coverage is sporadic.
Term Type: Leave this blank unless required. If not empty, this value is reported
as the terminal type in the Telnet negotiations. Use this only if your host has a
special Telnet server that uses the value to identify devices or special situations.
Initial Sleep: This setting should no longer be used. Instead, use ―Check
Network on Connect‖. This is the time, in seconds, for which CETerm will wait
when the application is launched. This setting is useful when CETerm is
configured to automatically start during a device cold boot and connect to a host
application. The ―Initial Sleep‖ allows the underlying wireless network to initialize
prior to the CETerm attempting to establish a connection. The default value is 0,
which means no delay.
NOTE: This setting has been obsolete by the ―Check Network on Connect‖
setting.
Network
This tab maintains configuration settings to enable detection, presence and availability of
the network.
Timeout: This is the length of time for which CETerm will try to find the host by
sending multiple ping requests. You can specify a navigation error page in the
Action setting to manage RF connection loss. You can also use the Scripting
event "OnNavigateError", to recover when RF is lost during navigation or if web
server is not responsive. See the Scripting Guide for details.
Host: This is the URL or IP address of the host server that you would like to
check to determine presence of network and availability of the host server. This
may be different from the URL or IP address of the host to which you are
connected.
CETerm | CE3270 | CE5250 | CEVT220 Page 38
Page 39

NAURTECH EMULATORS & WEB BROWSER FOR WINDOWS CE / WINDOWS MOBILE
NOTE: If this Network -> Host setting is blank, the network check extracts the
hostname from the pending connection URL and sends an ICMP Ping to
determine if the path to the host is available. This effectively checks if the RF is
available, the device is associated, any security protocols are established, and
the host is alive. The network check is only performed if the pending URL is a
HTTP or HTTPS type. Note that this does not check if your host web server has
crashed.
If this Network -> Host setting is specified, then that host is the target of the
ping. This can be useful if you have a network component or alternate host that
can be used to query.
Possible problems, if you always navigate to the error page could be:
- Your host or host firewall is configured so that it won't respond to a ping.
- You have a character in the "host" configuration of CETerm. Even a space will
be parsed to try to determine the host. Make sure it is empty.
Action: This is the action URL to which the Browser session is redirected if the
network is determined to be unavailable. This URL will typically be a device local
error page such as “file:///<myDeviceLocalPath>/myErrorPage.htm”
URL. If you specify an action, the Cancel button is disabled on the Network
Check dialog.
CETerm | CE3270 | CE5250 | CEVT220 Page 39
Page 40

NAURTECH EMULATORS & WEB BROWSER FOR WINDOWS CE / WINDOWS MOBILE
Security
This tab maintains all advanced connection configuration settings for data encryption and
security. Both Secure Shell (SSH) protocol and Secure Sockets Layer (SSL) encryption
are provided for all terminal emulations and web Browser sessions. Use https:
connections to provide SSL for HTML sessions.
Telnet over SSL (Secure Sockets Layer)
SSL or Secure Sockets Layer provides secure encryption of data between a handheld
terminal and the host. It is the underlying security protocol used by web browsers. With
SSL, they host system can also ask for a password to authenticate. This is sent over a
secure encrypted connection.
Enable SSL: Check this option to enable SSL data encryption. Once enabled, all
data sent to the host application is encrypted. All data received is decrypted
Perform Certificate Checks: Check this option if you want the client to perform
checks for valid certificate on the SSL server.
SSH Secure Shell
SSH, or Secure Shell, is a popular, powerful, software-based approach to network
security. Before data is sent by CETerm over a network, it is automatically encrypted
(scrambled) by SSH. The data is automatically decrypted (unscrambled) when it reaches
the host. The result is transparent encryption: users can work normally, unaware that
their communications are safely encrypted on the network. In addition, SSH uses
CETerm | CE3270 | CE5250 | CEVT220 Page 40
Page 41

NAURTECH EMULATORS & WEB BROWSER FOR WINDOWS CE / WINDOWS MOBILE
modern, secure encryption algorithms and can be found within mission-critical
applications at major corporations.
Enable SSH: This option enables the SSH protocol for this CETerm session. The
default is Off.
Advanced: This button allows configuration of more advanced settings specific
to the SSH protocol. By default, these settings will enable connections to most
SSH servers. It is recommended that you use the default settings, unless you
understand implications of the various settings.
SSH General
This tab is used to configure general settings of the SSH protocol. The list contains check
boxes that may be individually selected for the desired option. Please note that some
items, whenever applicable, have three selectable states: On, Off and Auto-Sense (Check
with ―A‖). Tapping these options will cycle through the three states.
If checked (On), the option is selected. If unchecked (Off), the option is not selected. If
Auto-Sense, CETerm will determine and use the most appropriate option setting.
Enable SSH: This option enables SSH for the current session. The option is
identical to the value on the previous Security tab and is repeated here for
convenience.
Prefer SSH-1 Protocol: Enable this option if you would like to connect to your
VT host server using SSH protocol version 1. The default setting is Off.
CETerm | CE3270 | CE5250 | CEVT220 Page 41
Page 42

NAURTECH EMULATORS & WEB BROWSER FOR WINDOWS CE / WINDOWS MOBILE
Prefer SSH-2 Protocol: Enable this option if you would like to connect to your
VT host using SSH protocol version 2. The default setting is On.
NOTE: If both SSH-1 and SSH-2 options are off, CETerm will first try to connect
using SSH2 protocol and then fall back to SSH-1 protocol.
Auto OK New Host keys: Automatically accept the host keys presented by the
server. Enabling this option will minimize the amount of interaction that is
required on part of a user. The default setting is Off.
WARNING: Enabling this option reduces security because the user does not
verify that the server being connected to is the intended destination. For greatest
security the user should verify that the server credentials presented match the
intended server.
Auto OK Changed Host keys: Automatically accept changed host key
presented by the server. Enabling this option will minimize the amount of
interaction that is required on part of a user. The default setting is Off.
WARNING-WARNING-WARNING: Enabling this option reduces security
because the user does not verify that the server being connected to is the
intended destination. A changed host key may indicate a ―man-in-the-middle‖
attack, or it may be that the server administrator has simply changed the server
host key. For greatest security the user should verify that the server credentials
presented match the intended server.
Try Keyboard Authentication: This option is for SSH-2 protocol only. It is a
flexible authentication method using an arbitrary sequence of requests and
responses. This method is not only useful for challenge/response mechanisms
such as S/Key, but it can also be used for asking the user for a new password
when the old one has expired. This option is On by default.
Try TIS Authentication SSH-1: TIS authentication is a simple
challenge/response form of authentication available in SSH-1 protocol only. You
might use it if you were using S/Key one-time passwords, or if you had a physical
security token that generated responses to authentication challenges.
With this option enabled, CETerm will attempt this authentication if the server is
willing to try them. You will be presented with a challenge string (which will be
different every time) and must supply the correct response in order to log in. If
your server supports this, you should talk to your system administrator about
precisely what form these challenges and responses take. This option is Off by
default.
Auth Username Changeable: The SSH-2 protocol allows change of username
during authentication, but does not make it mandatory for SSH-2 servers to
accept them. In particular, OpenSSH does not accept a change of username;
once you have sent one username, it will reject attempts to try to authenticate as
another user.
Enable this option if your server accepts changes to username in its
authentication process. This option is Off by default.
CETerm | CE3270 | CE5250 | CEVT220 Page 42
Page 43

NAURTECH EMULATORS & WEB BROWSER FOR WINDOWS CE / WINDOWS MOBILE
Skip User Authentication: When enabled, CETerm will not negotiate user
authentication with the SSH server. In most cases this will prevent a connection.
This option is Off by default.
Cache Decrypted User Keys: When enabled, CETerm will retain a private copy
of any user keys that have been unlocked with a user passphrase. Subsequent
requests for the key will be served automatically and will not require the user to
re-enter the passphrase. CETerm does not retain the passphrase. The cached
key may be used with multiple sessions and will be erased when CETerm exits
or if this option is changed to Off. This option is global and is common to all
sessions. The default value is Off.
NOTE: While this renegotiation is taking place, no data can pass through the
SSH connection, so the session may appear to ‗freeze‘ momentarily. This is a
short period when the key exchange is taking place.
Re-Key Every 60 Minutes: A shared session key is used by the encryption
protocol. If used too long, the session key may be subject to attack and expose
the SSH connection. Although such an attack is unlikely, it is wise to reexchange the key every so often. This can be initiated either by the client or the
server. Enabling this option will trigger CETerm to exchange a new key with the
server every 60 minutes. This option is On by default.
Re-Key Every 1G of Traffic: A shared session key is used by the encryption
protocol. If used for a large volume of traffic, the session key may be subject to
attack and expose the SSH connection. Although such an attack is unlikely, it is
wise to re-exchange the key after a significant amount of data. Enabling this
option will trigger CETerm to exchange a new key with the server following a total
data flow of 1 Gigabyte in either direction. This option is On by default.
Enable Compression: Enabling this setting will compress all data exchanged
over the SSH connection. We do not recommend using compression for
standard interactive sessions. By default, this setting is Off.
Enable Verbose messages: When enabled, the user is informed of major errors
which affect the SSH connection via a popup dialog. Some additional
information is presented within the emulation screen. This option is On by
default.
Allow IPV4: Enable this option to allow the IPv4 Internet Protocol addressing
scheme. The default is On.
Allow IPV6: Enable this option to allow the IPv6 Internet Protocol addressing
scheme. The default is Off.
Note: If neither IPv4 or IPv6 options is selected, CETerm will use IPv4. If both are
selected, CETerm will first attempt IPv6 and fall back to IPv4 if it is unsuccessful
connecting with IPv6.
Use TCP No-Delay (Advanced): Under normal operation, the TCP
communication stack performs data packet batching. Enable this option forces
the TCP stack to send immediately without batching data packets. This can result
in excessive traffic of short packets. We recommend leaving this option Off. It is
Off by default.
CETerm | CE3270 | CE5250 | CEVT220 Page 43
Page 44

NAURTECH EMULATORS & WEB BROWSER FOR WINDOWS CE / WINDOWS MOBILE
Send TCP Keep-Alives (Advanced): Enables the TCP socket keep-alive option.
This option is deprecated and should not be used. Use the SSH level keep-alive
to prevent session disconnection by a host. This option is Off by default.
No Pseudo-Terminal on Host (Advanced): When connecting to a Unix system,
most interactive shell sessions are run in a pseudo-terminal, which allows the VT
host system to pretend it's talking to a real physical terminal device and allows
the SSH server to catch all the data coming from that fake device and send it
back to the client. Occasionally you might find you have a need to not run a
session in a pseudo-terminal. Enable this option to prevent CETerm from running
a pseudo terminal. The default is Off.
No Host Shell (Advanced): Enabling this option will force CETerm to not run a
shell or command after connecting to the remote host server / host. This option
may be used only when using the SSH connection for port forwarding, and your
user account on the server not having the ability to run a shell. This option is only
applicable with SSH protocol version 2, since the SSH version 1 protocol
assumes you will always want to run a shell. The default is Off.
Run Sub-System on Host (Advanced): If enabled, attempts to run an SSH-2
subsystem on the host. By default, this option is Off
Try Proxy for Local Host: If using a proxy connection, this option enables the
use of the proxy even for connections to localhost. By default, this option is Off
DNS Lookup at Proxy End: If Off, CETerm will perform DNS lookup on the
handheld. If On, CETerm will perform DNS lookup on the proxy host. If AutoSense, CETerm will choose the DNS lookup location based on the proxy type.
By default, this option is Auto-Sense.
Local Fwd – Allow All Hosts: If enabled, this option allows hosts other than the
handheld to connect to local ports that are forwarded to the server. This may be
useful for a peripheral device to connect to the server. By default, this option is
Off.
Remote Fwd – Allow All Hosts: If enabled, this option allows hosts other than
the server to connect to remote ports that are forwarded to the handheld. By
default, this option is Off
Overwrite Existing Log File: Enable this option if you want to automatically
overwrite the existing log and start capturing a new log. If unchecked, log data
will be appended to the end of the existing log. The default option is Auto-Sense,
in which case the user is prompted when logging starts and the file exists.
Omit passwords from Log: When checked, password fields are removed from
the log of transmitted packets. This includes any user responses to challengeresponse authentication methods such as ‗keyboard-interactive‘. Note that this
setting will only omit data that CETerm knows to be a password. If you start
another login session within your CETerm SSH session, for instance, any
password used will appear in the clear in the packet log. This option is Off by
default.
CETerm | CE3270 | CE5250 | CEVT220 Page 44
Page 45

NAURTECH EMULATORS & WEB BROWSER FOR WINDOWS CE / WINDOWS MOBILE
Omit Session data from Log: When checked, all ‗session data‘ is omitted; this
is defined as data in terminal sessions and in forwarded channels (TCP, X11,
and authentication agent). This will usually substantially reduce the size of the
resulting log file. This option is Off by default.
NOTE: Not all SSH servers work properly. Various existing servers have bugs in
them, which can make it impossible for a client like CETerm to talk to them
unless it knows about the bug and works around it. Since most servers announce
their software version number at the beginning of the SSH connection, CETerm
will attempt to detect which bugs it can expect to see in the server and
automatically enable workarounds.
The following configuration options are provided to navigate around these known
bugs in the various SSH server implementations.
Bug – SSH-1 Ignore: Within the SSH-1 protocol, the client or server can send an
―ignore message‖ at any time. Either side is required to ignore the message
whenever it receives it. Within CETerm, this capability is used to hide the
password packet in SSH-1, so that a listener cannot tell the length of the user's
password. CETerm also uses ―ignores messages‖ for application level
keepalives. Certain SSH-1 servers lock up in using ―ignore messages‖.
If this option is not enabled, CETerm will assume that the SSH-1server does not
have this bug.
If this option is enabled, CETerm session connection will succeed, but keepalives
will not work and the session might be more vulnerable to eavesdroppers than it
could be.
If the option is auto-sensed, CETerm will detect the bug and stop using ―ignore
messages‖. The default option is Auto-Sense.
Bug – SSH-1 Password Hiding: When talking to an SSH-1 server which cannot
deal with ignore messages, CETerm will attempt to disguise the length of the
user's password by sending additional padding within the password packet. This
is technically a violation of the SSH-1 specification, and so CETerm will only do it
when it cannot use standards-compliant ignore messages as camouflage. In this
sense, for a server to refuse to accept a padded password packet is not really a
bug, but it does make life inconvenient if the server can also not handle ignore
messages.
If this ‗bug‘ is auto-sensed, CETerm will have no choice but to send the user's
password with no form of camouflage, so that an eavesdropping user will be
easily able to find out the exact length of the password. If this is enabled when
talking to a correct server, the session will succeed, but will be more vulnerable
to eavesdroppers than it could be.
This option only applies to SSH-1 servers. The default option is Auto-Sense.
Bug – SSH-1 RSA Auth: Some SSH-1 servers cannot deal with RSA
authentication messages at all. If Pageant is running and contains any SSH-1
CETerm | CE3270 | CE5250 | CEVT220 Page 45
Page 46

NAURTECH EMULATORS & WEB BROWSER FOR WINDOWS CE / WINDOWS MOBILE
keys, CETerm will automatically try RSA authentication before falling back to
passwords, so these servers will crash when they see the RSA attempt.
If this bug is auto-sensed, CETerm will go straight to password authentication. If
this option is enabled when talking to a correct server, the session will succeed,
but of course RSA authentication will be impossible.
This option only applies to SSH-1 servers. The default option is Auto-Sense.
Bug – SSH-2 HMAC Key: Versions 2.3.0 and below of the SSH server software
from ssh.com compute the keys for their HMAC message authentication codes
incorrectly. A typical symptom of this problem is that CETerm can fail at the
beginning of the session, saying ‗Incorrect MAC received on packet‘.
If this bug is auto-sensed, CETerm will compute its HMAC keys in the same way
as the buggy server, so that communication will still be possible. If this option is
enabled when talking to a correct server, communication will fail.
This option only applies to SSH-2 servers. The default option is Auto-Sense.
Bug – SSH-2 Encryption Key: Versions below 2.0.11 of the SSH server
software from ssh.com compute the keys for the session encryption incorrectly.
This problem can cause various error messages, such as ‗Incoming packet was
garbled on decryption‘, or possibly even ‗Out of memory‘.
If this bug is auto-sensed, CETerm will compute its encryption keys in the same
way as the buggy server, so that communication will still be possible. If this
option is enabled when talking to a correct server, communication will fail.
This option only applies to SSH-2 servers. The default option is Auto-Sense.
Bug – SSH-2 RSA Signature: Versions below 3.3 of OpenSSH require SSH-2
RSA signatures to be padded with zero bytes to the same length as the RSA key
modulus. The SSH-2 draft specification says that an unpadded signature MUST
be accepted, so this is a bug. A typical symptom of this problem is that CETerm
mysteriously fails RSA authentication once in every few hundred attempts, and
falls back to passwords.
If this bug is auto-sensed, CETerm will pad its signatures in the way OpenSSH
expects. If this option is enabled when talking to a correct server, it is likely that
no damage will be done, since correct servers usually still accept padded
signatures because they're used to talking to OpenSSH.
This option only applies to SSH-2 servers. The default option is Auto-Sense.
Bug – SSH-2 ID in PK Auth: Versions below 2.3 of OpenSSH require SSH-2
public-key authentication to be done slightly differently: the data to be signed by
the client contains the session ID formatted in a different way. If public-key
authentication mysteriously does not work but the Event Log thinks it has
CETerm | CE3270 | CE5250 | CEVT220 Page 46
Page 47

NAURTECH EMULATORS & WEB BROWSER FOR WINDOWS CE / WINDOWS MOBILE
successfully sent a signature, it might be worth enabling the workaround for this
bug to see if it helps.
If this bug is auto-sensed, CETerm will sign data in the way OpenSSH expects. If
this option is enabled when talking to a correct server, SSH-2 public-key
authentication will fail.
This option only applies to SSH-2 servers. The default option is Auto-Sense.
Bug – SSH-2 Re-Key: Some SSH servers cannot cope with repeat key
exchange at all, and will ignore attempts by the client to start one. Since CETerm
pauses the session while performing a repeat key exchange, the effect of this
would be to cause the session to hang after an hour (unless you have your rekey
timeout set differently). Other, very old, SSH servers handle repeat key exchange
even worse, and disconnect upon receiving a repeat key exchange request.
If this bug is auto-sensed, CETerm will never initiate a repeat key exchange. If
this option is enabled when talking to a correct server, the session should still
function, but may be less secure than you would expect.
This option only applies to SSH-2 servers. The default option is Auto-Sense.
Username: This is the field where you can specify what user name you want to
login as, when connecting through your SSH server. Configuring a username will
prevent you from having to explicitly type this on every connection. The default is
blank.
SSH Keep Alive: This is the time interval, in seconds, that CETerm will use for
triggering SSH level keep-alive frames. Note SSH Keep-Alives are different from
TCP protocol Keep Alives. A value of 0 implies not to use SSH Keep-Alives. The
default value is 0.
Log Mode: CETerm can maintain a log of all data interaction and exchange
performed over the SSH connection. This can be helpful in troubleshooting
connection failures. Use this setting to configure the type of log that CETerm
should save. The amount of information saved in the log varies with the
configured log mode setting. The log file is created in the root directory with the
following name format: /ssh_log_&h.raw where &h is replaced by the
hostname. The default mode is None.
None
Info
Debug
SSH Data
SSH Raw
Notices: This button displays SSH specific copyright notice.
CETerm | CE3270 | CE5250 | CEVT220 Page 47
Page 48

NAURTECH EMULATORS & WEB BROWSER FOR WINDOWS CE / WINDOWS MOBILE
Encryption
CETerm supports a variety of different encryption algorithms, and allows you to prioritize
which one you prefer to use. Use this configuration tab to set a priority preference for the
SSH encryption algorithms.
Encryption Priority: Highlight the preferred encryption algorithm and use the up
and down buttons to position it in the list box to specify a priority preference
order. When you make an SSH connection, CETerm will search down the list
from the top until it finds an algorithm supported by the server, and then use that.
By default, CETerm list the following encryption algorithms in priority order:
- AES Rijndael (SSH-2)
- Blowfish
- Triple-DES
- * warn below here *
- Arcfour
- * ignore following *
- DES
If the encryption algorithm which CETerm finds is below the ‗warn below here‘
line, you will see a warning box when you make the connection:
The first cipher supported by the server
is single-DES, which is below the configured
warning threshold.
Do you want to continue with this connection?
This warns you that the first available encryption is not a very secure one.
Typically you would put the ―* warn below here *‖ line between the encryptions
you consider secure and the ones you consider substandard. By default,
CETerm | CE3270 | CE5250 | CEVT220 Page 48
Page 49

NAURTECH EMULATORS & WEB BROWSER FOR WINDOWS CE / WINDOWS MOBILE
CETerm supplies a preference order intended to reflect a reasonable preference
in terms of security and speed.
In SSH-2, the encryption algorithm is negotiated independently for each direction
of the connection, although CETerm does not support separate configuration of
the preference orders. As a result you may get two warnings similar to the one
above, possibly with different encryptions.
Any algorithms below the ―* ignore following *‖ selection are not used and
ignored by CETerm.
NOTE: Single-DES is not recommended in the SSH-2 draft protocol standards,
but one or two server implementations do support it.
Diffie-Hellman Key Exchange Priority: Key exchange occurs at the start of an
SSH connection (and occasionally thereafter, depending upon your settings in
the SSH General tab); it establishes a shared secret that is used as the basis for
all of SSH security features. It is therefore very important for the security of the
connection that the key exchange is secure.
Key exchange is a cryptographically intensive process; if either the client or the
server is a relatively slow machine, the slower methods may take several tens of
seconds to complete.
NOTE: If connection startup is too slow, or the connection hangs periodically, you
may want to try changing these settings. If you don't understand what any of this
means, it's safe to leave these settings alone.
CETerm supports a variety of SSH-2 key exchange methods, and allows you to
choose which one you prefer to use. This configuration is similar to encryption
algorithm cipher selection. CETerm currently supports the following varieties of
Diffie-Hellman key exchange:
D–H Group exchange: with this method, instead of using a fixed group,
CETerm requests that the server suggest a group to use for key
exchange; the server can avoid groups known to be weak, and possibly
invent new ones over time, without any changes required to CETerm's
configuration. We recommend use of this method, if possible.
D–H Group 14: a well-known 2048-bit group.
D–H Group 1: a well-known 1024-bit group. This is less secure than
group 14, but may be faster with slow client or server machines, and may
be the only method supported by older server software.
If the first algorithm CETerm finds is below the ―* warn below here*‖ line, you will
see a warning box when you make the connection, similar to the one discussed
in the previous (encryption priority selection) configuration.
CETerm | CE3270 | CE5250 | CEVT220 Page 49
Page 50

NAURTECH EMULATORS & WEB BROWSER FOR WINDOWS CE / WINDOWS MOBILE
User Keys
This configuration tab manages the User Keys to be used for authentication with the SSH
server. User Keys are used for public key authentication. Public key authentication
requires a key-pair consisting of a public key and a private key. The public key can be
known be everybody whereas the private key is a closely held secret and is usually
encrypted with a corresponding passphrase.
The public key is copied to the server and the private key is imported into CETerm. The
private key is stored in CETerm in the encrypted form. The server and CETerm use the
keys to authenticate the login request.
User Key: This is the key which has been selected for use with the current
session. It can only be selected from the keys which have been imported into
CETerm.
Clear: This will remove any currently selected key for the session. Without a
key, the SSH connection will attempt to use password or other authentication
mechanisms.
Select: This button selects the highlighted key in the table to be used as the
User Key for this session.
Import: Tap this button to import a key into CETerm. CETerm can import keys
generated for OpenSSH and ssh.com servers and some SSH client tools.
Delete: Tapping this button will delete the highlighted key from the table and
remove it from CETerm settings.
Copy OpenSSH Public Text: Tapping this button will copy the public text for the
highlighted key into the device cut-and-paste clipboard and display the text in a
popup window. This text is commonly put in the ―authorized_keys‖ file in the
user‘s home directory on the server.
CETerm | CE3270 | CE5250 | CEVT220 Page 50
Page 51

NAURTECH EMULATORS & WEB BROWSER FOR WINDOWS CE / WINDOWS MOBILE
The table contains a list of keys that have been imported into CETerm. These
keys are shared by all CETerm sessions. Each key has a ―Name‖ which is
assigned by the user when the key is imported. Also shown is the ―Algorithm‖
the key supports, the ―Encryption‖ used for the key, and the ―Comment‖ field of
the key.
Server
The configuration attributes on this tab allow you to configure server options.
Environment: This setting specifies environment variables to be set on the SSH
server. Not all servers will accept new environment variables. The format of the
variables is a list of semicolon delimited name-value pairs:
name=”value”;name2=!a=b;c=”d”!
Each value is delimited by quoting characters. Typically that character will be the
double-quote (―). If the value contains double-quote characters, any other
printable character may be used, including the single-quote or exclamation mark.
Note that the value for name2 contains equal signs, double-quotes, and a
semicolon and is delimited by the exclamation mark (!).
Whatever character is used at the start of the value must be used at the end. The
default setting is blank.
Command (Advanced): This represents a special command or subsystem to
invoke on the SSH server in lieu of an interactive shell. This is typically used for
non-interactive host sessions. For most users this will be blank.
CETerm | CE3270 | CE5250 | CEVT220 Page 51
Page 52

NAURTECH EMULATORS & WEB BROWSER FOR WINDOWS CE / WINDOWS MOBILE
TTY Modes (Advanced): This setting can be used to add TTY Modes to be sent
to the SSH server. The format of the variables is a list of semicolon delimited
name-value pairs:
mode=”value”;mode2=”value2”
Each value is delimited by quoting characters. See Environment above for
details on quoting.
Forwarding (Advanced): This setting defines port forwarding or tunnels
supported by this connection. Each tunnel is defined in the following format:
[4,6,A][L,R,D][sourcehost:]sourceport=desthost:destport;…
Where brackets indicate optional items,
4 – use IPV4, or 6 – use IPV6, or A – autodetect
L – local port forwarded, R – remote port forwarded, D – dynamic (proxy) port
For most users this will be blank.
Delete Server Keys: Tapping this button will erase all ―known hosts‖ server keys
stored within CETerm. The user must re-accept all keys during future host key
negotiations.
Proxy
The Proxy tab allows you to configure CETerm to use various types of proxy servers in
order to make network connections. The settings affect the primary network connection
from your CETerm SSH session, but also any extra connections made as a result of SSH
port forwarding.
CETerm | CE3270 | CE5250 | CEVT220 Page 52
Page 53

NAURTECH EMULATORS & WEB BROWSER FOR WINDOWS CE / WINDOWS MOBILE
Type: This option allows you to configure what type of proxy you want CETerm
to use for its network connections. The choices are:
- None: No proxy is used.
- SOCKS 4 or SOCKS 5: proxy through a SOCKS server.
- HTTP: proxy through a web server supporting the HTTP CONNECT
command
- Telnet: Many firewalls implement a less formal type of proxy in which a
user can make a Telnet connection directly to the firewall machine and
enter a command such as connect myhost.com 22 to connect through to
an external host. Selecting ‗Telnet‘ allows you to tell CETerm to use this
type of proxy.
The default setting is None.
Host: This is the DNS name or IP address of the proxy server. The default is
blank.
Port: This is the port on which the proxy server is listening. Set this to match the
port on the proxy server for connections. The default is 80.
User: If your proxy server requires authentication, enter the username. The
default is blank.
Password: If your proxy server requires authentication, enter the password. The
default is blank.
WARNING: This password is stored in plain text within CETerm.
NOTE: Authentication is not fully supported for all forms of proxy. Username and
password authentication is supported for HTTP proxies and SOCKS 5 proxies.
With SOCKS 5, authentication is via CHAP if the proxy supports it otherwise the
password is sent to the proxy in plain text.
With HTTP proxy, the only currently supported authentication method is ‗basic‘,
where the password is sent to the proxy in plain text.
SOCKS 4 can use the ‗Username‘ field, but does not support passwords.
You can specify a way to include a username and password in the Telnet proxy
command
Exclude Hosts: Typically you will only use a proxy to connect to non-local parts
of your network. For example, your proxy might be required for connections
outside your company's internal network. Use this setting to enter ranges of IP
addresses, or ranges of DNS names, for which CETerm will avoid using the
proxy and make a direct connection instead.
CETerm | CE3270 | CE5250 | CEVT220 Page 53
Page 54

NAURTECH EMULATORS & WEB BROWSER FOR WINDOWS CE / WINDOWS MOBILE
This setting may contain more than one exclusion range, separated by commas.
Each range can be an IP address or a DNS name, with a * character allowing
wildcards. For example:
*.somehost.com
excludes any host with a name ending in .somehost.com from proxying.
192.168.88.*
excludes any host with an IP address starting with 192.168.88 from proxying.
192.168.88.*, *.somehost.com
This excludes both of the above ranges at once.
Command: If you are using the Telnet proxy type, the usual command required
by the firewall's Telnet server is connect, followed by a host name and a port
number. If your proxy needs a different command, you can enter an alternative
here.
In this string, you can use \n to represent a new-line, \r to represent a
carriage return, \t to represent a tab character, and \x followed by two hex
digits to represent any other character. \\ is used to encode the \ character itself.
Also, the special strings %host and %port will be replaced by the host name
and port number you want to connect to. The strings %user and %pass will be
replaced by the proxy username and password you specify. To get a literal %
sign, enter %%.
If the Telnet proxy server prompts for a username and password before
commands can be sent, you can use a command such as:
%user\n%pass\nconnect%host%port\n
This will send your username and password as the first two lines to the proxy,
followed by a command to connect to the desired host and port. Note that if you
do not include the %user or %pass tokens in the Telnet command, then the
‗Username‘ and ‗Password‘ configuration fields will be ignored.
CETerm | CE3270 | CE5250 | CEVT220 Page 54
Page 55

NAURTECH EMULATORS & WEB BROWSER FOR WINDOWS CE / WINDOWS MOBILE
IBM Options
This tab maintains all advanced configuration attributes relating to IBM (3270 or 5250)
terminal emulations.
IBM Codepage: All popular Western European and Eastern European
codepages are supported for IBM emulations. By default, only the US English
code page (IBM037) is selectable. Codepages for other languages are available
from the support section of our website. You can download a codepage from our
website for the desired language (CAB file) and install it on your device. Once
installed, you will then be able to select your language codepage from this list.
IBM codepages for popular languages are available for download from the
Support -> Knowledgebase portion of our website. If you have a need for an
unlisted code page, please contact us at support@naurtech.com
Device / LU#: The device name / LU# represents a dedicated LU name or
number on the server that you want to connect through. Device names are used
within IBM SNA world to optimize management of host connection resources. A
device name may be associated with a ―LU pool‖ or a specific LU. Device names
may also be allocated when connecting to an IBM host through an intermediate
gateway. Default is blank.
Error Row: In 5250 emulation sessions, the host application can send an error
message for display on the terminal. The host application controls the row on
which this error message is displayed. Setting this Error Row value displays the
error message on this row. Default is 0 implying no change in the row on which
the error message is displayed. Valid error row values are between 1 and 24.
CETerm | CE3270 | CE5250 | CEVT220 Page 55
Page 56

NAURTECH EMULATORS & WEB BROWSER FOR WINDOWS CE / WINDOWS MOBILE
Shift all Error Row content: Typically, a 5250 host application displays an error
message on an error row. This error message is only displayed during an actual
error. Certain legacy applications require the error row to always be displayed,
irrespective of an error message being present on it. Enabling this attribute will
force the error row to always be displayed.
Suppress Auto Field Advance: On IBM emulations (5250 and 3270), a host
application can define attributes on an input field to automatically advance the
cursor to the next field, if the existing field is full. Enabling this flag will ignore this
automatic field advance. This support is provided for compatibility with some
legacy applications.
Suppress Backspace at End: This setting applies only to terminals with a
phone style keypad running IBM emulation. Normally, when entering data using a
phone style keypad, the keyboard driver generates a Back Space following each
character that it is cycling through; To input ―B‖, you press ABC twice and the
keyboard driver generates ‗a‘, ‗BS‘ ‗b‘. When this setting is enabled, CETerm will
not Back Space if the present cursor location is at last char of an input field. This
is because cursor did not advance when the previous char was input, due to the
cursor being at the end of a field. This will allow overwriting of the last character
for phone style keypad rather than deleting a previous character.
3270 EAB: This is an optional 3270 terminal emulation parameter. If checked,
this will allocate an Enhanced Attribute Buffer. EAB support allows for advanced
display features such as color and highlighting. This attribute does not apply to
5250 host sessions.
CETerm | CE3270 | CE5250 | CEVT220 Page 56
Page 57

NAURTECH EMULATORS & WEB BROWSER FOR WINDOWS CE / WINDOWS MOBILE
VT Modes
This tab shows standard VT input and display attribute preferences.
Background: This option controls the background shade for VT host sessions.
Backspace: This option configures the backspace key to send either the Delete
character or the Backspace character.
Columns: This option specifies the number of columns for the VT host session
to be 80 or 132.
Enter Key: This option configures the Enter key to send either a carriage return
or a carriage return and line feed.
C1 Controls: This option selects 7-bit or 8-bit ASCII control sequences for the
host session.
Autowrap: Check this option to enable automatic wrapping of text once it
reaches the maximum column width.
Local Echo: Check this option to echo typed text locally on the terminal.
CETerm | CE3270 | CE5250 | CEVT220 Page 57
Page 58

NAURTECH EMULATORS & WEB BROWSER FOR WINDOWS CE / WINDOWS MOBILE
VT Options
This tab shows additional VT options including support for proprietary protocol
extensions.
Answerback Message: Host applications may query the VT terminal for a text
message answerback response. This response may be used to identify the
terminal. Configure the answerback text string as per your VT host application
requirement. Default is a Naurtech copyright message string.
Keyboard: Select the keyboard character locale for DEC multinational and
National Replacement Character set support. You can select from:
North American
British
Flemish
Canadian (French)
Danish
Finnish
German / Austrian
Dutch
Italian
Swiss (French)
Swiss (German)
Swedish
Norwegian
French / Belgian
CETerm | CE3270 | CE5250 | CEVT220 Page 58
Page 59

NAURTECH EMULATORS & WEB BROWSER FOR WINDOWS CE / WINDOWS MOBILE
Spanish
Portuguese
Canadian (English)
Default is "North American".
Send Mode: Check this option to select buffering of text prior to being sent to the
host.
Character: This is the default VT behavior. Every character is sent to
the host application as soon as it is typed. There is no local buffering.
Line buffered: When enabled, all typed characters are buffered locally
until a function key, editing key, Enter, or other non-character is typed. It
then sends the buffered keys to the host.
Local Edit (Block): This is an ANSI mode, which allows a host
application to define entry fields on a screen. All typing is stored locally
until a function key or Enter is typed. The contents of the screen are
then returned to the host, depending on the modes set by the host
application.
Both Line buffered and Local Edit modes optimize usage of network
bandwidth and host resources. However compatibility with these modes
is dependent upon the VT host applications.
Compatibility: Hardware vendors Intermec Technologies and LXE have
proprietary implementations of block mode support for VT host sessions. Check
the appropriate box for block mode compatibility.
User Preference Supplemental: This is the user preferred supplemental
character set. Default is DEC
CETerm | CE3270 | CE5250 | CEVT220 Page 59
Page 60

NAURTECH EMULATORS & WEB BROWSER FOR WINDOWS CE / WINDOWS MOBILE
VT Extensions
This tab shows proprietary extensions for international multi-byte character sets and
legacy VT extensions.
Multi-byte: This group box wraps all configuration settings for international
languages such as Chinese Traditional, Chinese Simplified, Japanese, Korean,
Thai, Hebrew, Greek and others. This support is only available for VT emulation
sessions.
Mode: This selects one of the several multi-byte modes to support single-byte
and double byte character sets. Select the type of character set encoding. You
can select from:
None: Use standard VT international character sets or National
Replacement Character (NRC) Sets.
DBCS: Double Byte Character Set. Selecting this encoding will process
double-byte characters based on the selected code page. Note that 8-bit
VT commands are illegal in DBCS mode.
SBCS: Single Byte Character Set. Selecting this encoding will process
single-byte characters based on the selected code page. Note that 8-bit
VT commands are illegal in SBCS mode.
UTF-8: Selecting this encoding will process the data stream as Unicode
in the UTF-8 encoding. Note that most 8-bit VT commands are illegal in
UTF-8 mode.
CETerm | CE3270 | CE5250 | CEVT220 Page 60
Page 61

NAURTECH EMULATORS & WEB BROWSER FOR WINDOWS CE / WINDOWS MOBILE
Code Page: When DBCS or SBCS modes are selected, this setting allows
selection of the appropriate code page. Only the code pages available on the
device will be listed. If none are available, the mode will be forced back to None.
All our emulators display international character sets using Windows CE
Font Linking. This makes it possible to link one or more fonts, called linked
fonts, to another font, called the base font. Once you link fonts, characters that
do not exist in the base font are displayed from the linked fonts. For example,
linking a Japanese font to a Latin font gives you the ability to display Japanese
characters when using a Latin font.
Font linking is typically used to enable Roman fonts to display non-Roman
characters. To extend font linking on your device, you can examine the following
registry setting to determine the mappings of linked fonts to base fonts.
HKEY_LOCAL_MACHINE\SOFTWARE\Microsoft\FontLink\SystemLink
You can add additional links by creating additional registry values:
"base font face name" = "path and file to link to," "face name of the font to link"
Example: In this example, the Japanese-specific font MSGothic is linked to the
base Tahoma font. When searching for a character, the Tahoma font is searched
first followed by the MSGothic font. This enables support for a larger variety of
characters without switching fonts.
[HKEY_LOCAL_MACHINE\SOFTWARE\Microsoft\FontLink\SystemLink]
"Tahoma"=\\Windows\\msgothic.ttc,MS PGothic
Two Column DB Characters: This setting only applies when displaying
characters requiring double byte character sets. When enabled, it forces
interpretation that the double byte character consumes two columns in screen
buffer. For some languages, this helps with character alignment.
Extensions: This group box wraps all VT protocol extensions that are proprietary
to legacy emulations. These are provided to easy migration from legacy terminals
to newer Windows CE terminals.
Symbol TNVT: Enable extensions from Symbols 3000 series and Telxon TE
such as enabling the scanner, setting fixed screen mode, reporting the IP
address, exiting the program, and sending special control characters.
Symbol CE VT: Enable extensions in Symbols VT220 CE TE, such as reporting
the MAC address, enabling the scanner, sounding tones, and setting block or
character modes.
Telxon: These are similar to the Symbol TNVT extensions.
CETerm | CE3270 | CE5250 | CEVT220 Page 61
Page 62

Display
Font
Type
Weight
Scroll Bars
Hide Vertical
Hide Horizontal
Beep Sound
Advanced
Hide / Show
Font
Hide Menu Bar
Allow Proportional Fonts
Hide Keybar
Force Proportional Characters
Hide Toolbar
Force Fixed Width Characters
Hide OIA (IBM only)
Width Factor
Hide SIP button
Lock SIP on Hide
Show Macro on Play
Show Start Bar on Exit
Colors
Scheme
Attribute
Intense
Select Color…
Cursor
Cursor Options
Full Block
Underline
Half Block
Automatic Scrolling
None
Center Cursor
Visible Cursor
Locked
Row
Col
NAURTECH EMULATORS & WEB BROWSER FOR WINDOWS CE / WINDOWS MOBILE
Display
This table below shows the hierarchy of configuration attributes for the Display related settings.
The terminal display may be configured to optimize screen real estate and readability. These
options may be configured for connected or non-connected host sessions. Hot keys are available
to toggle the options on and off.
From the application menu, Select [Session][Configure] or tap the "Configure"
button on the toolbar.
A "Configure" dialog box will come up.
Choose the "Display" tab
CETerm | CE3270 | CE5250 | CEVT220 Page 62
Page 63

NAURTECH EMULATORS & WEB BROWSER FOR WINDOWS CE / WINDOWS MOBILE
Font: This group allows configuration for a selectable font and its weight.
The font name is a fixed-width True Type font that is used to display the terminal text. To
enhance readability, you may install additional fixed-width True Type fonts on the device
by copying the associated .TTF file to the \Windows or \Windows\fonts directory.
Your font will automatically appear in this list and may be selected from this font selection
option.
NOTE: Except in special cases, only fixed pitch true type fonts will be visible in this
dropdown list. If VT emulation has proportional fonts enabled, then you will also see
proportional fonts
The font weight selects the boldness level used to display the terminal text. The following
shows the selectable options.
Default
Thin
Light
Normal
Medium
Bold
Xbold
y
HHeeaavvy
NOTE: The appearance of these weights is dependent on the selected font and the
device display resolution. In some cases, only 2 or 3 different weights can be seen.
CETerm | CE3270 | CE5250 | CEVT220 Page 63
Page 64

vv
Volume
is the volume of the beep. The range is 00-10 where 0 is
off and 10 is loudest.
FFF
Frequency
is frequency in 10 Hertz units. A value of 200 is 2000
Hertz, 300 is 3000 Hertz.
ttt
Time
is the length of the beep in 10ms units. A value of 050 is
½ second. 100 is one second.
NAURTECH EMULATORS & WEB BROWSER FOR WINDOWS CE / WINDOWS MOBILE
Scroll Bars: This group of attributes configures hide and show settings for the horizontal
and vertical scroll bars.
Hide Vertical: Checking this box will hide the vertical scroll bar. Pressing the
hotkey [Ctrl][Shift][V] or the toolbar button will alternate between the
hide and visible states.
Hide Horiz : Checking this box will hide the horizontal scroll bar. Pressing the
hotkey [Ctrl][Shift][H] or the toolbar button will alternate between the
hide and visible states.
NOTE: For Web Browser sessions, the visibility of scroll bars may be overridden
by the HTML page contents. Also, changes to these settings may not take effect
until the next page is loaded.
Beep Sound: This is an optional beep sound configuration. It controls the sound of the
standard terminal bell or beep. For devices that support .wav files, you can enter any
.wav file available in the standard sound locations on the device. For devices that
support tone generators, you can specify a custom tone. The custom tone has the
following format:
vvFFFttt or vvFFFtttvvFFFttt or vvFFFtttvvFFFtttvvFFFttt, etc.
where
An example of the setting can be 05300100. This will play a one second beep of 3000 Hz
at half volume. Don't forget the leading zeros.
Advanced: This button opens an advanced display configuration dialogs.
Hide / Show
This tab holds attributes to control the visibility of various application and display
widgets.
Hide All Bars: This configuration option is only available on Windows CE OS
platform devices. Since the toolbar and keybar are part of the application menu,
on Windows CE devices, enabling this option hides all three.
All Bars at Bottom: Checking this box will move the menu to the bottom of the
screen. Pressing the hotkey [Ctrl][Shift][B] will alternate the location
between the top and bottom of the screen. This option is only available for
CETerm | CE3270 | CE5250 | CEVT220 Page 64
Page 65

NAURTECH EMULATORS & WEB BROWSER FOR WINDOWS CE / WINDOWS MOBILE
Windows CE OS platform devices. It is not available on terminals running
Windows Mobile OS.
Hide Menu Bar: Checking this box will hide the application menu. This is the
main application menu with [File][Session][Display] options.
Hide Keybar: Checking this box will hide the configurable Keybar. The Keybar is
a set of configurable buttons that can be associated with application operations.
Hide Toolbar: Checking this box will hide the application toolbar. The toolbar is
the main application toolbar.
NOTE: Hiding the application Menu, Toolbar and Keybar will give you additional
rows of screen real estate and assist in locking down the device.
Hide OIA (IBM Only): Checking this box will toggle hiding of the OIA or the
Operator Information Area. This option applies only to IBM 3270 and 5250
emulations. Pressing the hotkey[Ctrl][Shift][O] will alternate between the
hide and visible states.
Hide SIP Button : This configuration setting is only available for Windows Mobile
OS platform devices. Checking this box will hide Windows Mobile SIP (Soft Input
Panel) button.
Lock SIP on Hide: Checking this box will cause the SIP (Soft Input Panel) to be
locked down when closed. This configuration setting is only available for
Windows Mobile OS platform devices.
CETerm | CE3270 | CE5250 | CEVT220 Page 65
Page 66

NAURTECH EMULATORS & WEB BROWSER FOR WINDOWS CE / WINDOWS MOBILE
Disable Browser Auto-SIP: On Windows CE platform terminals, when running
web browser sessions, the Soft Input Panel (SIP) automatically pops up if the
cursor input focus is in an input text box. This may not necessarily be the desired
behavior for your web application. Enabling this setting prevents the SIP from
popping up when focus set to text box in Windows CE browser.
Auto-Fit to Browser Screen: The underlying Web Browser capabilities between
Windows CE and Windows Mobile OS platforms are different. When enabled,
this setting turns on auto-fit formatting for Windows CE Browser as is available
on Windows Mobile Browser. The Web Browser will try to display the page in one
column with no horizontal scroll.
Display Browser Errors: When enabled, this setting will allow display of
JavaScript errors on web pages when displayed in a Browser session on a
Windows CE OS platform terminal. For equivalent functionality on a Windows
Mobile terminal, you need to manually set a registry value.
Show Macro on Play : By default, the macro toolbar bar is not visible when a
macro is being played back. Checking this option will make the macro toolbar
visible during playback.
NOTE: It may be necessary to make the macro toolbar visible so that CETerm
receives application focus to ensure the ―played back‖ keystrokes are sent to
CETerm.
If you run an auto-login macro and do not get focus back to your application, you
should enable this flag. Doing so will ensure you receive focus back in CETerm
Show Start Bar on Exit: Normally, CETerm restores the state of the Start Bar to
however it was found when it was launched. Enabling this setting forces the Start
Bar to be made visible if the user exits our application, ignoring the original state
of the Start Bar.
CETerm | CE3270 | CE5250 | CEVT220 Page 66
Page 67

Traditional
The traditional IBM terminal "green screen" color scheme
Black on White
Used primarily on devices with non-color LCD displays
White on Black
Inverse of Black on White
Factory
Scheme optimized for factory lighting and color displays
Custom
User configurable scheme
VT Attribute
IBM Attribute
Normal
Unprotected
Bold
Intense version of Unprotected
Blinking
Protected
Blinking and Bold
Intense version of Protected
NAURTECH EMULATORS & WEB BROWSER FOR WINDOWS CE / WINDOWS MOBILE
Colors
Windows CE devices are available with a wide variety of display screens (LCD, Color,
Active Matrix etc.). We provide predefined color schemes to enhance readability of the
terminal text on the device. In addition to the predefined color schemes, a "Custom" color
scheme is provided. The Custom scheme may be configured to suit the user's
preferences.
Scheme: To select a predefined color scheme, choose one from the "Scheme"
drop down box. The sample box will change to reflect the current selected
attribute foreground and background colors. The following pre-defined color
schemes are available.
Attribute: This lists display attributes for which colors may be changed as part of
creating a "Custom" color scheme. Under VT emulation, the attributes
correspond as follows.
CETerm | CE3270 | CE5250 | CEVT220 Page 67
Page 68

NAURTECH EMULATORS & WEB BROWSER FOR WINDOWS CE / WINDOWS MOBILE
Select Color: This button invokes the "Color" dialog to select a color for an
attribute
Intense: This check box, when selected, applies the custom color to the
"intense" version of the selected attribute. This option applies to 3270 and VT
emulations.
Sample Attribute: This is a sample box that shows the foreground and
background color of the currently selected attribute. To create a custom color
scheme, select the attribute from the attribute list box.
Choose the attribute, whose color is to be changed
Tap the Select Color... button.
You will see a "Color" dialog.
Select the desired color for the attribute. Press OK
The Sample box will change to reflect the newly selected color.
For updating colors associated with the "Intense" mode of an attribute,
check the "Intense" box then select the desired color.
Cursor
Cursor options are provided for easy identification of input fields. They also allow
automatic scrolling to make the row and column for the current cursor position visible.
CETerm | CE3270 | CE5250 | CEVT220 Page 68
Page 69

NAURTECH EMULATORS & WEB BROWSER FOR WINDOWS CE / WINDOWS MOBILE
You may configure cursor type and auto-scrolling options for the terminal.
Cursor Options: This option allows you to change the cursor appearance. Three
options are available:
Full Block: The cursor appears as a full character block ( █ )
Half Block: The cursor appears as a bottom half block ( ▄ )
Underline: The cursor appears as an underscore line ( ▬ )
Automatic Scrolling: This option enables automatic scrolling so the current
cursor position is always visible. This option is particularly helpful on devices with
small screens. The following auto-scrolling options are available
None: No automatic scrolling is preferred.
Center Cursor: In this mode the cursor is always as close as possible to
the center of the screen. When scrolling limits are reached, the cursor
will move toward the edge of the terminal display.
Visible Cursor: In this mode the cursor is always visible. The display is
scrolled vertically and horizontally to prevent the cursor from moving out
of view.
Locked: In this mode you can specify a starting row and column position
at which to lock the cursor. This would force every new screen to
automatically start its top left edge at the specified row and column
position.
Col: This is column number for the top left position of display. It
is applicable only with the ―Locked‖ scrolling option
Row: This is row number for the top left position of display. It is
applicable only with the ―Locked‖ scrolling option
NOTE: Only the starting position is locked. The user can still use scroll
bars, touch stylus, buttons, and remapped keys to scroll the screen. If
no scrolling is desired, you must hide or unmap these other controls.
CETerm | CE3270 | CE5250 | CEVT220 Page 69
Page 70

NAURTECH EMULATORS & WEB BROWSER FOR WINDOWS CE / WINDOWS MOBILE
Font
This tab holds advanced font settings for enhanced readability and international language
character glyphs.
Allow Proportional Fonts: Traditionally, only fixed pitch fonts have been used
with terminal emulation. This option, when enabled, will allow proportional fonts
in the font selection box. Some Asian language fonts are only available with
proportional spacing. Usually, the Asian fonts are ―linked‖ to the Tahoma font,
which is also proportional. To display all characters, this box can be checked
and the Tahoma font selected. Proportional fonts can also be used to improve
readability of the display if the host application does not require column
alignment of the screen (see Force Fixed Width Characters).
Force Proportional Characters: This option is enabled to force the display to
draw with proportional spacing even when the selected font is fixed pitch. This
setting may be required when a proportional Asian font is linked to a fixed pitch
font such as Courier New and Courier New is the selected font. This setting
overrides ―Force Fixed Width Characters‖.
Force Fixed Width Characters: This option will force the display to draw
proportional fonts with a fixed width spacing. This can result in irregular displays
where the narrow characters (e.g., 'i') appear scrunched to the left of their "cell"
and the wide characters (e.g., 'm') to overlap their neighbors on the right. This
setting is used to force a display into traditional column alignment and may be
needed with host applications that display tables or character based graphics.
CETerm | CE3270 | CE5250 | CEVT220 Page 70
Page 71

Printer
Serial
Network (WLAN)
Network Printer
Print Queue
Serial Config
Serial Port Config
COM Port
Baud Rate
Data Bits
Parity
Stop Bits
Timeout
DTR Control
RTS Control
CTS Out
DSR Out
XOnOff Xmit
XOnOff Recv.
Bluetooth Discovery
NAURTECH EMULATORS & WEB BROWSER FOR WINDOWS CE / WINDOWS MOBILE
When forcing to fixed width, a "nominal" width must be computed for the font and
it is narrower than the widest characters. The next parameter can be used to
spread out the characters.
Width Factor: This applies to a factor to the "nominal" width used when
forcing proportional fonts to fixed width. A value of 100 is 100% of the
"nominal" width. Values larger than 100 spread out the characters and
values smaller than 100 squeeze them together. You may use "Force
Fixed Width" and the "Width Factor" with fixed-pitch fonts to get more
readable displays.
Printer
This table shows the hierarchy of settings for configuration a tethered or networked printer.
Host applications may print to serial, IrDA, Bluetooth or 802.11B network attached printers. You
can configure the printer from the "Printer" options tab.
CETerm | CE3270 | CE5250 | CEVT220 Page 71
Page 72

Name of the print queue
on the network
Shows Serial printer
connection settings
Shows Network
printer configuration
settings
Discover BT printers
NAURTECH EMULATORS & WEB BROWSER FOR WINDOWS CE / WINDOWS MOBILE
Printer Connection: Select the type of connection used to access the printer. This may be
serial or a Network connection.
Serial: Select this button for printers attached via a serial port, IrDA or Bluetooth
protocols
Network (WLAN): Select this button to print to a Windows print queue or directly to a
network attached printer.
Serial Config
This button opens a serial port configuration dialog.
CETerm | CE3270 | CE5250 | CEVT220 Page 72
Page 73

NAURTECH EMULATORS & WEB BROWSER FOR WINDOWS CE / WINDOWS MOBILE
COM Port: This is the serial communications port to which the printer is attached.
Choices depend on the device. Users may select from COM, IrDA, Bluetooth, None, or
one of the Virtual COM (VCOM0 - 9) ports. The default value varies with the hardware
device. The None value can be selected to act as a ―sink‖. Printing to the None device
will always succeed. For printing to an infrared printer, select IrDA port. If IrDA is
selected, all settings except Timeout are ignored. Use the VCOMx ports for custom
connections such as virtual Bluetooth ports.
Baud Rate: The baud rate at which the communication device operates. It varies from
110 to 256K bits per second. Default is 9600.
Data Bits: The number of bits in the bytes transmitted and received. Default is 8.
The number of bits in the bytes transmitted and received. Default is 8.
Parity: The parity scheme to be used to communicate with the printer device. Default is
"None".
Stop Bits: The number of stop bits to be used. Default is 1.
Timeout: The amount of time to wait prior to aborting a connection if the printer is not
responding.
DTR Control: The DTR (data-terminal-ready) flow control. Default is "Disable".
RTS Control: The RTS (request-to-send) flow control. Default is "Disable"
CTS Out: The CTS (clear-to-send) signal monitoring for output flow control. If box is
checked and CTS is turned off, output is suspended until CTS is asserted again.
DSR Out: The DSR (data-set-ready) signal monitoring for output flow control. If this
member is TRUE and DSR is turned off, output is suspended until DSR is asserted again
XOnOff Xmit: When checked, use XON/XOFF flow control during transmission.
XOnOff Recv: When checked, use XON/XOFF flow control during reception.
Bluetooth Discovery
This button triggers the automatic discovery of Bluetooth devices (printers). It requires the
COM Port setting under Serial Port configuration to be ―BT Printer‖ or ―BT COM‖. A list of
discovered Bluetooth devices is provided in a selection list. Select your Bluetooth printer from
the list.
Network Printer
Configuration settings for a network printer
Print Queue: This is the Windows print queue name or the hostname of a printer.
CETerm | CE3270 | CE5250 | CEVT220 Page 73
Page 74

Name or IP
address of the
print server
NAURTECH EMULATORS & WEB BROWSER FOR WINDOWS CE / WINDOWS MOBILE
The Windows print queue uses Windows print protocols and assumes that the queue is
available on the network. You may be prompted for username and password if the print
queue is secured. Also, you should receive notification when the print job completes.
The print queue uses the following naming convention:
\\MyPrintServerName\PrintQueueName
\\192.168.1.223\PrintQueueName
To print directly to a network connected printer, enter the hostname or IP address of the
printer. By default this will connect to port 6101 and send all print content directly to this
port. Optionally, you can specify a different port.
The hostname uses the following naming convention:
hostname:port
where hostname is either a symbolic name or an IP address and port is a number.
CETerm | CE3270 | CE5250 | CEVT220 Page 74
Page 75

Options
Extended Commands
Configure Scripting
Port
General
Enable
Enable
Re-Initialize
Config Keybars & Keys
Script Timeout (sec)
Select Keymap
Show Script Errors
Keymap Type
Allow File / Registry Read
Session
Allow File Registry Write
Emulation
Allow Program Launch
Include Common Map
Scripts
Disable Windows Action Keys
Table of Script Slots
Device specific settings
Edit
Script Editor
Edit Keymap
Load At Startup
Keymap
Template
New
Test / Load
Edit
Import
Delete
Export
Reset Map to Default
Advanced
Access
User Text
Hide Start Bar
Edit
Hide Start Menu
Load From File
Disable App Exit
Set Password
Keybar Cycle
Info Items
Select Keybars
Info Item Selection
Add to Above
Update
Delete
Interval
Alert
Custom Bar
Level
Select Custom bar
Screen Display
Add to Above
Enabled
Delete
Allow Drag
Select from List of Actions
Type
Enable Custom Context Menu
X, Y
Manage
App Keys
Serial #
Remap Application Keys
MAC
Key
Server URL
Select Key Action
Touch
Enable Touch Features
Double Tab Enter
Horizontal Panning
Vertical Panning
Cursor Positioning
Function Key Hotspots
Menu Item Hotspots
IBM Hotspots
VT Hotspots
NAURTECH EMULATORS & WEB BROWSER FOR WINDOWS CE / WINDOWS MOBILE
Options
The diagram below shows the hierarchy of configuration attributes for the Options tab.
CETerm | CE3270 | CE5250 | CEVT220 Page 75
Page 76

NAURTECH EMULATORS & WEB BROWSER FOR WINDOWS CE / WINDOWS MOBILE
The Options tab includes configuration for key remapping, Scripting, device access control,
Indicators, Automatic licensing and touch screen features.
All key remapping is configured right on the device. Configuration dialogs are accessible through
the ―Configure Keybars and Keys…‖ button. Custom remapping DLLs were supported until
version 4.1. These have been obsolete by on device dynamic key remapping. Custom remapping
DLLs are no longer supported.
With version 5.5, the Scripting capability has been enhanced significantly. You can import, edit,
test and run scripts right on the device. Scripts provide a powerful mechanism to automate
workflows. All scripting is configuration is accessible through the ―Configure Scripting‖ button. We
provide a separate Scripting Guide Manual which describes the CETerm Scripting capability in
detail.
Intermec Extended Commands: This setting is part of the ―Legacy Support‖. It
enables proprietary extensions from Intermec for controlling peripheral devices.
"Extended Commands" are extensions to the terminal emulation protocol data
stream (3270, 5250 or VT) that allow host applications to control serial printers,
card readers etc. All our emulators support Extended Commands for bidirectional communication with peripherals such as Serial printers and Magnetic
Card Readers for all three terminal emulations.
Port: Intermec Extended Commands are sent to this port to access and control
peripheral devices.
Enable: Checking this box will enable support for Intermec Extended commands
Configure KeyBars and Keys:
This button invokes tabs for key remapping and Custom Keybar configuration.
CETerm | CE3270 | CE5250 | CEVT220 Page 76
Page 77

Device specific key
remap setting
Windows Mobile OS
platform specific key
control
NAURTECH EMULATORS & WEB BROWSER FOR WINDOWS CE / WINDOWS MOBILE
Configure Scripting: This button invokes tabs for configuration tabs for all
Scripting related settings.
Advanced: This button invokes tabs for access control and touch screen
attributes.
Configure KeyBars and Keys
The ―Config KeyBars and Keys…‖ button is used to remap device hardware keys,
configure custom KeyBars and associate device application keys with operations (only on
Windows Mobile terminals)
NOTE: For better usability, with version 5.5, the tab order under ―Configure KeyBars and
Keys‖ has been changed. The ―KeyBar Cycle‖, ―Custom Bar‖ and ―App Keys‖ tabs have
been moved towards the end.
Select Keymap
A ―Keymap‖ is a collection of remap bindings which associate keys with corresponding
actions. Most hardware keys can be remapped to perform any action such as simulating
a function key, entering a string of text, sending a custom VT escape sequence or
running a Script. Keys that control screen brightness, sound volumes, and other Windows
CE actions, often cannot be remapped. The two main steps for key remapping are
selecting the type of Keymap to use, and editing the Keymap.
NOTE: Certain settings which are specific to the Operating System platform or to the
device are only visible in the device tailored versions of CETerm for that OS and / or
device.
CETerm | CE3270 | CE5250 | CEVT220 Page 77
Page 78

NAURTECH EMULATORS & WEB BROWSER FOR WINDOWS CE / WINDOWS MOBILE
Select Keymap Type: Selects ―how‖ the configured Keymap will apply to
connected host sessions. The available choices are:
Session: The key remapping is associated with this host session only
(say S1, if S1 is being configured). When you choose this selection, the
key remap bindings will not be available in another session (say S2 or S3
etc). The will only be active for the configured session.
Emulation: The key remapping is associated with a particular type of
emulation or host connection; such as 3270, 5250, VT or HTML. This
Keymap can be shared with other host sessions running the same host
type connection. As an example, if sessions S1 and S3 are configured
for 5250 emulations and S2 is configured for a Web Browser session,
then all 5250 Keymap configurations will be available to all 5250
sessions (S1 and S3). These will not be available to session S2 as it is
not a 5250 emulation session.
NOTE: The external key remap, where the key remap bindings are
loaded as part of a separate DLL, is no longer supported.
Include Common Map: CETerm provides a predefined set of key remap
bindings which are common to all sessions by default. When checked, the
Common keymap will be added to the session or emulation keymap. You can
also modify the Common keymap binding separately.
Device Specific Key remap configurations: Certain devices, like the
Honeywell (Hand Held Products) Dolphin series and the Compsee MAT
terminals may have device specific key remap bindings which can be loaded.
These key remaps are based on popular legacy overlays for various emulations.
You can enable inclusion of these key remaps using the device specific
configuration attributes.
These settings will only be visible when running the device tailored versions of
CETerm on applicable devices.
Disable Windows Action Keys: The Windows Mobile Operating System
includes an OS Shell to manage its special user interface. For devices running
Windows Mobile, the OS shell intercepts certain function keys like the F6 and F7
for volume up / down controls thus preventing their use in any application (like
CETerm). By enabling this setting, CETerm prevents the OS Shell from
intercepting these keys.
This setting is specific to the OS platform and is only visible in CETerm running
on Windows Mobile platform devices.
Edit Keymap
You can add, modify and remove key remap bindings using this configuration tab. The
current bindings for the default selected Keymap are visible in the table.
CETerm | CE3270 | CE5250 | CEVT220 Page 78
Page 79

Select the Keymap that you want to create
or update
This is the remapping
table. It displays the
present key remap
bindings associated
with the selected
Keymap
Flags: These are the
modifier / state keys
which must be pressed
along with the hardware
key being remapped
Key: These keys are
being remapped
Action: This is the new
action operation, which the
remapped key will now invoke
NAURTECH EMULATORS & WEB BROWSER FOR WINDOWS CE / WINDOWS MOBILE
Keymap: Select the Keymap you wish to edit. You may select the session
specific map for the current session (Session #), an emulation Keymap (3270,
5250, HTML, or VT), the Base Keymap, or the Common Keymap. When you
select the Keymap which you want to configure, the table is automatically
populated with existing configured bindings for that Keymap.
Key: This column shows the ASCII character or "Virtual Key" symbol for the
remapped physical key. If a symbol is not available, the key may be shown as a
hexadecimal value.
Flags: This column shows the type of key and any modifier keys, which
represent the key combination for this binding. The physical key along with the
configured modifier key must be pressed to invoke this Keymap.
V indicates a Virtual Key.
A indicates "Alt" is pressed with the key.
C indicates "Ctrl" is pressed with the key.
S indicates "Shift" is pressed with the key.
As an example, the third entry in the table of the image above shows a key
combination of (C)ontrol + (S)hift + C for a session ―Connect‖ action.
CETerm | CE3270 | CE5250 | CEVT220 Page 79
NOTE: If you have Meta Keys configured, you may see additional state key
options.
Action: This column shows the action that the key remapping invokes. If the key
is associated to invoke a "Text #" action, the current text is shown.
Page 80

NAURTECH EMULATORS & WEB BROWSER FOR WINDOWS CE / WINDOWS MOBILE
New: This button opens a New Key dialog to add a new key remap binding to
the selected Keymap. Make sure that you have correctly selected the Keymap to
which you want to add a new binding.
Edit: This button allows modification of the highlighted key binding from the list.
Tapping this button will open an Edit Key dialog. Alternatively you may doubletap the entry in the list to modify it.
Delete: Pressing this button will delete the current highlighted key remapping
from the list.
Restore Map to Default: Tap this button to reset the current map to the default
contents.
NOTE: If you have enabled device specific key remaps to be included under the
―Select Keymap‖ tab, you must tap ―Restore Map to Default‖ button to include the
default key remap bindings for the selected emulation. You will see the table
being populated with the new key remap bindings for that emulation.
The same is true if you are disabling the use of device specific key remap
bindings.
New / Edit Key Dialog This dialog is used to edit existing Keymap bindings and add new
ones. If a new or edited Keymap binding conflicts with an existing binding, you will be
given a choice to apply or reject the new binding. Note that this dialog may vary in its
configuration attributes depending upon specific device tailored versions of CETerm,
which may include default key remap bindings for legacy support.
ASCII: When creating new keys, always use the "Virtual Key" (VK) mode unless
the VK code cannot be determined. VK codes may not be known usually for
non-standard hardware keys. If you know that the key you want to remap
generates an ASCII character but you cannot determine the VK code, then use
the "ASCII" mode and enter the character that is generated. Enter the desired
character in the box below.
CETerm | CE3270 | CE5250 | CEVT220 Page 80
Page 81

NAURTECH EMULATORS & WEB BROWSER FOR WINDOWS CE / WINDOWS MOBILE
VK Code: Use the VK code for this key remap binding. Select the virtual key
from the dropdown list or enter a hexadecimal value in the form "0x5a".
Trap: This is a new feature added in version 5.5. If you are not sure about the
VK code associated with a physical key (or key combination) which you would
like to remap, simply tap this button. CETerm will then monitor the next key (or
key combination) you press and automatically enter the associated VK code for
that key (or key combination). This feature helps you ensure that you are
remapping the correct VK code associated with the physical key.
We recommend always using the Trap button to let CETerm determine the VK
code of the physical key that you want to remap.
Alt: If checked, "Alt" must be pressed with the key for this key remap.
Shift: If checked, "Shift" must be pressed with the key for this key remap.
Ctrl: If checked, "Ctrl" must be pressed with the key for this key remap.
!ASC - This option is only available for Meta key configuration. It means "Ignore
Alt, Shift and Control" states. When checked, the Meta key will be effective
regardless of the Alt, Shift, or Control states. Usually this option is checked to
allow the most flexible key combinations.
Toggle - This option is only available for Meta key configuration. When enabled
the Meta key will "toggle its state" each time the key is pressed. Otherwise, the
state is set when pressed and cleared when the key is released. Usually, this
option is checked.
NOTE: Some keyboards require the "key up" action of a key before another key
can be pressed. For these keyboards, the "toggle" option *must* be checked,
otherwise no other key can ever "see" the Meta state.
One-shot - This option is only available for Meta key configuration. Enabling this
setting will force the Meta key state to reset after the next key is pressed,
whether or not the next key was part of a Meta key translation. If this option is
unchecked, the Meta state remains set until the Meta key is pressed again.
Usually, this option is checked.
Action: Select the desired action from the list. This is the action that the key will
be remapped to.
Text: This edit field is visible only if a "Text #" action is selected. You may edit
the associated text directly. It can include an IDA code (see Appendix), a Script,
an escape sequence or simple ASCII user string.
CETerm | CE3270 | CE5250 | CEVT220 Page 81
Page 82

NAURTECH EMULATORS & WEB BROWSER FOR WINDOWS CE / WINDOWS MOBILE
User Text
All user text strings may be edited via this tab. Text strings may contain special escape
sequences for VT or sequences of actions:
\r - return
\t - tab
\e - ESC for VT sequences
\x5a - hexadecimal value
\IDA_action\ - invoke action
NOTE: The \IDA_action\ text is a standard invented and used by Naurtech. This allows
users to invoke almost any application operation or event. Please refer to the Appendix to
lookup a specific IDA_action code.
Edit: Highlight a user text entry in the list and tap this button to open the edit
mode. Alternatively you may tap (not double-tap) the entry a second time to open
the edit mode. Once opened, enter the user text desired. The images above
show some samples.
Load from File: Tap this button to select a text file from which you can load user
text entries. The text file can have up to 64 entries. Each entry, delimited by a
CRLF, is imported into a separate user text slot.
The file replaces the current text contents that may already be present in the
table.
CETerm | CE3270 | CE5250 | CEVT220 Page 82
Page 83

Order in which the KeyBars will
"cycle". Can include pre-defined
KeyBars and Custom KeyBars
This is the complete list of
available KeyBars. You can
select from these predefined
KeyBars
NAURTECH EMULATORS & WEB BROWSER FOR WINDOWS CE / WINDOWS MOBILE
Keybar Cycle
A KeyBar configuration consists of both the KeyBar Cycle and any Custom or template
KeyBars. A KeyBar is a set of soft button keys visible at one time. The KeyBar Cycle is a
collection of KeyBars that can be visible. The user "cycles" through the collection of
KeyBars by tapping the arrow buttons on either end of the current KeyBar. Each key on
the KeyBar is associated with a host or emulator operation. Users are allowed a
maximum of eighteen KeyBars, six of which can be customized. The same KeyBar may
be added multiple times to the KeyBar Cycle.
Add to Above: Tapping this button will add the highlighted KeyBar from the
bottom listbox to the top (selected) list of KeyBars. Users will be able to cycle
through only the selected KeyBars in the application. A KeyBar which has
already been added to the selected list cannot be added again.
Delete: This button removes the highlighted Keybar from the selected list of
KeyBars (top listbox)
Custom Bar
If a Custom KeyBar (―Custom Keys 1‖ through ―Custom Keys 6‖) is selected in the
KeyBar Cycle, it can be configured by tapping the "Custom Bar" tab.
CETerm | CE3270 | CE5250 | CEVT220 Page 83
Page 84

Select the Custom KeyBar
This is a list of keys that will
appear on the Custom
KeyBar Cycle. The order of
keys in this list dictates the
order of appearance on the
Custom KeyBar
This is a list of all the
available ―action‖ keys and
operations, which can be
selected. A "Separator"
places a vertical separation
line. The "Empty" key leaves
an empty space on the
KeyBar.
NAURTECH EMULATORS & WEB BROWSER FOR WINDOWS CE / WINDOWS MOBILE
Select Custom KeyBar: Select the ―Custom Keys N‖ Custom KeyBar for which
you would like to configure the keys. This is a dropdown list with all the available
Custom KeyBars.
Add to Above: Tapping this button will add the highlighted key from the bottom
listbox to the top (selected) list of KeyBar keys.
Delete: This button removes the highlighted Keybar key from the selected list of
keys (top listbox)
Enable Custom Context Menu: The keys on ―Custom Keys 6‖ KeyBar can also
appear on the Context Menu. Enable this checkbox to enable the context menu,
which may be invoked by tapping and holding the stylus anywhere in the terminal
display area. Any operation configured in Custom Keys 6 will appear on this
context menu. This option does not work for any other Custom Bars other than
―Custom Keys 6‖/
You can add up to a total of 9 key buttons on each Custom Bar (Fewer on some
devices). The entry for "Previous KeyBar" cannot be removed and must exist in each
KeyBar to allow for "cycling" between KeyBars. Typically, the last key should be ―Next
KeyBar‖ for cycling to the next KeyBar.
CETerm | CE3270 | CE5250 | CEVT220 Page 84
One powerful capability of the KeyBar is the ability to associate keys with User Text and
Scripts. Key entries "Text 1" through "Text 20" or ―Script 1‖ through ―Script 20‖ may be
associated with KeyBar keys as well. The ―x‖ in Text x or Script x corresponds to the
respective User Text or Script slot. Thus if you have a text string configured in the User
Text, this string can be submitted to the host application by tapping on the "Text X" key in
a Custom KeyBar.
Page 85

NAURTECH EMULATORS & WEB BROWSER FOR WINDOWS CE / WINDOWS MOBILE
Tapping this key will send the complete text string to the current cursor location. For VT
terminal sessions, escape sequences can be added to the User Text string. This allows
users to configure custom escape sequences as required by their host applications.
Escape sequences can be entered into the User Text in the following format:
\e = Escape
\n = Newline
\r = Enter or Return
\t = Tab
\xDD = Hexadecimal value
Scripts loaded in specific script slots (Script x) can be associated with a Custom KeyBar
button.
App Keys
Windows Mobile devices have hardware buttons that launch
specific applications. These ―Application Keys‖ are typically
configured using an applet in the Control Panel. You can re-
map these keys to invoke emulator or host operations. The
App Keys dialog is used to configure the Application button
remapping.
NOTE: This functionality is only associated with Windows
Mobile platform devices.
NOTE: If ―Record‖ is one of the default application key
actions, you may need to change it in
[Start][Settings][Buttons] so that the application
keys can be remapped
Remap Application Keys: Checking this box will allow remapping of the
application keys
Key: This is a list of the all the hardware application keys available on the device.
This list will vary depending on the device. Select the Application key that you
would like to remap.
Select key action below: This is a list of actions and operations that you can
associate with the Application Key selected above. After selecting the Key to
remap, select the desired action. Only one action may be associated with a Key.
Configure Scripting
The ―Configure Scripting…‖ button is used to create, import, edit, test and associate scripts. The
Scripting capability in CETerm provides a platform to automate workflows with powerful
JavaScript scripting and Workflow automation objects. It provides a "solutions platform" to
automate and customize business tasks.
CETerm | CE3270 | CE5250 | CEVT220 Page 85
Page 86

NAURTECH EMULATORS & WEB BROWSER FOR WINDOWS CE / WINDOWS MOBILE
Scripts can be launched by button or key presses, or triggered by events such as specific host
data detected on the screen or successful barcode scanner input. Scripts can be edited and
tested directly on the device. Scripts can also interact with the Web Browser and native
JavaScript. A script can be as simple as an automated login or as complex as reformatting a TE
session with a Web Browser interface to improve productivity.
General Settings
The General tab maintains settings for enabling, running, permissions and testing scripts. All
settings on this tab apply to all scripts configured in the Scripts tab.
Enable: This is the main setting to enable or disable the scripting capability. This
checkbox should be set for the Scripting engine to be loaded and initialized inside
CETerm. The default value is unchecked.
Re-Initialize: This button can be used if you have made changes to the permissions or
your scripts and you wish to re-load these changes. The re-initialization does not take
place until the dialog is closed.
Script Timeout: This setting is provided to limit the duration of script execution. This
limit is useful when developing new scripts and as a safeguard against a script with an
―infinite loop‖. A value of 0 will disable the timeout. During execution, a script can modify
the timeout value and reset the timer to allow additional execution time. The default value
is 300 seconds; a little over 3 minutes.
Show Script Errors: Enable this checkbox if you want CETerm to display errors if these
are encountered in testing your scripts. Only syntax errors are detected.
Allow File/Registry Read: Enable this checkbox if you want to allow scripts running in
CETerm to have the ability to read data from the device registry.
CETerm | CE3270 | CE5250 | CEVT220 Page 86
Page 87

NAURTECH EMULATORS & WEB BROWSER FOR WINDOWS CE / WINDOWS MOBILE
Allow File/Registry Write: Enable this checkbox if you want to allow scripts running in
CETerm to have the ability to write and modify data in the device registry.
Allow Program Launch: Enable this checkbox if you want scripts running in CETerm to
have the capability to launch external programs.
Editing Scripts
Scripts are edited on the Scripts tab. There are 64 script slots. The size of the script in each slot
is limited to about 260,000 characters (about one-half megabyte under Windows CE). Scripts
can also be loaded dynamically from files. A script slot will usually contain function definitions,
which will be loaded into the engine, or executable statements such as function calls which may
be bound to a key, toolbar, or menu.
After selecting a script slot and tapping the Edit button, an Edit Script dialog will appear.
The edit dialog allows Import and Export of scripts. For initial script development it may
be easier to edit on your desktop PC, copy the script to the device, and Import the script.
Smaller changes are easily made on the device.
CETerm | CE3270 | CE5250 | CEVT220 Page 87
Page 88

NAURTECH EMULATORS & WEB BROWSER FOR WINDOWS CE / WINDOWS MOBILE
The checkbox Load at Startup should be checked for all scripts that contain function
definitions that you want to have available in the script engine. The checkbox should not
be checked for slots that contain scripts that are bound to keys or other activations.
Load at Startup should be checked for all event handler definitions. All scripts with
Load at Startup will be loaded into the script engine when it starts with CETerm startup,
or when Re-Initialize has been pressed on the General tab.
After importing or editing a script, you may want to tap the Test/Load button. If the script
engine was previously enabled, the script will be executed. If the current script is a
function definition, it will be checked for correct syntax and will be made available to the
script engine. If the current script contains executable statements or is a function call, it
will simulate activating the script. In general, you do not want to use Test/Load for
executable statements.
Remember to tap Test/Load or Re-Initialize (with Load at Startup checked) after
making changes to a script, if you want those changes loaded into the script engine.
Also, Test/Load will not work if you have just checked Enable but not yet accepted the
configuration changes.
The Template button displays a list of script templates which correspond to the scripting
event handlers. Select a template and tap OK to have it replace the current contents of
the script being edited. The template scripts show some of the ways to use CETerm
Automation Objects.
Detailed configuration and programming for Scripting is covered in detail in the Naurtech
CETerm Scripting Guide, which is available from our website.
Access
The following configuration tab is invoked from the Advanced button. It maintains all settings for
configuration Access control and Operating System lockout.
CETerm | CE3270 | CE5250 | CEVT220 Page 88
Page 89

NAURTECH EMULATORS & WEB BROWSER FOR WINDOWS CE / WINDOWS MOBILE
Hide Start Bar: When checked, the Windows CE or Windows Mobile ―Start‖ bar will
be hidden. This option prevents users from launching other applications on the
device. For Windows Mobile platform devices, it also removes the smart minimize
control (little ―x‖ on the top right of the Start bar which may be used to ―close‖ the
application) and allows the terminal screen to occupy the full display area of the
device. This also provides an additional row, which may be used by the terminal
display.
Hide Start Menu / Disable Start Menu: When checked, the ―Start‖ button will be
hidden (for Windows Mobile devices) or disabled (for Windows CE devices). The
Start bar however will still be present. This setting prevents users from launching
other applications yet provides the visual status controls (volume, WLAN, battery,
clock, etc) on the Start bar.
Disable App Exit: When checked, this option disables the application exit button.
This prevents the users from exiting out of our application.
Exit Now: This button is enabled only when the ―Disable App Exit‖ option is checked.
It allows the administrator to save the configuration and exit when ―Disable App Exit‖
is checked. Typical use would be for an administrator to set all configuration settings
including a configuration access control password and exit the application using this
button. Subsequently, users will not be able to exit the application and a password
will be required to access the configuration options.
Set Password: This button prompts the user for a configuration password. When set,
users are prompted for this password prior to viewing or modifying the session
configuration. This capability prevents users from changing the configuration settings
in controlled environments.
Windows Mobile Windows CE
NOTE: To remove the password, clear the password fields and press OK..
CETerm | CE3270 | CE5250 | CEVT220 Page 89
Page 90

NAURTECH EMULATORS & WEB BROWSER FOR WINDOWS CE / WINDOWS MOBILE
Info Items
The Info Items tab holds attributes related to configuration and display of various
Indicators. Indicators may be displayed in both terminal emulation or Web Browser
sessions to give visual status for RF signal strength, battery level etc. Indicators may also
be controlled and managed using scripts. These Indicators attributes should not be
confused with the ―Information buttons‖ in a Configurable KeyBar.
Indicator: This is the type of Indicator for which the various configuration settings will
be applied. Selection includes Battery State, RF Strength, Keyboard Mode and
Browser Loading Indicators.
Update: Enabling this check box will force a repaint update of the Indicator status.
This setting should be enabled if the Indicator is displayed on the screen.
Interval: This is the frequency of update in milli-seconds.
Alert: Enabling this check box will configure an alert notification message if the
Indicator strength falls below a certain threshold level.
Level: This is the threshold level, in percentage, below which a notification prompt is
generated if Alert notification is enabled.
Screen Display: This group box lists all attributes, which are related to the display of
the configured Indicator on the screen.
Enabled: This check box should be enabled to show the Indicator in this session.
Allow Drag: Enable this checkbox if you want the user to have the ability to tap-
hold and drag the Indicator icon to different locations on the screen.
CETerm | CE3270 | CE5250 | CEVT220 Page 90
Page 91

Battery Strength, RF Signal and
Keyboard State Indicators.
Double tab to get detailed
status in popup dialog.
Tap, hold and drag to
screen location
Automatic update of
strength icons
Can also be displayed as a
Keybar button
Configure notification
message if strength falls
NAURTECH EMULATORS & WEB BROWSER FOR WINDOWS CE / WINDOWS MOBILE
Type: Select the type of Indicator icon of your preference. These are designed
for minimal use of screen real estate in the orientation, which best conforms to
your host application.
X & Y: These are the top-left starting co-ordinates of the Indicator icon
You can tap the Indicator icon on for detailed status popup information. You can also
control the configuration and display of the Indicators from HTML META tags for Web
Browser sessions. Please refer to the Web Browser Programming Reference for details.
CETerm | CE3270 | CE5250 | CEVT220 Page 91
Page 92

Device serial# or preset ID
Device MAC address. All
zeros, if device is not
associated with Access
Point
NAURTECH EMULATORS & WEB BROWSER FOR WINDOWS CE / WINDOWS MOBILE
Manage (Automated Licensing)
The Manage tab maintains all configuration attributes to manage the licensing,
configuration and deployment of the application. It provides information related to license
registration and maintains attributes for automated licensing.
Server URL: This is the URL to the XML based license registration file. It may be
local to the device or may reside on a web server. Exact format of the URL
should be:
XML file on the device:
file:///license.xml
file:///Flash FX/license.xml
XML file on a Web server:
http://MyWebServerAlias/license.xml
http://x.y.z.w/license.xml
Please refer to the Automated Licensing section for more details.
NOTE: If you have spaces in your URL path, you may need to escape these using
%20 escape sequences. Note that the capability of the XML parser available on your
terminal varies with the platform and version of the Windows CE OS running on it.
CETerm | CE3270 | CE5250 | CEVT220 Page 92
Page 93

NAURTECH EMULATORS & WEB BROWSER FOR WINDOWS CE / WINDOWS MOBILE
Touch
This tab provides attributes to control touch screen interactions.
Enable Touch Features: This is a global setting for all touch features. When
checked, touch screen features are enabled. You must also individually enable
the granular touch features for these to work. When un-checked, no touch
features are enabled.
Double-tap Enter: When checked, a double-tap action with the stylus will
simulate pressing the Enter key
Horizontal Panning: When checked, allows panning in the horizontal direction
Vertical Panning: When checked, allows panning in the vertical direction.
NOTE: Using the screen panning functionality, you can ―tap-hold and drag‖ the
terminal display screen with a stylus, to scroll to areas of the host screen which
were not visible.
Cursor Positioning: When checked, a single stylus tap moves the cursor to the
location of the tap (IBM emulation only).
Function Key Hotspots: When checked, enables Hotspot functionality for
function keys. When enabled, you will be able to just tap on the function key text
(such as F7 = Prev F8 = Next etc) on the terminal display to invoke the
corresponding function key
CETerm | CE3270 | CE5250 | CEVT220 Page 93
Page 94

NAURTECH EMULATORS & WEB BROWSER FOR WINDOWS CE / WINDOWS MOBILE
NOTE: A Hotspot is a text on the terminal display where a user can tap
with a stylus to execute a function. This allows a user to interact with a
host application with minimal needs for special host keys.
A simple example might be the use of PF Keys. An operation associated
with a PF key might be displayed on the terminal screen as "PF1 =
Help". CETerm automatically detects this as a Hotspot and will send a
PF1 key to the host when you tap on the ―PF1‖ text on the terminal
display. Refer to the Hotspots section for further details.
Menu Item Hotspots: Check this attribute to enable Hotspot functionality for
menu items. When enabled, you will be able to just tap the menu item number on
the terminal display to invoke the corresponding menu item operation. An
example of this would be a menu such as:
1. Shipping
2. Receiving
3. Inventory
The user can just tap on ―1.‖ to invoke a ―Shipping operation.
IBM Hotspots: 3270 and 5250 applications have several keywords, which are
commonly used across many applications. Check this attribute to enable these
commonly used keywords as Hotspots. Examples are “Enter”, “More” and
“Bottom”. IBM Mouse and light pen activation must have IBM Hotspots
enabled.
VT Hotspots: VT host applications have several keywords, which are commonly
used across many applications.
CETerm | CE3270 | CE5250 | CEVT220 Page 94
Page 95

NAURTECH EMULATORS & WEB BROWSER FOR WINDOWS CE / WINDOWS MOBILE
Scanner
Device tailored versions of our Emulators and Web Browser provide integrated support
for barcode scanners. Scanner options may be configured and updated from the
"Scanner" tab.
From the application menu, Select [Session][Configure] or tap the
"Configure" button on the toolbar.
A "Configure" dialog box will come up.
Choose the "Scanner" tab
Enable: Checking this box will enable control of the barcode scanner. The
scanner should be disabled if you must use a separate scanner wedge
application. For all device tailored versions, we recommend that you let CETerm
control the barcode scanner. Default is enabled.
Enable Aimer: Some devices support an "Aimer" option with their barcode
scanner that appears as a laser pointer prior to scanning a barcode. Checking
this box enables such an aimer pointer. This setting is only visible if the barcode
scanner supports the functionality. Default is unchecked.
Preamble: This is a prefix ASCII string that will be pre-pended to any scanned
data. Default is blank.
Postamble: This is a suffix ASCII string or control command that will be sent
after completion of a successful scan. Default is blank.
CETerm | CE3270 | CE5250 | CEVT220 Page 95
Page 96

String
Description
\t
Tab
\r
Return or Enter
\n
New line
\\
Backslash character
\xYY
where YY is a hexadecimal digit between 00 and FF to represent a
character value
%A
ASCII label type (Symbol or HHP only)
%C
Custom label type, see config
%D
Date
%H
Device manufacturers labeltype as hex value
%I
AIM identifier letter of symbology, will be ―*‖ if unsupported.
%M
AIM modifier digit of symbology, will be ―*‖ if unsupported.
%L
Labeltype, custom (if defined) or same as %H
%T
Time stamp
%%
Percent sign character
\IDA_action\
where IDA_action is a Naurtech proprietary symbolic value that
represents an action. Please refer to the table below for some of the
popular actions.
Ref Name
Key / Action
IDA_ENTER
Enter key action
IDA_NEWLINE
Newline key action
IDA_ERASE_EOF
Erase to end of field key action
IDA_ERASE_INPUT
Erase input key action
IDA_FIELD_EXIT
Field exit key action
IDA_FIELD_PLUS
Field+ key action
IDA_HOME
Home key action
IDA_DOWN
Down arrow key action
IDA_UP
Up arrow key action
IDA_LEFT
Left arrow key action
IDA_RIGHT
Right arrow key action
NAURTECH EMULATORS & WEB BROWSER FOR WINDOWS CE / WINDOWS MOBILE
Some of the more commonly used preamble and postamble codes are listed in
the following table. You can join multiple codes with printable text in any
combination.
NOTE: You can use IDA codes for popular operations. You can specify the IDA
action using the following format:
\IDA_action\ where IDA_action is an IDA symbolic code.
Some of these are listed in the table below. A full list of IDA codes is available in
the Appendix at the end of this manual.
Redundancy: This configuration describes the redundancy or linear security
level used during decoding. Default is "Short Twice".
CETerm | CE3270 | CE5250 | CEVT220 Page 96
Page 97

NAURTECH EMULATORS & WEB BROWSER FOR WINDOWS CE / WINDOWS MOBILE
Scan Millisec: This attribute controls the scan duration. If a barcode is not read
within this time, the scanner will shut off and a failure tone is sounded. The
default value is 0 which is unlimited. Some scanners do not timeout regardless
of this setting.
Aim Millisec: This attribute controls the duration of the aimer pattern prior to
scanning of a barcode.
Verify Input: When using IBM 5250 emulation and if Verify Input is checked, the
input field at the cursor location will be checked to determine if there is sufficient
space for the scanned data. If there is no input field or there is insufficient space,
a warning will be displayed and the data will be discarded.
Symbology
Depending upon the device and built-in scanner, our Emulators and Web Browser
support about twenty different barcode symbologies. Individual symbologies may be
enabled, disabled and configured.
From the application menu, Select [Session][Configure] or tap the
"Configure" button on the toolbar.
A "Configure" dialog box will come up.
Choose the "Symbology" tab
The list box on the top left contains a list of barcode symbologies supported by the
scanner. This list of symbologies varies with every device. Configuration parameters
CETerm | CE3270 | CE5250 | CEVT220 Page 97
Page 98

NAURTECH EMULATORS & WEB BROWSER FOR WINDOWS CE / WINDOWS MOBILE
associated with each symbology are displayed with the selection of a symbology. These
configuration parameters vary depending upon the symbology selected.
Enable: Check this box to enable the selected symbology for decode. If desired,
you may enable a subset of symbologies from the complete list. On certain
devices, barcode symbology initialization can take a couple of seconds. To
minimize this initialization time on such devices, it is recommended that you can
enable only those symbologies that are being used for scanning and disable all
other symbologies.
Report Check: Check this box to report (or return) the check digit as part of the
barcode data.
NOTE: Each symbology has a separate set of configuration parameters
associated with it. Selecting the symbology from the list will make these
visible for configuration and update. Please refer to the individual barcode
symbology references in the documentation for the handheld device.
Advanced: This button opens advanced configuration dialog for the selected
barcode symbology. All settings configured and updated in this dialog are
associated with the currently selected symbology.
Data Length Min: This is the minimum length, in characters, for the decoded
barcode. Specifying a minimum length will require every scanned barcode to be
at least the minimum length. Possible values depend on the symbology. Default
is usually 0 which implies no minimum length.
Data Length Max: This is the maximum length, in characters, for the decoded
barcode. Specifying a maximum length will require every scanned barcode to be
at most the maximum length. Possible values depend on the symbology. Default
is usually 0 which implies no maximum length.
Strip Data Start: This is the number of characters to be stripped from the
beginning of the decoded barcode. Default is 0, which does not strip any
characters.
Strip Data End: This is the number of characters to be stripped from the end of
the decoded barcode. Default is 0, which does not strip any characters.
Custom ID: Checking this box will enable the Custom ID when used with the %L
pre-amble or post-amble code. A %C in a pre-amble or post-amble will insert the
CETerm | CE3270 | CE5250 | CEVT220 Page 98
Page 99

NAURTECH EMULATORS & WEB BROWSER FOR WINDOWS CE / WINDOWS MOBILE
custom ID regardless of the setting of this box. The custom ID text may be
configured in the edit box.
NOTE: Custom ID field may be used when you have a requirement to
add different pre-ambles or post-ambles for two or more barcode
symbologies. For example you may need to add a prefix ―UPC‖ to all
UPC-A barcodes and a prefix ―C128‖ to all Code 128 barcodes. In such a
case, you can set a custom id of ―UPC‖ for UPC-A symbology and a
custom id ―C128‖ for Code 128 symbology. Placing a ―%C‖ in either the
pre-amble or post-amble would then add the corresponding string based
upon the symbology of the barcode decoded.
Magnetic Stripe Reader
The device tailored versions of CETerm supports a powerful feature to select the desired data
fields from the Magnetic Card Reader and to present the data to the host or Web Browser
application. Support for MSR is configurable only for certain device tailored versions, which have
an integrated MSR. Devices includes terminals from Motorola, Fujitsu and Intermec.
To select the desired data fields, a "Match" expression is specified, which can identify and "tag"
fixed or variable character locations. The tagged matches are substituted into the "Replace"
expression to send the desired data to the host application.
Match Expressions
The Match expression is a limited form of "regular expressions" as used in text processing
languages such as Perl. As such, it is very powerful, but can seem complicated. If you need
assistance configuring the Match, please contact support@naurtech.com. We will give some
examples of Match and Replace expressions to illustrate their use.
When the data is read from the card, it is available in the format
"T1:DataFromTrackOneT2:DataFromTrackTwo".
Example 1
To remove the "T1:" and "T2:" identifiers and just return the data, use:
Match: "^T1:(.*)T2:(.*)$"
Replace: "\1\2"
The "hat" '^' at the beginning of the match forces it to start at the beginning of the data
and the dollar sign ($) at the end requires a match to the end of the data.
The first set of parenthesis surround the part of the match which is substituted for "\1" in
the Replace string and similarly for the second set of parenthesis and "\2".
You may specify up to 9 sets of parenthesis to identify 9 substitutions.
The literal characters "T1:" in the match string must match the characters in the card
data.
CETerm | CE3270 | CE5250 | CEVT220 Page 99
Page 100

NAURTECH EMULATORS & WEB BROWSER FOR WINDOWS CE / WINDOWS MOBILE
The special ".*" means to match zero or more characters; the '.' represents any character.
Example 2
We can also specify a fixed number of characters to identify fixed field locations:
Match: "^T1:.{4}(.{20}).*T2:([0-9]{10})"
Replace: "Name:\1 Account:\2"
The quantity between curly brackets "{}" is an exact number of characters to match.
The first ".{4}" will match, and ignore, the first four characters of track 1.
The "(.{20})" will match the next 20 characters which can be specified in the replace text
as "\1".
The next ".*" skips past the remainder of track 1 data.
The "([0-9]{10})" says to match exactly 10 digits and make them available as "\2"
because this is the second set of parenthesis.
The "[0-9]" means any character in the set from '0' to '9'. This may also be represented as
"[0123456789]".
Example 3
As a third example, we can identify the data between "delimiter" characters. Often, a cardholder
name is found between '^' characters.
Match: "\^([^^]+)\^.*T2:.*=([0-9]{20})"
Replace: "Name:\1 Account:\2"
The leading "\^" means to match the '^' character, not the start of the data.
The backslash '\' removes the "special" meaning of the '^'.
The "([^^]+)" may seem complicated. Remember that the "[...]" identifies a set of
characters to match. If there is a leading '^' in the set, it means to match anything
*except* the characters in the set. For example, "[^abc]" means any characters except for
'a', 'b', and 'c'. The second '^' in the set has *no* special meaning and is interpreted as a
literal '^' character. So, this means to match any characters *except* a '^'.
The plus sign '+' means to match one or more of the characters designated by the set, so
this will match one or more characters up to, but not including, the next '^' character. The
result is that we identify all characters between a pair of '^' characters and assign this to
"\1" for replacement.
After the "T2:" we have ".*=" which will match any characters and then an equal sign.
Following the equal sign is "([0-9]{20})" which will match a 20 digit account number.
CETerm | CE3270 | CE5250 | CEVT220 Page 100
 Loading...