

Page 1

Mobile Calendar (Version 2.0US) User's Guide -Page 1 -
Mobile Calendar (Version 2.0US)
User's Guide
Trademarks
Microsoft, Windows, and Windows NT are either registered trademarks or trademarks of
Microsoft Corporation in the United States and/or other countries.
All other product and company names mentioned herein may be the trademarks of their
respective owners.
l The contents of this document are subject to change without notice.
l In no event shall CASIO COMPUTER CO., LTD. be liable to anyone for special, collateral,
incidental, or consequential damages in connection with or arising out of the purchase or use
of these materials. Moreover, CASIO COMPUTER CO., LTD. shall not be liable for any claim
of any kind whatsoever against the use of these materials by any other party.
l This manual and the software it describes are owned by CASIO COMPUTER CO., LTD. The
structure, organization, and code of the software are the valuable trade secrets of CASIO.
l The operations described in this manual assume that you are already familiar with the basic
operation of Windows CE. See the documentation that comes with Windows CE for full
details on its operation.
l Sample displays shown in this manual may differ somewhat from the displays actually
produced by the product.
Copyright Notice
No part of this publication may be reproduced, transmitted, transcribed, stored in a retrieval
system, or translated into any human or computer language, in any form or by any means,
without the express written permission of CASIO COMPUTER CO., LTD.
Copyright 2000 CASIO COMPUTER CO., LTD. All rights reserved.
Page 2

Mobile Calendar (Version 2.0US) User's Guide -Page 2 -
Contents
Introduction ....................................................................................3
Features..................................................................................................................3
To start up Mobile Calendar................................................................................4
Inputting Calendar Data.................................................................5
Inputting New Calendar Data..............................................................................5
Setting Up a Repeat Appointment......................................................................7
Making Reminder Settings..................................................................................8
Making Other Tab Settings..................................................................................9
Assigning Category Colors................................................................................10
Editing Appointments..........................................................................................11
Viewing Calendar Data ................................................................14
Daily View.............................................................................................................14
Daily Timetable View..........................................................................................16
Weekly View.........................................................................................................18
Weekly Timetable View......................................................................................20
Monthly View........................................................................................................21
3-Month View.......................................................................................................22
Making Mobile Calendar Settings....................................................................24
Searching for Data..............................................................................................28
Command Bar Items (Menus and Buttons) ...................................30
Menus....................................................................................................................30
Buttons...................................................................................................................31
Page 3

Mobile Calendar (Version 2.0US) User's Guide -Page 3 -
Introduction
Mobile Calendar is a schedule management application you can run on your Pocket PC.
Though it is similar to and uses the same data as your Pocket PC's built-in Calendar
application, it provides you with additional functions and more display versatility than
Calendar alone.
Features
l
New, improved screen format simplifies Calendar data input and editing
Appointment Input Screen
l
Calendar data layouts that are more practical and easier to use
->
Calendar Screen Mobile Calendar Screen
Page 4

Mobile Calendar (Version 2.0US) User's Guide -Page 4 -
l
A choice of six different views: Daily, Daily Timetable, Weekly, Weekly Timetable,
Monthly, and 3-Month Calendar
Daily View Weekly View
Monthly View 3-Month View
l
Easy screen switching using Action control
l
The color of data on the Daily, Daily Timetable, Weekly, and Weekly Timetable
views depends on the category to which the data is assigned.
l
Quick and easy holiday highlighting (in red)
l
Powerful search functions help you find the information you want when you need it.
To start up Mobile Calendar
1.
Turn on your Pocket PC.
2.
Tap , Programs, and then Mobile Calendar.
l
This starts up Mobile Calendar and displays the DAILY view for today
(according to the date kept by your Pocket PC's clock).
Page 5

Mobile Calendar (Version 2.0US) User's Guide -Page 5 -
Inputting Calendar Data
You can use Mobile Calendar to input data into the Calendar database or to edit existing
Calendar database data.
Inputting New Calendar Data
Each Calendar record can contain an appointment time and description, as well as an
alarm time and other additional information. The following procedure describes only the
basic for new data input. Additional settings and data input are described elsewhere in
this section.
To input new Calendar data
1.
Start up Mobile Calendar.
2.
Tap New to display the General tab of the appointment input screen.
3.
Input the date and description of the appointment on the General tab.
Times....................The upper time is the start time, while the lower time is the end time of
the appointment. You can specify a date using the calendar that
appears when you tap a date button, or you can input a date into
a box. You can specify a time by selecting one from the list that
appears when you tap a time button, or you can input a time into
a box.
Start time
End time
Page 6

Mobile Calendar (Version 2.0US) User's Guide -Page 6 -
Description.........Input a description of the appointment. You can also specify a
location by selecting one from the list of previously input descriptions
that appears when you tap the descriptions button.
Location...............Input the location of the appointment. You can also specify a location
by selecting one from the list of previously input locations that
appears when you tap the location button.
Reminder.............Check this box when you want an alarm to sound15 minutes before
the appointment start time. You can also specify how long before the
appointment you want the alarm to sound.
All Day Event .....Check this box for an appointment for which there is no time setting
(such as a birthday or anniversary.
4.
Make the settings you want on the Repeat, Reminder, and Other tabs.
l
You can skip this step if you do not want to make settings for these tabs.
l
The following describes the types of settings you can make on these tabs.
Repeat.................Use this tab to set up an appointment that repeats once a week or
once a month. See "Setting Up a Repeat Appointment" on page 7 for
more information about this tab.
Reminder.............After you check the Reminder option in step 3, you can use the
settings on the Alarm tab to specify the alarm time. See "Making
Reminder Settings" on page 8 for more information about this tab.
Other....................Use this tab to add memo text to an appointment, to specify a
category, and to specify whether the appointment is public or
private. See "Making Other Tab Settings" on page 9 for more
information about this tab.
5.
After everything is the way you want, tap OK to close the input screen.
Page 7
Mobile Calendar (Version 2.0US) User's Guide -Page 7 -
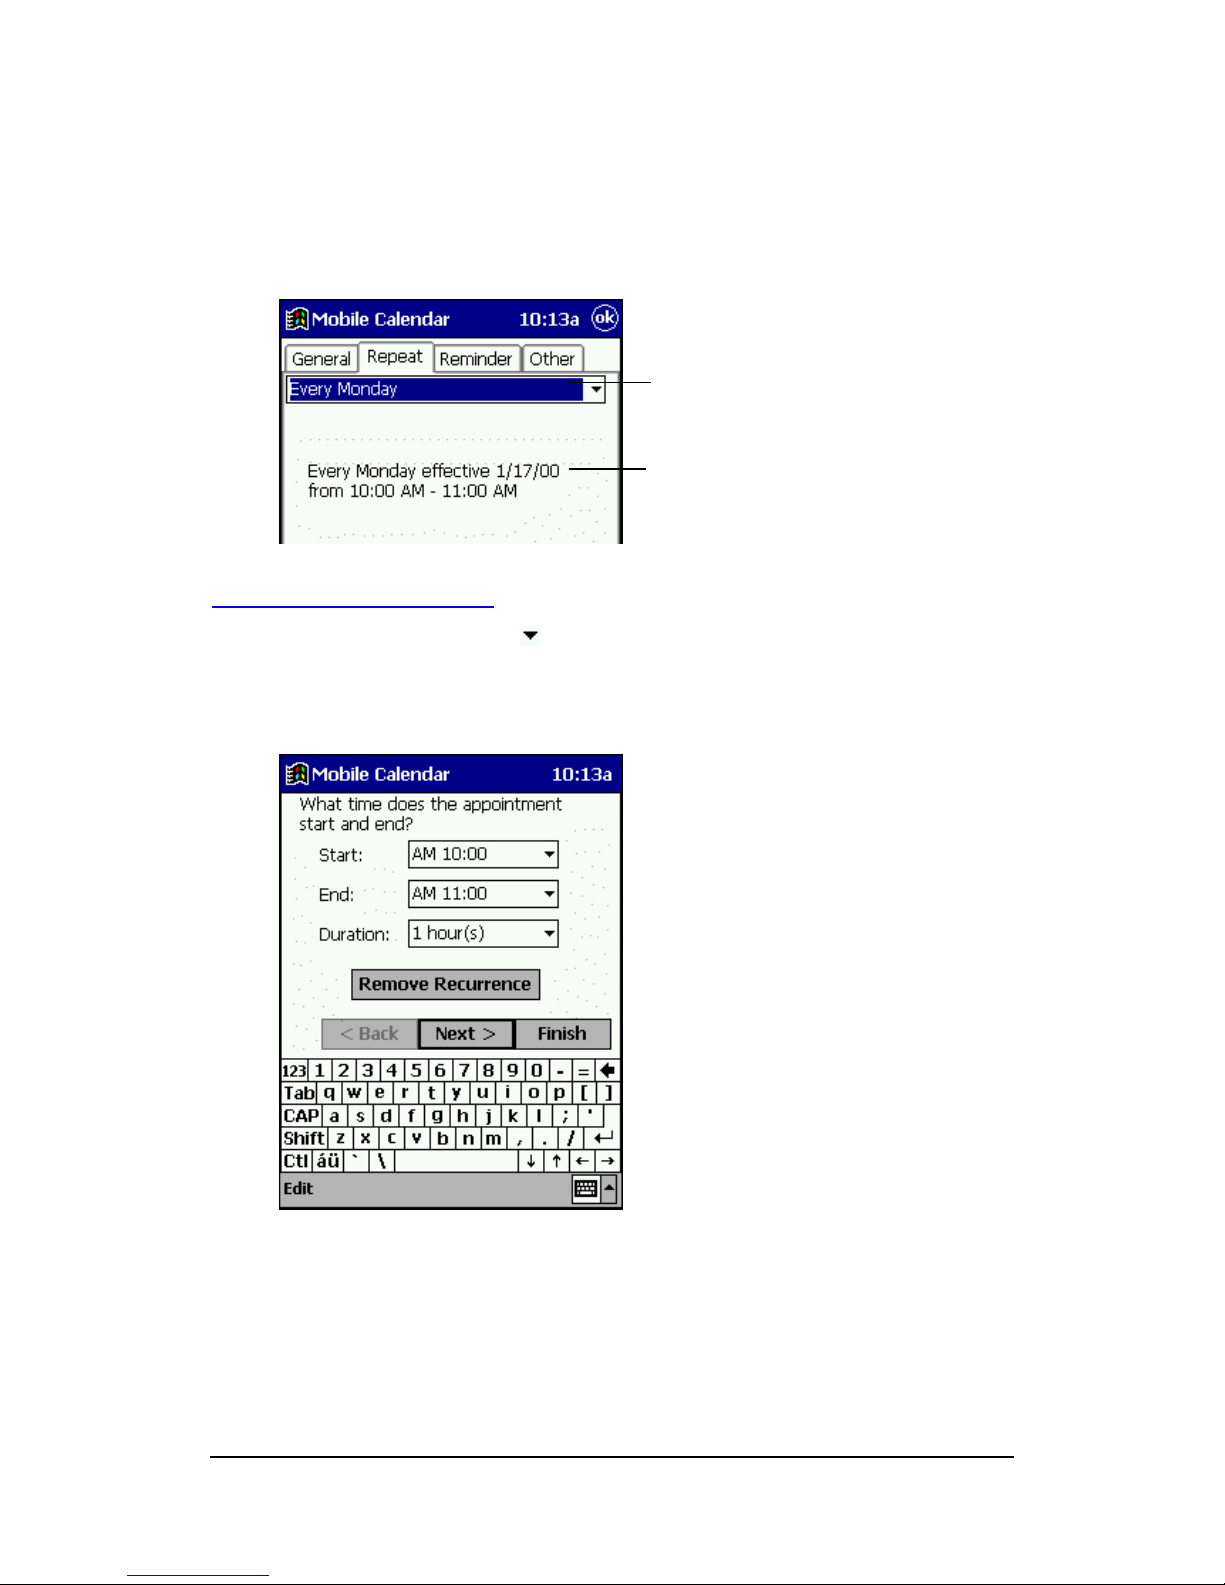
Setting Up a Repeat Appointment
You can use the Repeat tab to specify an appointment that repeats on the same day
of the week each week, on the same day of month each month, etc.
To edit a repeat pattern
1.
On the Repeat tab, tap the button and then select the Edit Pattern item from
the list of options that appears.
l
This causes the dialog box shown below to appear.
2.
Make the repeat pattern settings you want.
l
The settings you can make on this dialog box are the same as those for the
Pocket PC's built-in Calendar application. See Calendar online help for more
information.
This dialog box operates as a kind
of wizard. Make settings in
accordance with the instructions
that appear on the display.
Select the repeat type you want
here.
This shows the appointment data
in accordance with the repeat type
you select.
Page 8

Mobile Calendar (Version 2.0US) User's Guide -Page 8 -
Making Reminder Settings
Use the Reminder tab to change the alarm time.
Note
l
Note that the settings you make here are valid only when the Reminder item on the
General tab is checked. See "Inputting New Calendar Data" on page 5 for more
information.
l
Use the Pocket PC Sounds & Reminders feature to specify the notification type
(message display, flashing lamp, alarm sound), and the type of alarm sound (when
alarm sound is selected as the notification type). Tap , Settings, and then
Sounds & Reminders. On the dialog box that appears, tap the Reminders tab
and then make the settings you want. See online help for full details about how to
make settings.
This setting determines how long
before the appointment time the
alarm should sound. You can
specify a time from one minute to
99 weeks. The initial default setting
for this item is 15 minutes.
Page 9

Mobile Calendar (Version 2.0US) User's Guide -Page 9 -
Making Other Tab Settings
You can use the Other tab of the appointment input screen to add memo text to an
appointment, to specify a category, and to specify the record as public or private.
(1) If you want to input memo text, tap here to display the memo input screen.
You can handwrite or type memo text.
(2) Tap this button to display a list of categories, which you can use to assign a
category to the appointment.
(3) Use this box to select the method for making the appointment public. This
item is used only for synchronizing appointment data with Outlook running
on your computer and Outlook data is public and shared over the network.
See the documentation that comes with Outlook for more information.
(4) Check this box when you want to make the appointment private data.
Note
l Each of the category names in the list that appears when you tap the Categories
button has a category color next to it. The data in each category is displayed using
the applicable category color. You can control the color assigned to each category
using the dialog box that appears when you tap Tools - Color. See “Assigning
Category Colors” below for more information.
l See the Calendar online help for information about other settings you can make on
the Other tab.
(1)
(2)
(3)
(4)
Page 10

Mobile Calendar (Version 2.0US) User's Guide -Page 10 -
Assigning Category Colors
The data in the Daily, Daily Timetable, Weekly, and Weekly Timetable view is
displayed in the color currently assigned to its category (category color). You can assign
any one of 14 different colors to each category.
To assign a color to a category
1.
Tap Tools - Color.
l
This causes a dialog box like the one shown nearby to appear.
Color palette
These boxes
show the colors
assigned to
each category.
Color of data
items not
assigned to any
category
Color of data
items assigned
to multiple
categories
2.
Tap the category to which you want to assign a color.
3.
On the color palette, tap the color you want to assign to the category. This causes
the color of the box next to the category name to change to the color you select.
4.
Repeat steps 2 and 3 for other categories, if you want.
5.
When everything is the way you want, tap OK to apply the settings and close the
dialog box.
Page 11

Mobile Calendar (Version 2.0US) User's Guide -Page 11 -
Editing Appointments
This section describes how to use Mobile Calendar to edit and delete existing Calendar
database appointments. It also explains how to cut, copy, and paste existing data.
To edit an appointment
1.
On the Daily View, tap the appointment you want to edit. This displays the
General tab of the appointment input screen.
2.
Use the same procedure as those under "Inputting New Calendar Data" on page 5
to make the changes you want.
3.
After everything is the way you want, tap OK to save the appointment and close
the appointment input screen.
Note
If the appointment you are editing is a repeat appointment (See "Setting Up a Repeat
Appointment" on page 7), tapping OK in step 3 causes the message shown below to
appear.
Tap Yes to apply your changes to all of the applicable repeat appointments, or No if
you want the edits applied to only one of the appointments. Tapping Cancel returns to
step 2 of the procedure without doing anything.
To delete an appointment
1.
On the Daily View, tap and hold the appointment you want to delete.
2.
Tap Delete.
l
This displays a confirmation message asking whether you really want to delete
the appointment.
3.
Tap OK to delete the appointment or Cancel to cancel the delete operation without
deleting anything.
Page 12

Mobile Calendar (Version 2.0US) User's Guide -Page 12 -
Note
If the appointment you are deleting is a repeat appointment (See "Setting Up a
Repeat Appointment" on page 7), tapping Delete in step 2 causes the message
shown below to appear.
Tap Yes to delete all of the applicable repeat appointments, or No if you want to delete
only one of the appointments. Tapping Cancel returns to step 1 of the procedure
without doing anything.
Copying and Pasting an Appointment
Use the following procedure to copy an appointment and paste it to another date. This
makes it easy to input identical appointments on multiple days or to input appointments
are very similar.
Note
Copying a repeat appointment (see "Setting Up a Repeat Appointment" on page 7)
copies only the one single appointment that you select for copying.
1.
On the Daily View, tap and hold the appointment you want to copy.
2.
Tap Copy to copy the appointment to the clipboard.
3.
Display the Daily View screen for the date where you want to paste the
appointment that is on the clipboard.
4.
Tap Paste to paste the appointment data from the clipboard to the currently
displayed Daily View.
l
You could now use the procedures under " Editing Appointments " on page 10 if
you want.
Page 13

Mobile Calendar (Version 2.0US) User's Guide -Page 13 -
Cutting and Pasting an Appointment
Use the following procedure to cut an appointment from one date and paste it to another
date. This technique can be used to move data from one date to another.
Note
Cutting a repeat appointment (see "Setting Up a Repeat Appointment" on page 7) cuts
only the one single appointment that you select for copying.
1.
On the Daily View, tap and hold the appointment you want to cut.
2.
Tap Cut to cut the appointment and place it onto the clipboard.
3.
Display the Daily View screen for the date where you want to paste the
appointment that is on the clipboard.
4.
Tap Paste to paste the appointment data from the clipboard to the currently
displayed Daily View.
l
You could now use the procedures under " Editing Appointments " on page 10 if
you want.
Page 14

Mobile Calendar (Version 2.0US) User's Guide -Page 14 -
Viewing Calendar Data
Mobile Calendar lets you view your Contacts data using any one of six different views:
Daily, Daily Timetable, Weekly, Weekly Timetable, Monthly, or 3-Month. This section
tells you how to select and interpret each view.
Daily View
The Daily view appears first, with today's date selected in the calendar, whenever you
start up Mobile Calendar. It also appears whenever you tap on the toolbar.
l
The data area starts to scroll about one second after you select a date if the date
contains too much data to fit. Tap on the data area to stop the scrolling.
l
After stopping auto scrolling, you can use the scroll bar to scroll up and down.
Dates that contain
appointment data are
indicated on the
calendar in bold.
The currently selected
date has a box around
it. This box is the date
cursor.
You can mark
dates as holidays.
See “Holidays”.
The starting day of
the week is in
accordance with
how you set up
First Day of
week with the
Tools menu.
Page 15

Mobile Calendar (Version 2.0US) User's Guide -Page 15 -
Daily View Operations
l
Tapping a date in the calendar selects that date and displays its Calendar data.
l
Rotate the ACTION control down to move the date cursor forward and up to move it
back.
l
You can also use the cursor button to move the date cursor. Right or down moves
forward, while left or up moves back.
l
Tap the button above the calendar to change to the previous month's
calendar, or to change to the next month's calendar.
l
Tapping the button above the calendar displays the Daily Timetable view.
l
Tap for the Weekly view, for the Monthly view, or for the 3-Month
view. These views all include the date where the date cursor is currently located in
the Daily view.
l
A Note icon is shown on the Daily view when there is a note attached to the
appointment.
This icon indicates that there is a
note attached to the
appointment. Tapping the icon
displays the content of the note.
You can only view a note from
the Daily view. You cannot edit
it.
Page 16

Mobile Calendar (Version 2.0US) User's Guide -Page 16 -
Daily Timetable View
Tap the button on the Daily view toolbar to display the Daily Timetable view.
This view shows a graphic representation of your schedule for a specific date.
l
Tap to return to the Daily view.
Daily Timetable View Operations
l
Operations you can perform with this view are basically the same as those for the
Daily view.
l
You can input a new appointment by dragging the start and end boundaries of the
appointment time and then tap New.
The timetable initially
shows from 8:00 am to
8:00 pm, but you can
use the scroll bar on the
bottom of the screen to
scroll left and right.
The calendar area is
the same as the
Daily view calendar.
Dragging a time boundary
causes the area between the
two boundaries to become
highlighted in light blue. Tapping
New creates a new
appointment with the start time
and the end time in accordance
with the boundary locations.
An all-day appointment
is indicated by "*".
Page 17

Mobile Calendar (Version 2.0US) User's Guide -Page 17 -
l
Tapping an appointment selects it, which is indicated by triangular handles at either
end.
Drag the handles to change the start
time and end time of the appointment.
You can also drag the appointment on
the screen to another day or time.
Switching the Time between 12-hour and 24-hour Formats
You can switch between 12-hour and 24-hour timekeeping using the Time tab on the
Pocket PC's regional settings ( - Settings - Regional Settings). The setting you
select affects the time and timetable displays (Daily Timetable and Weekly Timetable) of
Mobile Calendar as shown below.
l
The current time display examples below show what appears at 9:00am and
3:00pm.
Current Time Timetable
12-hour format 9:00A/3:00P 12, 1, 2, ... 11, 12, 1, 2, ... 10, 11
24-hour format 9:00/15:00 0, 1, 2, ... 11, 12, 13, 14, ... 22, 23
Page 18

Mobile Calendar (Version 2.0US) User's Guide -Page 18 -
Weekly View
Display the Weekly view by tapping on the toolbar of the Daily, Monthly, or 3Month view.
l
Scroll buttons appear if a date has more than two appointments scheduled. Use the
scroll buttons to scroll the data on the screen.
Weekly View Operations
l
Tapping a date selects it. You can also use the ACTION control and cursor button
to move the date cursor.
l
Tap the button to change to the previous week or to change to the
next week.
l
Tap an appointment's data to display an editing screen for that appointment.
l
Tap a date to display the Daily View for that date.
l
Tap for the Daily view, for the Monthly view, or for the 3-Month
view. These views all include the date where the date cursor is currently located in
the Daily view.
Indicates the week
number of the currently
selected date.
Date cursor, indicating
the currently selected
date.
The starting day of
the week is in
accordance with
how you set up
First Day of
week with the
Tools menu.
Page 19

Mobile Calendar (Version 2.0US) User's Guide -Page 19 -
l
You can drag data from one date and drop it into another date, as long as the
destination date is within the same week.
Selected data
Data being moved
Selected start and
end times
Page 20

Mobile Calendar (Version 2.0US) User's Guide -Page 20 -
Weekly Timetable View
Tap the button on the Weekly view toolbar to display the Weekly Timetable
view. This view shows a graphic representation of your schedule for a specific week.
l
Tap to return to the Weekly view.
Weekly Timetable View Operations
l
Operations you can perform with this view are basically the same as those for the
Weekly view.
l
You can input a new appointment by dragging the start and end boundaries of the
appointment time and then tap New.
Dragging a time boundary
causes the area between the
two boundaries to become
highlighted in light blue. Tapping
New creates a new
appointment with the start time
and the end time in accordance
with the boundary locations.
Tapping an appointment selects
it, which is indicated by
triangular handles at either end.
l
Drag the handles to change
the start time and end time of
the appointment.
l
You can also drag the
appointment on the screen to
another day or time.
Page 21

Mobile Calendar (Version 2.0US) User's Guide -Page 21 -
Monthly View
Display the Monthly view by tapping on the toolbar of the Daily, Weekly, or 3Month view.
l
The currently selected date is the one that is shaded. This shading is the date cursor.
l
The indicator [AM] appears when there is an appointment scheduled between
midnight and noon, and [PM] appears for an appointment between noon and
midnight. An all-day appointment is indicated by " ".To view the full details for a
date, tap on it to change to its Daily view.
Monthly View Operations
l
Tapping a date selects it. You can also use the ACTION control and cursor button
to move the date cursor.
l
Tapping a date changes to its Daily view.
l
Tap the button to change to the previous month or to change to the
next month.
l
Tap for the Daily view, for the Weekly view, or for the 3-Month
view. These views all include the date where the date cursor is currently located in
the Daily view.
You can mark
dates as holidays.
See “Holidays”.
The starting day of
the week is in
accordance with
how you set up
First Day of
week with the
Tools menu.
An all-day
appointment is
indicated by " ".
Page 22

Mobile Calendar (Version 2.0US) User's Guide -Page 22 -
3-Month View
Display the 3-Month view by tapping on the toolbar of the Daily, Weekly, or
Monthly view.
3-Month View Operations
l
The currently selected date has a box around it. This box is the date cursor.
l
Tapping a date selects it. You can also use the ACTION control and cursor button
to move the date cursor.
l
Tap the button to scroll one month to the back or to scroll one month
forward.
l
Tap the button to scroll three months to forward or to scroll three
months back.
l
Tapping a date changes to its Daily view.
l
Tap for the Daily view, for the Weekly view, or for the Monthly
view. These views all include the date where the date cursor is currently located in
the Daily view.
Jumping to a Specific Date
You can tap a button to jump to today's date or you can jump to another date.
To jump to today's date
Tap on the toolbar.
l
This jumps to the current date as kept by the Pocket PC's internal clock.
Dates that contain
appointment data are
indicated in bold.
You can mark
dates as holidays.
See “Holidays”.
The starting day of
the week is in
accordance with
how you set up
First Day of
week with the
Tools menu.
Page 23

Mobile Calendar (Version 2.0US) User's Guide -Page 23 -
l
In the case of the 3-Month view, the above operation jumps to the calendar that
contains today's date.
To jump to a specific date
1.
On the Tools menu, tap Jump to display the jump dialog box.
2.
Use either of the following procedures to specify the date to which you want to jump.
l
Highlight the year, month, or day by tapping it. Next use the ACTION control or
cursor button to increase or decrease the selected value.
l
Tap the button to display a date selection calendar. Tap the and
buttons to change to the month you want, and then tap a date.
3.
After specifying the date, tap OK to jump to it.
l
In the case of the 3-Month view, the above operation jumps to the calendar that
contains the specified date.
Using the ACTION Control to Navigate Around Mobile Calendar
In addition to stylus operations, you can navigate around Mobile Calendar with one
hand using the ACTION control.
To use the ACTION control to navigate around Mobile Calendar
1.
While any Mobile Calendar screen is on the display, press the ACTION control to
display the ACTION Control menu of available actions.
2.
Rotate the ACTION control up and down to highlight the action you want to perform.
3.
Press the ACTION control to close the action list and perform the action that was
highlighted.
l
You can customize the ACTION Control menu to suit your needs. See
"Customizing the ACTION Control Menu" on page 26 for more information.
Page 24

Mobile Calendar (Version 2.0US) User's Guide -Page 24 -
Making Mobile Calendar Settings
This section describes the settings you can make with Mobile Calendar.
Holidays
You can mark holidays so they are highlighted on the calendars and other displays. You
can mark single dates or a series of dates by tapping or dragging on a calendar, or you
can mark all dates that fall on a particular day of the week for a range of months.
To mark and unmark holidays by tapping or dragging
1.
On the Tools menu, tap Holidays to display the 3-Month holiday setting dialog
box.
2.
Tap a date to mark it. Tapping a marked date unmarks it.
3.
To mark a series of dates, drag the stylus across them. Dragging the stylus across a
series of marked dates unmarks them.
4.
After the dates are the way you want them, tap OK in the upper right corner to
close the dialog box.
l
Tap the button to scroll one month to the past or to scroll one month to
the future.
l
Tap the button to scroll three months to the past or to scroll three
months to the future.
Page 25

Mobile Calendar (Version 2.0US) User's Guide -Page 25 -
To mark all dates that fall on a specific day of the week
1.
From the 3-Month holiday setting dialog box, tap Edit and then Day of the week
to display the day of the week holiday setting dialog box.
2.
Check one or more of the boxes on the left side of the dialog box to specify the
days of the week you want to mark.
3.
On the right side of the dialog box, specify the start month and end month of the
period for which you want dates marked.
4.
After the settings are the way you want, tap OK to return to the 3-Month holiday
marking dialog box.
To restore holiday mark defaults for a specific period
1.
From the 3-Month holiday setting dialog box, tap Edit and then All Clear to display
the holiday mark clear dialog box.
2.
Specify the start month and end month of the period for which you want to restore
holiday mark defaults.
3.
After the settings are the way you want, tap OK to return to the 3-Month holiday
marking dialog box.
Page 26

Mobile Calendar (Version 2.0US) User's Guide -Page 26 -
l
The above procedure restores holiday marking defaults, which marks all Sundays
as holidays.
Customizing the ACTION Control Menu
Use the following procedure to change the contents of the ACTION Control menu and
the order of the menu items.
Note
See "Using the ACTION Control to Navigate Around Mobile Calendar" on page 23 for
information about using the ACTION Control menu.
To customize the ACTION Control menu
1.
On the Tools menu, tap ACTION Control to display the ACTION Control
Setting dialog box.
l
While an action is highlighted, you can tap and to change its
position in the list and menu.
l
Tapping Restore returns the settings on this dialog box to their initial defaults.
2.
After everything is the way you want, tap OK to close the dialog box.
Check the boxes next to
the actions you want to
include in the ACTION
Control menu. Checked
items appear and
unchecked items do not.
Page 27

Mobile Calendar (Version 2.0US) User's Guide -Page 27 -
Specifying the First Day of the Week
Use the following procedure to specify either Sunday or Monday as the first day of the
week for the Daily, Weekly, Monthly, and 3-Month views.
1.
On the Tool menu, tap First Day of Week to display the dialog box shown below.
2.
Select either Sunday or Monday as the first day of the week.
3.
After making the setting you want, tap OK to apply your selection and close the
dialog box.
Page 28

Mobile Calendar (Version 2.0US) User's Guide -Page 28 -
Searching for Data
Use the procedures in this to search appointments for specific data. You can limit the
search by specifying a start date and end date.
To search for data
1.
On the toolbar, tap the button to display the search dialog box.
2.
Input the text you want to find.
3.
If you want, specify start and end dates.
l
To specify the start and end dates, use the same steps as described in step 2
under "To jump to a specific date" on page 23.
l
Unchecking Start searches through all data up to the end date. Unchecking End
searches through all data starting from the start date. To search through all data,
uncheck both Start and End.
4.
After everything is the way you want, tap Find to start the search.
Page 29

Mobile Calendar (Version 2.0US) User's Guide -Page 29 -
l
The search produces a list like the one shown above, which that all records that
match the text you specified.
l
See "About the found records list" below for more information about this list.
5.
Tap to clear the found records list.
Note
The message "No matches were found for the text you specified." appears in place of
the found records list if the search does not find any data that matches your text.
About the found records list
The following describes the contents of the found records list that appears when you
perform a search.
l
All records that match the text you specify are listed in chronological order.
l
Four lines are shown for each record (date, start time - end time, description, location).
Items that do not fit on one line are cut off.
l
For repeated records, only the first one found appears in the list.
The following are the operations that you can perform while the Found Records List is on
the display.
l
Tapping any record in the list clears the found records list and displays the
corresponding Daily view.
l
Tapping , , , or exits the search and displays the corresponding
view. The day, week, or month, that appears contains the date of the record that is
selected in the found records list when you tap the button.
l
You can use the button and Tools - Jump commands while the found records
list is on the display. Doing so, however, clears the found records list.
Page 30

Mobile Calendar (Version 2.0US) User's Guide -Page 30 -
Command Bar Items (Menus and Buttons)
Menus
Tools Menu
Command Description
Jump Displays a dialog box to specify a date.
Color Displays a dialog box to assign category colors.
Holidays Displays the holiday setting dialog box.
First Day of week Displays a dialog box for specifying the first day of the
week.
ACTION Control Displays the ACTION control setting dialog box.
About... Displays software version information.
Holiday Setting Dialog Box Edit Menu
Command Description
Day of the week Displays a dialog box for highlighting and unhighlighting
dates that fall on a particular day of the week.
All Clear Restores date highlighting to its initial default settings.
Page 31

Mobile Calendar (Version 2.0US) User's Guide -Page 31 -
Buttons
The following buttons are available on the command bar.
New .......Starts Calendar and displays its new record input screen.
..........Displays the search dialog box.
..........Clears the found records list produced by a search operation.
..........Jumps to today's date.
..........Switches to the Daily view.
.......Switches to the Daily view.
.......Returns to the Daily view from the Daily Timetable view.
..........Switches to the Weekly view.
.......Switches to the Weekly Timetable view.
.......Returns to the Weekly view from the Weekly Timetable view.
..........Switches to the Monthly view.
..........Switches to the 3-month view.
 Loading...