


E
MEP-PC10
For Windows
User’s Guide
version 1.00
What you can do
with MEP-PC10
Using MEP-PC10
Troubleshooting
Be sure to keep all user documentation handy for future reference.

Important!
The copyright of this manual and rights related
to the software all revert to CASIO COMPUTER
CO., LTD.
• Microsoft, Windows, Windows Vista, and Internet Explorer are
registered trademarks or trademarks of Microsoft Corporation in the
United States and other countries.
• TrueType is a registered trademark of Apple Inc. in the United States
and other countries.
• Adobe and Reader are trademarks of Adobe Systems Incorporated of
the United States.
• Other company names and product names used herein are trademarks
or registered trademarks of others. Note that TM and ® marks are not
used within the text of this manual.
© 2012 CASIO COMPUTER CO., LTD. All rights reserved.
Except as required for proper use or for creating backup copy, any
reproduction of this manual and/or the program, either in part or in their
entirety, is strictly forbidden without the express written permission of
CASIO COMPUTER CO., LTD.
Precautions Concerning This Manual
Note that CASIO COMPUTER CO., LTD. shall not be held in any way
■
responsible for any losses or lost profi ts, or for any claims by third parties
arising out of the use of the examples presented in this manual.
Any reproduction of this manual, either in part or its entirety, is forbidden.
■
Note that any use of this manual other than personal use without the
permission of CASIO COMPUTER CO., LTD. violates copyright laws.
The specifi cations and other contents contained in this manual are
■
subject to change without notice.
• For information about installing this software and the required oper-
ating environment, see the separate “User’s Guide” or the
“Installation Guide”.
• MEP-PC10 is application software that runs on Windows 8,
Windows 7, Windows Vista, and Windows XP.
• Certain equipment confi gurations may not support proper opera-
tion.
Index
Getting Ready
About this manual... · · · · · · · · · · · · · · · · · · · · · · · · · ·
Read the manual in this sequence · · · · · · · · · · · · · · 3
Information Contained in This Manual · · · · · · · · · · · 3
Introducing MEP-PC10 · · · · · · · · · · · · · · · · · · · · · · · · 5
MEP-PC10 Features · · · · · · · · · · · · · · · · · · · · · · · · 5
MEP-PC10
Using MEP-PC10 · · · · · · · · · · · · · · · · · · · · · · · · · · · · · 8
What you can do with MEP-PC10 · · · · · · · · · · · · · · 8
Starting Up and Exiting MEP-PC10 · · · · · · · · · · · · · · 8
Starting up MEP-PC10 · · · · · · · · · · · · · · · · · · · · · · 8
Exiting MEP-PC10 · · · · · · · · · · · · · · · · · · · · · · · · · · 9
Enabling MEP-PC10 Auto Startup · · · · · · · · · · · · · · 10
Basic Operations · · · · · · · · · · · · · · · · · · · · · · · · · · · · 12
Input Panel · · · · · · · · · · · · · · · · · · · · · · · · · · · · · · 12
Print Preview · · · · · · · · · · · · · · · · · · · · · · · · · · · · · 14
Print Image Screen · · · · · · · · · · · · · · · · · · · · · · · · 14
Right-click Menu · · · · · · · · · · · · · · · · · · · · · · · · · · 15
Inputting, Editing, and Printing Text · · · · · · · · · · · · 16
Inserting Canned Phrases and the Current Date
and Time into a Label · · · · · · · · · · · · · · · · · · · · · · 18
Using On-screen Text to Create a Label · · · · · · · · · 20
Inserting an Image into a Label · · · · · · · · · · · · · · · · 21
Using Previously Printed Content · · · · · · · · · · · · · · 23
Feeding the Printer Tape · · · · · · · · · · · · · · · · · · · · · · 25
3
Confi guring MEP-PC10 Properties · · · · · · · · · · · · · 25
Using Help · · · · · · · · · · · · · · · · · · · · · · · · · · · · · · · · · 31
Appendix
Operation Troubleshooting · · · · · · · · · · · · · · · · · · · · 34
Printing Troubleshooting · · · · · · · · · · · · · · · · · · · · · 35
Error Messages · · · · · · · · · · · · · · · · · · · · · · · · · · · · · 36
Label Creation Troubleshooting · · · · · · · · · · · · · · · · · 37
1

Getting Ready
About this manual...
MEP-PC10 also has a Help feature (page 31) that you
can use to fi nd out about procedures and precautions
when performing operations.
Read the manual in this sequence
First read the section titled “Getting Ready” (page 3 through 6), which
provides a general overview and information about the required
computer operating system.
To actually print a label, see “Using MEP-PC10” (page 8).
Information Contained in This Manual
This manual does not cover Windows.
■
This manual covers MEP-PC10 for Windows. This software is designed
to run on Windows 8, Windows 7, Windows Vista, and Windows XP
(referred to collectively here as “Windows”). This manual does not provide
details about Windows operations.
This manual assumes that you are familiar with the following basic
Windows operations, which are required to use this software.
• Click, double-click, right-click, drag and drop,
and other mouse operations
• Using the mouse to perform menu operations
• Using the keyboard to input text
• Common window operations
For information about these basic operations, refer to the user
documentation that came with your computer or your Windows package.
Button Operation Notation
■
All operations in this manual are explained using mouse operations.
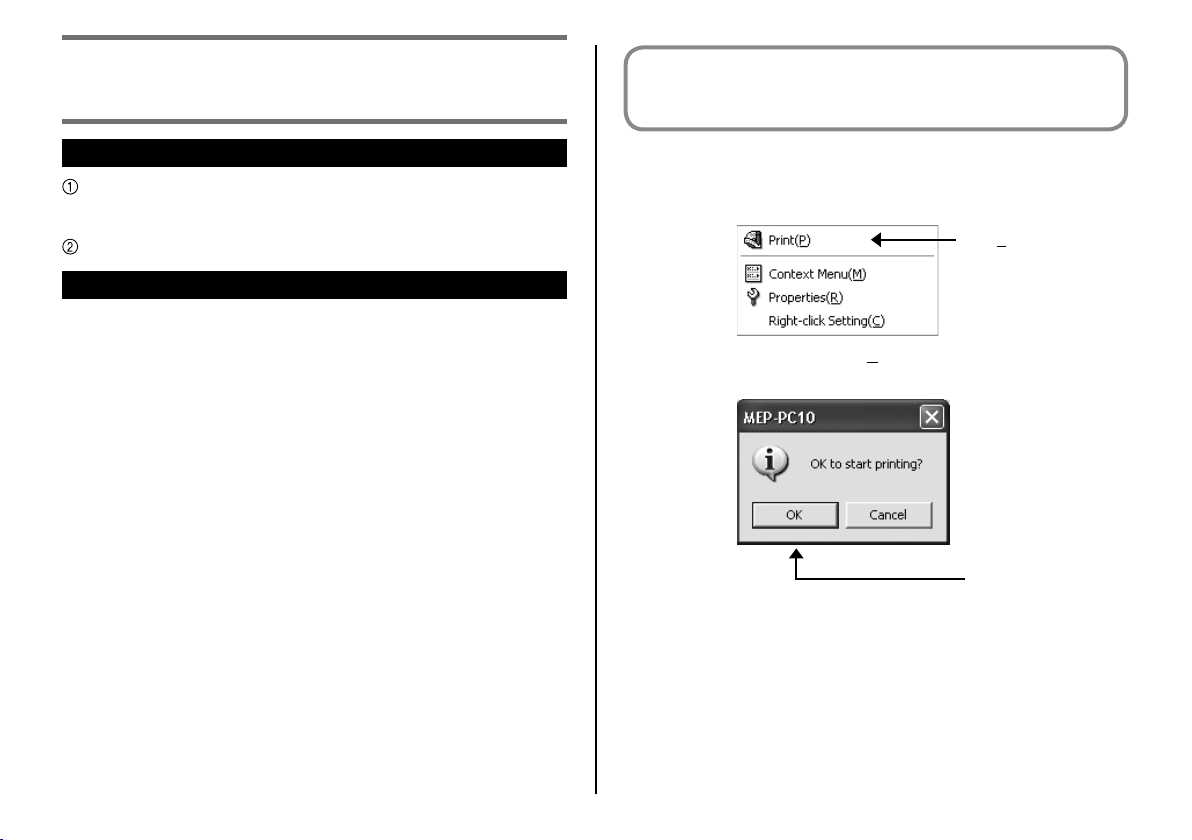
Menu command operations are represented as shown below.
•
Print( P )
Click Print( P ).
Dialog box button operations are represented as shown below.
•
OK
Click OK.
3

Key Operations
■
This software supports use of both mouse operations and keyboard key
operations. The following keyboard key operations are supported: Ctrl,
Shift, Alt. These keys are represented in this manual as Ctrl, Shift, and
Alt. They are used in combination with keyboard letter keys to perform
operations.
■
Display Screen
Though the screen shots shown in this manual may differ somewhat
•
from actual screen images, screen contents are accurately
represented.
Screen shots shown in this manual are based on the English version
•
of Windows XP, and examples assume that “English” was selected as
the display language during installation. Screens produced by other
operating systems or when another display language is selected may
be different from the screen shots shown here.
4
Introducing MEP-PC10
MEP-PC10 lets you use your computer to create content for
printing on tape.
This section explains what you can do with MEP-PC10 and provides
information about the types of uses for which it is suited.
MEP-PC10 Features
MEP-PC10 makes it easy to create labels using text displayed on your
computer screen and text that you input.
You can use fonts installed on your computer for printing. (TrueType
●
fonts only.)
●
Text is automatically adjusted to the optimum size, which eliminates
the need for detailed adjustments.
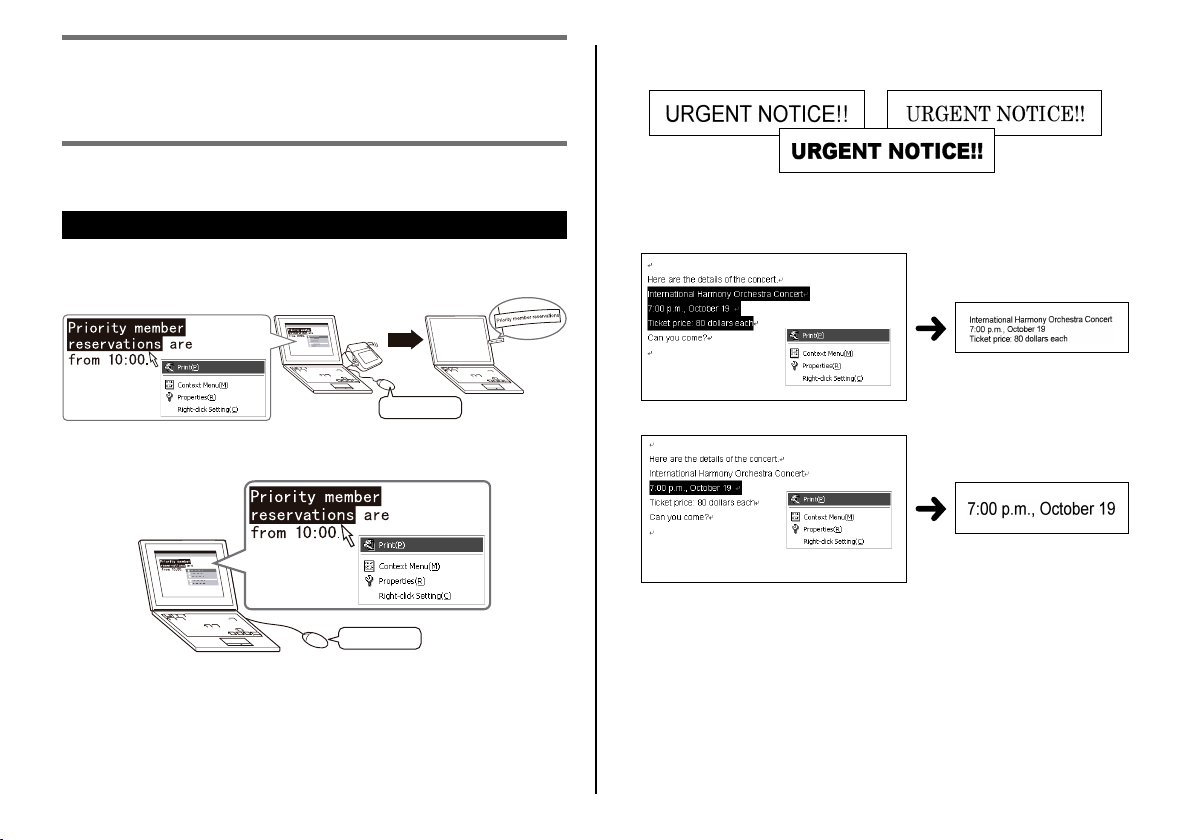
Select three lines...
Right-click
You can print displayed text (text you are inputting or editing input
●
using other software) on the spot.
Right-click
Select one line...
5
●
Leave it running without worrying that it will interfere with other
software.
MEP-PC10
•
Software can be exited when required.
●
Canned phrases for later recall and faster input.
●
History Manager lets you easily recall and reprint previously printed
text.
•
Find out more in “Using MEP-PC10” (page 8).
6

MEP-PC10
Using MEP-PC10
MEP-PC10 makes it easy to create labels using text displayed on
your computer screen and text that you input.
Starting Up and Exiting MEP-PC10
What you can do with MEP-PC10
Simple label creation without worrying about layout. The layout is
●
adjusted automatically in accordance with the text length and tape
width.
The application can be left running while using other software, so
●
text from the other software can be instantly printed as required. See
“Using On-screen Text to Create a Label” (page 20).
MEP-PC10 remains resident in the task tray, so terms can be input at
●
any time. See “Inputting, Editing, and Printing Text” (page 16).
Preview a label before you print it.
●
When printing with the right-click menu, an image screen is
•
displayed before actual printing is performed. See “Print Image
Screen” (page
•
When inputting with the Input Panel, a preview image shows you
what the label will look like when printed. See “Print Preview” (page
14).
Canned phrases can be recalled when inputting text. You can also
●
register your own canned phrases. See “Inserting Canned Phrases and
the Current Date and Time into a Label” (page 18).
History Manager remembers the contents of up to 100 labels. You can
●
recall previously printed content and reprint it. See “Using Previously
Printed Content” (page 23).
Right-clicking inside of another application while MEP-PC10 is
•
running normally will display the right-click menu for that application.
You can also confi gure settings so the MEP-PC10 right-click menu
appears when you right-click inside of another application. See “To
confi gure the MEP-PC10 right-click menu display operation” (page
29).
14).
Starting up MEP-PC10
Note that you do not need to perform this procedure if the MEP-PC10
•
icon is displayed in the Windows task tray.
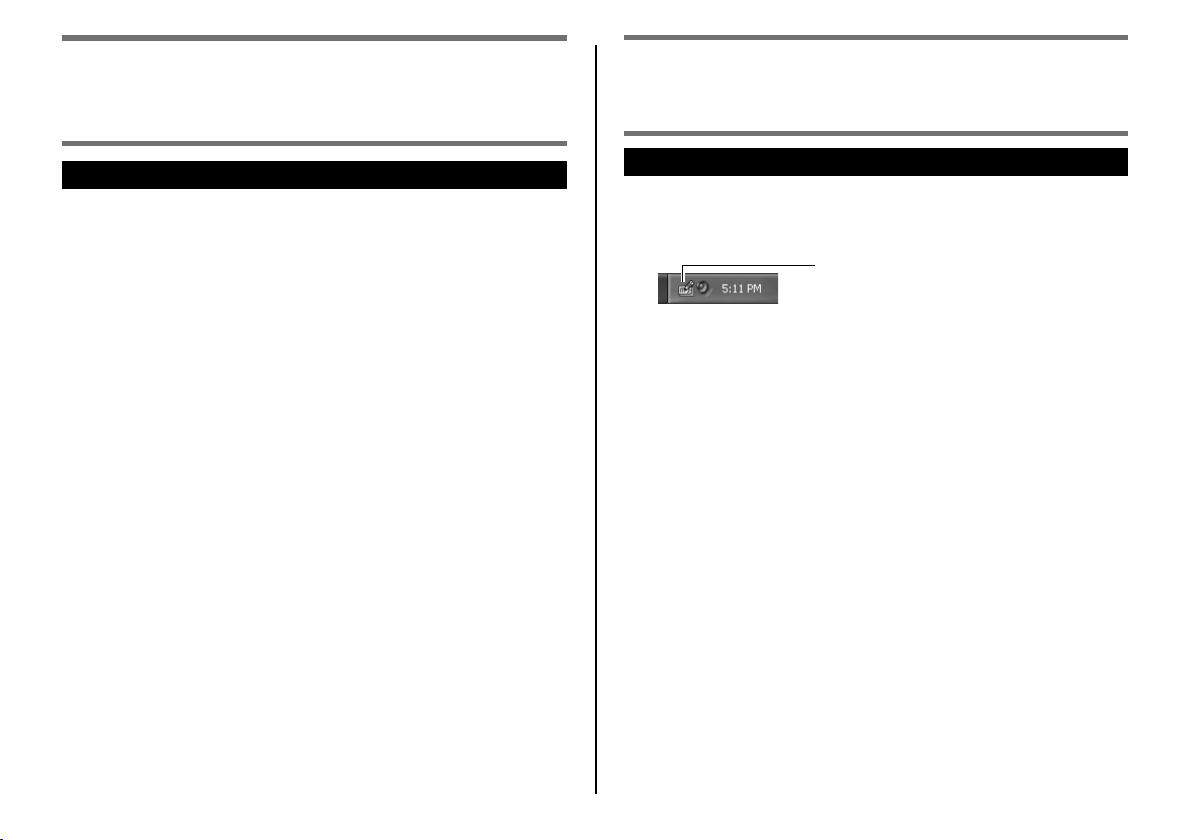
Windows task tray (Normally located in the lower right corner of the screen.)
MEP-PC10 icon (Indicates the application is
running.)
In Windows XP, the MEP-PC10 icon may not be displayed if the
•
“Auto-hide the taskbar” option check box is selected on the
Taskbar tab of the Taskbar and Start Menu Properties screen. Clear
the check box to display the icon.
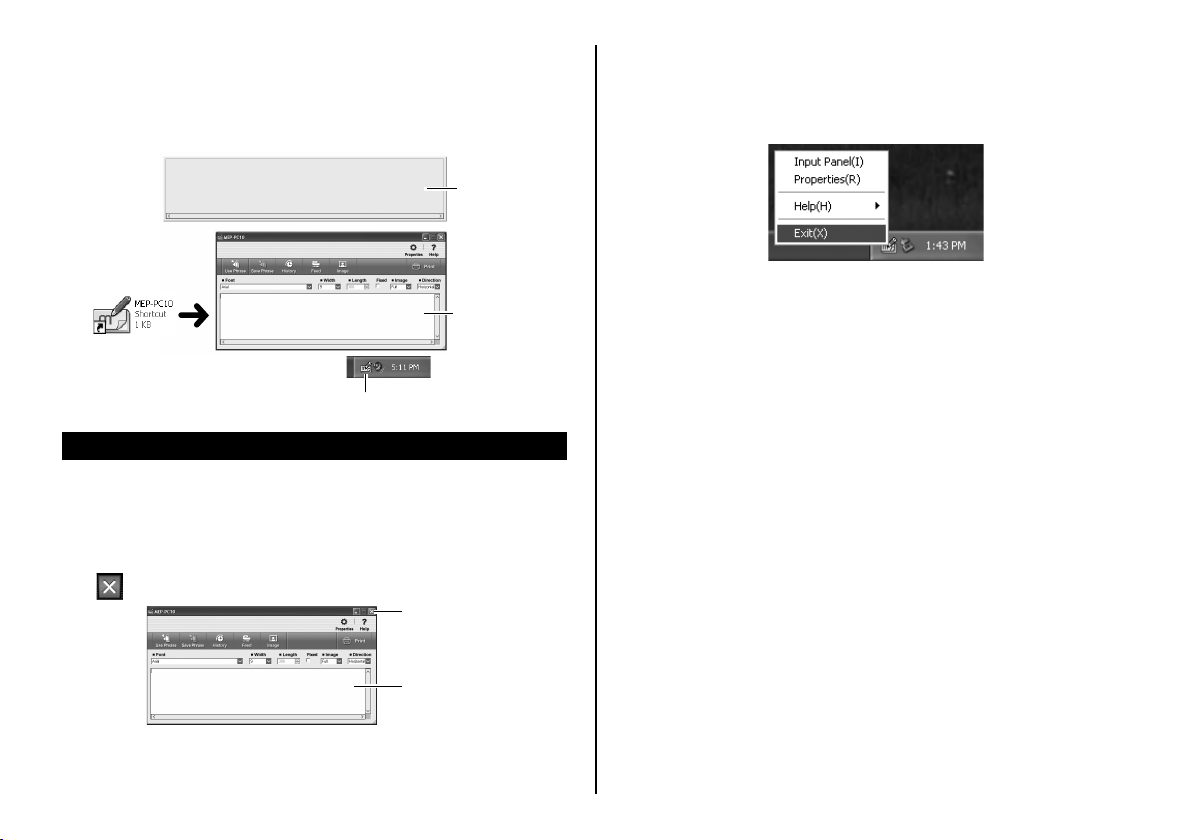
1. On your desktop, double-click the MEP-PC10 icon.
This starts up MEP-PC10. This will cause the Input Panel and a print
preview to appear, and will display the MEP-PC10 icon in the task
tray.
If you specifi ed not to display the MEP-PC10 shortcut on your
•
desktop, navigate to the location on your computer where you
have MEP-PC10 installed and then double-click the MEP-PC10
icon.
8
•
You can also start up MEP-PC10 by performing the following
operation: From the Windows Start menu, click All Programs,
CASIO, MEP-PC10, and then MEP-PC10. Note that the folder
that contains MEP-PC10 depends on settings you confi gured
when you installed the application.
Print preview
Input Panel
Double-click
MEP-PC10 icon
Exiting MEP-PC10
Use either of the two methods described below to exit MEP-PC10.
To exit MEP-PC10 from the Input Panel
■
1. In the upper right corner of the Input Panel, click the close button
(
).
Close button
To exit MEP-PC10 from the task tray
■
1. In the task tray, right-click the MEP-PC10 icon.
2. Click Exit( X ).
This exits MEP-PC10 and causes its icon to disappear from the task
tray.
Input Panel
This exits MEP-PC10 and causes its icon to disappear from the task
tray.
9
Enabling MEP-PC10 Auto Startup
Normally, MEP-PC10 does not start up automatically.
You can use the procedure below to enable auto MEP-PC10
auto startup.
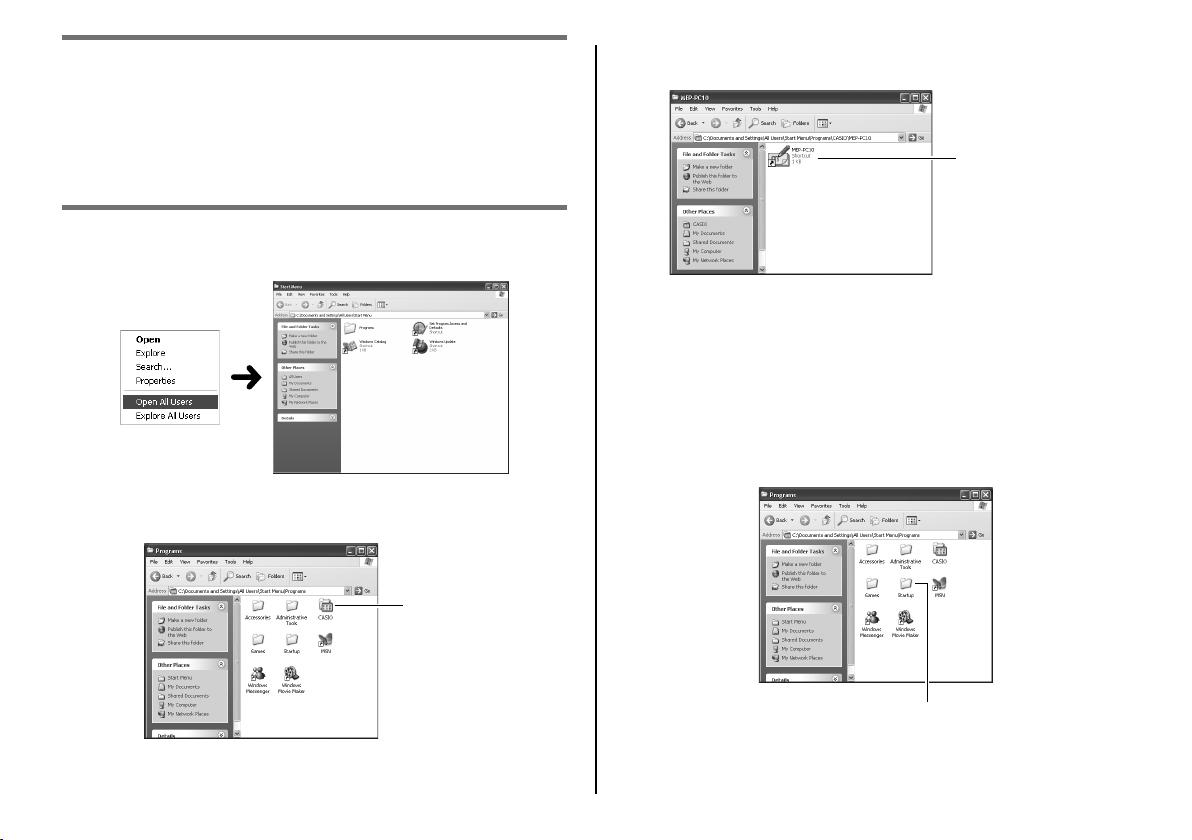
1. Right-click the Windows Start button.
2. Click Open All Users.
3. Double-click the Programs folder.
Check to make sure that there is a folder named CASIO.
CASIO folder
4. Open the CASIO folder and then double-click MEP-PC10.
Check to make sure there is an MEP-PC10 (shortcut) icon.
MEP-PC10 shortcut
5. Highlight the MEP-PC10 shortcut and then right-click. On the right-
click menu that appears, click Copy.
6. Click Back to return to the Programs screen in step 3.
Note that the above operation will differ depending on the
•
operating system you are running. Perform the window close
operation in accordance with the settings of your operating system
to return to the Programs screen in step 3.
7. Double-click the Startup folder.
10
Startup folder

8. On the Edit menu, click Paste.
This copies the MEP-PC10 shortcut to the Startup folder.
MEP-PC10 shortcut
In the case of Windows 8, Windows 7, and Windows Vista, click
•
Paste on the Organize menu.
Under Windows 8, Windows 7, and Windows Vista, a Destination
•
Folder Access Denied dialog box will appear. On the dialog box,
select Continue. When the User Account Control dialog box
appears, select Continue again.
Now restarting Windows will cause MEP-PC10 to start up automatically
and its icon will appear in the task tray.
To disable MEP-PC10 Auto Startup
■
1. Right-click the Windows Start button.
2. Click Open All Users.
3. Double-click the Programs folder.
4. Double-click the Startup folder.
5. Delete the MEP-PC10 icon.
The MEP-PC10 icon shown here is a shortcut icon, so deleting it
does not uninstall MEP-PC10.
Delete this icon.
Under Windows 8, Windows 7, and Windows Vista, a Destination
•
Folder Access Denied dialog box will appear. On the dialog box,
select Continue. When the User Account Control dialog box
appears, select Continue again.
11

Basic Operations
This section explains the Input Panel for inputting or editing text,
the print preview image and print preview screen for checking
the appearance of a label before printing it, and the contents of
the MEP-PC10 right-click menu. For operational procedures for
each function and item, go to the pages that are referenced in
this section.
Input Panel
Use Phrase button
Displays a list of canned phrases that can be input into the input box.
See “To input a canned phrase or the current date and time” (page
➜
18).
Save Phrase button
Saves text highlighted in the text input box as a new canned phrase
for later recall.
See “To register your own canned phrases” (page 19).
➜
History button
Displays a list of previously printed contents.
➜
See “To view History Manager contents” (page 23).
Feed button
Performs tape feed.
See “Feeding the Printer Tape” (page
➜
25).
Image button
Displays an image selection screen.
See “To insert an image into a label” (page 22).
➜
Properties button
Displays properties.
See “Confi guring MEP-PC10 Properties” (page
➜
25).
Minimize button
Closes the Input Panel and displays the MEP-PC10 button in the
task bar. To return the Input Panel to its original size, click the MEPPC10 button in the task bar or click the MEP-PC10 icon in the task
tray.
Close button
Closes the Input Panel and exits MEP-PC10.
Help button
Displays simple explanations of functions.
See “To access Help from the Input Panel” (page 31).
➜
Print button
Prints the text in the text input box.
See “Inputting, Editing, and Printing Text” (page
➜
16).
Direction box
Specifi es the printing direction.
See “Inputting, Editing, and Printing Text” (page 16).
➜
Image box
For specifying the position and size of a pasted image.
12

Fixed tape length check box
Toggles the tape length setting between fi xed and variable.
See “Inputting, Editing, and Printing Text” (page 16).
➜
See “Confi guring MEP-PC10 Properties” (page 25).
➜
Length box
Specifi es the tape length.
See “Inputting, Editing, and Printing Text” (page 16).
➜
See “Confi guring MEP-PC10 Properties” (page
➜
25).
Width box
Specifi es the tape width and type.
See “Inputting, Editing, and Printing Text” (page 16).
➜
See “Confi guring MEP-PC10 Properties” (page 25).
➜
Font box
Specifi es the font.
See “Inputting, Editing, and Printing Text” (page
➜
See “Confi guring MEP-PC10 Properties” (page
➜
16).
25).
Text input box
Area for inputting and editing text to be printed.
See “Inputting, Editing, and Printing Text” (page
➜
Important!
You also can use the properties screen to specify items that appear
on and can be set with the Input Panel. For more information, see
“Confi guring MEP-PC10 Properties” (page
You can resize the Input Panel by dragging its edges.
•
25).
16).
Tool Button Names
Moving your mouse pointer near a tool button on the Input Panel
will cause the name of the button to appear.
•
Moving the pointer near
the Length box displays
the supported tape length
settings. Moving the pointer
near the Fixed tape length
check box will display “Fix
Tape Length”.
Tool button nameTool button name
13

Print Preview
The print preview image gives you an idea of what the data will look like
when you print it.
Print preview
Print Image Screen
Selecting Print on the right-click menu will display the print image screen
before actually printing.
Scroll bar
Text input box
If the print length is longer than the print preview size, the right side
●
will be cut off. Slide the scroll bar handle left or right to bring the other
parts of the preview into view. You also can view more of the print
preview by dragging the edges of the preview window to make it
bigger.
Any part of a label that does not fi t within the print area (due to settings
●
or the number of characters) will not be printed. Either decrease the
number of characters or adjust the tape length as you confi rm the
result on the print preview, and then print.
When arranging a graphic image, you can display it as a grayscale
•
image instead of a binary image. See step 3 under “To confi gure
display settings” (page
28).
Scroll bar
If the print length is longer than the print image screen size, the right
●
side will be cut off. Slide the scroll bar handle left or right to bring the
other parts of the preview into view. You also can view more of the
print image by dragging the edges of the print image screen to make
it bigger.
Any part of a label that does not fi t within the print area (due to settings
●
or the number of characters) will not be printed. Either decrease the
number of characters or adjust the tape length as you confi rm the
result on the print preview, and then print.
Clicking Print( P ) starts printing.
●
Clicking the Cancel button cancels the print operation.
●
14
Right-click Menu
Right-clicking a screen while MEP-PC10 is running will display the rightclick menu.
•
Note that the right-click menu will appear only if you selected the
“Display MEP-PC10 shortcut menu on right-click. ( M )” option
check box in step 3 under “To confi gure the MEP-PC10 right-click
menu display operation” on page
MEP-PC10 Right-click Menu
■
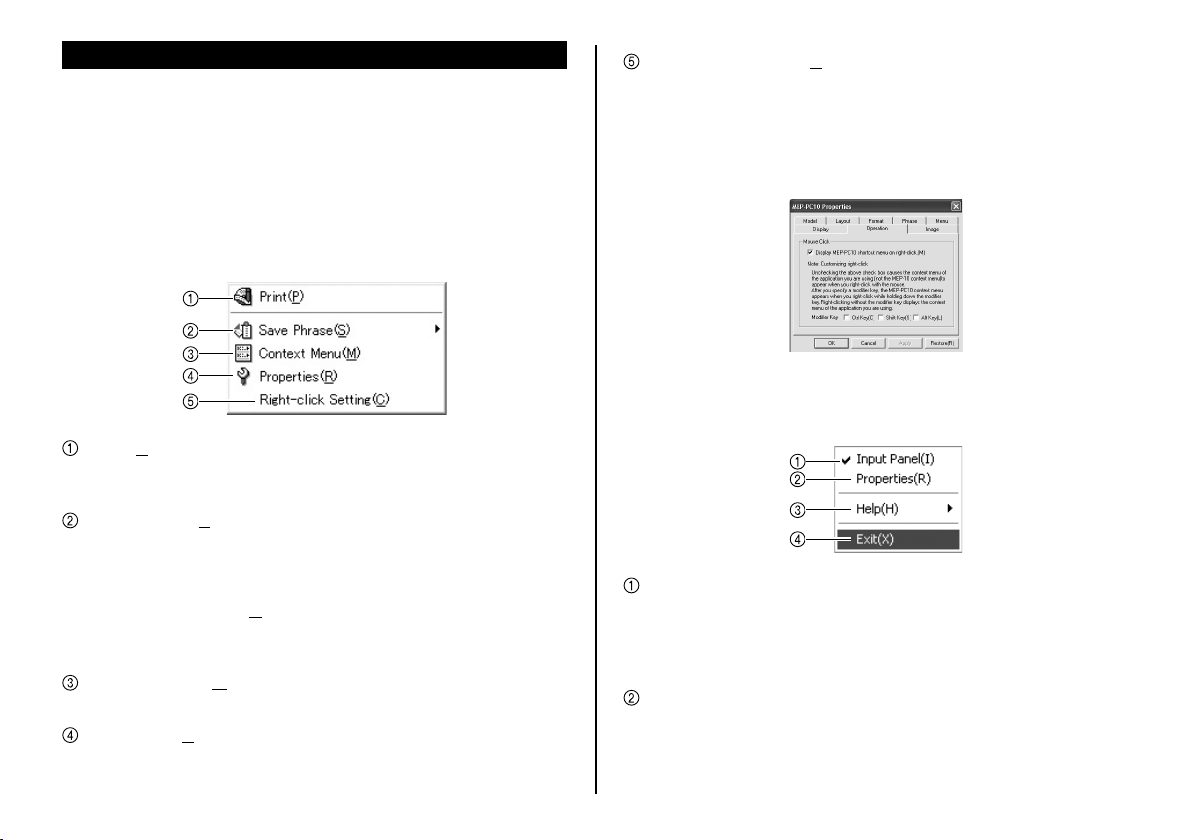
The MEP-PC10 right-click menu appears when you right-click on a word
processor, mail client, or other application’s screen.
Print( P )
Prints the text that is highlighted on another application’s screen.
See “To use on-screen text to create a label” (page
➜
Save Phrase( S )
Saves the text that is highlighted on another application’s screen as a
canned phrase.
Click USER1, 2, or 3.
Note that Save Phrase( S ) will appear on the right-click menu only if
•
you selected the Save Phrase option check box in step 2 under “To
confi gure MEP-PC10 right-click settings” on page 28.
Context Menu( M )
Displays the context menu of the application you are using.
Properties( R )
Displays MEP-PC10 properties.
29.
20).
Right-click Setting( C )
Displays the Operation setup window.
You can use the Operation setup window to disable display of the
MEP-PC10 right-click menu, or to confi gure it to appear only if you
right-click while the Ctrl, Shift, or Alt key is depressed.
See “To confi gure the MEP-PC10 right-click menu display
➜
operation” (page 29).
Task Tray Icon Right-click Menu
■
This menu appears when you right-click the MEP-PC10 icon in the task
tray.
Input Panel( I )
Displays the Input Panel.
See “Input Panel” (page 12).
➜
If this menu item has a check mark next to it, clicking it will hide
•
the Input Panel.
Properties( R )
Displays a screen for confi guring MEP-PC10 settings.
➜
See “Confi guring MEP-PC10 Properties” (page 25).
15

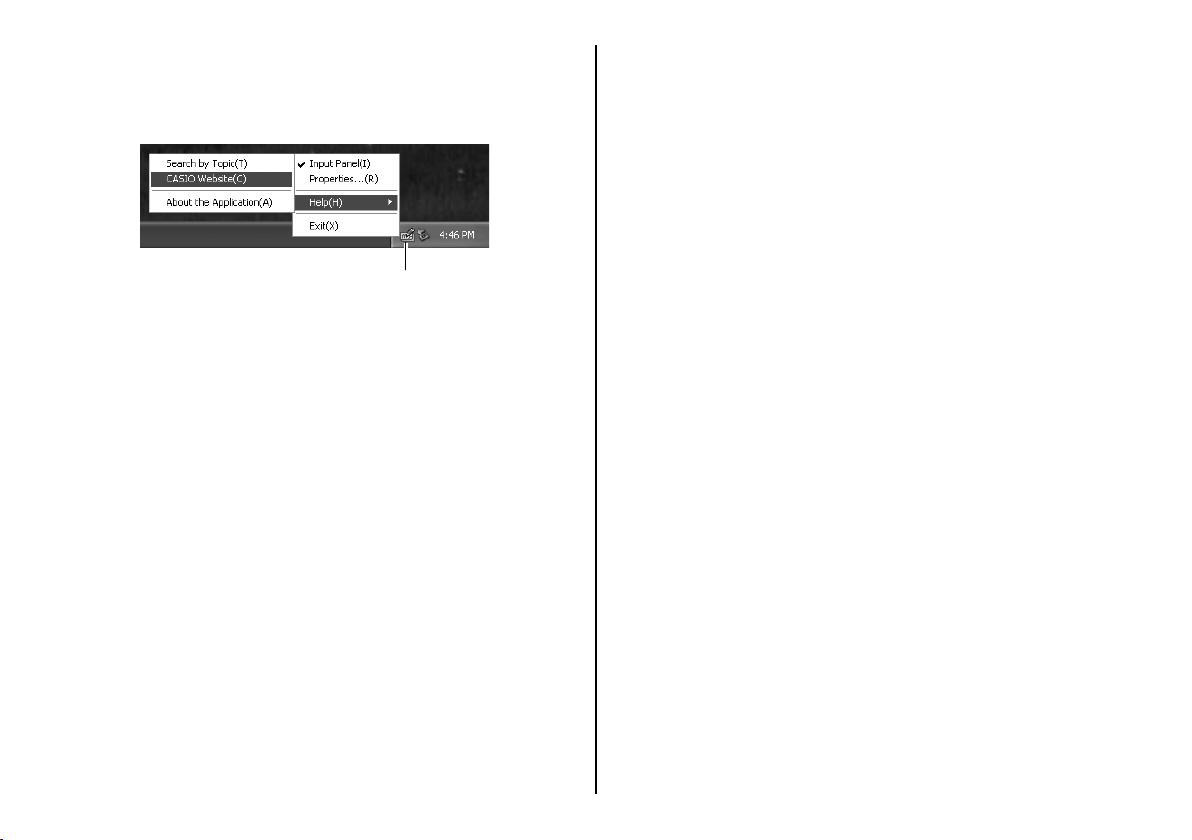
Help( H )
Displays a help menu.
See “To access help from the task tray icon” (page 31), “To access
➜
the CASIO website” (page
31).
(page
Help Menu
32), and “To check version information”
Exit( X )
Exits MEP-PC10.
See “ Exiting MEP-PC10” (page 9).
➜
Inputting, Editing, and Printing Text
You can use the Input Panel to input text or to edit text from that
you imported from another source, and then print it.
To input and edit text
■
1. While MEP-PC10 is running, click the MEP-PC10 icon in the task
tray.
If MEP-PC10 is not running, double-click the MEP-PC10 icon on
your computer’s desktop. This will display the Input Panel, so go on
to step 2.
Note that the Input Panel will not appear unless you have the
•
“Open Input Panel when program is started up.” option’s
check box selected on the Display tab of the Properties screen.
After MEP-PC10 starts up, click the MEP-PC10 icon in the task
tray.
This will display the Input Panel and a print preview.
2. Use the Input Panel to input and edit the text you want to print.
The print preview image will change as you input and edit text.
•
You can input up to 255 characters per label line. Exceeding 255
•
characters will automatically break to the next line. Note that the
number of characters that can be printed per label line is restricted
even further if you have fi xed tape length specifi ed. Reaching the
limit will cause an automatic break to the next line.
You can confi gure font, tape width, tape length, and other settings.
•
See “Input Panel” (page
You can insert graphic images into a label. See “To insert an image
•
into a label” (page
Functions are available for simple input of canned phrases, and
•
automatic input of the current date and time. See “Inserting
Canned Phrases and the Current Date and Time into a Label”
18).
(page
12).
22).
16

To print a tape
■
Print preview
3. Use the Direction box to specify the print direction.
Select Horizontal or Vertical.
Width
Font
Length
Print
Direction
Image
Fixed
1. Use the Width box to select the width of the tape you want to print.
Select the setting that matches the width of the tape you have
•
loaded in the printer.
2. Use the Length box to specify the label length.
•
If the Fixed check box is cleared (not selected), you will not be
able to specify a length with the Length box because the tape
length will be adjusted automatically. In this case, the Length box
will show “300 (mm)” (approximately 11.8 inches).
•
If the Fixed check box is selected, you can use the Length box to
specify a length in the range of 25 mm to 300 mm (approximately
0.9 to 11.8 inches), in 5-mm (approximately 0.2-inch) steps.
•
Note that you may not be able to print if you fi x a tape length that
is very short. In this case, nothing will appear in the print preview
either.
The tape length setting should be considered as an approximation
•
only. The actual length of the printed tape may be shorter due to
environmental conditions where you are printing, or due to printing
contents.
4. Use the Image box to specify the image position and size (page 21).
If you do not want to insert an image, select None.
5. Input you text and select a font, if you want (page 27).
6. Check the layout on the print preview.
The print preview image will change in accordance with the
•
settings you select.
7. Check to make sure that the printer is connected to your computer.
If the printer has a display, touch the touch panel to turn on power.
•
On the Main Menu screen that appears, touch the PC Link icon.
Check to make sure that the message “Ready for data transfer”
is displayed on the printer.
8. Check to make sure that you have tape loaded in the printer.
•
For information about how to load tape into a printer, see the user
documentation that comes with the printer.
9. Click the Print button.
You can also print by pressing Alt + P. This displays a print
confi rmation message.
10. Click OK.
This starts printing.
•
If the print preview screen appears, click Print( P ).
•
Any part of a label that does not fi t within the print area (due to
•
settings or the number of characters) will not be printed. Either
decrease the number of characters or adjust the tape length as
you confi rm the result on the print preview, and then print.
17

Important!
Never disconnect the AC adaptor or USB cable while printing is in
•
progress. Also, do not open the printer cover.
•
Take care that the printer’s tape outlet is not blocked by anything
during printing. Do not touch the tape as it comes out of the printer
during printing.
Inserting Canned Phrases and the Current Date and Time into a Label
MEP-PC10 comes with a collection of canned phrases that are often
used in labels. These help to make label creation quicker and easier.
You can also register and use your own canned phrases.
To input a canned phrase or the current date and
■
time
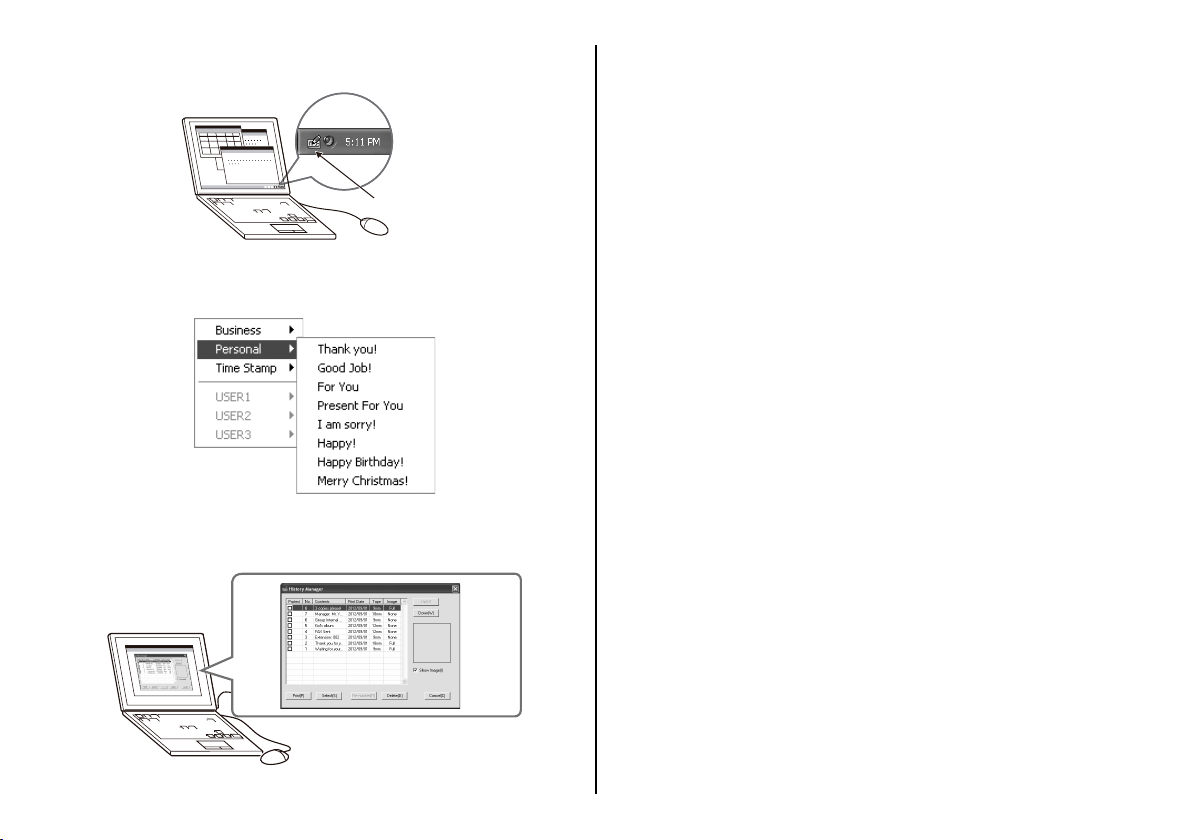
1. On the Input Panel, click the Use Phrase button.
This displays a phrase menu.
The phrase menu shows a list of categories (such as Business
•
and Personal).
Use Phrase button
18

2. Moving the mouse pointer to a category will display a list of phrases
in that category. Click the phrase you want to input.
This will input the phrase into the Input Panel.
Selecting Time Stamp will insert a place holder, which will cause
•
the current date and time (at the time of printing, as kept by your
computer’s clock) to be inserted.
To register your own canned phrases
■
1. On the Input Panel, highlight the text you want to register as a
canned phrase.
2. Click the Save Phrase button.
This displays a phrase menu.
Save Phrase button
You also can select text somewhere outside of the input box of
•
the Input Panel and register it as a canned phrase. Right-click the
selected text and then click Save Phrase( S ) on the right-click
menu.
If there is no Save Phrase( S ) on the right-click menu, see the
•
procedure under “To confi gure MEP-PC10 right-click settings”
(page 28) for information about how to display it.
3. On the list of groups that appears, select the group to which you
want to save the phrase.
This will save the phrase to the group you select.
•
There are three groups named USER1, USER2, and USER3, and
•
you can save up to 30 phrases to each group (90 total).
Editing a Canned Phrase
■
See “To edit canned phrases” (page 28) for information about how to edit
a phrase you registered, how to change the display sequence, etc.
19

Using On-screen Text to Create a Label
You can use the procedures in this section to select on-screen
text in a word processor, in an e-mail message, or in some other
text application and use it in a label. You can even combine bits
of text from different sources in a single label.
To use on-screen text to create a label
■
Example: To print text from Microsoft Offi ce Outlook
1. Check to make sure that the printer is connected to your computer.
2. While MEP-PC10 is running, highlight the text you want to print.
•
You can input up to 255 characters per label line. Note that the
number of characters that can be printed per label line may be
restricted even further if you have fi xed tape length specifi ed.
3. Right-click the selected text.
If you need to access the context menu of the text application you
•
are using (Microsoft Offi ce Outlook in this example), click Context
Menu( M ) on the MEP-PC10 right-click menu.
4. Click Print( P ).
This displays the print image screen.
For information about the print preview screen, see “Print Image
•
Screen” (page 14).
5. Check to make sure that you have tape loaded in the printer.
6. Click Print( P ).
This starts printing.
•
You can also start printing by pressing Alt + P.
•
Any part of a label that does not fi t within the print area (due to
•
settings or the number of characters) will not be printed. Either
decrease the number of characters or adjust the tape length as
you confi rm the result on the print preview, and then print.
Important!
Never disconnect the AC adaptor or USB cable while printing is in
•
progress. Also, do not open the printer cover.
Take care that the printer’s tape outlet is not blocked by anything
•
during printing. Do not touch the tape as it comes out of the printer
during printing.
20

Inserting an Image into a Label
MEP-PC10 comes with built-in images (illustrations) that you can
insert into labels you create.
When you inserting an image, you need to specify its initial
position inside the label and the size of the image.
You will be able to change the position and image size later, if
you want.
To specify the initial position and size of an image
■
1. Use the Image box to specify the image position and size.
The table below shows the setting options available and how they
affect the label layout.
L-Sm
Image box
Selecting Full will cause the text and image to be superimposed with
•
each other. If Full is selected while the Fixed check box is cleared, the
print preview image will not appear until you start inputting text.
No image is inserted when the None option is selected.
•
Inserting an image will restrict the area that can be used for printing
•
text more than when None is selected.
R-Sm
L-Lg
R-Lg
Full
None
After performing the above procedure, use the procedure below to
actually insert an image.
21

To insert an image into a label
■
1. Click (Image button).
This displays an image selection window.
The Image button will be disabled if the None option is selected
•
with the Image box.
Image button
3. Click OK.
This will insert the image in the position and at the size you specifi ed
with the Image box in the previous procedure.
Image Folder Contents
■
MEP-PC10 comes with a library of built-in image data.
Images are stored in four folders (Illust, Frame_S, Frame_M, Frame_L),
which you can fi nd in the Samples folder inside the MEP-PC10 folder.
The table below provides a brief description of what you can fi nd in each
image folder.
Image
Folder Name
Illust Illustrations• 256×256 40
Image Description
Image Size
(pixels)
Number
of Images
•
You can also display the image selection window by pressing
Alt + I.
2. Click the folder that contains the image you want to insert and then
click the image.
•
For information about the images stored in each folder, see “Image
Folder Contents” (page 22).
Frame_S Short frames, for use as
Frame_M Medium-size frames, for use
Frame_L Large-size frames, for use as
When Layout( L ) is selected on the Image tab on the properties
*
screen or when Full is selected with the Image box on the Input Panel,
input spaces to adjust the text and make sure that it does not overlap
with the frame.
22
• 256×64 12
backgrounds.*
• 384×64 12
as backgrounds.*
• 512×64 12
backgrounds.*

Using Previously Printed Content
The History Manager feature of MEP-PC10 remembers the
contents of up to 100 previously printed labels. You can recall a
previous label and print it again as-is, or you can edit it to create
a new label before printing.
To view History Manager contents
■
1. Click (History button).
History button
This displays a list of data for previously printed labels, along with a
preview of the label that is currently selected (highlighted).
You can also display the list of previously printed label data by
•
pressing Alt + T.
Protect check box
Label data whose protect check box is selected will not be deleted,
even if the maximum number of history items is exceeded. Data for
up to 99 labels can be protected against deletion.
Sort by number button
Click to toggle the list between ascending and descending order on
the entry number.
Contents sort button
Click to toggle the list between ascending and descending alphabetic
order on the contents.
Print Date sort button
Click to toggle the list between ascending and descending order on
the print date.
23

Tape sort button
Click to toggle the list between ascending and descending order on
the tape size.
Image sort button
Click to toggle the list between ascending and descending order on
the presence of an image in the label data.
Up( U ) button
Click to move the highlighted label data up one line in the list.
Down( W ) button
Click to move the highlighted label data down one line in the list.
Show Image( I ) check box
Selecting this check box displays image data on the right side of the
History Manager screen.
Print( P ) button
Executes a print operation.
Select( S ) button
Click to return to the Input Panel, and edit the label data, if you want.
Re-number( R ) button
Click to renumber History Manager contents according to how
they currently appear on the screen. Click this button to renumber
contents after performing a sort operation or after you move label
data upwards or downwards in the list.
Delete( D ) buton
Click to delete the highlighted label data from History Manager.
Cancel( C ) button
Click to close the History Manager screen.
To recall previously printed data for editing and/or
■
re-printing
1. On the History Manager screen, highlight the label data you want
to re-print.
•
You can use the scroll bar to scroll the list contents and search for
the data you want.
•
You can use the Contents, Print Date, Tape, and Image sort
buttons to change the sort order of the list to make it easier to fi nd
the label data you want.
•
You can use the Up( U ) and Down( W ) buttons to move label data
upwards or downwards in the list.
Print Date
Contents
Previously printed
label data
2. To print the currently selected tape data as-is, click the Print( P )
button. If you want to edit the tape data fi rst, click the Select( S )
button.
•
If the label data includes an image, you can display the image by
selecting the Show Image( I ) check box.
•
If you have changed the sequence of the label data items in the
list, you can click the Re-number( R ) button to renumber the
items in accordance with their current sequence.
•
To delete label data, highlight it and then click the Delete( D )
button.
Image
Tape
Up
Down
Scroll bar
24

Feeding the Printer Tape
Perform the step below to feed the printer’s tape.
To feed the printer tape
■
Click (Feed button).
Confi guring MEP-PC10
Properties
You can use MEP-PC10 properties to confi gure show/hide
settings of the items that appear on the Input Panel, and to
specify other settings for each item.
To display the properties screen
■
1. On the Input Panel, click the Properties button.
This displays the Model tab on the properties screen.
If the Input Panel is on the display, you can also display the
properties screen by pressing Alt + R.
•
Another way to display the properties screen is to right-click the
MEP-PC10 icon in the task tray and then click Properties( R ) on
the right-click menu that appears.
Model tab
To apply your settings and exit the properties screen, click OK.
●
To discard your settings and exit the properties screen, click
•
Cancel.
To apply your settings and keep the Properties screen displayed,
•
click Apply( A ).
To initialize settings to their post-installation defaults, click
•
Restore( R ).
25

To confi gure print settings (Printer, Layout,
■
Format)
1. Display the properties screen (page 25).
2. Click the Model tab.
3. Confi gure the settings described below.
Use the Offset for Folding setting to specify leading or trailing
•
margins to suit the location where the label will be used or how it
will be affi xed to something.
Selecting Left or Right will insert a margin that can be used as the
•
part that is affi xed to a document or other object, with the text part
of the label sticking out or folded upwards so it sticks up.
If you plan to affi x the entire surface of the label to an object, select
•
None here.
None Left Right
Leading
margin
(left)
Trailing
margin
(right)
•
•
Approximately
10 mm
(Approximately
0.4 in.)
Approximately
10 mm
(Approximately
0.4 in.)
You should change the Print Density( D ) setting only when you
feel printed text is blurry or too dark (too much density). Normally
you should leave print density at a setting of 3.
The Auto Cut Style( C ) is fi xed and cannot be changed.
Approximately
20 mm
(Approximately
0.8 in.)
Approximately
10 mm
(Approximately
0.4 in.)
Approximately
10 mm
(Approximately
0.4 in.)
Approximately
20 mm
(Approximately
0.8 in.)
4. Click the Layout tab.
Layout tab
5. Confi gure settings for each item.
•
You can change the Tape Length( L ) setting value within a range
of 25 to 300 mm (approximately 1 to 11.8 inches).
•
The tape length setting should be considered as an approximation
only. The actual length of the printed tape may be shorter due to
environmental conditions where you are printing, or due to printing
contents.
•
The table below shows the setting values for Tape Width( W ).
Tape width Maximum printing width
9 mm (approximately 0.3 in.),
12 mm (approximately 0.5 in.),
18 mm (approximately 0.7 in.)
12 mm (approximately 0.5 in.)
26

6. Click the Format tab.
Format tab
7. Confi gure settings for each item.
The Typeface( F ) setting is the same as the Input Panel’s Font
•
setting. The font you select here will also appear as the Input
Panel’s Font setting.
The Print Direction( D ) setting is the same as the Input Panel’s
•
Direction setting. The print direction you select here will also
appear as the Input Panel’s Direction setting.
The Word Wrap( W ) and Justify( J ) options are described under
•
“Word Wrap and Justify”, below.
Note that the Direction setting’s Vertical option applies only to
•
Chinese kanji and other double-byte characters. Horizontal printing
is always performed for other types of characters, regardless of
the Direction setting.
Some fonts may not support vertical text orientation.
•
Word Wrap and Justify
Word Wrap: This function ensures that new line operations are not
performed in the middle of a word.
Justify: This function prints text with the right side forming a
straight vertical line.
●
Word Wrap: Check box cleared
Justify: Check box cleared
Example
The word “into” is
split between two
lines.
Word Wrap: Check box selected
●
Justify: Check box cleared
Example
Words at the end of
a line (“into” in this
example) are moved
to the next line intact.
Word Wrap: Check box selected
●
Justify: Check box selected
Example
New line operation
is performed before
“into” and text is
adjusted to keep the
right side aligned.
Word Wrap: Check box cleared
●
Justify: Check box selected
Example
The word “into” is
split between two
lines and text is
adjusted to keep the
right side aligned.
“Word Wrap” and/or “Justify” are not supported for Chinese kanji
and other two-byte characters.
27

To edit canned phrases
■
To confi gure MEP-PC10 right-click settings
■
1. Display the properties screen (page 25).
2. Click the Phrase tab.
Phrase tab
3. Select the group that contains the phrase that you want to edit.
This will display the phrases included in the group.
4. Click the phrase you want to edit.
5. Edit the phrase as desired.
You can use the following to edit the phrase: Cut( T ), Copy( C ),
•
Paste( P ), Delete( D ), Up( U ), Down( W ).
You can copy a phrase from one group to another, if you want.
•
To select multiple phrases, hold down your keyboard’s Ctrl key as
•
you click phrases to select them.
1. Display the properties screen (page 25).
2. Click the Menu tab.
Menu tab
3. Select the check box next to each of the items that you want to
appear in the MEP-PC10 right-click menu.
To confi gure display settings
■
1. Display the properties screen (page 25).
2. Click the Display tab.
Display tab
28

3. Confi gure settings for each item.
•
To display with grayscale, select the “Display preview image in
monochrome.” check box.
•
To keep the MEP-PC10 Input Panel always on top of other
windows of other applications you have open, select the “Keep
Input Panel in front.” check box.
•
To display the Input Panel automatically whenever the MEP-PC10
program is started up, select the “Open Input Panel when
program is started up.” checkbox. If you do not want the Input
Panel displayed automatically at startup, clear the check box.
To confi gure the MEP-PC10 right-click menu
■
display operation
1. Display the properties screen (page 25).
2. Click the Operation tab.
Operation tab
3. Confi gure the right-click menu display operation settings.
•
You can confi gure MEP-PC10 so right clicking on another
application’s window displays the MEP-PC10 right-click menu
instead of the application’s right-click menu.
When this check box is selected
•
Right-clicking while holding down your
keyboard’s Alt key displays the MEP-PC10
right-click menu.
•
Right clicking without the Alt key displays
the right-click menu of the other application.
The MEP-PC10 rightclick menu does not
appear when this check
box is cleared.
When this check box is selected
Right-clicking while holding down
•
your keyboard’s Ctrl key displays
the MEP-PC10 right-click menu.
Right clicking without the Ctrl key
•
displays the right-click menu of
the other application.
29
When this check box is selected
Right-clicking while holding down
•
your keyboard’s Shift key displays
the MEP-PC10 right-click menu.
Right clicking without the Shift key
•
displays the right-click menu of the
other application.

To confi gure image settings
■
1. Display the properties screen (page 25).
2. Click the Image tab.
Image tab
•
This setting is the same as the Input Panel’s Image box. The item
you select with Layout( L ) will also appear as the Input Panel’s
Image setting.
•
Selecting the “Resize to fi t( F )” check box will resize the image
to fi t inside the size specifi ed by Layout( L ). When this check box
is cleared, the image is inserted as-is in the position specifi ed by
Layout( L ).
•
Selecting the “Maintain aspect ratio( M )” check box will maintain
the aspect ratio of the original image when performing a re-size
operation. This setting is ignored when the “Resize to fi t( F )”
check box is cleared.
4. Specify the monochrome conversion method.
•
Use Dithering( D ) to select the monochrome conversion method.
The available options are described below.
3. Select one of the image positioning options shown below.
Use the Layout( L ) settings to specify the image insertion position
•
and size. The table below shows the setting options available and
how they affect the label layout.
L-Sm
R-Sm
L-Lg
R-Lg
Full
None
30
Nearest color
Bright colors are made whiter and dark colors are made
blacker. This option is best when printing data that
includes line drawing illustrations or text only.
Pattern
Dark colors are black and light colors are white, as when
a color photograph is photocopied on a black and white
color copier.
Error Diffusion
Dark colors are black and light colors are white, as when
a color photograph is photocopied on a black and white
color copier. Printing takes longer than when Pattern is
•
Adjust the intensity of the inserted image by dragging the
selected, but the resulting printout looks better.
Gamma( G ) slider.

Using Help
There are two ways to access help: from the Input Panel and by
right-clicking the MEP-PC10 icon in the task tray. The menu that
appears when you right-click the icon also includes an item for
checking version information.
To access Help from the Input Panel
■
1. Click the Help button.
To access Help from the task tray icon
■
1. In the task tray, right-click the MEP-PC10 icon.
2. Click Help( H ) and then Search by Topic( T ).
MEP-PC10 icon
This will display the same screen that appears in step 1 under “To
access Help from the Input Panel”.
To check version information
■
1. In the task tray, right-click the MEP-PC10 icon.
2. Click Help( H ) and then About the Application( A ).
This displays version information.
MEP-PC10 icon
3. After checking the information, click OK.
31
To access the CASIO website
■
1. In the task tray, right-click the MEP-PC10 icon.
2. Click Help( H ) and then CASIO Website( C ).
MEP-PC10 icon
This displays the CASIO website.
•
32

Appendix

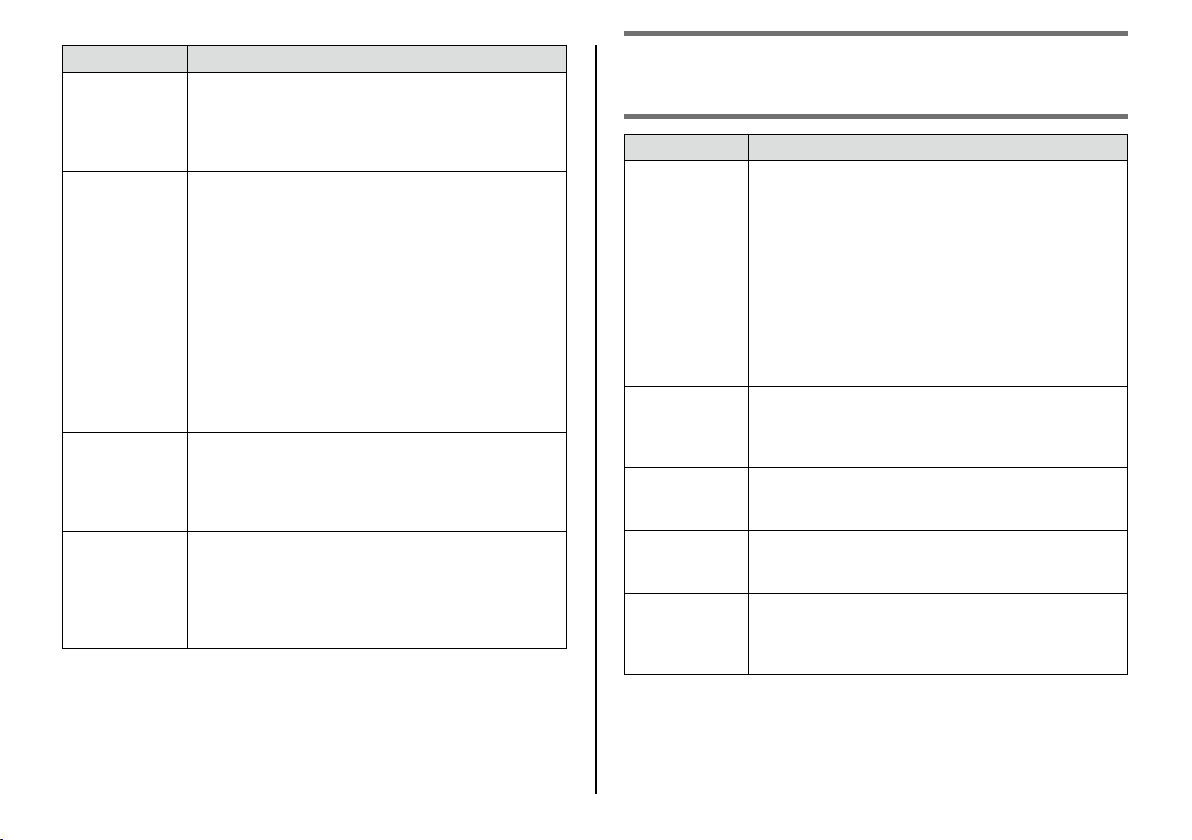
Operation Troubleshooting
Symptom Possible Cause Check This
Something
● Windows screen
wrong with the
MEP-PC10
Input Panel
or preview
screen, or with
my Windows
desktop.
Problems
● Confl ict between
using the
MEP-PC10
right-click
menu.
saver operation
the MEP-PC10
right-click menu
and another
application
Screen saver compatibility problems
when you have the “Keep Input
Panel in front.” check box selected
on the Display tab of the MEP-PC10
properties screen can cause the
Input Panel to remain displayed after
the screen saver is triggered. If this
happens, either clear the “Keep
Input Panel in front.” check box or
minimize the MEP-PC10 Input Panel
when you are not using it.
Print, Save Phrase
●
After you highlight text for printing
or to save as a canned phrase in
another application and then rightclick, there may be cases where
printing, saving, or other operations
are not performed, even if you click
a command on the MEP-PC10
right-click menu. If this happens,
use your keyboard to perform a Ctrl
+ C copy operation to copy the text
to the clipboard and then paste it.
Context Menu
●
When displaying the right-click
menu of another application, the
menu may not appear as it should.
If this happens, change MEP-PC10
properties to require holding down
of a modifi er keyboard key (Ctrl,
Shift, or Alt) when right-clicking to
display the MEP-PC10 right-click
menu, or disable display of the
MEP-PC10 right-click menu.
Symptom Possible Cause Check This
Dots are
● Font selection As label printer software, MEP-PC10
missing
from printed
characters.
Cannot select
● Modifi er key is
items on the
MEP-PC10
right-click
menu.
Problem with
● Confl ict between
MEP-PC10
right-click
menu
operation
on Windows
desktop
still depressed
(not released
after the rightclick menu is
displayed).
the MEP-PC10
right-click menu
and another
application
at times positions text so it is near the
edges of the print area on the tape,
which can cause certain types of fonts
to run outside of the print area. Select
a different font for printing.
MEP-PC10 properties can be
confi gured to require that a modifi er
keyboard key (Ctrl, Shift, Alt) be
held down while right-clicking in order
to display the MEP-PC10 right-click
menu. If this option is enabled, hold
down the applicable modifi er key as
you right click to display the MEPPC10 right-click menu. Next, release
the modifi er key and then use your
mouse or up/down arrow keys to
select the right-click menu item you
want.
While using the Input Panel to input or
edit text, you may experience diffi culty
in performing operations using the
menu that appears when you rightclick the Windows desktop. If this
happens, click the Windows desktop
and then right-click to display the
MEP-PC10 right-click menu.
34

Printing Troubleshooting
Symptom Cause and Required Action
● The printer cover is not closed securely.
Tape does not
come out of
printer when
printing.
•
➜
Securely close the cover.
See the user documentation that comes with the
printer for more information.
The printer is out of tape.
•
Replace the tape cartridge with a new one.
➜
See the user documentation that comes with the
printer for more information.
Tape is jammed.
•
Remove the tape from the printer, pull out the jammed
➜
tape with your fi ngers, correctly reload the tape into
the printer.
Important!
Do not do any of the following while printing is in
progress.
Block the tape outlet
•
Touch tape coming out of the printer
•
Open the printer cover
•
Disconnect the AC adaptor
•
Turn off power
•
Disconnect the USB cable
•
See the user documentation that comes with the
printer for more information.
Symptom Cause and Required Action
Tape does not
● The printer is not correctly connected to your
come out of
printer when
printing.
•
computer or you computer’s USB port is not enabled.
Check to make sure that the USB cable is connected
➜
correctly.
If you are using a printer that has a display, check
to make sure that the message “Ready for data
transfer” is displayed.
Also, depending on your computer’s operating
➜
system, perform one of the procedures below to make
sure that your computer’s USB port is enabled.
Windows 8, Windows 7, Windows Vista
■
Log in to your computer with an administrator account
and perform the steps below.
1. On the Start menu, click Control Panel.
2. Click Hardware and Sound and then Device
Manager.
3. On the User Account Control dialog box that
appears, click the Continue button.
4. Click the plus (+) icon next to Universal Serial
Bus controllers.
Windows XP
■
Log in to your computer with an administrator account
and perform the steps below.
1. On the Start menu, click Settings( S ) and then
Control Panel( C ).
2. Double-click the System icon.
3. Click the Hardware tab and then click the Device
Manager button.
4. Click the plus (+) icon next to USB (Universal
Serial Bus) controllers.
If the USB host controller and USB route hub appear, it
means that USB is enabled. If there are multiple hubs in
the USB chain, try connecting the printer USB cable to
another hub or try connecting to another device. Also,
check to make sure that the cable is securely connected.
If the USB host controller and USB route hub do not
appear, refer to the documentation that comes with your
computer or contact the manufacturer of your computer
to fi nd out how to set up and enable USB.
35
Symptom Cause and Required Action
Cannot print● Your label input contains only spaces and/or line
Printing is
● The print density setting is not correct.
unclear
Tape does
● Location or object where you are affi xing tape is not
not adhere
properly.
Nothing is
●
printed.
Printer turns
●
off during
printing.
•
feeds.
The printer will not print a label with input that contains
➜
only spaces and/or line feeds. Input the text you want
to print.
•
➜
Adjust the setting.
See “Confi guring MEP-PC10 Properties” (page
Tape is not loaded correctly.
•
Correctly reload the tape.
➜
See the user documentation that comes with the
printer for more information.
The printer head and/or rubber rollers are dirty.
•
Clean the printer head and rubber rollers.
➜
See the user documentation that comes with the
printer for more information.
Printing of text and/or an image that contains a lot of
•
black, which causes printing to look blurry.
Adjust the print density setting.
➜
•
suitable.
Affi x tape only to suitable locations and objects.
➜
See the user documentation that comes with the
printer for more information.
Batteries are low, or you are using a non-specifi ed AC
•
adaptor or batteries.
Use the specifi ed AC adaptor or batteries, or replace
➜
the batteries with new ones.
The printer head is overheated.
•
Wait for a while and try printing again later.
➜
25).
Error Messages
Error Message Required Action
Error occurred
during printing!
(Communications
error!)
Check
connections.
Error occurred
during printing!
(Printer cover
open!)
Low battery!
Continue to
print?
Error occurred
during printing!
(Printer error!)
Error occurred
during printing!
(Printer
overheated!)
1. Check to make sure that the printer is connected to
your computer. After checking to make sure that the
printer is turned on, try printing again.
If your printer has a display, touch the PC Link icon
•
on the display.
2. Check to make sure that the USB driver is correctly
installed on your computer.
If the cable is connected properly to the USB
•
port of your computer, your computer may not
be recognizing the printer due to some sort of
incompatibility. Try connecting to a different USB
port on your computer.
Make sure the printer cover is closed.
Replace the printer’s batteries or connect the specifi ed
AC adaptor for power.
Printing or tape feeding failed for some reason.
Printer head temperature is abnormal. Wait for a while
and try again later.
36

Label Creation Troubleshooting
Problems when Using Other Software
■
Problem with other software right-click menu after installing
●
MEP-PC10
MEP-PC10 is designed to be kept running on a computer to enable
printing from a right-click menu. See “To confi gure the MEP-PC10 rightclick menu display operation” (page 29).
37

CASIO COMPUTER CO., LTD.
6-2, Hon-machi 1-chome
Shibuya-ku, Tokyo 151-8543, Japan
MO1208-A
© 2012 CASIO COMPUTER CO., LTD.
 Loading...