

Page 1
x
z
x
c
v
b
n
+
6*>
@B
MA1203-EB
Operation Guide 5143
About This Manual
In this manual, operations are performed using the watch’s
crown, and the three buttons indicated by the letters A,
B and C.
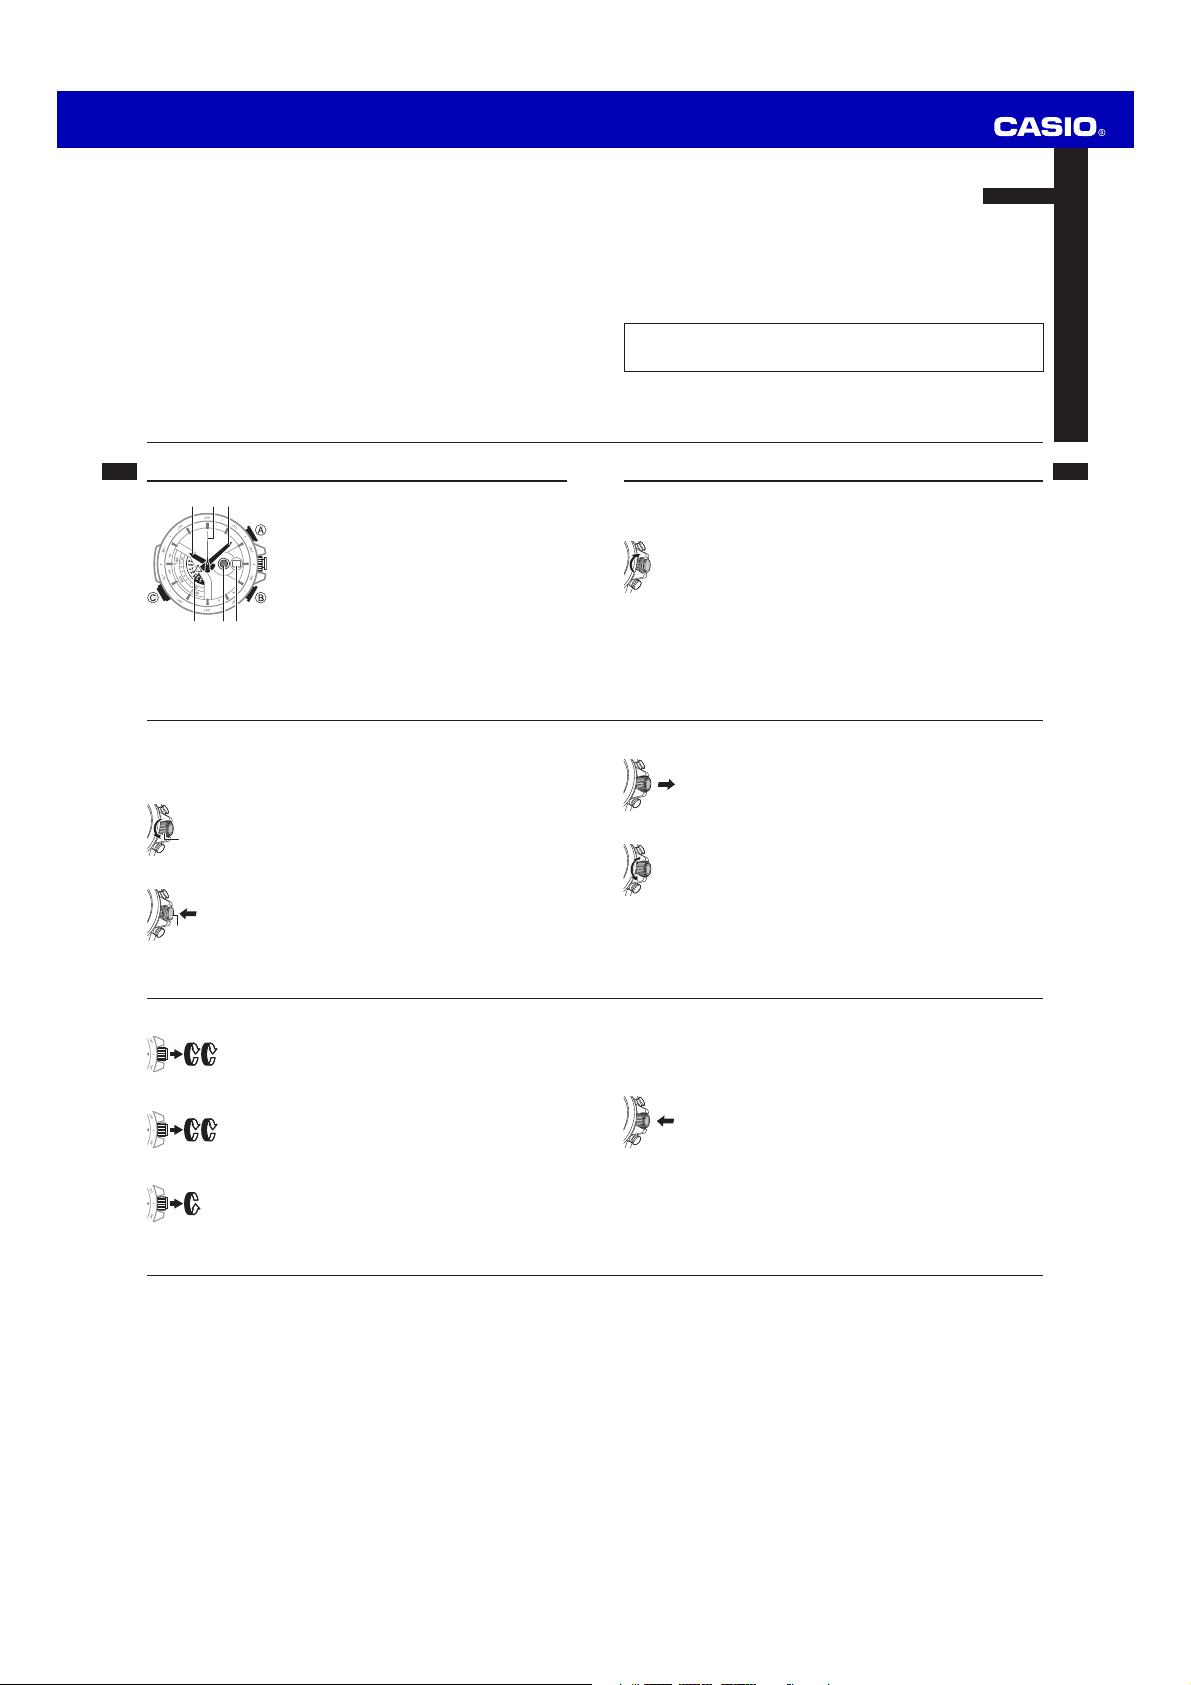
Hands and Indicators
E-2
Note that rotating the ring without pushing it down as far as it will go will change the x
settings of the watch. When locking the crown, be sure to press down fi rmly on the
ring as you rotate it.
Unlocking the Crown
Crown ring
Pressing the Crown Button
Press
Hour Hand
Second Hand
Minute Hand
Mode Disk: Rotates to indicate the current mode and
other information.
Chronograph Signal
Day
This User’s Guide uses numbers shown above to identify
watch hands and indicators.
Rotate the ring part of the crown towards you until it loosens
completely.
You can press the crown button while the crown is locked.
Congratulations upon your selection of this CASIO watch.
Note that the product illustrations in this manual are intended for reference only,
x
and so the actual product may appear somewhat different than depicted by an
illustration.
Note that CASIO COMPUTER CO., LTD. assumes no responsibility for any
damage or loss suffered by you or any third party arising through the use of this
product or its malfunction.
Using the Crown
The crown of this watch has a button part and a ring part. You can use the crown’s
button and ring to perform a number of different crown operations.
ENGLISH
Locking the Crown
Important!
Push down on the ring as you slowly rotate it. You should be able to feel it screwing
x
securely into place.
You should normally have the crown locked during normal daily use. Leaving the x
crown unlocked creates the risk of unintended operations or even damage due to
impact.
Pulling the Crown Out
Rotating the Crown
To lock the crown, push down its ring part as far as it will go as you
rotate the ring away from you until it is relatively tight. While the
crown is locked correctly, the only crown operations possible are
pressing the crown button and unlocking the crown.
After unlocking the crown, grasp the ring and pull the crown out.
With the crown pulled out, grasp the ring and rotate the crown
towards you to move the hands of the watch.
You can also perform high-speed hand movement using the
operations described below. Note that there are two levels of highspeed movement (High-speed 2 is faster).
Use High-speed 2 when changing the minute hand setting in the
x
Timekeeping Mode, Timer Mode, and Alarm Mode.
E-1
E-3
E-4
High-speed 1
High-speed 2
High-speed Cancel
E-6
Note
x
If you do not perform any operation for more than three minutes after pulling out the
crown, crown operations will become disabled automatically. If this happens, push
the crown back in and then pull it out again to re-enable crown operations.
Disabling Crown Button Mode Switching
You can use the following operation to disable crown button mode switching.
This helps to prevent accidental mode changes while wearing the watch.
To disable crown button mode switching
Hold down the crown button for at least two seconds until the watch beeps and 1.
then press A.
At this time the x
Release both buttons.2.
The watch will return to normal timekeeping.
x
E-8
With the crown pulled out, rotate it rapidly away from you two times.
After starting the High-speed 1 operation, rotate the crown rapidly
away from you two more times.
Rotate the crown towards you or press any button.
Second Hand will move to the 3 o’clock position.
Note
x
You can use high-speed hand movement when confi guring time settings in the
Timekeeping Mode, Alarm Mode, or Countdown Timer Mode, or when adjusting the
home positions of the hands.
Pushing the Crown In
Important!
x
To prevent unintentional operation, the button press operation of the crown
becomes disabled automatically for about eight seconds after you push the crown
back in. It will become re-enabled after about eight seconds.
While crown button mode switching is disabled, pressing the crown button will x
cause the x Second Hand to move to the 3 o’clock position. The x Second Hand
will resume normal timekeeping when you release the crown button.
To re-enable crown button mode switching
Hold down the crown button as you press A.
Carefully press the button of the crown the push the crown back in.
E-5
E-7
E-9
Page 2
Operation Guide 5143
x
z
x
x
x
+
6@
B
x
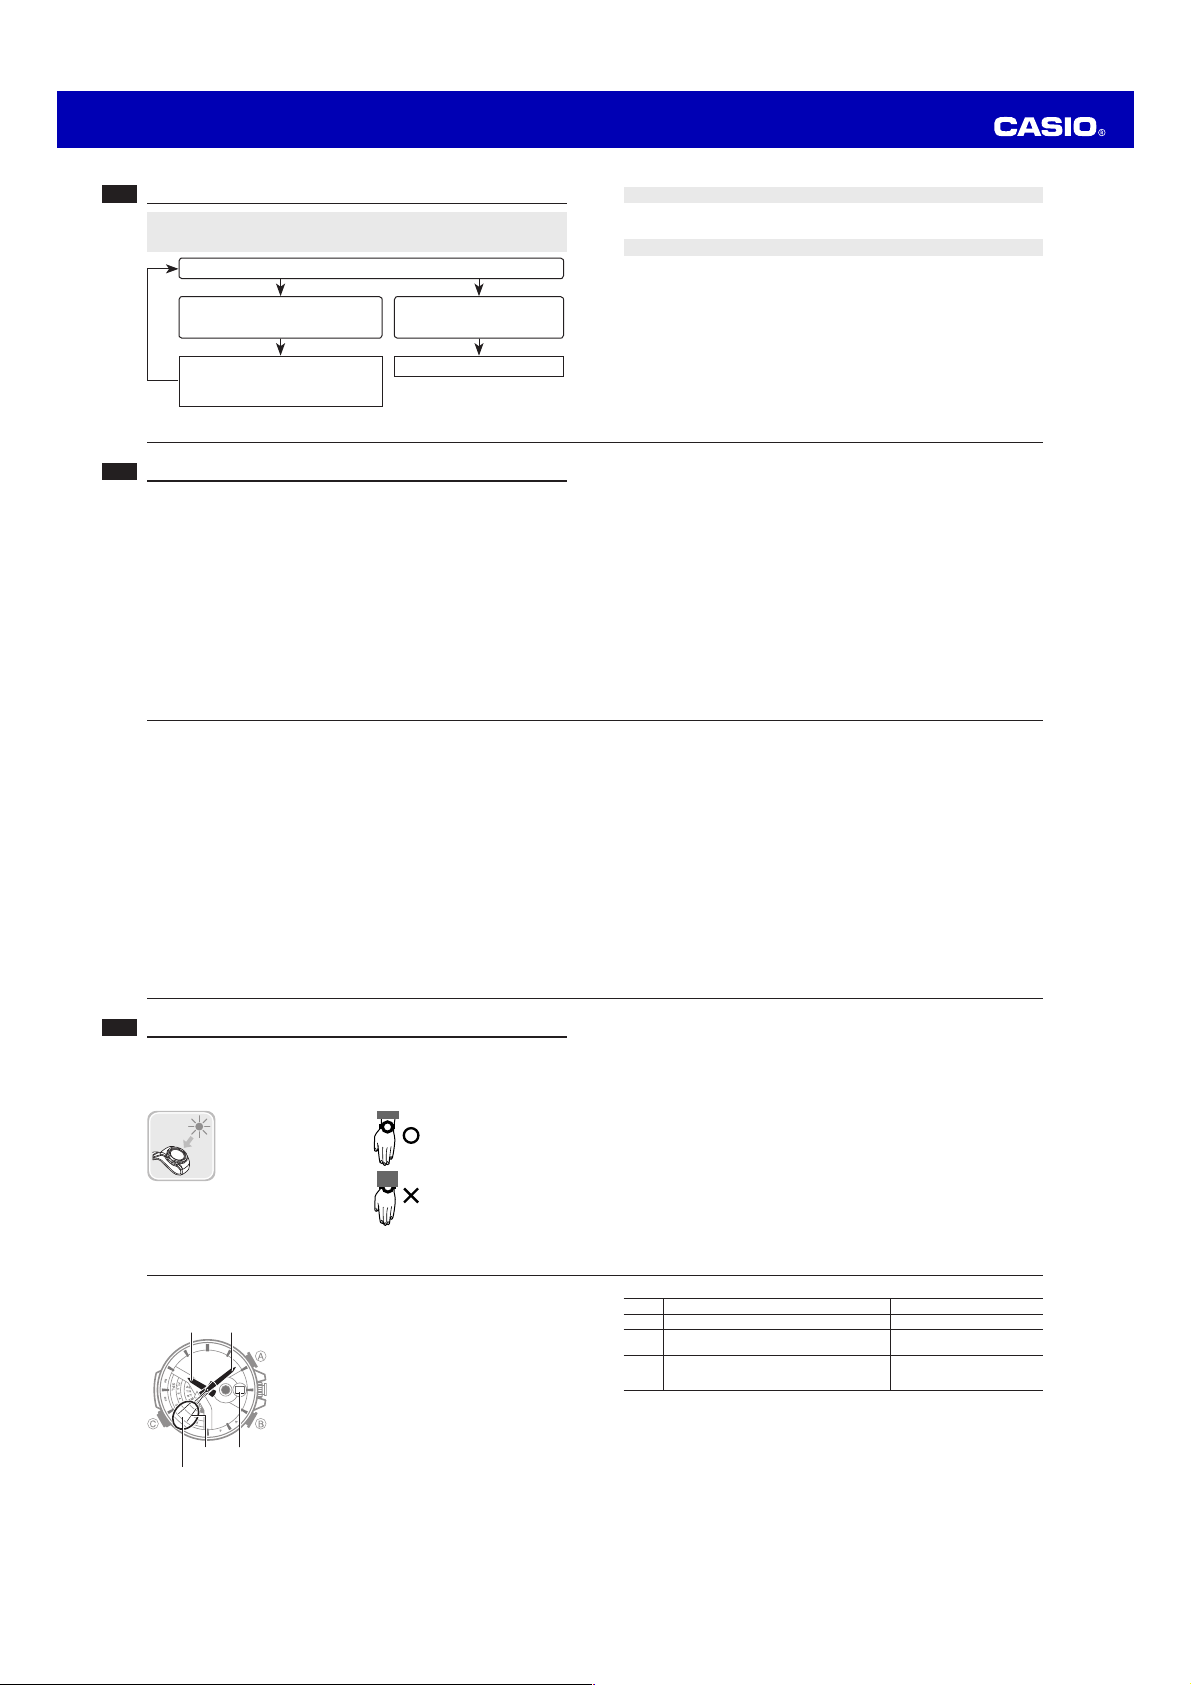
Things to check before using the watch
1. Press and hold the crown button (without unlocking the crown) for at
least two seconds to enter the Timekeeping Mode, and then observe the
movement of the
Is the x Second Hand moving smoothly at one-second intervals?
Is the x Second Hand moving at
two-second intervals or is it stopped
completely?
Power is low. Charge the watch by placing
it in a location where it is exposed to light.
For details, see “Charging the Watch”
(page E-16).
E-10
Second Hand.
NO
YES
The watch is charged suffi ciently.
For details about charging, see
“Charging the Watch” (page E-16).
Go to step 2.
YES
NEXT
Contents
E-2 About This Manual
E-3 Using the Crown
E-8 To disable crown button mode switching
E-9 To re-enable crown button mode switching
E-10 Things to check before using the watch
E-16 Charging the Watch
E-23 To recover from the sleep state
E-24 Mode Reference Guide
E-27 To determine the watch’s current mode
E-27 To return to the Timekeeping Mode from any other mode
E-28 To select a mode
E-31 Timekeeping
E-12
E-55 To recall lap data
E-56 Using the Countdown Timer
E-57 To specify the countdown start time
E-59 To perform a countdown timer operation
E-60 To stop the alarm
E-61 Using the Alarm
E-62 To change the alarm time setting
E-65 To check the AM/PM setting of the alarm
E-65 To turn the alarm on or off
E-65 To stop the alarm
E-66 Checking the Current Time in a Different Time Zone
E-67 To view the time in another time zone
E-69 To check whether a time zone is AM or PM
E-69 To specify standard time or daylight saving time (DST) for a city
E-14
2. Check the Home City and the daylight saving time (DST) settings.
Use the procedure under “To confi gure Home City settings” (page E-32) to confi gure
your Home City and daylight saving time settings.
3. Set the current time.
See “Confi guring Current Time and Date Settings” (page E-38).
The watch is now ready for use.
E-32 Confi guring Home City Settings
E-32 To confi gure Home City settings
E-36 To toggle the Home City time between standard time and daylight
E-38 Confi guring Current Time and Date Settings
E-46 Using the Stopwatch (Stopwatch Split Mode)
E-52 Using the Stopwatch (Stopwatch lap mode)
E-71 Adjusting Home Positions
saving time
E-38 To change the current time setting
E-42 To change the current date setting
E-48 To perform elapsed time measurement
E-48 To perform an elapsed time operation
E-48 To pause at a split time
E-53 To enter and exit the Stopwatch Lap Mode
E-54 To perform an elapsed time operation
E-54 To perform lap time measurement
E-72 To adjust home positions
E-76 Troubleshooting
E-82 Specifi cations
E-11
E-13
E-15
Charging the Watch
The face of the watch is a solar panel that generates power from light. The generated
power charges a built-in rechargeable battery, which powers watch operations. The
watch charges whenever it is exposed to light.
Charging Guide
E-16
Power Levels
Moves at two-second
intervals.
E-18
Whenever you are not
wearing the watch, be sure
to leave it in a location
where it is exposed to light.
Best charging
x
performance is achieved
by exposing the watch to
light that is as strong as
possible.
You can get an idea of the watch’s power level by
observing the movement of the
Timekeeping Mode.
If the
x
intervals, power is at Level 1.
If the
x
power is at Level 2, which is quite low. Expose the watch
to light as soon as possible so it can charge.
When wearing the watch,
makes sure that its face is
not blocked from light by the
sleeve of your clothing.
The watch may enter a
x
sleep state (page E-22) if
its face is blocked by your
sleeve even only partially.
Second Hand in the
Second Hand is moving normally at one-second
Second Hand is moving at two-second intervals,
Warning!
Leaving the watch in bright light for charging can cause it to become quite hot.
Take care when handling the watch to avoid burn injury. The watch can become
particularly hot when exposed to the following conditions for long periods.
x
On the dashboard of a car parked in direct sunlight
Too close to an incandescent lamp x
Under direct sunlight x
Important!
x
Keep the watch in an area normally exposed to bright light when storing it for long
periods. This helps to ensure that power does not run down.
Storing the watch for long periods in an area where there is no light or wearing it in
x
such a way that it is blocked from exposure to light can cause power to run down.
Make sure that the watch is exposed to bright light whenever possible.
E-17
Level Hand Movement Function Status
1 Normal. All functions enabled
xx Second Hand moves at two-second intervals.
2
nn Day changes to 1 (home position).
x
Second Hand stopped.
3
z Hour Hand and cc Minute Handstopped at
12 o’clock.
When power drops to Level 3, all functions will be disabled but the watch will x
continue to keep time internally for about one week. If you recharge the battery
suffi ciently during this period, the analog hands will move automatically to the
correct setting and regular timekeeping will resume. After one week, all settings
(including timekeeping) will be cleared. Recharging the battery will reset all settings
to their initial factory defaults.
A short while after exposing the watch to light after its battery charge has run down
x
will cause the xx Second Hand to move counterclockwise until it stops at second 57
on the face. This indicates that charging has started. See page E-21 for information
about required charging times.
Beeper and countdown timer
operation disabled
All functions disabled
E-19
Page 3
Operation Guide 5143
>
v
v
v
>
v
v
v
v
Power Recovery Mode
The watch is designed to go into a power recovery mode that stops hand operation
temporarily whenever power suddenly drops below a certain level due to overuse
of the alarm tone over a short period. Note that all operations are disabled while the
watch is in the power recovery mode.
The hands will move to the correct positions and the watch will resume normal
operation after power recovers (in about 15 minutes). Putting the watch in a location
where it is exposed to light will help power to recover sooner.
E-20
Power Saving
Power Saving enters a sleep state automatically whenever the watch is left for a
certain period in an area where it is dark. The table below shows how watch functions
are affected by Power Saving.
There actually are two sleep state levels: “second hand sleep” and “function sleep”.
x
Elapsed Time in Dark Operation
60 to 70 minutes (second hand
sleep)
6 or 7 days (function sleep)
The watch will not enter a sleep state between 6:00 AM and 9:59 PM. If the watch x
is already in a sleep state when 6:00 AM arrives, however, it will remain in the sleep
state.
The watch will not enter a sleep state while it is in the Stopwatch Split Mode,
x
Stopwatch Lap Mode, or Countdown Timer Mode.
E-22
xx Second Hand only stopped, all other functions
enabled
All functions, including analog timekeeping, disabled x
World Time Mode time stopped at the point the x
Timekeeping Mode time reached 0:00
Mode Reference Guide
Your watch has six “modes”. The mode you should select depends on what you want
to do.
To do this: Enter this mode: See:
View the current time in your Home City and in one of x
29 other cities around the globe
View the current date in the Home City x
Confi gure Home City and daylight saving time (DST) x
settings
Confi gure time and date settings x
Measure elapsed time and split times
Measure elapsed time and lap times, and recall lap
times
Use the countdown timer Countdown Timer Mode E-56
Set an alarm time Alarm Mode E-61
E-24
Timekeeping Mode E-31
Stopwatch Split Mode
(split measurement)
Stopwatch Lap Mode
(lap measurement)
E-46
E-52
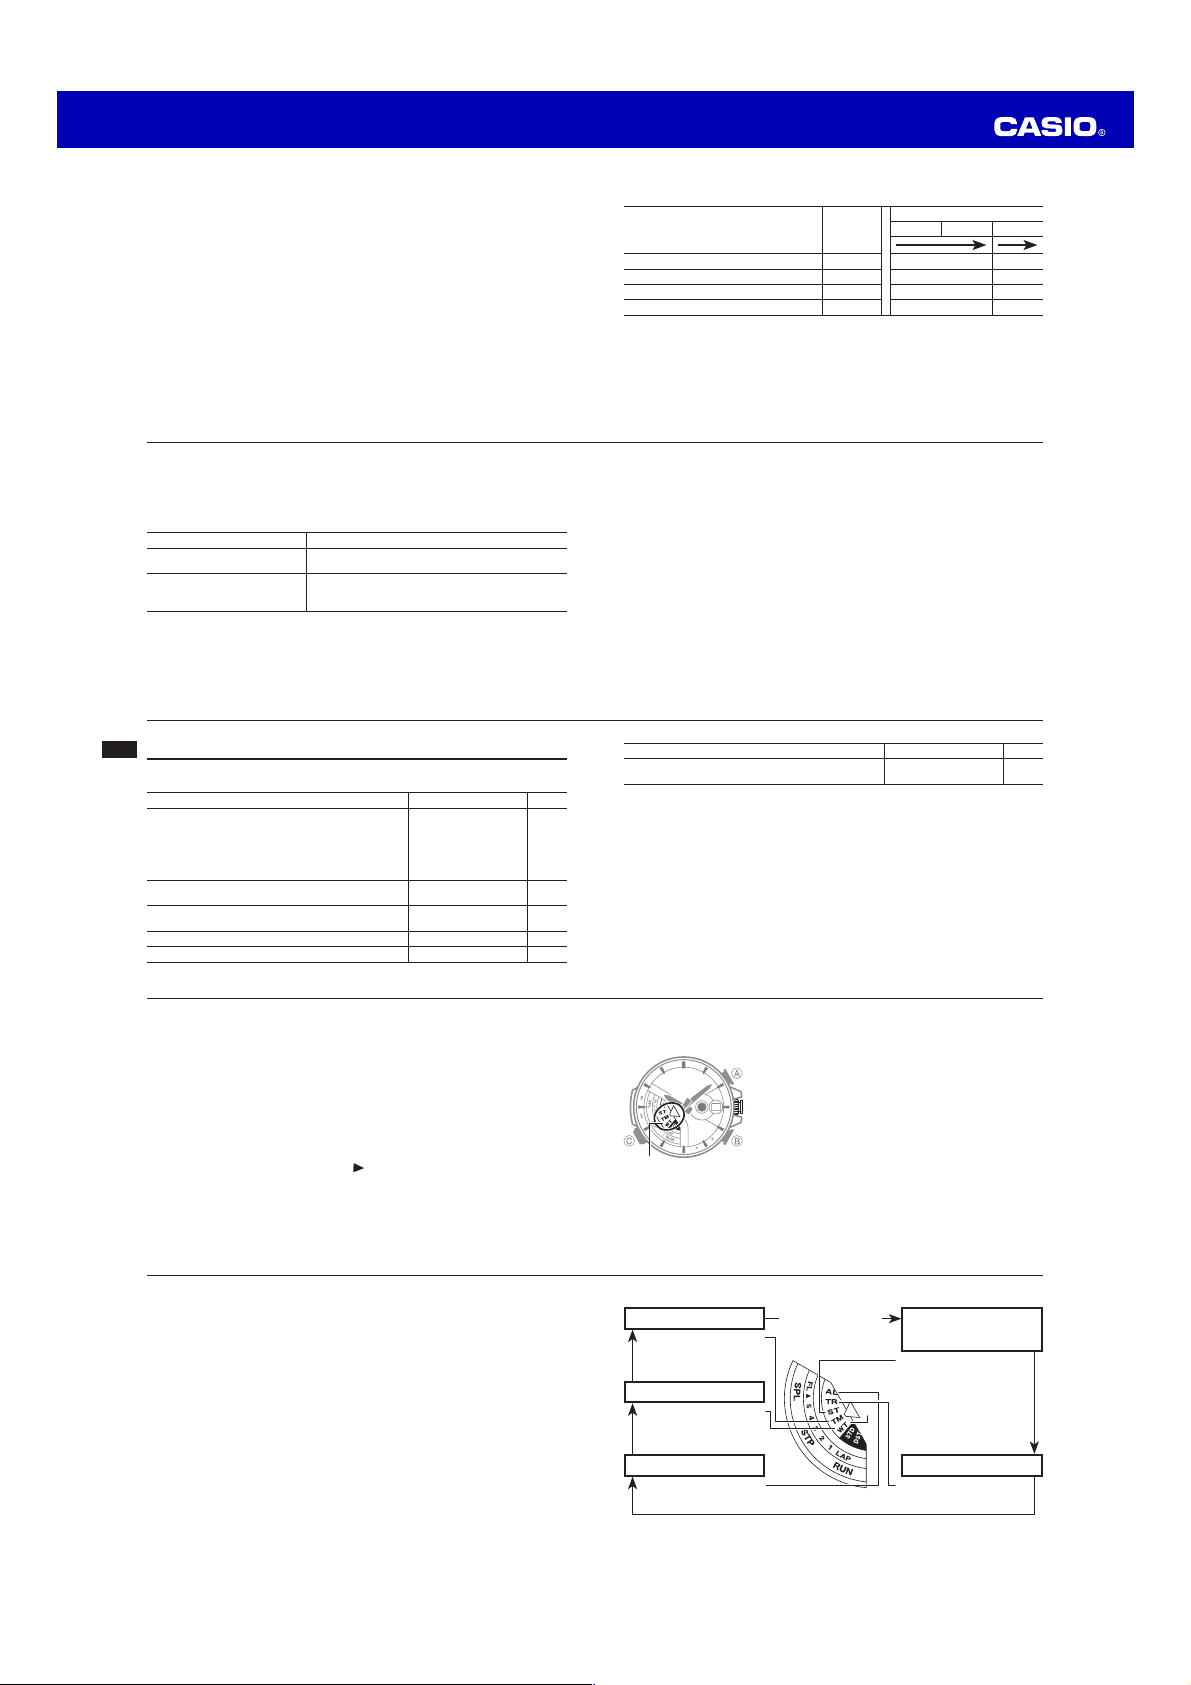
Charging Times
Exposure Level (Brightness)
Outdoor sunlight (50,000 lux) 8 minutes 3 hours 28 hours
Window sunlight (10,000 lux) 30 minutes 7 hours 105 hours
Window sunlight on cloudy day (5,000 lux) 48 minutes 10 hours 169 hours
Indoor fl uorescent lighting (500 lux) 8 hours 120 hours – – –
1 Approximate exposure each day to generate power for normal daily operation. *
2 Approximate exposure to take power up one level. *
The above times are for reference only. Actual times depend on lighting conditions.
x
For details about the operating time and daily operating conditions, see the “Power x
Supply” section of the Specifi cations (page E-83).
To recover from the sleep state
Move the watch to a well-lit area, press any button, or perform a crown operation
(push in, pull out, rotate).
To do this: Enter this mode: See:
View the current time in one of 29 cities around the
globe
Mode Disk Pointers
The vv Mode Disk uses three different pointers to indicate a variety of different
information: a mode pointer, a split pointer, and a lap pointer.
Mode Pointer
The mode pointer is in a fi xed position. Whenever you enter a mode, the v
Disk will rotate until the current mode indicator (AL, TR, ST, TM, or WT) is aligned
with the mode pointer. The mode pointer is also used for indication of standard time
(STD) and summer time (DST).
Daily
Operation
*1
Level Change *2
Level 3 Level 2 Level 1
World Time Mode E-66
Mode
E-21
E-23
E-25
Split Pointer
The split pointer is marked on the
Split Mode (page E-46), it indicates the current status of the stopwatch operation.
While a normal stopwatch elapsed time measurement operation is in progress, the
split pointer will point to RUN. When a split time is indicated by the hands (which are
temporarily stopped), the split pointer will point to SPL. Stopping the elapsed time
measurement operation will cause the split pointer to move to STP (stop).
Lap Pointer
The lap pointer is marked on the
lap time measurement in the Stopwatch Mode, the
lap pointer points at the current lap number (1 through 5). If the current lap number is
greater than 5, the lap pointer will point at
E-26
To select a mode
Each press of the crown button cycles through the modes in the sequence shown
below. The
pointer.
Movement of the
due to fi ne adjustment of hand positions and does not indicate malfunction.
Mode Disk rotates so the selected mode is indicated by the mode
Mode Disk may cause the watch hands to move slightly. This is
E-28
Mode Disk. Whenever you enter the Stopwatch
Mode Disk. Whenever you press B to perform
Mode Disk will rotate so the
.
Selecting a Mode
With this watch, everything starts from the Timekeeping Mode.
To determine the watch’s current mode
Check what the mode pointer is indicating on the
Disk as shown under “To select a mode” (page E-28).
To return to the Timekeeping Mode from any other
mode
Press and hold the crown button (without unlocking the
crown) for at least two seconds.
Timekeeping Mode
Mode pointer points to TM.
World Time Mode
Mode pointer points to WT.
Alarm Mode Countdown Timer Mode
Mode pointer points to AL. Mode pointer points to TR.
Press the crown
button. (No need to
unlock crown.)
Stopwatch Split Mode
(Elapsed time and
split times)
Mode pointer points to ST.
Then v Mode Disk rotates
until the split pointer points
to STP (stopped) or RUN
(running).
Mode
E-27
E-29
Page 4

Operation Guide 5143
+
@
B
x
@
z
c
v
+B
>
v
>
x
z
v
@
+
6
B
>
x
@
z
x
c
v
n
+6>@B
v
From any other mode, hold down C for about two seconds to enter the Stopwatch
LAP Mode. The
number (1 through 5, or
To return to the Timekeeping Mode, hold down C or the crown button for about two
seconds.
E-30
Mode Disk will rotate until the lap pointer points at the current lap
).
Confi guring Home City Settings
There are two Home City settings: actually selecting the Home City and selecting
either standard time or daylight saving time (DST).
To confi gure Home City settings
Note
x
This watch does not have a city code that
TYO (TOKYO)
E-32
corresponds to Newfoundland.
Press and hold the crown button (without unlocking 1.
the crown) for at least two seconds.
This will enter the Timekeeping Mode (page E-29).
x
Unlock the crown and then pull it out.2.
This will cause the x
city code of the currently selected Home City.
This indicates the city code setting mode.
x
Press 4. A to toggle the currently selected city code
between standard time and daylight saving time.
In the city code setting mode, the
x
indicates STD (standard time) or DST (daylight
saving time).
For details about the Daylight Saving Time setting,
x
see “Daylight Saving Time (DST)” (page E-35).
After the settings are the way you want, push the crown 5.
back in to return to the Timekeeping Mode. Next, lock
the crown.
x
Rotating the ring without pushing it down as far as it
will go will change the settings of the watch. When
locking the crown, be sure to press down fi rmly on
the ring as you rotate it.
Second Hand to move to the
Mode Disk
Timekeeping
Use the Timekeeping Mode to set and view the current time and date. To enter the
Timekeeping Mode from another mode, press and hold the crown button (without
unlocking the crown) for at least two seconds.
Hands and Indicators
Hour Hand
Second Hand
Minute Hand
Mode Disk: TM aligned with mode pointer.
Day
If you do not perform any operation with the crown x
for about three minutes after pulling it out, crown
operations will become disabled and the watch
hands will no longer move when you rotate the crown.
If this happens, push the crown back in and then pull
Daylight Saving Time (DST)
Daylight Saving Time (summer time) advances the time setting by one hour from
Standard Time. Remember that not all countries or even local areas use Daylight
Saving Time.
Note that you cannot switch between
x STD (standard time) and DST (daylight
saving time) while UTC* is selected as your Home City.
Coordinated Universal Time, the world-wide scientifi c standard of timekeeping. The *
reference point for UTC is Greenwich, England.
it out again.
For details about city codes, see the “City Code
x
Table” at the back of this manual.
Rotate the crown to move the 3.
city code you want to select as your Home City.
Each time you change to a different city code, the
x
Hour Hand, c Minute Hand, and n Day move
to the current time and date for that city code. Also,
the
Mode Disk rotates until the mode pointer is
pointing at either STD or DST (see step 4 of this
procedure below).
Second Hand to the
E-31
E-33
E-34
To toggle the Home City time between standard time and daylight saving time
Perform steps 1 through 3 under “To confi gure Home 1.
City settings” on page E-32.
Each time you select a city code, the
E-36
x
and
Minute Hand move to the current time for that
city code.
Press 2. A to toggle the time for the currently selected
city code between standard time and daylight saving
time.
x STD (standard
The mode pointer will point to either
time) or DST (daylight saving time) on the
Disk, which indicates the current daylight saving
time setting.
Hour Hand
Mode
Confi guring Current Time and Date Settings
To change the current time setting
In the Timekeeping Mode, unlock the crown and then 1.
pull it out.
x
This will cause the
TYO (TOKYO)
E-38
code of the currently selected Home City.
At this time, the mode pointer will point to the current
x
daylight saving time setting (STD or DST).
x
If you do not perform any operation with the crown
for about three minutes after pulling it out, crown
operations will become disabled and the hand will not
move if you rotate the crown. If this happens, push
the crown back in and then pull it out again.
Second Hand to move to the city
After the settings are the way you want, push the crown back in to return to the 3.
Timekeeping Mode. Next, lock the crown.
Rotating the ring without pushing it down as far as it will go will change the
x
settings of the watch. When locking the crown, be sure to press down fi rmly on
the ring as you rotate it.
Change the Home City and daylight saving time (DST) 2.
settings, if you want.
For details about these settings, see steps 3 and 4
x
under “To confi gure Home City settings” (page E-32).
Hold down 3. B for about two seconds. This will enter the
time setting mode.
xx Second Hand will move to A (AM) or P (PM).
The
x B cycles
In the following steps, each press of
between settings as shown below.
Home city/DST Hour/Minute Hour
BB
Month DayYear
BB
E-35
E-37
BB
E-39
Page 5

Operation Guide 5143
***
z
x
c
v
b
B *
@+
>
x
c
x
+
B
n
@
x
6@
x
c
c
z
x
Rotate the crown to adjust the time (hour and minute) setting.4.
x
Rotating the crown two full consecutive turns away from you will cause the
Minute Hand to start moving clockwise. Rotating the crown another two full
consecutive turns away from you will cause the
at high speed. To stop hand movement, press any button or rotate the crown one
full turn towards you.
Press 5. B to switch to the hour setting mode.
xz Hour Hand will move slightly left and right to indicate the z Hour Hand
The
setting mode.
If you want to change the hour setting without changing the minute setting, skip
x
step 4 above.
Rotate the crown to adjust the hour setting only.6.
x
Rotating the crown two full consecutive turns away from you will cause the
Hour Hand to start moving clockwise.
When adjusting the setting, check to make sure that the x
correctly indicates A (AM) or P (PM).
E-40
Minute Hand to start moving
Second Hand
To change the current date setting
In the Timekeeping Mode, unlock the crown and then 1.
pull it out.
This will cause the
x
code of the currently selected Home City.
Hold down 2. B for about two seconds.
xx Second Hand will move to A (AM) or P (PM).
The
Use 3. B to enter the time and date setting mode (page
E-39).
xn Day will move slightly left and right to indicate
The
the setting mode.
Second Hand to move to the city
Rotate the crown to adjust the date setting.4.
E-42
Press 7. B. This will enter the year setting mode.
The
xz Hour Hand will move to the number that represents the tens digit of the
year and the
digit. The
E-44
Minute Hand will move to the number that represents the ones
Second Hand will move to 12 o’clock and stop there.
0
1
2
9
8
75
6
Setting the year (ones digit)
90
3
4
80
70 50
Setting the year (tens digit)
00
10
60
If you want to change the date setting at this time, press x B and perform the
procedure starting from step 3 under “To change the current date setting” (page
E-42).
After the settings are the way you want, push the crown back in to return to the 7.
Timekeeping Mode. Next, lock the crown.
x
This causes timekeeping to resume with the
12 o’clock.
Rotating the ring without pushing it down as far as it will go will change the
x
settings of the watch. When locking the crown, be sure to press down fi rmly on
the ring as you rotate it.
Dec
Nov
Oct
Sep
Aug
Jul May
Setting the month
Rotate the crown to adjust the year setting.8.
If you want to change the time setting at this time, press
x B and then perform
the procedure starting from step 4 under “To change the current time setting”
(page E-38).
After the settings are the way you want, push the crown back in to return to the 9.
20
30
40
Timekeeping Mode. Next, lock the crown.
x
This causes timekeeping to resume with the
12 o’clock.
Rotating the ring without pushing it down as far as it will go will change the
x
settings of the watch. When locking the crown, be sure to press down fi rmly on
the ring as you rotate it.
Note
x
The watch’s built-in full automatic calendar makes allowances for different month
lengths and leap years. Once you set the date, there should be no reason to
change it except after you have the watch’s rechargeable battery replaced or after
power drops to Level 3.
Jun
Jan
Feb
Mar
Apr
Second Hand starting from
After the 5.
Day stops moving, press B.
This will enter the month setting mode.
The
xx Second Hand will move to the
currently selected month. This is the
month setting mode.
Rotate the crown to adjust the month 6.
setting.
Second Hand starting from
E-41
E-43
E-45
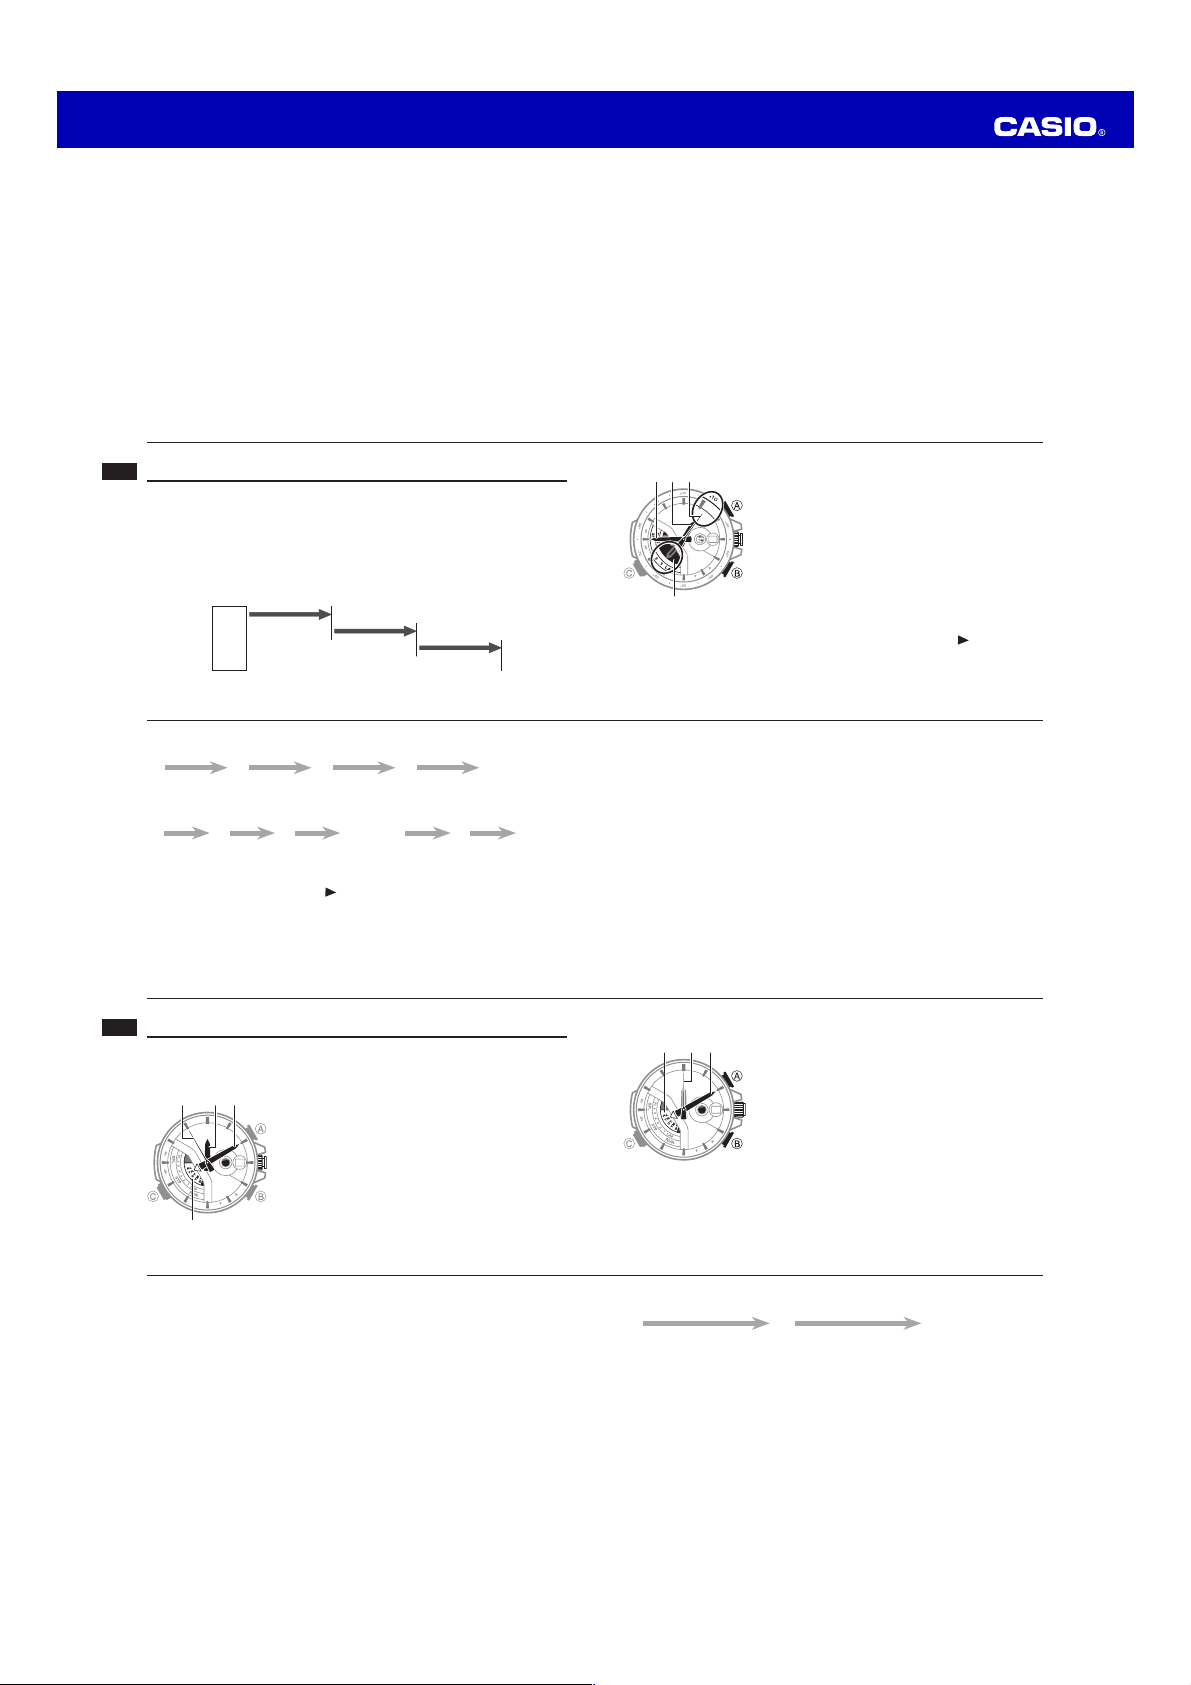
Using the Stopwatch (Stopwatch Split Mode)
The stopwatch measures elapsed time and split times.
What is a split time?
A split time is the time elapsed from the start point of a race up to any point along the
way in the race.
Example: Split times at the 10km point and at other points along the way in a
marathon
Split
Start
E-46
To perform elapsed time measurement
Press the crown button to navigate to the Stopwatch Split Mode.1.
The mode pointer will point to x ST on the v Mode Disk. Then the disk will rotate
until the split pointer points to STP (stopped), RUN (running), or SPL (split).
Now you can perform either of following stopwatch operations.2.
Split
Split
The xb Chronograph Signal changes in accordance the operation being performed:
STP (stopped), RUN (running), or SPL (split).
STP (stopped) RUN (running) SPL (split)
Hands and Indicators
Hour Hand: Indicates the stopwatch minute count
(1 revolution = 60 minutes).
Second Hand: Indicates the 1/20 (0.05)-second count
Minute Hand: Indicates the stopwatch seconds count.
Mode Disk: Mode pointer points to ST. Then disk
Chronograph Signal
during stopwatch operation.
rotates until the split pointer points to STP
(stopped), RUN (running), or SPL (split).
E-47
To perform an elapsed time operation
A
Start Stop (Restart) (Stop) Reset
To pause at a split time
A
Start Split Stop Reset
E-48
A A A B
B
Normal stopwatch hand movement will
resume automatically after fi ve seconds.
A B
Note
x
The Stopwatch Split Mode can indicate elapsed time up to 59 minutes,
59.95 seconds.
x
The watch’s bezel is marked in 1/20 (0.05)-second units.
E-49
Page 6
Operation Guide 5143
c
c
+> @
z
x
c
v
+B@
>
v
z
x
c
v
@+ B
>
x
An ongoing stopwatch operation will continue even if you pull out the crown to x
perform some setting operation.
x B will not
In the following cases, the hands of the watch are moving, so pressing
perform a reset operation.
While the hands are moving to elapsed timekeeping after you enter the Stopwatch
−
Split Mode
While the watch is changing dates at midnight
−
Once started, stopwatch timing continues until you press x A to stop it, even if you
exit the Stopwatch Split Mode to another mode and even if timing reaches the
stopwatch limit defi ned above.
You can press
x A to start an elapsed time operation immediately after entering
the Stopwatch Split Mode, even if the watch’s hands are still moving to their initial
Stopwatch Split Mode positions. Note, however, that if the stopwatch was not
reset after the last elapsed time operation, timing will restart from where it was last
stopped, and not from 12 o’clock.
E-50
Using the Stopwatch (Stopwatch lap mode)
You can use the Stopwatch Lap Mode to measure elapsed time and lap times, and to
recall lap times. Up to fi ve lap times can be stored in memory. There is also memory
to record the fastest lap time. Though no more lap times are stored after fi ve times are
in memory, the fastest lap time continues to be updated as required. Starting a new
elapsed time operation clears all of the memories (including fastest lap time).
What is a lap time?
A lap time is the time elapsed over a specifi c segment of a race.
Example: Car race on an oval track
Lap 1
Start
E-52
To perform an elapsed time operation
A
Start Stop (Restart) (Stop) Reset
To perform lap time measurement
A
Start Lap (LAP1) Lap (LAP2) Stop Reset
With each lap time measurement, the x
points to the next sequential lap number. Performing another lap time measurement
after LAP 5 is indicated will cause
A A A B
B B
Lap 2
......
Mode Disk will move so the lap pointer
(too many laps) to be indicated.
Lap 3
A B
The xx Second Hand indicates the 1/20 (0.05)-second count for the fi rst 30 seconds
of a stopwatch elapsed time operation. After that, the hand stops at 12 o’clock,
but 1/20 (0.05)-second timing continues internally after the fi rst 30 seconds. The
Second Hand will jump to the current value whenever A (Stop) is pressed.
Hands and Indicators
Hour Hand: Indicates the stopwatch minute count
(1 revolution = 60 minutes).
Second Hand: Indicates the 1/20 (0.05)-second count
To recall lap data
While in the Stopwatch Lap Mode, unlock the crown and then pull it out to enter the 1.
Data Recall Mode.
xv Mode Disk will move until the lap pointer points to LAP 1, and the hands
The
of the watch will move until they indicate the time recorded for LAP 1.
Rotate the crown to select other laps.2.
x
Rotate the crown away from you to select laps sequentially in ascending
sequence (2, 3, 4, 5), and towards you to select laps in descending sequence.
Rotating the crown until FL (Fastest) is selected will show the time of the fastest
lap.
To return to the Stopwatch Lap Mode, push the crown back in. Next, lock the 3.
crown.
x
Rotating the ring without pushing it down as far as it will go will change the
settings of the watch. When locking the crown, be sure to press down fi rmly on
the ring as you rotate it.
Minute Hand: Indicates the stopwatch seconds count.
Mode Disk: Mode disk rotates until the lap pointer
To enter and exit the Stopwatch Lap Mode
From any other mode, hold down C for about two seconds
to enter the Stopwatch Lap Mode.
The xv Mode Disk will rotate until the lap pointer points to
the current lap number (1 through 5, or
To return to the Timekeeping Mode, hold down C or the
crown button for about two seconds.
during stopwatch operation.
points to a lap number.
).
E-51
E-53
E-54
Using the Countdown Timer
The countdown timer can be confi gured within a range of one minute to 60 minutes.
An alarm sounds for about 10 seconds when the timer reaches zero, and a count up
elapsed time operation starts.
Hands and Indicators
Hour Hand: Indicates the elapsed time hour.
Second Hand: Indicates countdown or elapsed
Minute Hand: Indicates countdown or elapsed minutes.
Mode Disk: TR aligned with mode pointer.
x
All hands move counterclockwise during a countdown.
They automatically switch to clockwise movement when
elapsed time measurement begins after the countdown
is complete.
E-56
Rotate the crown to set the countdown start time.3.
Rotating the crown two full consecutive turns away from you will cause the x
Minute Hand to start moving clockwise. Rotating the crown another two full
consecutive turns away from you will cause the
at high speed. To stop hand movement, press any button or rotate the crown one
full turn towards you.
The maximum countdown start time setting is 60 minutes. To set a countdown start
x
time of 60 minutes, move the c Minute Hand to 12 o’clock.
Push the crown back in to exit the countdown start time setting mode. Next, lock 4.
the crown.
x
Rotating the ring without pushing it down as far as it will go will change the
settings of the watch. When locking the crown, be sure to press down fi rmly on
the ring as you rotate it.
E-58
seconds.
Minute Hand to start moving
To specify the countdown start time
To perform a countdown timer operation
A
Start Stop Reset
Pressing x B while the Countdown Timer is stopped resets the displayed time to the
start time specifi ed by you.
Pressing
x B will not perform a reset while the watch is performing any of the
following operations.
While the hands are moving to the current timer time after you enter the
−
Countdown Timer Mode.
While the displayed date is changing at midnight.
−
Before starting a countdown timer operation, check to make sure that the x
countdown timer is not already operating (indicated by a moving x Second Hand).
If it is, press A to stop it and then B to reset to the countdown start time.
All hands move counterclockwise during a countdown. They automatically switch to
x
clockwise movement when elapsed time measurement begins after the countdown
is complete. An elapsed time measurement operation will continue until you press
A to stop it.
Press the crown button to navigate to the Countdown 1.
Timer Mode.
The mode pointer will point to
x TR on the v Mode
Disk.
Unlock the crown and then pull it out. This enters the 2.
countdown start time setting mode.
x
If you do not perform any operation with the crown
for about three minutes after pulling it out, crown
operations will become disabled and the watch
hands will no longer move when you rotate the crown.
If this happens, push the crown back in and then pull
it out again.
A B
E-55
E-57
E-59
Page 7

Operation Guide 5143
x
@
v
x
z
z
x
c
v
n
B 6
+@
>
x
x
c
c
x
z
z
x
c
v
B>
+@
Pulling out the crown to perform a crown operation while a Countdown Timer x
countdown or elapsed time measurement is in progress will automatically stop the
ongoing Countdown Timer operation and reset to the countdown start time.
Elapsed Time Measurement Following Countdown
When the countdown reaches zero, the watch starts to count up elapsed time in
one-second increments, for up to 24 hours. When the watch switches to elapsed time
measurement, the hands automatically switch to clockwise movement.
You can pause and restart an elapsed time operation by pressing
x A. While an
elapsed time operation is paused, pressing B resets to the countdown start time.
To stop the alarm
Press any button or press the crown button.
Note
x
Pressing any button or pressing the crown button while the alarm is sounding
simply stops the alarm sound. It does not stop the elapsed time operation that
started when the end of the countdown was reached. To stop the elapsed time
operation, press A.
E-60
To change the alarm time setting
Press the crown button to navigate to the Alarm Mode.1.
x AL on the v Mode Disk.
The mode pointer will point to
Unlock the crown and then pull it out to enter the alarm setting mode.2.
xx Second Hand will move to either A (AM) or P (PM).
The
x
If you do not perform any operation with the crown for about three minutes after
pulling it out, crown operations will become disabled and the watch hands will no
longer move when you rotate the crown. If this happens, push the crown back in
and then pull it out again.
You can toggle between the hour and minute setting mode, and the hour only
x
setting mode by pressing B.
Hour/Minute Hour
E-62
After the setting is the way you want, push the crown back in to exit the alarm 6.
setting mode. Next, lock the crown.
The alarm always works based on the time kept in the Timekeeping Mode.
x
The watch will return to the Timekeeping Mode automatically if you do not x
perform any operation in the Alarm Mode for about two or three minutes.
Rotating the ring without pushing it down as far as it will go will change the x
settings of the watch. When locking the crown, be sure to press down fi rmly on
the ring as you rotate it.
B
Using the Alarm
When the alarm is turned on, an alarm will sound for about 10 seconds each day
when the time in the Timekeeping Mode reaches the preset alarm time. This is true
even if the watch is not in the Timekeeping Mode.
Hands and Indicators
Hour Hand: Indicates the currently set alarm time hour.
Second Hand: Indicates the current alarm ON/OFF
Pressing
x B causes the x Second Hand to move to the
current A (AM) or P (PM) setting.
Minute Hand: Indicates the currently set alarm time
Mode Disk: AL aligned with mode pointer.
Rotate the crown to set the alarm time.3.
Rotating the crown two full consecutive turns away from you will cause the x
Minute Hand to start moving clockwise. Rotating the crown another two full
consecutive turns away from you will cause the
at high speed. To stop hand movement, press any button or rotate the crown one
full turn towards you.
Press 4. B to switch to the hour setting mode.
The xz Hour Hand will move slightly left and right to indicate the z Hour Hand
setting mode.
x
If you want to change the hour setting without changing the minute setting, skip
step 4 above.
When adjusting the alarm time setting, check to make sure that the x
Hand correctly indicates A (AM) or P (PM).
Rotate the crown to adjust the hour setting only.5.
x
Rotating the crown two full consecutive turns away from you will cause the
Hour Hand to start moving clockwise.
To check the AM/PM setting of the alarm
In the Alarm Mode, press B and the
P (PM).
The
xx Second Hand will return to the current ON/OFF setting after about one
second.
To turn the alarm on or off
In the Alarm Mode, press A to toggle the alarm between on and off. The
Hand will indicate the current ON/OFF setting.
To stop the alarm
Press any button or press the crown button.
setting.
minute.
Minute Hand to start moving
Second
Second Hand will move to either A (AM) or
Second
E-61
E-63
E-64
Checking the Current Time in a Different Time Zone
You can use World Time to view the current time in one of 29 time zones around the
globe. The currently selected city is called the “World Time City”.
NYC (NEW YORK)
E-66
If you think that the time indicated for the selected World Time City is not correct, x
it probably means that there is something wrong with your Home City settings.
Use the procedure under “To confi gure Home City settings” (page E-32) to
correct the Home City settings.
After selecting the city you want, push the crown back in to return to the World Time 3.
Mode. Next, lock the crown.
x
Rotating the ring without pushing it down as far as it will go will change the
settings of the watch. When locking the crown, be sure to press down fi rmly on
the ring as you rotate it.
E-68
Hands and Indicators
Hour Hand: Indicates the hour of the current time in the
World Time City.
Second Hand: Indicates the currently selected World
Pressing
x B causes the x Second Hand to move to
A (AM) or P (PM).
Minute Hand
Mode Disk: WT aligned with mode pointer.
Day
Time City.
To view the time in another time zone
Unlock the crown and then pull it out.1.
xx Second Hand points to the currently selected World Time city code.
The
x STD (standard time) or DST (daylight saving
The mode pointer will point to either
time) on the
setting.
If you do not perform any operation with the crown for about three minutes after
x
pulling it out, crown operations will become disabled and the watch hands will no
longer move when you rotate the crown. If this happens, push the crown back in
and then pull it out again.
Rotate the crown to move the 2.
as the World Time City.
Each time you select a city code, the
x
move to the current time and date for that city code. For details about city codes,
see the “City Code Table” at the back of this manual.
To check whether a time zone is AM or PM
Mode Disk, which indicates the current daylight saving time
Second Hand to the city code you want to select
Hour Hand, c Minute Hand, and n Day
In the World Time Mode, press B and the x Second Hand
will move to either A (AM) or P (PM).
The
xx Second Hand will return to the city code you
selected after about one second.
To specify standard time or daylight saving time (DST)
for a city
In the World Time Mode, unlock the crown and then pull 1.
it out to enter the city setting mode.
Rotate the crown to move the 2.
city code whose setting you want to change. See “To
view the time in another time zone” (page E-67) for more
information.
Second Hand to the
E-65
E-67
E-69
Page 8

Operation Guide 5143
x
x
v
z
z
z
c
c
c
x
x
6>
@ +B
v
z
c
x
n
x
x
v
v
@>+
6
B
Press 3. A to toggle the time for the currently selected city code between STD
(standard time) and DST (daylight saving time).
Push the crown back in to return to the World Time 4.
Mode. Next, lock the crown.
x
Note that you cannot switch between STD (standard
A
E-70
time)/DST (daylight saving time) while UTC is
selected as the World Time City.
Note that the STD (standard time)/DST (daylight
x
saving time) setting affects only the currently selected
time zone. Other time zones are not affected.
Rotating the ring without pushing it down as far as it
x
will go will change the settings of the watch. When
locking the crown, be sure to press down fi rmly on
the ring as you rotate it.
To adjust home positions
Press and hold the crown button (without unlocking 1.
the crown) for at least two seconds to enter the
Timekeeping Mode.
Unlock the crown and then pull it out.2.
This will cause the
x
E-72
After confi rming that the 6.
This will advance to
If the x
Second Hand moves to 12 o’clock, it is in the correct home position. If it
doesn’t, rotate the crown to move it to 12 o’clock.
E-74
code of the currently selected Home City.
Hold down 3. B for about seven seconds. The
Hand will stop at 12 o’clock. The
rotate until the lap pointer is pointed at
This indicates the home position adjustment mode. x
First is x
If the lap pointer is pointed at x , it is in the correct
home position. If it isn’t, rotate the crown to move the
lap pointer to
After confi rming that the 4.
home position, press B. This will advance to
Hand home position adjustment.
If the
x
Hour Hand moves to 12 o’clock, it is in the
correct home position. If it doesn’t, rotate the crown to
move it to 12 o’clock.
After confi rming that the 5.
home position, press B. This will advance to
Hand home position adjustment.
If the
x
Minute Hand moves to 12 o’clock, it is in the
correct home position. If it doesn’t, rotate the crown to
move it to 12 o’clock.
Minute Hand is at the proper home position, press B.
Second Hand home position adjustment.
Second Hand to move to the city
Mode Disk should
Mode Disk home position adjustment.
.
Mode Disk is at the proper
Hour Hand is at the proper
Adjusting Home Positions
Strong magnetism or impact can cause the hands and/or day of the watch to be off.
If this happens, perform the applicable home position adjustment procedures in this
section.
Hand home position adjustment is not required if the time and day settings are
x
correct.
Note
x
Any time after you enter the home position adjustment mode in step 2 of the
following procedure, you can return to the Timekeeping Mode by pushing the
crown back in. In either case, any adjustments you made before the watch returned
to the Timekeeping Mode will be applied.
If you do not perform any operation with the crown for about three minutes after
x
pulling it out, crown operations will become disabled and hands will not move if you
rotate the crown. If this happens, push the crown back in and then pull it out again.
E-71
Each press of x B while the watch is in the home position adjustment mode will
cycle through the adjustment settings as shown below.
Mode Disk
Second
B
.
Hour
Minute
Day
Be sure to rotate the crown away from you only when adjusting home positions. x
You cannot adjust home positions by rotating the crown towards you.
Rotating the crown two full consecutive turns away from you will cause the hand x
you are adjusting to start moving clockwise. To stop hand movement, press any
button or rotate the crown one full turn towards you.
After confi rming that the 7.
This will advance to day home position adjustment.
The
xn Day is in the correct home position if it shows 1. If it doesn’t, rotate the
crown to change the day to 1.
Push the crown back in to return to the Timekeeping Mode. Next, lock the crown.8.
x
This will cause the hands to return to their normal positions and resume regular
timekeeping. Wait until everything stops moving before performing any other
operation.
Rotating the ring without pushing it down as far as it will go will change the
x
settings of the watch. When locking the crown, be sure to press down fi rmly on
the ring as you rotate it.
Hour
B
Minute
Second
Second Hand is at the proper home position, press B.
BBB
E-73
E-75
Troubleshooting
Hand Movement and Position
■ I lost track of what mode the watch is in.
Refer to “To select a mode” (page E-28). To return directly to the Timekeeping Mode
from any other mode, press and hold the crown button (without unlocking the crown)
for at least two seconds.
■ When pressing the crown button to enter the Stopwatch Split Mode from
the Timekeeping Mode, the crown needs to be held down longer than when
switching to another mode.
The watch is designed this way in order to ensure that the Timekeeping Mode is not
exited unintentionally due to accidental pressing of the crown button. When entering
the Stopwatch Split Mode from the Timekeeping Mode, press the crown button and
hold it down until the mode changes.
E-76
■ The current time setting is off by hours.
Your Home City setting may be wrong. Check your Home City setting and correct it, if
necessary (page E-32).
■ The current time setting is off by one hour.
You may need to change your Home City’s STD (standard time)/DST (daylight saving)
setting. Use the procedure under “To toggle the Home City time between standard
time and daylight saving time” (page E-36) to change the STD/DST setting.
■ The hands and/or day indications are off.
This could indicate that the watch has been exposed to magnetism or strong impact,
which has caused problems with proper hand and day alignment. Adjust the watch’s
hand and day home position alignment (page E-71).
E-78
■ The x Second Hand is moving at two-second intervals.
■ All the watch’s hands are stopped at 12 o’clock and none of the buttons work.
Power may be low. Expose the watch to light until the
normally, at one-second intervals (page E-18).
■ The hands of the watch suddenly start moving at high speed, even when I do
not perform any operation.
This could be due to any one of the following causes. In all cases, the hand movement
does not indicate malfunction, and should stop shortly.
The watch is recovering from a sleep state (page E-23).
x
The watch is returning to the Timekeeping Mode automatically from the Alarm Mode x
(page E-61).
■ Hands suddenly stop moving. Button operation also is disabled.
The watch may be in the power recovery mode (page E-20). Do not perform any
operation until the hands return to their normal positions (in about 15 minutes). The
hands should return to their correct positions when normal operation returns. To help
power recover, leave the watch in a location where it is exposed to light.
Crown Operations
The watch seems to change modes on its own.■
The watch will change modes whenever you press the button part of the crown. You
can disable mode switching when the crown button is pressed, if you want.
See “To disable crown button mode switching” (page E-8).
The watch will not change modes.■
Crown button mode switching may be disabled. Re-enable crown button mode
switching.
See “To re-enable crown button mode switching” (page E-9).
Nothing happens when I rotate the crown while it is pulled out.■
You did not perform any operation for more than three minutes while the crown was
pulled out, causing operation to become disabled automatically. Push the crown in
and pull it back out again to re-enable operation.
See “Using the Crown” (page E-3).
Second Hand starts moving
E-77
E-79
Page 9

Operation Guide 5143
x
x
x
Nothing happens when I press the crown button.■
To prevent unintentional operation, the button press operation of the crown is disabled
automatically for about eight seconds after you push the crown back in. It will become
re-enabled after about eight seconds.
See “Pushing the Crown In” (page E-7).
Charging
■ The watch does not resume operation after I expose it to light.
This can happen after the power level drops to Level 3 (page E-18). Continue
exposing the watch to light until the
second intervals).
The ■
Second Hand starts to move at one-second intervals, but then suddenly
returns to moving at two-second intervals.
The watch probably is not suffi ciently charged yet. Continue keeping it exposed to
light.
E-80
Second Hand starts moving normally (at one-
Specifi cations
Accuracy at normal temperature: ± 15 seconds a month
Timekeeping: Hour, minutes (hand moves every 10 seconds), seconds, day
Calendar system: Full Auto-calendar pre-programmed from the year 2000 to 2099
Other: Home City code (can be assigned one of 29 city codes and Coordinated
Universal Time); Daylight Saving Time (summer time) / Standard Time
World Time: 29 cities (29 time zones) and Coordinated Universal Time
Other: Daylight Saving Time (summer time) / Standard Time
Stopwatch: Measuring capacity: 59'59.95"
Countdown Timer:
E-82
Measuring unit: 1/20 (0.05) seconds
Measuring mode: Elapsed time
Lap time (Memories: 5, Fastest lap memory)
Measuring unit: 1 second
Input range: 1 to 60 minutes (1-minute increments)
Other: Elapsed time
City Code Table
City Code City
PAGO PAGO (PPG) Pago Pago –11
HONOLULU (HNL) Honolulu –10
ANCHORAGE
LOS ANGELES
DENVER (DEN) Denver –7
CHICAGO (CHI) Chicago –6
NEW YORK (NYC) New York –5
SANTIAGO (SCL) Santiago –4
RIO Rio De Janeiro –3
F. DE NORONHA (FEN) Fernando de Noronha –2
PRAIA (RAI) Praia –1
UTC
LONDON (LON) London
PARIS (PAR) Paris +1
ATHENS (ATH) Athens +2
L
(ANC) Anchorage –9
(LAX) Los Angeles –8
UTC Offset/
GMT Differential
0
Alarm
The alarm does not sound.■
x
Power may be low. Expose the watch to light until the
normally, at one-second intervals (page E-18).
The crown may be pulled out. Push the crown back in.
x
World Time
The indicated World Time is wrong.■
There is a problem with your Home City settings.
Check your Home City settings.
See “To confi gure Home City settings” (page E-32).
The indicated World Time is one hour off.■
The summer time setting for the World Time city is wrong.
See “To specify standard time or daylight saving time (DST) for a city” (page E-69).
Alarm: Daily alarm
Other: Power Saving
Power Supply: Solar panel and one rechargeable battery
Approximate battery operating time: 6 months (no exposure to light after a full
charge; 6 hours of stopped second hand per day)
City Code City
JEDDAH (JED) Jeddah +3
TEHRAN (THR) Tehran +3.5
DUBAI (DXB) Dubai +4
KABUL (KBL) Kabul +4.5
KARACHI (KHI) Karachi +5
DELHI (DEL) Delhi +5.5
DHAKA (DAC) Dhaka +6
YANGON (RGN) Yangon +6.5
BANGKOK (BKK) Bangkok +7
HONG KONG
TOKYO (TYO) Tokyo +9
ADELAIDE (ADL) Adelaide +9.5
SYDNEY (SYD) Sydney +10
NOUMEA (NOU) Noumea +11
WELLINGTON
(HKG) Hong Kong +8
(WLG) Wellington +12
Second Hand starts moving
UTC Offset/
GMT Differential
E-81
E-83
L-1
xBased on data as of December 2010.
x
The rules governing global times (UTC offset and GMT differential) and summer
time are determined by each individual country.
L-2
 Loading...